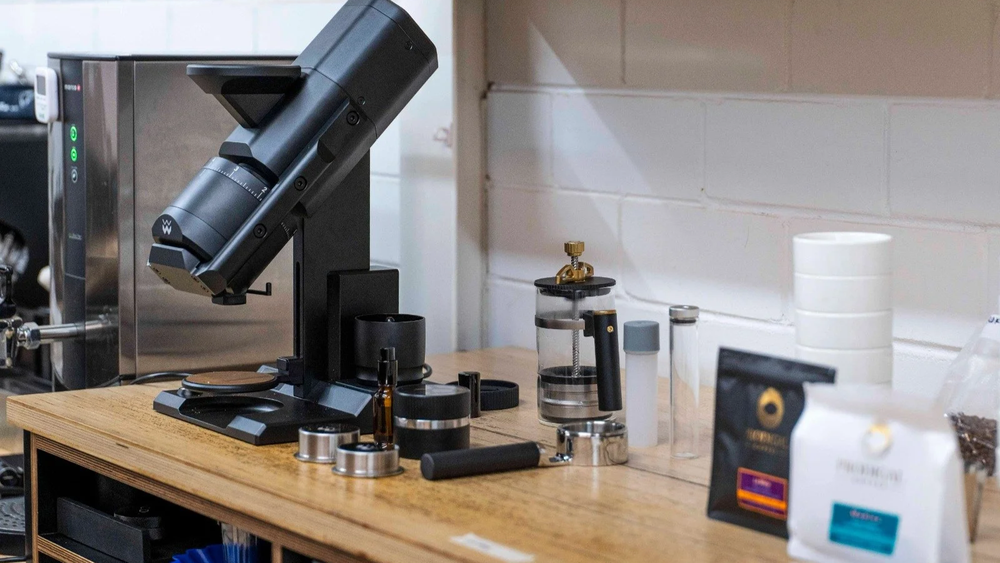
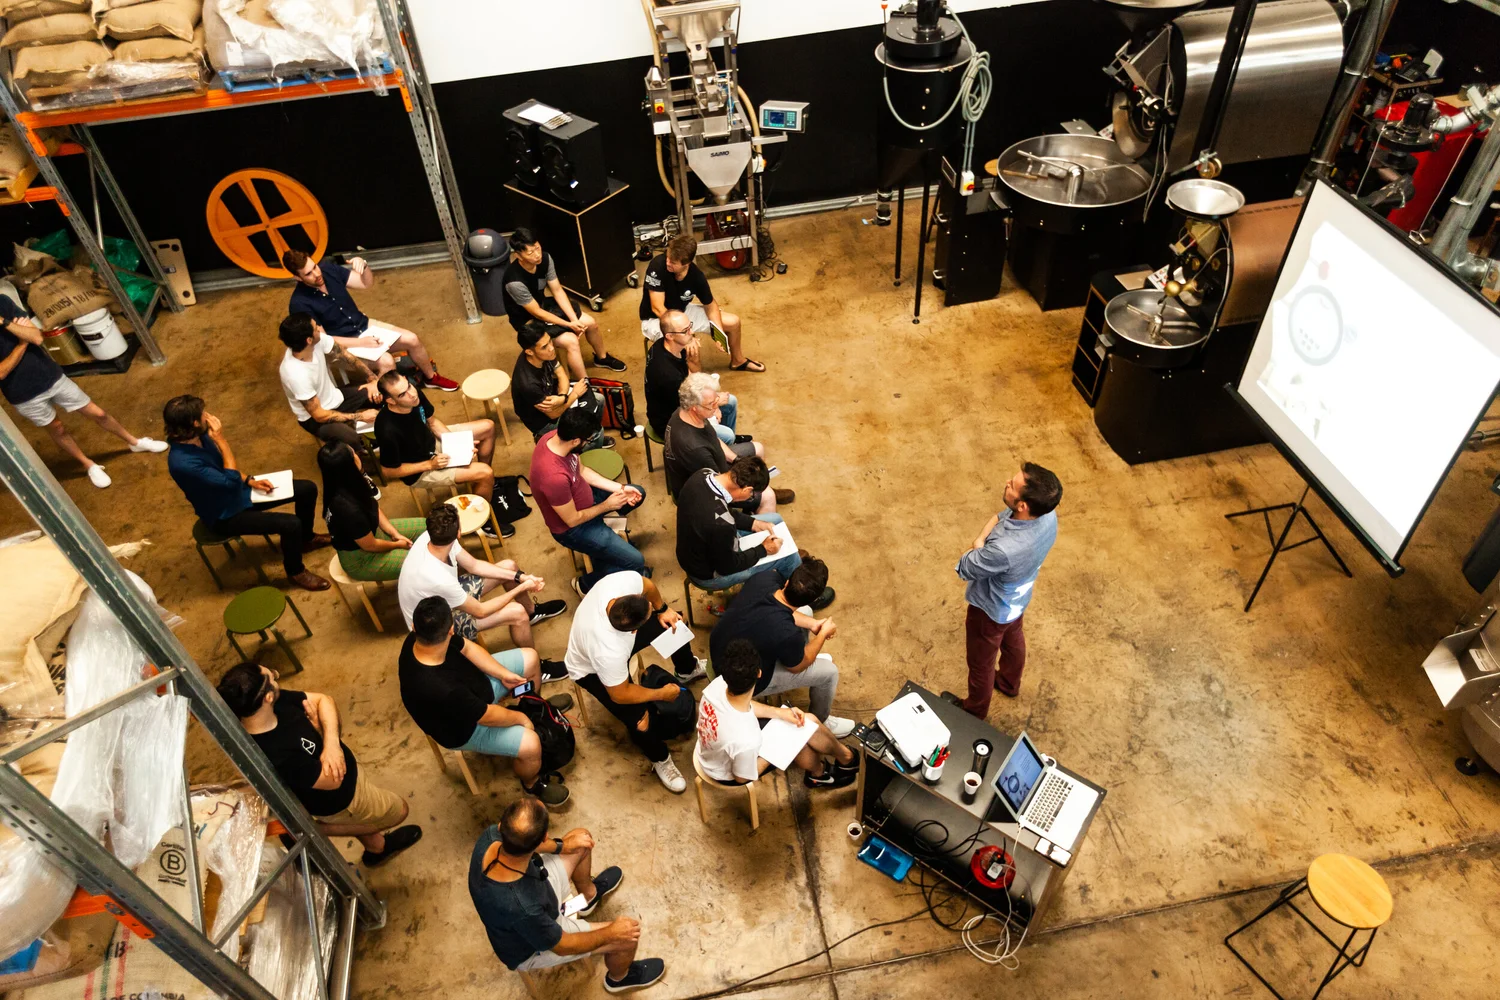
I often get asked versions of “what grind setting would I use for a v60 and the xyz grinder?”
There are a few problems with these questions:
I’ve usually not used that grinder (Not sure if people think I test different grinders daily. That’s Lance’s job haha)
Dose matters; the setting for a 15g V60 is much finer than that for a 30g V60.
Burr type, alignment, and sharpness may affect the optimal setting.
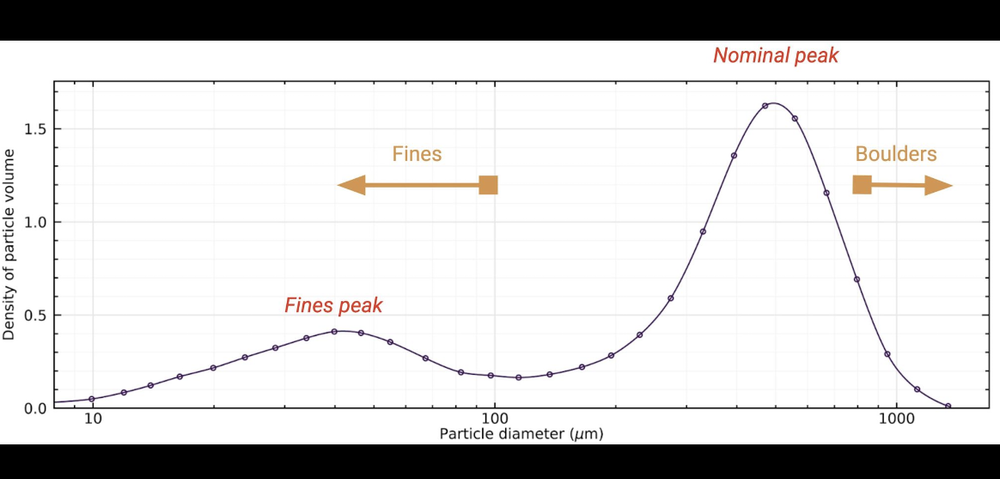
The amount of fines produced at a given grind setting varies for different coffees
Given that I almost certainly haven’t used the combination of coffee, roast level, grinder, brewer, and dose in question, the best I can do is recommend the person find the grind setting that produces the optimal total brew time for the dose and brewer in question. Even a reply such as “set the grinder to 650 um” is risky advice, given that the micron size of the PSD peak does not take into account the % of fines produced, and the fines have an outsized impact on flow rate through a coffee bed.
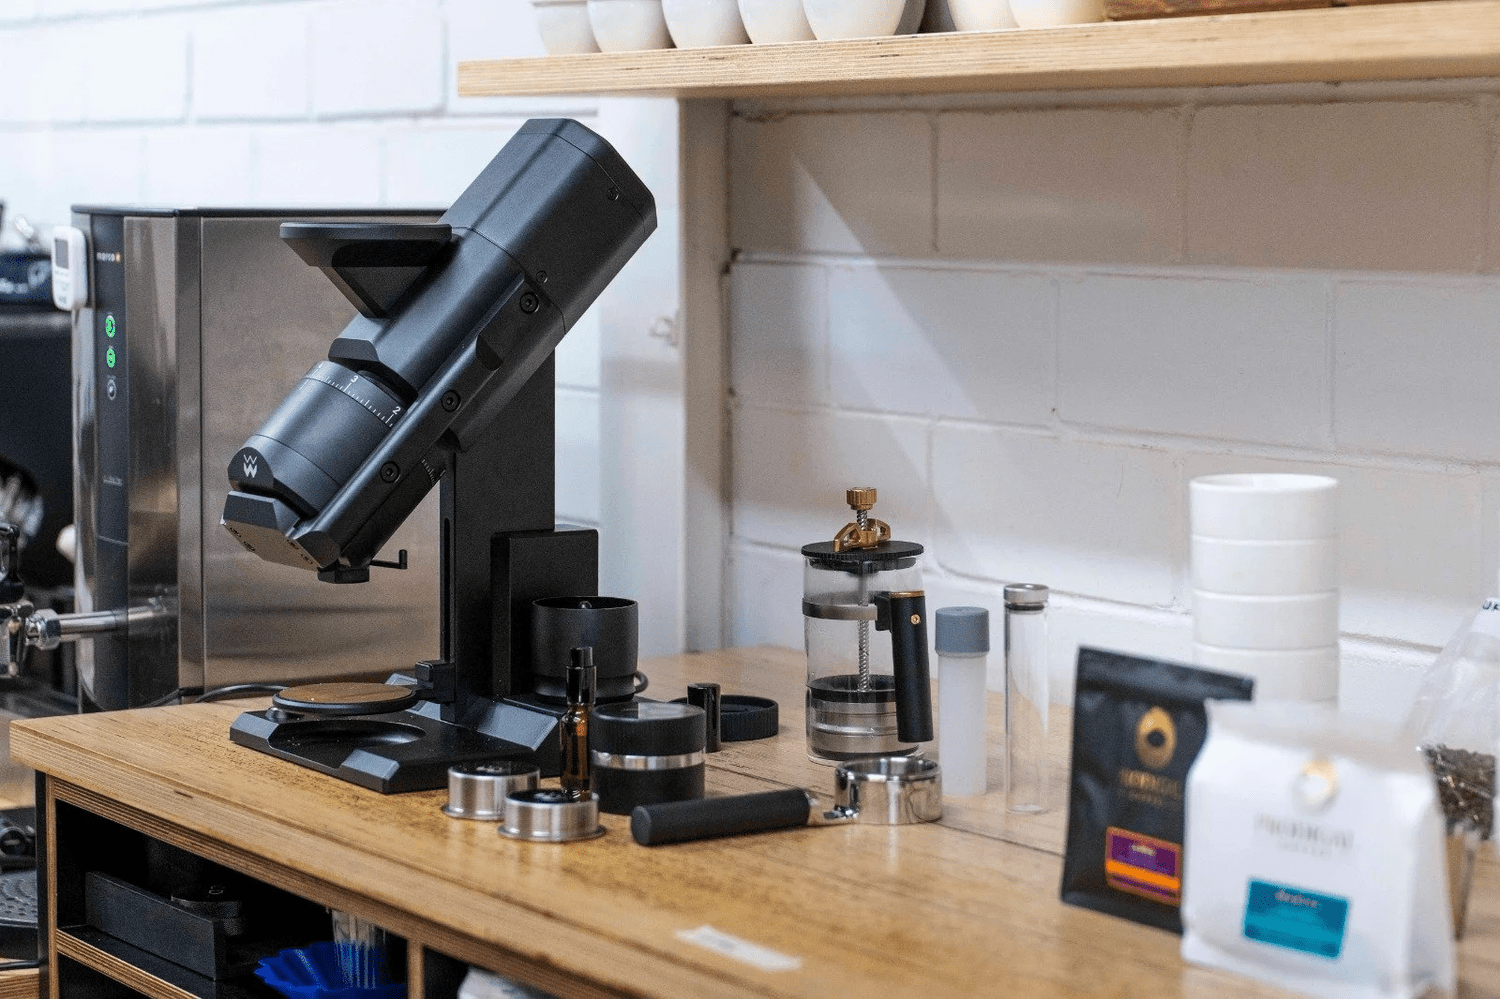
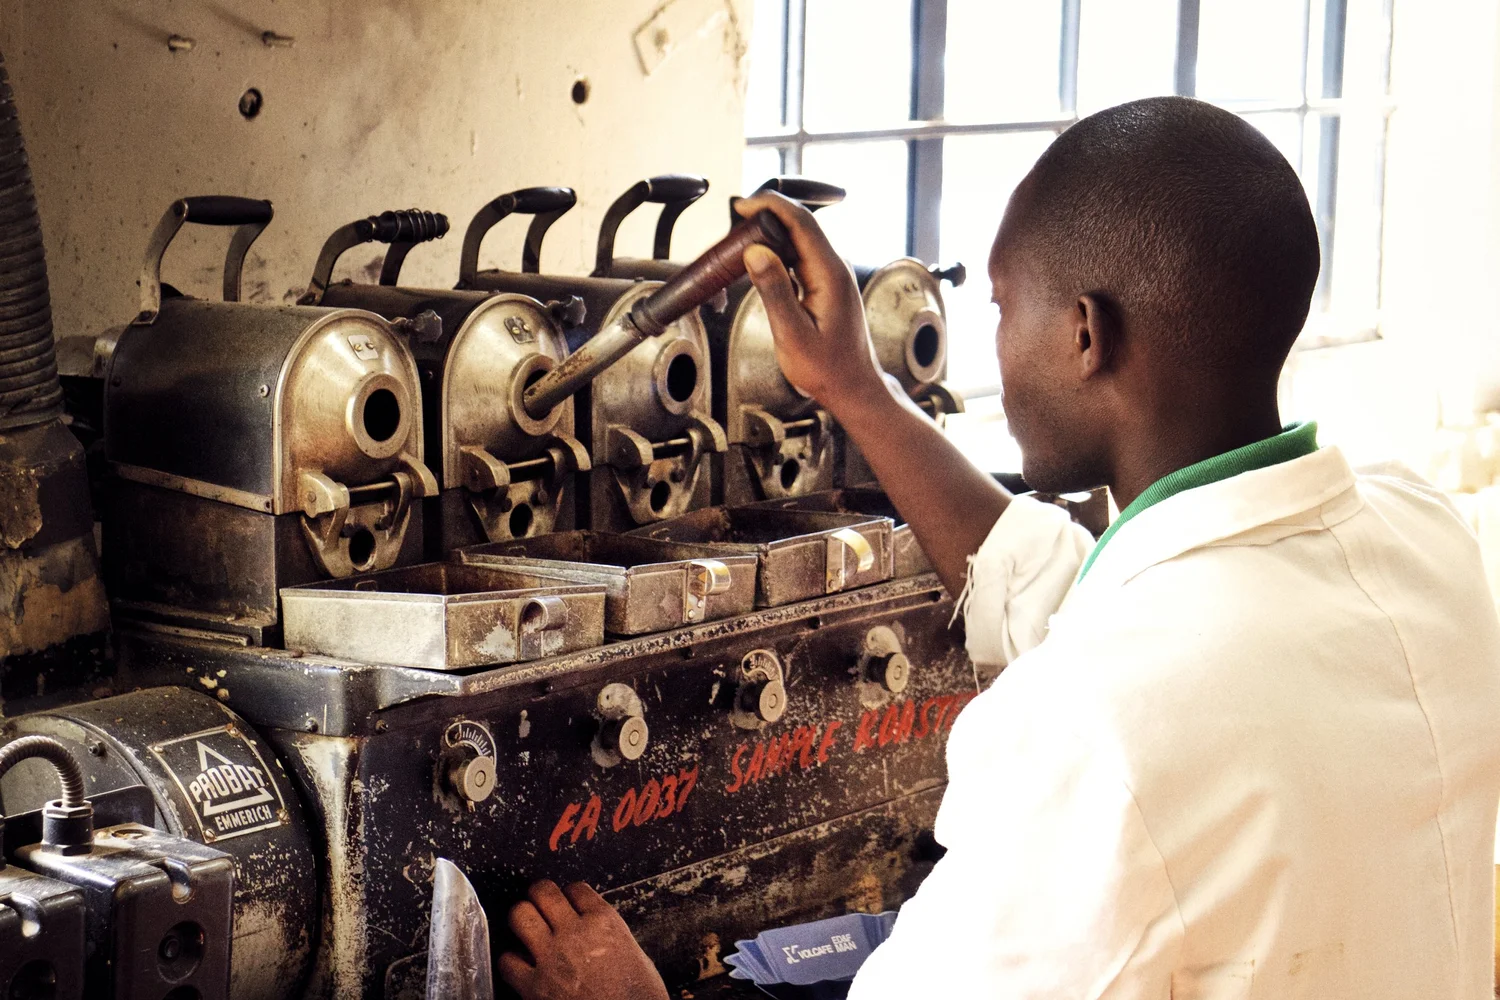
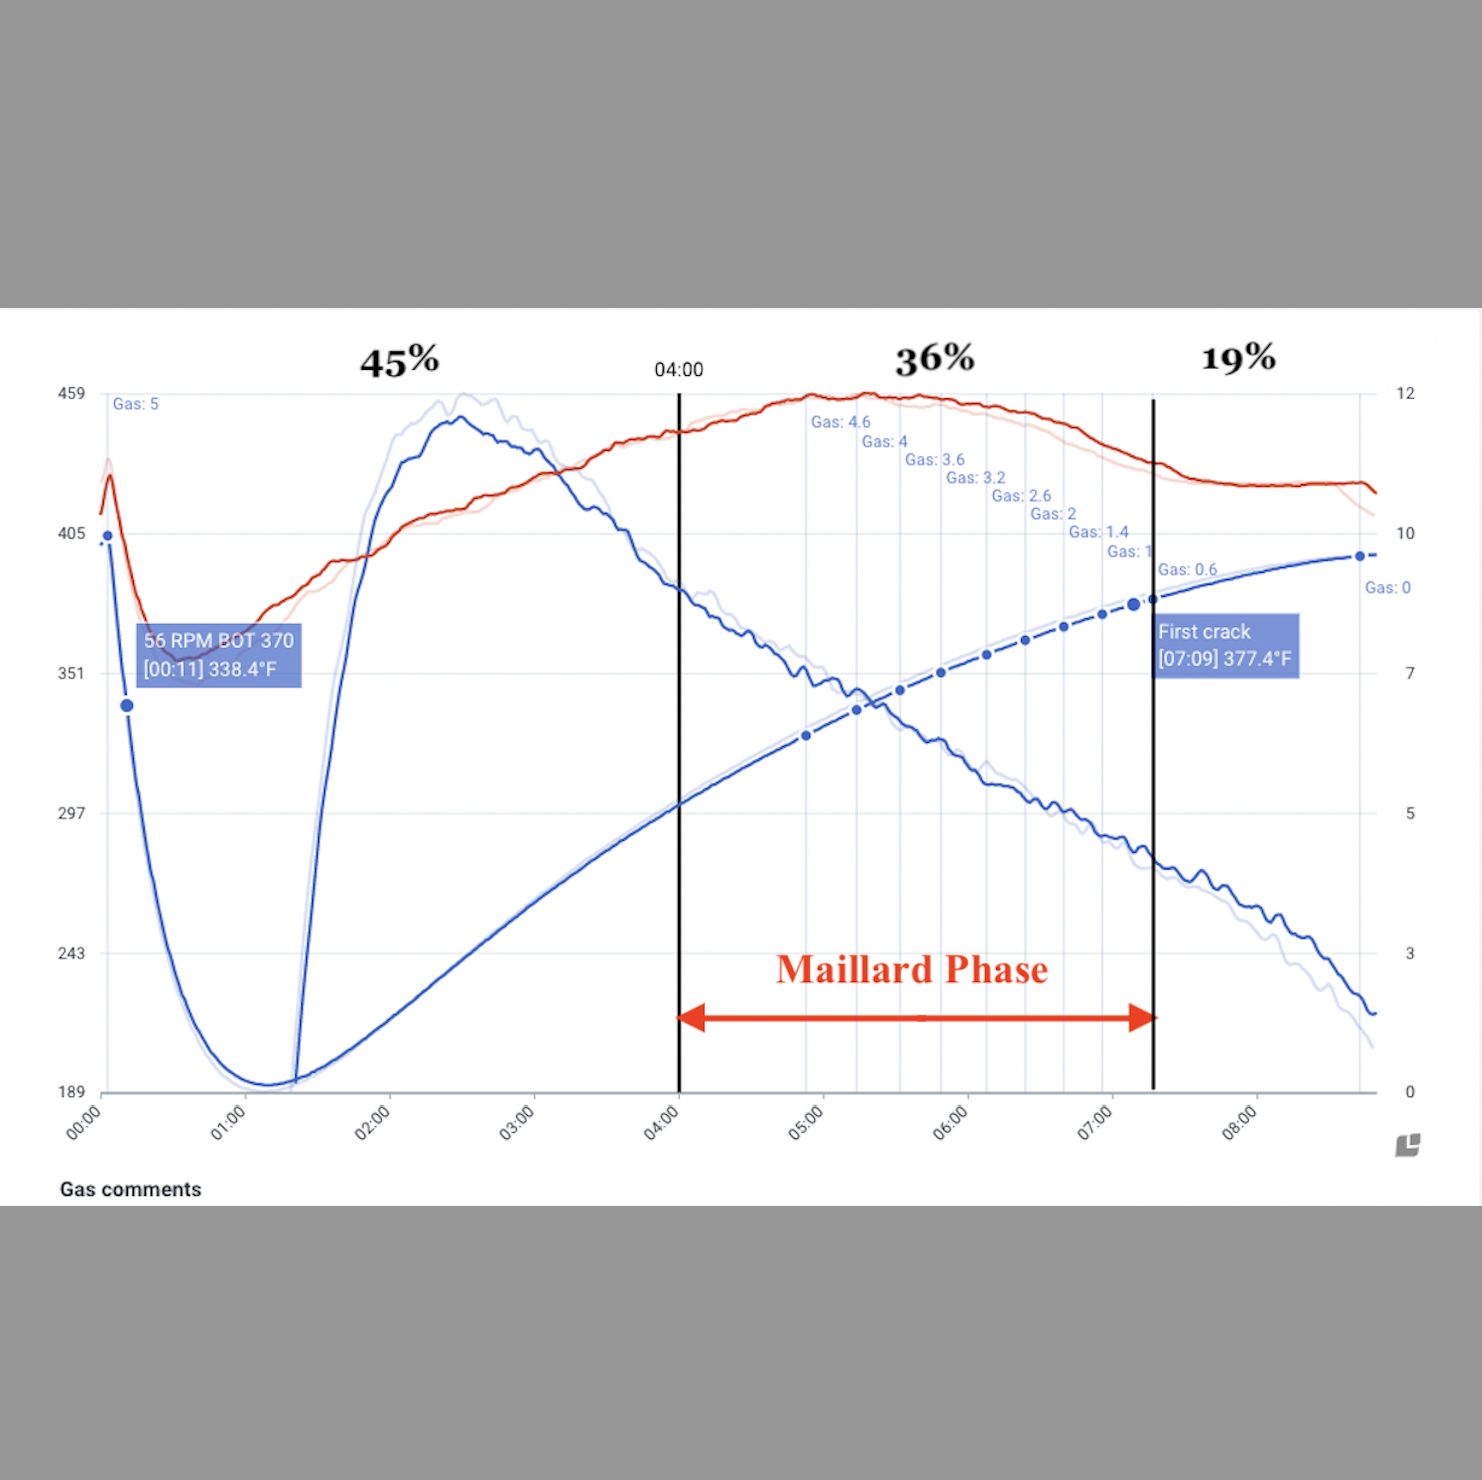
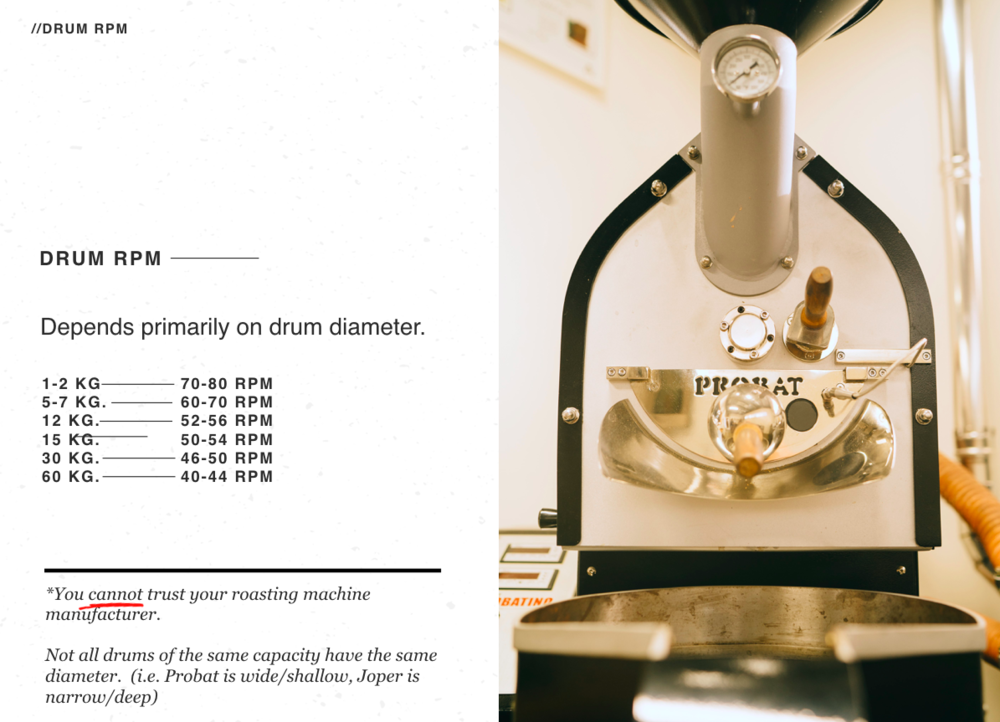
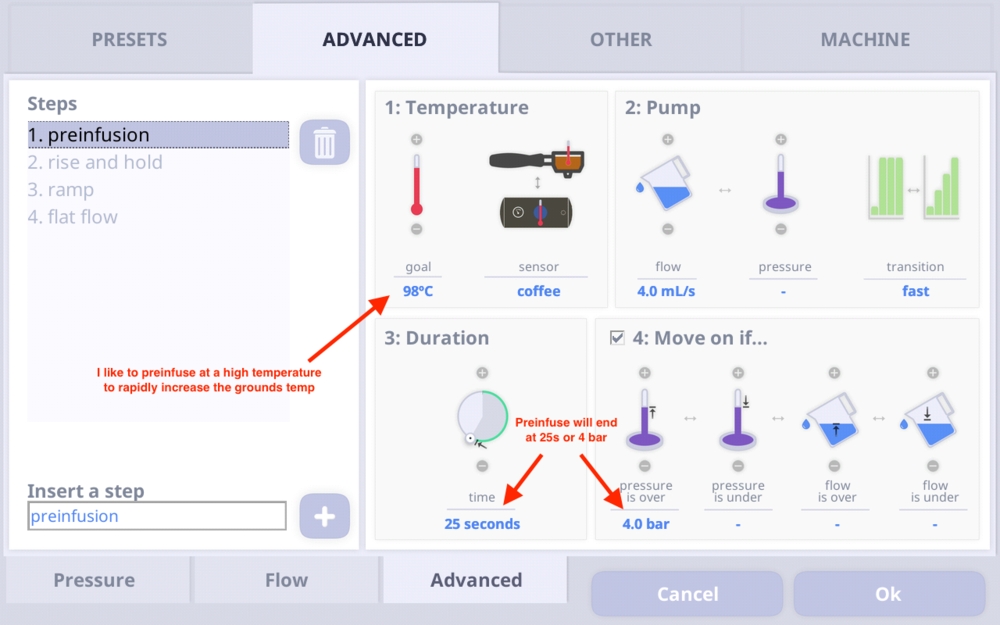
The Grinder
Twenty years ago, I had used the majority of pro-level grinders on the market. These days, there are too many grinders, and few people can name half of the pro-level grinders available, let along say they have used them. Lance has probably tested more grinders than anyone in the world, and even he probably hasn’t used half of the grinders on the market.
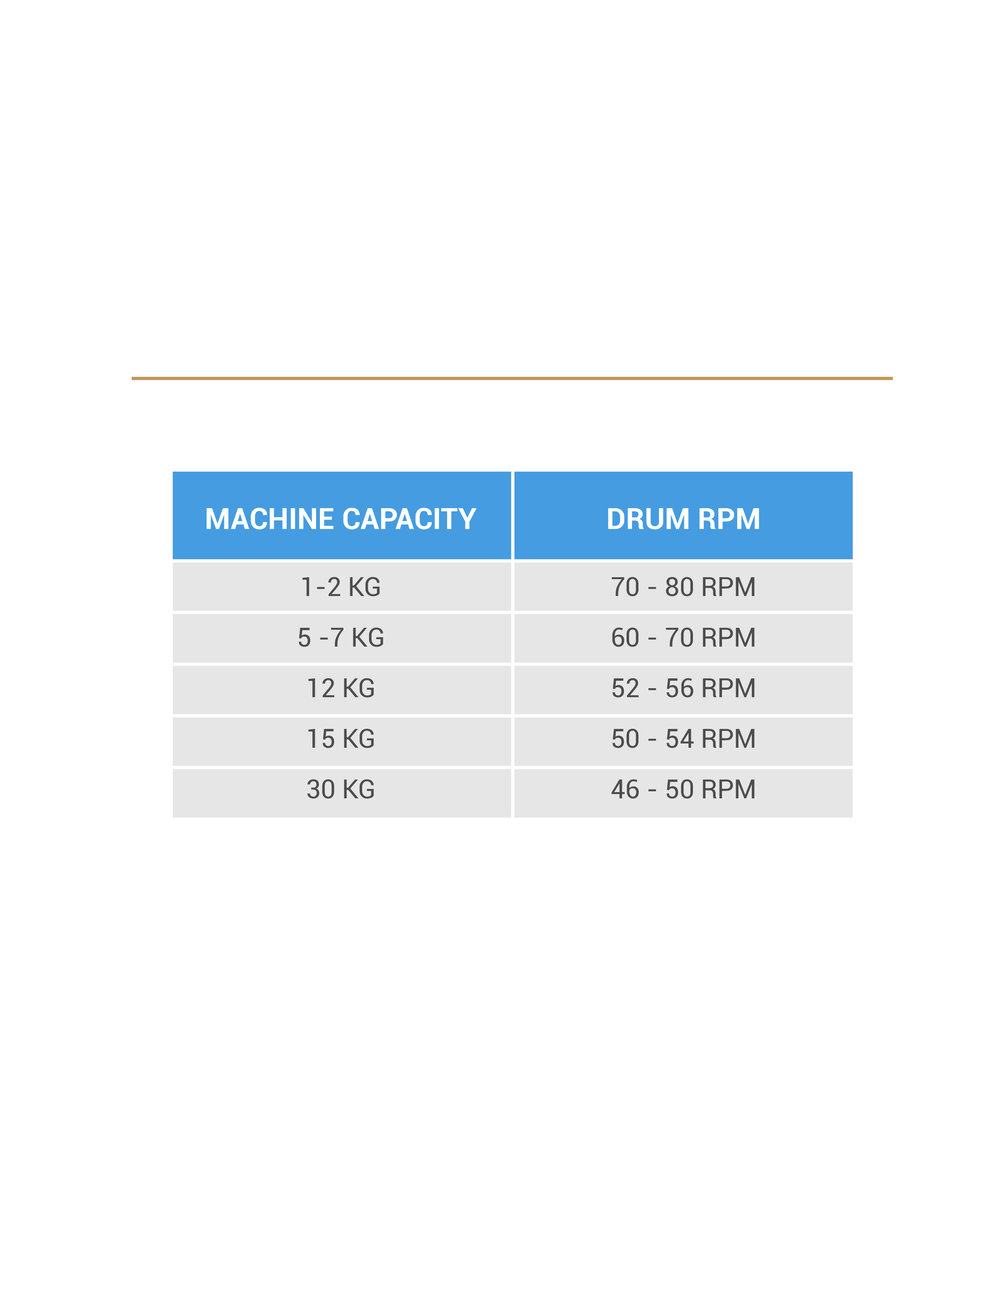
Many grinders now offer adjustable RPM, which complicates making settings recommendations, because when you increase RPM, 90% of the change in the PSD is the equivalent of turning the dial to a finer setting. (Eg “setting #5” at 400 RPM may be the equivalent of “setting #6” at 1500 RPM.)
The Dose
Deeper coffee beds offer more flow resistance, and require coarser grind settings than shallower beds do. For example, on an EK with settings 1—11, I might grind on #6 for a 15g V60, but #8 for a 22g V60. In a no-bypass brewer, increasing bed depth a certain amount may result in the need for a slightly greater coarsening of the grind than in a V60 or classic pourover.
Burr geometry, alignement, and sharpness
It’s no longer enough to say “what setting would you use on an EK43?” since there are so many different burr sets available for that and many other grinders. If a burr set is truly “low fines” one may need to grind a little finer than with a “core” or “HU” or “all purpose” burr set, AND one may prefer the flavor of the coffee with a slightly faster flow through the coffee bed with low-fines burrs.
If a burr set is poorly aligned, which is much more common than is discussed, the grounds will include more fines and more boulders. Generally, that will result in a faster flow rate at a given nominal setting on the grinder dial. This is easy to see when making espresso, so much so that I recommend using espresso flow rate as a guide to assessing burr alignment when installing new burrs on an EK. (Slower flow = better alignment.)
Fines production
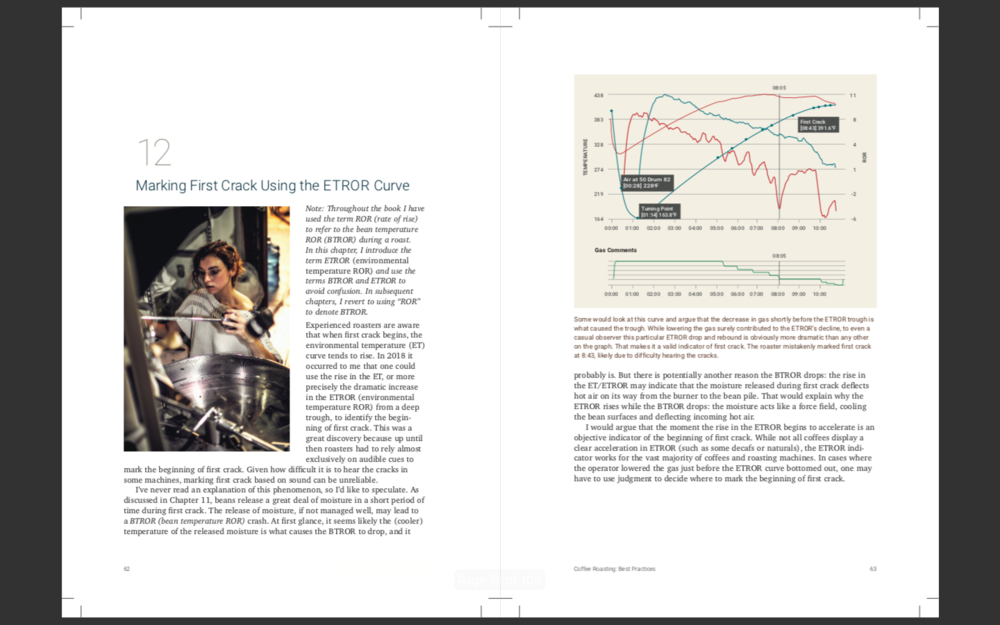
The % of fines in the grounds has a massive effect on the flow rate of liquid through the coffee bed. Beyond burr geometry, fines production is influenced by roast level (darker >> more fines), coffee origin (Ethiopians in particular >> more fines), decaffeination (decaf >> a lot more fines), and the temperature of the beans (colder >> more fines). Many people believe coffee processing affects fines production, and sometimes it does a little, but its effect is drastically overstated. What those posts about naturals producing more fines than washed coffeees do often leave out is they weren’t comparing numerous samples roasted to the exact same ground color. (ie the naturals were darker)
Dialing In
The rule of thumb when dialing in is: begin dialing in at a coarser setting than you expect is required. If the grind setting is too fine, clogging and channeling will occur, causing coffee to be astringent, and often unpleasant. If the grind setting is a bit too coarse, the coffee may be a little weaker or more acidic than desired, but it is generally drinkable.
A second advantage of beginning too coarse is the shorter brew time will give you a good sense of how much finer you should grind on the next try. When the grind is too fine and the brew clogs or stalls, it may be much more difficult to estimate how much coarser you need to grind to find your optimal setting.
As third-wave coffee has evolved over the past 25 years, we’re probably at or near the extremes of a few long-term trends: roasts have gotten lighter, roasters use fresher green, on average, than ever before, menu offerings have decreased in number, often down to just three or four offerings at a time, and filter brews have gotten smaller, especially in the US. All of these trends have caused welcome improvements in cup quality, but trying to brew smaller and smaller amounts of coffee has sometimes caused quality problems.
I’m all for brewing very small amounts of coffee. I’d rather taste several small portions of different coffees than one large mug of one coffee. But I often see cafes trying to batch brew less than two liters in their Fetco and Curtis brewers, or brew very small pourovers, such as using 15g doses in a Kalita 185 or a NextLevel Pulsar, or Filter3. The problem with these efforts is their bed depths are too shallow. (Side note: the recent increase in the number of drippers designed for smaller doses is encouraging.)
Why does bed depth matter?
If a bed is too deep, one has to use a very coarse grind. The result in the cup may or may not be good enough, but the extraction level will be low, which is inefficient, in the sense of wasting coffee material. More often, when I see people brew with beds that are too deep, they don’t grind coarse enough, and the brews end up being astringent due to filter clogging and the resulting channels the liquid creates to get around the clogged areas. This is especially common with lower-quality home grinders that produce too many fines, and with very large-batch batch brews. (It’s surprisingly challenging to convince some businesses that they may need to use the coarsest setting on the grinder for some brews.)
Shallow beds are more prone to astringency. Let’s assume that in almost all percolation brews, some version of a channel forms numerous times per brew. What matters is less the formation of channels than whether those channels reach the bottom of the coffee bed. Hypothetically, many channels will dead-end at denser areas of the coffee bed below the channels. Those channels end up being relatively harmless. Channels that manage to reach the bottom of a coffee bed carry larger, astringency-causing compounds out of the bed and into the cup. As you can imagine, if deeper beds offer more opportunities for channels to dead-end, shallower beds allow more channels to reach the bottom.
The old rule of thumb I learned in the 90s was to have a bed depth of 3cm—5cm in a batch brew. It’s hard to say what is the optimal bed depth for a one-cup pourover, especially given the variety of pourover shapes and sizes these days, as well as the variety of filter-paper types in use; some filters clog more easily than others, and some may trap a greater number of astringency-causing particles than others.
Personal experience would imply these doses offer something of a sweet spot for each brewer:
NextLevel Pulsar: 30 — 35 grams
Kalita 185: 25g seems ok, 30g seems better
V60: 20g — 25g
Fellow Stagg X: 25g
Kalita 155: 15g—18g
Pulsar Mini: 15g (soon to hit the market!)
Aeropress: 18g — 20g
Filter3: 20g—22g
Orea: I know it’s popular, but I honestly can’t keep track of all of the variations on offer, so I’ll pass on this.
*These dose/brewer combinations apply to dense, lightly roasted coffee. I cannot say what is optimal for darker roasts.
Of course you can use any dose you want, in any brewer. I’m not here to tell anyone what to do.
The point here is that if your bed depth is substantially less than would be created by the dose/brewer combinations above, the risk of astringency increases. These doses are “safe” in the sense of providing a combination of adequate bed depth to reduce risk of astringency, and a fine enough grind to provide reasonably high extractions.
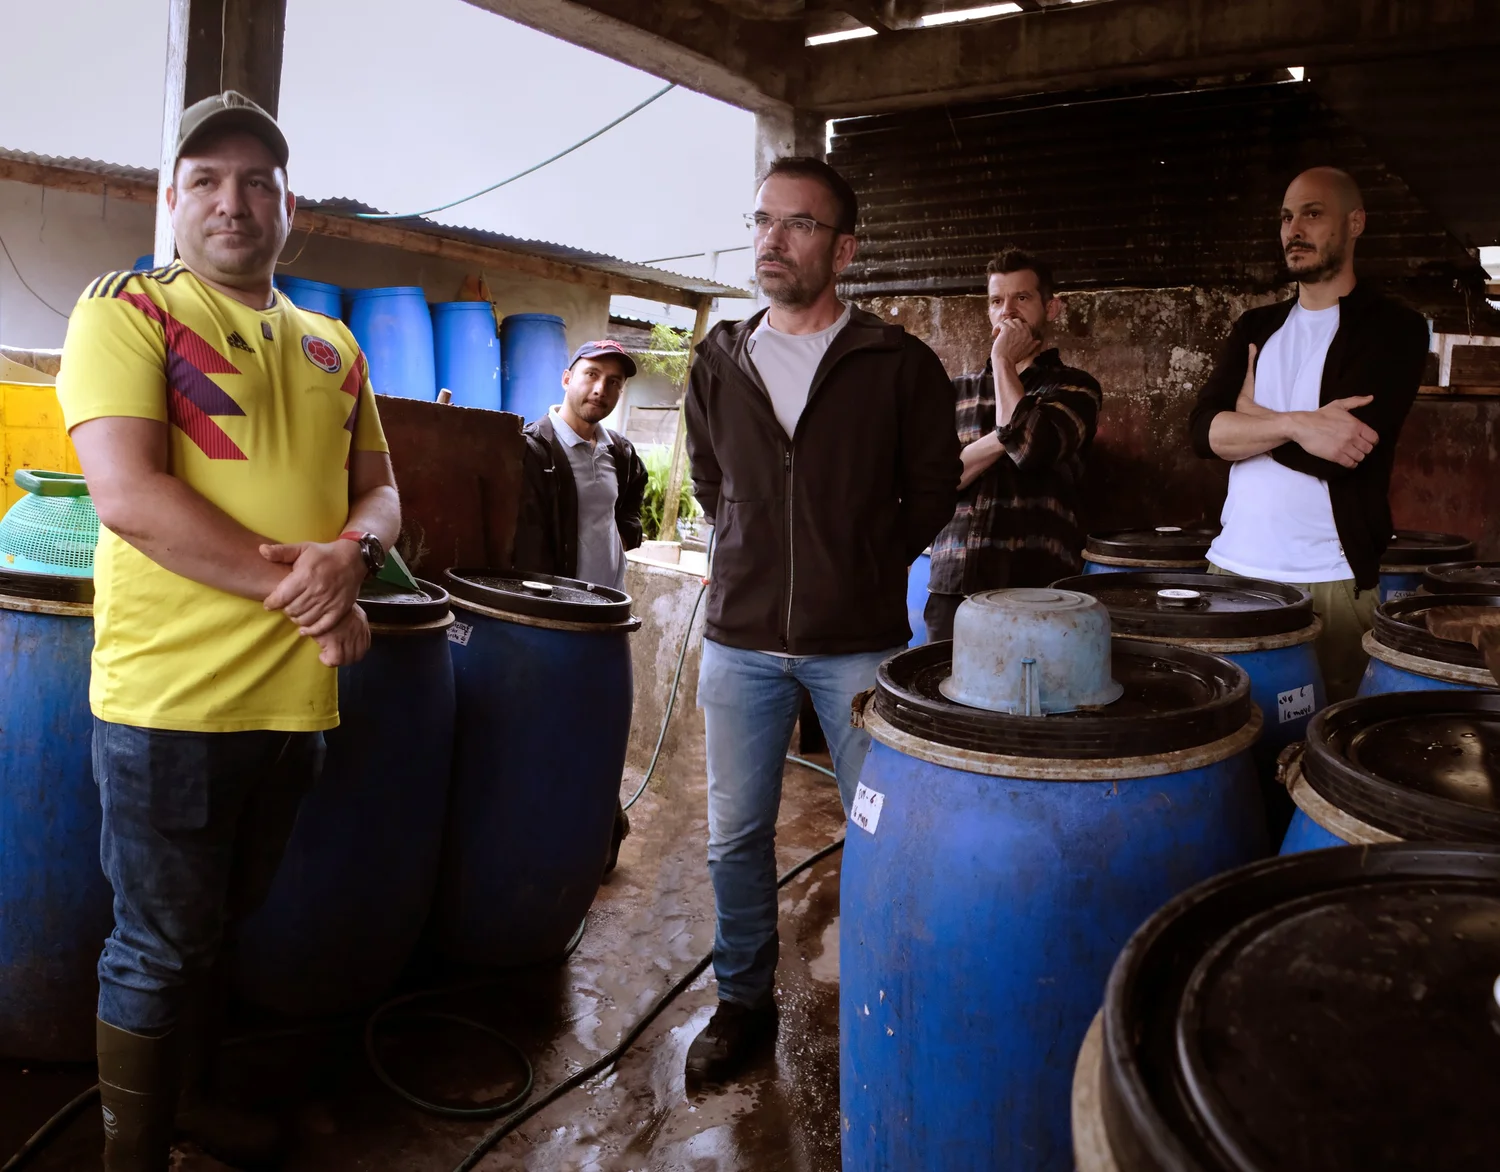
Last week I had the fortune to visit Colombia, this time spending a few days in Nariño and Medellin. Mil gracias to Adriana of Inconexus for hosting Philip and me in Nariño. Despite a stomach bug and near caffeine poisoning, it was a great adventure.
Day 1: Nariño
Nariño is a rustic, high-altitude region in the southwest of Colombia, bordering Ecuador. Unlike Huila, where coffee now seems to ripen year round, Nariño has one harvest season, which approximates North America’s summer. We arrived during peak harvest, with many trees full of ripe cherry, and coffee warehouses packed with coffee sacks. Adriana often worried the coffee we cupped was “too fresh,” but overall our timing was good, as the harvest was running later than usual.
As soon as we landed in Pasto, we hit the cupping tables. Twenty bowls later, and we were craving lunch and rutaecarpine capsules. Adriana showed us numerous impressive samples, and we were off to a great start.
Llano Redondo
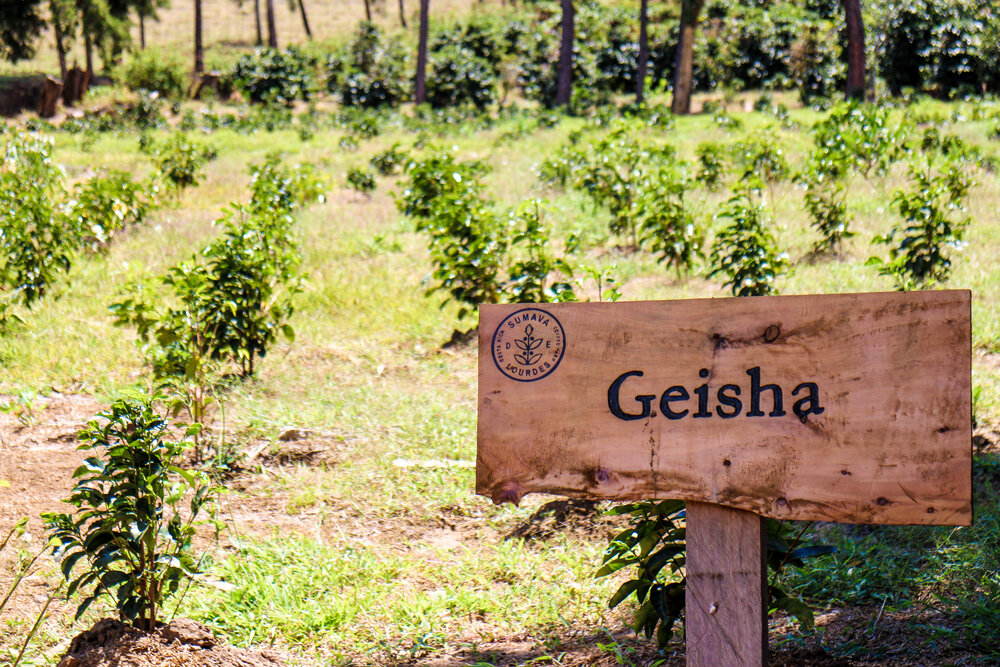
That afternoon, we drove to Llano Redondo, producer of one of the best coffees I have tasted so far in 2025. Prodigal and Regalia have each purchased their geisha multiple times, and we hope to be able to offer their coffee every year going forward. Jesús Ángel López and his family at Llano Redondo were welcoming and gracious, and it was endearing to see three generations of coffee farmers living and working together with so much love and affection. The views from the farm were epic, and almost every tree was full of ripe cherries. Philip and I ate couldn’t eat enough of the geisha cherries, they were sublime.
Above: Three generations working together at Llano Redondo
Day 2: More cupping, arepas, and farms
We spent the night at Centro Recreacional Buesaquito, a charming, rustic hotel overlooking Rio Negro. Adriana loves accommodations in dramatic, natural locations, and this one did not disappoint. After cupping another twenty cups and wolfing down a few arepas, we visited Finca San Antonio, and Finca La Mina, two perennial Cup of Excellence winning farms.
Finca San Antonio
Finca San Antonio, run by Nilson Luis López Dias and his family, had a very polished feel, with numerous raised drying beds, and an ozone machine to cull microbes before fermentation. They also served the most delicious local river trout for lunch, an unexpected treat. Another surprise was when they served an elegant, clean coffee after lunch and told us it was a natural. It was one of the rare times I have tasted a natural that didn’t have any classic natural characteristics. Their process of ozonating the coffee before inoculating the fermentation tanks resulted in a naturally processed coffee that could have easily passed for washed.
Above: Nilson Luis López Dias and family at Finca San Antonio
Finca La Mina
After San Antonio, we visited the nearby Finca La Mina. Prodigal’s Finca La Mina honey was one of my favorite coffees in 2024, and one particular cup was so sublime, I will never forget it. Our visit to La Mina was bittersweet, as the family patriarch, Franco Lopez, had passed away six months earlier, and it was clear his family missed him and felt his absence profoundly. Franco’s grandson Jheison now runs La Mina and was kind enough to give us a tour of the farm and wet mill. After experiencing how tight-knit multiple generations are at so many coffee farms, the idea of losing a family member seems like a tragedy impossible to overcome. Adriana had worked with Franco for almost twenty years, and it has been heartbreaking to see how emotionally attached she is to the farmers with whom she works.
On day three, we of course cupped more coffees, then drove to the airport to fly to Bogota. We spent one night in Bogota so we could visit Inconexus HQ the next morning.
Day 4: Bogota / Medellin
On day four, we did a quick cafe crawl, visiting Casa Cafe Cultor, a gem of a cafe with a cozy fireplace inside and water fountains on the back patio. Inconexus owns the cafe, so we were not surprised to be served the best coffee we tasted in Colombian cafe. Cultor is an oasis of calm and deliciousness in the massive city. After Cultor, we walked to the gorgeously designed Cafe Tropicalia. The coffee was a bit darker than our preference, but the interior design was 10/10. We then took an uber to Inconexus HQ for yet another twenty cupping bowls, and found more gems. From what we tasted, this year’s Nariño and Tolima crops are stunning. After cupping, we flew to Medellin.
In Medellin we visited Nikolai and Manuela of Desarrolladores del Cafe (DDC). It was heartwarming to see their hard work pay off and their operation expand so much since we began working with them. Between their new airy apartment, new milling operation, and the imminent birth of their son Luca, the vibe was upbeat and exciting. We cupped some coffees from Wilder Lasso and Jorge Rojas, inspected the new mill, and talked water chemistry, optical sorting, and milling strategies. Of course, we enjoyed a few vegan meals, went out for coffee, and discovered various breads made from yucca. I love how many forms of bread in Colombia are naturally gluten free.
Above: Grinding and hand sorting at DDC; Cupping at The Coffee Quest
Day 6: Medellin
On our last full day in Medellin, we visited Stephen at The Coffee Quest. Stephen operates one of the most efficient and quality-oriented mills in coffee, and it’s always interesting to learn about his operation and to discuss various strategies for roasting and quality control. Stephen graciously gave Philip a tour of how coffee gets milled, and treated us to lunch and some impressive gelato. On our last night in Colombia, we met up with Nikolai and Manuela for one last meal, at Alambique, an hidden gem of a restaurant full of plants, trees, books, and a vibe reminiscent of Havana.
As always, leaving Colombia was difficult. While life there has its challenges, there is so much raw emotion, zest for life, and passion for coffee in Colombia, making it bittersweet to leave. Thank you to Adriana, Stephen, Nikolai, and Manuela for your friendship, hospitality, and amazing coffees. We will be back.
Some of you may not know that I owned several cafes from the mid-90s to 2012. Somehow, the most interesting life stories and people I’ve met came from that first cafe in the 90s.
Our all-time most interesting customer was the “Snakeman.” One day circa 1998, Josh, one of our staff, said a guy came into the cafe and slithered on his belly like a snake. It seemed a bit far fetched, so I didn’t think much of it.
The next Saturday morning, a guy at the doorway got on his knees, then onto his belly, slide across the floor up to the pastry case, kissed the glass of the pastry case, turned around, and slithered out the door. Somehow no but me seemed to notice this man. I wondered if I was hallucinating.
The Snakeman, as Josh named him, turned around as if to crawl across the floor again. Concerned someone would trip over him, I asked for help at the bar, and I stood in the doorway. The Snakeman looked up, I shook my head, and he turned around and walked away.
Confused, and not wanting to miss an opportunity to talk to this man, I asked “hey, why did you crawl across the floor?” The Snakeman took a long pause, then answered in a gravelly voice “it’s something I need to do to survive.” That caught me off guard, and all I could say was “good answer.”
Over the next weeks, the Snakeman (real name: Bill) became a regular. He never drank coffee, but he would come to the cafe to borrow our broom and trash can — usually without asking — then spend his day cleaning the ground around town. Townies got used to Bill crawling into traffic to pick up a piece of trash.
Around this time, my friends Brandt and Tuck from Small World Coffee in Princeton, NJ visited to check out our roasting machine, as they were preparing to buy a roaster. While we watched coffee roast, we decided to trade crazy-customer stories.
I began to tell them about Bill, and they interrupted, and said “is he about 40, olive skin, usually has his shirt unbuttoned?” I was dumbfounded, and figured they had seen Bill around town. But they hadn’t; it turned out Bill lived in Princeton (a four hour-drive) and Bill regularly crawled on the floor at Small World. That was too much of a coincidence for me to handle.
The next day when I saw Bill, he said “chairperson (his nickname for me) I have to talk to you! What were the guys from Small World Coffee doing here yesterday?” “What were THEY doing here? They’re my friends. The question is what are YOU doing here, and why do you choose to crawl on the floor at our cafes?”
Bill didn’t try to explain, so I asked him if there were any other cafes where he liked to crawl. He said he sometimes went to the Haymarket in Northampton (six miles away) and Buchanan’s in Boulder, CO (2000 miles away). That was fascinating. SWC, Buchanan’s, Haymarket, and my cafe were all exceptionally busy, buzzy places. Bill didn’t drink coffee, but he seemed attracted to vibrant cafes and went out of his way to visit them.
Over the years the staff and I learned a lot about Bill. It turned out his father was a physicist at Princeton and was involved in the Manhattan Project. Bill formed relationships with many businesses around town. The businesses would give him free food and beverages, and every two weeks, Bill would cash a small check from a trust fund and put twenty-dollar bills in the tip jars of the businesses. Bill never paid for anything, but he tipped regularly each month.
Bill lived in homeless shelters and occasionally took bus trips around the country to his favorite cafes. Once when it was raining hard, Bill was walking without a shirt. I gave him my sweatshirt, he put it on, walked across the street, took off the sweatshirt, dropped it on the ground, and walked away. Bill did everything on his own terms.
I saw Bill many times over the years, even after I sold the cafe and moved from that small town. Bill would quiz me on the details of my life whenever we crossed paths. I don’t know what ultimately happened to Bill, but his legend will always live on in Amherst, MA and Princeton, NJ.
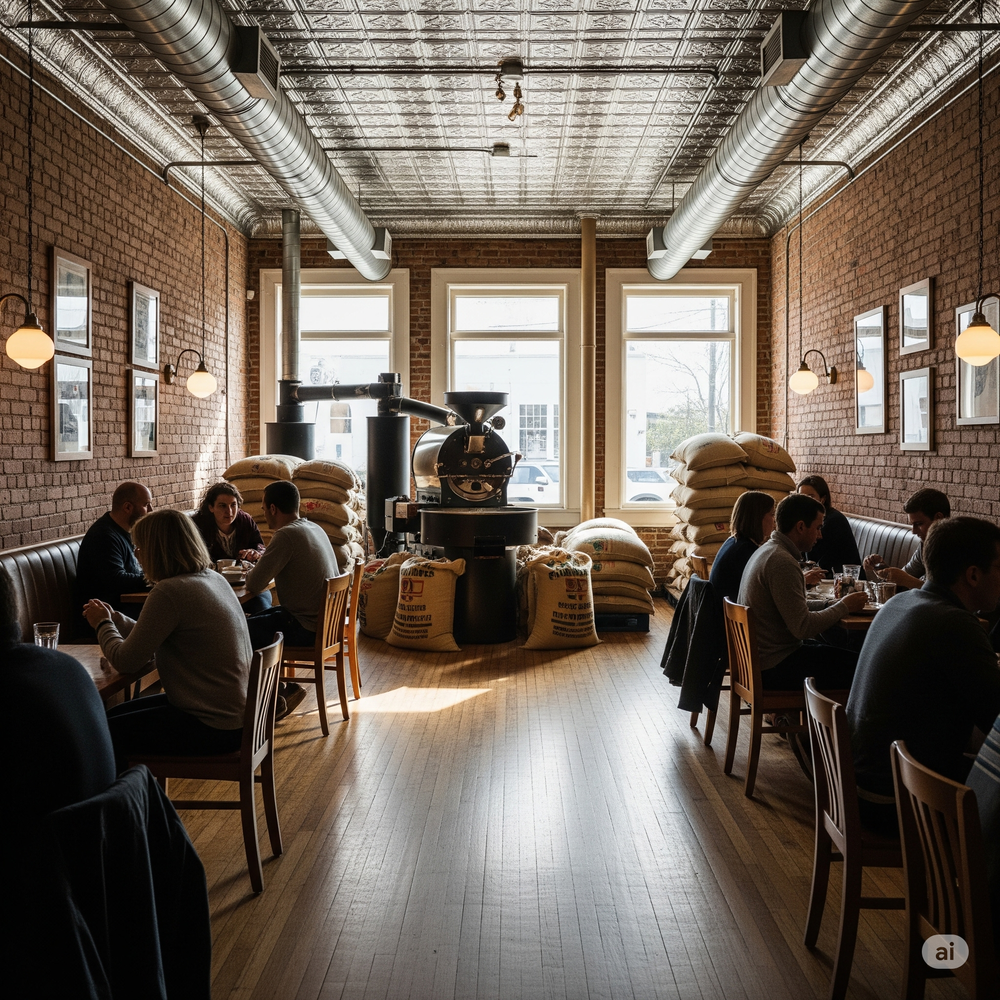
This is an ai’s rendition of my former cafe. Ai doesn’t konw not to put green coffee in direct sunlight :0
When I moved to Amherst, MA in 1994 to open Rao’s Coffee Roasting Company, I had hoped for a warm welcome. While the college students embraced the cafe from day one, many of the townspeople seemed offended I, a young outsider, would open the cafe in their town. Almost every morning during the quiet, early days of the business, a townie would walk in, look around in a nosy way, walk up to the bar, and say something hostile like “why did you come to our town?” or “don’t you know every business in this space before you failed?” or “we don’t need another coffee shop. We already have five.”
I was nervous, as I had gone deeply in debt to open my first business at age 22, in a town where I knew no one. That was not the welcome I had hoped for. A growing feeling of unease peaked one day when I answered the phone to the sound of someone screaming and claiming the coffee roasting was killing him, and hung up without explaining. A few days later, the town health inspector came to the back door of the cafe, and yelled at me, red faced, veins bulging from his neck, saying people were complaining about the roasting, and that he would shut down the business if I didn’t fix the problem.
It wasn’t clear who was complaining or what, exactly, they wanted. They were complaining about the smell of the roasting, but would hang up immediately after yelling. I received several more angry phone calls, and tried to ask the callers what they wanted. Did they want me to roast at night, or on the weekends? The one time I got a word in, I said I would try to accommodate them however they needed until I could install a pollution-control system on the roaster. No, the caller said, we just want you shut down. Then he slammed down the phone. I was unsure whether the callers’ motive was to stop the roasting or to get rid of the business because it was owned by an outsider and catered to students. I was petrified I would lose the business.
I purchased a pollution-control system for the roaster. A week later, one of the three complainers came to the cafe at 9pm on a weeknight. He said “I thought you might like to know, they’re having a meeting about you in the basement of the community center.” Legally, the town must announce meetings ahead of time and invite the public, so I knew this was a setup. This was a clandestine meeting in a basement, and I was the only one invited.
Of course, I went to the meeting. The Board of Health and the three complainers were there, waiting. During the meeting, I could hardly get a word in edgewise. The others insulted me personally and said the town had the power to shut down my cafe. I walked out of the meeting distraught, wondering if I was about to lose my business.
I did not sleep that night, and at 9am I called an attorney. The attorney told me the board had lied, and that there was a due process the town must follow. He said the process of shutting down the business would take a few months and that we could fight.
Over the next couple of weeks, members of the Board of Health came to the cafe sporadically. When I referenced the meeting, they said “what meeting?” Apparently, they knew the meeting was illegal, and they had decided to gaslight me and claim no such meeting had taken place.
I told some of my townie customers about the meeting, and Julie, a friendly regular, told me to write a letter asking customers to come to the meeting, and to only give the letter to townies, not students (the town had a history of hazing businesses that catered to students.)
Julie was insistent, so I followed her instructions, and handed out hundreds of letters. I also retained an attorney and an expert in industrial air-quality issues.
Shortly before these events, I had invested $15,000 in a system that included a water scrubber and two electrostatic precipitators to clean the roasting smoke and smell. Unfortunately, the system reduced the smoke and smell by only a small amount. I then found a better system and planned to order it.
On the day of the meeting, some members of the Board of Health came to the cafe and said “we hear many people are coming to the meeting.” “Great,” I said. “We are offended that you are turning this into a public issue.” Whaaaat? Did these corrupt, gaslighting assholes really think I was not going to fight back after they lied, insulted me, and threatened to shut down my business?
That night, hundreds of people came to the meeting. As people filed into the room, many would pat me on the shoulder, and say encouraging words like “don’t worry, we got this. We are sick of the town abusing businesses.” Local newspaper reporters came, and of course, the lawyer and the industrial air-quality expert were present.
When the meeting began, the Board of Health was visibly scared. They knew the entire room was against them. When the three complainers, accustomed to getting their way with the town, kept yelling and talking out of turn, the board had no choice but to eject them from the meeting. That left the board alone in a room with 300 angry townies.
The point of the meeting was to forge a compromise. I explained to the board that I had spent $15,000 on a system to clean the air, and acknowledged it wasn’t good enough. I told them I had found a better system that would cost $30,000 and I needed time to install it. I asked for three months to install the machine. The board accused me of “bluffing” and “stalling.” They protested and said three months was too long. However, they had no power, as the point of the meeting was to find a compromise, and they had ejected the other side. There was no one with whom to compromise. I pointed out to them that I could demand three years, and they would be legally obligated to approve it. They grudgingly agreed to the proposed three months.
Shortly after the meeting, the new system solved the problem, and the board mostly left me alone. The first time I saw the health inspector after that meeting, I told him I’d sue him for harassment if he ever crossed another line. After that day, he never again inspected the cafe.
At 22, I left university and decided to open a coffeehouse. With about $10,000 to my name, and no idea where to put the business, or how to fund it, I packed up my car, left LA, and drove across the country looking for money and the best possible location for the cafe. I had the naive optimism only a young entrepreneur could have.
The goal was to establish the cafe in an affordable town where specialty coffee wasn’t yet popular. My intended locations were large university towns, figuring they would be affordable yet provide a high volume of business.
The itinerary included cities such as Boulder, CO, Madison, WI, Ann Arbor, MI, and Columbus, OH. All of those places had potential, but nothing screamed “this is it!”
College Park, MD, was the first stop with major potential. The university had 50,000 students and the only espresso machine was in a bagel shop. It was a potential gold mine, but not quite th place I wanted to live. I wanted to open the cafe in a charming town, not a strip of stores on a commuter highway.
From College Park, I decided to visit Charlottesville, VA, and Chapel Hill, NC before choosing a location. Charlottesville was beautiful, but had a relatively competitive coffee scene. Arriving in Chapel Hill, I thought “this is the place.” The town was charming and the retail area bordered the campus. Walking down Franklin Street, I was excited until Judge’s Roastery came into view.
Judge’s was an impressive cafe, and nearly identical to the cafe I planned to open. Disappointed, but intrigued, I asked to speak to the owner. A tall, middle-aged curmudgeonly man named Ed came out from the back and said “yeah, what do you want?” I introduced myself and told him I had driven from California all over the US, and planned to open a cafe in a college town. Ed’s demeanor changed, and he said “really? I did the same thing two years before you. I was living in California, packed up my things, and drove across the country, trying to find the best college-town location for a cafe.”
We were shocked at this coincidence, so I took a chance. I said “if you weren’t here, Chapel Hill would be my number one choice. My number two is College Park, MD.” Amazingly, Ed said “College Park was my number three.” I couldn’t contain my excitement. I asked Ed his number two and he said “Amherst, Massachusetts.”
I thanked Ed, got in my car, and drove the twelve hours to Amherst. I found the cheapest motel in town and booked it for a week. I spent that week walking the streets of Amherst, counting foot traffic, and marveling at how busy Antonio’s Pizza was. Antonio’s was a hole in the wall doing $10,000 per day (in 1994 dollars!) of sales, selling nothing but pizza by the slice and cups of soda. It was probably the busiest pizza place in the US. Although Amherst had five or six coffee shops, none were serving exceptionally good coffee, and the success of Antonio’s hinted at the enormous business potential in Amherst.
I found a charming location tucked away from the main street, surrounded by trees and next to a pocket park. The space had beautiful old wood floors, brick walls, and a tin ceiling. It was 1100 square feet, and it was perfect. After a tough negotiation with the landlord, I signed the lease.
A few months later, I opened Rao’s Coffee. During those first months, shockingly, people would come in everyday and tell me I was going to fail, and that their town didn’t need another cafe or an outsider. It was heartbreaking, and the future battle with the town is the subject of the next story in this series.
Once Rao’s was established, I called Ed in Chapel Hill. “Hi Ed, I opened the cafe in Amherst, and I named a drink after you, Ed’s Study Aid!” “Yeah, so what?” Ed was back to his curmudgeonly self. A year later, Ed called and said “we’re coming up! I’m taking my managers on a road trip and we’re coming to see your cafe.” Underneath that gruff exterior, Ed cared, and it was a blast hosting him at the cafe. Ed sold Judge’s a couple of years later, and I lost track of him. But i will be forever grateful he pointed me toward Amherst.
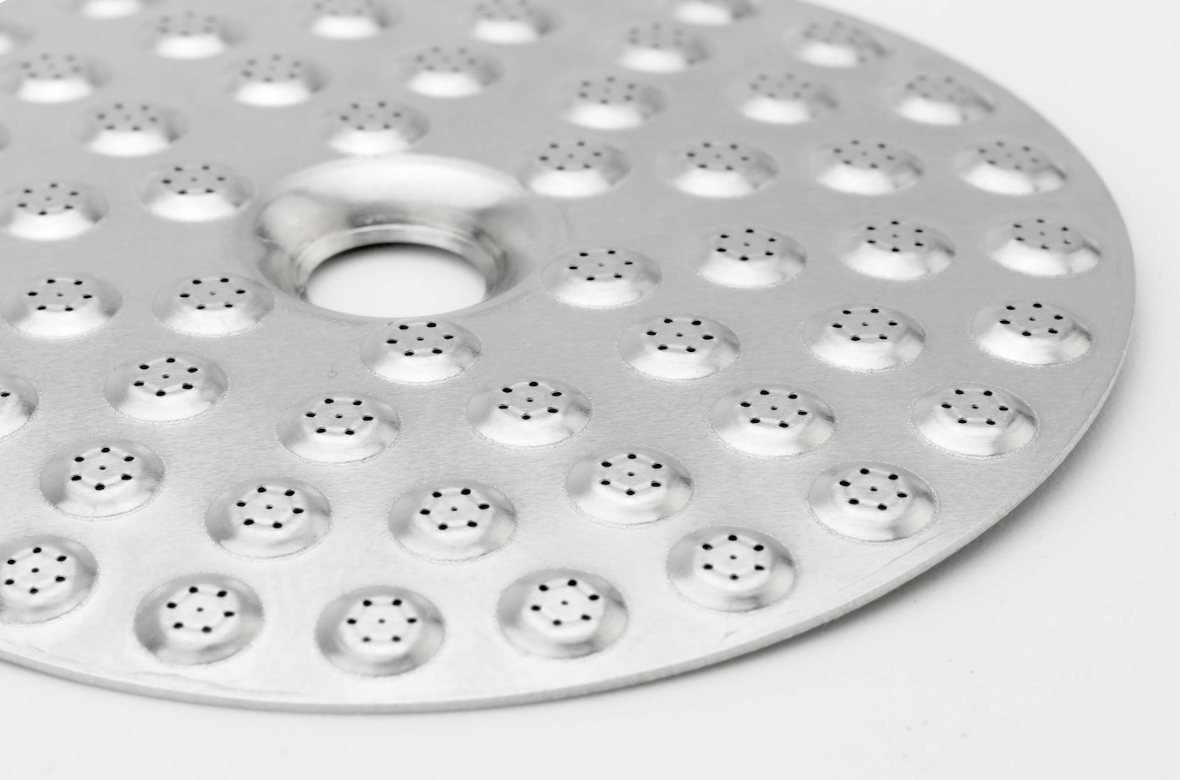
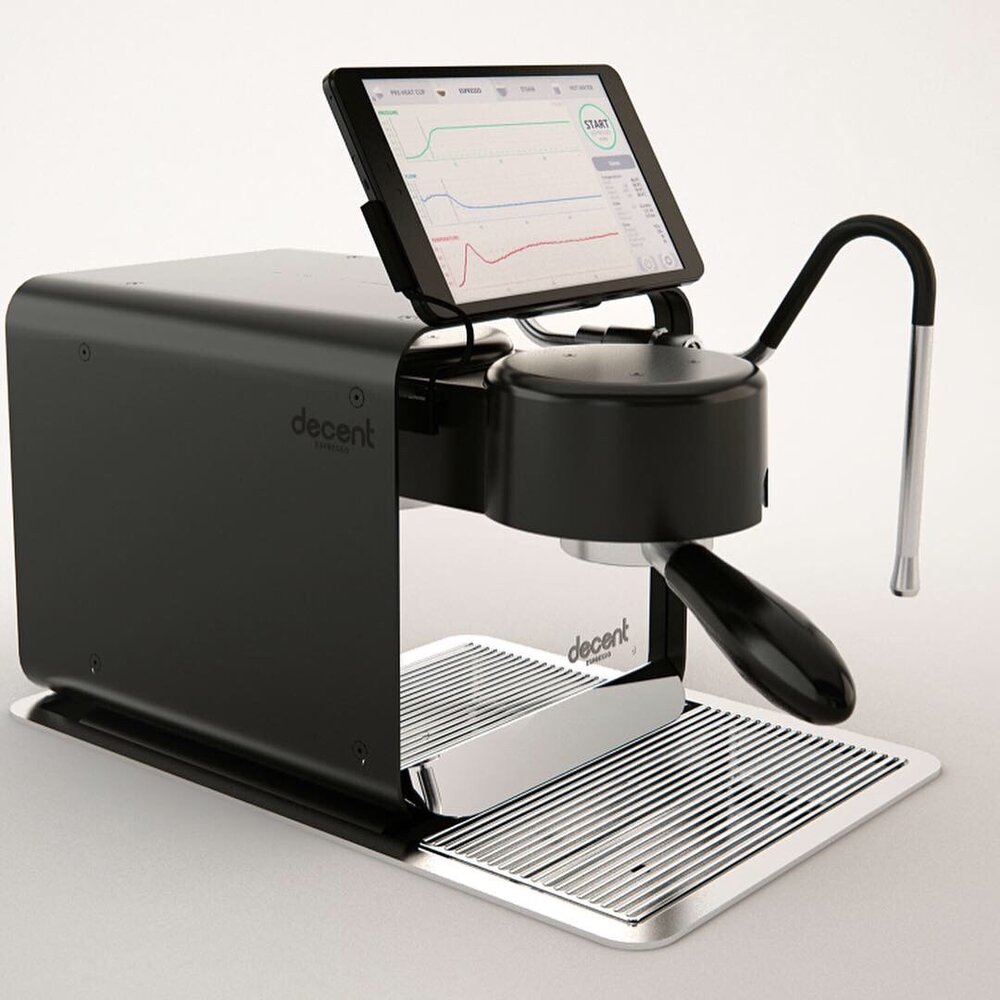
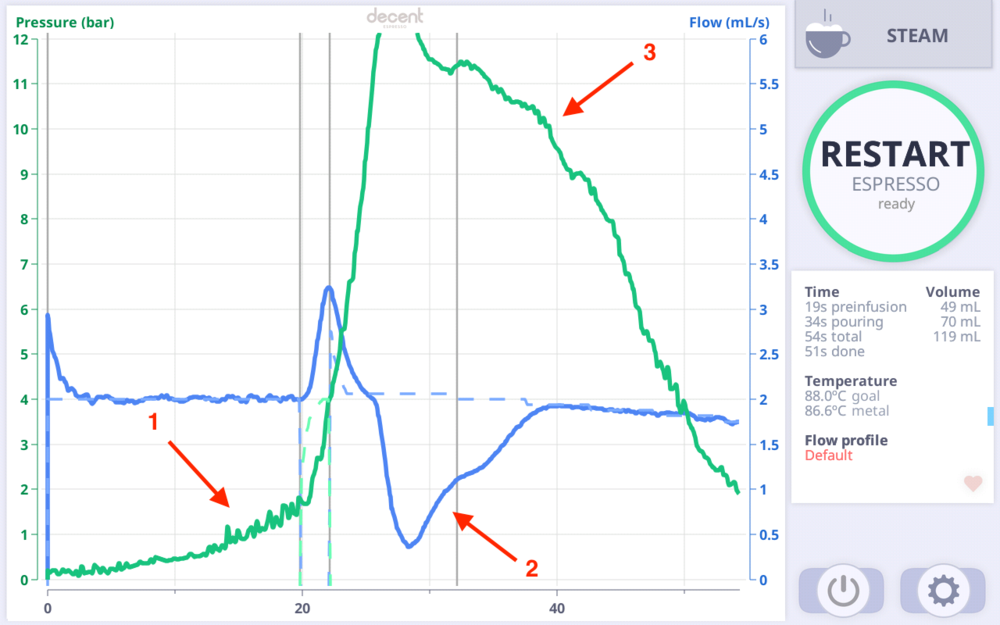
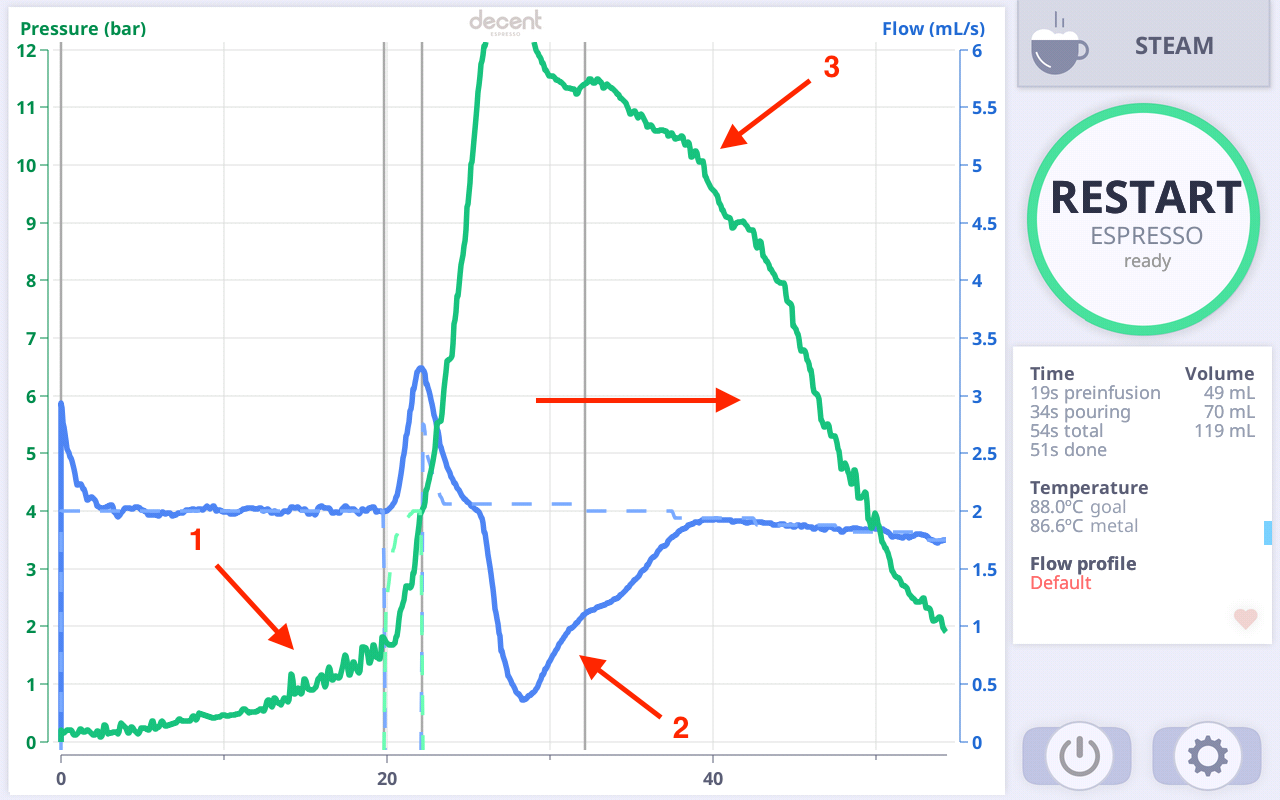
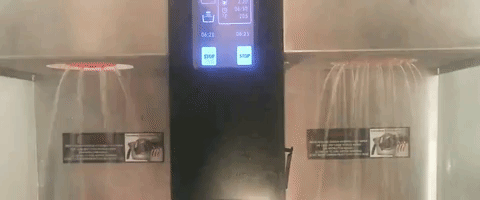
Decent Espresso has done it again. This time, they’ve revolutionized shower screens.
The new “dimples” and “freckles” shower screens prevent water from merging into just a few streams, as happens with standard shower screens after some light use. Instead, the water stays in 60 separate streams.
Dimples and freckles will improve water distribution and evenness of extraction on any 58mm machine that has a center screw hole in the shower screen. At $15 each, they offer tremendous value. Please see the bottom of this post for a list of compatible machines.
Dimples has holes only on the “dimples,” while freckles has holes on and between the dimples. Freckles is conceivably slightly better for espresso, and dimples is more appropriate for filter3.
Freckles (left) and Dimples (right)
Decent developed the shower screens in response to research done by a few Decent owners regarding radial uniformity of extraction across espresso pucks, as well as the realization that Filter3 would benefit from more even water dispersion.
In 2020, Stéphane Ribes (https://www.instagram.com/the_picky_chemist) performed a brilliant experiment to estimate extraction in different areas of an espresso puck. Stéphane discovered that with a standard shower screen and basket, the outer edges of the puck extract much lower than the interior. That makes sense, as shower screens are 52mm diameter, while baskets are 58mm. Some water makes its way to the outer edge of the puck, but far more water passes through the interior areas.
Stéphane pulled shots, cut the spent pucks into three equal-sized concentric sections, and extracted each section in a cupping bowl to determine their relative remaining soluble material.
Surprisingly, Stéphane found that a standard shot extracted far more from the center of the puck than from the edges. Putting a paper filter above or below the puck improved evenness of extraction throughout the puck.
Stéphane also found, unsurprisingly, that flat tampers yield more even extraction than convex tampers do.
DE1 owner Makelipino designed the “flowtafilter” to measure water flow from different areas of the shower screen. (above)
Each section of the flowtafilter has identical surface area.
Based on Stéphane and Makelipino’s work, Decent designed dimples and freckles to dispense more water from the edges of the shower screen than the center. Since shower screens are 52mm diameter and baskets are 58mm, dispensing more water from the outer holes of the shower screen helps to increase extraction from the edges of the puck.
There are a few common utterances about coffee that perplex me. One is blaming “overextraction” for bitter or astringent brews, despite their extraction levels not being high. The other is calling some coffees “easy to extract” despite their not producing particularly high extraction levels.
Overextraction doesn’t exist
Unless you are Nestle or some sophisticated operation hydrolyzing cellulose to achieve extractions of 40—50%, I doubt you have ever “overextracted” a coffee. When baristas refer to overextraction, they almost always mean a coffee was astringent due to channeling.
“Overextracted” implies an extraction was higher than optimal. But the term is thrown around without evidence that an extraction was, in fact, too high.
Let’s take a specific example: A barista brews a v60 and enjoys it. On the next brew, he or she makes the grind a bit finer, finds the result astringent, and declares it “overextracted.” There a few problems with this:
There is no evidence that a higher extraction was the problem. Even if extraction was measured and found to be higher, that is not evidence that higher extraction was the problem; that is simply a correlation.
The finer grind may have produced a lower extraction due to some combination of clumped grounds or channeling
The barista has not properly tested whether a higher extraction could taste better if, for example, he or she had used a better technique or different recipe.
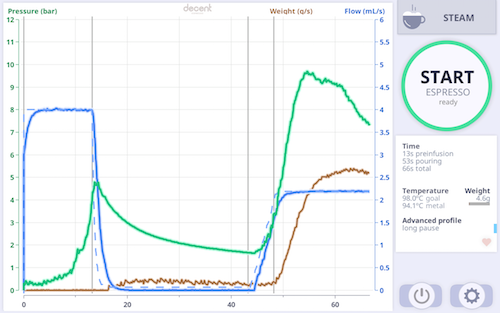
I’ve witnessed many baristas achieve very low extractions and declare a brew “overextracted.” Yet I’ve had brilliant, non-astringent brews as high as 28—29% EY (extraction yield) using the NextLevel Pulsar and the “blooming espresso’ recipe on the Decent Espresso Machine. If those extraction levels are possible, then a typical v60 or espresso with 20% EY is unlikely to be “overextracted.”
The myth of “easier to extract”
I scratch my head every time I hear a barista say a coffee is “easy to extract.” I don’t know what that means. My guess is it’s a poor way of communicating “this coffee tastes good almost no matter how I extract it.” If that’s the case, the more accurate statement would be “this is a high quality coffee.” Great coffee may taste good even when extractions are not optimal.
Much like with “overextraction,” “easy to extract” is usually claimed with no reference to actual extraction levels. “Easy to extract” should imply that a coffee achieves high extractions. In my experience, many Kenyan, Ethiopoian, and a few other select, superior green coffees tend to extract higher than other coffees. Those are, indeed, easy to extract, but not usually what baristas mean when using the phrase.
Most baristas tend to believe dark roasts are “easy to extract,” but even that supposition is suspect. Light-medium roasts seem to achieve the highest extraction levels. Underdeveloped roasts yield the lowest extractions, presumably due to low porosity within the cellulose. Extraction potential seems to peak at a light-medium roast level. Darker roasts often extract a bit lower, presumably due to some soluble material burning off during the roasting process, resulting in a higher proportion of insoluble material. I don’t have precise color readings to offer yet, but this trend seems to hold across high-quality arabica beans.
I’ve heard baristas refer to certain coffees as “difficult to extract” but that may simply mean “difficult to make taste good using my usual methods.” In that case, the culprit may be a roast problem, low-quality green, or some mismatch between a coffee and a barista’s brewing decisions (for example, grinding too fine and causing clumping in the coffee bed, which leads to water channeling around the clumps.) But it is unlikely the coffee is, in fact, difficult to extract, unless the roast is genuinely underdeveloped.
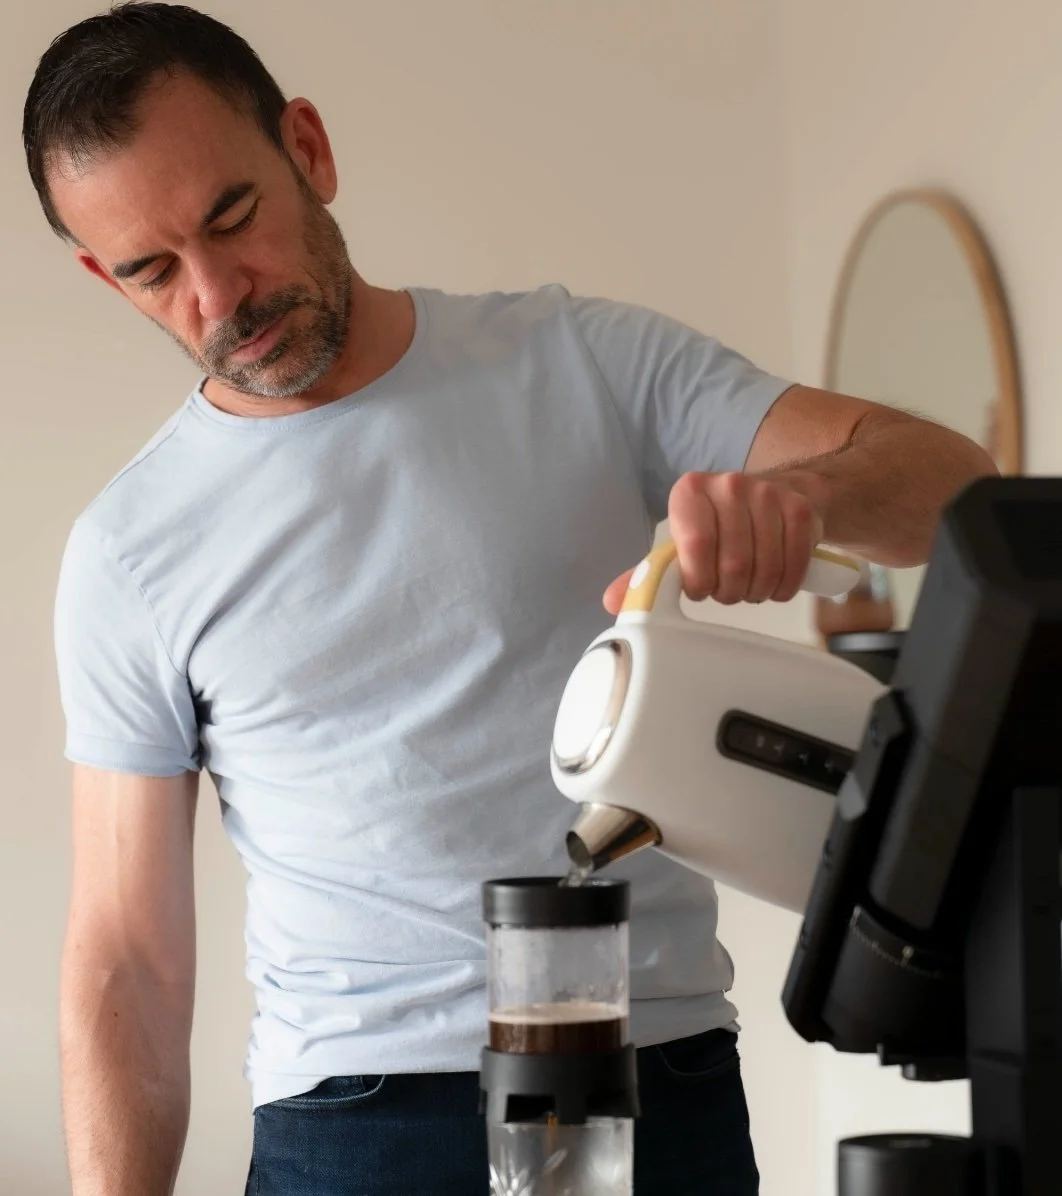
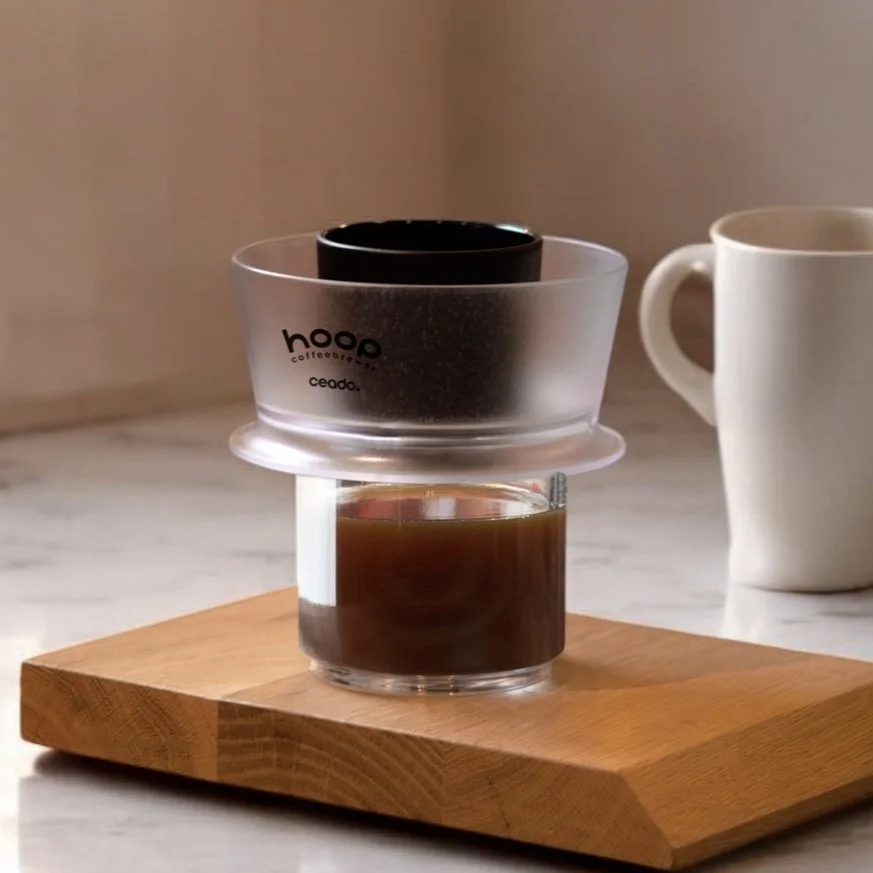
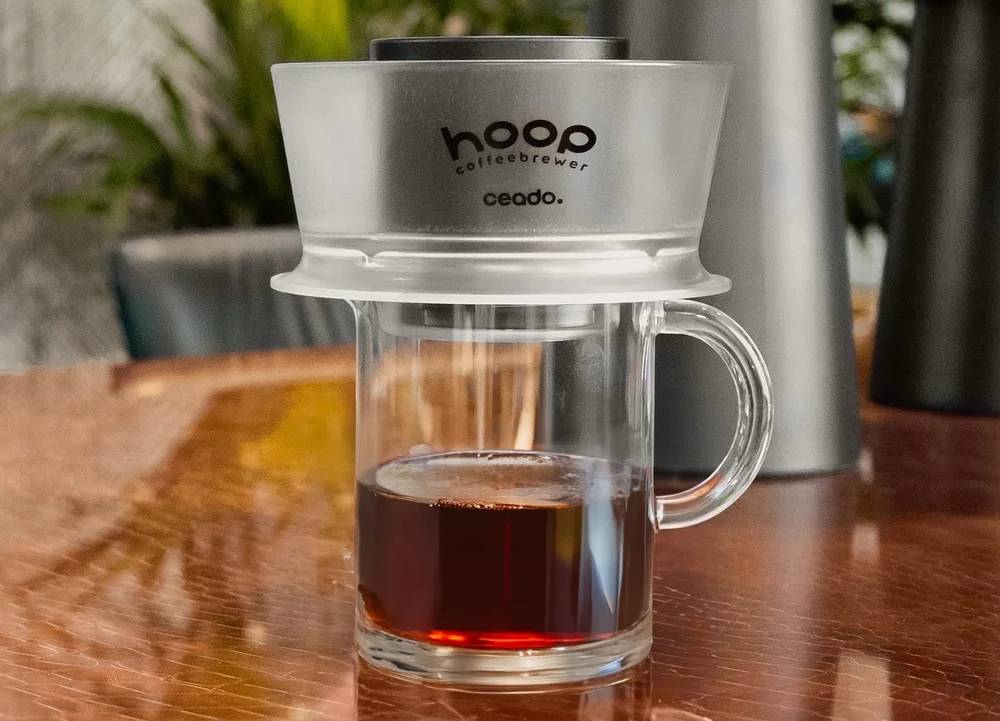
Now that I’ve used the Ceado Hoopbrewer for several months, I have a few tips to share with readers. Although the Hoop produces beautiful extractions more easily than any other brewer, every brewer has a few quirks to be mindful of when brewing.
Filter Paper
Before I began offering upgraded filter paper for the Hoop, the original paper’s flow restriction and tendency to clog forced Hoop users to use a very coarse grind. Some grinders can’t grind coarse enough to prevent stalls with the original paper.
The upgraded paper allows one to use a grind setting similar to what one would use for a larger-dose pourover or a NextLevel Pulsar to produce 4:00 brews with a 22g dose. Please remember to always mount the filter in the Hoop with the rough side up. The rough side of the filter has extra surface area, which allows it to trap far more fine particles without clogging. The paper from NextLevel is the best I’ve ever tried: it has smaller holes for good clarity, with ample surface area for trapping fines and limiting clogging. These filters turn the Hoop from a finicky brewer into one of the two the best manual brewer on the market (along with the Pulsar).
Breaking the Crust
I recommend generally avoiding agitating, swirling, stirring, or shaking the Hoop while brewing. Less agitation helps prevent clogging and uneven extractions. The one exception is if a dry crust of grounds forms at the top of the slurry when brewing fresher or darker roasts. The larger the crust, the fewer grounds that are in the intact coffee bed. At the extreme, a large crust can lead to low extractions. To break the crust, I recommend using a WDT Toolto gently stir the grounds until they submerge.
Pouring
While you *can* get a great brew by pouring the water rapidly into the outer ring of the Hoop, I find overall better results from pouring slowly, moving the kettle side to side to prevent the water from swirling in one direction. I tend to pour the first 1/3 of the water slowly, and then pour the rest quickly.
Water
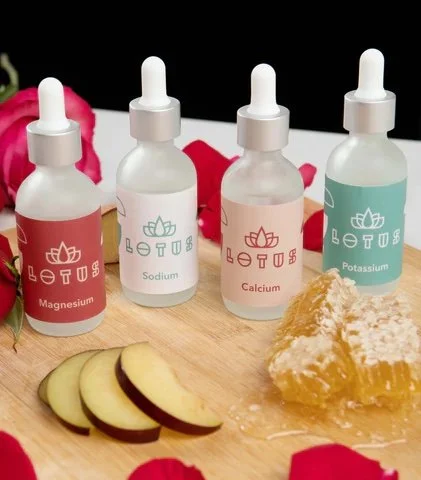
I recommend pouring water just off the boil. While there are many things I could say about optimal water chemistry, the most important consideration — by far — is that the alkalinity (aka KH, bicarbonate, buffer) is at a reasonable level. I recommend alkalinity of 25—40 ppm. While hardness matters, the Hoop is not at risk of scaling, and one has a wide range of acceptable hardness levels to yield delicious coffee. Hardness of 30—90 ppm (CaCO3 equivalent) should work well, as long as there is at least a modest level of magnesium in the water. In cases of near-zero magnesium, I recommend adding 3-4 drops of Lotus Magnesium Chloride to each brew, before or after brewing.
Level
Hoop users know that unfortunately the Hoop does not sit flat on all carafes. I recommend trying this if you want to use a glass carafe with the Hoop, or this if you want a stainless steel carafe.
Stalled Brews
If your brew stalls, please first try grinding coarser, even if the grind setting seems unreasonable to you. If the coarsest setting on your grinder still causes brews to stall, or yields brews that are too weak, please consider these factors:
Make sure you are using my upgraded filter paper and have inserted the filter rough-side-up
You can try a smaller dose, but I recommend not using less than 18 grams
Decrease or eliminate any source of agitation
Check that your grinder burrs are not dull or poorly aligned. Please note that just because your pourovers don’t stall easily, that doesn’t mean the burr sharpness or alignment isn’t the problem with the Hoop; it is possible your pourover brews have an exceptional amount of bypass. Most “espresso” or “Turkish” burrs will not work well with the Hoop, and are generally not appropriate for filter brewing.
If you try all of the above and your Hoop still stalls, please drop a comment below, and I will help you troubleshoot.
My sincere thanks to Peter Jones of Idle Hands Roasting and Trident Cafe, and to Benjamin Paz of Beneficio San Vicente, for their help with this post.If you enjoy this post and want to help increase awareness of Cup of Excellence, please share this post. Thank you.
Cup of Excellence is a competition of coffee quality held annually in numerous producing countries. Each competition involves six rounds of evaluation, a national jury, and an international jury. Cup of Excellence was founded by George Howell, Susie Spindler, and Silvio Leite in 1999. The first competition was held in Brazil, and the program has since expanded to sixteen producing countries.
Why I love Cup of Excellence
I love Cup of Excellence for many reasons: the competition promotes improved coffee quality, winners (those who qualify for the auction) receive very large price premiums for their coffees, COE incentivizes investment in quality, it connects buyers and sellers, and it rewards fantastic work. COE also does a lot to validate and recognize coffee quality in a way that helps grow the market for premium specialty coffee. We support COE at Prodigal because it is one of the few initiatives I’m aware of that fosters many unambiguous, positive outcomes for everyone involved. In the words of my friend Peter Jones, who has judged numerous COE competitions, “winning changes people’s lives.”
They’re not messing around
Years ago, I thought COE was simply a competition involving high-quality coffee. I drastically underestimated the depth, complexity, and impact of the competition: by the time the competition is over, approximately 8700+ cups will have been tasted and scored by the judges, volunteers will have given thousands of hours of their time to the competition, and the competition will have changed many lives.
A tremendous amount of effort goes into making each COE competition a success. About 40 volunteers each spend a week or two working hard to make a competition run smoothly. The national jury gives several days of their time to cup and score hundreds of coffees several times each. The international jury pay for their own flights and volunteer a week of their lives to each competition. Entire families, and often many neighbors from a producer’s community, will travel to the event to support a producer whose coffee is in the competition.
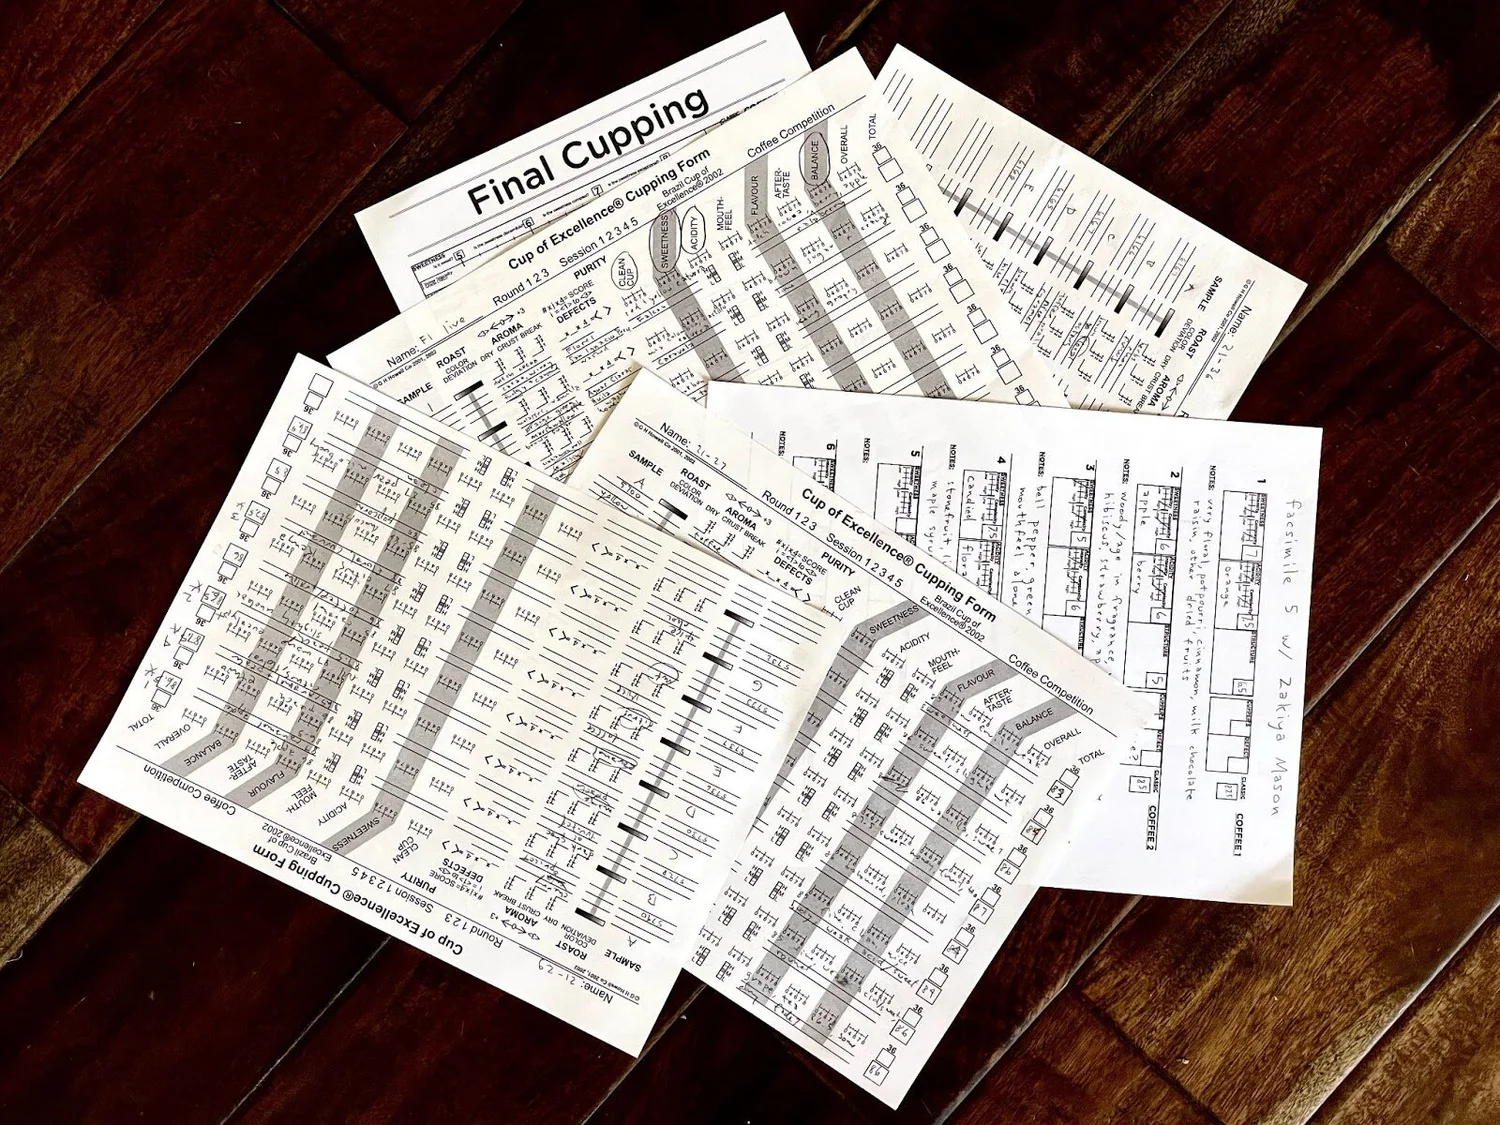
COE is open to all farmers in a given country. Each farmer may enter one sample at no cost. All coffees are cupped “blindly”, meaning judges do not know the name of the farmer, the farm, or the varieties of the coffees on the table. To qualify and advance in the competition, a sample must score at least 86 points.
slides courtesy of Scott Conary of Carrboro Coffee Roasters
Judging
The national jury is made up of experienced cuppers from the country of origin. This jury cups all of the coffees entered at pre-selection, and samples that score 86 or higher advance to the national jury week. After the national jury whittles the number of qualifying coffees down to 40, the judging is passed on to the international jury.
The international jury is made up of cuppers from both producing and consuming countries. Each judging panel spends one full day doing extensive calibration. To become a member of an international jury, a judge must take a standardized sensory training, participate in COE as an “observer” judge, and successfully calibrate his or her scores with those of experienced judges.
National Jury Day One (Calibration)
Before the competition begins, an in-country organization, such as the producing country’s SCA chapter, collects the samples entered into the competition. The head judge flies in and selects the national jury of 20 judges. The head judge spends a full day calibrating the national jury. On calibration day, the judges cup three tables of 10 coffees, with each coffee duplicated on the other side of the table. This process is repeated twice. Judges are expected to be consistent in how they score the duplicate cups, and to show a dynamic range in their scores, especially for a few outlier (non-competition) coffees added to the calibration tables.
National Jury Day Two (pre-selection)
On day one of the competition, the judges cup each sample four times, with typically 300 or more samples submitted to the competition. Cups must score an average of 86 points or higher to advance in the competition, with a maximum of 150 samples moving on to the next round.
After samples have passed round one, the producers must move their entire lots to a bonded warehouse overseen by an independent auditor. Samples cupped in successive rounds are drawn from these lots.
National Jury Day Three
The national jury cups the samples that passed the pre-selection round. A maximum of 90 samples advance to round three. Samples must again score 86 or higher to reach the next round.
National Jury Day Four
Judges cup the samples, choosing a maximum of 40 samples to advance to the international jury.
International Jury Day One:
All-day calibration
International Jury Day Two & Three
The international jury cups the samples and decides which will be awarded the “Cup of Excellence” label. Those 30 lots will enter the auction, and the scores for places 11—30 are now finalized.
International Jury Day Four
On the final day of the international jury, the judges re-cup the ten highest-scoring samples to give them extra scrutiny and finalize their scores and ranking. This day is fun for the judges, as the hard work of intense cupping is behind them, and they get to enjoy cupping ten beautiful coffees at a relaxed pace. Peter Jones told me there is a nice tradition of the international judges tipping the volunteers at the end of the competition.
International Jury Day Five
Day five is the big reveal and party. Paraphrasing Peter: “it’s emotional; government officials come, farmers and their families, and sometimes their neighbors, come, and all of the winners get a plaque and a certificate. Everyone is very supportive, cheering on farmers, and you can see and feel the emotions of everyone involved. Everyone goes crazy when they reach the top three, and people are crying and cheering. You can tell the farmers’ lives are changed by placing in the competition.”
The Auction
About five or six weeks after the competition, the top 30 lots are sold in an internet auction. Competition lots that scored above 85 but did not reach the top 30 qualify for the National Winners Auction.
COE Cupping form
Impact
A Technoserve report from 2015 of COE’s impact in Brazil and Honduras found impressive direct and indirect benefit to producing communities and concluded COE acted as a catalyst for specialty-coffee industry growth in participating countries. COE competitions have promoted direct trade, helped forge new relationships between buyers and producers, and promoted specialty coffee growth in new markets, especially in Asia.
According to the report “the premiums paid by COE are several times higher than prevailing specialty and direct trade prices. These high premiums encourage producers to enter a beneficial cycle of improved quality, greater recognition for specialty coffee, and greater demand….The indirect benefits from COE are estimated to be more than $100 million for Brazil and $22 million for Honduras (and are included in the total benefit cited above).”
Presumably, nine years later, the economic impact of COE in those countries is now far greater than it was at the time of the report.
I asked Benjamin Paz of Beneficio San Vicente to tell me a little about his experience with COE, and his perspective on the benefits of the competition. Benjamin began working with farmers in 2005-2006 to help them place well in COE. In 2011, Benjamin bought his own farm, and has placed many times in the COE competition. Benjamin’s coffee came in first place in 2022 and 2024!
Benjamin says participating in COE has generated a lot of interest in San Vicente, and Santa Barbara coffees in general, not just in the farms that have placed well in the competition. That may be the true virtue of COE: rewarding hard work by bringing attention to farmers and regions producing amazing coffee.
One example of COE focusing attention where it belongs happened in 2015. Benjamin cupped a new hybrid variety that wasn’t very popular at the time. He recommended the producer submit the coffee to COE, despite others saying it would not do well. That coffee, the first parainema to enter COE, came in first place :). Personally, I have loved the few parainemas I have tasted, and understand what Benjamin saw in that coffee.
Prodigal is a proud participant in Cup of Excellence
Because we greatly admire the Cup of Excellence program, we have already purchased lots in several recent COE auctions, and hope to purchase lots from many more in the future. This week we released two Ethiopian COE winners and lots on the way from the Best of Rwanda and other COE competitions.
Given that coffee color is the best predictor of flavor, color measurement is a useful tool in roasting quality control. There are many color meters on the market with similar utility. I don’t have a strong preference for a particular color meter, but would like to offer a short guide to ensuring accurate color measurement.
When purchasing a color meter, there are a few considerations:
How consistent and accurate is the device?
How easy is it to use?
What is the cost?
What amount of ground coffee is required for a ground-color measurement?
Sample tray size
I think the last factor is the most underappreciated: some devices require upwards of 100g to take a color measurement. While a larger dose can provide more surface area, which offers more stable and representative measurements, it also wastes a lot of coffee. A roastery measuring 100 batches per week, at 100g per sample, at an average cost of $10/kg (roasted) coffee would spend approximately $5,000 per year taking ground color measurements! The same roastery using a color reader that requires 5g per sample would spend $250 per year on ground-coffee measurement.
Most people in the market for a color reader fixate on trying to save a few hundred dollars when purchasing a color meter, but don’t factor in that purchasing one meter vs another may cost an extra $48,000 over the next ten years.
Of course, using a very small sample tray has a downside, which is that readings are more volatile. For example, we use a DiFluid Omni, which has a very small sample tray and requires about 5g per ground sample. One quaker can alter the color reading by a few points. In a larger tray such as that of the Agtron or ColorTrack, there will be less variability in the readings. We compensate for this variability by taking a few readings if the first reading is not what we expect it to be. Note: I don’t mean “our reading is out of our target range.” I mean “we expected the reading to be x based on the roasted weight loss, but the reading is x+4.”
Grinding
Grind size has a shocking impact on color measurement. For example, we have an EK with setting from 1–11. When we grind on #1, the color reading is ~25 points higher than when we grind on #5 (#1 is reasonable for espress, #5 is our cupping setting, and slightly finer than pourover). Not only is it important to always use the same setting, but I recommend having a small grinder with low retention dedicated to color readings. We use a Fellow Ode for our color measurements, and we never use the grinder for any other purpose. We do this because we want the burrs to dull as slowly as possible. If you use your cafe grinder for color readings, the color readings can easily drift 5–6 points within a year as the burrs get duller. I expect our Fellow Ode to offer consistent color results for the next 20 years at our current rate of use.
I recommend using a relatively fine grind and tamping the ground sample if possible. A coarser grind may cause larger chaff particles to float on top of the ground sample, making the result lighter. Tamping helps to create a smooth surface, which improves measurement accuracy.
Timing of color readings
I can’t say if there is a “best” amount of time between roasting and taking a color measurement, but for the sake of rapid feedback and workflow, we take color readings of every batch as soon as the beans leave the cooling tray. We want to know the weight loss and color of the previous batch before we reach first crack in the current batch while roasting, in case we need to make a change to our roast color.
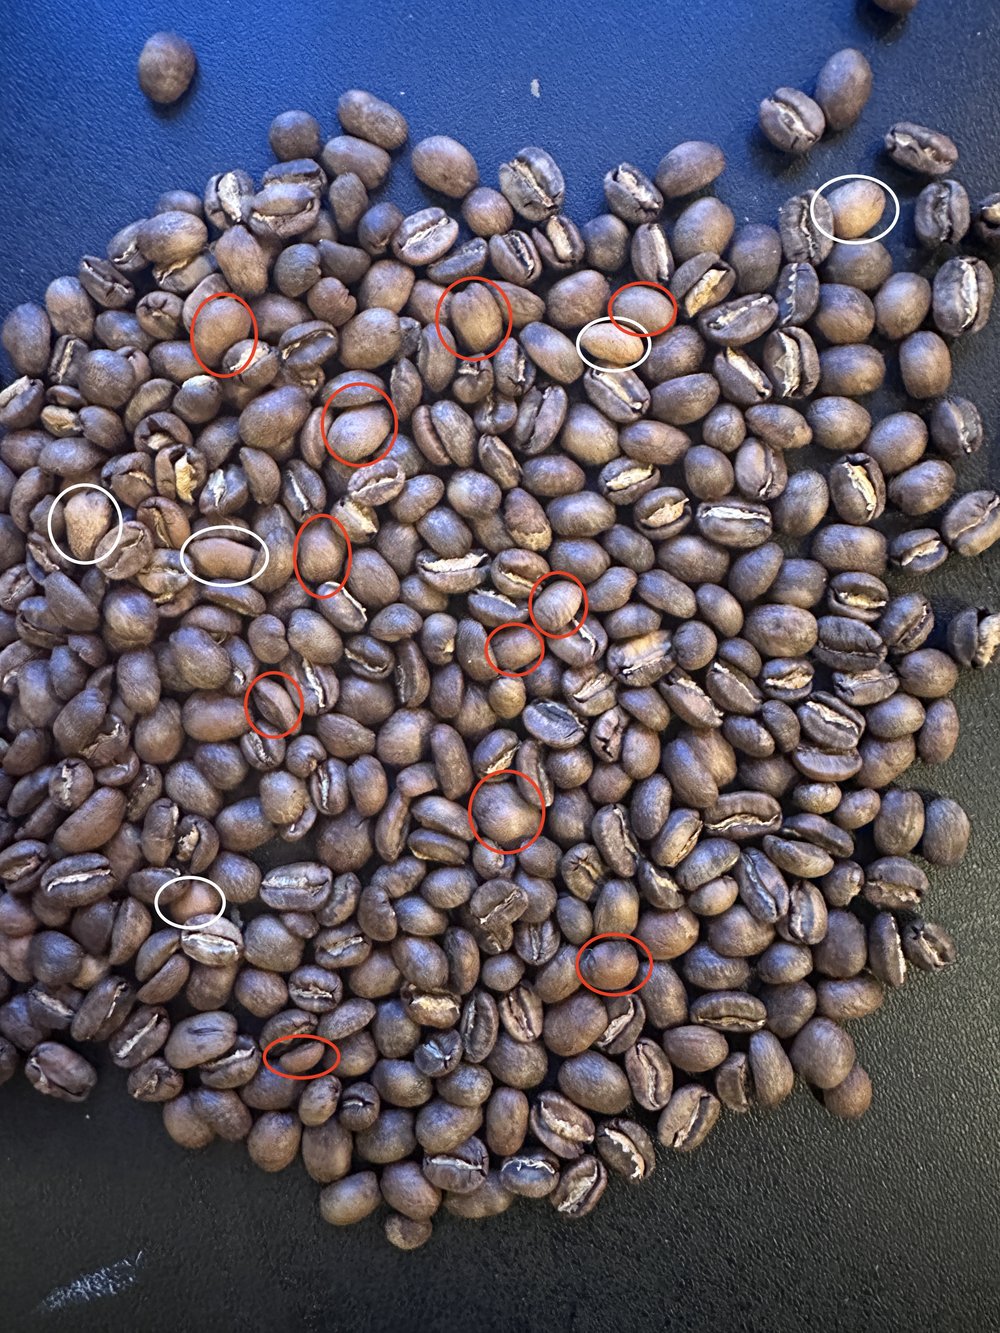
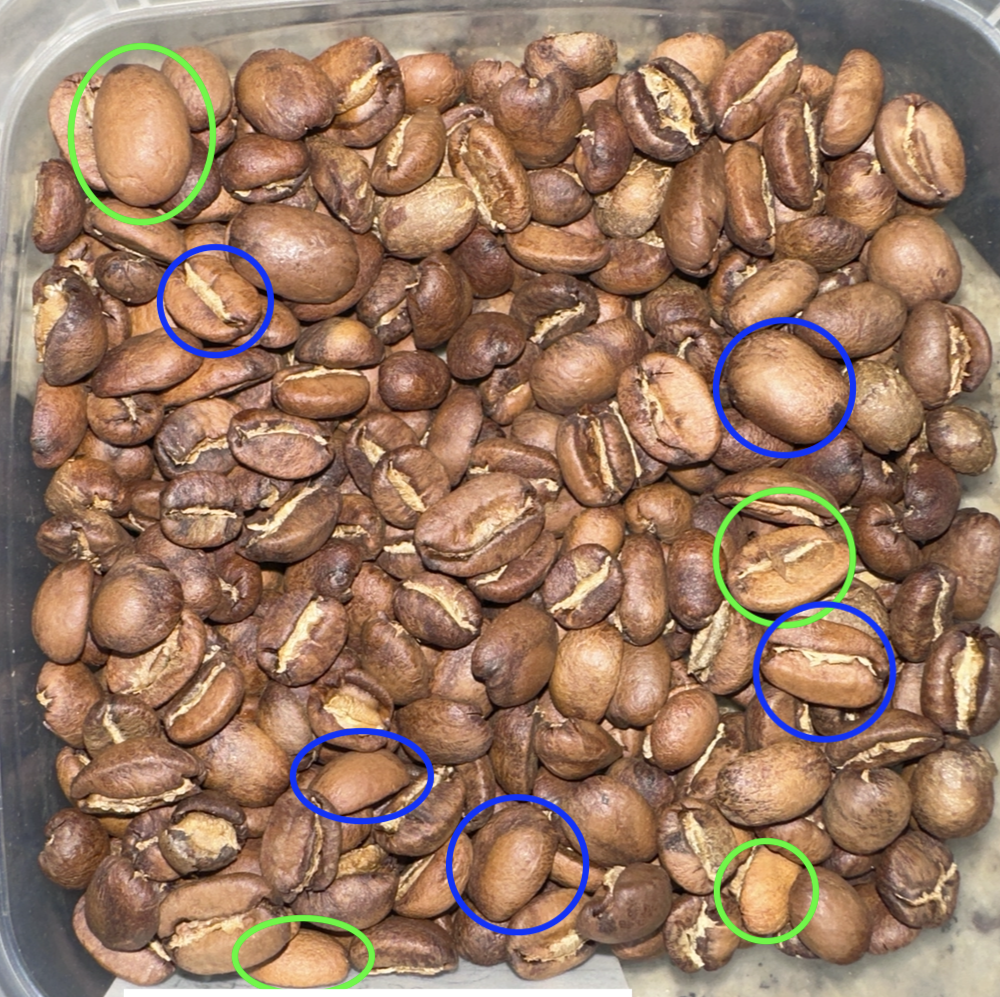
Quaker sorting
Whether you sort quakers or not, it is important to standardize the proportion of quakers when measuring color. Variability in the number of quakers can impact color readings, since quakers tend to be much lighter in color than mature seeds. At Prodigal, Mark and I hand sort to an agreed-upon level that mimics the degree of sorting we expect our optical sorter will do for each coffee. That is not as difficult as it may sound, as we hand sort samples for cupping, and frequently communicate about, and compare, our perceptions about how much sorting we will do for each coffee.
Whole-bean color readings
I consider ground-coffee color readings more important than whole-bean readings, but we always measure both whole-bean and ground color. This is not only to take yet another measurement of our roasting consistency, but also to learn how to manipulate the spread between outer and inner roast color.
Whole-bean readings tend to be a little less reliable than ground readings. This is due to several factors, including the bean surfaces being rounded, variability in the number of beans oriented with their “cracks” facing the color meter lens, and variation in the amount of silverskin stuck to the outside of beans. Much like with ground-color measurement, if we are surprised by a reading, we will repeat it a few times.
Calibration
I don’t have enough experience with various color meters to say how often or why they go out of calibration. My recommendation is to recalibrate the color meter before each roast session, and to liberally recalibrate if multiple readings are out of the expected range.
Weight Loss
It is essential to precisely measure the weight loss of every batch. Not only is weight loss a great proxy for overall roast development, but weight loss readings complement color readings well. If, for example, our roasted weight loss for several batches of a given coffee is 11.0, 11.0, 11.0, 11.0, but the ground-color readings are 98, 100, 102, 104, there is almost certainly an error in the color measurements. This pattern may indicate that the quaker sorting was not consistent or that the color reader needs calibration. Likewise, if the color readings are 98, 99, 98, 99, but the weight losses are 11.0, 11.0, 11.9, 11.1, the third weight-loss reading is suspect. The problem may have been user error, something was touching the scale to influence the reading, or perhaps some beans were lost in the roasting process (this happened to me recently while sample roasting; I set the airflow too high, and sucked a few beans out of the roasting chamber and into the chaff drawer. I was confused by the weight-loss readings until I opened the chaff drawer and realized the problem. I consider taking both weight loss and color readings a form of checks and balances in roasting QC.
Difluid Omni and sample tray / Omni app data presentation of whole bean color / alternative data presentation for ground coffee color
Like many of you, I’ve seen the Ceado Hoop here and there, and never paid much attention to it. But when my friend Alessandro of Aroma Cofffee in Bologna brewed a Hoop of a Prodigal coffee for me this summer, I was intrigued, and only then realized the genius of the Hoop’s design.
After tasting the coffee Alessandro made, I reached out to my friend Cosimo Lombardo who now works with Ceado. Cosimo and I had a wonderful conversation about the Hoop as well as some of Ceado’s other projects (more on that in the future.) I immediately signed up to sell The Hoop due to its impressive combination of quality and simplicity.
How to brew using The Hoop
To brew coffee, the barista pours water slowly into the outer chamber of the Hoop, and the Hoop does the rest. The brewing chamber is “no bypass” (hat tip Jonathan Gagné) and the design ensures the slurry never rises too high. Both features decrease the potential for astringency.
The Hoop may be the perfect manual brewer for cafes, as baristas can simply pour and walk away, knowing that four minutes later, the Hoop will deliver an excellent extraction.
There is no need for a prewet, a bloom, or a spin or swirl. :0. Just pour slowly.
If the coffee blooms to form a thick crust, one may want to use a WDT tool (or fork, or whisk) to submerge the crust after pouring. Very fresh or dark roasts will likely require WWDT (wet Weiss Distribution Technique) to break and submerge the crust.
The Hoop has every attribute of a great manual dripper:
Requires no skill
Takes scant barista time (this is especially valuable to cafes)
Offers low risk of astringency
Makes even extractions easy to produce
Offers near-perfect consistency
Just pour the water in the outer ring and four minutes later, enjoy some incredible filter coffee.
Deep bed, shallow slurry
Like the Pulsar, Tricolate, and Filter3, The Hoop is a no-bypass brewer, which means astringency is easy to avoid, and The Hoop produces high extractions using a relatively coarse grind. The small-diameter brewing chamber provides a deeper bed than most no-bypass brewers. Only Filter3 has a deeper bed.
The genius of The Hoop lies in allowing the barista to pour all of the water at once, while limiting the rate water enters the brewing chamber.
Three brewing dynamics help limit astringency:
sufficient bed depth
maintaining a shallow slurry
introducing water to the brewing chamber in such a way that it does not damage the integrity of the coffee bed
Sufficient bed depth is important because coffee beds act as filters that clarify brews. Deeper beds are better filters, and mitigate astringency. In a deeper bed, a smaller percentage of channels reach the bottom of the bed, limiting the amount of astringent particles channels deliver to a brew. A shallow slurry decreases astringency by limiting the (water-column) pressure on the coffee bed. The more pressure exerted on a coffee bed through suction or pressure, the more it will exploit a given channel.
Optional upgraded filters
Each Hoop comes with a pack of 100 standard filters from Ceado. The standard filters require a coarse grind to achieve the recommended 4:00 brew time. I offer optional upgraded filters as an add-on for those who want to use a finer grind to achieve higher extractions with excellent flavor clarity in the same 4:00 brew time.
The upgraded filters, as well as my personal “how to” guide to the Hoop, are available only through www.scottrao.com
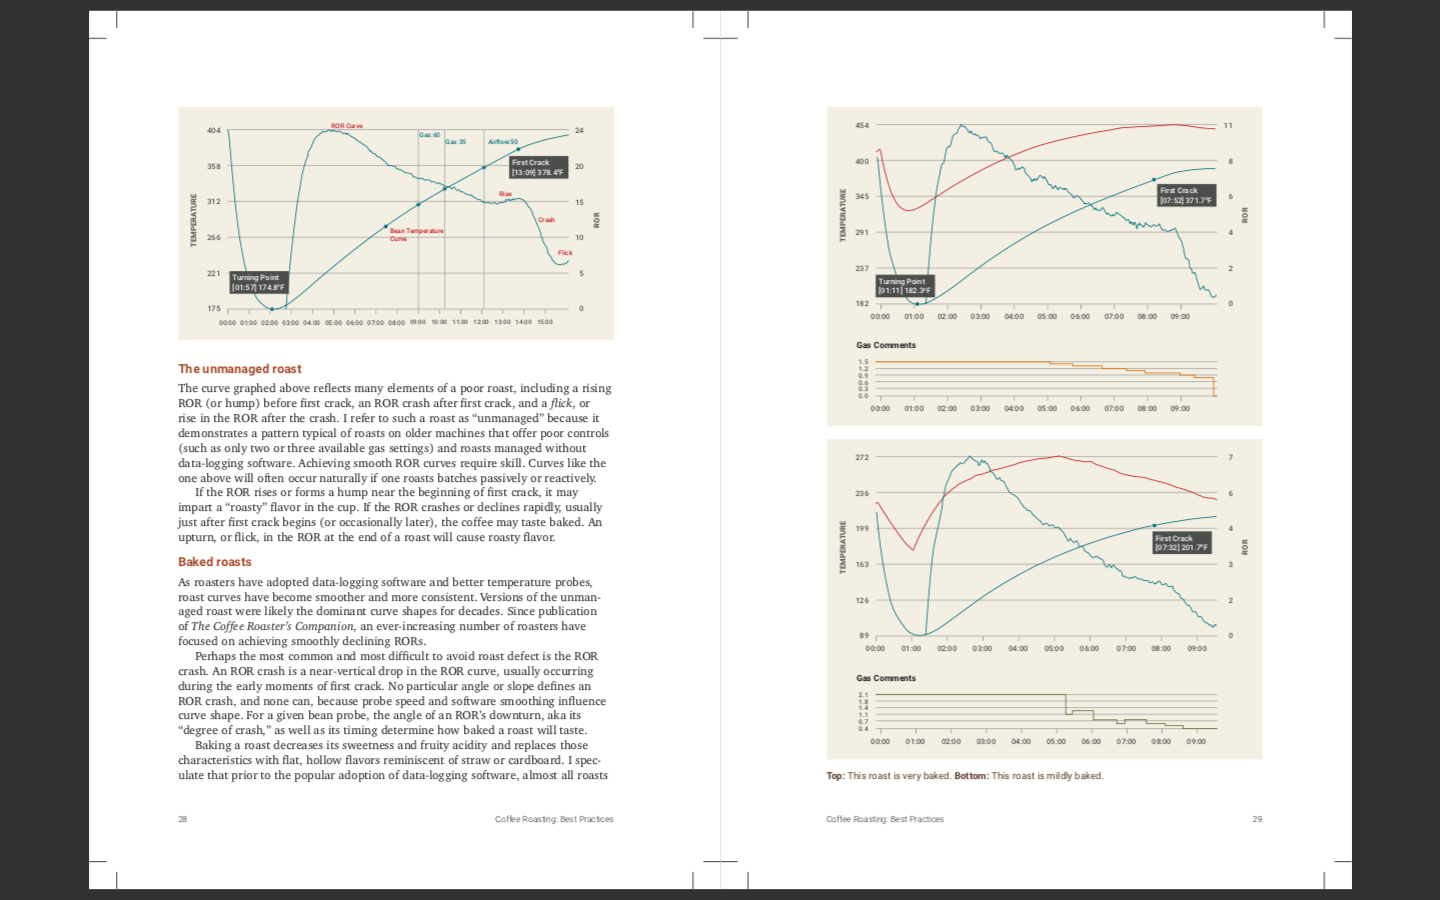
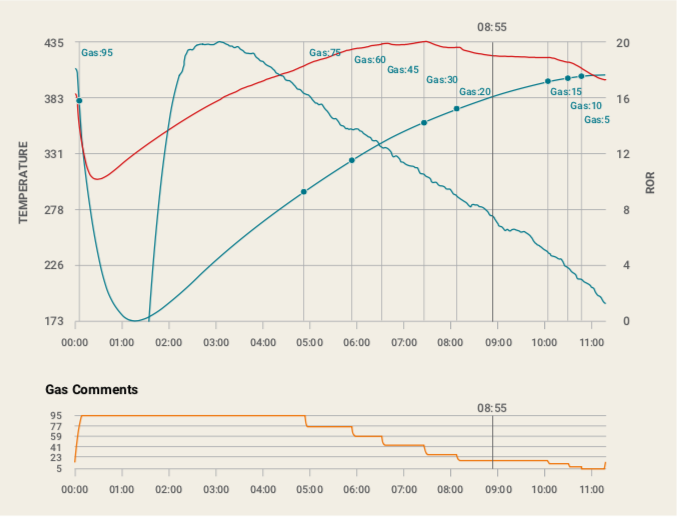
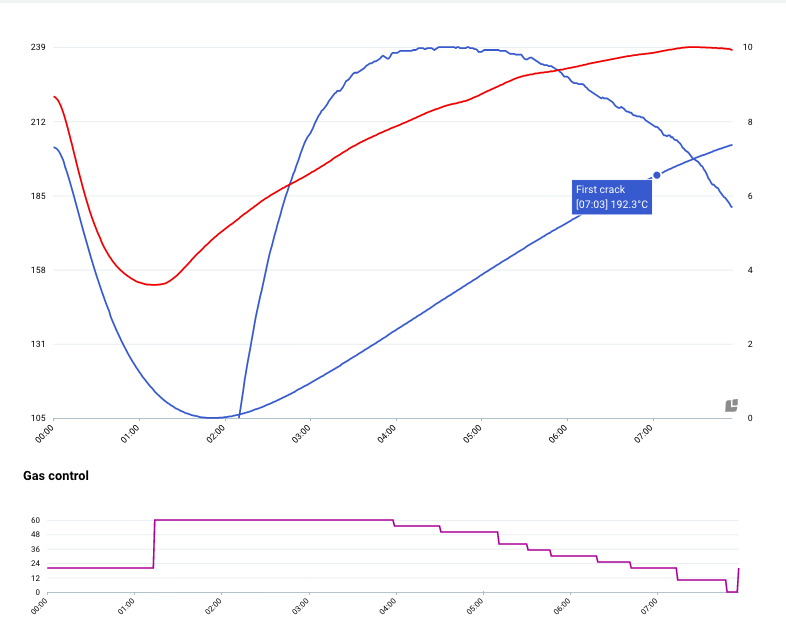
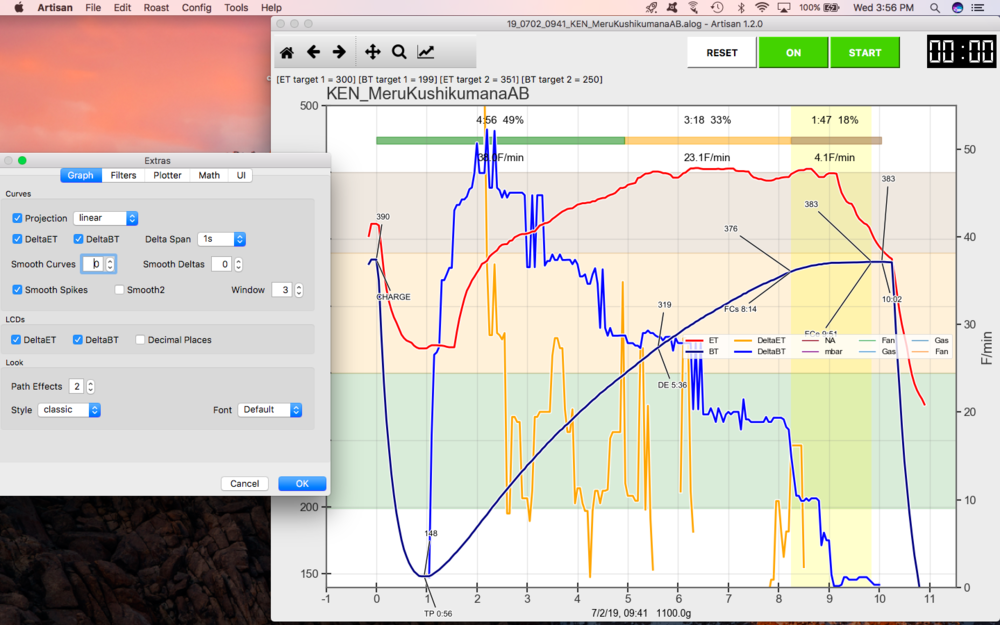
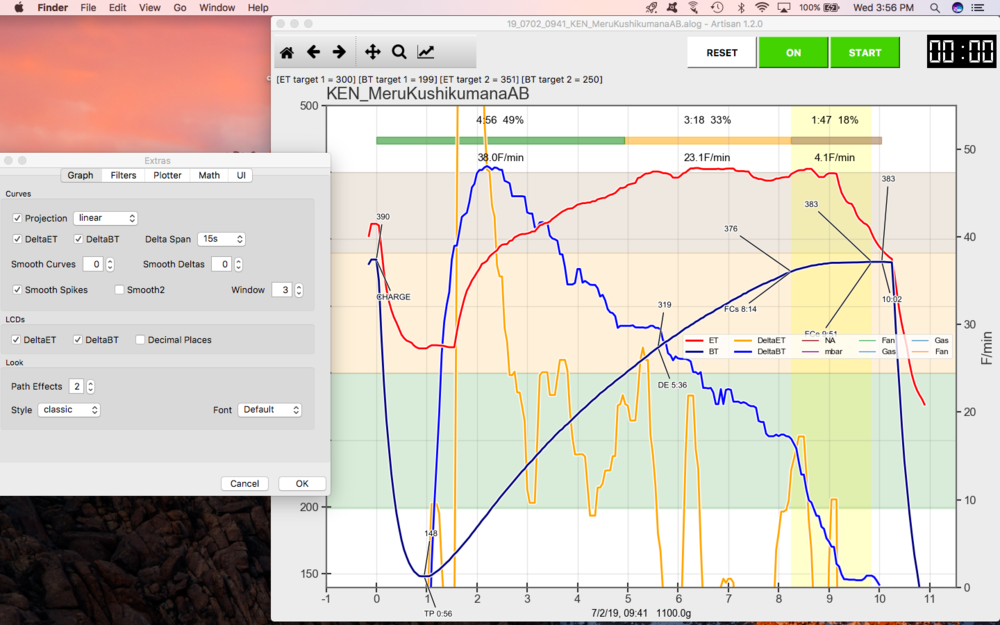
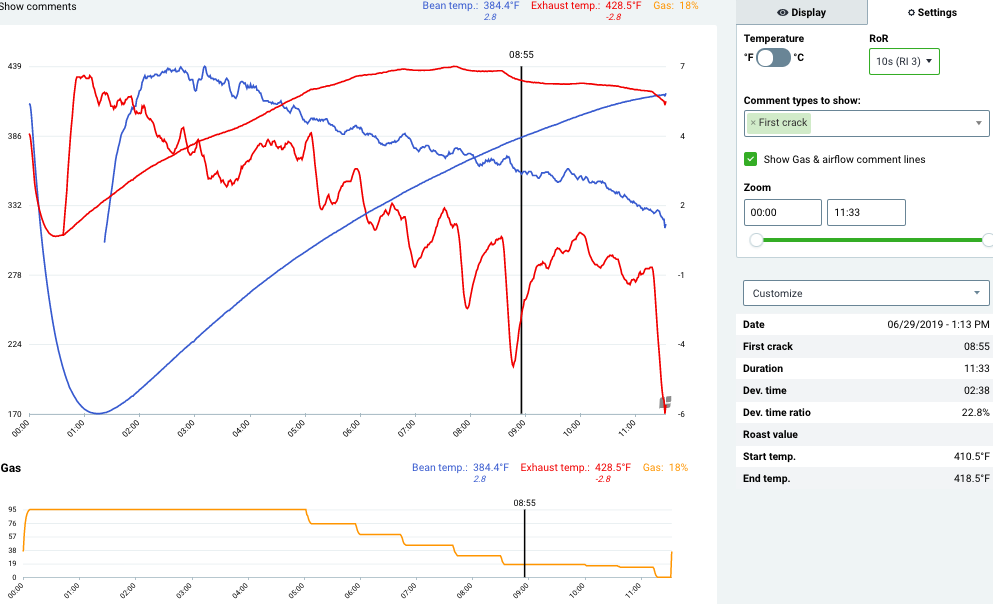
There are currently a few ways to control roasts; from most common to least common are:
gas valve % (power settings)
inlet temperature
exhaust (environmental) temperature
PID curve management
GAS % (POWER PROFILE)
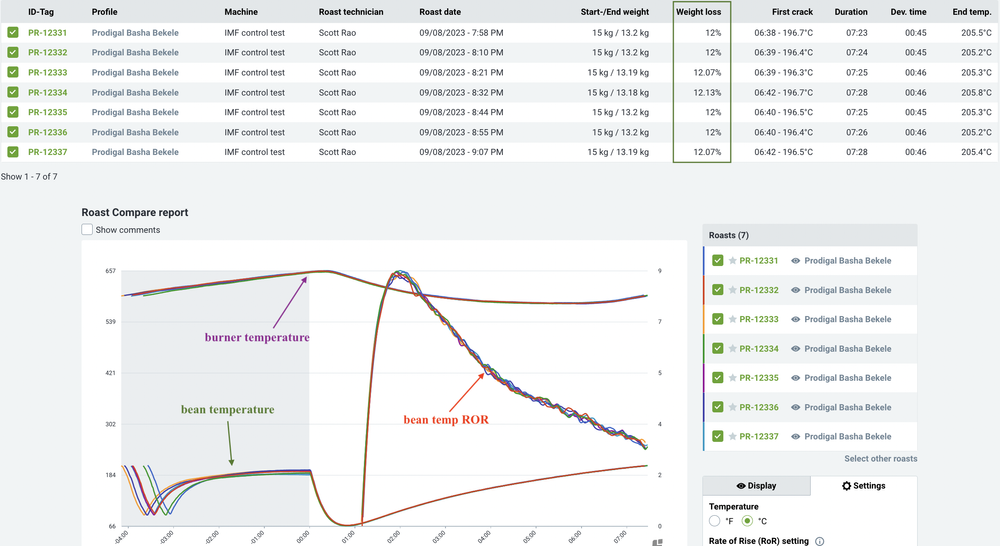
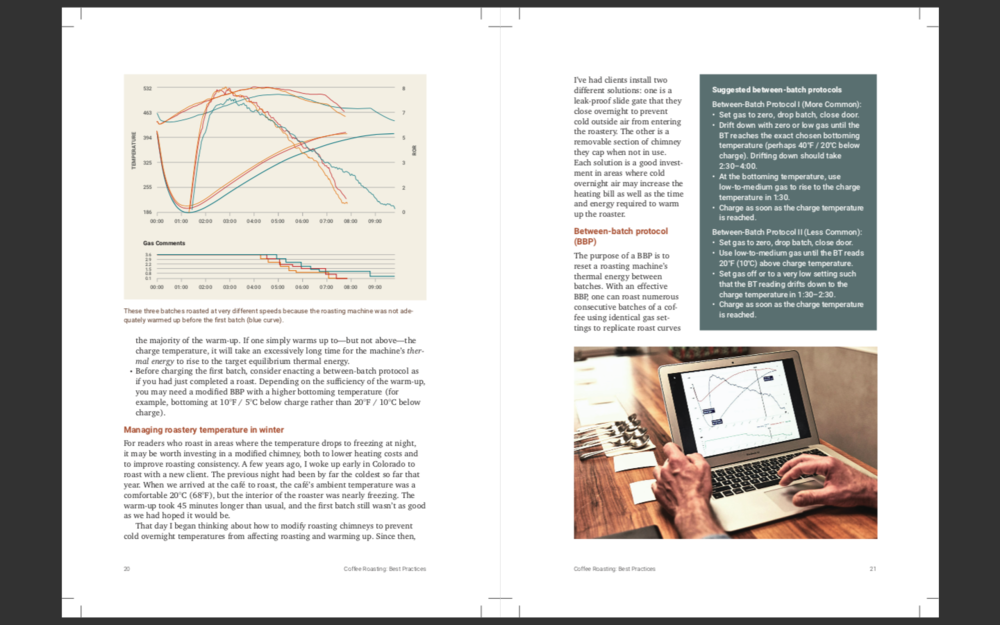
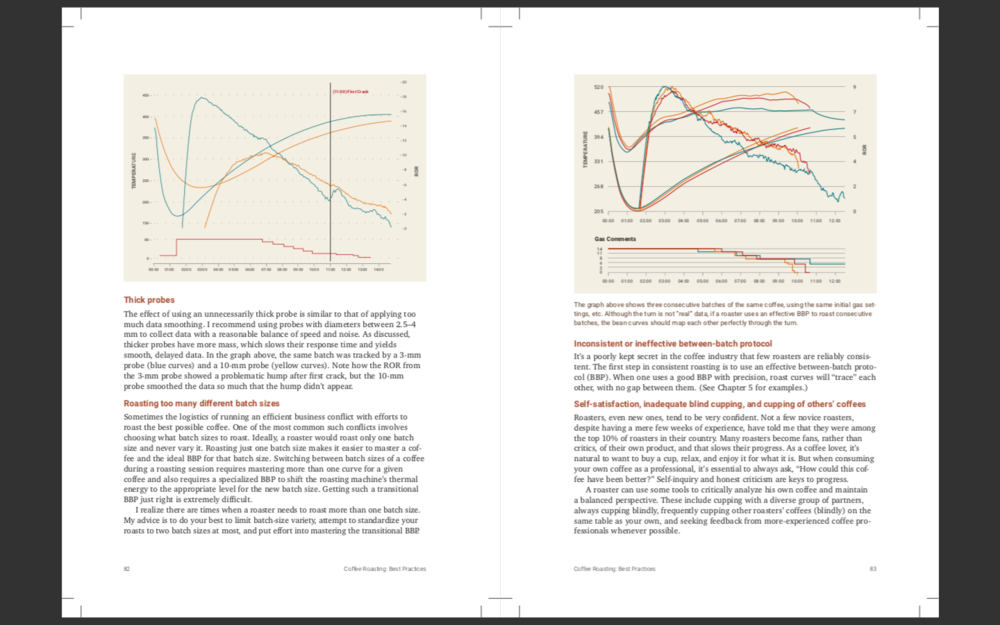
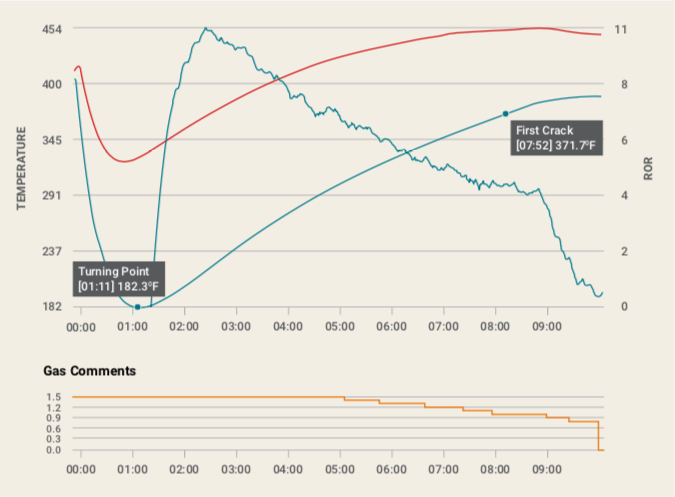
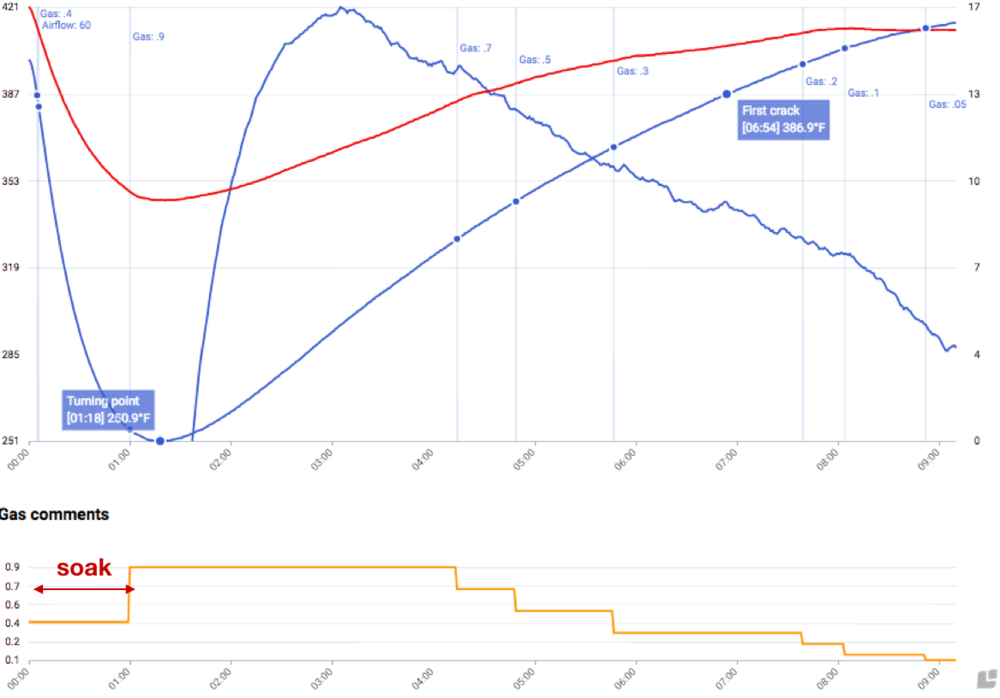
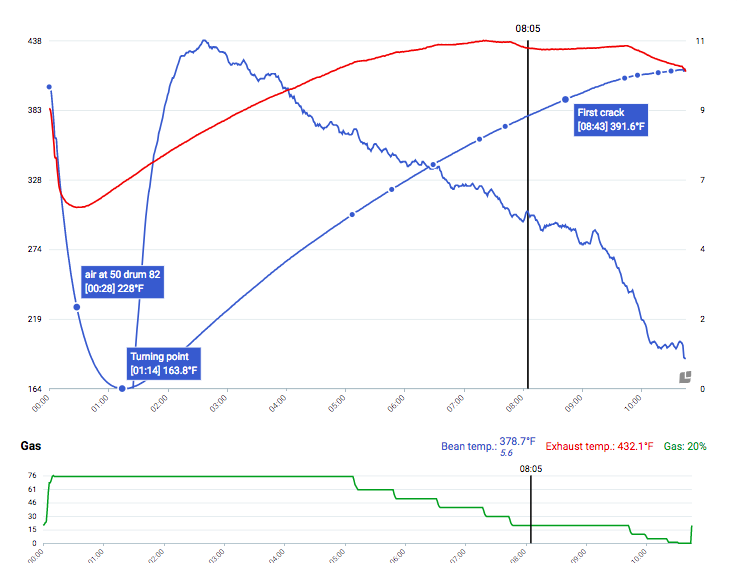
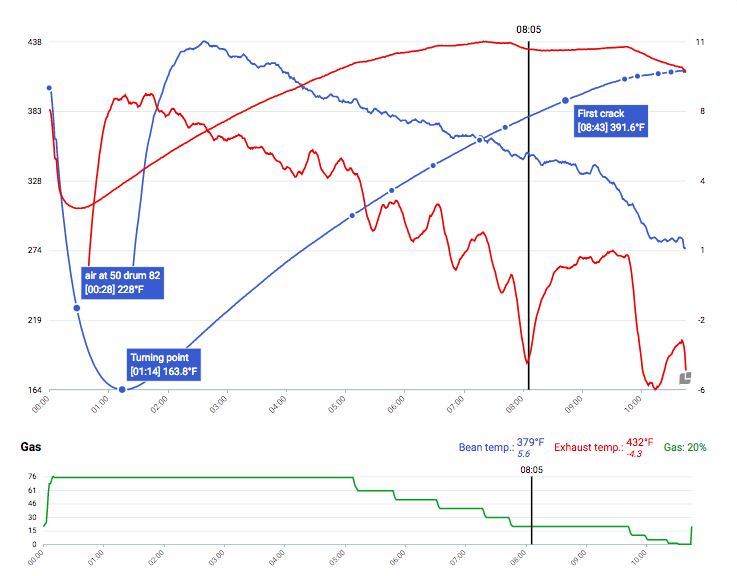
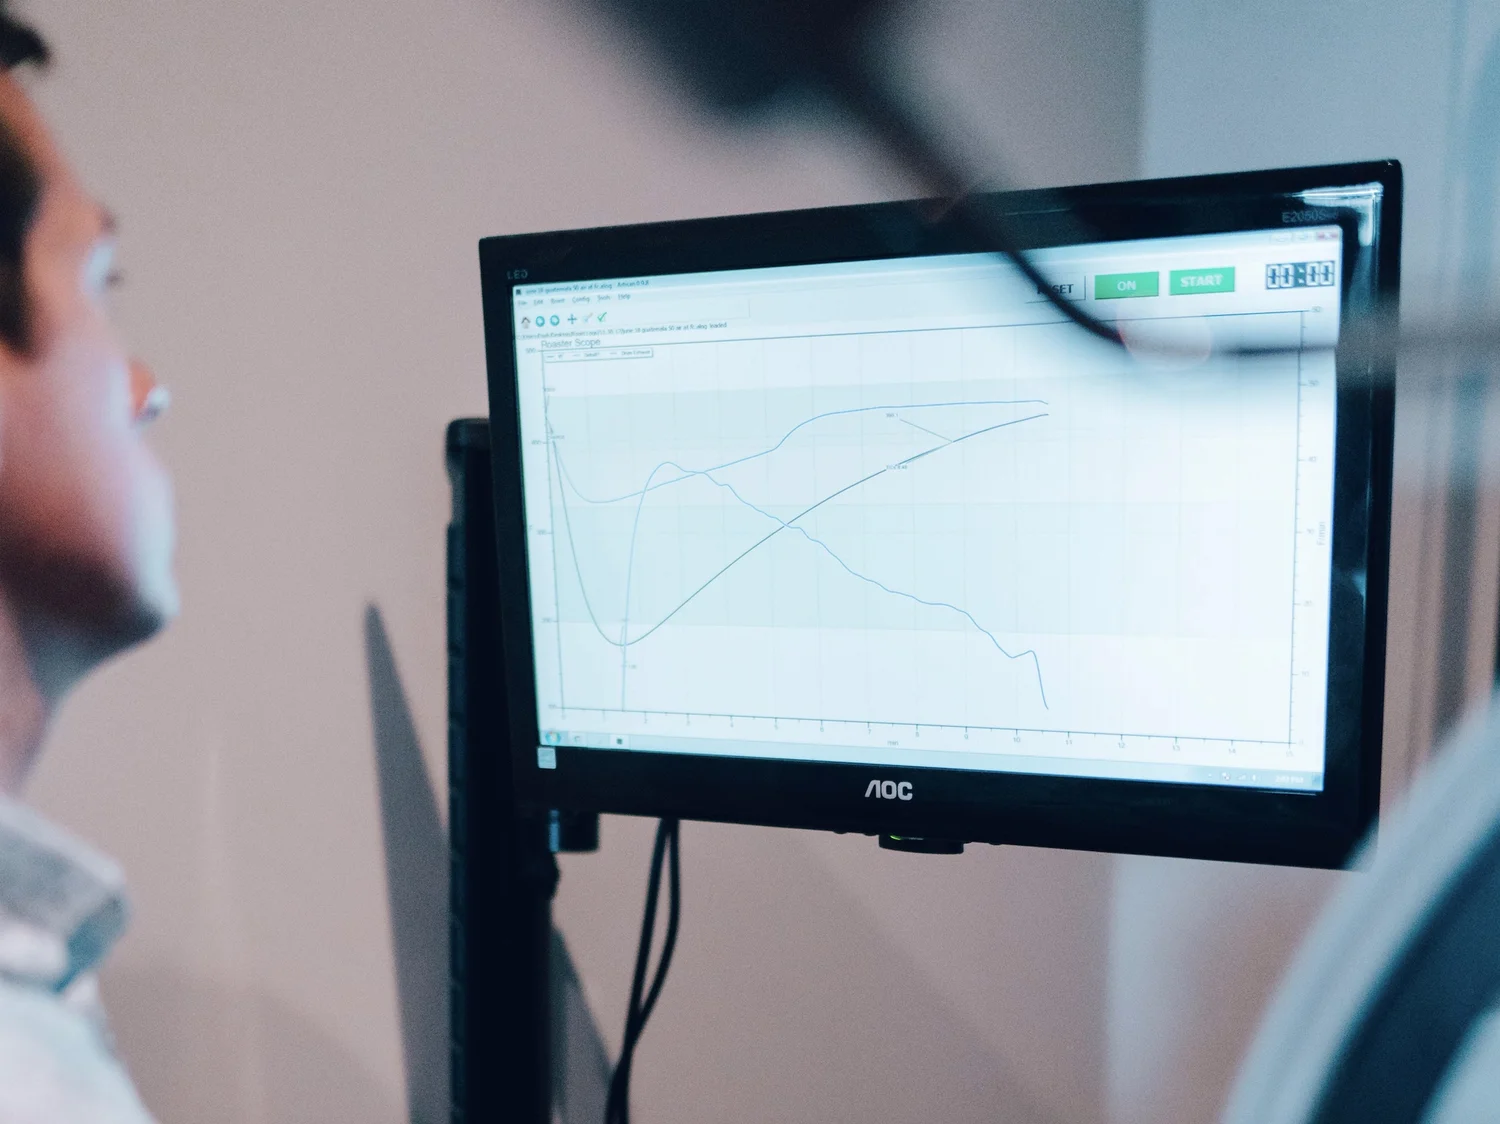
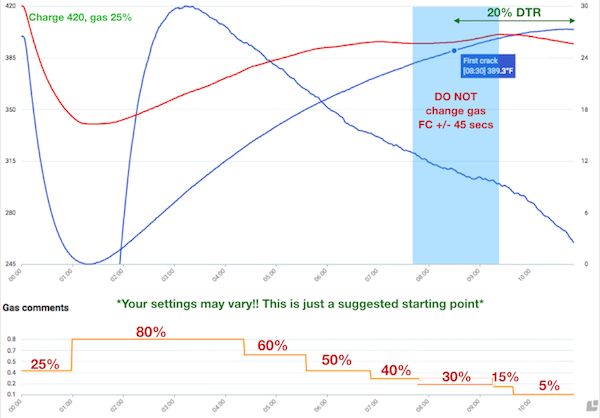
Most roasters operate by gas % or “power profiles”. This includes most popular versions of Probats, Diedrichs, Giesens, and Lorings, etc. used in specialty coffee. While using gas valve or power settings is intuitively easy, every experienced roaster has learned the hard way this system does not guarantee consistency. For example, you may find batches early in a roast session run slower than batches later in a session, or batches run faster when the ambient environment in the roastery is hotter. In the former case, the roaster needs a more effective between-batch protocol. In the latter case, the roaster must either control the ambient conditions (difficult or expensive), or alter the gas/power settings depending on the ambient temperature (also difficult).
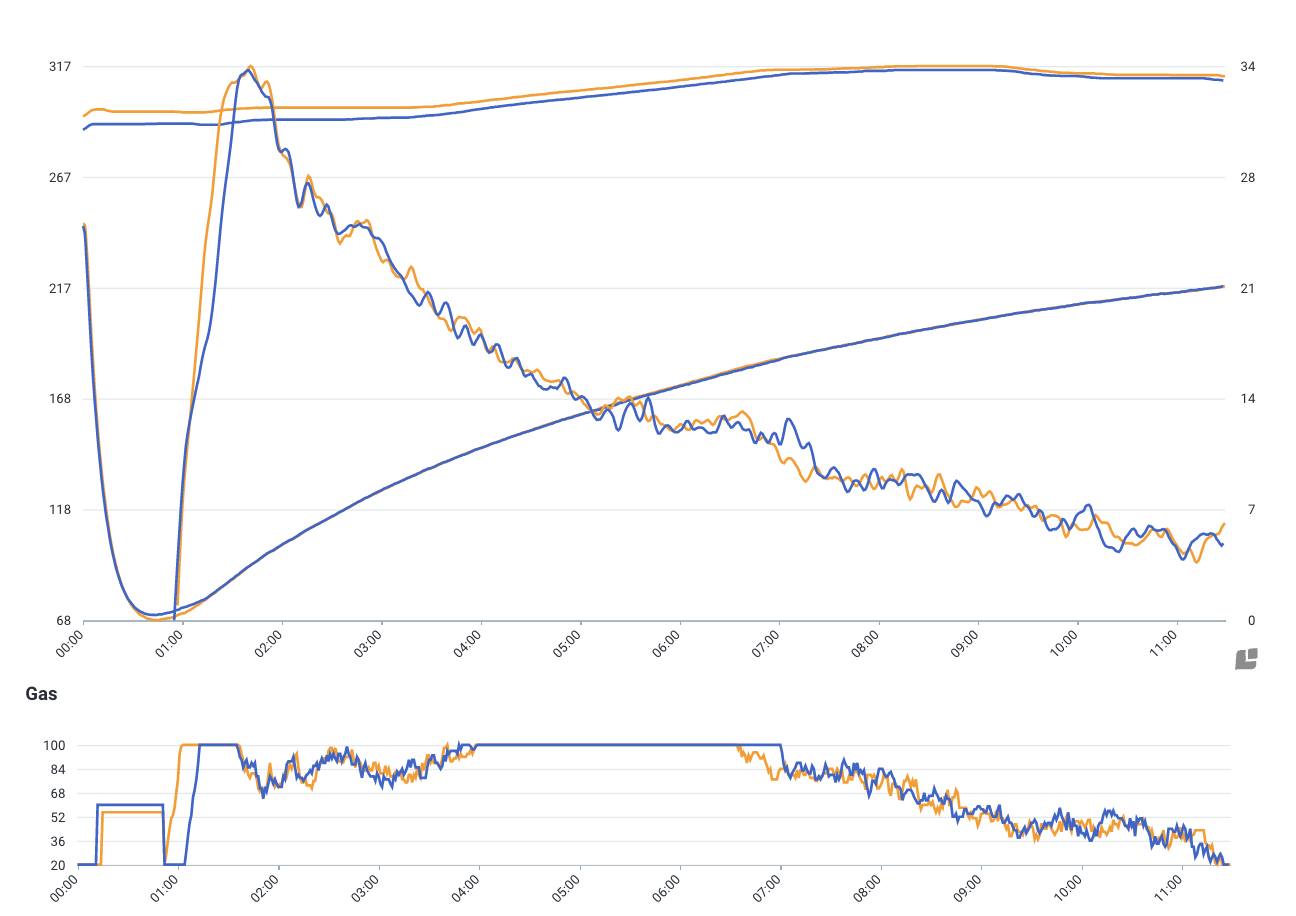
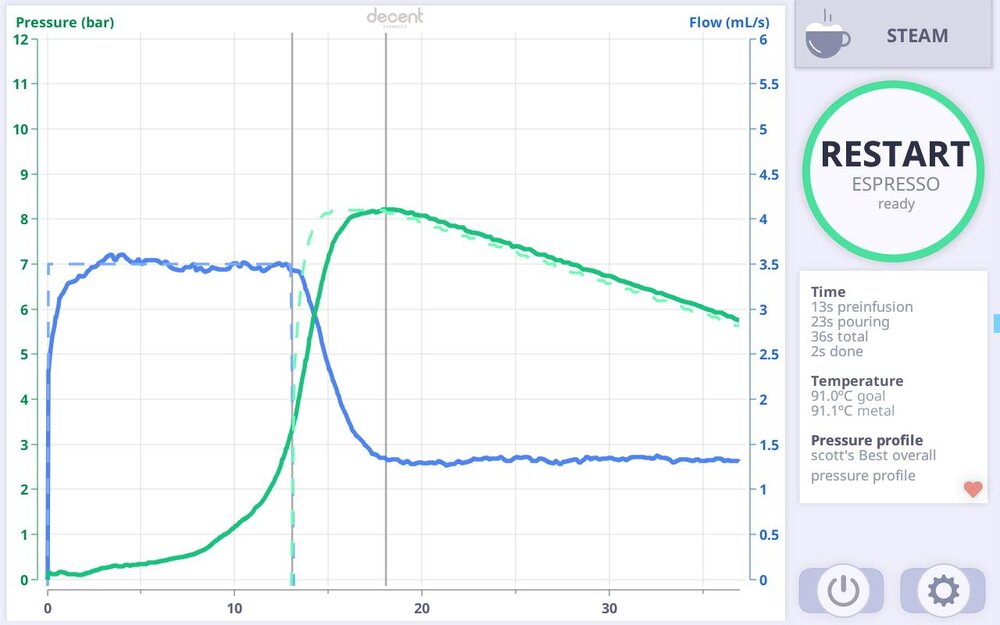
Above is an example of successful roast replication using gas-valve settings on a Giesen W6. The key to the consistency here is the BBP
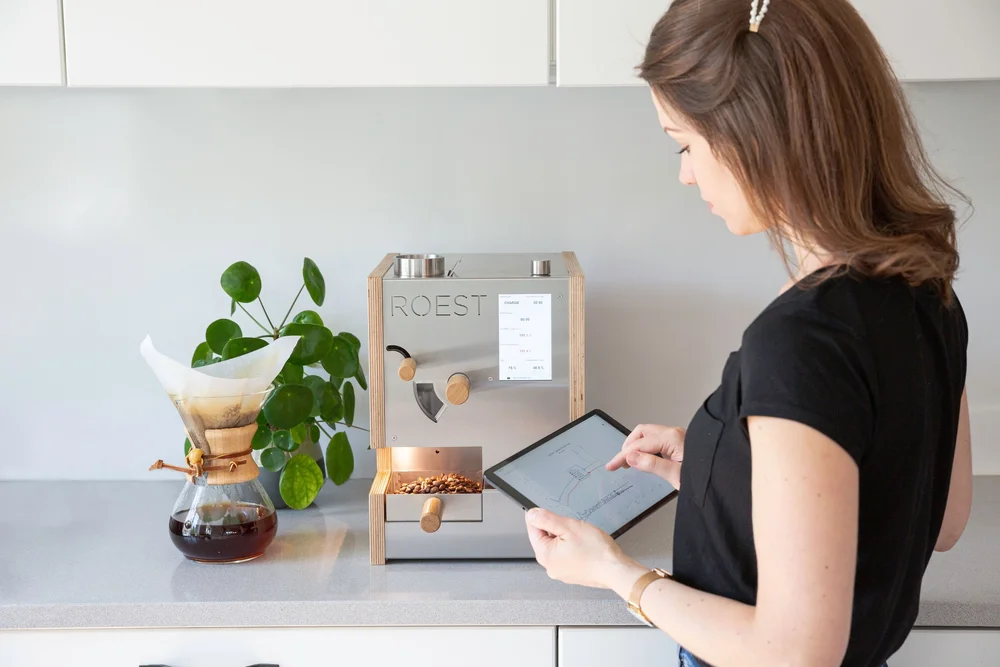
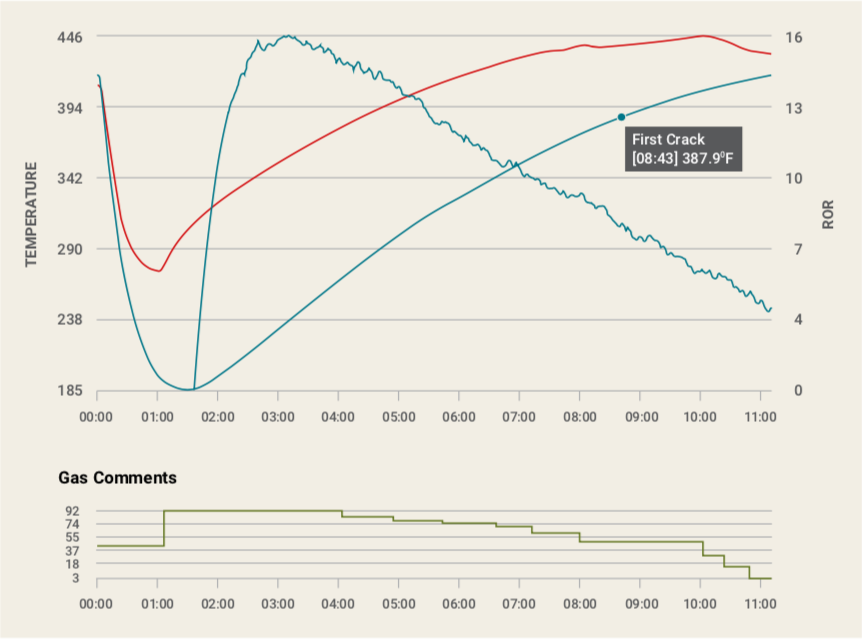
INLET-TEMPERATURE CONTROL
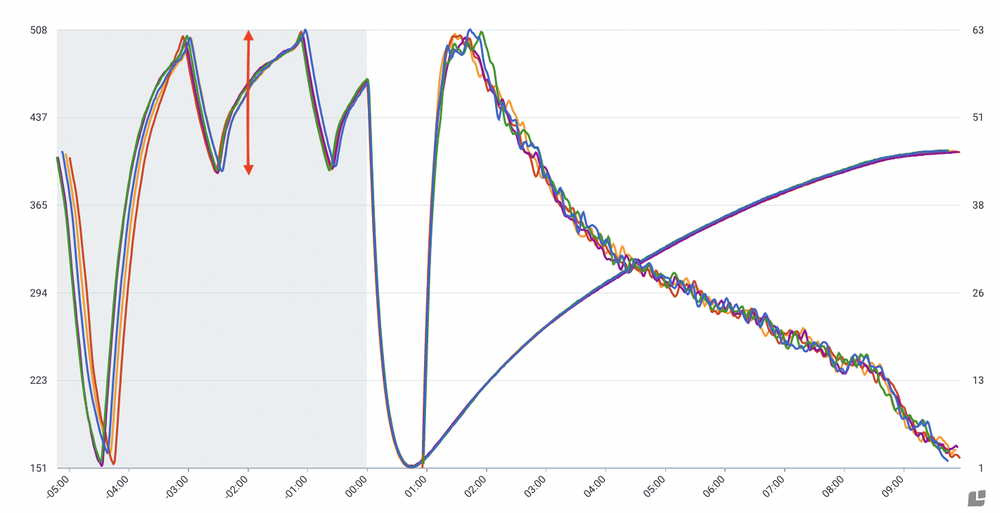
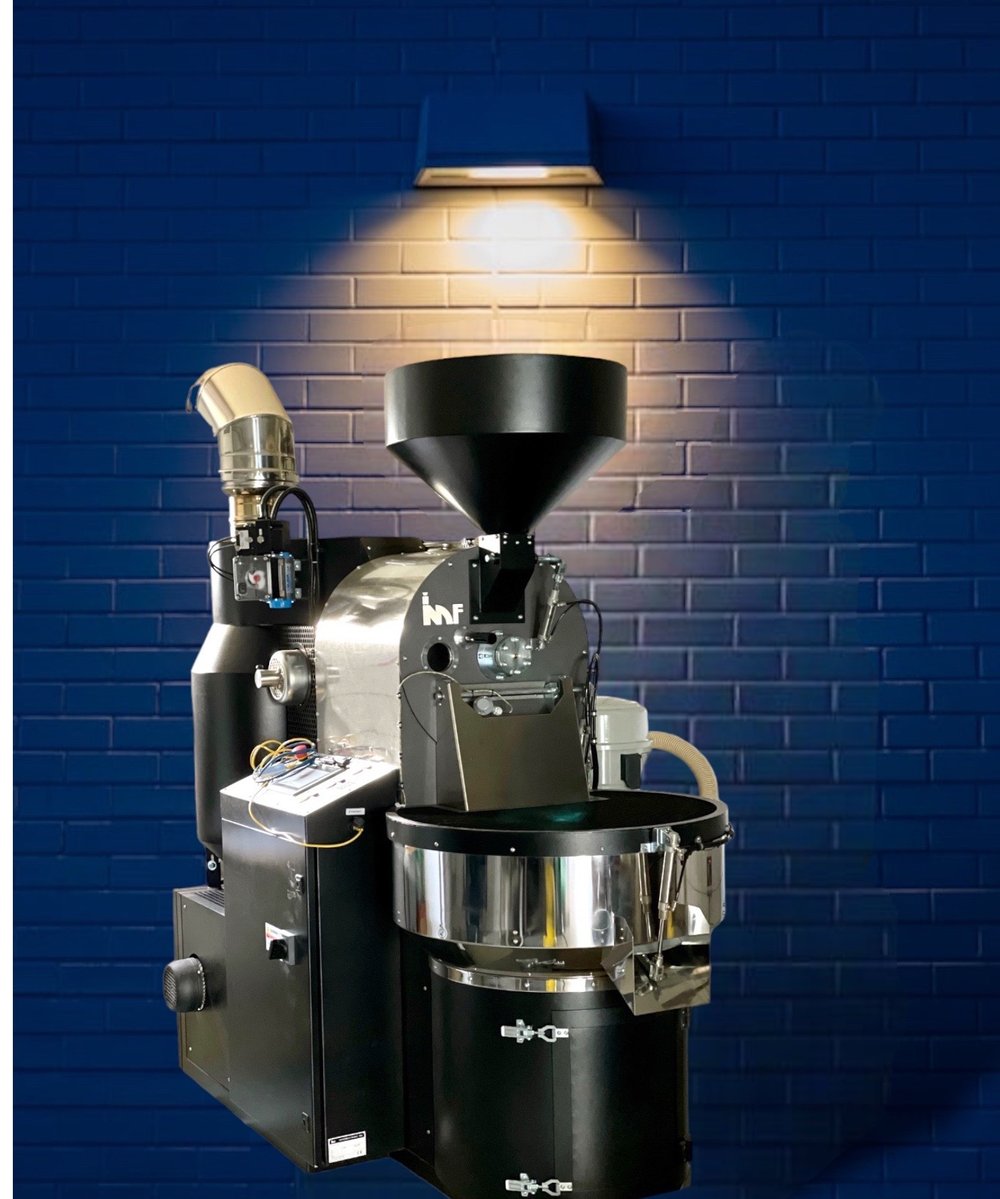
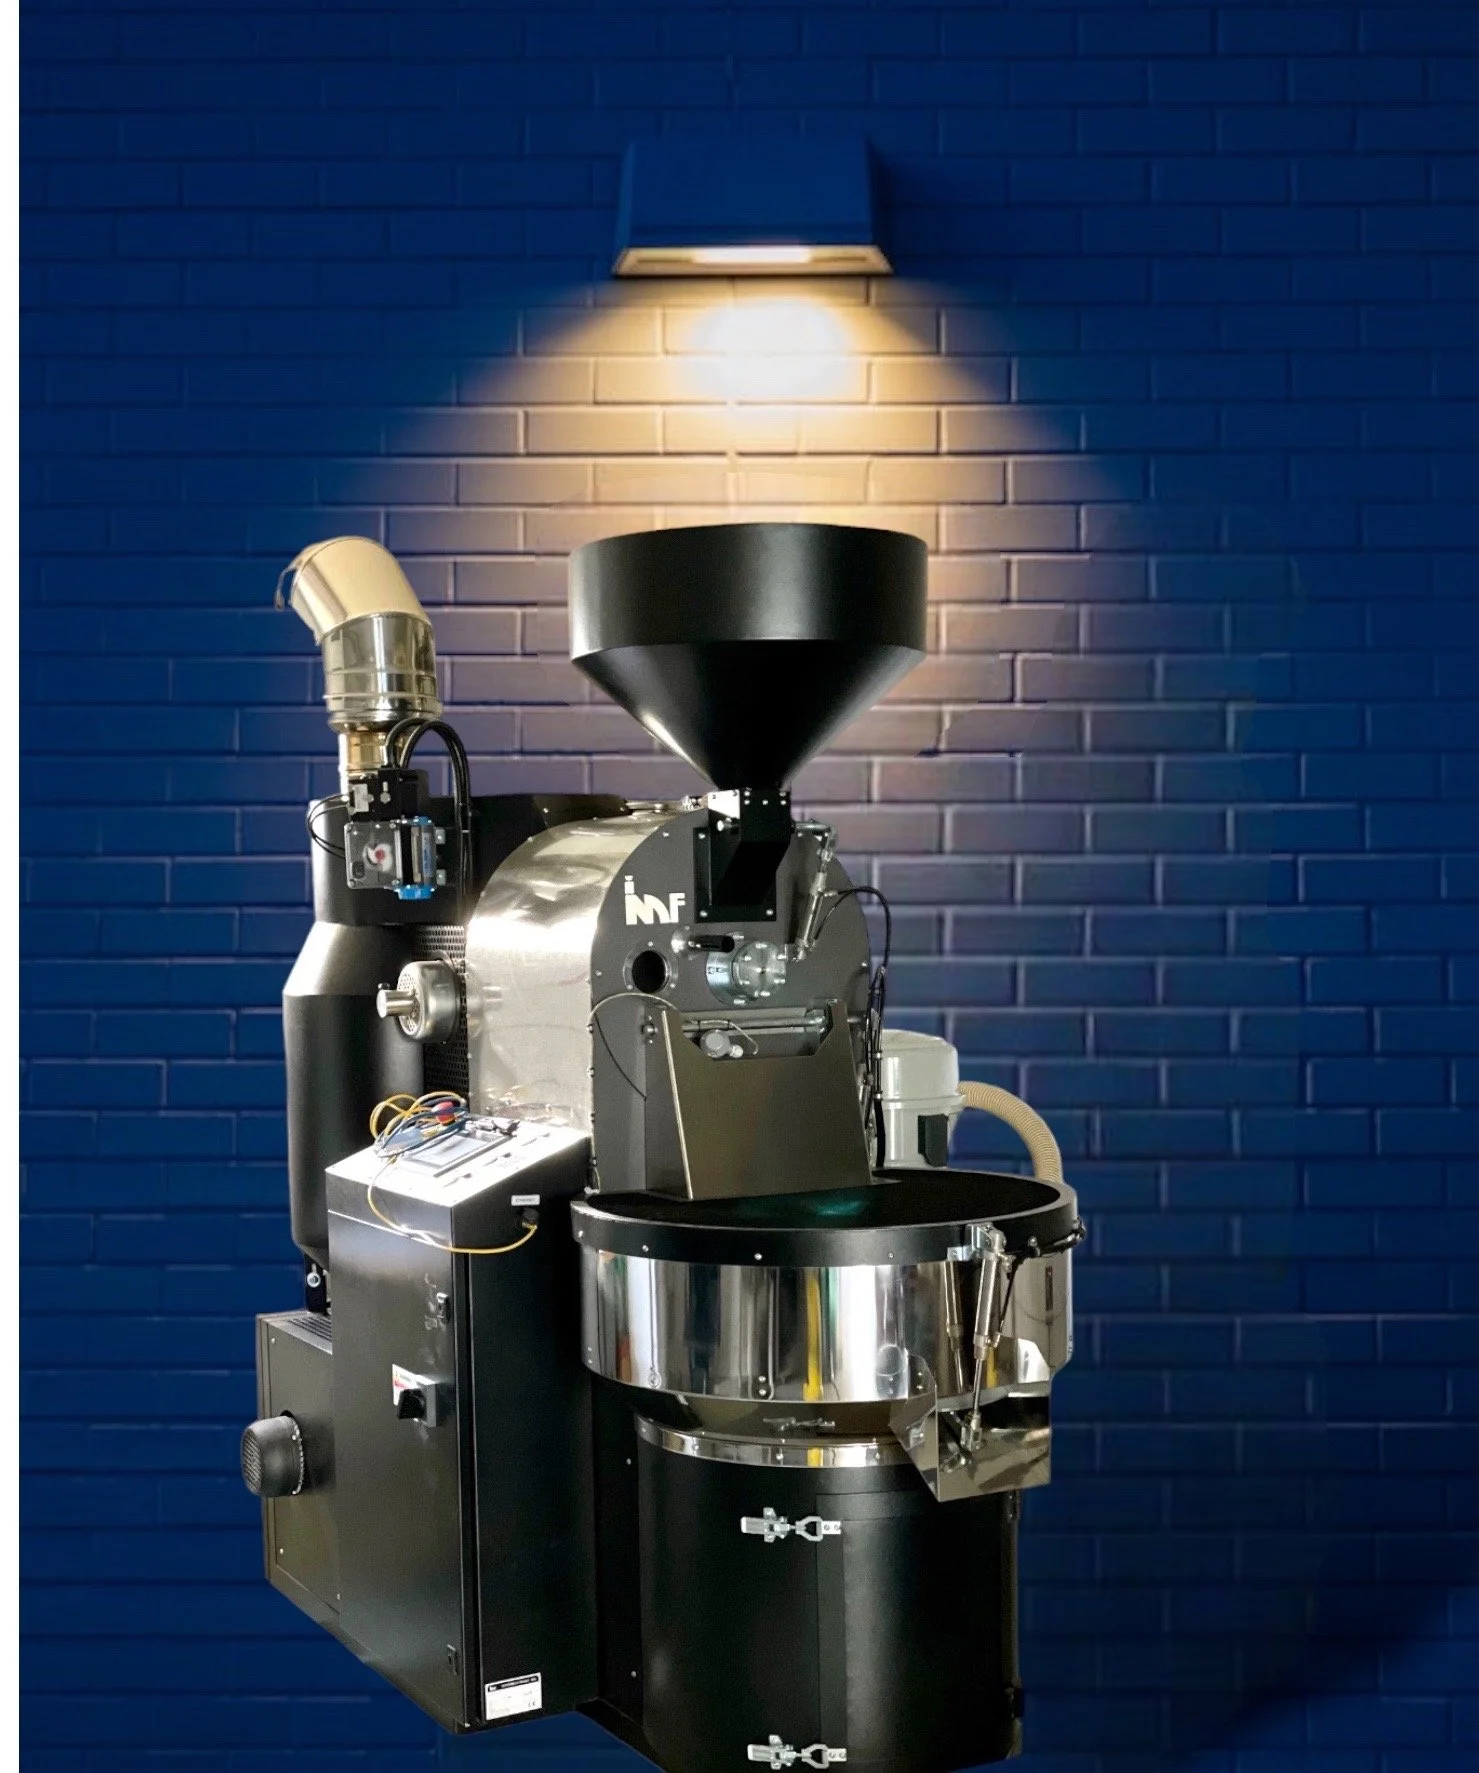
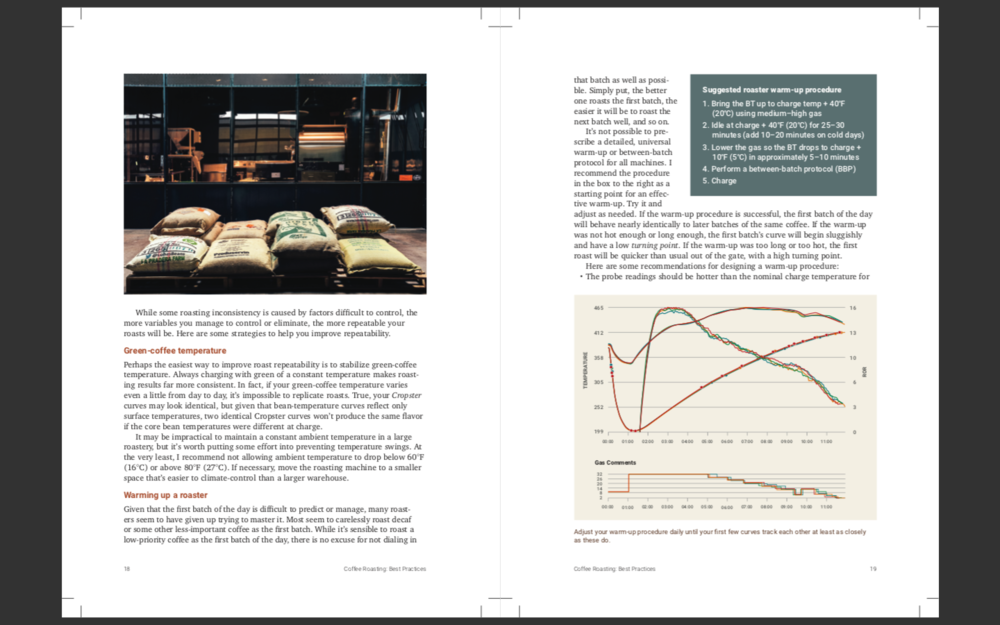
Inlet temperature is the temperature of the air entering the roasting chamber. Machines that can control roasts based on IT include IMF, Roest, Sivetz, Brambati, and many larger, industrial machines. The great advantage of IT control is it can mostly or completely neutralize the influence of changing ambient conditions. For example, when using IT/BT recipes (inlet temperature control with changes in IT based on bean-temperature setpoints), both our IMF and Roest machines will trace curves accurately, always staying within one second of the reference curve, whether our roastery’s ambient temperature is 15°C (50°F) or 25°C (76°F), assuming the same green-coffee temperature in each case.
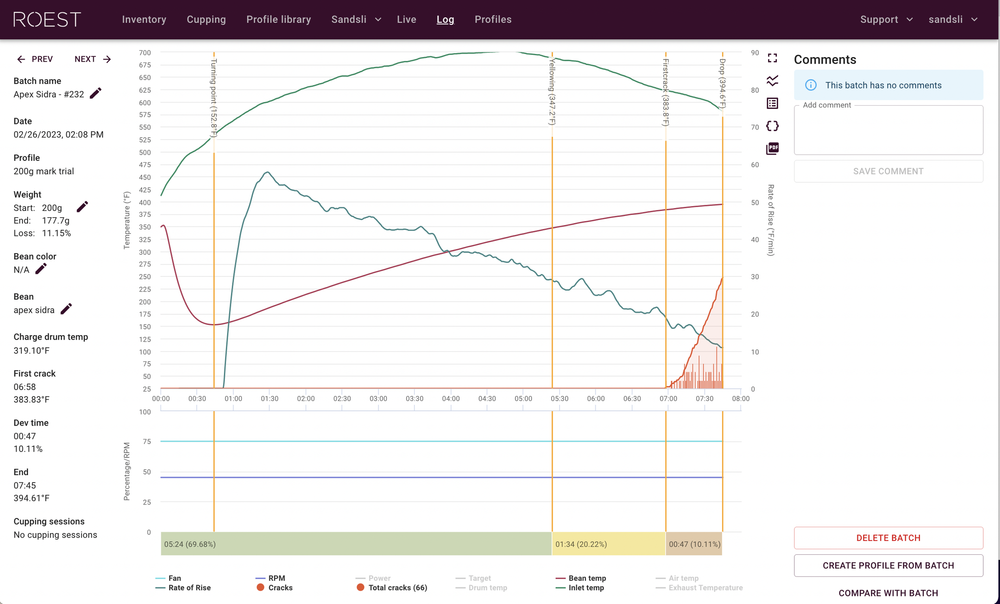
Here are five consecutive batches from yesterday's roasting session at Prodigal. A simple inlet-temperature recipe can yield impeccably consistent curves, roasting statistics, and cupping results.
EXHAUST-TEMPERATURE CONTROL
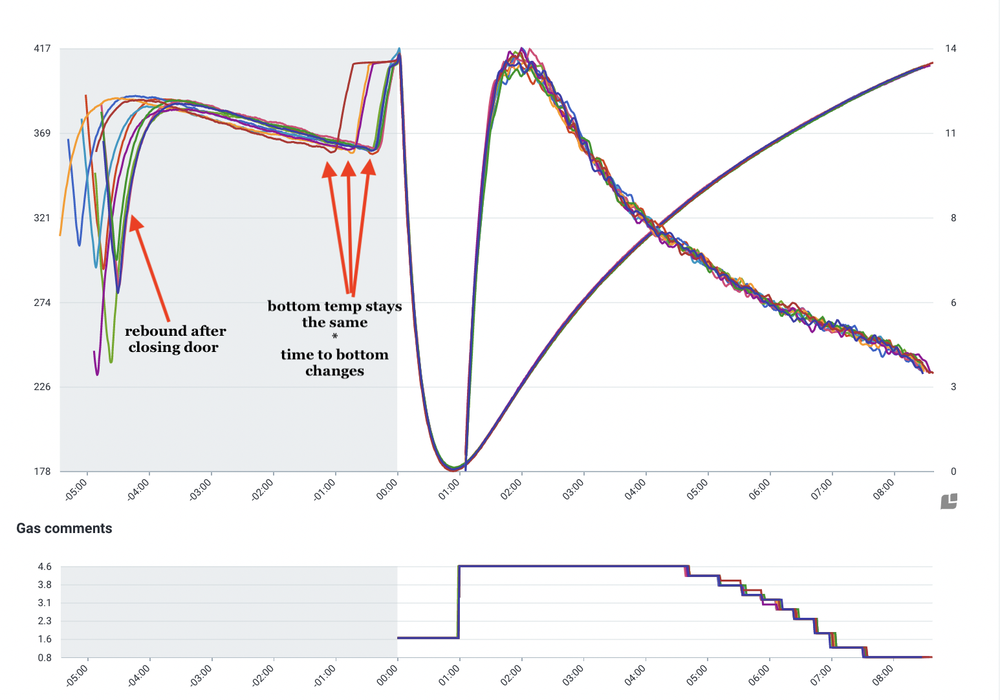
Managing roasts based on exhaust or environmental temperature is conceptually backwards. It is akin to driving by looking in the rear window of the car; it may work sometimes, but I wouldn’t trust it. This control system has been the standard on the Ikawa for a long time, it is an option on the Roest (that fewer and fewer people use), and it has been used in some third-party roast-automation software.
PID CURVE MANAGEMENT
PID Curve Management has potential, but no one has fully realized that potential yet. Kaffelogic and Loring’s “profile roasting” automation use PID curve management, and Artisan software can manage curves using a PID. The idea is the software will make countless small adjustments to the power settings in an attempt to replicate a reference bean-temperature or ROR curve.
PID control has a few challenges. For one, if a roast falls behind the reference-curve target, it is critical that the machine has ample “extra” power to quickly get back on track. In the case of the Loring automation, for example, if you see the machine stuck at either the lowest or highest power setting for more than a few seconds, it means the machine is struggling to match the reference curve. A second challenge is that the optimal PID settings change throughout a roast: ideally, one would want a very “aggressive” PID during the first minute or so of a roast, when temperature changes are rapid and dynamic, and a “mellower” PID mid-roast, before again needing an aggressive PID to manage the rapid changes in temperature and moisture release during and after first crack. A third challenge is how to deal with the (fake) declining BT readings at the start of a roast, since the BT reading is not accurate until after the turning point. There is no easy answer to how to program an automated PID system to manage a curve while the BT data is both inaccurate and also changing rapidly.
Here is an example from Loring's profile automation... note that the machine does not attempt to manage the curve until after the turning point. After the turn, the machine switches between full power and minimum power, as the machine can neither lower the power enough or raise it enough to track the reference curve.
I recently spent twelve days in Colombia. It was an unforgettable trip, full of learning, beautiful scenery, wonderful hospitality and new friends. I’d like to share a bit of my experience with you.
I visited Colombia at the urging of Diego Bermudez. Diego and became friends after having dinner together in San Francisco and Chicago, and we plan to work together on some future projects. After his numerous invitations to come to Colombia, I found time in May. Since I was visiting Colombia, I made plans to meet several farmers, mills, and exporters we work with at Prodigal.
Medellin
My first stop was Medellin, a dramatic, mountainous city of five million people. While in Medellin, I had the pleasure of visiting Nikolai and Manuela at their apartment and their mill/lab/roastery located on a coffee farm on the city fringe. After a delicious vegan breakfast, we visited the mill and lab, which are a five-minute walk from their apartment. Nikolai mills coffee in Medellin for several of Colombia’s best producers, including the famous Wilder Lazo. Nikolai and I had several cupping sessions, worked on sample-roast profiles on his Roest, and talked about ways to hack his Diedrich IR-12. We toured their small mill as well as the farm’s nursery. Nikolai’s operation is small, but laser focused on top-quality coffees.
On day two I visited Stephen at The Coffee Quest mill near the Medellin airport. The mill is fantastically clean and efficient. We cupped two dozen coffees, talked about their QC protocols, sample roasting, buying stations, and their systems for labelling and tracking coffees through the milling process. If you’ve tasted Prodigal’s Perlitas, Pradera, Finca Costa Rica, or Las Jazmines, they came from Coffee Quest. If I had to sum up Coffee Quest in a few words, they would be: efficient, systematic, and excellent value.
Cauca
On day three, I flew to the small airport at Cali to meet Diego and Matheus. Our first stop was Finca Betel, to meet Diego’s cousin César and his family. Mark and I already loved César for his exceptional coffees, his infinite friendliness, and his sunny outlook on life, so I was eager to meet César in person. Upon arrival at the farm, we were greeted by César, his friends, and his parents. I was urged to sit, and a plate of food immediately appeared. We spent hours in rapt conversation about life and coffee, we shared several cups of César’s clean, delicate, lactic-fermented natural Laurina, toured the farm and processing areas, and cupped several coffees. I felt like part of the family. The scenery at Betel is gorgeous: the farm is perched on a hillside overlooking Calima Lake. The covered, open-air living room of the house fostered vibrant conversation with expansive views. César has often told me he lives in paradise, and I agree.
After dinner, Matheus informed me we would spend the night at Betel. I was a little concerned, because Diego and Matheus had told me several times that protestors and guerrilla activity in Cauca often shut down all of the area roads. Given that the roads were currently open, it seemed prudent to drive to Diego’s farm that day. Sure enough, we woke up at Betel to the news that there were several protests and road closures in the area, we couldn’t go to Finca El Paraiso, and Diego could not go home. The protests grew quite extensive, so later that day we abandoned our plans to visit Paraiso. Our consolation prize was a blissful day at Betel, more touring, learning, and wonderful conversation, and finally a visit to the cafe César and Diego co-own in the town of Florida. The cafe was gorgeous, with a Stronghold roaster and a modern third-wave coffee bar, as well as waffles made from the local favorite “pan de bono,” which, happily, is gluten free. I had my first waffle in 20 years before heading to the airport to return to Medellin.
Clockwise: César with our coffees; Diego making our morning coffee; me with Matheus, Diego; cupping with legends; César explaining his drying oven; the view from above Finca Betel.
Medellin
I returned to Medellin for a few days and had some relaxed visits with Nikolai and Stephen as well as some new Colombian friends. I was disappointed to miss Finca El Paraiso, but enjoyed having a couple of free days in Medellin.
San Agustin
Next I flew to Pitalito with a stopover in Bogota, with a plan to meet Andrew and Wilson from Suited NYC in Pitalito. They would join me for the second half of the trip. Bogota airport was a little confusing, as it wasn’t clear which terminal I needed to fly from, or even which airline to check in with, as my flight was with Clic Air, a subsidiary of Avianca. The confusion cost me some time, and I decided to take a taxi between the terminals to save a few minutes. While in the taxi, I saw Andrew and Wilson on the sidewalk, also seemingly confused about where to go. I asked the taxi to stop, I yelled their names, and they hopped in the cab. I took the chance meeting as a sign of good fortune.
<< caption: Andrew and Wilson at Masaya
When we arrived in Pitalito, we were met by Adriana, co-founder of Inconexus. We stopped at an Argentinian steakhouse for lunch, and some musicians dropped in to play during the meal. After lunch we drove two hours down a dirt road to Finca Las Palmas, a gorgeous farm owned by Efren and Adriana Mora, that Prodigal purchased from in 2023. While rain poured down, we were treated to a tour of the drying patios, guardiola, and the farm’s coffee bar, where Efren roasted and brewed us a cup of his alcoholic-fermentation natural. We were blown away by the quality of green, the roasting, and the brewing, and i got a kick out of watching Andrew drink the coffee, his first in Colombia. I could tell he was wondering “does everyone in Colombia roast coffee so well?” Unfortunately not, but I experienced several impressive, delicate roasts at Las Palmas, Betel, and Nikolai’s lab. Most producers and exporters roast rather dark by modern standards, but it was encouraging to find so many people in Colombia roasting light.
The skies cleared as soon as we were ready to tour the farm, as it did every time we needed to go outside. I won’t say we influenced the weather, but a sort of Gabriel-Garcia Marquez magical realism followed us everywhere, whether it was perfectly-timed weather, our sense of time expanding and contracting, or just feeling like we were in a fantasyland. At Las Palmas we tasted our first grenadilla, my new favorite fruit, and guama, a giant pod with seeds encased in a pulp reminiscent of cotton candy. Personally, I loved that so many Colombian fruits had unexpected textures and very mild sweetness. Before we left, I gifted Efren a NextLevel Pulsar, we brewed one together, and we had yet more delicious coffee, alongside some unforgettable arepas fresh from the oven.
From Las Palmas we drove to Masaya, a fabulous accommodation perched on the edge of a canyon in San Agustin. Our hunger made dinner all the more special, and we spent the meal pestering Adriana with questions about Inconexus’ mission and work with farmers, and about coffee trading in Colombia. Bizarrely, the same musicians from lunch in Pitalito showed up to play at Masaya in San Agustin.
The next day, Adriana took us to five coffee farms she works with, beginning at Llanada, where Oscar Omer, a chemist who formerly worked in the yogurt industry, gave us a tour and graciously fielded my many questions about microbes and coffee fermentation. From Llanada we visited El Placer, owned by Pastor Odoñez, and Finca Filadelfia, owned by Ciceron and Alicia Rodriguez, who graciously served us lunch. Prodigal recently purchased some coffee from Filadelfia, and having met the wonderful people behind the coffee makes it even more special to offer it to our customers.
Adriana did a great job of showing us several farms that produced lovely coffee using different approaches. Some farmers were more scientific in their approach to fermentation and drying, others followed more traditional systems, and all proudly showed us their gorgeous farms and shared their life’s work. At the end of our day of farm tours, we stopped at the Inconexus warehouse in San Agustin. We were treated to some nicely roasted coffee (again!), a tour of their operations, and a cupping of about 15 coffees. The cupping generated some lively discussion about sample roasting, scoring, processing, and things we had seen that day. The Inconexus team was gracious and friendly, and I felt great about being their customer.
Clockwise: Enjoying the Finca Las Palmas family; drying patio; guardiola; enjoying a cup at Las Palmas, Pastor Odoñez and Adriana on Pastor’s rooftop drying patio; Adriana sniffing a fermentation barrel at Las Palmas;
San Adolfo
The next morning we said our goodbyes to Adriana and drove to San Adolfo to meet Nikolai and his photographer friend Carlos. After dropping our bags at a (coffee) farmstay owned by Victor, one of the most inspiring, friendly young people I’ve ever met, we drove to Wilder Lazo’s farms. After some hellos, we immediately jumped into the first of several cuppings in his lab. We spent the next two days touring Wilder’s farms, cupping every chance we could get, and discussing sample roasting, color measurement, and approaches to processing. We tasted some lovely coffees, including the uber-light Prodigal roast of his Lot 2 Geisha I had put on the cupping table. The most rewarding moment of the visit was when Wilder praised my roast of his coffee and asked how he could get that kind of flavor from his sample roaster.
Pitalito
We spent one night in Pitalito after leaving San Adolfo. Wilder and his wife Leidy joined us in Pitalito for a lovely sushi dinner, nonstop vibrant conversation, and the next day we cupped at the office of an exporter friend of Nikolai’s. While Pitalito is a modest city, what’s fascinating about it is the amount of coffee traded there. Pitalito is a hub where coffee farmers sell their harvests to middlemen, and it seemed half of the buildings in Pitalito were warehouses for green coffee in various states (cherry, parchment, green).
Such scenes led to many conversations with Andrew and Wilson about the realities of coffee trading, and how they contrast with the online and marketing myths about how coffee gets from farmers to consumers. Marketing materials and politicized online discussions about coffee production rely on over-simplified narratives. The reality is complicated, heterogeneous, and messy. Many blog posts on the subject will follow, I’m sure. Spoiler alert: choosing relatively pricey, specialty coffee is the only sustainable path for the industry.
Bogota
From Pitalito, Nikolai, Carlos, Andrew, Wilson, and I flew to Bogota for dinner al fresco at a delicious Italian restaurant. While I like rice, beans, and plantains as much as the next person, I welcomed a meal of salad and fish. The dinner conversation about what we had experienced and how the trip shaped our perspectives on coffee production was as vibrant as ever, and I’m grateful to have had their companionship on the trip. That night we all went our separate ways, with an unspoken acknowledgement that we had all just experienced something special together.
Takeaways
There is too much I want to say about the ways the trip to Colombia impacted me. The generosity, hospitality, and respect we received were humbling and heartwarming. Everywhere I went, I felt like family, and felt connected to people in a way that is often challenging to feel with new acquaintances in the US. Warmth, friendliness, conversation, a slower pace of life, and a shared love of coffee obliterated concerns for material wealth or modern conveniences. It’s impossible to care much about “first world problems” when sitting in the outdoor living room of wonderful new friends and drinking fabulous coffee produced in that place, by those lovely people, overlooking impossibly beautiful scenery.
Andrew and I often remarked to each other how the farmers we met seemed happy, healthy, and immensely satisfied with their lives and work. While there are indeed very poor people farming coffee in difficult circumstances around the world, there are also farmers who love their lives and their work, are experts at their craft, have wonderful, deep connections to family, community, and the land, and live in some of the most beautiful places in the world.
If, as Arthur Brooks posits, happiness derives from the three pillars of enjoyment, satisfaction, and meaning, then many of the people we met in Colombia have mastered Arthur’s formula. The enjoyment of shared experiences with tight family and community bonds, the satisfaction that can only come from hard work, and the sense of purpose and meaning farmers derive from their work with coffee, usually on land passed down several generations of their families, added up to a degree of happiness I don’t often see in richer, more modern countries.
Over the years, several friends who buy green coffee for a living have told me Colombia is their favorite country. I completely understand why.
The names “holiday blend” and “house blend” don’t exactly get the pulses of third-wave consumers racing. Blending has tremendous potential to mold or improve coffee flavor, but has an unfortunate reputation among many coffee lovers.
Compared to “single origin” offerings, most blends are made up of cheaper, darker roasts meant to be “accessible” and paired milk and sugar. None of this is a commentary on what one should like; to each his or her own. I’m sure some stellar light, interesting “house blends” exist.
“Everything is a blend”
At the farm level, cherry from various types of coffee trees may be blended and harvested together. At the dry mill, coffee in parchment or seed form, from numerous varieties or farms, may be blended at various steps to produce a lot with a single marketing name. A roaster may blend several coffees before or after roasting. A barista may combine multiple coffees to make a filter coffee or espresso. In a sense, almost everything is a blend, even coffees called “single origin.”
The purposes of blending
Blending at the roastery level can serve many purposes. Roasters may blend coffees to maintain a certain flavor profile year-round, to try to “hide” an aging or otherwise disappointing lot of green coffee, or to attempt to save money while achieving a consistent flavor profile. Paradoxically, blending may be the easiest and most impactful way to improve coffee flavor after roasting.
Blending can achieve an under-appreciated flavor synergy. One of the simplest ways to experience this is to blend a small amount of an intense, fruity natural coffee with a large amount of subtler washed coffee with lower-intensity fruit. While the natural coffee on its own may be too fruity or intense for some, it can spike the fruitiness of the blend just enough to create a “best of both worlds” effect. Blending can convert a “bug” into a “feature” by toning down its intensity. A roaster or barista may create almost any desired flavor profile through blending, but would likely struggle to achieve such flavor range if limited to using only one “single origin” coffee.
Not many roasters or baristas bother to blend expensive, high-scoring coffees. After all, those coffees tend to be beautiful as is. But blending can sometimes improve even those coffees. At the end of our daily cuppings at Prodigal, Mark and I often spoon various proportions of coffee from different cupping bowls to create impromptu blends. More often than not, we prefer some of the blends to any of the individual components. The rare exception is when we have a nearly flawless, balanced coffee that is so much better than any other coffee on the table that it is nearly impossible to improve that special coffee.
Pre-blend or post-blend?
I recommend post-roast blending over pre-roast blending. The problem with blending before roasting is that beans of differing sizes and processes will develop at different rates. Pre-blending often makes ROR curves easier to manage, but may result in some beans being underdeveloped or a little too dark while other beans are developed beautifully. Pre-blending is generally not a good idea except when blending coffees of similar size and processing type. There is some folklore in Italy that says if you blend the green coffee for a few days before roasting a pre-blend, the beans’ moisture contents will homogenize, making them roast more harmoniously. I cannot verify if such moisture migration occurs, but would still avoid pre-blending due to variations among blend components’ bean sizes and processes.
Roasting before blending allows a roaster to optimize the development of each blend component. Post-roast blending also allows the roaster or cupper to adjust blend ratios to optimize the roast batches on hand, which can be more effective than blending by formula if not all batches are on target.
“Solubility matching,” the idea that one should blend only coffees of similar solubility, was once all the rage. The idea was that if (for example) a 50/50 blend consisted of, say, one coffee that would extract to 24% and another at 20% (using a given set of brewing parameters), each component would extract at a compromised, suboptimal level. However, this idea was never fully valid; the end result in the cup is an approximation of how the coffees would taste if brewed separately and then combined. Likewise, when blending two coffees that produce different particle size distributions (PSDs), the blend’s (PSD) will be the weighted average of each component’s PSD.
How to Blend
There are no rules to blending, but I will offer a few recommendations:
☞Choose post-roast blending over pre-blending. Post-roast blending offers more control and makes it easier to optimize the roast of each blend component.
☞Use the spoon method: the best hack for deciding which coffees to blend, and in what ratios, is the spoon method:
Set up a cupping bowl of each blend component candidate
Label the bottom of several empty cupping bowls with various blend ratios (such as 1:1, 2:1, etc)
When the coffees are cool, spoon various ratios of coffee from each bowl into an empty cup. For example, if you take three spoonfuls from cup A, two from cup B, and one from cup C, that would represent a 3:2:1 blend of those coffees.
Make several such blends and have someone else shuffle the order of the cups
Taste the cups blindly to decide the optimal blend
☞Take chances. Try blends that don’t make sense or seem like they won’t work, and take the opportunity to think outside the box and learn about how coffees interact.
☞Avoid blends in which one component makes up less than 15% of the blend. Even with adequate mixing, the ratio of blend components in each small dose of coffee is likely to vary. For example, in the 3:2:1 blend above, component C is 16% of the blend. If you brew using 20g doses of the blend, C may make up 10% of some doses and 20% of other doses. If a blend component were to make up only 10% of the total blend, some doses would have just a few percent of that component, making that component’s contribution to flavor almost invisible.
Disclaimer: I’ve worked with Decent Espresso from the start, helping to plan and design the DE1. I may be biased, but everything in this post is factual.
Having a software background, John designed the DE1 to be “unfinished” and able to add new capabilities as we think of them. John expected researchers and coffee nerds to come up with “what if it did this?” ideas, and he wanted the machine to evolve with that discussion. If you buy a traditional espresso machine now, its capabilities will be identical in ten years. If you buy a DE1, its capabilities change and improve almost weekly.
Decent Espresso users have access to the Decent Diaspora, a private online forum. The forum is always friendly and civil, and the number of incredibly intelligent people there is impressive. The community has come up with countless new ideas about espresso and has helped improve the DE1 and our understanding of how to make great espresso. Many of the espresso innovations I mention in this post would not have been possible without the Diaspora brain trust.
In the early days, the DE1 was considered “unforgiving” by many. I didn’t mind, as the DE1’s ability to control shot parameters more than made up for its early challenges.
The DE1 brewing Filter3
I think the machine was considered unforgiving for a few reasons:
Most of our profiles used a slow preinfusion flow rate, whereas everyone else, except Slayer users, was using a faster fill.
The Decent’s graphs allowed us to see evidence of extraction problems we had not been able to see before.
High quality, budget grinders were rare at the time. The Niche Zero and other new grinders changed that, and helped make it easier to pull good shots.
Since that time, we’ve learned a lot about shower screens, water distribution, and headspace above the puck, and have redesigned several parts to take advantage of what we’ve learned. Our forthcoming shower screen is incredible for both espresso and filter3. Over the past nine years the hardware has become much quieter, gained steam pressure, and become easier to control without the tablet, via the grouphead controller. The hardware improvements are impressive, but frequent software upgrades are what has set the DE1 apart from any other machine.
During the first year I had a DE1, I created the allongé and blooming espresso profiles to improve the quality of espresso from light roasts. Allongé taught us that lighter roasts taste better with faster flow rates, and has produced some of the most fruit-forward coffee I’ve ever tasted. Blooming taught us that the extraction “ceiling” is indeed above 30% EY, and that extremely high extractions can produce beautiful flavors with the right coffees. I haven’t uttered the phrase “overextraction” since creating the blooming espresso; it proved that harsh flavors do not in fact come from high extraction levels, but from channels. Jonathan Gagné has hypothesized that channels yield astringency and bitterness not because of high extractions along channels, but because channels allow larger, astringent particles an easier path out of the coffee bed and into the cup.
Allongé and Blooming, while quite different, share something in common: they both make espresso from light roasts less sour and bitter, and more balanced. A traditional espresso extraction removess more material from the upper layers of the puck, and at higher temperatures, than from the bottom of the puck. Allongé increases extraction and temperature at the bottom of the puck by running a large volume of water through the puck. Blooming increases extraction and temperature at the bottom of the puck via a 30-second bloom that homogenizes temperatures and extraction throughout the puck. Blooming arguably offers a more even espresso extraction than any other profile or machine can.
We learned that the most effective preinfusion may include a shift from high flow to low flow with a modest pressure buildup. We have found a slow pressure ramp after preinfusion, similar to that of some manual levers, helps compensate for imperfect puck prep. Jonathan Gagné came up with an “adaptive” profile that holds flow rate at whatever it was at a shot’s pressure peak. In the case of a grind setting being poorly “dialed in”, the adaptive profile optimizes the flow rate for the current grind setting.
The Decent community has come up with various ‘failsafe” ideas that prevent bad shots. For example, if the grind is too fine, rather than a shot choking and being destined for the sink, one can program the DE1 to limit the pressure and maintain a reasonable flow rate. Flow profiles have some ability to “heal” channels by decreasing pump pressure when the machine senses an increase in flow rate.
More recently, I have turned the DE1 into the world’s best single-cup filter-coffee machine. The Filter3 basket offers a “no bypass” brew with control over flow and temperature, and is one of the few single-cup brewers that offers appropriate bed depth with a 20g dose. Anyone who tasted Filter3 from the Prodigal booth at SCA Expo can vouch for its excellent, hands-free extraction quality.
Later this year, Decent will release its beautiful new machine, the Bengle, with some impressive new features, as well as a clever new shower screen that improves water distribution and prevents water from merging into a small number of streams.
Stay tuned, things are always evolving and improving.
I’d like to share a brief overview of the quality-control protocols we use at Prodigal. I think you’ll find them interesting, and probably a little extreme. We take great pains to buy and roast the most delicious coffee we can, and admittedly, some of these efforts make us less, not more, profitable. Hopefully that will change with time if the market comes to value things like quaker sorting and buying from a roaster able to replicate flavor batch after batch.
Note: I have not been paid, and will not be paid, by manufactureres of any of these equipment I mention in this post.
Some of our most costly QC protocols include:
We go to great pains to purchase almost exclusively coffees processed within the past month. The limitations and costs associated with choosing only recently processed coffees, and getting them to Prodigal in a matter of days or weeks, and not months, are extreme.
We remove quakers to improve cup quality, but is painfully expensive. So far, the market hasn’t rewarded that effort, but we sleep better at night knowing that we have a lower percentage of quakers in our bags than any other roaster. Some of the tedious “knee-jerk moral outrage” crowd online is “offended” by our intense quaker sorting. Any consumer reading that nonsense will think “I guess those roasters sell coffee with a lot of quakers,” so I welcome their complaining. We wouldn’t be a target if we weren’t doing something special. We want to raise the bar in every way we can.
For a given coffee we have a ground-coffee color-range tolerance of four points, an accepted weight-loss range of +/-0.2%, and a cup-score floor of 87.5 points. Any batch that doesn’t meet those standards goes in our heavily discounted “first batch” offering. Selling First Batch kills our margins, but it allows us to sleep well at night, and it absolutely thrills customers who can’t quite afford to pay full retail for lovely coffee. There are times when we spend a small fortune on green coffee and the arrival coffee is below 87.5 points. That can be very costly, as we have to find a way to sell that green rather than roast it and put it in a Prodigal bag.
Green Buying
Green buying is the most challenging and time-consuming part of running our roastery. We roast dozens of samples each week, often repeating a sample roast if the first attempt did not land in our desired ranges for ground color and weight loss.
We measure the moisture content of each green sample before roasting, using the Agratronix Coffee Tester. It’s probably not the most accurate moisture meter on the market (it seems to read a bit high), but it’s consistent enough to be reliable and useful. We roast samples in the Roest L100 Plus. (Disclaimer: I have a small financial interest in Roest.) Immediately after roasting, we calculate weight loss, and measure color using the DiFluid Omni. The Omni is consistent and wastes only 3—5 grams of coffee per ground-color reading. We are currently testing a beta version of the DiFluid Omix, which has exciting potential as an all-in-one color/moisture/density/screen size/water activity meter. We have yet to test its accuracy against other devices. If the weight loss or color of a sample is not within our target range, we will immediately re-roast that coffee. We save weight loss and color data in the Roest software.
The next morning we cup our sample roasts blindly, often with production roasts and samples from other roasters on the table. We remove quakers from each cupping bowl and for any coffee we record the percentage of quakers by weight of any coffee we are considering for purchase.
We carefully manage our water chemistry and weigh both the water and beans in the cupping bowls. We break the crust at 4:00 and begin slurping at around 13:00. We take copious notes on each coffee and score them before discussing our findings. We debate the merits of various cups. After this we reveal the coffees, take notes, and discuss further. We cup an average of 125 bowls every week.
We will often re-cup a coffee if we missed a substantial quaker and tasted its influence in a cup. We re-cup any coffees we consider potential buys, if we scored the coffee 87.5 or higher, or we think the coffee may have 87.5+ potential if we change something in our processes. We will often brew potential purchases as Filter3 to get a different impression of its flavor.
We pass on some coffees that are 87.5. Reasons for passing can include price, funky flavors, various types of risks, and marketability. We’re not price sensitive, but we don’t accept when a supplier asks for double the price of better alternatives. While better coffees tend to cost more overall, some fantastic green is a relative bargain, and some mediocre green costs double or triple what better alternatives do. A few middlemen buy green, mark up the price fabulously, and wait to see who bites. We’ve seen a few lots offered by various middlemen at wildly different prices. Cost of production, politics, logistics hurdles, and government policies all contribute to what sometimes seems like irrational pricing. The quaint notion many people have of a farmer asking X price, and then shipping coffee directly to a roaster exists; we have and love those relationships, but they are not the norm, especially not with certain origins or larger-production lots. We try to have as many such direct relationships as we can, but the laws and logistics in some countries make such simple, direct, transparent transactions challenging or impossible. Thankfully, technology is bringing farmers and roasters closer together in many ways, and we love being able to wire money directly to farmers when possible.
Risk Management
Not a day goes by that we don’t discuss risk at the roastery. Risk can take many forms, and without good risk management, I don’t think any producer, middleman, or roastery can survive. One risk we learned about the hard way last year was the risk that sample material had been prepared to a much higher standard than the arrival coffee. This is a common practice that somehow never favors the roaster, and undermines trust, which ultimately holds down prices and inhibits productive relationships. Anything that promotes transparency, security, and trust paves the way for potentially higher prices, in any industry. Think about this: every rich country in the world is what economists call “high trust” and every poor country is “low trust.” There may be some chicken and egg in the dynamic, but no one can argue against honest, open practices that promote trust.
There are many other sources of risk to a roastery: will a coffee degrade during transit? Will coffee take far longer than expected to arrive? Will a roaster purchase too much green and watch it age, not knowing how to sell it? Will a key account go to a competitor, causing a roaster to get stuck with extra, expensive, unsellable, aging inventory and negative cash flow? Will a coffee fade prematurely or taste baggy soon? Will a coffee simply not sound appealing to customers? Will a roastery run out of cash because it has too much money tied up in green inventory and contracts? I am not in any way downplaying the risks farmer face; those are massive and almost unthinkable. But that doesn’t change the fact that many roasters and green importers have gone out of business due to being long on expensive green or receiving low-quality, unsellable green.
We have had coffees arrive with so many quakers that we had to sort 40% of the material in order for the coffee to meet our quality standards. (The samples were somehow almost completely free of quakers.) Obviously, that was not a profitable purchase. We have had coffees we could not sell because they arrived with fade. One coffee was beloved among customers, but we began noticing fade in about 1 of 5 cups, so we reluctantly yanked it from the menu.
In 2023, we purchased five dud coffees. None of those coffees reached our menu. Since our business model calls for an extremely high standard for green coffee, when green coffee arrives below our standard, we need to sell it to someone else. Thankfully, we’ve always found a new home for green coffee we didn’t want to keep.
We store our green in airtight bags in a refrigerated and humidified room. We monitor green for changes in moisture content over the weeks we store the coffee. We store a very small amount of exceptional green in vacuum-sealed bags in a freezer. Cold storage temperatures retard aging and decrease a major source of risk at a roastery.
We buy relatively modest amounts of each coffee we purchase. Not a day goes by that I don’t have Ryan Brown in my head, telling me it is better to buy too little green than too much.
As Ryan wrote in Dear Coffee Buyer: “It takes mere days to buy a quality coffee when necessary (call your importer, ask for samples, cup them, approve the best—or the least-awful—and ship it to your roastery), but it can take up to a dozen months to roast it all. Because of this, it is much easier to correct an underbought situation than to correct an overbought situation.”
I may have taken Ryan’s admonition to an extreme, but I’d rather run out of coffee at Prodigal than ever sell something that tastes a little aged.
So far, we have purchased very few coffees based on preship samples (PSS) or contracts for future harvests. At some point as we grow, we will have to increase our time horizon and risk tolerance. Our tiny size has allowed us to avoid that until now. New businesses are inherently risky; we were bound to make many errors in our first year, and we did. We bought bags that needed replacing. We bought an unusable optical sorter. We ran out of money a couple of times. We bought five dud coffees. We got screwed for $25,000 by a supplier who pulled a bait-and-switch with some green, and then spent five weeks avoiding our messages. Live and learn. Once we grow and feel more secure in our purchasing relationships, we’ll be able to shoulder more risk. Had we taken the amount of risk in year one that most roasters take in an average year, we would have had to change our business model or go out of business. Being a niche roaster without a retail cafe business or a large, not-so-picky wholesale account, we don’t have the usual outlets roasters use for their mistakes (cheap blends, iced coffee, etc).
No one says this out loud, but every roastery has a fair number of subpar green purchases each year, and they either sell the coffee as-is and hope customers don’t notice the low quality, or they hide it in a blend.
We are irrelevant in the market
For those who think it’s “wrong” to have high standards for green, remember: every quality roaster rejects more than 90% of the samples they cup. Unlike most companies, we do not buy green based on price. We prefer to pay high prices for extraordinary coffees. And there will always be a home for those 87-point coffees we reject; it’s not like we are the only possible buyer, or even an important buyer. Any supplier holding an 87-point coffee possesses something relatively easy to sell.
We take our responsibilities to our suppliers and our customers seriously. We pay perhaps the highest average green prices of any roaster in the world (>$10/lb FOB in 2023), we deliver it to customers who expect consistently flawless results, and we always offer a money-back guarantee.
We are small, and do not have a material impact on the market. Our best chance of having an impact is to spend lavishly on green, to put pressure on competitors to follow suit. A few times over the years (before Prodigal) I was accused on social media of influencing green prices. Such absurd accusations indicate many people don’t realize the size of the green market. Saying I can move green prices is like saying a single EV driver can influence petrol prices. If you were to make a list of the 1,000 people in the world who most influence green prices, I would not be on that list. If you think otherwise, please get out of your bubble and read some statistics about the $40,000,000,000 per year green-coffee market. (As an aside, about 10 years ago I visited an Italian roastery that almost no one outside of Italy has heard of. At that time, the roastery produced as much coffee per week as *all* US-based third-wave roasters combined. That roastery could have swallowed the combined production of Intelligentsia, Stumptown, Counter Culture, Blue Bottle, and Onyx without getting indigestion.)
From sample roasting to production roasting
While one cannot transfer settings or temperatures from a sample roaster to a production roaster, we use sample roasting to inform how to approach a new coffee in the IMF. We roast each arrival coffee 5—8 times in the Roest and cup those samples blindly to decide our production-roast targets for color and weight loss, and we note any unusual behavior a coffee displays in the sample roaster. We could not use this prediction system with most sample roasters, but the excellent control and data collection provided by the Roest make it possible.
Once we have chosen a profile and targets for our first production roast, we roast it in the IMF, with predictions for development time, roast duration, weight loss, and color. We rarely miss our targets by more than a trivial amount in our first production roast. After measuring color and weight loss of a roast, we may adjust our time targets and/or recipe in the IMF for subsequent batches. After our first batch of a coffee, we expect to be within +-0.1% of our weight loss target and +/-2 points of our color target on every subsequent batch. If we have any concerns, we brew a Filter3 or pour a cupping bowl of a batch right out of the roaster. Such rapid sampling isn’t ideal, but it is usually enough inform us of how to improve a coffee.
All batches that do not quite meet our standards get blended and sold as “First Batch.” If something were ever uncomfortably off-spec, we would sell it as grinder-seasoning beans. First Batch is frankly pretty good, and an incredible bargain.
Sorting
We run all roasted coffee through the MINI-125 optical sorter from Coffee Machines Sale.
We choose sorting weight loss by cupping several different sort levels. This process is time consuming and expensive, but our goal is to maximize cup score relative to cost by removing quakers. Quakers contribute astringency, vegetal, peanutty, and often stale flavors to coffee. They are difficult to avoid, and we do not want them in the coffee we sell.
Very few specialty roasters sort quakers, and none to my knowledge sort the percentage of quakers we do. We average 20% sort loss on most coffees, but have gone as high as 40% weight loss to ensure the result cups at 87.5 or higher in blind cuppings.
Quakers and odds and ends get bagged and sold as grinder-seasoning beans. We waste nothing.
Bagging
We bag coffee using aDupre Simplex 1H3L weigh and fill. It’s fast and accurate to within one gram. We use a continuous band sealer, DS770, also from Dupre.
Production Cupping
The morning after production roasting, we cup every batch from the previous roast day. We skip cupping perfectly replicated batches. In other words, if three batches of a coffee all roasted in 8:31 with a weight loss of 11.1%, identical ground colors, and identical curves, we only cup one of the three batches. Our tolerances are such that almost all batches of a coffee are indistinguishable.
We save a sample of every production roast and attempt to re-cup the coffee after one, two, three, and four weeks, in order to taste the coffee as it rests and matures. We find our coffees taste best between 3–5 weeks off roast, which is why we sell several “rested’ offerings on our site. The rested coffees are popular, but really should be far more popular. We often get messages from customers who say “I finally waited four weeks to open a bag, and I wish I had been doing that all along.”
When we started Prodigal, I took a leap of faith on an optical sorter from Alibaba. I don’t think I have to tell you the rest of that story 🤕. After Mark spent months on Whatsapp with the manufacturer, only to realize the manufacturer didn’t really understand how to use the sorter for coffee, we gave up. The machine was simply too difficult to program.
Immediately after that, I had the fortune of running into Kacper from Coffee Machines Sale at World of Coffee in Athens. Kacper pulled me to the CMS booth, telling me I’d like what he was about to show me, and that he was going to give me an optical sorter. I was intrigued.
Kacper demonstrated an optical sorter with a machine-learning (AI, if you will) programming system. He passed a “too dark” sample of beans in front of the sensors, pressed a few buttons, and repeated the process with samples that were “just right” and “too light.” Let’s call it the Goldilocks program. The machine sorted the beans by color pretty well, and a few weeks later, Mark and I were the proud owners of a new optical sorter. Unlike the Alibaba seller, Kacper actually knew how to use the machine and coach us in its use.
I know several roasters who have purchased a very expensive, popular sorter, only to have a technician spend TWO TO FIVE DAYS at their roastery programming the sorter. Let’s face it, if an expert — who spends all of his time programming sorters — requires 2–5 days to program a machine, the customer has little chance of mastering such a machine anytime soon. Kacper set us up remotely in less than two hours on Facetime.
For those new to sorting, please understand that even with a good set of foundational recipes, the user still needs to be skilled at programming the sorter for new coffees. There is no such thing as “set it and forget it” recipes if you want the sorter to remove quakers with any precision.
Kacper told me “I know if you use this machine, you’ll love it. And if you use it and love it, others will buy it.” I told him I would promise nothing, because I can’t promote something I don’t believe in; my reputation is worth a lot more than a $14,000 machine.
Kacper was right, the machine is excellent, and he saved me from blowing $30,000 on a machine I would have found frustrating to use. I had no obligation to write this post, other than to pay a debt of gratitude to Kacper and CMS since the machine has been incredible for us. Paolo and I have since purchased a sorter (not free) for Regalia and Multimodal, and I’ve recommended the machine to several clients.
Let’s discuss some details about sorting, as I think it is both more complicated and more important than most roasters realize.
Sorting is not easy
As the examples of Alibaba and 2–5 day of initial programming show, sorting is not simple. The machine-learning system is by far the easiest I have seen. Programming a machine by showing it the actual beans to be sorted makes a heck of a lot more sense than trying to learn a complicated system of adjusting front and back cameras, red, green, and blue color settings, throughput speed, and an ultra-confusing bean-size setting I can not put into words.
What, exactly are we sorting?
In a word, filberts*, but you may know them as quakers. The historical industry standard for a quaker is the obvious, yellowish bean that at a glance stands out in bucket of roasted coffee. If you have never brewed a cup of pure quakers, please collect some, grind them into a cupping bowl, and add that bowl to a blind cupping. You’ll know when you get to that cup🤢. You will learn a lot in that first slurp. And, I’m sorry.
[*At Thanksgiving dinner last year, I was hand sorting quakers before brewing a pot of coffee. My friend Sharon asked me why I was removing those beans. I explained they were “quakers” and they tasted like peanuts. The next morning Sharon had forgotten the name of those beans, and when I served her coffee, she asked me if I had removed the “filberts.” 😜]
Those yellow quakers are awful. But what about all of those smoother and lighter-colored brown beans? Turns out those are quakers, too. Let’s call those pseudo-quakers for now, or filberts, if you wish.
Not sure if a bean is a pseudo-quaker? Take a potential quaker, smash it on the counter, and smell the crushed bean. If it smells like peanut, it’s a pseudo-quaker. If it smells like fruit and flowers, you just removed what was probably one of the best beans in the bucket. There is risk in over-sorting lighter-colored beans.
In the photo below, traditional quakers are circled in white, and the red circles represent pseudo-quakers. Please note I circled only a few representative quakers of each kind. I did not attempt to circle all of them.
Below: traditional quakers in green, pseudo-quakers in purple.
Two years ago I embarked on a mission with Mark to train ourselves to detect quakers. We would sort all quakers out of a sample of coffee and portion that sample into several cupping bowls. One bowl would be unsorted, one would have zero pseudo-quakers (fully sorted), and we would add one, two, or three quakers to other bowls. Then we’d scatter those bowls on a cupping table with several other coffees, taste blindly, and score.
After a few such sessions we got pretty good at detecting pseudo-quakers. Perhaps a little too good, because we now have difficulty enjoying unsorted coffees.
What are quakers?
Quakers are immature coffee seeds. They can be the result of subpar plant health or nutrition, or picking underripe cherry. Quakers less dense and contain less sugar, protein, and starches than mature seeds do. As a result, quakers brown slower than mature seeds during roasting. Quakers can be difficult to identify and sort in green coffee, but are more obvious after roasting.
Producers can minimize quaker content by supplying coffee trees with adequate nutrition (starting with great soil health), picking only ripe cherry, and floating the cherries. It is far more efficient and affordable for producers to invest in preventing quakers than it is for roasters to remove quakers through sorting.
How quakers affect cup quality
How do quakers affect a cup of coffee? Have you ever described a coffee, perhaps from Brazil, as nutty? Quakers. Experienced an astringent cupping bowl? Quakers. Does a coffee have early onset of fade or baggy flavors in some cups but not all? Quakers. Quakers tend to be astringent, bitter, peanutty, and often grassy, grainy, or vegetal, depending on development level.
It’s difficult to quantify the impact of quakers on cup quality, but I’d estimate that if a cupping bowl contains one yellow quaker, the score will drop about one point. If 10—40% of a sample is pseudo-quakers (by weight), cup score will drop by 1/4—3/4 points. While the various industry scoring systems offer guidance for scoring quakers, not all quakers are created equal. Some quakers are barely noticeable in the cup, others single-handedly destroy an entire cup.
Quakers are not necessarily all bad. After all, people are used to tasting quakery coffee, and a bit of quaker-peanut flavor in an espresso blend meant for milk drinks may work well.
How many quakers are in coffee?
After becoming human quaker detectors, we naturally decided to sort as many quakers as possible from our coffee. Until that time, we never quite realized how many quakers of both types were in coffee. Average top-ten coffee from a recent COE competition? 15% quakers. Typical 87-point natural Ethiopian? 40% quakers — on a good day. Average 83-point, mechanically harvested “blender” from Brazil? It would be easier to count the non-quakers.
Last year we purchased two very expensive coffees from a well-known Colombian producer. The arrival coffees were so quaker-riddled that we had to sort and remove 40% of the coffees’ weight in order to bring the quality up to Prodigal’s standards. Needless to say, the pre-ship sample had hardly any quakers. This is a common bait-and-switch: provide a roaster with a perfectly sorted sample, hook them, and then ship an unsorted or poorly sorted version of the same coffee. It’s as if I you bought a new Toyota Corolla from me, but I deliver you a used car and tell you “but it’s still the Toyota Corolla.”
If a roaster does not use an optical sorter, the most frequent cupping note on your score sheet should literally be “peanut.” If you’re not noting peanut more than half the time in your cuppings, it means your brain is so used to associating peanut flavor with coffee that it is filtering out the peanut.
I’m sure many readers don’t believe that. But think about this: how often do you note “bitter” in cuppings? Probably not often. Yet every cup of coffee is bitter. Remember your very first cup of coffee? Bitter, right? So how did bitter go from the most prominent flavor you noticed to something you rarely notice? Simply put, if something is always present, your brain learns to partially ignore it.
As the bar for clean coffee gets raised over time, more roasters will sort their coffee. Once third-wave coffee drinkers get used to well-sorted coffee, serving peanut-flavored coffee will not go unnoticed.
I challenge the reader to try the quaker-detection training mentioned above a few times of over the course of a couple of weeks. Then, buy some Prodigal and a coffee of the same origin and process from some other third-wave roaster that doesn’t sort. Cup them blindly. Look for the peanut contrast. Once you learn to see it, you cannot unsee it.
How much should you sort?
Heavy sorting is expensive. We fight a daily battle to decide the appropriate amount of sorting for each coffee. We hand-sort sample roasts to what we consider a reasonable standard that our optical sorter can easily achieve. If we didn’t sort sample roasts, we’d probably reject far too many coffees, given our quaker sensitivity. But if we sort sample roasts too perfectly, they may achieve cup quality we can’t replicate with the arrival coffee. If you have an optical sorter and sort out 2%-5% by weight of each coffee, you’ll probably remove almost all of the worst quakers, but leave a fair amount of pseudo-quakers in coffees, and the peanut flavor will still be apparent. We sort to a much higher standard than that, but try to avoid extremely high sorting losses where the cost far exceeds the gains in cup quality. There are times when cup-quality improvements are more affordable via sorting, and times when one can purchase better cup quality more affordably by simply buying better green.
Do you have experience with sorting, or are you curious about it? Please feel free to leave a comment.
Each week at Prodigal we get a few messages along the lines of “how should I brew x coffee?” These messages imply some confusion about coffee brewing. I receive many messages about roasting with a similar implication.
If you have several non-defective coffees, all roasted to similar degrees, there is no need to change anything other than the grind setting when brewing each coffee. If you spend time on internet forums, you’ll read countless posts by people who believe they need a wildly different approach to optimize different coffees.
In the days before the coffee refractometer, it was common to see baristas require 40-60 minutes to dial in a coffee each morning. For reasons I don’t understand, many baristas felt compelled to adjust dose, temperature, ratio, and shot time each day, despite always using coffee of a similar roast level, and sometimes the exact same coffee, each day. The coffee refractometer was instrumental in teaching baristas how various brewing parameters affected extraction level, and that in turn helped baristas narrow down what ranges they preferred for each parameter. (Side note: choices that increase extraction levels often tend to be better, but that doesn’t mean higher extraction levels are always better.)
With time, baristas realized one could find a reasonable temperature, dose, and ratio, set those parameters as constants, and adjust only the grind when switching coffees. Working with only one variable is infinitely easier than attempting to juggle several variables. Did such a system guarantee an endless succession of God Shots? No. But limiting the number of variables one adjusted when brewing a variety of coffees made it far easier to deliver consistently good results.
Taste and judgement always play a critical role in producing great coffee, but without a system to deliver somewhat predictable and consistent results, it is simply too difficult to dial in a coffee efficiently.
I recommend finding a sensible, successful foundational recipe and sticking with it for all coffees of a given roast level, adjusting only the grind when changing coffees. This applies to espresso and various types of filter brewing. Possible exceptions include Ethiopian coffees and decafs that produce exceptional amounts of fines; these may require down-dosing if you cannot grind coarse enough to prevent choked brews.
As in roasting, there are no points awarded for difficulty. Coffee is complex; choosing reasonable, fixed values for most parameters and limiting the number of variables one must adjust is the key to simplifying the process in order to yield consistently good, predictable results.
Going back to the messages we receive at Prodigal, there is no special way to brew Prodigal coffee. Our coffees brew just as other lightly roasted, non-defective coffees do. If a roaster recommends a wide variety of approaches for its menu of light roasts, they either haven’t found fundamentally sound brewing recipes, or they are trying to mitigate unpleasant flavors. For example, one may want to grind coarser, use lower-temperature water, or target lower extraction levels to minimize certain defective flavors.
When asked, we offer some best practices for brewing.
Good general filter brewing practices include:
Try to find filtered or bottled water with alkalinity (KH, or bicarbonate) of 30-50 ppm, or add minerals to distilled water to make your own. General hardness (GH) is less important, and anywhere in the range of 30-100ppm should be fine. For reference, our roastery water has 45ppm GH and 45ppm KH, but my personal preference is 30KH with modest levels of both Calcium and Magnesium.
Use the finest grind setting that does not produce astringency with your brewer and recipe.
Target a TDS of 1.3—1.4%. Weaker coffee tends to lack flavor intensity, and stronger coffee tends to decrease flavor clarity and “flavor separation.” Preferences will vary; these are simply my recommendations.
If your grinder is new, please season it with 6kg/13lbs of coffee using a grind setting finer than pourover, but much coarser than espresso. Season with smaller amounts of coffee at a time (usually 500g is okay) to prevent overheating of the motor. We sell cheap, junky grinder-seasoning beans at $3.00/lb for your convenience.
Espresso recommendations include:
Use the dose for which your basket is rated (eg 18g in an 18-g basket)
Use a 2:1 brewing ratio
If you are a very experienced barista or use the BH AutoComb, you may enjoy longer ratios, such as 2.5:1 or 3:1
For very light roasts, try higher flow rates, such as pulling up to a 5:1 ratio in 30 seconds. No matter the shot size or use, we recommend avoiding shot times longer than 35 seconds.
Experiment. Espresso is finicky, and the range of grind qualities, pressure/flow paradigms and other factors is wide.
Please note that no one other than Lance has used >90% of the grinders currently on the market, and it is impossible to guess at the correct setting for a unique combination of coffee + brewer + ratio + recipe. The best setting depends on burr sharpness, geometry, and alignment. Even if two people use the same model of grinder, the optimal settings may differ due to those factors. It is better to target brew times (eg 4:00 for a NextLevel Pulsar made using a 17:1 ratio and 22g of coffee) than a particular setting or micron rating.
Going forward, I recommend:
Find a brewer and recipe that works well for you on a regular basis. I recommend the NextLevel Pulsar, as it does a great job of promoting even extractions, and makes it difficult to ruin a brew.
When brewing a new coffee, begin with your foundational recipe, and adjust the grind until the brew time is in your target range.
If you taste anything defective, and you are confident the extraction quality was good, try a lower water temperature.
When in doubt about what initial grind setting to use, always begin too coarse rather than too fine. If the grind is too fine and a brew clogs, it is difficult to know how much coarser the grind should be. If the grind is too coarse and the brew is too fast, it is easier to predict how much finer to grind.
I’m pleased to announce Prodigal’s new monthly subscription! Subscribers will receive discounts, access to exclusive subscriber-only coffees, and can rest easy knowing they will never miss out on a great offering.
There are several ways to join:
Prodigal Combo, our flagship subscription, includes two different coffees each month:
One 250-gram bag of Prodigal's fresh releases &
One 150-gram bag of Prodigal's premium coffees
Standard includes two 250-gram bags of Prodigal's fresh releases
Premium includes two 150-gram bags of Prodigal's premium coffees
Prodigal's subscription offers discounted prices below our normal menu rates, plus the benefit of set-and-forget convenience. Subscribers also receive special access and discounts on rare or nano-lot coffees that we find.
Occasionally I have the urge to post about something unrelated to coffee. But if there is a way to connect a post to coffee, I will. This post is not about making great coffee; it’s about happiness. It’s also about how some of our coffee-career trajectories and current trends in third-wave cafe design may be decreasing our happiness.
I hope you will listen to one of the podcasts I link to in this post. I have never experienced so much wisdom packed into two hours. Without exaggeration, I think you may find either podcast life-changing.
Back at my first cafe in the 90s, usually while caffeinated, my staff would often say “coffee makes you happy!” Caffeine can trigger elation, but to me the meaning of that phrase was a bit deeper, and had little to do with caffeine.
Like many people, I opened a coffee shop because I liked making coffee, and I enjoyed the community environment of a cafe. My first cafe was the center of town life in Amherst, Massachusetts. Not only did well over 1000 of the town’s 30,000 people come to the cafe each day, but nowhere in town was as vibrant, or had such an emotional place in townspeople’s lives. At the cafe, lifelong friends were made, PhD dissertations were written, and future spouses were met. I’m still in touch with dozens of people who worked at or frequented the cafe. At least ten strangers introduce themselves to me online each year to relate a memory of their first great cup of coffee or an experience at the cafe. I find it incredible that strangers routinely reach out to tell me about their experiences at a cafe 25—30 years ago. Several customers and a few staff went on to establish their own roasting companies, cafes, or green importing businesses.
When I was 14 years old, my friend Arash took me to Espresso Royale Cafe in Ann Arbor on a snowy February night. It was my first experience going to a coffeehouse, and it was a revelation. I felt like an adult, sipping an “Italian soda” among college kids late at night. I was happy. My first motivation in opening a cafe was not to serve delicious coffee; it was to provide others experiences like the one I had with Arash, and to cultivate a feeling of belonging and community.
When I was in university at UCLA, there was an old-style coffeehouse on campus with stained glass windows, poetry night, people smoking in the corner, ratty old wooden furniture. Pink Floyd’s Wish You Were Here played at least once each night, and they served hideous, dark-roast, flavored coffee. (I always ordered tea or hot chocolate.) I spent almost every night there studying with friends, and the idea of having a welcoming “third place” became my obsession. Kerckhoff Coffeehouse was my happy place.
When I left university, my career mission was to replicate that happy place for others. After a year and a 4,000-mile drive searching for the best place to put that cafe, I landed in Amherst, Massachusetts, and was certain that was the place to open the cafe. My subsequent cafes businesses each brought a feeling of enjoyment, satisfaction, and community, but in different ways from the first, and never quite as profoundly. As laptops replaced socializing, it became more challenging to cultivate a sense of community.
Roasting and consulting have brought satisfaction, but have never provided the level of enjoyment or happiness owning cafes did. I’ve always understood why in a fuzzy way, but now I’m sure why, because of a brilliant man named Arthur C. Brooks.
Dr. Brooks has written eleven books, writes a column about the science of happiness in The Atlantic magazine, and teaches a course on happiness at Harvard Business School. He has made it his life’s mission to study happiness and translate its science and methodology to help others lead more fulfilling lives.
Dr. Brooks claims the three pillars of happiness are satisfaction, enjoyment, and meaning. You need all three elements in relative balance to be happy. He emphasizes that pleasure is not the same as enjoyment, and happiness is not a feeling. (He likes to say happiness is not a feeling any more than the smell of dinner is dinner.) Dr. Brooks explains satisfaction requires struggle or work, and a pleasurable experience only provides enjoyment if it is shared with others and creates a memory.
That last insight resonated with me; I’m an introvert, and often default to doing activities alone. Dr. Brooks confirmed something I suspected for many years: running cafes made me happier because that experience was shared with so many others, which made it enjoyable. I doubt so many people would write to me about a coffee experience 25 years ago if it weren’t for the community and shared enjoyment involved. Consulting and roasting provide some satisfaction, but not as much enjoyment, and for an introvert, the shared-experience-brings-enjoyment part can be challenging.
Most of us entered the coffee industry as baristas. Our first job was making coffee, interacting with customers, and bonding with coworkers over teamwork during busy shifts. Being a barista can provide very high levels of enjoyment and satisfaction. For many, moving into sales, roasting, management, or marketing was a natural career move, and the barista job had been a mere stepping stone. But for some, as our coffee careers evolve, we may never replicate the enjoyment being a barista brought us. The online trend of complaining about work is self-destructive: we won’t get satisfaction, and are less likely to find meaning in our lives, without working hard. Hard work and struggle provide many under-appreciated non-financial benefits.
I’ve never been thrilled with the trend toward austere, white, uncomfortable cafes focused solely on coffee. Such places may brew and serve lovely coffee, but they often lack the community vibe, comfort, connection and interpersonal stimulation that coffeehouses provided for centuries. Throw in customers sitting alone with their laptops, and cafes don’t promote happiness the way they once did. I don’t enjoy having coffee in such cafes much more than I do drinking coffee at home.
The hottest new dripper of 2023 is also the best manual dripper ever made. This should surprise no one, since astrophysicist-coffee nerd Jonathan Gagné collaborated with NextLevel to design it. Every detail of the Pulsar is just right: the gentle shower spray, the height of the shower screen, the amount of turbulence, the valve, and the heavily creped filter paper. I’ve received an extraordinary number of messages similar to “I am not even dialed in yet, but my first Pulsar brew was already better than my best pourover.” Those messages are testament to the Pulsar’s clever, foolproof design. Finally, even extractions are virtually automatic, with no skill required.
Last Christmas my friend Martina at Spinware Studio made me a gorgeous set of three ceramic cupping bowls. This year, I suggested she fire a few sets as gifts for coffee lovers. These limited-edition cupping bowls are the perfect size, shape, and aesthetic to maximize enjoyment of the cupping experience, and they double as beautiful latte mugs. Their heavy construction cools coffee quickly to drinking temperature.
If you’re looking for a special gift for a cafe owner, pro barista, or avid home barista, the AutoComb is a must-have tool. AutoComb solves puck prep, the biggest challenge to consistent espresso quality.
The AutoComb spins 12 carefully arranged needles to achieve perfect distribution in five seconds, every shot. Nothing says I love you like helping your loved ones eliminate channeling.
**Now until December 22, buy AutoComb + any other other item at www.scottrao.com and get $20 off using the discount code HOLIDAY20
| have a few requirements for a travel mug: vacuum insulation, durability, an easy open/close mechanism, and a leakproof design, even when the mug is turned upside down. The Fellow Oscar has all of that, plus Fellow’s signature good looks. Fellow offers a version with a standard screw-on lid, though I prefer the design shown here, with the clever slide-to-open lid.
I visited Elliot at Steady State a few weeks ago and he offered me a cup of a natural pacamara with a promise that I would love it. I laughed because he knows both “pacamara” and “natural” are red flags for me. But damn if this wasn’t the best coffee I’ve tasted outside of Prodigal’s cupping table in the past few months. The stated tasting notes of kiwi, honeydew, and banana ring true, and for the nerds, I’d score this coffee 89 points. If you buy this coffee as a gift for someone, you may want to get an extra bag for yourself to avoid coffee envy.
I’ve been using this travel mug regularly for tea at least a decade. I love that the lid doubles as a cup for drinking and the leak-proof push-button mechanism has lasted through a decade of almost daily use. It isn’t pretty, but it gets the job done.
The Business of Specialty Coffee by Maxwell Colonna-Dashwood is the brand new, definitive book about the specialty-coffee business. I’ve often considered writing a similar book, and am pleased Maxwell decided to write this much-needed book. Whether you are a cafe owner, an aspiring cafe owner, or just interested in the business of specialty coffee, this book is for you. The Business of Specialty Coffee is a deep dive into the economics, ethics, strategies, and of the coffee business. Maxwell did a great job, and I expect this book to influence a generation of cafe owners.
*Orders to US addresses ship December 11. International orders ship in early January.
De-Caffeinate could be an interesting, quirky gift for someone who sometimes must consume more caffeine than they prefer.
I don’t want to recommend anyone use this, as I do not offer medical advice. And it’s not known whether regular use of this supplement could have any detrimental effects, though the FDA considers it GRAS (generally regarded as safe). I occasionally take one of these when I get over-caffeinated. My caffeine tolerance is low, and this supplement has been a godsend when I need to cup dozens of coffees.
De-Caffeinate contains a plant extract called rutaecarpine, which induces the body to produce more CYP1A2, the liver enzyme responsible for 99% of caffeine metabolism. In my experience, if I take De-Caffeinate when over-caffeinated, I feel normal and non-jittery in about an hour later. My n=1 is an unscientific, biased study, but De-Caffeinate has been useful to me.
A few years ago, Jonathan Gagné coined the term “no-bypass brewing.” The phrase refers to brewers that force all of the brewing water to pass through the coffee bed. In this post I’d like to discuss a few simple lessons no-bypass brewers have taught me or reinforced.
The “other” type of bypass
The term “bypass” usually refers to water seeping through the wall of a pourover filter above the level of the grounds. This is distinct from the bypass feature of a batch brewer.
Batch brewers such as Fetco and Curtis and Bunn machines have a secondary water-dispensing spigot positioned near the inner edge of the basket. When the user opts to use some bypass, the bypass water pours into the basket but outside of the filter. Batch-brew bypass dilutes the final brew akin to how adding water to an espresso creates an Americano; the primary effect of both is dilution. One may opt to use the bypass valve when brewing very large batches relative to the basket diameter. The theory is that if the coffee bed is too deep (eg greater than 5 cm), it is better to dispense some water through the bypass valve than to grind coarse enough to allow all of the brewing water to pass through the bed in a reasonable amount of time. In some cases, the coffee bed may be so deep that one’s grinder cannot grind coarse enough to provide sufficient flow for all of the brew water to pass through the bed in a reasonable amount of time.
First-generation no-bypass brewers
The first generation of no-bypass brewers included the Tricolate and the NextLevel LVL10. The first and most surprising lesson was how much pourover bypass decreased potential extraction levels relative to what could be achieved with a no-bypass brewer. It is not difficult to reach extraction levels as high as 29% with coffees from Kenya and Ethiopia in a no-bypass brewer. That is not to say those extraction levels are optimal; it is simply illuminating that the extraction ceiling is so much higher in a no-bypass brewer. Although one can find claims online of people extracting ~29% in a v60 or Kalita, such claims are often due to inaccurate measurement or use of grinders that produce extremely low proportions of fines and boulders; with such grinders, no-bypass brewer extractions can exceed 30%. The more realistic limit with common grinders, accurate tools, and proper measurement technique is nearer 24%.
Other findings either learned from, or reinforced by, using a no-bypass brewer included the benefits of both dry and wet Weiss Distribution Technique. Lance Hedrick was the first person I am aware of to apply wet WDT, or WWDT, during a bloom. The method is easier to perform beneficially in a flat-bottomed no-bypass brewer than in a pourover. The relatively shallow, flat-bottomed bed of the first generation no-bypass brewers also lends itself well to dry WDT, something previously used to improve espresso puck distribution, but rarely used in filter brewing.
Second-generation no-bypass brewer
The NextLevel Pulsar represents what I consider the second generation of no-bypass brewers. The most important design change was the addition of a valve capable of stopping and modulating flow of liquid out of the brewer. Other improvements included lowering the shower screen, slowing the flow of water through the shower screen, and narrowing the brewer to increase bed depth in the popular ground dose range of 20g—25g.
Closing the valve during the bloom allows one to maintain a slurry above the grounds, which helps keep the slurry temperature higher. Such a “wet bloom” presumably makes it more likely the grounds will fully saturate with water. I have had better average results using a wet bloom than when allowing the bloom to dry out, though I cannot be sure of the reason.
A surprising lesson from the NextLevel has been the impact of bloom time on cup quality. Comparing bloom times in a pourover in an apples-to-apples way is nearly impossible, because the comparison is confounded by if, and for how long, the slurry dries out. The NextLevel’s valve allows us to compare the results of bloom times while maintaining a slurry above the grounds in all cases. Many have noticed shorter bloom times tend to produce more aromatic, delicate brews, while longer blooms yield less aroma, and heavier cups.
When I was in Rotterdam in August, I had coffee with my friend Han. She asked me two interesting questions when I told her I had been in coffee for 30 years:
What changed over the past 30 years?
What beliefs did you once hold and decide were wrong?
Those questions seemed like the basis for an interesting blog post, so thank you Han for the inspiration.
What changed over the past 30 years?
Well, everything and nothing, depending on your point of view. The big trend changes are obvious: light roasts are more common, high-quality green is more common, data collection and technical proficiency in coffee has improved, processing styles have gone wild, and baristas have more tattoos than they once did.
This may surprise readers, but I don’t think top-quality green has changed that much over those years. In the 90s, Kenya, Ethiopia, and Colombia were pumping out green offerings that would shine on any of today’s cupping tables. I remember having a life-changing Kenya Kirinyaga in 1994 at Coffee Connection, George Howell’s former company, just before he sold it to Starbucks (truly, one of the most unfortunate takeovers in coffee history.) While I didn’t know how to score then, my internal heuristic for an 88+ coffee is “I will remember this coffee vividly in a year.” I remember that cup pretty well 30 years after drinking it, so I suppose that puts the coffee around 90 points.
In the 90s, it was easy to get what I would call 87-point green from Bill McAlpin’s projects (Costa Rica La Minita being the most famous), Kai Janson’s farm in Panama (Kai: I’m still waiting for those geisha samples!), importers such as Tim Castle, author of The Perfect Cup, and Kenyans from Jeremy Woods. Supply and demand were such that those coffees were affordable and available spot. Not many roasters sampled pre-ship samples months ahead of time in the hope that the coffee would be a similar quality level upon arrival. These lovely coffees cost an average of $3.50/lb (roughly $7/lb, or $14/kg in today’s dollars.)
It wasn’t until Kevin Knox of Allegro paid, if I’m not mistaken, a record $10 per pound for a Kenyan at auction in ~1998, that green prices began to wake up and high-quality lots slowly began commanding the differentials they deserved relative to average specialty lots. Ironically, many roasters at the time were critical of Mr Knox for his bold move, because they didn’t want to pay more for green. Many of those same people would now call such a buy a sign of fairness or a well-deserved reward to a producer. I don’t know Kevin, but when I first read about his auction “win,” I thought “it’s about time someone valued those Kenyans much more than other coffees.”
Interest in both precise and experimental green-processing techniques have of exploded over the past three decades. Although I’m not a fan of the average “experimental” processing, I greatly value the experimentation, as some experiments will lead to breakthroughs we will need to maintain and improve quality, especially due to the challenges of global warming.
old-school sample roasting
photo credit: @coffeeandlucas
modern, precision sample roasting
For example, I posted a story on Instagram about a robusta I tasted in July, processed by Diego Bermudez and his team. I couldn’t tell it was a robusta, which surprised me. Diego and his team are experimenting with processing robusta as part of a ten-year plan to be ready for the future. That cup wouldn’t be my choice for a daily driver yet, but it made me more optimistic about the future of green. Note that coffee was worlds better than the mediocre “specialty” robusta people claim is the future of specialty coffee.
Thirty years ago, I had not tasted coffee outside of the US, so I can’t speak to the trends in other countries at that time. In the early 90s, about 50% of sales were batch brew, 20% retail bean sales, and milk drinks were steadily growing in popularity, partly due to the spread of Starbucks. In 1995, the most common customer requests were French Roast, Colombian, and hazelnut-flavored drip coffee. Everything outside of those three was a little too exotic for the average customer. We won over customers by demonstrating that one didn’t have to roast dark to prevent sourness or weak cups.
“Light” back then was a roast dropped closer to the beginning of second crack than to the end of first crack. “Light roast” weight losses have dropped steadily over thirty years from around 16% to 12%. For reference, Starbucks has proudly stayed near 20% the entire time.
For those newer to coffee who love light roasts, please don’t be too hard your 90s brethren: without good data collection or control systems, no one was capable of roasting light with enough consistency or precision to prevent frequent, and often disgusting, underdeveloped flavors. Even in the 2000s, the transition to very light roasts was ugly, and there were years where I was not served a single competent light roast in a cafe. Roasters were becoming famous simply for roasting lighter than anyone else, regardless of competency or consistency. Unfortunately, the “lighter is better at all costs” mentality hasn’t completely died. Lighter is better only if you know how to do it well. In 2000, almost no one knew how. Today, I would put fewer than ten US roasters on the list. Most “Nordic style” roasters, regardless of location, proudly sell the celery/corn/twiggy flavors of underdevelopment, and too few consumers are aware one can have lovely, transparent, nuanced roasts without those flavors.
I owned my first cafe from 1994-2001. I roasted on a 12-kg “Sasa Samiac” roasting machine (the French build roasters!) with a gas dial similar to that on a kitchen stove, and a slide-gate damper to influence airflow. The first day I roasted a batch, the fire department showed up. The learning curve was shallow. A few years later I bought a UG22 and it felt like driving a Corvette after owning a Ford Pinto. Cropster was still merely a gleam in Andreas’ and Norbert’s eyes, and I filled piles of notebooks with time and temperature data, sometimes staring at it for hours searching for answers.
In the 90s in the US, typical drink sizes were 12oz and 16oz (360ml and 480ml, respectively). The “venti” mercifully hadn’t been invented yet). I put the first-ever timer on an espresso grinder to control doses, I stacked two hopper on top of each other to prevent the dreaded grind coarsening and popcorning of beans when the hopper got low, I installed a commercial humidifier in my cafe/roastery to stabilize green moisture content and shot quality (the difference was shocking), and I threw out batch brew that didn’t sell within 30 minutes of brewing. In year one, we threw out more than we served. Everyone thought I was nuts. By year five, we were serving over 1000 drinks per day, mostly batch brew, seven days per week, in a town of 30,000 people. Maybe not so nuts after all. I learned latte art from the photos in David Schomer’s book (not David’s fault, but my latte art was never that great), I briefly put Monsooned Malabar in my espresso (ultimately not for me), we weaned people off of flavored syrups, and mastered the crafts of ice-blended coffee beverages and toddy-style coffee brewed cold overnight in a lineup of 20-liter buckets.
When I sold my cafe in 2001, I spent four years traveling the world, and fortunately stumbled upon the coffee scenes in Australia and New Zealand. While there probably wasn’t a decent filter brew to be found in either country, there were civilized, small, Italian-sized beverages, and unrivaled milk quality and texture. I remember getting schooled in milk texture by Kate at Coffee Supreme (sorry Kate, I forget your last name, but you were amazing!), Dave Lamason at People’s Coffee (he won’t remember me, but I remember that cappuccino!), and Jason Moore at Mojo (now roasting his own at Vanguard Specialty Coffee in Dunedin). I swear it took ten minutes for Jason’s milk to separate. I still don’t know how he did it.
After that adventure, I opened a cafe/roastery/bistro in the US with more focus on milk texture, smaller beverages served in ACF cups, and tried to do well by antipodean standards, while navigating an inherited, overpowered 23kg Gothot with a drum made of sheet iron. The Giesen also served as my sample roaster, roasting 100g batches with a constant air temperature of 420°F (it works). Meanwhile, places like Stumptown and Ritual began roasting light enough to make George Howell blush, beverages in the US were mercifully, if slowly, shrinking in size outside of the walls of Starbucks, and blueberry-tinged natural Ethiopians were providing more and more people their “aha moment” about specialty coffee.
It was 2007 when Hacienda La Esmeralda’s Geisha won the Best of Panama competition and fetched $130/lb at auction that the industry really woke up to the sort of prices the best lots could command. Kevin Knox probably laughed out loud at the haters. The rest is a history you are probably familiar with.
With the advent of the coffee refractometer in 2008 and Cropster in 2011 (?), data slowly began to influence how coffee was roasted and brewed. Data has helped improve consistency and quality, and data is here to stay, whether one likes it or not. There is little doubt that the next 30 years of coffee roasting and brewing methodology will be shaped by data-driven learning. It’s only a matter of time until AI-driven machines outperform the best humans. I just hope I retire before that happens :0.
What beliefs did you once hold and decide were wrong?
My answer is again version of “everything and nothing.” The biggest change in my beliefs over the years has been what is an appropriate roast level. Although I saw “cinnamon roasts” (not too far from today’s “Nordic style” roasts) in open barrels at Zabar’s in NYC during my childhood in the 80s, such light roasts were otherwise unheard of. Like most lighter roasters of the 90s, I dropped coffee shortly before second crack began. I never saw anyone other than Zabar’s do that, and I suspect they did that to maximize yield, not flavor.
My old friend and mentor James Marcotte visited my cafe in Amherst circa 1998 while I was batch brewing a blueberry-tinged Ethiopian Harrar in an old American Metal Ware urn-style brewer (a la Peet’s, complete with a gentle stir of the grounds during prewetting!), and told me I was grinding too fine. It was one of those “aha” moments that made me realize grinding too fine often led to astringency, and I became a lot more conscious of finding that “highest non-astringent extraction level” for all brewing methods. At that time, I became obsessed with astringency and eliminating it anywhere I could. Of course, we weren’t yet measuring extractions (Vince Fedele patented the coffee refractometer in 2008), but we knew grinding finer or using a lower brewing ratio resulted in stronger coffee. It seemed that “too fine” was the point where a brewing method produced astringency (now we believe that happens due to an increase in bypass with finer grinds.)
Another area where I was wrong was in the source of astringency in coffee. I, along with almost everyone, believed that astringency came from “overextraction” along channels. However, I began to have doubts in 2019, when I extracted up to 30% making “blooming” shots on my Decent Espresso Machine and didn’t detect more astringency than I did from more typical extraction levels. Jonathan Gagné seems to have solved this mystery; his plausible hypothesis is astringency comes from larger, undissolved molecules that are able to “escape” the coffee bed through larger flow paths, such as channels and areas with bypass.
Not powered by AI
photo credit: @coffeeandlucas
Soon, physics geniuses and AI will take over coffee ;0
At one point I believed that the tighter the grind-particle-size distribution, the better, at least for filter coffee. Regardless of the practical impossibility of a fines-free or truly “unimodal” PSD, this seems to be another one of those “the happy medium is best” situations. Some fines seem desirable, and we seem to be in the early stages of learning what an “ideal” PSD looks like, if there is one.
In roasting, we knew nothing but folklore and old wives’ tales before Cropster and Artisan appeared on the scene. I knew certain combinations of batch size, roast times, and final roast colors seemed most likely to produce results I liked, but we didn’t have the data or the control systems to be confident of much else. I targeted total time as well as time-before and time-after first crack, as well as final bean temperature and weight-loss numbers, and tried to be as consistent about those as possible. In the 90s, I was happy if I hit my targets within a 10-second time range. These days I consider a three-second miss to be cause for concern.
In the 90s, air roasters and that Sivetz guy were quirky and interesting, but it was hard to take a machine seriously that had virtually no controls, and no cooling bin. (The modern Sivetz machine is much more sophisticated.) It took many years before seeing a quality air roaster in action to form a valid opinion about it.
In 2008, I did a consulting job at 49th Parallel in Vancouver, and it was a turning point in my career and understanding of roasting. The owner, Vince, wanted me there, and was serious about quality at any cost. His staff resented my presence (this often happens on jobs; the boss wants progress, and the staff want to defend the status quo and to not look bad), and I had to hit a home run to win them over and get them to buy into a better system.
The first night of the job, I spent four of five hours poring over reams of roasting data in spreadsheet form, tried to discern what the better batches had in common, and what I discovered there gave me the confidence to write The Coffee Roaster’s Companion.
The next day at 49th, we roasted two coffees with 88-point potential, a washed Kenyan and a washed Ethiopian. On the third day, we cupped and brewed day two’s roasts and I remember Vince sitting down, staring at a cup of coffee, and saying “I didn’t know the coffee could taste like that.” The staff were won over, we implemented a system based on a new methodology, and 49th reigned for a while as the best and most consistent roaster in North America. It was one of the most rewarding consulting jobs in my career.
I always knew writing the first professional-level book about roasting would cause endless controversy and bring out the haters. Certainly, I made mistakes, most of which I righted in Coffee Roasting: Best Practices. But CRC accomplished two undeniable things the critics don’t seem to have noticed: it introduced systematic approaches to roasters (no more “smell-a-vision” as Mark likes to say), and it opened a public conversation about roasting that had not yet existed. Roasting was still in the “we can’t share our secrets” phase (translation: we are too insecure to share our beliefs, because they may be wrong), and I stuck my neck out, ready for the trolls to chop it off. (Editor’s note: I still have my head, and now “walk the talk” with Prodigal.)
The most famous (or infamous) advice in The Coffee Roaster’s Companion is a recommendation to drop coffee at a DTR of 20%—25%. Was that a mistake? Perhaps in delivery, but not in substance. Do I roast to 20%—25% DTR? Not often. Huh? At Prodigal, for example, we use an air roaster and average lower than 12% weight loss per batch. We’ve occasionally neared 20%, but most roasts end up with much lower DTR. How do I square the advice in CRC with my current approach? It’s simple: CRC was written for all of the world’s roasters, not just the 1% who roast the lightest. We light-roast lovers tend to live in a bubble and sometimes forget that perhaps 99% of the world’s roasts are dropped after first crack has ended, and most of those are dropped during second crack. In CRC, I invented the concept of DTR, and I made a recommendation that is fitting for a very large proportion of the world’s roasters. Of course, if you choose to be in the extreme 1% of a spectrum, typical approaches may not work well for you.
The mistakes I made in CRC are things that don’t get much notice. In the years prior to writing the book, I had the experience many times of the first batch of the day being underdeveloped if the machine was not adequately warmed up. That led me to think higher thermal energy at charge is important for adequate development. With experience, I’ve learned that is not necessarily true. These days I see finding the “happy medium” in phase balance and initial thermal energy as best practices to help prevent underdevelopment. Likewise, I underestimated the importance to development of minimizing airflow and roasting slower, especially in drum roasters.
Another famous piece of book advice was to attempt to achieve a constantly declining rate of rise (ROR), preferably with a somewhat constant slope. I have no way of proving that is the optimal approach to roasting, but I follow it today with excellent results. Perhaps a better question than “is that the right target?” is “what would be a better target?” I have yet to read or hear a plausible suggestion of a superior approach. Optimal or not, it’s a target that keeps many roasters on the right track.
I’m sure I’ve updated or replaced countless beliefs I cannot even remember. That’s okay, as my goal is to change my mind and grow, not to be dogmatic. The internet isn’t always so understanding, and writing a book has a way of causing others to believe I haven’t changed my mind since publication, which is absurd. I change my mind routinely. Prodigal’s roast quality and consistency improve every week. This learning allows to help clients more precisely every year. However, most roasters don’t seem to improve or change much over time. When I stop learning, I will retire.
I assume 99% of what we believe at any time is incorrect. Even scientific belief has been incorrect for 99% of science’s history. But science has a mechanism for updating beliefs and facts as they evolve, and that’s probably the best we can do. I hope the next thirty years teach us all the ways we are wrong now, and bring us new, better beliefs and processes that help us to make progressively better coffee.
********
Prodigal drops a new, fabulous coffee each week. Join our mailing list to get exclusive, first access to new offerings
When I wrote The Coffee Roaster's Companion in 2014, I coined the term “between-batch protocol,” something I had been teaching and honing with clients for several years. While there are some things I would change in CRC (and did, when I wrote Coffee Roasting: Best Practices), discussing how to design an effective BBP was probably the most important and impactful information in the book.
Roasters have always had some system between batches, but prior to 2014, I had never seen a roaster have an effective one. The most common practices were either idling at a certain BT or ET for some set amount of time or turning off the gas until the BT reaches a certain temperature. Neither system works well, and below I’ll explain why.
Several years later, at my urging, Cropster introduced a feature to graph curves between batches. Once roasters began seeing their BBP data graphed in realtime, many more roasters began realizing they needed better systems.
Teaching thousands of roasters how to design an effective BBP, roasters using data-logging software, and seeing the data in graphical form have all improve consistency in roasting. Unfortunately, there is a long way to go, as many prominent roasters are still in the “data doesn’t matter” camp (translation: their data is messy or inconsistent, so they dismiss its value), and I’ve yet to see a published scientific paper about roasting wherein the scientists first demonstrated their ability to replicate roasting results before comparing the results different approaches. One of the first rules of science is to verify that your results are repeatable. I’ve yet to see that verification.
Data and Cupping Results
Do differences in data translate to differences in the cup? Absolutely, yes. Of course, cuppers’ abilities to taste subtle differences in cups will vary. At Prodigal, we favor measuring variation in weight loss over color readings, not because color isn’t important — it’s critical — but because there are several flaws in the available color-measurement systems. More on that in a future post.
As you can see in the graph at the top of the page, while our data is not “perfect,” it’s extraordinarily consistent. A roaster friend whom I showed this to said “looks like fake data,” which is about the highest compliment I could ask for. Our lowest and highest weight loss for these batches of Basha Bekele (a gorgeous naturally processed Ethiopian sourced by Christopher Feran for Crop to Cup, and one of the coffees in our current Ethiopian Tasting Kit) were 12.0% and 12.13%. In a situation where the curves are nearly identical and the weight losses are 0.13% apart, that’s about the smallest variation that is still tastable to us, and the taste differences are almost negligible. I estimate we accept weight-loss variation of 0.25% from our target; greater variations end up in our discounted “first batch” offering.
The purposes of a BBP
The two main purposes of a BBP are to reset the “thermal energy” of the roasting machine, and, usually, to cool the chamber surfaces in order to prevent them from creeping hotter throughout a roasting session. What we are manipulating with the BBP is primarily the temperature of the roasting drum. Unfortunately, we don’t have a commercial solution yet for measuring the temperature of the drum, so I’ve designed BBPs using the bean-temperature reading as a “hack.” The BT does not indicate the drum temperature, which is why simply idling at a constant BT does not lead to effective roast replication. However, making the BT drop and rise in a controlled manner can effectively accomplish the two goals of cooling and resetting the drum or roasting chamber’s thermal energy.
Do we always need a BBP?
Short answer: no. In 2020, my partner Paolo at Regalia, the first roaster to master my BBP system, came to me with data from several hours worth of roasts of a Colombian coffee. The graphs replicated beautifully, and Paolo said “I did this with no BBP.” We had a fun discussion about how technically, you don’t need a BBP, but you can only get away with a no-BBP system if 1) you roast only one coffee, with the same settings, every batch and 2) the ending drum temperature is of a reasonable temperature for the start of the next batch. A BBP becomes essential as soon as a roaster wants to roast more than one coffee, use different settings for various batches, or roast batches to different degrees. In other words, unless you limit yourself to only roasting one coffee one way in a roasting session, you need a BBP.
Designing a BBP
There is no “one size fits all” BBP, but all effective BBPs share common features:
The gas is off or low enough to cool the drum/roasting chamber
The temperature of the air (usually the BT) in the empty roaster goes through at least one cycle of falling and rising (preferably in that order).
Some roasting machines limit the ability of the user to implement the standard BBP procedure. For example, Loring machines don’t allow the user to turn the gas off completely during the BBP. Such machines need slightly different approaches.
Below on the left is a successful approach to a Loring BBP I call the “two cycle” approach. One sets the minimum and maximum temperatures, allows the machine to cycle twice down to the minimum and up to the maximum, and as the BT rises after reaching the minimum temperature a second time, the roaster charges the next batch.
Below on the right is a typical drum-roaster BBP: the BT drops as the door opens and the gas is off, the BT rebounds strongly after closing the door, and the BT sinks slowly to the chosen “bottoming temperature.” At the bottoming temperature the user turns on the gas to a prescribed setting and charges when the BT reaches the charging temperature. The keys to a successful BBP are the choices for bottoming temperature, gas setting, and charge temperature. Rising too slowly or too quickly to the charge temperature, for instance, will make the BBP ineffective. Note that the amount of time it takes to reach the bottoming temperature will vary, but that is the BBP doing its job, acting as a sort of shock absorber for thermal energy variation.
My BBP template works on every machine I’ve ever used, though a few machines, such very large machines with power burners, and smaller, recent-vintage Diedrich machines, make a short, effective BBP challenging to design. In my seminars and consulting I teach hacks for such difficult cases.
Some roasters require a manual BBP, and some have a programmable BBP. Although they do not call it a “BBP,” Loring has a semi-automated BBP system. IMF’s (below) is quite simple to execute. Some manufacturers have gone so far as to create explicit BBP programs. For example, the Roest sample roaster and the Sivetz roasting machine have programmable BBP profiles.
automatically executes a programmable BBP profile as soon as one drops a batch, and beeps when the BBP is complete. The beep is simple, but brilliant; it allows me to ignore the roaster during the BBP, knowing I won’t miss the moment I should charge.
Last year I worked with Michael Barthmus, the new owner of Sivetz Roasting Machines, on modernizing the Sivetz fluid bed roaster. One of the my favorite upgrades Michael made is a programmable BBP button, which executes a pre-programmed BBP cycle.
Do Air Roasters Need BBPs?
Yes. While many air roasters allow the operator to use a shorter BBP than would be necessary on a classic-drum roaster, there is no roaster do date that does not require a BBP. Unfortunately, several manufacturers have claimed otherwise, but none has yet to share data showing effective curve replication without a BBP. I’m not holding my breath.
Prodigal’s IMF BBP
One of the reasons I started Prodigal was my frustration with roasters’ consistency. There has yet to be a time i loved a coffee from a roaster, ordered a second bag, and was as satisfied with the second bag. I’ve tried many times, the second bag has always been a disappointment. It seems unlikely a company would get worse at roasting a coffee, so the more likely explanation is that those companies’ roasts are too variable for consumers to rely on them to deliver excellent quality to every customer. As a roaster, I know how difficult that can be, but as a consumer, it drives me crazy.
At Prodigal, we are more consistent than any other roaster I am aware of (the only roasters who are close are all clients of mine), and despite our level of consistency, we still offer our good-but-not-perfect batches as our discounted “first batch” offering. Truthfully, we don’t have bad batches anymore, now that we have settled into a rhythm with the IMF. But we like to experiment, and “first batch” is now made up almost exclusively of experimental batches, rather than batches we just didn’t execute well.
The next time a roaster’s inconsistency frustrates you, ask to see their roast data in this format (curves, times, and weight loss numbers). One of three things will happen: either they will refuse (red flag), they’ll claim “data doesn’t matter” (red flag), or they will share messy data with you, confirming your suspicions. Of course, you could also just buy coffee from a roaster who invented the first effective BBP and is willing to share data publicly.
The three graphs above are of last weekend’s batches that went into our Ethiopian Tasting Kit. Our consistency allows us to sell such kits with the assurance that every customer will receive nearly identical-tasting beans.
—————————————————
Want to learn more about BBPs and roasting consistency? Join my October/November online class. The class consists of a 3—4 hour live, interactive video presentation (saved in the private class group online, to view as often as one wishes), and access to a private forum for one month. Class participants are welcome to post curves, ask me anything about coffee, and have an entire month to digest the class information and practice ideas discussed in the presentation.
As always, previous class attendees are welcome to join for 50% off. Please email me scott@scottrao.com for a discount code.
As many of you know, the much-anticipated NextLevel Pulsar launched earlier this month. The Pulsar is a collaboration between Jonathan Gagné, astrophysicist, coffee nerd, and author of The Physics of Filter Coffee, and NextLevel, manufacturer of the LVL10, and now the Pulsar. When the first generation of such brewers hit the market, Jonathan dubbed them “no bypass” because, unlike most coffee drippers, these brewers do not offer the water a way to bypass the coffee bed. The Tricolate and LVL10 were the most prominent no-bypass brewers. After using those brewers for some time, Jonathan realized they could be improved by the addition of a valve to allow a the grounds to stay submerged throughout the bloom, and by changing a few other features, such as the shower screen. The result is a dripper that makes great coffee and even extractions incredibly easy to achieve.
By now the first customers should have received their Pulsars, so I’d like to offer some tips here. While there are myriad ways to use the Pulsar, I recommend this as a starting recipe and technique before trying variations.
What you’ll need:
Any type of kettle (pouring spout type not important)
In the past few years, several well-known coffee experts, scientists, and grinder manufacturers have measured and publicly discussed grind particle-size distributions. Some have even rented or borrowed expensive machines that offer relatively precise measurements. Despite the increased interest in PSDs, our understanding of how burr geometry affects PSD is rather crude, and I don’t believe any of us have a clear idea of what an optimal PSD looks like. We may be vaguely aware of wanting fewer fines for filter coffee than espresso, and there is general agreement that “boulders” (particles much larger than the average) are undesirable, but to my knowledge, no one has quantified optimal fines levels with any precision, nor does anyone know much about the impact on the cup of “micro fines” vs larger fines.
Along the way, thanks mostly to the work of Jonathan Gagné, author of The Physics of Filter Coffee, we have come to understand more about how fines affect channeling and liquid flow in percolation brewing. According to Illy in Espresso Coffee: The Science of Quality, “finer particles enhance the exposed extraction surface and the coarser ones allow the water flow.” In The Physics of Filter Coffee and on his blog Coffee Ad Astra, Jonathan elaborated on the role of fines in percolation, including dynamics related to fines migration and channeling. I recently asked Jonathan for his current thoughts on fines and he said: “When there is an insufficient proportion of fines, it causes larger, uneven gaps between particles.” Jonathan agrees that having too many fines can cause channeling, and having too few fines leaves too much large, open flow paths for astringent particles to travel out of the coffee bed. Fines fill the gaps between larger particles and help limit the amount, and perhaps size, of low-density flow paths within the coffee bed.
I’m not a scientist, but I have 30 years of experience in coffee and have personally brewed more than one million cups, which has given me some insights. What I discuss in this post is a speculation I call the “happy medium theory of fines.”
In my experience:
When there is an excessive proportion of fines, many flow paths clog easily, and water must find channels through which to bypass the clogged areas. These channels result in undesired astringency.
When there is an insufficient proportion of fines, large flow paths form in the coffee bed, and a disproportionate amount of water exits the bed through those paths, lowering brew strength, and carrying larger, astringent compounds into the cup.
The “happy medium” amount of fines provides enough fines to even out the size of gaps between larger coffee particles, but not so many fines that excessive, localized clogging occurs.
The happy medium amount of fines for a given brewing situation is the amount that minimizes astringency.
Optimal espresso percolation requires a greater proportion of fines than filter-coffee percolation does.
Burr types Coffee grinders almost always use one of three types of burrs: flat (disc), conical, or roller. Flat burrs usually produce a modest amount of fines. Exceptions include “Turkish” burrs, and other burr sets designed for espresso and Turkish coffee; for the rest of this article, “flat burrs” will refer to the more common flat burrs designed for filter coffee. Conical burrs generally produce more fines than flat burrs do. Roller mills produce an average amount of fines, and the lowest proportion of boulders, assuming the beans are passed through more than one set of rollers.
In Everything But Espresso, I proposed the idea that flavor clarity and body are always in opposition. That idea has stood the test of time. Whether one changes a brewing method, filtration type, or grinder, gains in clarity always coincide with loss of body, and vice versa.
This diagram first appeared in Everything But Espresso, 2009. These days, there is a greater variety of paper filters than when I created the diagram, so the “paper filter drip” circle would be much larger. I probably messed up the positions of Clover and Chemex relative to each other, but hopefully the reader gets the gist of the diagram.
Note: when I wrote Everything But Espresso, the Vac Pot, Clover, and Eva Solo were quite popular; if I were to update the diagram, I would delete those brew methods and add the Aeropress and the forthcoming NextLevel Pulsar.
Coffee professionals often recommend flat burrs for enhanced flavor clarity, and conical burrs for increased body. However, in the past year, I’ve come to believe there is a third aspect of grind quality to consider: astringency. Astringency is the puckery or dry sensation one often experiences in the mouth when drinking wine, tea, coffee, and consuming many other foods or beverages. While astringency is welcome in wine, it is less desirable in tea, and very undesirable in coffee. Personally, any detectable astringency ruins my enjoyment of coffee.
The consensus beliefs that 1) flat burrs are good for filter and conicals are bad and 2) that low-fines flat burrs are better for filter than high-fines flat burrs, are too simplistic. While I wouldn’t sacrifice clarity for body, I’m willing to give up a little flavor clarity if it means decreasing or eliminating astringency. For example, I have never enjoyed percolation brews from “ultra-low-fines burrs” because every cup I have had from them was too astringent for my taste. Likewise, while many have criticized a grinder like the Niche Zero as having too little clarity for filter coffee, I find the Niche’s balance of clarity, body, and astringency acceptable with some brewing methods because it tends to produce very little astringency.
Note that having an adequately deep and intact coffee bed, which is rare in pourover brewing, helps to enhance clarity and limit astringency. For example, on the recent Decent Espresso Tour in Europe, I made Filter3 with coffee ground in the Niche. I polled dozens of attendees, and everyone agreed the flavor clarity was exceptional. I wouldn’t have used the Niche to brew V60s, but I am happy with it as a Filter3 grinder.
The Bottom Line
I’m not proposing baristi use conical burrs for hand pours or never use ultra-low-fines burrs. To determine what type of grinder and burrs to use for a brewing method, one must consider the proportion of fines, the brewing method, and the effectiveness of the coffee bed as a filtering device. An informed barista must consider his or her desired balance of clarity, body, and astringency, and choose the appropriate burrs and brewing method to achieve that balance.
Personal preference will vary, and of course all of this may be too tedious or technical for many. But for some of us, the endless complexity of coffee is what makes it so much fun.
These images are subjective estimates, not based on hard data, as there are not yet standards for objectively measuring all three qualities.
A while back, Kody reached out to me to discuss workplace injuries among baristi. He offered to write this guest post to hopefully help baristi avoid pain and injury. This post is strictly educational, and not medical advice. I am grateful to Kody for his generosity and his patience while waiting for me to publish this post.
-Scott
My name is Kody Johnson D.C. I am a Chiropractor board certified in electrodiagnostic medicine (used to diagnose nerve issues like carpal tunnel), and interestingly the only other work I have had is in the third-wave coffee industry. Having worked for both third-wave shops and roasters, the first decade of my professional career consisted of working around, using, and cleaning a number of different espresso machines and coffee roasters. As such, I am intimately familiar with the biomechanics, ergonomics, and research surrounding working in the coffee industry. Today we are going to look at a practical approach to preventing pain in the workplace. Now, full disclosure, there isn’t a ton of research on ergonomics within the coffee industry; what is available will be referenced, but some information will be pulled from other industries. The information presented here is strictly educational. Specific health issues should be addressed with a healthcare professional. With that being said, lets dive in!
1. Stay Active
Many problems that we face as baristas can be avoided by simply having an active lifestyle. No, being a barista does not count as being active. Yes, being a barista is a physically demanding job, but that is not a substitute for physical activity. Physical activity is a recommendation that has remained consistent for the prevention of low back pain among workers. Even a recommendation like avoiding repetitious bending at the waist is not a clear-cut solution for occupational back pain, but exercise has remained consistent. This is particularly important when roughly 1/3 baristas report back pain related to their work.
2. Avoid Manual Tamps if Possible
Manual tamping is fine for home use, however, consistently using a standard manual tamp, puts excess force on the forearm, shoulder, neck, and back. This excess force makes it a suboptimal candidate for shop use. Ideally, a lever-based tamper or automated tamper would be the tool of choice either as a stand-alone entity or as an attachment available on some commercial grinders. If a manual tamper is desired, a flat palm-based tamper would be preferred to the traditional “T” shaped tamp. I know that last statement can be controversial, as people love their tamp of choice. There was a study done that looked at the force distribution, hand posture, and trunk posture that found palm-based tampers were less stressful in every category observed. Biomechanically, this makes sense as well. Given how much forceful gripping the average barista does, using a palm-based tamp would give the finger flexors a break, while a traditional tamp would still require use of the finger flexors. Additionally, it is difficult to tamp with a traditional tamp without using the shoulder to lift the arm away from the body. This action (called abduction), is used so frequently with portafilter use, pouring milk into pitchers, steaming milk, pouring drinks, and cleaning milk pitchers that giving the shoulder a break from this motion for a different motion puts less repetitive stress on the shoulder.
3. Death to Death Grips
Many of the hand and wrist problems in the barista world can be predominantly linked to forceful grips and forceful exaggerated movements in the wrist. Both grip and excess movements have been linked to Carpal Tunnel and epicondylitis. At every point when using your portafilter, avoid using a death grip. Keep a loose grip on the portafilter at all times, even when securing the portafilter into the machine. The same logic applies to removing the puck from the portafilter. Keep a loose grip and let gravity do the work to remove the used puck. Forceful slamming gives unnecessary stress to your wrist, and over time can lead to pain. Improper tamping and portafilter use has been shown to directly influence pain in baristas.
4. Steam With Your Eyes Not Your Neck
Work related neck pain has been linked with consistent neck flexion, especially when combined with shoulder movements. This presents a problem because steaming milk combines both shoulder movement and neck flexion. Likewise pouring drinks also uses similar motions, consistent neck flexion with associated shoulder movement. In general, try to keep the arms tucked into the body when steaming and look down with your eyes not your neck. If possible, make sure the machine is high enough to avoid using excess bending of the neck to look down.
5. Take Care of Your Mind
Any talk about neck and low back pain always needs to include a section on stress management. Stress/mental health are frequently associated with low back pain and neck pain. This is particularly important for a field that has both customer service components and physical stress components. Talking with a therapist or your primary care physician about treatment options for depression/anxiety is always a great idea.
6. Dress for Function not Style
Lastly, constant standing has been linked with multiple health conditions including low-back pain and leg pain. Because baristas spend a majority, if not all of their day on their feet, priority should be given to shoes that provide comfort and support rather than style. Addition of cushioned mats to stand on has also shown to be helpful in a similar manner.
The coffee community is a caring and passionate community of people that pose unique healthcare challenges. It has been my pleasure to be in your midst over the course of my life. I hope you find this information helpful to you as a barista or as a shop manager in facilitating the health of your workers. This is by no means an exhaustive list, but I do hope that the above topics prove useful and hopefully I will be writing a part two here soon.
Kody can be contacted at kodyjohnson2395@gmail.com or on Instagram @drdarthdarkseid
I recently spent two weeks with John and Bugs from Decent Espresso, doing demonstrations of the DE1 as well as my forthcoming Filter 3.0 basket, throughout the Netherlands, Germany, Switzerland, and Austria. We did sixteen demonstrations in twelve cities, and it was a blast. Our hosts were incredibly gracious and generous, and everyone who came to the events seemed to enjoy the vibe and the coffee as well as the insights about extraction we have gained from using the DE1.
As always happens when I spend time with John, we honed many of our ideas about coffee extraction, and came up with new ideas to work on in the future. Below is a blog-post version of discussions we had at our demonstrations. No matter how experienced you are at making espresso, I trust you will find some interesting food for thought in this post.
The history of espresso machines
In the early days of the Decent DE1 machine, John created various profiles to mimic every significant espresso profile from history. The profiles included versions of lever profiles, the E61 profile, and the flat nine-bar profile common today. John did this to demonstrate the versatility of the DE1 and to show that anything any other machine can do, the DE1 can do it as well. That is still the case, and the DE1 does many things no other machine can do (a few manufacturers make claims about flow and temperature profiling, but don’t provide the data needed to see the accuracy of the claims.) During our demos, John talked about the evolution of espresso-machine design, where it where it went wrong, and how today’s most popular design is not well matched with lightly roasted coffee.
Early espresso machines had manual levers (the barista applied pressure using a lever) while other machines had spring-loaded levers to apply pressure more consistently, and with an arc (preinfusion followed by a pressure rise, peak, and gentle decrease) similar to the pressure curve of the allongé graph in the next section of this post . The spring-loaded lever machines were arguably the peak of Italian espresso-machine design in terms of optimizing coffee quality. Over the years, most manufacturers abandoned the spring-lever design in favor of pump-driven machines that apply a constant nine bars of pressure. Such machines require less barista time and effort, but yield coffee flavor and extraction levels inferior to that of spring-loaded levers.
Allongé
At the beginning of every demo, I served two allongés, a style of very long espresso. I pulled allongé in part because it’s a delicious way to extract lightly roasted coffee, and in part because it yields a lot of coffee, making it easier to serve a large crowd.
Back when I founded Café Myriade in Montreal in 2008, every cafe in the city was expected to serve allongé, and it was the second-most popular drink after filter coffee. Back then, baristi simply pressed the shot button multiple times, or hit the continuous button, to make a very long espresso, using their usual espresso blend, grinder, and grind setting. Of course, such shots were very bitter and astringent. We did things differently; I dedicated a grinder to allongé, used a coarser grind than for espresso, created a diligent puck-prep routine to decrease channeling, and served only fruity, lightly roasted, washed coffees.
I served allongé because it was expected; what was unexpected was how much I liked it. With our light coffees, allongé enhanced the fruit acids and made some memorable shots. Visiting coffee pros were often shocked by how much they enjoyed a 110-ml espresso! Subsequent trends such as “coffee shots,” “turbo shots,” and “extractamundo dos” were all descendants of my allongé, and I’ll discuss later how and why they differ from allongé.
When I told John about allongé eight years ago, he programmed it as as 4.5 ml/s flow profile on the DE1. That meant the machine would apply whatever pressure was necessary to yield 4.5 ml/s. Although the allongé we had served at Myriade were quite good, they didn’t compare to the allongé we served this month on the Decent, since at Myriade we had a Kees Van Der Westen Mirage, an excellent machine, but it could not control flow.
For the record, the allongé we made on tour used 15g of grounds to yield 73g of coffee in 25 seconds.
Note that the constant flow caused the pressure to naturally rise, peak, and decline steadily. Pressure rises as the puck compresses and drops as the viscosity of the slurry decreases (Thanks to Jonathan Gagné for the insight that it is decreasing viscosity, more so than puck erosion, that causes pressure to drop.)
Graph of textbook, flow-profile allongé; green=pressure, blue=flow, brown=shot weight
Fines and channels
The pressure curves of most allongé look like the one above. However, when I pulled a few allongé using an Ethiopian coffee roasted by DAK, something interesting happened: the pressure and the flow levels both stayed constant. Many Decent owners are aware that the curves of Ethiopians and decaffeinated coffees behave differently from other coffees; that is because Ethiopians usually generate more fines than any other origin, and decaffeinated coffee yields more fines than even Ethiopians do. Larger amounts of fines help maintain puck integrity for longer.
Allongé of Ethiopian coffee with flat pressure and flow curves
Turbo Shots, Extractamundo Dos
A few years ago, Chris Hendon, et al. published a paper proposing to optimize the consistency and flavor of espresso by pulling fast and short “turbo shots.” They didn’t explicitly say their findings were only for lightly roasted coffee, but whether they knew it or not, their system wouldn’t work as well with dark roasts. The study’s authors used 15g in a 20g basket to yield 40g, using flat-six-bar pressure, and an EK43 grinder set coarser than the standard espresso grind size. They claimed more consistency and better flavor by pulling such shots vs conventional slower, higher-pressure espresso shots.
When I read the paper, I appreciated their efforts, but lamented that they didn’t use a Decent, because had they used one for a while, they would surely have framed the paper differently. They were discovering things John, some DE1 owners, and I had known for years: lighter roasts taste better at faster flow rates, the optimal grind size is not the one that yields the highest extraction, but is slightly coarser than that (in order to limit excessive puck compression/flow suppression, which promote channels), and shots from most large, flat-burr grinders such as the EK, should be pulled shorter, presumably because of lower fines production than most traditional espresso grinders, as a lack of fines causes the puck to lose integrity earlier in a shot.
I believe the choice of six-bar pressure was merely a hack to decrease the severity of channeling, whether the authors were aware of that or not. Had they had better puck prep and a proper, complete preinfusion, they would likely have had different results, and preferred slightly higher water:grounds ratios. More fines would have also nudged them toward higher ratios.
When I made allongé in Montreal, I used 22g in a 20g basket to create a deeper bed to decrease the risk of astringency. Deeper espresso beds generally increase body, decrease clarity, and lower the risk of astringency. I also used a Robur, which has conical burrs and produces more fines than an EK. The extra fines allow pressure to persist longer, and decrease channeling by blocking larger flow paths. These days, one can see all of those dynamics in the Decent’s pressure and flow curves.
Although I was the first person in specialty coffee to use an EK grinder, I have never enjoyed the quality of espresso extraction from an EK, at any flow rate or ratio. It’s simply not well-suited to espresso, which I believe skewed the results of the paper. That points to a weakness of scientific method when studying a complex system like coffee: it’s difficult for a scientist to know what is “true for coffee in general” and what is “true only for our particular equipment and coffee and methods.” The DE1’s graphs plus the 5000+ members of the Decent Diaspora forum together make up a more effective system for studying espresso extraction, as the DE1 owners’ collaboration is akin to a “big data” approach. DE1 owners have uploaded data from over one million shots to https://visualizer.coffee, a very useful resource for coffee researchers. I believe such an approach is more effective and appropriate than traditional science for learning about a complex system. In summary, the “turbo shot” is shorter than allongé because one needs to use a lower water:grounds ratio to compensate for the channeling and uneven extraction produced by lightly roasted coffee with modest amounts of fines, pulled on flat-pressure machines.
EKs and constant-pressure machines are suboptimal for getting the most from lightly roasted coffee.
A recent variation on allongé/turbo shots is the “extractamundo dos” profile. Extractamundo is a shorter version of its predecessors. John and I believe extractamundo is popular with DE1 owners mostly because pulling shorter, fast-flowing shots decreases the flavor damage from roast defects, imperfect puck prep, and channels related to low fines production.
My prediction for the future is that as more people use the DE1, and the forthcoming Barista Hustle AutoComb improves puck prep, baristi will pull light roasts at higher flow rates and longer ratios, on average, than they do currently.
Extraction of Light Roasts vs Dark Roasts
Over the years, roasters have attempted to optimize coffee flavor from nine-bar machines. However, while such machines do a passable job with darker roasts, they do a poor job of optimizing light roasts. I know I’ll take flack for that from people who use nine-bar machines and love their espresso, but any barista who has spent years using a variety of profiles, instead of only nine-bar machines, is likely to agree that a flat-nine-bar machine does not optimize light roasts. I’m not saying what one should like, I’m saying that certain systems tend to produce better overall results from lightly roasted coffee. For reference, precious few Decent owners choose the Italian nine-bar profile on the DE1 to pull straight shots with light roasts.
To optimize dark roasts and minimize bitter, burnt, and acrid flavors, one may want to pull shorter shots, target lower extraction levels, and extract at lower temperatures. Paul Chan of Decent recently created the “80s espresso profile” to decrease the harshness of darker roasts. (You can also add salt to espresso to decrease bitterness.)
The allongé and my “blooming espresso” profile on the Decent were breakthrough profiles for getting the best flavor from lighter roasts. Blooming was inspired by drip brewing methods: the profile consists of a preinfusion phase, a 30-second bloom with a small amount of applied pressure to prevent the puck from expanding (and possibly losing integrity), a pressure ramp, and a slow pressure decline. When I craeted the blooming profile, I was shocked to experience extraction levels as high as 29% with light roasts and 2.5:1 ratios. Unlike dark roasts, quality light roasts tend to taste best at high extraction levels, and some of the most memorable espresso shots of my life were blooming shots of Kenyan coffees extracted to 29%.
During our demos, John perceptively pointed out that both allongé and blooming use non-standard methods to boost extraction from lighter roasts. Allongé runs a lot more solvent (water) through grounds than any other espresso profile, and blooming uses a 30-second bloom to increase contact time between the grounds and water. Notably, neither technique makes great espresso from darker roasts, since they yield such high extractions, which make harsher dark-roast flavors more prominent.
Blooming espresso: preinfusion is done at 4 ml/s, pressure gradually and naturally declines during a 30-second bloom, and pressure rises and falls during the secondary flow stage of 2 ml/s
Filter Coffee
During the second half of our presentations I made filter coffees for the audience using my forthcoming Filter 3.0 basket. It’s called 3.0 because over the years, in my attempt to turn the DE1 into a filter-coffee brewer, there were two earlier iterations.
Filter 1.0 made use of a blank portafilter basket with numerous holes in it to turn the basket into a spray head. The barista set a manual brewer under the basket, pressed START, and the DE1 ran a pulsing flow profile to make filter coffee. Unlike, say, a cheap home filter machine, since the DE1 can apply a small amount of pressure, spray from the holes was even, and the result was pretty good filter coffee with no barista effort or skill required. The results were good, but I wanted better.
In Filter 2.0, I used 18g of finely ground coffee in a 25g basket. I used a flow profile that occasionally applied up to 0.2 of pressure. The goal was to make a coffee concentrate with as little pressure as possible, and to dilute the concentrate before serving. Results were sometimes amazing, but inconsistent. The problem with 2.0 was it demanded flawless puck prep. Great puck prep led to excellent results, but when puck prep wasn’t perfect, astringency was noticeable.
Filter 3.0 in action
Filter 3.0 is almost ready for production, and I’m happy to report, makes excellent filter extractions every time, with no barista skill or time required. The barista drops a 57mm paper filter in the basket, pours in 22g of grounds, shakes the basket to level the grounds, and presses START. The DE1 runs a flow profile consisting of a prewet, bloom, and successively slower flow rates, with a declining temperature profile. Extractions hover in the low 20s and brew times are 4:00-4:15. The basket is a version of a “no-bypass brewer,” a term coined by Jonathan Gagné to describe brewers such as the Tricolate, NextLevel LVL10, and the forthcoming NextLevel Pulsar. Since there is no possibility of bypass, the grind for 3.0 is extremely coarse, similar to that one would use for a commercial batch brew. I’m thrilled with the results, and the audiences at our demos seemed universally happy as well. Several of the host cafe owners on our tour expressed their interest in buying a DE1 in order to make Filter 3.0 in their cafes.
Q&A
At the end of each demo, we talked about topics such as water chemistry (see my recent posts here and here), grind quality, how fines affect espresso extraction, Decent’s new “forever warranty” program, and our plans for a new commercial Decent machine, the Bengle. Stay tuned for more, and thanks to everyone who hosted us and joined our demonstrations!
Water can be a confusing topic. For example, as I have mentioned in The Professional Barista’s Handbook and Everything But Espresso, “alkalinity” and “alkaline” mean different things. Machine manufacturers focus on avoiding scale, but are generally not aware of what water chemistry is best for flavor, or how to balance the concerns of avoiding scale vs optimizing flavor. Further, the industry’s historical focus on overall TDS has led to a misguided belief that having a reasonable TDS level means water is optimal for coffee making.
I’ll do my best here to simplify the discussion to help cafes, baristas and roasters make decisions about water quality. The important points to discuss are:
Alkalinity is the single-most important factor in how water will affect coffee flavor.
One must get a laboratory water analysis to know what water-treatment system is appropriate for a cafe or roastery. Test, don’t guess.
Beyond flavor, it is important to ensure your water will not cause scale to precipitate in your coffee machines. This is especially important in high-volume settings such as coffee bars. Sometimes one needs to compromise and allow a little scale or sacrifice a little flavor quality to balance those two concerns.
Some definitions
TDS: Total Dissolved Solids. This means exactly what it says: how much stuff is dissolved in the water. Industry recommendations have historically been to use water with TDS of 100-150, but by itself, TDS is a relatively unimportant number.
Hardness / General Hardness/ Temporary Hardness/ GH: this is the type of hardness created by dissolved calcium, magnesium, and iron cations. GH may influence flavor and scaling risk, but there is little consensus on the optimal level or the ideal balance of Ca+ and Mg+.
pH/ Potential Hydrogen: a measure of acidity, from 1—14. Neutral is 7.0. The pH scale is famously confusing because it is logarithmic. In other words, a pH of 2 is ten times more acidic than a pH of 3. Coffee, having a pH around 5, is not all that acidic, despite its reputation. For reference, lemon juice (pH of 2) is 1000 times more acidic, and stomach acid can be far more acidic than lemon juice. Water pH is not particularly important when considering water for coffee because the alkalinity level will have a far greater impact on final acidity in the cup.
Alkaline: this simply means pH is above 7, or the water is “basic” and not acidic.
Alkalinity/ Bicarbonate/ Buffer/ Carbonate Hardness/ KH: As you can see by these terms, whoever created water-chemistry nomenclature was a misanthrope. Alkalinity is a solution’s resistance to becoming more acidic upon the addition of an acid. Alkalinity is — by far — the single most important factor in how water chemistry will affect coffee flavor. Simply put, higher alkalinity makes coffee less acidic. Lower alkalinity makes coffee more acidic. These statements are true regardless of the water pH.
My personal preference for lightly roasted, well-developed beans is an alkalinity level of 30—40ppm. Your preferences may differ, and there may be times you intentionally choose unusual alkalinity levels to enhance or tone down acidity, depending on the bean and roast quality and degree. For example, you may choose low-alkalinity water to enhance the acidity of a flat-tasting coffee, etc. Please note that water can have high alkalinity (buffer) but not be alkaline. As I wrote in the The Professional Barista’s Handbook (2008):
A solution can be very alkaline but have low alkalinity, and vice versa. As an analogy, think of alkaline as the solution’s location on the political spectrum. Let’s say alkaline refers to being on the right, and acid refers to the left; alkaline denotes being conservative, acid denotes liberal. (No political commentary intended!) Alkalinity, on the other hand, is analogous to stubbornness, or resistance, to becoming more liberal. Of course, one can be at either end of the spectrum (acid or alkaline) and still be resistant (have high alkalinity) or amenable (low alkalinity) to becoming more liberal.
Water for coffee at home
If you make coffee at home, there are a few convenient options:
Search online for your city’s municipal water-quality report. It may help you know if your tap-water alkalinity level is high or low, or if your water contains contaminants you want to avoid, and may only be removed via reverse osmosis. Knowing your tap-water chemistry will help you make an informed decision about how to optimize it for coffee brewing.
Bottled water: I’ve never been somewhere in the world that didn’t offer at least one bottled-water option that was pretty good for coffee brewing. It’s worth reading labels and looking online to learn more about the bottled-water options in your area. If you can’t find a single bottled water with your preferred alkalinity level, consider blending distilled water with other bottled water to achieve your target alkalinity.
Buy demineralized or distilled water, and add dry salts or a product like Lotus Water Drops. This can be a great way to learn the effects of different water chemistry on coffee flavor, and help you dial in your preferences. Many grocery stores sell affordable reverse-osmosis water that you can buy and pour into large, reusable jugs.
If your tap water is naturally good for coffee, you may want to use a simple carbon filter such as a Brita pitcher or similar. If your water is hard and/or has very high alkalinity, you may want to try thePeak Water pitcher or a similar product.
Water for coffee in a commercial setting
If you survey machine manufacturers, they will rightly steer you toward water treatment that will protect your machines from scale (the precipitation of CaCO3). However, most machine providers or servicers are not aware of what water chemistry makes coffee taste best.
A simple way to estimate the scaling potential of water at various temperatures is to use an online Langelier Saturation Index calculator. I have mentioned the LSI in several of my books:
For many years, I battled with my espresso-machine supplier because he insisted that i use a water softener to protect the machine. I argued that I did not need a softener, since my water would not produce scale in the machine, and that further, softening very hard water damages coffee flavor, so a softener is never the best solution. He finally relented when I showed him the LSI.
In more recent years, the industry has avoided the risks of water softeners by favoring reverse-osmosis systems with blending valves. These systems remove approximately 90% of the dissolved solids from water by reverse osmosis, and offer the option of blending the RO water with carbon-filtered tap water. Let me offer an example of how to use an RO system with blending valve. Let’s say your tap water has:
80 TDS
60 GH
60 KH
but you prefer alkalinity (KH) of 30.
The RO water will have KH of 6 (we will assume it removes 90% of dissolved solids in the water). The “blending water” that passed only through a carbon filter will have KH of 60.
If you use 55% RO + 45% blending water, the result will be:
.55*6 + .45*60 = 3.3 + 27 = 30.3 KH
Please note that while RO systems are common in cafes, they are inappropriate in places with soft tap water. For example, a cafe in Manhattan may have 25 TDS and 15 KH. Removing any minerals from that water would be a mistake, and the cafe should only use a sediment filter + carbon filter to remove undesired tastes and odors.
Test, don’t guess
I always ask my clients to get a water test from a laboratory before choosing a water system. I have my preferred labs, and I would personally pay the $100-$200 for a test rather than get a free test from a water-treatment company, partly to not feel in debt to that company, and partly to get a comprehensive test that few, if any, water-treatment system companies provide for free
For example, below are the test results of the water at the Prodigal roastery. As you can see, the alkalinity is slightly above my preferred range, but close enough to that range that I don’t think it’s worth getting an RO system. We are satisfied with the coffee flavor after passing this water simply through a sediment filter and carbon filter.
“Resting” coffee after roasting is a hot topic, and apparently a confusing one at that. Around the time the Loring became popular and more third-wave roasters began roasting ultra-light, or “Nordic style” it became common for roasters to recommend resting beans for weeks or months after roasting. That was a revolutionary change from traditional practices.
Why we rest coffee for espresso
Historically, most roasters and baristas were on the same page when it came to resting beans to be pulled as espresso. Pulling shots of coffee roasted recently and ground on demand results in massive amounts of crema and lower extractions than shots pulled from beans several weeks off roast. The reason for this is likely that the back pressure caused by degassing during espresso extraction forces the barista to use a coarser grind with very fresh coffee, and/or the outgassing may make it more difficult for the water to rapidly dissolve solids from intact cells within the grounds. (In a pressurized espresso basket, there is nowhere for the gas to escape to; in filter brewing, gas released when water wets the grounds escapes into the atmosphere, and does not provide meaningful back pressure.)
Until the last several years, common practice was to rest espresso beans, but not beans for filter coffee. More recently, especially as the popularity of the Loring has exploded and the more roasters have chosen to roast ultra-light, resting has become a standard, almost universal practice.
Why would we rest beans for filter coffee?
There seems to be a connection between the strength of beans’ cellulose structure and the need to rest coffee. Lighter roasts have stronger, less brittle, less porous cell structures. I am not sure if anyone knows exactly what changes during resting, whether the cellulose weakens with time or (more likely) some chemical changes occur slowly to affect coffee flavor in a way that makes the coffee seem more developed. Most of us would agree that the lighter the roast, the more resting is required to reach the coffee’s flavor peak.
What factors make resting beneficial?
As noted, light roasts seem to benefit more from resting. Coffee from air roasters seem to benefit more than coffee from drum roasters. Presumably, the conductive heat transfer in drum roasters damages the outer layers of the beans during roasting, weakening the cell structures, and making them more porous, more developed, and less in need of resting.
Resting times among different air roasters
I have spent the last several months roasting on two air roasters, a Roest sample roaster, and a 15kg IMF. I roast on the light side by almost any standard, and my roasts seem to benefit from some rest. However, while they may peak one or two weeks after roasting (the jury is still out), they taste perfectly fine a day or two after roasting.
But not all air roasters are the same; in my experience, coffee from Loring machines requires longer resting periods than coffee from other air roasters. I’m not sure why that is, but one of two unique features of Lorings is the likely culprit: the roasting chamber is pressurized, and the roasting environment is oxygen-free (I cannot confirm that, but Loring claims that is the case.) One of those two factors is likely the reason why coffee from Lorings needs longer resting times than coffee from other machines.
How long should you rest coffee?
Judging by my inbox, many people assume all roasted coffee needs lengthy resting periods. Of course, everyone has his or her own preference. But I would argue optimal roasting time depends on roast level, whether the coffee came from a drum or air roaster, and if from an air roaster, whether the machine was a Loring.
If I were forced to drink a dark, oily roast, I would not rest the coffee for more than a day, as the coffee will likely taste a little rancid within a few days. (And of course I would add salt, haha.) I don’t find coffee from classic-drum roasters benefits from more than a day or two of rest, unless the coffee is what I would consider underdeveloped. As for air roasters, I would probably rest the coffee from one to four weeks, depending on development level and whether the coffee came from a Loring.
Storage conditions and resting
While not usually a part of the resting conversation, how roasted coffee is stored affects quality after a given resting period. At one extreme, freezing vacuum-sealed beans slows the aging process so much that it would probably take months or years to reach the same condition as coffee rested for a week or two at room temperature. Likewise, pressurized cans, such as those used by Illy, can slow the aging process to a crawl. Beans stored in cooler conditions will evolve more slowly, while beans stored in warm environments will degrade much faster.
The bottom line
There is no one size fits all resting period. Consider the type of machine, roast and development level, and storage conditions when trying to guess when a coffee will peak. Comments welcome.
I’ve been asked dozens of times why I chose IMF for Prodigal, and not Loring or Probat. To understand that, I’d like to explain how those machines differ and why I believe IMF makes the best roasting machines in the world.
Drum roasters vs air roasters
Although IMF and Loring machines have drums, most of us call them “air roasters” because they transfer heat almost exclusively by convection with little-to-no conduction. Some air roasters, such as Sivetzand Neuhaus Neotec move the beans via a “fluidized bed” of hot air; other air roasters such as IMF and Loring use a drum to direct the bean movement, independent of airflow.
Over the years, marketers have done a good job of muddying the facts about drum vs air roasting. Air roasting advocates have often claimed all drum roasts are “burnt” and only air roasting is “clean” and some drum roaster fans have claimed air roasts have “no body” or “uneven development.”
While such claims may have some merit when a machine is used improperly, I do not think they accurately represent the results a semi-skilled operator would achieve.
A skilled roaster will find drum roasts offer a little more body, a bit less flavor clarity or delicacy, and less inner-bean development at a given outer-bean roast color. All of those differences are due to drum roasters transferring more heat via conduction.
Air roasters, on average, make inner-bean development easier and are less likely to impart roasty flavors. The same trade-off that exists between flavor clarity and body exists in roasting; increasing one decreases the other.
Air roasters allow faster roasting than drum roasters do, since air roasters can operate at extremely high inlet-air temperatures without concern of overheating the drum surface. The common notion that roasts should take “10-12 minutes” or the like is an artifact of most roasters using drums; let’s say you put a massive burner in a 12kg Probat and roasted 12kg in six minutes; the drum would get so hot that it would sear the beans, causing tipping, scorching, and likely inadequate inner-bean development at lighter roast levels. But it’s common to roast in 6-7 minutes in air roasters; hot air does not damage beans (for reference, in my ROEST, I use an inlet temperature as high as 700 fahrenheit during my 200-g batches with no cosmetic or flavor damage.
One could argue that roast consistency is a little easier with an air roaster, though I think nearly equal consistency is achievable in most machines, provided they don’t have features or control systems that interfere with an effective between-batch protocol.
Which type of roaster is better?
I don’t believe there is a one-size-fits-all roaster design. If you prefer darker roasts and maximum body, you should probably use a drum roaster. At darker roast levels, inner-bean development won’t be much of a concern, and you probably won’t mind the lack of flavor delicacy. If you prefer light roasts and high flavor clarity, you’ll probably want to choose an air roaster.
But, dear reader, please do not misinterpret what I’ve written here: nowhere have I said that you cannot develop light roasts well in a drum roaster or impart roasty flavors in an air roaster. These are merely comparisons of their relative performance.
IMF vs Loring
Given that I prefer light roasts and delicate flavors, I was definitely going to buy an air roaster for Prodigal. The choice came down to IMF and Loring.
Both machines use air-recirculation: instead of having a burner for the roasting process and an afterburner to clean the exhaust air, they have one burner held at afterburner-level temperatures to clean the exhaust air and provide hot air for roasting. Both designs are more fuel efficient than using a drum roaster with an afterburner. But the similarities end there.
Airflow: There are effectively two different airflows in IMFs and Lorings, what I’ll call “air throughput” and “recirculated air.” Think of them like this: imagine you are filling a leaky bucket with water from a faucet. The water entering the bucket and draining from the bucket are the “throughput.” If you simultaneously stir the water, that is the recirculation. The “types” of airflow in the IMF and Loring intermingle but their levels are independent.
Both machines recirculate air through their burners, and assuming one maintains the burner temperature high enough, the air is “cleaned” of smoke and pollution, to prevent the recirculation from tainting coffee flavor.
The amount of throughput in Lorings is correlated with the gas setting, in order for its fuel injection system to maintain a constant air:fuel ratio. So, when using a gas setting of 80%, the throughput is roughly twice as high as when the gas is at 40% (I’m not sure if it’s exactly a 1:1 ratio, but it’s close). I do not like this system for two reasons: it prevents the Loring from lending itself to inlet-temperature profiling (see below), and it means the air throughput is very low when using low gas settings late in roasts. This, to me, is the reason why the IMF is better at both controlling roasts through first crack and executing dark roasts.
The IMF exhaust fan and burner temperature are independently controlled. That means we can have whatever throughput level we want at anytime. It also allows one to use inlet-temperature profiling, which is the best way to control an air roaster.
Incoming air in the IMF is a combination of hot air from the burner and air from the roasting room, blended dynamically by a fluttering “vortex” valve that produces the desired inlet temperature at all times. The level of air throughput is determined by the exhaust fan setting, which is set by the operator.
To me, the only benefit of Loring’s lower overall air throughput is it makes the fuel efficiency higher than that of the IMF. The IMF’s higher air throughput offers superior control of roast curves at all times, especially when most needed late in a roast.
Airflow: advantage IMF
Fuel Efficiency: advantage Loring
Drum: The Loring’s drum is solid steel, while the IMF’s is perforated. While I don’t think that’s a big deal, I would always choose a perforated drum in order to decrease potential conductive heat transfer.
Drum: advantage IMF
Productivity: Both machines can roast full batches faster than a drum roaster. Some Loring machines seem more powerful relative to stated capacity than others (The 15kg seems especially underpowered.) But IMFs are more powerful than Lorings at any size, and one can roast full batches in less than 8:00 in IMF with no compromise in quality.
Productivity: advantage IMF
Control System: Loring offers three ways to control roasts: manually changing gas settings, using automated burner recipes, and “profile roasting.” Burner recipes are like manual control, but with valve settings preset by the operator, and executed by the machine (Cropster Gas & Replay, and Artisan software offer this same option for any machine that has a digital gas valve capable of receiving commands from the software.) In profile roasting, which I wrote about here, the Loring uses a PID to change the gas setting automatically, in an attempt to trace the bean-temperature curve of a reference roast. The system does not perfectly trace curves, because profile roasting gets confused during the first minute of a roast while the BT reading drops. After the turn, the system does a relatively good job of tracing curves, assuming the operator has programmed a curve achievable by the automation. I find the profiling system useful for very dark roasts, but a skilled operator can usually roast more consistently in manual mode than in profiling mode.
The IMF control screen allows the operator to create a twelve-step recipe using bean-temperature set points. The operator can choose the inlet temperature, drum speed, and fan setting at each bean-temperature set point. I cannot overstate the superiority of controlling roasts by inlet temperature rather than valve settings. For example, let’s say you have a Probat and have a recipe that looks like this:
gas 80@ BT300°F
gas 70@ BT320°F
gas 60@ BT340°F
The beans do not experience the gas-valve settings, they experience the inlet temperatures produced by those settings. However, since ambient air is drawn through the burner, unless the ambient temperature is tightly controlled, a given valve setting will produce different inlet air temperatures as ambient conditions change. For example, it’s typical for a certain gas setting to produce hotter inlet temperatures at the end of a roast session than at the beginning, if the roastery gets progressively warmer throughout a session. Likewise, inlet temperatures tend to be higher in summer than winter for a given valve setting.
Directly controlling the inlet temperature prevents inconsistencies due to changes in ambient conditions. I doubt many roasters until now have recognized the benefit of such a system. The improvement in predictability and consistency yielded by an inlet-temperature control system is why I asked ROEST to add that feature to its machines, and why machines like ROEST and IMF make roast replication much easier than machines that require control by gas-valve settings.
One cannot operate a Loring by inlet temperatures, and even if they could, the constantly changing air throughput of the Loring would make the heat transfer more challenging to manage.
Advantage: IMF, by a landslide
In this photo of the IMF recipe screen, the machine will deliver inlet temperatures of
485c @ BT174c
480c @ BT185c
475c @ BT191, etc
Please note these settings are not recommendations; they are merely examples.
Price
While price was never a consideration when deciding which machine to purchase for Prodigal, IMFs are, across the board, cheaper than Lorings. I doubt that will be the case for long, once roasters come to understand the benefits of IMF.
Advantage: IMF
Conclusion
While I consider Loring and IMF to be two of the best roasting machines on the market, I chose IMF for all of the reasons above. I confess that I didn’t start Prodigal earlier because I was frustrated with the choices of sample roasters and production roasters until recently. Now that I have found IMF, and ROEST has added inlet-temperature profiling, I couldn’t be happier with o results.
Since starting Prodigal, I’ve been thinking a lot about sample roasting. Sample roasting is arguably more important to final product quality than production roasting is, so I have been remiss in not discussing sample roasting more in the past.
What is sample roasting?
Sample roasting involves roasting small quantities of coffee, usually as little as 50g up to 200g, but most commonly 100g, to test and choose which lots of green coffee to buy. Sample roasting is also sometimes used to “profile” a coffee before production roasting, but the utility of such “profiling” is dubious. The word profiling can mean various things, but here it refers to the practice of attempting to learn how to roast a new coffee on a small machine, with the intention of transferring that knowledge to a larger machine. Unfortunately, it is difficult to transfer more than general insights (how much relative power does a coffee require to roast, approximately how does it behave around first crack, what roast color tastes good, etc.) from a small machine to a larger one. Profiling in this way can give one a “ballpark idea” of how to approach a coffee, but cannot, with our current technology and understanding, tell one precisely how to roast a coffee in a larger machine.
Types of sample roasters
Historically, most sample roasters were small drum roasters with open-faced drums, such as in the photo above. While such dinosaurs often churn out surprisingly delicious coffee, they make consistent, predictable results nearly impossible. For a deep dive into why these machines offer poor consistency, and how to modify them for better results, please see my post HERE
In recent years, a plethora of +/-500g drum roasters have hit the market that offer more controlled and consistent, if not always as delicious, sample roasts. Most such machines come from China, have similar features, and none stand out as particularly special. The positive aspects of these machines include fully modulating control over gas, drum RPM, and airflow, and easy connection to software such as Cropster or Artisan. However, some of these machines roast with too much conduction, most have slow bean probes in frankly stupid locations, and some have the reliability of an Edsel. If you don’t know what an Edsel is, consider yourself fortunate.
If you are going to buy one of these small drum roasters, I recommend getting one of the cheaper ones, because they are all similar, with nearly identical designs, and usually require the user to replace and move the BT probe, possibly the gas-pressure gauge, and often a few other small features.
More recently, air roasters such as the Ikawa, Kaffelogic, and Roest have hit the market. The potential roast quality out of air roasters is generally superior to that of drum roasters, since air roasters transfer little to no heat by conduction, but instead use convection, which makes it easier to develop coffee and avoid roasty (not a real word) flavors. Until recently, I was frustrated by the control and repeatability offered by most of these machines, although all have the ability to produce delicious coffee at least some of the time.
What I use
Prior to 2022, my preferred sample roaster was a 500g drum roaster. Such machines offer good data quality down to 100g batches, and offer probably the most insight into how a coffee may behave in a production roaster. Roast quality was “pretty good” but consistent and predictable. I’d rather roast at a quality level of 8/10 consistently than have erratic, and occasionally better, sample roasts, because one needs consistency to give each green sample a fair trial.
More recently, at Prodigal I began using the Roest. For full disclosure, I did not pay for the machine. You don’t have to trust me, but no amount of free stuff could make me use anything but the best possible machine at Prodigal, or could compel me to write a blog post about a product. I needed a great machine to get the most out of my coffee, and for years I’ve been begging manufacturers to build exactly what Roest has built.
My relationship with Roest was rocky at first, as I had a disagreement with someone at the company about roasting data. Because we had such different perspectives, I invited some of the Roest folks as guests at my roasting seminar in Boston last year. They took notes, asked questions, shared their experience designing machines with the class, and — wonderfully — embraced the importance of an effective warmup and between-batch protocol. They were excited, because they recognized an effective BBP was not only necessary for good consistency (yes, even in an air roaster), but also essential for successful automation and replication. I was excited, because a manufacturer finally engaged and cared about the importance of a quality warmup and BBP :). Further discussions led to the addition of an inlet-temperature probe, because using an inlet-temperature recipe is the most effective way to manage an air roaster consistently (more on that in a future post).
A roast using an inlet-temperature profile (please ignore the “yellowing” note)
Last year, Roest added the ability to create customized warmup and BBP profiles, and now the machine automatically triggers the BBP upon dropping a batch. I cannot say how happy that makes me as a roaster, and also the only person yelling about the importance of an effective BBP for years. The last piece of the puzzle happened this month, as Roest now offers the option to create inlet-temperature profiles based on bean-temperature set points instead of time. Such as system makes consistent, predictable, high-quality roasting possible in a way it had never been before.
I’m grateful to Roest for the machine, but more grateful they care about details, consistency, and continual improvements. Choosing a sample roaster is finally a no-brainer for me.
NB: Readers may notice some similarities between the Roest and the Decent espresso machine. I’m fond of both machines for similar reasons: each is a seamless marriage of user-friendly, clever software and hardware, both companies listen to feedback and rapidly improve and update their software and hardware, and they offer unparalleled control and real-time information while roasting and making espresso, respectively. Most importantly, each offers better coffee, more consistently, than any other machine in its category.
Roest screenshots: 1) An inlet-temperature profile 2)Profile log 3)Roast comparison
Portland Classes
Please join Samo Smrke and me for our masterclasses in Portland.
You can find tickets and details about my roasting masterclass HERE.
Tickets and details of Samo’s “Improving coffee with science” class can be found HERE
Prodigal Update
Prodigal is on hold for another month or two, while we finalize our permits and the installation of our IMFroaster. We may release a small amount of extremely delicious coffee in the next couple of weeks, as we have some stunning green that we want to roast while it is still incredibly fresh. We will update our mailing listandInstagramfollowersas soon as we know when we will get back to a regular roasting schedule.
Prodigal Coffee at SCA Expo
I’m pleased to announce you will be able to taste two smashing Prodigal coffees at SCA Expo, our washed Colombian “Finca La Indonesia” sidra and washed Colombian “Francy Castillo” geisha. I will roast both coffees on the ROEST, the machine I consider hands-down the best sample roaster.
You can taste Prodigal’s coffee brewed in the new NextLevel Pulsar by the fine folks of NextLevel (they will share Sivetz Roasters’ booth) and also at the ROEST booth. I will spend time brewing the coffees at the two booths, and I’ll post my schedule on Instagram on the day of the event so you know where to find me.
My intention is to not only showcase what the ROEST and Pulsar can do, but to make sure these are the two most memorable coffees you taste at Expo!
You can, of course, also taste Prodigal coffees at my Roasting Masterclass on Saturday.
Thanks to Apex Coffee Imports for sourcing two of the cleanest, prettiest, most floral coffees I have tasted in recent memory.
Ahead of the launch of Prodigal, Mark and I cupped for a minimum of one hour each morning. Having such a routine allowed us to calibrate well after cupping more than 2000 samples together. Those sessions also taught us a lot, some of which I’d like to share here.
First, I want to credit Ryan Brown. Over the years, I learned a lot not just from cupping with Ryan, but from throwaway remarks he would make. To him, many of those remarks were the equivalent of cupping small talk. To me, they often held pearls of hard-earned wisdom. Ryan is rigorous in creating systems that prevent bias and help to confirm his findings about samples. A good green buyer cups each sample multiple times on multiple days and does everything possible to avoid bias.
Until launching Prodigal, most of my cupping was done through the eyes of a production roaster and cupping was mostly an exercise to evaluate roast quality. I focused on problems of baking, roast development, side effects of excessive conduction, and the like. I did not cup to intensely analyze the merits of one green lot vs another. But production-roast cupping improved my green-evaluation skills.
Herein are what I consider some cupping best practices.
Always cup blindly
This rule may seem obvious, but in my experience, few roasters follow this rule religiously. I get it: cupping blindly with others can be embarrassing and humbling. But cupping isn’t a competition. You can either protect yourself from looking bad, or you can learn from experience, but you can’t do both well at the same time. Suck it up, make mistakes, and don’t worry if you thought that wet-hulled Sumatra was a washed Kenya. It happens to everyone.
As often as possible, consder “double blinding” a cupping by having someone else set up the cupping so the cuppers do not know what coffees are on the table.
To make cupping as blind as possible, consider hiding visual differences in coffees; for example, if you have a variety of roast levels on the table, it helps to cup in bowls with black interiors, in order to not see the colors of the brews. Some training sessions even use sunglasses to decrease visual cues about samples.
Please do not use the traditional practice of setting a sample tray of roasted coffee next to each cupping bowl. That makes it impossible to be appropriately blind when looking at the roasted beans of a sample.
Always cup with others
Cupping with others is far more educational than cupping alone. Various people will perceive different flavors in coffees, and some people are better at perceiving certain defects than others are. Cupping with others is a great way to expand your tasting abilities. For example, Mark is better than I am at tasting certain underdeveloped flavors, while I am more likely than he is to detect fade in coffee samples. Cupping together helps us shore up our weaknesses.
Try to cup with more experienced professionals whenever possible.
This is a no-brainer. Cupping with more experienced pros is by far the best accelerant if you want to get better at tasting coffee.
Always take notes during cupping
Please don’t try to memorize your impressions of 5–10 cupping bowls; it is always better to take notes to discuss results with others, for scoring coffees accurately, and for future reference. I don’t believe one needs an official score sheet to score samples accurately, but I do believe it takes months of calibration practice to score accurately and consistently.
Wait until after everyone has done at least one round of slurping and note taking before discussing samples
I’ve been to many cuppings where people begin discussing the coffees as soon as they begin tasting. That is more fun than taking notes silently, but it also inhibits learning and increases the risk of bias.
Be as rigorous as possible in cupping procedure
What I mean by this is: use a consistent grind setting (I usually grind at a setting 1-2 integers finer than a typical 20g pourover setting) and water chemistry, weigh grounds to 0.1g resolution, weigh water to within a few grams per bowl, grind, pour, and taste on a timer with a rigorous schedule, and consider cupping at a brisk but comfortable pace to ensure you are tasting all samples at similar temperatures. Ryan taught me to take just one or two slurps per sample and to focus hard on those slurps. That has helped me cup more quickly. Previously I was taking too many slurps per bowl, which was taking too much time, decreased my focus , and caused my palate to fatigue earlier.
Take one or two slurps, jot down a couple of words in your notes, and move to the next bowl. It’s okay if you don’t perceive an encyclopedia of descriptors after just one or two slurps.
When cupping to choose green, do your best to optimize cup quality
When cupping to decide what green lots to purchase, sample roasting and cupping should be done in a way that optimizes cup quality. That will allow each green lot the shine and show its best features.
When cupping for production roasting QC, consider sacrificing cup quality, if necessary, in order to detect roast defects more easily
Let me explain this idea… Personally, I use an identical procedure when cupping for green buying and cupping for production roast analysis. However, I’ve cupped with many companies whose coffees tasted better when using a coarser grind or lower water temperature during cupping. In those situations, grinding finer or brewing hotter likely highlighted roast defects. If your cuppings taste better at grind settings coarser than your typical pourover grind setting, then there is probably work to do to improve roast quality. But please do not change the grind setting or water temperature to improve the flavor of cupping bowls.
Always cup at least one sample from another roaster on every table for context
I find many roasters are biased in favor of their own coffees. I recommend roasters find the best coffees they can from competing roasters, and to always have at least one such sample on every cupping table for context.
Test the effectiveness of your cupping system
Many roasters have told me something like “This coffee cupped sharp on day one out of the roaster, was super fruity on day two, the flavors were muted for a few days and then the coffee was cupped great again after one week.” While I don’t doubt that cupper’s experience, it is unlikely the coffee really got worse, better, worse, and better. It’s possible, of course, but it’s more likely the cupping system is to blame, or the coffee has an abundance of quakers or other dodgy beans that show up in some samples but not others.
To test the reliability of your cupping system, try something like this:
Scatter three bowls of the same coffee among several other coffees on the cupping table. Note whether your tasting notes and scores were consistent for those three bowls.
Taste several bowls of the same coffee several days in a row, again scattered among other samples, to see whether your notes change day to day.
With a little effort, you can taste the baseline reliability of your cupping system. If the three bowls in each of the trials above tasted and scored identically, your system is probably reliable. If the three bowls varied a lot in flavor
, it’s important to run the same test with a few other coffees to see whether the cupping system or the coffees themselves are inconsistent.
In general, scattering multiple bowls of a particular sample throughout a cupping table and trying to identify them is an excellent exercise to hone your tasting ability.
Re-cup your roasts several times over the few weeks after roasting
Once you have shored up the reliability of your cupping system, it is worth tasting various roast batches over several weeks after roasting to perceive how the coffee ages and evolves. You may find your coffees typically peak after a certain number of “resting” days or you may find your coffees peak within a day of roasting and decline from there.
Regularly testing and monitoring the quality of your roasts as they age can help you optimize your customers’ experience.
Cup more rigorously when purchasing green than when analyzing sample roasts
When cupping to select green for purchase, I consider it essential to cup multiple bowls of a candidate sample multiple times before choosing a green lot. Not only do I want several looks at a coffee in order to avoid defects that may appear in only some bowls, but I want to confirm my impression of a coffee before committing to it.
When cupping production roasts, we are usually confirming the consistency of our results, or testing whether one approach works marginally better than another approach to roasting a particular coffee. Occasionally I will re-cup a roast batch to get a clearer picture of its quality, but usually one bowl is sufficient per batch.
We received multiples more inquiries than we had coffee available. Some of that was due to us deciding some of our green, once arrived, was below our quality standards for Prodigal, and some was due to my poor forecasting skills.
Roasting and filling orders and handling inquiries was quite a challenge, as we had expected a much slower start. To be frank, no part of the process ran as smoothly as I would have liked, but we intend to be far more prepared for our next roasting and fulfillment session.
Before the launch we did not have a green moisture meter, color meter, or enough staff to double-check every order. We also didn’t have experience with how our roasts would evolve due to travel and resting. All of that is sorted now.
The first day of roasts (Jan 4) cupped beautifully directly out of the roaster and the next morning. A week or two later, the coffees tasted “too developed” but not roasty. I issued a public apology and offered to make any dissatisfied customers whole. Three customers took us up on that offer.
Working on a new machine in an environment I couldn’t control was challenging. Contrary to popular belief, roasting is about systems and controlling variables, not about sniffing beans in a trier or some sixth sense about what is happening to 50,000 beans inside a giant hunk of hot metal. Having sixty batches under our belts, learning when to roast (at night, in a sealed, climate-controlled space), and how our coffee would age with time, will all contribute to future improvements.
The vast majority of feedback was wildly positive; we received many comments such as “the best coffee I’ve tasted in over six months,” “the juiciest roast I can remember,” etc. The majority of critical comments were something like “it was not roasty but it was more developed than I prefer.” As noted, those batches have been acknowledged, and I don’t expect many of those roasts or comments in the future, other than from the more extreme tasters out there. Doing the best one can is not the same as pleasing everyone.
A couple of weeks ago we upgraded our sample roaster and began using the Roest. After a few days of a steep learning curve on the Roest, we’ve settled into a system using the new inlet-temperature recipe program and automated BBP. We’ve been pleased with the overall results. I’ll write a post soon about our experience with the Roest.
We sold coffee wholesale to three cafes with whom we had prearranged deals. With apologies to others who made wholesale inquiries, we did not have enough green to sell wholesale to any other cafes. We hope to change that soon, but it will depend on retail demand and green availability. Likewise, we hope to offer a subscription soon, but cannot do so until we are confident about having a steady stream of green that meets our quality threshold.
Roast level vs quality of roast
Having consulted for well over a thousand roasters over the years, I have to remain relatively adaptable about roast level. It is not my job to tell my clients how light or dark to roast, it is to help them achieve their desired roast level in the highest-quality and most consistent way possible. I’ve literally never told a client “you have to roast darker (or lighter)” or “you have to roast to 20%DTR,” etc. What one writes in a book for mass consumption is necessarily different from what one prescribes to a roaster with a particular machine and unique goals. As a consultant, step one is to ask a client his or her goals. Step two is to help them achieve those goals. Everything must be customized for that client.
Like any coffee drinker, I have my personal preferences. I prefer light, juicy roasts of clean —usually washed — coffee, and famously despise funk. I respect that others have different preferences.
There is, however, a difference between roast level and quality of roast.
I’ve noticed many people confuse the two. A roaster may roast darker than I like, but do a great job of optimizing that roast level. Likewise, another roaster may roast in the color range I prefer, but the coffee may be baked or underdeveloped. I do not judge roasts solely by the final color, I also judge them by how skillfully the roaster achieved that roast level.
Roast level is a style choice. Roast quality is independent of roast level. I don’t see that distinction made often enough.
What’s next
Prodigal will release four new coffees this week. I’m pleased to say the new release will include our first natural :0, our first blend (the components of which will remain a mystery until next week’s blog post), a new shipment of the lovely Betel Geisha, and our first coffee from Ecuador.
We always notify our Prodigal Mailing Listsubscribers a day before anyone else of our new releases. If you don’t want to miss out on the new offerings, please consider joining the mailing list.
“Transparency,” like “sustainability,” is a word thrown around too often. Let’s face it, very little in modern society is truly sustainable. Likewise, transparency in business is always selective and limited.
It is nice to know that a roaster paid $10/kg FOB or $5/KG at the “farm gate” but do we know what that really means to the producer? It’s always more complicated than it seems. We paid $19/lb ($41.80/kg) before shipping for our two Betel coffees, but we don’t know César’s input costs or the cost of living in his part of Colombia. I don’t know how he and his family are doing financially, but he produces lovely coffee and he seems happy.
It’s easy to say “this is what we paid” but it’s difficult to know what the numbers mean. One USD of income is a very different thing in Cauca and Copenhagen. I can imagine economists arguing endlessly about how to compare the value of a dollar in each place.
Financial transparency is nice, but tricky to make sense of at times.
At Prodigal, we hope to practice a different type of transparency more relevant to our customers: owning up to our virtues and mistakes. I’ve ordered coffee from hundreds of respected roasters over the years, and as every honest, experienced coffee professional knows, inconsistency is rampant in our industry.
Sources of inconsistency in coffee
Green coffee quality can change radically from the cupping table at a mill, to a PSS (pre-ship sample) from an importer, to an arrival or spot sample offered in the country of the roaster. A small change in green temperature or ambient roastery temperature can be the difference between a deliciously developed and underdeveloped roast. Heck, even what was roasted the previous batch can dramatically impact the current batch, unless one has an appropriately slow, systematic BBP (between-batch protocol), and even then, there are times when a BBP has a difficult time compensating for extreme changes in batch-to-batch roast styles (eg switching from a dark roast to a light roast or changing batch sizes mid-session can cause a roaster fits.) Throw in problems with water chemistry, brewing technique, and grind quality, and it’s a wonder that we ever enjoy two consecutive cups of coffee.
Prodigal: consistency, standards, and flops
When Mark and I launched Prodigal, we fretted over every detail that could affect quality, and we still came up short in some ways. For example, we cupped over 100 green samples, begged suppliers to be very selective in what they sent us, and we purchased only seven coffees.
All of the coffees we purchased cupped at 87.5+ as PSS. We score strictly, and if you see any green sellers or roasters claiming they are awash with 88+ coffees, please disregard them. Score inflation is real. We calibrate with COE judges and impartial Q Graders, not marketing scores.
Upon arrival, a few coffees held up and matched their PSS quality, and a few declined by 0.25-0.75 points across numerous sample roasts. We made the difficult decision to not sell those coffees as “Prodigal” because we want to uphold a certain standard for our brand, even if it means we sell less coffee. All of the rejected coffees are still lovely, and i reckon almost any coffee pro would happily drink them.
We are selling our good-but-rejected arrivals as green coffee to home roasters, as they are tasty, and a bargain relative to what home roasters can source through the usual channels.
Green buying is the most important and difficult job of a roasting company. Green coffee is alive and constantly changing. Precious, delicious green gets exposed to a variety of conditions between the mill and the roastery that can and will degrade quality. We missed by a little on three of our seven purchases. We will find transparent ways to unload our green that doesn’t make the cut.
Roasting
I separate third-wave roasters into three groups; note that companies I refer to here may offer more than one roast level or style. I am focusing on their “filter” roast offerings, and don’t mean to imply that they target only one goal or style for all of their offerings. They are merely illustrative examples using high-quality, familiar roasting companies. I have enjoyed coffee from all of these companies and roast styles at times.
“Nordic” style roasters favor cup clarity above all else. Examples of such roasters include Sey, La Cabra, and Tim Wendelboe (Tim crosses over into the “maximum juiciness” group frequently, in my opinion.) Fans of those companies are virtually allergic to “roast” flavors and most fans would probably choose to sacrifice some sweetness, body, and juiciness to achieve maximum clarity. One may often need to “rest” Nordic roasts for several weeks or months to decrease the perception of underdeveloped flavors.
“Maximum juiciness” roasters target a balance of acidity and sweetness, and are willing to sacrifice a bit of body or clarity to achieve their aims. Such companies include Regalia, Nomad, and Doubleshot.
“Fully developed” third-wave roasters focus on sweetness and juiciness, and sacrifice a some acidity and clarity to meet their goals. Examples of such roasters include Onyx, Go Get ‘Em Tiger, and Blue Bottle.
Each group has its fans and detractors. Some Nordic-style fans tend to call everything else “dark,” which is like a guy who is 6’5” calling everyone else short.
The common complaints about Nordic roasts, beyond their light, tea-like body, include flavors reminiscent of peanuts, vegetable broth, grass, and cellulose. Most Nordic roasters drift into that flavor territory periodically. To me, it is a fail; to others, it’s no big deal.
“Maximum juiciness” roasts may be too low in clarity or acidity or body, depending on the coffee drinker.
“Fully developed” roasters may stray into “roasty” territory on occasion, or suppress acidity enough to make some coffees taste a little dull.
For the record, my personal preference is on the light end of maximum juiciness. But it is not always wise to attempt to target one’s ideal roast level, as discussed below.
Prodigal beans, left to right: Betel geisha, Fidencio Castillo (caturra and Colombia varieties), and La Argentina pink bourbon
Prodigal’s roast style
We are currently roasting on a friend’s Probat. While we roast on that machine, we will target “maximum juiciness.” Once we have installed our IMF roasting machines, we are likely to lighten our roast level by a few degrees Fahrenheit, or approximately 5-10 points on the Agtron Gourmet Scale.
Why would we roast darker on a Probat than on an IMF? An IMF, like a Loring, is a convection-dominant machine that recirculates exhaust air through a burner held at 600 to 700°C. Such machines are very fuel efficient and make inner-bean development easier than do classic-drum roasters. When inner-bean-development is easier to achieve, it is safer to roast light with less risk of underdeveloped flavors.
My mistakes
When we launched Prodigal, we thought we had enough green to last a few weeks. Instead, we sold out in 24 hours. That presented several challenges to our efficiency and quality. We not only had to roast through the wee hours of the morning several days in a row, but we learned the hard way on our first roast day that our roastery’s ambient temperature was not stable enough to roast on our preferred knife’s edge of Nordic/maximum juiciness without flirting with underdeveloped flavors or losing some juiciness.
Three batches from day one went into bags of “first batch” beans we sell at a steep discount. The “first batch” offering was very popular, and we look forward to feedback from customers who purchased our “first batch” coffees.
To combat consistency and development problems, on day two we stabilized the roastery’s ambient temperature by roasting at night when no one would open doors to the frigid Colorado air. Along the way, we cupped every batch directly out of the roaster (!), as well as the next morning, and we were happy with the results. We see ways to improve, and we see every batch and cupping as an opportunity to learn and improve.
We will always cup every batch before packing it in Prodigal bags. It’s time consuming and makes our systems less efficient, but we think it’s worth it.
Unfortunately, those roasts from day one lost some vibrancy over the next few days, and I reckon by the time some international customers receive those beans, the roasts will be in the “fully developed” camp. We’re thrilled with their sweetness, and none of those batches tastes “roasty,” but we missed the sweet spot on several batches from day one. I’m frankly a little embarrassed by that. We will do everything in our power to ensure that never happens again. (Note: please do not “rest” our beans; drink them ASAP upon delivery.)
Thankfully, the next two roast days were more on-target and consistent, we were able to safely lighten our drop temperatures by 3°F/1.5°C, and we now have a tighter rein on green-storage temperature, roastery ambient temperature, and our approach to the Probat. Perhaps 25% of our roasts fell in the “fully developed” camp and the other 75% were in the “maximum juiciness” category. Nothing was baked, underdeveloped, roasty, or flicked, but some of our roasts taste darker than we would have liked. If you purchased some Prodigal coffee and found it too dark, please let us know.
Our promises to you
Coffee is challenging. We’re always learning, our standards and preferences are always evolving, and we are all fallible. I rarely hear roasters own up to their mistakes or inconsistencies, and often see them fight back against legitimate customer complaints. I’d like to do things differently.
If you are ever unhappy with any Prodigal purchase, please reach out to us directly (preferably without maligning us online first) and we will find a way to satisfy you.
No company or roast style will please everyone, and I expect to hear an equal amount of “you roast too light” and “you roast too dark” comments over the coming years. We’ll do our best to set clear expectations, communicate about our mistakes, and manage customer relationships with respect.
Welcome to my semi-annual Holiday Coffee-Gift Guide. I thought it would be nice to suggest a few coffee-related gifts for the coffee nerd in your life. I won’t tell if you buy yourself the gifts or ask me to send this blog post to a family member ;).
These suggestions are completely biased: they are all products I enjoy, and some that I sell.
Forget overpriced, dumbed-down industry courses; the BH Unlimited Subscription is hands down the best all-around online coffee education money can buy. Coming from someone who offers coffee education for a living, I hope those words carry weight. Whether for you or for your café staff, BH is the best option. In 2023, BH Unlimited is going to get even better, as a certain blogger you follow will be contributing to the subscription’s roasting content.
Click HERE to sign up and get a 14-day free trial.
If you *really* like someone, get him or her a Lagom grinder. The Lagom P64 and P100 are the best single-dosing grinders on the market, in my opinion. The grinders are beautiful, have low retention, excellent burrs, adjustable RPM (an important, underrated feature), and the are well-aligned at the factory (Thank you, Option-O, for caring.) In other words, Lagom offers everything you can ask for in a grinder.
Crafted by my friend Martina in Golden, CO, Spinware Ceramics are clean, beautiful, functional, and durable. Martina’s work would make a great gift for anyone who drinks coffee or tea.
From Spinware’s website:
“When you buy a handcrafted piece from a ceramic studio, you are buying more than an object. You are buying hours of experimentation and error. You are buying moments of frustration and happiness. You are buying a piece of heart, a piece of soul, and a piece of someone else's life.”
was already the best-value home grinder on the market for making filter coffee (note: it is not designed to grind fine enough for espresso or aeropress) before they released their v2 burrs in late 2022. Now it’s the best-value home grinder with even better grind quality (but still not made for espresso.)
I don’t usually pre-sell my online classes, but in case someone would like to give or receive a class as a gift, I thought I’d make tickets to my upcoming March online roasting class available now. The class comes with daily access for one month to a private group in which I will answer any and every question asked, and help students manage their roast curves. This is the most factual and practical roasting class in the world.
The Clever Dripper doesn’t get the credit it deserves. Compared to a pourover, the Clever produces delicious, non-astringent coffee with less effort and skill required. Pro tip: add the water first to yield higher and more even extractions. When adding the water first, one avoids the two most challenging problems in pourover brewing: achieving even extractions and extracting at high-enough temperature to make acidity “pop.”
I’ve owned enough cafés to say with authority that this is a good book. While it’s tempting to dismiss the book as “mostly common sense advice,” it is packed with great advice aspiring and current café owners should follow, but few do. Colin’s writing is informal and pleasant, and the book is peppered with stories and lessons he learned while building his successful company 3fe in Ireland.
Doubleshot from Prague doesn’t get the attention it deserves, perhaps because they don’t roast super-light, but attempt to highlight the juiciness and ripe fruit notes in coffee by roasting light/medium. Regardless, Yara from Doubleshot is one of the world’s best green buyers, and his production-roast cupping tables are as delicious as any I’ve experienced. Doubleshot is offering a Christmas Coffee Set featuring two washed Colombian coffees from the Imbachi family, whom Yara has worked with for eleven years. Both coffees, caturra and pink bourbon, are grown on the same farm and processed identically. This set is a unique opportunity to taste the influence of coffee variety on flavor. Expect big, juicy, ripe fruit notes with a hint of spices (it is Christmas, after all.)
Click HERE to purchase in North America and HERE to purchase in Europe and the rest of the world.
Lotus Water Drops: While there are plenty of powder sachets you can buy to optimize your coffee water, I prefer the Lotus Water Drops, both because many of the sachets on the market produce inconsistent results, and because the LWD mineral concentrates are easier to use. To be honest, I’ve spent a few too many Saturday mornings exploring how different LWD recipes affect coffee flavor. If you need suggestions for how to use the drops, see my blog post here.
After 15 years of writing and consulting, I’ve missed producing something tangible, and decided to get back into roasting. My new company Prodigal, based in Boulder, Colorado, doesn’t intend to be large or take over the world. What we want is that thing we’ve never been able to find: a source of clean, juicy, delicious coffees, always roasted meticulously. Our promise to you is every coffee we ever ship in a Prodigal bag will be well developed, not baked, and not roasty (and not funky haha). If we make a mistake, it’s our problem, not yours. Count on it.
Our first offering is a set of four gorgeous, clean, washed Colombian coffees. Not only will our first month’s offering come separately or as a set of four coffees, but we will offer our customers an online, interactive cupping session with Shared Source founder Andrew Kelly, who imported the green, and myself. Prodigal customers are welcome to cup and score with us, and ask questions along the way.
Prodigal will launch in the coming week. Please follow us on Instagram @getprodigalcoffee; we will offer our Instagram followers a discount on the first order and they will always be the first to know when we release a limited-edition coffee likely to sell out quickly.
Years ago, the main concerns about water for coffee were “don’t scale up your espresso machine,” “don’t make coffee with very hard water,” and “don’t use water that tastes or smells bad.” Times have changed; since the advent of the Barista Hustle water recipe and products like Lotus Water Drops, capable of independently manipulating water hardness and alkalinity, coffee enthusiasts have become much more interested in customizing water to enhance coffee flavor.
Over the past few months I’ve been using Lotus Water Drops at home to make coffee and to learn more about the effect of water chemistry on coffee flavor. In this post I’d like to tell you about the drops, the standard way to use them, and a shortcut I use to discover the optimal water for a particular coffee.
About the drops
A kit of LWD contains four dropper bottles:
Calcium Chloride (CaCl2)
Magnesium Chloride (MgCl2)
Sodium Bicarbonate (NaHCO3)
Potassium Bicarbonate (KHCO3)
The Calcium (Ca) and Magnesium (Mg) contribute to hardness
The Sodium (Na) and Potassium (K) Bicarbonate contribute to alkalinity
(All references to ppm in this post refer to ppm as CaCO3 equivalent.)
For 450 ml of water:
1 drop Ca adds 10 ppm hardness
1 drop Mg adds 10 ppm hardness
1 drop Na adds 5 ppm alkalinity
1 drop K adds 5 ppm alkalinity
For one gallon of water:
5 drops Ca adds 6 ppm hardness
5 drops Mg adds 6 ppm hardness
5 drops Na adds 3 ppm alkalinity
5 drops K adds 3 ppm alkalinity
Hardness and Alkalinity basics
Hardness, also known as General Hardness (GH), is a measure of divalent ions (ions with a positive charge of 2+). Magnesium and Calcium make up the bulk of hardness in water, and, depending on their levels and ratios – and who you ask :0 – may add “sweetness,” “structure,” or flatness to coffee.
Alkalinity, also known as Carbonate Hardness (KH), buffers acidity. Too little alkalinity, and coffee may taste acidic and unrefined. Too much, and coffee may taste chalky or flat.
Note that the flavor effects of these minerals are not “linear” or always predictable. For example, I recently tested four LWD recipes using the same coffee, and the cups at 10 KH (low) and 70 KH (moderately high) “popped” and tasted better than the cups at 30 KH and 50 KH. At extremes, such as 0 KH or 150 KH, the effect of KH on flavor is more predictable.
I prefer a little sodium in my coffee water because sodium counteracts bitterness. If you want to tame a bitter coffee such as a robusta or dark roast, adding extra sodium may help. If for some reason you must drink a dark-roast robusta, just dump an entire salt shaker in the mug after brewing.
Alkalinity for filter coffee and espresso
When adding minerals to water, one can do something not usually possible with standard water-treatment systems: easily and radically change hardness or alkalinity independently of the other. Very hard water is not great for coffee making because some of the hardness will precipitate as scale upon heating the water, and scale can damage coffee machines. However, very high-alkalinity water can have positive effects espresso.
Many coffee professionals agree that when making filter coffee, water alkalinity levels around 30–40 ppm yield reasonable levels of acidity. Given that alkalinity neutralizes acidity, and filter-coffee strength is approximately 1.2–1.4% TDS, to neutralize acidity in espresso at a strength of 10% TDS requires water with perhaps 7–8 times more alkalinity. With LWD or a jar of sodium bicarbonate, one can experiment with neutralizing espresso acidity for interesting effect. I doubt making espresso with KH of 200-300 ppm will become the norm, but I have found the results enjoyable and insightful.
Protecting your machines while experimenting
Calcium can create scale but Magnesium cannot. Therefore, you can test high-hardness and high-alkalinity recipes by increasing Magnesium and bicarbonate without increasing Calcium beyond a certain level. To estimate the scaling and corrosion potential of a recipe, you can use this online calculator.
How to use Lotus Water Drops - the standard method
The traditional way to use LWD is to add drops to distilled (demineralized) water. If distilled water is not an option for you, reverse-osmosis water is the next best option, but one can add LWD to any water to increase its hardness or alkalinity.
A couple of standard filter-coffee recipes based on distilled would look like this:
*the Rao/Perger recipe is the brainchild of Dan Eils, my partner and 3D printing expert at Litmus Coffee Labs
To one gallon of distilled or RO water, add:
25 drops Ca
50 drops Mg
30 drops Na
40 drops K
My Lotus Water Drops hack to reverse engineer your preferred water chemistry
Recently I was frustrated by the myriad possible water chemistries and decided to create a shortcut to finding what water chemistry would make the beans in my kitchen taste best. Using a surprising recent insight from chemist Samo Smrke that coffee tastes the same whether water minerals are added before or after brewing, I decided to brew a large amount of coffee using distilled water, split the brew into several equal portions, and add LWD to the brewed coffee.
Here is a shortcut to zero in on your preferred water chemistry:
Brew 900ml of coffee (you can do this by combining multiple pourovers, using one giant immersion, or whatever is convenient.)
Stir the brewed coffee well.
Pour equal 225ml portions into four cups.
Add a different combination of LWD to each cup. Each drop of Ca and Mg will add 20 ppm GH; each drop of Na and K will add 10 ppm KH)
Stir and taste (preferably blindly)
For example, I tried this recently to zero in on my preferred KH level for a coffee:
Cup one: 1 Ca + 2 Mg + 1 Na (60 GH, 10 KH)
Cup two: 1 Ca + 2 Mg + 2 Na + 1 K (60 GH, 30 KH)
Cup one: 1 Ca + 2 Mg + 3 Na + 2 K (60 GH, 50 KH)
Cup one: 1 Ca + 2 Mg + 4 Na + 3 K (60 GH, 70 KH)
Note that while KH drives acidity level, you may not sense a difference between levels as close as 10 KH and 30 KH. I recommend beginning with much larger differences, such as 10 KH, 50 KH, 100 KH, and 150 KH. Once the differences are apparent, you can challenge yourself with smaller variations in GH and KH.
Lotus Water Drops for roasters
Any roasting company that sells coffee outside of its home city faces a dilemma: how to roast coffee to suit the variety of water chemistries its clients use. There is no easy answer to this. One option would be, of course to use a common/recommended water chemistry (such as the Rao/Perger recipe above) and to encourage customers to use similar water. Another option would be to use LWD to mimic a variety of common water chemistries customers are likely to use, and to roast in a way that yields good results for that spectrum of chemistries. LWD is probably the most convenient way to mimic customers’ water chemistries.
ClickHERE to for more information and to purchase Lotus Water Drops
Last month I posted a request on Instagram for 88-point coffees, with the promise to promote any samples that I (and a Q-Grader friend) scored 88 in a blind cupping. The purpose of the offer was not to get lots of free coffee (that’s the last thing I need), but rather to understand more about how roasters score, and what they know about scoring. The experience was eye-opening in unexpected ways
The results
First, no coffee scored 88; the highest score was 87.5 (cottage Colombian pink bourbon from Escape in Montreal), and that was for a coffee the roaster said he didn’t think was 88, but given that it was a pink bourbon recommended by Jonathan Gagné, i was keen to try it. It was delicious. And I’m impressed that Escape didn’t try to oversell it.
The other candidates scored in a range of 83–87. The 83 may have once been a great coffee, but the coffee tasted old and baggy.
The process
I only accepted samples from roasters who offered credible reasons to believe the coffees might be 88. Several roasters offered coffees they were confident were 88 because “the green seller said it was 92” or “the coffee is so fruity that it has to be 88” or “it must be 88 because my customers love it so much.” I rejected those offers to save those roasters the time and expense of sending the coffee to me. It’s apparent that most roasters don’t understand the mechanics of scoring.
All coffees were cupped blindly, multiple times, by my friend Mark (Q Grader) and me. All cupping sessions contained coffees from multiple roasters. All cupping sessions included “anchor” coffees we had tasted multiple times, whose scores were consistent and known. Usually one of us had no idea what coffees would be on the table each day.
Calibrating with Sey
During this process, Matt from Sey Coffee reached out and offered some samples. Matt didn’t claim any of the samples would be 88, but he promised they would be tasty, and he was interested in calibrating, which I appreciated. I reciprocated by sending various samples to Sey. We compared our respective scores, as well as the scores of some importers with which Sey deals.
While my scores on all samples were a tad lower than those of Sey and the importers, we generally agreed on how we ranked various coffees. I believe everyone involved enjoyed and benefitted from the experience, though I doubt Sey enjoyed that baggy sample much :0 (sorry guys).
How roast quality affects score
When Ryan Brown and I ran Facsimile, a cupping-oriented subscription service, I occasionally sent multiple sample roasts of the same coffee to Ryan. Ryan preferred that all samples he received were not marked in any identifiable way (Not even country of origin). Every sample roast we cupped was well within the range of “typical” third-wave roast quality, ie nothing was grossly flicked or underdeveloped.
Our scores for a given coffee roasted a variety of ways would land in a 1.5-point range. Since then I have assumed semi-competent roasting could influence a cup score by up to 1.5 points. One way to look at that would be a “perfect” roast would capture the full potential of a coffee, while a flawed-but-not-awful roast would cause a deduction of up to 1.5 points.
Score inflation is real
As with everything, it seems, at some point marketers hijack something good, exaggerate claims of quality, and eventually make quality claims meaningless. Coffee scoring is no different. Green sellers and roasters are under competitive pressure to inflate scores. After all, if two green suppliers offer nearly identical coffees from a given origin at roughly the same price, but one importer scores theirs “88” and a competitor claims theirs is “86,” most roasters will be more inclined to buy the “88.”
In my experience, score inflation can be reasonably predicted based on the source of a score:
Coffee-review websites will habitually over-score by 6-9 points (no joke; if they scored conservatively, no one would send them samples)
Green importers will over-score by 1-5 points depending on the audience
Roasters inflated scores by an average of 1-3 points
Cup of Excellence scores seem quite accurate
CQI scores are accurate, by definition
Even if you disagree with my estimates, the simple fact that the main sources of public scores disagree by such large amounts mean the system is full of bias and inaccuracy.
The vast majority of the world’s roasters are quite small, and as far as i can tell, the majority of small roasters don’t sample roast and cup green samples blindly before purchase. A great deal of small and new roasters get their introductions to scoring from importers, which may compound score inflation over time.
A friend of mine who has been a Cup of Excellence judge since the beginning of COE says he is frustrated by scores creeping higher in COE competitions as well. I doubt score creep is nearly as bad there as it is in most of the industry, but that was still concerning to hear.
Thankfully the industry has a scoring “anchor” in the form of the CQI, which offers Q–grader scoring of coffees for a fee. Unfortunately that fee is rather high for most small roasters, but it would behoove roasters and importers to send the occasional samples to the CQI for calibration.
Scoring should be semi-logarithmic
I recommend interpreting seemingly linear scoring systems, such as that used in coffee, as non-linear. Although 88 is just over 1% higher than 87, I don’t view 88s as approximately 1% better than 87s; 88s are obviously much more than 1% better. Scoring is not linear.
I assume that over the course of cupping an extremely large number of samples (at least 10,000, preferably more) from a great variety of sources and price points, there should be approximately 10x more 87s than 88s. In my experience, that has been the approximate trend.*
Of course in a smaller sample size, or a set of samples with some sort of selection bias (eg you only taste washed coffees that cost above a certain price), this 10x relationship won’t hold. But it’s a good mental model; if you score only 2x more coffees 87 than 88, something is wrong. If you are scoring or offering 90-point coffees on a regular basis, there is a calibration problem.
*Think of this 10x trend as a bit like the stock market. The stock market may not return 10% in any given year, and its annual returns may fluctuate between -10% and +40%, but over time the market may return 10%. In 2018, I probably scored 2-3 coffees (all Kenyans) at 90 and 15 of them at 88-89. In 2022, due primarily to the collapse in Kenyan-coffee quality, so far I have scored nothing 89 or 90. Much like the rare years in which the stock market returns 40%, coming across coffees that score above 90 is so rare that it’s hard to know what their frequency would be over 100s of 1000s of samples over many decades. My guess is the 10x relationship would have decent predictive power up to about 93-94 points. To be honest, I have no idea what a 95+ coffee would taste like. If I ever taste one, I’ll probably cry and make that the last cup of coffee I ever drink. (Note to the haters: serve me a 95 and you’ll never have to hear from me again. Thanks)
The future of scoring
I fear that a few current trends will contribute to further score inflation:
The dramatic fall in the quality of coffee from Kenya and Ethiopia, historically the highest-scoring origins, over the past few years.
The continued explosion in the number of new roasters who learn scoring calibration from their green suppliers
The explosion in popularity of funky processing methods that are objectively dirtier than washed but somehow get a pass. (The phrase “clean for a natural” alone should make one suspicious.)
The first trend is most critical: Literally every 90-point coffee I have tasted over 30-year career was from Kenya. If there are no more 90-point Kenyas, “90” will lose its historical meaning, and today’s 87s may become tomorrow’s 90s. Once that happens, how will we score the Kenyans sitting in George Howell’s freezer? 105?
This slide is already happening, most obviously in 2022 due to “framing” effects and roasters “grading on a curve.” I’m frankly a little frustrated with the number of 88–90 scores roasters have claimed for their Kenyans this year. Literally twenty roasters this year have said to me a version of “I know Kenyans aren’t as good as they were, but I found one that tastes like the Kenyans of old.” Right, and everyone is a better-than-average driver :0.
Bias is rampant in all human pursuits.
If you want to know what a true 90+ coffee is, try some Kenyan from George’s freezer. It’s probably the only current, reliable source of such coffees. If you want to know what an 88 is, perhaps purchase a coffee that scored 90+ in a Cup of Excellence competition. I say 90+ because the competition coffees will have been scored when they were optimally fresh. By the time they land in your local roaster’s warehouse, they likely lost one or two points.
How to combat score inflation
If you are interested and can afford it, consider taking the Q Exam. It’s probably the quickest route to learning to score accurately.
Whether you are Q-certified or not, the most important practice is to calibrate with other experienced scorers who have no motivation to inflate the scores of the coffees you cup together. I didn’t know how to score until cupping with Ryan Brown, and I’m grateful to have been introduced by someone so competent and objective.
In recent years, I have found myself well-calibrated with Lance Hedrick, the entire, well-calibrated team (!) at Nomad in Barcelona, Jaroslav of Doubleshot in Prague, my daily co-cupper Mark Benedetto, Elliot at Steady State, and a few others.
Over time I hope to expand my circle of calibrated cuppers, as I believe it is the best way to prevent bias or score drift. In the future I plan to send samples to CQI periodically to calibrate with them. I welcome your comments.
It’s the most affordable way to get professional coaching for your roasting, and the group is 100% polite, supportive, and a pleasure to work with. Just having access to the vast archive of posts is worth the price of admission. Get more info HERE
Many people wonder why roaster automation is not better or easier. I’d like to discuss the current state of automation and the difficulty of creating successful automation. I define “success” as having identical results in the cup, such that a panel of expert tasters would not notice a material difference among several batches of a coffee roasted using automation.
I define full automation as a system in which the roasting machine manages the settings in an attempt to match a reference curve. This is distinct from semi-automatic systems such as Cropster Gas Control and Replay Assist, the Probat Pilot system, etc., which change gas settings at bean-temperature triggers based on preset recipes.
For clarity, Loring offers both systems: “profile roasting,” which is full automation, and “burner recipe” which is semi-automation.
Successful full automation requires:
An effective warmup and BBP. I’m a little tired of machine manufacturers claiming that *their* machines don’t require an effective BBP. Sure, it’s possible one of those manufacturers has rewritten the laws of physics, but it’s much more likely they have low tasting abilities or low standards for consistency, or their marketing departments are just dishing out BS.
A very well tuned PID.
Ideally, a fluid bed (Sivetz, Neuhaus Neotec, Typhoon) or indirectly-heated machine with recirculation (Loring, IMF, Brambati). Full, precise automation is always going to be more difficult in classic drum roasters due to the slow responsiveness of heavy metal drums combined with our current inability to measure drum temperature reliably.
Let me give some examples of why automation systems are not as precise as they seem at first glance. These examples are from roasts using Loring automation (profile roasting) with a competent BBP. While Loring has made the best attempt so far at full automation, I personally would not use it yet. These examples show that the best automation system out there still needs work. Of course, if these examples did not involve an effective BBP, they would look and taste even less consistent.
These are two 60kg Loring batches that followed a series of 20kg batches. The blue curve was the first of the 60kg batches, as astute readers would assume. The graph shows that the machine’s thermal energy was lower before the blue batch, which was to be expected, given that the previous batch was 20kg, and few roasters know how to create a successful “transitional BBP” when changing batch sizes (which is emphatically necessary, even with Loring.) These curves could have conceivably been identical with a proper transitional BBP, but those are 1) difficult to work out and 2) needing one brings into dispute the false claim that one can switch between batch sizes at will and the Loring automation will keep churning out identical batches (of a given batch size) regardless of those changes.
These two batches of course tasted noticeably different.
In the example above, at the very least, the PID should have used more gas, and kept it at 100% sooner and longer, in the blue roast, at approximately 1:30. Note that most of the time, when the automation chooses 100% gas, it is saying “I’m playing catch-up with the reference curve” which means it is usually not replicating the reference curve.
Here is an example of four batches using Loring automation. As you can see, replication was obviously more successful here. Factors that probably improved the replication were that the BBP was effective and didn’t have to compensate for a change in batch size, and the inlet-temperature curve was more consistent. That doesn’t guarantee consistent results, but it is an important piece of the puzzle. If we had better data quality from the first minute of each batch, I suspect the replication would look a little less successful,
Here is an example of excellent replication by a competent human roasting manually
Let’s up the stakes and look at replication of 9 consecutive batches by a competent human roasting manually. Note that some of the (very minor) discrepancies below came from changing the recipe in an attempt to improve results (in other words, intentional inconsistency, as you can see in the purple gas curve). The cup results were as consistent as the curves
Should you use full automation?
That depends on your standards. If your standard is “I don’t mind a small drop in quality and consistency to have a more labor-efficient system” then using it may make sense. If you say “the automation is more consistent than I am” then it also may make sense. Though in that case I’d prefer you seek a consultant to improve the consistency of your manual roasts (hint: choose the person who coined the term “between batch protocol” and developed the first truly successful BBP in the industry.)
Personally, I think more people should use semi-automatic (burner recipe) systems. Such systems are also labor efficient, but when combined with an effective BBP will generally yield more consistent, and likely tastier, coffee than the currently available automation systems.
The day will come when roasting automation is better than a competent human, but that day has not yet arrived.
I would rank the current state of roasting systems like this:
Best: competent human or competent human programming a semi-automatic system
Good: full automation
Bad: Not-so-competent human or not-so-competent automation
Cannot ever work consistently: any system that excludes an effective BBP
If you read the coffee-internet enough, you are guaranteed to be more confused about roasting than you were before reading it. One of the more confusing bits of roasting advice I hear often is to “extend the Maillard phase” of a roast. The internet seems to believe more time in the Maillard phase has predictably beneficial results.
One challenge in roasting is when a roaster makes a single change from batch to batch, tastes a difference, and then declares that one aspect of that change (eg lower gas, lower ET, longer Maillard phase, longer roast time, etc) responsible for the change in flavor. Unfortunately, to be confident in the cause-and-effect relationship, one would have to make that change countless times, under controlled conditions, and make extreme efforts to rule out other possible causes of the new result. It’s painstaking work, which is why scientists often spend years and millions of dollars to study the effects of a small change in a system—often without clear answers despite the time and effort!
A few thoughts on why the standard Maillard-phase thinking is questionable:
Extending the Maillard phase necessarily means lowering and flattening the ROR, reaching first crack at a lower ROR, and increasing the risk of an ROR crash. There is no way to change just one variable in roasting— every change creates a chain reaction.
Extending the Maillard phase results in Maillard reactions happening at a slower rate. If you double the time in the Maillard phase, you may approximately halve the rate of Maillard reactions (this is a guess; I don’t know the exact change, but the relationship of Maillard phase time to Maillard products is not remotely linear, and no one really knows the relationship yet.) So, it’s possible the net change in Maillard products is negligible. I do not believe this issue has been studied thoroughly.
One can easily create two equivalent-tasting roasts of quite different total durations and Maillard-phase durations. For example, a 7:00 sample roast may taste nearly identical to a 13:00 production roast. This fact alone negates the standard Maillard thinking.
It is suspicious that no one ever seems to recommend shortening the Maillard phase. The implication seems to be “more is better.” Every good practice in roasting seems to have a “happy medium.” I can’t think of any instance where more is always better. This is a red flag indicating the proponents of longer Maillard phases are just repeating a trendy idea and don’t really know what’s optimal.
Focusing on balancing the time in various phases is extremely difficult and will almost necessarily lead a roaster to sacrifice curve shape, consistency, and predictability.
The bottom line is that roasting is complex. Most of what one reads online is false. Knowing a factoid about chemistry is not the basis for a roasting system. It’s an excellent practice to form opinions slowly, and only after exhaustive testing.
I’ve had access to an old Probat electric sample roaster recently at a friend’s roastery. The machine is a bit of a dinosaur, and needed some serious MacGyer-ing (if you don’t know MacGyver, look him up; you’re in for a treat.)
Hundreds or thousands of roasters and importers use a version of this machine (and similar dinosaurs) to roast samples. While I’ve had delicious coffee from these machines, I’ve always been suspicious of their consistency. Now that I have had my hands on one of these machines for a few days, I’m certain: it’s impossible to roast consistently on these machines with their standard design. That is obvious from both the data and cupping results.
Those using these machines in their green-buying process need to be concerned that they may often reject coffees due to unrecognized roast issues. If you’re using one of these machines and not noticing their wild inconsistency, I implore you to roast 10 batches of the same coffee on one of these machines, and to cup the coffees blindly. Unless you’re roasting the s**t out of your coffees, the differences between batches should be obvious.
These machines have a several design problems:
• The electric heating elements have high latency and lack precision control.
• The airflow cannot be controlled with precision.
• The small outlet for exhaust air from the drum gets clogged with chaff easily and often.
• The standard temperature probe is poorly positioned and very slow.
• The barrels affect each other’s performance
I’d like to discuss how we tackled these problems to modernize the roaster and have a fighting chance at quality, consistent roasts.
Key: Dark green circle: Analog temperature probe.
Purple: our MacGyver’d probe and clip
Blue: Wattage meter
Bright green: Airflow knob
Red: Power dial
The electric heating elements have very high latency and lack precision control
What this means is that when you increase or decrease the power setting, the heating elements heat or cool slowly. How slow is slow? Very slow. Here’s an example below. This is between batches, empty drum, raising the power from 250 watts to 600 watts (the maximum is 880w). Note that it took more than one minute for the BT to begin to rise!
The power settings are controlled with a simple dial, as seen in the photo above (red circle). That dial offers little precision, as we learned when we plugged the machine into a wattage meter.
The airflow cannot be controlled with precision.
The airflow control is a small knob (bright green circle, above) one pulls out (increase) or pushes in (decrease) to adjust the airflow. For reference, the difference between insufficient airflow and excessive airflow is less than 2cm on the knob. Even a 1mm adjustment in the knob has a significant effect on airflow.
The small outlet for exhaust air from the drum gets easily clogged with chaff.
On the back of the machine is a narrow grate, with a 2cm square hole, where the air gets sucked out of the roaster. Unless one shifts to high airflow late in a roast, chaff builds up and partially blocks the hole, decreasing the airflow. Unfortunately, moving the airflow knob during roasting is risky, given that there is no way to adjust it precisely or consistently.
Not only that, but those without proper data logging may not notice the profound effect of shifting airflow. Below we increased the airflow at approximately 1:50. When you see a shift in data like that, it’s difficult to know what is really happening. My goal with this machine is to avoid changing the airflow at all costs.
Our solution to the airflow problem was a combination of “set it and forget it” and measuring the airflow with an anemometer (blue circle), a device that measures wind speed (which is different from airflow; windspeed is m/s, airflow is m^3/s.) With a reasonably precise anemometer, we are able to reset the air level with consistency.
Measuring air speed
The standard temperature probe is poorly positioned and very slow.
The stock temperature probe is in the back of the drum, and meant to measure environmental temperature rather than bean temperature. The probe is very slow and feeds to a mostly-useless analog gauge that changes temperature at a snail’s pace. Let’s just say one should not roast by ET alone, and analog gauges and roasting without proper BT data are very 1920s. I’m pretty sure none of us want to drink coffee the way it was roasted in the 1920s. Our solution was to mount a clip on the front of the machine to hold and guide a 2mm BT probe in the optimal location.
The barrels affect each other’s performance
While this machine is a two-barrel roaster, the barrels share the same exhaust fan and duct and cannot be used simultaneously without affecting each other. If you desire precise, predictable results, this is effectively a single-barrel roaster.
The results
After our MacGyver’ing, the roasts are more consistent, though not up to modern standards. At least now the machine won’t ruin many samples. We haven’t addressed the high latency of the heating elements, so that will impair precision. It is still challenging to prevent the chaff from sometimes clogging the exhaust port, but we can live with that for the moment.
Late edit: We have attached digital manometer to the machine to have continual air-pressure readings, so we’ll know immediately if the exhaust duct is slowly clogging.
Thanks for reading
Thanks to Mark Benedetto for doing most of the hard work, and to Vajra Rich and Boxcar Coffee for the help and hospitality!
After a few weeks of hearing several online misconceptions about my work, I thought I’d take the opportunity to share what I do for clients on a weekly basis.
Being a roasting consultant is not about telling clients how their coffee should taste, telling them to end at a certain DTR, trying to influence them to roast lighter, etc.
Being an effective roast consultant is about giving clients the tools to consistently make their coffee taste they way they want it to.
When beginning work with new clients, I have them share information about their machine, installation, software, and current approach. There are almost always problems to fix related to machine tuning, warmup procedure, and between-batch protocol. It is necessary to solve those problems before attempting to optimize roast quality and consistency.
For example, in just the past week, I helped clients around the world with the following:
I helped client with a new Probat tune his burner, fan, and drum RPM, establish appropriate warmup and BBP, and troubleshoot some installation problems.
I helped a client learn how to find the optimal airflow level, between-batch protocol for his machine and batch size, how to log his warmups and BBPs in Cropster, and how to prevent massive flicks in his roasts.
I helped a client understand which noise in his temperature data is misleading, and which is relevant, as he was undermining his roasts by reacting to the misleading data.
I helped a client avoid spending money on a green loader he did not need.
I helped a client source a badly-needed digital manometer, manage a problem in his RORs, overhaul his BBP, and figure out how to manage problems caused by a merged chimney.
I helped a client improve his manual roasts so they are tastier and more consistent than his automated Loring roasts.
I helped a client tune his airflow and drum RPM to decrease conductive heat transfer and reduce roastiness in the cup.
I helped a client identify some problems in this green-buying system that were holding back his otherwise-excellent roasting.
All of that was in addition to working with dozens of clients on managing their roasts to be more consistent, and answering dozens of questions about roasting in my online roast-coaching forum.
Roasting isn’t just about cupping, or managing curves, or any other one thing. Anyone can roast a tasty batch here and there. Successful roasting is first about proper machine installation and tuning, second about having a system to ensure consistency, and finally about the day-to-day work of cupping and curve analysis and adjustment.
I’m pleased to announce my first in-person roasting masterclass in three years. The class will be held in Boston on April 8 from 8-11am during SCA Expo weekend.
The class will include:
Cupping and discussion of a new Roast Defect KIt
Tasting of a few exceptional coffees, impeccably roasted
A focus on roasting consistency, including designing and mastering one’s between-batch protocol— the cornerstone of a successful roasting system.
Discussions of numerous advanced topics you won’t find discussed anywhere else.
Those who have previously taken my online or in-person classes are eligible for a 50% discount. Please email me (scott@scottrao.com) for a discount code.
I’m inspired to discuss water chemistry yet again after having some recent disappointing coffee experiences due to cafe owners not using appropriate water-treatment systems.
There is a lot of information online about water for coffee. It can be confusing — almost every cafe owner I have spoken to about water has been confused in one or more ways. I’d like to discuss some common mistakes and offer a simple roadmap to ensuring you are using the appropriate, high-quality water for coffee.
Cafe owners and coffee enthusiasts often:
Focus solely on TDS when evaluating water for coffee.
Take advice from water-system vendors
Think Reverse Osmosis systems are always the answer.
Don’t bother getting their water tested properly by a lab.
Let’s talk about each of those issues.
Focus on TDS
TDS does not determine whether water is good for making coffee. In my consulting work and my seminars, I have often asked roasters and café owners to tell me about their water chemistry. 90% of the time, they quoted an estimate of their TDS, but had no other useful information to share. Unfortunately, TDS by itself is not much of a guide to the quality of your water for coffee brewing. The one minor exception is when TDS is so low that hardness and alkalinity are also necessarily too low. For example, if the tap water at a cafe in lower Manhattan has TDS of 25, the hardness and alkalinity are too low.
As I have written about on Instagram, this website, my books, and most recently in Standart Magazine issue 25, alkalinity, not TDS, is the single most important data point when considering water for coffee. If alkalinity is too low, coffee may be too sour or sharp, and if alkalinity is too high, coffee may be flat, chalky, or lifeless. Depending on your coffee and taste preferences, an alkalinity range of 20-50 ppm is reasonable for most. Of course, there are important factors beyond alkalinity, but if one wants to simplify the discussion of water chemistry, I recommend focusing on alkalinity first.
Taking advice from water-systems vendors
I have nothing against people who sell water-treatment systems. They often know a lot about water chemistry and treatment options. However, regardless of how nice and well-meaning they are, their job is to sell — and upsell — equipment. It defies common sense to get your purchasing advice from vendors. For example, a former client was planning a cafe in Manhattan, where the TDS was the aforementioned 25 ppm, and a vendor had talked him into getting a $3000 RO system. I explained to the client that he would be better off adding minerals to his water than removing them. He was confused at first, but also relieved to only have to buy a $500 carbon-filter system.
Reverse Osmosis systems are not always the answer
RO systems are often the answer, sometimes counterproductive (see above) , and always expensive. If one needs an RO system, one may want one with a bypass system, depending on the tap-water chemistry. RO removes approximately 90% of the minerals dissolved in water. If the tap-water alkalinity is, say, 100ppm, before RO treatment, it will be approximately 10ppm after RO. In such a situation, a bypass or blend-back system can increase alkalinity and hardness to desired levels by blending the RO water with carbon-filtered tap water.
As usual, there is no one-size-fits-all solution.
Test, don’t guess
A *appropriate* lab test of your tap water will cost approximately $100 — $150 and is essential for knowing with confidence what the best water-treatment system is for your needs. I say “appropriate” because most lab tests do not measure all of the important analytes. Please ensure your test measures ALL of these things:
TDS
General Hardness (bonus points if the test measures Ca+ and Mg+ separately)
Alkalinity
pH
Fluoride
Chloride
Ideally, along list of various metals
In my consulting work, I frequently recommend a $125 lab test that measures over 30 analytes precisely and leaves nothing to doubt. With the test results in hand, plus the Langelier Saturation Index formula, I help clients choose the appropriate water system with complete confidence the result will be great-tasting coffee without scale buildup in machinery.
For most of 2021, Ryan Brown and I offered Facsimile, a novel coffee subscription wherein each month we sent subscribers four coffees and Ryan and a coffee-expert friend cupped the coffees with subscribers via livestream. For many of us Facsimile filled a void created by not being able to cup with others due to the pandemic.
Shortly before we closed Facsimile, my friend Vladimir, a software developer, created an app to enhance the virtual tasting experience. I regret that Ryan and I didn’t have the chance to demonstrate Vladimir’s fantastic software for Facsimile subscribers. I told Vladimir I would like to help him introduce his software to roasters and coffee tasters everywhere.
What we were missing at Facsimile was interaction. The cupping videos were entertaining and educational, but opportunities for those cupping at home to interact with Ryan and friends was limited to a simple chat box.
With CupWise, Vladimir enhanced the chat feature and added a dynamic scoresheet. Tasters can enter their own scores and tasting notes in CupWise, and the software tallies the scores and creates word clouds from the tasting notes. The scoresheet is fully customizable, and roasting companies that host CupWise for their customers or for intra-company cupping can choose among the SCA Scoresheet, Cup of Excellence Scoresheet, or any custom format they wish. The CupWise host can hide scores until scoring is complete, and then “reveal” the average scores and notes. Vladimir has also added some fun statistical analysis, such as “polarizaton” that allow users to see how much agreement or disagreement there was about each score.
Sharing
One of Vladimir’s prime motivations in creating CupWise was his love of the shared tasting experience. There is something special about sharing and discussing great coffees with others. Sharing our impressions of coffees can be a bonding experience and helps us to learn and improve as tasters. Cupping with people like Ryan, Paolo, and Lance has made me a better coffee taster, and we are confident CupWise will improve our users’ experiences and skills.
See CupWise in action
I could try to describe CupWise all day, but it's best to see it in action to understand its power and how pleasant it is to use.
My partner Paolo at Regalia and I recently offered a new iteration of our Roast Defect Kit, and I thought cupping the RDK together, along with our friend Lance Hedrick of Onyx, would be a fantastic way to demonstrate CupWise.
Paolo, Lance, and I will demo CupWise live for RDK customers on Monday, February 21 at 10am NYC time (3pm in London). RDK customers will be able to chat, score, and enter tasting notes, and everyone else is welcome to watch the cupping and share the CupWise experience. The public can watch the event live, or saved, HERE.
We’ve all tried to make good filter coffee in an espresso machine. It makes sense, right? Every espresso machine provides access to hot water, a spray head, a filter basket, and usually automatic volumetric dosing. Unfortunately, the flow and pressure provided by espresso machines is generally excessive for brewing great filter coffee.
If cafes could brew amazing filter coffee in an espresso machine, it would be the Holy Grail of brewing coffee by the cup.
After almost three decades of thinking and tinkering, I have finally found a method to brew extraordinary filter coffee in a (Decent) espresso machine in three minutes or less. I’ll call this Filter 2.0 until someone suggests a better name.
Much credit goes to Jonathan Gagné for sparking part of this idea with his long-steep aeropress technique, and John Buckman for his relentless improvement of the DE1 machine.
The pieces of the puzzle
The Long-Steep Aeropress Technique
Jonathan recently developed and wrote about his new aeropress technique that involves a steep of 10 or more minutes. The idea of improving and increasing extraction with a long bloom and removing the liquid extract gently from the coffee grounds is a cornerstone of Filter 2.0. In a cafe setting, I would limit the bloom phase to two minutes. At home, it’s worth experimenting with much longer blooms.
The Filter Sandwich
In May, 2019 I posted onInstagram about my “filter sandwich.” Many years earlier, Andy Schecter had posted online about putting an aeropress filter under his espresso pucks to absorb fats and possibly prevent his blood cholesterol from rising. Andy reported the interesting side effect that the filter allowed him to grind finer and extract (1.5%?) higher. In 2019 I built on Andy’s idea by adding a filter on top of the puck, in an attempt to decrease channeling. The filter sandwich decreases channeling, increases extraction, and also maintains puck integrity when applied pressure is released during the bloom. In the case of Filter 2.0, I recommend using a bottom filter with very small holes of 1—2 microns. More-porous filters will yield coffee with less clarity and possibly more astringency.
The Blooming Espresso
in late 2018, a few months after receiving my DE1, I created the “Blooming Espresso” profile, in which pressure and flow pause for 30 seconds (without opening a valve) to allow the grounds to “bloom” before percolation removes liquid from the puck. The bloom improves extraction quality and quantity, especially from the lower layers of the puck. Filter 2.0 is a filter-coffee variation on the Blooming Espresso with a longer bloom phase.
The Profile Building Capabilities of the DE1
The Decent allows a user to build profiles with as many steps as desired, with features such as temperature profiling, flow control, the ability to move from one step to the next based on a trigger (such as reaching a pressure or volume target) and countless other next-level options. In this profile I used 90°C during preinfusion and 85°C during percolation, a two-minute bloom phase, and a flat 3 ml/s flow rate during percolation. As a safeguard, I set a “pressure limit” of 3 bar during percolation, just in case my grind is too fine. I’m not yet sure whether that is necessary, but it can’t hurt.
The Process
Insert a two-micron 55mm paper filter in the bottom of a clean portafilter basket
Rinse the filter and basket with hot water or latch and flush with hot water.
Fill the basket with finely ground coffee, not quite espresso grind, but far finer than any filter grind. I use settings 2a—2m on a Baratza Forte depending on the coffee. You might try something like #3 (out of 11) on an EK43 or #3 on a Ditting. I use 20g—22g in a 24g basket in order to have enough room for the Flair58 puck screen.
Distribute the grounds, ideally using the Weiss Distribution Technique
Tamping is optional :0. Take a breath. It’s ok to not tamp this.
Set a metal mesh screen such as the Flair58 puck screen on top of the grounds. Ensure the filter is level.
Latch the portafilter on the espresso machine and pull the shot.
Preinfusion: I set the pre-infusion time just high enough such that the entire puck will be saturated a few seconds after the preinfusion flow stops. If you are using a Bluetooth scale with the DE1, you can set the pre-nfusion time longer and set the maximum weight to something like 2g, which will cause the profile to move on to the bloom as soon as the scale senses a few drips. An easier solution might be to figure out the number of ml at which you’d like preinfusion to end. Experienced DE1 users will know there are several more sophisticated ways to program just the right amount of preinfusion.
Bloom (pause): As noted, the bloom time is flexible. For use in a café, I think two minutes is adequate. Longer bloom times are marginally beneficial. For use at home, you may want to experiment with much longer bloom times.
Percolation (flat flow): my standard flow rate is 3 ml/s. I find a higher flow rates increase fruitiness of coffee but also increase the risk of astringency. The flow rate should ideally be scaled to dose size. For example, if you are using a small basket and does such as 12 g, you may want to use 2 ml/s but 3 ml/s would be appropriate for an 18g dose. Flow rate should scale more or less in proportion to the depth of the coffee bed .
Pulling a shot
Note that I limit these shots to 5:1 ratios. The shot you see here was made using 20g in a 24g basket with a Flair58 filter on top of the grounds and a 55mm, 2-micron filter under the coffee bed. To mitigate the risk of astringency, I don’t usually exceed a 5:1 ratio. After the shot is complete, I dilute it with hot water to my desired brew strength. The end result is a 20g dose and 100g extraction diluted with 225g—250g of water to yield a 23%—26% extraction with 1.4%—1.5% strength. Of course, all of these numbers are adjustable to taste.
If you sense astringency, consider improving the puck prep, grinding coarser, or putting a finer-mesh filter under the puck.
So, how does it taste? It tastes like an incredibly-well-made filter coffee, the kind you hope the barista will make for you, but you rarely get, when you order a pourover. I recommend tinkering with the Filter 2.0 profile to influence acidity and fruitiness and tone down undesirable flavor. For example, one might lower the temperatures when using darker or defective roasts. One could extend the bloom phase to increase extraction when not in a hurry. And one could increase the percolation flow rate to enhance fruitiness, though that may increase the risk of channeling.
What’s Next?
I hope this post inspires others to give this a shot (sorry) and make improvements. I have only been using this profile for a few days, and I’m sure others will make many incremental improvements.
I have one caveat, however: please do not try this shot with a standard, traditional espresso machine. It’s just not going to work well. It is possible to approximate this profile with a lever machine or with an E61 machine with low line pressure, though it’s easiest and best with the DE1.
Every part of this profile is important and works together to produce a great end result. Before experimenting or modifying, please test this profile the way it was designed, using the filter sandwich, DE1, preinfusion, long bloom, low temperature, and low ratio. Skipping or modifying any of these parts is likely to damage extraction quality and enjoyment. Thank you.
NB for DE1 users: John has added this profile to the profile library on the DE1. Simply update your app and you will see it.
Roasters often debate the merits of “omniroasting” but I have never heard someone discuss what I think is the most important determinant of whether one should omnniroast: quality of espresso extraction.
Omniroasting refers to using the same roast profile for both filter and espresso. Of course, espresso roasts have traditionally been darker than filter-coffee roasts. And I am all for using lighter-than-traditional roasts for espresso. But with the advent of third-wave roasting and the sometimes obsessive desire of roasters to roast as light as possible — whether they can do so successfully or not — many have decided to roast their espresso coffees as light as they do their filter coffees.
Unfortunately, espresso made from very light roasts is often unpalatably sharp, sour, and imbalanced. However, it is not always due to the roast, it is often due to the espresso extraction.
Until the past few years, a “god shot” was something coffee pros expected to experience perhaps once per year. I don’t fault baristas — or a deity — for the infrequency of god shots. I fault the limitations of the equipment we have had at our disposal until now.
Prior to using the DE1 from Decent Espresso, I had tasted perhaps five truly great espresso extractions in my life. For 20+ years, almost every espresso I tasted was imbalanced, too sharp, and too bitter, and usually astringent. The exceptions were usually shots made from low-acid coffees, but those coffees were not of good enough quality for me to enjoy as straight espresso. However, it makes a lot of sense that darker, low-acid coffees have been the rule in most countries for many decades. Every other type of bean pulled as espresso was guaranteed to be too sharp and imbalanced for most palates.
The first day I pulled blooming espressos on the DE1 was the first time I tasted several great extractions in one day. The blooming espresso profile consists of a flow-controlled preinfusion (note: there is no such thing as preinfusion controlled by pressure) followed by a 30-second “bloom” during which the flow stops but the machine applies a modest pressure on the puck to prevent it from expanding or losing its integrity. With the right grind setting, a few drops will fall during the bloom. After the bloom the machine executes a 2.2 ml/s flow profile to extract the coffee. Much like when making a pourover, but more dramatically, the bloom phase increases and improves the temperature of the lower layers of the coffee bed, ensures all of the grounds are saturated with liquid before extraction, and increases extraction level. The higher, more uniform extractions of the blooming espresso soften the flavor profile, decreasing sharpness and bitterness. They also produce very high extractions, allowing one to use less grounds if desired.
A well-executed blooming espresso shot approaches the extraction quality of good filter coffee.
With the blooming espresso and similar profiles on the DE1, as well as with the allongé, another high-extraction profile I have written about extensively, I happily (and exclusively) pull shots of very lightly roasted washed coffee. While baristas have historically avoided shots of lightly roasted Kenya because of their inevitable sourness and sharpness, lightly roasted Kenya and Ethiopian coffees are now my go-to espresso beans, just as they are for filter coffee.
So, should you omniroast? If you are using something like a Mazzer Robur and an LM Linea, without true preinfusion, definitely not. If you are using a better grinder such as a Mythos with a machine that offers proper preinfusion and/or pressure profiling (E61, Strada, etc) you may be able to pull nice shots of light omniroasts. And if you have a DE1, you can mold the flavor of your espresso to your liking.
My advice is to not allow the platonic ideals of super-light roasting or omniroasting to get in the way of producing the best end product. I believe it is best to adapt to, and optimize for, the limitations of your equipment, or upgrade your equipment, and roast appropriately for it.
One simply cannot discuss omniroasting without considering the quality of espresso extractions. Comments always welcome.
I selfishly started Facsimile because I wanted a good excuse to cup with experts from around the world. We recently completed the fifth live cup-along, and I’m in awe of how much I’ve learned already.
I took a moment to reflect on the past several months and a handful of the takeaways. Here’s what I found.
1.Consistency is king
The purpose and namesake of Facsimile is to provide coffee enthusiasts an exact copy of the experience of cupping side-by-side with experts. We take efforts in preparation to ensure that each set of samples is identical. We provide as much instruction as is reasonable so that each cupping bowl of a sample tastes the same.
But it’ll never be precise, and we know that. However, you can control that each of your samples is prepared and handled the same way. Ground the same, brewed the same, and evaluated the same.
This is especially important on any given cupping table of green samples, but also important from table to table, session to session. Eliminate all variables apart from the samples themselves, and you’ll have a more successful evaluation.
A song may sound different on different speakers, but you should still be able to tell the difference between “Hey Jude” and “Smells Like Teen Spirit,” no matter what you have available to you.
2. Sensory evaluation is comparative evaluation
As a coffee brewing method, cupping is inherently cynical. It readily trades quality of brew for reproducibility and assumes that defects are everywhere if you just look close enough.
Yes, cupping is designed 1) as an easily repeatable extraction process, and 2) as a means of more easily detecting defects and inconsistencies (by way of several, smaller brews).
But there’s a pleasant, perhaps unexpected byproduct of this pessimistic outlook. Cupping is hands down the best way to brew many samples at once, and brewing many samples at once creates a magical context for comparative tasting. This is no small matter. Drink a cup of any coffee and you will be immersed in its qualities, you’ll be very much seeing its trees, and not the forest. Give yourself several other coffees to taste before and after, and you’re giving yourself a broad view of the forest.
This comes up again and again during our live cup-along: the first sample often just smells like and tastes like, well...coffee. This isn’t some affliction of the novice. With my 20 years of coffee tasting experience, I habitually return to sample #1 to complete my evaluation. If I ever need to cup just one sample, I’ll find one or two other samples to put on the table alongside it to be sure that I obtain the benefit of comparison.
This is also why I cup incognito and scatter bowls across my cupping table. I gain very little from knowingly tasting the same sample three or four times in a row. I gain so much from unknowingly tasting them throughout the table in different contexts. (After I grind each sample, I place the same color sticker under each bowl and on the card or bag with the coffee’s information. Having done this to every sample’s bowls, I randomly scatter the bowls around the table, then reassign them numbers for my cupping notes. Upon completion of the evaluation, I check the sticker of each bowl, sort out any discrepancies, and finalize my scores.)
3.Official cupping forms aren’t used much
I’ve been using a Cup of Excellence form as long as I can remember for all coffee scoring. But, I don’t use it properly. I rarely score all individual attributes, and instead hack it to fit my needs. This was reinforced by the habits of the Stumptown cupping lab circa 2011, where we all did the same.
I had a sneaking suspicion that I wasn’t alone and that there were other cuppers who didn’t use official cupping forms at all, or who used them in a hacky way, or who had designed their own.
If the Facsimile guest cuppers are any indication, I underestimated. While most of them have formal cupping training of one sort or another and all of them know how to use a standard 100-point scoring system and the SCA cupping form, not one of them routinely uses an official cupping form for evaluating green coffee.
Scott Rao tends to capture notes and intuit a score based on a nearly unconscious evaluation of the cleanliness, sweetness, acidity, and flavor. Gabby Wright is Q certified and has memorized the SCA cupping form. When she scores, she uses a notebook to capture coffee notes and a final score. Zakiya Mason and Charles Babinski use a proprietary form that separates sweetness, acidity, and then buckets everything else under “structure”. Petra Veselá and Gwilym Davies use a 6-point smiley-face system modified from barista competition scoring, with which they have abundant, diverse experiences.
And yet, I have been in sync with these experts across a variety of origins and qualities in cupping after cupping, in coffees ranging from 82 to 89 points.
4.Be clear about your goal for each cupping
A reason why official cupping forms are seldom used is that they don’t expressly address the goal of a given evaluation.
For example, Zakiya and Charles were coming to the cupping table looking for coffees they’d be proud to share with visitors of their cafés. The customized form they use instead of an official form is designed to answer--and explicitly asks--the question, “Would you serve this?”
Gabby cups with her roasting clients in mind. Scott cups to better understand how to approach roasting and extraction. Petra and Gwilym primarily cup in order to evaluate the success of their roasting.
If your goal is to give the coffee an official SCA or Cup of Excellence score, then I know just the cupping form for you to employ. If you’re cupping to purchase, to understand how a coffee may fit into a blend, or to showcase a range of qualities to a customer, consider how that should affect your approach.
5.Cupping results are a form of communication
Sometimes the most obvious detail can be lost in an elaborate, intimidating ritual. For example, it took me an embarrassingly long time to fully grasp that coffee processing techniques--washed, natural, and nearly every other version--were each created with the straightforward goal of preparing coffee to be stable for storage and transit.
Cupping may appear to be a series of steps that you need to precisely follow to be “doing it right.” While there’s some truth to this, and certainly unavoidable parts of cupping, the steps are a means to an end, and that end is an accurate, concise description of a sample that can be understood by someone else.
Cupping results are a form of communication, whether the recipient of the message is a farmer, importer, roaster, customer, or even your future self who won’t otherwise remember what it was like to taste that coffee.
The magic of cupping with others (as we do in Facsimile) is the value of having that communication in real time while the cups are still warm and in front of you.
The most impressive, productive (and sometimes over my head) discussion about espresso these days is on the private Decent Diaspora forum. One of the wonderful things about the Decent community, besides its civility, is the way a group of impressively intelligent people collaborate to expand our understanding of espresso extraction.
A recent development has been John’s new “Best Practice” espresso profile. Although it is a work in progress, as all of our profiles are, this development is worth discussing. If you’re not familiar with the Decent’s graphs, bear with me, it’s a lot simpler than it looks at first.
Longtime readers will notice this profile looks a lot like my “Blooming Espresso” profile. The Best Practice Profile includes a few improvements on the Blooming. The improvements come primarily from work by Damian Brakel and Jonathan Gagné.
Quick fill of group head at the start of preinfusion. Preinfusion starts hotter (not shown) than the rest of the shot, to compensate quickly for the cooling effect of the room temperature puck.
Low pressure preinfusion, to assist capillary action in fast, even wetting.
Pressurized bloom to maintain puck integrity. (The low-pressure bloom of the Blooming Espresso can work brilliantly but offers a greater risk of channeling when pressure is reapplied.)
Softened pressure rise to avoid channeling that a steep rise can cause.
Extraction phase switches to flow profiling for automatic channel healing.
Extraction phase has a linear flow-rate ramp over time, to keep constant water contact time, instead of using pressure profiling to approximate this.
Other notes:
The extraction phase uses a pressure limit, so as to never go above the set maximum pressure of 9 bar. This “failsafe” is now a feature many of us for all shots on the DE1, to salvage cup quality if the grind is a little too fine.
The BPP will soon implement Jonathan Gagne’s “adaptive profile” idea, in which the extraction phase will decide the steady-state flow rate relative to flow at peak pressure. This adapts the profile to the grind size, using
Accurate stop-at-volume closely matches scale weight, because of a fully successful preinfusion.
A smooth puck resistance curve is achieved.
While this may be a lot to digest, rest assured that when using the Decent, you can “set it and forget it.” If I were using a DE1 in a cafe, I would use this profile all day, and only adjust the grind as needed. While the Decent’s brain is complex, the user interface couldn’t be simpler.
Some of the "best practices" here were originally discovered on traditional machines:
- Several machines (such as Kees' Idromatic) have a quick fill, followed by a soft-pressure-rise feature built into the group, and manual lever machines have done this for years. (one great thing about the DE1 is it can mimic any feature from any other machine.)
- Pressurized preinfusion is fairly common in traditional machines, but to my knowledge, no traditional machine implements this by measuring puck pressure. Instead they measure pressure-behind-a-flow-constrictor, which gives different results.
To answer the inevitable question, yes, these shots can taste amazing.
I’d love to know your thoughts about this.
*******
Would you like to improve your cupping skills while enjoying delicious coffee? Subscribe to Facsimileand cup along live with Ryan Brown and his guest coffee experts each month. We offer a money-back guarantee, and no commitment is required.
Does the difference in the body of various coffees matter? The answer may seem obvious, but bear with me.
Let’s say you drink only specialty-grade coffee. How much does body vary from one bean to another? Not much, I would posit. Natural variation in body among different coffees is modest, but the ability to change body through roasting and brewing is much greater.
I believe that most perceived differences in body at the cupping table are due to not meticulously weighing both the ground coffee as well as the water used in cupping. While some modern green buyers and roasters weigh their cupping water, that is not a universal practice, and it was rarely if ever practiced until about fifteen years ago.
What is body?
Body is the tactile sensation of coffee on the tongue, produced by a combination of viscosity and insoluble particles. Body is related to mouthfeel, but most authorities attribute body primarily to insoluble particles, and mouthfeel to the presence of oils. Mouthfeel relates to the sensation of “butteriness” produced by suspended oils in coffee. Interestingly, body does not seem correlated with the proportion of fines various coffees produce when ground.
Body is indirectly related to brew strength as measured by TDS. I say indirectly because TDS is a measurement exclusively of dissolved particles, and body is produced by insolubles. But generally speaking, for a given brew method, increases in TDS correlate with increases in body. TDS is a measure of density, and a denser brew produced by the same method will typically have more body.
How to influence body in coffee
There are four ways I can think of to influence the amount of body in brewed coffee:
choice of green coffee
roast level and development
brewing method and filtration
brewing ratio
Choice of green coffee
The choice of green coffee probably has the least capacity to affect body. Recently I was talking about body with Ryan Brown, cofounder of Facsimile Coffee. Ryan noted that body has probably never been a decisive factor him when buying green coffee. That remark struck me and sparked my interest in writing this post.
While coffee origin and processing can affect body, the choice of origin or processing has less impact on body in the cup than do the following factors.
Roasting and body
Roast level and development, as well as the ratio of conduction to convection used in roasting influence body. Darker roasting, greater development, and coffee roasted with more conduction have the capacity to increase body. Perhaps few of us would choose to roast darker simply to increase body, but learning to increase roast development without roasting darker can be a useful tool for manipulating body as well as flavor.
Brewing method and filtration
The choice of brewing method, and especially filtration, have the greatest capacity to influence body. Immersion brews and other unfiltered brews produce the most body. Percolation methods in which the coffee bed acts as a form of filtration to trap fine particles produce less body. Percolation methods using filters with low porosity and high capacity to trap fines produce the least body.
Brewing ratio and strength
Increasing the ratio of grounds to water and/or increasing brew strength (density), all else being equal, will increase body.
The bottom line
Returning to the original question, it seems reasonable to ignore or discount body as a factor when choosing green coffee. Small changes in brewing method, recipe, and filtration have the capacity to alter body far more than one could achieve by choosing different green coffee.
Interested in improving your cupping skills while enjoying spectacular green roasted flawlessly?
Subscribe to Facsimile. We offer a money-back guarantee if you don’t love it.
A few years back there was a trend called “solubility matching,” an attempt to blend coffees of similar solubility. The idea was appealing but never seemed to gain traction or improve the quality of blends. What is solubility? And what is solubility matching? And does it matter?
Solubility is a property referring to the ability for a given substance, a solute, to dissolve in a solvent. Simple enough. It is estimated that just over 30% of a coffee bean’s weight is soluble in hot water. Roast development, coffee variety, and, I believe, coffee density, among other factors, influence the solubility of a particular bean.
Underdeveloped roasts tend to be less soluble than well-developed roasts. Very dark roasting decreases solubility by burning off some of a beans soluble mass. The most soluble roasts seem to be well-developed, light-to-medium roasts.
I have reached extractions as high as 28%—29% (most often with Kenyan and Ethiopian coffees) using extraction methods such as the Blooming Espresso, Vacuum-pot brewing, and the Tricolate brewer, all of which offer opportunities to achieve near-complete extractions. I imagine I’m still a few percentage points away from “complete” extraction, or exhausting a coffee’s solubility, without resorting to hydrolysis, as many instant-coffee manufacturers do.
“Solubility matching” is the appealing idea of blending coffees with similar solubilities. I believe the assumption behind solubility matching was that blending coffees of similar solubilities would improve flavor or extraction level. One difficulty of solubility matching was that it severely limited what coffees one could blend together. Recent efforts to revisit solubility matching have confirmed for me that blending two coffees of different solubility levels merely creates a resulting coffee with an extraction level that is approximately the weighted average of the extraction levels of the two blend components, and a required grind setting that is likewise similar to the component’s weighted-average grind sizes. (Jonathan Gagné recently confirmed for me that blending two coffees creates a blended version of their particle-size distributions.)
As for flavor, I have never found a formula or a shortcut to creating a great blend. Solubility matching hasn’t improved my results. Given that green coffee is always slowly fading and roast batches often vary in quality, I believe informed trial and error, with lots of blind tasting, is still the only practical way to create and manage a great blend.
The only shortcut I use to blend coffee is the well-known “spoon method”: pour a cupping bowl or brew a cup of each blend component you are considering using. Spoon some of each blend component into a separate, clean cup. For instance, if you have three blend components and want to taste a 3:2:1 blend, blend three spoons-full from the first cup, two from the second cup, and one from the third cup, and taste that. Repeat and taste with different ratios from each component.
I'd love to hear from you if you would like to share your experience with solubility matching and blending. Thanks for reading.
How the belief in a supposed skill made me miss out on great coffees
There’s a little story I started telling myself after I had been buying coffee for just a couple of years, and it went like this:
I can taste green coffee through the roast.
What does this even mean? It means that I believed I could accurately evaluate a coffee’s qualities and score regardless of how poorly it was roasted, provided it wasn’t charred beyond recognition. It means that I believed the score I gave the sample wouldn’t change if I cupped a different roast of the same green.
The story served me well; it certainly helped me avoid buying bad coffees. But the story is a lie, and I’m sure it made me miss out on a great deal of great coffees.
First, let’s explore why I told myself this lie. To be an effective buyer of green coffee, you have to build a deep understanding of what factors cause green coffee to taste as it does. You learn about terroir, soil, varieties, harvest, processing, and drying above all others. You grow an intuition for how changes in these crucial steps play a part in the samples you’re cupping.
On a given table of samples, you can reasonably assume that they were all roasted similarly enough that roast is not a variable. All of those other details of the green coffee are what make up the differences in the cup.
But there’s more than that. Many green coffee buyers travel all over the world tasting coffee. Often, they have little or no control over how samples are roasted, even if they fully appreciate the impact of roasting on a cup’s score.
I’m not alone in feeling this way. I can count on one hand the number of green buyers who believe that roast is important in their sensory evaluation of a green coffee. I would need several hands to count the number of coffee buyers who believe they cup through roast.
Recently, I cupped a Rwandan sample provided by Atlas while looking for offerings for Facsimile. Here are my raw cupping notes:
83.00
fragrance/ aroma: vegetal, chocolate?, molasses
liquor: unsweet, vegetal, raisin, nice body, sweet + bright when hot, still vegetal as cools
Not sure if you caught this, but I wrote “vegetal” three times and wrote the coffee off completely. Also note that I do not mention the roast at all. There was nothing obviously wrong with the roast during my evaluation.
But Scott Rao, who closely monitors the ROR curves of all the coffees I received, reached out when he saw my score. He pointed out that, due to no error of the person sample roasting, the reliable Mark Benedetto, there had been an issue with the roast.
Fortunately, the good people at Atlas were willing to indulge a little experiment, and sent me more of the sample, despite my explanation that I’d be unlikely to purchase the coffee. (Thank you, Chris Davidson!) A new sample, properly executed, arrived on my table:
A three-point difference for this experienced cupper because of roast? This experience has completely changed my understanding of green-coffee evaluation.
For one, it’s why we decided that all Facsimile products include a roasted sample. We had been considering offering a green-only version, but reconsidered after realizing that even the most skilled and experienced sample roasters using the best equipment can make a mistake, especially in their first batch of a new coffee.
Two, I accept that if I don’t like a sample, it might be the roast, not the green.
Three, you will no longer hear me say that I cup through roast. I don’t believe that anyone else can either. If anything, this lie held me back from a deeper understanding of when a roast is not appropriate for green coffee evaluation.
Finally, it has helped me considerably to have consistent ROR curves in my sample roasts. Great roasting should not be exclusive to production roasting.
A few years ago, I wrote the first book about the coffee buying role, Dear Coffee Buyer. I explained my motivation to share my experience as plainly as I could in the preface:
I’ve made my fair share of coffee-buying mistakes. Some of them were likely unavoidable, but others could have been sidestepped if I had only had access to training for the job. Know-how and skill-building for the position, like an urban legend, has been passed on through the oral tradition. If you don’t work directly with someone who has been buying coffee for years, you just have to figure it out on your own. My goal is to help you avoid the mistakes I made and to shorten your path to proficiency in coffee buying as quickly and painlessly as possible.
I’m satisfied with the effort to share what I know about coffee buying, but there’s a limit to how much you can learn from reading a book.
Since its publication, it has become clear to me what I didn’t--what I couldn’t--include in Dear Coffee Buyer.
To be a truly great coffee buyer, you have to be a great coffee taster.
To be a great coffee taster, you have to cup with other, experienced tasters. You have to cup the same roasts of the same samples, brewed with the same water at about the same time. “Go out of your way to cup with others,” I write in Dear Coffee Buyer. “Getting someone else’s opinion on a cup or sample--even, or especially, if it’s different from your opinion--is incredibly valuable.”
Unfortunately, this work cannot be done alone or in isolation. It cannot be done with your importers or other suppliers, because (please keep in mind) they’re trying to sell you something.
Typically, this could be done in-person, but this isn’t always possible, and for the past year, has been very nearly impossible.
Scott Rao and I are launching a cupping subscription designed to help you become a better coffee taster. Our goal is to provide you with an exact copy of the coffee we’re tasting so that we can cup them together, live and online.
Each month, you will receive several unique coffee samples, expertly sourced and roasted.* I will evaluate the samples online while you taste along at home and compare notes, live or in your own time. We’ll invite guest cuppers to share their takes on the same coffees you have brewed in front of you. You’ll have the chance to improve your skills while you gain insights about origins, processing, and samples.
It’s called Facsimile, and it’s available in limited quantities now.
*This may sound glib or superficial, but we’re dead serious.
We could wax poetic about how we collectively come with decades of green sourcing and roasting experience, or how we’ve written definitive, seminal books in our fields, or how we promise nothing short of exceptional coffees roasted flawlessly, free of any defects.
But we’ll make it simple: We guarantee your satisfaction. If you’re not happy we’ll refund your money in full.
Recently a friend and I discussed the viability of starting a niche business selling green coffee. We decided not to do it, but one of the interesting issues to come out of our discussions was cup-score inflation.
Part of our business model would have been to offer customers our coffees’ cup scores. However, scoring our own coffees would present an obvious conflict of interest: competition would pressure us into either inflating our cup scores or risk losing business to competitors who inflated the scores of their coffees.
For example, one of my friends who is a home roaster and Q-grader purchased numerous coffees from a well-known green supplier. He scored all of those coffees 3––6 points lower than the scores provided by the green seller. The most egregious example was a Kenya rated 91 points by the importer, which my friend rated a generous 85. This is not a mere quibble. You should know a 91 when you taste it. You will remember where you were and who you were with. An 85, on the other hand, is not memorable. These scores are not close.
Another example: last year I asked several importers to send me only samples of coffees rated 88 points or higher. The vast majority of samples I received were 85––86 points. While there is nothing wrong with 85-point coffees, it is difficult to mistake an 85 for an 88.
These are all examples of what I think of as the “slippery slope” problem marketers often face: if you are completely honest about the quality of your product but your competitors all exaggerate the quality of their products, you will lose to those competitors. Once one competitor makes exaggerated quality claims, it becomes nearly impossible to avoid inflating your own claims of quality. Over time, the claims of almost all surviving competitors are inflated.
Even when importers score coffees accurately, they often publish the score of a coffee when it was at its best, say, based on a pre-ship sample, and they do not re-score the coffee after it arrives, or later as the coffee fades and loses quality. Some coffees can easily lose a few points in a matter of a few months due to shipping conditions, storage conditions, excessive moisture content, or even the microbes used during fermentation. (See Chris Feran’s excellent post about microbes and coffee fade here.)
Ideally, one hopes roasters will be “educated” enough to evaluate quality accurately, and then choose green accordingly, but in my experience working with newer and smaller roasters, that is often not the case. Many of my smaller clients don’t sample roast or request enough green samples before purchasing a coffee, and they over-rely on green sellers’ scores to guide their buying. This dynamic may train less-experienced roasters to score coffees too high.
In the past year, my smaller clients have overrated the score of almost every roast sample they have sent me, usually by 2––3 points, but sometimes as much as 5––6 points.
Please don’t misunderstand me: I do not think green sellers are any less honest than other people. They are simply adapting to an unfortunate dynamic in the industry created by a combination of competitive pressure and having inexperienced clients. I wish they would be more accurate and up to date in their scoring, but I also wouldn’t want to be in their position.
What’s the solution?
I won’t pretend to have the definitive solution to this problem, but here are some suggestions that may help less-experienced roasters make better green choices.
Take the Q-certification course. It is perhaps the only industry-sponsored course worth the money.
Train in person or remotely with an expert. If your goal is to improve your cupping and scoring skills, this is a more cost-efficient option than taking the Q course. I don’t consider myself expert enough to offer such training, but if it interests you, send me an email (scott@scottrao.com) and I’ll connect you with someone who is.
Always sample roast, and cup blindly. Ideally, use more than one cup of each sample, and scatter the duplicate cups around the table so you don’t know where each coffee’s twin is. If you find you often score the duplicate cups differently, you know you have some work to do.
Always cup more than one type of coffee at each cupping session. This is great advice from Ryan Brown, who told me he never cups a coffee by itself because he prefers to have a reference coffee on the table. And of course, ideally that reference coffee is cupped on a table with many samples.
Try to cup with seasoned professionals when possible (and when we’re not in a pandemic.)
As we enter the holiday season, I thought it would be nice to make some gift recommendations for the coffee enthusiast in your life. I admire and enjoy all of these items personally, and strongly recommend them. Please note that I have no financial interests in any of these products, other than my own book and the Decent Espresso Machine.
The World Atlas of Coffee by James Hoffmann is simply the best all-around book ever written about coffee. James has recently updated the book’s data for the producing countries he discusses, and he has added sections such as one on home roasting. The book is available in English, German, Chinese (Simplified and Traditional), Russian, Korean, Japanese, Norwegian, Thai and even Italian!
Barista Hustle Subscription Whether you’re a home barista or work in a cafe, there is no better way, especially during a pandemic, to deepen your barista skills than by taking the Barista Hustle online course. Barista Hustle, led by Matt Perger, is the world leader in making geeky baristas even geekier. If you’re going to learn, learn from the best.
If you’re in Europe and want to order some special beans for a loved one, I recommend the honey-processed Costa Rican Geisha Sumavafrom one of Europe’s best and most underrated roasters, Doubleshot in Prague. Nothing says “I love you” like a bag of Geisha, right? (But if I send you a bag of natural beans…)
I’ll say it out loud: The Espro Bloom is my new favorite pourover brewer, despite the funny-looking filters ;). The Bloom is the fastest pourover brewer I’ve ever seen, it makes delicious coffee, and is a pleasure to use. I can’t recommend it enough.
The Flair Espresso Maker is a wonderful new manual espresso maker. Just fill it with boiling water, flex your biceps, and in 30 seconds you’ll have cafe-quality espresso. The design is lovely, and it’s fun to challenge yourself to apply pressure smoothly and consistently (if you’re into that sort of thing).
I use the Peak everyday at home, and it’s revolutionary: the Peak allows me to adjust the amount of ion exchange to target whatever water alkalinity level I prefer for coffee brewing. Given that my tap water at home is quite hard, the Peak has been a godsend and has saved me a bundle on bottled water.
The Decent Espresso Machine Whether you really, really want to make a loved one happy, you’ve got too much cash burning a hole in your pocket, or you just want your significant other to make you extraordinary coffee every morning, the Decent Espresso Machine is the splurge gift of the year. The DE1 pulls beautiful espresso and is easily the world’s most versatile machine. Try the Blooming Espresso, the Allongé, or create your own custom flow and pressure profiles. For the uber-geek in your life, the real-time flow, pressure, and temperature graphs are fascinating to watch while pulling shots. This machine has truly revolutionized espresso, and now it even makes consistent, extraordinary filter coffee.
Call me biased, but I am very happy with my new roasting book. It’s the book I’ve always wanted to write: detailed, prescriptive, and data-driven. I developed the roasting system in the book over many years of offering seminars and consulting for some of the world’s top roasters. Whether one is looking to roast more consistently, manage RORs better, or just avoid ROR crashes, this is the right book. If you have a roasting enthusiast in your life, this would make a great gift.
I’m pleased to announce my newest all-levels online roasting class this November 7.
The class will be broadcast through a private Facebook group. All ticket holders will have access to the class video and discussion forum for one month after the class airs. *It is not necessary to view the class as it airs live.*
Many students of previous online classes have said the month-long discussion forum improved their roasting more than any other class or resource ever had.
During the class we will discuss the samples and their curves from the upcoming Roast Defect Kit. If you would like to receive the Roast Defect Kit in the mail to cup along with us at home, the kit will cost an additional $50 USD plus shipping. The coffee in the new kit is an incredible 88.5-point organic Ethiopian honey setami (a variety new to me!). The RDK is a great educational tool to share with your coworkers or staff!
DATE & TIME: Sat, November 7, 2020 (1:00PM-4:00PM US Pacific Standard Time)
LOCATION: This class is online only.
INCLUDES: Three hours of lecture and Q&A plus one month of online coaching
• Cupping and curve discussion of the "Roast Defect Kit" featuring good, baked, and underdeveloped roasts. • Methods to create consistent, repeatable ROR curves • Advanced methods to prevent ROR crashes and flicks • How to modify roasting machines for better performance. • Pro tips to get the most out of Cropster and other roasting software. • How to adapt strategies to different types of machines. • Analysis of numerous roast curves.
All ticket holders will also have access to a discussion forum on the private Facebook group for one month. I will field questions and discuss students’ curves every day on the forum. The forum will provide a safe, friendly space for a high-level discussion about roasting. This is the same service I offer private consulting clients, at a steeply discounted rate, and in a fun format.
The course is appropriate for roasters of all levels. Although I am calling it an “all levels” class, this course will touch on methods more advanced and practical than anything in the level-three SCA roasting course (those classes are very basic). I guarantee your satisfaction.
I’ve frequently written about astringency on Instagram and Jonathan Gagné, author of the forthcoming book The Physics of Filter Coffee, wrote an excellent blog post about the science of astringency. Here I’d like to offer a practical guide to finding and fixing astringency in brewed coffee.
What causes astringency in coffee?
Large molecules called polyphenols, in particular chlorogenic acids (CGAs) and tannins, are the likely, primary sources of astringency in brewed coffee. Being larger molecules, polyphenols tend to extract less readily than most other coffee solubles, though CGAs seem to extract more readily than tannins do. (It has not been scientifically proven that CGAs extract more readily than tannins do, but it seems probable.) It’s likely the majority of astringent polyphenols found in brewed coffee extract via channeling in percolation brewing. Astringency is much less likely to occur in immersion brewing due to the lack of channeling.
What increases the risk of an astringent brew?
There are several potential sources of increased astringency in brewed coffee:
beans (seeds) from underripe cherry*
underdevelopment in roasting*
channeling during percolation brewing
*Both underripe cherry and underdeveloped roasts tend to yield higher levels of CGAs in the cup. CGAs are both astringent polyphenols and also the most prevalent acids in coffee. Having some CGA is probably important for a delicious cup (though I’m not sure any of us have ever tasted a coffee without any CGAs), but when the CGA level is too high, the coffee becomes noticeably astringent.
How to find and fix the source of astringency
When I find a brew astringent, I go through a series of steps to find and fix the source of the astringency:
If I have previously made a non-astringent, percolation brew of the same roast batch of the coffee in question, it is almost certain that channeling caused the astringency in the more recent brew. In that case, I would brew again with either (hopefully) better technique of a coarser grind setting.
If I cannot rule out channeling (for example, if I don’t trust my brewing method or skill), I will taste the coffee as a cupping. If the cupping is astringent, then channeling was not the cause, or at least not the only cause, of the astringency in the percolation brew.
If both percolation and immersion (cupping) produced astringency, the cause must be due to an underdeveloped roast or underripe cherry.
If some roast batches of the coffee in question are astringent and others aren’t, it is likely that roast development was the cause of the astringency.
If all roast batches of the coffee are astringent when cupped, and you are confident they are not all underdeveloped, then the green was likely from underripe cherry.
If you’re in the market to purchase a coffee roaster, I wrote this book for you. I’ve had the fortune to roast on hundreds of machines throughout my career, and I’d like to help new roasters buy the right machine for their needs. My goal in writing this book isn’t to tell the reader which brand to buy, but to help the reader to understand the important considerations in the decision and to make an educated choice that suits his or her needs.
Most machines from the major brands are capable of roasting a delicious batch of coffee, but some machines have features that make top-quality roasting and replication too difficult, even in skilled hands. Common examples of such features include thin, single-walled drums, slow gas valves, valves with poor resolution at low settings, excessive insulation around the drum, slow or poorly positioned probes, and limited control of roasts after first crack.
When seeking advice about what machine to buy, please ask those who have experience with all of the major brands. Roasters who have used only one or two machines tend to favor those machines and lack perspective about other machines. It should go without saying, but please do not rely on the advice of roasting-machine sales associates, as they are always biased, and often misinformed about the virtues of competing brands.
I do not publicly recommend or critique particular brands in this post, as those opinions are best shared with clients in private. Here, I will discuss what to consider when choosing a roaster. It’s up to readers to infer my opinions of various brands.
Budget
First, consider how much you can afford to spend on a roaster. When calculating your budget, don’t forget to include the cost of necessities such as chimney ductwork, pollution-control equipment, initial green-coffee inventory, QC equipment, a laptop for logging roast data, and various supplies. A budget should also include the costs of installation, permits, and architectural drawings for the permit process.
If you’re a first-time roaster buying a machine with a capacity of between 6 kg–15 kg per batch, I’ve offered current (2020) equipment cost estimates below. Costs will vary country to country; I’m most familiar with the costs in the US, so I’ve referenced those here.
All prices are in USD; I’ve attempted to offer reasonable low and high estimates for each item. If an item’s low estimate is $0, it means the item is optional. I haven’t bothered including optional equipment such as color readers and other QC devices, as they are not critical for a roasting startup.
Key Considerations
With your budget and the above costs in mind, consider how much you can spend on the roasting machine. If you can afford it, please buy a larger roaster than you think you need. I’ve never known a roaster to regret buying a machine that was a bit too large, but I’ve known many roasters who regretted buying machines they quickly outgrew. Once you’ve estimated the startup costs of your roasting operation, prioritize your wants and needs.
1.CapacitY
To choose the proper machine size, it’s important to estimate how much coffee you expect to roast each week over the next two years. Note the weekly amount of coffee you expect to roast two years from today. I recommend buying a machine large enough to roast that quantity of coffee in no more than 25 hours. When performing these calculations, remember that a machine’s real capacity is likely less than its stated capacity, and that beans lose 14%–20% of their weight during roasting. (For reference, third-wave roasts lose approximately 14%, while a Starbucks roast may lose 20% or more.) A machine’s burner capacity—not its drum size—determines how much coffee it can roast well. A reasonable guide is to assume that a quality roast of one kg of green coffee requires 11,500 kj/hr (or, one lb of coffee requires 5,000 btu/hr).*
*This formula does not apply to machines that recirculate hot air back into the roasting chamber. Recirculation machines have higher capacity relative to burner output.
Your roasting-machine salesperson will likely claim that you can roast 15 kg per batch in a 15kg machine. The job of a salesperson is to sell machines, not to help you roast the best-possible coffee, so take any claims lightly. The salesperson may be technically correct, because the drum can surely fit a 15-kg batch, but a full batch may take 15:00–20:00 to roast, which is longer than ideal. If quality roasting is your goal, it’s usually safe to assume you will roast 3–3.5 lf batches per hour at 50%–70% of a machine’s stated capacity. Then deduct the 14%–20% weight lost per batch to calculate how much roasted coffee per hour a machine can produce.
For example, if one were to roast three and a half batches of 7 kg green coffee per hour in a Diedrich IR-12, with an average weight loss of 15%, the machine would produce just under 21 kg of roasted coffee per hour (3.5 * 7 kg * .85 = 20.8 kg). That’s more realistic than assuming the machine will roast 48 kg per hour.
2. Reliability
Some machines are more reliable than others. Machines with fewer parts, fewer high-tech features, and heavier builds tend to be more durable and reliable. Older, simpler roasters, such as the fabled UG-series Probats are examples of rugged, low-tech machines built to last. Of course, all design decisions entail tradeoffs. Some modern technology may lack reliability but make quality roasting easier and more repeatable. Again, ask other users about reliability before buying— I’m sure most roasters would be happy to share their experiences, especially if they have complaints! While roasters are not always objective about their own roast quality, they tend to be somewhat objective about the reliability of their machines.
3. Service
Many brands may not offer service or support in your country. Further, some companies offer poor support once you have paid for your roaster. I won’t publicly discuss which companies, in my experience, neglect their customers, but I implore you to ask other users of a brand about service quality before you put a deposit on a machine. Even if you have a pleasant initial sales experience with a company, that does not guarantee future service quality.
4. User Interface:
This may seem like a trivial consideration, but if you’re going to spend 20–40 hours per week using a roaster, a well-designed user interface is important. The interface isn’t just about convenience and comfort, it can also affect roast quality and repeatability. For example, machines that require you to repeatedly tap an up- or down-button to change the gas setting can be tedious and slow to respond. In comparison, a machine with an analog gas dial or a smart touchscreen is more responsive, makes it easier to replicate curves, and can be a pleasure to operate. Other ease-of-use considerations involve having large, well-positioned digital manometers, timers, and temperature readouts.
5. Aesthetics
You may want to consider aesthetics if you are installing a machine for use in a retail cafe or other public space. A beautifully refurbished vintage machine may make a nicer impression than a budget, modern machine.
6. Machine Configurations
I discussed this topic in detail in The Coffee Roaster’s Companion, but will repeat the basics here. Common architectures include classic-drum roasters, indirectly fired roasters, recirculating roasters, and fluid-bed roasters. Each design has pros and cons.
Classic drum roasters: In these machines a drum rotates above a gas flame, and a fan pulls hot air from the burner through the drum and out of the roaster. Most smaller machines are classic drum roasters. Classic drum roasters get the job done, though many models provide too much conductive heat transfer, due to having a thin single-walled drum or an improper distance between the burner and drum. If too much heat is transferred to the beans via direct contact with the drum, coffee will taste harsher and less delicate. If you choose a classic drum roaster, I suggest you seek a machine with a double-walled drum and a burner with sufficient btu/hr (or kj/hr) for your needs. Compared to other designs, classic drum roasters offer good thermal stability but slower responses to gas changes.
Indirectly heated drum roasters: In these machines the burner chamber is separated from the drum and hot air passes from the burner chamber through the drum. The design allows the drum’s surface to remain cooler because the flame is not in contact with the drum. Indirectly heated roasters are more difficult to control than classic drum roasters, because they require skillful management of airflow, while classic drum roasters rarely require much, if any, airflow adjustment.
Recirculation roasters: These machines recirculate a portion of the roasting exhaust air back through the burner and roasting chamber. Such machines are energy-efficient but often run the risk of imparting smokey or polluted flavors on coffee. To avoid smoke taint, it’s important to heat the recirculated air to a sufficiently high (afterburner-level) temperature before passing it through the drum.
Fluid-bed roasters: These machines rely on a bed of rising hot air to circulate the beans and keep the beans aloft. Fluid-bed roasters eliminate the risk of conductive-heat damage, and are usually capable of developing beans well in short amounts of time. While there is no theoretical downside to fluid-bed roasters, in practice their control systems are usually too simplistic to fulfill the machines’ potential. Given the current, rapid evolution in roast-control and data-logging software, I expect the utility and popularity of fluid-bed roasters to grow rapidly in the near future.
7. Features
None of the features listed below are necessary to roast a good batch of coffee, but each may contribute to improved roast quality or repeatability.
Double drum (applies only to classic drum roasters) and powerful burner:The foundation of a good classic drum roaster is its burner and drum. As noted previously, burner output determines a machine’s true capacity. Double drums allow for faster and hotter roasting with less risk of tipping or scorching. Make drum quality and burner output your first two concerns when choosing a classic drum roaster. You can easily replace or upgrade fans, valves, ducts, etc, but you cannot easily replace a drum, and upgrading a burner can be expensive.
Variable-speed-drive (VSD) fan: As long as your roaster’s fan provides a reasonable amount of draw, you don’t need a variable-speed fan to produce good roasts. But without a VSD fan, it’s impossible to maintain consistent airflow levels day to day. The combination of a digital air-pressure manometer and a VSD fan is essential for expert-level roast repeatability.
Air manometer (aka drum-pressure manometer): A manometer in the duct between the roasting drum and exhaust fan is a relatively new, worthwhile addition to a roaster. The manometer reads pressure, not flow, but that pressure reading correlates with airflow. Using the same fan setting every day does not ensure consistent roasting because airflow may vary day to day with the weather and other factors. Having an air-pressure manometer helps one know how to adjust the fan to provide consistent airflow every batch. (Note: directly measuring airflow requires installing probes in the exhaust duct, but the probes get dirty too quickly during roasting to work effectively. Using an air-pressure manometer is the best current option to monitor and maintain consistent airflow batch to batch. However, the relationship between pressure and flow will shift slowly as the ducts get dirty, so frequent chimney cleaning is critical.)
High-resolution gas manometer: Most roasting machines come with small, cheap analog manometers that offer imprecise gas-pressure measurements. I recommend replacing your stock analog manometer with a high-resolution digital manometer. Analog manometers may be aesthetically pleasing, but they make discernment of precise readings too difficult.
Proper probes and probe locations: To be a great roaster by today’s standards, one needs better green, lighter roasts, quality data collection, precise controls, and software to track and analyze the data. To ensure adequate data collection, insist on having a bean probe and an environmental probe, each with diameters of 2.5 mm– 4 mm. An inlet-temperature probe is helpful but not critical.
The optimal bean probe location in most machines is as follows:
The probe’s tip should be 3–5 cm from the inside of the machine’s faceplate.
The probe’s tip should be 3–5 cm from the inner drum edge. (2 cm is ok for machines with capacity of 1 kg or less.)
The probe tip should be in the heart of the bean pile, even when roasting very small batches. If the probe is too high in the drum or too close to the center axle, it may not be immersed in the bean pile of very small batches. Proper probe location should provide quality data for batches as small as 20% capacity.
Paying for a machine: Manufacturers typically require the buyer to deposit 50% of the machine’s price upon ordering, with the balance due upon shipment of the machine. The problem with such arrangements is that once a manufacturer has your deposit, he or she may lose motivation to deliver your machine on time. Salespeople routinely promise a machine in three months, secure a deposit, and then ship the machine six to nine months later, claiming unavoidable delays. The buyer is helpless as he or she pays rent on an empty roastery and loses money waiting for the machine to arrive. I have seen such delays happen on fully half of my clients’ orders. I strongly suggest insisting on a sales-contract clause guaranteeing delivery by a certain date, with a penalty against the manufacturer for late delivery.
Given the number of considerations listed above, how should one prioritize them when purchasing a machine? Here is how I would prioritize the list:
Ensure a brand’s machines are reliable.
Seek out features that assist in precision roasting.
Find a company that offers prompt, reliable service, with service representatives based in your country.
Cost (relative to burner output and features)
Other considerations discussed above, such as installing a better probe or manometer can often be arranged with the manufacturer or added after you receive a machine.
The Bottom Line
When choosing a roaster, I suggest you determine your budget, make a prioritized list of your needs and wants, and ask other roasters about their experiences with various machines. Trust others’ opinions about machine reliability and service, but be skeptical of their opinions about roast quality unless they have had extensive experience on numerous models of roasters. Ignore subjective information from salespeople. When possible, arrange with the manufacturer or another roasting company to spend a few hours working on a model of machine before committing to its purchase.
Notes about accessories:
Floor scale: Please choose a sturdy floor scale with a resolution of no more than 0.005 kg (0.01 lbs) and a maximum capacity greater than the weight of your largest batch plus the bucket in which you will weigh that batch. You may want a scale with even larger capacity if you plan on blending together full batches. The scale’s resolution must be precise enough to provide useful weight-loss calculations.
Timer: Your software or roaster’s control panel probably tracks roast time, so you shouldn’t need a separate timer. If you do need one, make sure it is easy to read from a distance.
Spotlight: I recommend mounting a lamp with a full-spectrum bulb just above the bean trier. While I recommend using the trier sparingly, it should be well-lit for those rare times you use it.
Fire-suppression: I recommend hard-plumbing a water line into the roasting-machine faceplate and chaff collector. The water line should include a spray head with an easy-to-access valve. This is probably the best insurance you can have against a roaster fire.
Small accessories list:
Please consider this list a starting point; it is not comprehensive.
Large scoop for green coffee
Large scoop for roasted coffee
Buckets for green coffee
Separate, larger buckets for roasted coffee
Bucket labels and markers
Tables or counters for weighing, bagging, and boxing
Empty bags and boxes
Heat sealer
Wet/dry vacuum for cleaning chaff collector
Brush for chimney cleaning
Rags for wiping oil from buckets and cooling bin
Knife and/or scissors for cutting open green-coffee bags
Commercial dishwasher (if you can afford it)
Cupping supplies
Packing tape
Label printer
High-temperature, food-grade silicone (for resealing pipes after cleaning)
Sometimes the most fundamental and important messages seem to get lost in the details. Some of what is said online and otherwise about roasting, and about what I have said about roasting, is mistaken. I’d love to set the record straight on the fundamentals and my beliefs, and there’s no better time to do it than just before my upcoming beginners’ online roasting class.
Roast Time There is no one “correct” duration for a roast. However, depending on your machine, gas pressure, and batch size, there is a reasonable range of roast times. For example, one can’t say “an eight-minute roast is too fast” without knowing the context. Eight minutes is not too fast when roasting 3kg in a Probat P12, but definitely too fast when roasting 12kg in a P12. It’s all in the context.
I don’t recommend a specific roast duration; instead, I always teach that optimal roast duration is dependent on the ratio of batch size to burner output.
Roast Color
I’ve never told a client how light or dark to roast: to me, that is a personal and business decision. While i’d love to see most roasters roast lighter, and while I personally choose to roast and consume extremely light roasts, light roasting can be a poor business decision for many. I also believe roasters should roast only as light as they have the skill to do successfully; if you often underdevelop coffee, then I recommend roasting a little darker until you have figured out a system to improve development of lighter roasts.
The Best Roasting Machines
I do not recommend any particular brands, at least not publicly. I’ve said kind words publicly about a couple of brands, but that was not a recommendation to buy their machines. If I were to publicly name my top three roasting machines, everyone reading this would be very surprised by at least two of them. When clients ask me what machine to buy, I explain the pros and cons of various machines, and ask them to talk about their preferred roast style and budget. We also consider factors such as which brands offer service in the client’s country. There is no machine that is ideal for everyone. While it’s perfectly sensible for Tim Wendelboe to roast on a Loring, a machine well-suited to light roasting, it’s equally sensible for a second-wave chain to choose a classic-drum roaster such as a Probat. One should consider budget, service, roast style, ease of use, preferred degree of automation, reliability, and several other factors when choosing a machine.
Data Collection
It would be inadvisable to look at a curve I post online and try to copy the numbers using your roasting machine. I may hit first crack at 375f (190c) and drop a batch at 405f (207c) but on your machine the equivalent numbers may be 10f (5c) higher (for example), depending on our relative probe calibrations and the environmental temperatures at those moments in the roasts (ET readings affect BT readings.)
Having a reasonably good probe (2.5mm—3mm diameter, ungrounded is my preference) in a good location, using Cropster or Artisan, and learning to read curves is critical. Prior to data-logging software, specialty roasters as a group made little progress for decades. After data logging became popular, roasters’ learning curves went vertical. Please do not assume that your machine’s manufacturer has set you up for proper data collection. If they are not offering a 3mm (ish) probe and an ET probe, both well located, at the least, please talk to them about it. I find many manufacturers to not be very interested in data collection and presentation, but customer demand for better data collection has altered their decisions significantly over the past five years.
Baked Roasts
It’s taken years, but I’ve won over many roasters to the understanding that baked roasts are caused by hard ROR crashes, not by slow roasting. Some roasters intentionally bake coffee to decrease acidity, though I recommend other methods to accomplish that. Baked coffee is generally less sweet, more hollow-seeming, and often has hints of straw and flatter acidity.
DTR
Sometimes I wish I had never invented the concept of Development Time Ratio. Despite it being just one concept in a 100-page book, 99% of comments about the book have focused on DTR. DTR is often misunderstood, so let’s address that: the book wasn’t written for only those who roast on very lightly (that I am fond of light roasts); it was written for all of the world’s roasters. If you think 15% is the perfect DTR for your middle-of-first-crack drops, please know that you are in the 1% of the world’s very light roasters. It may be appropriate for you, but I would have done a disservice had I written a book full of advice that excludes 99% of the world’s roasters.
DTR is useful as a QC tool, as a target, and as an indicator of a balanced roast curve. However, if your ROR is crashing and flicking all over the place, your DTR doesn’t matter. DTR is also not a good reason to drop a batch; please drop batches based on color or bean temperature. STEP ONE in roasting is to control and smooth your RORs. Step two is to worry about DTR and everything else.
SMOOTH RORs
I’ve saved the most important issue for last: First, please trust that 99% of roasters’ RORs are not smooth enough to eliminate all roast defects. I know this because for some reason people ping me weekly on Instagram showing me their “smooth” curves, but less than 1% of those curves have in fact been smooth. (PS Please don’t DM me on IG with your curves, my inbox is a disaster :0. Thanks.)
It’s very difficult to master smooth RORs. So difficult, that when roasters tell me they don’t believe smooth RORs are good, I know they haven’t actually mastered—and I do mean mastered—smooth RORs. I know this because I’ve consulted for about 600 roasters and 99% of them have been happier with their roasting once their RORs became pretty smooth. Only 10% of those clients are what I would call ‘masters’ of smooth RORs. Mastery takes time and practice, like it does in any pursuit. By definition, it cannot be a formula or something you attain in a few weeks or months.
Many of these comments may be controversial to some people. That’s great news— disagreement leads to our mutual learning, but only if there's engagement. I openly invite contrary opinions and comments so we can talk about it and find some common ground. Thank you.
I’m pleased to announce my first online roasting class for beginners, April 18. This class is appropriate for anyone curious about roasting, with up to two years’ experience.
The class will include:
Anatomy of a roasting machine
How to tune a roasting machine
How to choose batch size, charge temperature, air, and gas settings.
Basic management of roast curves
Advice on buying and storing green coffee
Fundamentals of data collection
Included in the class will be membership to a month-long private Facebook coaching group. Members will be welcome to ask questions, post roast curves, and discuss other’s questions and curves as well. I’ve found that such “group consulting” is not only extremely effective, but also a lot of fun. I look forward to seeing you there.
MEMBERS WILL HAVE ACCESS TO THE CLASS VIDEO FOR ONE MONTH, TO VIEW AS MANY TIMES AS THEY WOULD LIKE.
LATE EDIT: THE COFFEE INNOVATION SUMMIT HAS BEEN CANCELLED; MATT AND I WILL INSTEAD USE THE SPACE WE RENTED IN PORTLAND TO HOST A FEW INFORMAL EVENTS. MORE ON THAT IN A NEWER POST. WE APOLOGIZE FOR ANY INCONVENIENCE.
I’m excited to announce The Coffee Innovation Summit. Matt Perger and I will be organizing two one-day events, one in Portland on April 23 and the other in Melbourne on May 3, coinciding with SCA Expo and MICE, respectively.
The Coffee Innovation Summit will explore the cutting edge of specialty coffee. The program will include live tastings alongside presentations of innovative ideas by industry experts. Attendees will have the chance to experience our speakers’ innovations firsthand.
Throughout the events, our team of top-tier, paid baristas will serve numerous high-quality coffees, demonstrating industry best practices. All of the coffee we serve will be chosen and roasted for the event, and brewed on cutting-edge equipment using custom-made water. We plan to not only offer delicious, memorable coffee, but also carefully curated, interesting tasting flights to complement our presentations.
We are still confirming our full roster of speakers, but so far, presenters and topics in Portland include:
Optical sorting of green coffee for specialty production - Jon Allen, Onyx Coffee Lab
Controlled fermentation of coffee using wine yeasts - Lucia Solis, Luxia
The next generation of espresso grinds distribution - Matt Perger
Ultraviolet fluorescence of green coffee to detect defects - Christopher Feran, Phoenix Coffee
Roast defects: how to detect and prevent them - Scott Rao
Please click HERE to buy tickets for the Portland event.
Please click HERE to buy tickets for the Melbourne event.
Topics and speakers in Melbourne so far will include:
Optical sorting of green coffee for specialty production - Jon Allen, Onyx Coffee Lab
Recent green processing experimentation - Aida Batlle
The next generation of espresso grinds distribution - Matt Perger
Roast defects: how to detect and prevent them - Scott Rao
How should you determine the optimal dose and brewing ratio for espresso or filter? Ongoing conversations I’ve been having with Jonathan Gagné and the recently published piece of espresso research by Chris Hendon et al, have been keeping this issue top of mind. I hope this post will provide readers with food for thought when making brewing decisions.
Rather than always relying on standard, popular ratios (eg 2:1 for espresso, 17:1 for filter), I recommend baristas consider a few factors when deciding on a ratio for a brewing method.
Desired TDS and Extraction Yield: each particular combination of EY and TDS can only be achieved by a unique brewing ratio. If for some reason you desire a specific TDS and EY combination, such as 1.4% TDS and 22% EY, there is only one ratio that can produce that pair of numbers. This also means that you may want to use different brewing ratios with different grinders. I recently brewed the same coffee as a v60 on my DE1 using two different grinders; one grinder achieved 24.5% EY/ 1.6 TDS. The other grinder could achieve only 21% EY/ 1.4 TDS. If my goal is to always have a TDS of 1.4 at the highest possible EY, I would consider using a higher brewing ratio with the first grinder.
Channeling: In percolation methods, it’s important to use a ratio that won’t lead to noticeable channeling or astringency. In espresso brewing, better puck prep will allow a barista to use a higher ratio (say, 3:1 as opposed to 2:1) without channeling. If you have poor puck prep, or if your grinder produces a lot of clumps, you may want to consider decreasing your brewing ratio to avoid astringency due to channels. In drip brewing, the more evenly you spray or pour the water over the coffee bed, the less channeling will occur. The more evenly the water extracts from the coffee bed, the higher the ratio (within reason) you can use without channeling.
Bed Depth: Whether pulling an espresso, brewing in a v60 or using a Fetco, each basket you use has an optimal range of bed depths. Batch brew bed depth should typically be 3cm—5cm. A device such as a v60 generally brews best in a range of 15g—22g of coffee (5cm—6 cm.) Coffees of extremely high or low density may require small adjustments in dose to maximize extraction. Note that many cafes that serve two-liter batch brews use baskets designed for larger brews. If you brew two-liter batches, the smallest-diameter baskets available for your batch brewer may help to increase the bed depth of your doses into the recommended range.
Flavor defects If you’re brewing a defective or poorly roasted coffee, you may improve flavor and mask some of flavor defects by lowering your ratio and extraction level. Intentionally underextracting charred, baked, or underdeveloped coffee can sometimes make it more palatable.
Beverage Sizes When planning a dose and ratio for espresso, it’s important to consider the sizes of your milk drinks, and how much total dissolved solids your shots will contain. For example, a 15g dose at 22% extraction would provide 3.3g of dissolved solids, while a 22g dose at a more modest 22% would provide 4.84g solids. While the 15g dose may be appropriate for a cappuccino or a cortado, its 3.3g of dissolved solids would nearly disappear in a 12oz latte. The 22g shot may be just right (for some) in the latte. Some cafes choose to use larger (20—22g) doses and to “split” the shots so they can use a single shot for straight espresso and very small milk drinks and two shots for larger milk drinks.
Do you have some thoughts on other factors to consider when determining a dose and brewing ratio? Please share your thoughts in the comments section. Thanks for reading.
There are two significant differences in how third-wave baristas serve coffee in the US and Australia. I believe if baristas in each country adopt the other’s practices, it would improve labor efficiency and speed of service in both countries.
Batch brew makes up perhaps 40% of coffee orders in the US, but less than 5% in Australia.
Most Australian baristas “split shots,” while few Americans do.
I believe Australian and American cafes could benefit from adopting some of each other’s practices.
Batch Brew
The obvious benefit of batch brewing is it requires much less time and labor to serve. Given the high cost of labor in Australia, many cafe owners have expressed a desire for customers to embrace batch brew. Unfortunately, customer acceptance has been slower than many in the Australian coffee industry would like. While I’m not an expert on the Australian market, I’d like to make a few suggestions to help customers warm to batch brew:
Do it well. Unfortunately, the popular Aussie choice to use a Moccamaster in a cafe is not good enough. Moccamasters do a poor job of achieving even extractions, and their brewer/carafe design causes excessive heat loss during brewing. That heat loss, compounded by suboptimal brewing-water temperature, greatly accelerates the aging rate of the brewed coffee. (If you must use a Moccamaster, please use the commercial version with the round spray head and find a way to prevent heat loss from the carafe during brewing.)
Don’t serve old coffee. Most Australian third-wave cafes that serve batch brew hold the brewed coffee too long (as do most Americans). Serving two-hour old batch brew is not going to win converts. I feel for Aussie cafes here: batch-brew machines are generally designed to brew at least two liters at a time, but the cafes don’t serve enough batch brew to brew that much coffee without having to pour most of it down the drain. (The good news is I believe in the next year there will be at least two new batch brewers designed to produce excellent batches smaller than two liters.)
Talk it up. Explain to customers that batch brews offer great extraction quality. Give them free samples while they wait in line, especially to those who order long blacks and americanos. Offer an interesting coffee exclusively on batch brew. Hold events featuring your best coffees on batch brew. Familiarity is the key to acceptance.
Splitting Shots
Italian espresso developed around small doses of 7-ish grams and beverages no larger than 150ml (5 ounces). In the 90s many specialty-coffee markets adopted larger drinks sizes, which require significantly larger doses. For example, if you’re a Starbucks barista serving 20oz (600ml) lattes, it would be reasonable to use doses of 20g or more. (Note: I do not know what dose size Starbucks uses.)
Australians have never warmed to the massive beverage sizes common in North America. Aussie cafes generally serve Italian-sized beverages with the occasional 250—350 ml (8—12oz) caffe latte on the menu. Serving smaller-sized drinks has allowed many Australian coffee bars to split shots, or pull two shots from one portafilter. In a country where few customers order batch brew and almost every coffee is espresso-based, splitting shots is critical to enhance efficiency and control labor costs. Of course, a few third-wave American cafes split shots, and a few Australians don’t, but they are exceptions to the rule.
Specialty shops in the US used to serve a variety of larger beverages, using massive espresso doses. However, as US third-wave shops have gradually adopted the smaller sizes common in Australia, American baristas now have a chance to improve efficiency by splitting shots, and, I believe, improve many beverages. I hope some US third-wave shops will consider splitting shots; as beverages have shrunk and extractions have increased, split shots have become more appropriate than they used to be. Half of a 20-gram dose is plenty for a straight shot of espresso, a 5-oz (150ml) cappuccino, a macchiato, and most hipster-sized drinks (cortados and gibraltars). The full 20g dose is plenty for a 12-oz latte, if a cafe chooses to serve one beverage that large.
The Upshot
While this post isn’t revelatory to anyone who has ordered coffee around Australian and the US, it does bring up some potential ways each country can benefit from the other’s practices. The part of the American market that offers smaller beverages is ready to split shots, which will cut coffee costs and improve labor efficiency and speed of service. Australian baristas have a chance to introduce their customers to batch brew at its best, which would greatly cut labor costs if widely adopted. But winning customers over to batch brew may require best practices and greater familiarity: Brew small batches in quality brewers. Brew into enclosed, appropriately sized thermal carafes with “brew-through” lids to conserve heat. Never brew more than one coffee at a time or two liters per batch. Ditch brewed coffee before it tastes sour and bitter. Feature batch brew at tasting events and demonstrations. Gently familiarize customers with batch brew.
I’m pleased to announce I will offer an online roasting course on January 4th, 2020. The class will be broadcast through a private Facebook group. All ticket holders will have access to the class video and discussion forum for one month after the class airs. Many students of previous online classes have said the month-long discussion forum improved their roasting more than any other class or resource.
Please note that it is not necessary to view the class when it airs live.
All ticket holders will have access to the class and forum for one month. During that month you can view the class as many times as you would like.
Please join us online, or if you’re in Southern California, we’d love to see you in person. Live seating will be limited, so claim your seat ASAP. The class will be held at Common Room Roasters in Costa Mesa from 1pm—4pm.
All ticket holders, live and virtual, will have access to the class video for one month through Facebook.
**ONLINE CLASS ACCESS WILL BE FROM JANUARY 4 -- FEBRUARY 3, 2020**
All ticket holders will also have access to a discussion forum on the private Facebook group for one month. I will field questions and comment on students’ curves every day on the forum. The forum will provide a safe, friendly space for a high-level discussion about roasting, something difficult to find anywhere else. Students of past online courses have found the forum helpful for solidifying the class lessons, have enjoyed the community feeling, and many have shared their roast-curve progress on the forum.
The course will be appropriate for roasters of all levels. Although I am calling it an “all levels” class, this course will touch on methods more advanced than anything in the level-three SCA roasting course (even their “advanced” classes are basic), and I guarantee your satisfaction.
The class will include:
Three hours of lecture and Q&A
Cupping and curve analysis of the "Roast Defect Kit" featuring good, baked, and underdeveloped roasts.
Methods to manage ROR curves
Advanced methods to prevent ROR crashes and flicks
How to modify roasting machines for better performance.
Pro tips to get the most out of Cropster and other roasting software.
How to adapt various strategies to different types of machines.
Online tickets are $125 USD, live tickets are $175. During the class we will cup samples from the upcoming Roast Defect Kit. If you buy a virtual ticket and would like to receive the Roast Defect Kit in the mail to cup along with us at home, the kit will cost an additional $50 USD (making online and live tickets the same price.) The RDK is a great educational tool to share with your coworkers or staff. (Note: we are sorry but cannot ship the RDK to South Africa, China, Russia, Greece, or Brazil.)
The vast majority of machines I’ve worked on in my consulting career have needed what I call “tuning.” For example, just this past month, a client with a new Probat had far less airflow than he needed, due to his chimney configuration. Two experienced clients were operating with less than half of their respective machines’ optimal gas pressures. Several clients were operating machines with suboptimal drum RPMs or airflow levels. One client had both inadequate gas pressure and inadequate airflow, caused by an air leak at the loading funnel. Several roasters were using excessive software smoothing or slow thermocouples.
Proper gas pressure, drum RPM, airflow level, probe size and location, and software settings are all necessary before one can roast great coffee with impressive consistency. My experience implies that most roasters reading this post likely have tuning problems of which they are not aware. All of the issues below can be remedied quickly or cheaply. Fixing any of them will provide an excellent return on the invested time or money.
Gas Pressure
Every gas burner is designed to work safely and efficiently in some range of gas pressures. For example, your machine’s manufacturer may recommend a range of 3–5 kpa (12–20 inches of water column). The recommended range should be listed on a badge on the side of your roaster or on the manufacturer’s website. What almost no one tells roasters is that pressure at the top of the recommended range offers a lot more power and efficiency than pressure at the bottom of the range. Suboptimal gas pressure forces many roasters to roast smaller or slower batches. I’ve seen increases in gas pressure lead to 50% increases kg per hour of roasted coffee.
Drum RPM
Even if your machine is brand new and the manufacturer installed it for you, check its drum RPM. A few major manufacturers deliver machines of a given model with widely varying RPMs (often a difference of 20 RPM machine to machine). Some whom I’ve asked to fix it for my client have claimed “it doesn’t matter” (one of those same manufacturers has told me that ROR crashes don’t matter, so be careful where you get your roasting advice!) Please count your drum RPM over the course of one minute. If your machine’s RPM are either too high or too low, it will cause more conductive heat damage and harsher coffee. Very low RPM can also contribute to ROR crashes.
My RPM recommendations are in the chart below. If you have a 12kg roaster with, say, 35 RPM (a frequent problem from one manufacturer), you will not be able to avoid ROR crashes and excessive conductive heat transfer. You may be satisfied with roasts from a low-RPM machine, but the coffee will be noticeably better when you adjust the RPM to the proper range.
Airflow
There are many causes of improper airflow levels in roasting: air leaks, such as loading hoppers that don’t seal well, fans spinning in the wrong direction (more common than you would think), chimneys that are too tall or have too many 90-degree angles, or simply roasters adjusting fans and dampers improperly. If your roasting-exhaust and cooling-air chimneys merge before passing through the roof it may cause back pressure in the roasting drum and shifts in roasting airflow depending on whether the cooling fan is on.
If your RORs decline with a relatively constant slope, your ET curve should stop rising somewhere just before or around the beginning of first crack (there are too many factors to be more specific here). If your ET peaks more than two minutes before first crack begins, you probably have too much airflow. If your ET curve rises all the way through the end of a roast, you are probably using too little airflow. And of course, if lots of smoke or chaff pours out of the drum when you drop a light or medium roast, the airflow is probably set too low.
Probes and Software
This probe is slow enough to make the data almost worthless.
Quality data collection and presentation are essential to quality, consistent roasting. If the turning points of your roasts are routinely later than 1:30, your probe is probably too slow. If your RORs look very noisy when viewed in the 15-second averaging interval in Cropster RI3 (or the 15s delta span in Artisan), you may have excessive noise in your system. (I covered this issue more thoroughly in my July 4, 2019 post.) If your RORs are smooth, rather than jagged, curves, your smoothing settings are too generous.
Please don’t assume that if you like the way your coffee tastes or your machine is new that it doesn’t need tuning. Few of the roasters I’ve worked with whose machines needed tuning knew there was a problem, but all were happier with their roasts after we tuned their machines.
Today's podcast is all about brewing, with a sprinkling of questions about coffee & business.
Show full content
As of today’s podcast, I ‘ve begun separating the podcasts by theme: brewing, roasting, coffee & health, etc. My hope is to help listeners decide which episodes may interest them most. Today I fielded questions with Vassily about brewing, with a few coffee-business questions in the mix as well.
EPISODE TWO (also available on iTunes):
Q&A Coffee Podcast, Episode 2
Scott Rao
Scott Rao
Q&A Coffee Podcast, Episode 2
EPISODE QUESTIONS & TIMES
Mirko Thamm (1:10)
1: concerning the CO2 level of the beans. Is it better to degas after grinding (30-45min) or to grind and brew directly after grinding. Which way will get better (sweeter or more consistent) results?
2: Sieving the grind. I sieved my grind and if I used just a small range of particles (like 400-500 micrometer) the coffee was not as complex as the whole range. Should we sieve the course particles (bigger than 500microns), the fines or just a small range? Thanks
From Jonathan Mitchell (5:20)
#1 Business - I have a few potential office/law firm clients that want to become a wholesale partner but they are reluctant to keep a grinder on hand. They want me to pre-grind the coffee. I am already a little hesitant to have my coffee represented in this area but it feels like an untapped arena and a decent source of revenue. What are your thoughts?
#2 Any tips on partnering/raising money for future expansion? I am so scared of losing ownership, as I never want to compromise profit sharing with my employees, but I am also scared to dip into my personal savings for a new shop.
Benjamin Byrd , Due South Coffee Roasters (09:55)
I have a Breville precision brewer on the way and I was wondering if you had any tips on programming it for the best results, or if the batch brew rules blog was directly applicable to it. Thank you for your time and for all you do to save the industry from underdevelopment!
Ghazi Almoayed (12:30)
Hey Scott
I have 2 questions for you about espresso brewing:
1. What are you thoughts on lowering pressure to 5 or 6 bar? Is this beneficial for better extractions + consistency regardless of roast level
2. For lighter roasts I have heard about extracting 1:3 . So 18g in with 54g out. Is this only possible with an EK grinder or can a Baratza Forte still pull this off? What sort of timings should one aim for when attempting those ratios ?
Nuno Cristiano de Sousa (19:48)
Hi Scott!
First of all, thanks for taking the time to answer questions of the community - How do you scale up your filter recipes?
I can make my extractions pretty aromatic and balanced with a 2 pours recipe, comandante 25clicks, pouring at an average 2.5ml/sec (measured in acaia). If the flow rate is higher, the total time is lower, and that messes up the extraction.
However when I tried to scale up to 500ml/17oz, i changed the grind to 28 clicks, kept flow rate, and the average extraction time raised to 3:30.
Scott Rao answers your submitted questions with Vassily Lissouba.
Show full content
Photo credit: Norman Mazel (@normanito)
I get an endless stream of unsolicited coffee questions in my inbox. In the past I’ve tried to reply to every such email and instagram message, but it became a bit too time consuming. I decided recently to try to answer some of these questions in podcast format. The podcast will air monthly(ish) and contain a mix of beginner and advanced questions about both brewing and roasting. Most podcasts will include a guest with whom I’ll discuss the questions and answers. I hope to share most episodes with coffee-pro friends who will be able to answer some of the questions outside of my wheelhouse, such as those about green processing.
This first episode is all about feedback. The podcast is 29 minutes. Is that too long? Too short? It’s a mix of brewing and roasting questions.. Should we have separated the roasting and brewing segments for those who are interested in only one or the other? I’m new at this, so please let me know what I can do better. Thanks
The podcast, Episode one (also available on iTunes):
Q&A COFFEE PODCAST WITH SCOTT RAO, EPISODE ONE
Below is a link discussed in the podcast, the questions, and the time at which each question was addressed, in case you would like to skip around.
As far back as I can remember, I’ve been told to very quickly wiggle and rinse the portafilter under a running grouphead before drying and filling the basket. A friend recently told me that not only is this unnecessary, but actually flat out wrong.
I’ve been searching online for sources and test results to prove one method or the other, but to little result. Does simply wiping remove enough of the fines and coffee oils that might have baked into a portafilter between shots? If I rinse and flush after I pull a shot, is it unnecessary to do so before? Will the water from the grouphead cool quickly enough to cool the portafilter? If only wiping is the more reliable method, how many shots can you pull with wiping in between before rinsing is completely necessary
2. From GIORGOS PAPANTONIOU (6:00)
During a pourover, which is a preferred slurry temperature in your opinion?
You see, I recently bought a water boiler in order to fill my kettle for handbrews and to my surprise the water temperature was really low, because of the heat loss during transfer, and led to really low slurry temperatures as well. I didn't see that coming since so many coffee shops around the world are working that way. Filling the pourover kettle from a hot water source. It was really hard for me to accept that so many people are brewing coffee with hardly 90 degrees Celsius in their water kettle. And I think it's important to mention the slurry temperature and not the starting water temperature because depending on the brewing method, the first one may vary significantly.
3. From Meshal Alshehri (10:00)
I would like to know more about your methodology of developing a batch brew coffee recipe using Fetco or any other brand.
Trial and Error is costly especially when changing coffee types.
4. From Tarik (13:45)
Hi Scott, how do we measure tds for espresso in the refractometer without vst syringe filters? Thanks
5.FromGhazi Almoayed (18:58)
When building your own water for espresso , is the general rule if the water does not work on a filter brew that means it would also not work on espresso ? Can this be used as a guide to choosing a water for a given coffee ?
I have not had good results with the Barista Hustle recipe water on Kenyans , has this been something you noticed ? Might be to do with the fact that Kenyans need more buffer ?
6. From Jason Richter (23:11)
Hey Scott, here are two questions I have right now.
1. How do I make sure I'm choosing the right charge temp for an individual bean?
2. How does ambient air temperature affect the flavors you get in the cup.
Thanks to everyone who submitted questions, and thanks to everyone who listens and leaves feedback. I look forward to hearing from you.
Idle noise, ROR intervals, and analyzing roast curves
Recently, Marko Luther of Artisan published a fascinating blog post “On Idle Noise.” Marko’s post discussed how to diagnose and fix “idle noise,” or background noise present in one’s data collection and processing when using Artisan. Marko offered a simple test of noise by data logging bean-probe readings with a roasting machine off and with its motor on (with no beans in the machine). I’m pleased to have inspired part of Marko’s post and to also recognize him here for his brilliant work. Please read the post and do his idle-noise test on your machine .
Marko’s post is a little complicated, so I’d like to show a few simple curves illustrating various levels of bean-data noise and software smoothing of the noise. It is a little easier to see excessive noise in Artisan than in Cropster, so I will focus on Artisan curves here.
A few definitions before we begin: in each of the next few curves, there is a box on the left containing various settings. All of these curves had the following settings:
Sampling interval:1. Sampling interval is the amount of time between each point of data collection from the probe. For instance, a sampling interval of three seconds means that the software asks for data from the probe every third second. Here I have set the sampling interval to one second; Marko recommends three seconds. I used 1s to match the default sampling interval of Cropster, in order to help Cropster users better relate to these curves .
Smooth Curves/ Smooth Deltas: 0 I have set these to 0 in order to not artificially smooth the data. (Other than via the delta span.)
Delta Span: 1s or 15s Each curve is shown with the shortest (1s) and longest (15s) delta spans Artisan offers. The delta span is the time interval over which the ROR is calculated. In other words, any given ROR reading is the average of , respectively, the last one second or fifteen seconds of data. Longer delta spans make curves look smoother. Delta span is what Cropster calls ROR Interval.
Here is an ROR curve derived from very noisy data, with the delta span set to 1s and 15s. Note the intense vertical spikes in the 1s delta-span view; they are telltale signs of data noise.
Delta span of 1s: Note the spikes in the blue (ROR) curve. This is very noisy data.
Side note: you will rarely, if ever, see noise like this in Cropster. It’s not because the noise isn’t there, but because Cropster uses a different smoothing algorithm from Aritsan’s. Each system has its pros and cons.
Using 15s delta span artificially smooths the data from that same curve. This makes it easier to analyze (and helps roasters sleep better at night.)
The curves below are from a system with relatively little idle noise, shown in the 1s and 15s delta-span views again:
Delta span of 1s: Noisy and spiky but far less so than the Delta span of 1s: Noisy and spiky but far less so than the previous example with the 1s delta span.
Low-noise, high-quality data at 15s delta span
The Bottom Line
There is no universal set of optimal settings. You must customize the settings for your probe’s responsiveness, the level of background noise, and the software you use. Of course, you should attempt to minimize background noise and use the lowest practical delta span or ROR interval.
NB: Even if you don’t see obvious spikes in your ROR data, you may still have a serious problem with idle noise.
How to optimize software settings to analyze past curves
There are two types of data analysis I do on a roast curve: looking for a trend and looking for an event. By trend, I mean the shape, or changes in shape, of an ROR curve over a period of time. An event refers to a point in time, such as when an ROR crash or flick began. When looking at trends, i’ll make use of a higher ROR interval and when looking at events, I’ll typically use a lower ROR interval. .
Events
Let’s look at an event —an ROR crash— in Cropster. Cropster and Artisan calculate ROR curves differently, and at this time Crospter’s ROR-interval options range from 10s to 60s; quite a bit higher than those of Artisan. In this case, we’ll use a 10s ROR (the lowest in Cropster) to determine as precisely as we can when an ROR crash occurred.
The red arrow indicates the beginning of an ROR crash. Viewing such an event in the 10s ROR view can help a roaster more precisely determine how to time gas settings next time to prevent the crash.
Here’s an example of looking at a trend in Cropster, looking at the same curve with a 30s ROR interval:
The arrows approximate the ROR’s slope at various parts of the roast. It’s easier to discern a trend such as an ROR slope in the 30s ROR view than in a shorter interval such as the 10s view.
Another event you may look for in a completed curve is the beginning of first crack. Here is an example of using a 10s ROR interval in Cropster to decide the precise beginning of first crack
Note that the roaster chose to mark first crack after the ETROR trough. If the trough seems to have been triggered by a decrease in gas, it is sometimes sensible to mark first crack after the trough. Details on this some other time.
Often the most difficult part of improving a coffee is diagnosing how various inputs created a cup’s qualities. For every coffee I taste, I think about how the five main inputs (green, roast, grind, water, and extraction) contributed to the cup, and especially how any of them may have inhibited cup quality. My understanding of the role of each of those inputs is always evolving, and there is tremendous overlap among their effects.
Rather than simply being pleased with one’s own coffee, I wish every roaster and barista would default to thinking two thoughts immediately after tasting one’s own coffee in a work setting:
“How could we have made that better?”
“Which inputs (green, roast, grind, water, and extraction) should we change to improve the result?”
The effects of some inputs are sometimes easy to isolate and identify, and sometimes very difficult. Here are a few examples of ways to diagnose cause and effect in the cup.
Smokiness
Smokiness is always a result of roasting. Smokiness is distinct from “roast” or “char.” Roasts taste smoky due to insufficient airflow or excessively dark roasting (roast a batch dark enough for long enough, even adequate airflow won’t prevent some smokiness from creeping into the cup.) Some “clean” or “smokeless” roasting machines yield smoky coffee due to the beans dwelling in too much smoke for too long. Some such machines are better than others, but we can save that discussion for another time. Char and carbonized flavors are also always caused by roasting.
Acridity
A related flavor, “acrid” is usually created by roasting, but sometimes caused by excessively-hot brewing water. To taste acridity, set an espresso machine hot enough to deliver sputtering, hissing water. Ensure the portafilter is as hot as possible before brewing. Try pulling long (3:1) shots at that extreme temperature setting and look for a harsh, bitter, slightly stomach-turning flavor.
Flavor defects due to water chemistry
Certain “chemical” or “mineral” flavors are always due to water problems. Perhaps the most common is the classic defect “dish soap residue”. Sussing out the causes of these flavor taints is easy: you may use a quality bottled water as a control, and if dish-soap residue is a concern, taste the coffee in a paper cup instead of ceramic.
Vegetal flavors
Vegetal flavors usually come from roast underdevelopment, sometimes from low-quality green (especially wet-hulled coffees), and occasionally from poor water chemistry. For example, distilled water often produces vegetal flavors that don’t show up in the cup when using water with greater mineral content. To test whether vegetal flavors are inherent in a bag of green or due to roast underdevelopment, simply do a darker sample roast of the coffee and see if the vegetal flavors are still present.
Astringency
Astringency may be due to unripe cherry, an underdeveloped roast, or channeling. To find the source of astringency, I would do the following, in order:
To rule out channeling, cup the coffee— don’t taste it as a percolation brew. Immersion brews don’t channel.
If the coffee is still astringent, test roast development by sample roasting a darker batch of the coffee. Then cup it again.
If the coffee is still astringent, the likely culprit is underripe cherry.
Extremely low-TDS water can magnify astringency, but I’m honestly not sure if water can create astringency by itself.
Removing grind and water quality as factors
At a cafe or the QC lab of a roastery, if you always taste coffee by cupping (and thus avoid channeling) and have proof that your water quality and grind quality are excellent, then diagnosing the sources of cup qualities is easier, as you can focus merely on green quality and roast quality.
Side note: consider assuming your grind and water quality are suboptimal, and test them. When is the last time you blindly tasted coffee made using your water vs. various quality bottled waters or water recipes, such as the easy, excellent recipe favored by Barista Hustle? Did you invest a couple of hours to properly align your grinder when you last installed new burrs? And were those burrs installed in the past few months? Unless you can answer all of those questions favorably, please invest a few hours to test and improve your grind and water quality.
*
This post highlights a small sampling of ways the five inputs affect cup quality. There are countless such cause-and-effect relationships to consider the next time you make and taste a coffee. I hope this post offers a helpful starting point for diagnosing and improving your coffee.
I’m pleased to announce I’ll be offering a roasting masterclass in Berlin on June 8, at the venerable Five Elephant roastery. This class will feature a few new, exciting elements, such as:
A comprehensive system to permanently banish ROR crashes, flicks, and underdevelopment.
A cupping of the upcoming Roast Defect Kit (if you can’t make it to Berlin, you can order the RDK through regalia.coffee to get on the list.)
Free slices of Five Elephant’s legendary cheesecake.
A second cupping of roast samples, both good and (intentionally) bad, of a few choice, pricey coffees. I may even roast a natural for this, but thankfully we have the cheesecake to cleanse the palate.
*A guest post by Ryan Brown, author of Dear Coffee Buyer*
I can’t help myself from occasional banter with baristas. Often this leads to playful arguments, and while I’d like to think that I usually win these arguments, I painfully remember a time I was wrong.
In late fall, while visiting a cafe & roastery, I asked how they had come into possession of what was being marketed as a new crop Kenya.
The best Kenyan coffees typically begin harvesting in late November and arriving in February. Despite the esteem for the country’s quality, it may surprise you to learn that a huge majority of what you’ve ever tasted comes from a pretty small area surrounding Mt. Kenya, so there’s little fluctuation in this timing.
It is entirely possible the coffee was from Kenya’s fly crop—its small, mid-season harvest that is rarely purchased by specialty buyers, as the quality is considered predictably lower than the main crop. But still, it was extremely unlikely that this was a new crop of Kenya being offered in early November.
I insisted to the barista that it had to either be a fly crop selection or else a coffee from the previous year. A lengthy disagreement ensued with the barista, whom I would later learn was also the coffee buyer
Whether the coffee was fly crop or old crop is beside the point. I was wrong to ask the question at all. (Granted, I wasn’t trying to make a point when I asked, it was merely curiosity.) As I note in Dear Coffee Buyer: A Guide to Sourcing Green Coffee: “I’ve generally been able to rely on coffees from Ethiopia and Kenya lasting a very long time after harvest.”
But what about all of this talk of seasonality? Isn’t it important for me to buy the right coffees at the right time? I address these questions in DCB:
Seasonality in coffee is an attempt to apply standards to how fresh green can, or perhaps should, be. Most attempts at seasonality standards are based on duration of, or at least relation to, recurring harvest cycles. For example, some roasters may deem a coffee “seasonal” only if it is within six months of harvest.
This nomenclature is too arbitrary. Such rules don’t justify the presence on your menu of a coffee that’s only three months from harvest but has faded, lost its character, or, even worse, picked up papery, aged flavors. Likewise, the rules are cruel to a coffee that is twelve months old but still vibrant, clean, and free of any hint of past-crop flavor. In my early days as a coffee buyer, I attempted to create a schedule of origins and their corresponding seasonality calendar, but I realized that the best solution was to do away with any consideration of time, as it missed the point. We care about seasonality because we care about cup quality.
Understanding the seasonal crop cycles will naturally inform your purchase decisions, but if you set strict rules for how long after harvest you should roast coffees, you’ll either be unfairly cruel to some, too lenient on others, or both. “A coffee should be considered seasonal so long as the cup is vibrant, shows structured acidity, and is free of any signs of age (paper, bagginess, astringency, etc). It doesn’t need to be any more complicated than that.”
Click on image below to learn more about Dear Coffee Buyer
Most of my work over the past ten years has involved analyzing roast-curve data for clients. Those years spent analyzing tens of thousands of curves have helped me identify consistent, verifiable relationships between curve shape and cup quality. Regardless of a clients’ roasting goals, that experience has usually made it easy to help the client immediately improve upon a roast simply by looking at a curve and suggesting alternative settings.
As I gain experience on the DE1, I’m learning to read its tablet’s curves and benefit from them. Below is a discussion of the most typical curve shape (ie a bad one). I think of this shot as the espresso equivalent of a roast curve with an ROR crash and flick. Mind you, the art and science of analyzing extraction curves is much more immature and speculative than that of analyzing roast curves; we’re still deciphering what all of this means.
This shot was generated using a flow profile. The green line represents pressure and the blue line indicates flow. The red numbers indicate important feedback.
The volatility in the pressure curve indicates channeling during preinfusion. Despite being in flow mode— which helps “fix” channels as they form— a fair amount of channeling still occurred. I have little doubt this shot suffered from poor puck prep or too many clumps in the dry grounds.
The collapse in flow after preinfusion likely indicates the grind is too fine (note the peak pressure of twelve bar), causing too much puck compression to allow the desired flow rate to occur. The high pressure could also be due to too large of a dose, but I’m assuming we use a consistent, appropriate dose.
The phase from 25s to 40s where the pressure declined gradually is what John calls the “healthy extraction phase.” On some shots, the gradually declining pressure does, in fact, seem healthy— we believe it indicates no significant channeling while the puck erodes. On this shot, it’s debatable how much of this phase reflects “healthy extraction” and how much it indicates the puck is too compressed and/or still absorbing liquid (ie incomplete preinfusion). The steep pressure drop after #3 almost certainly indicates the formation of channels as the puck erodes.
We are confident that we prefer shots with smoother pressure curves, steadier flow after preinfusion, more gradual pressure decline after the pressure peak, and smoother pressure curves. Those observations have proven valid in both directions— when we see those curve features, the shots generally taste better. And when we taste numerous shots of a given coffee, the best-tasting shots turn out to have had such curves.
It’s still early days in my Decent Education, but the DE1’s graphs have already made me a better barista, and it’s a lot more fun and interesting to pull shots with the feedback of the DE1’s graphs.
For reference, the graph below is what I would consider “excellent',” and it coincidentally (?) looks quite a bit like a steadily declining ROR curve. Cropster for espresso, indeed.
Litmus Coffee Labs is excited to announce that we’re finally ready to sell our spray head compatible with the Fetco XTS batch brewer. Dan has been refining the spray head for the better part of a year and it has been in the hands of approximately fifty beta testers for a few months. All of the testers have been thrilled with the improvements in their Fetco batch brews, and through their experience we’ve learned how to optimize the product. We’re offering a limited production run of 100 spray heads that will ship immediately. The next several hundred orders will ship within a couple of weeks, on a first-come, first-serve basis.
Why the Litmus XTS Spray Head?
For years, baristas have lamented Fetco’s change from the old flat-plate spray head to the Cascading Spray Dome (CSD). Our spray head radically improves the CSD’s performance by providing a more uniform spray to yield a higher and more even extraction with more clarity and less astringency.
Testimonials
From Kris Wood of Black Fox Coffee
"From a coffee lover’s perspective, the clarity of my filter coffees has improved drastically due to the even extraction. Coffees that were already very good are now excellent. From a business side, our TDS went up by 0.12. That brought our dose weight down by 3.9% saving thousands a year. It should be triple the price."
From Dave Stallings, Passenger Coffee
"It is hard to exaggerate the positive impact that the spray head has had on our batch brewed coffees. Of course we expected a more even bed and thus more even and balanced extraction, but this spray head has delivered on levels far beyond that: our extractions have increased across the board while also finding a focus, clarity, depth of sweetness, and cleanliness of finish that we have never before experienced on our batch brewer."
From Will Shurtz, Methodical Coffee
"I really love how much of an impact the spray head had on the quality of our batch brew coffee. There was a noticeable increase in the clarity of flavor of our coffee. So much so that multiple customers mentioned the difference they detected once we applied the spray head to our brewer."
Flow Comparison: The original CSD sprays in 12 large streams, while the Litmus device catches all the flow from the CSD and distributes it in 19 streams (apologies for the steamy video)
Caution before ordering:
We've encountered a small percentage of CSDs with an unusual design. Please take a look at your CSD before ordering. If you have one of the CSD's with the small circles on the bottom, it is not compatible with our mod. Please let us know if you have such a CSD, we’d like to know how many are out there.
Here's a short video showing how to install the part
The Litmus XTS Spray Head snaps easily onto your existing CSD. Before snapping it in, please ensure the two parts are aligned such that the four middle holes are exposed, as shown in the video.
Please click HERE to purchase the Litmus XTS Spray Head.
I’m pleased to announce I will be holding two roasting masterclasses in Boston this April during the SCA Expo.
These will be very advanced classes, complete with a tasting of the newest Roast Defect Kit and some new strategies for managing ROR crashes. I’m getting closer to being able to completely prevent ROR crashes, and I’m excited to share these new findings and strategies with advanced roasters.
Among other topics will be a strategy that argues for ignoring first crack on some roasts :0. It will be an interesting conversation.
I recently ranted, I mean posted, on Instagram about the unnecessary frustrations of aligning the burrs of an EK grinder. Mahlkonig designed the EK for grinding spices (not coffee) and was flat-out lucky that I took a chance on buying an EK for coffee in 2010. The first day I used the EK in Montreal I achieved 23% extractions in my Fetco and word spread rapidly throughout the coffee industry. Cafes all over Montreal began buying EK’s and then Mahlkonig lucked out again when Matt Perger used the EK in his excellent World Brewers Cup routine. Since those events, Mahlkonig has sold many thousands of EK’s and has had the nerve to raise the price without addressing the issue of the machine’s atrocious alignment. I’ve used over 100 EK’s and would estimate that at most 10% of them were well-aligned right out of the box. The terrible QC of EK manufacturing has cost us collectively tens of thousands of hours trying— often unsuccessfully— to accomplish something that Mahlkonig could have accomplished in minutes per grinder sold.
When someone has manufactured a commercial grinder for less than $5000 USD that grinds better than the EK and is also well aligned out of the box, please contact me: I will happily promote your machine for free after testing it to my own satisfaction.
Over the past nine years baristas have become more aware of the issue, and some homegrown re-alignment methods have partially solved the problem. Unfortunately, those methods require an hour or two each time the burrs are removed or replaced. (Matt’s tutorial HERE is excellent.)
Upon reading my rant/post, Mitchell Hale commented on the Instagram thread about a method of sanding the burr carriers to realign the burrs. I asked Mitchell to share that method as a guest blog post and he graciously gave his time to writing this how-to. I have not tried the method yet (I don’t have an EK at home and my current home grinder is well aligned) but I have faith that it will become the new standard for burr alignment for many flat-burr grinders, not just the EK. This method may take three to four hours, but once it is done, you will not have to repeat it each time you remove or replace burrs. This seems like an excellent investment of time.
Mitchell has agreed to reply to some comments here, but please be sure to read this post several times before asking questions. Please don’t ask questions such as “will this work on some other type of flat-burr grinder?” The answer is: “probably” but neither Mitchell nor I have tested this method on a variety of grinders. Posts like this are to spur ideas and conversation, nothing more. Do some research, try at your own risk, and give back to the community by sharing your results and insights. Thank you.
Guest Post by Mitchell Hale
Before we begin I want to give credit and thanks to the community at kaffee-netz.de, and to Jürgen Peter Ohler (Jupe3.0) in particular, for coming up with this idea in the first place. I’d have never been able to put together this guide without their pioneering of the method.
I’d like to introduce you to a simple and straightforward way to align your grinder that uses the inherent properties of the grinder itself, rather than relying on user observations like methods such as marker alignment. This method uses readily available supplies to allow the burrs to alter the grind chamber and the burr carrier so that the burrs are aligned parallel to each other and perpendicular to the drive shaft without shims. To achieve this, we’ll be attaching sandpaper flat to the back of the burrs in two different configurations (see diagram) to sand both mounting surfaces.
This method works easily with any grinder with an EK-like burr pattern. With the inner burr fixed in the grinder chamber and the outer burr on a spinning carrier that goes over the drive shaft. EK43, Bunn G1, etc.
Sandpaper of several grits, I used a bunch of big packs from the hardware store, but a multi-pack would be ideal. We’re only going to need a couple sheets of each grit size. Make sure it's wide enough for your burrs. 98mm for EKs, 80mm for Bunns, etc.
Adhesive remover, I used Goo Gone, available at https://www.amazon.com/Goo-Gone-Pro-Power-Spray-Gel/dp/B00SPHYQXM and most anywhere you can get cleaners. I do want to note that Goo Gone is not a food safe product, but you can clean it off thoroughly. If you do feel concerned, I find that canola oil does a good job of stripping the adhesive as well. Be sure to clean it thoroughly too, for different reasons.
An X-Acto style knife. Most hobby stores, hardware stores, and office supply stores will have something suitable.
Some rags to wipe up the metal filled cutting oil. Expect to throw them away after, so get something cheap.
Masking tape.
The thinnest tape you can find. It has to fit between the sweepers on the burr carrier and the outer burr.
A screwdriver for the burr chamber and another for the burrs themselves. I highly recommend a torque screwdriver for the burrs to put them in with more even tension. It's not strictly needed, but if you can get even a cheap one you can be a lot more confident you’re not over tightening one side.
UNPLUG YOUR GRINDER AT THIS POINT. LEAVE IT UNPLUGGED UNTIL FINISHED.
Now, for the chamber sanding
-----
Cut out 6 squares each of about 220 grit, 320 grit, 400 grit, and 800 grit sandpaper that will fit the entire burr on them. If you like shine and don't mind the time it takes, throw some higher grit in there too.
Take the outer burr carrier out of your grinder, remove the spring from it, and set it aside. Then unscrew the inner burr, you'll be attaching the sandpaper to this burr first.
Take one of the squares of your 220 grit and spray the back lightly with spray adhesive, then press your inner burr on it. Wait for it to dry. Then cut off the excess sandpaper from the edges and middle leaving only a ring of it.
Tape your inner burr to the outer burr that's still screwed into the burr carrier. You can work around the sweeper post things with masking tape, or try to get the tape under them with the thin tape.
Apply cutting oil to the sandpaper.
Put the assembly of two burrs in the burr chamber (making sure the spring is out of the carrier) and spin it around with gentle pressure. Take it out from time to time to wipe off the oil and metal. Continue until the sandpaper is worn out.
Repeat 3-6 two more times to use 3 discs. You'll need the adhesive remover to clean the burr to attach the next disc.
Repeat steps 3-7 for each size of sandpaper. You should use 3 discs for at least 220 and 320, and can probably go down from there. Those sizes do most of the work and the rest polish.
Now your chamber is sanded to be perpendicular with the driveshaft. But your carrier does not perfectly match, not yet.
Now, for the carrier sanding
-----
Screw your inner burr back into the grinder. Ideally with a torque screwdriver to keep things even. Unscrew the outer burr from the carrier
Take one of the squares of your 220 grit and spray the back lightly with spray adhesive, then press your outer burr on it. Wait for it to dry. Then cut off the excess sandpaper from the edges and middle leaving only a ring of it.
Tape the outer burr, without carrier, to the inner burr. This can be a pain to pull off depending on the individual grinder, and you'll need some thin tape. The sweeper posts will need to be able to fit over the tape this time.
Apply cutting oil to the sandpaper.
Put the carrier over the two burrs that are affixed to the chamber, apply gentle pressure and spin it to sand down the carrier. Same way you did with the chamber sanding.
Repeat with multiple grits and multiple discs of each grit the same way you did with the chamber.
Your carrier now has a parallel surface to your chamber. Which is also perpendicular to the driveshaft! Congratulations, your grinder is aligned the best it can be this side of a machine shop!
Final steps and notes
-----
Don’t worry about matching things like my grit numbers exactly. They’re there as guidelines for cutting grits and finishing grits.
Your zero will change significantly. We’ve removed material from both burr mounting surfaces, so they will be physically further apart at the same settings until rezeroed.
Make sure to clean your grinder before using it.
Make sure to clean your burrs thoroughly of both adhesive and adhesive remover before reinstalling them.
Make sure to flush your grinder with at least a few doses of coffee, ideally more, before using it.
When you're applying spray adhesive, have it in a box or other contained area to not make a mess.
Rubbing alcohol, acetone, dish soap, etc all do nothing on the spray adhesive. You do need an adhesive remover or oil. Trust me, I thought I wouldn’t need it.
If you use any water on your burrs for cleaning, dry it off right away. Especially for standard uncoated tool steel burrs.
You can repeat the chamber sanding once the carrier is done for a theoretically slightly more perfect surface, but it's not really necessary.
Sanding times are for standard sandpaper, and should last several minutes to 10-20 minutes tops for a sheet. If using any especially long lasting sandpaper and it isn’t wearing out at all over several minutes, you can stop after a few normal sheets would have worn out and move on to the next grit.
When cutting sandpaper around the burrs, make sure not to get it too tight. Remember, the burrs have to fit into the sanded area. If the sandpaper is cut too tight and leaves some of the burr face uncovered, the burr will end up sitting on the unsanded edge around the burr. It’s ok if it goes just slightly beyond as well. So if in doubt, it’s better to have a disc slightly larger than needed, than one slightly too small to work.
I’m pleased to announce that I’ll be offering a Roasting Masterclass in Sydney at Collective Roasting Solutions on February 3.
This will be a very advanced class, complete with a few new strategies for managing ROR crashes. I’m getting closer to being able to completely prevent ROR crashes, and I’m excited to share some new findings and strategies with Australia’s best roasters this February.
Among other topics will be a strategy that argues for completely ignoring first crack. :0
I like cascara. It’s not the most “interesting” beverage, as it often lacks nuance and liveliness. However, there is something comforting and (energetically) warm about cascara that makes me want to drink it every morning.
My partner Paolo at Regalia often includes a bag of cascara as a treat when he mails me roasted coffee samples. The cascara he sent me last week is like no other I have ever tasted. This cascara is the first one I have ever found to be interesting, with some zingy acidity and crispness reminiscent of some African coffees.
Here is Paolo’s description of the cascara and a link to Regalia’s website. Enjoy.
Region: Sabanilla del Poas Altitude: 1500 MASL Process: Red Honey Varietal: Villa Sarchi, Caturra, Catuai
Perhaps one of the finest cascaras on the market: the Chacon's cascara is incredibly clean, with a honey-like sweetness, and a fruit quality that resembles peach and kumquat.
Dona Francisca and her husband Oscar Chacon of the Cumbres del Poas micro mill are 3rd generation coffee producers. The Cumbres del Poas micro mill is located in the Sabanillia de Alajuela in the Central Valley region of Costa Rica. Both Francisca and Oscar believe in preservation of the environment. They were some of the first pioneers of high-quality honey and natural-process coffees in Central America back in 2009 when they started experimenting with special processes. Water use at the mill is minimal, since their coffees do not undergo the washed process. During the harvest of their coffees they will measure the Brix content in the coffee cherries to determine the best time to pick their coffees to obtain the sweetest and most fruit forward profiles.
Rather than processing their cascara like they would their normal parchment, the Chacons treat theirs like one would approach dried fruits. These are lightly washed and quickly dried on parabolic driers.
RECIPE
If you're new to brewing cascara, note that you are easily able to do so like one would steep tea in a satchel:
20g Cascara
360ml boiling water
8:00 steep time
Pro Tip: If you filter the final product through a paper filter, it will enhance the cascara's fruit-quality.
(Note from Scott: I use a little lower ratio of cascara:water but steep it longer than Paolo does. Cascara doesn’t “overextract” so don’t be afraid to leave it in a thermal mug all day.)
Why Spin the Slurry? A guest post by Jonathan Gagné
From Scott: The history of The Spin is murky…although it’s often called the “Rao Spin,” I did not invent the spin. It’s likely that James Hoffmann was the first person to spin the slurry. Almost everyone to whom I’ve shown The Spin has immediately adopted it. It’s easy to execute well and it works, pretty much every time.
Jonathan Gagné, an astrophysicist based in Montreal, came to my roasting masterclass this past November. I’ve been fortunate to befriend Jonathan, as I’ve always wanted to have an astrophysicist on speed dial to call when I have a question about how things work :). I’ve been helping Jonathan with his coffee making and he’s been providing some great coffee-analysis resources, some of which I hope appear on this blog.
I asked Jonathan to explain why he believes The Spin works and we decided to publish his answer as a guest post here. This post and a few more technical discussions on coffee brewing are also available on his blog at https://coffeeadastra.com.
Why Spin the Slurry ?
Summary
In this post we will discuss the physics behind why spinning the V60 during a brew is a useful method to obtain a more uniform extraction. While spinning is helpful, it’s important not to overdo it - it can cause fine coffee grounds to migrate to the bottom of the slurry and clog the filter, slowing the drawdown and imitating a brew made with a lower-quality grinder.
Spinning the slurry during a V60 brew is useful to minimize the channeling of water that can lead to an uneven extraction. The reason why this is true can be understood with the help of physics.
A rotating slurry will experience a centrifugal force*, which means that every drop of water and every particle of coffee will suffer a force that pushes them outwards. In physics, the strength of centrifugal force is more important for heavier objects, and because of this, water will tend to migrate outward more than coffee because water is heavier.
When you brew coffee, the main cause of channeling is that dry coffee repels water more than wet coffee does. The physics behind this effect are not fully understood: they are related to the fact that molecules of water bond with each other, and dry coffee doesn’t bond with them in the same way. At first pour, water might begin travelling through a tiny hollow on the surface of the dry coffee, and then it will prefer to keep traveling through that same tunnel, because the rest of the coffee bed is still dry and repels water. In practice, a coffee bed will often develop several channels if you don’t take steps to avoid it.
When you rotate a channeled coffee bed, the water flowing down the narrow tunnels is forced out of them by the centrifugal force, and the water will wet some of the dry coffee. This horizontal re-mixing of the slurry will cause channeling to decrease overall.
There is, however, a drawback if you spin too much. As mentioned earlier, heavier things are more affected by the centrifugal force. The largest coffee particles will thus experience a stronger pull toward the walls of the V60. In a slurry where coffee is mixed with water, this effect will be slightly reduced by water friction. Think of trying to run in the sea - the friction water exerts on you will slow down your movement, especially if you present it with a large surface, for example by wearing saggy pants. The friction is however not strong enough to completely stop the migration of particles based on their size, and the larger coffee particles will be sent outwards.**
This whole situation presents the smallest particles with an opportunity: the larger ones having moved out of the way, fines will sink down to the bottom of the V60, where they will be free to do their worst at clogging the paper filter. This will significantly slow down the flow of your brew.
As an illustration of this, I recently brewed a few V60s with a prewet-plus-two-pours method, performing a spin right after the prewet, and right after each of the two pours. At first I did not pay too much attention to how long or how strong I was spinning, and I experienced large inconsistencies in my brew time (up to ~20 seconds), which led to inconsistencies in average extraction yields by about 0.7%. I was controlling everything else, including the height from which I poured, the flow rate, timing, grind size, slurry temperature, etc.
I then tried timing my spins, and found that using seven-second spins resulted in a 5:18 drawdown time, while two-second spins resulted in a much shorter 4:28 drawdown time! This is a nice demonstration that fines can migrate and clog your filter if you spin too much. Adjusting the grind size appropriately to maximize extraction yield and avoid astringency, I found that the two-second spins resulted in a brighter and more enjoyable cup.
In summary, you want to spin just enough to break the up channels, but not so much that fines clog the bottom of the filter.
*NB: I can already hear the interwebs shouting “CENTRIPETAL NOT CENTRIFUGAL”. Both concepts are valid and useful tools: when you stand outside of a rotating system and want to describe forces acting on that system that keep it together, the concept of a centripetal force (directed toward the center) is appropriate. It describes the external force that allows the system to keep going in this rotating motion without splattering everywhere around. In our case, this force is provided by the walls of the V60, preventing the slurry from flying around and messing up your counter. If, however, you take the point of view of the things rotating (the water and coffee), then the concept of a centrifugal force becomes very useful. You can then describe the system as if it was not rotating, by just adding a slight modification: you add an artificial “pseudo force”, also called an “inertial force” that points toward the outside, in our case the “centrifugal force”. It is often called an “inertial force” because it arises from the fact that your frame of reference (the V60 in this case) is rotating (in technical terms, it is “not inertial”). A “pseudo force” is by no means a false thing or an invalid concept, as long as you understand where it arises from and use it carefully — in fact, one can even see gravity as a pseudo force (Einstein realized that), yet it is very useful in everyday situations to view gravity as just a normal force.
** The mass of a coffee particle is proportional to its volume, which is itself proportional to the cube of its size. The water friction that the particle experiences is proportional to its surface, or to the square of its size. As a consequence, a particle three times larger will be nine times more massive and will feel nine times more centrifugal force, but only six times more water friction. If you combine the two effects, it will therefore be pushed outwards 9 - 6 = 3 times more.
I’m excited to visit Melbourne during MICE this February, because:
It’s a blast to explore Melbourne’s food and coffee scene.
I’m still hoping some Australian family will adopt me and save me from Trump
Veneziano Coffee Roasters is hosting my Masterclass on February 9 at their gorgeous headquarters and roastery.
If you’re in Melbourne during MICE, bring your most pressing questions about roasting and prepare to be challenged by some radical new ideas about controlling roast curves.
Disclaimer: While I don’t take requests for equipment recommendations on social media, occasionally I like to share my experiences with various coffee equipment. I do not have a financial relationship with Baratza or Mahlkonig, but Baratza was once kind enough to upgrade a grinder for me because the first model I bought wasn’t quite right for my needs (I bought a Sette, which is designed for espresso, but I wanted a grinder that would be equally good for espresso and filter brewing.)
*****
For the past few months I’ve been using a Baratza Forté at home. I chose the Forté because I wanted a grinder that would do a good job grinding for both drip coffee and espresso. In addition, I needed a grinder capable of producing extremely fine grinds to pull “blooming espresso” shots on the DE1PRO. (A blooming espresso shot involves a 30-second pause after preinfusion, and requires an extremely fine grind.) Neither an EK43 nor most professional or consumer grinders can grind fine enough to pull a good blooming espresso shot. Perhaps an EK43 with perfectly aligned burrs could do it, but such an EK43 is virtually a unicorn.)
I had expected the Forté to do an adequate job, and to eventually want to replace it with a professional grinder, but I dreaded putting a large machine on my small kitchen counter. Much to my surprise, the Forté has not only performed better than any pro grinder I have ever owned, but I have been making the best v60’s of my life using the DE1PRO + Forté. (More on the DE1PRO as the world’s best drip brewer in a future post.)
For reference, I’ve owned well over forty professional grinders and I was the first person in specialty to use an EK43 and recognize its ability to achieve exceptionally high extractions. (Note: Mahlkonig did not design the EK43 for coffee and the machine’s success was a lucky accident.) I used to be fond of the EK43 but now avoid it whenever possible.
While the first EK43 I owned happened to produce impressive results, I’ve since used about one hundred EK’s and I’ve realized that I was lucky: that first machine happened to have been well aligned. Only about 10% of the Ek43’s I’ve used since then have had such good alignment. Poorly aligned Ek43’s are the norm, a problem Mahlkonig has chosen not to resolve, and a problem that has caused their quality-oriented users endless grief and wasted time, as users have had to personally realign the burrs both out of the box and upon each burr change, a frustrating process. There is no excuse for selling such an expensive grinder that usually underperforms right out of the box. Nor should customers have to spend so much precious time bringing the grinder’s performance up to a reasonable standard.
Because of the Ek43’s alignment issue, I desperately wanted to avoid overpaying for a machine that would give me fits. I’m pleased to report that the Forté extracts higher than any EK43 I have ever used, makes tastier coffee than any EK43 I have ever used, and can grind much finer than most EK43’s.
The Forté also has a few clever features such as a built-in scale for accurate grinding by weight, an anti-static receptacle (EK43’s produce so much static that their exit chutes look like chia pets), and the option to grind by time or by weight, with multiple programmable presets for each. I can’t say whether most Fortés are well-aligned straight from the factory. I can only report on my experience.
Sure, I probably wouldn’t grind 100 lbs/day in a Forté in a busy café, but if you’re looking for a great home grinder, just know you don’t have to buy a commercial machine or convince your spouse that it’s reasonable to have an enormous, $3000 grinder on the kitchen counter.
Thanks for reading.
NB: Please do not ask for equipment recommendations in the comments section. I don’t claim to know much about Baratza’s product line, competitors’ offerings, etc. Also, I have the Forté AP but also have both burr sets and both receptacle styles (portafilter holder and plastic bin). Sorry for the confusion about those details.
I’m pleased to announce that I will offer an online roasting course this January 19th. With the help of my friend Lee Safar of Map It Forward and Elixir Specialty Coffee, we will broadcast the class through a private Facebook group. All ticket holders will have access to the class video and discussion forum for one month after the class airs.
Please join us online, or if you’re in Southern California, we’d love to see you in person. Live seating will be limited, so claim your seat ASAP. The class will be held at Steady State Roasting Co in Carlsbad, CA at 2pm.
Online tickets are $125 USD, live tickets will cost $175. During the class we will cup samples from the upcoming Roast Defect Kit by Regalia Company. The RDK’s coffee will be the Jeremias Lasso Gesha from Colombia. If you buy a virtual ticket and would like to receive the Roast Defect Kit in the mail to cup along with us at home, the kit will cost an additional $50 USD (making online and live tickets the same price.) Please click HERE to order the RDK. (Note: we are terribly sorry but cannot ship the RDK to South Africa, China, Russia, Greece, or Brazil.)
All ticket holders, live and virtual, will have access to the class video for one month through Facebook. Please note that if you live outside of the US and purchase the Roast Defect Kit, it will take approximately two weeks to arrive. I guarantee you will receive the RDK before your online class access expires (given that you will have access to the class for one month, there is no particular benefit to cupping the RDK on the day of the live broadcast.).
**ONLINE CLASS ACCESS WILL BE FROM JANUARY 19 -- FEBRUARY 18, 2019**
All ticket holders will also have access to a discussion forum on the private Facebook group for one month. I will field questions every day on the forum. The forum will provide a safe, friendly space for a high-level discussion about roasting, something difficult to find anywhere else. Students of past online courses have found the forum helpful for solidifying the class lessons, have enjoyed the community feeling, and many have shared their roast-curve progress on the forum.
The course will be appropriate for roasters of all levels. Although I am calling it an “all levels” class, this course will touch on methods more advanced than anything in the level-three SCA roasting course (those classes are basic) , and I guarantee your satisfaction.
The class will include:
Three hours of lecture and Q&A
Cupping and curve analysis of the "Roast Defect Kit" featuring good, baked, and underdeveloped roasts.
Methods to manage ROR curves
Advanced methods to prevent ROR crashes and flicks
How to modify roasting machines for better performance.
Pro tips to get the most out of Cropster and other roasting software.
How to adapt various strategies to different types of machines.
Click HERE for more information and to purchase tickets.
Just in time for the holidays, I thought I’d share a few book and gift
recommendations for you to get for the coffee nerd in your life. Or just
gift them to yourself if that appeals. :)
Show full content
Just in time for the holidays, I thought I’d share a few book and gift recommendations for you to get for the coffee nerd in your life. Or just gift them to yourself if that appeals. :)
If you’re serious about coffee and were to only ever read one book about it, make it this one. James Hoffmann is rightfully famous and popular in the coffee industry for his prose, his perceptiveness, and his uncanny ability to see the big picture clearly. The World Atlas of Coffee has tremendous breadth, covering everything from coffee origins and varieties to roasting and brewing methodology. Somehow James dives deep enough into each topic that the reader learns much of practical value and no topic is glossed over. Even seasoned coffee professionals will learn a lot from The World Atlas of Coffee. It’s a gem.
Zingerman’s Guide to Giving Great Service by Ari Weinzweig
Zingerman’s Deli is a decades-old institution in Ann Arbor, Michigan. It’s so impressively busy and efficient that it has inspired countless other entrepreneurs to copy its approach to food and service. If Zingerman’s had been established in New York or San Francisco, it would doubtlessly be one of the world’s most famous casual food businesses. While the food at Zingerman’s is pretty good (I will warn readers that the coffee is marginal), what sets the business apart is its service. Zingerman’s is the kind of place where you could interrupt any staff member at any time, ask any question, no matter how obscure or annoying, and receive a friendly, well-informed answer. Sometimes I wonder if the staff all microdose some kind of happy drug.
Zingerman's Guide to Giving Great Service is a how-to guide to creating a complex, bulletproof service system. Their system manages to tackle every service-related concern imaginable, and once I read the book I understood how their businesses ran so flawlessly. In fact, in a fit of cheekiness, I tested the system at Zingerman’s Roadhouse. I went there alone for dinner (had I brought a friend I think they would have run away mid-meal by what I was about to do.) I was most difficult-but-polite customer I could be. I asked countless difficult, detailed questions about the food, I changed my order multiple times, I complained about the wine, I made special requests, and I generally pushed up against the precise boundaries of Zingerman’s service system in an attempt to get my server to go off script or show some frustration. My server never cracked or showed impatience. At the end of the meal, I left her a massive tip and confessed that I was testing the durability of the Zingerman’s service system. She laughed and said that by the end of the meal she had begun to suspect that was what I had been up to.
The bottom line: the system worked and my service was extraordinary. If you’re in service, this book is a must-read.
When I owned my first cafe and roastery in the 1990s, I read every decent book I could find about running a business. The one book that stood out from that era was The Fifth Discipline. It introduced me to the concepts of the “learning organization” and systems thinking. Prior to reading the book, I had been feeling a little burnt out from working long hours and had fallen into several ruts. For months after reading The Fifth Discipline I went to work with tremendous energy, inspired to apply what I had learned from the book.
The Fifth Discipline reminded me to make business decisions that resonated with my personal values, it inspired me to focus on continual learning, and it helped me focus a little less on finances and the daily routine, and a little more on operating the business in a more thoughtful, fulfilling way. I can’t recommend this book enough to business owners and managers.
Dear Coffee Buyer: A Guide to Sourcing Green Coffee by Ryan Brown
If one thing separates third-wave coffee from the rest of the industry, it’s the focus on procuring fresh, high-quality green coffee. The early 2000s brought a revolution in standards for green quality and in modern green-buying practices. In my 25-year coffee career, I’ve never met a more competent green buyer than Ryan Brown. Ryan’s palate is, of course, extraordinary, and every cupping session I’ve had with him has been an education for me. But Ryan’s brilliance as a buyer was as much about the strategies and systems he brought to green buying as it was about his cupping prowess. In Dear Coffee Buyer, Ryan teaches the reader invaluable lessons about risk management (e.g. it’s better to buy too little than too much of a coffee), communication (and why it is more important than a world-class palate for procuring great coffee), and strategies to help get green to arrive in good condition, when you want it. He’s also a gifted writer whose skillful prose and stories about traveling to origin keep the reader entertained and engaged.
Even if you never plan to be a green buyer, if you work in any capacity in the coffee industry, Dear Coffee Buyer is essential reading. It should be required reading for anyone who buys, roasts, brews, or teaches about coffee.
If, like me, you prefer to use a bottomless portafilter to help detect channeling in shots, you need a way to prop the portafilter so the basket is level while weighing and tamping doses. The Decent Portafilter Stand is the perfect solution.
To dose precisely with minimal clumping, I recommend dosing into an intermediate container, shaking or banging the container to break up clumps (or if you’re not in a hurry, use the Weiss Distribution Technique) and pouring the de-clumped grounds into the portafilter basket. It’s difficult to pour grounds into the basket without some spillage, but the Decent Funnel solves this problem elegantly. Unlike the unwieldy, ill-fitting jam funnels many baristas use, the Decent Funnel is compact, ridged to lay securely on the rim of a portafilter basket, and weighted for stability. This is my personal favorite Decent product other than the espresso machines.
*Note: if you buy three or more products at a time from Decent, shipping is free to anywhere in the world. Decent also sells Dear Coffee Buyer and The World Atlas of Coffee here.
A few months ago Mr. Zubing Sun contacted me on Instagram, offering to send me a tamper. I’m usually skeptical of such offers, as I rarely find coffee accessories all that impressive. The Force Tamper is an exception. It allows the barista to achieve adequate tamping pressure while using precious little force. The Force Tamper works like an acupuncture needle in that once the barista applies just enough force, the mechanism takes over and jabs at the coffee bed with precise, repeatable pressure. The Force Tamper even makes the a satisfying “zing’ noise reminiscent of an acupuncture needle (or, perhaps the world’s scariest noise if you’ve been traumatized by an acupuncturist.)
My only gripe about the Force Tamper is that grounds frequently build up between the tamping face and the metal disc above it. That makes the Force Tamper less appealing for use in a high-volume cafe, but it’s still great for use at home.
I’ve been using this scale for over ten years both at home and for travel. It’s tiny, light, cheap ($11 USD), and durable. It’s frankly a more reliable scale than most of the semi-disposable $40—$80 scales baristas use in cafes. The AWS is not waterproof, but I’ve poured plenty of espresso and water on it over the years and somehow it keeps on ticking. Best of all, if you break the scale by dropping it or drowning it in liquid one too many times, you can replace it for a mere $11.
Happy Holidays, and don’t forget to sneak your own coffee into those family gatherings :0
I'm pleased to announce the last Roasting Masterclass of 2018, to be held
at the Regalia Company in NYC. This masterclass is unlike any other offered
in the world. This will also be an unusually small class due to space
constraints, so I promise to give lots of individual attention to all of
your questions and concerns.
Show full content
Roast Defect Kit available via the Regalia Company.
I'm pleased to announce the last Roasting Masterclass of 2018, to be held at the Regalia Company in NYC. This masterclass is unlike any other offered in the world. This will also be an unusually small class due to space constraints, so I promise to give lots of individual attention to all of your questions and concerns.
Whether you are a novice roaster or a veteran with decades of experience, you will leave with plenty of useful new ideas and methods to implement at your roastery.
The class will include:
Three hours of lecture and Q&A
Cupping and curve analysis of the "Roast Defect Kit" to demonstrate good, baked, and underdeveloped roasts.
Methods to manage ROR curves
Advanced methods to prevent ROR crashes and flicks
How to modify roasting machines for better performance.
Pro tips to get the most out of Cropster and other roasting software.
How to adapt various strategies to different types of machines.
Bring all of your curiosity and most pressing questions. I guarantee your satisfaction or your ticket is free!
Click HERE for tickets and info, and I hope to see you in New York!
One challenge to precision roasting is knowing when first crack began. Some
roasting machines make hearing the cracks nearly impossible, but even when
hearing the cracks is easy, knowing exactly when to mark the beginning of
first crack can be debatable or subjective.
One challenge to precision roasting is knowing when first crack began. Some roasting machines make hearing the cracks nearly impossible, but even when hearing the cracks is easy, knowing exactly when to mark the beginning of first crack can be debatable or subjective.
The importance of precisely marking first crack
First crack (FC) is perhaps the most significant event during a roast:
At FC beans release a tremendous amount of moisture and gas in a short period of time
The ROR is most likely to crash at FC (due to that same release of water vapor and gases)
Much smoke develops
The bean surfaces are delicate, and (in a classic-drum roaster) the drum is simultaneously very hot, a risky combination.
If the ROR is to crash, it will most likely crash just as FC begins (there are many exceptions to this, notably including some of this year’s Ethiopian coffees.)
Gas settings before and after FC
The timing and magnitude of gas adjustments around FC are critical…when roasting a coffee that tends to crash early in FC, I often advise clients to avoid lowering the gas in the window of time from 45 seconds before to 45 seconds after the beginning of FC. (The specific advice to clients is more nuanced than that, as the timing of adjustments depend on the timing of the crash and the rate of roasting. However, FC +/- 45 seconds suffices for this post.) Lowering the gas within that time window will exacerbate any potential ROR crash. Simply raising the gas at FC (presumably just before a crash begins) to mitigate the crash is a terrible choice— I won’t go into that here, but if you currently use that strategy, find a way to avoid a crash without raising the gas; if you match the curves well (ie. roast two nearly identical curves, one created by raising the gas at FC and the other without raising the gas) you’ll taste the difference. If you can’t taste the difference, cup the roasts blindly with someone with a more experienced and sensitive palate, something worth doing anyway. There’s more to roasting than creating an aesthetically pleasing ROR curve — how you create that curve matters tremendously. I consider raising the gas at FC “cheating,” in the sense that it may produce a great-looking curve, but harms coffee flavor. While a nice curve may be a prerequisite for an optimal roast (note: “optimal”, not “I think it tastes good”), it is not a guarantee of an optimal roast.
To time the gas settings perfectly throughout a roast, it’s critical to know precisely when FC occurred, or will occur. Having experience with a given coffee may help a roaster predict the bean temperature of FC. However, the curve leading up to FC and the ROR and ET readings at FC may alter the bean-probe reading at FC for a given coffee. I’d like to propose a system that is better than simply listening for FC or assuming FC will always arrive at a given bean-probe reading.
How to use Cropster data to precisely mark first crack
Several roasters have remarked on the behavior of the ET curve at FC; depending on the location and sensitivity of the ET probe, the ET curve may arc up during FC. (If you have an inlet-temperature curve, that may arc up even more.) You can see a version of that phenomenon in the curve below.
Close up of roast with proper FC marked.
Unfortunately, the timing of arc in the ET curve is not obvious enough to help one mark FC with precision. However, the ET ROR curve is usually sensitive enough to alert the operator of the imminent hump in the ET curve. Here is the same late-batch curve with the ET ROR curve shown (turning on the ET ROR in Cropster compressed the BT.ROR curve, so please ignore that.)
Close up of end of roast with ET ROR on
Note that the operator marked FC at 9:35, but I have placed a vertical line at 9:13 at the trough of the ET ROR curve. I believe that the ET ROR trough is usually the best indicator of the “real” beginning of FC. Some exceptions to this would be if the operator had decreased the gas shortly before the ET ROR troughed, FC began in a prolonged, erratic manner (as may happen with some coffees), or some decafs and naturals that crack gently or erratically.
I believe the ET ROR jumps for several reasons, but I don’t claim to completely understand the dynamic (there isn’t enough scientific evidence for anyone to understand it completely.) Part of the explanation seems to be that the release of moisture and gas from beans as they fracture increases the flow of hot air passing the ET probe. I’ve often wondered why the BT ROR crashes at the same time the ET curve jumps up. This may not be the complete reason, but I will speculate that the moisture escaping the beans cools their surfaces and, more importantly, deflects some of the hot air attempting to penetrate the beans. The combination of cooler moisture and deflected hot air causes the BT ROR to crash, while the greater amount of hot air passing the ET probe causes the ET curve to jump.
Here’s another example of a Cropster curve with and without the ET ROR shown:
Rwanda FC marked too late
I believe FC really began at 8:05… this coffee is a fresh-crop Rwanda that crashes unusually late in FC.
What if I mark FC at the wrong time?
If you mark FC too early or too late, simply add a new “First Crack” comment in Cropster… the software will assume the new FC timing is the proper one and will adjust FC and the live DTR counter accordingly. You may clean up your redundant comments by making a new “dummy” comment at the exact time of the incorrect FC comment. For example, in the roast above, if I want to eliminate the FC comment at 8:43, I may choose to make a new comment at 8:43, type “x” and then press “Text Comment”. That will add the comment “x” at 8:43 and delete the old FC comment.
**Breaking news: if that process sounds clunky it's about to get smoother. The Cropster team just informed me that the next update to RI4 (due within two weeks) will allow comment editing on the fly.**
Coda
Since I have begun teaching clients to mark FC using the trough in the ET ROR, they have been better able to keep their ROR’s smooth, avoid crashes, and even roast a little darker without an ROR crash or flick. Mind you, this strategy doesn’t always work, particularly if one lowers the gas shortly before the crack. In such cases, some experience with this method will help.
Many thanks to Jerome of Structure Roasters for his tutelage in some of the scientific dynamics at play during first crack.
Somehow despite the cold. Canada is calling to me for the second time in a
month. Perhaps it’s the polite people, or perhaps it’s just nice to spend
time in a country with a reasonable leader.
Show full content
Somehow despite the cold. Canada is calling to me for the second time in a month. Perhaps it’s the polite people, or perhaps it’s just nice to spend time in a country with a reasonable leader. :0
I’ll be offering a Roasting Masterclass in Vancouver on Sunday, December 9. Given the late notice, this will surely be an intimate affair, so whether you’re in BC or just want to escape America for a bit, come to class and bring your most urgent and challenging questions about roasting.
I’m grateful to George and the team at Revolver for hosting the class. If you’ve never been to Revolver, it’s a treat: the rare third-wave shop that puts humans first and also makes wonderful coffee.
See this link here for tickets, and I hope to see you in Vancouver
I’m pleased to announce that I’ll be offering a three-hour roasting
masterclass in Montreal on November 17. The masterclass will include two
hours of lecture, a cupping of the Roast Defect Kit, and thirty minutes of
Q&A. I personally guarantee that any roaster who attends will take home
many new and useful roasting ideas to implement.
Show full content
I’m pleased to announce that I’ll be offering a three-hour roasting masterclass in Montreal on November 17. The masterclass will include two hours of lecture, a cupping of the Roast Defect Kit, and thirty minutes of Q&A. I personally guarantee that any roaster who attends will take home many new and useful roasting ideas to implement.
Tickets and information about the class are available here.
As many of you know, I founded Café Myriade in Montreal back in 2008. At the time, Myriade was incredibly innovative, and many of the systems I brought to Myriade became standard practice in cafes around the world. Some unfortunate incidents transpired a few years later, and I sold my share of the business. Montreal is a wonderful city, and I’ve missed it ever since.
On November 17, I’m not only offering the masterclass, but returning to the Montreal coffee scene as a partner with Andy Kyres (of Tunnel Espresso) in The Canadian Roasting Society, a new co-roasting facility. I believe CRS will impact roasting in Montreal the way Myriade once revolutionized the city’s café scene. We will offer roaster training, white-label roasting, and rental time on our fleet of Probat roasters.
After the masterclass, we’re holding several public events:
A cupping of Tunnel’s future roasting brand (name TBD)
An espresso lesson based on a demo of the Decent Espresso Machine
An espresso extraction contest using the Decent
A grand-opening celebration with music and drinks.
If you’re anywhere near Montreal on the 17th, we’d love to see you there.
For our first product, we’ve chosen to offer an upgraded spray head for the Curtis G3 and G4 batch brewers. Why did we choose the Curtis? The Curtis G4 Thermapro is the most capable batch brewer on the market, but its spray head is its proverbial Achilles heel, and we wanted to fix that.
Note the way the original Curtis spray head favors the grounds in the center of the bed. It may be difficult to tell from the photo, but the spent bed is much lower in the center and raised on the edges.
The G4 has the industry’s most versatile programming and user-friendly interface, and it performs more consistently than most batch brewers do. However, the spray head greatly favors the grounds near the center of the coffee bed (evidenced by the large, depressed area in the center of the spent coffee bed). The result is exceptionally uneven extraction, which yields more bitterness and astringency and lower overall extraction levels.
Our goal was to help the machine reach its full potential by improving the evenness of its extractions. Our device produces better and higher extractions by distributing water more evenly across the entire coffee bed.
Dozens of beta testers over the past few months have found our spray head yields a more uniform extraction as well as a higher extraction. That means your coffee will taste sweeter, less bitter, and less astringent. As a bonus, you'll be able to use a bit less coffee grounds to produce the same brew volume and brew strength. Our mighty little spray head will pay for itself many times over, in both quality and cost savings.
Thanks for reading. You can buy the UFO and Litmus Coffee Lab's other products here.
Last year, I met Dan Eils, an engineer, through my blog. We found we had a shared philosophy on how to go about improving coffee equipment, so we decided to set to work on a new coffee-machine project (which will take us approximately forever to complete). While working on the machine, I suggested we take on some bite-sized projects to fix some problems in coffee making, and hopefully those projects would make enough money to fund our R&D along the way. Thus was Litmus Coffee Labs born.
At Litmus we've got a few products in the pipeline, all designed to be affordable and to significantly improve your coffee. We’ve had dozens of beta testers using our products happily for several months, so we’ve decided we’re finally ready to launch our company. We will announce products on this blog, you can buy them HERE and we guarantee your satisfaction with all of our products. Feedback is always welcome.
If there are any common coffee-machine parts you think could use an upgrade, drop us a line here or at litmuscoffeelabs@gmail.com.
I’m rather overdue in noting that my books are available around the world in various languages. Whether you would like to read one of my books in French, Spanish, Russian, Czech, Hungarian, or Korean, please visit these links below to buy the translated editions. To resell my these translated editions, please use the same links to make wholesale inquiries. The books make great holiday gifts. Just saying. :0
One thing notably absent from most marketing and discussion of grinders is
mention of extraction level. Manufacturers routinely reveal burr size, lbs
or kg per hour, motor RPM, etc, but rarely mention extraction data. It
would be a great service if the SCA or some other hypothetically impartial
body would test and rate grinders and other coffee gear using objective
metrics.
One thing notably absent from most marketing and discussion of grinders is mention of extraction level. Manufacturers routinely reveal burr size, lbs or kg per hour, motor RPM, etc, but rarely mention extraction data. It would be a great service if the SCA or some other hypothetically impartial body would test and rate grinders and other coffee gear using objective metrics. In the case of grinders, the most important metric would be extraction level. (I know that grinders don’t do the extracting.)
Given that roast development affects extraction data, there probably cannot be a standardized, objective number (eg this grinder extracts a certain recipe at 20%). But it wouldn’t be impossible to use extraction data to compare grinders. For example, one could test the relative extraction levels numerous grinders yield using beans from the same roast batch.
A few facts about grinders, extraction, and coffee flavor:
Higher extractions are almost always better. For a given brew recipe and grinder, the highest extraction is not necessarily the best. For example, many of us have had the experience of setting the grind one small notch finer and having flavor deteriorate despite a marginally higher extraction level than that produced by the coarser setting. However, if you measure and taste hundreds of batches of a particular brewing method, the best brews would likely cluster around the highest extraction levels.
A technique that produces higher extractions for a particular brewing method will usually yield better results than will lower-yielding techniques. For instance, if you improve your puck prep to decrease channeling during espresso extraction, flavor improves and extractions increase.
If two grinders yield different average extraction levels for a given set of brewing parameters, the grinder that yields the higher extractions will almost always produce the tastier coffee.
As a grinder’s burrs dull with use, extraction levels will decrease.
Improving burr alignment will increase average extraction yield.**
**A top-notch grinder with poor alignment may produce higher extractions but inferior flavor compared to a mediocre grinder with excellent alignment. Many of us have had this experience with high-extraction, gushing, channeled espresso shots from an EK. A perfectly aligned EK can yield magical espresso, but few of us have had that experience.
You may not personally be a big fan of measuring extractions, but measurement offers many benefits, not the least of which is offering some objective data on which to base discussions and comparisons. Measurement led us out of the dark age of ristretto madness, measurement helped me to discover the value of the EK grinder (something about which even Mahlkonig was unaware), and measurement can help to evaluate puck-prep methods, burr sharpness, burr alignment, and of course, repeatability of results. Extraction measurement is a tool, not a dogma. Measurements offer valuable data, which you can use as you wish.
There are two important reasons to consider extraction levels when choosing a grinder:
A grinder that produces higher extraction levels will generally yield better-tasting coffee.
Higher extraction levels allow you to use less ground coffee to achieve the same brew strength and weight.
For example, let’s say you use an espresso grinder that typically yields 19% extractions and 9.5% TDS using 20g of grounds to pull 40g shots. If you then switch to a grinder that produces 22% extractions, you can then produce 40g shots with 9.5% TDS by using only 17.3g of grounds. (Please note these numbers are a little imprecise, but I’d rather not address here.) Decreasing the dose by 2.7 g per shot would add up to an annual savings of over 400 lbs (190 kg) per year for a café that pulls 200 shots per day. That means spending, say, an additional $1000 USD for a higher-yielding grinder may yield an annual return of $4000, assuming you are paying $10 per lb ($22 per kg) for beans.
The bottom line: better grind quality produces higher extractions, which result in tastier coffee and cost savings.
Please leave a comment below. I’d like to hear from you.
Custom Grinder | Photo Courtesy of Frank Durra @titusgrinding
I recently posted a roast curve on my IG to illustrate how the way one sets the axes (the ranges for time, temperature, and ROR) affects a curve’s appearance.
For instance, if one sets the ranges too high, a curve may look like this:
Note how the ROR curve is compressed into a tiny vertical space. Curve views like this one are quite common (and useless).
Minimizing the ranges of the axes expands the curves and provides a better view:
Red = Inlet Temp… Blue = Bean Temp ROR…Green = Environmental Temp
While this may seem obvious to many readers, I see a tremendous number of roasters, both in person and on Instagram, setting their graph axes more like the former than the latter. Such curve views will make a roaster overly confident in his or her results. Quality Control and progress will suffer.
A while back, I badgered the fine folks at Cropster to automatically adjust the axis ranges. While Cropster can’t do that during a roast, as it has no way of knowing what the necessary ranges will be, they listened and made the range-minimization automatic when viewing past roasts.
The same principle of optimizing the curve view applies to adjusting ROR smoothing (via the ROR interval in Cropster or the delta span in Artisan) and using appropriately responsive and well-located probes. These are fundamental — not advanced — concepts. Simply put, if you don’t practice all of them, you’re handicapping your roast-curve analysis for no good reason.
Going back to the Instagram post, many commenters volunteered opinions about how the coffee and the curve. I was surprised by many of the assumptions people made about what the operator had done or how aspects of the curve would affect the coffee’s flavor. (Hint: the timing of the turn is meaningless and if someone else’s turn is higher or lower than yours, it says nothing about flavor.)
Typing with one’s thumbs on Instagram is not an efficient way to have long conversations, so I thought I’d turn the discussion into a blog post. Some readers may not want to risk making mistakes publicly, but the only way to learn is to put yourself out there and have this discussion. If this conversation is productive and involves a diversity of commenters, perhaps this “game” will become a series. If that appeals to you, please participate.
So, what can (and can’t!) you glean from the curve below? Please, no questions about the coffee, machine, or curve; only answers. I’m intentionally not providing any more information than what you see below. There are no “tricks” involved — the machine, probe, coffee, batch size, between-batch protocol, etc, all fall within the realm of reasonable “best practices.” Thank you.
Red = Inlet Temp… Yellow = Environmental Temp… Blue = Bean Temp ROR
I’ve worked with several hundred roasting machines over my consulting career and have experienced a troubling problem: manufacturers often deliver roasting machines with what I would consider defects, and then refuse to acknowledge the problems or fix them for customers. I won’t name companies in this post, but would like to discuss a few of these recurring problems here in the hopes that roasting-machine manufacturers address these issues soon.
DRUM RPM
The most common inconsistency I have noticed in delivered machines has been drum-RPM count. There are two issues around drum RPMs and new machines: delivered machines having consistently suboptimal RPM levels, and delivered machines of a particular model from a given company having wildly different RPMs. I understand that manufacturers may disagree with me about appropriate RPM levels; that’s fine. But when I see a 1kg machine delivered with 50 RPM or a 12kg machine delivered with 35 RPM, or a 15kg machine delivered with 70 RPM, we’ve crossed the line from debatable to unreasonable.
In my seminars I often share this table of RPM recommendations. The numbers are merely estimates. Please don’t think that if I recommend 50—54 and your machine clocks in at 55 that you have a problem; you don’t. Please note that I cannot recommend a precise RPM level for all machines of a particular size because the proper RPM level depends on drum diameter, and two different models of 15kg machines, for instance, may have quite different drum diameters. For example, a 15kg Joper has an unusually long, small-diameter drum, while a Probat UG15 has an unusually shallow drum with a large diameter. All else being equal, the Joper’s drum RPM should be higher.
INCONSISTENT RPMs
It’s tempting to assume that machine manufacturers are all experts at roasting, but few are. For instance, one US manufacturer repeatedly tells customers that ROR crashes don’t matter, they confound baking with roasty-ness, and they seem to think that ROR flicks at the end of roasts are “normal” and not a problem. I, and every competent roaster I’ve ever worked with, couldn’t disagree more. The same company offers costly roasting classes, which should give readers pause. One decades-old machine manufacturer routinely delivers 12kg machines with drum RPM ranging from 35—55. Beyond the fact that 35 RPM is unreasonably low for a 12kg machine, this company must (I hope) have some RPM target, so why in the world are they willing to ship machines with such disparate RPM levels? That company has yet to agree to fix any of those 35-RPM machines and claims that 35 RPM on the 12kg machine is “normal” while also shipping some machines at 55 RPM. Contrast that with an experience I had this month with Reyes Tellez at Probat USA: I had just begun working with a new client on his Probat P12. I asked the client to fill out a consultation intake form, which included measuring the machine’s RPMs. It turns out the machine’s RPM was 67 instead of the 55 that both Reyes and I agreed was optimal. I emailed Reyes a video of the drum turning for one minute. A day later, Reyes acknowledged the problem, said he suspected there was a fault in the generator, and overnighted new generator to the client. That fixed the problem immediately. Every company makes mistakes or delivers machines with faults; that doesn’t bother me. It bothers me, and should concern everyone thinking of purchasing a roaster, when companies refuse to acknowledge or fix those faults.
OTHER FEATURES
Inconsistencies often exist with other roasting-machine features. For example, one major brand often delivers machines with excessively high airflow, several offer burners that are woefully underpowered for their intended batch sizes, and many manufacturers still provide temperature probes too slow to produce the quality of data necessary for expert-level roasting.
SOME COMPANIES ARE LISTENING
Whenever I get a new client with a poorly tuned machine, I ask him or her to tell the manufacturer. For years, the manufacturers would almost always respond by asserting their expertise and then dismiss the customers’ concerns. I’ve had the complete opposite experience with Mill City Roasters. Steve and his crew have not only added new features every year to their machines, but they have considered and tested every recommendation I have made, and they have implemented almost all of them. Although I have no financial relationship with Mill City (other than them selling my book and my buying a machine from them— at retail), I’ve enjoyed sharing my experience with them because it’s a joy to work with a company willing to listen, test, and improve continually.
I see it as part of my job as a consultant to ensure manufacturers get feedback from both myself and from clients, and to advise clients to buy from companies that are open to feedback and determined to improve. Through that process it has become easier to know which companies take responsibility for their products and for their customers’ satisfaction.
***
Thanks for reading. I respectfully request that comments not directly criticize any particular brands; let’s please focus on features and experiences, and not on brands or models.
POST-PUBLICATION NOTE: Some readers have expressed confusion about whether the RPM recommendations refer to batch sizes or machine capacity. For instance, they are wondering if a 7-kg batch in a 15-kg machine calls for the same RPM as that recommended for a 7-kg machine. The answer is no. To be clear, the RPM recommendations are based on machine size and drum diameter, not batch size. Whether it is beneficial to adjust up or down a few RPM when doing half batches is a separate discussion.
Advanced Mode on the DE1+ is perhaps the deepest rabbit hole into which any barista can climb. I generally recommend baristas master the machine in the more familiar Pressure Mode first, and then get comfortable with Flow Mode before using Advanced Mode. Once I dove into Advanced Mode, no other mode or espresso machine could ever satisfy. The possibilities are endless.
Advanced Mode on the DE1+ allows the barista to customize a recipe in any way he or she desires. Would you like to preinfuse with a set flow rate, switch to controlling the shot based on pressure, and then switch back to flow mode? No problem. If you want to then use a different brewing temperature for each stage, that’s easy. You can set “triggers” that tell the machine to move from one phase to the next based on pressure, water volume, or time. Advanced Mode is incredibly versatile, and it’s much easier to use than I had expected when John first told me about it. Recipes can be as simple or as complex as you would like.
My favorite type of espresso shot to pull in Advanced Mode mimics filter brewing: after pre infusion I program a pause, or “bloom”, to allow water to saturate the entire puck before turning the flow back on. This type of recipe increases extraction by 1%—1.5% and greatly improves evenness of extraction because preinfusion alone does not fully saturate the grounds. Pausing after preinfusion increases extraction while reducing astringency and bitterness, which is the biggest win-win I can imagine in espresso extraction. Blooming also does more than any other method to bring the quality of espresso extraction closer to that of filter. (Yes, filter extraction quality is higher than that of espresso.)
Below are the recipe screens from a recent shot I made at home, ground in a Baratza Forté. Extraction (with 0 for VST presets--as always--for those keeping score at home) was 24% (the default presets likely would have brought that up to 24.5%), and TDS was 8.5%. The beans were four weeks old, which boosted extraction a bit. The final screen is the resulting curve. Take it in slowly. It's not complicated, but having so many new data points to look at can be daunting for a moment.
Last year I had plans to open a cooperative roastery in LA but various problems with the landlord and the building forced me to cancel that project, I'm sorry to say. However, I've been quietly involved in a similar project in NYC and it is now open for business.
I'd like to introduce Regalia Company, a boutique roastery and shared roasting space. I've teamed up with my friend Paolo Maliksi to open Regalia and to fill a need in NYC. Sure, there are other places where you can rent time on a roaster, but Regalia offers a few unique features you won't find anywhere else. Regalia is just one subway stop from Manhattan and straddles the border of Queens and Brooklyn. At Regalia we offer discounted rates to roast on our 15kg Mill City roaster, perhaps the most customized, feature-laden roaster on the market.
At Regalia you're welcome to store your own green coffee or buy some green from us (we have ample storage). If you're new to roasting and want some coaching, Paolo is available to help at no charge. Once clients are up and running at Regalia, I'm available as a resource, offering free coaching and consulting to our partners.
Among other features at Regalia, we offer a fully-stocked lab with an EK grinder, cupping supplies, vacuum-sealing machine, DE1PRO espresso machine, and Fetco batch brewer. As well, I'll be at Regalia a couple of times per year to offer classes, tastings, and coaching for clients.
Whether you have a café in NYC and would like to save some money and support your own brand, or whether you just want to roast coffee for clients, we'll work with you and support you in any way we can.
Probably the most exciting feature of the DE1+ is its ability to manage shots by flow rate. That may not sound like a big deal, but read on to have your mind blown.
The flow mode recipe screen. It's simple and intuitive.
Most espresso machines apply a steady amount of force to the coffee puck, the puck provides resistance, and the resulting flow rate rises as the puck erodes due to extraction. In my experience, this dynamic leads to erratic flow paths late in a shot, regardless of the quality of the barista’s puck prep. Uneven flow through a puck is akin to lots of mini channels, and, like larger, more obvious channels, it decreases extraction and increases bitterness and astringency.
Pressure profiling machines allow the barista to vary the pump’s applied pressure. The classic, competent pressure profile I had written about in my ebook Espresso Extraction: Measurement and Mastery was inspired by the profile of a lever machine, and includes preinfusion and a pressure ramp followed by a pressure decline. The pressure decline in the latter half of a shot can prevent the flow rate from rising as the puck erodes. With such a pressure profile, if the grind setting and puck prep are skillfully executed, the result will be a relatively constant flow rate and minimal channeling.
In flow mode on the DE1+, the machine manages the output (flow), not the input (pressure), which is a big step forward for repeatability. It does this by varying the pressure up 6,000 times per second (not a misprint) to trace a programmed flow curve. Flow mode takes the pressure (sorry) off the barista to provide the perfect puck prep and grind setting. Don’t get me wrong: skilled puck prep and setting the proper grind are still important. But pulling shots in flow mode compensates somewhat for imperfect puck prep and grind setting.
DE1+ screen view showing the pressure, flow, and temperature curves of a flow-profiled shot.
How is that possible? In flow mode the DE1+ “fixes” channels. That may seem too good to be true, so let me explain. When a typical espresso machine’s pump delivers constant pressure and a channel forms, the puck’s resistance decreases. A channel allows higher flow as lots of water bypasses the more densely packed areas of the puck. The extra flow through the channel causes it to enlarge, setting off a vicious cycle of lower resistance causing higher flow and a larger channel, leading to even less resistance. When a channel forms in flow mode on the DE1+, the pump slows in order to maintain the desired flow rate, and therefore doesn’t exploit the channel as aggressively. We have found that as the pump pressure decreases in flow mode, the grounds rearrange themselves, decreasing the size of the channel. As grounds shift into the channel, it shrinks, the puck’s resistance rises, and the pump pressure increases again to maintain flow.
Flow mode may not improve a great barista’s best shots (though it probably will), but it improves the majority of shots, even by good baristas, and can dramatically improve the quality of shots pulled by average and poor baristas. I see flow mode as an incredible tool for restaurants and chain coffee shops where baristas may not be as skilled as those at the better third-wave shops.
A flow shot with the grind too coarse in a mediocre home espresso grinder. Note how the pressure curve (the green line) peaked at only 3.5 bar. That implies the grind was too coarse, but the DE1+ prevented the shot from gushing and running too fast.
Although I think flow mode is an incredible advance, it can be a crutch, and like any crutch, it will be up to the barista to not rely on it excessively. For example, if a barista creates a flow profile, aims for a 20g in/ 40g out/ 30-second shot, and sets the grind five notches too coarse on a Robur, the shot will take approximately 30 seconds and the extraction will be low. However, the result will be superior to the 10-second “gusher” that such a grind would create in pressure mode or on a standard “dumb” espresso machine. The gusher will also extract too low but will have far more channeling, bitterness, and astringency than the shot pulled in flow mode. To distill the difference down to one critical point, the flow shot will extract much more evenly than the pressure shot.
I've had a DE1+ at my house for the past few weeks and I've already learned a ton. In this post, I'd like to introduce readers to the "pressure" and "flow" modes of the Decent. In the next installment we'll discuss the "Advanced" mode and I'll introduce some new ideas about espresso extraction that I've learned from the machine.
The DE1+ comes with a tablet computer and quite a few sensors. There are so many sensors that the sensors are literally monitoring each other to ensure they are as precise as possible. Instead of a boiler the DE1+ has a "thermocoil", or continuous water heater (the De1+'s temperature profiling would be impossible with a traditional boiler), the machine measures temperature just above the shower screen (not at the boiler, a major improvement), and it mixes hot and cold water continually to maintain precise water temperature at the screen. The steam runs extra hot in order to squeeze the most juice possible out of standard home electricity. On the tablet you can program the hot water tap to dispense water at any chosen volume and temperature. Within five minutes of turning it on in the morning, the machine is ready to make coffee at a precise temperature -- no sink shots required. When using a bluetooth scale, the DE1+ can stop shots gravimetrically.
Any one of those features would probably cause the professional coffee community to get excited about the machine. But none of those innovations are what makes the Decent the best espresso machine in the world. What's amazing is that it can brew espresso using pressure profiling, flow profiling, or a combination, and the barista can see the pressure, flow, and temperature curves in real time during a shot. The feedback provided by those curves is invaluable. It's like Cropster for espresso, and once you see it, you'll never want to pull a shot without it. After pulling hundreds of thousands of shots over more than two decades and learning quite a bit along the way, I've probably learned more about espresso extraction in the past few weeks than I had learned in the past ten years.
The pressure mode is somewhat like that of other machines that offer pressure profiling, but the DE1+ allows the barista to see the results of his or her efforts and adjust accordingly. Given that we can taste only so many espressos per day, one can progress only so quickly by pulling shots, tasting, adjusting, and repeating. With the Decent, it's obvious which shots are worth tasting, which need a finer or coarser grind, and how much each shot channeled. That means I can dial in a shot nearly perfectly before bothering to taste it. My palate is grateful for the assist.
Programming in pressure mode is simple and Intuitive. You can program preinfusion to end based on a particular time or pressure target. Contrary to popular belief and what other machines' pressure gauges indicate, one does not preinfuse at a particular pressure. This is because no matter how hard the pump works, the puck must provide back pressure before the system is pressurized. Preinfusion works at atmospheric pressure until the headspace above the grounds is full of water, then pressure ramps up as the grounds absorb water, swell, and provide increasing amounts of back pressure.
In the example below, I have asked the machine to preinfuse at a flow rate of 4 ml/s until 15 seconds has elapsed or the pressure reaches 6 bar. As soon as one of those goals is met, the machine moves on to the "rise and hold" phase, in which I've asked it to rise to 8.2 bar and hold that pressure for 10 seconds. Next the machine will lower down the pressure to 5 bar over 30 seconds.
Pressure mode recipe screen
Below is the resulting shot.
The green line is the pressure curve and the blue line is the flow curve. The curves offer a treasure trove of insights:
The volatility in the green curve indicates channeling (note the channel near the top/right of the red circle.) The volatility of the pressure curves on the DE1+ come from two main sources, as far as I can tell: clumped grounds and poor puck prep. In this case, I'm using a grinder that is producing an incredible amount of clumps. The grinder hasn't been aligned or fully seasoned and I'm hoping that I can improve the grind quality soon and the volatility will decrease. Bigger, better, sharper burrs generally produce smoother curves-- that's obvious when I pull shots from two different grinders. As a side note, one remarkable thing about the Decent is that in flow mode it "fixes" channels. More on that in the next post.
The blue curve shows that the flow rate dipped after preinfusion and took a long time to level off. This is what John refers to as a "slow-to-develop shot." We think this happens due a combination of possible reasons: the grind is too fine, the puck is too compressed (more on this in a later post), or the puck is still absorbing water during the 15--20 seconds after preinfusion ended because preinfusion didn't fully saturate the puck. We have generally preferred espressos that didn't have such a dip in flow rate, and we're still working on the significance of this. Speculations are welcome. (For the record, we have preferred shots where the flow is steady almost immediately after preinfusion.)
Sample slide from class of a suggested, generic starting point for settings when approaching an unfamiliar machine and coffee.
It's a bit last minute, but I hope if you're in Amsterdam for World of Coffee that you'll join my Roasting Masterclass on June 23, 8:30am--11:30am. The class will be located conveniently between the city center and RAI Amsterdam, where WOC will be held.
If you're a roaster, I strongly recommend you consider attending. Many roasters are skeptical before coming to one of my masterclasses, but almost always leave feeling excited to have many new ideas with which o experiment in their roasting. This class will challenge you, and I guarantee you will be satisfied. I'm always thrilled with how many attendees return to repeat the class in later years to see what new ideas they can pick up.
There will be plenty of time to ask questions, so bring your toughest and most pressing questions. The Q&A is always vibrant, the roast samples at class will be just like those of the "Roast Defect Kit" I've released today, and I promise to leave you with a lot to think about.
Please see the Eventbrite link HERE for more details and to purchase tickets (€225)
I'm pleased to announce that I've just released the second ROAST DEFECT KIT today, in conjunction with Regalia Company. We were waiting for Regalia to receive some lovely new-crop Kenya AA from the Karumandi Factory in Kirinyaga. Paolo gave it a few practice batches and then nailed the "good," "baked," and "underdeveloped" roasts. I tasted them blindly this morning and am proud to offer these to readers.
I developed the idea of the RDK while writing The Coffee Roaster's Companion, as a means to help coffee enthusiasts identify baked and underdeveloped roasts, as well as to offer an example of an excellent roast. Being you able to identify underdevelopment and baking is a skill even most coffee pros lack. Some coffee drinkers may be so accustomed to baking or underdevelopment that they have come to enjoy it. To each his or her own, of course. But whatever your preference, I think there is still value in establishing what the terms mean and how to recognize them in the cup.
My hope is that you'll blindly taste the samples in the kit with friends and colleagues, discuss what you taste, and the compare the cup results with the roast curves. There should be enough coffee in each sample to repeat the tasting session several times.
In the RDK we've included:
3x 100g frozen and vacuum-sealed roasts: an under-developed roast, a baked roast, and an excellent roast. When we fulfill your order, we'll send you the roast curves and their respective settings.
2x small packets of mineral salts (CaCl, MgCl, KHCO3). Each packet willconvert four liters of distilled (demineralized) water into perfect brewing water. We've included these to help everyone who tries the RDK to have a more similar taste experience.
Below are the roast curves; please note that although one can objectively identify a baked roast by looking at its curve (if derived from valid data), it is impossible to identify underdevelopment merely by looking at a roast curve. That is because curve data are derived from surface bean-temperature readings, but underdevelopment refers to undercooked bean centers. At this time we have no way to accurately measure or infer the temperature of the bean centers during roasting.
Please click HERE to purchase the RDK. We have only twenty kits available on a first-come, first-serve basis.
UPDATE: ALL OF THE RDKs HAVE ALREADY SOLD OUT IN JUST THE FIRST DAY. WE'RE A LITTLE SURPRISED, AND WE'LL WORK ON THE NEXT ON TOUT DE SUITE. IF YOU'D LIKE TO BE ON THE WAITING LIST FOR RDK #3, PLEASE SEND AN EMAIL TO hello@regaliacompany.com AND WE'LL LET YOU KNOW WHEN THE NEXT ONE IS READY. THANKS FOR THE SUPPORT!!
A sentiment I hear often from buyers representing smaller roasteries is, “How can I compete with bigger buyers for the best green coffee? They have all the purchasing power!”
I’ve been at both the small (Ritual, Tonx) and the big (Stumptown, Blue Bottle, Peet’s) and I ask: How can they compete with you, small buyer? I have never encountered a more thoughtful buyer than the one who can purchase only a handful of coffees a year. A big buyer has to deal with a persistently huge appetite, and if you recall the times you’ve been famished, your discernment for quality tends to dip. It’s when you can’t eat too much that you become very, very picky.
Besides, “best” is a fairly useless term when considering what guides your green coffee purchases. As I discuss in Dear Coffee Buyer: A Guide to Sourcing Green Coffee: “Coffee buying is not a skill with linear, inevitable results, where two hypothetically “equal” buyers choose to buy the same coffee. Scores may be objective, but preference is not. A world with more proficient buyers is a world with greater availability of excellent, varied, coffee options.”
The most important thing that a buyer of any size can do is to establish an offering philosophy, something I cover in greater detail in the book:
When I began in specialty coffee there were two implicit but well-followed rules:
• You must offer representative coffees from the three major growing regions: Latin America, East Africa, and the Pacific Islands.
• You must offer a fistful of proprietary blends.
To this day, you can still see many of these rules followed in older establishments such as Peet’s and Starbucks. It seems wild now, but the third-wave pioneers mostly accepted these rules, with the slight tweak of replacing “representative” with “most pleasing” or something like that. A menu of thirty-one flavors was predictable and honestly represented the world’s spectrum of coffees. A roasting company distinguished itself almost entirely by the way it talked about coffee’s flavors, as expressed by some combination of national terroir and roast degree. By today’s standards, almost all roasters had a heavy foot on the gas pedal of the roaster. Those dark roasts and discussions of flavors, plus each company’s coffee-shop aesthetics, comprised the heart of the “brand.” It’s not that roasters felt they had no choice in this matter; it’s more that the idea of choice was precluded by these implicit rules.
A few optional origins produced exceptional quality at entirely reasonable prices. Some of the origins that were overpriced from a cup-quality:cost perspective, such as Hawaii and Jamaica, were nearly ubiquitous at the specialty cafés of the second wave. As late as 2010–2011, Kevin Knox, ex-buyer at Allegro and coffee-buying luminary, complained about roasters that weren’t offering the full lineup, nearly implying that it was a cheat (whether to customer expectations or to implicit rules, I am not sure) to exclude naturals or wet-hulled coffees from your menu.
Because I learned to buy coffee with no mentor and few understood expectations, I modeled the early menu at Ritual in 2007 in the same way that I saw Stumptown and Intelligentsia doing it, which is to say that I bought at least one coffee from every region and offered it nearly year round. Those two companies were pioneers of the third wave, and it seemed reasonable for me to first copy what they did, as their practices were the closest things to “instructions” I could find.
I broke the rules by accident initially, but as soon as I did, it was an epiphany. I had been traveling for weeks and miscalculated our consumption of Sumatra against our inventory, causing our roastery to run out. Sumatra was a staple of every third- wave menu at the time. I began going through the motions of replacing it. I contacted several brokers—traders who buy and sell coffee of various qualities—and asked for Sumatra spot samples (samples representing lots that are in domestic warehouses and available for immediate shipment to a roastery), roasted and cupped the samples, hemmed and hawed over the results, and finally made a decision: Ritual would no longer buy Sumatra.
By 2008, Ritual was building a reputation for clean, acidic coffees. I loved exotic flavors, but I wanted them to be true to the bean, not the result of zealous roasting or overwrought processing. At the time, if you had given a cup of Sumatra—a region that produces predominantly wet-hulled coffee—to a coffee taster and told her it was from Latin America, she’d have told you it lacked clarity of cup if she was diplomatic, or that it was dirty or defective if she was honest. If you then said, “Oops! I’m mistaken, it’s from Sumatra,” the coffee taster would recant and suddenly begin extolling the cup’s earthy, woody, dry characteristics. To me, the idea that different origins should be judged differently is foolish. How could I ever look at a Latin American producer again and tell him his coffee wasn’t up to snuff because it was earthy, woody or dry, while I was buying earthy, woody, dry coffee from Sumatra?
I couldn’t.
Instead of arranging for purchase of Sumatra, I talked with Ritual’s owner, Eileen, and convinced her that it was OK for us to not offer Sumatra. She asked me a few due diligence–type questions and then smiled and, with her ever-persistent entrepreneurial spirit, championed the decision. I afterwards heard her bragging about our decision to not offer Sumatra because it wasn’t up to the quality standards we had established. I was relieved that she was in agreement with me, thrilled that she was now using our decision to promote our green coffee narrative, and over the moon that I could—for a time—stop tasting wet-hulled coffee samples.
Now, the point of this story is not to tell you what your offering philosophy should be, though I’d selfishly be pleased if you stopped roasting wet-hulled and most naturally processed coffees. I want to make clear that you should have an offering philosophy, and you’ll be best off if it reflects your own taste preferences. The decision to stop offering wet-hulled coffees was a revelation for us at Ritual, and it felt like a huge weight was removed from our shoulders. I imagine that at this point not offering wet- hulled coffee is so deeply imbued in the ethos of Ritual that there would have to be a true revolution in wet-hulling for them to reverse course and begin offering it again.
The real revelation was not that we no longer had to offer Sumatra; it was that we didn’t have to follow any of the unwritten rules. Furthermore, your personal tastes do not have to be as simple as what flavors you favor in brewed coffee; they can also reflect more abstract preferences.
If you’re inclined to note that the grass is always greener on the other side, gaze on. It’s true! Bigger buyers absolutely have advantages, but so do you. Yes, they have purchasing power, and for many suppliers, it’s easier to work with fewer, bigger buyers. Bigger buyers also tend to have more satisfactory outlets for the few lots that don’t show up as expected. But step outside of your coffee head for a moment and ask yourself if your most memorable experiences, culinary or otherwise, come from the bigger or smaller brands.
Pick up a copy of Dear Coffee Buyer for more of Ryan's perspective and advice on green-coffee buying.
About five years ago, I began pestering my friend Ryan Brown to write a book about green-coffee buying. I thought Ryan was the perfect person to write such a book, as he was the most competent coffee buyer I'd ever encountered. It took those five years, but last year Ryan finally gave in and wrote the book. I'm pleased to say it's a masterpiece.
My first memory of cupping with Ryan took place in the basement of Ritual Coffee in the mid-2000s. Ryan had about ten coffees set up blindly on the table, brought his nose no closer than six inches (15cm) to each cup, and correctly declared which coffee was in each cup (mind you, many of the coffees were quite similar.) I was amazed; Ryan could probably out-sniff my sister’s beagle, and his green evaluation seemed borderline psychic compared to my ordinary abilities. My first thought upon witnessing that trick was that I was going to keep this guy around for a long time and learn what I could from him.
Happily, the rest of the world can now also learn from Ryan. Dear Coffee Buyer is like Ryan’s doctorate-level thesis on green coffee buying. The book is part masterclass in green evaluation, part clever advice for professional green buyers and those thinking about getting into the business, part travel narrative, and part editorial of what terms like “direct trade” really mean. I hope every barista, roaster, and green buyer reads this book. If they do, the industry will be much better for it.
We're also offering a poster derived from one of the book's gorgeous illustrations by Jory Felice. The poster depicts the various stages of the major coffee-processing methods. Please see below for the poster and sample pages from the book.
Ryan and I are jointly selling the book and poster here
We're offering a $10 discount if you buy the poster and book together as a bundle. If you are interested in placing a wholesale order for 10 or more books or posters, please contact me directly at scott@scottrao.com
Coffee-processing poster. Great educational wall art for any café or roastery.