If you haven’t already, read Simon Willison’s post on “Vibe engineering”. It perfectly lays out what many people who rely heavily on coding agents observe every day, and the unique challenges in getting the most out of these tools without becoming the bottleneck.
Show full content
If you haven’t already, read Simon Willison’s post on “Vibe engineering”. It perfectly lays out what many people who rely heavily on coding agents observe every day, and the unique challenges in getting the most out of these tools without becoming the bottleneck.
Like many others, I’ve been using Next.js for new projects for a while. Although it has its pain points, it generally provides a fast development loop without much setup. It’s obvious, though, that it stems from a pre-LLM era, when the most important requirements for a framework were different. It falls short for several of the vibe engineering practices that Willison describes:
Parallel development: Being able to run multiple coding agents in parallel provides amazing leverage, but can be hard to set up correctly. Spinning up multiple instances of a plain Next.js app is fine, but if you add anything full-stack — a database, for example — that suddenly becomes a lot more complicated and requires manual setup.
Testing and automation: Unsurprisingly, testing is usually not a top priority for someone building a new product on top of Next.js. Coding agents change that value equation, though: test loops let them work more autonomously and tackle more complex things, and agents can also help with tedious test writing.
Documentation: Next.js is well represented in training data, but that mostly covers the frontend. Once you venture into backend land, Next.js is largely unopinionated and you need to pick a stack for yourself. That is nice in many ways, but it also means you need to give your coding agent proper context for the full stack.
I’ve been experimenting with an alternative to Next.js optimized for coding agents, supercharging the flow of agents writing code with us guiding them. I’m aiming to provide a familiar developer experience for people using Next.js, while at the same time addressing the issues above:
Parallel development: Built-in support for spinning up isolated development environments with all dependencies, databases and other services, that parallel coding agents can work against.
Testing and automation: Includes a testing framework designed to be written and iterated on by coding agents, using those same isolated environments to run. Also supports letting coding agents manually test pages and APIs with code they wrote, for even more autonomy.
Documentation: Provides a local MCP that you can plug into your coding agent, which offers accurate and complete documentation for building across the whole stack.
The project isn’t ready yet, but will be open-sourced soon here: github.com/fabianlindfors/specular. If you want to follow along, follow the Github project, and if you want to chat, reach out at fabian@flapplabs.se.
Turning the revered Postgres into a distributed database is a tall order but not a new idea. It has been done in many different ways with different characteristics. Citus requires a fair bit of manual configuration and client setup, but is open-source and distributed as an extension. CockroachDB is simpler to integrate but is not actually Postgres and not open-source. Neon is perhaps the most interesting being a true Postgres extension and having some compelling features, but isn’t fully distributed in the multi-master sense.
Show full content
Turning the revered Postgres into a distributed database is a tall order but not a new idea. It has been done in many different ways with different characteristics. Citus requires a fair bit of manual configuration and client setup, but is open-source and distributed as an extension. CockroachDB is simpler to integrate but is not actually Postgres and not open-source. Neon is perhaps the most interesting being a true Postgres extension and having some compelling features, but isn’t fully distributed in the multi-master sense.
None of these quite scratched my itch for what a distributed Postgres could look like, so I couldn’t help but try to scratch it myself. The result of that is pgfdb, an experimental, open-source extension for Postgres that turns it into a stateless layer on top of FoundationDB. This means full compatibility with Postgres (it is Postgres) with the scalability, resiliency and transactional guarantees of FoundationDB.
Being able to build such a project is a testament to just how extensible Postgres is. pgfdb uses a number of Postgres extension points, like custom table and index access methods, to fully replace the standard storage and transaction engines. This means table and index data is stored and read in a way that suits FoundationDB, and full use is made of FoundationDB’s distributed transaction processing.
pgfdb is still very experimental and it remains to be seen if acceptable performance can even be achieved for a typical Postgres workload, but I wanted to put it out there early. If you are interested in chatting about it, please reach out!
I recently released a new version of Reshape, a tool for automating zero-downtime schema migrations in Postgres. I’m quite excited about this new version as it automates schema migrations that require changes across multiple tables, all whilst ensuring zero downtime for both your application and database. I’ll lay out an example of such a complex, multi-table migration here but you might also like to read the introductory blog post for Reshape first.
Show full content
I recently released a new version of Reshape, a tool for automating zero-downtime schema migrations in Postgres. I’m quite excited about this new version as it automates schema migrations that require changes across multiple tables, all whilst ensuring zero downtime for both your application and database. I’ll lay out an example of such a complex, multi-table migration here but you might also like to read the introductory blog post for Reshape first.
Until now, Reshape supported a quite wide variety of migrations but they were all limited to a single table. With the latest version, Reshape can now make schema migrations that span multiple tables, including backfilling data in new tables and changing the structure of data that is spread out across tables. Let’s go through an example of where this can be useful: going from a 1:N relationship to N:M!
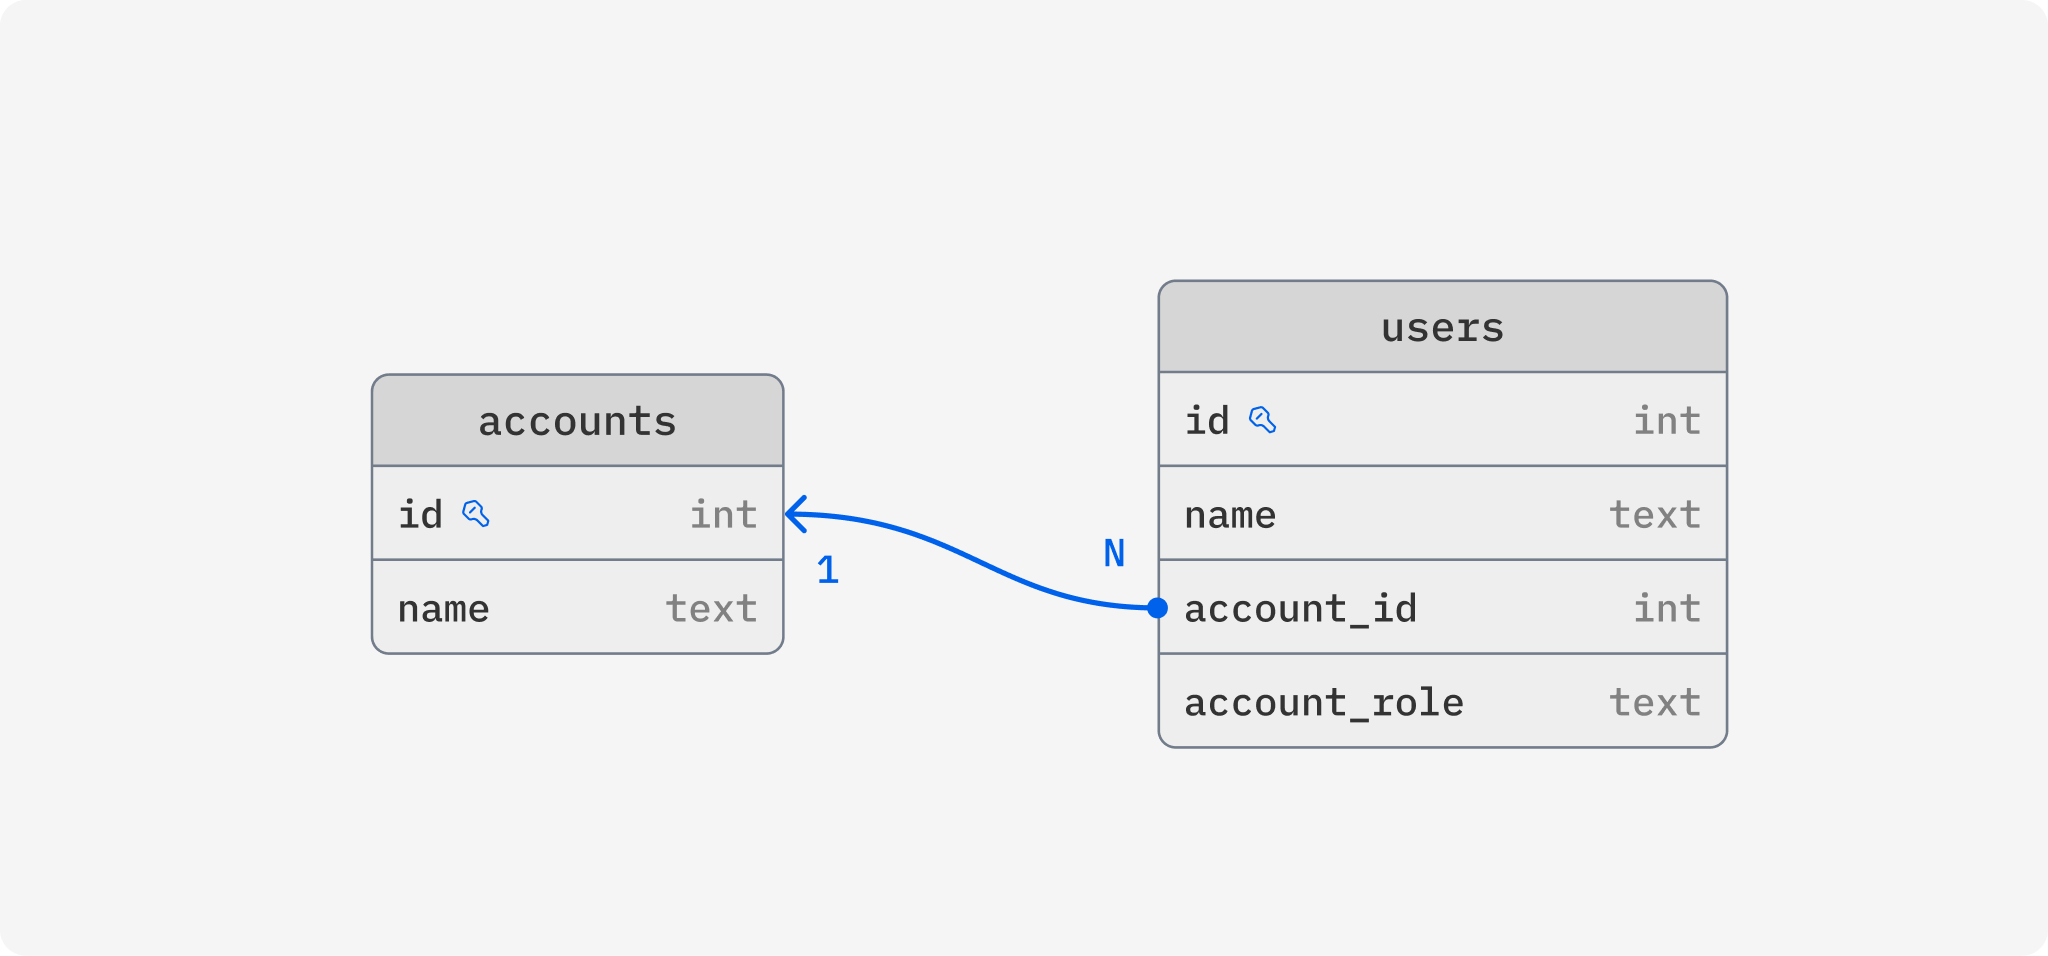
Say we have an application where users can sign in and access data tied to an account, and multiple users can have access to one account. In our database schema, we are representing this with two tables, users and accounts, where users has a column that references the account it belongs to and it also contains a column that tells us which role this user has for the account.
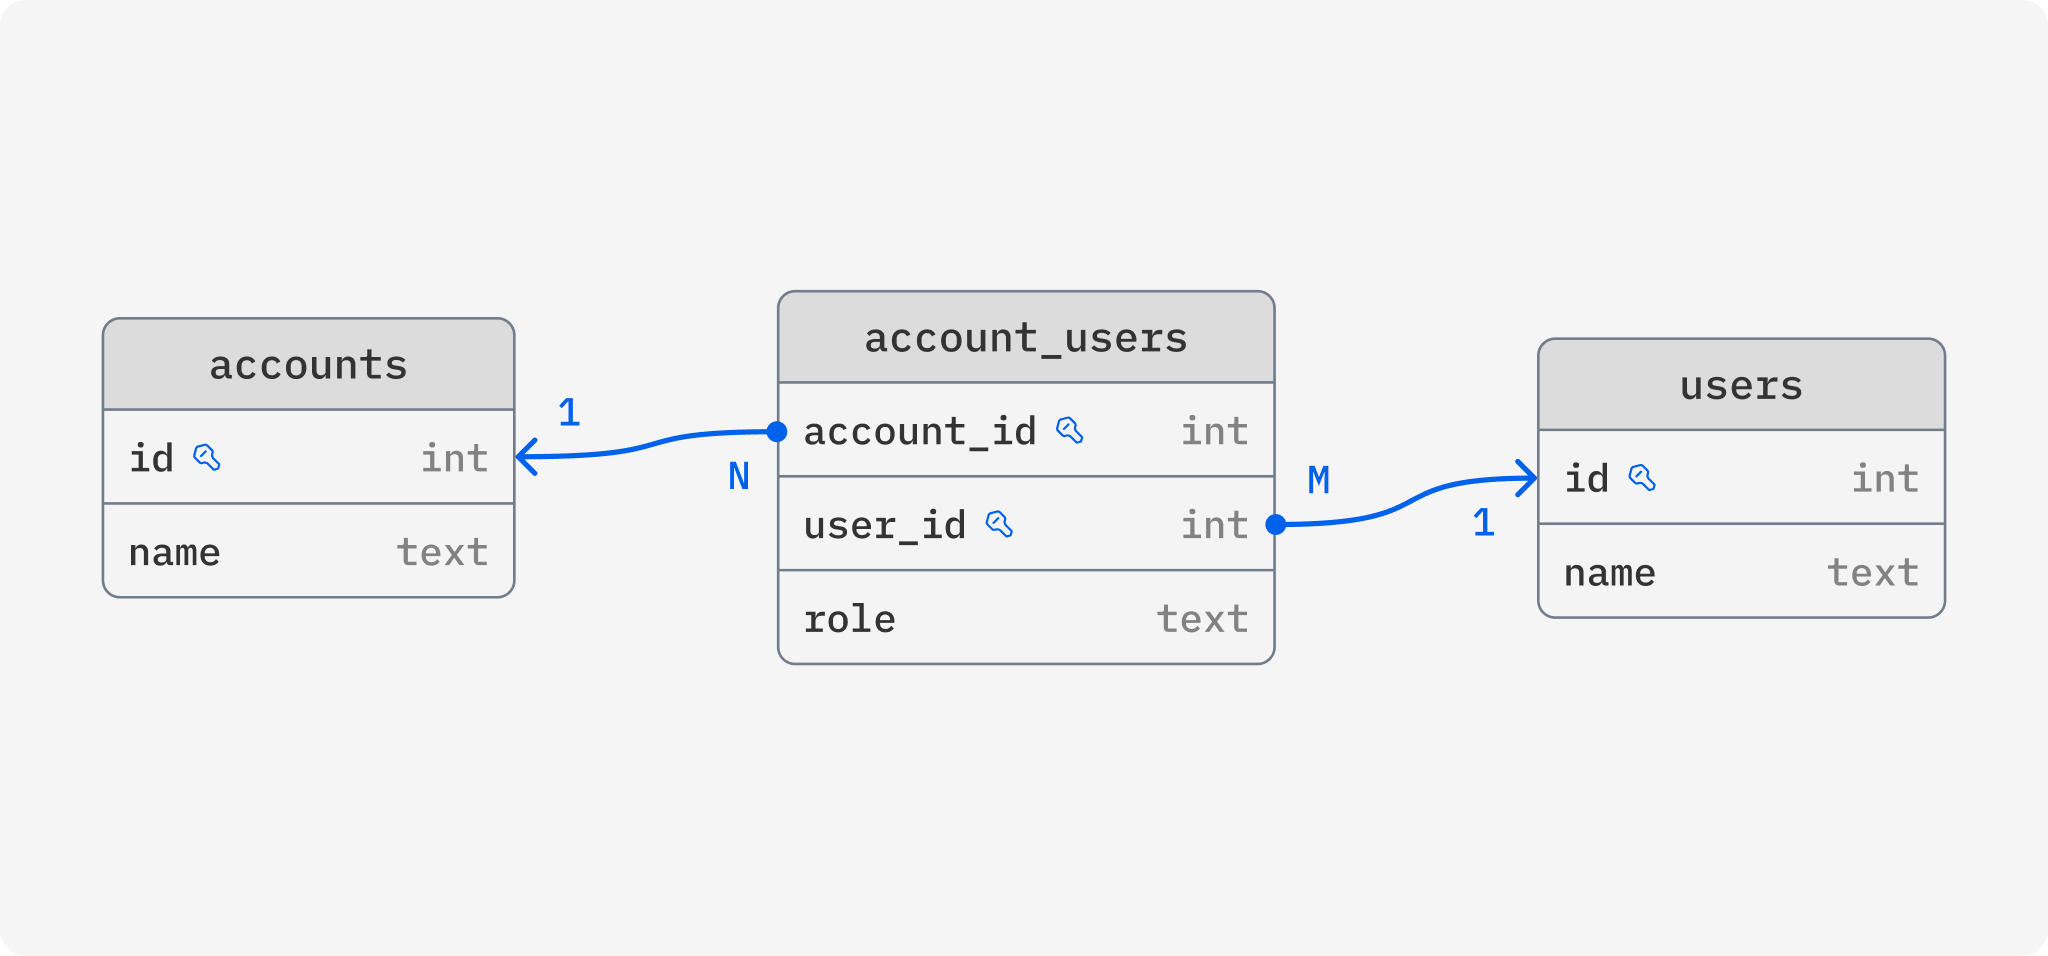
This database schema is serving us well but now we have a new feature we want to implement, a single user should be able to have access to several accounts, with potentially different roles for each. To make this feature a reality, we would have to change database schema to support a many-to-many relationship between users and accounts. Preferably, our database schema should look something like this:
Making this change without breaking our application or bringing it down is not easy. To ensure zero downtime, we would have to go through these steps manually:
Add the new account_users table and update application to write both to the new table as well as the existing columns on users (deploy)
Write and run a script that backfills account_users based on the existing data in users
Update application to read from the account_users table (deploy)
Update application to stop writing to the columns on users (deploy)
Remove account_id and account_role columns on users
That’s a lot of manual work! Several pull requests and deploys and a lot of waiting, with plenty of room for human errors. What would the process look like with Reshape?
Write a migration and update your application to read and write to account_users instead (deploy it all in one go)
The magic here of course lies in how you write that migration. You define how to translate between the new and old schema, and Reshape takes care of the rest. More specifically, here’s what the Reshape migration definition could look like:
# Add `account_users` as a junction table
[[actions]]
type = "create_table"
name = "account_users"
primary_key = ["account_id", "user_id"]

    [[actions.columns]]
    name = "account_id"
    type = "INTEGER"

    [[actions.columns]]
    name = "user_id"
    type = "INTEGER"

    # `role` is currently stored directly on the `users` table but is part of the relationship
    [[actions.columns]]
    name = "role"
    type = "TEXT"
    nullable = false

    # Tell Reshape how to backfill the new table from `users`
    # In `values`, we map a `users` row to a row in this new `account_users` table
    # `where` tells Reshape how to match rows in `users` with the new table
    [actions.up]
    table = "users"
    values = { user_id = "id", account_id = "account_id", role = "account_role" }
    where = "account_users.user_id = users.id"

# Remove `account_id` from `users` as this relation is now handled by the new `account_users` table
[[actions]]
type = "remove_column"
table = "users"
column = "account_id"

    # When `account_users` is updated, we write the `account_id` back to `users`
    [actions.down]
    table = "account_users"
    value = "account_users.account_id"
    where = "users.id = account_users.user_id"

# Remove `account_role` from `users` as this is now tracked for each account in the `account_users` table
[[actions]]
type = "remove_column"
table = "users"
column = "account_role"

    # When `account_users` is updated, we write the role back to `users`
    [actions.down]
    table = "account_users"
    value = "account_users.role"
    where = "users.id = account_users.user_id"
During your deploy of this migration and your application changes, Reshape will set up triggers and views to make sure both the old and new schema are accessible simultaneously. This is important because during the deploy of your new application, there will be some time where both the old and new application version are running and interacting with the database at the same time. When your old application makes a write to the old account_id and account_role columns, Reshape will automatically make the corresponding changes to account_users, and vice versa if your new application makes changes. On top of that, Reshape will automatically run a backfill to ensure account_users is fully populated, so once your new application rolls out, it can read from the table and be certain all the data it expects will be there.
I’d be remiss not to mention that many application don’t need zero-downtime schema migrations. In many cases, it’s completely fine to bring your application down fully to make schema changes, in which case you wouldn’t need something like Reshape! I do believe Reshape becomes even more powerful for more complex migrations like the one above though. Making simple changes to your database might only take a few seconds of downtime, but running a backfill can take much longer depending on the size of your data.
If you’d like to chat about Reshape or schema migrations in general, please reach out! You might also be interested in a new project I’m working on which takes these ideas to the next level: ReshapeDB, an all new database built from the ground up to make complex schema and data migrations simple and safe. Reach out if you’d like to know more about that!
Renaming a field in your database is perhaps the most fundamental schema change, yet doing so safely is really hard with most databases. Take MongoDB for example. Its schemaless nature means that renaming a field must be done with an update for each record in the database. During this migration, some of your records will have the new name and some the old, and your application will need to be updated to handle them both, unless you simply take your application down for maintenance until all records have been updated.
Show full content
Renaming a field in your database is perhaps the most fundamental schema change, yet doing so safely is really hard with most databases. Take MongoDB for example. Its schemaless nature means that renaming a field must be done with an update for each record in the database. During this migration, some of your records will have the new name and some the old, and your application will need to be updated to handle them both, unless you simply take your application down for maintenance until all records have been updated.
Databases with stricter schemas, like Postgres, technically makes this easier. This simple SQL operation does the job:
ALTER TABLE user
RENAME COLUMN full_name TO name;
Even though your database will make the change almost immediately without having to update any rows, it’s not that easy. The old version of your application expects the old name and will start to error the moment the change has been made. The new version of your application expects the new name, and hence will error until the change has been made. This means a gradual rollout is not possible, you will have to take your application entirely offline, make the change and then rollout the new version, resulting in some downtime.
Achieving a zero-downtime rename requires a much more complicated procedure:
Add a new column with the new name
Update your application to write to both the new and old column for every insert and update
Write, run and wait on a backfill script which copies all data from the old to the new column
Update your application to read from the new field and stop writing to the old one
Finally remove the field with the old name
This means several separate deploys, a ton of manual work and leaves plenty of room for human errors, just to rename a field! If you are using Postgres there is a nice trick around this though by using views, which I’ve written about previously. I even built Reshape on this technique which although powerful, is still greatly limited by the design of Postgres.
After building Reshape and going deep on the subject, I’ve become convinced that our databases can and should help us make any kind of change–from a simple rename to complex data migrations–simple, safe and zero-downtime. Renaming a field in your database shouldn’t be any harder than renaming a variable in your code! To try and make this a reality, I’m building ReshapeDB. What does a rename look like in ReshapeDB? It’s as simple as updating the declarative schema file.
model "User" {
-   field "full_name" {
+   field "name" {
        type = "string"
    }
}
Once you apply this change to your database, ReshapeDB will not immediately rename the field but will instead support both the old and the new name for the field. This works because each client tells ReshapeDB what schema it expects, so for the existing deployed version of your application, it will keep accepting and using full_name, and for the new version you are rolling out, it will expect name. This way, you can gradually roll out your application changes without any downtime, and if something breaks, you can roll back in seconds.
Of course, I’m not just aiming to solve the renaming problem with ReshapeDB. By building a database from the ground up with change in mind, we can greatly simplify all kinds of schema and data migrations that would normally require a ton of manual, error-prone work. I’ll be writing more about those capabilities soon but if you’d like to know more or just chat about the subject, please reach out!
I’ve been working on a tool called Reshape which aims to automate zero-downtime schema migrations for Postgres. The main thing I aspire for with Reshape is a great developer experience, hopefully as good as other schema migration tools which don’t do zero-downtime. Because of the way Reshape works, it requires some slight changes to your application so lately I’ve been focused on improving that experience with helper libraries.
Show full content
I’ve been working on a tool called Reshape which aims to automate zero-downtime schema migrations for Postgres. The main thing I aspire for with Reshape is a great developer experience, hopefully as good as other schema migration tools which don’t do zero-downtime. Because of the way Reshape works, it requires some slight changes to your application so lately I’ve been focused on improving that experience with helper libraries.
In this post, we’ll see how easily Reshape can be integrated with Rails and the great advantages it provides compared to standard Active Record migrations. If you’d like an introduction to Reshape first, I recommend reading the introductory blog post.
Setting up a Rails project
To illustrate Rails and Reshape together, we will set up a simple blog by loosely following the official getting started guide. First off, we need to create a new Rails project:
$ rails new reshape_test --database=postgresql
$ cd reshape_test
$ bin/rails server
Next, we create a controller to handle our blog articles. To keep things simple, we’ll only support listing articles and creating them.
$ bin/rails generate controller Articles index new create --skip-routes
And then we add some routes to config/routes.rb for our new controller as well:
Rails.application.routes.draw do
  get "/articles", to: "articles#index"
  get "/articles/new", to: "articles#new"
  post "/articles", to: "articles#create"
end
Creating a model and our first migration
Here comes the fun part! We’ll need a model for our articles and if we tell Rails to generate one for us, it will also generate a Active Record migration. We want to use Reshape for migrations though so let’s create a model without a migration to start:
$ bin/rails generate model Article title:string body:text --no-migration
Now we need to create a corresponding Reshape migration to set up the table for our articles. We’ll store our migration files in migrations/ and prefix the file names with incrementing numbers to keep them sorted:
# migrations/1_create_articles_table.toml

[[actions]]
type = "create_table"
name = "articles"
primary_key = ["id"]

	[[actions.columns]]
	name = "id"
	type = "INTEGER"
	generated = "ALWAYS AS IDENTITY"

	[[actions.columns]]
	name = "title"
	type = "TEXT"

	[[actions.columns]]
	name = "body"
	type = "TEXT"

	[[actions.columns]]
	name = "created_at"
	type = "TIMESTAMP WITHOUT TIMEZONE"

	[[actions.columns]]
	name = "updated_at"
	type = "TIMESTAMP WITHOUT TIMEZONE"
Make sure you have Reshape installed and then run the following to apply the migration.
$ reshape migration start --complete
And now for the secret sauce. Reshape works by encapsulating your tables in views and having your application interacting with these views instead. During a migration, Reshape will ensure both the old and new schema are available at the same time through different views, allowing you to roll out your application gradually with no downtime. This requires that the application specifies which schema it supports using what’s called a search path, which is easily done with the Ruby helper library. Let’s add it to our Gemfile:
gem "reshape_helper", "~> 0.2.0"
And then we update our config/database.yml to set the correct search path:
Next, we want to actually make use of our new model. We need to add a few things to our controller:
# app/controllers/articles_controller.rb

class ArticlesController < ApplicationController
  def index
    @articles = Article.all
  end

  def new
    @article = Article.new
  end

  def create
    @article = Article.new(article_params)

    if @article.save
      redirect_to @article
    else
      render :new, status: :unprocessable_entity
    end
  end

  private
    def article_params
      params.require(:article).permit(:title, :body)
    end
end
This leaves us with a fully functional, albeit slightly bare-bones, blog, ready to be deployed for the world to enjoy!
When things inevitably change
With the blog deployed, it’s about time we start bikeshedding code quality. After an intense nitpicking session, we decide that we need to rename the title column to heading. With normal Active Record migrations this would be hard to do without downtime. Because our currently deployed application expects it to be called title, there will inevitably be some downtime when rolling out the new one. If we want to avoid that, we would need to: create a new column with the new name, backfill all the values, write to both columns for new articles, deploy, stop writing to both columns, and then finally remove the old column.
Phew, that’s a lot of work! Luckily we are using Reshape which will automate it all for us. We just need to create a new migration:
# migrations/2_rename_title_to_heading.toml

[[actions]]
type = "alter_column"
table = "articles"
column = "title"

	[actions.changes]
	name = "heading"
And update our application to use the new name for the field. In our case we only need to update the view:
Now we are ready to deploy which means doing the following:
Run reshape migration start to apply the new migrations
Gradually roll out our application changes. Both the old and the new schema are available at the same time so there will be no downtime!
Once fully deployed, run reshape migration complete to remove the old schema
That’s it! We managed to change the name of a table column and update our application with a single deployment and no downtime. No manual work was necessary, Reshape handled all the tricky and annoying bits.
Wrapping up
Changing the name of a column is one of the simpler schema changes one could make, but Reshape supports a whole lot more, check out the documentation for some examples. Reshape also doesn’t need to be added to a project from the start, it can just as easily be added to an existing Rails application with no downtime.
Schema changes are a natural part of all development involving databases but the developer experience around them is abysmal. At least for me, improving the experience is a great boon for productivity. If you’d like to chat about Reshape or schema migrations in general, feel free to reach out!
About six months back, I wrote a post on how to use views in Postgres to encapsulate tables and create a versioned interface to a database. At the end of the post, I mentioned working on a tool to automate zero-downtime migrations using this technique and I’ve finally released something, albeit experimental. It’s open-source and called Reshape.
Show full content
About six months back, I wrote a post on how to use views in Postgres to encapsulate tables and create a versioned interface to a database. At the end of the post, I mentioned working on a tool to automate zero-downtime migrations using this technique and I’ve finally released something, albeit experimental. It’s open-source and called Reshape.
Like many other migration tools, Reshape is a CLI tool which works with files that define changes to the database schema. The big difference is that Reshape makes non-destructive changes, ensuring that clients that still expect the old schema continue to work. This means that the database can be accessed in parallel using the old and the new schema, and application and database changes can be deployed gradually without any downtime.
That’s just about enough talk, let’s see an example!
Creating a table
Say we need a table called users with two columns: id (auto-generated) and name which contains the full name of the user. With Reshape, we can create that table with a migration like this one:
[[actions]]
type = "create_table"
name = "users"

    [[actions.columns]]
    name = "id"
    type = "INTEGER"
    generated = "ALWAYS AS IDENTITY"

    [[actions.columns]]
    name = "name"
    type = "TEXT"
To apply it, we run reshape migrate. Reshape will create the table but it will also create a Postgres schema for the migration. Inside of this schema, it will create a view which maps directly to the table. Our application will not be interacting with the actual table, instead it will perform all queries and updates against the view!
This also means that the application needs to tell the database which schema it wants to use, which can be done by setting the search_path. We only need to do this once when the application connects to the database, and Reshape can generate the query for us using reshape generate-schema-query. Thanks to this, our application can make queries just as if the schema didn’t exist.
Renaming a column
Our application is now running nicely, creating, reading and updating users, but then we realize something. name is a bad name for our column, it really should be called full_name. How are we supposed to change the name of the column without stopping our application and causing some downtime? That’s where Reshape helps.
We’ll create a new migration to change the name:
[[actions]]
type = "alter_column"
table = "users"
column = "name"

    [actions.changes]
    name = "full_name"
and then we run reshape migrate again. What happens now is that Reshape doesn’t actually change the name of the column, instead it creates a new schema and new views for the migration and changes the name inside the view. This means that the currently deployed application will continue to work and we can deploy our new application in parallel.
Once we are done deploying and have stopped the old application instances, we finish up the migration by running reshape complete. This will perform the actual rename of the column and remove any old schemas. If the deployment were to fail, we can run reshape abort which will non-destructively reset any changes.
Replacing one column with two
Changing the name of a column is a very basic change but what if we need to make more complex changes, like altering columms or adding new ones? Reshape automates that as well.
To illustrate this, let’s say we no longer want to store the full name but instead we want to store it separately as first_name and last_name (which is a bad idea). Reshape makes this as simple as a single migration which creates two new columns and removes the old one. The trick is that we specify how to transform between the new and old schema using up and down.
[[actions]]
type = "add_column"
table = "users"

# Extract the first name from the existing full_name column

# This can be any valid SQL expression

up = "(STRING_TO_ARRAY(full_name, ' '))[1]"

    [actions.column]
    name = "first_name"
    type = "TEXT"

[[actions]]
type = "add_column"
table = "users"

# Extract the last name from the existing full_name column

up = "(STRING_TO_ARRAY(full_name, ' '))[2]"

    [actions.column]
    name = "last_name"
    type = "TEXT"

[[actions]]
type = "remove_column"
table = "users"
column = "full_name"

# Reconstruct column by concatenating first and last name

down = "first_name || ' ' || last_name"
If we run reshape migrate now, Reshape will once again not actually remove the full_name column. Instead, it will automatically set up triggers that transform between first_name and last_name columns and full_name depending on if the data is changed using the old or new schema. For any existing rows, the new columns will be automatically populated without locking up the database. Locking up the database for too long could also cause downtime, so Reshape makes sure that doesn’t happen.
Once again, we can deploy our new application which expects first_name and last_name in parallel with the old version. Once the deployment is finished, we run reshape complete which will delete full_name for real and remove the triggers.
In conclusion
Reshape is still experimental and a proof-of-concept but there are some potential features I’m excited about. One is migrations involving changes to multiple tables. For example, splitting up an array column into a separate table. Thanks to the amazing support for transactions, triggers and views in Postgres, there are a lot of possibilities.
Check out the project on Github and if you’d like to chat about Reshape, please reach out!
Schema migrations are tricky, especially when planned downtime is not an option. Changes need to be carefully designed to stay backwards compatible so that both the new and old schema are available simultaneously. They must also be designed to not interfere with any other queries, for example by locking up tables. Plenty has been written on how to this right but one pattern I haven’t seen mentioned often is using views.
Show full content
Schema migrations are tricky, especially when planned downtime is not an option. Changes need to be carefully designed to stay backwards compatible so that both the new and old schema are available simultaneously. They must also be designed to not interfere with any other queries, for example by locking up tables. Plenty has been written on how to this right but one pattern I haven’t seen mentioned often is using views.
The idea is to encapsulate the data in the database. Clients will not query the actual tables storing data, but instead query views that map directly to the underlying table. Each version of the schema will have a set of views that never change. This way we can perform changes to the underlying table whilst maintaing a stable schema for clients.
The reason this technique isn’t commonly referenced might just be that it’s dumb, but that shouldn’t stop us from exploring it!
Renaming a column
Let’s test this pattern out with a deceptively simple migration: renaming a column. Say we have a non-nilable column named id which we want to rename to user_id. The recommended way of achieving this without downtime is to:
Add a new nillable column called user_id
Add triggers that transfer any saved data from user_id to id and vice versa
Backfill the new column with values from the old one
Set user_id to be non-nilable
Once no clients use the old id column, remove it
Phew, that’s quite the process! How can views and encapsulation help us here? We start by setting up our table and inserting some data. Remember that this table will never be queried directly.
CREATE TABLE users (
	id SERIAL PRIMARY KEY,
	email TEXT,
	name TEXT
);

INSERT INTO users (email, name) VALUES
	('jerry.seinfeld@aol.com', 'Jerry Seinfeld'),
	('george.constanza@aol.com', 'George Costanza');
Now we need some views so that we can actually retrieve this data. A nice trick is to use Postgres schemas to hold our views. Every version of our schema will get its own Postgres schema and they will contain one view for each underlying table. If we call our starting schema “A”, we can set it up like:
CREATE SCHEMA A;

CREATE VIEW A.users AS
	SELECT id, email, name
	FROM public.users -- public is the default schema where the table was created
Now all the clients have to do is specify which version of the schema they want during queries. To keep the application code agnostic of migrations, we can set the search path when connecting:
SET search_path TO A;

-- users will now refer to A.users
SELECT id, email, name FROM users;

-- Results:
-- +----+-------------------------+-----------------+
-- | id |          email          |      name       |
-- +----+-------------------------+-----------------+
-- |  1 | jerry.seinfeld@aol.com  | Jerry Seinfeld  |
-- |  2 | george.costanza@aol.com | George Costanza |
-- +----+-------------------------+-----------------+
Now for the grand finale, how do we rename the id column? If we perform a regular rename, Postgres will update the existing A.users view to reference the new name while still calling it id, keeping the change backwards compatible. We also need to introduce a new version of our schema which uses the new user_id name, let’s call it “B”:
ALTER TABLE public.users
RENAME COLUMN id TO user_id;

CREATE SCHEMA B;
CREATE VIEW B.users AS
	SELECT user_id, email, name
	FROM public.users;
The rename is done! No downtime, no extra column, no triggers, no backfill. Just good old encapsulation.
-- Older clients can still access the old column name
SET search_path TO A;
SELECT id, email, name FROM users;

-- Results:
-- +----+-------------------------+-----------------+
-- | id |          email          |      name       |
-- +----+-------------------------+-----------------+
-- |  1 | jerry.seinfeld@aol.com  | Jerry Seinfeld  |
-- |  2 | george.costanza@aol.com | George Costanza |
-- +----+-------------------------+-----------------+


-- New clients just have to update their search path
SET search_path TO B;
SELECT user_id, email, name FROM users;

-- Results:
-- +---------+-------------------------+-----------------+
-- | user_id |          email          |      name       |
-- +---------+-------------------------+-----------------+
-- |       1 | jerry.seinfeld@aol.com  | Jerry Seinfeld  |
-- |       2 | george.costanza@aol.com | George Costanza |
-- +---------+-------------------------+-----------------+
Wrapping things up
Renaming a column is admittedly the simplest possible migration and throwing in things like foreign keys and indices will invariably complicate things. Hopefully this view-encapsulation technique will be helpful in more complex scenarios as well. Setting up a clear, versioned interface to the database can help keep application code simpler by keeping out migration-specific implementation details.
I’m currently working on a tool that aims to make zero-downtime schema migrations effortless for developers. If you think this sounds interesting, then please shoot me an email! If you’d like to discuss this article or just have a chat, then feel free to reach out as well.
The decorator pattern is a convenient way of extending functionality with minimal changes to existing code. The basic premise is to create a new type (the decorator) which wraps an existing one. Our decorator should implement the same interface functions as the wrapped type and forward function calls to the wrapped object with some extra functionality. Because the decorator implements the same interfaces as the type it wraps they are interchangeable.
Show full content
The decorator pattern is a convenient way of extending functionality with minimal changes to existing code. The basic premise is to create a new type (the decorator) which wraps an existing one. Our decorator should implement the same interface functions as the wrapped type and forward function calls to the wrapped object with some extra functionality. Because the decorator implements the same interfaces as the type it wraps they are interchangeable.
In some languages creating a decorator type entails a bit of boilerplate. In Java for example one would have to declare an all new class with an instance variable for the wrapped object. Every interface function would then have to be manually overriden and forwarded to the decorated object, leaving room for human error. Go has a nice little feature which makes this process much less manual, embedded structs. Let’s try it out with a simple example.
Adding caching to an API client
Say we have a simple client for fetching and creating users with an external API. A basic implementation could look something like this:
1
2
3
4
5
6
7
8
9
10
11
package api

type HTTPClient struct {}

func (client HTTPClient) GetUsers() []string {
  // Fetch all users from API and return their usernames.
}

func (client HTTPClient) CreateUser(username string) {
  // Add a new user with the specified username.
}
Now say we want to make our client more efficient by caching the results of GetUsers to lower the amount of API calls. One way to do this could be to add the caching to our HTTPClient but that would make our type responsible for both API requests and caching, two pretty separate concerns. Another way would be to add caching wherever the HTTP client is used but that could possibly mean a lot of code changes in many different places.
A third is way is to use the decorator pattern and create a new type which decorates HTTPClient. The new type would be interchangeable with the existing client which would minimize the need for changes to existing code. It would also only handle the actual caching, giving us a clear separation of concerns. For this we’ll need a Client interface which can be used in place of HTTPClient.
1
2
3
4
5
6
package api

type Client interface {
  GetUsers() []string
  CreateUser(string)
}
Next let’s create a new struct, CachedHTTPClient, which embedsHTTPClient.
1
2
3
4
5
package api

type CachedHTTPClient struct {
  HTTPClient
}
That was easy enough. Does this really do anything? Yes, it does! This embedding will add a field to CachedHTTPClient with an HTTPClient object. Not only that it will also automatically get all the exported functions from HTTPClient which will be forwarded to the wrapped object. Given this our new struct will also implement our Client interface and CachedHTTPClient is ready to be used, acting exactly as the object it wraps.
Our final step is to make GetUsers use a cache. We can take control of GetUsers by simply implementing it ourselves. In that case we need to manually invoke our wrapped objects function. We’ll use a hypothetical cache.Cache object to handle our caching needs.
1
2
3
4
5
6
7
8
9
10
11
12
13
14
15
16
17
18
19
package api

type CachedHTTPClient struct {
  HTTPClient
  usersCache cache.Cache
}

func (client CachedHTTPClient) GetUsers() []string {
  // Check if there are any cached users.
  cachedUsers, hasCache := client.usersCache.Get()
  if hasCache {
    return cachedUsers
  }

  // If there are no cached users we'll fetch them from the API and save to cache.
  users := client.HTTPClient.GetUsers()
  client.usersCache.Set(users)
  return users
}
Notice that we never have to manually define CreateUser if we don’t want to decorate it. This reduces the amount of boilerplate and makes our CachedHTTPClient implementation more focused on its main task, caching. The effect becomes even greater with more exported functions on the decorated object.
It’s worth noting that there’s a caveat to using embedded structs. Embedding HTTPClient will add a new exported field, making it possible to bypass the decorator and invoke the wrapped object directly using cachedClient.HTTPClient.GetUsers(). Preferably the wrapped object should not be exported but to achieve that we would have to do without the embedding and do the manual function forwarding, hence there is definitely a trade-off to using this technique.
Apple recently open-sourced FoundationDB, two years after acquiring the company and depriving the world of some promising technology. FoundationDB is a distributed key-value store featuring ACID transactions, painless scaling and easy fault tolerance, all tested with ridiculous thoroughness. In short, a seriously impressive feat of engineering. Before the acquisition its creators often touted the concept of “layers”, meaning stateless programs which add new features to the otherwise simple database. A SQL layer could make FoundationDB behave like a relational database while an AMQP layer could make it function as a message broker.
Show full content
Apple recently open-sourced FoundationDB, two years after acquiring the company and depriving the world of some promising technology. FoundationDB is a distributed key-value store featuring ACID transactions, painless scaling and easy fault tolerance, all tested with ridiculous thoroughness. In short, a seriously impressive feat of engineering. Before the acquisition its creators often touted the concept of “layers”, meaning stateless programs which add new features to the otherwise simple database. A SQL layer could make FoundationDB behave like a relational database while an AMQP layer could make it function as a message broker.
In this post we’ll explore how to build a simple object store (like Amazon S3) as a stateless web server which persists data to FoundationDB. The final code is available on Github, some familiarity with Go is recommended to follow along!
Connecting and serving
We’ll be building our service in Go and if you want to follow along there are two dependencies you need to have installed. The first is the official FoundationDB Go bindings which can be installed by following the instructions here. We are also going to be using the Gin web framework so make sure you have that available as well. Let’s jump in!
The service we are building will be super simple and have only two features: uploading files and downloading them. Because all files will be persisted to FoundationDB it will be a breeze to scale this out to fit a huge amount of data with great redundancy and performance. Our first step is to set up a simple web server. Start by creating a directory for the project and adding a main.go file containing:
package main
import (
"bytes"
"github.com/apple/foundationdb/bindings/go/src/fdb"
"github.com/apple/foundationdb/bindings/go/src/fdb/tuple"
"github.com/gin-gonic/gin"
"io"
"strings"
)
func main() {
router := gin.Default()
router.GET("/object/*name", func(c *gin.Context) {
name := c.Param("name")
c.String(200, "Getting file with name %s", name)
})
router.POST("/object/*name", func(c *gin.Context) {
name := c.Param("name")
c.String(200, "Saving file with name %s", name)
})
router.Run()
}
This code can be run with go run main.go which starts a simple web server responding to GET and POST requests for our object endpoints. By defining the endpoints as /object/*name we allow names containing slashes such as path/to/image.png. Our store won’t have any notion of directories and hierarchy but this structure allows it to be simulated, similar to Amazon S3.
Saving to the database
Next up: connecting to FoundationDB and saving data. We’ll use a single FDB connection so let’s add a variable at the start of our file to hold it. In the main function a connection will be established and assigned to the variable:
1
2
3
4
5
6
7
8
9
10
11
// ...

var db fdb.Database

func main() {
    // An API version needs to be specified
    fdb.MustAPIVersion(510)
    db = fdb.MustOpenDefault()

    // ...
}
Gin exposes the convenient c.FormFile() to handle file uploads. This returns a file object which contents can be read using file.Open(). Add the following code to the POST endpoint:
1
2
3
4
5
6
7
8
9
10
// Content type will be needed to enable downloads later
contentType := c.PostForm("content_type")
file, err := c.FormFile("file")
if err != nil {
  c.AbortWithError(400, err)
  return
}

reader, _ := file.Open()
defer reader.Close()
With our file uploaded and ready we are all set to save it to our object store. We’ll add a function saveFile(name string, contentType string, reader io.Reader) which will read the data from reader (the file handle) and save it with name to the database. All keys and values in FoundationDB are simple byte strings but oftentimes we need to structure keys hierarchically. For this FoundationDB has the notion of a tuple layer allowing keys to be specified as tuples which later will be encoded to byte strings. Our data will be structured as (name, "content-type") and (name, "data").
When storing large blobs of data under a single key there are a few things to keep in mind. Most importantly, FoundationDB values are limited to 100kB and should be kept below 10kB for best performance. The documentation recommends splitting blob data over multiple keys which can be joined on retrieval and that is exactly how we will store our file contents. All interactions with FoundationDB are handled through atomic transactions therefore we add one to our saveFile.
1
2
3
db.Transact(func(tr fdb.Transaction) (ret interface{}, e error) {
    return
})
Using the reader we can step through the file contents incrementally with a buffer of the size we choose. By setting the buffer size to 10kB, Go can handle the data splitting previously mentioned.
db.Transact(func(tr fdb.Transaction) (ret interface{}, e error) {
// Allocate a 10kB buffer
buffer := make([]byte, 10000)
i := 0
for {
// Read data into buffer
_, err := reader.Read(buffer)
if err == io.EOF {
break
}
// Save buffer to key on the form (name, "data", index)
tr.Set(tuple.Tuple{name, "data", i}, buffer)
i++
}
// Save content type to object
tr.Set(tuple.Tuple{name, "content-type"}, []byte(contentType))
return
})
This code will step through the file contents 10kB at a time and save the data to individual keys. A simple counter is used to index the data, ensuring that the keys end up in the correct order. The final step is calling the save function from the post endpoint: saveFile(name, contentType, reader). Start the server again and try uploading a file with cURL (or my favorite, HTTPie). Don’t forget to pass content_type as well.
Reading and returning
Now that our data is safely stored in FoundationDB it’s time to get it back. We’ll start by adding a function getFile which takes an object name and returns the file data and content type. For this we define a simple File struct wrapping the content type and data.
1
2
3
4
5
6
7
8
type File struct {
    Data        []byte
    ContentType string
}

func getFile(name string) *File {
    return nil
}
Once again we want to interact with FoundationDB meaning we need to create a transaction. We’ll start by retrieving the content type and if it doesn’t exist we’ll assume there is no such file. To check if a key exists we can perform a nil check when retrieving its value, like this:
The actual file data is stored under the key (name, "data", index). What we want is to retrieve all the keys under (name, "data") and join them into a single byte array. This can be achieved with a prefix range where we specify a prefix tuple and then get a range to query which includes all subkeys. From this a slice of key-value pairs can be retrieved. Add the following code to the transaction:
1
2
3
start, end := tuple.Tuple{name, "data"}.FDBRangeKeys()
range := fdb.KeyRange{Begin: start, End: end}
kvSlice := tr.GetRange(range, fdb.RangeOptions{}).GetSliceOrPanic()
Our next step is joining all the values retrieved into a single buffer. Go’s standard library has a Buffer data type built in to the bytes package and it’s dead simple to use:
1
2
3
4
var b bytes.Buffer
for _, kv := range kvSlice {
    b.Write(kv.Value)
}
Put together we now have a function which can retrieve all the pieces from the database and put them back together into a file. Because the transaction returns a generic interface{} we need to cast back into a File. The resulting function should look like this:
func getFile(name string) *File {
file, _ := db.Transact(func(tr fdb.Transaction) (interface{}, error) {
contentType := tr.Get(tuple.Tuple{name, "content-type"}).MustGet()
if contentType == nil {
return nil, nil
}
// Retrieve the split data using a prefix query
start, end := tuple.Tuple{name, "data"}.FDBRangeKeys()
range := fdb.KeyRange{Begin: start, End: end}
kvSlice := tr.GetRange(range, fdb.RangeOptions{}).GetSliceOrPanic()
// Combine the retrieved file data into a buffer
var b bytes.Buffer
for _, kv := range kvSlice {
b.Write(kv.Value)
}
return &File{Data: b.Bytes(), ContentType: string(contentType)}, nil
})
if file == nil {
return nil
}
return file.(*File)
}
Finally we need to invoke getFile in our GET handler and return the file as a HTTP download, Gin makes this really easy to do. We’ll establish a file name for the download by splitting the file name (or “path”) by slashes and using the last part.
1
2
3
4
5
6
7
8
9
10
11
12
13
14
15
16
router.GET("/object/*name", func(c *gin.Context) {
    name := c.Param("name")
    file := getFile(name)

    if file == nil {
        c.AbortWithStatus(404)
        return
    }

    // Split file path by slash to get file name
    splitName := strings.Split(name, "/")

    c.Header("Content-Description", "File Transfer")
    c.Header("Content-Disposition", "attachment; filename="+splitName[len(splitName)-1])
    c.Data(200, file.ContentType, file.Data)
})
That’s it! Try uploading a file using your favorite HTTP client and then visit the same path in your browser. Your file should come right back like any regular download, only this time fetched from a distributed key-value store.
Final words
This is a very rudimentary implementation lacking a lot of necessary error handling and validation. It also has some serious limitations, for example FoundationDB limits transaction sizes to 10MB hence files over that size won’t be saved.
I do hope this serves as a proof of concept for the power of stateless layers coupled with FoundationDB. Stateless services are easy to write, reason about, and deploy. By leaving complex things involving persistence, scaling, and fault tolerance to stable software such as FoundationDB, building complex services becomes a cakewalk. The prospects are exciting and I can’t wait to see what the open source community will put together.
Like many developers I constantly find myself taking up new programming languages. The learning process is often refreshing and challenging as a result of novelty and it has many times served as a relaxing break from work and studies. At the same time I’ve always associated this curiosity with shame. Instead of diving deeper into what I already know something new grabs my attention and drives me further from a pipe dream of deep knowledge. Lately my feelings have shifted and the shame that I once felt has turned into a feeling that learning new programming languages actually carries a lot of value.
Show full content
Like many developers I constantly find myself taking up new programming languages. The learning process is often refreshing and challenging as a result of novelty and it has many times served as a relaxing break from work and studies. At the same time I’ve always associated this curiosity with shame. Instead of diving deeper into what I already know something new grabs my attention and drives me further from a pipe dream of deep knowledge. Lately my feelings have shifted and the shame that I once felt has turned into a feeling that learning new programming languages actually carries a lot of value.
When I started my studies I found a lot of peers were quite shocked with how the courses constantly jumped between languages. Our programming 101 course was taught in Scala and then we immediately jumped to Java for the second course causing a bit of panic among the beginners. For people like myself with some prior experience it actually felt natural, our professors simply chose the language they deemed most appropriate for the subject. In the end, programming languages are merely tools independent of the real engineering we are being taught. Whilst I still believe in this separation, observing my beginner friends has made me reconsider my view on programming languages.
Every language was conceived for a reason, oftentimes introducing a fresh approach to a common problem. Matsumoto created Ruby because he was missing an easy-to-use, object-oriented language; Erlang was conceived to simplify the development of highly available and concurrent applications; Rust wants to bring safety and guarantees to systems programming and so forth. The most interesting aspect is how the languages are designed to solve their intended problems. Why do developers find Ruby easy to use? How does Erlang achieve such high availability and effortless concurrency? What properties does Rust have which lets it guarantee safety? When learning for example Erlang we are not just picking up a tool for building concurrent applications; we are learning about the actor model, message passing, and green threads. These underlying approaches are the truly valuable parts of the language, knowledge which usefulness extends far beyond Erlang itself.
To summarize, there is a great deal of thought and domain knowledge behind every programming language. Most languages were designed to address a need and every one brings novel approaches and solutions to problems their designers faced. When learning a new language we are taking part of this expertise behind every single design decision. By focusing on the motivation and story behind design patterns, learning a new language can become one of the most enjoyable and efficient ways of improving as an engineer.