GeistHaus
log in · sign up

Ziff Media Engineering - Medium

Part of Ziff Media Engineering - Medium

At ZMG, we know tech no longer simply drives culture in today’s hyper-connected world, tech is culture. Understanding and embracing tech has become essential to how we live, how we work, how we have fun, how we shop, how we learn, and finally how we connect with world around us. - Medium

stories primary
RetailMeNot GraphQL Federation
ziff-davisretailmenotgraphqlgraphql-federation
Show full content

Did you ever have to maintain multiple versions of a REST API because the change you needed to make would break existing clients? Does your native app have to call multiple REST endpoints to get all the data it needs? This blog post is about how we addressed these common problems using GraphQL and our transition to GraphQL Federation at RetailMeNot.

RetailMeNot, part of Ziff Media, Inc, makes everyday life more affordable for shoppers. We are a leading savings destination providing online and in-store coupons and cashback offers to our users. Today, we serve millions of monthly active users from our desktop, mobile web, native (iOS & Android) apps, and browser extension (Deal Finder™) experiences.

For the last 10 years, RetailMeNot’s engineering teams have built several highly performant, scalable, and efficient systems to bring savings data to our users through our experiences. And like many companies, RetailMeNot used REST APIs to serve the data. However, as the company and the systems grew, we started to experience problems like versioning, over-fetching, and under-fetching with REST APIs. For more details on the classic problems that arise from REST services and how GraphQL solves them, see this blog post. For an introduction to GraphQL, see this blog post.

How it started: A Monolithic Graph

In 2019, we took a step back to rethink where we are headed in terms of our tech stack and how to best serve future experiences. We decided to rewrite our native Android and iOS apps and the backend that supports them. In addition to this, we also built a brand new browser extension (Deal Finder™) and re-wrote several parts of our core website.

As we started to rebuild our native apps, we wanted to solve the above problems we faced with REST APIs. GraphQL seemed like a great solution for this.

Enter GraphQL. In our first iteration with GraphQL, we built a GraphQL monolith.

Monolith Graph

The GraphQL Monolith at RetailMeNot was a single GraphQL Server used by our Native Android, iOS, desktop, and mobile web clients. A single team (Graph API team) was responsible for “gatekeeping” and defining standards for this new RetailMeNot data graph.

To allow the client teams to develop and iterate faster, they were given autonomy to contribute to this monolith and expand the graph based on their needs. This, however, soon overwhelmed the Graph API team, and they became a bottleneck for getting new changes published to the graph. It was clear that we needed a new solution where the client teams could have the autonomy to expand the unified graph at their own pace and not be limited by a centralized team.

Escaping the Monolith with GraphQL Federation:

Enter GraphQL Federation.

The premise behind Federation is that each subgraph team is responsible for building and maintaining their portion of the unified graph schema. This allows the subgraph teams to iterate faster as they are decoupled from the rest of the graph.

Setting up a reliable and highly scalable federated GraphQL architecture is not easy. There are several things to consider:

  1. How to prevent a subgraph from introducing a breaking change to the graph?
  2. How to make sure the GraphQL gateway always reflects the most up-to-date schema?
  3. How to monitor the health and performance of all the queries that are served from the graph?

To help us address these concerns, we partnered with Apollo GraphQL and leveraged their Managed Federation architecture.

In order to maintain backward compatibility and ensure zero downtime during the migration from a monolithic architecture to a federated architecture, it was very critical for us to adopt an “incremental migration” approach.

Here are the incremental steps that we took for this migration:

  1. First, we transformed the existing GraphQL schema in the monolithic service to support federation specifications. This allowed us to support both the federation spec and schema stitching in the same service. Here are the open-source libraries that provide support for federation spec.
  2. We then set up a new Gateway service that simply forwarded the traffic to the monolithic service.
  3. Using a weighted routing technique, we then controlled the amount of traffic that would hit the new Gateway service vs the monolithic service. Once we were confident with the changes and validations in our lower environments (stage/pre-production), we then switched over to 100% of our traffic going through the Gateway service in the production. At this point, our monolithic service was completely behind the gateway.
  4. Finally, we started to break apart the schema in our monolithic service (which now became a subgraph) and migrated the entities over to more cohesive and smaller subgraph services.
How it’s going: A Federated Graph

Here is what the GraphQL architecture at RetailMeNot looks like today:

Federated Graph

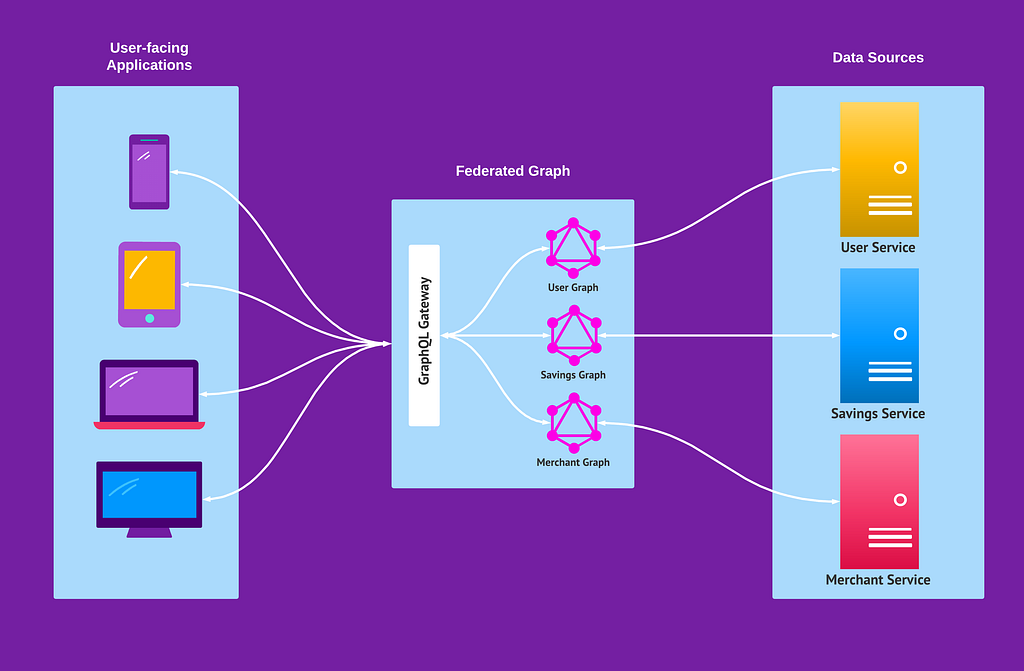
Currently, our unified data graph at RetailMeNot consists of several fully federated and highly cohesive subgraph services that are being actively worked on by different teams independently.

Adoption and lessons learned:

We had a very quick adoption of the new federated architecture internally. Multiple teams wanted to join the new federated graph immediately after it was available. This was a huge win for the Graph API team. However, as we began to incorporate new subgraph services across various teams into the federated graph, it became a bit of a wild west with subgraph design and maintenance inconsistencies. Here are some of the lessons we learned from our early adopting teams:

  • Use a standard naming convention
  • Standardize a schema review process
  • Be very intentional about field nullability
  • Document the schema definition
  • Always prioritize clients’ needs

Graph Stewardship:

To address the above lessons we learned, we set up a “virtual” guild. This virtual guild consists of one member from each subgraph team. The main responsibilities of this guild are:

  • Setting up best practices for RetailMeNot’s unified graph and enforcing them
  • Reviewing schema changes from each sub-graph and providing feedback
  • Helping onboard new subgraph teams
  • Sharing what they learn with broader teams at RetailMeNot and drive GraphQL adoption across the company

So, how did moving to a federated architecture help us?

  • Faster product iteration: The user-facing application teams can move much faster as the bottleneck from a single “GraphQL API team” is removed.
  • Concern-based separation: Moving to a federated architecture enabled different teams to work on different product areas without affecting/blocking each other while contributing to a single graph.
  • Similar tech-stack across services: Moving to a federated architecture helped us standardize the tech-stack across multiple services at RetailMeNot. This also led to high collaboration across teams.
  • Developer experience: With standardized tooling and a common tech stack, developer experience has been improved a lot.

Here are some of the responses to the same question above from a few members of our organization:

“Federation enabled our teams to iterate over the deliverables with minimal dependencies. Teams have clear ownership and this has empowered the product and UX teams to iterate over new features, evaluate the market reach, and keep customers happy.”
“By utilizing Federated GraphQL, we have been able to improve the cohesion of our backend services and hide the migration of subgraph responsibilities from our client applications.”
“Federation allowed our teams to iterate on features faster and more independently, while at the same time pushing us to improve cross-team communication and collaboration in order to effectively manage the unified graph.”
“At an org level, GraphQL and federation specifically forced us to come to a mutual understanding of the data types and terminology that are used across our different services. Because of this, we were able to have meaningful conversations more quickly.”

Finally,

RetailMeNot + GraphQL Federation = Greatness

A big thanks to everyone who helped me put this blog together. Special thanks to the members of the GraphQL guild at RetailMeNot, the teams at Apollo GraphQL, and the broader GraphQL community for helping us reach where we are.

Interested in solving complex problems at scale? Check out our careers page or reach out directly if you have any questions.

About Ziff Media, Inc:

Ziff Media, Inc. is a portfolio of leading digital properties in tech, culture, and shopping. Our brands include Mashable, PCMag, RetailMeNot, Offers.com, BlackFriday.com, BestBlackFriday.com, ExtremeTech, AskMen, and TechBargains.


RetailMeNot 💜 GraphQL Federation was originally published in Ziff Media Engineering on Medium, where people are continuing the conversation by highlighting and responding to this story.

https://medium.com/p/3bb36dac5aaa
Extensions
Decreasing Applitools Android Boilerplate with Kotlin and JUnit
junitkotlinapplitoolsandroid
Show full content
Background

At RetailMeNot, we are excited by the promise of automating visual regression tests with Applitools. In this post, I’ll show how to make writing Applitools tests for Android a cinch. We’ll start with the official integration guide recommendations and then use JUnit and Kotlin features to make our tests concise and maintainable. This post assumes the reader is familiar with Applitools visual testing.

Our Starting Point: lots of boilerplate code

Applitools’s official integration guide for Espresso recommends a test that looks approximately like the below code block. I’ll explain each line of this snippet later in the article. But for now, notice the excessive setup code and cleanup code that’s getting in the way of our actual test code. This boilerplate would need to be copied for every test.

The Solution: a much simpler test

We can reduce the boilerplate to achieve the following test. By stripping away the setup and cleanup as much as possible, we are left with the kernel of the test. In doing so, the purpose of the test is much easier to comprehend.

ApplitoolsHelper, on line 2, has encapsulated the setup and cleanup. This will make long-term maintenance easier, because when the Applitools APIs change, we’ll only need to update them in the one location.

The Required Steps to Run an Applitools Test

Before diving into the helper code that enables our concise test, let’s review the steps involved in an Applitools visual test:

val eyes = Eyes()
eyes.apiKey = "YOUR_API_KEY"
eyes.appName = "YOUR_APP_NAME"

We must initialize the Applitools SDK and set our API key and app name. This is going to be the same for every test in our suite. We will extract this code into a JUnit test rule.

eyes.open("TEST_NAME");

This starts the Applitools test session. This must be called with a unique test name for each test. We will use a lambda expression, explained below, to hide this from being called in the middle of our test.

eyes.checkWindow("SNAPSHOT_TAG");

This is the core of our test. It takes the visual snapshot of our app’s UI and associates it to the snapshot tag, a string identifier. This is the only part of the test that we’ll leave unchanged.

eyes.close();

This ends the test and kicks off the diffing of our snapshot against the historical snapshot. If there’s a visual regression, our test will fail here. This step will also be hidden by our use of a lambda expression.

try { ... }
finally {
eyes.abortIfNotClosed()
}

An exception in our test would cause the function to exit before the Applitools test session could be closed. Therefore, we must wrap the session in a try block and then perform this cleanup step in the finally block. It, too, will be a hidden implementation detail through the use of the lambda expression.

Introducing Our Helper File

So what’s going on here? In ApplitoolsHelper.kt, we've created a custom JUnit test rule to handle all setup and cleanup. JUnit test rules provide useful components, accessible to our tests, whose lifecycles span only the execution of each test. In this case, ApplitoolsHelper creates a brand new, fully configured Eyes instance for each test.

ApplitoolsHelper also defines a runTest function, which accepts the Applitools test name and a lambda expression. runTest will handle opening and closing the Applitools test session and invoke the lambda within the try block. The lambda expression, which takes an Eyes parameter, runs the actual test code. This can be seen in ConciseTest.kt line 7, where we pass in the test code as a trailing lambda.

Summary

In this post, we have used the Test Rule feature of JUnit and the lambda expression feature of Kotlin to separate setup from test code. Doing so makes our lives easier, because our tests become less burdensome to read, write, and maintain.


Decreasing Applitools Android Boilerplate with Kotlin and JUnit was originally published in Ziff Media Engineering on Medium, where people are continuing the conversation by highlighting and responding to this story.

https://medium.com/p/46c61b5e10ce
Extensions
Treat Testing Pain with a Healthy Dose of Test Strategy
testing
Show full content

We live in a day and age where consumers cannot access medication for their ailment because of cost. We are aware of the anecdotes related to delaying treatment. In the same way, some engineering teams are stuck with projects which are in an unhealthy testing state. The team goes on sprint after sprint with the situation getting worse, not better. In this article, I will introduce a low-cost tool to enable you to diagnose your situation and put together a treatment plan.

Testing pain

It’s a sad situation, but I think we’ve all been in the place where testing on our project is a pain.

“belchonock” © 123RF.com

It’s a project where no one took the time to set up unit testing. Or the unit test framework exists and no one bothered to add unit tests. There are unit tests, but no integration tests. Or there is no support for the types of integration tests you want to write. The tests are flaky. They take too long. The tests are difficult to maintain or understand. The tests don’t provide value and were added to hit a random test coverage number. After all the automated tests pass, you still have this nagging doubt about releasing the latest version to the public.

The pain points I have called out above are not exhaustive. We can relate to these pain points, but why don’t we fix them?

We know ignoring a medical problem is not a good idea. It’s not a good idea to ignore your testing pain. But choosing to tackle your testing problems can seem like a daunting task. A tool that I have found helpful to start dealing with my testing pain is to develop a test strategy.

Dejan Bozic” © 123RF.com

Develop your Test Strategy

A strategy is “A plan of action or policy designed to achieve a long-term or overall aim.” (Definition of strategy in English. https://www.lexico.com/en/definition/strategy) A test strategy is a plan of action or policy designed to achieve a long-term testing aim.

To develop a test strategy, start answering the following questions.

What are the testing pain points?

If you have never taken the time to identify the testing pain that you are experiencing, that is a great place to start. A prescription is very focused on the treatment of a specific ailment. Similarly, develop a test strategy to deal with your immediate testing pain. The first step is being clear about what is painful. In this exercise, make sure you go beyond the symptoms. To identify test strategies that last and are effective, we need to get to the root of the problem.

What?

Maybe your issues have to do with being clear about what needs to be tested. Identify your key features that need testing.

  • What are the things you want to have confidence before you release your project? User success scenarios? User error scenarios? Likely error states? Unlikely error states?
  • What is your risk tolerance?
  • What is in the scope of testing?
  • What is out of scope?

Who?

Maybe your issues have to do with being clear about who is responsible for the testing. Identify who is responsible for different parts of the testing.

  • Who tests?
  • Who develops the tests?
  • Who runs the tests?
  • Who looks at the test failures?

How?

Maybe your issues have to do with how your project is tested. Figure out how you want to test the project.

  • How many layers of tests that you will have? Unit tests? Integration tests? End to end tests? Smoke tests?
  • How will you test your analytics?
  • How will you test your integration with that upstream API?
  • How will you test your dependency on the database?
  • How will you test that the user interface conforms to user experience designs?
  • How will you test different error scenarios?
  • Do you use hardcoded data or generated data?
  • Do you mock or depend on live services?

Where?

Maybe your issues have to do with where your project is tested. Find out where the tests are running and if that is where you want them to run.

  • Do they run locally?
  • Do they run in a test environment?
  • A staging environment?
  • A QA environment?
  • In production?

Maybe your issues have to do with where your tests are located. Identify the best location for the different types of tests.

  • Do they live with the production code?
  • Do they live within the QA test repo?
  • Do they have their own separate repo?
  • Is it ok that someone has them stored in a directory on their workstation?

When?

Maybe your issues have to do with when the tests are developed. Identify when different tests are expected to be developed.

  • Do tests need to be written before you develop code?
  • Do you write tests after you develop the code being tested?
  • Do you need to push unit tests with your code?
  • Do you need to push integration tests with your code?
  • Do you add tests after you push your code?
  • When do the end to end tests get updated?
  • When do the smoke tests get updated?

Maybe your issues have to do with when tests are run. Identify the times for them to run.

  • Do you block pushing a commit until the tests run?
  • Do you run the tests before deploying to an environment?

Discuss your test strategy

After you answer the questions you think need answering, have a discussion as a team and get agreement on the test strategy. We found the process of debate and discussion is very beneficial to the strategy, the team and the project.

Implement your test strategy

Once you have your first version of the test strategy, start applying it. There are many techniques for deciding what to do first. Focus on addressing the biggest pain point. Starting immediately, operate in light of the test strategy. Build up a backlog, prioritize it and add the stories and tasks to your board. Whatever approach you use, remember that just because you came up with all these points and goals does not mean you are committing yourself to fix everything right now.

Benefits of developing a test strategy.

I like the definition of strategy because it contains the concept of the long-term view. What you are doing is setting the direction of where you want to go.

Another benefit of developing a test strategy is the conversation it drives. We all have hidden biases and assumptions that we operate on. Get the specifics out of our minds and write them down where we can see and evaluate them. Consensus and alignment are essential to the long-term testing goal of a whole team approach to quality and testing.

A test strategy also reduces ambiguity. Being clear about expectations related to testing helps people move faster.

A test strategy guides building testing into your planning. Testing can easily become an afterthought. A test strategy brings testing to the forefront. It facilitates being intentional rather than passive.

A test strategy assists you in identifying and prioritizing your top testing concerns. It helps identify the implications of those choices.

In Conclusion

Remember a test strategy should be a living document. It should not be something that you come up with one time and then forget about it. As you apply your test strategy you will learn from your successes and mistakes. Adapt your test strategy accordingly.

Happy and healthy testing.


Treat Testing Pain with a Healthy Dose of Test Strategy was originally published in Ziff Media Engineering on Medium, where people are continuing the conversation by highlighting and responding to this story.

https://medium.com/p/43285deaad95
Extensions
Better Code Review: Part 3
code-review
Show full content
Reviewing code

Happy new year! The beginning of the year is a great time to reflect on our strengths, our accomplishments, and our areas of opportunity. Perhaps you’ve decided that code reviews are one of your areas of opportunity. Wonderful! I’m so glad you’re here. I highly recommend checking out parts 1 and 2 of this series, as code review is a two-way street. Now that you’re caught up, let’s move onto part 3: reviewing others’ code. What follows are a few tips and tricks that I’ve learned and (tried to) put into practice myself.

Language matters
Being condescending makes you look like a jerk and teaches the developer nothing

What you say in code review matters, and so does how you say it. It’s important to be clear and conscientious when giving feedback, positive or negative.

  • One of the first tips I’ve learned when it comes to language is to use “we”, not “you”. “You need to do it this way” comes across like a demand, “we need to do it this way” is a reinforcement of team standards. It’s a small thing really, but can yield positive results.
  • Ask what, not why. People are more open to negative feedback in the form of a “what” than that of a “why”. Rephrasing questions to ask “what are the benefits of x over y” instead of “why did you choose x?” forces you as the asker to clarify what you really want to know, and gives the responder a straightforward, non-judgmental question to answer.
  • Avoid using “just” or “simply”. What seems simple to you might be less intuitive to others — there’s no reason to imply that there’s something wrong if a solution isn’t obvious to them. The reality is that “just” and “simply” are filler words that don’t add value to your comment, so you can leave them out without losing anything.
  • Lastly, emoji. This may be a hot take but I don’t think emoji belong in code reviews. If you’re adding a smiley face to a comment to try and defuse tension it might cause, you should probably reword your comment. Or better yet, deliver it in person! As I mentioned in part 2, people are more likely to take a written comment negatively than a verbal comment, regardless of its content.

It will take some extra effort, but if you are mindful of the language you use in code comments you will see improved results.

Time matters
3 days is a long time to go with no comments or approvals. Don’t make people chase you down to do reviews!

Your time is important, and so is the time of the engineer whose code you’re reviewing.

  • You should do your reviews in a timely manner or let them know if there’s a reason you can’t. If you’re done leaving comments and the code needs work, reach out to let them know it’s time to make edits or mark the PR as Needs Work. Don’t let your code reviews sit in limbo for extended periods of time.
  • Also along the lines of being respectful of time: recognize when an issue you’re about to raise isn’t related to the ticket being worked on, and file a separate ticket to address it. Try not to fall into the trap of asking “While you’re in here, could you just…?” That’s a slippery slope to go down and can turn a simple PR into a behemoth. Not to mention it can make debugging more complicated in the future. It’s frustrating to be looking for the root cause of a problem and have to dig through a bunch of extra changes in a commit to get to what was actually supposed to be in there.
  • And as with being reviewed, as a reviewer it’s important to know when to take a conversation offline. If you’ve gone back and forth twice and a question hasn’t been resolved to your liking, it’s time for some face time.

By respecting others’ time you’ll provide an example of how they can respect yours and foster a sense of goodwill within the team.

Learning matters
Now we all know more about CopyOnWriteArrayList, and knowing is half the battle!

Code reviews are learning opportunities for everyone involved, regardless of their relative seniority on a given team.

  • Be on the lookout for impressive bits of code, and call them out with a comment when you see them. This puts you in a learning mindset to hopefully find something new and interesting to comment on, and provides positive reinforcement to the author of the code. A simple “Clever use of data structures here!” lets the reviewee know they made the right decision. The act of leaving a comment also makes it more likely that you’ll remember their use of data structures when you have an opportunity to do the same in your own code.
  • Try to phrase comments in the form of specific questions whenever possible. It allows the developer being reviewed to maintain a sense of ownership over their own code, rather than just following directions given by reviewers. “This needs work” is NOT HELPFUL. “Does this need work?” is a question, but still not helpful. Be specific and use questions to guide the developer to the answer à la the Socratic method.
  • Questions don’t have to always be about problems you see in the code; you can ask questions for your own understanding. The developer who wrote the code likely put a lot of time into learning the lessons that helped them get it finished. Allow them to share that knowledge with you, but keep in mind the guidelines about when to turn a conversation in code comments into a face-to-face discussion.

As a developer you have an obligation to make sure your code is robust and readable. As a reviewee, the responsibility lies with you to clarify and communicate, as well as address issues that have been pointed out in a timely manner. As reviewer, your job is about more than just finding mistakes. Help your coworker to become a better programmer by conscientiously pointing out possible issues and also pointing out pieces of code that are really well written. While I admit I don’t follow my own advice 100% of the time, things tend to go more smoothly when I do. I sincerely hope you’ve found this series useful! Please feel free to share comments about code review tips that work well for you.


Better Code Review: Part 3 was originally published in Ziff Media Engineering on Medium, where people are continuing the conversation by highlighting and responding to this story.

https://medium.com/p/4efb568885
Extensions
Better Code Review: Part Two
code-reviewsoftware-development
Show full content
Being Reviewed

Putting your code up for peer review can be a scary proposition. You’ve artfully crafted this code over multiple hours and cups of coffee. Your precious, perfect baby is about to be exposed to the big, dark, scary world and torn to pieces by your coworkers. Okay, maybe I’m overstating things a bit. But code reviews can be scary, especially if you’re new to them. Few people truly relish in the idea of being criticized, but that’s what we do in code review: invite criticism. So what can we do to come out of this process unscathed? If you’ve read part one of this series then hopefully you’re already engaging in self-review before opening your pull request (PR). This will help you screen out obvious errors and save your reviewers’ time for more nuanced issues. Once the self-review is over and the PR is open, I’ve got a few more tips for you to survive being reviewed.

The first thing to keep in mind is that you are not your code. It’s easy to get your ego tied up in your work, but to survive critique you have to take your ego out of the equation. Great code can be written by inexperienced developers and buggy code can be written by highly regarded, experienced developers. Reviewers will find issues with the code you write, and that has no effect on how good you are at your job. When you conflate your ego and your code you get defensive in response to criticism, and that’s just not productive. If you can remind yourself to focus on the critique as it pertains to the code and not as a criticism of your skills as a developer, you’ll free yourself up to use the skills you know you have to fix the issues your reviewers have found.

If I know someone’s going to be picky about my code, I’ll go to them directly when I open the PR and talk through their criticisms to avoid an avalanche of comments.
 — Jazmine, Software Engineer, RMN

A common issue people bring up with code reviews is that they can take too long when the reviewer and reviewee go back and forth in a long thread of comments. A good rule of thumb is that once a comment thread gets to 3–4 comments long, it’s time to take it offline. Hopefully you both work in the same office and it’s as simple as walking over to their desk and saying “Hey, let’s hash this out.” Even if one of you is remote, hop on a video call or share your screen to talk through whatever confusion remains. Try to avoid having the conversation in writing (like over instant messages or emails). Research has shown that we have a negative bias toward written communication (Daniel Goleman provides some great links to papers in this article); the same sentence will come off as more negative in writing than it will when spoken. If the back-and-forth is due to a difference of opinion, recognize it as such and act accordingly. I believe that an opinion alone is not a good enough reason to make a change to a PR, so my advice is to advocate for yourself, and escalate to a manager if they try to steamroll you.

Reviewing code isn’t easy, and it takes time. Often the burden of doing reviews is shifted toward more senior members of the team, so they may end up spending a disproportionate amount of time on reviews. Recognize that whoever is assigned to review your code is taking time away from writing code of their own to do it, and be appreciative of that fact. Respond with gratitude to feedback until it becomes a reflex. Practice, even just in your head, saying “Thank you”, instead of “**** you”. Even if you disagree with their assessment, always be grateful that they took the time to give it. Once reviewers provide comments, be respectful of their time by responding and/or making changes in a timely manner. Once you’ve made updates, send a quick message to your reviewers letting them know your code is ready for second looks so they don’t have to remember to keep checking back. Keeping that gratitude mindset will help you keep a positive attitude throughout the code review process and generally make you a better person to work with.

Here, we treat reviews as a teaching opportunity. … The teaching opportunity works both ways. Reexamining long-held prejudices and explaining them from first principles is a great way to learn.
 — Whitney, Sr. Software Engineer, RMN

In his 2015 RailsConf talk (which I highly recommend), Derek Prior said, “Code review is the discipline of discussing your code with your peers.” These discussions can be intimidating, but there are plenty of things you can do as a reviewee to ensure better outcomes. By removing your ego from your code you can respond professionally to critiques and not get defensive. When conversation threads on reviews start to get long, remember to take the conversation offline both to more quickly work out the issue and to remove the negative bias that exists in written communication. And finally, keep a gratitude mindset when it comes to your reviewers. It will make you a more pleasant person to work with and generally help keep you in a positive headspace. Stay tuned for part 3 of this series, where I’ll provide some tips for how to be successful when you’re the one reviewing code!


Better Code Review: Part Two was originally published in Ziff Media Engineering on Medium, where people are continuing the conversation by highlighting and responding to this story.

https://medium.com/p/92f17ee42c56
Extensions
Better Code Review: Part One
code-reviewsoftware-development
Show full content
Self-Review

Code reviews are an integral part of software engineering, and unless you work alone, are likely to be a regular part of your work life in building software products. Code reviews can occasionally be contentious, and about as fun as a root canal, but they don’t have to be! Over the course of this three-part blog series, I will present some tips from my experience to help you review code and for your code to be reviewed in a more productive and less onerous way. First, by putting your code through a form of self-review before having it reviewed by others, you can catch bugs earlier and set yourself up for more successful technical discussions.

Microsoft conducted an internal study on code review in 2013. Their aim was to find out why we do code reviews, what the most frequent outcomes are, and how we can conduct reviews more effectively. While most of those surveyed listed finding bugs as their main motivation for code review, in practice only 14% of code comments centered around code defects. The main outcomes found in the study were knowledge transfer, increased team awareness, and finding alternative solutions to problems. Given this information, how can we as reviewers and reviewees change our approach to help bolster those outcomes?

The code review process does not begin when you open a pull request (PR). It begins when you start writing code that you intend to merge to a shared codebase. There is a level of due diligence that we are obligated to perform before opening that PR to ensure the best process for everyone involved. I believe by engaging in a few steps of self-review before opening a PR, we can all produce better, more robust code.

I propose that there are three steps to self-review:

  1. Run it
  2. Read it
  3. Document it

Run it

This may sound obvious, but run your code. Even in the case of a simple String change, always run your code. Crashing code that goes to code review creates unnecessary churn and wastes developer and QE time. Very well-written code from very smart engineers can still crash due to a mistyped semicolon or a flipped Boolean — it’s always better to be sure before opening a pull request. While you’re at it, run your code through a linter as well. Annyce Davis has a great article on code reviews that mentions some good ways to automate this part of your self-review. Ensure that your code matches your team’s agreed-upon style guidelines so reviewers can focus on the content. The Microsoft study found that repeated comments about style were a cause of stress and reduced the perceived value of technical discussion, so save yourself and your reviewers that step.

It’s difficult to see right away here, but in removing one variable from my if statement I accidentally flipped the logic of the remaining one. This is one of those errors that’s easier to spot by running the code than just reading it.

Read it

Pull up the diffs for your code change and read over them before opening your pull request. Ask yourself if the logical steps you took in the development process are clear. Does your code solve the problem specified in the associated ticket, and only that problem? If your changes extend beyond the scope of the ticket, consider breaking them out into a separate ticket to maintain the focus of each code review on just the problem being addressed. Do your variable names make sense? A Boolean named yesOrNo doesn’t tell me anything about the purpose it serves. Your job as reviewee is to provide sufficient context to fuel the technical discussion of the code review, so determine how much context is provided by your code and how much needs to be supplemented.

Typos (like the above “inputSteam”) are annoying to point out and to have pointed out.

Best to find and fix them on your own by looking at the diffs.

Document it

Truly self-documenting code is extremely rare. For the majority of code, there’s actual documentation. Documentation can take many forms. It can be as simple as a descriptive commit message (and no, a ticket number doesn’t count) or as complex as full javadocs. Tests are also a great way to document how your code works and how it is intended to be used. Test that your code succeeds when it should, but also that it fails when it should. When you open a pull request, add descriptive comments to provide context for reviewers and explain your decision-making process while you were developing the code. Think beyond the pull request. Presumably at some point in the future someone else will have to maintain your code — write lasting documentation that will help them to understand how it works and how it came to be.

There are a lot of repetitive lines here. A couple clarifying comments immediately improve readability

Taking the time to run, read, and document your code is part of due diligence as reviewee in the code review process. When small bugs and style issues are found before a PR is opened, reviewers are able to focus on deeper technical discussion. By ensuring your code is readable and logically clear, you reduce time spent answering questions. And by documenting your code you provide necessary context to understand your decision-making process and maintain your code in the future.


Better Code Review: Part One was originally published in Ziff Media Engineering on Medium, where people are continuing the conversation by highlighting and responding to this story.

https://medium.com/p/ae3d4ff0494d
Extensions
Mentoring Angela
software-developmentmentorshipmentoringinternships
Show full content

I can’t say that I was always fond of teaching. My first introduction to it was also my introduction to presenting. Many years ago, a small company I worked for held an annual conference on how to develop and work on its software platform. Having brought all the staff together, the CEO declared that everyone was expected to present. I still remember the shocked looks of horror on my coworkers’ faces, myself included.

I wasn’t particularly social, and I was perfectly content to have a lovely 1 on 1 relationship with my computer and no one else. Teach? To a crowd? The heck you say. But as the years passed I discovered I really loved teaching. It became something that I incorporated into nearly every job I’ve had since then.

So when Kevin Haggard, the manager of Labs here at RMN, asked me to take on the task of mentoring a bright-eyed 16-year-old Code2College intern in the ways of modern web development, I was genuinely excited. I myself was a new hire, barely a month in, and I was hurriedly getting up to speed on the web technologies the company used. In a way, I think this intern and I were in the same boat.

Angela was 16 and had very little experience working with any Frontend technologies aside from Code2College’s after-school programs. She wasn’t completely new to coding however, as she took classes in Python in high school. I wasn’t sure what to expect. Would she be able to pick up enough in one summer for this internship to have mattered?

Code2College is a non-profit organization that helps disadvantaged students (based on race, gender or income) break into the tech industry. They get the opportunity to have practical experience working with technical professionals who volunteer their time and knowledge, whether that’s afternoon college prep courses, weekend workshops or in this case a summer internship with a company.

Matt Stephenson, the founder of Code2College, used a word to describe the young adults who are in his program. Hungry. That word most definitely described, Angela.

Every day she and I would sync up on what she was working on, and every day she would amaze me with how much she learned. I wish I could take more credit, but Angela largely guided her own learning process in an incredibly organic way.

Because of that, I realized early on that coming up with a lesson plan for her didn’t make much sense. I would give her the tools necessary to accomplish a task, and as she used those tools the questions and lessons naturally evolved. She would do the one thing that most adults, seasoned veterans in their industry, are afraid to do: she would admit she didn’t know something.

On the last day of her internship, there was a party for all interns on another floor. I was puzzled why Angela wasn’t down there with everyone. She and I and a few others from Labs were taking a break and chatting about TV shows, vacations, nothing terribly important. Finally, I asked her, “Why aren’t you having fun with the other interns downstairs?”.

“Because if I leave this room, then it’s over. It’ll be real,” she responded.

I realized, I felt the same way. I thanked her, and she looked at me like I had a lobster crawling out of my nose.

“Why are you thanking me? You’re the one who taught me so much,” she asked.

I remember smiling.

“You taught me a lot too.”

Read about Angela’s intern experience at RetailMeNot.


Mentoring Angela was originally published in Ziff Media Engineering on Medium, where people are continuing the conversation by highlighting and responding to this story.

https://medium.com/p/18ac3d6a766f
Extensions
Down the Swift associated type rabbit hole
associatedtypegenericsswiftprogrammingcomputer-science
Show full content

If you want to make Swift programmer shudder, just whisper the words “associated types.” They’re one of the few Swift language typing features you’re unlikely to find in other programming languages, so they can take some getting used to. Last week I tried to write a seemingly simple function, and ended up spending most of my day diving down the associated type rabbit hole. This post is going to explain how I (eventually) wrote the “simple” function, and hopefully teach you about associated types, generic constraints and “where clauses” along the way!

What’s the goal?

I wanted a function that would:

  • Take in two Arrays (or ArraySlices), base and newElems as parameters, and return a new array
  • The output array should be made by adding each element of newElems to base, but only if it wasn’t already in base
  • All input and output array should be the same type T
Note: in Swift, getting a subrange of an array returns an ArraySlice instead of another array. ArraySlices are views into part of the original array — they’re basically just two pointers into the start and end of the array subsection. They can be really helpful!
Imagine you had an array with 2 billion elements, and wanted to examine the subarray from elements 5 to 2 billion. Without ArraySlices, examining that subarray would require allocating another 1.9 billion-length array, which would be a waste of space and time. Instead, we can just make an ArraySlice that tracks where the subarray starts and ends, without allocating any more memory. Hell yeah.
Wrestling with type signatures

ArraySlices are great. There’s just one downside: ArraySlice is a different type to Array — and remember, our function should take either type. So if you write a function like this:

Then Swift won’t let you pass an ArraySlice into it. Sure, we can just convert our ArraySlices to Arrays first, but that’s no fun. Instead, let’s see if there’s some protocol that both Array and ArraySlice meet.

I consulted the docs for both types (search for the “Conforms To” section) and found they’re both Collections! So let’s try this instead:

There are two problems here. Firstly, this type signature won’t stop people passing in two different-type Collections, like an array of Ints and an array of Strings. Secondly, we’ve got this bizarre compiler error:

protocol 'Collection' can only be used as a generic constraint because it has Self or associated type requirements

What does that even mean?

Protocols with associated types

I’d really recommend watching Alex Gallagher’s excellent talk on protocols with associated types (PATs) if you want to properly understand associated types. Basically, protocols with associated types are like classes with generics. One important difference between PATs and regular protocols:

  • Normal protocols can be used anywhere you use a regular type, e.g. the return type of a function, the type of a constant, etc.
  • PATs can’t be used in any of those places. They can only be used in the <>s of function/class declarations to constrain the generic being defined there.

So if we want to use the Collection PAT, we’ve got to use a generic T, and then add a constraint saying T must be a Collection. Something like this:

I read this signature as saying

Pick any type T that is a Collection. This function will take in two Ts, and returns another T.

We’re now using Collection as a constraint on our generic type T. This function actually compiles! Hell yeah! But this won’t let us mix and match Arrays and ArraySlices. Why not? Well, both arguments have to be the same type T. When calling the function, both Ts could be Array, or both Ts could be ArraySlice, but the compiler won’t allow one T to be Array and the other T to be ArraySlice. Luckily, this has an easy fix:

I’m ignoring the return type and body for now. This function lets us mix and match Arrays and ArraySlices, because T and U can be different types (or the same type) as long as they’re both Collections.

We’ve made progress, but we’re not there yet. Our type signature is too broad — it’ll let us pass in an Array<String> and Array<Int>. It’s too broad, so we have to constrain it again. But how?

Generic “where clauses”

Remember how Collection has some associated types? One of them is Iterator, which in turn has an associated type called Element. We want both T and U to be Collections of the same element. So we can write something like this:

This is a generic where constraint, and it lets us further constrain our generics. We’re now saying

  • Our function takes two arguments, of T and U
  • T must be a Collection
  • U must be a Collection
  • T and U are both Collections of the same element

The last idea in that list is too complicated to be written in the <>s. The <>s are only used for defining the generics, and constraining them to some protocol. For anything more complicated, like relationships between different generics, we have to use a “where clause”.

We can now write our function body and add a return statement:

We’re so close, but this won’t compile, because we can only check if base contains elements from withNewElems if their elements are both Equatable. So let’s add one more constraint to our where clause:

Note that the Swift compiler is smart enough to infer U.Iterator.Element is also equatable (because it’s the same as T.Iterator.Element). Nice. This does everything we want, and it only took a five line function signature 😅

Wrapping up

Give yourself a PAT on the back (sorry)! We tamed that surprisingly complicated beast. Why was this so hard?

Swift’s type system is more “powerful” than other older languages. We can express requirements that we couldn’t express in Go or Java (for example). In those languages, we’d have to compromise and write a function that was too broad (e.g. took any two Collections, not Collections of T) or too narrow (e.g. took two Arrays, but not a mix of Array and ArraySlice). Hitting that sweet spot in the middle can take a bit of work!

There are languages like Haskell whose type systems are even more powerful, but Haskell has been around much longer. Programmers have already written a ton of guides to Haskell language features and “how to write X in Haskell” posts. Eventually, as the Swift community grows, it’ll get easier and easier to learn about these new language features.

I hope Swift’s type system is a little less confusing now! Please let me know if I’ve missed anything. Happy coding!


Down the Swift associated type rabbit hole was originally published in Ziff Media Engineering on Medium, where people are continuing the conversation by highlighting and responding to this story.

https://medium.com/p/1f41ee6ceaf4
Extensions
Feature-oriented APIs
mobile-app-developmentapiclojure
Show full content

In my last post — Minimally Invasive API Versioning — I talked about how the Mobile API team at RetailMeNot handles versioning our Clojure APIs using a macro called versioned. This macro alone worked great for over a year, but we needed more.

In this post I will cover how we evolved it to help ease our feature rollout process, and how we gained a super-easy feature flagging system basically for free.

To recap, the versioned macro introduces a convenient syntax for annotating source code with version-specific information — things like “this line was added in version 3” or “this line was removed in version 7.” We call these annotations version-qualifiers. Initially we had several. some were “binary”, like added, removed, only, which let the developer specify code that should or should not exist for a specific application version; and others, like changed, lets the developer specify alternative implementations based on the application version.

We call these qualifiers collectively linear version-qualifiers, because their functionality is based on the linearity of versions: something like “added in version 2”makes no sense without the assumption that V1 precedes V2, which precedes V3, etc.

Like I said, this reasoning got us very far, but it has one major drawback: we typically ship multiple features per version, and when we do encountering this version-specific code would often leave developers wondering, “Why was this change made? Which feature was it a part of?”. Furthermore, say a feature slipped and we needed to move it to a later version, we found it difficult to go back through the code base to identify and edit those places only related to that feature.

The fundamental problem is that when we annotate code with linear version-qualifiers we imbue that code with version-specific information. Stated another way, these kinds of annotations only let a developer look at the code and answer the question, “When did this change ship?”, but this mindset ignores the reality of why we’re making a code change at all: to satisfy the requirements of a feature.

Rather than adding version-specific annotations, we should be adding feature-specific annotations, and then — somewhere else — we should maintain a mapping of which features are enabled in which versions. By doing this, we can accomplish two things. First, we decouple the source code that is sensitive to the app version from the irrelevant particulars about when that code was turned on, and instead we manage that “when” somewhere else entirely. The second benefit is that code that all relates to one feature can be explicitly annotated as such, and so greping the code base for changes related to that feature becomes possible.

We call these feature-specific version-qualifiers “feature-qualifiers.”

This OfferCard function is functionally equivalent to the linear qualifier example above. image will appear starting in V2, and footer will be absent in V3. We achieve this same functionality by using the version-manifest, which defines which features belong to which version. This is something that we could only implicitly handle before when using the linear qualifiers.

As you can imagine, it’s dead simple to turn a feature on or off for any version: simply add or remove it for that version in the manifest. No more scouring the codebase whenever we need to move a feature!

Using feature-qualifiers solved the problem of easily toggling and identifying features in the API, but there was still a niggling problem that we had yet to address.

When we release an app that requires backward incompatible features to be added to the API we define a new content-negotiation version, which only the latest version of the apps will request; however, sometimes we need to code a kill-switch so the apps can revert a feature in the case that something goes dramatically wrong. We call this a “feature flag.”

It may seem like the kill switch could just simply be to make the apps request the previous API version. This works when the only difference between two versions is that flagged feature; however, often these feature flags make up only part of an API version, or perhaps they span multiple versions and so simply reverting to an older API version would have the effect of rolling back many unrelated changes. Rolling back more features than are necessary is simply unacceptable. We needed a way of toggling some features on and off regardless of the current API version.

So for a while we did what any other API team would do. Maybe we’d add a query parameter to an endpoint like “with_feature_X”, and then if the client asked for feature X, we’d litter the code with “if” statements in order to build (or not build) the experience with that feature enabled. But we just finished a whole new feature-oriented method of modifying source code, so surely there was some way to leverage it!

Above, in our version-feature-manifest the feature is either included or not included in a given version, and this dictates how the code for that version ends up being compiled by our versioned macro.

But what if…

What if we could specify that some features are “flaggable” for a version? For example, what if the :offer-card-images feature may either be or not be part of version V2? Maybe what we really have in this case are two different versions of version V2: version V2, and version V2 with offer-card-images:

And that’s exactly how we tackle this problem: we generate a “fake” version for every combination of feature flags for each version listed. In the example above, we will generate V2+offer-card-images for the version V2, and if there was a second feature flag B, we would also generate V2+B, and finally V2+B+offer-card-images.

If the combinatoric potential of this worries you, fear not: All of this happens during compilation, and the runtime overhead of the resulting code is constant for practically any number of versions!

Here is an example of what the generated code ends up looking like:

The last step is to — based on the value of a query parameter or something — upgrade the user’s content negotiated version at runtime from, V2 to V2+offer-card-images, the details of which I won’t bore you with.

In my opinion, this is a great example of how opportunities for reuse tend to present themselves when you can break your layers of abstraction down into their simpler elements. In this case, we decoupled two things: the code changes required to implement a feature, and the version of the API that that feature was a part of. By doing this, we were able to incorporate feature flags into this system and thereby unify the two ways in which API clients can influence the behavior of the API.

Best of all, API developers no longer need to concern themselves with how or why a particular feature is enabled — be it by feature flag or content negotiation—they need only care that it is enabled.

I’m very happy to announce that this library has been recently open sourced, and I would love for you to check it out on github. The project includes the “linear” and “feature” version qualifiers, but not the code to implement a feature flagging system; we implemented that entirely on top of this library.

Thanks for reading!


Feature-oriented APIs was originally published in Ziff Media Engineering on Medium, where people are continuing the conversation by highlighting and responding to this story.

https://medium.com/p/f0010d140d3a
Extensions
Minimally Invasive API Versioning
programmingapimobile-app-developmentclojure
Show full content

One of the challenges in developing an API for mobile apps is that there is not both a pleasant and reliable way of forcing them to upgrade. This means that in some cases your API needs to support apps that are several years old. The mobile API for RetailMeNot is no exception.

This post walks through one of the ways that we’ve leveraged Clojure to make supporting old API versions, and thus old app versions, significantly easier.

First, I will introduce you to a function that builds a portion of our response.

This is a simple function that builds the meat of an “offer card.” The function is called “OfferCard”; it has three arguments — “image,” “title” and “description” — and it returns a JSON map with its arguments embedded in it at certain locations. The OfferCard is ubiquitous in our app, and many attributes have been added and removed over time to support changes to the mobile apps over time.

Two traditional ways for iterating on a function like this exist: The first way is what I’ll call copy-and-modify. This involves simply copying the source code, picking a new name for the function and then making whatever changes are necessary to fulfill your requirements (and, of course, making sure the caller picks the correct version to call):

You’re probably allergic to copy-pasted code, and rightly so; copy-pasted code, while not always a bad thing, may subtly change over time, and in general just creates another chunk of code that must be maintained.

The alternative is for a new, second function to call the old function, and then mutate its return value to fulfill the requirements. I’ll call this the call-and-mutate method.

This technique also has some tradeoffs. One nice aspect is that modifications to the original OfferCard function will automatically be incorporated in the OfferCard-V2 function, so we don’t have the same problem of having to maintain the same functionality in multiple places as we did in the copy-and-modify approach. The one major drawback is that we’ve created a function that is pretty mysterious: You will have to go on a bit of a wild goose chase to figure out what OfferCard-V2 returns, and you will have to mentally calculate the result by doing all the “assoc-in” (and whatever else) calls in your head. Just imagine this process for OfferCard-V10 or OfferCard-V20! This technique can only support so many chained calls before it becomes completely unintelligible.

What we really want is a method that can combine these two approaches and take the best features from both. As developers, we want a single place to look at in order to figure out what a version of an OfferCard will look like, but we don’t want to have to maintain multiple independent pieces of code that do practically the same thing but with only minor alterations from version to version.

Using Clojure’s powerful meta-programming support we are able to get both of these features.

What would be ideal is if we can simply annotate our code with “version qualifiers,” which would indicate something like “this piece of code was added in version 2” or “this piece of code was removed in version 3.” Once we marked up our code, we could then run a preprocessor over it to do the boring work required for the copy-and-modify or call-and-mutate approach.

This would require us to basically modify the compiler, which is not something that many languages let you do. However, in Clojure, by using macros we can very easily hook into the compilation process in order to implement our version qualifiers! Here is an example of an annotated OfferCard function, the ideal of what we’re shooting for:

A couple of things are going on here: We’ve converted the argument list (image, title, description and footer) into a single map argument. This is similar to Python’s keyword arguments; it allows callers to optionally specify each of the four arguments by name, which is helpful for when they’re generating a version of the OfferCard that doesn’t need one of the keys, like version 3 in this example when we’ve removed the description field.

The second difference is the versioned expression that is wrapping the body of this function. This is our macro, which we use to enhance the Clojure compiler to allow us to write the “removed” and “added” version qualifiers within its scope — without it, these qualifiers would cause compilation errors because Clojure doesn’t recognize them.

Versioned is implemented similar to any other function in Clojure, except that because it can only run at compile time its arguments aren’t (and can’t be) evaluated like they would be at runtime. Instead, the literal source code that the programmer writes is passed in as an argument, and the macro’s job is to return syntactically valid Clojure source code. In this case, source code for the body of the OfferCard function is now passed to versioned so that it can process it into a function that can produce every version of the OfferCard!

All of this allows us to dynamically alter which version of an OfferCard we want this function to return. For example, in version 2 there will be an extra “footer” field; in version 3 the “description” will be removed.

“But what does the generated source code look like?” That is, “what does the versioned macro return?” It turns into something like the following:

It simply compiles into a switch statement! The versioned macro is implemented by essentially applying the copy-and-modify technique to your source code, and stuffing every computed version into a big switch statement. The version qualifiers are simply instructions that tell versioned to include or remove a chunk of the source code when generating one of the switch cases. (If you’re wondering, the-requested-version is a dynamic variable that is set to whatever version the mobile client specifies in its request headers.)

In the examples above I’ve only shown version qualifiers on the keys of maps, but we can also put them in vectors (“[ .. ]”) or into lists (“( … )”), and because Clojure source code is just nested lists, this means we can annotate any arbitrary code.

In this simple example we’ve computed offer-cards by mapping the OfferCard function over our offers, but we’ve also specified that in and after version 2, we also need to add-inventory-positions to those cards. These subtle variations appear all over our codebase, and without a tool like the versioned macro, we would be stuck coming up with an ad-hoc way of handling each minor case. This macro gives us extra syntax we can reach for to solve the problem.

Abstraction is at the heart of much of what we as programmers do, and it is absolutely necessary to build more and more complicated systems with greater ease. This macro demonstrates the power of meta-programming with Clojure, which allows you to build syntactic abstractions. In this case, the copy-and-modify or call-and-mutate ways of solving this problem require a certain amount of boilerplate — that is, a certain amount of syntax — to implement, but our macro lets us encapsulate those details (lovingly referred to as “design patterns” in many contexts) into a syntax that is designed to express that intent.

This relatively simple macro has done quite a bit of heavy lifting to drastically reduce our code footprint and complexity on the Mobile API team here at RetailMeNot. Something like it wouldn’t be possible in many other languages.


Minimally Invasive API Versioning was originally published in Ziff Media Engineering on Medium, where people are continuing the conversation by highlighting and responding to this story.

https://medium.com/p/de5d85ea96d7
Extensions