At GameChanger, we have a dedicated App Platform team that focuses on scaling our engineering organization and supporting development teams across the company. Our mission is to make building things the right way the easy way for all developers at GameChanger. This involves:
Implementing and maintaining core infrastructure like dependency injection systems
Creating and improving development tools and workflows
Establishing best practices and architectural patterns
Providing support and guidance to feature teams
By having a dedicated team focus on these foundational aspects, we achieve several benefits:
Consistency across the codebase, making it easier for developers to switch between projects
Reduced cognitive load for feature teams, allowing them to focus on business logic
Faster onboarding for new team members
Improved code quality and maintainability
The work on integrating Anvil with our existing Dagger setup is a prime example of how the App Platform team contributes to these goals. By streamlining our dependency injection process, we’re making it easier for all teams to build features efficiently and correctly.
With this context in mind, let’s explore the technical details of our setup and why we chose to augment Dagger with Anvil.
What’s the setup?
The Android codebase has the following Dagger components: a longstanding Application Component, a User Component that lives for as long as the user is logged in, and Game Components that last for as long as any live game.
Features usually involve a fragment to render UI and a view model to manage business logic and state. Said view model is supplied by a factory in either the Application Component or User Component and pulls in dependencies from the rest of the Dagger graph that may come from any of the mentioned components.
So Why Anvil?
1. Anvil makes modularization easy:
We’re following, as shown in the diagram above, a format for modules across the codebase to follow that involve the inversion of control principle, similar to what’s described here.
:pub is for public facing interfaces and models
:impl contains implementations of said interfaces.
We don’t want any modules to depend on :impl and instead depend on :pub to ensure lean compilation times and exposure of only the bare necessities for every feature. To put it all together into an app, normally you would manually write Dagger modules to provide :impl contents for your :pub interfaces as visualized below. An orchestrating shell or app module can then use said wiring modules to facilitate the entire app.
With Anvil, however, we can get rid of manually writing Dagger modules for the wiring and simply use annotations like @ContributesTo to generate those modules instead, eliminating the need for writing the wiring altogether. In other words, Anvil makes DI easy. When DI is easy, modularization is easy.
2. We want to skip the Dagger boilerplate:
To ensure a view model is in the dependency graph, some boilerplate is required in the appropriate Dagger module (either Application or User):
@Binds @IntoMap @ViewModelKey(MyViewModel::class)
abstract fun bindMyViewModel(viewModel: MyViewModel): ViewModel
With Anvil, we make this go away by simply annotating the top of a view model with:
@ContributesMultibinding(UserScope::class)
@BindingKey(MyViewModel::class)
class MyViewModel @Inject constructor(…)
And with an additional custom annotation and some code generation using some handy code-gen hooks exposed by Anvil, the above can be further simplified to a single line like this:
@ContributesViewModel(UserScope::class)
class MyViewModel @Inject constructor(…)
Under the hood, we use this custom annotation along with the CodeGenerator API from Anvil (which we won’t dig into here) to generate a module with aggregated bindings collected from annotated view models like the above, which looks something like this:
@Module
@ContributesTo(MyAnvilScope::class)
abstract class MyViewModel_Module {
  @Binds @IntoMap @ViewModelKey(MyViewModel::class)
  abstract fun bindMyViewModel(viewModel: MyViewModel): ViewModel

  @Binds @IntoMap @ViewModelKey(MyViewModel2::class)
  abstract fun bindMyViewModel2(viewModel: MyViewModel2): ViewModel

  @Binds @IntoMap @ViewModelKey(MyViewModel3::class)
  abstract fun bindMyViewModel3(viewModel: MyViewModel3): ViewModel

  ...
}
This means that if you want to start a feature in our codebase, you simply create a fragment to navigate to and summon from the dagger graph a view model that you annotate with a single line.
💡
On a similar note, we’ve found that `@ContributesMultibinding` from Anvil is really neat and can be used to allow individual consumers to specify any values that need to be aggregated across the codebase without having to break the inversion principle. A great use case for example that we’ve seen is adapters for serialization as described [here](https://gpeal.medium.com/dagger-anvil-learning-to-love-dependency-injection-on-android-8fad3d5530c9).
What about other alternatives?
After considering Koin, ultimately dismissing it due to the amount of overhaul required on our existing Dagger code, we took a look at Hilt for potentially similar ergonomic gains across the codebase given that it’s built on top of Dagger.
However, we learned that Hilt requires an invasive amount of work as well. We would need to annotate every Android entry point (broadcast receivers, activities, fragments, etc.), and it is highly opinionated, making it less trivial to work with the custom Dagger components described in the beginning.
We found that Anvil required no extra overhead and could fit least invasively into our codebase with only a few addendums to existing patterns (like creating Anvil scopes) that ultimately allow developers to write less code.
Conclusion
Anvil on top of Dagger is our tool of choice for dependency injection. Its compatibility with our existing custom Dagger components and ability to generate wiring modules automatically make it superior to alternatives like Koin and Hilt for our specific needs.
By significantly reducing Dagger boilerplate, simplifying view model integration, and facilitating easier modularization, it has streamlined our dependency injection workflow; allowing us to easily build features the right way.
At GameChanger, video streaming has become a huge part of our business and thus our tech stack. But as a small company that practices shipping often, we can’t ship everything feature complete from day one and thus video streaming launched with the ability to only stream from your default rear camera lens.
But as we know, ultrawide lenses on phones have become common place and sure enough, customers began writing in, asking to be able to use their ultrawide cameras to stream their event. Baseball and softball fields are actually quite wide and it makes a lot of sense to be able to capture more of the field. So in time, ultrawide streaming became our priority and thus we engaged in battle with one of the most brittle Android APIs we have seen…
Streaming in the olden days
Well, not really in the olden days, because we are using the most up to date APIs, but before we implemented ultrawide streaming, selecting the camera we wanted to stream with was generally pretty simple:
private fun CameraManager.chooseCamera(teamId: TeamId) = cameraIdList.filter { id ->
    val characteristics = getCameraCharacteristics(id)
    val capabilities = characteristics.get(CameraCharacteristics.REQUEST_AVAILABLE_CAPABILITIES)!!

    characteristics.get(CameraCharacteristics.LENS_FACING) == CameraMetadata.LENS_FACING_BACK &&
        capabilities.contains(CameraCharacteristics.REQUEST_AVAILABLE_CAPABILITIES_BACKWARD_COMPATIBLE)
}
    .mapNotNull { id ->
        val characteristics = getCameraCharacteristics(id)
        val cameraConfig = characteristics.get(CameraCharacteristics.SCALER_STREAM_CONFIGURATION_MAP)!!

        val (width, height) = arrayOf(1280, 720)
        cameraConfig.getOutputSizes(MediaRecorder::class.java)
            .filter { it.width <= width && it.height <= height }
            .maxByOrNull { it.width * it.height }?.let { id to it }
    }
    .map { (id, resolution) -> CameraArgs(cameraId = id, width = resolution.width, height = resolution.height, fps = 30) }
    .firstOrNull()
TL;DR: Basically, get the first rear camera that supports 720p. Note the cameraId—an ID corresponds to each camera on the device…right?
Nope. Well sometimes, it depends.
Enter Multi-Camera API
At the time of writing, the not-deprecated API for accessing cameras on Android is camera2. camera1 is deprecated. cameraX is built on top of camera2. Obviously.
Here are some references for camera2. We are going to focus on the multi-camera training here as a jumping off point.
The multi-camera training page does a great job of explaining the differences between logical and physical camera setups, when it was introduced and why but for the purposes of this article here’s what you need to know:
An Android device running above API level 28 runs either a logical or physical camera setup. Below 28 is strictly a physical camera setup.
Physical camera setups expose each camera sensor individually with cameraIds through cameraManager.cameraIdList. If you are lucky, you will have one camera id per physical sensor and be able to choose any id you want to stream with.
Logical camera setups hide the details of the different physical cameras sensors on the back side of the phone, giving you just one id for the front and back of the device in the cameraManager.cameraIdList. However, if you continue to poke the camera API, you can get those physical sensor ids, but you still can’t use them to open a camera session. You must use ids from cameraManager.cameraIdList. Thus, to actually stream with an ultrawide sensor on a logical camera setup, you have to do more…things.
Okay, doesn’t sound too bad. It’s easy enough to figure out if a device is a physical or logical camera setup:
private fun CameraManager.getRearCameraIds(): List<CameraId> = cameraIdList.filter {
    val characteristics = getCameraCharacteristics(it)
    val capabilities = characteristics.get(CameraCharacteristics.REQUEST_AVAILABLE_CAPABILITIES)

    characteristics.get(CameraCharacteristics.LENS_FACING) == CameraMetadata.LENS_FACING_BACK &&
        capabilities?.contains(CameraCharacteristics.REQUEST_AVAILABLE_CAPABILITIES_BACKWARD_COMPATIBLE) == true
}

private fun CameraManager.hasRearLogicalCameras(): Boolean = this.getRearCameraIds().any {
    this.getCameraCharacteristics(it).get(CameraCharacteristics.REQUEST_AVAILABLE_CAPABILITIES)
        ?.contains(CameraCharacteristics.REQUEST_AVAILABLE_CAPABILITIES_LOGICAL_MULTI_CAMERA) == true
}
So let’s start with the easy one.
Supporting physical camera setups
Once we know that we are dealing with a physical camera setup, it’s simply a matter of iterating over rear ids and calculating the widest one. Our camera feature only exposes the default and the widest sensor to the user, so this is the logic that works for us:
private fun getWidestPhysicalCamera(streamingResolution: StreamingResolution): CameraInfo? {
    return cameraManager
        .getRearCameraIds()
        .getWidestCameraId()
        ?.mapNotNull { cameraId ->
            cameraId.toString().getMaxSupportedResolution(streamingResolution)
        }
        ?.map { (cameraId, resolution) ->
            CameraInfo(cameraId, CameraLensType.WidePhysical, StreamingResolution(resolution.width, resolution.height, streamingResolution.fps))
        }
        ?.firstOrNull()
}

private fun List<CameraId>.getWidestCameraId(): CameraId? = this.maxByOrNull {
    it.computeCameraWidth()
}

private fun CameraId.computeCameraWidth(): Float {
    val characteristics = cameraManager.getCameraCharacteristics(this)
    val activeSize = characteristics.get(CameraCharacteristics.SENSOR_INFO_ACTIVE_ARRAY_SIZE)
    val physicalSize = characteristics.get(CameraCharacteristics.SENSOR_INFO_PHYSICAL_SIZE)
    val pixelSize = characteristics.get(CameraCharacteristics.SENSOR_INFO_PIXEL_ARRAY_SIZE)
    val focalLengths = characteristics.get(CameraCharacteristics.LENS_INFO_AVAILABLE_FOCAL_LENGTHS)

    var cameraWidth = Float.MIN_VALUE

    if (activeSize != null && physicalSize != null && pixelSize != null && focalLengths != null) {
        val fractionX = activeSize.width().toFloat() / pixelSize.width.toFloat()

        val firstFocalLength = focalLengths.firstOrNull()

        firstFocalLength?.let {
            cameraWidth = Math.toDegrees(2.0 * atan2((physicalSize.width * fractionX).toDouble(), 2.0 * firstFocalLength)).toFloat()
        }
    }

    return cameraWidth
}
Note that we basically ripped the widest calculation logic from various SO posts. Here’s one that offers a good explanation of what’s going on there.
This logic along with the original logic to fetch the default rear camera yields two camera ids. Switching between them is just restarting your preview/capture session with the new id.
Supporting logical camera setups
Okay, we have to jump through a few more hoops when supporting logical camera setups. Once we have determined we do have a logical camera setup present, we have to determine which rear camera id has the logical cameras behind it:
@RequiresApi(Build.VERSION_CODES.P)
private fun List<CameraId>.getLogicalCameras(): List<CameraId> = this.filter {
    val characteristics = cameraManager.getCameraCharacteristics(it)
    val capabilities = characteristics.get(CameraCharacteristics.REQUEST_AVAILABLE_CAPABILITIES)
    capabilities?.contains(CameraCharacteristics.REQUEST_AVAILABLE_CAPABILITIES_LOGICAL_MULTI_CAMERA) == true
}
Now we have a list of rear camera ids that have logical multi camera capabilities. This means that this camera id is a logical camera id. This means that this logical camera id has 2 or more physical camera ids behind it. We need those to address individual lenses. This is how we get them:
Now we have physical ids paired up with their logical id. Now we need to figure out the widest lens of the physical ones. This is easier than the physical setup, because now we have LENS_INFO_AVAILABLE_FOCAL_LENGTHS available to us:
private fun List<Pair<CameraId, CameraId>>.getWidestLogicalCamera(): CameraId? = this.minByOrNull {
    val cameraCharacteristics = cameraManager.getCameraCharacteristics(it.second)
    cameraCharacteristics.get(CameraCharacteristics.LENS_INFO_AVAILABLE_FOCAL_LENGTHS)?.minOrNull() ?: Float.MAX_VALUE
}?.first
Exhausted yet? Finally, logical camera setups require you to set a zoom ratio to get the widest focal length. We get the number like so:
@RequiresApi(Build.VERSION_CODES.R)
private fun getMinimumControlZoomRatio(logicalCameraId: CameraId): Float {
    val cameraCharacteristics = cameraManager.getCameraCharacteristics(logicalCameraId)
    return cameraCharacteristics.get(CameraCharacteristics.CONTROL_ZOOM_RATIO_RANGE)?.lower ?: 1F
}
So we have the correct id to open the rear camera session with and a control zoom ratio. The capture request is built the same but now we use the control zoom ratio:
if (cameraLensType is CameraLensType.WideLogical && Build.VERSION.SDK_INT >= Build.VERSION_CODES.R) {
    captureRequestBuilder.set(CaptureRequest.CONTROL_ZOOM_RATIO, cameraLensType.controlZoomRatio)
}
Note that you don’t use physicalCameraIds to actually open a camera session. With logical camera setups, you still use a camera id found in cameraManager.cameraIdList to open a camera session. You then just give it a minimum zoom control ratio. Then the OS itself takes care of selecting the widest lens to reach the desired zoom control.
Gotcha!
Okay, so code stuff out of the way. Figuring all the correct ways of doing this was tough as there are not a lot of code samples out there. But there is one…
OpenCamera. OpenCamera is a highly featured, open source camera app. And it includes support for physical and logical multi camera setups! Great, a perfect reference.
So I install OpenCamera on my OnePlus 7 Pro and it seamlessly switches between wide and ultrawide lenses. So a couple cmd+c, cmd+v strokes from the OpenCamera source later I had the multi-camera implementation inside the TeamManager app. And…it didn’t work. cameraManager.cameraIdList showed only the front camera and the rear standard lenses in my app (Note this is a physical setup). But in the OpenCamera app, the same API call cameraManager.cameraIdList showed the front camera, rear standard and rear ultrawide.
This really threw us for a loop. For whatever reason, the OpenCamera package name was white listed and thus allowed to access more camera ids.* Why? We aren’t sure. Just OnePlus things, amirite? But what it means is that our app can not support wide angle streaming for OnePlus devices.
*I can’t find where I found this anymore, but it was buried deep in a SO post. Took us a couple of days at least to find out.
And this was just the tip of the iceberg for dealing with manufacturers’ implementation…
At the mercy of the manufacturers
Reading this whole article, you may ask, how do we know which phones support which setup? Well, the short answer is that we have no idea. Here’s a short list of what we have found so far, if the device has an ultrawide rear lens:
OnePlus devices: Physical setup that doesn’t expose ultrawide to our app, does expose ultrawide to OpenCamera. Ultrawide works in native camera app.
Motorola devices: Physical setup that doesn’t expose ultrawide to any app. Ultrawide works in native camera app.
Samsung devices: Physical setup that exposes standard rear and ultrawide. Ultrawide works in native camera app and OpenCamera. We were able to support Samsung devices.
Pixel devices: Logical setup, but only the Pixel 5 has an ultrawide. The Pixel 4 has a standard and telephoto. So we needed to check if the device has a logical rear camera that is wider than the default camera. Pixels are the only devices we have found that support logical setups.
And these are just the ones we know about! We don’t have every device in the world and this can change with software updates and new devices.
As you can see, how each manufacturer decides to implement the multi-camera API is completely random and illogical. We ended not being able to support as many devices as we thought when the project was conceived. It is very disappointing to see the state of the multi camera API as manufacturers implement it. Especially considering how many devices are being built with multiple lenses.
But hey, I think we are “future-proofed”, whatever that means. Until the multi-camera API is deprecated anyway…
In a long lived and complex application, there often comes a time when some early decisions end up becoming constraints that are difficult or impossible to overcome. At some point in the lifespan of the software, you may be faced with a choice — do the Big Refactor, or find ways to work around the problems. More often than not, the latter route is taken. When you have a lot of immediate priorities, it’s difficult to justify spending a lot of time on a big and potentially risky project.
Sometimes however, the benefits of doing the big refactor greatly outweigh the drawbacks. It takes a cost-benefit analysis specific to your app to determine if that is the case. And recently at GameChanger, the big refactor was worth it, so we did it!
This blog post is about how we at GameChanger successfully executed a huge overhaul to our data model. We removed a foundational database entity, person, upon which almost every part of our system relied in some way, and replaced it with new entities which enabled the user experience that we knew our customers expected.
We’ll take a look at what user-facing problem we were addressing and the high level adjustment to our data model. We’ll also talk about how we approached such a large project tactically, some of the interesting technical problems we solved along the way, and the benefits we’re reaping a couple months out from shipping.
The Problem 🧩
For a long time, one of our most common complaints from users of Team Manager was the complexity around who can edit players and what information they could edit. The root of the complexity was this: a player could be created without an email address, but, once a player was attached to an email address, a user could not edit that player’s information, like first name or last name, independently of another team. A player’s name and their relationships to other users would carry over from team to team. And that meant in order to avoid situations where a coach on one team could make edits to a player which would be disruptive to another team, we pretty much disabled editing of player information entirely after the player was attached to an email address.
From the launch of Team Manager in 2017 to summer in 2020 when we first started seriously considering doing this project, we received thousands of CX cases that had something to do with this issue. In addition to these CX cases, we had evidence from conducting user tests that there was confusion around how editing players worked. Clearly, this user experience was unbecoming of a best-in-class team management app!
The technical reason for this user experience limitation was relatively simple - a single record in a person table was the source of truth around player information across all teams. In essence, players were in the “global” scope. So the problem at hand was to adjust our data model so that player information could be scoped to individual teams, allowing coaches to freely edit players without worrying about affecting that player’s information on another team.
The original motivation for building the data model in this way was to support building career stats for players. The idea was that a player’s info could be carried over from team to team, allowing us to easily create a view of a player’s youth sports journey. However, we found that the old model wasn’t actually cleanly supporting this use case. Notably, we had issues with duplicate players. So, we were paying the cost for the complexity of this model, but not getting the benefits we wanted without doing some extra work on our previous data model.
One of our values at GameChanger is to put the customer first, and in this context, we thought putting the customer first meant fixing this UX problem now, despite the potential downside for career stats being tricker to support in the future.
So, the big technical lift was to fix our data model. One major challenge with that was that the concept of a person was deeply embedded into all three of our clients (iOS, Android, and web) as well as the API powering them.
Thousands upon thousands of lines of code dealing with person. Not to mention, a busy baseball season soon approaching. How will we update our client apps with the new data model, and cleanly deprecate app versions on the old model? Will there have to be downtime? How will we safely and accurately migrate person data to new tables that we may create? Is it worth doing this project so close to a busy season? The answer to the latter question we determined was yes – we wanted as many users on the new data model as soon as possible. Why? We expected that Spring 2021 would bring an influx of new Team Manager users, as well as users migrating from the legacy GameChanger app – and the less users that had to have their data migrated from the old model to the new model the better.
Whatever solution we came up with, it was clear the level of effort required to implement it would be immense.
But, this was no deterrence for us on the Athlete Experience team at GameChanger. One of the great things about working here is that teams are empowered to solve problems that are important within our mission - and we understood that fixing this user experience problem would offer long term benefits to our users and our product. And so, we got to work!
Research 🔬
We’d identified at a high level the problem, the ideal solution, and some alternative solutions. The next thing to do was to enumerate the work in detail, write a proposal, and disseminate it for feedback.
Our proposal had to cover a lot of ground. Here are some of the things our proposal discussed:
What is the dependency graph between the person table and the rest of our data model? What high level concepts in our API and in our clients are involved in making our person model work?
What new tables will be created? Which existing tables will require migrations? What new high level concepts will we have and how will the old concepts map to them?
Exactly how will iOS, Android, and web apps be migrated to use the new data model?
We use Realm on our mobile apps - so what Realm tables will need migrations?
How will each high level feature that we support be affected by this data model change? How will it be migrated to the new data model?
How will we migrate data from the person table to other tables (we’ll explain this in a bit more detail later)
What are the alternative solutions?
Here’s a brief summary of the data model that we had, and the new one we proposed:
Previously:
A person stored someone’s name, phone number, and linked them to their user account if they had one.
A player linked a person and a team
Associations between a user and a player were modeled as links between person IDs
This should illustrate the “global” player issue described earlier. If a player is on multiple teams and has a user account, that player’s name and relationship information comes from the record in the person table. There was no straightforward way in our previous model to scope that to a single team.
Currently:
A player stores a link to a team, and optionally a user. It also stores a name and a phone number.
Associations between users and players are stored as links between user IDs and player IDs.
This change allows players to have different relationships and different names per team. We completely remove the concept of a person.
We should note, above are the high level changes to show how we adjusted our data model to accommodate the user experience we desired. But, omitted are many auxiliary changes and other important details that were needed to transition our data model away from person.
A Detour - Data Mirroring 👯♂️
One interesting problem outlined in our proposal was how to populate our new tables with data. For existing data, we could run a script that would migrate all of it to the new data model. However, for data currently being written into the system, we needed a way to migrate that data immediately. Blocking writes in order to migrate data was definitely not an option – we wanted the system to keep humming along and have data from the old models migrated to the new models in as close to real time as possible.
We referred to the solution that we came up with as “data mirroring”, and it would help ensure that we lost no data while migrating over to the new data model. Its function was essentially to update our new tables every time the old tables changed. Architecturally, this was implemented as a service in our Node.js API.
We proposed two ways in which data mirroring could occur:
Inline mirroring: update the new tables within the same transaction that the old tables are updated.
Queued mirroring: update the new tables after the transaction where the old tables are updated. We put the work of updating the new tables on a queue.
You may be wondering, when each of these would be used and why. The purpose of these two ways of mirroring data was to ensure data consistency.
Imagine we need to update a person’s name. In the old data model, this is an update to the person table. In the new data model, this might be an update to a player, or an update to a user. If we only used inline data mirroring, then one possible scenario would be a person’s name changed at the same time that the person was added as a player. If the transactions run in parallel, then the new player might be created with the old name, since each transaction works on a view of the database after the last transaction. We could use postgres’ SERIALIZABLE mode, but that is a non-starter for us due to various unrelated reasons (though let us know if you want to hear more about our experience working with Postgres). We address this scenario by queuing the task to update a person’s name, and then queuing the task to add that person as a player. The order in which these execute does not matter, both will see the database after the relevant changes are applied, and the data is consistent.
Most data mirroring operations would occur as transactional operations, and queued mirroring primarily served the purpose of fixing issues that would arise from transactions happening in parallel.
Execution 🔧
After we identified what had to be done, we broke up our work into roughly 7 phases, with a point of no return that we referred to as “cutover”.
Phase 1: Create new tables, write new API endpoints, implement data mirroring.
Phase 2: Update our sync system to work with our new data model. Sync is our mechanism for keeping client devices up to date with the server - read more about our implementation here.
Phase 3: Build new UI on iOS and Android to accommodate the new data model.
Phase 4: Migrate various features on the server and mobile clients to work with our new data model.
Phase 5: Update the web client to work with the new data model
Phase 6: Data & Analytics changes
— Cutover —
Phase 7: Cleanup, take on various work we punted on.
Cutover ⚠️
Cutover was the point at which we would stop writing to the old models, and begin reading and writing to the new models. This was a point of no return because data mirroring was essentially a one-way operation – once they diverged, it would be tricky, though not impossible, to get back to a place where they were 1 to 1. For all intents and purposes though, we treated it as a point of no return, and so we treated the execution of cutover as a particularly sensitive part in the process of migrating to our new data model.
We did a number of things to make sure the execution of cutover would be successful:
We created a runbook for the day of cutover.
We did it at a low traffic time.
We assigned roles for each person involved in executing cutover.
A scribe - someone to capture what was going on during the video call and write it into Slack
A monitor - someone to monitor system behavior to make sure the apps and the API were performing properly. We had 2 people in the monitor role, one person for the API, and one person for the mobile apps.
A console - someone to perform various development tasks. We had two consoles, someone to run scripts, and someone to flip feature tags.
We did cutover on staging a week prior to doing it on production as a practice run.
All the planning and preparation paid off, as we were able to execute cutover with no major issues and no data loss.
Looking Back 🌇
At the time of writing, we’re a few months out from cutting over our API and our clients to use the new data model exclusively. The project has been a resounding success – our app now works the way our users want it to, which was the aim of this project.
In addition to eliminating the CX cases in our queue that deal with the complexity around editing players, we’ve also managed to reduce the amount of requests that our sync system has to send when players are updated, since we can send syncs only to the team affected by a change to a player, instead of to all teams where the player has an association.
This work would not have been possible if it were not for the amazing people that we have at GameChanger. Every team at the company played some role in making this project a success, but a very special shout to Eliran Ben-Ezra, Peter Gelsomino, Abhinav Suraiya, Ami Kumar, Adam Tecle, Israel Flores, Dane Menten-Weil, Janell Eichelberger, Wai-Jee Ho, and Leah Giacalone.
Improving our original, embedded SQL generator and some related scripts by converting them to a better, long term, stand alone SQL producer that’s faster, more reliable, and more obvious.
About seventeen years ago, in 2019, I published my blog post “Let me automate that for you” about a design for automating creating warehouse tables based on schemas for new event data. The idea was when our ETL system couldn’t load waiting data into a warehouse table (as there was no table to be found), it would look up the schema for that data, convert the schema to a SQL statement, then issue a PR to the repo where SQL migrations for such needs are kept. Eventually creating tables made a friend, updating tables when there was a mismatch between the schema of the data we were loading and the schema of the table in the warehouse, and a third buddy joined the part, optimizing a table to improve its performance.
The system had some absolutely great qualities: it automated acting on errors it saw, it generated great documentation in the PR and the SQL statement (with comments for discussions and places to review more closely), and it posted to Slack to let engineers know that there was something for them to do a final review on.
However… it wasn’t perfect.
Reading is going toward something that is about to be, and no one yet knows what it will be. [1]
Let me take you through the evolution of our embedded SQL generator to stand-alone SQL producer.
While the SQL generator eased so much work for so many different people in the company, it had some… strange caveats, shall we say. Some were more noticable than others but all were, in their own way, just that little bit too grating to live with long term.
Systems program building is an entropy-decreasing process, hence inherently metastable. Program maintenance is an entropy-increasing process, and even its most skillful execution only delays the subsidence of the system into unfixable obsolescence. [6]
The most obvious was that the SQL generator was reactive. It might takes hours for the loader to hit a problem that causes it to try generating a SQL migration. This long turnaround was painful for the data team, painful for the engineers making the upstream changes — it was just too unpredictable and drawn out for us to ever feel comfortable. Nothing like a PR showing up at 2am on Saturday because your robot engineer doesn’t have a sense of boundaries and working hours!
On top of that, the SQL generator wasn’t always invoked when it should be, especially around updates to schemas. We require, with help from the Schema Registry, that all of our schemas be backwards compatible, which has this odd quirk that means the loader can still load the new schema’s data… into the old schema — good for sending data, not for warehouse table design! The issue here was we had the code to generate updates, but we didn’t have the code to trigger updates every time. Paired with the long turn around time for “will it/won’t it,” the system still required a lot of hands on attention, from triggering the update manually to finding gaps that went unnoticed.
We were also pushing the boundaries of Python; it just was no longer the right implementation language for this system. The most distrubing yet hilarious example was being able to tell the difference between “the default value is null” and “there is no default value,” both of which — in Python — are None. We ended up using a magic string of "∅⦰⦱⦲⦳⦴" to try to indicate these differentiate between these types of emptiness but we all knew, this indicated we had gone too far with this set of tools. We needed something better, something designed to work together instead of three related but separate mini systems that needed constant supervision.
Opportunities to build it better
With our new data pipeline out the door, we had an opportunity. You see, the Schema Registry writes all its schemas to Kafka. This actually means you can subscribe to schema changes from a Kafka consumer without a lot of fuss. Get updates within a few seconds or minutes of a new or updated schema instead of hours or days? Uh, yes please! That is a much more reasonable turnaround time and removed the problem of not updating for every changed schema.
With the valve’s Kafka consumer setup in Scala, that presented a companion opportunity to switch implementation languages to one that could better represent the strong typing of the two systems we were converting (Avro and SQL), including different forms of emptiness! :tada: It’s the simple wins in life sometimes that give you hope and being able to delete "∅⦰⦱⦲⦳⦴" as a mission critical part of a system was truly a win.
Thus we had a new plan: move the embedded SQL generator to a stand-alone SQL producer in Scala that consumed from Kafka, opening up the chance for faster turnaround, better representation of the data, easy access to the official Avro library (so we wouldn’t have to reimplement their logic), and a better setup for testing nitty gritty, hard-to-spot edge cases in both the short and long term.
I saw and heard, and knew at last
The How and Why of all things, past,
and present, and forevermore. [7]
It just made sense.
Building blocks of a stand-alone SQL producer
To start (re)implementing a system like this required tackling it both from the foundation as well as from the high level, “what will be the final output?” view, to ensure the two met somewhere reasonable; the previous system had grown organically but we really needed to replace it all at once, mostly for our own sanity but also to not have the two competing against each other. We scraped together implentations from the valve and other one-off scripts we had to form the basis of starting code that wasn’t unique to the SQL producer: things like producing to and consuming from Kafka, connecting to Consul or the Schema Registry, and talking with Redshift especially about the metadata of our warehouse tables. Then we looked at what did our Python implementation hint at the existence of but not fully explore as a data structure or stand alone function taking care of a specific task without outside help? What could we do to better leverage this new implementation language to make the code as obvious as possible?
Don’t tell me what I’m doing; I don’t want to know. [2]
A good place for us to start was, since we’d be combining multiple services within this one system to do specialized work, how could we talk about all of their output collectively? They each produce one or more migrations, after all, so… could we start with that?
Internally, each data structure that extends the Migration type does a lot of logic to produce their unique array of one or more migrations and the detailed PR writeups, but hiding that complex code away allows them to be self contained. Ultimately, when we’re “done” with a service processing its request, we just need to be able to publish the migration to Github and ping Slack about it. The above exposes for us just what we need and nothing more.
Which, of course, meant that another foundational building block would be publishing migrations:
object Publish {
    def apply(migrations: Set[Migration]): Unit = migrations.foreach(migration => {
    if (!migration.hasChange) Log.info(s"No changes were found for `${migration.schema}.${migration.table}`")
    else if (recentMigrationAlready(migration)) Log.info(s"There's already a recent migration for `${migration.schema}.${migration.table}` so not going to publish")
    else {
      Log.info(s"Migration for `${migration.schema}.${migration.table}` has changes which going to publish")
      val branchName = github.commit(migration)
      val prUrl = issuePr(branchName, migration)
      val channelsPostTo = channelsToNotify(migration)
      notifyHumans(channelsPostTo, migration, prUrl)
      if (shouldUpdateDeduplication(migration)) updateDeduplication(branchName, migration)
      Log.info("Migration has been created, issued, and shared")
    }
  })
}
Here I’ve included only the main block of orchestration logic but you can already see how we can build complex flows from such a simple input as a Migration. For any set of migrations, so long as there are changes and we haven’t already recently issued a migration for it, we’ll commit it to Github (more in Appendix B), issue the PR, get the Slack channels to notify, let the humans know, and maybe even go back in to update other files like our JSON of deduplication rules for our loader. Configuration files have never been treated so well!
Another grouping of foundational items we needed were converters, translating from one language to another, for example from Avro types to Redshift types:
object ColumnDefinition {
  val defaultStringColumn = "CHARACTER VARYING(24)"

  def avroToWarehouse(schemaField: ProcessedField): String = schemaField.`type` match {
    case Schema.Type.STRING if schemaField.name.endsWith("id") => "CHARACTER(36)"
    case Schema.Type.STRING if schemaField.name.endsWith("ts") => "TIMESTAMP"
    case Schema.Type.STRING if schemaField.name.contains("email") => "CHARACTER VARYING(256)"
    case _ if schemaField.name.contains("latitude") => "DECIMAL(8,6)"
    case _ if schemaField.name.contains("longitude") => "DECIMAL(9,6)"
    case Schema.Type.STRING => defaultStringColumn
    case Schema.Type.BOOLEAN => "BOOLEAN"
    case Schema.Type.INT => "INTEGER"
    case Schema.Type.LONG => "BIGINT"
    case Schema.Type.FLOAT => "NUMERIC"
    case Schema.Type.UNION => avroToWarehouse(
      schemaField.copy(
        `type` = schemaField
          .unionTypeValues
          .get
          .filterNot(_.getName == "null")
          .head
          .getType
      )
    )
    case _ => defaultStringColumn
  }
}
This has a combination of simple translation using the Avro library’s built in types along with business logic, for example that every perceived identity field will be a UUID and thus exactly 36 characters in length. I also default string fields to a small number of characters, so that humans have to review it and consider what’s a more appropriate length. Emails, though, we let those get wild at 256 characters.
These sorts of conversions existed in our Python implementation but were nowhere near as easy to reason about nor readable. While the above switch case statement is massive, it’s super obvious what it’s doing and super easy to add to it if we, say, had a new specialized type like phone number that we wanted to handle. It’s a great example of could a human do this? Yes. Would a human do anything different than a machine in doing this? Not really, we’d just go look up the translation and go through a similar flow to find the right one. The system doesn’t get every case right every time but the ones it misses require human judgement anyway and are a great opportunity for someone new to say, “I think I have a rule for how to automate this.”
Dans la nature rien ne se crée, rien ne se perd, tout change.
In nature nothing is created, nothing is lost, everything changes. [5]
The last grouping of foundational items fell into a sort of “expert decision making” category. These functions don’t replace the average engineer looking at an Avro schema and saying an INT becomes an INTEGER in Redshift; they replaced a data engineer saying, “Sort keys should follow this pattern, distribution keys should follow this pattern, here’s what optimized types look like.” This is where the difficult decisions and need for deep knowledge become embedded in the system, which both helps make the attention of data engineers less scare (if they’re in a meeting, you can always look up what they have the expert system do for an idea of what they would tell you) while also ensuring humans don’t accidentally forget something minor along the way (which is 100% what I would do all the time when I tried to optimize tables by hand, omg the amount of small things to check became wild and you litter typos everywhere). So long as the experts have implemented and tested the rules, then all the cases they would know how to handle are handled, and other ones can be added as they’re discovered.
case class ColumnEncoding(column: String, recommendedEncoding: String, savings: Double) {
  lazy val reason: String = s"Switch to recommended encoding with savings of $savings%"
}

object FixEncoding {
  def apply(definition: Set[ColumnDefinition], encodings: Set[ColumnEncoding]): Option[ProposedChange] = {
    var notes: Map[String, String] = Map()
    val changes = encodings.map(recommendation => {
      definition.filter(column => column.name == recommendation.column).head match {
        case column if column.sortKey && column.encoding != "RAW" =>
          notes += (column.name -> "Sort key should have a `raw` encoding")
          column.copy(encoding = "RAW")
        case column if !column.sortKey && column.encoding != recommendation.recommendedEncoding && recommendation.savings > 1.0 =>
          notes += (column.name -> recommendation.reason)
          column.copy(encoding = recommendation.recommendedEncoding)
        case column => column
      }
    })

    if (definition != changes) Some(
      ProposedChange(
        definition,
        changes,
        "Corrected encodings that were mismatched, such as using tightest compression or not encoding the sort key.",
        Some(notes)
      )
    )
    else None
  }
}
The encoding example is probably the easiest to read (though I realize it’s still a touch wild) but has one of the most nuanced caveats in the system: we want to use the recommended encoding for all columns except the sort key. Why? Well, the tighter the compression, the less reading from disk Redshift has to do, which is one of the slowest acts it has to perform. However if you encode the sort key (which Redshift will make recommendations for), then you actually cause Redshift to need to perform more reads from disk to find the blocks of data it’s looking for. I would have no expectation that a randomly selected engineer in the office would remember that — it’s a deep bit of knowledge for data engineers, as the specialists in this area, to know and care about. But hey, if I’m on vacation, you can come look at the code and see that "Sort key should have a raw encoding". Sometimes, that’s enough.
Joining the human needs with the computer’s logic
Instead of showing what I built with these foundational pieces next, let me show you the entry point for the SQL producer: I think this will give you a better idea of how the bridge from high level entry point to small, dedicated blocks of foundatal code were built and, even better, how they can be changed, extended, or added to over time, depending on what we need.
We are what we repeatedly do. Excellence, therefore, is not an act, but a habit. [4]
Our driver is incredibly simple:
object Driver {
  val topics = Set(
    schemaTopic,
    optimizeTableTopic,
    optimizeSchemaTopic
  )

  def process(topic: String, messages: List[Message]): Unit = topic match {
    case _ if topic == schemaTopic => schemaChanges(messages)
    case _ if topic == optimizeTableTopic => optimizeTables(messages)
    case _ if topic == optimizeSchemaTopic => optimizeSchema
    case _ => Log.warn(s"Topic $topic does not have any supported actions.")
  }

  def main(args: Array[String]): Unit = PipelineConsumer(serviceName, topics, process)
}
Similar to my writeup of our valve system, we make use of a Kafka consumer that we can pass in a function to execute against for each batch of messages it receives. This consumer, however, actually acts on multiple topics: one for Schema Registry changes (either new or updated schemas), one for optimizing a specific table, and one for optimizing a specific schema. The function we pass in to the Kafka consumer, then, is essentially just an orchestrator that immediately moves each batch of messages to the processor that’s designed for its topic. So, what does that processor look like?
object Processor {
  private def warehouseSchema = Consul.valueFor("data-warehouse", "schema")

  private def start(action: String, about: String, metric: String): Unit = {
    Log.info(s"Going to $action `$warehouseSchema`")
    Metric.attempting(metric, warehouseSchema)
  }

  private def finish(action: String, about: String, metric: String, results: Try[Unit]): Unit = results match {
    case Success(_) =>
      Log.info(s"Able to $action `$about`")
      Metric.succeeded(metric, s"$about")
    case Failure(exception) =>
      Log.error(s"Unable to $action `$about`", exception)
      Metric.failed(metric, s"$about")
      Slack(
        Publish.channelsDefault,
        s":x: Unable to $action `$about` because of `${exception.getMessage}`",
        ":dna:",
        s"SQL producer ($environment)"
      )
  }

  val schemaTopic: Topic = "__schema"
  private[service] def createTable(schema: SchemaMessage): Unit = {
    val action = "create table"
    val metric = "create.table"

    start(action, s"$warehouseSchema.${schema.topic}", metric)
    val migrations = CreateTable(warehouseSchema, schema.topic)
    val results = Try(Publish(migrations))
    finish(action, s"$warehouseSchema.${schema.topic}", metric, results)
  }
  private[service] def updateTable(schema: SchemaMessage): Unit = {
    val action = "update table"
    val metric = "update.table"

    start(action, s"$warehouseSchema.${schema.topic}", metric)
    val migrations = UpdateTable(warehouseSchema, schema.topic, schema.version)
    val results = Try(Publish(migrations))
    finish(action, s"$warehouseSchema.${schema.topic}", metric, results)
  }
  def schemaChanges(messages: List[Message]): Unit = {
    val (newSchemas, updatedSchemas) = messages
      .map(_.asInstanceOf[SchemaMessage])
      .partition(_.isNew) // if schema version == 1
    newSchemas.foreach(schema => createTable(schema))
    updatedSchemas.foreach(schema => updateTable(schema))
  }

  val optimizeTableTopic: Topic = "_optimize_table"
  private[service] def optimizeTable(table: Message): Unit = {
    val action = "optimize table"
    val metric = "optimize.table"

    start(action, s"$warehouseSchema.${table.topic}", metric)
    val migrations = OptimizeTable(warehouseSchema, table.topic)
    val results = Try(Publish(migrations))
    finish(action, s"$warehouseSchema.$table", metric, results)
  }
  def optimizeTables(messages: List[Message]): Unit = messages.foreach(message => optimizeTable(message))

  val optimizeSchemaTopic: Topic = "_optimize_schema"
  def optimizeSchema: Unit = {
    val action = "optimize schema"
    val metric = "optimize.schema"

    start(action, s"$warehouseSchema", metric)
    val results = Try(OptimizeSchema(warehouseSchema))
    finish(action, s"$warehouseSchema", metric, results)
  }
}
There’s essentially five main groups of code within the processor:
There’s getting the main warehouse schema our SQL producer is in charge of, which comes from Consul. The reason it’s a function that keeps getting the value is in case we change the schema; the long-lived SQL producer instance handles staying up to date so no one has to think to refresh it.
There’s starting and finishing processing: log what doing, log what happened, incremement the correct metric, and possibly reach out on Slack to let humans know that there was a problem, this way we can act on bugs as soon as possible.
There’s the processing block for schema changes, which includes figuring out if the schema is new or updated then acting on each accordingly before publishing any changes found.
There’s the processing block for table optimizations, which checks the warehouse for any improvements to be made for the specified table and publishes what it finds.
There’s the processing block for schema optimizations, which walks all the tables available in the schema to find any that can be improved before putting such requests into the pipeline to be consumed by the SQL producer later on to optimize each table.
As you can imagine, this high level orchestration hides a lot of nitty-gritty complexity, but that is by design. The complex logic of what each input maps to as output is handled in either the small, foundational items or in the middle level of dedicated logic, both of which are heavily tested for every edge case we can think of or have encountered in the wild. Thus the orchestration is simple to read, simple to test (both automatically and manually, as live has its own set of problems), and easy to drill into if there’s a bug to be tackled. Want to add a new service? It’s very clear how to do it.
(I should state this code was recently refactored so its tidiness is due to that: if you build your own custom SQL producer and it looks much more messy, believe me ours was a mess too, thus the refactor. It just hasn’t had time to grow organically again quite yet.)
What you’ll notice is that each function essentially starts the action, hands off processing to a dedicated bit of logic that generates migrations, then publishes the migrations and finishes its work. The reason it ended up like this is that while the input and output for each service is nearly identical, the way the input is used to generate outputs varies wildly. Maintenance wise, this is a nice win, as we can choose to focus on either what all the services share or one specific service at a time in keeping the system up to date.
But that does rather leave, ya know, the complex marriage of the input to its output left to implement.
Detailed breakdown of the services available
Walking you through each service in detail would be not just worthy of a blog post for each one, but possibly multiple blog posts for each! Instead I’ll run you through the logic for each service, which is pretty unique to each technical landscape a SQL producer would be needed in. You might have different rules or opinions about, for example, a standard sort key than we do, and that’s fine: the point is just to get those rules or opinions into the code, so the system handles them for you.
Creating a table
The simplest service is, truly, the most foundational.
Figure out if the table already exists. If it does, you’re done.
Translate the Avro schema, in particular each field, to a Redshift table, in particular the columns.
A good rule of thumb for encodings in a new table is set everything except the sort key and booleans to ZSTD; leave the two exceptions as RAW. Later on you can optimize the encodings, once there’s data in the system, but until then this will work well enough.
Updating a table
In my opinion this is the most complex service; it is difficult for both humans and the system to get this sort of update right, which is why having the system helps: it might take a while to implement but then humans don’t have to worry about doing it themselves.
Figure out if the table already exists. If it doesn’t, you’re done or create it, your choice.
Find the difference between the Redshift table and previous Avro schema compared to the current Avro schema.
For each change, translate the difference into a block of SQL statements. You may want to issue multiple migrations for each block, depending on how you run migrations and what you feel comfortable with.
By not just comparing the two schemas but also looking at the Redshift table, you find a lot of edge cases that are super easy to miss. There’s also certain changes in Avro that aren’t really as dramatic in Redshift, so you might be able to discard certain changes as not actually having any impact on Redshift.
Optimizing a table
Honestly, this is the most fun service, both in terms of writing it and, most importantly, in terms of benefiting from it. When you create or update a table, you’re making an educated guess on what to set the columns, sort, and distribution to be, but being able to go back and review those guesses when you have more information is fantastic. This is especially helpful if you have an existing warehouse with tables in a variety of states from a little out of whack to what the hell is happening here.
Grab yourself a whole lot of metadata about the table in Redshift: what its column definitions look like, what its recommended encodings are, what it’s skew is, just about everything. (Appendix A contains more details about how to do this.)
Using each bit of metadata, find each change you want to make.
For each change, translate the update into a block of SQL statements. As with updating a table, you might want to issue multiple migrations. You can also recreate the table from scratch, moving the data from the old table to the new one, if you find it easier. (We do!)
Obviously this service, unlike the Schema Registry centric ones, can be triggered by a human wanting to see if a table can be made better, for example a data analyst who is working with a table that’s super slow. We hooked our workflow system up to produce a message for this service whenever a human has a particular interest; otherwise, it tends to be requested by its companion…
Optimizing a schema
This was the next step up from optimizing a table. Sure, an out of whack table should be optimized, but what is an out of whack table to optimize?
Another flaw in the human character is that everybody wants to build and nobody wants to do maintenance. [8]
Our workflow system, every week, triggers checking our main schema and picking up to so many tables to optimize for us. At first this produced the max number of migrations every time but now we’ll go weeks without any optimizations, because the tables are kept so up to date and pristine.
(The reason for limiting how many tables are optimized is purely so that humans aren’t flooded with too many pull requests, especially when we knew our warehouse had a lot of old tables that needed a lot of work.)
Get yourself a list of tables to focus on. The way we do that is:
Get all tables in the schema.
Cross reference all of these tables with the Schema Registry, to verify they’re of interest to us and not a table in the wrong schema.
Do some light metadata checking for if they’re poorly optimized (see Appendix A for detailed instructions on this). A deeper check will come later.
If we have enough poorly optimized tables, focus on those; otherwise, take the list of all tables to do a more random dive.
Shuffle the possible tables to focus on (so you don’t have a bias towards those early in the alphabet) and take twice the max number of tables you want to end up with. This limit is purely to speed up the system so you can change it as you’d like.
Only keep tables that have at least 90 days worth of data. This is to ensure we don’t prematurely optimize a table.
Check each table’s metadata more deeply, such as for incorrect sort keys, missing encodings, or skew. Only keep those that have some deep issue we think we can correct.
Of all remaining tables, take the max number.
For each table, produce a message to Kafka for the optimize table service about the table.
While there is overlap in the metadata that the optimize table and optimize schema service review, breaking them down is both mentally easier to reason about and keeps the optimize schema request (which might issue some long running queries) moving along without timing out or making Kafka think it failed to consume a message. Like it did that one time where it spent all night issuing like a hundred PRs for the same table… yeah don’t do that, make sure it can complete within the amount of time Kafka is giving it to say it’s done.
Troubleshooting live
Sixty years ago I knew everything; now I know nothing; education is a progressive discovery of our own ignorance. [4]
As I alluded to above, no matter how much you test automatically, live has its own problems. Sometimes a new case for evolving a schema shows up, so you have to add in support to capture that in the future. Sometimes migrations make sense at each individual statement level but ultimately don’t add anything to the system, like making an already nullable column nullable, so you find ways to remove that code when the system sees such a migration since it has no actual “change” suggested. Sometimes Avro default types show up really heckin funny compared to what you thought they’d be, so you need to change the comparison logic to convert Avro’s NULL constant to a JVM null value. There will always be gaps — that’s fine.
Because the Schema Registry only sees new or updated schema so often, it’s not as easy to test live as say walking a schema to find some tables to optimize, which we could hammer in both our lower and upper environments to see what happened. What I’d recommend for those schema-dependent services is: take every change that does happen and every little “hmm” the migration or PR puts in you, and really ask yourself, “Should I do something here?” Even if it’s just a ticket you throw at the bottom of your backlog, having the example of here’s what happened, here’s what I’d expected to happen, here’s how this can be fixed — you’ll probably see this problem again, so you’ll be grateful you captured it. Those sorts of bugs might also be a great onboarding item for people new to the system who want to play around and get exposure to it.
Optimizing a schema or tables, though, you can get wild! Since it has human triggers, and for us at least only posts to Slack for our team, we can run it whenever we want and then discuss very particular cases we either set up or found to figure out, “What is better here? How do we keep this data useful?”
Invite feedback from others as well! We had an optimization for one of our largest tables, with its very thorough writeup in the PR, when fellow GCer Matt C pointed out that, if we had notes from the PR writeup in the SQL migration, we could comment on them specifically to have a deeper discussion. Brilliant! We have that now, just as a little comment at the end of each line for, if there was a change, what was the reason. The PR presents the full writeup, the SQL comments give you a place to drill in and figure out if this was the right decision.
@gamechanger/data

:wave: I've automatically created this migration for `public.sample_table` because I noticed it could be improved. :tada:

However I can't do everything a human can, so I've noted the parts that need verification and possibly updating below along with what I did.

I hope I did a good job! :blush:

## Table schema

### Description

>This is a sample table for testing.

### Before

* Sort: `test_column`
* Distribution: `test_column`

 column | type  | nullable | encoding | comment |
 ------ | ----- | :------: | -------- | ------- |
 `row_id` | `BIGINT` |  | `ZSTD` | ∅ |
 `event_ts` | `TIMESTAMP` |  | `RAW` | ∅ |
 `test_column` | `CHARACTER VARYING(36)` |  | `LZO` | This is a test of the emergency broadcasting system. |
 `empty_column` | `CHARACTER VARYING(256)` | ✓ | `ZSTD` | ∅ |

### After

* Sort: `event_ts`
* Distribution: `test_column`

 column | type  | nullable | encoding | comment |
 ------ | ----- | :------: | -------- | ------- |
 `test_column` | `CHARACTER(36)` |  | `ZSTD` | This is a test of the emergency broadcasting system. |
 `row_id` | `BIGINT` |  | `AZ64` | ∅ |
 `event_ts` | `TIMESTAMP` |  | `RAW` | ∅ |

## What changed?

### Type and length

 column | before | after | rationale |
 ------ | ------ | ----- | --------- |
 `test_column` | `CHARACTER VARYING(36)` | `CHARACTER(36)` | Max and min are same length |

### Dropped columns

 column | type | rationale |
 ------ | ---- | --------- |
 `empty_column` | `CHARACTER VARYING(256)` | Column contains no data |

### Encoding

 column | before | after | savings |
 ----------- | ------ | ----- | ------ |
 `row_id` | `ZSTD` | `AZ64` | Switch to recommended encoding with savings of 10.0% |
 `test_column` | `LZO` | `ZSTD` | Switch to recommended encoding with savings of 27.0% |

### Sort

* Before: `test_column`
* After: `event_ts`
* Reason: Made `event_ts` the only sort key.

### Distribution

* Before: `test_column`
* After: `test_column`
* Reason: Currently there is no logic to automatically change the distribution if required.

## When reviewing, please focus on:

* Types and lengths changed, impacting
	* `test_column`
* Columns were dropped, impacting
	* `empty_column`
* Encodings changed, impacting
	* `row_id`
	* `test_column`
* Distribution key, **human intervention is required**
* Sort key changed, impacting
	* `event_ts`
	* `test_column`
Sample PR writeup
CREATE TABLE public.sample_table_temp (
  test_column CHARACTER(36) NOT NULL ENCODE ZSTD, -- Corrected encodings that were mismatched, such as using tightest compression or not encoding the sort key. Optimize character column so it's just the size it needs to be.
  row_id BIGINT identity(0, 1) PRIMARY KEY NOT NULL ENCODE AZ64, -- Corrected encodings that were mismatched, such as using tightest compression or not encoding the sort key.
  event_ts TIMESTAMP NOT NULL ENCODE RAW
)
DISTSTYLE KEY
DISTKEY(test_column) -- Currently there is no logic to automatically change the distribution if required.
COMPOUND SORTKEY(event_ts); -- Made `event_ts` the only sort key.

INSERT INTO public.sample_table_temp (
  test_column,
  event_ts
)
(SELECT
  test_column,
  event_ts
FROM public.sample_table);

DROP TABLE public.sample_table;
ALTER TABLE public.sample_table_temp RENAME TO sample_table;

DELETE FROM metadata.comments WHERE schema_name = 'public' AND table_name = 'sample_table' AND column_name = 'empty_column';

GRANT ALL ON public.sample_table TO GROUP human_users;
GRANT SELECT ON public.sample_table TO GROUP system_users;

ANALYZE public.sample_table;
Sample SQL migration
And as always, do be sure to include a wide variety of emojis in your PRs. The PR might be from some code but that code is still, in this instance, a teammate doing their best.
Final thoughts
Life can only be understood backwards; but it must be lived forwards. [3]
Converting the embedded SQL generator to a stand alone SQL producer probably struck outside people as a weird thing to give attention to: after all, the current thing works fine enough, so like… who cares?
Well, “works fine enough” isn’t the same as “works.” We were relying on it more and more as a company, all while it became harder to maintain and missed more edge cases. The long turn around was causing ongoing confusion. The Hack Day project in Python that the SQL generator had started out as needed to, finally, become a true production-ready system.
It’s a big system, bigger than the valve; its Python implementations hid how complex it was. I like to say that while the valve is complicated to explain, it’s got a simple implementation — the SQL producer is the reverse. You really become aware of how much you know and how many heurestic rules you use to do this sort of work once you start getting it down into code with numerous tests to verify everything. Even within the team, there were differences in what we looked for and how we decided what to do with the same information.
But it’s a great system: it’s a second example of Scala and Kafka consumers, it reacts quickly (great for inspiring more streaming ideas), and it allows humans to not even have to think about it or the problems it addresses. If you’re needed, a PR will tag you and Slack will have a message; otherwise, you keep doing your thing.
Truthfully, it’s been one of my favorite systems to work on, even when it aggrevates me to no end. It combines so many different pieces (Kafka, Avro, Schema Registry, Redshift, SQL) in a way that makes sense and relieves the burden of work on me. I used to spend a lot of time creating, updating, and optimizing tables, which led to lots of mistakes no one caught or lots of tradeoffs because I didn’t have the time — no more! :tada: And it shows how the implementation language can impact the implementation you produce: you might start off picking what everyone is most comfortable with but ultimately you’ll need to use what’s the right language or framework or set of tools for the problem at hand, otherwise you’ll have friends for "∅⦰⦱⦲⦳⦴". You don’t want friends for "∅⦰⦱⦲⦳⦴".
You do, however, want automated PRs with emojis. Trust me, it’ll make you smile every time.
Our code uses the AWS Redshift JDBC driver for Java without the AWS SDK but any Postgres connector should work. I’m providing the queries as Scala strings with basic interpolation, so it’s obvious what values need to be passed in from the service running these queries. You parameterize your queries as you like though for production systems.
This returns a set of maps, where each element in the set is a row and each map is the column to value of that row. Highly recommending setting type WarehouseRecord = Map[String, Any] and type WarehouseResults = Set[WarehouseRecord] to make it just that bit more obvious, even if Scala doesn’t yet have opaque type aliasing.
Schema of a table
s"""SELECT *
FROM pg_table_def
WHERE
	schemaname = '$schema'
	AND tablename = '$table'"""
While this query is great to get an overview of what the table currently looks like, we’ve also found it helpful in seeing if a human already updated a table ahead of the system or if the “revised” table the system will suggest a migration for is actually that different from the table right now.
Metadata about a table on disk
First execute
s"ANALYZE $schema.$table;"
to refresh Redshift’s metadata, then execute
s"""SELECT
    results.rows AS numRows,
    tableInfo.unsorted AS percentUnsorted,
    tableInfo.size AS sizeOnDiskInMB,
    tableInfo.max_varchar AS maxVarCharColumn,
    tableInfo.encoded AS encodingDefinedAtLeastOnce,
    tableInfo.diststyle AS distStyle,
    tableInfo.sortkey_num AS numSortKeys,
    tableInfo.sortkey1 AS sortKeyFirstColumn
FROM SVV_TABLE_INFO AS tableInfo
LEFT JOIN STL_ANALYZE AS results
ON results.table_id = tableInfo.table_id
WHERE
    tableInfo.schema = '$schema'
    AND tableInfo.table = '$table'
ORDER BY results.endtime DESC
LIMIT 1;"""
to get the latest metadata for yourself. The results tell you things like if you’re missing encodings (bad), the size on disk (to determine how much of an impact tweaking this table might have), and what your sort and distribution currently look like. Great for both “what do we fix?” and “what is the benefit of doing the fix?”
Skew of a table across the cluster
s"""SELECT skew_rows
FROM svv_table_info
WHERE
	schema = '$schema'
	AND "table" = '$table';"""
This is a handy one I learned while looking for ways to automate distribution suggestions. Skew can be particularly hard to spot as the table needs time to accumulate data before a bad distribution style or key becomes evident. Ideal skew is 1.0; we choose to recommend distribution optimization on any table with skew of 3.0 or higher. Like golf, lower is better here.
Recommended encodings of an established table
s"ANALYZE COMPRESSION $schema.$table"
I have seen Redshift recommend we bounce a particular column between two encoding types, over and over, so we tend to only use a recommendation if there’s other changes we’re making or the change will save us a minimum amount of space on disk. You can combine this with metadata about the table’s size on disk to figure out if there’s enough savings to make it worth it:
def encodingsIndiciateOptimize(schema: String, table: String, eventKey: String, diskSavingsMinimum: Double): Boolean = {
  Redshift.recommendedEncodingsFor(schema, table) match {
    case Success(results) =>
    	val sizeOnDisk = Redshift
    		.execute(
          s"""SELECT tableInfo.size AS sizeOnDiskInMB
FROM SVV_TABLE_INFO AS tableInfo
LEFT JOIN STL_ANALYZE AS results
ON results.table_id = tableInfo.table_id
WHERE
    tableInfo.schema = '$schema'
    AND tableInfo.table = '$table'
ORDER BY results.endtime DESC
LIMIT 1;""")
    		.get
    		.head("sizeOnDiskInMB".toLowerCase)
    		.asInstanceOf[Long]
    	val savings = results
    		.filter(_.column != "row_id") // our surrogate primary key
    		.filter(_.column != eventKey) // our standard sort key
    		.map(result => result.savings / 100.0 * sizeOnDisk)
    		.fold(0.0)(_ + _)
    	savings >= diskSavingsMinimum
    case Failure(_) => false
  }
}
We look for at least 25 GB of savings typically, to ensure doing the work is worth it, but we might drop the amount soon as all of our really poorly encoded tables have already been found.
(For a really thrilling/terrifying warehouse, you might want to start higher to focus on the biggest wins possible with encodings, especially if you’re trying to build an argument for spending time optimizing tables by hand or building out your own automation. Tweaking two tables for us one time saved us terabytes of data and sped just about every query in the warehouse up.)
Max and min length of varying character columns
s"SELECT
	MAX(OCTET_LENGTH(${column.name})) AS max,
	MIN(OCTET_LENGTH(${column.name})) AS min
FROM $schema.$table;"
This query actually let’s us do a couple of things:
if both lengths are 0, the column is empty so can possibly be dropped
if both lengths are the same, we can convert a VARYING CHARACTER column to a CHARACTER column
if the max is under where the schema indicates we set the limit, we can lower it to something more realisitic
We use powers of 2 to make a recommendation, such as a column with a max value length of 92 characters being set to allow a max of 128 characters instead of 256 or 1024 characters. This is less for performance and more for, when a human looks at a column, having a vague idea of how much shtuff each value contains. A field called “name” that’s 1024 characters wide is a weird thing to find in the wild; a field called “name” that’s 64 characters wide makes more sense mentally.
(If you’re wondering with we use OCTET_LENGTH in this query: emojis.)
Tables that truly need your love and attention
I’m not going to pretend to fully understand the following query; the Redshift Advisor suggested it for finding what they considered poorly optimized tables. What is helpful about this query (which I’m sure AWS has an explanation for somewhere though I’ve tweaked it a bit) is that it surfaces tables that truly need your love and attention as soon as you can give it to them. Even if you’re not going to have your SQL producer optimize tables, this is helpful for a human to use to find where to look in Redshift and put attention.
s"""SELECT DISTINCT ti."table" AS "table"
FROM svv_table_info AS ti
LEFT JOIN(
    SELECT
        tbl AS table_id,
        COUNT(*) AS size
    FROM stv_blocklist
    WHERE (tbl, col) IN (
        SELECT
            attrelid,
            attnum - 1
        FROM pg_attribute
        WHERE
             attencodingtype IN (0,128)
             AND attnum > 0
             AND attsortkeyord != 1
    )
    GROUP BY  tbl
) AS raw_size USING (table_id)
WHERE
    raw_size.size IS NOT NULL
    AND (
      raw_size.size > 100
      OR skew_rows > 3.0
    )
    AND ti.schema = '$schema'
;"""
Appendix B: select Github logic
We use this Github Java driver for interacting with the Github API but others are available, both natively in Scala and Java. The Github API has a lot of power but can be hard for a new person to wrap their head around, thus why I am providing our code essentially as-is. (Also shoutout to GC alumni Hesham, now at Github, who helped me debug my problems and make my ideas a reality!) With this base, you should be able to tweak anything to match your needs while also finding other functionality to add following a similar pattern.
Our setup involves connecting to a specific repo using an access token but you can make it more generic if necessary. We also use some established values like defaultBaseBranch and pathToMigrations (since this system explicitly puts out migrations) which can be easily swapped out for your specific needs or, again, made more generic.
class Github(accessToken: String, repoName: String) {
  private val repo = new GitHubBuilder()
    .withOAuthToken(accessToken, organization)
    .build
    .getRepository(s"$repoName")

  def getBranch(branchName: String): GHRef = repo.getRef(s"heads/$branchName")

  private def makeBranch(branchName: String): GHRef = {
    val base = repo.getRef(s"heads/$defaultBaseBranch")
    val baseSha = base.getObject.getSha
    repo.createRef(s"refs/heads/$branchName", baseSha)
  }

  /** If the branch does not yet exist, create it. If it does exist, it can be created again or returned as is. */
  def createBranch(branchName: String, deleteIfExists: Boolean = false): GHRef = {
    if (deleteIfExists) deleteBranch(branchName)

    Try(getBranch(branchName)) match {
      case Success(branch) => branch
      case Failure(_) => makeBranch(branchName)
    }
  }

  def deleteBranch(branchName: String): Unit = Try(getBranch(branchName)).map(branch => branch.delete)

  private def getMaxMigrationNumber: Int = repo
    .getDirectoryContent(pathToMigrations)
    .asScala
    .map(content => content.getName)
    .filter(_.startsWith("V"))
    .map(_.stripPrefix("V"))
    .map(_.split("__")(0))
    .map(_.toInt)
    .max

  def commit(migration: Migration, deleteBranchIfExists: Boolean = true): String = {
    val branch = createBranch(migration.branchName, deleteBranchIfExists)
    var nextMigrationNumber = getMaxMigrationNumber + 1

    migration
      .migrations
      .foreach(sql => {
        repo
          .createContent
          .branch(migration.branchName)
          .path(s"${pathToMigrations}V${nextMigrationNumber}__${migration.prType.toString}_${migration.schema}_${migration.table}.sql")
          .content(sql)
          .message(s"Creating migration to ${migration.prType.toString} ${migration.schema}.${migration.table} in warehouse")
          .commit
        nextMigrationNumber += 1
      })

    migration.branchName
  }

  /** If a branch has had commits since a given datetime. */
  def hasCommitsSince(branchName: String, since: Date): Boolean = repo
    .queryCommits
    .from(branchName)
    .since(since)
    .list
    .toList
    .size > 0

  def makePullRequest(branchName: String, migration: Migration): URL = new URL(
    repo
      .createPullRequest(s"${migration.prTitle} ($environment)", branchName, defaultBaseBranch, migration.prDescription, true)
      .getIssueUrl
      .toString
      .replace("api.", "")
      .replace("repos/", "")
      .replace("issues", "pull")
  )

  def getContentsOf(branchName: String, path: String): String = repo
    .getFileContent(path, s"heads/$branchName")
    .getContent

  def updateContentsOf(branchName: String, path: String, newContent: String, commitMessage: String): Unit = repo
    .getFileContent(path, s"heads/$branchName")
    .update(newContent, commitMessage, branchName)
}
I felt bad there were no images in this post so here’s a kitten, thank you for making it this far. :bowing_woman:
Footnotes
Italo Calvino, If on a Winter’s Night a Traveler.
Federico Fellini.
Søren Kierkegaard’s journals.
Will Durant.
Antoine-Laurent de Lavoisier, Elements of Chemistry.
Frederick P. Brooks Jr., Mythical Man Month.
Edna St. Vincent Millay, Renascence and Other Poems.
An overview of off-the-shelf solutions for moving data out of Kafka, problems we had making those systems work, and how we wrote our own solution and stood it up for those in a similar situation.
You cannot know everything a system will be used for when you start: it is only at the end of its life you can have such certainty. [1]
Many moons ago I wrote about our design for upgrading our data pipeline, which lightly touched on how we’d move data out of our pipeline (Kafka) to downstream systems, namely our data warehouse and data archive. At that time we hadn’t really been able to dive into focusing on getting the data out of Kafka, because getting data in to Kafka is often much more custom and complex, and we thought we’d be able to use an off the shelf solution like Kafka Connect to move data out, don’t even worry about it.
We were, uh — we were wrong.
Let me take you on our journey, in case you’re on this journey too.
data warehouse: This will be our holding tank where data waits between extraction and loading. (More on this name later.)
data archive: This will be our archive where data waits until we maybe, one day, thaw it, should it be needed again.
We’d like to store data based on a timestamp within the event.
data warehouse: We want to use the processing time.
data archive: We want to use the event time.
That last item is a really subtle, nuanced one so let me give an example of what I’m talking about: say there was some sort of outage on April 2nd, 2019. Maybe an upstream system hit two unrelated bugs that caused about fifeteen minutes of downtime when they joined forces, you know the kind I mean. The user impact was resolved quick as can be, all of the systems seemed to go back to normal, we all went along with our lives.
Then, in March of 2021, one of our data scientists realizes we’re missing this block of data and it’d be great if we could grab it for them, to fill in this gap for their work. Would that be possible? They’re doing some sort of deep dive so having all the data they can would be :kissing_heart::ok_hand: but no worries if that’s not possible; data will always be imperfect.
Sure thing, we can grab that data! We go to the upstream system and replay the fifteen minutes of missing data, on March 28th, 2021. (I know that implies someone was working on a Sunday but it was my birthday so let me have it.) The data goes into the data pipeline again, ready to move to its downstream systems like nothing ever happened. Where does that data land?
Well for our data warehouse, the data lands in the holding tank to wait to be moved into the warehouse. Because it was processed recently, we put it with other March 28th, 2021 data. For our data archive though, it’s a bit different, as this data was processed recently but is about April 2nd, 2019: you can see that in its event time. If we ever wanted to go back and look at all April 2019 archived data — say for a legal or security request — but the backfilled data wasn’t there with its friends, we’d miss that when we pull data from the archive. And what’s the point of a data archive if you can’t trust that the data is neatly organized to pull from? Our data archive passed 50 TB a long time ago, we can’t sift through it easily by hand, nor can we pull all data from April 2019 until now to compensate for bad sorting in fear that we’d miss something important. That’s no way to live your life.
And that is why we need to store data in the two systems based on different timestamps within the events. We know both fields will always be available (it’s a requirement for our producers to put data into the pipeline) so want to take advantage of that to make sure we keep the data archive tidy and usable. When you shove things in a freezer without labels, you often don’t know what food it is — same problem here when we’re trying to figure out what data we need to thaw from the archive.
So… how do we tackle this problem?
Solution 1: Kafka Connect
Good judgement comes from experience, and experience comes from bad judgement. [2]
If you Google for how to solve this problem (which is possibly how you came across this writeup), the Internet will tell you to use Kafka Connect. And that makes sense: I love being able to use the native, built in solutions a system is meant to work with. It makes your life easier, it’s less maintenance, you’ll probably have much more community support — it’s a win all around! And Kafka Connect can both write data into Kafka and write data out from Kafka, so you can use it in multiple places. We stan a solution that just makes sense.
A Kafka Connect job assignment we used, here for our production archiver
Except… people have issues with Kafka Connect writing data to S3. There’s just something about that combination that causes it to have issues. I’ll leave you to decide whose accounts online you’d like to read, as it seems we all encountered different though related problems, but what we found over the nearly year and a half we had Kafka Connect running was it would run out of memory no matter what we did, how we changed the configurations, how much memory we gave it, and how we limited the data it was processing. From people who run the system in production to the main authors of the system, no one could figure out or explain why.
Real talk: I’m not hear for that sort of mystery in my systems, especially ones as critical as this one would be. You shouldn’t be either, you deserve better.
When you work with bounded data — a word here which means a finite set of data — you can do things like batch the data for processing and design your solution around the specifics of the data set. But when you’re processing unbounded data — infinite data that just keeps coming, at higher or lower volumes, depending on factors outside your control — you have to be able to handle those ups and downs gracefully.
To understand the limitation of things, desire them. [8]
We wanted a streaming solution — one designed for unbounded data sets — to ensure both that we were moving data as quickly as we could, to deliver insights as quickly as we could, but also to ease the maintenance. It might sound strange, as you’d think a streaming solution would be hella more work to maintain in the long term than a batch system, but in this case it was quite the opposite. The system we’d used in our previous data pipeline was batch based but it was hard to onboard new people to, required a lot of deep knowledge of areas like MapReduce to reason about, and if it got a little bit behind — oof, forget about it, once it hadn’t run for four hours you were about to be in for punishment. One time it was down over the weekend and took a whole week (maybe longer?) to catch up, with single batch runs taking 36+ hours before failing out. Our team took turns having to watch it and keep it running at all hours of the day, and we still had data loss because we weren’t fast enough despite throwing all the hardware we could at it.
There will be large volumes of data, and the data will keep coming. A streaming solution is the right way forward, but Kafka Connect wasn’t ready for the needs we had. So we started to look elsewhere for what other solutions there were. The Internet warned us to write our own solution, but the hope persisted that in this one area, a system already existed that we could use.
Solution 2: Secor or Gobblin
My gracious data engineering partner-in-crime Emma took the lead on looking into two other solutions we’d come across that weren’t as popular as Kafka Connect but could maybe, still, be made to work. I’d like to thank her for her dedication in the great Battle To Make These Systems Work; she was a brave soldier who fought a good fight, which I would not have been able to make it through.
That’s what I consider true generosity: you give your all, and yet you always feel as if it costs you nothing. [7]
Secor was our first contender. It’s from Pinterest, who has some hecka big Kafka clusters, so I trust that their Kafka experts understand what it’s like to run these systems in production in the long term. It was easy enough to get started with but we couldn’t get it to behave as we expected, similar to Kafka Connect. We were seeing strange issues related to codecs, especially around Avro, so someone moving around data without Avro might not face the same challenges. But this for us was a very important requirement so forced us off of Secor to our next item.
Gobblin is the successor to the previous system we’d used for this need, Camus, and yes that does mean we were running Camus years after it was sunsetted, yes it was a scary time I’d like to not think about again. We had thought that Gobblin, while more a batch design, being the evolution of the system we already used, perhaps this would be easy enough to set up and we could tweak it over time. We were still hopeful.
Uh, yeah, so — no. I’m sorry Emma! We spent a week or two intensively working on just seeing if we could make this work — not meet all our needs, purely work. We had trouble with the Avro time partitioning, which had been so easy with Camus. We had constant issues with Gobblin’s Maven dependencies, which was not expected. We couldn’t set the S3 path where the files would be, when it did occasionally put out three files before crashing.
An architect’s first work is apt to be spare and clean. He knows he doesn’t know what he’s doing, so he does it carefully and with great restraint.
As he designs the first work, frill after frill and embellishment after embellishment occur to him. These get stored away to be used “next time.” Sooner or later the first system is finished, and the architect, with firm confidence and a demonstrated mastery of that class of systems, is ready to build a second system.
This second is the most dangerous system a man ever designs. [2]
Yeah, so, the Internet was right all along that we’d need to write our own solution. Would it be something we’d need to maintain? Yes. But would it at least work? We had to hope so!
Solution 3: we’ll do this ourselves
At this point, we had a data pipeline being held up by the need to do two simple, nearly identical things: move data from the pipeline to the archive, and move data from the pipeline to the holding tank. That was it, these were S3 locations, we wanted Avro files, let us specify the timestamps — nothing crazy or out of the ordinary. Simple needs, all configuration based, but none of the off the shelf solutions would work for us and we needed to deliver.
So we wrote our own solution.
I will certainly not contend that only the architects will have good architectural ideas. Often the fresh concept does come from an implementer or from a user. However, all my own experience convinces me, and I have tried to show, that the conceptual integrity of a system determines its ease of use. Good features and ideas that do not integrate with a system’s basic concepts are best left out. [2]
Before I walk you through the solution in detail, let me explain how it came about. See, when Emma and I were discussing what we’d do knowing we needed to write our own implementation, we decided we’d write a Scala consumer using the Kafka native consumer library. Avro and the Schema Registry were also easy enough to throw into the mix, grabbing from Hack Day projects and other one-off scripts we’d used over the years. We decided we’d pair program the implementation and gave ourselves a few days, as I was more familiar with Scala and had a stronger sense of what we’d want to achieve, but we both agreed we needed more than one person to understand the system and be able to maintain it. We cleared our calendars, we made sure people knew we’d be doing Big Things, and then we settled in for several days of intense work.
I’d say about, oh, 40 minutes in, we had 90% of the logic down. :woman_facepalming:
A setback has often cleared the way for greater prosperity. Many things have fallen only to rise to more exalted heights. [6]
Is our solution going to win any awards? No, but that’s fine. We’re not going for a clever solution; in fact, I explicitly didn’t want a clever solution. A clever solution isn’t obvious, a clever solution uses slight of hand and is hard to maintain. What I wanted was a smart solution, a solution that when you look at it you say, “Well of course,” as if there was no other way to logically do this, duh. A smart solution should be so obvious it’s almost painful that you had other iterations before it, but it can take a lot of deep knowledge and work to arrive at such a solution. A smart solution hides the sweat and toil that went into it, but it is the right solution in the long run.
But of course, we all know the two hardest problems in computer science are naming things, cache invalidation, and off by one counting errors. However I’ve found a nifty way of naming things that helps to attack this NP-hard problem: poll your coworkers! Not just your team but the whole company! Let everyone brainstorm, especially people who aren’t deeply in the thick of the implementation so can think more freely about what the system is, so it’s name makes sense to them.
Ultimately, the most important part of naming things is just that: meaningful names. As with clever vs smart solutions, there’s a difference in a clever vs smart name, and once you see the smart name, people will assume that was the obvious name from the start. I don’t care if you know what a functor is so long as you can see one in the wild and go, “Yeah I get how that works.” There shouldn’t be barriers to entry making in groups for who understands a system and who doesn’t. What’s the point? You’ve made people feel stupid and excluded, you’ve limited who can and will help you, and for what? A smart name is meaningful to everyone who wants to come along and go, “What’s this? Tell me more.”
I’ve polled people in the past to great results: when we needed a name for the data store where we kept extracted data from the pipeline before loading it into the warehouse, a teammate suggested “holding tank.” Beautiful! Love it! Never been done before! It’s the tank of data that holds stuff waiting to move. It’s specific, it’s meaningful, it’s smart naming.
The finest of pleasures are always the unexpected ones. [9]
So off went the poll for this system: we’re creating a system to sit between the pipeline and the holding tank/archive. It’ll regulate moving data from the one to the other. What should we call it? Shoutout to TJ for suggesting “valve,” a beautiful, succinct name that just fits — so obviously, it’s like it was always meant to be.
We had a name, we had a plan, we had a language in hand. Time to implement!
How you can do this yourselves, code edition
A language that doesn’t affect the way you think about programming is not worth knowing. [4]
Our solution being in Scala had its up and down sides. The upside is, Kafka is very much JVM first and written in a mixture of Java and Scala, so there’s lots of examples online and helpful libraries you can use. Scala also allows you to easily use higher order functions and, being heavily typed, allows you to stub out functions you’ll come back to later. I often find functional Scala works beautifully with test-driven development because you can set up these basic pieces and then, truly, treat each implementation like a black box that just needs to meet your test’s expectations. Having these tests then act as documentation as well as specifications, especially with a given/when/then format which neatly breaks down the test into preconditions, the action being tested, and the postconditions.
test("get value that exists") {
  Given("a Consul directory")
  val directory = "data-consul-test-directory"
  assume(directory.nonEmpty)
  assume(!directory.endsWith("/"))

  And("a Consul key")
  val key = "test_key_1"
  assume(key.nonEmpty)

  When("I get the value from Consul")
  val result = Try(Consul.valueFor(directory, key))

  Then("I am successful")
  assert(result.isSuccess, s"Result should have been a success but was a failure: $result")

  And("the value I expect comes back")
  val expected = "this is a test key"
  assert(result.get == expected, s"Result `${result.get}` should have matched expected `$expected` but didn't.")
}
An example Scala test using given/when/then that was set up before the code it tests was written.
The downside is Scala has a hella steep learning curve. Once you’re in it, it’s pretty smooth sailing, but getting to that point can be difficult. For that reason, I’m going to throw a lot of code at you to assist you and give you a starting point to jump off from. If you want to translate it to Java, go for it, do what makes the most sense for you! If you want to do it in another language, again get wild — you’ll have to live with the implementation and maintenance, so make the choice that is right for you and your team.
It is exciting to discover electrons and figure out the equations that govern their movement; it is boring to use those principles to design electric can openers. From here on out, it’s all can openers. [3]
Domain specific language
Our DSL package contains the building block data structures we use throughout the system. For us, this was most importantly the message data structure to contain our input we take in from the pipeline.
/** Represents a neat, cleaned up message from the pipeline.
  *
  * @param schema The processed schema that represents this event.
  * @param message The contents of this event.
  * @param raw The original, raw contents of this event.
  * @param timestamp The timestamp for when this event was from, if available.
  * @param partition The partition for where this event was from, if available.
  * @param offset The offset for where this event was in the pipeline, if available.
  */
case class Message(
    schema: ProcessedSchema,
    message: Map[String, Any],
    raw: GenericRecord,
    timestamp: Option[Long] = None,
    partition: Option[Int] = None,
    offset: Option[Long] = None
  ) {
  /** Returns the timestamp for this message based on the extraction key provided.
    *
    * @param key The key in the message to get the value with.
    * @return Formatted string of the value retrieved.
    */
  def extractionStringOf(key: String): String = {
    require(message.keys.toSet.contains(key), { s"Cannot extract string using key `$key` when not in message: ${message.keys}" })

    val extractionTimestampString = message(key).toString
    val extractionTimestampDate = new DateTime(extractionTimestampString, DateTimeZone.forID("UTC"))
    Message.dateFormatter.print(extractionTimestampDate)
  }
}
The ProcessedSchema type here is just a wrapper around the raw Avro schema with some key metadata made easily available, like the name of the schema and a list of its field names, mostly for debugging purposes. Avro is a very concise format, which is great for sending and storing large volumes of messages but not so easy for human eyeballs to make sense of!
One of the big pieces of the message we’ll need for our system is getting the datetime string from the input that we want to use for where we put the message: if it’s from April 2nd, 2019 at 14:00, we need to pull out 2019-04-02 14:00:00 from somewhere to know that! Which key we use is configured when the system gets its assignment, but you can always have more logic around determining that if you want. The formatter can also be made specific to your needs; we use year=YYYY/month=MM/day=dd/hour=HH for historical reasons but you can use whatever you like.
Another key data structure is the messages we’ll output to our deadletter queue about problems the system encountered. This wraps the input message but also provides additional information for debugging later like the error we saw, when we had the issue, who specifically had the problem (in case you have multiple systems outputting deadletters), whatever it is you’d want to know to work on the problem.
/** Deadletter for the deadletter queue, ie message that could not be processed and instead has an error associated with it that requires further investigation.
  *
  * @param message Message that could not be processed.
  * @param exception Error encountered.
  * @param processedAt When the message was being processed.
  * @param processedBy Name of who was processing it.
  */
case class Deadletter(val message: Message, val exception: Throwable, val processedAt: DateTime, val processedBy: String) {
  lazy val asJson: Map[String, Any] = Map[String, Any](
    "processed_at" -> Deadletter.dateFormatter.print(processedAt),
    "processed_by" -> processedBy,
    "exception" -> exception.getMessage,
    "topic" -> message.schema.topic,
    "message" -> message.message,
    "timestamp" -> message.timestamp.getOrElse(null),
    "partition" -> message.partition.getOrElse(null),
    "offset" -> message.offset.getOrElse(null)
  )
}
A nice side effect of including the original input is, if we resolve a bug, we can later on send the impacted messages through the pipeline again to its original topic. You can also build out something to track if you keep seeing the same message error out over and over, which might indicate something so broken that it boggles the human brain. I’ve seen some wild data, I bet you have too.
Writing the output
We know ultimately we’ll need to write our messages out as Avro files. This is relatively straightforward though not super obvious if you’re not that familiar with the Avro library’s options. I’m definitely no expert in this area, but I’ve at least gotten the below to work and its generic enough that I’ve used it in a couple of systems.
def write(messages: Seq[Message], fileName: String = ""): Try[File] = Try({
    require(messages.map(message => message.schema).toSet.size == 1, { "All messages must be of the same schema." })

    val fileNameUse = "tmp/" + {
      if (fileName.isEmpty) messages.head.processedSchema.topic
      else fileName
    }.stripPrefix("tmp/").stripSuffix(".avro").replace("/", "-") + ".avro"

    val schema = messages.head.processedSchema.rawAvroSchema
    val writer = new DataFileWriter(new GenericDatumWriter[GenericRecord](schema))
    val output = new File(fileNameUse)
    writer.create(schema, output)
    messages.map(message => writer.append(message.raw))
    writer.close()
    output
  })
This function will write a local tmp/ file of the passed in messages, assuming they’re all of the same type. Because a message carries metadata about its schema, we can grab the schema from there and make a generic writer that moves our messages from the running system to that local file. This is a very imperative method but I’ve not found a “better” way yet, so if someone is more familiar with the Avro options, please let me know!
(If you’re looking to write JSON output like a deadletter, json4s works beautifully with case classes but can be made to work with generic maps of JSON input quite easily as well.)
Processing the data
Now that we have our handful of building blocks, we can piece them together into our actions we want to take when we have messages. If there is a secret sauce to the system, this is it, so I’m sharing it nearly as is (removing some internal specific comments). Code that’s referenced but I’ve not provided is pretty generic, so you can make your own implementations for things like Log and Metric as you’d like.
/** Perform (business) logic for valve consumption of pipeline messages to move them to data stores. */
object Valve {
  /** Generates a file name for a batch of messages using the provided timestamp value for path and file name.
    *
    * @param timestamp Value to use for timestamp to write messages out using.
    * @param messages Messages from the pipeline consumer.
    * @return Combined path and file name to use in S3.
    */
  def getFileName(timestamp: String, messages: List[Message]): String = {
    require(timestamp.nonEmpty, { "Timestamp value must be present" })
    require(messages.nonEmpty, { "There must be at least one message in the batch" })

    val topic = messages.head.schema.topic
    val length = messages.size
    val uniqueId = java.util.UUID.randomUUID.toString

    s"$topic/$timestamp/${topic}_${length}-messages_${uniqueId}.avro"
  }

  /** Writes given messages to S3 using provided timestamp value for generating paths and files.
    *
    * @param s3 Connection to S3 bucket for where to write messages.
    * @param timestamp Value to use for timestamp to write messages out using.
    * @param messages Messages from the pipeline consumer.
    * @return File name wrote to S3.
    */
  def writeToS3(s3: S3Connector, timestamp: String, messages: List[Message]): String = {
    require(messages.nonEmpty, { "Cannot write empty messages to a file" })
    val fileName = getFileName(timestamp, messages)
    val file = AvroConverter.write(messages.toSeq, fileName).get
    s3.write(fileName, file).get
    file.delete
    fileName
  }

  /** Send messages that are associated with an error to the deadletter queue for investigating later.
    *
    * @param processor Name of processor that encountered these messages, ie name of valve running.
    * @param errorTopic Topic to send deadletter messages to.
    * @param producer Producer for deadletter messages.
    * @param messages Messages that the error is associated with.
    * @param exception Error encountered.
    */
  def sendDeadletter(
    processor: String,
    errorTopic: String,
    producer: PipelineJsonProducer,
    messages: List[Message],
    exception: Throwable
  ): Try[Unit] = Try({
    messages
      .map(message => Deadletter(processor, message, exception))
      .map(deadletter => producer.produce(errorTopic, deadletter.asJson))
      .map(result => result match {
        case Success(_) => Log.info(s"Wrote to deadletter queue $errorTopic for ${messages.size} messages")
        case Failure(exception) =>
          Log.error(s"Unable to write to deadletter queue $errorTopic for ${messages.size} messages: ${exception.getMessage}")
          throw exception
      })
  })

  /** Action for a pipeline consumer.
    *
    * @param processor Name of processor consuming these messages.
    * @param s3 Connection to S3 bucket for where to write messages.
    * @param extractionKey Key to use for timestamp to write messages out using.
    * @param errorTopic Deadletter queue topic, if errors are encountered.
    * @param errorProducer Deadletter queue producer, if errors are encountered.
    * @param messages Messages from the pipeline consumer.
    */
  def process(
    processor: String,
    s3: S3Connector,
    extractionKey: String,
    errorTopic: String,
    errorProducer: PipelineJsonProducer
  )(messages: List[Message]): Try[List[String]] = {
    val result = Try({
      require(messages.nonEmpty, { "Cannot consume empty messages" })
      Metric.attempting("process", messages.head.schema.topic, messages.size)
      messages
        .map(message => (message.extractionStringOf(extractionKey), message))
        .groupBy(_._1)
        .map(timestampAndWrappedMessages => {
          val (timestamp, wrappedMessages) = timestampAndWrappedMessages
          (timestamp, wrappedMessages.map(_._2))
        })
        .flatMap(timestampAndMessages => {
          val (timestamp, messages) = timestampAndMessages
          Try(writeToS3(s3, timestamp, messages)) match {
            case Success(fileNames) => Some(fileNames)
            case Failure(exception) =>
              Metric.deadletter(exception.getCause.toString, messages.head.schema.topic, messages.size)
              sendDeadletter(processor, errorTopic, errorProducer, messages, exception).get
              None
          }
        })
        .toList
        .sorted
    })

    result match {
      case Success(files) =>
        Log.debug(s"Just wrote ${messages.size} messages to: `${files.mkString("`, `")}`")
        Metric.succeeded("process", messages.head.schema.topic, messages.size)
      case Failure(exception) =>
      	Log.error("Error encountered consuming", exception)
        if (messages.nonEmpty) Metric.failed("process", messages.head.schema.topic, messages.size)
    }
    result
  }
}
I know there’s a lot in there but as I said, this is it: this is what makes the system the valve we’re after. You can tweak how you generate file names for your needs, or maybe send more or less metrics than we do. The process function though will probably remain pretty similar to what we have:
For each batch of messages,
For each message, get the timestamp we want to use.
Bucket each group of messages with those who have the same timestamp, for example all of the 2019-04-02 14:00:00 messages.
Clean up our list of (timestamp, messages) to (timestamp, list of messages).
For each timestamp with its messages,
Try to write the messages to S3.
If successful, collect the file names.
Otherwise, send the messages to the deadletter queue.
Grab the list of files we wrote and sort them (purely for humans to have an easier time reading).
Everything else is metrics and logs! The data structures provide the necessary extraction functions, and the helper functions provide the rest so each piece is as small as possible: easy to update, easy to test, easy to understand.
Running it
With all of that, all that’s left is to run the system.
object Driver {
  def main(args: Array[String]): Unit = {
    val configs = Configuration()

    val processor = configs.pipelineGroupName

    val s3 = S3Connector(configs.bucket)
    val topics = SchemaRegistry
      .getTopicsToConsume(configs.topicToConsume)
      .get

    val deadLetterQueueTopic = s"_dead_letter_queue_$processor"
    val deadLetterQueueProducer = PipelineProducer.json(processor)

    PipelineConsumer(
      processor,
      topics,
      Valve.process(processor, s3, configs.groupByTimestamp, deadLetterQueueTopic, deadLetterQueueProducer),
      configs.maxBatch
    )
    deadLetterQueueProducer.close
  }
}
You might remember from my blog post about only having to specify configurations once that we use Consul to share values. This allows each piece of our system (like pipeline consumers and producers) to grab the configurations they need, so our Configuration object only needs to grab the environment variables specific to this valve, like which bucket will it write the data to or which timestamp are we grouping by. Then, once the pieces are set up, we pass the pipeline consumer our processing function and the rest takes care of itself.
(I have choosen to omit the pipeline consumers and producers as they are very basic implementations you can make using the default Kakfa drivers. My only suggestion is do allow the consumer to take in a function it applies to each batch of message — this allows you to use the same consumer code in multiple systems with minimal changes in between. Here we also use the Schema Registry to figure out which topics are of interest to us, but you might have another way of specifying that.)
How you can do this yourselves, infrastructure and metrics edition
Alright, we have a valve, it works well enough to throw it into the wild and see how it behaves. We even have some metrics around it, so like: now we launch it, yeah? How do we launch it though?
We like to use AWS ECS on Fargate (read more about our running Apache Airflow on it here) for our data systems so I’ll let that description suffice for this blog post as well for how we run containers. The major difference between that setup of Terraform to run containers and what the valve has is scaling: the valve is constantly running, trying to keep pace with data, so we want to make sure we have enough valves for the data we’re seeing. Since Kafka works with consumers to distribute messages, all we need to do is scale the consumers in the group and Kafka will organize distribution of messages. Thanks, Kafka!
The programmer, like the poet, works only slightly removed from pure thought-stuff. He builds his castles in the air, from air, creating by exertion of the imagination. [2]
We’ve chosen to scale on three metrics: offset lag (if we’re more than so many messages behind), time lag (if we’re more than so many hours behind), and memory usage (as the final backup though we’ve yet to see this really be necessary). The offset lag and time lag we calculate in our consumer and report to AWS, looking at the difference between messages we’re just consuming and where the most recent data is; for example, if we’re processing a message from 06:00 today with an offset 973 and right now it’s 17:32 with the latest offset for this topic/partition being 10452, we’re over eleven hours behind and nearly a thousand messages behind. Time to scale on time lag!
Within our Terraform module, we use the following generic scaling policies that we configure as necessary with min/max instances, offset lag (for us, 25 batches behind), time lag (two hours behind), and memory usage (60%). This way each version of the valve (one for extracting, one for archiving, always room for more!) can scale on its own but we can also have them configured similarly, since they’ll all be flooded at the same time with the same messages. It’s easier for us to mentally reason about the system this way while allowing each to do its thing in its own time and way.
At this point with the valve up and running, monitoring the system is actually super simple! We like to use the same style boards for most of our systems, so if the below Datadog examples look familiar, it’s because you’ve seen me use these before.
We must trust to nothing but facts: These are presented to us by Nature, and cannot deceive. We ought, in every instance, to submit our reasoning to the test of experiment, and never to search for truth but by the natural road of experiment and observation. [10]
Looking at our last month in production, I can see what our valve has been up to:
CPU and memory usage have been typically low, excellent, and that makes sense: the system is data intensive but not doing anything complicated. We can also see the pickup in data coming in based on our running or pending tasks; as a sports company, weekends and nice weather are often quite clear in our metrics about what our data systems are up to. We’re constantly tweaking our max instance limit as well as offset/time lag scaling policies, to make sure we’re moving the data through our systems as quickly as we can, so this is always exciting to drill into on Monday morning to see if we were aok or need to give the system more room to scale or make it more sensitive to prevent falling behind and then, worse, staying behind.
When we looked at processed messages (so messages that hit the Valve.process function and what happened from there), there’s a lot happening all the time! :fr: Formidable! :fr: We do have a spike in failed processes to look into, but that’s super rare and — given the scale of messages — it’s actually so small that it doesn’t bring down our success rate.
Similar to the processed metrics, the consumed messages (when the Kafka consumer picks up messages and if there’s an issue in that handoff), there’s the same amount of messages flowing through but none of them fail to be consumed. We do see our max wait in the pipeline keeps peaking way over our scaling, meaning that while we’re scaling, we’re not necessarily doing it fast enough or early enough; certain topics are more impacted by this than others (names removed but I promise they’re there on the real dashboard). Your scaling patterns might differ from ours so humans can respond more quickly during the week, whereas our load happens while no one is working. Gotta keep Mondays spicy.
Takeaways
So, uh, hate to say it, but the Internet was right from the start on this one: for moving data from Kafka to other systems, especially S3, writing your own custom solution remains the best way forward. And that can be daunting! Especially if the Kafka native libraries aren’t that familiar to you, or Kafka itself is a relatively new system.
All programmers are optimists. [2]
My hope is that, by providing so much detail of our thought processes, our code, our setup and monitoring, I can make taking on this problem and writing your own solution not only less daunting but something you feel confident tackling. A system like the valve might be complicated to describe but its implementation is small, obvious, and can be fully covered in automated tests to ensure both that you know what your code is doing and that others will be able to understand and maintain it as well.
Since rolling the valve out, we’ve had no problems that come to my mind outside of purely tweaking the scaling of the system. Again, given that our data is very seasonal and high load tends to come when we’re not working, getting our scaling just right is a long learning curve that we’re used to from every system that scales.
And the valve has, thankfully, started to pave the way for making use of the newer features our updated Kafka provides us. It shows that now we can not only make huge, data intensive systems that keep pace with the flow of data through the data pipeline, we can do it with just a little, straightforward code that anyone can hop into. If you want to start transforming data in real time, we can do it — no more batch jobs that take hours! If you want to start building customer-facing features that don’t slow down the main RESTful backend server, we can do it — and you have all the data available to you! The only limit, really, is your ability to figure out what you want to do with all this power.
We can only see a short distance ahead, but we can see plenty there that needs to be done. [5]
This journey took a year and a half to come to its conclusion but it was worth it: our new data pipeline was rolled out so smoothly, no one knew we’d torn down the old one until we announced that we’d already done it weeks ago. In our ETL process, the extractor is the fastest system with the least number of errors. If anything, the main problem with the valve is that it is so fast, the systems downstream from it look incredibly shabby and slow in comparison. Maybe time to redo those systems, to make them as quick and responsive as the valve is.
I’d like to thank Emma and Eduardo for their help in working with Kafka Connect, Secor, Gobblin, and the valve. I’d also like to thank the entirety of the data team for their help in running Camus manually during our largest extractor incident, and their faith that if I said we were going to write our own Scala solution, that that was the right way forward and I’d make the team feel comfortable with it. And finally I’d like to thank Jason, who never lost faith that Data Engineering would figure it out, even (and especially) when Data Engineering was just me, floundering, doing the best I could.
Time to convert another batch system to a streaming solution!
At GameChanger, we use scripts in many of our flows such as during deploys
or running Ansible while booting new instances. Some of these flows are
critical to our operations and require good visibility. Traditionally we
tried to send both metrics and logs to DataDog where we can both monitor what
scripts are doing and set alerts on various metrics. DataDog integration,
however, is not always available such as during the instance boot. In addition,
sometimes a DataDog alert does not provide enough context of what failed and most
importantly why it failed. It simply states that some threshold was reached. To
investigate the issue requires more manual steps by looking for the appropriate
log which is not always intuitive. That is why recently at GameChanger we
started integrating Slack error reporting directly into some of our critical
scripts. This post describes the exact mechanism of how that is achieved since
it uses a really cool bash trick.
Useful Commands
First some background on some of the useful commands.
tee Anyone?
Tee is a really useful command. It captures an output from a script
and both echoes it to standard out as well as forwards it to a file.
This allows to both see an output as well as capture the same output
for later use. For example:
$ echo hello there | tee hello.log
hello there
$ cat hello.log
hello there
Process Substitution
Some commands only work with files. For example a classic diff:
Sometimes however it is convenient to be able to refer to an output of commands
as a file without manually creating a temporary file. This is what process
substitution allows to do. Same example as above but with process substitution:
This is the output form of process substitution which uses <(command) syntax.
It stores an output of a command into a temporary file for the duration
of a command. There is also input form of process substitution which uses
>(command) syntax. It similarly creates a temporary file to which data can be
written to and process substitution will forward that content to a command. For
example:
$ echo "
> 2
> 1" > >(sort)
1
2
exec
Most common form of exec is to simply execute another command by replacing
the process:
$ bash -c 'exec echo foo'
foo
However exec also overtakes process file descriptors which allows exec to
adjust what a process does with its file descriptors which includes stdout
and stderr. For example exec can capture script output into a file:
Similar results can be achieved by manually sending script output to a file
(e.g. command &> log.txt) however exec allows to do that directly within
the script.
Putting Everything Together
Putting all commands together allows to do something like:
LOG_PATH=/tmp/deploy_$(date +%s).log
exec &> >(tee -a $LOG_PATH)

function error_msg {
    echo "Deploy last 50 logs:
$(tail -n 50 $LOG_PATH)
"
}

function slack_error {
    msg=${1:-}
    slacksend \
        --channel=alerts \
        --color=danger \
        --snippet="$(error_msg)" \
        --filename="deploy.log" \
        "$msg" \
        || true
}

deploy || (slack_error "terminating rolling deployment at $HOSTNAME"; exit 1)
Here is what the above does:
Shows script output as normal via tee. This allows normal script log
aggregation to work as normal.
In addition it fully captures script stdout and stderr to a log file via
exec, process substitution and tee
When the deploy command fails, it sends a slack message with the last 50
lines of the script logs
Wrap Up
It might not seem like much, but immediately seeing what failed and why by
including the failure logs makes for a much more pleasant debugging experience.
Most importantly it does not adjust how the script is used so no other changes
are required to other systems since all the enhancements are baked directly in
into the script itself.
Hopefully you will find some of these cool bash capabilities useful as well.
In any large object oriented codebase, managing dependencies can get difficult. Each class can require any number of third parties or other classes to function, and it can be hard to test the behavior of a single class with mocks if those dependencies aren’t easy to provide.
Fortunately, there’s a popular design pattern that can be applied to solve this problem, and that is dependency injection.
When using dependency injection, classes can be provided their dependencies through a constructor, and those dependencies can be swapped out easily for other implmentations. In tests, mocks can simply be substituted in to test class behavior.
While most of the time, this pattern is implemented with a framework, even without one manual dependency injection can give you some of these benefits.
Here at Gamechanger, we previously had a form of manual dependency injection in our typescript codebase. Each class would have a constructor that accepted its dependencies, which could be swapped out with mocks or a real implementation.
class BusinessLogic {
  constructor (dependencyA: DependencyA, dependencyB: DependencyB) {}

  private void foo() {
    this.dependencyA.action();
  }
}

// To instantiate this class, both dependencies must be created
const businessLogic = new BusinessLogic(new DependencyA(), new DependencyB());

// to test this class, mocks can be passed in
const testBusinessLogic = new BusinessLogic(new MockDependencyA(), new MockDependencyB());
In this example, if you need to replace a dependency, you can just supply a different class in the constructor for BusinessLogic.
This can work great for a small number of classes with a tiny dependency tree, but as your codebase’s number of dependencies grow, it can become difficult to manage. Once your dependencies have dependencies, its not as straightforward to get an instance of a class.
class DependencyC {
  constructor(dependencyE, DepedencyE) {

  }
}

class DependencyA {
  constructor(dependencyC: DependencyC, dependencyD: DependencyD) {

  }
}

// Now, to instantiate BusinessLogic, we need to create a tree of instances.
const dependencyC = new DependencyC(new DependencyE());
const businessLogic = new BusinessLogic(new MockDependencyA(dependencyC, new DependencyD()), new MockDependencyB());
Even in this relatively mild example, it’s starting to get complicated to manage the dependency tree. If you want to mock dependency C in the business logic dependency chain, you have to create all of the dependencies around it and pass those in.
When you need to test a particularly complicated class, setting up all its dependencies can take more time that writing the test itself! If you only need to mock a single subdependency, you need to instantiate everything all the way down until the mock is required, and then pass it in there.
Fortunately, there are dependency injection frameworks for typescript that can simplify the work that needs to be done.
Tysringe allows you to tag a particular dependency as injectable with a decorator, and then very easily get an instance of it.
At its core, tsyringe provides you a dependency container that keeps track of all your dependencies. When you need to create an instance of a class, you can call resolve on the the container with an injection token and it will return you the right dependency registered under that token.
Our previous example becomes much easier to manage with this:
import { container, injectable } from 'tsyringe';

@injectable()
class DependencyC {
  constructor(dependencyE, DepedencyE) {

  }
}

@injectable()
class DependencyA {
  constructor(dependencyC: DependencyC, dependencyD: DependencyD) {

  }
}

@injectable()
class BusinessLogic {
  constructor (dependencyA: DependencyA, dependencyB: DependencyB) {}

  private void foo() {
    this.dependencyA.action();
  }
}

// Now, all we need to do if we need an instance of business logic, is resolve it
const businessLogicInstance = container.resolve(BusinessLogic);
That’s it! All you need to do is tag your classes as injectable and tsyringe can take care of instantiating the whole dependency tree.
Writing tests also becomes much easier with the framework, when you need to mock a low level dependency, you can just register it with the dependency container, and leave everything else in place.
To register a mock, you can call registerInstance on the container, and provide it with the injection token you want to replace, and what you want to replace it with. Once you’re done with the mock it can be cleared with clearInstances on the container.
import { container } from 'tsyringe';

describe('BusinessLogic', () => {
  it('should call action on dependencyA when foo is called', () => {
    // We can mock a class at any level in the dependency tree without touching anything else
    container.registerInstance(DependencyC, mock());

    // dependency A gets a mock version of dependency C during this resolution.
    const underTest = container.resolve(BusinessLogic);

    // We can call this now that we're done testing, and the mock will be removed.
    // When we resolve the instance after this, we get the original dependencies.
    // In practice, we've found it's easy to just place this in your afterEach block.
    container.clearInstances()
  });
});
Here, DependencyC will be replaced with a mock for the duration of this test, and at the end, when clearInstances is called, it will return to its original form.
Tsyringe provides some great utilities we’ve been able to leverage to deal with common dependency problems. For instance, its fairly common to have classes that are singletons, and while managing that manually can be a bit difficult, its virtually painless with tsyringe.
import { singleton } from 'tysringe';

// This class will be a singleton, when container.resolve is called
// All calls will return the same instance.
@singleton()
class MySingleton {

}
Tsyringe also contains some great tools for managing the lifecycle of a given dependency. Dependencies can be scoped in a number of different ways. By default, dependencies have the transient scope, which means that every time you resolve this dependency a new instance is created. This can make sense, but also has some performance and memory implications, especially if you have some classes that are large and expensive to construct that aren’t singletons.
For our dependencies, we found that ResolutionScoped worked in reducing our memory usage. Resolution Scoping means that the same dependency will be reused during a resolution chain, so if you have a class that could need a dependency more than once in its dependency tree, it will only ever be instantiated once.
Potential Issues
There’s a few quirks we’ve learned to navigate with using tsyringe, mostly related to how to register mocks. There are a few ways to register something with the dependency container, the easiest of which is adding the @injectable() decorator, but you can also manually register something with a call to container.register. This can be useful if you need to register something that’s not a class. An additional note that’s useful in this case, is that your injection token can be a string which can also be helpful if you’re not registering a class.
If you need to resolve something from a string token in a contstructor, there’s an @inject decorator you can use to make sure the dependency is automatically resolved.
import { inject } from 'tsyringe';

class MyClass {
  constructor(@inject('NonClassDependency') nonClassDependency: NonClassDependencyInterface) {

  }
}
One problem with dependencies registered manually can be cleared unintentionally by a call to clearInstances which should be used in-betweeen tests.
To register a dependency that is unclearable without the decorator, it needs to be registered with useFactory. The factory should be a function that returns the item you want injected.
// Application code
container.register(MyDependency, { useFactory: () => myDependencyObject );
container.register(OtherDependency, { useValue: otherDependencyObject );


describe('MyDependency', () => {

  it('should not be mocked', () => {
    container.resolve(MyDependency);
    container.resolve(OtherDependency);

    container.clearInstances();
    // This will fail!
    // OtherDependency is no longer registered with the container.
    container.resolve(OtherDependency)

    // This will be fine, the dependency remains registered after clears
    container.resolve(MyDependency);
  });
});
This allows you to register whatever classes or objects you want managed by the dependency container in your application code, and then selectively replace them with mocks, in a given test, and then revert back to the original when the test is done.
Wrapping Up
Adding tsyringe has definitely made managing our application dependencies and testing code much easier, with a dependency injection framework, we now have a much more manageable solution to dealing with our large dependency tree.
At GameChanger, being able to deploy our changes quickly and reliably has always been important. Over the past few months on the platform team, we’ve been working to build a simpler and more reliable deployment pipeline to support our product teams in shipping code with speed and reliability.
In this post, I’ll go over the system that we have in place now, and some of our recent improvements.
How deploys our work
High Level Overview
At a high level, the core of our deployment process involves shipping a docker image to some EC2 instances, and then starting a container with that image.
Our main code repository contains a Dockerfile with the required configuration for our live app. After each new commit to our main code repository, Our CI process will docker build a new image with a new tag, and push it to our internal docker registry. During a deploy, we pull that image on the relevant EC2 instances, and start a container with it. Once we have a running container, we register that EC2 instance with a load balancer, and start serving traffic.
While the high level is straight forward, there’s a lot of work that goes into making sure our deployments happen safely, and at the right time.
Once a new image has been pushed to our registry by our CI process, we need to notify all our currently running instances that there’s a new version to deploy. Each commit corresponds to a new docker tag that’s created during the build. Once the tag is created, we notify our internal deployment service of the new version. Once our tag is pushed, and our deployment service is aware of it, we tell our deployment service to start a deploy, which will send a message to all of our running EC2 instances.
Serf Messages
We use Serf to send that message out without needing to directly contact every instance. The message we send contains a role and environment. The role is the name of a docker image we want to deploy a new version of, and environment will be production or staging depending on where this deployment is headed.
Through the Gossip protocol, the Serf message will propagate across our entire cluster in a short period of time, but only the boxes that are responsible for deploying the specified image do anything when they get the message. That’s because each box runs a serf agent, which listens for our messages and is given Serf tags when it’s initially provisioned. Serf tags allow us to associate a box with the docker images that should be deployed there. In our infrastructure, each box has a images tag, which is a list of docker images that should be deployed there. We’ll only start a deployment when the serf tags match the details in the deployment message.
Serf also allows you to configure event handlers for certain messages. An event handler is just a script that executes when a certain serf message is received by an instance. Each of our boxes has the same event handler for deploy serf messages, which is what starts the execution of our deploy script.
Deployment Locking
Before we can start creating the new containers, we need to make sure that it’s safe to start the deployment. During our deploy process, our live containers will stop serving traffic and be removed from our load balancers for a period of time. Since all of our instances receive the deploy message at the same time, they could all start deploying at once, and bring down our application until the deployment is done. In order to make sure that doesn’t happen, we use a locking system to ensure only 1/3rd of our boxes for any given service can be deploying at once.
First, each box uses serf to figure out the current size of the deployment (how many instances are involved) based on the environment and service name. Serf has a built in members command that allows us to see all of the other boxes that are active and running serf agents. We use this and the serf tags to get the count of live boxes we are going to deploy on. We also store this number in a redis key, and decrement it whenever a box is done deploying, so that when it reaches 0, we know a deployment is completely finished.
Once we have that, we know how many locks should be available, and each box will simultaneously try to acquire the first deployment lock. Each “lock” is represented by a single redis key with a suffix. We start with 1 as the first lock suffix, and increment from there. We use a SET NX to represent acquiring a lock, which will set a key only if it does not already exist. With only 1 instance of redis, only 1 box can succeed at this operation. The box that successfully sets the redis key will have acquired a deployment lock.
The box that succeeds can start deploying, and the rest of the boxes, will try acquiring other deployment locks by if they are available (since we only deploy a 3rd at a time, there are only cluster size / 3 locks available). If there are other locks available, the rest of the boxes will try incrementing the lock key suffix, and attempt to acquire the next lock key.
If there aren’t any locks available, the remaining boxes will poll redis until a lock frees up. Once a box is done deploying, it will release the lock it held by deleting the redis key it created.
If there’s an issue during deployment, or a box freezes or shuts down, we don’t want to prevent future deployments, so we set a TTL on the lock key of 15 minutes, to prevent holding up any deployments if we have to terminate an instance.
Once a box has a deployment lock, it can start running our deployment script. Since our serf message doesn’t contain which tag we want to deploy, we first reach back out to our deployment service, which tells us which tag to pull from the registry. Once we know the right tag, we can pull it and start some containers. Each of our boxes is provisioned with a docker-compose file, that tells us what containers we need to run on that box, what environment variables they need, and how they’re connected. The deployment script uses docker-compose to understand how to start up our container and it’s dependencies.
Because each service has it’s own compose file, starting up an application and it’s dependencies is as simple as running docker-compose up -d
If everything goes well, after our container starts up, the instance will register with our load balancers, and start serving traffic!
Blocking bad deploys
Before some recent changes, when we started a deployment, we would continue deploying to all of our infrastructure even if there were issues with the image. In cases where we might be deploying a faulty release, there was no way to stop it from rolling out to all of our boxes first, even if we had a fix ready to go.
One of the recent improvements we’ve made, has been preventing bad deploying from rolling out to all of the boxes for a service. Since we only deploy a 3rd of the cluster at a time, there’s no sense in continuing to roll out deploys that we know are broken.
To make this work, we take advantage of our locking mechanism. If a deploy is broken (for example: if we can’t start a container with our new image), we set a special key in redis that all of our currently deploying boxes look for as they’re waiting for a lock to become available, telling them to cancel the deployment. Once this key is set, the other instances stop deploying, and call out to our deployment service to mark this release as “broken”.
This new feature also allows us to make sure deploys work in lower environments first before automatically promoting them to production. Our pipeline will first, kick off a deploy to a staging environment, and if there are no issues, automatically kick off the production deploy.
Wrap Up
Our recent improvements have added some reliability and more visibility into our deployment pipeline, but the system is still evolving. Down the line, we’d like to look at tying in our APM metrics to deployment, and improving our detection of “broken” releases. We’re continuing to work on delivering a best in class deployment system to support shipping releases as quickly and reliably as possible!
An overview of what AWS ECS is, how to run Apache Airflow and tasks on it for eased infrastructure maintenance, and what we’ve encountered so that you have an easier time getting up and running.
Our data team recently made the transition in workflow systems from Jenkins to Apache Airflow. Airflow was a completely new system to us that we had no previous experience with but is the current industry standard for the sort of data-centric workflow jobs we were looking to run. While it hasn’t been a perfect fit, we have been able to get a lot of benefits from it: jobs are defined in code, we’ve the history of each job, it goes through our normal pull request process, and everyone on the team is able to read and write jobs.
Since our team is data focused, we wanted our Airflow setup to be as easy to maintain as possible, especially around infrastructure, so we have minimal distractions with high resiliency. This led us to using AWS ECS not only to run Airflow but for our bigger tasks that are already containerized. Not familiar with ECS? Or how to run Airflow or its tasks on it? Don’t worry, we weren’t either.
tl;dr Running Airflow’s infrastructure on ECS is super easy but running the ECS operator needs hecka help setting up.
What is ECS?
ECS is AWS’s Elastic Container Service, designed to let you run containers without worrying about servers. You do this by creating a cluster for your system, define task definitions for the tasks you want to run, and possibly group your tasks into services. You can also choose if you want to have your containers fully managed (ECS on Fargate), kind of managed but kind of not (ECS on EC2), or if you’d like to use Kubernetes.
If all of that made sense to you, congratulations: you can skip to the next section! If you need a bit more of a breakdown, here’s what you need to know:
A container is like a snapshot of a tiny computer that you can run anywhere. If, for example, you have some Docker containers to run, you can run them on my mac Mac, my father’s Mac, my mother’s Windows, my sister’s Linux, a server in a public cloud, a server in a private data center with an undisclosed location for security reasons — anywhere there’s a computer that supports the container’s setup can run that container, and you’ll get the same result from the container every time.
The main advantage containers give us is that it simplifies making sure that something running locally on an engineer’s machine, and running perfectly fine in a staging environment QA is testing in, will also run in a production environment where users are making requests, since they’re all the same container being run the same way. No dependency went missing in the middle, no permission was accidentally changed locally that hid a problem: it’s the same thing running the same way.
You might be saying, that sounds great! I’mma launch containers everywhere! And that is the attitude ECS is meant to capture and bring to fruition, because your other option to running containers is a bit more hands on: after all, a container needs to execute on a system, and that means hardware. That means a server somewhere you define and setup with an operating system of its own, and you might have to install the container’s setup system on it (for example, installing Docker), and you have keep it all up to date, plus you want to secure it, and you have to have a way to get containers started on that server, and you probably want a way to monitor for if a container goes down with a way to restart it, and there’s security patches…. This is starting to be a long list, and while it’s been a pretty standard list for a while, we deserve better systems.
We’re a data team, after all, and none of that is really about working with our data.
That’s where ECS comes in. Instead of running servers (EC2) where you do all the above things to to get your containers running, you can use ECS with Fargate to worry only about the containers: here’s the CPU and memory it needs, here’s the start command, here’s a health check, give it these environment values, and I want two of these running at all times. Boom: your containers are running, and restart as needed, and things are kept up to date for you, and there’s monitoring built in.
There’s a lot more nuance that goes into picking if you want to run ECS on Fargate or EC2 or Kubernetes, but if you’re still reading this, you probably want Fargate: with Fargate, you only need to worry about your containers, and the rest is taken care of for you.
Now that we’re all caught up…
ECS with Terraform
As discussed in a previous post, we’re huge fans of using Terraform for our team’s infrastructure, especially modules to keep systems in line across environments; I’ll let you read that post if you’d like some background knowledge on how we use Terraform modules and have them interact with Consul for sharing values. The short story though is, as with the above, it keeps the setup easy for our data team so we can continue to focus on our data.
For our workflow system, as with our data pipeline, we started by setting up a new Terraform module that contains
input values like configurations for the infrastructure or pass through values (we’ll discuss those later)
a single output value within Terraform, the workflow security group, so it can be allowed access to other systems like the data warehouse
Consul output values like where to find the workflow system or pass through values (again, more on those later)
our metadata store for Airflow; we’re using a PostgresRDS instance
our ECS cluster to house our workflow system, including its security group and IAM role
our main ECS tasks, for the basic Airflow infrastructure (discussed in the next section)
That might seem like a big list to you but remember, this is for a fully functional, production ready Airflow setup: you can start much simpler with just the cluster and its tasks, and add on as you go.
To start our ECS setup, we first needed a cluster with a capacity provider, ie the management style we want:
Our cluster also needed a role, which you can define through Terraform or create manually through the AWS console and then connect in Terraform, so it can have permissions to do things like talk to Redshift:
data "aws_iam_role" "airflow-role" {
  name = "test.workflow"
}
(If you didn’t catch it, that’s a data block instead of a resource block, so it’s fetching what already exists and making it usable within Terraform. This is especially helpful if you have existing infrastructure that hasn’t been fully ported over yet but want to set up new infrastructure in Terraform.)
The other big thing our clusters needed regardless of its tasks is to control who can talk to it and getting permission to talk to others, since we want to tightly control who can access our data:
You can see we take in the VPC and security groups from whoever is invoking the module, and then expose elsewhere this Airflow security group for other systems to allow access to.
Beautiful, now we have an ECS cluster. We can look at it, we can marvel at it, we can say, “Oh yes, I don’t worry about servers anymore, for I have transcended and run my containers directly.” But of course, just because we have a cluster doesn’t mean it does anything: you need to define task definitions for actual work to be done, and possibly services too if you’d like. (Tasks, as we’ll see later, can be run outside services.) However this does give us the framework now to set up the rest of our Airflow infrastructure within.
Setting up Airflow infrastructure on ECS
The two main pieces of Airflow infrastructure we needed were dubbed “the controller” and “the scheduler.” (Later additions to our setup like Celery workers, nicknamed “stalks,” followed the same setup pattern so I won’t include them here.) Now, you might understand immediatley what the scheduler is doing: it’s in charge of the Airflow scheduler (airflow scheduler). That leaves the controller as a new addition to the Airflow vocabulary.
We use the controller to run the UI (airflow webserver), make sure the database is all set up (airflow initdb), set up our root users (airflow create_user …), and create pools to throttle access to certain resources (airflow pool --import throttling_pools.json). Since it’s in charge of controlling all these pieces, we have dubbed it the controller, and when more work is needed, it is where we add this work to.
(Sidenote: as a team we prefer to use controller/worker language across our systems, with the controller name coming from Kafka where the lead broker is dubbed the controller, since leader refers to a different part of the system and is an easily overloaded term. It works well for nearly all systems we’ve applied it to, and might work well for your systems as well.)
Despite these differences between what the controller and scheduler do, they actually have almost identical setups within ECS and use a lot of the same inputs, so I’ll show the scheduler to start with since it has less pieces.
The first thing our scheduler needed was a task definition:
The majority of this is the task definition, mainly what container to run, what environment values and secret values to set up, how to log and perform health checks, and what command to run. Then we linked that up with Fargate and our role we created earlier, specify the CPU and memory we want, and we have something that can run the scheduler.
(Note that right now, this is not tied to our cluster: task definitions are cluster agnostic, should you have a task you want to run in multiple clusters.)
Now, since we always want a scheduler running, we created a service around this task definition to ensure it’s able to do its job:
This service wraps our task definition, pulling it into the cluster which will always make sure one task is running based on it. This takes care of running our Airflow scheduler, nothing else needed, boom we’re golden.
The controller has an almost identical task definition and service setup, sharing nearly all values. What we added to it though was a nice DNS record that can be accessed while on our VPN and the option to run multiple web servers if we wanted to through a load balancer:
(If you’ve never connected a DNS record, load balancer, and auto scaling group in EC2 before, the above might look like a lot of work, but it’s a pretty standard if verbose setup.)
And with that, we now have Airflow up and running: the database can be setup and configured as desired, the scheduler will run, the controller will prep the system if needed before starting the web server, and we’re good to roll this out for testing. Of course you might choose to pass in your secrets in a different way, or add way more Airflow configurations, but it should be simple no matter what.
You might have noticed that I did sneak in a few extra environment variables in those Airflow task definitions: the environment, the log level, the Consul address, and the Docker address. We found that having those always available helped our jobs to run (for example, we know every job can always check the environment it’s in) and allowed us to build custom utilities, especially around running Airflow tasks on ECS.
Setting up Airflow tasks on ECS
Airflow has an ECS operator that seems great to start with: run this little bit of code and you’re done! But… not quite.
Unfortunately, Airflow’s ECS operator assumes you already have your task definitions setup and waiting to be run. If you do, then go ahead and use the operator to run tasks within your Airflow cluster, you are ready to move on. If however you need to define those dynamically with your jobs, like we did, then it’s time for some Python.
Remember how before I said we had pass through values in our Terraform module? That’s where those come in. Terraform is where we know things like the address for our Docker Registry, or how to connect to our data pipeline and data warehouse. By having Terraform pass those values into Consul, we can then write Python to pull it down and make use of it, same as with our data pipeline setup. See: logic to the madness!
We have utility functions in our workflow setup for all of our most common actions: creating a DAG, creating a local (Python) operator, creating a remote (ECS) operator, getting values from Consul, posting to Slack, etc. These grew out of the Airflow provided functionality either not providing everything we needed or requiring additional setup that we wanted to keep standard and sensible for our team, like the remote operator setup. Here, let me even show you our publicly exposed function’s call signature and documentation for making a remote operator to run something in ECS:
def make_remote_operator(
    dag,
    task_id,
    task_group,
    task_name,
    task_container,
    task_start_command = None,
    task_memory = CpuValues.M.default_memory(),
    task_cpus = CpuValues.M,
    healthcheck_command = None,
    healthcheck_waittime = None,
    healthcheck_interval = None,
    healthcheck_timeout = None,
    healthcheck_retries = None,
    environment_values = None,
    secret_values = None,
    local_values = None,
    jit_values = None,
    throttling_group = None
):
    '''
    Create a remote operator. Currently this is an ECS operator. Read more at https://docs.aws.amazon.com/AmazonECS/latest/developerguide/task_definition_parameters.html .

    :param dag: DAG this operator will be part of.
    :param task_id: Id of this task.
    :param task_group: Enum value of WorkGroup this task is a type of, for example WorkGroup.ETL for an ETL task.
    :param task_name: Name of task.
    :param task_container: Container to run for task.
    :param task_start_command: Start command to use, if different from default.
    :param task_memory: How much memory (in MiB) to have; must be valid for the CPU setting. Use the CpuValues enum to verify valid values.
    :param task_cpus: How much CPU to have, as a CpuValues enum.
    :param healthcheck_command: Command to run to perform a health check, if any.
    :param healthcheck_waittime: How long to wait before performing a health check, in seconds. Must be from 0 to 300. Disabled by default.
    :param healthcheck_interval: How long to wait between performing a health check, in seconds. Must be from 5 to 300. Default is 30 seconds.
    :param healthcheck_timeout: How long to wait before failing a health check that didn't response, in seconds. Must be from 2 to 60. Default is 5 seconds.
    :param healthcheck_retries: How many times to retry the health check before failing. Must be from 1 to 10. Default is 3.
    :param environment_values: List of environment value keys to fetch and populate from Consul.
    :param secret_values: List of secret environment value keys to fetch and populate from Consul.
    :param local_values: Map of key/values to populate.
    :param jit_values: Map of key/values to populate that you cannot know until just before the job runs (just in time).
    :param throttling_groups: Enum value of ThrottlingGroup this task if in the throttling group of, if any, for example ThrottlingGroup.WAREHOUSE for the warehouse group.
    :return: ECS operator.
    '''
Long list, isn’t it? This is the actual information needed to create a task definition and run it in ECS; you can see why we wrapped it instead of asking everyone on the team to go their own way and hoping for the best.
To take you through the steps so you can create a utility that makes sense for your use case, let me walk you through the code as it executes. This actually brought us even deeper into how ECS runs than we needed to know for the controller and scheduler, while also giving the data team a way to easily run their containers remotely without needing engineering help.
The first thing we do to create an ECS operator is to get all the values in a specific Consul directory, waiting for a remote task to use. You might find your values are different from ours but what we pop in there is:
You can see that most of these were also used in setting up the controller and scheduler; that’s why passing these from Terraform to Consul is so important in allowing us to use them here. If you decided to move from Fargate to EC2, update Terraform, it’ll tell Consul, and the Python that pulls these values down will automatically update your task definitions.
Now with those basics out of the way, we need to generate our task definition, which is what the majority of those parameters are about. Essentially we want to generate the full JSON task definition that the ECS API uses, including settings like:
the container and, if applicable, the command to start it with; this is where having the Docker Registry address comes in handy
any configurations around health checks for the container while it runs
environment and secret values, which we can pull from Consul if they’re present or supply from the job definition directly
logging so we can follow what the container is doing
This is the part of the code that requires the deepest understanding of ECS but, once implemented, should help new people find quickly what they need to supply and what it does without having to go to the AWS documentation.
Alright, at this point we have a task definition but we haven’t registered it yet. AWS’s boto3 library provides a way to interact with ECS; what we do is check for a current version of the task and pull it down. If there’s no task definition or, and this is the crucial part, if the task definition we just generated is different from what ECS currently knows about, we register a new version; otherwise we let it be. (We founded we needed deepdiff to do this comparison effectively as there’s no upsert method, so our system… yeah it registered hundreds of thousands of task definitions for no reason. 🤦🏻♀️) So, let’s say you have a data scientist on your team who changes a job so that a container’s start command and a few of the input values are different: this will detect that and push up an update to the task definition without the data scientist even having to know what a task definition is.
It’s now and only now that we can finally invoke the ECS operator Airflow provides, putting any last minute overrides like just in time values (maybe input from the user triggering the job) into the operator and adding it to any pools as needed (for example, only letting so many systems interact with the warehouse at once). From there, Airflow handles telling ECS to spin up this task and execute, watching it until it’s done, and reporting back.
That’s all a lot of work and you might be asking yourself, what’s the point? Well for our team, the point is that we already have a lot of containers and setup around them: a Docker Compose file, for example, to tell us how to run every task. By running these containers locally and in the workflow system, we know we will have consistent results, and we can extend our utilities to do things like read in the Docker Compose file (it’s just a YAML, after all) to help us generate our remote operator (what’s the container name, or startup command, or values needed?) with a bit more ease. For heavy duty, long running operations that might require a lot of CPU or memory, this gives us flexibility. (Currently Fargate doesn’t support GPUs but that’s on the roadmap and other ECS capacity providers do support it, which might be of particular interest to data teams.)
Learnings from Airflow and ECS
Picking up ECS was quite the challenge sometimes, and I’m not sure we would have made it ourselves without writeups from the community about how they managed it and AWS sending some lovely folks to visit us several months ago and answer our questions. Tasks and services, for example, were very confusing at the start and we couldn’t get our head around what we were suppose to be doing with them.
We’d discovered ECS at the start of our journey as something people talked about running their Airflow setup on, but hadn’t found a lot of detail around how to actually do that, especially for working with ECS operators in Airflow. It’s been our goal from the start to not only get Airflow running and learn how to work with ECS for other systems the data team might have, but to also provide what we learned and did for others to have an easier time getting their system set up and running. If people want to know more than I’ve already written, we can post follow ups; just let us know!
Our Airflow setup actually arrived just in time for Jenkins going hard down. We were able to spin up our Airflow production with less than a day’s notice and start using it. Sure, it still has some quirks the team needs to get used to as Airflow is a hecka quirky system, but for the moment it’s taken over better than anyone could have anticipated. The rest of the team is quickly getting accustomed to how ECS works, where logs are, how to monitor it — everything we’d hoped for.
Ideally in the future we’ll be able to move other systems the team owns from EC2 to ECS, which will both ease what the team needs to know to maintain those services while also easing the burden on other teams to help us keep them up and running. After all, when we do our job well, no one even notices we’re here doing it, moving and processing terabytes of data like it’s no big deal, and that’s how we like it.
Also, Airflow contributors? How about building out that ECS operator pretty please?
It can also store insane amounts of surprises, considerations, new ideas to learn, skewed tables to fix, distributions to get in line, what’s a WLM, what am I doing‽
This post is meant to give you a crash course into working with Redshift, to get you off and running until you have the time and resources to come back and internalize what it all means. This is by no means a comprehensive review of Redshift, as then it’d no longer be a crash course, nor does this dive into data warehousing specifics, which I can cover in another post if people want.
The vast majority of this post actually comes from our internal documentation, so you can trust that we do use this to help educate those less familiar with Redshift, and get them ramped up and feeling comfortable.
Introduction to Redshift
On Redshift
The Redshift database will behave like other databases you’ve encountered, but under the hood it has some extra considerations to take into account. The main difference between Redshift and most other databases you’ll have encountered is due to scale, with the cluster being important to keep in mind in table design along with standard table design considerations. And since the scale is so much larger, the impact of IO can go up considerably, especially if the cluster needs to move or share data to perform a query. The reasons for this and how to best avoid these inefficiencies are detailed below.
Within a Redshift cluster, there is a leader node and many compute nodes. The leader node helps orchestrate the work the compute nodes do. For example, if a query is operating only on data from May of 2017, and all of that data is stored on a single compute node, the leader only needs that node to perform the work. If instead a query is operating on data from the full available timeline, all compute nodes will be needed and they may need to share data across themselves.
If a query can be performed in parallel by multiple nodes, then congratulations: your data has been distributed well! (More on parallel processing here.) By allowing each compute node to work independently, better performance is achieved.
If a query being performed requires multiple nodes to share data across each other constantly, then it will take a lot more effort for the query to be executed and optimization may be needed.
While having a query that requires no passing of data ever is highly unlikely, as there is a cost with keeping data pristine at all times, distributing the data in such a manner that we minimize the passing of data will allow the cluster to run efficiently and make best use of Redshift.
On IO and performance hits
Disks are slow. Reading to them, writing to them — while Redshift tries to optimize queries as much as it can (more on query performance tuning here), this required work cannot be optimized around at query execution time. Instead it must be considered and finessed when the table is designed, so that data on disk is as optimized as it can be for the query that comes in.
For this reason, when designing your table it is advantageous to know what your most important query will be so that you can ensure the design of the table assists the query. (More on query design here.)
I’m going to assume that you know what column types and sizes you want, and skip constraints as more advanced than this post is meant for, though consider those if you want.
Redshift stores data by column, not by row, and by minimizing the size on disk of columns, you end up getting better query performance. The reason is that more data can be pulled into memory, which means less IO needs to be done fetching more data as the query runs, thus better performance: narrow columns (ie tightly compressed columns) thus help work zip by. The exception to this is the columns you leverage as sort keys: if those are highly compressed, it’s more work to find the data on disk which means more IO.
Now that I’ve convinced you, what compression to pick for your columns?
ANALYZE COMPRESSION TABLE_NAME_HERE;
The easiest way to determine the optimal compression is to finish designing the basics of your table, load sample data in, then utilize the ANALYZE COMPRESSION command (statement above, more on it here). Its output will tell you the compression that best works for your sample data for each column, thus doing all the work for you. From there, update your table definition and load the data again. Your disk size should now be smaller (disk size query provided in table metadata section).
Still not sure what to pick? Perhaps you don’t have data yet? Here’s an easy to remember rule of thumb:
If it’s your sort key or a boolean, use RAW
Otherwise, use ZSTD
That should get you started until you have enough data to go in and reviews compression choices, as ZSTD gives very strong compression across the majority of data types without a performance hit you’d notice.
References to compression and performance can be found here, here, and here.
Distribution and sort
It is important to understand the difference between distribution of data and sort of data before moving on to how to use them to your advantage, as they can have the biggest impact on your table’s performance.
Distribution of the data refers to which node it goes to.
Sort of the data refers to where on the node it goes to.
If your distribution style is even, that means all nodes will get the same amount of data. Or if your distribution style is by key, each node will have data from the same one or more keys.
Once the node your data will live on is decided, the sort impacts its ordering there. If you have time sensitive data, you may want each node to store it in order of when it happened. As data comes in, it isn’t necessarily sorted right away (unsorted data discussed below) but it will be by Redshift as and when necessary or forced (such as during maintenance).
Distribution
There are two times when data is distributed:
When data is first inserted
When a query requires data for joins and aggregations
The second scenario is more important in terms of the performance impact, as having the data already where it needs to be for a query will have the biggest savings impact by allowing data to only be distributed in the first scenario without a redistribution that slows down the user’s query.
An ideal distribution of data allows each node to handle the same amount of work in parallel with minor amounts of redistribution. This is true both within a table and across tables: two tables constantly joined should have similar distributions so that the data needing joining is already present on the same node.
Using the most important and intensive query(ies) allows for the appropriate distribution style to be chosen (more on using the query plan for distribution decisions here), of which there are three options, ranked from least likely to be of use to you to most likely:
An ALL distribution puts a copy of the entire table on every node.
An EVEN distribution splits data up evenly across all nodes without looking at the content of the data.
This is helpful if you never join the table with other data or there is no clear way to leverage a KEY distribution (below).
A KEY distribution splits data up according to part of the data (the key).
Start by seeing if there’s a particular key that your query is dependent on. If there’s no obvious one or no joins with other tables, then consider an even distribution. In a staging environment, you can also try setting up the table multiple ways and experimenting with what would happen to get an idea of the impact of the different distribution styles.
The sort of data can be leveraged in query execution, especially when there is a range of data being looked at: if the data is already sorted by range, then only that chunk of data needs to be used rather than picking up a larger number of smaller chunks of data. I now regret using the word “chunks” but we’re sticking with it.
There are two options for sorting and which one you pick is highly coupled with the query(ies) you will execute:
A COMPOUND sort key uses a prefix of the sort keys’ values and can speed up JOIN, GROUP BY, ORDER BY, and compression.
The order of the keys matter.
The size of the unsorted region impacts the performance.
Use with increasing attributes like identities or datetimes over an INTERLEAVED key.
This is the default sort style.
An INTERLEAVED sort key gives equal weight to all columns in the sort key and can improve performance when there are multiple queries with different filter criteria or heavily used secondary sort columns.
The order of the keys does not matter.
Performance of INTERLEAVED over COMPOUND may increase
As more sorted columns are filtered in the query.
If the single sort column has a long common prefix (think full URLs).
For what to put in the sort key, look at the query’s filter conditions. If you are constantly using a certain set of columns for equality checks or range checks, or you tend to look at data by slice of time, those columns should be leveraged in the sort. If you join your table to another table frequently, put the join column in the sort and distribution key to ensure local work.
Using EXPLAIN on a query against a table with sort keys established will show the impact of your sorting on the query’s execution.
There are built in commands and tables that can be used to generate and view certain metadata about your table. To ease your burden, the following queries are provided for you premade.
SELECT * FROM pg_table_def WHERE tablename = 'TABLE_NAME_HERE';
Table compression
ANALYZE COMPRESSION TABLE_NAME_HERE;
The results will tell you, for each column, what encoding is suggested and the size (in percentage) that would be saved by using that encoding over what is currently there.
Table metadata
ANALYZE VERBOSE SCHEMA_HERE.TABLE_NAME_HERE;
SELECT
    tableInfo.table AS tableName,
    results.endtime AS lastRan,
    results.status AS analysisStatus,
    results.rows AS numRows,
    tableInfo.unsorted AS percentUnsorted,
    tableInfo.size AS sizeOnDiskInMB,
    tableInfo.max_varchar AS maxVarCharColumn,
    tableInfo.encoded AS encodingDefinedAtLeastOnce,
    tableInfo.diststyle AS distStyle,
    tableInfo.sortkey_num AS numSortKeys,
    tableInfo.sortkey1 AS sortKeyFirstColumn
FROM SVV_TABLE_INFO AS tableInfo
LEFT JOIN STL_ANALYZE AS results
ON results.table_id = tableInfo.table_id
WHERE
    tableInfo.schema = 'SCHEMA_HERE'
    AND tableName = 'TABLE_NAME_HERE'
ORDER BY lastRan DESC
LIMIT 1;
This query has two parts: the first analyzes the table (VERBOSE here indicates that it updates you of its status as it runs) and the second outputs metadata from two system tables. The columns have been aliased for easier reading.
As data comes into a node, it is not always efficient to sort it in right away. To see how much of a table is unsorted, you can leverage SVV_TABLE_INFO.unsorted from the above table metadata section. A smaller unsorted region means more data is exactly where you told the node it should be.
If data tends to come in slowly, regularly running VACUUM will clean up the unsorted region. This can be done as part of regular maintenance at a time when it will have the smallest impact on users.
If data tends to come in in large batches, see below for efficient bulk loading.
If data tends to be removed from the table wholesale, truncate instead of deleting the rows. TRUNCATE will clean up the disk space whereas DELETE does not.
InternalError: Load into table 'X' failed. Check 'stl_load_errors' system table for details.
It is recommended you to turn on \x to view this table.
SELECT
    errors.starttime,
    info.table,
    errors.colname,
    errors.err_reason,
    errors.raw_line
FROM stl_load_errors AS errors
LEFT JOIN SVV_TABLE_INFO AS info
ON errors.tbl = info.table_id
ORDER BY 1 DESC
LIMIT 5; --that’s just so you don’t get overwhelmed
Show all tables
SELECT schemaname, tablename FROM pg_table_def WHERE schemaname != 'pg_catalog' AND NOT tablename LIKE '%_pkey' ORDER BY schemaname, tablename;
Describe a table
SELECT * FROM pg_table_def WHERE schemaname = 'public' AND tablename = 'TABLE_NAME';
What are the largest tables?
SELECT
    tableInfo.schema AS schemaName,
    tableInfo.table AS tableName,
    tableInfo.unsorted AS percentUnsorted,
    tableInfo.size AS sizeOnDiskInMB
FROM svv_table_info AS tableInfo
ORDER BY sizeOnDiskInMB DESC
LIMIT 25;
Congratulations, you now have the GameChanger Data Engineering seal of approval for Redshift Basics!
As you work with Redshift, you’ll start to develop your own rules of thumb and opinions that might add on to what I’ve presented or differ from those rules of thumb we use here. And that’s ok! Redshift is an evolving system that is designed for many different use cases: there is no right design.
And remember, this isn’t everything there is to know about Redshift nor even all of the features it has for you to make use of. However this does cover the vast majority of basic use cases, and basic use cases are what you want to break your problems into. It’ll make your life easier, and your Redshift work easier too.
GameChanger’s Team Manager is built on top of a Node.js API server. Although we’ve had a lot of monitoring and logging throughout it’s lifetime, most of our metrics were at an aggregate level. By alerting on symptoms, it was easy to spot that something was broken, but not necessarily what or why. With the server handling over 100 million requests per day, over 1000 per second, we needed a better way to drill into what the server was doing and figure out causes. Operating at that scale meant that local testing was at best an approximation of production realities.
Integrating Datadog APM (Application Performance Monitoring) has solved a lot of our observability issues. It wasn’t always straightforward to work with—some of the tooling isn’t obvious and the documentation is all over the place—but now that things are up and running, it’d be hard to imagine a world without it.
We’ve also open sourced some of the APM utility code we made along the way as an NPM package.
APM Stands for Application Performance Monitoring. It can take different forms from one offering to another, but it generally consists of breaking down what your server is doing while accomplishing a specific unit of work. For example, if your server offers an API, the APM will keep track of when a request starts, what functions are called to handle that request, what database queries are performed, and what the response is.
A representative flame chart from Datadog’s APM for one API request.
In Datadog’s words, APM “provides you with deep insight into your application’s performance - from automatically generated dashboards for monitoring key metrics, like request volume and latency, to detailed traces of individual requests - side by side with your logs and infrastructure monitoring”.
What does Datadog provide?
In addition to APM, Datadog has a host of monitoring options—logging, monitoring, analytics, synthetics—and their web UI gracefully ties them all together.
In order to make use of their offerings, Datadog provides a number of client libraries. For the purposes of this post we’ll focus on their dd-trace Node.js library which enables APM.
dd-trace has two sources of documentation: there is general Datadog APM documentation along with library specific documentation. Both are adequate to get things up and running, but for our needs we had to turn to a third source of documentation, the source code itself. Fortunately, the code is pretty straightforward, applying the same basic patterns across each of the libraries that it wraps.
Although written in vanilla Javascript, dd-trace comes bundles with type definitions for typescript.
What challenges did we face?
Implementing APM wasn’t always straightforward; as mentioned earlier, we often had to reference the source code to accomplish what we needed.
Getting tracing out of the way
This was the hardest part: our philosophy is that monitoring and analytics code should not impact business logic code. Ideally, adding or removing tracing should be a single line change that doesn’t touch the business code at all. Since our code makes heavy use of classes, decorators were an obvious language feature to accomplish our goal.
(Note: although decorators are only a stage 2 proposal for ECMAScript, they are available as a feature in Typescript (with the experimentalDecorators flag turned on) and through babel if you’re using vanilla JS.)
Decorators allow us to augment classes and class methods without modifying the body of either. For example, if we had a decorator to log the name of the method being called, we could add it with a one line PR. Similarly, when we’re done debugging that function, we can cleanly remove that one line without being afraid of accidentally changing business logic.
// Example PR Diff adding logging to MyClass.method
class MyClass {
+   @logMethodName()
    method() {}
}
With that in mind, we wanted our traced code to look like this:
// Trace *all* methods of a class
@APM.trace()
class GameChanger {
    public foo() {}
    private bar() {}
}

// Trace *individual* methods of a class
class GameChanger {
    @APM.trace()
    public foo() {}
    private bar() {}
}
This also allows easy modification of how we’re tracing our code—configuration of the traced code is also separate from the business logic.
// The decorator can be configured to override the defaults
class EmailQueue {
    @APM.trace({ serviceName: 'queue', spanName: 'queue.message' })
    public async pop() {}
}
The pattern itself isn’t new, and the Datadog Java client library actually provides this as its interface:
import datadog.trace.api.Trace;

public class MyJob {
  @Trace(operationName = "job.exec", resourceName = "MyJob.process")
  public static void process() {
    // your method implementation here
  }
}
For Node.js, however, you currently have to manually start and stop your spans, as seen in the docs:
For synchronous code, like that above, this manual tracing is straightforward. Things get quite cumbersome, though, when dealing with async functions. Javascript has no built in way to detect if a function is a promise, with the best approximation being to check if the returned value is a function itself. And example of this is the dd-trace-js internal code itself:
Wrapping each function like that was out of the question, again we wanted to add a single line decorator and be done with it. There were some gotchas, especially in getting typescript to play nicely with a decorator handling both classes and methods, but in the end it worked out great. We made a helper library to hide the complexity behind a decorator interface, which you can read about further down the page.
Making tags searchable
When we started, you could only search tags that were added to your root span, but there was no documented way to access the root span. There is, however, an accessible property on the Koa context passed to each piece of middleware, context.req._datadog.span. Using that, we were able to add tags to our root span and make them into searchable facets. This is no longer an issue: facets can be created from nested spans as of the writing of this post. That said, there still may be times you want to add tags (but not global tags) to your root span. We included a getRootSpanFromRequestContext utility function in our helper library.
Marking non-throwing spans as errors (and dealing with null values)
Knowing whether a span was successful is important in almost every part of consuming APM data. Unfortunately it wasn’t clear straight away how to mark a span as being an error. By default uncaught errors will be flagged, but if your code handles errors you’re out of luck. For example, in our queue processor, if we have an error we push to an error queue but don’t throw anything.
All that it takes is adding a few of the correct tags to a span for everything to work. The issue is that getting a span can be cumbersome. The tracer.scope().active() function will return the current span, if it exists, or null. That means all of your code needs to handle the null case. If you don’t mind having if (span) {} littered about your code, perhaps you should be writing golang. In our case, we ended up with a utility function APM.markAsError(error: Error) that handle getting the current span and dealing with a null span for us. Learn more in our helper library.
Making spans show up in App Analytics
Note: Previously, the documentation on this was less straightforward. It’s also a less pressing issue now that the new “traces” screen has been rolled out.
Getting runtime metrics working
This was our fault—we were on an old version of both the Datadog agent and Node.js. Another dependency kept us from jumping straight to Node 12, but once we were on Node 11, everything was working as expected. If you have issues getting runtime metrics to work, try upgrading to a newer version of node (we were on 8 when we had the issues).
What doesn’t Datadog provide? A feature wishlist
Service page span name selector
This is no longer relevant at the time of posting this article. A dropdown selector allows changing which span name is shown on the service page. Previously you had to manually change the URL to the desired span name.
Working filter estimates
With our number of events, we need some filtering to keep our costs in check. There is a tool to estimate the effect of event filtering on event count, but it was often necessary to simply wait a day to see if the filter had the desired impact.
Extrapolated query metrics
You can pull in App Analytics queries to any dashboard. However, they will be sampled and there is no good way to get an extrapolated number of the total. If you create a search filter to find the number of POST /games requests, App Analytics will show you an upscaled chart in the top left of the page. If you pull that query into a dashboard, the raw number will be shown in the chart. If APM sampling were a simple percent cut of all events, it’d be easy to manually extrapolate, but the sampling is dynamic. That makes the dashboard charts utility questionable.
Custom measures from tags
In App Analytics, the duration tag is special. You get a min/max selector in the facets column, and more importantly it is treated as a “measure” in charting. Custom tags, despite being marked as integer or double, are treated as distinct values which limits their value in filtering and charting.
Introducing @gamechanger/datadog-apm
If you’re writing a Node.js app with any classes, consider checking out @gamechanger/datadog-apm. In our experience, the decorator syntax has made adding tracing a dead simple process. There are some other utility functions and conveniences built in, so you may even find value if you’re not using OOP in your code..
Conclusion
If you’re not using an APM product, you probably should be. For a small performance overhead, you get a completely different class of insights than what logs and request metrics can offer.
Datadog’s APM is a fantastic offering that keeps getting better—the outline of this blog was put together a couple months ago, and by the time of writing much of the “pain point” section was already out of date. Yes, some of the implementation can be cumbersome, but once set up the web UX/UI is responsive and intuitive.
You’ve finally got everything working in your staging environment: the new systems talk to each other, everything is running smoothly, your dashboards are beautiful and pristine.
Now you need to get it into production with zero down time and no interruptions.
And then you realize, you’ve no idea what you actually did in your staging environment.
Let’s talk about infrastructure
I don’t consider myself an “infrastructure lady;” it’s just not my jam, and that’s fine. However I have had to learn a lot about our infrastructure for setting up our new data pipeline system — and I don’t just show up to learn the minimum.
I come to m a s t e r.
IaC, or infrastructure as code, is the idea of setting up your infrastructure using definition files, code, and standard programming practices. In a way, it brings infrastructure to those of us who might otherwise be overwhelmed by what’s going on and what we’re suppose to do. Why manually enter configuration values when you can store them in a YAML or JSON file in a git repo? Suddenly you can see its history, you can search it, and it documents itself to a certain extent.
This last point is of particular interest to me, as so much of the data pipeline is just how the systems work together, what the configurations are to facilitate this, and and documenting how all this works. If — if — we could have our data pipeline and all its friends live in some straightforward, self documenting IaC setup, it would make it easy not only to remember what we did but also to onboard someone new to the system and to deploy it to different environments with high confidence that it’ll work.
At GameChanger, that meant making three systems work together: Terraform, Consul, and Ansible. Terraform sets up what we want the landscape of our machines to look like. Ansible sets up what we want the landscape on our machines to look like. And Consul is the new kid in the collection, just here to have a good time and be helpful.
Leibnizian optimism
Alright, so we know what our tools are and we know what we want to do:
using Terraform, Ansible, and/or Consul in some way
be able to spin up the full data pipeline with a single command
configurations should make their way to all the systems that need them automatically
and we should be able to use this tool we produce for multiple environments
As our Ansible setup will work within the confines of what Terraform sets up for it (can’t set up a machine that doesn’t exist yet), Terraform is where we’ll want to start. And this makes sense on a second level too since a lot of what Terraform will output, like the addresses to services it’s brought up, will be used by Ansible to set configuration values. Therefore, we need those machines set up before we can configure them.
Starting with Terraform, there were a few key things I came across that helped me put together a plan of an ideal end state:
you can set up a module, which functions kind of like a class
Well, I know what I’d do if I was writing a class to accomplish what I want: take in a few values that specialize the pipeline for the specific environment I want to set it up in, do all the internal secret sauce, then send back the configuration values that are needed for other systems to connect to the pipeline. Running it would thus get me a pipeline “object” which is, ultimately, one of the few things I want in this world.
That and a cat.
What we’ve got now is shaping up to be a nice little plan: make a Terraform module; pass in the values that make it unique for an environment; pass out the values that are needed to connect to it. We’ll then need a way to get those values to Ansible, probably using Consul, but one foot in front of the other.
Let’s get ready to M O D U L E
A nice thing about Terraform is it figures out the order to run your blocks of instructions in, meaning you can structure your file so that it makes sense to humans.
Our Terraform module had a head start in that, before I made the module, I’d set up bits and pieces of the pipeline in different Terraform files that didn’t work together but could be refactored into one location. That’s because Terraform is, despite what it might seem, oddly easy to work with once you get used to reading the documentation and using the examples to make your own version of whatever you need. (Sure, it inevitably needs its own special snowflake version of something vaguely YAML-esque to work, but at this point we all know that’s how large tech projects assert dominance in the world.)
Starting with what the module needed to do helped guide figuring out what needed to go in and come out:
set up nice DNS records to make it easier for humans to know what they’re talking to
Sure, that’s a long list, but once the module is set up, it’ll be only one thing that handles all of the interconnectivity, which is thus also documented by the module. That would mean we’ve already covered a huge amount of our ideal end state.
Layered like an onion
I started at the logical core and worked my way out for the Terraform module, making notes of what I’d want to have passed in as I went. Everything of interest lived in either main.tf, where I did all the fun Terraform adventuring, or vars.tf, where I documented what a user of the module would need to know.
// Must provide
variable "pipeline_name" {
  default = "test"
  description = "The value to use in naming pieces of the data pipeline. This will most likely be the name of the environment but might also be another value instead."
}

variable "environment" { }

// …

// Can override
variable "kafka_version" {
  default = "2.2.1"
}

// …
Sample from the vars.tf. Using the description field was particularly helpful in ensuring the ability to make sense of the module without further, separate documentation. I also split the variables into what must be provided at the top and what could be provided at the bottom.
Comments not only separated each block of Terraform work in main.tf but also let me put in markdown-style links to where further documentation was, in case someone wanted to read more about, say, the pipeline. I’d like in the future to go back and break down main.tf into smaller files, one for each chunk of work, but that’s more advanced than my current Terraform skills so will wait for another day.
My favorite thing I’ve learned from Terraform is how many AWS resources can have tags: EC2, MSK, security rules, if you can name it, you can probably tag it! These tags are helpful not just while in AWS, figuring out what is what and searching for something specific, but also can propagate elsewhere as a sort of shared configuration: Ansible can see tags but so can Datadog, for example. Now you can scope your host map, using only tags!
Imho the following tags are what I feel best capture what you need to know without going overboard:
the environment you’re in
the jurisdiction this piece is part of
for example this item could be part of the data-pipeline, or ci-cd, or maybe a collection of related microservices that, together, form one system
the project_version, especially if you’re doing upgrade work
the service this actually is under the hood
and the purpose of this piece within the grand scheme of things
The difference between the last two might be something like service: msk and purpose: pipeline, or service: kafka-connect and purpose: extract. The purpose tag is like a shorthand, then, for what you’re trying to accomplish without getting bogged down in how you’re accomplishing it. I could change out MSK for a self-hosted Kafka, but the purpose of that piece would still be to function as the pipeline.
Sharing is caring
We have our Terraform module now. It’s beautiful. It’s orderly. It’s doing its best to prevent the universe from descending into chaos. We can bring up the whole thing with a single command. Checking our list of hopes and dreams, we now have:
using Terraform, Ansible, and/or Consul in some way
be able to spin up the full data pipeline with a single command
configurations should make their way to all the systems that need them automatically
and we should be able to use this tool we produce for multiple environments (50% done)
Aight, some progress, but… well, our output goes into our output.tf file but… that’s not somewhere Ansible can get those values, let alone other services. We need to work on that.
But oh! Remember that third service we can use? Consul? Time to shine.
Well, if we can have Terraform produce the configurations into Consul, and Ansible consume the configurations from Consul… that should be what’s left on our list!
Declaring our values
Instead of the Consul keys block in Terraform, I actually found the similar sounding but slightly different Consul key prefix block in Terraform to be what I wanted, as it lets me group all my configurations in the most straightforward way possible.
Sample of how Terraform outputs are pushed into Consul. Some of this was remembering the inputs originally passed in, but a lot of it was taking the values Terraform had helped create and remembering them for use later.
What’s the address for the Schema Registry? "schema_registry_servers" = "${aws_route53_record.schema-registry-dns.name}" set the value in Consul. What’s the name of the bucket I want to use as an archive? "archive_bucket" = "${aws_s3_bucket.archive.id}" set the value in Consul. You get the idea.
Combing through all the configurations I had set in Ansible and in different services, I was able to move all values that would ever change into Consul. This was useful in not just, for example, sharing what is the expected number of partitions a pipeline topic should have (pipeline_cluster_partitions) with services that should match that expectation, but also in having a place where a human can go look up all current values.
Example of what we’ve stored in Consul.
Once it was confirmed that all of the values were making it from Terraform to Consul, it was time to start using them.
Configurations for the lazy
As Ansible had been used to help determine what Terraform should put into Consul, it then became a matter of replacing the hardcoded values with getting the values from Consul: thus, never again would Ansible need to be updated for a configuration change.
Using Ansible’s Jinja support, all we had to do was change something like
Sure, that takes up hella more space on the line, but it gets the values automatically. If you change what you want your port to be, just have Terraform update Consul! Ansible gets that update for free.
The eagle eyed among you will notice the .decode('utf-8') after each lookup. Funny story: everything came back with a b in front of it because of the way the lookup was parsing Consul’s values (they all came back as byte literals since we run Ansible using Python 3). The short answer to how to fix this is to force encodings. The long answer is… longer, and Ansible isn’t something I 100% understand so…
At least you can run Python functions easily in Ansible.
Wrapping up our project
Let’s check back in on our list:
using Terraform, Ansible, and/or Consul in some way
be able to spin up the full data pipeline with a single command
configurations should make their way to all the systems that need them automatically
and we should be able to use this tool we produce for multiple environments
We did it people! We did it!
Now any system that needs to talk to the data pipeline can just ask Consul for the values using the very straightforward API, or let Ansible set up the values for them. Terraform can do everything its little heart desires in a sane way that humans can read and understand. Our data pipeline lives.
And best of all, our configurations have a single source of truth.
In summation
a data engineer who doesn’t know a lot about infrastructure
simplified setting up a complex, interconnected infrastructure
and got configurations sharing between the different systems
Before we begin, I suggest settling in. Unlike my previous post, this one won’t be short. It’ll also be more technical, though I will do my best to link to resources in case you get lost along the way. So my suggestion is get a nice cuppa, turn off notifications, and brace yourself:
We’re going on an adventure.
In the beginning
Back in 2016, when we were all younger and more innocent, Alex Etling wrote a series of blog posts about his learnings in setting up our original data pipeline, which was built around Kafka, which is built upon Zookeeper. I’ll let his blog posts speak for themselves in case you’re interested in that history, though they’re not necessary prerequisites for this post if you’d rather save them for later.
Instead to give you a lay of the land, here’s a high level overview of the data pipeline and data warehouse systems, to function as a map for our adventure:
Bringing back this architecture diagram, as it’s so wonderful. [1]
Spiffy, huh?
Thus the Kafka and the Zookeeper clusters, and all the host of them, were finished
This pipeline setup has allowed us to do things like grow our data warehouse, provide business intelligence to data users, and do deep analysis as a data team to answer questions about how we can better serve our customers.
At the same time, a lot has changed around this system: in our infrastructure setup, in Kafka’s capabilities, and in who uses the pipeline and for what. Back then, the desire was to answer a few basic questions about the customers using a variety of data; now the consumers of our data go in hard to look at the nitty gritty details themselves and really understand the complexity in the data to get their answers. What makes a team successful? Are our features helpful to teams across sports and ages? The people need to know.
You cannot know everything a system will be used for when you start: it is only at the end of its life you can have such certainty. [2]
Perhaps one of the biggest changes though was hiring a dedicated data engineer — me! I had the advantage when I started over Alex in that he had had to learn about Kafka and data pipelines from scratch, whereas I started here specifically because I love both of those and had experience with them. Want to talk about event driven architectures? Data on the inside versus on the outside? Logs? Your favorite part of the Kafka documentation? I think the design section is really an underappreciated gem that is super easy to get into and follow. I learned Scala explicitly to work with Kafka and be able to read the source code, which has led me to a passion for functional programming and test driven development. This is what gets me excited to come to work.
But it is important to state that the system I came in to take ownership of was impressive despite its age and dust: there were super detailed dashboards about the metrics, there were tools set up to monitor the clusters, there were libraries for producing into Kafka from outside the JVM when Kafka was still very much JVM only (take a peak at our original Python client if you’d like). The problem was that systems, like code, are for people, and naturally over the course of people’s careers, they will move on to other projects, jobs, and passions. With the original folks gone from the project, a lot of oral knowledge had been lost. What do all the metrics mean? Why is this function of code like this? Also, what does it do?
Let’s take a step back
Today we’re pushing the system harder than ever and don’t have a lot of options we like the look of. We’re two major versions behind so upgrading Kafka is high risk, but that also means we can’t take advantage of things like streams to relieve pressure elsewhere like on our data warehouse with its batch ETL process. Sometimes we encounter problems where the Internet’s main solution is to upgrade our Kafka version, but that’s not exactly something you can do in an incident where you’re trying to make sure you minimize data loss. What if we have a problem and can’t fix it? What if the system goes hard down? Is that it?
We value keeping the systems our customers rely on operational; everything else can wait. Except for the day you realize that you have internal customers, and suddenly this system that seemed less important than all the rest jumps up in the ranking.
Write once, run forever, debug forever
Now this all sounds bad but an important question to ask is how bad? Light rain when you don’t have an umbrella bad? Or suddenly we’re all using nuclear reactor failure language bad? Can we Apollo 13 our way out of this?
Also, small correction from earlier: you know that architecture diagram up there? The one with clean lines? You and I both know it’s a lie and there are things not captured in it, code or dependencies you come across in the wild and silently to yourself mouth, “oh no,” while contemplating laying face down under your desk to signal to others that, right now, you need alone time.
We use a lot of metaphors to describe technology, and I definitely do my part in this, so here’s another: systems are like gardens, they grow over time.
My father loves gardening, and as a child I remember he’d come home from work and go right into the garden, just walking around and taking it all in. He’d finally come back with a hand full of sticks and weeds he’d pruned and collected to compost or recycle before coming inside. He knew what was suppose to be in his garden, what wasn’t suppose to be there, and how to take care of each of his plants.
We couldn’t necessarily say the same thing about our system, so we performed an audit. Sounds exciting, I know, but it really was valuable. Every single part of the system, from large open source systems like Kafka and Zookeeper down to small helper libraries and even just configuration files were documented. We collected what version it was and when was that released, compared to the latest version and release date. We collected what language and version it was implemented in. We linked to Github repos for open source code and documentation about how to use the systems. We had everything in one giant document.
Breakdown of different data pipeline service languages and their versions, and release years for versions we’re using. You might think the unknown release year bar is terrifying but the unknown Java version is what really upsets me. [2]
Then and only then we could look at it and figure out what we had compared to what we’d thought we’d had. The State of the Pipeline, which summarized the audit, captured my opinions as the leading expert in the office on what I saw; others gave their feedback, so that finally — finally — we could start figuring out what we should do next.
Second system effect
In the wonderful Mythical Man Month, a book I cannot recommend enough, Fred Brooks describes one of the truest aspects of technology that I’ve ever encountered:
An architect’s first work is apt to be spare and clean. He knows he doesn’t know what he’s doing, so he does it carefully and with great restraint.
As he designs the first work, frill after frill and embellishment after embellishment occur to him. These get stored away to be used “next time.” Sooner or later the first system is finished, and the architect, with firm confidence and a demonstrated mastery of that class of systems, is ready to build a second system.
This second is the most dangerous system a man ever designs. [3]
“Here be dragons,” as medieval cartographers would say. I find keeping in mind Brooks’s words when starting a system design process to be important in perhaps, maybe, if you’re lucky, avoiding dragons.
How does the architect avoid the second-system effect? Well, obviously he can’t skip his second system. But he can be conscious of the peculiar hazards of that system, and exert extra self-discipline to avoid functional ornamentation and to avoid extrapolation of functions that are obviated by changes in assumptions and purposes. [3]
Knowing there are dragons, and knowing how dangerous our own work can be, the plan to replace our existing pipeline was done cautiously as if we were starting from scratch with nothing in our audit:
We evaluated all possible options for our pipeline, though truthfully Kafka was the right choice back then and was still the right choice now for us and our data. The main boxes it ticked were being able to reconsume messages, having support for multiple languages, and wide community support and adoption.
We looked into options for running and maintaining the pipeline, including hosted solutions, since (as anyone who’s sat a software engineering course in college knows) systems will spend most of their life under maintenance, and having engineers keep this system up and running was a pretty big expense in terms of time and knowledge as well as the least savory part of what the audit showed.
We took stock of our producers and consumers of the pipeline, their priority in moving over, and our needs as a company now, several years into using them. This was relatively straightforward as our current setup only has two producers and one consumer, forming the most commonly interacted with part of the whole system for engineers, and thus the areas we knew the most about.
We then were able to decide on the large epics, determine their ordering, and start filling in the details of implementation. The audit was particularly helpful here in reflecting on how the first system had grown and being able to point at each component to say, “This needs upgrading, this needs sunsetting, this needs something slightly different.” The audit, like data in a business decision, couldn’t replace a human’s judgement but could help confirm that we were on the right track.
pick new consumer to act as an extractor and set it up
write new producer libraries for two producers and integrate them into existing systems
set up metrics and monitoring
create documentation about the new system and runbooks for what we will still maintain
tests???
That last item was particularly important to me, as a lot of the data team’s work is so stateful that it is incredibly difficult to test manually and nearly impossible in the current setup to test automatically. Having tests would let us know when we’d reached the definition of done for each of the items on the list; they would then double as the tests used going forward to ensure nothing is borked as the system evolves over time.
Striving to have a stronger emphasis on automated tests also forced us to think about things slightly differently, breaking out chunks of code that could be easily tested so that what is not so easy is as isolated and small as possible, to minimize risk. This led to us thinking of new edge and corner cases as we set up the tests for the purely functional code, and to capture the concerns of other engineers when they work with the system, so that those concerns could be automatically tested as well.
Speaking of the other engineers, part of my work in this phase included interviewing them as users of the producer libraries. As you may remember from my previous post, engineers are in charge of writing emitters which take in an event’s data and pass it to the producer for sending to the pipeline. Since they are often tourists to this area of code, asking them about their challenges and concerns was a wonderful chance to again inform what was actually important for this second pipeline system and what was only important in our minds.
I will certainly not contend that only the architects will have good architectural ideas. Often the fresh concept does come from an implementer or from a user. However, all my own experience convinces me, and I have tried to show, that the conceptual integrity of a system determines its ease of use. Good features and ideas that do not integrate with a system’s basic concepts are best left out. [4]
(If there’s interest for the specific design of the producer code, especially making it easy to work with Avro and the Schema Registry, let me know and I’ll be happy to write a post about that.)
Does the above list cover everything required to get into production and deprecate the old system? No, but it’s a start at the minimum required to at least get into lower environments and make sure we’re achieving parity.
“Achieving parity?” you might be saying. “How do you test that bold claim out?”
I’m so glad you asked.
Let’s do this
My background is in computer science, which often shows when I’m working with people who come from a purely engineering background. If this new second pipeline was a big experiment in “can we learn from the past without committing the second system effect sin?”, we needed to be able to prove it. We needed to be able to say to people, the data is still making it through at the same rate as the old system, if not better. Emitters are as easy to set up as in the old system, if not better. The ETL process will still work as in the old system, if not better.
Better has to be measurable. Better has to be visible.
With high risk, something to prove, and a big system, the path forward that made the most sense was a side by side deployment.
Simplicity, patience, compassion. These three are your greatest treasures. Simple in actions and thoughts, you return to the source of being. Patient with both friends and enemies, you accord with the way things are. Compassionate toward yourself, you reconcile all beings in the world. [5]
A side by side deployment would allow us the time we needed to build out the new system and fix bugs as they cropped up, tuning it as we went along. It would also allow our resource constraint — that is to say, only I would be implementing that big ole todo list — to not stop the whole project as we delivered things bit by bit.
If every week, we could say, “Here’s how things are getting better already,” better became measurable and visible.
More importantly, if every week, I could say, “Here’s how things are getting better already,” I could keep going without feeling overwhelmed by the task ahead of me.
Our producers produce into both pipelines.
Our consumers each consume from their pipeline.
We can compare the data collected and metrics generated.
We’ve got a plan.
Harvesting
Obviously this post doesn’t cover the details of getting each todo list item checked off (but, again, I can write one that does if people want to hear about it), and we’re still working on closing out the last bits of what remains, but already we’re seeing the new pipeline do great things while also getting to enjoy some of the benefits within the old system.
For example, a lot of engineers who write emitters complained of the boilerplate that existed, so I condensed what’s required to just the bare minimum with the system instead then fluffing out the data before sending it to both pipelines. (That’s the refactoring project discussed here.) This then also meant we had a lot of pure functions we could test, and a way to automatically test every emitter could do things like encode its data.
export class PersonEvent extends BaseEmitter<PersonInterface> {
    public topicName = 'person';
    protected doc = 'Represents a person and an associated user if they have one.';
    protected fields: AvroSchemaField[] = [
        { name: 'id', type: 'string', doc: 'the id of the person' },
        { name: 'user_id', type: 'string', isNullable: true, doc: 'the id of the user associated with the person, if one exists' },
    ];
}
Sample of what an emitter now looks like. That’s it, everything from producing to the pipeline to filling in things like when the event happened are done automatically within the producer, which is evoked from the base emitter. [6]
The best way to both measure and see the benefits is through our metrics dashboards, which I’ve become obsessed with looking at and comparing to the old pipeline’s figures, as it lets me see in real time how the system is doing as I deploy new pieces. My favorite dashboards in particular are:
an overview dashboard that takes your through the flow of the whole system, showing on the left a link to more details and on the right the single most important metric to tell if that piece of the system is healthy or not. It starts with producer errors, goes through the pipeline, and then ends with our ETL process and data warehouse, so you can compare everything quickly and easily as data flows through the system.
Example from the overview dashboard for the pipeline. The left links to the more detailed dashboard; the right shows the top metric and colors to indicate if it’s in a good or bad state. The emojis are just for fun. [7]
a data status dashboard that zooms in on if the producers are encountering errors and what data was invalid, dropped, or had some other failure. Again this links to more details but also allows the data team to see a list of events impacted and by how much, should there be an outage or bad deployment. We’ve set this up for the older pipeline as well and it’s where you can really see how the new system has nearly no errors while the older one, even on a good day, drops data pretty regularly.
the new producer dashboards, which again show metrics as a flow through the system, from connecting to emitting to encoding to producing. Coloring once more plays a big part in helping people know, whether in an incident or just curious, if things are fine, questionable, or on fire. We also, where helpful, show a comparison to how we were doing last week, as some days might be more spiky than others but week over week tends to follow the same trend.
Example from a producer dashboard. Each section of the dashboard is laid out with the overview and a big number showing times or success rate, then the breakdown of successes in blue and failures (if any) in red. [7]
the pipeline dashboard, which is so much tidier now that we no longer host our own Kafka and Zookeeper clusters but instead use a hosted solution. I’ve invested time as the office’s expert on this system into carefully marking the ranges of good and bad so that if something happens, I’m not required in the heat of the moment to figure out the state of things.
Example from the pipeline dashboard. This one relies the most on color so that no one has to remember how many controllers we should have or if an offline partition is bad or not. [7]
What does all this show us? That we’ve begun harvesting what we’ve sewn before the project’s conclusion, whether in changes we made that are already live or in the side by side comparison. The goal is, once the full pipeline is deployed, to switch between versions for where we’re pulling the data from and see if we can find differences that require further changes in the new pipeline. If so, we can rollback and make the changes without interrupting the normal flow; if not, then we’ve achieved parity, which is all we’re currently after.
I was going to put in a picture of one of my Minecraft farms for the harvesting metaphor, but they’re not terribly aesthetic so here’s a random picture of a sunrise instead. It captures the calm feeling I have when a new part of the pipeline works as expected and its metrics are all smooth. [8]
Final thoughts from a data engineer
This project has been way too massive and as small as possible and a headache inducer and a load of fun and a great learning opportunity, all rolled into one. A system like this requires a certain amount of investment, because a stable data pipeline is the foundation that allows smaller producers, consumers, or streamers to be worked on, spun up, or sunsetted independently with low effort.
One of the main concerns we wanted this system to be able to address was not getting into the same state that brought this system into existence: we shouldn’t be afraid to upgrade our version nor stuck on an old one, nor should we have code we must maintain but don’t feel we fully understand. The new pipeline should be able to grow and change with us, rather than having to be worked around. It should be easy for tourists to visit and understand, but also for the rest of the data team, including scientists and analysts, to conceptualize and make use of.
A leader is best When people barely know he exists Of a good leader, who talks little, When his work is done, his aim fulfilled, They will say, “We did this ourselves.” [5]
There’s still a long road ahead, from getting the new pipeline hardened and into production, to deprecating the old pipeline, to making use of the power we now have at our hands. But the main benefit has been that everyone in the office understands what’s being worked on, from the data team to the other engineers, to QA and designers and the office manager, to the CTO and CFO. Everyone is able to come in, look around, and say, “I understand and can ask questions if I want to, because I know enough to feel comfortable doing so.”
Along the way, I’ve been capturing as much as I can for posterity, whether its in reference documentation stored as close to the work as possible, to articles and books that helped informed my thinking for whoever might have to retrace my steps. Below I’ve linked some of my favorites for you, if you’ve made it through all of this and want moar.
In the end, my main recommendations are:
you will forget everything you did, so keep the code simple, your naming verbose, and your tests obvious
you will forget what everything means, especially under pressure, so add annotations to your metrics and dashboards
test driven development, functional programming concepts, and strong typing make everything infinitely easier when working together
you will regret most of the choices you made eventually, so keep in mind you will delete this code to replace it with something else, and that’s quite alright
friends make things easier, so have a pipeline friend or two when implementing your system who are also on the project
we’ve learned nothing since OS/360 so read Brooks’s book, and then read it again
if you’re working with Kafka and have your choice, the JVM makes things so easy, especially Scala, so learn and use it
if you’re working with Kafka, have someone else host your cluster — it’s worth the money
People tend to think systems like Kafka are too complicated to be useful, but really there’s just a need to learn its basics before it becomes easy (and not hosting your own cluster, I cannot recommend that enough). If you then keep your system built around it tidy, observed, and up to date, it’s smooth sailing thanks to the potential Kafka unlocks.
If not, to quote my favorite line in The Bard’s canon,
The fault, dear Brutus, is not in our stars, But in ourselves [9]
As GameChanger’s data engineer, I oversee the data pipeline and data warehouse. Sounds simple, right? And at a high level, it is!
Fig 1.1: high level architecture diagram. Some complexity removed due to it being kinda boring for this post.
Producers produce into the pipeline, and our main consumer is the ETL job which moves data to our warehouse, enabling anybody to come get answers to their questions and see what’s happening across all our systems. Boom: easy.
Well, not quite.
Who owns what
Since data can come from any number of backend systems and teams, engineers are responsible for writing the setup that shepherds their data through the system: a producer that lives near their data, the pipe it travels through in the pipeline, and the warehouse table. This often means new data that I’m unfamiliar with arrives in our warehouse without me even knowing it’s been set up, which is actually kind of neat: the system should be so easy to work with that you don’t need the data engineer.
After a recent refactoring project, producers were made as simple as possible with removed boilerplate and plenty of tests to automatically catch the most common bugs engineers encounter. Typically, engineers have no problems with making their producers.
Fig 2.1: engineers before and after producer refactor project. Studies have shown that engineers prefer to be happy.
The pipe their data travels through is set up by filling in a form and pressing a button. Again, engineers typically have no problems with this.
It’s the warehouse table that becomes a pain point.
Follow the readme
There are two times non data engineers need to interact with warehouse tables:
they’ve created a new producer which needs a table for their data to land in.
they’ve updated an existing producer which needs its table updated as well.
The second point is trickier and easier to get wrong, but the first point proved just as difficult for many engineers and far more common, especially if the engineers in question had never made a producer before. The warehouse is a different database from the ones they usually interact with, it has slightly different (SQL) syntax than they might be used to, and the code must be written by hand instead of using a library to generate it. It’s also easy to miss that you’ve forgotten it when you don’t typically interact with the data warehouse.
So how bad is “bad”?
Why does it matter that the table exists? Well, if we look at how data crosses the pipeline-to-warehouse boundary, we find a gotcha.
Fig 4.1: a gotcha in the ETL system. Unlike data, a gotcha cannot be turned into information.
Our warehouse needs a place for data to live, a home to call its own. If there’s no table for it, our loader isn’t able to move the data over: it builds up in our holding tank, never getting to the transformer.
Previously this caused our loader to become unstable, as it pushed data from the holding tank into the warehouse; our new version pulls data only if there’s a table, but the table is still key.
Fig 4.2: unmoved data. Many studies posit that data, unlike engineers, have no preference towards being happy, but I would disagree.
So if engineers often forget or struggle to create the table, the data won’t move without a table, and I don’t have the in depth knowledge of what this data is to make every table myself (or even that there’s new data coming through), what can we do?
Thought experiment: an ideal world
Let’s imagine what an ideal world would be for solving this problem: in this world, the table would be created automatically in the warehouse.
Well, what keeps us from that?
Firstly, we’d need to know the shape of the data to know the shape of the table.
Figure 5.1: the shape of things. Between systems, the same thing should have vaguely the same shape.
Actually this is something we already have: all data as it moves through the data pipeline must declare a schema, which is registered with a service that will happily answer the question, “what is the shape of x?”
Secondly, we’d need to be able to convert that schema to a table.
Alright, so say we had a way to convert a schema to a table, what else would we need?
There’d be a few gotchas around how to convert the schema fully: an integer is an integer and a boolean a boolean but is a string a VARCHAR(48) or a CHAR(36) or even a DATETIME in hiding? Plus our warehouse is distributed, so what do we distribute it on?
Let’s imagine we had a system that could make most of the table but not all of it: if we asked engineers to then finish the flagged portions of the table, would we have something pretty close to an ideal world?
One way to find out.
A touch of magic
To bring this project from high level to specifics, here are the pieces I needed to make work together:
Our loader, which is written in Python.
Github, which is where table creation files are reviewed before being automatically run when they hit master.
Slack, to let engineers know that there’s a table in need of a review.
Github, Slack, and the Schema Registry all have RESTful APIs which we could easily hit from our Python without much fuss, which meant not only was this doable but it shouldn’t be too crazy for other engineers to read and understand.
Figure 6.1: pseudocode of bringing our ideal world’s solution to GameChanger.
The hardest part of implementing the above ended up being create_branch_for(missing_table, create_statement) as git commands are simple to do on a command line but required introducing a new Python library to achieve in the code. Instead of trying to make that work, I cheated and wrote a shell script — ironically, the first time perhaps that a shell script was the simplest implementation for everyone to understand.
Figure 6.2: pseudocode of the shell script to assist our Python, which only had to add the waiting file and substitute in a few names.
As I was implementing and testing the code, other sticky spots arose (the Github API wasn’t playing nice for some reason but the Python library wrapping it was) as well as opportunities: I realized while writing convert_to_sql(schema) that I could flag the specific lines that needed an engineer’s attention with a simple -- Please verify this line! when there were strings or where the distribution key was defined.
Finally I found a way to add, not just a touch of magic to the system, but also a touch of fun with a little bit of personality in the pull request; this would go a long way in taking the PR from “a thing the system demands of you” to “a fellow engineer, albeit not human, asking for your help.”
Figure 6.3: personality in automation was achieved using politeness, random emoji selection, and doing work for other people so they don’t have to. It also never forgets to add the data team, nor to link to where it found the table missing.
What have we learned?
So far the only engineer who’s used the system to create tables has been me, but as I write this three new producers are being reviewed that the system will create tables for. The documentation for creating producers has been massively shortened, with the entire section on creating tables replaced with a reminder that while the system will start the pull request, the engineer needs to finish it.
Figure 7.1: how I often feel waiting to see if a thing works in production.
As small as it seems, there’s something to be said for removing that mental burden of switching contexts, writing a SQL CREATE TABLE, thinking through the different options… and instead being asked very specifically, “What is x’s data type? What does it represent?”
For me this has been especially gratifying as, since the day I started, I’ve known this was a pain point for others that I wanted to address. Being a data engineer at GameChanger means overseeing the data pipeline and data warehouse, sure, but it also means knowing a little bit about every system, listening to what my fellow engineers are saying and struggling with, and coming up with ideas that might seem crazy but are doable with a bit of reading the docs, pushing through, and just the right amount of chutzpah. Of the values we hold as a company, the one I associate with most is, “We do unglamorous work in service of the team.” Automating away table creation might have been unglamorous, but it was also satisfying.
Wrap up
I’d like to thank my fellow GameChanger Josh for helping to illustrate this blog post and give it, like my automated pull requests, that little bit of personality to make it shine. I’d also like to thank Eduardo who does the truly unglamorous work of reviewing my pull requests, which are rarely about the same thing two times in a row.
We’re actually looking to hire another data engineer along with a host of other roles in case you’d like to join us. There’s so many great things we do at GameChanger but I can guarantee one thing you won’t ever do, and that’s have to create warehouse tables for your producers.
Old habits die hard. We’re creatures of habit, and provided there’s no stimuli that causes us to change and evolve, we’ll all very likely stay static. After all the more you repeat something, the better you get at it, and there’s little to be gained from change for change’s sake save for a new perspective, which can be rather varied in its returns.
I’ve been an Android Developer for a little over 5 years now, and I love Java. Quite a bit actually; its APIs for common data structures, its explicitness and the way it makes it easy to read someone else’s code, its OOO approach and how it lends to easy encapsulation and delegation to class instances, its recent adoption of a pseudo functional paradigm with functional interfaces and single abstract methods… the list goes on. Not only does it offer all this, but it does so while being backwards compatible with previous versions of the language. It’s therefore not surprising Java and the JVM form the thriving ecosystem they are today. I’ve spent a considerable amount of time learning about the language and its design decisions and they all seem extremely justifiable to me.
However, the programming world moves fast, and with Google embracing Kotlin more and more each year, I needed not only to switch, but to be in an environment that I could use Kotlin in, day in and out. Here at Gamechanger, I’ve found that, and have been learning and using Kotlin for the past 90 days, and there’s quite a lot to like.
Fundamentally Kotlin doesn’t try to re-invent the wheel, nor is it some great departure from Java that would cause an epic schism or anything of the sort in the JVM ecosystem. If anything, it readily embraces its heritage with 100% interoperability with Java. What Kotlin seeks to do instead, is get out of your way, and let you do as much as you already could with a lot less effort and code.
Compiler niceties
A lot of what Kotlin does I’ve found, is to take things the compiler could do, and simply make the compiler do them. From inferring generic types, to smart casting and much more. Take for example casting an object:
	when(val item = container.item) {
		is Car -> item.drive()
		is Plane -> item.fly()
		is Rocket -> item.launch()
	}
In Java, the cast is still necessary despite having just performed an instance check right before. In Kotlin, the compiler is smart enough to skip the ceremony and let you start interacting with the Item as what you’ve already ascertained it is, a Car.
The standard library
In Java, creating a list, or map of items is a bit of a ritual. The tersest form for creating a mutable list of names is:
List<String> names = new ArrayList<>(Arrays.asList("Jack", "John", "Mary"));
And even that is shrouded in nuance, the wrapping ArrayList is only necessary to make the List mutable, as the Arrays.asList method returns an unmodifiable List. Trying to mutate it would cause an exception and you wouldn’t know unless you read the docs beforehand, or at runtime.
Kotlin instead uses the more readable
val names = mutableListOf("Jack", "John", "Mary")
Which is less verbose, and yet much clearer. Kotlin actually separates mutable collection types from immutable ones, there are no methods available to mutate a List, they only exist on a MutableList. Whereas prior you couldn’t communicate that a List was unmodifiable without throwing an Exception, you can now easily convey it in the language itself.
Infix Functions
Another amazing example of how the language gets out of your way to let you get things done are infix functions. Similar to the above, let’s create a map of numbers to names in Java.
    val map = mutableMapOf(
      1 to "Jack",
      2 to "John",
      3 to "Mary"
    )
Again Kotlin is more succint, and more than that, the mapping operator to is not a language keyword, it’s a regular function that creates a Pair of two elements, i.e:
val pair = 1 to "Jack"
is equivalent to
val pair = 1.to("Jack")
is equivalent to
val pair = Pair(1, "Jack")
By declaring a function as infix, you can write more readable code with less ceremony, provided you meet the requirements of the infix notation. You can even write your own infix functions if you so desired, and can call them with the same syntax.
Extension Functions and Receivers
Finally, my favorite Kotlin ability, are extension methods and receivers. Extension methods are statically resolved syntactic sugar that let you define methods on a class, as though you owned it without having to inherit from it. This is very common in Android where framework classes are build for the lowest common denominator and have fairly open APIs for you to make them as robust as you wish.
Take for example, trying to get the current displayed View in a ViewPager. In Java, a utility method would need to be created like this:
    public static View getCurrentView(ViewPager viewPager) {
	    ...
    }
While in Kotlin:
    val ViewPager.currentView: View?
	    get() {
		    ...
	    }
Calling the method in Java would take the form:
View currentView = getCurrentView(viewPager)
and Kotlin
val currentView = viewPager.currentView
Of the two, the Kotlin version reads better, as for all intents and purposes, the current view in a ViewPager really is a property of the ViewPager itself despite it not being included with the ViewPager dependency.
This is but a tip of the iceberg however. We’ve been able to add a property to a class we have no control over, but what if you could execute arbitrary code in the context of any class at anytime?
Think of functional interfaces in Java like a Consumer<T> but instead of the consumer receiving the instance of the object T, it also receives the execution context of T, as though you were writing code inside the body of class T.
To illustrate, let’s bring back the Container class from earlier. Assume the class has since been refactored to contain generic bounds for the item contained within, so a Container of a Car now has the signature Container<Car>.
This container is passed around quite often, so in Java I could define a method called onItem of the signature:
Within the scope of the lambda expression, I’m writing code as though it were inside the body of the Car class. All the instance variables and methods in the Car class are available in the lambda context, as well as those available in the execution context of the method block the receiver was called in. This avoids having to create temporary variables for state within the car class that we may need, bloating our code base as it’s readily accessible within the Car context.
The Kotlin Standard library has various permutations of different kinds of methods that use receivers. They take some getting used to, but really are quite lovely, especially when working with Nullable types.
Wrap up
Kotlin has a lot more to offer than just these perks, but in my 90 days, these are the ones I’ve enjoyed the most as they dealt with the parts of Java I wasn’t fond of.
Do I still love Java? Yes, but more in a legacy way now. Without it, there’d be no Kotlin, but Kotlin improves on in it so many ways that it really is night and day between the two. It’d also be non trivial to bring those same Kotlin features to Java in a backwards compatible way. It only took 90 days, but I wholly prefer Kotlin to Java. Couldn’t be a second earlier either, Google IO 2019 was a couple months ago… unsurprisingly, Google is going Kotlin first with Android now, I’m just glad I caught the train.
Have you ever participated in a firefight where the root cause seems unclear, then suddenly the symptoms self-resolve? Sometimes inadvertent action may cause it, other times it appears miraculous. If you find yourself in this situation, or excusing recovery with “it was a one-off blip,” your system likely lacks sufficient observability. With development and operations increasingly converging, application instrumentation continues to concern many teams building new platforms and maintaining legacy ones.
The general rule of thumb when introducing observability into a system is to instrument everything. However, this philosophy creates a user experience challenge. How do we deliver the salient system correlations to the people who can best leverage them? The platform team at GameChanger recently had the opportunity to tackle this question when we encountered performance degradation while scaling a new back-end system. We are not yet finished, but we have progressed meaningfully.
Diving into the black box
Modern Node.js, using async/await with Koa, powers GameChanger’s nascent Team Manager product. PostgreSQL serves as the primary datastore and PgBouncer manages connection pooling to the database. We already use Datadog to monitor many of our legacy systems. Starting with Datadog for a new system made sense for a number of reasons:
Vendor familiarity: engineers already understand the operational model and where to look for diagnostics
Breadth of functionality: support for a wide variety of metrics, application performance monitoring (APM) and centralized logging, and mature monitor types, ensure our telemetry can scale alongside the codebase
Low adoption cost: integrating new services with our existing Datadog configuration is trivial
After building an MVP, our baseline instrumentation included typical system level metrics, such as load average, CPU utilization, and used memory, as well as custom metrics for all requests like duration and status code. Such metrics enable us to monitor attributes of user impact like error rate and response time. We also had the ability to selectively time function calls, but no meaningful way to create correlations such as flame graphs. Lastly, we use Loggly for log aggregation, but constructing a timeline from logs and associating them with behavioral trends we might encounter in Datadog remained challenging. These mechanisms provide robust insight horizontally; we can see behavioral patterns in a cluster from the data we categorize. However, once we identifed problematic requests, we had little transparency vertically, such as the time database or third party network calls consumed during the request.
A sample of graphs from one of our dashboards. We categorize similar classes of metrics in order to reduce cognitive overhead during diagnostics.
As our active user count increases, we continue to add new functionality to the application. In the initial design, we had clear intent behind some of the architectural patterns, but only hypotheses about whether these patterns would achieve our goals. Additionally, GameChanger’s engineering culture encourages team members to work across the stack and contribute to codebases and systems in which they might not be experts. These practices stimulate learning and technical growth. However, when intersecting with a new codebase, testing performance and scalability hypotheses becomes problematic.
In order to refactor both incrementally and holistically, while maintaining a high velocity of contributions, we wanted to augment how we gather information to inform decisions. On the people side, we formed a decision-making committee from members of many contributing teams. This committee conducts research and effects architectural change in the system. On the technical side, we sought to empower engineers to more easily identify performance bottlenecks using instrumentation. In order to do this, we outlined a few requirements:
Distributed correlations: provide a comprehensive view of how all of our components, e.g. Memcached, Redis, AWS Simple Queue Service (SQS), in addition to PgBouncer and Postgres, interact within the lifecycle of a request
Granular tracing: expose as many details around timing as possible, from individual function calls to low level framework operations such as the Node.js event loop and garbage collection
Extensibility: extending this monitoring with new additions to the codebase, whether it be new endpoints, new providers, etc, should demand minimal effort
Stretch: zero-touch installation: avoid requiring changes to application code in order to surface useful metrics
Surfacing with clarity
Two significant bugs in our system surfaced recently. In hindsight, tools fulfilling such requirements would have revealed the root causes more quickly. The first bug was a mistake in some ORM code, where some requests executed redundant SQL statements orders of magnitude more than they should have. The database handled the load well, yet the I/O-intensive activity caused thread starvation in the Node.js worker pool and we witnessed widespread request timeouts. In this case, we had attempted to correlate Node.js requests to PgBouncer waiting client connections to Postgres transaction throughput. However, without vertical visibility into each request, each component appeared relatively stable in isolation.
The second bug was a design flaw in our workers that process SQS queue items. In a loop, workers either perform queue tasks or short poll SQS to determine if items need processing. The polling frequency for empty queues triggered AWS rate limiting. Combined with our exponential backoff response, we witnessed delays in all workers, regardless of queue length. Thus, empty queues cannibalized the throughput of populated queues. In this case, we had no monitoring on our SQS network calls and debugging was an archaeology exercise.
To try making some of these bugs easier to diagnose, we turned to APM solutions as a panacea fulfilling many of our requirements. While typically installed on a single application, APMs provide granular tracing and can infer interactions with external services by treating them as a black box. We evaluated both Datadog’s and New Relic’s solutions. Each supports Node.js out of the box and is relatively straightforward to install with minimal application code changes. Much to our delight, New Relic provides detailed instrumentation of Node.js internals, exposing metrics on the event loop, memory usage, and garbage collection. Additionally, both services trace request operations, correlating insights from database to external service activity. Yet both solutions had varying support for Koa at the time of adoption. Datadog only recently introduced support for Koa, and New Relic required some manual pattern matching of routes.
Aside from those features, we mostly found both services functionally equivalent. We chose Datadog for its superior user interface, familiarity with the platform, and ease of integration (at the cost of vendor lock-in). Datadog provides a more refined web application for browsing traces, and their query DSL is simple and intuitive. Finally, the ability to export trace searches to our existing alerts and dashboards made extending our existing, monitoring coverage trivial.
Datadog traces supplement flame graphs with host metrics and provide optional, logging integration.
Revisiting the bugs we previously discussed, we now have observability into:
SQL statements executing during a request, allowing us to identify excessive database activity
Duration of external asynchronous operations, enabling us to monitor outlier slowness
While we still lack sufficient observability into Node.js internals with Datadog, we enabled granular, distributed tracing with relatively low overhead. The automatic route matching and support for many common frameworks and libraries in their APM ensures low effort to maintain quality instrumentation as we extend the application with more endpoints and service integrations. The vertical observability of individual requests and API operations supplements the horizontal observability from existing dashboards and graphs. In practice, we still rely heavily on dashboards and graphs to illuminate behavioral trends of dependent components in a system and explain what is happening. APM now brings us closer to potentially answering why such things happen.
On the horizon
While implementing APM reaped many rewards for us, we still have outstanding concerns. For example, we lack the ability to correlate API HTTP requests to PgBouncer TCP connections to Postgres transactions, which might make it difficult to tune connection pooling strategies. Our logs remain segregated from our monitoring and are impossible to analyze across attributes with high cardinality. Connecting monitoring to the teams best positioned to act upon them continues to challenge us.
We briefly considered alternative approaches to instrumentation (not necessarily mutually exclusive). Envoy Proxy appeared on our radar as a solution for monitoring at the network level and also fulfilled our zero-touch installation requirement. Honeycomb.io also intrigued us for its approach to observability primitives and ability to generate many insights from raw data structures. Ultimately, APM provided the most value for effort given the prior state our system, but it would be interesting to explore such options in the future.
You may have been in a meeting where you see one person constantly get steamrolled, notice one person repeatedly interrupting others, or observe someone feeling uncomfortable to speak up. Although we have, in many ways, grown accustomed to these behaviors and the biases that cause them, they can unfairly favor certain individuals and negatively impact others. Imagine the more productive and fulfilling work life you could have if everyone on your team was fully engaged and felt heard and respected. Your team community would feel stronger and consequently more productive.
These types of biases can be common in a professional atmosphere. A subconscious bias is a mental model of the world and by definition is not something people are aware they have. Mental models themselves are not always harmful. In fact, mental models are constructs that usually help people prepare for and process the world around them. However, sometimes people develop mental constructs about other groups of people that can negatively impact their decisions and subconsciously affect how they treat others. The attitude or stereotype behind the action is the subconscious bias; the action it leads to can be called a microinequity. This subconscious bias is different from overt bias, which is bias people know they have and intentionally act upon. However, subconscious bias can be just as harmful. A female coworker once experienced such bias during a breakfast at a tech conference. She was the only woman at the table, and every time someone new came to the table, they shook hands with everyone at the table but her. Even if it was something they did unintentionally, it still had an impact on her morale and left her excluded in the introductions.
If these biases go unchecked, they can create uncomfortable and even hostile work environments. Teams where people don’t feel comfortable or accepted can be unhappy and are actually less productive. Workplace biases can lead to demoralized and disgruntled employees, create friction on teams, and reduce productivity in the workplace, according to a Career Trend article. A recent Harvard study proved that workplace bias has harmful effects on minorities. The study collected data from a French grocery chain and found that the performance of minorities dropped when they were working with biased managers. Workers at the chain worked with different managers daily and the study discovered significant evidence to prove drops in performance correlated with managers who displayed biased tendencies.
The best way to address the effects of subconscious bias in the workplace is to accept that everyone has developed subconscious biases in some form and have honest discussions about how to recognize and address them. However, it is often more difficult to recognize or stand up against these biases as the victim in these situations. A very effective solution to biased action is bystander interruption.
My intention was to find an actionable and productive way to address subconscious bias at GameChanger. We already had a culture of sharing articles and talks and having open conversations about these topics at GC. I wanted to take this one step farther and somehow address these issues in a more personal and tangible way.
I discovered an outline for an activity on the NCWIT website that discussed having a workshop with your team at work. There were nine scenarios listed in the activity, and the document suggested having discussions about actionable ways to deal with the subconscious biases present in each scenario. It recommended acting out the proposed solutions so that people could practice dealing with these scenarios in real life. My idea started forming after looking at this activity. I liked the idea of having open discussions about real scenarios and coming up with actionable solutions to deal with them. I also liked how this activity stressed bystander interruption, and how it made dealing with bias everyone’s responsibility, not just the victim of these situations. I decided I wanted to develop my own such workshop to try at GC.
My Goals
I had two goals in mind for this activity: come up with actionable, realistic solutions for dealing with bias in professional scenarios and, on a larger level, learn how to have productive conversations about bias.
Come up with realistic bias interrupters for specific scenarios
I wanted the solutions we came up with to be as useful in day-to-day life as possible. I came up with two methods to achieve this:
Discuss real life scenarios during the workshop
Use discussion prompts to keep the solutions specific and realistic
I got the scenarios we discussed from the workshop participants’ past experiences in order to keep the discussions relevant and realistic. This would allow people to empathize with the material and keep them engaged in the workshop. They would also be more likely to encounter these scenarios in the future, and hopefully would have strategies to identify and correct them then.
Even if we used real life scenarios, the solutions we generated would not work in practice if they were too vague and unrealistic. I made it clear that we were coming up with very specific solutions to these problems, down to the exact words the participants suggested saying. I provided discussion prompts to help people make their solutions more detailed and to encourage people to consider multiple possible ways a scenario could play out. Prompts included asking how the participants would modify the solution if they were dealing with people they knew vs. people they didn’t know and how they’d account for the power dynamics of the people involved. This way, everyone in the workshop would be equipped with multiple usable solutions for a specific scenario. They would get practice analyzing different situations and adapting their solutions based on the circumstances.
Practice having discussions about bias
Bias is nuanced, and there is never an easy solution on how to address it. We need to learn how to talk through scenarios and envision possible solutions. The discussion prompts also helped with this goal. They guided the conversations and gave people examples of questions they should ask during conversations about biases.
Guidelines
Another key part of having a productive conversation is making sure all parties in the conversation feel comfortable and heard. I had a strict code of conduct to facilitate a safe environment during the workshop and that would hopefully be applied to future such conversations as well. I had four major guidelines for the workshop:
Psychological safety
Psychological safety is a term coined by organizational behavioral scientist Amy Edmondson, who defined it as “a shared belief held by members of a team that the team is safe for interpersonal risk-taking.” It means feeling heard, safe, and able to take risks without fearing retribution or ridicule. It boosts productivity and personal satisfaction, and is necessary for generating good ideas and having happy and comfortable team members. It is crucial when having tough conversations in order to come up with the most productive solutions.
Everyone participates equally
I wanted to limit all forms of bias during the actual discussion, including biases that act against introverts and quiet people in most meetings. Equal engagement is crucial in company culture discussions, and I wanted everyone’s voice to be heard equally. I constructed the actual brainstorming and discussion during the workshop such that everyone could feel comfortable participating and no one person would speak more than the rest. In practice, this included things like enforcing no interruptions and limiting full team discussions, focusing on solo generation of ideas and small group brainstorms.
Don’t vent, and don’t get defensive
While being able to talk and commiserate about issues can be essential in processing the tough things that happen to us, I did not want that to be the purpose of this workshop. I wanted us to be focused on actionable solutions. On the flip side, I did not want anyone to react defensively to the situations addressed. Not only does that stomp on the psychological safety of those around you, but it ends the conversation by taking the focus away from the victims of these situations and onto the perpetrators of the bias. The only way to have productive conversations about reversing and limiting the effects of these biases is to accept that everyone has them. The workshop focused on what to do if you are a bystander who witnesses bias partially so that participants would not feel inclined to vent or get defensive. It is also easier for bystanders to recognize and address bias than it is for the victim in a situation, so this workshop was designed to target what would hopefully be the most effective way in limiting the biases around us.
Preparation
Once my goals and guidelines were set, I started putting together content for the workshop itself. I got buy-in from our people operations team and upper management early on to make the workshop mandatory for the whole team. The workshop would be most effective and worthwhile if everyone did participate. If only a couple people in each team were present, it would be difficult for those who did to apply the skills we picked up during the workshop with the rest of their teams. We decided the first iteration would be just the engineering team so that the discussions would be as relevant to the participants as possible, and so we could talk about topics as specific as code reviews. If we felt like it was a success, we’d do another version of it with the rest of the company.
I wanted the people in the workshop to generate the content for discussion. The best way to have an engaging and productive discussion was to talk about scenarios participants have experienced, relate to, or find realistic. I collected anecdotes from the group by sending out an anonymous survey to the workshop participants. The survey consisted of one question:
“Discuss a time you experienced or observed subconscious bias in your professional career. What was the situation?”
Participants were encouraged to submit more than one response.
Survey participants were informed these responses would be used in the workshop and were advised to keep their responses general and anonymous, especially if the situation happened while they were at GameChanger. Once we got the survey responses, we wanted to take extra steps to anonymize them and wanted to incorporate as many of the responses in the actual activity as possible. We grouped responses into similar themes, including interviewing bias, problematic language used about a woman or minority, and one person taking or receiving credit for another’s work or idea. We then created composite situations for each group by combining elements from each of the responses, and reframed them so that the subject is an observing third party. For example, if one of the submissions was that the employee’s manager called her “high maintenance” for demanding a peer to meet a deadline, we would reword it to the following:
You overheard a manager telling a female coworker she is “high maintenance.”
We wanted to make sure the scenarios we used were anonymous and could not be traced to any particular situation if they did occur at GameChanger, but still wanted to keep them relatable. We also wanted the scope of the discussion to reach as many of the submitted responses as possible.
I wanted to make sure that the actual workshop format and discussion prompts easily facilitated conversations, and wanted to get feedback on the process in general. I put together a small group of three other people and went through one round of dissecting a test scenario. I wanted to test the times allotted for each part of the discussion and get feedback on the format in general.
Finally, I wanted to make sure people were in the right frame of mind for the workshop and did not want to spend too much time proving that subconscious bias was harmful to the workplace or that this discussion was necessary. I also wanted participants to come in with a common vocabulary. I sent out a short introduction explaining some common biases women and minorities face in the workplace along with a couple pre-reading articles explaining technical privilege and bias interruption. This small introduction to the activity hopefully got people in the right frame of mind so that we could focus on the actual brainstorming the day of the discussion.
We had the resources we needed and had laid out the necessary groundwork for the actual workshop. If you want to read about the activity itself and the aftermath, check out the second part to this blog post.
In the first part to this two part article, I talked about the motivation and preparation behind creating and running this activity. Here, I will talk about the setup of the activity itself and the aftermath and feedback we got from it.
The Activity
We allotted two hours for the activity and broke it down into the following segments:
Intro presentation (20 minutes)
Round 1 (35 minutes)
Round 2 (35 minutes)
Conclusion and optional follow up conversations (30 minutes)
Each group got one scenario to discuss per round. We were fortunate to have enough survey submissions that no scenario was repeated throughout the activity, and each scenario grouped at least two survey responses. The rounds were broken up as follows:
Solo brainstorm with post-it notes (3 minutes)
Small group discussion (12 minutes)
Presentation to full group (20 minutes total)
As with the reading materials and the introductory email sent out before the workshop, the intro presentation was intended to get the group on the same page and give everyone a common foundation on which to have these discussions. I included brief definitions of relevant terminology, most of which was introduced in the pre-reading materials sent out before the activity. The terms included psychological safety, technical privilege, microinequity, and subconscious bias. It would be easiest to have these conversations if everyone was equipped with the vocabulary commonly used around this topic. We also took some time explaining the high level goals of the activity, the code of conduct, and the actual format of the activity. We then briefly showed the group the prompts for the solo generation and small group discussion, though we had these visible during the pertinent parts of the entire activity as a guideline.
The prompts were designed to help people either better recognize bias in the future, help guide each individual’s thought process on the best way to interrupt, or provide a basis for discussions with peers on the best way to interrupt different kinds of biases. There were questions asking how the participant would reassess the situation if one of the people in the situation was a manager, if the victim was an introvert, if they didn’t know the victim well, and other nuances that could affect what the appropriate response would be. I included questions asking people to identify the different types of biases that were at play in the situations. Participants were encouraged to write down different interruption strategies based on each type of scenario they envisioned.
We decided to split the engineering team into groups of three, trying as best we could to make the groups as diverse as possible and include people from different teams. We started with solo generation, which was a strategy to engage everyone equally so that everyone could come into the larger group discussions with ideas to contribute. This eliminated the anxiety of thinking on the spot and stopped any one person from dominating the small group discussions. We used post-it notes during the solo generation. Each discussion point, interruption strategy, and question went on its own post-it note so that they could be easily grouped in similar themes in the discussion that followed. During the solo brainstorm, participants were given prompts but asked to focus on the question: What, if anything, would you say or do?
Participants could then easily compare interruption strategies and raise questions or concerns during the small group discussions. The group could easily move around and categorize these individual thoughts during the discussion, in preparation for the larger group presentations. We presented a separate set of prompts during this session, most of which encouraged people to poke holes in the interruption strategies and consider different ways a situation could occur.
After the solo generation and small group discussion, we came back to the full group and each team had a couple minutes to present the high level takeaways during their discussions. Groups were encouraged to share their interruption strategies, different ways they envisioned the situation could play out, and the benefits and downfalls of each of their proposed solutions. However, in most large group discussions, there tends to be a few voices that dominate all the discussion, which went against one of my fundamental goals for this activity. Therefore, I limited questions during this segment to just a couple per presentation, and encouraged the group to write down any exploratory questions or comments they had and revisit them in the last thirty minutes of the activity, which was reserved for more free form follow up discussions. This way, we could achieve equal participation during the workshop and limit the unfair advantage large group discussions give to more extroverted individuals.
The combination of individual brainstorming, small group discussions, and full team presentations allowed us to have productive conversations with every participant fully engaged, while still being able to share all the discussions with the large group. The brainstorming and discussion prompts for the solo generation and small discussions helped keep the discussions on track and allowed participants to practice how to have productive conversations, which they can hopefully apply in the future as well.
The Outcome
I was incredibly pleased with the analytical and thoughtful conversations and productive solutions that came out of the workshop. It was clear people thought about the nuances of each situation, and saw multiple ways the situation could play out. Groups came up with many different interruption strategies and advised on the best ways to determine which one to use based on the exact situation that unfolded. They brainstormed interesting questions, and often advised to check in with the victim of the bias, before or after acting, to determine how they could improve upon their interruption strategies. People brainstormed realistic solutions as well, which is crucial if we want to actually implement these solutions.
One of our example scenarios was: You are in a meeting and notice a co-worker repeatedly cutting off another colleague and attempting to finish her sentences. The group considered whether the best strategy was to interrupt in the moment, or wait until after the meeting and approach the victim. However, they decided interrupting during the meeting was preferable, regardless of how well they knew the victim or had previously had a conversation with her about this behavior. This is because the negative impact this behavior could have on the victim and the meeting dynamic, especially if they noticed this behavior early in the meeting. The advised bias disruption strategy was to re-interrupt the interrupter and somehow draw attention back to the victim. A simple strategy would be to circle back to the colleague who was interrupted and ask, “Is that what you meant to say?” They also advised possibly following up with the co-worker doing the interrupting after meeting, especially if this was a repeated pattern. However, they did brainstorm how the victim’s personality and power dynamics with the interrupter could affect her prefered response strategy, and therefore advised to check in with her before doing so. Finally, they mentioned showing solidarity with a victim in this type of situation was crucial even if there was no opportunity for bias disruption during the meeting.
We took notes during the full team presentations and had groups send in any notes they had themselves for these presentations. We compiled these into a document to send out to the company. Even though it is impossible to address every way biases can manifest in the workplace, we were able to address a lot of the common microinequities people at GC have faced in the past.
We also sent out a feedback survey immediately after the fact and overall got an extremely positive response. People found it useful, which encouraged us to prepare another iteration of the workshop with the rest of the company who did not participate in the first round. I also heard many success stories in the weeks after the workshop about coworkers following up with one another about whether something they had seen was bias, and whether they interrupted it correctly.
I am grateful to the management team for allowing me the opportunity to carry out my vision, to my coworkers who continued the initiative after the first iteration, and most of all to everyone who participated in the workshop for putting their thought and energy into the workshop. My goals were to encourage people to have empathetic and psychologically safe conversations about difficult topics and to speak up and intervene when they see bias. We accomplished both during the session.
Up until the latter half of last year, we, the QA team at GameChanger, dedicated many hours to manually running regression tests on our apps. We found ourselves caught in a time crunch before weekly releases, falling behind in testing new features, and struggling to maintain a high standard of quality for our products.
An obvious solution would have been to create a suite of automated tests so that we could forego manual regression testing. Although we are starting to work on this as part of our complete test strategy, we still have a need for manual testing for many reasons. For instance, automated tests may not pick up on certain types of UI bugs like a flashing screen and they certainly cannot provide usability feedback.
So we came up with the idea of hiring manual testers for regression testing…
At first, we hired a company that supplied us with on-demand testers who were randomly assigned to us when we needed to run our regression test suites. This meant that tests were always executed by someone who had never seen our apps before. However, without a deep understanding of functionalities within our apps, these testers were unable to effectively test and find bugs. This solution was a swing-and-a-miss.
Assembling the Ultimate Team of Part-Time Testers
We needed our QA team to focus on creating test plans, testing new features, and strategizing and implementing ways to attain and maintain higher standards of quality. So we set out to hire our own team of part-time testers to run our daily regressions and beta regressions.
When we first thought about hiring testers, we were constantly weighing the importance of hiring someone with solid QA experience versus someone who was very familiar with our apps. At the time, we were so impressed with the enthusiasm of GameChanger users applying for the role, we ended up hiring avid GameChanger users with at least some QA experience.
Contrary to the outsourced testers, our newly hired testers were real users who were personally invested in our products and able to provide real-world feedback. They were also easy to train, able to run tests faster, quickly find release-blocking bugs, and were more adept at finding complex bugs. The idea of having real users to test products was further solidified by a talk at the STAREAST Conference last year describing how other companies found success in hiring their loyal customers as testers.
How our QA Team has Benefitted from our Part-Time Testers
After a couple months of tweaking the job post for part-time testers and interviewing candidates, we were very fortunate to find a strong team of GameChanger users with QA experience. At first, we had them run our daily regressions and beta regressions. In time, we found that our testers were so proficient at finding bugs in our apps that we started to give them new features to test as well. If a new feature is ready to test at the end of the day, we are able to have our testers run test cases for the feature that evening. Any bugs that are found are ready for our engineers to work on the next morning, increasing the velocity of our product teams.
While it is still our job as QAs to thoroughly test features, having the features tested sooner and having another set of eyes on them increases the speed and quality at which we can release features. We can also get feedback from our testers who are real users before features get shipped.
Another huge benefit of having a team of testers is that we gain more coverage on a spectrum of devices and OS versions. In the past, an in-house QA would run an entire regression by him/herself on one device on one OS. We would have needed more QAs to provide the same coverage we have today. Now, we have testers testing our apps on various devices and OSs on a daily basis. The risk of our customers finding bugs related to specific devices and/or OSs has greatly reduced.
Getting to Know our Remote Part-Time Testers
A few months ago, a group of women at GameChanger, including myself, decided to participate in the Grace Hopper Celebration conference by submitting topics to the conference that focused on women in technology. As we discussed potential topics to submit, I thought about doing some research on our testers on the basis that they were mostly women. Gender aside, I wanted to better understand what drives our testers to put forth incredible amounts of effort every day to ensure that our apps adhere to high standards of quality.
Getting a more holistic picture of our testers’ backgrounds and their thoughts could help us understand both the positives and negative aspects of their roles at GameChanger. The hope was to use these findings to help us optimize and enhance how we work with our testers. So I sent out a questionnaire to our team of part-time testers with some open-ended questions and found some common themes in their responses.
Some facts about our testers:
All but one of our testers are users of our apps
All but one of our testers are women
All of our female testers have families with children
General themes that came up in their responses to the questionnaire:
All of those testers were drawn to the role in part because they love our apps and are long-time users of it
Only one tester does not have an additional full-time or part-time job
Being able to spend more time with family was evident in the women’s responses
Most testers mentioned that lack of physical face-to-face contact was a negative but daily communication via messaging was a plus
The women:
One of the themes that came up for the women was an increased sense of productiveness, accomplishment, and self-importance
Some of the quotes from our testers’ responses that really struck a chord with me:
“This position had nothing to do with the hours/money I really like GameChanger as an app for softball and thought it would be fun to get a job there”
“I love the app and wanted to be part of something new (change it up a little from my normal job)”
“I like being productive, using my brain, actually speaking to adults once in awhile, and earning an income.”
“…after 17 years in the same job you get comfortable and you get scared that you couldn’t leave that job and find something else (not capable enough etc.), but know that I really do have the experience and knowledge and work ethic to gain a new position was pretty powerful (personally). This may sound odd, […] but it gave me the little extra spark that (if something was to happen with my regular job) I would be ok.”
“I had been a home-based employee the last 8 of those years […] I have a child with epilepsy and when she was diagnosed 7 years ago we decided that it would be best if I stayed closer to her schools in the event something happened.”
Changes in How We Work with Our Testers
Since acquiring the responses to the questionnaire, we have made conscious decisions as to how we work with our testers.
Being Sensitive to Personal Schedules
The most obvious theme from the responses was that all our testers have family and/or other job obligations. We try to be cognizant of their busy schedules when we communicate with them and when we schedule tests for them to run. We are also flexible as to the time of day they test and if they need time off.
To help our testers plan their days, we have set up a calendar with daily assignments that stays quite consistent from week to week. We have found that once we implemented a consistent and transparent schedule that they could follow, it seemed to have lessened anxiety around balancing testing with their other jobs and personal tasks such as picking up their kids from school and going to their kids’ ball games.
Meeting with Testers
Lack of face-to-face contact was one of the negative aspects of working remotely that we also wanted to address. After being aware of this, we have made a conscious effort to either meet with our testers on video chat or by phone in order to keep our lines of communication more open and personable. In addition, our testers we use Slack to keep us connected at all times.
Changes to How We Select our Testers
When the time comes to hire additional testers, we will be focusing on candidates who are users of our apps. This approach has already proven to be a huge benefit to our company. Our testers are always excited to test out new features and promote them to their friends and family. They truly care about maintaining high standards for our products as they use them regularly to track teams that their families are involved in.
Maintaining Good Relationships with Our Testers
Companies should show appreciation to all their employees and we wanted to make sure that our testers felt valued even though they work remotely. We want them to be happy in their roles, continue to care deeply about our products, and be proud to work at GameChanger.
Showing appreciation for our colleagues is already part of our company culture for those of us who work in the office. For our remote workers, we try to convey our appreciation on a daily basis through our communication. We try to check in on how they are doing personally and how they feel about our processes and the workload that we give them. We also try to respond to any of their needs and concerns as quickly as possible. In essence, we treat them as part of the GameChanger family.
Conclusions
While automated test suites are something we are currently looking into building, manual testing is a necessity for our apps due to complex user interfaces and our company’s extremely agile environment.
We are happy to say that we now have a strong group of testers. Our testers have contributed to much lower crash rates in our apps and a lower incidence of hotfixes. We have also seen a significant reduction in customer complaints about bugs. Our QA team is now able to focus on releasing quality features and implementing strategies that help maintain high standards for our apps.
Since our testers are real users of our products, they are also great promoters of our products within their communities. User feedback from them is also very valuable to us.
Even more rewarding is that not only do our testers benefit our company, but they also find that their roles benefit themselves and their families.
We are so grateful to have such a great team of part-time testers and hope that we can continue to work with this amazing group of people.
I have been developing Android apps in Java for years. I recently joined GameChanger and was excited to learn that GameChanger is using Kotlin. I originally thought that moving to Kotlin would be as simple as learning some new syntax, but I discovered that there was more to it. After a brief learning period, I’m up and running working in Kotlin. In this article, I’ll save you some of the trial-and-error by introducing some important concepts about constructors for those making the jump from Java to Kotlin.
Not All Constructors are Created Equal in Kotlin
In Java, all constructors are equal in a sense.
public class Person {

   String name;
   int age;

   public Person(Person p) {
       name = p.name;
       age = p.age;
   }

   public Person(String n, int a) {
       name = n;
       age = a;
   }
}
Take the above example, Person(Person p) and Person(String name, int age) can be used independently. Of course, you can choose to have one calling another, but it’s not required by the language.
In Kotlin there is always a primary constructor. Any additional constructors are secondary constructors. The primary constructor is always incorporated into the class header.
class Person(n: String, a: Int) {
   var name: String = n
   var age: Int = a
}
The variables name and age are initialized with n and a. In fact, n and a are available anywhere in the class for variable initialization.
class Person(n: String, a: Int) {
   var name: String = n
   var age: Int = a
   var nameX2: String = n + n

   init {
       println("The age is: " + a)
   }
}
Any other constructors would become secondary constructors which are required to call the primary constructor in the very beginning.
class Person(n: String, a: Int) {
   var name: String = n
   var age: Int = a

   constructor(p: Person) : this(p.name, p.age) { }
}
The Order of Creation
So, what is the order of processing when calling a secondary constructor? The primary constructor is invoked first, which triggers all the initialization from top to bottom. Then, the body of the secondary constructor is executed.
class Person(n: String, a: Int) {
   init {
       println("1st: initialization block 1 run")
   }

   var name: String = n.apply { println("2nd: initialization lines run") }
   var age: Int

   init {
       age = a
       println("3rd: initialization block 2 run")
   }

   constructor(p: Person) : this(p.name, p.age) {
       println("4th: secondary constructor run")
   }
}
Can I Skip the Primary Constructor?
No, a default primary constructor is still there even when you don’t write it and you are still required to call it in the secondary constructor. Also, you cannot initialize the variables in the secondary constructor because it has already passed the initialization timeframe. (Well, they are actually properties, but they behave just like variables in this case.)
class Person() {
   var name: String // Compile Error: Property must be initialized
   var age: Int // Compile Error: Property must be initialized

   constructor(n: String, a: Int) : this() {
       name = n
       age = a
   }
}
OK, if you really want to fake it like a Java constructor, here is the hack. It’s NOT recommended and I wrote it just for the learning purpose.
class Person() {
   var name: String = ""
   var age: Int = 0

   constructor(n: String, a: Int) : this() {
       name = n
       age = a
   }
}
What happened above is that we initialized name and age with a default value and assigned them to a new value in the secondary constructor. However, it doesn’t work when you replace var with val because Kotlin does not allow variable initialization in a secondary constructor.
Overloading Arguments with Default Value
Last, but not the least. Kotlin has this elegant way to overload arguments with default values.
class Person(n: String = "Nameless", a: Int = 1) {
   var name: String = n
   var age: Int = a
}

fun main(args: Array<String>) {
   var p1 = Person() // name: Nameless, age: 1
   var p2 = Person("Tom")  // name: Tom, age: 1
   var p3 = Person(a=5) // name: Nameless, age: 5
}
The primary constructor is actually a sweet requirement in Kotlin. You will always know what is expected to create the object by scanning the the primary constructor without having to look at all the constructors as you would in Java, because constructors are no longer independent of each other. The primary constructor is also easy to spot because it is the first line of the class. If you are starting on learning Kotlin, I think the constructor is a good starting point. I hope you find this post helpful.
In my last article I talked about the sync system for our new GC Team Manager app and the trade-offs we considered in our design process. To reiterate, the high-level structure we settled on was a backend Pub/Sub service, with small granular updates, and we needed to account for the lack of ordering in message delivery. In this article I will cover how we implemented and made this sync system work.
I mentioned in the last post that part of the reason we settled on Pub/Sub was because we could use an iterative approach instead of all or nothing. This iteration broke down into two distinct parts, Asynchronous Polling Sync and Pub/Sub Sync. Asynchronous Polling Sync relied on Asynchronous Polling and topic updates. Pub/Sub Sync built device notification on top of Pub/Sub Sync. I will describe each in turn.
Asynchronous Polling Sync
The goal of Asynchronous Polling Sync was to solve a few distinct problems. First, it focused on building an algorithm that was resilient to out-of-order messages received by the devices. Second, it focused on turning backend database updates into targeted sync topic updates. To simplify the initial build, Asynchronous Polling Sync specifically avoided solving the problem of pushing topic updates to the devices themselves. It did this by allowing the devices to use Asynchronous Polling to get all updates. Switching from Asynchronous Polling to direct topic updates is the provenance of Pub/Sub Sync. I will cover each part of Asynchronous Polling Sync.
Asynchronous Polling Sync Algorithm
Handling Out of Order Messages
When thinking about the out-of-order messaging problem, the goal is to ensure that no matter what order message are received in, all devices will end up in a consistent state. When we were thinking through possible ways to do this in our sync system, we realized that the type of message being sent can help you solve this problem. As a demonstration I will consider three types of updates the backend could send to the app: send the data values of the updates, send the type of data change(update, delete, etc), or just send the id of the thing that changed.
Scenario 1: Team 1 is created then updated. All apps receive updates in the correct order
Specific Updates: 1.{id: <team_1>, type: 'team', updates: 'created'} 2.{id: <team_1>, type: 'team', updates: {name: 'Cool New Name'}}
Type of Updates: 1.{id: <team_1>, type: 'team', change_type: 'created'} 2.{id: <team_1>, type: 'team', change_type: 'updated'}
Id and type updates: 1.{id: <team_1>, type: 'team'} 2{id: <team_1>, type: 'team'}
Scenario 2: Team 1 is created then updated. All apps receive updates in reverse order
Specific Updates: 1.{id: <team_1>, type: 'team', updates: {name: 'Cool New Name'}} 2.{id: <team_1>, type: 'team', updates: 'created'}
Type of Updates: 1.{id: <team_1>, type: 'team', change_type: 'updated'} 2.{id: <team_1>, type: 'team', change_type: 'created'}
Id and type updates: 1.{id: <team_1>, type: 'team'} 2{id: <team_1>, type: 'team'}
As you can see, all update types work when messages are received in order. But as soon as messages start to be handled out-of-order, sending the id and the type of update is the only method that cannot lead to incorrect app side data. All the device has to do when it receives an update is to go to the respective API resource endpoint and load the current data. This method will always lead to the app having the most up to date data. (Note that the type of objects sent in our updates map nicely to the resources of in our API.) This simple update then reload algorithm lets our sync system be robust to out-of-order messages.
Topics
We now have a type of update that we can send that allows the system to survive out-of-order messages. But specific updates are just part of the solution. I also need to discuss the topics themselves and how they are structured.
We have a few high level topic types. These were chosen based off of our resource model. Any other resource updates are put in those high level topics.
Each topic contains a list of update objects described above
Each topic also has three other important values
current_offset - This number can be used to help figure out what updates each device has already seen. It is a number indicating the most recent update sent to the topic. Each new update pushed into the topic increments the current_offset.
max_number_of_items - This number indicates the max number of updates to store for this topic. We structure our topics to only store a certain number of updates depending on the type of topic.
storage_id - If we change the storage database or reset the updates, the storage_id allows us to communicate that effectively to the app. As a simplification, this value indicates the version of the topic you are looking at.
Algorithm
Given the structures above we use the following algorithm in Asynchronous Polling Sync:
When the app initially starts up, it gets the current_offset and storage_id for all topics it cares about. (This same procedure happens when it decides it cares about a new topic).
When the app reopens and/or every X minutes, the app asks for all updates on all topics it cares about and sends down the current_offset and storage_id
If the storage_id sent does not match that found in the backend, a specific error is returned. If the app gets that error it knows it needs to do a full resync of that topic
If the current_offset sent < current_offset in the backend - max_number_of_items a specific error is returned. If the app gets that error it knows to do a full resync of that topic.
If both storage_id and current_offset are valid, the backend returns back a list of all updates whose offsets are between the app’s current_offset and current_offset in the backend.
For each update the app receives back it attempts to reload the the resource described in the update from the API. GET /persons/<person_id>, GET /games/<game_id>, etc.
When it has successfully reloaded all resources mentioned in the updates, the app updates the current_offset for the topic.
This algorithm and the structures described make it very easy for the app to get updates it cares about, every X minutes, without having to worry about out-of-order messages.
Database updates -> Sync topic updates
Where to store Updates
Now that we have a robust app sync algorithm, we still need a way to start pushing updates into the topics when someone alters an API resource. Before we can decide how to transform backend updates to sync topic updates, we first need to figure out where to store our updates. What type of database should we use? The main database for our backend is Postgres. But there were a few reasons we were hesitant to just stick our updates in Postgres:
We did not want the large number of sync updates to swamp out our responsiveness to actual API calls
Making a dynamic number of topics to hold updates + the three variables each topic needs, ends up being pretty hard to do in Postgres.
Contention on the topic updates table could end up very high which could slowdown all Postgres operations.
We needed a system which is super fast, has great list support, provides transactions, and is simple to get up and running. For these reasons we decided to store all of our updates in Redis.
Transformation
So we now have the place to save our updates, but we still need a way to translate the Postgres database update to sync topic updates. We need some sort of transformer like in the picture above. This transformation actually ends up being very easy. We have a 300 line class which takes in query and update objects for each Postgres write and transforms those into a list of topic updates. The topic updates are then saved to Redis and then the main database updates are saved to Postgres. A simplified version of our transformer class can be seen below.
After we had built the features and functionality described above, Asynchronous Polling Sync was finished. That left us the time to prioritize and build Pub/Sub Sync when it became appropriate.
Pub/Sub Sync
The main difference between Asynchronous Polling Sync and Pub/Sub Sync is that Pub/Sub Sync replaces the Asynchronous Polling loop with a Pub/Sub service. All other parts of the system remain the same. This allows the devices to receive updates near instantaneously. Once again there are two pieces to consider when we built out Pub/Sub Sync, the algorithm to use for sending topic updates to the devices and how to actually build the Pub/Sub service.
Pub/Sub Algorithm
Similar to Asynchronous Polling Sync, there are many different algorithms we could use when pushing updates to the Pub/Sub service. Originally we just planned to send the full sync updates to the Pub/Sub service. This strategy ended up being suboptimal because there are times when Pub/Sub messages are dropped and not sent to the devices they were supposed to. Sending our full topic updates meant our algorithms depended on all devices receiving all sync updates. When this turned out not to be true we would then require a lot of extra complexity to handle dropped messages. Instead, we decided to just send a blank update that indicates something has changed on the topic: {changed}. When a device receives this message, it attempts to load all updates in that topic. For each update it loads, it GETs the proper resource from our API. This algorithm adds an extra step and network call, but keeps the overall algorithm very simple.
How to send Pub/Sub system updates
We now have an algorithm we want to implement to finish up our sync system. How do we build out this Pub/Sub service to send updates? Lucky for us, after some research and thought, we were able to find a prebuilt system that could serve as our Pub/Sub service: Google’s Firebase Cloud Messaging. (Specifically FCM’s topic feature). This free system allows devices to subscribe to topics and will make sure messages sent to those topics are delivered to those devices. The system also has a bunch of nice features: storing a certain number of messages per device if an app cannot immediately be reached, a very long TTL for messages, a pretty high per topic rate limit, and seemingly no overall rate limit. This system was also very easy to integrate with from both the client and backend side. We pretty much just dropped in FCM as our Pub/Sub Service and with that our sync system was finished.
Conclusion
We have come to the end of our discussion of our new sync system. We started out with an ideal sync system and some constraints on what our system needed to be able to do. We covered the trade-offs and criteria we considered when designing our system. Finally I covered all the technologies, algorithms, and systems needed to implement a sync system incredibly close to our ideal. The full flow implementation of our system can be seen above.
GameChanger recently released an all new app, GC Team Manager. This wonderful new product helps youth sports communities communicate, coordinate, and organize their team’s lives. I have been lucky enough to be on the team that gets to build the backend for this new app. Throughout building out this completely new backend, I have gotten to work on a lot of different pieces of the system. The one I want to dive deeply into today is our sync system.
Sync is a pretty generic, buzzwordy programming term. Therefore, it is important for me to clarify what sync means in this context. In this article, sync is the processes of ensuring that all devices in our system have a shared, up to date view of the world. If one device sees the state of Team A one way, all other devices should see the exact same state for Team A. If a device makes a change to Team A, that change is reflected instantaneously across all other devices. Note that this is the ideal version of sync. There are many constraints and challenges that make this hard to achieve but this is the goal I set about building towards. The reason sync needed to work this way in our app is:
Users expect it - Users have begun to expect near immediate updates to propagate across their and their friends’ devices.
Avoids confusion between users - The closer to instantaneously that an app updates itself the less likely it is for two users to find divergences in their data. We want to avoid two coaches on the same team seeing different versions of that team’s data.
Keeps reconciliation simple - The longer period of time where data can diverge, the more work it can be to reconcile changes into one object. We want to try and limit the potential for divergence and to limit the reconciliation complexity.
Having settled on what sync means, the rest of this article attempts to describe the design and architectural decisions and trade offs that went into solving the sync problem for our new Team Management app. There will be a follow up article that dives into the nitty gritty implementation of our sync system. But before I can fully describe the trade offs made in designing this system, I must describe the constraints of this system:
Each app needs to operate independently - Each app must be able to create, read, update, and delete data without having to coordinate between other apps. Our apps should not solve this distributed system problem. This allows our app to remain quick and responsive and allows our app’s developers to spend more of their time building features users want to see. That means the solution, complexity, and implementation need to be built in the backend.
Apps need to be fast - Sacrificing speed and usability of the app to make this sync system work is a non starter.
The solution must handle network outages and off line usage - The parents and coaches that use our apps sometimes find themselves at sports fields with poor or no network coverage.
The nearer to instantaneous the update, the better - See the ideal sync system described above.
Do not drain the device’s battery - The fastest path to getting your app uninstalled is to kill the phone’s battery, so our solution needs to be as battery efficient as possible.
Take an iterative approach and use the smallest amount of time possible - Since we are designing a totally new backend for this new app, there are tons of features that need to be built to deliver real value to our users. We cannot drop everything to make this system perfect and anything that allows us to build it iteratively is a big plus.
Given the constraints I talked about, I wanted to cover 4 broad alternatives we ran through when designing this system. For each architecture I will discuss the pros and cons of this system. At the end I will describe the architecture solution we went with for our sync system.
1. Just In Time Loading
The idea behind just in time load (JITL) is pretty simple. The app stores no data locally, i.e. no local database. When it needs to display a new screen on the app it goes to the backend and loads all data it needs. It then takes that data and displays it as needed on the device. On the next screen, the app simply rinses and repeats.
Positives:
Simple - This approach is very simple from both a backend and a client perspective. Since we are using http as app’s sync protocol, it is incredibly lightweight.
Data is up to date - Since the app is pulling data from the backend right as is need it, the users will see the most up to date version of the data. This meets the ideal of our sync system.
No need to maintain a local database - This is strongly related to the point about simplicity, but not having to build and maintain a local database for the app is complex enough to merit its own data point.
Negatives:
Slow - Network requests are some of the slowest calls anyone can make in computing. Cellular network requests take even more time due to data bandwidth constraints and latency. In this system the app has now delayed displaying all screens until it makes anywhere between 1 and N network requests. This will slow the app down to a crawl and make it nigh unusable.
Only works online - This violates one of our constraints. If the app only display a screen after loading data from the network, it becomes unusable offline.
This wastes phone battery - Using a devices network card has a high battery costs. The ideal way to use the network is to make a bunch of requests all at once and then leave the network off for a period of time. In this scenario we would constantly be turning the network card on and off, wasting battery.
Data is not always up to date - If a user loads a screen on the app and then sits there for a period of time, the JITL system can lead to divergence. The data displayed can be changed by a different device in the background leading to divergence and confusion.
2. Asynchronous Polling
This Asynchronous Polling (AP) system is very different from JITL. First, this system involves a local database. This stores a version of all data the app needs. Every time the app wants to display a screen, it uses the data in its local database. Second, instead of loading data from the backend every time we display a screen, the app loads the data every X minutes. That data is then saved into the app’s local database.
Positives:
Fast - The AP is a drag racer compared to JITL’s bicycle with square wheels. Replacing many network requests with local database reads makes this system fast and user friendly.
The system now works offline - Another benefit of the local database is that the system works offline. When the app loses network connection, it just reads data from its local database and stops polling.
More battery efficient - In the JITL system every time we loaded a screen we were spending battery life to use our network card. In this new system the app only uses the network card every X minutes. This is much more efficient.
Negatives:
Introduced divergence and delay - One of the worst things about this solution is that we have moved further away from our ideal sync system. We now have up to an X minute delay between the time one app makes a change to the backend till all other devices have synced that change.
Always runs every X minutes - Another downside of this AP solution is that the polling loop runs whether or not any data in the backend has actually changed. This has negative consequences for both the app and the backend .For the app that means that we could be wasting both CPU and battery life every X minutes for no updates. This can lead to the app being slower and more of a battery hog. From the backend’s perspective the consequences of this system are dramatic. For every device running our app, every X minutes we get a series of request to refresh each app’s local database. This ends up being a lot of requests and scales linearly with the number of devices. From past experience with our scorekeeping app, these polling sync requests can come to dominate all requests to our backend.
Open Questions:
How does the app know what to reload? - Even with AP, the app still needs to determine what has changed and what data it should fetch. There is a spectrum of solutions to this problem. At one end, the app can reload all data currently in its local database. On the other end the device can identify itself to the backend and ask what all has changed since its last request. Because the app still does not know what has changed, the pure app solution still involves a lot of unneeded work. The pure backend solution involves a lot of complexity in order to track what each device cares about and what has changed since each device last synced. Ideally a balance is struck, where the backend has a good way to track changes and the app gives it some context on what it actually cares about. Generally though, no matter what our solution here, we will be adding complexity somewhere.
3. Targeted Push Notifications
Targeted Push Notifications (TPN) builds on the failures of the AP system. It keeps the app local database which confers the same speed and offline benefits as in the AP system. But now, when an app saves data to the backend, the backend is responsible for notifying all devices who care that something has changed. The backend does this by transforming all database updates into a set of updates per device and sending updates for those devices to a push notification service (something like APNs).
Positives:
Near real time data consistency - Because push notifications are sent and received very quickly, we move much closer to the ideal of our sync system. Almost as soon as something changes, our devices should know about it and be able to reload.
Much less load on the backend - Another benefit of dropping the polling loop is that every app no longer hits the server every X minutes. Each app only requests data when something has changed. This can drastically cut down on the total number of requests on our backend.
More Battery Efficient - Instead of of the apps needing to poll every X minutes they now only use network when saving data or when a push notification informs them that something they care about has changed. This solution begins to reach the upper limit of batter efficiency.
Negatives:
iOS push notifications are not guaranteed to be delivered - As the saying goes: “In theory, there is no difference between theory and practice. But, in practice, there is.” A huge detractor here is that iOS push notifications cannot be relied on to always be delivered. If we build a sync system that relies on devices getting an update, and that update is never received, the divergence in the system quickly becomes very large.
There are no ordering guarantees - Because of how distributed systems work, when sending multiple updates to an app, there is no guarantee that the first update will be received first. This is true, even if iOS push notifications were guaranteed to be delivered. That does not mean we cannot use push notifications, but it does mean that our sync system will need to take this into account.
Conversion of database save to device push notification is very complex - This solution falls on the all backend side of the reload question above. The backend is now forced to know about what data each device cares about in order to figure out which devices need to be informed on data save. This means that devices now need a way to signal to the backend that they care about a piece of data. This leads to much higher complexity, orchestration, and implementation time.
Open Questions:
What level should updates be at? - Even if we had the infrastructure already built, could ensure push notification delivery, and ordering guarantees, the TPN system still has an open ended question. What level of updates do I send to the app. If an RSVP for person A for game X on a team 1 changes, do I tell the app that the RSVP changed, the game change, the team changed, or something else? The solution we choose has network and complexity implications for both the backend and the frontend.
4. Pub/Sub
The Pub/Sub solution is very similar to the TPN system. Both have a local cache. Instead of transforming database updates into device updates, the Pub/Sub model converts them into a series of topic updates (In our case teams, persons, etc). These topic updates are sent to a Pub/Sub Service. At the same time each device subscribes to all of the topics they care about. Then, when a new topic update is pushed to the Pub/Sub Service, all devices subscribed to that topic get that update.
Positives:
Near real time data consistency - see TPN positives
Much less load on the backend - see TPN positives
Much stronger delivery guarantees - Because we are no longer constrained to using push notifications, we have much more solid guarantees around delivery.
Converting a backend change to a topic change is relatively simple - The topic updates used in this system are much easier to derive than device updates used in the TPN. All the backend needs to know are business rules mapping backend updates to topic updates. There is no longer a need to coordinate with each device to figure out what it cares about.
Negatives:
No ordering guarantees - See TPN negatives
Worse battery life - Since we are no longer using efficient push notifications we will have to start using more network requests to keep the device up to date with the Pub/Sub service. This might be more efficient then the polling loop described above, depending on the level written at, but is still less efficient then push notifications.
Open Questions:
What level should updates be at? - see TPN open questions
Conclusion
So I have discussed four different solutions with different trade offs we could use to build our sync system. Which ones did we go with and why? The final implementation of our system is very much based off of the Pub/Sub system described. On top of that we needed to add a way to handle out of order delivery guarantees and wanted to send targeted updates. The reasons we chose this implementation are:
Pub/Sub provides near ideal sync. This allows us to meet users expectations and puts us on a footing to compete with any app out there.
We were willing to sacrifice some battery life in order to get stronger delivery guarantees. These stronger guarantees can allow the system to be much more reliable and much simpler from the app’s perspective.
Topic updates are much simpler than device updates and allow this system to be built much more quickly.
We were able to map out a simple iterative development path starting with AP and evolving into Pub/Sub that allow this system to be built and tested in pieces.
If you want to learn more about the specific implementation this solution, check out my follow up blog post.
I work as a software engineer at a sports tech company and I am a woman. These facts about my life are why I continue to be distressed about the news of the Google Memo, written by software engineer James Damore, and its ramifications for my industry. While the headlines may make the memo seem like it was written by a deranged maniac, the fact that it wasn’t written as a blatant anti-diversity statement (it begins: “I value diversity and inclusion, am not denying that sexism exists, and don’t endorse using stereotypes”) is one of the things that makes it harder for people to be immediately outraged about its contents (and why this discussion is so fascinating and important).
As a software engineer, questioning assumptions and raising potentially controversial ideas is part of the job. I agree with the Damore’s assertion that “If we can’t have an honest discussion about this, then we can never truly solve the problem.” The topic of diversity is critically important and I want to add my voice and insights to the discussion as honestly as possible. I agree with the myriad of responses suggesting that there were many productive ways that Damore could have raised some of his concerns, such as his views that conservative viewpoints aren’t valued in tech or that the diversity programs at Google should be more inclusive, without perpetuating gender stereotypes to make his point. I am pained to see that people are now afraid to raise controversial or minority opinions or ask questions because of the consequences of this memo.
But the issue for me is not the theoretical or hypothetical raising of unpopular opinions. In theory I absolutely agree that is very important. But I want to focus on the reality of this situation and the memo that was actually published. Damore’s main argument is that “Google’s political bias has equated the freedom from offense with psychological safety, but shaming into silence is the antithesis of psychological safety.” However, you can’t ask for psychological safety for one group while stomping on the psychological safety of another group. Content matters. The way these opinions were raised matters. Making an entire gender feel less qualified or question their career choice matters. As a female software engineer, the response to this memo makes me feel less safe. As a coworker, and fellow female engineer, put it, “[the memo] weighs on me because it validates my fears that I will have to spend most of my career proving I am competent before I’m given the space and respect to learn and grow.”
Despite Damore specifically recommending against reducing a population to their average, by even discussing “average” traits of women and men, the memo now provides specific stereotypes for people to point to to explain why a woman may be a lesser engineer. When you first start at a job or on a team no one has reasons to assume that your traits are anything but “average” until proven otherwise. If people believe that the “average” woman is less qualified it puts more onus on women to prove their worth the second they walk in the door. And trust me, even without this memo circulating, women in the tech industry are constantly being forced to prove their competence.
Damore selected three particular traits to discuss. He did not include his reasons for selecting those particular traits as his examples of genetic differences between males and females, although he did discuss ways in which, in his opinion, those traits cause problems in the tech industry. In summary, he mentioned that “average” female traits include: 1) “openness directed towards feelings and aesthetics, rather than ideas…[including] a stronger interest in people rather than things;” 2) “extraversion expressed as gregariousness rather than assertiveness,” which included “higher agreeableness;” and 3) “neuroticism (higher anxiety, lower stress tolerance).” Each of these terms in the memo also hyperlinks to a Wikipedia definition, rather than scientific treatises, and therefore seem to be a random selection of traits and stereotypes that Damore believed to be detrimental to the workplace. However, not only am I skeptical of the representativeness of the chosen traits and the sources cited, I believe that some of these traits are actually crucial to create a balanced, productive workplace. Imagine software built by a team where all members were more interested in “things” than people and no one wanted to pay attention to aesthetics (assuming the team was able to ship anything if it was comprised of assertive rather than agreeable people).
Additionally, while defining these “average” traits, Damore’s stated that “More men may like coding because it requires systemizing and even within [software engineers], comparatively more women work on front end, which deals with both people and aesthetics.” This assertion really got under my skin because, for a split second, it made me self conscious of being a front end leaning developer. I do not only enjoy front end work because of aesthetics, that is one of the last pieces that I consider in my day to day work. Working as an engineer in any capacity requires deep systemizing and writing code. Contrasting front end work with coding in this way undermines the amount of critical thinking that front end engineering requires. This also serves to enforce biases that one gender should work on a particular part of the stack.
I can only share my own experience, but I believe it is important for more individuals to share their stories. To show that generalizing to the “average” actually hurts real people on real journeys.
My Journey
My entire adult life I have heard things like “you only got into MIT because you’re a woman” or “you’re just a diversity hire.” I went to a job interview where I asked how many women they had on the engineering team and the interviewer freaked out briefly and said “We only have one! But we’re trying to improve that number! That’s why we’re interviewing you!” By citing a diversity statistic as a reason to interview me, I suddenly felt less qualified for the position. Needless to say, I did not accept that job offer. But this constant questioning or suggesting that I am only interesting because I increase diversity numbers leads to feelings of imposter syndrome and wondering if I do belong or if I am actually good enough.
When people ask me what I do for a living and I say “software engineer” they often respond with a surprised “really?” or if I say I work at a tech company they say “oh as a designer?” (while I AM fully qualified to be an engineer, I am in NO WAY qualified to be a designer). I have even had this experience with other attendees at conferences specifically targeted at Software Engineers. As these conversations continue, when we finally do establish that I’m an Engineer, often times when I say I work on front end/UI work that is when the lightbulb goes off and people say “oh that makes sense.” Because I am finally saying SOMETHING that aligns with their preconceived perception of what I should be doing.
I would get those reactions no matter where I worked, but I also work at an amazing company that focuses on youth sports. And I happen to work here because I LOVE sports, especially baseball. Plenty of other engineers at my company don’t care very deeply about sports, I just happen to be one of the ones that does. But even that is something I have to prove whenever I mention it, suddenly being quizzed about minute trivia or the last time my favorite team won the World Series (2013 in case you’re wondering). This not only occurs when I am discussing my job, but also in contexts such as having internet and cable installed in my new apartment. After an 8.5 hour installation process the cable rep finally turned on the TV and asked me what channel he could check to make sure that it was all installed. I responded “ESPN, I got the sports package” and he just turned around and stared at me like I had grown another head and said “You like sports?!”
I shouldn’t have to hesitate when being asked about where I went to school or what I enjoy doing in my free time, but I do. I often answer the simple question “where did you attend college?” by responding simply “in Boston.” Because having to explain more is so often a hassle. In addition to enjoying baseball, I also casually enjoy watching basketball, but you will rarely hear me admit it because I often feel like I do not know enough to answer the series of questions that follows.
While my day to day interactions with friends and coworkers are positive and supportive, constantly having to explain my job or prove my knowledge to others causes me to second guess myself regularly. Yet I know I am qualified. I worked my ass off in high school, crushed the SATs, volunteered with a bunch of organizations and did the typical over-achiever list of extracurricular activities. I was qualified to get into MIT, just as much as anyone else, but that is not what people see when they see me. It is the same with my job. I am fully qualified and capable of being here. I have both Bachelors of Science and Masters of Engineering degrees in Computer Science from MIT. I had technical internships throughout college and did a 1.5 year research project/thesis that involved building software. Often times I am told I shouldn’t experience imposter syndrome because of my qualifications, but because of these perceptions and stereotypes I do continue to feel like I don’t belong.
Thoughts & Conclusions
If you have never had your career choice or passions questioned or don’t regularly face people assuming you are unqualified for your job, you probably can’t comprehend why the fact that someone presented “scientific” ideas suggesting that you’re unqualified for your job hurts so much. I deal with these reminders of the uphill battle from people outside the tech industry regularly and now the fact that there is a publication within the industry that is causing more women to feel isolated, less qualified, or making them have to prove themselves even more than we already have to is not okay.
Additionally, the mere suggestion that if a woman does want to succeed, she has to exhibit more “male” qualities is (in my opinion) ludicrous. This is the main point of contention that I have with this memo: it put into very public words and thoughts the idea that women may be less genetically qualified to be engineers. While the memo does not say that ALL women cannot be engineers, it emphasizes the opinion that typically “female” traits make someone a bad engineer and that therefore the bad engineers are women and men who display more “female” traits. The memo also suggests that the diversity programs are lowering the bar for hiring, so even if the author truly believes that some or most of his female colleagues are qualified for their jobs, he has now created a document that allows anyone and everyone to question ALL women and whether they belong in their position or not.
I do not stop being a woman when I am doing my job. I don’t know where I fall on the continuum of traits, but based on the female qualities outlined in the memo, I am fairly solidly on the “female” end of the traits spectrum. And I am damn good at my job. What is so concerning is that the memo suggests that the way to succeed in the tech industry is to display traits matching the existing status quo. Women already receive more personality-based feedback and it is worrisome to think that documents like this memo can be used to further encourage women to alter their personalities to succeed. I want women everywhere to know that is unacceptable and untrue.
While I am extremely lucky to work at a company that values diversity and works to eliminate biases in the interview process, this is not necessarily true across the tech industry. It is horrible to continually be looking over your shoulder and wondering whether people think of you as a diversity hire, instead of a highly qualified worker. The fact that anyone can say “well maybe he has a good point” in even implying that “female” qualities make someone less qualified to be an engineer confirms my greatest fears and self doubts. The reason I am hurt and angry and upset about this memo is that it means that I am still fighting to prove that I belong here. That I have to continue overcoming these invisible obstacles. For instance, if I have a dissenting opinion in a meeting, I not only have to prove my point, but also prove I’m not just being “neurotic” AND actually have valid things to say.
I would very much like to erase the misconception that women are somehow inherently or biologically less able to be engineers. Knowing that potentially there are people holding those beliefs performing code reviews, filling out peer reviews, giving me feedback, and potentially determining my career path is terrifying. Being told that I may need to alter my personality to be successful or having my errors not necessarily be attributed to the fact that everyone makes mistakes, but the fact that I am a woman makes me feel like I am walking on eggshells. I want all the engineers on my team to be evaluated as engineers, not as men or women.
I honestly do believe the author of this memo has a right to question the hiring practices at his company. At GameChanger, I’ve asked questions about our hiring process/interview questions and I’ve spoken to a lot of people about ways we can continue to improve our culture. I do believe that people have the responsibility to ask potentially controversial questions, but I also believe it must be done in a way that does not attack or marginalize or state opinion as fact. This brings me to probably the most upsetting conclusion of the memo, Damore’s opinion that empathy makes you a bad engineer. The reason there is so much backlash is that the author did not for one second think about how this could impact others. How on earth can you build good software if you’re not empathetic to your colleagues, company, and most importantly users? You can’t! But because of this memo people all over the industry are pausing and thinking “maybe that is a good point” and that is what scares me.
I have been in a Software Engineering role full time for 2 years and I am already tired of hearing “don’t let it bother you.” I’ve already heard many things that I would have every right to be bothered by and they don’t bother me at this point, so the fact that this memo has been weighing on me compelled me to speak up. Being a woman in tech you have to pick your battles and this is a battle I am choosing to fight. I feel obligated to stand up for this because I am in a position where I can discuss my experiences candidly and this is a real issue facing the tech industry. I need it to be very clear that being told “this doesn’t relate to you, just to most women” or “just to the average woman” still insults me as an individual. Maybe you don’t believe this about your own coworkers or friends or family. I personally have received an outpouring of support from coworkers and friends and family. But I still know that I am “most women” to someone out there so if you belittle any of us, you’ve belittled all of us. I am hopeful now that we can shift the conversation beyond stereotypes of what a woman can and cannot do because of her gender. We instead need to focus on what individuals are qualified to do, interested in doing, and eager to take on. To make any meaningful change, we must stop perpetuating generalizing stereotypes and focus on the strengths, passions and abilities of individuals.
Note: The views expressed in this post are those of the author and do not necessarily reflect the views of GameChanger.
I’ve been working on a new project recently, and when I say new, I mean brand new. This isn’t just a lateral shift on the team to get my hands dirty in a new area of focus. Nor is it even adding a new product to our existing stack. This is building a brand new backend API for a brand new app. I’m really excited about being able to develop a new codebase, but the sheer number of unknowns and amount of work ahead is daunting. I wanted to share how my teammate Alex Etling and I embraced modular design to make our decision making process faster and less stressful.
Let’s start this story a few weeks ago, at the inception of the new team. The purpose of the app was clear, but I’m not sure I needed two hands to count the number of decisions that had been made. In that setting, Alex and I were given the mandate to figure out what the stack looks like and start building. We are both veterans at GameChanger, but neither of us had taken on something with this combination of future scale and current uncertainty. We’ve both architected solutions to a hard problems before, but when looking at a blank text editor and wondering what database should we use?, what language should we write this in?, and most terrifyingly what if we make the wrong choice?, it was hard to figure out where to start.
Alex and I were getting started a few weeks ahead of the team that was going to be building the client app that will use this API. That means that we didn’t have to spin something up immediately, but we knew that in a few weeks we had to have decisions made and a basic API ready for consumption. Everyone else who was working on the project at this point were focused on high level research, not implementation details. Alex and I had to start implementing crucial parts of the stack that could have long lasting consequences if we chose the wrong solution, without the clear definition of future product requirements and direction. It was a bit stressful.
So we started. Alex and I split up and did some research for a few days around things like which language, framework and database we would use to build the app. These questions took some time and research to get comfortable with a decision, but we eventually both came back together and presented our research and recommendations to each other. We settled on writing TypeScript, using a Node framework (Koa) and storing our data in Postgres. We felt good about making some early quick but well-researched decisions and we were ready to move on to the next thing.
Researching the Unknown
The next decision that I looked into was deciding whether an ORM should sit above our database, and if so, which ORM did we want to use? In our earlier decisions, Alex and I were able to pull from some past experience to narrow our search field and get a small set of options to really dig into. When looking into ORMs however, I didn’t have that past experience, especially not with any of the options available for our Node app. I wasn’t even able to make the first determination of do we need an ORM? quickly, because I didn’t know enough about the possible benefits and consequences of the choice.
Because of my lack of knowledge, I spent several days reading blogs, books, everything I could find about using ORMs, and never really finding a consensus. Especially because there was so much that was undefined about the future of our project, I couldn’t even search out the opinions of people who built systems with similar constraints. After a few days of this I realized that I wasn’t getting anywhere with research, but we had a schedule to stick to. We had to have something stood up for the client app team to start using sometime soon. I was just going to have to guess and hope I made the right decision.
Even when I finally made a decision, I wasn’t happy with the ORM I chose, Sequelize. While prototyping with it I realized that it didn’t quite fit what we needed. There was always a feeling in the back of my head that I was forcing something to work instead of feeling like I was gaining a lot by using Sequelize. It was the best tool out there, although the ideal solution may be building a solution that fits our specific needs. A custom tool wasn’t an option because we needed to start building a working API, not building out a TypeScript ORM.
What if we got it wrong?
I was getting pretty frustrated that I was not going to be able to make a well informed decision. I really didn’t want to set ourselves up for failure by locking in decisions that I had no idea were right. I’ve seen projects that made decisions that seemed perfectly rational given the constraints that have gone off the rails as they evolved. I was worried because I wasn’t even at rational yet, I felt like I was just guessing. Settling on Sequelize felt like I was selling out my future self, the person who was going to have to deal with the fallout of my bad decision.
We came to grips with this frustration by recognizing that we needed to focus not on are we choosing the right technology?, but instead on how can we enable ourselves to change this decision? We started talking about layering the code in our project with strong interfaces between the layers. Then, when it becomes apparent that a better choice is out there, we will be able to replace our earlier choice with the new hotness. Even the language choice is something that we can move away from if need be. Modules can be connected via an HTTP interface to allow us to move sections of responsibility to other microservices, written in other languages. That should also keep our main service small enough that a rewrite in a new language wouldn’t be untenable.
This idea of modularizing the component parts of a system is in no way new. Martin Fowler espouses the exact idea that I am talking about in Is Design Dead. It is a great practice for building maintainable systems, and it doesn’t just apply to software. Real-life objects like cameras use modularity to enable photographers to use expensive equipment in more ways. The epiphany for me here was how modular design makes the decision making process less stressful. Once we realized that our decision shouldn’t have permanent consequences, saying I’m comfortable going with Sequelize becomes much easier. I knew that a future switch to another ORM would be work, but that work would be contained.
How is it going?
With visions of modularity dancing in our heads, we dove headlong into our next set of decisions and building out the first iteration of the API. The code that we’re writing has to work, but also has to create barriers between modules that will help us replace a module if need be. Typed languages help a great deal here, we’ve been really happy with TypeScript. If you’re interested in understanding how we’ve implemented these modules in practice, check out the more technical exploration of modularization (coming soon). The project is still relatively small, so we haven’t explored the microservices tactic yet, but I think we’ve been relatively successful in writing our code in a way that makes it easy to replace.
Overall the project is going great, we’ve successfully provided a basic API to the client app team, and we’re ready to keep expanding the breadth of resources that we’re able to handle. We’re also looking forward to adding depth of responsibility to the API, adding features that turn it from an interface on top of a database to something that provides real customer value. There are lots of interesting projects in the pipeline, and we’re hiring people to come help us build them.
Some of the most difficult issues to avoid or debug when you first start building iOS applications are those dealing with view layout and content. Often, these issues happen because of misconceptions about when view updates actually occur. Understanding how and when a view updates requires a deeper understanding of the main run loop of an iOS application and how it relates to some of the methods provided by UIView. This blog post will explain these interactions, hopefully clarifying how to use use UIView’s methods to get the behavior you want.
Main run loop of an iOS app
The main run loop of an iOS application is what handles all user input events and triggers the appropriate responses in your application. Any user interaction with the application is added to an event queue. The application object, shown in the diagram below, takes events off the queue and dispatches them to the other objects in the application. It essentially executes the run loop by interpreting input events from the user and calling the corresponding handlers for that input in the application’s core objects. These handlers call code written by application developers. Once these method calls return, control returns to the main run loop and the update cycle begins. The update cycle is responsible for laying out and redrawing views (described in the next section). Below is an illustration of how the application communicates with the device and processes user input.
The update cycle is the point at which control returns to the main run loop after the app finishes running all your event handling code. It’s at this point that the system begins updating layout, display, and constraints. If you request a change in a view while it is processing event handlers, the system will mark the view as needing a redraw. At the next update cycle, the system will execute all changes on these views. The lag between a user interaction and the layout update should be imperceptible to the user. iOS applications typically animate at 60 fps, meaning that one refresh cycle takes just 1/60 of a second. Because of how quickly this happens, users do not notice a lag in the UI between interacting with applications on their devices and seeing the contents and layout update. However, since there is an interval between when events are processed and when the corresponding views are redrawn, the views may not be updated in the way you want at certain points during the run loop. If you have any computations that depend on the view’s latest content or layout, you risk operating on stale information about the view. Understanding the run loop, update cycle, and certain UIView methods can help avoid or debug this class of issues.
You can see in the diagram below how the update cycle occurs at the end of the run loop.
Layout
A view’s layout refers to its size and position on the screen. Every view has a frame that defines where it exists on the superview’s coordinate system and how large it is. UIView provides methods that let you notify the system that a view’s layout has changed as well as gives you methods you can override to define actions to take after a view’s layout has been recalculated.
layoutSubviews()
This UIView method handles repositioning and resizing a view and all its subviews. It gives the current view and every subview a location and size. This method is expensive because it acts on all subviews of a view and calls their corresponding layoutSubviews methods. The system calls this method whenever it needs to recalculate the frames of views, so you should override it when you want to set frames and specify positioning and sizing. However, you should never call this explicitly when your view hierarchy requires a layout refresh. Instead, there are multiple mechanisms you can use to trigger a layoutSubviews call at different points during the run loop that are much less expensive than calling layoutSubviews itself.
When layoutSubviews completes, a call to viewDidLayoutSubviews is triggered in the view controller that owns the view. Since layoutSubviews is the only method that is reliably called after a view’s layout is updated, you should put any logic that depends on layout and sizing in viewDidLayoutSubviews and not in viewDidLoad or viewDidAppear. This is the only way you will avoid using stale layout and positioning variables for other computations.
Automatic refresh triggers
There are multiple events that automatically mark a view as having changed its layout, so that layoutSubviews will be called at the next opportunity without the developer doing this manually.
Some automatic ways to signal to the system that a view’s layout has changed are:
Resizing a view
Adding a subview
User scrolling a UIScrollView (layoutSubviews is called on the UIScrollView and its superview)
User rotating their device
Updating a view’s constraints
These all communicate to the system that a view’s position needs to be recalculated and will automatically lead to an eventual layoutSubviews call. However, there are ways to trigger layoutSubviews directly as well.
setNeedsLayout()
The least expensive way to trigger a layoutSubviews call is calling setNeedsLayout on your view. This will indicate to the system that the view’s layout needs to be recalculated. setNeedsLayout executes and returns immediately and does not actually update views before returning. Instead, the views will update on the next update cycle, when the system calls layoutSubviews on those views and triggers subsequent layoutSubviews calls on all their subviews. There should be no user impact from the delay because, even though there is an arbitrary time interval between when setNeedsLayout returns and when views are redrawn and laid out, it should never be long enough to cause any lag in the application.
layoutIfNeeded()
layoutIfNeeded is another method on UIView that will trigger a layoutSubviews call in the future. Instead of queueing layoutSubviews to run on the next update cycle, however, the system will call layoutSubviews immediately if the view needs a layout update. If you call layoutIfNeeded after calling setNeedsLayout or after one of the automatic refresh triggers described above, layoutSubviews will be called on the view. However, if you call layoutIfNeeded and no action has indicated to the system that the view needs to be refreshed, layoutSubviews will not be called. If you call layoutIfNeeded on a view twice during the same run loop without updating its layout in between, the second call will not trigger a layoutSubviews call.
Using layoutIfNeeded, laying out and redrawing subviews will happen right away and will have completed before this method returns (except in the case where there are in flight animations), unlike setNeedsLayout. This method is useful if you need to rely on the new layout and cannot wait until views are updated on the next update cycle. However, unless this is the case, you should call setNeedsLayout instead and wait for the next update cycle so that you only update views once per run loop.
This method is especially useful when animating changes to constraints. You should call layoutIfNeeded before the start of an animation block to ensure all layout updates are propagated before the start of the animation. Configure your new constraints, then inside the animation block, call layoutIfNeeded again to animate to the new state.
Display
A view’s display encompasses properties of the view that do not involve sizing and positioning of the view and its subviews, including color, text, images, and Core Graphics drawing. The display pass includes similar methods as the layout pass for triggering updates, both those called by the system when it has detected a change, and those we can call manually to trigger a refresh.
draw(_:)
The UIViewdraw (drawRect in Objective-C) method acts on the view’s contents like layoutSubviews does for the view’s sizing and positioning. However, it does not trigger subsequent draw calls on its subviews. Like layoutSubviews, you should never call draw directly and instead call methods that trigger a draw call at different points during the run loop.
setNeedsDisplay()
This method is the display equivalent of setNeedsLayout. It sets an internal flag that there has been a content update on a view, but returns before actually redrawing the view. Then, on the next update cycle, the system goes through all views that have been marked with this flag and calls draw on them. If you only want to redraw the contents of part of a view during the next update cycle, you can call setNeedsDisplay and pass the rect within the view that needs updating.
Most of the time, updating any UI components on a view will mark the view as “dirty,” by automatically setting the internal “content updated” flag, and cause the view’s contents to be redrawn at the next update cycle without requiring an explicit setNeedsDisplay call. However, if you have any property not directly tied to a UI component but that requires a view redraw on every update, you can define its didSet property observer and call setNeedsDisplay to trigger the appropriate view updates.
Sometimes setting a property requires you to perform custom drawing, in which case you should override draw. In the following example, setting numberOfPoints should trigger the system to draw the view as a shape with the specified number of points. In this case, you should do your custom drawing in draw and call setNeedsDisplay in the property observer of numberOfPoints.
class MyView: UIView {
    var numberOfPoints = 0 {
        didSet {
            setNeedsDisplay()
        }
    }

    override func draw(_ rect: CGRect) {
        switch numberOfPoints {
        case 0:
            return
        case 1:
            drawPoint(rect)
        case 2:
            drawLine(rect)
        case 3:
            drawTriangle(rect)
        case 4:
            drawRectangle(rect)
        case 5:
            drawPentagon(rect)
        default:
            drawEllipse(rect)
        }
    }
}
There is no display method that will trigger an immediate content update on the view, like layoutIfNeeded does with sizing and positioning. It is generally enough to wait until the next update cycle for redrawing views.
Constraints
There are three steps to laying out and redrawing views in Auto Layout. The first step is updating constraints, where the system calculates and sets all the required constraints on the views. Then comes the layout pass, where the layout engine calculates the frames of views and subviews and lays them out. The display pass completes the cycle and redraws views’ contents if necessary by invoking their draw methods, if they have implemented any.
updateConstraints()
This method can be used to enable dynamically changing constraints on a view that uses Auto Layout. Like layoutSubviews() for layout and draw for content, updateConstraints() should only be overridden and never explicitly called in your code. In general, you should only implement constraints that are subject to change in updateConstraints. Static constraints should either be specified in interface builder, in the view’s initializer, or in viewDidLoad().
Generally, activating or deactivating constraints, changing a constraint’s priority or constant value, or removing a view from the view hierarchy will set an internal flag that will trigger an updateConstraints call on the next update cycle. However, there are ways to set the “update constraints” flag explicitly as well, outlined below.
setNeedsUpdateConstraints()
Calling setNeedsUpdateConstraints() will guarantee a constraint update on the next update cycle. It triggers updateConstraints() by marking that one of the view’s constraints has been updated. This method works similarly to setNeedsDisplay() and setNeedsLayout().
updateConstraintsIfNeeded()
This method is the equivalent of layoutIfNeeded, but for views that use Auto Layout. It will check the “constraint update” flag (which can be set automatically, by setNeedsUpdateConstraints, or by invalidateInstrinsicContentSize). If it determines that the constraints need updating, it will trigger updateConstraints() immediately and not wait until the end of the run loop.
invalidateIntrinsicContentSize()
Some views that use Auto Layout have an intrinsicContentSize property, which is the natural size of the view given its contents. The intrinsicContentSize of a view is typically determined by the constraints on the elements it contains but can also be overriden to provide custom behavior. Calling invalidateIntrinsicContentSize() will set a flag indicating the view’s intrinsicContentSize is stale and needs to be recalculated at the next layout pass.
How it all connects
The layout, display, and constraints of views follow very similar patterns in the way they are updated and how to force updates at different points during the run loop. Each component has a method (layoutSubviews, draw, and updateConstraints) that actually propagates the updates, which you can override to manually manipulate views but that you should not call explicitly under any circumstance. This method is only called at the end of the run loop if the view has a flag set that tells the system some component of the view needs to be updated. There are certain actions that will automatically set this flag, but there are also methods that allow you to set it explicitly. For layout and constraint related updates, if you cannot wait until the end of the run loop for these updates (i.e. if other actions are dependent upon the view’s new layout), there are methods you can call to trigger immediate updates, granted the “layout updated” flag is set. Below is a chart that outlines each of these methods as it relates to each component of the UI that may need an update:
Method purposes
Layout
Display
Constraints
Implement updates (override, don’t call explicitly)layoutSubviewsdrawupdateConstraintsExplicitly mark view as needing update on next update cyclesetNeedsLayoutsetNeedsDisplaysetNeedsUpdateConstraints invalidateIntrinsicContentSizeUpdate immediately if view is marked as “dirty”layoutIfNeededupdateConstraintsIfNeededActions that implicitly cause views to be updatedaddSubview Resizing a view setFrame that changes a view’s bounds (not just a translation) User scrolls a UIScrollView User rotates device
Changes in a view’s bounds
Activate/deactivate constraints Change constraint’s value or priority Remove view from view hierarchy
The following chart summarizes the interaction between the update cycle and the event loop, and indicates where some of the methods explained above fall during the cycle. You can explicitly call layoutIfNeeded or updateConstraintsIfNeeded at any point in the run loop, keeping in mind that this is potentially expensive. At the end of the loop is the update cycle, which updates constraints, layout, and display if specific “update constraints,” “update layout,” or “needs display” flags are set. Once these updates are complete, the run loop restarts.
https://i.stack.imgur.com/i9YuN.png
This summary chart and table, and the more granular method explanations above, hopefully clarify the usage of these methods and how each relates to the main iOS run loop. Understanding these methods and how to efficiently trigger the correct updates in your views will allow you to avoid problems with stale layout or content and other unexpected behavior, and debug any issues that do occur.


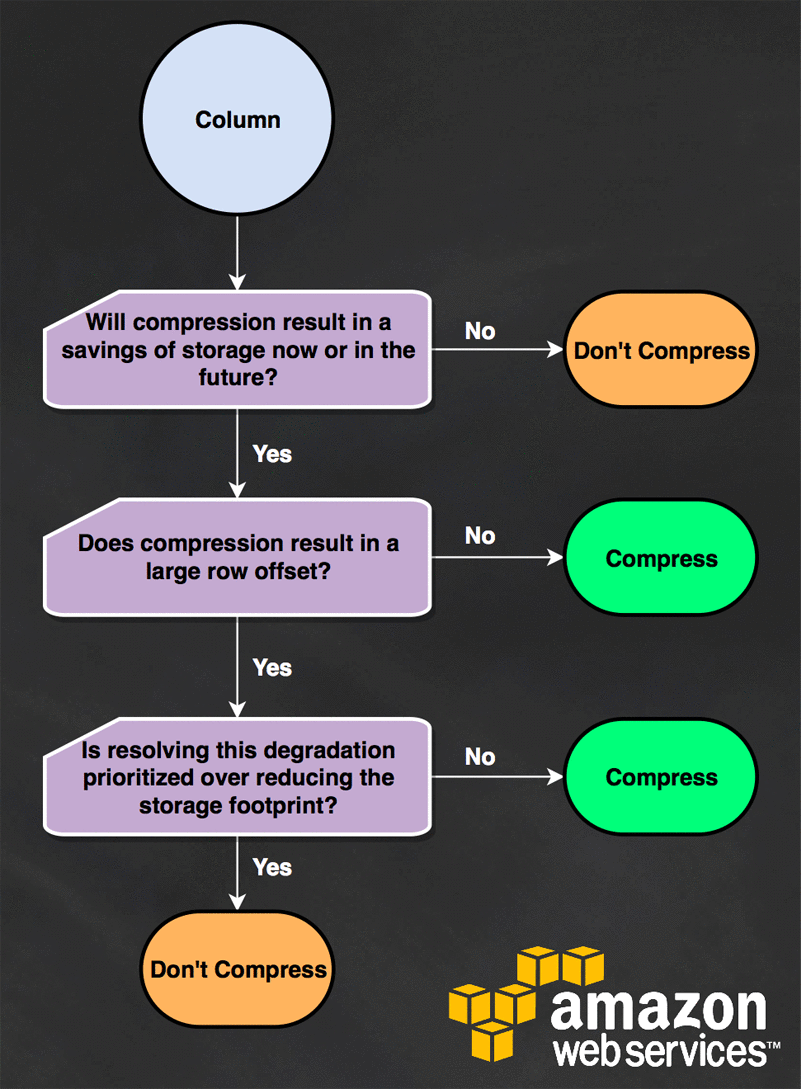