Configurations exist to allow a program to behave differently without modifying its code. You have a program, you configure it, run it, and it behaves accordingly. In a way, they are like function inputs, but at the application level. They tend to reflect and affect how a system works under the hood. This also makes them closely related to the complexity of our applications.
Thinking this way, I cannot think of configurations as just simple inputs. That is why I wanted to think about this topic a bit more and write down some thoughts.
Two Kinds of Configurations
I think we can group configurations into two types: information-passing and behavior-changing. This distinction is useful because it helps us consider which configurations deserve more attention.
Information-passing Configurations
In my experience, information-passing configurations are not a big deal. This is because they mostly just pass values around. Whether you pass 5 or 10 of goroutines, or increase or decrease endpoint rate limits, it does not really change how the code is written.
To make this more concrete, consider the following example:
type Config struct {
	Workers int
	RateLimit int
}

func Process(cfg Config, jobs []Job) {
	pool := NewWorkerPool(cfg.Workers)
	client := NewAPIClient(cfg.RateLimit)

	pool.Run(jobs)
	client.Send()
}
Here, introducing this Config type does not really change how Process is written. It does not matter whether the values come from flags, environment variables, or a configuration file. If we replaced them with default values directly in the code, the overall structure would stay mostly the same.
Again, from a code perspective, these kinds of configurations are usually fine. That being said, simply having these values can signal complexity that already exists in the application. For example, we now know there are workers running under the hood and rate limits that need configuration.
Whether that is a good thing or not depends on the situation. Sometimes you may actually want to expose these details instead of hiding them, simply to make what is going on more visible. Compared to behavior-changing configurations, I don’t worry much about them.
Behavior-changing Configurations
Behavior-changing configurations change how the application behaves. They control things like which algorithm to use, whether features are enabled, and so on. I think these are the kinds of configurations we should be more careful about before adding them.
Unlike information-passing configurations, they signal the existence of different features being controlled. So, they hint the complexity of the application way better than information-passing configurations.
You implement a flag for every possible behavior, you may end up with code looking like this (don’t worry, you are not supposed to read all of it):
type Config struct {
	UseConcurrentMode bool
	UseFastAlgorithm bool
	EnableCache bool
	UseNewParser bool
}

func Process(cfg Config, input []byte) Result {
	if cfg.UseNewParser {
		input = parseV2(input)

		if cfg.EnableCache {
			if result, ok := cache.Get(input); ok {
				return result
			}

			if cfg.UseConcurrentMode {
				if cfg.UseFastAlgorithm {
					return processV2ConcurrentFastWithCache(input)
				}

				return processV2ConcurrentSafeWithCache(input)
			}

			if cfg.UseFastAlgorithm {
				return processV2SequentialFastWithCache(input)
			}

			return processV2SequentialSafeWithCache(input)
		}

		if cfg.UseConcurrentMode {
			if cfg.UseFastAlgorithm {
				return processV2ConcurrentFast(input)
			}

			return processV2ConcurrentSafe(input)
		}

		if cfg.UseFastAlgorithm {
			return processV2SequentialFast(input)
		}

		return processV2SequentialSafe(input)
	}

	input = parseV1(input)

	if cfg.EnableCache {
		if result, ok := cache.Get(input); ok {
			return result
		}

		if cfg.UseConcurrentMode {
			if cfg.UseFastAlgorithm {
				return processV1ConcurrentFastWithCache(input)
			}

			return processV1ConcurrentSafeWithCache(input)
		}

		if cfg.UseFastAlgorithm {
			return processV1SequentialFastWithCache(input)
		}

		return processV1SequentialSafeWithCache(input)
	}

	if cfg.UseConcurrentMode {
		if cfg.UseFastAlgorithm {
			return processV1ConcurrentFast(input)
		}

		return processV1ConcurrentSafe(input)
	}

	if cfg.UseFastAlgorithm {
		return processV1SequentialFast(input)
	}

	return processV1SequentialSafe(input)
}
Actually, the nested if-else conditions that you see are a good example of combinatorial explosion. Each new configuration option multiplies the number of states your application can be in.
Of course, the previous code was a bit of an exaggeration. We could have rewritten the same thing like this:
func Process(cfg Config, input []byte) Result {
	if cfg.UseNewParser {
		input = parseV2(input)
	} else {
		input = parseV1(input)
	}

	if cfg.EnableCache {
		if result, ok := cache.Get(input); ok {
			return result
		}
	}

	if cfg.UseConcurrentMode {
		return processConcurrently(input, cfg.UseFastAlgorithm)
	}

	if cfg.UseFastAlgorithm {
		return processFast(input)
	}

	return processSafely(input)
}
Here, we pass the relevant configurations into helper functions. Each helper function handles relevant configs inside. This makes it look better. But you still have code with many possible execution paths, which also means many possible interactions and edge cases to think about.
Even if you use design patterns like the Strategy pattern or other techniques, the tradeoff is still there. You are often making the system more complex in exchange for making it more configurable.
So, What’s The Takeaway?
Information-passing configurations are usually fine. They mostly signal complexity that already exists instead of adding much new complexity on their own.
Behavior-changing configurations deserve more attention. They often create new execution paths and edge cases.
Whether these configurations create accidental complexity depends on why they exist and how they are implemented. Were they added because the application truly needed them? Or were they added because “it might be useful to make this configurable”?
I find it helpful to remember that making behavior configurable can make a system much uglier than expected. Before adding a new behavior-changing configuration, I think it is worth asking: Is this solving a real requirement, or am I adding another branch that future me will have to deal with?
An example of an expression that returns true in JavaScript. Here, 2 + "2" becomes "22", and 2 * "11" becomes 22. In the end, "22" == 22 returns true. 🙂
I sometimes see people say that programming languages like JavaScript, PHP, and Perl do not have types. Well, that’s simply not true. Yes, these languages do not enforce types at compile time. They are also not very strict about what you can do with those types. But they still have type systems. Every value has a type during execution. I think that if we define a type as “a classification of a value that determines how it can be used and how it behaves in operations,” then we can also say that it has types. Which means almost all of the mainstream programming languages you have heard of are already typed! JavaScript already support types like strings, lists, numbers, and so on.The problem with languages like JavaScript
The main problem here is that JavaScript just is not as strict about what you can do with its types as other programming languages are, and I guess that is why some people think it does not have types. Because they see programming languages like C#, and people having to explicitly write things like string, int, bool, void, class, and so on all over the place, and they probably assume those are what types are.
If both a language like C# and JavaScript have types, then what explains the differences we see between them? Well, what differentiates them is how their type systems are implemented, not the mere existence of types themselves. A brief look at Basic Type System Terminology just shows us that we can simply examine type systems on two axes: Where and when the checks for types are being done (static vs dynamic), and how strictly those types are enforced (strong vs weak). There is obviously more to it than that, but I think this is a good starting point.
I think it is fair to say that none of the practical programming languages we use daily would be effective without types, or at least without some way to distinguish between the kinds of values they handle.
The closest thing to an “untyped” language I can think of is assembly. The bits you are operating on might represent completely different things, an integer, a floating-point number, or a memory address, and the meaning depends entirely on how the programmer chooses to interpret them. But even then, I am not sure we can really call it “untyped”. It still operates on values with fixed sizes, such as 32-bit or 64-bit quantities. Maybe “one-typed” would make more sense there, but probably not quite right either.
Anyways, the thing is, your languages have types. Even the ones that do not feel like they do. So yeah, when someone says “TypeScript is JavaScript with types”, what they probably mean is that TypeScript adds a stricter type system. JavaScript already has types; it just is way too liberal with them.
I know this might seem like a trivial issue to some. If your main concern is just getting programs to run, why should it matter whether you call a language “typed” or not? If that is all you care about, it probably does not. But I think these distinctions start to make more sense once you begin learning other programming languages. They help you understand where a language sits relative to others and give you a rough idea of what to expect.
Having my own homelab was something I wanted to try for a long time. However, I just couldn’t get started. Mostly because I kept overthinking it. How will I handle dynamic IPs? Do I need something like a local DNS on my router for that? Even if I solve things inside the home, how am I supposed to access it remotely? Do I need port forwarding at the NAT layer? And what about TLS certificates, how do I even manage those without using a public certificate authority?
Of course, I know there are answers to all of these questions. And each one, on its own, is probably manageable. But I was discouraged by the possibility of Lingchi, small things slowly adding up until the maintenance burden is no longer low.
I knew that I could have used a VPS. Hosting everything there would have solved all these problems I mentioned. But I chose not to, for three main reasons: (1) A VPS still lives on someone else’s computer. So, nothing fundamentally prevents a VPS company from accessing your machine. (2) My old home computer is cheaper than renting an equivalent compute and storage. And lastly, but maybe most importantly, (3) I would feel much more satisfied homelabbing on hardware I physically control.
So, how did I start homelabbing then? What changed?
Well, my friend Halil introduced me to Tailscale. He showed me how it kind of solves all the problems I talked about. I do not want to explain how it works in detail here; I think it would be more appropriate to examine that in a separate blog post. But shortly, Tailscale lets you create a private peer-to-peer network between your devices, with a lot of conveniences that make it very easy to manage. For example, it allows me to access my machines remotely without exposing them to the public internet. Makes SSH access trivial. Handles HTTPS certificates so local services can be accessed securely, and gives fine-grained control over which devices can communicate with each other.
Since most of my concerns were eliminated by Tailscale, there was basically no reason not to try it. So I started a small homelab experiment and used my old Lenovo computer as the server. The next step was to decide which apps I wanted to try and what features I should be looking for.
(Lenovo Ideapad, age 7, running my homelab. A Linux Tux stitched by my aunt ensures morale stays high 😃)
Prioritizing Local-First Software
Now, since things like electricity or internet outages are real possibilities, I think it is reasonable to expect that there will be times when the server is not available. Especially when I am away from it. In those cases, I would still want to be able to use the programs, with everything syncing back once the server is available again. I simply do not want to be blocked from using something when I need it. So it became kind of a hard requirement for me that the most important apps I use also have local-first clients.
Luckily, all of the important apps I set up so far had local-first clients. For example, my Vaultwarden setup uses the Bitwarden client, where the vault is stored locally for up to 90 days, and the server is mainly there for syncing across devices.
With Immich, the client is still usable even if it cannot reach the server at that moment. You can view files on your device, and everything shows up again once the server is available.
And for note-taking, I use Obsidian, which is already offline-first by design. Syncing is handled through Nextcloud whenever an internet connection is available.
The Architecture
The initial architecture I followed for this homelab setup is fairly simple. I have a homelab directory under my $HOME directory. Right now, it looks something like this:
I use Caddy as a reverse proxy in front of all my services, and the caddy folder here is a symlink to its configuration in /etc/caddy. I prefer keeping everything related to my homelab in one place, and any change I make here is automatically reflected there, and vice versa. The nice thing about Caddy is that it integrates well with Tailscale. Basically, it automatically fetches and renews certificates for *.ts.net services through the local daemon, which you would otherwise have to manage manually.
Each of the remaining folders is used to bootstrap its service with Docker and store its data. They contain a docker-compose.yml and a .env file, and the volumes are mounted directly into these folders, so it is always clear where the data lives, especially for backups.
Overall, I tried to keep things simple: the caddy folder is for configuration, and every service gets its own directory with its compose file, environment variables, and local volumes.
Applications Tried
Now that I have covered the overall setup I followed for starting my self-hosting journey, I think it is a good time to talk about the apps I tried so far and my overall experience. I will start with the ones I liked the most, and then briefly mention some of the others that did not work as well for me.
VaultWarden for Password Management
The first thing I wanted to self-host was my password manager. I was using Bitwarden through its public server at bitwarden.com. But one concern I had was whether it really made sense to store such critical information somewhere outside. I know that passwords are encrypted client-side, and if you choose a strong passphrase, it should be fine. But even then, you still allow things like someone looking over your shoulder, seeing your master password, and then being able to log in to your vault from anywhere. I think it’s also possible to overlook certain security issues or newly discovered vulnerabilities (yes, even regarding cryptographic implementations), which, while rare, do happen from time to time.
The main point is, these risks would be much less of a concern if my password manager was hosted somewhere not directly accessible from the internet, where access is restricted to a specific subnet.
So I just started by self-hosting something I was already using on a daily basis, and something I was already concerned about being accessible over the whole internet. Setting up Vaultwarden was very easy. Migrating my existing vault to the new self-hosted instance was also straightforward. And the nice part is that, since I now self-host Bitwarden, I also get access to paid features like OTP and similar functionality.
Immich for Managing Photos
I was missing a proper photo application for a long time. Just to give you an idea, while most of my friends were enjoying the convenience of syncing their photos across devices through their default apps, I was just manually backing up my photos over USB using MTP (Media Transfer Protocol). I was not able to access the photos I had backed up to my SSD or laptop when I was on my phone. I also was not able to do cool stuff like people or location based filtering, since I was not using any service that extracts metadata or uses image recognition to identify faces. :)
This was partly because I did not like the idea of something as personal as my photos being stored on someone else’s computer. But once I started homelabbing, I realized I could just host something like an image server myself. I looked it up and luckily found Immich. It is really, really good. It not only handles syncing, but also provides all the niceties I mentioned earlier. It has a lightweight image recognition system that detects faces and tags your photos, extracts location data from metadata, and even lets you search your images using a lightweight NLP model, and so on…
Nextcloud for Syncing Files
Another thing I thought would be useful was a way to sync my markdown notes across all my devices. I had used Syncthing before for this. It uses a relay server to help devices discover each other, and then they communicate directly. It is lightweight and fast. I had already used this setup to sync my notes between my phone, through a community-maintained client, and my computer.
But there is one important aspect of Syncthing. Since it is peer-to-peer, there is no single source of truth. By default, it does not provide an experience similar to something like Google Drive. It is not like you just connect with credentials and immediately start syncing your notes. For every device, you need to establish connections and explicitly authorize access to the folders you want to share. This is great for fine-grained control, but not always the best in terms of user experience.
So, since I had already tried Syncthing, I wanted to try something a bit different this time. I gave Nextcloud a try, and it worked fine out of the box. Syncthing would have been enough as well, but I found the overall experience a bit easier with Nextcloud.
Synchronized note-taking on Obsidian (with Nextcloud)
Now, for both mobile and desktop, I like Obsidian the most for note-taking.
So I looked for a way to use it across all my devices, with my vault automatically synced through Nextcloud. Setting this up between my MacBook and Linux machine was very easy. I just created the vault inside my Nextcloud folder on one device, and on the MacBook I simply opened it from there. Any change made on one device is quickly reflected on the other.
For mobile, it is a bit different. Nextcloud does not support a continuously watched folder like it does on desktop, probably due to OS restrictions around background execution and filesystem access. But I still managed to find a workaround. While we do not have a local folder that syncs automatically, we can still access files through WebDAV.
So if Obsidian could sync a local vault with WebDAV, that would solve the problem. Luckily, there is already a community plugin called Remotely Save that does exactly that. I installed it on my mobile client, set it up with my WebDAV credentials, and it works great.
Applications I Tried But Will Not Use
Well, so far so good. I’ve shared my experiences with the applications that I tried and thoroughly enjoyed. But what about the ones that left a bad taste in my mouth and I ended up abandoning?
Here are a few that I experimented with, and why I ended up not using them:
Kavita for a book/comic reading. There is no proper mobile (and desktop) client that allows offline reading. This was simply my reason for it.
Ghostfolio for portfolio tracking. The mental model did not really fit mine. It also does not support adding custom assets, so if you are investing in something not available in its dataset, you cannot track it. For now, I will probably stick with spreadsheets, or maybe build something simple myself for my use cases.
Joplin for note-taking. I tried running Joplin Server as a backend for it. If the sync experience and the app worked well for me, I might not have needed to set up Nextcloud at all, since syncing notes was the primary reason I set it up in the first place. While everything technically worked and syncing was fine, I just did not like the UI/UX compared to Obsidian. It is as simple as that.
But of course, just because they did not work for me does not mean they are bad. If you are curious, I would encourage you to try them yourself.
To Conclude
So far, this little self-hosting experiment has been running smoothly. I am using almost all the services I set up here on a daily basis.
Of course, there are still many things on my mind. How should I set up a proper backup system? Which apps should I try next, maybe things like Jellyfin, Paperless-ngx, or some bookmarking tools? What other features of Tailscale can I make better use of? How can I improve the observability of my home server so I can easily track resource usage? Is there anything I can do about power outages so that if my computer shuts down, it can start back up automatically? And so on… But the good thing is, I do not have to answer all of these questions at once. I intend to continue this experiment incrementally and document what I learn along the way through new blog posts.
I developed a web extension called Mark Scroll Positions about 1.5 years ago. I built it both to solve my own need and to experiment. If you are interested in how it looked and the original idea, you can check Introducing: Mark Scroll Positions. But long story short, other people started using it after I published it, even though I did not have high expectations for it. I received some comments on both Firefox and Chrome. A few users even went to GitHub and opened issues.
Most of the issues were simple problems that I could have fixed easily if I had taken the time. For example, adding a dark theme option or fixing the drag and drop feature that was not working properly in Firefox. However, I was a bit tired at that time and focused on other things, so I could not find the motivation to handle these requests. I left the repository as it was.
When I first built the extension, AI agents were not as good as they are now. I was also very skeptical about using them. I was afraid that if I used AI too much, I might lose my ability to write good code. I also worried that the code could become hard to maintain in the future, or that my own skills would get worse.
Recently, I spent a lot of time with my friend Cem, and we tried different AI models and agents together. My perspective changed a lot. Seeing a good developer friend of mine working very efficiently with different agents in front of me was something I could not ignore.
So I also started using LLMs and different agents more and more in my workflow. At the same time, I tried to be careful about choosing the right tools and workflows, so it would become easier to put the LLM into a feedback loop. I also try to follow simple principles like making incremental changes. I review the changes made by the agents, so I still work with a human in the loop approach when using LLMs.
In terms of efficiency, for some tasks, AI might still be slower than an experienced developer who is fully focused and writing everything manually. But I think this way of thinking misses the main point. For many people, including me, the main benefit of using AI agents was never just about speed. It was about being able to offload tasks that you do not want to do, or do not have time to do, and focus more on the parts you actually care about. Developer velocity alone does not mean much if you get exhausted and stop. It does not matter if you start fast but then get stuck because of boring tasks and lose motivation. With AI, I feel that this mental barrier becomes lower. That is very valuable for me, even if it does not always increase speed, although in many cases it does.
So I decided to try this approach on the extension that I had already stopped developing, even though there were still users requesting some features. I thought it would be better to offload these tasks to an AI agent instead of not solving them at all.
Over three nights, I probably spent around 3 to 4 hours thinking about Mark Scroll Positions, and the LLM likely spent about the same. In the meantime, the repository changed significantly. It migrated from Parcel to Vite. It moved from raw CSS to Tailwind, because I thought AI would work more easily with it. I removed the SVG icons and started using the Font Awesome library. I modernized the whole UI. I took most of the initiative in the design because Claude did not implement things exactly how I wanted at first. I added dark and light theme support. I fixed the drag-and-drop problems in Firefox popups. I added a sort by latest changes feature and a settings page. I also fixed the broken auto jump feature, where the extension would open the site but not scroll to the correct position. If you are curious about the difference, you can watch the previous version in this video and explore the latest release on the Firefox or Chrome stores.
Are any of these tasks very hard or impossible for a human to implement? No. Would I have implemented them on my own? I am not sure I would have found the motivation and time if I was not using an AI agent. And the thing is, this was not the only case where I experienced this. I chose this example because it shows the situation I am trying to describe very clearly. It was a project I had already left behind, even though the required changes were not difficult. With agents, I was finally able to move it forward again.
In the end, speed was not the most important thing that LLMs gave me. It was mostly about reducing mental barriers. And from now on, I intend to use AI agents more and more in my upcoming projects.
It has been about a year since I decided to learn Go, and more than half a year since I started working at an HFT company that uses it. This is not a very long time with the language, but some of my developer friends have already asked me about my impressions of Go.
In this blog post, I want to share my overall experience with it. I will first explain why I felt the need to switch to Go in the first place. Then, I will describe what I did to learn it and how I improved over time. Finally, I will discuss my current impressions of Go, including what I like, what I do not like, and whether I would recommend it to others based on their goals.
(Two Gopher amigurumis stitched by my aunt, using patterns from here)
Looking for an Alternative to JavaScript
To give some context, until very recently, I was using JavaScript for most of the paid full stack projects I worked on. This was largely due to its high development velocity, mainstream adoption, and large ecosystem. On the frontend, I was primarily building on top of the React ecosystem, and on the backend, I was using Fastify. Overall, JavaScript worked well for those projects. There were only a few cases where it was not sufficient due to higher performance requirements. Even then, I was able to work around those situations by offloading the heavy parts to services written in faster languages like C++.
So, if JavaScript is good enough for most projects I worked on, why did I feel the need to try another language?
Well, I enjoy trying out new things. I also felt it would be valuable to have a programming language in my toolbox that expands the set of problems I can handle. I find functional programming interesting, and I like the mental model it provides. So, I could have chosen to invest more time in Clojure or Haskell to deepen my existing understanding of them. I could also have spent more time with Python; its ecosystem is very mature in areas like data science and machine learning. Trying frameworks like Ruby on Rails or Laravel was also appealing, given how productive their ecosystems can be.
But the problem with all of these options was that anything I could build with them, I could already build with JavaScript. I felt that the marginal gains from spending more time learning another high level programming language would be low.
Because of this, I wanted to try something that is closer to the machine than JavaScript. I believed this would help me better understand how things work under the hood. It would also prepare me for situations where performance matters more.
Why Go and Not Others (Rust, Zig, etc.)?
You might be thinking, “All of this explains why you wanted something closer to the machine than JavaScript, but it does not explain why you chose Go over Rust, Zig, C, C++, or something else.” That is fair. The answer is simple. Being closer to the machine and having better performance was important, but it was not my only priority. I was also thinking about developer velocity, how long it would take to learn the language well enough to build useful things, how widely adopted it is in the industry, and the overall philosophy behind it.
Rust was tempting. It is very fast and widely used. It is also interesting because it managed to solve a hard problem in a practical way: achieving memory safety without using a garbage collector. Still, I was hesitant because of its learning curve. I was also not sure if its philosophy and style would fit the way I want to work. I had a tendency to build things on top of abstractions, even when they are not needed. This sometimes lead me to spend time solving problems that are not a real priority, instead of focusing on problems that actually add value (see Why I am Leaving NixOS After a Year). Since I realized this, I started trying to keep things as simple as possible on a cognitive level. Rust felt like a language that encourages abstraction, not just because it allows it, but because many of its core ideas depend on it. That was another reason why I was hesitant about it.
Zig was also tempting. I was already following Andrew Kelley and his blog, and I have a friend, Halil, who liked both Zig and Go and introduced me to Go in the first place. He often described Zig as a more modern and slightly opinionated version of C. He also mentioned that many Go developers tend to like Zig, and many Zig developers tend to like Go, often pointing to people like Mitchell Hashimoto and
Tim Culverhouse. Zig was clearly very interesting. However, once I realized that it was still under active development, without a stable release, and that its ecosystem was not as mature as Rust or Go, I felt it might be too much for me at that moment. I was also not sure if I wanted to go as low level as Zig or C right away, before having something more suitable for most mid tier tasks.
As for C++, it was the language we used in our data structures and algorithms courses in college. I never developed a good feeling for it. It was more of a language I would use only if I really had to.
This left Go as the option that made the most sense to me at that moment. It was much more performant than JavaScript, while still offering good developer velocity, at least according to people already using it. It had a large ecosystem and placed a strong emphasis on simplicity. Because of this focus, the syntax was clear and it was easy to pick up quickly.
None of this means that I am against using Rust, Zig, C++, or other languages. I can easily see myself using any of them in the right context. At the time, I was simply looking for a language that matched my goals and constraints better, and Go fit those needs best.
The Learning Process
I learn best by both reading and getting my hands dirty. So, I decided to learn the Go syntax and core concepts just enough to start building things. Then, while experimenting and trying things out, I would continue reading more material to better understand what I was doing right, what I was doing wrong, and why.
To get started as quickly as possible, I followed the Tour of Go and also read Introducing Go by Caleb Doxsey. Both resources were short yet sufficient to help me understand the syntax and get a general sense of what Go is capable of. Right after finishing them, I was ready to move on to actually building something.
I had been thinking about building my own fitness application for a while. Most existing apps either felt like overkill for what I needed or were missing features I actually wanted. I also saw it as a good opportunity to build the API in Go and get more comfortable with the language. I looked into different API libraries and ended up choosing the go-chi router. It stood out as one of the simplest options, both in terms of staying close to the standard library and having a small codebase of under a thousand lines. Using a minimal library felt like a good way to learn Go better and focus more on the language itself.
While I was learning Go at my own pace and building projects with it, I got a job from an HFT company that was using Go. They gave me a case study to complete in Go, and I was able to do it. I also passed the technical interview and started working as a full-time Go developer. This is just my impression, but I think Go makes it easier for companies to hire developers from other language backgrounds. If someone is already comfortable with a C-like programming language, their skills tend to carry over to Go quickly. My guess is that this is because Go keeps the language small and predictable, which makes it easy to read and reason about, even for people coming from languages with more complex syntax.
The key point here is our programmers are Googlers, they’re not researchers. They’re typically, fairly young, fresh out of school, probably learned Java, maybe learned C or C++, probably learned Python. They’re not capable of understanding a brilliant language but we want to use them to build good software. So, the language that we give them has to be easy for them to understand and easy to adopt.
With working in an HFT company, I also started to pay more attention to the performance side of things. To that end, I read the book Efficient Go by Bartlomiej Plotka. Overall, I can say that this book really provided a lot of perspective that could be quite useful both for Go and other languages.
My Overall Impressions on Go
Ok, so far so good. But what about my overall impressions?
Well, I think Go actually provides the experience that it promises. It is simple (not to be confused with easy). It has a very minimal and easy to understand syntax. The language itself kind of feels like a subset of C, but it feels more comfortable because you do not have to think about many things that you need to handle manually in C. It provides great primitives for handling concurrency. It has a great standard library. It is very readable, as a result of being simple and not having many ways to do the same thing. Because of all this, it provides a great developer experience, as long as you are ok with not trying to be too smart with fancy abstractions. In fact, I did not feel much of a decline in my developer velocity since I started using it. To the contrary, I feel like I am moving at a much faster pace when handling things related to backend work and concurrency.
Simplicity is better than complexity because simpler things are easier to understand, easier to build, easier to debug and easier to maintain.
This is interesting because, in a way, you would expect a programming language with more abstractions, like Node.js, to obviously have an edge when it comes to developer experience, since the point of abstractions is usually to make things much easier. So how can a programming language with a very minimal syntax (that is not as expressive as others), fewer fancy features, and a very conservative way of doing things actually make you move faster?
I think there are many reasons for this, but the most likely one that comes to my mind is that Go kind of trades expressivity for understandability (and readability), and understanding is usually the main bottleneck when working with others. Maybe you do not have many ways to write the same thing, and maybe this can reduce your developer velocity in some cases, but it also makes working with other people much easier. It makes understanding code written by others easier as well, and it removes time spent on secondary things, like debating how code should be formatted. (Go has its own formatting tools provided by default.) I feel like, as a result of this, it is also easier to work with LLMs in Go than in other languages that provide more hacky ways of solving the same problems. I find it much easier to work with LLMs in Go, because it is easier for me to understand what is going on compared to other languages like Node.js. And since the understanding part of coding is more expensive than the writing part, I feel like some of the things that look like boilerplate in Go (for example, errors being values, and error handling causing a lot of boilerplate code) are actually its strength.
I think Go’s standard library being really good also has a lot to do with its developer experience. The standard library in Go is not cutting edge, but it is very strong and large. You can almost find anything you need in it. It even has its own string and HTML templating engines, provides standard database interfaces (that many external libraries also build on), includes built-in JSON, XML, and CSV support, a full-featured HTTP server and client, cryptography primitives, context propagation, and many other things you would normally expect from external libraries. Also, most external libraries also try to be compatible with it. As a side effect of this, it becomes easier to read and understand code.
Again, the standards are strong in Go; you spend less time understanding different approaches to the same problem and more time focusing on the actual logic that matters. It even comes with its own testing, formatting, and documentation tools. This means you can go pretty far using only the standard tools that come with Go itself.
And lastly, I really loved the Communicating Sequential Processes way of thinking when it comes to building concurrent systems in Golang. Maybe there is a slight overhead when using channels, but overall, the mental model it provides makes it very easy and intuitive to design the interacting parts of your systems. I really like how channels work. I love goroutines. I love the concurrency patterns you can apply with them. I love the concurrency tools available in the standard library (I also suggest Gist of Concurrency by Anton Zhinayov for those who are further interested in the topic), and so on.
Overall, I am glad that I learned Golang. The learning cost was not high, and when you consider what you get for the time you spend on it, it is one of the few technical learnings that easily justified itself.
Is the language itself perfect? Probably not. I still don’t like the lack of non-nilable types. I also think it would have been better if errors were handled through things like type matching and union types instead of multiple return values. I would rather prefer the language to enforce explicit initialization instead of silently filling everything with zero values by default. But if we are talking about the best language I have used so far, rather than the best language in an ideal world, Go is the way to go. So far, it was the most balanced language that I used in terms of being performant, simple and providing good developer velocity.
I built my own Corne keyboard around six months ago, in July. I have been using it ever since. Although I am no expert on split keyboards, I accumulated a fair amount of observations during this whole process. I thought that if I wrote down my experiences, they might still be of interest to people who are considering whether to try a split keyboard. Or, if they are already using one, maybe they can also benefit from some of the tricks that helped me a lot. So, here it is: a blog post about how and why I built my own Corne keyboard, the things I learned and applied to improve my ergonomics over the last 6 months.
I will first talk about my overall reasons for choosing such a niche keyboard, then why and how I built it. Finally, I will share some very cool tips and tricks about how I played with the layout to make my Corne fit my specific needs better.
Let us get started without losing any more time. :)
Why A Split Keyboard?
Whenever a friend sees my Corne keyboard, they usually ask what it is, where I got it from, and why I am using it. Sometimes they want to try it, and I let them play around with it for a bit. After a few minutes, the reaction is almost always the same: they tell me that it is hard and frustrating to use. I understand this. It definitely looks strange, and it is far from a natural typing experience for someone who is used to a “normal” keyboard. Still, I want to try my best to explain why I decided to use a split keyboard in the first place.
I can think of three possible reasons for using a split keyboard. First, they look cool, and some people simply enjoy trying cool things. Second, there is the promise of improved typing speed or efficiency. Third, and most importantly for me, they are often more ergonomic and natural for the body. I admit that the aesthetics played a small role in my decision as well, but the primary factor was simply ergonomics.
For some context, I have been dealing with neck and back pain for quite a while. For this, I had already spent a lot of time thinking about office ergonomics. I regularly use laptop and monitor stands to keep my screen at eye level. I pay attention to chair and desk height, distance, and how they relate to my posture and leg position. I have also invested in a standing desk and a chair that I find comfortable for long work sessions. I also started learning more about biomechanics and began exercising more regularly. 1
This made me think about how I could further improve my ergonomics. After some thinking, it became obvious that the two things I interact with the most when using a computer are my keyboard and mouse. A quick research pointed me toward two promising upgrades for my setup: a split keyboard and a vertical mouse.
Both made sense to me. A vertical mouse more closely resembles a neutral hand position, which can help reduce awkward wrist movements. With a split keyboard, the ability to position the two halves independently allows the wrists to remain in a more neutral alignment. This same split setup, combined with the option to place the halves farther apart, also helps reduce internal shoulder rotation. Over time, this can improve shoulder comfort and may even reduce neck strain.
To give you a brief idea, the following image from boardsource.xyz demonstrates this really well.
Why Ortholinear?
Another concept that I came across while researching this topic was “ortholinear”. Here, “ortho” means right-angled, and “linear” means arranged in lines. So, an ortholinear keyboard is one where the keys are placed in a straight grid of aligned rows and columns instead of being staggered.
For those who are further interested, I recommend checking out The Planck Keyboard blog post by Matt Gemmell. Just to give you a brief idea of what an ortholinear keyboard looks like, here is a photo of his keyboard:
This makes sense to me. However, I was concerned that, since an ortholinear keyboard is usually narrower than a normal one, it might cause more wrist deviation. So I did not want to try a non-split ortholinear keyboard such as the Planck. Still, I wanted my split keyboard to be ortholinear, because being able to align the two halves already solves the wrist deviation problem.
So, a split, ortholinear keyboard it is. But there is still one very important question: why choose the Corne over the many other split keyboards available?
Why Corne, Specifically?
When I first looked into the list of split keyboards being recommended, I was baffled. Not only are there so many alternatives, but they also differ a lot.
Just to give an example, consider something as minimalist as ChocoFi and something as full-fledged as Moonlander. Both are split keyboards, yet the difference between them is immediately obvious.
This is how I quickly realized that it would be better for me to first set my expectations and then filter them. Not the other way around of trying to learn all the subtleties and then trying to make an educated guess.
Since it would be my first attempt at a split keyboard, I wanted a keyboard with a community around it. This way, I could benefit from the experiences of other people and find answers to my questions if I ever had them.
The split keyboard being open source was also very important, because rebuying it if something ever went wrong was not an option. This is not only due to the prices, but also because customs regulations in Turkey currently make ordering items from abroad very difficult. For example, anything above 30 euros, including shipping, requires a formal customs declaration and additional fees. Likewise, the number of orders that can be placed is limited on a monthly basis, and at the moment, this limit is five orders per month. On top of this, there is not much of a marketplace for split keyboards in Turkey either. That meant I either had to ask friends abroad to buy parts for me as a gift, or obtain the components separately and solder and assemble the keyboard myself. I chose the second option because it made me less dependent on others. I could still ask for keyboard help if needed, but if something went wrong, fixing it myself would at least be possible.
And of course, the keyboard had to be ergonomic. In fact, I was okay with going with split keyboards that prioritize ergonomics more, even at the expense of challenging my habits. I was okay to try new things if I was convinced of the possible benefits.
So, after some market research, my final decision came down to Corne vs Lily58. Both of them seemed to satisfy my main requirements, with one key difference between them. The Lily58 has 58 keys, while the Corne has only 42.
In practice, this means that the entire number row and a few additional keys are removed on the Corne to make it more compact. Access to those missing keys is handled through layer combinations instead. On paper, I liked the idea that it would reduce overall hand movement. However, my main concern was whether I would actually like the experience or not.
Since I could not clearly decide which one to go with, I went YOLO. I decided to build the Corne myself and asked my friend Onur to bring me a Lily58 for personal use.
Building The Corne Keyboard
Before starting on my own, I wanted to see if anyone else in Turkey has already built a split keyboard. I found a subreddit called MechIstanbul, where there were lots of split keyboard builds. Although the subreddit itself seemed to be inactive, I realized that their Telegram group was still very active. There, I was able to ask some of the questions that I had in mind to the experts directly :) I’m especially indebted to a member named Erdem (yes, we share the same name) who helped me a lot with choosing which parts to order and from where for a Corne keyboard build.
After having a better sense of which parts I needed to order, I bought all the parts that were essential for a split Corne keyboard through AliExpress. Specifically, I used all of my monthly order limitations for the following items (each order under a 30 EUR cost):
100 XDA keycaps. There was no particular reason behind this choice. I was just browsing keycaps, and these simply looked nice.
110 Outemu Silent Yellow switches. I wanted my split keyboard to be relatively quiet. I went with Outemu instead of Cherry MX mainly because they were cheaper. I couldn’t spot any significant difference between the two when listening to sound comparisons between the two.
5 NRF52840 MCUs. These basically share the same interfaces and functionalities as nice!nano MCUs, but they are much cheaper.
A Corne PCB kit, which includes the Corne circuit boards, diodes, hot swappable sockets (so that the switches are not soldered directly to the board and can be easily replaced later), TRRS jacks, and similar components.
Upper and lower plates to sandwich the PCB. These serve both as a protective layer and as an aesthetic element.
If you are further interested, here is the list of all parts with their costs:
Keep in mind that I bought most of the parts in double the needed amount, just in case I use them for another keyboard later.
After the orders reached, I simply followed the tutorials available on the internet. 2
While watching the video, I noticed that the soldering part looked a bit tedious. Since I had never done soldering before, I did not want to risk the process. So, I went to my cousin, who is experienced with soldering, and asked for help. Thankfully, he helped a lot. After that, I plugged in the parts, installed the ZMK firmware on the MCUs, and then programmed the left and right halves using the Keymap Editor.
Of course, there were a few minor issues along the way. For example, the female pins we soldered onto the PCB were slightly too long, which caused the MCU to sit a bit higher than intended and left insufficient space to attach the covers properly. We also accidentally stripped the soldered area on the battery during soldering, and ended up breaking the on-off switch as well.
But, despite these problems, I think that the overall result was still good enough, and I finally had a keyboard that was fully usable.
The Overall User Experience
Speed
The moment I had my Corne keyboard working, the first thing I did was open MonkeyType and see how fast I could type things down. It was 3 words per minute in my first try. On the second try, it was a bit better, and after a few iterations, I was able to get around 60 WPM in the same hour in which I started experimenting. It’s not really fast compared to my usual speed. 3 But it was still good enough for me to get things done using this keyboard.
I can say that after around two days of using the Corne keyboard, I was getting 90 to 100 WPM, which was about 80 to 90 percent of my previous performance. This was sufficient for me to use the keyboard effectively at work.
I believe this shows two things. First, as many people expect, changing from a normal staggered layout to an ortholinear split layout decreases your typing speed tremendously at first. Second, it is not that hard to recover from that decrease. In fact, not long after that, around three weeks later, I was able to beat my previous typing record on MonkeyType with 139 WPM.
I do not know about other people, but for me, the main reason I slowed down when I first started using the Corne keyboard was not that it was split. I think one reason was simply that the keys are in an ortholinear layout. For example, at the beginning, I used to type ‘C’ a lot when I meant to type ‘X’. This is because I was so used to a staggered layout that when I typed from the row below the home row, my fingers naturally moved a little to the right. I had to unlearn that habit.
Getting Used To Layer Keys
Besides unlearning some of my previous habits, I also realized that I needed to learn new ways of typing special characters. The Corne has fewer keys than a typical keyboard, and as a result, letters and modifier keys occupy almost all of the base layer. This means that other characters, such as curly braces {}, square brackets [], and even numbers, have to be typed using layer keys.
For example, pressing the key that corresponds to q on the base layer produces q. Pressing the same key while holding the layer 1 key produces 1, and holding the layer 2 key produces !.
To give a concrete idea, this is how my keys behave when I am holding the layer 1 key:
And this is how they behave when I am holding the layer 2 key:
This might seem a bit confusing at first, but when you think about it, layer keys are not very different from modifier keys like Shift or Ctrl. They simply change the behavior of the other keys while they are being held.
As for how long it took to get used to these keybindings, adapting to layer 1 was especially easy for me, and layer 2 was not much harder either.
One important thing I noticed is that I adapted faster to the special characters I used most often than to the ones I used less frequently. This is actually good news, because the characters you need the most become available to you first.
Embracing “Less is More”
I think the Corne keyboard is a good example of less is more. You are reducing the number of available keys, but you still gain more than you had before: better ergonomics, more speed, and more precision. Realizing this made me wonder whether I could push the idea more. For example, could I reduce pinky usage even further by removing the sixth column from the keyboard?
After coming across “the endgame keyboard” video by Joshua Blais, I realized that I could even go further.
I started thinking about ways to reduce my pinky usage. Erdem from the MechIstanbul community sent me the Home Row Mods post by Matt Gemmel again. It was a great read. To summarize the main idea, you can define custom behaviors for certain keys so that they act as modifier keys when held and as normal keys when tapped.
This lets you move most of the modifier keys that are usually pressed with the pinkies onto the home row, reducing pinky strain even further. What I did was mirror the home row modifier keys on both halves of the keyboard. This way, when I need to press a key on the left side with a modifier, I can use the modifier on the right side, and vice versa.
Here is what my default layout looks right now:
As you can see, I have four empty keys in total, which means I am actively using 38 keys. I still rely heavily on my right pinky, but I recently realized that some of those keys can be moved to the empty thumb positions. I can also start using combo keys, a custom behavior that allows certain characters to be typed by pressing two keys together. However, at the time I was configuring my keyboard, this setup seemed acceptable.
Emphasis on Thumb Keys
One thing I quickly noticed when using this keyboard was that it shifts some of the load that was previously placed on the pinkies onto the thumbs. Normally, I used my thumbs only for pressing the space key. With this keyboard, each thumb is assigned three keys. The important point is that these thumb keys usually replace functions that were previously handled by the pinkies.
I think this is very good overall. Because it kindof balances the load between your fingers. At the same time, if your thumbs are sensitive, this change can make things worse rather than better. After using the Corne keyboard for a few weeks, I noticed a slight pain in my thumbs. It was concerning, so I took a break over the weekend, and the pain went away. It never returned. I suspect this was either due to my hands adapting to the new layout or a minor strain from doing knuckle push-ups and pull-ups around the time. Even so, the experience made me realize that these keyboards may not be ideal for people with sensitive thumbs.
What About Lily58?
You might remember that in the Why Corne Specifically? section, I mentioned that during my decision period between the Corne and the Lily58, I went YOLO and decided to try both.
Well… By the time my friend handed me a Halycon Lily58 kit that was bought from splitkb.com, it was already too late. I was already certain that I was not going to leave the Corne anytime soon. I had adapted to it extremely well and was not really seeking the additional keys that the Lily58 offered anyway. In other words, even if I used the Lily58, I would most likely stick to the same keybindings and layouts that I already use on my Corne keyboard.
So, I asked a couple of my friends whether they would be interested in using the keyboard. Thankfully, Mert was interested, so I handed my Lily58 over to him. 🙂
Goodbye, Lily58.
So, What’s Next?
So far, I am very fond of my Corne, but I have a feeling that I could eventually switch to a 5x3 layout. I already have a PCB for a wireless Choc Corne at home, and I plan to build it in one of my spare periods. I also want to improve my CAD skills and experiment with 3D printed cases and rests designed specifically for my own needs. For now, however, I am happy with my current Corne, and I think the best next step is to start using this 6x3 keyboard as if it were a 5x3.
Anyway, thanks for reading this far. I hope this post was helpful for at least some of you.
I would also like to thank Oussama for reviewing the initial draft of this post.
I can say that exercise helped me the most on a personal level. Still, paying attention to ergonomics was also very helpful. To me, exercise feels like a way to increase my overall tolerance, while improving ergonomics is more about reducing the damage. Because of that, I wanted to take the best of both worlds as much as possible. ↩︎
I found both this video from Josean Martinez and this one from Joe Scotto, very helpful during the process. ↩︎
Just to give you an idea, I used to be able to consistently type around 110+ WPM on MonkeyType with my Logitech K380. ↩︎
This post was written while Go 1.25 is the mainstream release. Some implementation details may change as the Go team continues to refine the garbage collector. Still, the ideas here should remain useful for building an intuition about what happens under the hood and why certain design choices exist. If you need the most up-to-date specifics, always refer to the official Go source and release notes.
I was reading Efficient Go and came across the section on garbage collection (GC). I realized how little I actually knew about such an important topic. Both out of curiosity and for the fun of learning things, I decided to learn a bit more about how it works. So, I looked into many different resources 1 and wrote down my understanding to make it stick. This post is the result. I hope it becomes useful for you as well.
Also, special thanks to my friends Onur and Oussama for their early feedbacks and some clarifications.
Introduction
Go is a garbage-collected language. This is great for developer velocity. It allows us to spend less time on manual memory management and more on business logic. Unfortunately though, making GC work efficiently is neither simple nor cheap.
The thing is, just because GC hides memory management details from us doesn’t mean that they don’t happen under the hood. They happen, and they are costly. If we don’t think about it, we might just generate garbage without realizing the possible runtime costs.
Think of a garbage collector like a Roomba: Just because you have one does not mean you tell your children not to drop arbitrary pieces of garbage onto the floor.
- Halvar Flake
Thus, by seeing the actual costs involved with GC, we can better appreciate the complexity of the problem it’s solving. Thus, we might feel more motivated to write code that creates less garbage. At least, that was my experience.
For this, in the following sections, I will examine the Go Garbage Collector in more detail. I will examine its trigger policy, how it frees or rearranges memory, and the side effects of these actions. I will also talk about what we can do to help the GC, so that our applications suffer less from latency caused by poorly managed memory.
The Pacing Problem
Now, even if we had a procedure for cleaning up garbage, unless we trigger it, we are basically no better of. So, any garbage collector, in a way, requires a mechanism for determining when to trigger the collection process.
Honestly, if I were to implement such a trigger mechanism for the first time, the first idea that would come to my mind would be to simply trigger the GC periodically at a fixed interval. But, even a little bit of thought shows the problem here. A fixed interval does not care whether the program is allocating a lot or very little. What about something like triggering the GC after allocating memory a determined number of times? Likewise, this approach would also likely fail. Because it simply ignores the fact that allocations can have very different sizes and lifetimes.
So, whatever mechanism we come up with, it better should adapt to the program’s behavior. It needs to monitor how fast memory is being allocated and how quickly old objects become unreachable, then decide when to run the collector accordingly.
💡
The Pacing Problem
Running the GC too often or too rarely can both cause serious problems:
If the GC doesn’t run often enough, memory usage grows too quickly. When it finally runs, it has to clean a much larger area, which takes more CPU time than if collections had been more frequent.
If the GC runs too often, it wastes precious CPU cycles by checking for garbage before enough has accumulated. This means extra work with little benefit.
It’s a bit like cleaning your house: If you never clean and let garbage pile up, you waste space and also make the next cleaning much harder. If you keep checking a clean room again and again, you’re just wasting time.
Fortunately, Go takes a smarter approach by using a special mechanism to decide when to trigger garbage collection. This mechanism is called the pacer.
How Does The Pacer Work?
ℹ️
Go’s GC Pacer Source Code
Those who are curious about how the pacer works in more detail can read the runtime/mgcpacer. It is not that hard to follow and only about 1500 lines of code (comments included).
The main idea behind Go’s pacer is to keep garbage collection proportional to the rate of memory allocation. Basically, after each collection, the GC measures the size of the live heap (the memory still in use after collection) and some additional parameters to compute the next target.
Here is a piece of code from runtime/mgcpacer demonstrating how the heap goal is calculated.
// Compute the next GC goal, which is when the allocated heap
// has grown by GOGC/100 over where it started the last cycle,
// plus additional runway for non-heap sources of GC work.
gcPercentHeapGoal := ^uint64(0)
if gcPercent := c.gcPercent.Load(); gcPercent >= 0 {
 gcPercentHeapGoal = c.heapMarked + (c.heapMarked+c.lastStackScan.Load()+c.globalsScan.Load())*uint64(gcPercent)/100
}
// Apply the minimum heap size here. It's defined in terms of gcPercent
// and is only updated by functions that call commit.
if gcPercentHeapGoal < c.heapMinimum {
 gcPercentHeapGoal = c.heapMinimum
}
c.gcPercentHeapGoal.Store(gcPercentHeapGoal)
Here, heapMarked is the number of bytes marked by the previous GC. It is the part of the heap that survived the last collection, and also known as the “live heap”. The lastStackScan is the number of bytes of stack that were scanned last GC cycle and globalsScan is the total amount of global variable space that is scannable. There is also one last value to talk about gcPercent. It is the growth percentage. It comes from GOGC and defaults to 100, which means the next goal allows roughly a 100 percent growth over the base term.
Here, I find the addition of GC roots rather interesting. Why add them into the equation in the first place? Why not use something as simple as the following example?
Target heap memory = (1 + GOGC/100) * Live Heap
It turns out that it was already like this until Go v1.18. It seems like the main motivation for this change was to make the GC’s pacing model reflect all of the work the collector needs to perform, not just the size of the heap. Those who are further interested in the topic, can look up the GC Pacer Redesign proposal that initiated the change.
Regardless of these details, the main idea is still the same: we have a pacer that basically keeps the garbage collector in sync with the program’s allocation behavior. It constantly adjusts when the next collection should happen based on how the heap grows and how much work the previous GC cycle required.
ℹ️
The GOMEMLIMIT Option
Go also provides an option called GOMEMLIMIT. When the process approaches this limit, the pacer logic triggers the GC immediately, without prior checks. It serves as another pacing mechanism, but one focused on memory pressure rather than allocation rate.
However, this option is a tricky one. The Efficient Go especially warns us about it:
When your program allocates and uses more memory than the desired limit with the GOMEMLIMIT option set, it will only make things worse. This is because the GC will run nearly continuously, consuming around 25% of the CPU time that could otherwise be used by your program.
At this point, we have discussed how the pacer calculates the next target for heap memory after a collection. But this still leaves the question: where do we actually compare the current heap memory with the target heap memory to trigger the GC?
As I understand, there are two main places:
The runtime/malloc.go implementation: For each large allocation (roughly greater than 32 KB), the GC always checks whether the heap has passed the GC trigger threshold. For small allocations, it performs the check only after enough space has been allocated over time, similar to waiting for sufficient allocation activity to occur. Those interested in the details can examine mallocgc and, in particular, its helper functions: mallocgcTiny, mallocgcSmallNoscan, mallocgcSmallScanNoHeader, mallocgcSmallScanHeader, and mallocgcLarge.
The forcegchelper goroutine defined and being run in runtime/proc.go. It basically runs GC if it does not run for a certain period of time defined by the constant forcegcperiod.
In addition to these, we can also trigger the GC manually via runtime.GC() and debug.FreeOSMemory(). I guess they can be helpful in cases where we want to reclaim memory deterministically or prepare for a memory-heavy phase. But in many cases we don’t need this, or simply using better patterns is a better idea.
How Does The Collection Works?
The Efficient Go book summarizes how Go’s GC works as follows:
The Go GC implementation can be described as the concurrent, nongenerational, tri‐color mark and sweep collector implementation. Whether invoked by the programmer or by the runtime-based GOGC or GOMEMLIMIT option, the runtime.GC() implementation comprises a few phases. The first one is a mark phase that has to:
Perform a “stop the world” (STW) event to inject an essential write barrier (a lock on writing data) into all goroutines. Even though STW is relatively fast (10– 30 microseconds on average), it is pretty impactful—it suspends the execution of all goroutines in our process for that time.
Try to use 25% of the CPU capacity given to the process to concurrently mark all objects in the heap that are still in use.
Terminate marking by removing the write barrier from the goroutines. This requires another STW event. After the mark phase, the GC function is generally complete. As interesting as it sounds, the GC doesn’t release any memory! Instead, the sweeping phase releases objects that were not marked as in use. It is done lazily: every time a goroutine wants to allocate memory through the Go Allocator, it must perform a sweeping work first, then allocate. This is counted as an allocation latency, even though it is technically a garbage collection functionality—worth noting!
So, I know this is a lot to take in if you’re learning about garbage collectors for the first time. What does “concurrent, nongenerational, tri-color mark-and-sweep collector” even mean? Let’s explain these terms one by one. I’ll start with the tri-color mark-and-sweep part, it’s the core idea behind how the GC identifies and frees unused memory. After that, I will move on to explaining the concurrent and nongenerational parts.
ℹ️
Objects and Garbages
You will encounter the term “Object” quite a lot during discussions related to GC. What it means is any value or data structure that resides in the heap. Garbages are basically objects that are no longer pointed by any reachable reference (or root).
Tri-color Mark and Sweep
The tri-color mark-and-sweep algorithm is the main technique that Go’s garbage collector uses to determine which parts of memory are still in use. It belongs to the family of Tracing GC algorithms. They are called tracing collectors because, instead of something like tracking how many active references point to a given object (aka reference counting), they start from a set of known roots and trace through every reachable object. The main idea is simple; Anything that cannot be reached during this traversal is unused and thus, can be used by the allocator.
The tri-color in the name refers to how the objects are categorized into different groups during the tracing phase. During the scan (tracing), the collector needs a way to separate objects that are known to be reachable and completed, objects that are reachable but still need to be processed, and objects whose reachability is still unknown. So, it classifies objects into three groups:
- White for objects that have not been reached yet.
- Gray for objects that have been reached, but whose children still need to be scanned. Gray objects are basically in-progress to become black.
- Black for objects that are confirmed reachable and fully processed, including everything they point to.
The diagram below shows how objects move between these states:
At the start of a garbage collection cycle, every object begins in the white set. The collector scans the roots and moves the objects they reference into the gray set. As it continues to follow pointers, any newly discovered object moves from white to gray. A gray object becomes black once all of its children have been scanned. By the end of the cycle, all reachable objects become black, and anything that remains white is considered unreachable. This process is repeated every time a new collection starts.
ℹ️
Warning
Keep in mind that this description is just an oversimplified, conceptual model of how Go’s collector behaves. The actual implementation does not store literal colors on objects and uses internal bitmaps, spans, and work queues to represent these states efficiently. If you want to see how this works in practice, the relevant code lives in src/runtime/mgcmark.go and src/runtime/mgcsweep.go in the Go source tree.
Concurrent
Concurrent means that the GC runs alongside our goroutines most of the time rather than stopping everything. As it’s explained in the Memory Efficiency and Go’s Garbage Collector (and visualized below, using the explanation provided there), there are only two parts where “stop the world” occurs: When creating write barriers before the marking phase begins, and when removing those barriers after marking is complete.
Here, I think it’s important to realize that Go’s GC does not stop goroutines to perform the actual marking of unused pointers. It only pauses them briefly to install the write barriers. Another point worth noting is that these write barriers do not block. A barrier might sound like something that halts execution (which was my first impression too), like a mutex, but it’s not that. It doesn’t stop anything. It just acts like a small guard that notifies the GC whenever a pointer write happens.
Write barriers ensure correctness while the application mutates objects during concurrent marking. These barriers help track references created or modified mid-scan so the GC doesn’t miss them.
So, Go’s GC doesn’t block other Goroutines most of the time, except for those tiny moments when it adds or removes the write barriers. I found this trick of introducing barriers pretty clever.
Nongenerational
Nongenerational just means Go is not generational. And what does generational mean? Well, it’s basically treating objects differently depending on how long they’ve been around and how often they’re accessed. Why? Because they can use this information to optimize collection cycles. Most objects die young. So, by focusing on recently created ones more often, the GC can reclaim memory faster without scanning the entire heap each time. This is interesting. But if this approach is so efficient, why doesn’t Go do the same? Apparently, the reason is that there was no obvious benefit to it, that is, the benefits were not sufficient enough. 2
To Conclude
The more I read about how Go’s garbage collector works, the more I realize how deep the topic goes. It is absolutely possible to study every corner of the runtime, but that wasn’t the goal of this essay. My goal was to build a practical understanding of the system and develop an intuition for the bigger picture. I think, at this point, it’s enough to recognize that the Go team prioritized low latency and simplicity.
I think we’ve covered quite a bit in this blog post; The pacing problem, how the collection itself works, some of the implementation details, and so on… I believe, If there’s one thing to take away from all of this, it’s that we should stay mindful of the garbage our code generates. Even though the GC hides it from us, it still happens under the hood and has real effects on how our programs perform. In Helping Out The Go’s GC essay, we are going to look into some of the practical things we can implement to achieve this.
I hope this post helped you build a clearer intuition about how Go’s garbage collector works. It sure helped me a lot. If you spotted something I missed, or have other insights worth sharing, I’d love to hear about them.
Thanks for reading all the way through…
BONUS: The Green Tea Garbage Collector
As I’m writing this, there’s an ongoing effort to make Go’s garbage collector even more performant. The work is part of a new proposal called “Green Tea GC”. You can follow the discussion and progress in this issue on GitHub.
As for why Go is non-generational, Go Optimization Guide notes that “it hasn’t shown clear, consistent benefits in real-world Go programs with the designs tried so far.” The ISMM keynote, Getting to Go: The Journey of Go’s Garbage Collector also explains that while generational collectors can help reduce long stop-the-world pauses, Go’s concurrent GC already avoids those and instead focuses on maintaining low, predictable latency. ↩︎
Some people think having an organized environment is the result of frequent organizing. My personal journey of becoming more organized actually makes me question this belief. Yes, we can organize things at fixed intervals. However, in practice, I find it too difficult to make this effectively work. To me, the fixed intervals approach associates organizing with costs. You now have a new chore to remember when the time comes. You also keep letting disorder build up until it’s time to clean. So the work sucks more when the time comes and you become more likely to say things like “I’m so tired from work right now, I should rest and put this off.”
Let’s say your takeout arrives. You sit at the table and open the bag. Instead of putting the bag and extra sauces you don’t use into the trash, you directly proceed to eat. After eating, you don’t do anything and leave everything (forks, spoons, plates, etc.) as it is, and walk back to your room.
Well, my friend, the problem isn’t how often you clean. It’s how quickly you let things get disorganized.
I think building habits that prevent disorder helps more than just focusing on organizing afterward. Remember that with each action you do, you possibly increase entropy.
Generally, when we do something, we need to temporarily change our surroundings. We take out the things we need at that moment and use them to do something. And we also usually have both idle and active times when doing stuff. What I see is that these idle times are perfect moments to tidy up the mess that usually occurs in the moment. Let’s say you’re making sausage and eggs. You take the eggs and sausage out of the fridge. You slice the sausage, toss it in the pan to cook, and while the sausage is cooking to a certain point, you don’t want to add the eggs yet. You’re IDLE. Why not put the sausage and knife you just took out back where you got them instead of standing there waiting by the pan? You’re done with it anyway.
Postponing these small things to be done later once the task is finished might seem more efficient, but believe me, most often it is not. You are not only adding a new task to keep in your head, but you are also making it harder for you at that time.
I think this is a bit like garbage collection in programming. You can let unused stuff pile up and then clean it all at once (like a big cleanup session), or you can put things away as soon as possible when you’re done with them. I think in general, the second approach feels more stable. Just spread the work out and prevent disorder from building up. This way, you don’t need to worry about organizing as much.
I feel that, ideally, organizing should happen only when something new comes up. After that, your habits should maintain order. Once you’ve set up a system, your real task is simply not to disorganize it again.
I think “Fake it till you make it” is very poor advice if you read it literally, and otherwise, it is simply badly phrased advice.
If you take it literally, it encourages people to present themselves as something they are not. If you don’t see any problem with this, then why not phrase it more directly as: “It’s OK to manipulate others until you get what you want?” At least that wording captures the Machiavellian intent.
If you take a more charitable reading, such as “by acting like X, you eventually become like X. The actions you repeat become sticky, turn into habits, and eventually feel natural”. Then I would ask, “How is that even faking?” For example, when you act the way a courageous person would act in a situation that requires courage, would you say that you are faking courage or that you just acted courageously?
Excellence comes about as a result of habit. We become just by doing just acts, temperate by doing temperate acts, brave by doing brave acts.
- Aristotle
Additionally, it is not very hard to find cases where this “fake it” logic fails. For example, if you are not able to do a pull-up, pretending you can do one is not going to help nearly as much as following exercises specifically designed for someone who cannot yet do a pull-up but wants to build the strength to get there. This is actually the opposite of faking: you acknowledge your current incapability and work from that starting point.
Maybe a much better piece of advice than “fake it till you make it” would be to remind ourselves that we grow more by practicing than by pretending. Just genuinely try to build the small habits that move you closer to who you want to become.
Around a year ago, I published a blog post explaining my overall experience Switching from Arch to NixOS. You can read it if you’re interested in my early experiences, but, to give you a spoiler, that post ends with me saying:
Unfortunately, though, I don’t think the benefits I’ve gotten in this one month of using NixOS so far justified the cost I’ve initially spent and continue to spend learning Nix and NixOS.
—
Ultimately, whether the benefits of learning a particular technology outweigh the costs depends on how much you take full advantage of its features. So, I believe that if I experiment with more setups, try different programs, or start managing servers with Nix, I will begin to see a better return on this investment from what I have learned so far. :)
Well, it’s been about a year since I published that post. Since then, I’ve experimented with more setups, tried different programs, and started managing my own server with NixOS. And… Contrary to my initial expectations that I would get a better return on investment from NixOS with more usage, the opposite happened.
The Pain of Getting Things to Work
So you want to try a new program/service? First, you try the NixOS module and see whether it works the way you want. Oh… it doesn’t. Now, you have a few choices:
Try to figure out what’s wrong with your current configuration (maybe even read the source code of the NixOS module you’re using.)
Stick to more standard NixOS modules instead of using the one provided for the program you’re trying to install. For example, you might create your a systemd unit file and include the program binary using Nix.
Just use some containerization technology like Docker, or maybe a sandboxing solution like Flatpak (which is exactly what you can do on any typical FHS-based Linux distro.)
Sometimes, you just can’t foresee whether the reason an app isn’t running the way you want is due to a problem or limitation in the NixOS module. And if you don’t put a time limit on how much you investigate it, you may lose a lot of time. The problem with the second option is that it’s not fun to go through that process every time you want to try a new application or service on your system. Especially if it’s just because you can’t install it the native way, or you just don’t like something about the native way. So you end up falling back to the third option, which is something you can just as easily do on any FHS-based distro anyway.
You need to run a program like Electron in your Node project for your new job, and you try to install it through npm and then run it? Well, guess what. NixOS hates pre-compiled programs, so you need to learn more about how to resolve this problem while using NixOS. So you’re kind of forced to learn about other specific Nix tools (nix-ld, buildFhsEnv, creating your derivations, etc.) if you need to use them regardless.
In an FHS system, you’d configure a file and then run the program with that configuration. In NixOS (or home-manager), you now write a DSL based on Nix expressions, which then generates the actual configuration file the program will use. I think this just means another layer to trace when debugging. When you are using NixOS, and things work, everything works smoothly. It’s fine. But when things go wrong, you now have an additional layer to worry about. Did you misconfigure something at the NixOS level, or did the config generate correctly but there’s an issue with the program itself? And so on…
Problem of (Leaky) Abstractions
I think one of the main issues here is that NixOS just adds an abstraction layer on top of a procedural system. You interact with it as if it were declarative, but it’s not. Under the hood, you’re still running programs that were designed for FHS environments, where programs share their libraries, bootstrap themselves, install other precompiled programs, and so on… I believe that almost all my frustrations with NixOS is due to this phenomenon of abstractions.
As the Law of Leaky Abstractions suggests, “All non-trivial abstractions, to some degree, are leaky.” And it turns out that NixOS is not immune to this phenomenon either.
I would definitely prefer NixOS over an FHS-based Linux distro if it weren’t just a wrapper around Linux, but instead its own system with dedicated tooling and native programs. But I also understand how hard it is to build and sustain a community of people developing software specifically for a niche OS. So, it makes sense that NixOS is designed as a Linux distro. It’s similar to how Rich Hickey made Clojure run on the JVM and JavaScript runtimes to take advantage of their tooling and ecosystems, despite sharing very little with them in terms of philosophy.
But in the end, I feel like the discrepancy between the philosophy of NixOS and the programs and services running under the hood is so great that it is almost impossible to not feel this in some negative way, as a user.
The Time Cost
Well, I like NixOS and Nix’s philosophy. That’s why I stuck with it for over a year and tried to learn as much as I could despite the frustrations. I also think NixOS delivers on most of its promises, so the issue for me isn’t whether it works or not. It’s also not about whether you can make things work (you can). The problem is: at what cost? Tasks that would take very little time on a traditional FHS-based distro can take significantly longer on NixOS. And I really don’t like that.
I understand the benefits of reproducibility and so on, but when I think about how much I’ve gained from that reproducibility compared to my old dotfiles setup, I realize that I did NOT see any real benefits in practice. I am just sure that configuring and making stuff run the Nix way just takes way more time than just using a regular FHS distro.
Back to Arch, BTW
I still think that NixOS can be useful for some people who especially HEAVILY rely on syncing configurations across multiple devices and TRULY need system-level reproducibility. But I’m definitely not one of those people. I don’t need reproducibility to the extent that NixOS provides, and I also realized that I’m way more comfortable getting things done in an impure system than dealing with the friction of a pure one that slows me down in almost in every change I do.
A friend recently sent me a tweet of Tsoding, a recreational programmer who creates cool videos on YouTube that I also enjoy watching. The tweet is as follows;
Stop obsessing over splitting code into files. I end up grepping codebases anyway. I literally don't care where you put your functions. miniaudio.h is a single file with 92k LOC and it's fine. File is an OS construct anyway. pic.twitter.com/4zLXGrXEzA
Although I don’t fully agree with him, I understand the message to some extent. That is, you can work just as efficiently in a single file as you would in a repo with split files. I agree that it is possible, especially if you are someone like Tsoding.
I don’t like seeing too many files clustering around like small satellite particles either. I think excessive use of new files is often correlated with some kind of boilerplate being followed (which is very common in Java, C#, or even C++ communities) and with code that’s harder to trace. So, I too, usually prefer seeing related code kept together than just seperating them at every chance. That being said, I think, taking this idea of “not splitting pieces of code into separate files” to extreme is just as bad as those satellites making it harder to trace the code as you need to jump between files all the time.
The Problem
I think the main problem with both single-file and satellite-style codebases is that it’s far easier for the person who wrote them to operate on them than it is for others trying to get adjusted. That’s because the original author already has an idea of what kinds of functions exist in the codebase, so they can just grep for things and navigate easily.
Reading a codebase when you already know what exists beforehand, and reading one when you have no idea what you’re going to encounter until you read it, is a HUGE difference. It’s easy to overlook this and assume your code is simple to understand, especially if you’re the one who wrote it recently.
Let’s say you’ve just joined a backend project and you are expected to develop a new endpoint. Compare a system where files are organized hierarchically according to their relevant topics (db, api, routes, entrypoint) with a system where there is a single, very long file. Which one do you think would be faster for you to figure out which places to start trying to understand for the feature you want to develop?
If you go with the first approach, you’ll likely need to skim through the entire file to figure out where to add your new feature. But with the second approach, it’s usually obvious where to look first. You might even be able to implement the feature without ever touching the other files.
Also, let’s not forget that in addition to the cognitive benefits of using split files over a single long file, there are also practical advantages: splitting your codebase into multiple files reduces the likelihood of version control conflicts and allows AI tools to index and analyze your code more effectively.
Finishing Notes
Among the projects I worked on this year, there were two I took over that involved these kinds of large single-file codebases. These were by far among the hardest codebases to adapt to. The mental burden was significantly greater compared to projects where the code was separated into modules across different files. I wouldn’t say these single-file projects were especially complex or difficult. They weren’t. And I wouldn’t say the total lines of code were higher than in the more modular projects I’ve worked on, because they weren’t either. I think the main issue is that jumping into a large block of code without any clear structure or signposting just makes it harder to navigate.
Which, I believe, is true not just in programming, but in reading in general. Imagine having to read a textbook without titles, chapters, or any structure. Files may be “OS-level constructs anyway”, but so are many other constructs from different domains that are useful and helpful to us.
This essay presents a list of reflections on my attempts to create a simple workflow for building front-end applications using vanilla JavaScript. I first discuss what it was like to code when I first started programming and the things that I enjoyed about it. Then I walk through several approaches I tried in the pursuit of simplicity and also share the problems I ran into meanwhile. Later, I show how we can make use of libraries such as Hyperscript and Snabbdom to resolve those issues without giving up on our simplicity ideals.
I don’t aim to convince anyone to adopt the workflows presented in this essay but simply to share my experience with others who might share the same concerns about simplicity.
When JavaScript Was Just JavaScript
I remember the times back in high school when I used to build recreational projects 1 just for fun. I’d write everything directly in the browser, sometimes maybe everything in one big index.html file. No build tools. No frameworks. No libraries. Just plain HTML. Some CSS. And native JavaScript. The code quality was terrible. Global variables are everywhere. Different functions would change the shared state in a way making it very hard to trace what was going on. Bad variable names are all over the place. Not following a consistent writing style, etc. I wasn’t aware of the “best practices” I am aware of now. YET, despite my incompetency in the subject, I was able to build things that genuinely interested me using only the limited native JavaScript tools I had. And the good part was that I was able to understand what was going on!
I’m not entirely sure, but I have a sense that it’s become harder to develop an understanding of the tools we commonly use. If that’s true, it’s especially weird given how available educational resources are today. JavaScript itself also hasn’t become more complex in recent years. I think what changed might be that people have been led to believe (largely through marketing) that they can’t build anything without powerful and complex tools.
While I believe most of these frameworks and libraries exist not just because of marketing but also because they genuinely serve a purpose, I think they’re often oversold. It’s worth remembering that simpler approaches can sometimes be just as effective, especially, when the requirements of your app are also dead simple.
Again, I don’t want to try to convince anyone to not use frameworks or stuff like that, I use popular frameworks 2 in many projects. I don’t think using frameworks is a matter of do or don’t but more like “Does the value provided by this tool justify the costs?”
In the end, I want this essay to function as a kind of reminder of you can also build stuff in native js, especially if it’s already something simple.
What Makes Vanilla JS Appealing
I use React for most of the paid projects I work on. I’m not a fan of it as I believe it introduces a lot of accidental complexities 3, yet, I find it provides enough value for me to use it on real projects.
I like building hobby projects occasionally, but, I don’t like the idea of having to use a package manager just to install certain tools to transpile my source code from one format to another. Sure, it’s not a mountain to climb, but it feels unnecessary when you can just write a code, and run it on the browser directly.
This is why for personal projects with simple requirements, I just like to use vanilla JavaScript. No build tools, no package managers, no transpilers. No frameworks to deal with its weirdities. It is just your code. Serving is dead simple. Iteration speed is good. Anyone who has a decent understanding of JS can also read and understand your code, whereas, I suspect it’s harder to understand a framework that you did not learn before. When your source is what you serve, this also simplifies continuous deployment a lot.
I believe you can admit that there is a HUGE difference in terms of simplicity between serving the source directly and adding an extra few steps to it.
Structuring Vanilla JS Projects
Vanilla JavaScript doesn’t enforce any particular style or architectural decisions on your code. You’re free to organize things however you like. But, I think it’s still better to stick to some consistent preferences rather than make ad hoc decisions each time. That way, you spend less time later trying to figure out things like “What was I trying to do here?” when revisiting your own code.
For those who’ve never heard of Elm and its MVU architecture, you can think of it as a design pattern where the application is divided into three parts: a Model (your app’s state), a View (a function that renders the UI from the model), and an Update function (which modifies the model based on events).
To imitate this architecture in vanilla JavaScript, I typically implement:
Model by defining the application’s state as a plain JavaScript object.
View by creating a function that takes the current model and returns a DOM tree or HTML string.
Update by writing functions that handle user input by updating the model and triggering a re-render.
Here is an example “Counter” program that uses this architecture:
There are a few things I like about this architecture: it’s straightforward, and also, easy to trace. You have your model, a view function that returns the UI based on that model, and update functions that handle events. That’s it. You also don’t need to learn any complex tools or libraries to get understand what’s going on.
I’ve already built quite a few small recreational projects 4 using this approach, and it worked well.
Some Problems
Despite its simplicity, I think this approach has some important problems:
Re-rendering the entire view on every update is very inefficient.
Global functions like increment() and decrement() on window via inline onclick handlers (onclick="increment()") is not idiomatic in modern JS.
Now, to address the inefficient re-rendering problem, we could re-implement our render function so that it can also render only specific parts of the DOM. For example, it might take a selector and a component function, and update just that part of the UI.
However, I think this would just be a bad practice as now you’d not only need to call render from inside your event listeners but also figure out exactly which component needs to be re-rendered. This kindof creates a coupling between your event handling and rendering logic.
And for the issue of global listener functions, we basically have no alternative but to abandon defining event handlers in the HTML and instead attach listeners to the required DOM elements on each re-render. Which, also is not a really good practice for the same inefficiency reasons I just explained above.
We could address this by switching from returning innerHTML strings to constructing and returning real DOM elements using document.createElement. That would let us attach event listeners more idiomatically and avoid global functions altogether. However, I believe that doing so would decrease the overall development experience (DX).
For example, if we avoided using the innerHTML approach and instead just used native DOM manipulation, the source code of the simple counter application we designed above would look like this:
We got rid of the global functions but now the number of lines of code increased by about 1.5 times! It’s also harder to read. And, less fun to write.
I think it would be nice to have an alternative approach where the code we write is compact just like the innerHTML approach but also can self-contain certain logic such as which event handlers to use, etc. Well, the good thing is that the hyperscript function already does this, and its implementation is only around 150 lines of code!
Meet HyperScript for Creating DOM Elements
So, the hyperscript function, h, is a very simple function that is used for creating and returning a DOM Element. It takes a tag name, an optional properties object, and any number of children as its inputs. This way, we can get rid of lots of boilerplate from our code.
This is similar to our initial approach of returning string literals. They are both declarative. That is to say, the function’s inputs by themselves are enough to describe the DOM tree you want. Another good thing with this approach is that it allows us to write more idiomatic code compared to creating component functions that return string literals: We’re working directly with JavaScript values and structures. We’re not building strings, so we avoid things like manual string concatenation. We can define event listener functions inline when creating elements, instead of relying on global functions. And so on…
Do you remember the Counter app we wrote earlier? Now, with the h function, we can just write it as:
This solution is just as compact and declarative as our initial string literal approach. It also has the benefits of the native DOM API, since it’s just a utility wrapper around it. It kind of offers the best worlds of two approaches.
Improving Performance with Snabbdom
Well, we have solved many problems by introducing the h function but we still have the inefficient rendering problem: The render function still creates a whole new DOM tree and re-renders everything from scratch each time it is called.
One good thing about hyperscript is its clean interface 5. Because of this, many popular frameworks (like React, Vue, Mithril, and Snabbdom) implement a function that follows the same pattern. Some call it h, some m, some React.createElement6, but the input and output are the same.
Thanks to this, we can simply use a library like Snabbdom, which provides its own h function with the same interface but returns virtual nodes instead of DOM Elements and exports a patch function for efficient rendering.
Just import the h function from Snabbdom instead of the original hyperscript library, and update the render function as follows;
The patch function uses a diffing algorithm to determine which parts of the UI have changed and updates only those in the real DOM.
Voila! That’s it! We have also solved the inefficient rendering problem.
Example Template for Starting Out
If you’d like to try this approach yourself, I’ve created a minimal template repository: snabbdom-starter. You can either clone the repo and build on top of it or simply use the “Use this template” option on GitHub to start your project.
This approach is a relatively recent addition to my workflow. It is the result of experimenting with the approaches described above, running into their limitations, and looking for small ways to improve them. I’m sure there are still many things to be improved, but even in its current state, I believe it can prove useful for those who value minimal workflows with as few moving parts as possible.
As a real-world example, I recently built HN Domain Stats using this approach. You can also check out its source code to see how it all comes together.
These include, Vanilla JS, JQuery, React, Next.js, Vue3, Nuxt.js, and even those other solutions that are written in other languages (like using Reagent and Clojurescript) but in the end transpile into Javascript. CSS Modules, Tailwind. Static site generators such as Hugo. ↩︎
I think functional React components and hooks are good examples of these accidental complexities. Certain hook rules can feel really unintuitive and arbitrary to those who are new to React. For example, why can’t we just conditionally use hooks? ↩︎
If you’ve used React before, whether you wrote it directly or had a transpiler convert your JSX into it, you’ve already used a hyperscript function via React.createElement. ↩︎
I like hanging out on Hacker News, reading essays. I also enjoy submitting essays I like that haven’t already been shared there. This way, the author gets recognition and others get to read something they might enjoy too. Plus, more karma never hurts. 😀
For that, I’ve been using an extension called What HN Says. The extension basically lets you see whether an HN discussion already exists for the page you’re viewing. If it does, it lists them and lets you open them in a new tab; If not, it makes submitting the link easy by opening the HN submission page with the title and URL prefilled. Despite being a simple app, I’ve been using it for a while and enjoying it.
Recently, I thought the same Algolia API that this extension uses could also be used for constructing additional analytics related to a specific domains. These analytics could be anything like: The total number of upvotes and comments the domain has received so far, how much time has passed since its first submission, how many unique users have submitted links from it, a graph of submission, upvote, and comment counts over time, and so on.
I’d certainly be interested in seeing HN analytics for my own site from time to time. I looked out whether such an app already exists or not, but after not finding one, I thought why not develop one?
So, here, I introduce HN Domain Stats. It is a very simple application that analyzes and visualizes how domains perform on Hacker News over time.
Here’s what the app looks like after analyzing a domain (in this case, rugu.dev):
If there are any features you’d like to see, feel free to reach me out through issues or e-mail.
Also, I would appreciate any feedback if you’re willing to share one.
I frequently come across people thinking, ‘Why bother learning something if AI will do it better than me in the future?’ Alongside this thought, I also noticed a rise in pessimism.
I believe this pessimism originates from three misconceptions: (1) overlooking the difference between instrumental and intrinsic value, (2) underestimating our ability to adapt to change, and (3) losing sight of what essentially matters.
Focus More on Intrinsic Value
Some things need to be done by specifically you. Not because they can’t be done by other beings, but because they are good for you when you do it yourself.
You don’t exercise to lift things machines can already lift, you exercise to improve your health and life satisfaction. The same thing applies to fundamental activities like thinking and learning. The moment you start outsourcing what matters to you to AI just because it can do it on your behalf, remember that you may be sacrificing, instead of gaining.
In the end, I believe the things AI devalues the first are those that derive their worth from being tools, that is to say, things that shouldn’t end in themselves anyway.
For the things that should be ends in themselves, AI doesn’t change how you should approach them. You still need to exercise and take care of your diet for health, do your meditation, engage with philosophy for a meaningful life, and strive to understand important things especially the fundamentals of the domains on which you are operating.
AI might reduce the value of learning in some instrumental areas, but it mostly won’t diminish the value of understanding itself. Given that the thing that you are trying to understand is meaningful.
You Can Adapt
Yes, as AI advances. Some skills lose their value over time. But that doesn’t mean learning them is pointless.
Some skills are valuable for a specific period, but it can still make sense to invest time in them. Think about foremen, they often learn the specific details of machines that may become outdated in the future, yet their value in some countries is higher than ever.
Also, humans are adaptable creatures. If the skills you’re learning now lose value and new ones become important, you can start learning those as well. Nothing is preventing you from adapting. Also, these changes don’t happen overnight. They occur gradually. So, people often overlook that they can adapt and adjust their direction over time.
Don’t Lose Sight of What Matters
If we ever reach a point where learning and understanding become meaningless, we’ll likely face much bigger existential problems than unemployment.
Understanding the world, adapting to it, and striving to improve ourselves have been the best things we could do since the first days of humanity. Honestly, there’s still nothing better we can do now.
So, instead of thinking, ‘AI will take our jobs, so why bother?’ focus on improving yourself. Not because AI can’t surpass you, but because there’s simply no better path than continuous self-improvement, no matter what the future holds. If there’s any meaning to life, I believe it’s deeply connected to this pursuit of growth and understanding.
We cannot live better than in seeking to become better.
-Socrates
Focus on the method that proved itself so far. Which is working hard and focusing on creating value.
Conclusion
The value of self-improvement and meaningful work goes beyond utility. It is tied to our sense of purpose and fulfillment.
Focus on what you can control: Your curiosity, adaptability, and drive to create value.
For me, whether AI can be beneficial or not is out of the question, and I am not here to discuss that in much detail. I already heavily use tools like aider (a terminal-based alternative to Cursor), autocompletion assistants such as copilot, and conversational LLMs like claude, chatgpt, and deepseek all the time. So, I truly believe there’s immense value these tools can provide, and I’m not here to discourage anyone from using them. They’ve already proven their worth to me in many ways.
However, the thing is, no matter how much AI increases our productivity, at the end of the day, that productivity increase is a multiplier of our existing productivity. The key determining factor remains how well we have mastered the basics and our productivity level without AI, not with it. This is also partly why I believe that existing AI tools are much more useful for people who are already experienced in a field than for newcomers.
The Illusion of Improvement
When someone first starts using AI and experiences a productivity boost, they might find themselves completing more tasks in less time than before. This can create the illusion that they have improved. But in reality, the multiplier effect on their base productivity can also lead to a decline in their capabilities. Yes, you can achieve more results in the same amount of time, but this also means you can achieve the same results with less effort. Less effort means less time spent on self-improvement. And humans have a natural tendency to spend as little energy as possible.
A fitting analogy would be the invention of cars. The invention of cars allowed us to travel greater distances. But since we could travel greater distances with less effort, they also have led to muscle atrophy for many, as they no longer needed to rely on their leg muscles. I strongly suspect that over-dependence on AI could lead to similar consequences.
The fact that some new graduates struggle to write code without LLM support is a clear example of this phenomenon. How these tools impact our learning is a very important topic to further discuss. If the short-term productivity gains is harming the learning process, I would rather not use AI at all and rely on my own skills than relying on AI, which is yet another external dependency.
Hopefully, it should still be possible to benefit from the good sides of AI while keeping the side effects in control. Just as using cars does not prevent us from still working out our legs.
Make sure you’re not relying on AI so much that you’re not just outsourcing tasks but also the process of learning. Occasionally write code without using AI tools to keep your skills sharp. Be cautious about the suggestions AI tools give you. I’ve found AI more helpful for tasks I already understand well but don’t want to do myself. However, when I use it in areas I’m not familiar with, the code often becomes messy. The quality of the answers you get depends on the quality of your prompts, which depends on how well you know the topic. So, always give more priority to actually learning the concepts that you are working on top off.
Again, the main idea to take away here is that AI mostly acts as a multiplier on your existing productivity and that you have to prioritize your base productivity levels rather than your AI-enhanced productivity levels.
I can’t remember when I truly realized the power of writing. But as far as I remember, I’ve been trying to use writing as a tool for putting order to the chaos in my mind since high school.
Currently, I have a diary with about 325 pages (assuming each page consists of 500 words). And there’s probably at least an equal amount other writings I wrote for different purposes but deleted in the end. The first entry dates back to 2017, meaning I’ve been writing regularly for around 8 years. That’s a lot of time, but I don’t regret a single moment. Because I know for sure that the positive impact writing has had on my mind far outweighs the effort.
Whenever I face a problem that requires tough decision-making, I typically open a new entry in my diary and start typing whatever comes to mind. After flushing out whatever is in my mind at that moment, I then start organizing it. Sometimes, this process results in definitive answers to my questions, and sometimes, not. Either way, I still have a clear outline of the choices available and a better understanding of their potential benefits and costs.
I also write to my diary whenever I feel strong emotions, or emotions that I am not sure what they are about. Sometimes, I just try to write the things that happened, how I feel and so on, and even while doing so I can understand myself better just realizing certain patterns that appear in my thoughts & feelings over time. This may not have been possible if I had not documented them in the first place.
Writing things down is like moving thoughts from your temporary memory to a persistent one. :)
I started to experience frustrating back pain in 2024, mostly due to being sedentary for around a year or so with very bad spine hygiene. At some point, the pain was so bad that even sitting for around 30 minutes or so without pain was kind of a challenge. The moments after I would wake up, the experience of pain would start to build up as long as I didn’t stay lying down.
One of the recommendations in the book Back Mechanic was to keep a journal specifically for back pain. It suggested tracking things like how long it took for the pain to start, what activities made the pain worse or better, and so on. I started this practice during that time. I wrote almost daily, analyzing the patterns of my pain. Over time, I started noticing patterns I wouldn’t have recognized or would have likely forgotten without documenting them. This habit became one of the key practices that helped me improve my back.
So, writing in the form of journaling is already great for:
Flushing the things on your mind to a more persistent place
Documenting small but cumulative changes that might otherwise go unnoticed
Solidifying your ideas and emotions as you structure them into a clear and coherent form
But the thing is, you don’t have to stop here. As writing becomes a habit and a natural part of your life, you’ll also likely end up writing things that might be of interest or helpful to other people as well. This could include notes you take for yourself, reflections on how to get a certain task done, your experiences, and so on…
With some rephrasing, structuring, and refinement, the things you write for yourself can also become valuable to others. This way, you can also further benefit from other people’s perspectives, feedback, and recognition. You can test your ideas in the real world. You can experience the satisfaction of helping other people through your writing and more.
You’ll also likely get better at writing and delivering content more quickly. This will prove itself to be helpful especially when communicating and discussing ideas with others.
So, I urge you to just start to write, and see how it affects your life in general.
I recently wrote a short essay called Linux Asceticism, and it got a lot of attention on platforms like Hacker News and Reddit. I also received an email from Brodie Robertson, telling me that he would soon release a video on his main channel about my essay. He also invited me to be a guest on his Tech Over Tea podcast series.
It really surprised me to see a Linux content creator that I was already following not only featuring my essay but also inviting me to his podcast to discuss it. Despite not trusting my English speaking abilities as much as my writing, I told him I’d love to be a guest. I shared my concerns about not being very fluent in English and wanting to prepare beforehand. We briefly talked about the podcast format, and the topics we could cover, and set a date for the recording.
You can watch/listen to the Podcast here:
We talked about how I came up with the Linux Asceticism essay, my Linux journey and workflow, “Software Minimalism,” and the idea of stupid light software. We also covered the difference between essential and accidental complexity, creating personal blogs, my experience with NixOS, and some of the other essays I’ve written.
Reflections
At first, the idea of joining a podcast channel in a language that I was not as confident as my native language felt a bit stressful. I also had never been a guest on any YouTube channel before, let alone a channel that has over 10k+ subscribers. So, that also did not help much. But, I figured out that preparing could help me ease my stress. So, I prepared a lot before the day that the recording of the podcast took place. I started thinking, writing through possible topics we might discuss. I also asked one of my friends Aras to interview me like he is Brodie, which also helped me relieve my stress a bit more.
While preparing for the podcast, I ended up with a file of around 9 pages if you consider each page to have around 500 words.
> cat brodie-prep.md | wc -w
4614
In the end, I did not talk about most of the things I prepared for, but it still helped me a lot to feel ready.
I also realized that giving a disclaimer about my English skills upfront would help ease the pressure by lowering the audience’s expectations. So, I went ahead and did that too.
In the end, the actual podcast experience was much smoother and less stressful than I had expected. Despite frequent misspellings and struggles expressing myself, I believe the podcast turned out to be better than my initial expectations. I think this is also partly thanks to Brodie being an experienced host who knows how to make the guests comfortable by keeping the setting relaxed as well.
But again, all these experiences reminded me of one of the famous Stoic quotes;
We suffer more often in imagination than in reality.
- Seneca
I think it was a great experience overall. And I also plan to turn some of the notes I’ve taken in the preparation document into separate essays as well.
I’ve been using NixOS for about six months and am generally satisfied with my experience. However, in this essay, I won’t talk about how great NixOS is, but rather about one common issue that many users, including myself, have faced or will face in the future.
In NixOS, most pre-compiled programs will not work out of the box. In this essay, I’ll share my experiences on this issue and explain why it happens, along with some approaches I’ve found very helpful to overcome it. Hopefully, this will help others avoid some of the frustrations I’ve encountered.
The Problem
Let’s say that you’re working on a project. Maybe using Node. You decide to try out a library. You write some code. And then, once you try to run your script, you get the following error:
Error: Failed to launch the browser process!
/home/rugu/.cache/puppeteer/chrome/linux-131.0.6778.108/chrome-linux64/chrome: error while loading shared libraries: libdbus-1.so.3: cannot open shared object.
Being a smart person, you suspect this might be related to NixOS. You begin researching the issue, only to find people suggesting case-specific solutions such as [1] and [2]. Sure, in this case, using the Chromium installed on your system instead of the built-in version that comes with Puppeteer, and specifying the executablePath property to its path in your Node code when initializing Puppeteer can save the day.
But as a smart person, you also understand that this is a case-specific solution and wonder what you would do if the library that you use did not allow such flexibility.
The problem is that, while case-specific solutions like the one mentioned above may work, you can still encounter the same issue whenever you try to run a precompiled program that expects certain files and libraries to be located in specific paths on your filesystem.
So, as I said in the beginning of the essay, in NixOS, most pre-compiled programs will not work out of the box. And now we need to understand why this happens so that we can also understand the solutions better.
Why it happens?
Most UNIX-like systems follow the Filesystem Hierarchy Standard (FHS), which defines where programs can find resources or place files. For example, system-wide configuration files are typically in /etc, executables in /bin or /usr/bin, and shared libraries in /lib or /usr/lib, and so on…
The problem with this approach, and part of why some people prefer systems like NixOS, is that it tends to be messy: The files are scattered across the system, there is no single source of truth, the structure relies on conventions rather than strict enforcement, you can have problems such as version conflicts across different programs that rely on different versions of the same programs, and so on.
The approach that the Nix tools take to resolve these issues is to store every package under a folder called /nix/store, in a way that each package has its isolated file structures instead of relying on shared directories. We can say that this directory is a Merkle tree: package paths are derived from hashes of their contents, dependencies, and inputs. And, if any of these things change, the path for the package also changes.
Now, even when using tools built around /nix/store (such as the Nix package manager, nix-build, nix-shell, or home-manager), you can still modify most system files imperatively and apply “dirty” solutions in certain parts of your system. However, once you switch to NixOS, the /nix/store management approach extends to the entire system, including system files, universally shared resources, shared libraries, and so on.
This is why precompiled programs designed for conventional UNIX systems usually don’t work in NixOS. These programs expect specific libraries to be located in certain paths, but NixOS manages system dependencies and files in a self-contained manner within /nix/store. As a result, most of these programs can’t find what they need unless they are packaged with Nix, run in an environment that mimics FHS or are guided by NixOS itself.
Dynamic Linking
When you run a precompiled program that depends on shared libraries (those not statically built into the program but loaded at runtime), the dynamic linker (ld.so on Linux) is invoked to load the necessary libraries.
The linker checks a set of directories, like /lib, /usr/lib, and others specified in environment variables such as LD_LIBRARY_PATH, to find the required libraries. It also performs caching to help speed up the loading of dynamic libraries.
In the case of puppeteer or similar programs, the program is precompiled and expects certain dynamic libraries. However, the linker cannot find these libraries.
Workarounds
The solutions I’ve come across so far to work around this problem are:
(1) Look for whether the program you are trying to run is already available in nixpkgs
(2) Package the program you want to run as a Nix derivation with the necessary dependencies.
(3) Use the Nix derivation function buildFHSEnv
(4) Use the nix-ld options in NixOS.
Among these options, (1) is typically the best solution. If the program you’re trying to run is already packaged in nixpkgs (which is often the case), it saves you a lot of time.
Unfortunately, though, there will be times when you can’t find what you need in nixpkgs. In that case, (2) building your own Nix derivation is also an option. It’s helpful to the community, and it’s also the most modular approach as a package in the nixpkgs repository can still work on a traditional UNIX system without a home-manager or NixOS. The downside is that this approach will likely take more time than the other options.
If you are short on time, or not that much of an altruistic person, you can consider using (3) or (4).
The buildFHSEnv function allows you to create an environment that mimics the traditional UNIX filesystem hierarchy (FHS), you can then use this environment, in a nix-shell for example. This enables you to place your program and its dependencies in expected locations like /usr/bin or /lib without fully packaging it.
On the other hand, nix-ld (option 4) is a NixOS-specific solution that helps with dynamic linking. It ensures the program can find the libraries in /nix/store without needing to rebuild or repackage everything.
If you’re in a non-NixOS environment and don’t want to mess with your shared libraries, buildFHSEnv might be the way to go. But if you’re already using NixOS, I think nix-ld just makes more sense. It resolves the issue at the same layer where it originated, NixOS itself. You can specify the libraries that you want to be available on your whole system in your configuration.nix file, and can also use NIX_LD*environment variables, for example maybe with shell.nix to make certain libraries available in the ephemeral shell that you intend to work in without affecting your global system.
Whichever option you choose, except for the first one, you’ll still need to figure out which Nix packages to install to make the necessary libraries available to the program.
Finding which packages to install
To find the necessary Nixpkgs packages for dynamic libraries, you can use tools like ldd, nix-index, and nix-locate.
Run ldd on the executable to list the shared libraries it needs. Then, you can use nix-locate to find the corresponding Nixpkgs packages. But, to use nix-locate, you first need to run nix-index or use a pre-generated nix-index database (like I did, since nix-index consumed a lot of memory on my system for some reason).
Now, the issue with nix-locate is that it can return a lot of results. Not just those that provide it, but also the ones that depend on it. For example:
We would not want most of these packages. So, to resolve this issue, I’ve experimented with nix-locate a bit and found the following specific flags to narrow down the results to what we essentially want:
Great, this means that for “libdbus-1.so.3”, we can just install dbus package from Nixpkgs!
To automate the process of finding dynamic libraries using ldd and then using nix-locate to identify which Nixpkgs provides them, I created a small script. It lists the dynamic libraries and which nixpkgs provide them, all at once. To use it, you can simply run it as follows:
nixldd $PROGRAM_PATH
Example (I didn’t include the full output because it’s too long):
Now, we know which Nix packages to install to provide the required dynamic libraries.
I also considered creating a tool that returns the optimal combination of packages to install, but could not find time to work on it yet. Maybe I can try to do that in the future.
Conclusion
So, these were some of the insights and tricks I’ve learned over time about making precompiled programs work in NixOS while using it in my development environment. I hope they help you as well.
Most well-known living philosophies -such as Cynicism, Epicureanism, Stoicism, Buddhism, and Sufism- advocate some form of Asceticism. This could involve various acts such as fasting, deliberately confronting personal fears, or even something as subtle as choosing not to pour salt on food. But regardless of the specific way that these practices are pursued, the main goal remains the same: Strengthening your body and mind to make yourself indifferent to and indifferent from the things that are outside your control. That is to say, turn yourself into someone who can handle hardships with as few possessions as possible.
When people argue for using Linux, they often focus on either political or practical reasons. For instance, they may choose Linux because it supports the principles of software freedom and personal control. They may also choose it for reasons such as cost savings, customizability, flexibility to meet specific needs, performance, tool availability, and so on.
However, there’s another often-overlooked aspect that can make using a minimal Linux distribution worthwhile: using a minimal Linux distro on your personal computer is a form of Askesis -disciplined practices done for self-improvement. At first, it will probably feel uncomfortable and overwhelming. You’ll face many problems that you’ll need to solve. But you’ll also come to realize and understand better that many of the features you take for granted in an OS with a preconfigured desktop environment are actually separate components that need to exist on your system for you to have that functionality.
There will be times that you might need to understand what a network interface is, what a block device is, what mounting is, how keyboard mappings are handled differently on the virtual console or in a desktop environment/window manager, and so on. It will force you to learn more and more and you’ll also begin to appreciate the underlying elements that are often hidden away by the layers we rely on. This effect will be amplified especially if you like to tinker and try to make things happen as you want them to be.
In the end, you’ll gain a deeper understanding of what happens under the hood. Your comfort zone will broaden as you develop the mindset of solving problems. I know that this kind of reasoning is not as forceful as the pragmatic or ideological reasons for some people, but it still is a good bonus that further motivated me to learn more and more about Linux.
For the last few years, I’ve been mainly using Arch Linux as my choice of personal OS, and for the past few months, I’ve been using NixOS. Although I have not used/tried MacOS yet, I guess that if I tried it, most of the skills I acquired through using Linux would carry over to it and I would not have much problems getting adapted to it. However, I’m not so sure about the other way around, especially for those who switch from Windows to Linux.
If you’re going to fight in the rain, train in the storm.
- Unknown
I think it’s good to have tools in our toolbox that let us work minimally, but I also think it does not make much sense to use them all the time if there are already other tools available to achieve things in an easier and faster way. So I am not against using non-minimal software by any means. They are fine as long as they don’t introduce more problems than they solve.
When you interact with a text file using an editor, what you see doesn’t necessarily reflect the data stored in the file. Sure, the contents of plain text files are byte codes encoded in formats like ASCII, UTF8, or UTF16, and these byte codes are the ultimate source of truth. But in the end, it’s still your text editor that chooses how to interpret and represent that ultimate source of truth - binary codes into something recognizable to you. This means that two different files could look the same, or the same file might appear differently depending on the editor(s) you use.
Your text editor might highlight (or not) certain parts based on syntax it recognizes, it can control how tabs appear (2 spaces, 4 spaces, or even 8). It decides how to encode the tab key input, whether as \t or as a set number of spaces. The same applies when you press the enter key to create a new line. Whether it gets encoded as \n (UNIX) or \r\n (Windows) depends on the editor’s configuration.
Your text editor hides details so you don’t have to overthink. However, there are many times when these details leak through the protection layer that your text editor tries to provide. And you often don’t notice these complexities until you face them.
So, the main goal of this essay is to share some of my experiences and what I’ve learned over time about common problems you might encounter with plain text.
Tabs vs Spaces
Historically speaking, spaces existed long before tabs. The reason why tabs were initially developed was to reduce the repetitive use of both the space bar and backspace key.
However, people still debate using tabs or spaces in their projects. This isn’t about whether we should use the tab key itself, but rather whether text editors should insert spaces or tabs when we press it, that is to say how to encode the blank spaces we see in our editor when we press tab key.
I guess the main advantage of tabs over spaces is the flexibility it provides. When using tabs, you can collaborate with many different people who prefer to see different levels of indentation, without having to expose their preferences over others. (Sure, there is also the fact that tab character takes less space, but I don’t think this makes much of a difference, especially considering that we are in 2024.)
One problem with tabs, though, is precise editing. Since tabs represent multiple spaces at once, aligning lines may not work as one expects from time to time.
Like, what you perfectly see as OK in one editor where tabs are configured to take 4 columns, can be disgusting in another editor where tabs are configured to take 2 columns:
Editor 1 with tabs configured to take 4 spaces:
// 4 tabs, + 3 spaces
function calculate(a, b,
 c, d) {
 // Some logic
}
Editor 2 with tabs configured to take 2 spaces:
// 4 tabs, + 3 spaces
function calculate(a, b,
 c, d) {
 // Some logic
}
This is also partly the reason why I use spaces most of the time. If you still end up adjusting the tab width to match others’ preferences, what’s the purpose of using tabs in the first place?
I don’t know whether this is just due to first-mover advantage or not but it also looks like more projects use spaces over tabs. So what’s the point of going against the tide where there does not seem to be a very powerful advantage anyway?
With all that said, I still believe that in many cases this conversation is somewhat overkill and often doesn’t make a significant practical difference. In the end, what truly matters is whether the codebase is consistent (either using tabs or spaces throughout). Aside from that, it shouldn’t matter much since these settings can be easily configured in many environments anyway.
Soft Wrapping vs Hard Wrapping
When using plain text, there will come a point when the text you write becomes too long. In many text editors (Notepad, Notepad++, Neovim, or even VSCode), the default behavior is for the text to continue growing horizontally until you press Enter to create a new line break. This can be somewhat unuser-friendly compared to most email or messaging clients, where the text automatically wraps, making it much easier to read.
To be more clear, let me show you what non-wrapped and wrapped texts look like.
The text that is not wrapped:
Lorem ipsum dolor sit amet, consectetur adipiscing elit. Praesent fermentum
felis nec elit bibendum, sit amet tempus sapien volutpat. Sed eu congue massa,
non condimentum diam. Aenean vel consectetur odio. Suspendisse nec diam ac nisl
bibendum tempor. Ut rutrum maximus velit, commodo consectetur nulla auctor ac.
Curabitur neque dui, scelerisque in facilisis at, sagittis quis massa. Ut non
tempor arcu. Vivamus elit massa, pulvinar vitae tellus ut, lobortis sagittis
elit. Aenean vehicula varius eros, vitae pellentesque lorem consequat non.
Aenean gravida velit id pellentesque tempor. Aenean ut purus nulla. Curabitur
fringilla felis consequat ante condimentum porta. Curabitur id ex in libero
rhoncus lobortis sit amet ac ligula.
The text that is wrapped:
Lorem ipsum dolor sit amet, consectetur adipiscing elit. Praesent fermentum
felis nec elit bibendum, sit amet tempus sapien volutpat. Sed eu congue massa,
non condimentum diam. Aenean vel consectetur odio. Suspendisse nec diam ac nisl
bibendum tempor. Ut rutrum maximus velit, commodo consectetur nulla auctor ac.
Curabitur neque dui, scelerisque in facilisis at, sagittis quis massa. Ut non
tempor arcu. Vivamus elit massa, pulvinar vitae tellus ut, lobortis sagittis
elit. Aenean vehicula varius eros, vitae pellentesque lorem consequat non.
Aenean gravida velit id pellentesque tempor. Aenean ut purus nulla. Curabitur
fringilla felis consequat ante condimentum porta. Curabitur id ex in libero
rhoncus lobortis sit amet ac ligula.
As you can see, the wrapped text is a lot easier to read compared to the unwrapped one. This is why many people follow the practice of inserting newlines after a certain number of characters is reached (often around 78). In fact, in the text editor I use, Neovim, it is as simple as just pressing gq for this line-wrapping procedure to happen for the current line you are in.
This procedure of putting actual newlines between text so that it looks wrapped is known as hard-wrapping. This was what I did for a while as well, but since you are wrapping a line into multiple lines just because you can read it more easily in the text editor, you now have the following problems:
It’s frustrating to constantly hard-wrap the text manually, even if you have a shortcut.
If you copy the wrapped text this way and paste it into another application, like your favorite messaging app, it will likely look unpleasant, especially on smaller devices like smartphones. This happens because when the screen size is reduced, the messaging app will make sure each line is wrapped again if they don’t fit the vertical window size. I recommend reading The problems with hard wrapping email body text to understand this phenomenon a bit better.
Once you start adding actual newlines into your text just to make it more readable, you are sacrificing greppability. You can think of the term “greppability” as a way to describe how well the text is suited for efficient searching through tools like grep. In the case of hard-wrapped text, if you search a sentence that is split across multiple lines, the search/find tools like grep might just fail since they usually operate on a line-by-line basis.
This idea of greppability is so important and time-saving especially when working on a code-base. For example, in general, it is not very optimal to split your error message or log messages into multiple lines as you lose greppability. See Greppability is an underrated code metric, if you are further interested.
So, what’s the solution? Stop hard-wrapping and just use soft-wrapping, many modern text editors already provide soft-wrapping solutions. This is what I have started to do recently. I am sure there are ways to achieve it in many modern editors. In Neovim it is as simple as to use the following commands:
:set linebreak
:set wrap
:set columns=80
Newline
Let’s say that you are collaborating with other people through Git, and you just changed one line of code in a file and then pushed it to a branch. And suddenly, your colleagues started complaining about how your commit diff looks like you’ve changed the entire file.
In this case, if you are not sure what’s going on, you might find yourself spending some time just to realize that it is your text editor that automatically converts all the line break characters to its format.
I had a few friends who used VSCode as their main text editor and experienced the same issue. They were very confused the first time they encountered this kind of issue. Luckily, I was there to help them understand what was going on. :)
I’m going to take a step back in time, but please bear with me for a bit.
A long time ago, before monitors were common, people interacted with computers using these cool devices known as teleprinters. These were devices that combined a keyboard for input and a printer for output. You would type stuff, and when you send your command to the computer, you would get the results just like this:
Now, in the context of a teleprinter, what “newline” meant was something like first physically moving the typewriter’s carriage back to the beginning of the line (CR: Carriage Return) and then moving the paper up by one line (LF: Line Feed)
For these early machines designed to work with teletypes, both CR and LF were required to begin typing on a new line. And this influenced the early days of both Unix (1971) and MS-DOS (1981) as well. Back then, teletypes were still in use, so it kind of had to influence both operating systems in various ways. It turns out that, Unix developers chose to simplify the process of creating new lines by treating the LF character alone to signify the end of a line, while MS-DOS retained the full CR + LF combination. I guess the Microsoft guys were more concerned about legacy and hardware compatibility.
And all these conventions continue to exist even today. Files created in Windows use \r\n for newlines and those generated in UNIX-like systems (Linux/MacOS/BSD) use \n. However, many modern text editors are capable of reading and parsing both formats across both operating systems anyway so we don’t even notice these small differences. Unless we mess up our git diffs :D
To avoid these situations, you can configure your text editor correctly, use a linter, and create a .git/config file with autocrlf set to your need.
Conclude
Even plain text might not always be as straightforward as it appears. Understanding what’s happening behind the scenes can be helpful, especially for those who work with it frequently.
Also, if you have additional things to say about plain text, feel free to share them with me. I would really like to hear them.
When we encounter new information that conflicts with our current beliefs, we
typically follow one of the preceding options:
Ignore the new information.
Place it into your existing belief system, regardless of whether it is
consistent with your other beliefs.
Create an ad hoc explanation to keep our beliefs intact.
Adjust or revise our existing beliefs.
Since the last option is typically the most demanding, and humans are
programmed through evolution to conserve energy, people usually choose the
first two options unless the information is crucial to their survival.
Many of the fallacies or biases we have developed were ingrained because they
were effective in environments where being quick and efficient was more
important than being accurate, as conserving energy was one of the greatest
challenges.
The issue is that most of us no longer live in environments where we can’t
afford to think things through. Our world has become so abstract and reliant on
complex systems with many layers, that we may be living in a time where
thoughtful analysis of how we choose to do things is more crucial than ever
.
I can’t help but think about how much we could improve quality of our living if
we honestly tried to be consistent in our beliefs and approaches by applying
points 3 and 4 a bit more.
Don’t delegate thinking to others!
The unexamined life is not worth living.
- Socrates
Consider the example of someone who has just started investing but lacks
knowledge in the field and doesn’t have a clear strategy. What often happens is
that they tend to look for people who seem to be experts in the domain. For
example, this person might try to copy Warren Buffett by imitating his
portfolio. How do you think this person will react if something unexpected
happens with their portfolio? Do you think they will act like Warren Buffett
when things go wrong, or do you think they will be more likely to panic and act
randomly? It’s often the last one.
Don’t get me wrong. I’m not saying that appealing to authority is always a bad
approach. What I’m trying to emphasize here is that whether or not you truly
believe in the system matters a lot when it comes to your consistency in
following it!
You cannot merely trust the experts as long as you understand and agree with
their way of doing things. Even experts most of the time disagree. So, if you
are blindly trying to apply what they told you without understanding the
rationale behind it, you will quickly find yourselves in a conflicted position.
So, even if you are appealing to authority, you still have to put an effort
into choosing the right authority, the one whose approach makes sense the
most.
As you think more about it, it becomes clear that it’s not just about “experts
telling you the most optimal solution for your case.” Instead, people often
seek certain types of experts without realizing it, and the supply of experts
adjusts to meet this demand. I suspect this is also why passive therapies
(where treatments are done to the patient rather than involving them in the
process and making them more aware of the situation) are more common than those
requiring patient effort. If many people are looking for an “easy solution,”
you’ll end up with experts who offer these “easy solutions.” But what happens
if that easy solution doesn’t actually solve the problem?
Anyway, what I’m trying to convey here is that you can’t simply delegate your
problems to experts. Because, even selecting the right expert requires some
thought, which affects the quality of the results you’ll get.
Consistency is (almost) the best thing you can achieve
We cannot live better than in seeking to become better.
- Socrates
When you think about it, we don’t seem to have much control over many things
that influence and feed us. Where we were born, the society we live in, the
content we accidentally encounter through some recommendation algorithm,
the influental high school teacher that we had, and so on… All these things,
in essence, can be considered as inputs that contribute to who we are. And the
thing is, we don’t seem to have much control over what these inputs will be.
This is likely one of the reasons why many intelligent people disagree on
fundamental issues. The inputs that feed us are indistinguishable from who we
turn out to become.
But wait… Does not this mean that our resulting set of beliefs is kind of
arbitrary? Yeah, most of our beliefs are indeed arbitrary, in the sense that if
we were exposed to different environments we could have different beliefs. But
is not this point why we should try to put our beliefs to the test, and try to
make our beliefs at least consistent?
First of all, we can reduce the amount of contradictory beliefs we have. If you
hold one of the possible coherent worldviews, there is a possibility that you
might be right, most likely some of your beliefs will overlap the reality while
others don’t. But, if you have contradictory beliefs at the same time, you are
certainly more wrong than the alternative set of beliefs you could have without
the contradictory beliefs.
The second point I want to emphasize is that, although consistency doesn’t
always mean truth, it often brings you closer to it. Also, keep in mind that
it is quite possible that seemingly very different philosophies can arrive at
the same conclusions in some of the most important subjects. For example, it’s
fascinating to see that most philosophies of life (such as Buddhism, Sufism,
Christianity, Stoicism, Epicureanism, and others) focus more on internal matters
within our control, rather than external ones. This is just one example I can
think of, but you get the idea.
Lastly, is there anything you can do better to be true than to trying
making your beliefs more coherent and inclusive? Don’t think so.
While I can try to give logical inferences and arguments why you should try to
be consistent, I think this never suffices to convince a radical skeptic who
even questions whether the world exists or not (what does this mean anyway?).
So I will stop philosophizing about why you should try to be consistent here and just
finish this section quoting Marcus Aurelius.
The happiness of your life depends upon the quality of your thoughts.
- Marcus Aurelius
Don’t be afraid of being opinionated
Over time, I’ve realized that when I base my approach to a field on a
philosophy or system, making progress and building on my current position
becomes much easier. I think this is because it’s easier to maintain a routine,
especially when you understand, enjoy, and agree with it.
If a man knows not to which port he sails, no wind is favorable.
- Seneca
I believe most people who take action don’t place enough importance on this
phenomenon, and as a result, their potential is limited to mediocrity at best.
The thing is, even though the opinions you get from your thinking process might
differ from those that are just as smart as you, you can still benefit from
having them.
I think following a diet plan is a good example of this. If your goal is simply
to lose weight, whether it’s a carnivore, Mediterranean, paleo, or intermittent
fasting diet, all of them are likely better than not having a plan and randomly
eating whatever is available. While one diet might be better than others in
certain ways, I believe most people would benefit from any of these diets. The
key factor is whether you can healthily stick to the diet while maintaining a
calorie deficit.
I believe this also applies to building exercise programs. Whether you’re doing
calisthenics, bodybuilding, powerlifting, swimming, running, or anything else,
you’re likely better off than those who don’t have a plan and aren’t taking
actions that are planned.
In most cases, it is just better to have a system that you find it reasonable
and build on top of it than having none.
In my view, many software developers lack a fundamental understanding of the
concepts they’re building on, leading them to face problems that could have
been avoided in the first place. I think those who contribute to accidental
complexity often lack a sense of craftsmanship and are more focused on just
getting the solution, regardless of how messy it is. This might be ok if they
don’t truly care about the quality and maintainability of the products they
deliver, but if they happen to care about these things, I guess that even a
person opinionated towards Object-Oriented Programming -which I don’t like it
much compared to Procedural or Functional Programming- might be superior
compared to copy-paste NPC developer out there.
So, despite I don’t like much I still respect developers who are committed to
OOP. At least they strive for consistency through a systematic approach to
software development.
Long story short, if you wan’t to improve, just don’t be so afraid to have
certain ideas and tastes even if it means sticking out.
Up until now, I was not aware that concurrency and parallelism were actually
different things since they are often used interchangeably by some. I just
learned that this is not the case while reading Chapter
9 of the book “Clojure for the
Brave and True.”
This made me want to learn more about concepts related to concurrency and
parallelism, especially concerning the programming language I know best:
JavaScript. So this essay is basically a collection of notes I made during this
learning process.
Sequential, Concurrent and Parallel
When executing tasks in our lives, we execute them sequentially, concurrently,
or parallel. And this applies to computing as well.
Sequential execution is basically when tasks are done one after another without
any overlap. For instance, if someone first looks at their phone, finishes
their job with it, and only after that switches to another task, for example, to
eat their soup, they are working sequentially. The problem with this approach
is sometimes your tasks are getting blocked, like for example when you ask a
thing to your friend from your phone, if you don’t switch to other tasks until
your friend answers, you will basically lose time. So different forms of
multitasking can be of help from time to time to save time. Concurrency and
parallelism are ways to achieve multitasking. But there are subtle, yet
important differences between the two.
Concurrency is like handling numerous tasks by alternating between subtasks
(aka interleaving), while parallelism is like performing multiple tasks
simultaneously. For example, if someone looks at their phone, puts it down
to take a spoonful of soup, and then returns to their phone after setting down
the spoon, they are working concurrently. In contrast, if a person is texting
with one hand while eating with the other at the same time, they are working in
parallel. In both cases, they are multitasking, but there is a subtle
difference in how they multitask.
In the analogy above, I referred to eating soup and using the phone as
different tasks and each task consists of subtasks (for example eating soup,
you need to hold the spoon, then put it into your soup, then put that into your
mouth, and so on…).
Likewise, in the context of programming, the subtasks can be thought of as
individual segments of a larger set of instructions in a process. The
conventional way to operate on different subtasks simultaniously is to create
different kernel threads. Which are, kind of like separate workers each
handling their specific tasks while being able to work on the same set of
instructions as well as resources.
Whether your threads run in parallel or concurrently actually depends on your
hardware. If your CPU has more cores than the number of threads running
simultaneously, each thread can be assigned to a different core, allowing them
to operate in parallel. However, if your CPU has fewer cores than the number of
threads, the operating system will start interleaving between the threads.
When it comes to kernel threads, the developer’s experience remains the same,
whether the tasks are actually handled concurrently or parallelly does not make
much of a difference. The developer uses threads to improve performance and
avoid blocking. However, it’s the operating system that makes the final
decision on how to handle these threads depending on the resources available.
As long as the developer uses threads, whether they run concurrently or in
parallel, it doesn’t matter; in both cases, the order in which instructions
from different threads are executed is kind of unpredictable. Therefore, the
developer should be cautious of potential issues (like race conditions,
deadlocks, livelocks, etc) that can occur from two different threads operating
on the same data anyway!
Spawning Processes, I/O Notifications
There are also other ways to achieve concurrency/parallelism other than using
threads, for example although not as efficient as threads, spawning multiple
processes is another way to go. Since the CPU runs different processes both
parallely and concurrently, you can multitask using many processes. The
disadvantages here are that each process comes with its own memory space
allocated and they don’t share their memory space by default like threads. So,
if you need different processes to operate in the same state, you might need
some sort of an IPC mechanism like shared memory segments, pipes, message
queues, or even databases.
Kernels also implement their own way of I/O event notification mechanisms,
which again, can also be helpfull when building programs that you don’t want to
get blocked while doing certain tasks.
I don’t want to delve into much details, since I don’t know much about it, but
the key idea is, kernel threads are not the only OS specific way that you can
achieve concurrency.
NodeJS, an Example for User-space Concurrency
Programming languages often provide their own concurrency mechanisms to
simplify the complexities associated with using the Operating System’s API
(system calls). This means that the compiler or interpreter can translate your
high-level code into low-level system calls that the operating system
understand so that you don’t have to think much.
Node.js is a great example of this concept. Although your JavaScript program
runs in a single-threaded environment with a sequential execution flow,
blocking tasks such as IO operations are delegated to the Node.js Worker
Threads. So NodeJS uses threads behind the scenes to manage those blocking
tasks, without revealing the complexities of managing them to the developer.
Here’s how it works: Blocking operations, such as writing to a file or reading
from a file, or sending a network request are typically handled using the
built-in functions provided by Node.js. You usually pass callback functions as
parameters when calling these functions, so that Node.js Worker Threads can
execute the callback functions that you provided when they complete their
tasks.
Having a bit of more idea how NodeJS concurrency works under the hood, we can
now start practicing this theory by examining certain cases/situations.
Consider the following code (thanks to my friend
Onur for coming up with the example);
setTimeout(() => {
 while (true) {
 console.log("a");
 }
}, 1000);

setTimeout(() => {
 while (true) {
 console.log("b");
 }
}, 1000);
Here, if you run this program, the only thing you will encounter on your screen
will be “a"s. This is because the NodeJS interpreter continue executing the
current callback as long as there are instructions still available.
As soon as all instructions in the main code are executed, the NodeJS runtime
environment then starts calling the callback functions. You can also think of
the main code you write as being called by default as a callback. In the
example above, the first setTimeout is executed with the callback function
provided, and the second setTimeout is executed with the callback function
provided. After 1 second passes, it starts spamming “a"s. You never see “b"s
because, once the first callback is called, it dominates the main thread with
its ugly while loop, forever! So, the second callback is never called.
This has a few important effects. First, it reduces the chance of issues like
race conditions, though they can still happen, especially compared to
multi-threaded languages like C. Why? In C-like languages, the CPU interleaves
threads at the instruction level, while here, it mostly happens at the callback
level. As long as you avoid having complicated logic that relies on async
functions with nested callbacks, it is certain that the flow of execution
remains uninterrupted, basically sequential.
If the programming logic contains many asynchronous callback-based functions
(like fs.readFile(), setTimeout(), setImmediate(), or even
Promise.then()), the race conditions can easily start to occur.
This also applies to the usage of await because you can think of await
statements as shorthand for wrapping the remaining code in the current scope
into a callback function that runs once the awaited Promise is resolved.
Consider the test and test2 functions provided below:
const
 {scheduler} = require('node:timers/promises'),

 test = async () => {
 let x = 0

 const foo = async () => {
 let y = x
 await scheduler.wait(100)
 x = y + 1
 }

 await Promise.all([foo(), foo(), foo()])
 console.log(x) // Returns 1, not 3
 },

 test2 = async () => {
 let x = 0

 const foo = async () => {
 await scheduler.wait(100)
 let y = x
 x = y + 1
 }

 await Promise.all([foo(), foo(), foo()])
 console.log(x) // Returns 3
 },

 main = () => {
 test()
 test2()
 }

main()
The reason test() logs 1 is that when the foos functions are called, as soon
as they encounter await scheduler.wait(100), they essentially finish. Because
under the hood, using await scheduler.wait(100) evaluates something like the
following:
scheduler.wait(100).then(() => {
 x = y + 1
})
So, the first foo function finishes its job, it is now upto the callback
function to continue the business, but since it will only be called 100ms
after, the NodeJS interpreter does not stay idle but instead continues
executing the second and third foo functions by order. They also set y
variable to the value of x before the callback from the first foo is
triggered, and call scheduler.wait with the callback function. As a result,
when the callbacks are eventually executed, they all update x using the
previous value of x, so we get 1, instead of 3.
Why we get 3 logged out when running test2()? Because the place where await
is being run is different and it evaluates to something like
scheduler.wait(100).then(() => {
 let y = x
 x = y + 1
})
As soon as this callback function is called, nothing can interleave between
let y = x
x = y + 1
So, no race condition can occur.
To Conclude
The main idea here is that there is not just one way to achieve “concurrency”,
and the way you achieve it can also affect many things, like how performant
your programs will be or even what kind of problems you can encounter, or what
things to watch out for and so on.
Just try to be mindful when working on programs that are supposed to work
concurrently/parallelly. Things can go wrong pretty fast.
Addendum
2024-09-18: This essay received a lot of attention that I did not
anticipate. It got 99 upvotes on HackerNews and appeared on the front page for
a while. A few days later, my friend Carlo informed me that my essay was
featured in the 323rd issue of the Bytes
newsletter, a JavaScript newsletter with over 200,000 subscribers.
I’ve also received a few messages expressing appreciation for the essay and
even got the first pull request
to my blog’s GitHub repository. Thanks to everyone who took the time to read
and provide feedback.
In the HackerNews discussion, @duped and @donatj recommended Concurrency is
not Parallelism by Rob Pike. It
is a very good talk, so I wanted to mention it here as well for anyone else
further interested in the topic.
In this essay, I share some tips that I’ve found particularly beneficial for my
own debugging experience. Hope it helps the reader as well.
If you have any cool tips you’d also like to share, feel free to share them. I
might include them in the essay and give you credit for it.
Writing Logs to STDERR
I’ve noticed that developers, myself included, often instinctively write debug
logs to STDOUT. While this might not cause problems if the program’s output
isn’t intended for other programs to consume, it becomes crucial when managing
multiple scripts that depend on each other (such as when one script writes to a
file that another reads).
In these situations, if you’re writing everything to STDOUT, you might not be
taking full advantage of the pipe and redirection mechanisms available in your
UNIX environment. The primary purpose of the STDOUT file descriptor is to
facilitate interprocess communication through mechanisms like piping. By using
STDOUT for debug logs and similar outputs, you might be accidentally
complicating your own workflow and missing out on its intended purpose.
So, what to do instead? Simply write your debug logs to STDERR instead of
STDOUT. Since both STDOUT and STDERR are displayed in your terminal, you’ll
still see your debug logs on the terminal screen as usual.
Many common UNIX utilities already follow this practice. Run grep on a
non-existent file, you will see that the error message is sent to STDERR, while
any matching lines would be sent to STDOUT. Attempt to create a directory with
mkdir that already exists or run cat on a non-existent file, the error
messages are directed to STDERR. The same behavior can be observed with curl
and find when they encounter errors. These programs consistently write error
and debug messages to STDERR.
Simply put, if the output of your process isn’t intended for use by another
process, direct it to STDERR instead. Additionally, if you want certain errors
to be manageable by other programs, you can use EXIT CODES. This allows other
programs to decide how to handle specific error situations.
Just don’t clutter the STDOUT.
Conditional Debugging
In NodeJS, there is this function called
debuglog
under the default util module.
What it does is to return you a debug function that conditionally logs to
STDERR, based on the value of NODE_DEBUG env variable.
To give you an example, consider the following file debug.js:
const
 {debuglog} = require('util'),

 normalLog = debuglog('normal'),
 verboseLog = debuglog('verbose'),

 main = () => {
 normalLog('This is a normal log!')
 verboseLog('This is a more specific, detailed log!')
 }


main()
Now, on your shell, try running node debug.js, you won’t get any results
printed to terminal.
Now, try it like NODE_DEBUG=normal node debug.js;
$ NODE_DEBUG=normal node debug.js
NORMAL 16231: This is a normal log!
Now, try it like NODE_DEBUG=normal,verbose node debug.js;
$ `NODE_DEBUG=normal,verbose node debug.js`;
NORMAL 16337: This is a normal log!
VERBOSE 16337: This is a more specific, detailed log!
I hope you see the value of this approach. By adjusting the value of the
NODE_DEBUG environment variable, you can control the level of detail you want
to see in your debug logs. You can also have different debug logs for unrelated
parts of the code so that you can seperate unrelated logs from each other. What
I generally like to do is to have different debug logs for different modules.
This way, you can have more control over your debug logs so that they don’t
clutter the STDERR much. You can, for example, choose to disable/enable certain
kind of debug logs depending on what you really want to see at that moment.
The good thing is that the way debuglog works under the hood is pretty
straightforward, (see source
code).
If it already doesn’n exist, you can easily implement a similar mechanism in
your favorite language (as long as it supports higher-order functions). Feel
free to translate the following custom JavaScript code I wrote (for
demonstration purposes) into the language of your choice.
A tap function is a function that returns the value it receives while executing
specific side effects. It is commonly used for logging, particularly for
intermediate values, without requiring significant code refactoring.
Let me show you how it looks. Consider the following piece of code I came up
with:
f1(f2(f3( ...someArgs)))
Say you want to see what the function f3 returns in your debug logs. What
would you do?
You can probably understand the frustration that comes with this approach.
However, tap functions let you do something like this instead:
f1(f2(taplog(f3( ...someArgs))))
As you can see, we simply wrapped the f3 function call with taplog. This
approach requires much less effort and is especially helpful when you need to
quickly log an argument passed to another function (in this case, the result of
f3 being passed to f2) without altering the code structure much.
I find tap functions particularly helpful when working with frameworks like
React, where you occasionally pass expressions as arguments to other components
and want to log those expressions without disrupting the code flow.
What I like is to create a generic function for creating tap functions, called
tap.
const tap = fn => (value) => {
 fn(value)
 return value
}
And then use it to create your specific tap functions based on your needs.
I’ve switched my desktop computer environment from Arch Linux to NixOS and used
it for about a month. I want to share my migration experience in case it might
interest or even help others.
I also want to thank my friends Onur and
Mert for encouraging me to switch to NixOS and
providing help.
Why Migrate from Arch in the first place?
As someone who likes playing with tools to understand how they work as well as
to match my preferences and ergonomic choices, I find myself frequently changing many
configurations on my system. However, it didn’t take long for me to realize
that I need a system to save and possibly automate these configuration
processes to save time in the future.
A common solution is to create a git repository, often called “dotfiles,” where
you can store your configurations and changes. This approach helps you avoid
repeating the process of configuring the same stuff over and over when
switching to new host machines. You turn your home folder into a repository
itself by initializing git directly inside of it, set the remote address, and
pull the content. You can check out what my dotfiles looked like before
switching to NixOS here.
Yet, even with this “dotfiles” approach there are some problems:
It’s very easy to forget to add some configuration files from your computer
to the repo because, in a typical Linux setup, these files are often
scattered in different locations, and unstaged changes can be easily
overlooked. This is especially true for the home directory, where there are
many unstaged files by default, making it easier to miss the ones you want to
stage. I’ve had several instances where I realized I was missing some
configuration files from my old computer in the Git repo after formatting my
PC.
Your dotfiles are likely to become more complex over time, requiring you to
document how to configure certain aspects to avoid confusion the next time
you set up your environment.
Even if your dotfiles repo is perfect, there’s no guarantee your system will
work the same when you rebuild it. Changes might have occurred to some of the
packages that your dotfiles repo relies on. As a result, you might encounter
issues regarding package upgrades or even conflicts. This problem isn’t
specific to rebuilding systems from a dotfiles repo but also affects regular
users who just want to just update their systems.
In addition to these problems mentioned, although not very often, I would
encounter situations in Arch Linux where I had to look up an error message, a
specific bug, or a non-backward compatible update for some of the apps I use.
Why? Because a system update broke something! While this may not seem like a
big problem, it can be very inconvenient if you’re in a hurry to get a job
done. In these kind of situations, I often had to either fix the problem
immediately or ignore it for a while and fix it later. Rolling back to the
state of my computer before the system update and postponing the task of
addressing the issue introduced by the update was not an option.
This was the moment when I remembered that the tools (Nix and NixOS) my friends
had been recommending could be useful to me.
What is Nix/NixOS?
In essence, Nix is a package manager (there’s also a programming language
called Nix, which can sometimes be confusing). What sets Nix apart from its
alternatives is the way it manages packages and much more, including your home
folder. It is designed to provide reliable and reproducible package management
by isolating packages from each other in a smart way, preventing issues like
dependency conflicts. It also allows users to configure their computers using
its configuration files, through its programming language. So, you’re not
limited to downloading specific versions of packages with their dependencies,
but you can also configure other files on your computer, such as your dotfiles.
NixOS, on the other hand, is a Linux distribution that uses Nix as its default
package manager. It integrates Nix’s features to manage the entire system at
both the system and user levels.
To stay within the scope of this essay, which is to share my Nix and NixOS
experiences rather than explain their inner workings, I’ll stop here. However,
if you’re curious to learn more, I found nix.dev and
nixos.wiki particularly helpful for learning more about Nix and NixOS.
The Learning Curve and Initial Trial
Since NixOS fundamentally provides a much different user experience than most
of the other Linux distributions. I thought it would be wiser to first try
NixOS in a VM instead of directly trying to figure out stuff after installing
the distro on my host machine.
I can confidently say that during this period of testing NixOS on a VM, I had
more troubles related to QEMU and network bridging than problems related to
understanding how Nix works. The same goes for the installation process as
well, for some reason Ventoy did not work properly with the NixOS iso image
while formatting the disk with dd just worked fine.
My initial goal was to make the VM I was running function exactly like my host
machine. This way, once I got NixOS working as intended in the VM, I could
replicate the setup on my host machine. I just needed to copy the configuration
files from the VM to the host machine and run a few Nix and NixOS commands. And
this was exactly what happened when I switched to my host machine. Easy peasy.
:)
In the end, it took me around 4-5 days, working 2-3 hours each day, to learn
Nix and NixOS and replicate about 95% of my Arch dotfiles in the VM. When I
installed NixOS on my host computer, I simply cloned my nix-config repo, ran a
few commands as described, and boom! Everything was set up. :) It was such a
nice experience.
Initial Impressions and Experience
Here are my first impressions after using NixOS for about a month:
At first, it feels like the knowledge you’ve gained from using conventional
FHS Linux distros becomes redundant, as you no longer configure programs by
directly modifying their configuration files in the file system. Instead, you
use the settings provided by NixOS and home-manager (a standardized Nix
program that allows users to manage and configure their home environments
through Nix files without root privileges).
Because most configurations are done through the settings provided by the
packages, it initially seemed like this might prevent users from
understanding what’s happening under the hood.
However, after using NixOS for a while, I realized this was not true. The
abstraction that NixOS packages provide doesn’t hide everything from the user
to avoid confusion with irrelevant details. Instead, it offers a way to
configure your environment the Nix way, so the resulting configuration files
are created by Nix.
Most of the prior knowledge I had about configuring the programs I use was
easily transferable to the NixOS domain. Also, you don’t have to configure
every dotfile through Nix. In fact, home-manager allows you to source files
to desired destinations (see the home.file.*.source option for home-manager).
The documentation is not in great shape. The Nix wiki is certainly not as
good as the Arch wiki. Sometimes, it’s outdated, and other times, it’s not
detailed enough. This is why it’s very important to learn the Nix programming
language well so you can easily read the options available for a package you
want to install. Once you understand the fundamentals of the Nix programming
language, the code itself becomes the documentation.
It is very confusing to have many alternatives for certain tasks. For
example, there are two different ways to install home-manager (standalone
installation vs. system modules), and how you install it affects the way you
interact with it later. Another example is Nix flakes, which are meant to
replace channels (an imperative way of downloading packages) but are still
considered an experimental feature by NixOS.
To be fair, having to choose between many options is already an issue in
Linux (though many see this as a feature), and NixOS seems to have the same
problem.
From my experience so far, most Nix packages are designed to allow
self-contained setups and installations, including plugins. Here are a few
examples:
When installing Firefox or Chromium browser packages, you can set which
plugins you want to be installed by default.
Example
For my default password manager pass (a standard UNIX password
manager), the plugins I wanted to integrate with pass can be defined
through a derivation attribute withExtensions.
Example
When installing the Minecraft launcher prismlauncher, you can declare
which JDKs should be available and used by the launcher by simply
overriding one of the package attributes.
Example
For Neovim, you can declare which dependencies and plugins you want to
install out of the box using the extraPackages and plugins options of the
home-manager’s programs.neovim option.
These are just a few examples, and I am sure this is a standard for many
other programs. I really like this. Dependencies used only
by certain programs are self-contained within the program that will use them.
You can even override some of the derivation attributes for the package you
are installing so that it is not installed from the git source repository
defined in the nixpkgs repo, but from your own source repository. I used this
technique to install and set up my window manager dwm using my own git fork
of dwm.
Example
The configuration files and the nix-config repo I now have are much
more elegant and simpler than my previous dotfiles repo. It’s much easier to
organize configurations in a modular way now.
The rollback mechanisms that Nix provides (combined with the ease of using
other people’s configurations) make trying new things (like different window
managers, desktop environments, programs, or even other people’s setups) very
appealing.
In Arch, there were a few instances where I had to use additional package
managers like yay to access the AUR (Arch User Repository) alongside the
official Arch repository. I also recall compiling and building some tools,
like fzf, from scratch. I haven’t needed to do any of this while using
NixOS.
Overall, I’ve had a better experience with the Nix package manager itself
compared to using pacman and the AUR.
To Conclude
In the end, I really think Nix and NixOS are very strong tools for achieving
reliable and reproducible system configurations and package management.
Unfortunately, though, I don’t think the benefits I’ve gotten in this one month
of using NixOS so far justified the cost I’ve initially spent and continue to
spend learning Nix and NixOS.
But since I currently have no workload and enjoy the learning process, I
don’t see a serious problem here.
Ultimately, whether the benefits of learning a particular technology outweigh
the costs depends on how much you take full advantage of its features. So, I
believe that if I experiment with more setups, try different programs, or start
managing servers with Nix, I will begin to see a better return on this
investment from what I have learned so far. :)
This post was written when Mark Scroll Positions was first built. Since then, it has been modernized by a lot, and the application does not look as it’s been showcased in here. Still, the ideas here should remain useful for building an intuition about how it works.
I like reading blog posts a lot. While some of them are short and easy to read,
most of them are long and require more time to finish. When reading those long
essays, I take a break most of the time. Thus, when I re-open an essay, I
often lose the original place where I was reading. And if I
can remember where I was, then I manually scroll back there. This makes the
reading experience less smooth and more time-consuming.
A Not-So Clever Workaround (Fragmented Identifiers)
I have found a neat trick to work around this problem over time. I was already
using the bookmark feature of my Brave browser, but it was not tracking where I
left reading. So, I would proceed with the following procedure:
(1) Open the inspect mode.
(2) Click an element that has an ID nearest to where I am at, get the element
ID.
(3) Append the element ID to the URL of the site in the form of a fragmented
identifier.
(4) Using the new URL with fragmented ID, either overwrite the existing
bookmark or create a new one.
If you don’t know what fragmented identifiers are, they are the part of the URL
that follows the hash symbol (#). Consider the following URL:
Here #maintaining-balance is the fragmented identifier and thanks to it the
browser directly knows where to jump when it opens the page.
Anyways, this approach works, but there are some problems with it. First of
all, it requires manual labor which could have been automatized, secondly,
although the fragmented links directly jump to the element with the id
specified in the URL, if there is no element with id close to where you are,
the method fails.
Seemingly A Better Idea (Storing Scroll Positions)
So, I wanted a tool to save and jump to specific scroll positions on a webpage.
I found some programs that are built for this purpose, but none of them met my
expectations.
The most popular one I found was Scrroll
In,
and even that could be improved a lot: For example, it forces you to name each
saved scroll position with an alert prompt. Why not automatically give a random
name that can be renamed later? The fetch and save UI/UX is confusing. Why not
directly show the saved scrolls and allow users to jump to them? Additionally,
it lacks features like adding notes to scrolls and searching through saved
scrolls.
So I decided to build my extension for storing/marking scroll positions on web
pages.
Introducing: Mark Scroll Positions
Here is my extension built for that purpose, you can download it from
here.
You can save your scroll positions and resume reading later with ease. You can
save as many scroll positions as you want, add notes, rename them, and see and
manage all your saved spots on a separate page.
Implementation Details
I think there are 3 important aspects for understanding how this project works
under the hood.
1) Interaction between the popup and content scripts
In modern browsers, the environment used by an extension’s popup is separate
from the environment of the current tab the user is viewing (i.e., the HTML,
CSS, and JavaScript files of the webpage).
This separation isolates the extension from web content and prevents extensions
from directly accessing and modifying tab content. For this, extensions need
specific permissions like scripting and activeTab to interact between the
extension’s popup window and content scripts.
In our case, when the user clicks the “Mark” button in the popup window, we
want to fetch the scroll position information from the active tab. However,
this can only be done in the content script environment. In such scenarios, you
can either create a content script that listens for events from the popup
(using chrome.runtime.onMessage and chrome.runtime.sendMessage) or inject
content scripts into the page environment (using
chrome.scripting.executeScript) when the user clicks the “Mark” button. I
chose the second approach as it seemed cleaner. The same applies to the “Jump”
utility.
This is basically to isolate the extension’s environment from the web content
so that extensions cannot directly access and modify tab content. As a
result of this, extensions need specific permissions such as scripting and
activeTab permissions to make an interaction between the extension’s
popup window and the content scripts.
2) The data structure to be saved
If you want your application to be persistent and remember what the user has
done, you need to store data in a persistent form.
I chose to store the details like this:
{
 [absoluteURL]: {
 scrolls,
 title,
 }
}
So, the data is stored in chrome.storage.local consists of keys of absolute
URLs and values of data related to that page.
Each time a new scroll position is saved, the scrolls array is fetched and the
new scroll details are added to it. The same approach is used for deletion and
updates.
3) Deciding on how to implement the jump functionality.
Deciding how to implement the jump functionality was challenging. I could have
simply saved the window.pageYOffset value when the user clicks “Mark” and
uses that value with window.scrollTo(0, offset) when the user clicks “Jump”
(like Scrroll
In
does). However, this would fail if the user resized the page or if the author
changed font sizes. So, I decided to save enough information to recalculate the
target offset based on a percentage.
When the user clicks “Mark,” I save not only window.pageYOffset but also
window.innerHeight and document.body.scrollHeight. Since
window.pageYOffset + window.innerHeight roughly equals
document.body.scrollHeight when the user scrolls to the bottom of the page,
we can adapt to page resizes with a normalization procedure when the user
clicks “Jump.”
Is it that easy? Unfortunately, no. This method fails when the page gets longer
due to dynamic content updates (like new comments). In this case,
document.body.scrollHeight gets bigger, but the offset where the user left
off and should continue to read on doesn’t actually change. Here, jumping
directly to the offset works better. You can still adjust the offset value in
comparison to window.innerHeight, also known as the viewport.
Currently, my extension uses the first method, but I might add a feature
allowing users to choose which jump method they prefer for certain pages.
An Alternative Idea (Storing Uniquely Identifiable Text)
Another option is to mark pages based on uniquely identifiable text so the user
can jump to specific text. The problem with this is if the author changes the
page or content. Even changing one word can break the mark. In contrast, if you
save scroll positions, you will still land somewhere close to the initial text.
Last Thoughts
I believe all these ideas can be improved to create a better marking
application. Maybe a combination of these methods could work, or there might be
even simpler concepts that I have missed.
The main problem is that pages can change, and it’s unclear how our application
should adapt to these changes.
Anyway, I hope this application will be useful to some people. It will at least
be useful to me. If you want to contribute, please feel free to send your PRs
to
kugurerdem/mark-scroll-positions
A significant amount of my time of the day is spent interacting with computers
and cell phones. Some of these are due to habits (like having a feeling of
missing out), some are due to reasons related to dopamine (like watching
movies, tv-series or content which are supposed to be fun), and some are
related to work (software development) or productivity (writing, communicating,
researching). So, I am regularly exposed to all kinds of stimulants that are
available on the internet.
I am quite confident that it is not “normal” for us human beings to be exposed
to lots of different kinds of digital stimulants at such a fast, mindless pace.
We Can’t Keep Up
Ways to consume stuff always seem to get faster and faster. For most people,
the content they consume is transforming from deeper and wider content to
shorter content that is in the form of compensated “pill"s. The existence of
“YouTube Shorts” and “Instagram Reels” is a good example of this. I don’t think
there is an inherent problem with content presented in the form of “pills”. I
understand that they can be useful when we don’t have much time to grasp all
the details of a certain topic. However, the problem I see is that this way of
consuming content becoming the norm. Many of us constantly train our brains to
seek brief moments of feeling good, rather than deliberately focusing on one
concept and exploring it in more depth. And this happens all the time without
us even noticing it.
I think the key thing that we need to recognize is that the amount of
satisfaction (or benefit) that we obtain from consuming these contents does not
always seem to increase at the rate they become available.
The quality of our being, how we feel, and how we learn, are not solely
determined by the content or information we’re exposed to but also determined
by how we intentionally react to them. The way we do things is just as
important as what is being done. The effect of intentionally watching a certain
movie is not the same as watching randomly suggested YouTube videos … The
effect of choosing a topic and taking the time to learn about it is not the
same as a random platform such as YouTube recommending a random video for
learning X in Y minutes.
Think about it, even when it comes to learning and education, we see the
results of this. There are concepts well-known to many people such as “tutorial
hell”. It is also quite common for people to feel like they are improving yet
they are not.
How content is consumed is just as important as the content that is being
consumed. We have to become more mindful when interacting in the realms of the
internet if we want to benefit from it.
I think this is where the concepts of we pulling information and information
being pushed to us come in handy.
Pulling vs Being Pushed To
In communication, ‘pulling’ refers to the phenomenon where the receiver
actively requests specific information and then receives it. ‘Pushing’, on the
other hand, refers to the phenomenon where a particular piece of information is
sent to the receiver without them asking for it.
You are essentially pulling information each time you search for stuff using
Google. You are the one who is intentionally asking Google what piece of
information they need to show it to you.
In contrast, information is pushed to you when one of your favorite platforms
sends you a push notification from your phone or sends an email to recommend
you to check out their brand-new cool stuff.
Keep in mind that it is not always as easy as this to distinguish whether
information or content you encountered was pulled by you or pushed onto you.
Consider the case where you open YouTube, it is you who initially triggered the
process to open the YouTube, but as soon as you open it, you are welcomed with
a page that is full of video recommendations that you did not specifically ask
for. While from a technical point of view, it might be our HTTP request that
triggered that piece of data to be fetched, from a user point of view, we
see a page that is full of things that we did not initially intend to see.
Maintaining Balance
While both pulling and pushing seem to be necessary, an unbalance between these
two concepts makes it harder for us to live mindfully. If you are constantly
being pushed information, you are not actively and intentionally spending your
time. You are like a leaf that is blown away in each wind. Not to mention you
can also be controlled more easily by those apps that you use thanks to their
recommendation algorithms. You converge into what is presented to you.
Likewise, if you are completely closed to information being pushed onto you,
then you are like a closed box, you might miss some of the important stuff
which are happening around you.
The thing is, it is much more common for people to lose balance by constantly
information being pushed onto them. So what most of us need is to reduce the
amount to which we are being pushed.
Pulling is Usually Better for Being Intentional
When I reflect on my old school days, most of the things I actually learned
were not the ones enforced by the school curriculum. They were the topics I
found interesting anyway and took the initiative to learn on my own.
Pulling information is a more engaging process than things being pushed onto
you and our brains seem to place higher importance on the subjects we are
actively engaged with.
I think if we want to live our lives more intentionally, what we should aim for
is to be more active in the way we learn, watch, and do. The alternative is
leaving ourselves at the initiative of the companies’ recommendation algorithms
which are purposefully designed by professionals so that they keep you on their
apps.
Most of the things we are notified of, or shown are distractions.
This being said, what can we do if we want to reduce our exposure to pushed
informations?
Reducing Our Exposure To Pushed Content
I highly suggest that you go to the notification settings of the applications
you use. Disable all kinds of notifications that you think are not something
you want to see deliberately. For example if you are using a social media
platform, try to disable all kinds of in-app notifications except mentions,
comments, and so on… I also highly suggest that you disable push
notifications almost for all the apps you use unless the kind of notifications
that are being pushed to you are not related to things that are urgent like
calls, etc. The end-goal here is not to get rid of all notifications but to
get rid of notifications that are not important for us or neither urgent.
Sometimes, an app might continue to push stuff onto you by sending emails and
so on. Using different emails for primary applications and secondary
applications might help with this as well.
Also, remember that it’s a mistake to register an app with your primary email
if you’ll only use the app for a brief moment. Use disposable emails for those
cases.
We have talked about how it is sometimes hard to identify the stuff that is
being pushed on us. In some cases, even a UI element can be thought of as
something that is being pushed to us. And indeed, I think there are many cases
where certain UI designs cause more harm to us than good (while benefitting the
related company). I think “recommendations” sections are usually one of these.
Seek for alternative, lightweight frontends for the applications you use so
that you are less distracted. Only Let the app direct you when you need a
direction, otherwise try to remove all the noise. If you can’t find
alternative frontends to the web applications you use, you can consider using
Browser extensions that help you to minify the content you see.
Practice mindfulness. You can set reminders for yourself to check in
periodically (I use Bell of
Mindfulness).
Make it a habit to take a breath in and out while asking yourself specific
questions such as, “Am I consciously doing what I’m doing right now, or am I
just being controlled by the algorithms?” This self-reflection can provide
clarity and intentionality to your actions.
And finally, remind yourself that the best thing we can do in order to be less
disturbed and distracted is actually to not use those apps which distract us at
the first place.
Addendum
2024-05-24 : I’ve been using a Chrome extension called
Stylus
that lets you customize the CSS styles of websites. One problem I had with both
the mobile and web versions of WhatsApp was that archived chats were still
easily accessible at the top, even showing a notification icon. I just hid that
section from the UI using this app.
I usually enjoy listening to certain types of ambient music or sounds when
doing repetitive tasks or even when meditating. In the comment section of these
kinds of videos, there are often people spreading love and writing nice things
to each other. After consuming so many videos of this kind, I’ve started to
predict that these kinds of comments would be present in a video even before
opening them. Sometimes, it felt like I was reading those comments without even
opening them.
Even right now, it’s highly likely that a random individual somewhere in the
world is contemplating spreading love and positive energy. I don’t know
anything about them, yet this statement probably holds true. Now, if I were to
feel a certain affection for this person and they also had the thought of
“there’s probably another random person out there spreading love,” would this
constitute a very basic form of interaction?
Imagine a simple game, such as XOX. The algorithm you need to follow is pretty
straightforward. Even with the many possible game states, you can generally
categorize most of the outcomes without loss of
generality. Now,
let’s suppose there are other people in different physical locations who know
the algorithm for playing the game. Assume that these people are also thinking
about the other people whom also contemplate this game in their heads. If these
people were to play O and X in their minds, the algorithm they follow would
dictate how they play which means that they could predict the other person’s
moves even without physically interacting with them. Given this scenario, could
we say that these individuals have actually played the game together although
never seeing each other?
The points I’ve made above are basically results of our human ability for
abstract thinking. We can think reflectively and about specific phenomena, as
well as ponder those who thought about these phenomena before us, or thinking
about right now. In essence, it seems to be possible to think about specific
things simultaneously with other people and even predict their thoughts if the
domain in which the thinking is occurring has clear rules.
If I were to become more rational, would I become more aware of others'
feelings or thoughts of those people whom I’ve never seen or physically
interacted with? Would I be able to have simple interactions with them?
This could also be related to how an omniscient God would understand each of
us, as it would possess knowledge of all logical possibilities. This might even
explain why people who believe in God often feel less alone. If God does exist,
we would never be alone in our thoughts, as there would always be a presence
accompanying us as long as we are aware.
Honestly, I don’t know if any of these thoughts even make sense. However, all
of these concepts remind me of the Stoics’ understanding of
Logos. Stoics believed that those who
are capable of reasoning are part of the same community as they were all
interconnected through Logos whether they are physically close to each other or
not.
My mother recently mentioned that her phone is continually opening certain
windows and prompting her to use services she doesn’t need. After checking her
phone and doing some online research, I found out that many others have also
complained about this issue.
Apparently, she was referring to pop-ups triggered by a pre-built program
called “SIM Menu”. This program basically allows operators to send
notifications and even generate pop-ups on your phone. And the frustrating part
is that most of these pop-ups seem to promote irrelevant services. If you
accidentally click “OK” when one of these pop-ups appears, you get charged by
your provider. It is a carefully set up trap designed to make you accidentally
subscribe to their unnecessary services and pay money.
Since I prefer simplicity and like to have control over the tools I use. I was
already thinking about removing the bloatware on my phone that came
pre-installed and can’t be deleted through the interface. Hell, even some of
the fundamental apps, like a gallery or file manager, are filled with ads. It
gets on my nerves. So, I was already planning to learn how to remove these
bloatware and the situation I described earlier was the final straw for me.
I’ve searched for tools to debloat Android phones and found adb, Android
Developer Bridge. It’s basically a program which allows you to directly create
a shell session for your phone, similar to connecting to a remote server via
SSH (the only difference is that instead of connecting through the internet,
the connection is made via USB).
Since Android is essentially an OS based on the Linux Kernel, the shell you
connect to will most likely be a variant of the sh dialect. So, for those who
are familiar with working in UNIX environments, its very convenient to remove
or install packages and customize your phone this way.
In this essay, I document this process of removing bloatware from my phone
as a reference for future use. Hopefully, you find it helpful as well.
Enabling USB Debugging Mode
While it is possible to establish an ADB connection to your phone over Wi-Fi, I
chose to use ADB through a USB connection as using Wi-Fi involves certain
security risks. For instance, others on your Wi-Fi network could potentially
connect to your phone, especially if your phone doesn’t have proper security
settings. Not to mention that you would need to set up your phone using ADB
through a USB connection first before initiating a Wi-Fi connection anyways.
Which kind of makes using WiFi seem more pointless as the reasons for
preferring Wi-Fi over USB are usually just convenience or not having a USB
cable available.
To connect your phone using adb via a USB connection, you need to enable USB
Debugging mode on your phone. I won’t go into the specifics of this process as
it varies by phone. But for my own phone, I simply navigated to the “About”
section and tapped “MIUI Version” multiple times to switch into Developer Mode.
Then, I searched for the “USB Debugging” option and enabled it.
Connecting to your phone via a Shell Session
Once you’ve installed adb, you can view the manual by typing adb help. You
can also refer to the online
documentation.
To connect to your phone via a shell session, simply type adb shell and
you’re good to go. Most standard UNIX commands such as ls, cat, echo,
grep, and more can be used.
Keep in mind that you don’t need to enter a shell session just to run specific
commands. You can also use the adb shell <cmd> pattern to run your particular
command <cmd>. This approach simply creates a shell session, executes your
command, and closes the session, while forwarding the stdout to your current
shell session.
Uninstalling Bloatware
The Command Line Interface (CLI) tool used in Android for interaction with the
Android Package Manager is pm. This tool basically allows you to list,
install, or uninstall software packages.
To list the currently installed packages, execute the following command:
pm list packages
To view only the default apps on Android, enter this command:
pm list packages | grep 'android'
At this point, I would advice you to search for other unwanted pre-installed
apps known to come with your phone’s brand as well as android packages which
are known to be bloatware. Take a list of these apps for future reference so
you can easily repeat this process if you need it later again.
To delete a specific app from your phone, you first need to identify its
package name. You can accomplish this by searching for it on the internet.
However if you can’t still find it, you should be able to locate the app’s “apk
package code” directly on your phone. This process can vary depending on the
phone you’re using, so I suggest you look up how to find package codes for
applications on your specific phone model.
Also, be careful to not to delete anything critical for your system to work. Do
not delete a package if you are not sure that it is not something system
critical.
Once you get the package.name, you can just run the following command in the
adb shell:
pm uninstall --user 0 package.name
Here, --user 0 specifies the user for which you want to uninstall the
package. User 0 is typically the device’s default or primary user. When I have
run the command pm uninstall without this, it would say package is
successfully deleted but the package would still remain on my phone.
Keep in mind that we could have also used the following command:
adb shell pm uninstall --user 0 package.name
Or even:
adb uninstall --user 0 package.name
Automating the Process
Remember that I told you to make a list of the packages you remove. This was
for to make the debloating process easier if you need to do it a second
time on your phone.
I use a specific git
repository for this purpose.
In this repository, I have a file named bloatwares.txt that contains the
package names of certain prebuilt applications for Mi, Xiaomi, Android, and
third-party applications.
If I ever need to debloat my phone, or anyone else’s, all I need to do is to
run the following command:
If you haven’t already started, I strongly encourage you to consider debloating
your phone. Install adb on your computer, connect to your phone using it,
identify packages that seem unnecessary, and free your device from the unwanted
‘guests.’
Go ahead and take back at least a partial ownership of your phone by getting
rid of these intruders!
For those who may not be aware, Neovim is to me what a lightsaber is to a Jedi.
It forms an essential part of my routine, as I use it for nearly all my tasks
involving text. Be it drafting an essay, sending an email, or coding, Neovim is
my go-to tool.
Moreover, I have a deep admiration for the UNIX philosophy and its command-line
interface programs. It’s quite fascinating to observe how these small,
uncomplicated UNIX programs, designed to do one thing flawlessly, interact
effectively using piping mechanisms. Tools like sed, grep, awk, count, cut, and
many others, often prove to be incredibly useful for text processing.
I can confidently state that both Neovim and UNIX have proven themselves
invaluable in my work.
However, like many others, I have been introduced to another set of efficient
tools for dealing with text, known as Large Language Models or LLMs. I’ve spent
several months experimenting with tools like Co-pilot and ChatGPT, and I’ve
found them to be highly beneficial for text-based tasks.
Naturally, I wanted to utilize the true potential of all these tools in my
interactions including text. For this reason, I began searching for Neovim plugins
and command-line interface programs capable of integrating these AI tools.
The process of integrating Co-pilot was relatively simple thanks to a
plugin available on Neovim.
However, incorporating ChatGPT into my workflow wasn’t as straightforward as I
had hoped. I looked into several neovim plugins, like
ChatGPT.nvim, which allow
interaction with ChatGPT through Neovim. However, the majority of these plugins
seemed like an overkill compared to what I expect from them. They also had many
features designed to simplify the programming process, a job that Co-pilot
already handles for me. Additionally, I would want llms to be accessible not
only in vim but also within my regular terminal environment. I would appreciate
it as a command-line interface tool, which would enable piping, giving
arguments, and flags for more complicated tasks. Unlike Co-pilot, I would like
to use a tool like ChatGPT in a more widespread context.
Hanging around Twitter, I recently saw a post from
Gary, giving a
credit to Simon Willison’s library, llm. I was
surprised to find out that this library was exactly what I was looking for as
well. It was a command-line interface tool that allowed me to interact with
LLMs through my terminal, which is exactly what I wanted. I could pipe the
output of any command into llm, and it would return the result of the input.
For instance, I could pipe the output of a command like cat into llm, and
it would return a response from the AI model, which you could pipe or redirect
into another command or file.
Examples
Here are some of the examples that comes to my mind on how you could use the
llm tool:
git diff | llm 'Recommend 5 different commit messages for these change'
cat essay.txt | llm 'Summarize what these are about'
Furthermore, if you keep finding yourself using the same prompts over and over
again, you can create templates for them.
# Create a template for finding synonyms of a word
llm --system 'What are the synonyms of the following prompt' --save synonyms

# Create a template for rephrasing text
llm --system 'Fix grammar mistakes and rephrase the text' --save rephrase

# Create a template for finding titles for given content
llm --system 'Recommend 5 titles for the following prompt' --save titleize
You can later use these templates by passing the -t flag to the command.
# Rephrase the text which are copiod in your clipboard
xsel -b | llm -t rephrase

# Find synonyms of the word 'serenity'
echo 'serenity' | llm -t synonyms

# Find appropriate titles for your document
cat vi-llm.md | llm -t titleize
You can also further specify system messages, choose language model you want to
interact with, and many more things, which you can examine on the
documentation of the app.
The Readline Issue
So, I was quite happy for finding this tool, but the only thing I did not like
about it was that when you try to use chat mode with llm chat command, the
readline would break my initial GNU readline settings defined in my
~/.inputrc file.
When delved into the source code of the repo, I have seen that other people
have been encountering the same
issue.
I figured out that the issue is likely caused by the readline libraries used to
build the llm chat command overriding the default readline settings.
Because I’m not very familiar with these Python libraries, I decided not to try
fixing the issue by changing the source code. Instead, I have decided to use
the rlwrap command to address this problem. Basically, rlwrap is a
program that allows you the wrap the readline of the programs that you run so
that you can still use the application’s readline as it was respecting your
shell’s readline settings.
I know that by the time you, the reader, come across this, the issue may
already be fixed. However, the purpose of this piece is not just to provide a
solution to this particular problem, but to share how I approached solving it
and what I learned from the experience.
The vi-llm Wrapper
Anyways, the problem with the rlwrap solution was that, yeah, it allowed me
to use my shell’s readline settings, so I could use vi keybindings when giving
prompts, but I still could not copy, highlight, and modify the answers that are
given to me, or the previous prompts that I have give. For this, I have built a
shell script called vi-llm based around
one of my favorite unix utils vipe, and
llm. vi-llm is basically a wrapper for llm that gets all of its prompts
from Vim, enabling an interactive communication with ChatGPT using llm, by
letting you input a message through the vim editor, then sending that message
to the LLM interface. subsequently displaying any logs received from the
interface right back in your text editor, repeatedly, until the user quitting
the vim editor without doing any changes. In essence, it operates similarly to
a chat interface. You type in messages (or commands) which get sent to the LLM
system, and any response from the LLM system gets displayed back to you. This
cycle continues, enabling continuous, interactive communication with the LLM
from your command line.
Here is a quick showcase:
If you are interested, you can check out the github repo.
Conclusion
I’ve been using Copilot and ChatGPT for months and now I am using this tool for
a few days now. Now I have all the tools that I have needed in order to utilize
my workflow even more, a strong autocompletion tool such as Copilot, a program
that allows me to interact with large language models through shell: llm, and
finally, a wrapper vi-llm based around llm for my personal use case.
I hope that this essay was helpful or at least interesting to some of you.
In this essay, I describe how I made a Node.js module to listen to keypresses
across the system on Linux machines using X. This experience helped me grasp
how the OS and Window Managers handle keyboard inputs, clarifying the reasons
behind an unexpected behavior I had encountered before, which I also mention in
the essay.
If you’re interested in learning more about how keyboard events are handled,
this essay might be of interest to you.
An Issue About Remapping Keys
As a person who uses VIM for many things I do, seamlessly transitioning between
VIM modes is essential for my workflow. However, the default key for returning
back to normal VIM mode is the Escape key, necessitating me to remove my hands
from the keyboard in order to reach it.
This is exactly why many VIM users, including myself, remap the Escape key to
the Caps Lock key. This adjustment is particularly beneficial for those who are
already accustomed to pressing the Shift key for uppercase characters.
However, I’ve encountered a minor issue with this setting: Certain applications
seem indifferent to the remappings I’ve configured. Occasionally, when I press
the Caps Lock key, the operating system interprets it as an Escape key press,
while the specific program I’m using still recognizes it as the original
physical key pressed.
I have encountered this problem both in my Linux computer, and Windows
computer. So the problem itself is OS-agnostic. However I’ve unintentionally
identified the reason behind this occasional discrepancy while I was working on
a recreational project.
Linux and Keyboard Events
Recently, a friend asked me if it’s possible to create macros using Node.js. I
confidently said, ‘Sure, it’s probably easy.’ After a quick search, I found a
desktop automation library called robotJS and wrote a simple script where
specific keys are pressed regularly by the script.
However, I started wondering if it was possible to trigger those keypresses
after a user presses a certain key. To achieve this, I needed to listen to
keypress events on a system-wide level. I searched for suitable Node.js
libraries for this task on Linux, but I couldn’t find one that worked
seamlessly.
There were libraries like iohook, but they seemed to lack support for
listening to Linux keyboard events in the latest versions of Node.js. Some
solutions only focused on capturing keyboard events within the current window
associated with the process.
I stumbled upon a library called xev-emitter but it didn’t provide what I
needed as it mainly dealt with listening to xevents of a specific X windows.
After some contemplation, I decided to create my own Node.js module using
xinput underneath, just for the sake of it and out of curiosity. xinput
is a Linux tool that allows listening to keyboard events and provides an
interface to monitor events from connected keyboards.
For instance, running the command xinput gives me a list of available input
devices connected to my PC:
xinput also has a command type that lets you listen to a specific input
device. For instance, if I use xinput test 15, it listens to the device with
the specified ID 15. When I run the command xinput test 15 and then press the
‘a,’ ’s,’ and ’d’ keys on my keyboard, the output I get is as follows:
Now, with these two commands, we can iterate through all the input devices
related to keyboards and listen to them. We can create a script that first
lists the available input devices, filters them, and then runs the command
xinput test for each of them.
However, there is still a minor problem. How do we understand which key is
pressed just by looking at the numbers that xinput gave us? How can we know
that 38 stands for the key ‘a’?
The numbers provided by xinput are known as X Key Codes. These codes represent
the physical keys pressed on the X layer. They are essentially similar to Linux
Input Event Codes, which the Linux Operating System generates to represent the
physical keys pressed. For reasons I’m not aware of, X Key Codes are
incremented by 8 compared to Linux
keycodes
Now, the challenge lies in making sense of each X Key Code. We need a mapping
between the X Key Codes and their corresponding keys. However, what they
correspond to can be configured by users. In fact, I’ve configured this using
the command setxkbmap -option "caps:swapescape". So, although pressing the
same keys on a physical keyboard will result in the same key codes, the
interpretation by your operating system or window management server can be
configured. Therefore, the correspondence of each keycode with what you’ve
pressed might vary from one environment to another. In the X protocol, you can
view the mapping between X Key Codes and X KeySyms by running the command
xmodmap -pke.
This is essentially what I did in the Node.js module I created to listen to
keyboard events using X:
Obtain the list of available input devices by running xinput as a
subprocess.
Filter the devices; you don’t need all of them, just their IDs.
For each ID, run the command xinput test id.
Use the result of xmodmap -pke to understand the semantic meaning assigned
to each physical keypress, known as a KeySym.
If you’re curious, you can check out the module I created,
Node XInput Events.
Probably a Better Approach
After implementing the module mentioned earlier, I discovered the existence of
a Linux utility called showkey that allows listening to pressed keys.
It’s also possible to create a similar script using showkey under the hood. In
fact, this might have been a better approach compared to what I did above
because it operates on a more fundamental level than X.
Similar to how we mapped between X Key Codes and their corresponding X Key
Codes, we could create a mapping between Linux Event Codes and their meanings
by examining the Linux source code for the input event
codes
Moreover, using scripts like xinput as subprocesses under our script might not
be the optimal approach for implementing an EventEmitter library to listen to
system-wide keypresses. The conventional way is likely to interact with the X
server using an X library. Unfortunately, I couldn’t build the nodeJS x11
library on my computer and chose not to delve into it much.
Conclusion
The series of experimental processes I went through greatly enhanced my
understanding of what happens behind the scenes when I simply press a key on my
physical keyboard.
Returning to the initial scenario I described, when you’re developing a
program, you can act upon the values of key syms or key codes. While the key
codes might remain the same, the key syms (the meanings attached to those key
codes) can differ. It appears that some applications focus on key codes,
disregarding your local options.
Essentially, at the kernel layer, there are only keycodes. Your operating
system assigns meaning to these keycodes through specific configuration files,
which you can either directly modify or use another program for modification
(in this case, the X Window Management server). Since it’s generally more
convenient to alter settings in the window management layer, most people
configure their preferences through utilities provided by their window manager,
and the window manager handles the interaction with the OS.
This serves as a compelling example of how casually experimenting with things
can significantly contribute to one’s understanding of the core concepts they
are dealing with.
I’ve recently been involved in a fintech project that demands high performance,
posing various challenges related to a solid understanding of low-level
concepts, concepts that are primarily relevant to the inner workings of the
tools and protocols used beneath the surface.
One challenge involved separating two tasks into different processes:
The main process, responsible for constructing the necessary business state from
incoming messages through a specific socket connection.
The monitoring process, allowing users to track relevant changes in the state.
To enable communication between these processes, I implemented Inter-Process
Communication (IPC), and sockets naturally came to mind as a suitable solution.
Since not all incoming protocol socket messages to the main process were
relevant to user interaction, I set up a mechanism to filter and process the
relevant messages for the front-end perspective. These refined messages were
then sent to the monitoring processes through a socket connection.
However, acknowledging that sockets operate at a low level and suspecting I might
be overlooking something about the socket protocol, I aimed to confirm that each
piece of data sent from the main process would result in one received data on
each monitoring process. Delving into the self-assigned task of understanding
how sockets work, it turned out that one sent message does not always have to
correspond with one received data.
When sending messages through a TCP socket, it separates our messages into
multiple parts called packets and sends those. The receiving socket then
reorders and reassembles those packets into a chunk of the original message which is
sent – a data – and appends it to the socket’s buffer. Since it is said that
these packets are reordered and reassembled by the TCP socket itself, most
people assume that one sent data will result in one data received. The thing is,
sockets do not wait for all incoming packets to be reordered and reassembled to
append them to their buffer. Instead, they append the chunks that are validated
and arrive in the correct order as they keep coming. A socket can essentially be
considered a Duplex Stream; it does not frame your messages and does not
necessarily know which parts of the incoming/outgoing data actually constitute a
meaningful message from your application layer’s perspective.
From the perspective of socket users, the inner workings of “packets” are not
something to be worried about. The chunks added to the socket’s buffer are
simply referred to as “received data” or “data chunks”. The meaningful portions
of this data, converging as intended by the sender to convey a message, are
simply labeled as “messages”.
Since the sockets lack awareness of the types of data and the desired format for
transmission, users of the socket must devise methods to identify which portions
of the incoming data constitute meaningful messages. This process, commonly
known as message framing, involves two approaches: the length prefix approach,
where each message is prefixed by the byte length of its content, and the
delimiter approach, where messages are separated by a designated delimiter
character or sequence of characters.
What struck me the most about diving into these concepts was observing the
widespread tendency for people to misunderstand the behavior of one of the most
fundamental tools a developer may need to interact with – a socket. For
instance, consider the experience of a developer who highlights this issue:
True story: I once worked for a company that developed custom client/server
software. The original communications code had made this common mistake.
However, they were all on dedicated networks with high-end hardware, so the
underlying problem only happened very rarely. When it did, the operators would
just chalk it up to “that buggy Windows OS” or “another network glitch” and
reboot. One of my tasks at this company was to change the communication to
include a lot more information; of course, this caused the problem to manifest
regularly, and the entire application protocol had to be changed to fix it. The
truly amazing thing is that this software had been used in countless 24x7
automation systems for 20 years; it was fundamentally broken and no one
noticed. [1]
This entire process once again shows the importance of us developers being
genuinely curious about the tools and protocols we work with. If I hadn’t asked
such questions about the tool which I am using, just because the program works,
I might have fallen into the same pitfalls that others have encountered.
This blog post is a review of my journey into software development up until 2023-09-22. It is not intended to be a series of detailed explanations/guidelines for my career choices. Consider it more like personal reflections on events that shaped me as a developer. So, take the things that I say here with a grain of salt.
My First Introduction to Programming
I used to hang out with my cousin a lot when I was around 6 or 7 years old. He would always develop something cool whenever I saw him using his computer.
Back then, I used to play Solo Test a lot. When I showed this game to my cousin, he thought about coding it and building a solution engine for it. He did both in front of my eyes. The game is still available on his website. He was already one of my idols, but this was one of the moments that made me respect him even more. The idea of being able to build the things you like, the way you want, by this thing called “code” was fascinating.
Not only did my cousin demonstrate coding, but he also encouraged me to make simple video games. He introduced me to a program called Macromedia Flash for this. I would try to make simple Flash games by following the YouTube videos I saw. Unfortunately, I would usually get stuck trying to make things exactly how I wanted due to my limited understanding. I would get frustrated, and… would give up.
I guess both my limited English and lack of patience were making it much harder for me to move forward. So my attention went to other hobbies that were easier to pick up. Playing games, reading books and creating pivot animations…
Learning JavaScript when I was in Highschool
I was better suited to learning programming when I was in high school. I was more patient. I understood English a bit better. I had a growing interest in subjects like philosophy and mathematics. Having sophisticated interests I could already follow on my own was proof that programming could be added to them.
I started learning JavaScript. This choice was because it was the only programming language that could be run in a web browser. My cousin also saw it as a great investment for the future. The high accessibility of learning materials for it was also another bonus.
I don’t recall the exact sources I used. But the overall process was simple. First, I would try to understand a concept that I either found interesting or that my cousin suggested. These would be things like variables, conditionals, functions, and so on.. Once I felt comfortable, I would either ask my cousin for an assignment or come up with my own experiment to apply it. Then get his feedback on what I implemented. Re-iterate.
The tasks would be simple, with small caveats. Like, not using built-in utilities like sorting or string functions. This was so that I had to re-implement them when I needed to and learn how things worked under the hood. This was a good approach. I think it was thanks to that my first year taking CS courses was very easy for me. I was already familiar with most of what was taught, so I had time to explore topics that interested me.
In Turkey, colleges admit students based on a central placement exam score. Unfortunately, I didn’t score high enough to get into the CS/CENG programs at the top universities. I was required to be in the top 0.1%, but I was only in the top 1%. My ranking just wasn’t good enough.
I knew that I could learn on my own what a mediocre university would teach me anyway. The campus experience, being around other intellectual people, was important to me. I did not want to study CS at a mediocre university. So, I instead considered pursuing other degrees that interested me at top universities. Meanwhile, I would continue to learn software development on my own.
My friend Ibrahim showed me that I could take CS electives alongside my math studies. And my ranking was sufficient for a Mathematics degree at one of the top universities in my country.
So I ended up studying mathematics and also taking almost all the compulsory CS courses. The only two CS courses that I did not take were Operating Systems and the 4th-year Algorithms course. So, I kind of did something like a double major, but an unofficial one.
I also wasn’t very worried about not having a CS diploma. I saw it as a valuable bonus rather than something required to qualify. I believed that as long as I had competence and knowledge in the subject, I would be able to land a job. Which later turned out to be true as well.
My First Projects
I started losing interest in pursuing an academic career during my third year of college. I simply realized there were better things I could be doing than trying to maintain a good GPA. I began focusing more on how I could put my programming skills to use. I also started thinking about what I could learn on my own that is both interesting and pragmatic.
Coincidentally, I had just started investing in cryptocurrencies around that time (during Covid). This was when I first began learning about the concept of decentralized finance (DeFi). And with it, I realized that there could be many opportunities to automate. We started researching potential automation ideas and executing them with Ibrahim. He would usually handle the research, and I would usually handle the execution part with programming.
We tried and experimented with many different ideas. 1 Some worked well, others did not. Our work was not professional, but these projects were still sophisticated enough to improve us. We became better both in programming and in research. For me, this was especially important. Because it functioned as a first-hand proof that I could actually put my programming knowledge into practical use.
My first Job
So, I was already building software projects for earning money even before working at a job. Luckily, these experiences also made getting my first job much easier.
I was discussing my recent projects with a friend who had a broader network than mine. He was surprised that I hadn’t applied for a software development job, given the things I was already doing at that time.
He referred me to one of his connections who recently founded a startup.
I succeeded both the technical and non-technical interviews. Then, started working as a part-time remote software developer there.
A new Mentor
The company I worked for was getting a consultancy service from a cracked developer with the nickname gwn.
In Switching to Arch Linux essay, I already mentioned my first impression of him as follows;
About a year ago, I was invited to a pair coding session at the startup where
I was working. The developers were receiving consultancy from a strange
person. At one point, he took control of the screen sharing while reviewing
some of the pull requests that had been made to our codebase. When he shared
his screen, there was nothing but a black screen. Suddenly, a terminal screen
appeared with his keystrokes and he quickly began examining the codebase,
providing feedback on people’s code at a speed I had never seen before. He was
able to jump between different files in an instant, examining the diffs that
were made in different git commits.
After seeing what I saw, I thought to myself, ‘If I were able to develop and
refactor code at that speed, I would save a lot of time, I could have spent
more time thinking about the actual stuff with as little friction as possible.
I want to have this power.’ So I have looked at his CV and realized that he was
knowledgeable on topics that many developers, including myself, struggle with.
Influenced by this, I started asking him (he was our consultant, after all) as
many questions as I could and focused on the resources he suggested and the
technologies he used.
I began frequently asking him questions about software development. Sometimes, questions that are not even related to the job we were doing. For example, his opinions on different approaches to software development or some Linux stuff.
He was usually more than willing to answer my questions. We got along well, and at some point, we even started working together on several projects. This has continued for quite some time.
I actually learned a lot from working very close to him. I did not learn anything knowledge-wise that I would not have been able to learn on my own. But, I must say that I learned a lot in terms of developer habits, approach, and procedural knowledge.
I think I was lucky enough to have both yuempek and gwn as mentors at some point in my life.
To Conclude
So, that was the story of how I first got into software development and the events that shaped me so far up until this point (2023-09-22). I look forward to what comes next. Thanks for reading. I hope this becomes helpful if you’re on a similar path.
It is often mentioned that the bottleneck in building software projects is not
one’s typing ability but ability to think clearly, and to design the
architecture effectively. Afterall, if typing speed was so essential to
programming, the time difference between rewriting an already existing project
with that of creating it from scratch would not be as high as it is.
While I agree that typing speed is not essential to programming, I cannot
relate on how this fact is used by lots of people to justify their thinking of
typing fast being not important for the development process.
The comparison made above between writing a project by scratch and rewriting an
already existing one, is good for showing that typing speed itself cannot be a
sufficient criteria for being a good developer. But what it does not show is
the unimportance of typing fast. In an an ideal setting, we could have compare
the development speed of developers who almost have the identical cognitive
abilities and experiences with different typing speeds. Unfortunately, I do not
heard any such experiments. So what I will do to show you the importance of
typing is instead will give you my arguments for it.
First of all, programming is not just about thinking and designing systems but
also about debugging bugs, refactoring code, experimenting, and finally
researching or discussing stuff. One commonality of all these exercises is that
they are being iterative processes. Any programmer with a sufficient experience
would probably understand what this means. I remember countless times where I
needed to put debug logs lots of different places in the code, so that I can
exactly point source of the bugs. Same applies for experimenting with the tools
I am not used to so that I can get an idea about the inner workings of them.
Even searching stuff on the internet is often an iterative process where one
search leads to another prompt so that you can understand the related concepts.
All of these processes are usually proceed by trial and error, where in each
iteration you are somehow bottlenecked by the necessary actions that are needed
to be done in order to proceed to the next iteration. I think what typing speed
is esentially helpfull for is to reduce the time between those iterations.
Yes, it’s essential to spend time on the architecture of the code, technology
stack, algorithms which will be used and requirement specifications. However
this doesn’t diminish the importance of typing fast. To the contrary, this just
makes typing fast more important because reducing the time spent on typing
would allow us to allocate more time to the essential works.
Even though typing itself is not so important, typing fast would still be one
of the most critical skills for developers because it reduces the time spent on
an insignificant task of typing.
This reasoning is similar to what Hans Hoffman once said:
“The ability to simplify means to eliminate the unnecessary so that the
necessary may speak.”
Typing is the way we actualize our ideas into real programs.
If you do not have the faculties to realise your ideas at the rate they occur,
then they can accumulate to a point where you eventually reach a position where
you have to abandon some of them. Essentially, the faster you can transform
your ideas into code and test them, the less likely you are to experience an
overflow of untested and undeveloped ideas.
Improving Typing Speed
Given that the typing speed of an average person is around 40 WPM, even
reaching 70-80 WPM would be a significant leap for most people. While pursuing
further improvements is still admirable, its important to be aware of that
there comes a point where the cost-effectiveness of pushing ones typing speed
diminishes, as the challenge escalates when you approach your personal limits.
Although having a personal average typing speed of 105 WPM on
10FastFingers, I still like to exercise typing
speed. But I do this as a kind of challenge rather than an expectation of being
more productive.
The main advice I would like to give the people who want to improve their
typing speed is to learn touch typing, a technique where you become accustomed
to using all 10 of your fingers to type without looking at the keyboard.
Although increasing typing speed without a common technique like touch typing
is indeed possible, I still like to recommend touch typing as it is a
standardised way of typing which its know-how can also be transferred to other
people in a consistent way. I personally used sites like
keybr and typing club while
I was initially learning touch typing, whereas I still use
10FastFingers and Type
Racer for exercise.
For developers, I also strongly recommend becoming accustomed to using the
English keyboard layout even their native language is not English. Most
programming languages are designed to use symbols readily available on a US
keyboard, such as {}[]/`\"’, which may not be as easily accessible on other
layouts, (e.g. Turkish layout).
About a year ago, I was invited to a pair coding session at the startup where I
was working. The developers were receiving consultancy from a strange person. At
one point, he took control of the screen sharing while reviewing some of the
pull requests that had been made to our codebase. When he shared his screen,
there was nothing but a black screen. Suddenly, a terminal screen appeared with
his keystrokes and he quickly began examining the codebase, providing feedback
on people’s code at a speed I had never seen before. He was able to jump between
different files in an instant, examining the diffs that were made in different
git commits.
After seeing what I saw, I thought to myself, ‘If I were able to develop and
refactor code at that speed, I would save a lot of time, I could have spent
more time thinking about the actual stuff with as little friction as possible.
I want to have this power.’ So I have looked at his
CV and realized that he was knowledgeable on
topics that many developers, including myself, struggle with. Influenced by
this, I started asking him (he was our consultant, after all) as many questions
as I could and focused on the resources he suggested and the technologies he
used.
The inspiration from this hacker guy, combined with the very precious help from
a friend of mine who had a strong interest in operating systems (he uses Arch in
Qubes OS btw), being libre, and having control over his computer, led me to
switch to Arch Linux. I have also benefited a lot from discussions on hackernews
and from youtubers like Luke Smith which I also heard from the Qubes OS friend
of mine.
In this post, I will first provide a brief overview of Linux and Arch Linux in
particular. Then, I will discuss my reflections on the past few months,
including the downsides and upsides of switching to Arch Linux. Finally, I will
explain the programs that I currently use in my workflow.
What are my reasons for using Linux?
Unlike MacOS or Windows, Linux is a free and open-source operating system.
Perhaps you are already know that a vast majority of servers actually run on
Linux. Android, which is the operating system most phones use, is a specific
variant of the Linux Operating System. By these means, many developers already
seem to acknowledge the importance of learning Linux for practical reasons.
However, the controversy usually arises when it comes to using Linux on a
personal computer.
For an average computer user, it typically doesn’t matter which operating
system they use as long as it doesn’t interfere with their daily tasks.
However, in my case, as my views have become more nuanced, switching to Linux
has started to be more appealing.
Here are some of the reasons why I prefer using Linux over MacOS or Windows:
Both Windows and MacOS forces you their ecosystem by their updates. With each
update, its more likely that your Desktop Environment is cluttered by a new
application which Microsoft added and most likely you will not even use. Most
of the prebuilt stuff that are coming with Windows, I do not use at all. I
think the same argument also holds for MacOS, as using one of their apps
usually forces you to use other Apple apps and you to stick with their
environment.
Since both MacOS and Windows are closed-source, we don’t know for sure what
they do under the scenes. Windows, for example had a builtin keylogger. If
you are curious about this, please type “Windows builtin keylogger” to your
favorite search engine. You will encounter many entries explaining how to
disable builtin keylogging. Although I do not have sufficient reasons to
claim that the Apple is doing the same thing, in practice, there is nothing
preventing these Close Sourced applications to do things like that besides
legal issues.
You need to pay some money in order to use both MacOS and Windows, whereas
Linux is essentially free. You can set up Linux on a computer with no cost at
all except some finite amount of time you will put in to learn things.
Linux is highly customizable and allows users to modify and tailor their
environment to meet their specific needs. In contrast, Windows and Mac OS are
more limited in terms of customization. This partly makes Linux a better
choice for users who aim to be a power user, a user who wants to have control
over their operating system and want to modify or customize it to meet their
specific needs.
Linux offers a variety of versions that cater to the different needs of
various users, which is a significant advantage. These versions, known as
Linux distros, are essentially Linux systems with additional packages
specifically designed for certain users. I have not come across a similar
phenomenon in either MacOS or Windows. Linux provides more options than any
other proprietary operating system can offer.
Using a product often means more than just using it; it also means becoming
part of a group. Using Linux involves you in a community populated by hacker
minded people. And whether you indend it or not being part of a group
influences your habits. By immersing yourself in an environment filled with
more experienced individuals, you become more exposed to their knowledge and
ideas.
I understand that similar points could be made for the sake of Windows or
MacOS. Examples include Linux not being able to run some proprietary software
that these operating systems can, or Linux not being as convenient because you
often have to figure out most things yourself. I get that. However, all things
considered, the value that Linux provides to me exceeds the values that those
proprietary OSes provide.
What is unique about Arch Linux?
Essentially, a Linux distro is a version of the Linux operating system that
comes packaged with additional software and tools.
Oversimplicated, but an intuitive formula can be given as:
DISTRIBUTION = KERNEL + SOME ADDITIONAL DEPENDENCIES
Theoretically, there’s nothing stopping you from doing in one Linux
distribution what you can do in another simply by altering the ‘SOME ADDITIONAL
DEPENDENCIES’ part of the above formula. These additional dependencies can
range from package managers to init systems, as well as the initial software
that comes with the distribution.
When you examine the variety of potential distributions one can select from, it
can be overwhelming. Why are there so many different Linux distributions? The
answer is because many people have different objectives when using an operating
system and therefore require different dependencies. Additionally, numerous
organizations and communities each have their distinct views on what
constitutes a good Linux distribution.
While distros like Ubuntu focus on being more friendly and welcoming to new
users, some distros, like Debian focus on stability and some like Arch, focus
on a certain combination of being minimal, cutting-edge and active.
To me the key principles that Arch Linux were emphasasising (which can also be
read in their wiki), were more
appealing than the other mainstream distros available.
Arch Linux essentially distinguishes itself as a minimalist distribution with a
very knowledgeable community. This fact partially explains why Arch is
considered one of the most cutting-edge distributions out there – its active
community maintains available packages that Arch users can install through a
community-driven repository called the Arch User Repository.
When you install Arch, you don’t receive anything but a virtual console and
specific programs that you instructed the Arch installer to download. Unlike
other distributions that build many packages into your system by default, which
might include several programs that you may need but at the cost of downloading
additional unwanted programs, Arch Linux instead puts the customization
responsibility on the user. Which allows you to install and focus solely on
what you need.
Some Reflections
Getting used to it
Switching from Windows to Arch Linux was really challenging as in Arch Linux,
it is you that needs to bear practically all responsibilities regarding your
computer. As a result of this transition, I began to appreciate all the
features we often take for granted; screen lockers, clipboard functionalities,
power management, multimedia keys, and so on. These functionalities are usually
managed by specific processes running unseen in the background. The average
computer user might not realize that these are distinct programs that need
setup. However, when you are building your system on a minimalist distribution,
your knowledge of such details tends to increase.
Variety of Solutions
When you want to accomplish something on Linux, there are many alternative ways
to do it. As a result, you’re often left wondering, “which method/approach
should I choose first?” I think that these kinds of questions frequently
puzzled me. Here are some examples:
‘I am using X as a Window Server Protocol but I heard that Wayland is a newer
protocol, should I switch to it?’
‘A program called pipeware for audio handling is recommended but some suggest
something called pulseaudio, which one shall I use?’
‘Shall I use vim or neovim? I heard that vim is organized by one person whereas
neovim is more community driven.’
Don’t misunderstand me. I’m not suggesting that these questions are irrelevant.
They indeed become meaningful when the minor differences between them begin to
matter. However, I believe that the best approach is to simply select a tool
that resolves the problem at hand without overthinking and keep progressing in
our work. It’s not beneficial for beginners to obsessively search for the
‘best’ program. Often, opting for a ‘sufficient’ solution can also be the
‘best’ choice, considering the time you might waste finding a program.
Some beginner mistakes
One common mistake I see among beginners, which I also made myself, is
attempting to do things without understanding them properly. This is especially
common among new Linux users who may wind up breaking their system by copying
and pasting commands from some forum. They tend to install programs that
perform the same functions and use different package managers that configure
multiple dependencies and configuration files. Which often leads to one manager
disrupting the changes made by the other, and so on.
While it’s understandable that people may want to work in the same way they’re
accustomed to, this habit can also hinder them from getting used to the Linux
environment. For instance, instead of looking for programs that allow
installations through GUI-based applications, it’s more beneficial to
understand how to operate the native package manager through a terminal, learn
how to build things from source code using makefiles, and so on.
The solutions people try to replicate their previous workspace can become
overly complicated. In these cases, it can be better not to solve the ‘problem’
in the first place. Hell, even I’ve been guilty of this myself. Since I loved to
use MSPaint, whenever I needed to draw something on Linux, I used to run a
Windows instance on QEMU and start MSPaint with a bash alias that I had set up.
In retrospect, this was a poor solution as it would have been just simpler to
switch to another drawing program designed for Linux.
Dual Boot
Setting up a dual-boot computer with Linux and Windows could seem like a good
choice for those interested in learning Linux. However based on my experience,
it is usually a bad idea. I made the error of installing Linux Mint alongside
Windows few years ago only to find myself frequently trying to synchronize my
files between the two systems. The maintenance that was required increased due
to the usage of both systems. Moreover, having the option to fall back on
Windows when facing issues prevented me from engaging with the Linux
environment enough. I could not learn how to troubleshoot and resolve issues on
myself.
In my view, what I have described above is like attempting to learn swimming
while using a flotation device. It’s probably more effective to dive in and
learn the Linux operating system without relying on Windows as a safety
net.
I guess the only valid reason for wanting to keep Windows installed on a
computer is to play video games or use specific programs that are not available
on Linux. Other than that, I suggest using Linux for most things you do.
GUI vs Terminal
Linux users often use terminal programs as they sometimes offer more
flexibility and power for certain tasks. The tasks are usually completed by
using command-line interface (CLI) programs which allows users to enter
commands to perform various actions. This is different from programs with a
graphical user interface (GUI) which usually have buttons and menus.
Even when using GUIs, we often end up performing repetitive tasks manually. In
these kinds of situations, using a terminal instead of a GUI program can become
really handy. As simple CLI can easily be used programmatically. They can be
used in loops, conditionally, and to pipe the output from one program to
another. This approach can be a game-changer, especially for those who aspire
to become power users. Here are a few simple examples of where this approach
has saved me a significant amount of time:
Recently, I had a batch of 113 weirdly rotated images, but I was able to
rotate them all to the desired orientation using the following code:
 for file in *.jpg;
 do
 convert $file -rotate 90 rotated-$file;
 done
I used yt-dlp to easily download youtube videos and playlists. It was one
of the most comfortable downloading experiences I had.
I used pdfcrop for cropping PDF files.
I changed the structure of folders that have many files in them by using
simple for loops alongside with mv cp rm
Not to mention how much its easier to install packages that are on AUR or Arch
Repository compared to installing stuff in Windows.
Overall, I strongly believe that the power of interacting with programs through
terminal can increase one’s overall productivity.
Arch Linux manuals
One caveat of using command-line interfaces (CLIs) is that it can be easy to
forget the specifics of the interface. As a result, it is essential for terminal
users to know how to quickly open and find the information they need in manual
pages in order to effectively use CLIs.
Thankfully, most programs in Linux already have their own manuals available
through the man command. When I need to use a certain utility or CLI function,
all I do is open the terminal through a keybinding that I have set up and type
man programname, then I can quickly scroll through the manual page using VI
keybindings.
Despite the fact that I am already acquinted by heart with some of the most
important flags and utilities of the programs that I use, I am also a lot better
(faster) at finding the stuff I need. It is just as much important, if not more
important, to be able to find the stuff you need by knowing them by heart.
I do not use any desktop environments. I use a tiling Window Manager (WM), a
type of software that automatically arranges and resizes application windows in
a non-overlapping fashion, without the need for manual dragging and resizing.
The particular WM I use now is called dwm, it is one of the tools that are
built by the hacker organization suckless.
Having switching to a tiling window manager, I now realize that how much of a
hassle was it to manually resize, drag, and select all my application windows.
Besides slowing me down, your average desktop environment also takes a lot of
space with their tilebars and etc. which I might want to use for seeing more
content.
dwm comes with another program called dmenu which enables you to select list
of options from the menu and do whatever you want with it. Initially dwm uses
dmenu to make the user easily open the programs they want to open through a
certain shortcut.
I also use dwmblocks to control the contents of the info bar on the top left.
I only show Volume, Battery, Memory and Date info there.
Keyboard Layout
Since I am from Turkey, I need to use Turkish characters in my daily life a lot
especially when interacting with my friends. The thing is I also find English
keyboard layout very productive, especially when it comes to coding and using
Vim. As a result, I needed a mechanism to be able to benefit from both of these
functionalities. For this, I have attached a shortcut to switch between TR and
US layouts.
I have also swapped the Escape key with the CapsLock key as I use the escaping
functionality a lot when using VIM but do not use Caps Lock that much. It is
ergonomically a lot more preferable to use the CapsLock key for the Escape
functionality.
Here are my settings in .xinitrc that imply those changes:
I am also aware that I could have used tr-alt-q layout which is basically an
English keyboard layout but if you use AltGr, keys like i,o,u,g,c turns into
ı,ö,ü,ğ,ç. The problem is that the only way I found was to change the keycode
tables through .Xmodmap and it was buggy. I could not find a simple and clean
way to implement this layout
Terminal & Shell
As terminal, I use st, so far I have not seen particular advantage of using st
over other possible terminals that I could have use Alacritty or so, I just
needed a terminal that is lightweight and st was one of the possibilities I
could choose.
As shell, I mostly use bash. But I understand using zsh is perfectly fine in a
personal environment as well. The only possible problem that I can think of zsh
is portability problem of the scripts written for it.
Text editing and programming
I use neovim for almost all my works involving text. Neovim is a fork of Vim,
a highly configurable text editor that is designed to be extendible and also
efficient through the maximal use of keyboard both with macros and
shortcuts. It also comes with a powerful syntax highlighting engine and support
for a wide range of programming languages and file formats. As a dialect of Vim,
Neovim is fully compatible with Vim and uses the same configuration files and
command syntax, but it includes additional functionality and improvements that
are not available in the original Vim. dialect of vim.
‘Why use neovim instead of vim?’ you might ask. Right now, it does not matter to
me whether I use vim or neovim since in both of these the things I want is
available. I use neovim because it was my first decision to go with it and
because of this I already have my files configured for neovim. The reason why I
initially chose neovim over vim was because of a certain workflow video I have
seen on youtube: Vim had not some the plugins that were used in the video. Later
on, I thought that video was full of unnecessary stuff so I gave up on it.
Getting used to vim has significantly improved my speed and comfort when
programming as its command mode is very efficient for text navigation and
manipulation without even having to use mouse or moving your hand much.
When my friends see me getting done stuff in VIM they sometimes refer to it as
‘black magic’, I like this a lot too. =)
I should also mention that I have started to convert some of my .odt, .docx
files like diaries, logs, records to plain text just because it gives me to
flexibility to be able to edit/read them through simple text editors such as
vim.
Terminal Multiplexer
A terminal multiplexer is a software program that allows multiple terminal
sessions to be created, accessed, and controlled from a single terminal window
or console. It enables users to have multiple terminal sessions running
simultaneously, switch between them, and manage them easily.
Since I use terminal for almost all the text work I do including software
development, it is, thus, ergonomically important for me to have a way to manage
different programs through one terminal.
I do this thorugh a program called dvtm, an alternative for tmux.
Although I can split screens in vim when doing software development, it does not
give the same flexibity and ease of use the dvtm gives. There are some
programs you might want to see running simultaneously through one terminal
instead in addition to being able to edit/write files. You can do the latter in
vim, but the former is not so trivial to achieve.
Since dvtm already solves a problem that vim splits solve, I do not use vim
splits anyways.
Here is an example showcase of dvtm:
File Manager
I use ranger, considering to switch to lf but also don’t see a reason for it
since I am already used to ranger.
As far as I remember the only thing I have changed in ranger is some of the
priorities on which programs to use when openning files and to enable image
preview mechanism.
Before getting used to ranger I was using a file manager with GUI named
dolphin.
Taking Notes
I used lots of different note-taking apps such as Google Keep, Obsidian, Notion…
The problem is, almost all of these apps come with features that I do not use at
all, I mostly use note-taking applications as a way to remember the things that
I intended to do and for this, all I need is a way to sync my files between my
Phone and Computer. I used telegram for this purpose for a while, but since its
purpose is not this, I then looked for some alternatives.
Meanwhile, I found gitjournal, it is a git based note taking application with
a Mobile App. On my phone, I use its own application whereas on my computer, I
just use the gitjournal script that I created that updates the notes by
automatically running commands such as git pullgit commitgit push before
and after opening nvim to change note files.
Also there is a very simple script called passmenu which uses dmenu to fetch
the passwords from pass easily. For passphrase aplet to open, you need gtk2 or
gtk3 though.
Wifi & Bluetooth
I use bluetoothctl to connect bluetooth devices and use networkmanager &
nmcli to connect to the internet.
Web Browser
I just use brave like a normal human being. I like that it has a builtin
adblocker. Since I like moving with vim keybindings, I have also installed an
extension called vimium. This extension helps you to navigate your browser
through vim keybindings.
Conclusion
Switching to Arch Linux was a challenging experience due to its steep learning
curve. I had to deal with many things that I always used, but never realized
that there were actual programs for those functionalities, such as clipboard,
screen locks, and opening screens. It took some time to get used to it, but now
I am so accustomed to using Arch Linux that I don’t even want to use Windows
anymore, except for cases like playing video games (which I also don’t do it
much these days).
It’s also fun to challenge yourself and succesfully get over those challenges.
This essay was originally written for the ‘Introduction to Philosophy I’
(PHIL103) course at Bilkent University, where we delved into various branches of
philosophy, including consciousness. It reflects some of the thought processes
that arose as I grappled with these philosophical questions. It’s important to
note that this essay is not an exact reflection of my personal beliefs, but
rather an exercise in argumentation.
Despite this, I believe the arguments presented in this essay hold value and are
worth exploring. My hope is that this essay provides you with insight and
provokes thought, and that you find value in engaging with the ideas presented
here.
Introduction
Believing in a particular framework that describes the nature of existence,
known as an ontology, can greatly influence an individual’s perspective on life
and their actions. Three such ontologies are Physicalism, Dualism and Idealism.
Physicalism states that all phenomena can be explained in terms of physical
concepts. If a person believes in Physicalism, they may prioritize material
possessions and physical experiences, and focus on achieving practical goals.
This belief can also affect their beliefs about the afterlife and the nature of
the self.
Dualism, on the other hand, is a view that posits the existence of two
fundamental and distinct kinds of substances or principles: matter and mind.
This view is similar to Physicalism in that both agree that there exist physical
objects. But is different in the sense that it holds that the mind and the body
are distinct entities that cannot be reduced into one another.
In this article, I argue that we have sufficient reason to believe that objects
that exist are not physical, refuting both Physicalism and Dualism. I do this by first
showing that the existence of physical objects cannot be known, and then
combining this belief with the principle of parsimony, also known as Ockham’s
Razor. As a result, this argument supports the ontology of Idealism, which is
the view that reality is ultimately mental in nature.
Argument
Let me present you the outline of my argument:
P1. If agents can know whether something exists, then they know so a priori
or a posteriori.
P2. Agents don’t know a priori whether physical objects exist.
P3. Agents don’t know a posteriori whether physical objects exist.
C1. Agents cannot know whether physical objects exist.
P4. If existance of a thing cannot be known and assuming it does not give us
more explanatory power than what we are left without it, then there is
no reason assuming it exists. (parsimony principle)
P5. Assuming existence of physical objects does not give us more explanatory
power than what we are left without it.
C2. There is no reason for assuming that physical objects exists.
The first premise (P1) is very easy to see, if not self-evident. By
definition, a priori knowledge means the knowledge we gain without experiencing
whereas a posteriori knowledge means the knowledge we gain with experience. It
is either one or the other.
The real challenge is to show that P2 and P3 are true.
For (P2), we can say that agents’ understanding of physical objects are
fundamentally acquired through the sensory experiences they have. For example,
physicists do not know the behavior of an electron until they perform certain
experiments, such as observing its interactions with other particles or
measuring its properties using certain equipments.
Also, keep in mind that a priori knowledge is the knowledge that is not
contingent. Whereas it is not possible to conceive a triangle that has 4 sides,
it is, possible to conceive physical objects not being exist.
(P3) can be deduced by claiming that a representation is not the same thing
as the thing it represents, and that what we don’t deal with physical objects
themselves, but with their representations.
Representation of a thing, is not the same thing as it represents. For
example, a wine in a menu is not the same thing as a wine, for you cannot drink
the wine in a menu but the wine itself. The words we use for describing stuff,
the concepts we have in minds are also representations of things. When it comes
to representations, there always are stuff that you can do with one but not with
another.
Furthermore, our experiences of the world are limited by the capabilities of our
senses. We can only perceive a small range of colors and other sensory
information, and this information is not experienced directly but is interpreted
by our brains. This is why we can be susceptible to optical illusions and other
forms of sensory deception. Additionally, our experiences of physical objects
are not of the objects themselves, but of their representations in our minds.
This means that We don’t deal with physical objects themselves, but with their
representations.
This is analagous to one of the metaphors Donald Hoffman, a cognitive scientist,
likes to use. The sensory systems that humans possess (such as touch, smell,
sight, sound, and hearing) function as a user interface that hides the true
complexity of reality (e.g. the circuits and voltages in a computer) and allows
individuals to control and interact with it without needing to understand it. He
compares this to the way that a desktop interface on a computer hides the inner
workings of the device and allows users to control it through icons and actions
like dragging and clicking (Hoffman).
(P4) is also referred as principly of parsimony, or Ockham’s Razor. The
principle helps us to simplify our thinking by reducing the number of competing
frameworks that compete with each other. There are two reasons I follow this
reason.
Firstly, whether we know reality is necessarily simple or not, unless there is a
good reason or advantage to believe a concept over other explanations, we are
justified in not believing it.
Secondly, we already use this principle a lot when doing science. In general,
the massive embracement and success of this principle in scientific fields
provides a reason to think that it is a useful and reliable guide for
eliminating certain hypotheses.
Finally, let us consider (P5),
In P3, we demonstrated that our understanding of the world is derived from our
experiences and observations. This is based on representations, not the things
themselves. We do not obtain these representations after having the concept of
physical objects; rather, it is the other way around.
Even without accepting the existence of physical objects, we are already capable
of conducting science. Our assumption of the existence of physical objects is
simply a mental shortcut that we use to try and comprehend our surroundings.
However, we do not necessarily need this assumption.
Moreover, all of the regularities that we observe in the world would still be
possible even if we only accepted the existence of mental substances. In this
way, what we refer to as physical objects would be fundamentally a type of
mental substance. This does not violate Ockham’s Razor, as there are already
strong arguments, such as Descartes’ cogito ergo sum, that support the existence
of mental things.
Criticisms
Now that I have proposed my position in advance, it is now a good time to
consider some of the potential criticisms and misconceptions that could be
raised against this position.
What is it that is represented?
“If physical objects does not exists, and the only thing that we deal with is
physical representations, then what is it that is represented? There cant be a
representation of a thing that does not exist.” one might say.
Yes, I agree with the part that if something is represented, then a thing
exists. The part that I don’t agree with is that physical representations are
the representations of objects that are physical objects which are independent
of mind.
It is now a great time to clarify what I mean by physical objects and physical
representations. In this argument, I used the expression “physical objects” not
in the sense that a substance that can be fully explainable through physics. If
that would be the case then it would be wild that I claim such objects does not
exist. By physical objects, I refer to objects that exists independently of
mind. Physical representation, on the other hand, are the kind of
representations that are made in Physics. This representations, by themselves,
does not require what is required to be independent of mind.
In essence, idealists does not necessarily reject physical objects does not
exist in the sense that there are objects which can be explained by physics but
in the sense we prescribed above. When certain a spiritualist says “Matter is a
way of seeing, not something that is seen” (Spira) they seem to be agreeing that
there exists objects that can be understood from the perspective of Physics but
disagree with the part that those objects are abstract, mind-independent
substances by themselves.
Ockham’s Razor is not reliable
The argument relies on Ockham’s Razor, which states that the simplest
explanation is most likely to be true. However, this assumption may not always
hold true. Some may argue that we do not have sufficient evidence to assume that
reality is simple.
Although one can believe that reality is not supposed to be ontologically
simple, they can still be epistemically justified to favor the simplest
explanation when faced with multiple possibilities. This does not have to be the
case because the reality is ontologically simple, but rather, it is the best we
can do: In the absence of other compelling evidence when comparing seemingly
equivalent explanations, it is already justified to choose one of the theories
randomly, so why not just choose the simpler one?
Direct Perception of Physical Objects
It is possible to reject P3 by saying that direct perception of physical objects
is possible. One could say that a representation of a thing can be seen as
identical to the thing itself if the function of the representation is the same
as the thing it represents. For example, one might argue that if a photograph of
a cup were able to serve the same function as the actual cup it represents, then
they could be seen as identical.
However, this approach ignores all the other aspects of entities besides their
functions. Even though the photograph and the cup may function in the same way,
they are not necessarily the same thing unless they are made of the same
substances and share the same inner workings.
Conclusion
In conclusion, I have come to the conclusion that there is no reason for assume
that physical objects exist according to the principly of parsimony. I have done
this by first arguin that agents cannot know whether physical objects exist. And
then showing that assuming the existence of physical objects does not give us
more explanatory power than what we are left without it.
 An example of an expression that returns true in JavaScript. Here,


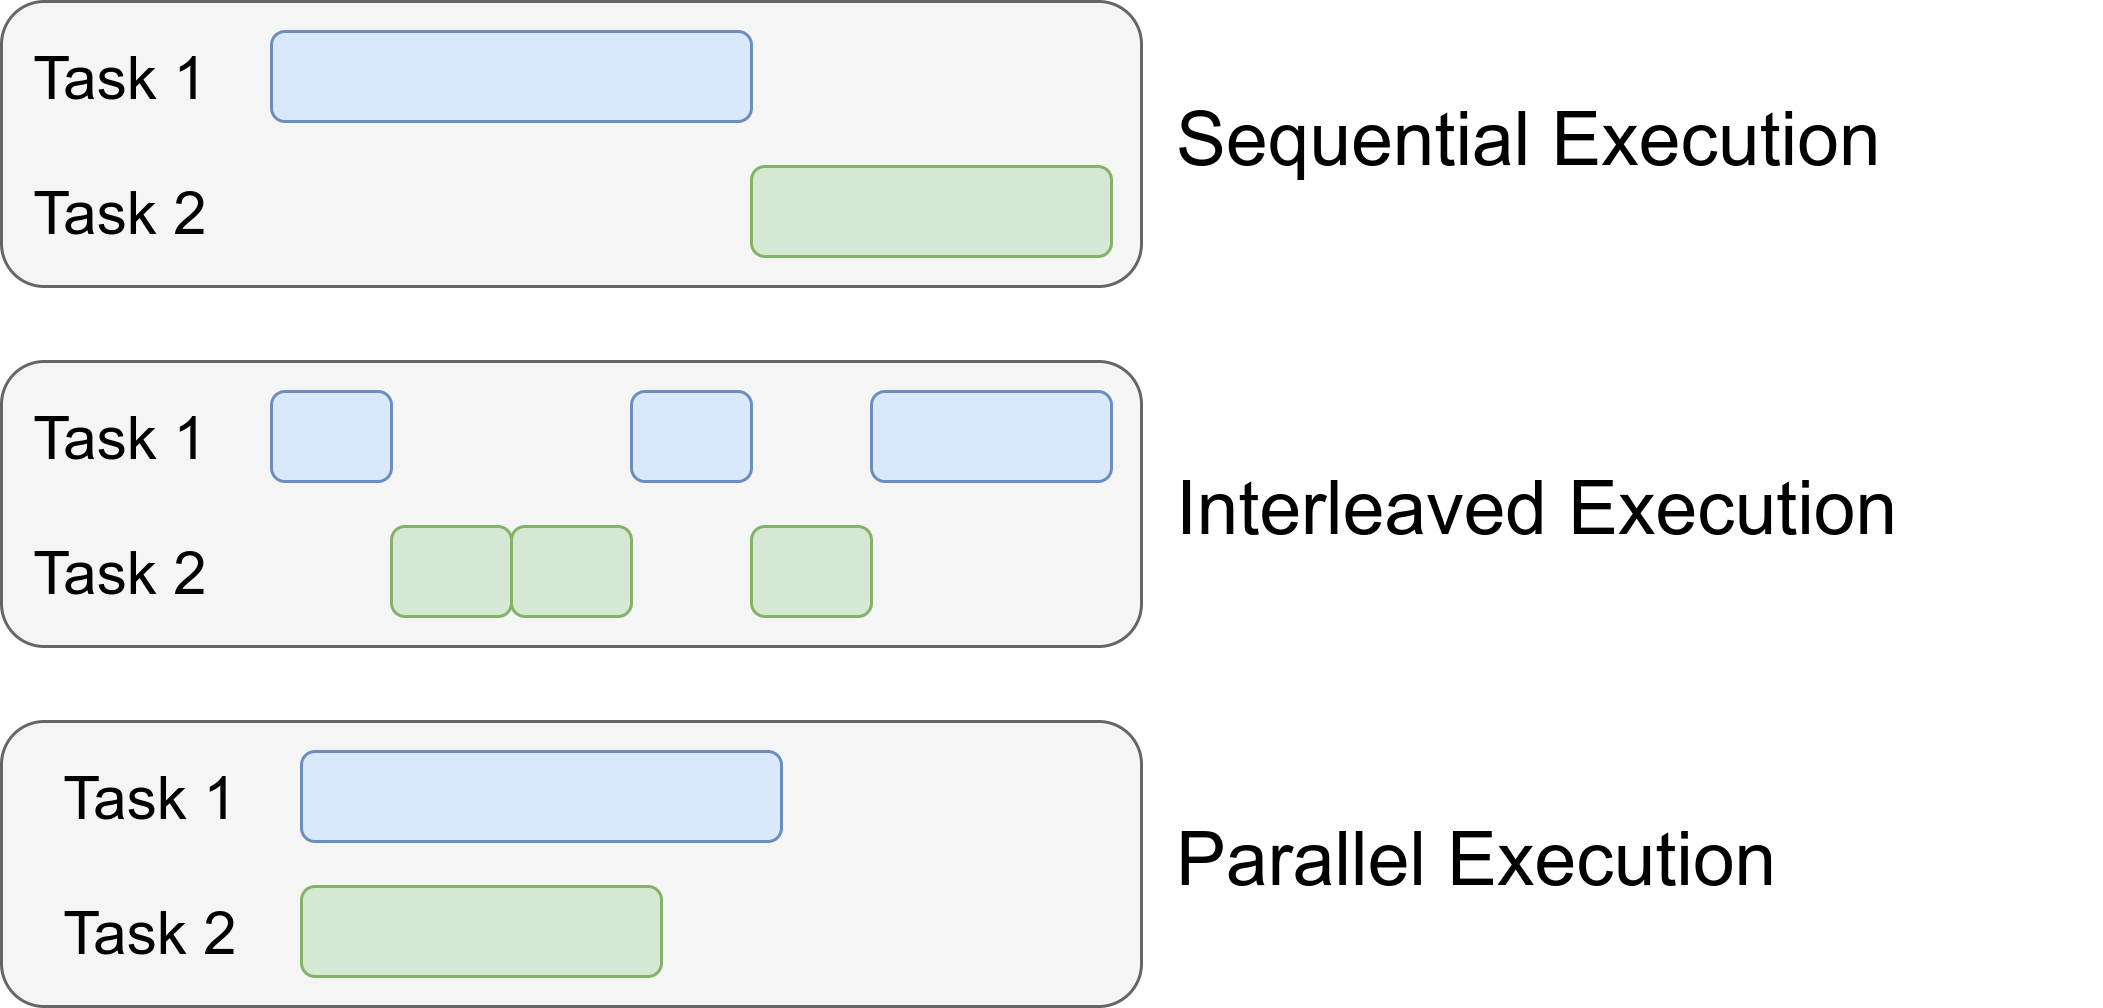 (Image taken from
  (Image taken from