Compact guide for building an OpenClaw workspace focused on child protection, minimal retention, local models, direct-message-only behavior, and guardian escalation.
OpenClaw is not just for automation. With strict guard rails and local models, it can become a private daily helper and a protection layer for children in chats.
Out of multiple conversations with people at BSD conferences, I noticed that many would love to see a chatbot that provides precise information on FreeBSD—for users, admins, and developers.
I strongly believe that there should not be an official chat.freebsd.org. Local chatbots work well and can be tweaked to fit personal needs.
This how-to is for demo cases. Proper authentication, firewalling, jail separation etc. is mandatory for production!
Out of multiple conversations with people at BSD conferences, I noticed that many would love to see a chatbot that provides precise information on FreeBSD—for users, admins, and developers.
I strongly believe that there should not be an official chat.freebsd.org. Local chatbots work well and can be tweaked to fit personal needs.
This documentation is written for macOS with Apple Silicon (because of the GPU support), but should work on other OSes as well.
This tutorial walks you through downloading and configuring the FreeBSD 14.2 image for Raspberry Pi Compute Module 4 (CM4). You’ll enable SSH access, configure the system, and install a custom EFI loader. If you are using a Compute Blade, this guide will work for you as well.
Prerequisites
Raspberry Pi CM4 or a system with an eMMC/SD card.
FreeBSD environment or a system capable of running the required commands.
Your SSH public key for remote access.
Basic familiarity with Unix commands.
A reliable internet connection.
Step 1: Download and Modify the FreeBSD RPI Image
Download the FreeBSD image for ARM64 Raspberry Pi:
How to create secure remote access with zero trust policy
This short how-to should give you some ideas on how to create secure web access to your web services without VPN.
First of all: You can stop reading (and probably using Internet after all) if you don’t trust any content providers.
I will use Cloudflare, OPNsense, Solokeys and Github for this Demo. You need a fixed IP-address or just use Cloudflare’s DynDNS service as well.
Everything has been comitted and merged upstream.
So you can simply run:
pkg install opensearch
STALE
Want to try out OpenSearch on FreeBSD?
Right now there is no official support or port for OpenSearch on FreeBSD, so I created a small hotfix for a demo installation.
As I like to run everything on BastilleBSD I added basic support for jails as well (due to missing default loopback interface).
Using bastille upgrade 12.1-RELEASE 12.2-RELEASE is the prefered way of upgrading.
If you need to do that air-gapped or with a special release (like -HEAD) you can use this tutorial.
before you start: make sure your host system is not behind the jails release
If you want to fetch a special branch you can svnlite checkout one of the following branches: ‘release/12.2.0’ ‘releng/12.2’ ‘stable/12’ e.g. svnlite checkout https://svn.freebsd.org/base/releng/12.2 /usr/src
sysrc cloned_interfaces+=lo1
sysrc ifconfig_lo1_name="bastille0"
service netif cloneup
edit /etc/pf.conf (add the lines without #)
ext_if="em0"

set block-policy return
scrub in on $ext_if all fragment reassemble
set skip on lo

table <jails> persist
nat on $ext_if from <jails> to any -> ($ext_if)

## Enable dynamic rdr (see below) bastille 0.7+
rdr-anchor "rdr/*"

block in all
pass out quick keep state
antispoof for $ext_if inet #disable for VNET
pass in inet proto tcp from any to any port ssh flags S/SA keep state
This a short how-to for creating a FreeBSD pkg mirror using BastilleBSD and Poudriere.
Two things:
Yes! This is not a full how to for creating a mirror, but I assume you’re able to spawn a webserver and move files on the filesystem.
Yes! You could do more automation using templates. At the time we started playing with poudriere with bastille didn’t have the features it has now (0.8).
on the jail host:
Bastille is very active so make sure you switch to latest pkg mirror
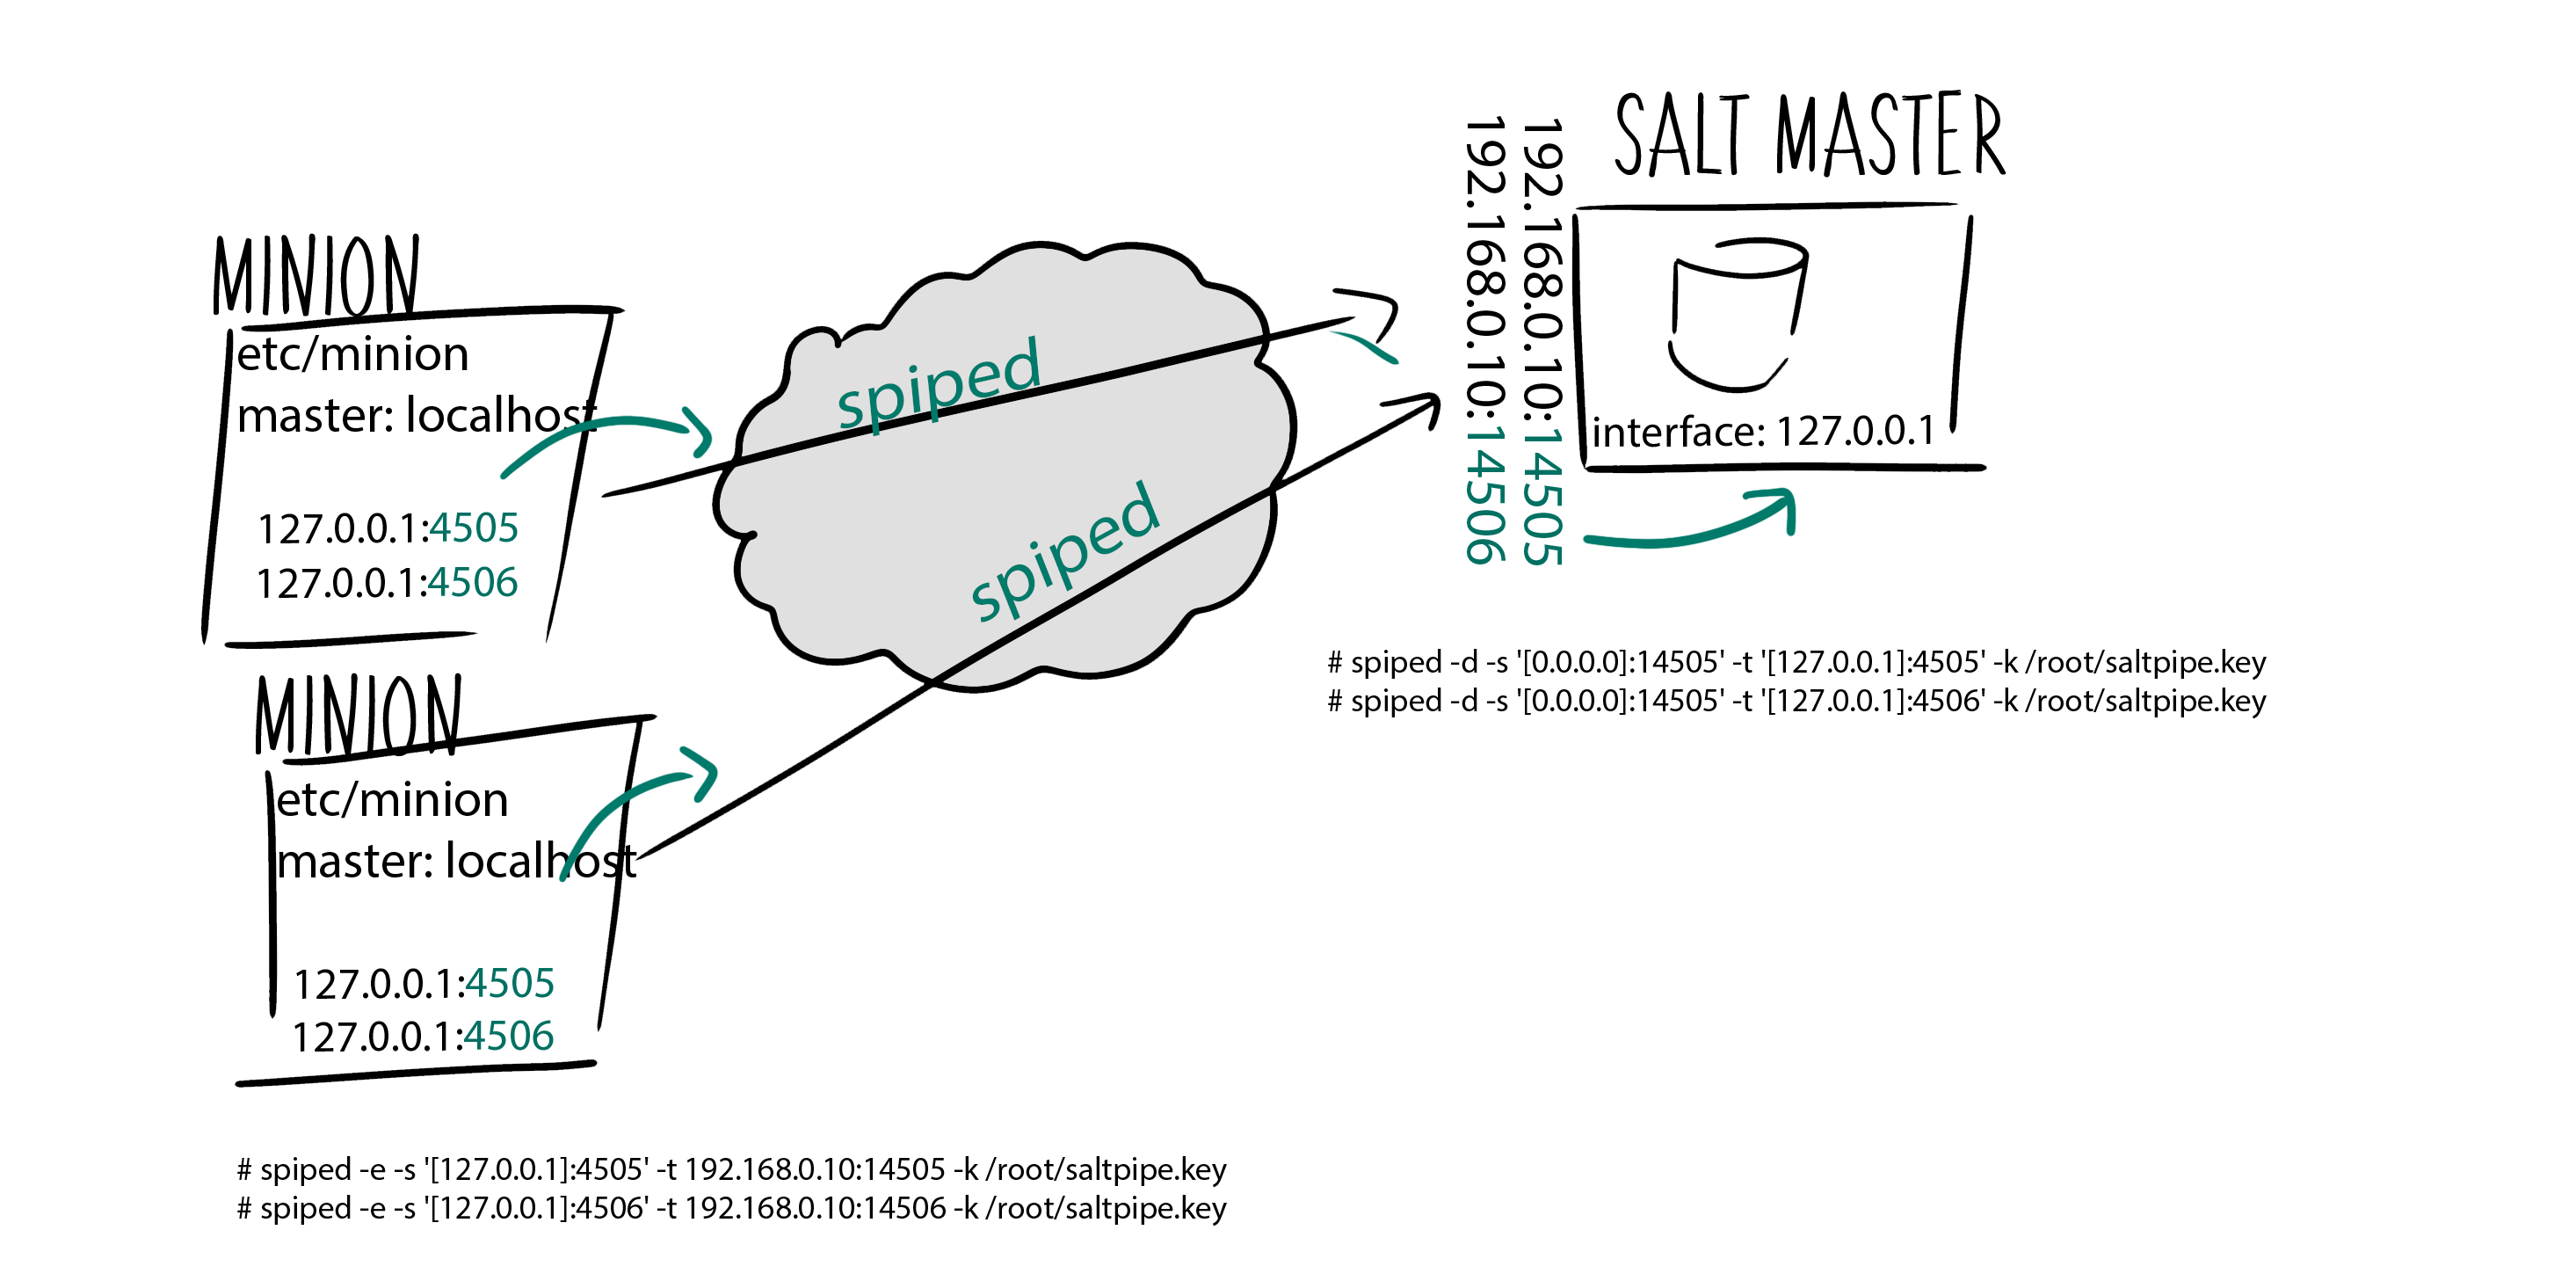
This is a short how-to for securing Saltstack communication via spiped.
(most of it is based on the how-to I wrote on securing Elasticsearch with spiped)
sysrc cloned_interfaces+=lo1
sysrc ifconfig_lo1_name="bastille0"
service netif cloneup
edit /etc/pf.conf (add the lines without #)
ext_if="em0"

set block-policy return
scrub in on $ext_if all fragment reassemble
set skip on lo

table <jails> persist
nat on $ext_if from <jails> to any -> ($ext_if)

block in all
pass out quick modulate state
antispoof for $ext_if inet
pass in inet proto tcp from any to any port ssh flags S/SA keep state
add the following lines to your httpd.conf or Inlcudes/redmine.conf
LoadModule passenger_module /usr/local/lib/ruby/gems/2.4/gems/passenger-6.0.0/buildout/apache2/mod_passenger.so
PassengerRoot /usr/local/lib/ruby/gems/2.4/gems/passenger-6.0.0
PassengerRuby /usr/local/bin/ruby24

to use ssl uncomment the following lines and set Listen port to 443
LoadModule ssl_module libexec/apache24/mod_ssl.so
SSLEngine on
SSLCertificateFile "/usr/local/etc/apache24/YOUR_SSL.crt"
SSLCertificateKeyFile "/usr/local/etc/apache24/YOUR_SSL.key"
RailsEnv production
PassengerDefaultUser www
DocumentRoot /usr/local/www/redmine/public/
<Directory “/usr/local/www/redmine/public/">
Allow from all
Options -MultiViews
Require all granted
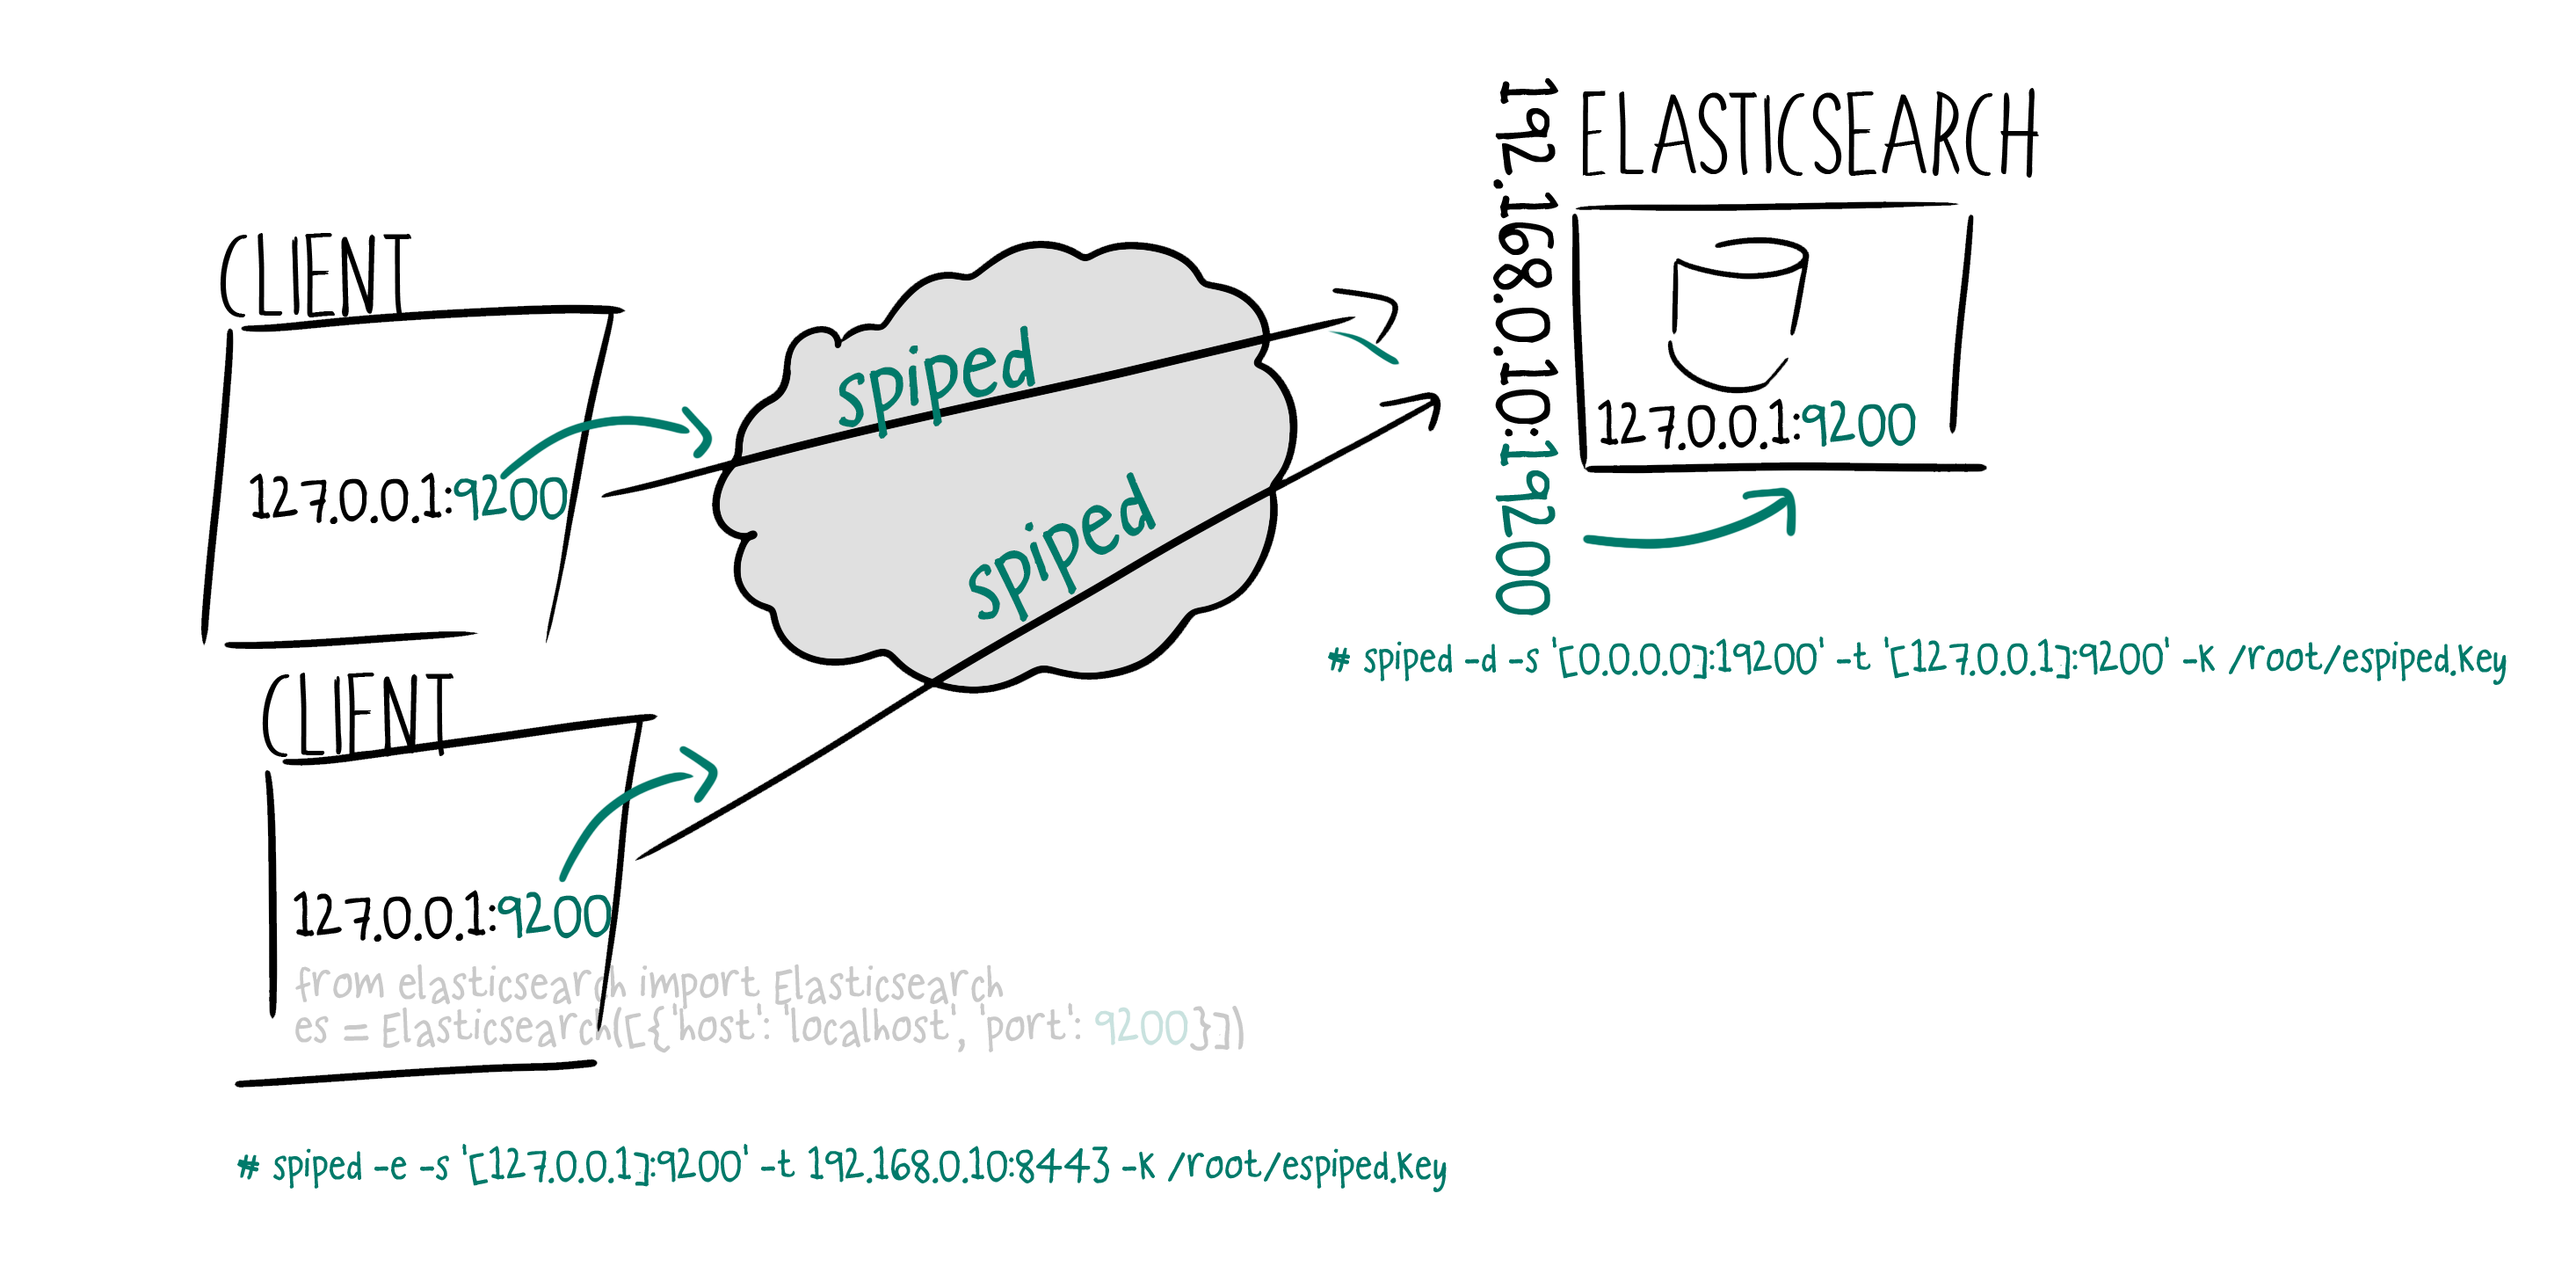
HowTo Secure Elasticsearch using spiped on FreeBSD, Debian and CentOS
Spiped makes it really easy to secure connections between clients and Elasticsearch databases.
Keep in mind that the symmetric key (once compromised) can be used to intercept/mitm all connections.
install spiped
FreeBSD
pkg install spiped
Debian/Ubuntu
apt install spiped
CentOS
vim /etc/yum.repos.d/spiped.repo
[lsde-spiped]
name=Copr repo for spiped owned by lsde
baseurl=https://copr-be.cloud.fedoraproject.org/results/lsde/spiped/> epel-7-$basearch/
type=rpm-md
skip_if_unavailable=True
gpgcheck=1
gpgkey=https://copr-be.cloud.fedoraproject.org/results/lsde/spiped/pubkey.gpg
repo_gpgcheck=0
enabled=1
enabled_metadata=1
If your Salt Minion fails to start with
[salt.utils.process:754 ][ERROR ][5542] An un-handled exception from the multiprocessing process > ‘SignalHandlingMultiprocessingProcess-1:59’ was caught:
Traceback (most recent call last):
File “/usr/local/lib/python3.5/dist-packages/salt/utils/process.py”, line 747, in _run
return self._original_run()
[…]
File “/usr/lib/python3.5/asyncio/base_events.py”, line 411, in run_forever
‘Cannot run the event loop while another loop is running’)
RuntimeError: Cannot run the event loop while another loop is running

 Keep in mind that the symmetric key (once compromised) can be used to intercept/mitm all connections.