I feel there is spectrum between vibe coding and agentic engineering, which I like to refer to as Outcome Driven Development (ODD). Agentic engineering is using agents but evaluating its outputs with the same thoroughness as if you wrote code by hand. ODD is where you care less about the
Show full content
I feel there is spectrum between vibe coding and agentic engineering, which I like to refer to as Outcome Driven Development (ODD). Agentic engineering is using agents but evaluating its outputs with the same thoroughness as if you wrote code by hand. ODD is where you care less about the generated code but more about the outcomes it produces and do a thorough testing on those outcomes.
I’ve been primarily using Claude Code. The recent launch of DeepSeek V4 and GPT 5.5, has made me realize the importance of having an open coding harness that is model agnostic. That will help me explore the capabilities of these new models. I’ve just reinstalled
Show full content
I’ve been primarily using Claude Code. The recent launch of DeepSeek V4 and GPT 5.5, has made me realize the importance of having an open coding harness that is model agnostic. That will help me explore the capabilities of these new models. I’ve just reinstalled OpenCode and gonna give that a try again.
Good article describing CRI (Color Rendering Index). Living in the Pacific Northwest, past winters I've been thinking of how to improve SAD by using better lighting. This article provided me more knowledge on what should I be looking for.
Show full content
Good article describing CRI (Color Rendering Index). Living in the Pacific Northwest, past winters I've been thinking of how to improve SAD by using better lighting. This article provided me more knowledge on what should I be looking for.
Coding agents have a tendency to make all experiences be alike. Using them to push UX is more of something we should do as experimentation is now a lot cheaper. I love the idea of apps being much more extensible and customizable by the users.
Show full content
Coding agents have a tendency to make all experiences be alike. Using them to push UX is more of something we should do as experimentation is now a lot cheaper. I love the idea of apps being much more extensible and customizable by the users.
I've been thinking about AI-generated tests and the friction around them. AI can generate a lot of tests, but figuring out which ones are "good" requires human review that doesn't scale. The reframe I keep coming back to is to stop judging them on
Show full content
I've been thinking about AI-generated tests and the friction around them. AI can generate a lot of tests, but figuring out which ones are "good" requires human review that doesn't scale. The reframe I keep coming back to is to stop judging them on quality and start thinking of them as tripwires. Their job isn't to validate correctness, it's to alert reviewers when something significant changed. If a PR trips them, look closely. If nothing trips, the change likely didn't touch core logic.
If that framing holds, you could use techniques like mutation testing to find gaps where code changes would go unnoticed, then generate tests targeting those gaps at scale. The bar shifts from "is this a good test" to "would this catch a change," which is much easier to clear with less review overhead and directly accelerates code reviews by telling reviewers where to focus. Still thinking through this but it feels like an interesting direction to explore.
Unlock home GPU power for cloud workloads with Tailscale and Docker. I demo a simple architecture that tunnels requests to your local rig, skipping pricey cloud GPUs. All ports stay hidden, ensuring a tight, cost-effective environment.
Show full content
I've been building webtomarkdown.com to have a tool that allows me to convert various type of content to Markdown so I can pass it to LLMs (Markdown is the language of LLMs).
I started with microsoft/markitdown which is a really nice and fast library. But it does poorly on PDF that are beyond basic text e.g. tables, images etc. In my research and trying it out I see the DS4SD/docling does a lot better in extracting content from PDF. One of the reason it is able to do it is because they trained a neural network based model huggingface/ds4sd/docling-models which takes an image and extract the content.
Running it requires GPU and Cloud-based GPUs, come with a hefty price tag. I don't want to pay for it, when the primary user of the tool is myself and maybe few who explore it. I wanted to tap into my home rig (packing a 4090 and a 3090) which I currently use for Local LLMs and want to utilize it for this.
The big question: How do I expose my home server to my cloud environment without throwing security out the window?
The answer: Docker and Tailscale. Below is how I set it up, keeping GPU usage cheaper and my machine safe from unwanted traffic.
Using Tailscale for Secure Networking
Tailscale provides a simple, secure VPN solution built on WireGuard. It allows devices to connect directly and securely, forming a mesh network that's perfect for securely linking to machines. In this case two containers
I have my actual service deployed in Digital Ocean Droplet with Docker Compose
I want to expose service from my home GPU server only for docling, wrapped in a different service.
The home GPU server shouldn't open any ports to public internet but rather my container in Droplet should connect to container in my home server using a VPN (Virtual Private Network).
Network topologySetup Tailscale
Tailscale for various tasks, but isolation is essential to ensure each device only accesses what it should. Tailscale’s Access Controls (ACLs) help you achieve this. By combining tags and ACLs, you can ensure that in this scenario, two containers only have access to each other—and not the rest of your network—effectively containing potential security issues within those containers.
ACLs function by letting you specify explicit rules for what can communicate with what, while anything not covered remains off-limits.
The following rules allow containers tagged as your-svc-tag to communicate only with each other, unless other rules permit additional connections
//Allow traffic from devices with tag:your-svc-tag devices with same tag
{
    "action": "accept",
    "src":    ["tag:your-svc-tag"],
    "dst":    ["tag:your-svc-tag:*"],
},
Setup Docker with Tailscale
The way your Docker container works with Tailscale is that you have container for Tailscale that is handling the networking and then your app container uses the network through the Tailscale container.
Following is the example of docker-compose.yml file that I use for my home machine which has the GPU that I want to expose to my Digital Ocean Droplet VM
TS_AUTHKEY: This is auth key you generated for this purpose. We'll talk more on how to generate one.
TS_HOSTNAME: This is what you will use to connect to this node, also what shows up in Tailscale Dashboard
TS_EXTRA_ARGS: It indicates that when Tailscale daemon is started then it advertises the tag that you created for this purpose. This is important as that is what will allow ACLs to work properly.
TS_SERVE_CONFIG: This is the Tailscale config, which will allow you to serve selected ports so that the Droplet can access it. You will be connecting to this service using name-of-service-host:PORT.
Tailscale config
The tailscale.config.json will be dependent upon how your service is setup, but for basic 8080 hosted service you can use something like following
You can go to Tailscale Settings and then click on "Generate Auth Key", to see the following dialog where you need to select various settings
Reusable: As your container can start again, I believe this is needed so auth key can be reused when you deploy an updated container
Ephemeral: If you restart/create new container and old one goes offline then it gets auto-removed
Pre-approved: This is up to you depending if you want these containers to automatically connect or need your explicit approval whenever you restart it.
Tags: Select the 'your-svc-tag' here
Expiration: Set whatever you are comfortable with but be aware that if you start a new container after the expiry time, Tailscale will fail to connect and you would need to generate a new auth key.
Host discovery
Although you’ve set a hostname for your service, when containers restart, they connect to Tailscale with an incrementing suffix. For instance, if your hostname was foobar-hostname, it might register as foobar-hostname-1, and so on.
To identify the correct hostname to connect to, you need some form of host discovery. One approach is using Tailscale APIs to find an online node whose hostname begins with the given prefix.
import requests
from datetime import datetime, timezone
from typing import Optional, List

class TailscaleDiscovery:
    def __init__(self, api_key: str):
        self.api_key = api_key

    def find_node(self, name_prefix: str, max_idle_seconds: int = 300) -> Optional[str]:
        """
        Find the most recently active Tailscale node matching the given prefix.

        Args:
            name_prefix: Prefix to match node names against
            max_idle_seconds: Maximum seconds since node was last seen (default: 300)

        Returns:
            str: Hostname of the matched node, or None if no match found
        """
        try:
            # Fetch all nodes
            response = requests.get(
                "https://api.tailscale.com/api/v2/tailnet/-/devices",
                headers={"Authorization": f"Bearer {self.api_key}"}
            )
            response.raise_for_status()
            nodes = response.json()["devices"]

            # Filter and sort matching nodes
            matching_nodes = []
            now = datetime.now(timezone.utc)

            for node in nodes:
                # Skip nodes that don't match prefix
                if not node["name"].startswith(name_prefix):
                    continue

                # Check if node is recently active
                last_seen = datetime.fromisoformat(node['lastSeen'].replace('Z', '+00:00'))
                if (now - last_seen).total_seconds() > max_idle_seconds:
                    continue

                matching_nodes.append(node)

            if not matching_nodes:
                return None

            # Return hostname of most recently seen node
            return sorted(
                matching_nodes,
                key=lambda n: n['lastSeen'],
                reverse=True
            )[0]['hostname']

        except Exception:
            return None
In this code, you retrieve the list of devices, filter those matching the provided prefix, and check when each device was last seen (i.e., the most recent time it was online).
You can adapt this further to cache domain information. If you have multiple machines, you could implement a round-robin approach to distribute requests. Once you identify the correct Tailscale hostname, you can simply call your service.
Some issue I ran into
when running Docker inside it. I couldn’t get the Tailscale container on the Droplet to function properly—particularly for DNS resolution. Instead, I ended up configuring Tailscale directly on the Droplet (with the Auth Key, Tags, etc.) and then set my container to use the host network:
DeepSeek-R1 uses cost-effective Reinforcement Learning to unlock emergent reasoning. By rewarding correct, verifiable steps, it refines logic and answers—showcasing how systematic feedback can reduce data needs and boost performance. Here I discuss my understanding from research paper.
Show full content
DeepSeek-R1 has created quite a stir in the AI world, with headlines all over the place, primarily focusing on the low cost aspects of it to create a competitive model that butts head with o1 reasoning models from OpenAI. I was more curious on the Reinforcement Learning aspects of it which I feel is step change for how these models are built. Some private labs may have already discovered this but its good to have these techniques now in the open and also proving their usefulness.
Current challenges
For Supervised Fine Tuning, you need a decent amount good quality data which either needs to be annotated by humans or through synthetic data generation where you would then need to filter between good vs bad generated data. This is a cumbersome process and also costly. For training reasoning, you would need data that would contain the reasoning step and there is not a whole lot of data on internet that does that.
One of the earlier emergent LLMs behavior was the Chain of Thought, which essentially was that when you ask LLM to "think step by step", you would get reasoning steps and generally a better answer. DeepSeek-R1 uses this technique to train a model to make reasoning part of its response, out of the box.
Reinforcement learning
The mechanism they used was Reinforcement Learning (RL), which refers to training the model through trial-and-error by rewarding outputs that contain correct, verifiable answers and reasoning steps. This iterative process helped the LLM systematically improve its reasoning capabilities as it learned from the reward signals.
There have been other approaches to train LLMs using reinforcement learning, but till now many of them were costly; either requiring more data, or more complex training, leading to costly training. What DeepSeek has done is make it cheaper and scalable to use RL for LLM training and avoiding Supervised Fine Tuning (SFT).
The main part of the training that help achieve this was Group Relative Policy Optimization. Its a reinforcement learning method which avoids a separate critic model (in previous research) by sampling multiple answers for a question and using group scores to estimate the baseline, which lowers the resources needed for training.
DeepSeek-R1-Zero
This is where they used DeepSeek-V3-Base as the base model and applied reinforcement learning to enhance reasoning capabilities. While successful, they noticed the model's outputs had readability issues and occasionally mixed different languages.
Training Process
The reinforcement learning approach relied on multiple reward functions. Reward functions take the output and then give some +ve, 0, -ve reward.
Rule-based Rewards: They used questions with verifiable answers (code, math, logic) from their dataset. The model had to generate both reasoning steps and the final answer. Accurate answers received rewards while incorrect don't.
Format Rewards: The model received additional rewards for following specific output formats, using <think>...</answer> tags followed by <answer>...</answer> tags.
During each reinforcement cycle, the model:
Generated multiple outputs for each question
Received rewards based on correctness and format
Used Group Reward Policy Optimization (GRPO) to incrementally improve towards better-rewarded outputs
Emergent Behaviors
What's fascinating is that they only provided a simple system prompt asking for reasoning in a specific format, without dictating how to reason. During training, the model developed self-reflection, self-verification capabilities, often re-evaluating and adjusting its reasoning mid-process. It also learned to reason for longer as the training went on.
This demonstrates the power of reinforcement learning - you don't explicitly teach how to reason, but rather let the model learn through rewards. This approach could potentially be applied to train models for various other capabilities, as long as you can create verifiable rewards. While this opens new possibilities for model development with less data dependency, some initial bootstrap data remains important (as we'll discuss later).
DeepSeek-R1-Zero AIME accuracy during trainingDeepSeek R1
Because of some of the issues with R1 e.g. readability, mixing of language, likely degradation on tasks that weren't specifically had verifiable rewards e.g. creative writing etc. they trained R1 to improve the overall usability of the model.
R1 was trained in multiple phases
Phase 1 - Cold start with SFT
Taking DeepSeek-V3-Base, used Supervised Fine Tuning on cold-start data that was collected from R1-Zero checkpoint. The data was likely handpicked to make sure it is of high quality.
Phase 2 - Reasoning oriented RL
Similar to R1-Zero, this phase used RL to train on reasoning related tasks on verifiable questions/answers. They did add another reward in the process which was Language Consistency Reward. This reward made sure the model avoided language mixing. Later they ran ablation experiments, where they remove this reward to understand its impact. What they saw was that Language Consistency Reward did decrease model performance but as it led to more human readable model, so its worth having.
Phase 3 - Rejection sampling and SFT
After the Phase 2 is completed, from that model checkpoint, they collect more data for Supervised Fine Tuning for subsequent round. But here they not only have reasoning oriented data but also data for other domains e.g. creative writing, role-playing, general tasks to make sure the model is well rounded. Gathering good data is important.
For reasoning related data, they generate data containing accurate answers, doesn't have mixed-languages or long paragraph etc. At the end of process they have 600K reasoning related training samples.
For non-reasoning data, they use data they had for SFT in the DeepSeek-V3 model. The use DeepSeek-V3 to also generate reasoning data for such tasks, but also exclude it for tasks that don't require reasoning so that model also learns to avoid reasoning when its not needed.
Using all this data they train the DeepSeek-V3-Base with this curated dataset of 800K samples.
Phase 4 - RL for all scenarios
In this final state a round of Reinforcement Learning is done, but not only on reasoning data but also on other data where the reward is based on human preference. There is also safety related (harmlessness) evaluation done during this phase.
At the end of all these phases we get the DeepSeek-R1 model and my vibe check on that model has been pretty good.
Distillation
Lastly they use the R1 model to generate 800K sample data and use Supervised Fine Turning on various small language models e.g. Llama-3.3-70b-Instruct, Qwen2.5-32b etc. and observe that those models overall improve in complex tasks requiring reasoning.
The other interesting thing they also observe is that directly using RL on those models similar to R1-Zero, doesn't improve those models as much as distillation from larger model does.
Comparison of Distilled and RL models on reasoning-related benchmarksWhats likely to happen next
The year 2025 is going to be interesting, we are going to see much more research in direction of RL, many more distilled small models with reasoning capabilities that will be SOTA. The test time scaling will be something that Open source/weights models will also be pushing in direction off. Likely more (verifiable) domain specific small models may become easier to train due to RL. Anything that you can verify relatively cheaply in training process, you are likely to see much improvements in models related to those.
We are already seeing various OpenSource capability to train using RL (e.g. Unsloth). Here is my attempt to train reasoning with emojis in each step using Unsloth 😄
<reasoning> Her 200 sheep each produced 10 pounds of wool, so the total amount of wool is 200 * 10 = 2000 pounds 🐑. She sold one pound of wool for $20, so the total revenue is 2000 * $20 =$40,000 💸. The cost to her was $2000 💸. So, her profit is $40,000 - $2000 = $38,000 🤑. </reasoning> <answer> $38000 </answer>
Its certainly going to be exciting 2025 for open source models.
Disclaimer: I'm no ML/AI expert, but a curious engineer who has been learning more about the inner workings of the LLMs to try to understand better the new techniques (when it comes to using them) and also how these models are becoming better. If you find something incorrect in my understanding please leave a comment.
Struggling to finish side projects due to limited time? In my latest blog post, I share how I improved my productivity using AI tools like LLMs and Cursor IDE. Learn to refine specs, bootstrap code, and iterate effectively to rapidly build and deploy your projects—even with a busy schedule.
Show full content
I transitioned to the role of Engineering Manager approximately 5 years ago, since then I haven't been programming in my day job but the itch to do so has always been there. So I continue to work on side projects to not lose touch and continue to hone my skills.
Because my time has always been limited, progress on side projects had been slow in the past, and many remained unfinished as life's events caused a loss of momentum, making them harder to resume. However, in the last year (2024), I have been very productive with my side projects, quickly building the tools or projects I need and deploying them for others to use—in other words, finishing the v1 of each project.
A few examples of what I've built are
jsonplayground.com - JSON formatter but also in browser JQ using WASM so no data leaves the machine.
webtomarkdown.com - As I often feel the need of converting files to Markdown, or parts of website to Markdown for passing in as context to LLMs. I'm currently building this tool to solve that problem.
Face lift for my soaring club page Evergreen Soaring where I volunteer (not deployed yet on official website).
A Chrome Browser Extension to automate parts of public messages we receive at my soaring club.
LLMs in general have been immense booster for my productivity when it comes to side projects and more specifically the Cursor IDE has been a great editor to use these LLMs for coding.
In this blog I'll go over what my high level flow looks like for greenfield projects and I hope that may help you. I do want to acknowledge that these tools are good in certain cases but may annoy you (waste time) in other areas, you just need to use them to figure out where specifically it's useful for you.
I have a nice habit tracker that I would like to replicate as a website, but all data stored locally, so let's use that as an example of what to create here.
Start with a spec
I use the o1 ChatGPT to first get my application specification more refined. The reason I do that is so that it helps me scope the problem and also the spec I get at the end, I use it in further stages of bootstrapping the code. You can try to write the spec yourself, but I feel that going from few sentences to more detailed spec through ChatGPT o1 has been very useful in saving me time. I also ask it to further probe me with questions to further refine it.
Following the prompt I start with.
I’m want to build a website for habit tracking where user sees columns of months and each row being a date. They can simply select to indicate a day where they continued with the habit. It should store all that on local machine. Ask me more questions to refine the idea.
It asks me bunch of questions which I answer, but then it continues asking me more questions. At some point, where you feel there is enough details, you should explicitly ask it to create a spec with the details that will allow another person/AI to build application. I also specify the technology I would prefer to use as thats what I'm familiar with most.
Answer those questions for me reasonably and create a spec that I can give to a person or another AI to help create the website. Make sure to have the details of project, user experience, technical details. I want to use typescript, react, tailwind css.
Now store that spec in SPEC.md in a folder where your project will be. We will continue to refer back to it when needed.
Bootstrap project
I use Vite to bootstrap my project. This allows me to setup all the necessary tooling in a consistent manner. In the directory of project I run npm create vite@latest . which will ask me question about which UX framework and Language to use. Once I have the project and SPEC.md in that project I use the Cursor Agent to create the initial code.
You can go to Composer > Select Agent > Added SPEC.md in the context and ask it to implement it.
This will go over your code, setup tailwind, update few files to create the initial version.
This is what the initial version looked like. Not exactly what I was looking for (skeuomorphic design) but close enough in structure that I can iterate over it.
There is also some bug in it, where clicking on the button doesn't change the state. But overall, this puts us into a good starting point, it created the overall UX layout I expected, stored data in local storage, has the right export feature for Markdown. All of it in just order of minutes instead of hours.
P.S: Sometime I also use v0.dev to bootstrap the UX aspect of the project. That tools allows quicker iteration on the UX aspects.
Small iterations
You don't want to one-shot everything i.e. ask it to do multiple complicated tasks in one go. That can sometime work but can lead to issues and makes it harder (and slower as it will regenerate bunch of code that it doesn't need to change) to iterate. Follow a divide and conquer approach, i.e. split your feature into smaller tasks and iterate over them using the Chat/Composer.
Now first let's fix the bug and also change the UX. In my spec conversation with o1, I ask it to create a spec for UX focused more on skeuomorphic aspects of it. Then I use the Cursor Composer to update the code. I select the o1 model in this case.
Update @App.tsx @MonthColumn.tsx @MonthColumn.css @App.css to improve the UX, also fix the issue where the state isn't being changed when I click the button.
{PASTE THE UX SPEC}
Here is what it looks like now. So it fixed the bug, and also updated the UX to have some more Led like behavior with depth, some shadows etc. It still look horrible but we will further iterate on that.
In the next iteration I gave the above screenshot (yes cursor can also use images for context) in Chat mode and first asked it to describe the details the button and then asked it to make necessary changes to replicate that. After couple of more iterations.
After few back and forth, I have the experience which looks good enough for the demo here.
Now finally I need to setup deployment using GitHub actions, so whenever I check-in to main, it builds and deploys to GitHub pages. I already had a workflow in another of my repository that I wanted it to use as context and make specific changes to build this project. The good thing about Cursor is that you can also provide context by adding a link, so either its some existing code, some documentation, it can be passed to LLM for context. In my experience providing relevant context generally allows it to output better code and avoid hallucinations.
Similar to @https://raw.githubusercontent.com/zabirauf/evergreensoaring-modern-web/refs/heads/main/.github/workflows/deploy.yml create a deployment to github pages and also make sure to npm install and npm run build (which puts it in dist folder). The dist is what needs to be deployed
💡This all got deployed and you can try it out here:
Use LLM to hash out the details of the project and store it for further context
Use a tool or open-source template to bootstrap your project to setup all the necessary toolings and following a manageable project pattern.
Leverage Cursor Composer (agent mode) to bootstrap the project
Use mix of o1 and claude-3.5-sonnet. Generally I use o1 where broad stokes are needed e.g. 1st draft of a feature and then use Claude-3.5-Sonnet to further iterate on it. But I'm using Claude-3.5-sonnet approx. 80% of times.
Select the right mode e.g. Chat, Composer (normal), Composer (agent). I use Chat, when I need back and forth and know exactly where changes will be and want to see the changes before applying. I use Composer (normal) when I need multi-file changes e.g. new feature. I don't use Composer (agent) often enough yet. Composer (agent) can run commands in terminal, lint code, re-iterate etc, but going back to the principle of small iterations, I try to scope things to what I can review easily and add.
Provide relevant context as much as possible e.g. specific files you want changed, specific docs (links), or submit with codebase option in chat when you want it to search for relevant context.
Store markdown files relevant to your project so you can add those as context e.g. SPEC.md, documentation from website that you often get back from (plugging https://webtomarkdown.com for converting a website documentation to Markdown and storing it 😄)
Create and use .cursorrules file in your project directory for instructions that you want it to take in prompts, e.g. if you see it always using some library you don't want then add it to .cursorrules, specific technology that you want it to user in code e.g. Tailwind, certain component library e.g. Shadcn etc. This allows you to start nudging it in direction you want for most of your prompts.
Always make sure that you understand the code at high level so you don't land in a space where eventually it's such a messy code that it becomes hard for you to debug when LLMs can't find issues for you. My tip is to continue to split stuff into manageable pieces (hint, you can use LLMs to do it from time to time).
Closing remarks
I hope this has been helpful, and that you can start finishing the first versions of your projects and deploying them. By turning unfinished projects into completed and deployed ones, you can continue to build momentum even when you take small breaks. This approach allows you to gradually add more to your projects while keeping them manageable. I believe this also helps keep me motivated, as I get to see progress more quickly on what I want to deliver.
Discover how to securely manage secrets in NixOS Home Manager using SOPS and sops-nix. Learn to set up Age encryption, create encrypted secret files, integrate SOPS with NixOS, and access secrets as environment variables. Perfect for maintaining secure, declarative NixOS configurations.
Show full content
When setting up a NixOS system, we often want to store secrets in environment variables for various tools to use. For example, you might want to use the llm CLI tool, which requires setting the OPENAI_API_KEY environment variable.
However, if you're using declarative configuration files or flakes to set up your NixOS system (which is a great practice!), you can't simply update those files with the secret. That would be insecure, especially if you're tracking your configurations in Git and pushing to a public repository.
Enter SOPS
To manage secrets on machines, we can use a tool called SOPS (Secrets OPerationS). SOPS allows you to manage secrets by encrypting them when storing them in a file. You use the tool to edit the secrets, and when you save, it writes them in an encrypted manner.
In NixOS, we have sops-nix, which helps manage SOPS-based secrets using configuration. Here's how it works: when SOPS secrets are loaded from a file at runtime, each secret is stored in a different file. This means at runtime, you can read from those files to get the secret and export it as an environment variable.
Replace <YOUR_PUBLIC_KEY> with the public key you obtained earlier. And replace hostname with your machine host-name. This configuration tells SOPS to use Age for encrypting any file named secrets.yaml using the specified public key.
Create and Encrypt the Secrets File
Use nix-shell with SOPS available to run creating the secrets.yaml file. Make sure to run it from the same directory where .sops.yaml exist. It will open the editor that is configured using EDITOR in your shell.
nix-shell -p sops --run "sops secrets.yaml"
Add your secrets to the file:
openai_api_key: 'YOUR_OPENAI_API_KEY'
Save and exit the editor. SOPS will encrypt the file upon saving, and secrets.yaml will now contain encrypted data along with other metadata.
Integrate SOPS with NixOS Using sops-nixUpdate Your flake.nix
This line adds the sops-nix input, fetching the sops-nix repository from GitHub. It provides the necessary modules to integrate SOPS (Secrets OPerationS) into your NixOS system.
Including the SOPS NixOS Module:
modules = [
  ./configuration.nix
  sops-nix.nixosModules.sops
  # other modules...
];
By adding sops-nix.nixosModules.sops to the modules list, you're integrating the SOPS module into your NixOS system configuration. This enables system-wide management of encrypted secrets.
This section includes the SOPS module in Home Manager's shared modules by adding sops-nix.homeManagerModules.sops. It allows you to manage user-specific secrets through SOPS within your home environment configurations.
This configuration tells NixOS to use the encrypted secrets.yaml file and makes the openai_api_key available at the specified path. Whenever you add a new secret, you should update the config here with that secret info as well.
Accessing the Secret as an Environment Variable
In your config you can use $(cat ${config.sops.secrets.openai_api_key.path}) to get the secret. For example I configure my zsh file to export the OPENAI_API_KEY.
After updating your configurations, rebuild your NixOS system:
sudo nixos-rebuild switch
Now, your OPENAI_API_KEY is securely stored and accessible as an environment variable without exposing the key in your configuration files.
Conclusion
By integrating SOPS with NixOS, you maintain a declarative and secure configuration while managing sensitive secrets. This setup ensures that API keys and other confidential data remain encrypted in your repositories and are only decrypted on your local machine during runtime.
Remember to always be cautious when dealing with secrets and never commit unencrypted secrets to your repository!
Learn how to install a custom Hugging Face GGUF model using Ollama, enabling you to try out the latest LLM models locally. This guide covers downloading the model, creating a Modelfile, and setting up the model in Ollama and Open-WebUI.
Show full content
Ollama is a powerful and user friendly tool for running and managing large language models (LLMs) locally. But not all latest models maybe available on Ollama registry to pull and use. The fastest way maybe to directly download the GGUF model from Hugging Face. In this article, we'll explore how to install a custom Hugging Face GGUF model using Ollama, enabling you to try out latest models as soon as they are available.
I use Open-WebUI as the interface for Ollama, and all these instructions would allow you to use the model from Open-WebUI as well.
1. Download the Model
First, we need to acquire the GGUF model from Hugging Face. We'll use the Hugging Face CLI for this:
This command downloads the specified GGUF model, which in this case is a fine-tuned version of LLaMa 3.1.
2. Create a Modelfile
Modelfile is the blueprint that Ollama uses to create and run models. Since we're working with a LLaMa 3.1 variant, we can base our Modelfile on an existing one:
ollama show --modelfile llama3.1:70b-instruct-q4_0 >> Modelfile
This command generates a Modelfile based on the llama3.1 model specifications which I already had locally pulled.
If you don't have example of existing Modelfile to reuse then you would need to figure it out from the Hugging-Face page for the model and then create one.
3. Update the Modelfile
Now, we need to modify the Modelfile to point to our downloaded GGUF model. Open the Modelfile in a text editor and update the FROM line with the path to the downloaded model. The Hugging Face CLI will have printed this path at the end of the download process.
4. Create the Model in Ollama
Finally, we'll use Ollama to create our custom model:
This command processes the Modelfile and copies the model to Ollama's storage, typically located at /usr/share/ollama/.ollama. Here mattshumer/Reflection-Llama-3.1-70B:Q4_K_S is the name of the model that I will use in Ollama, you can name it whatever you want.
If you want to delete the hugging face cached model so you don't use double the storage then you can run the following which will start a Terminal UI for you to select which models to delete.
huggingface-cli delete-cache
By following these steps, you've successfully installed a custom Hugging Face GGUF model using Ollama and in Open-WebUI.
Explore OpenWebUI's Pipelines: extend your self-hosted LLM interface. Learn to create custom pipelines, from filters to tools. Intercept LLM interactions, implement function-calling, and integrate new providers. Enhance AI workflows or build RAG systems with this guide to OpenWebUI's extensibility.
Show full content
OpenWebUI is a self-hosted UI for interacting with various LLM models, both on-device and in the cloud. I use it as my primary method of interacting with LLMs due to its wide variety of models, ability to keep data local with locally deployed models, and extensive features. I've set it up along with Tailscale on my homelab so my family can access it with their own logins, maintaining their conversation history and settings.
Recently, I stumbled upon Storm from Stanford, a tool that uses LLMs and Search to generate long Wiki-like articles. It's useful for my personal workflows by providing a jumping point for deeper research. I aimed to bring this functionality to OpenWebUI, so I began exploring Pipelines.
Pipelines serve as the mechanism in OpenWebUI to extend its capabilities. Unfortunately, they are still not well-documented, which led me to dig into the code, scratch my head, and debug to integrate Storm finally. I hope this post serves as an introductory guide for anyone trying to do the same, saving you a few hours of head-scratching.
Valves
Briefly Valves is the mechanism for configuring your pipeline. This is the mechanism for user to change something about your pipeline e.g. if you want to get some API_KEY then that will be a Valve, if you want some value from user which will change your pipeline behavior then that will also be a Valve. The admin can see and update all these values from the OpenWebUI settings.
Pipelines
Following are different type of pipelines you can create
Filter
Filter pipelines allows you to intercept the user request/message before it goes to LLM model and also after the response comes from LLM model but before its sent to users. This is what can allow various scenarios such as
RAG to fetch more context and put it into the message to LLM to use.
Tools that gets executed and adds any context for LLM
Prompt injection filter to catch them before LLM gets to respond
Safety filters e.g. using Meta LLamaGuard before user request is answered
How I like to think of this is that if I want to do something before or after LLM is called then I would create a Filter pipeline.
Filter pipeline flow which is "Chat request -> Inlet -> LLM model -> Outlet -> Chat response"
Here is what a filter pipeline would look like
from typing import List, Optional
from pydantic import BaseModel
from schemas import OpenAIChatMessage


class Pipeline:
    class Valves(BaseModel):
        # List target pipeline ids (models) that this filter will be connected to.
        # If you want to connect this filter to all pipelines, you can set pipelines to ["*"]
        pipelines: List[str] = []

        # Assign a priority level to the filter pipeline.
        # The priority level determines the order in which the filter pipelines are executed.
        # The lower the number, the higher the priority.
        priority: int = 0

        # Add your custom parameters/configuration here e.g. API_KEY that you want user to configure etc.
        pass

    def __init__(self):
        self.type = "filter"
        self.name = "Filter"
        self.valves = self.Valves(**{"pipelines": ["*"]})

        pass

    async def on_startup(self):
        # This function is called when the server is started.
        print(f"on_startup:{__name__}")
        pass

    async def on_shutdown(self):
        # This function is called when the server is stopped.
        print(f"on_shutdown:{__name__}")
        pass

    async def inlet(self, body: dict, user: Optional[dict] = None) -> dict:
        # This filter is applied to the form data BEFORE it is sent to the LLM API.
        print(f"inlet:{__name__}")

        return body

    async def outlet(self, body: dict, user: Optional[dict] = None) -> dict:
    	This filter is applied to the form data AFTER it is sent to the LLM API.
        print(f"outlet:{__name__}")
You intercept the messages using the body that is passed in. It contains all the information e.g. messages which contains the message history. You can use utility methods such as get_last_user_message, get_last_assistant_message to get latest messages, do something with them and update the corresponding message content and return back the whole body with the updated messages e.g.
....
from utils.pipelines.main import get_last_user_message, get_last_assistant_message

class Pipeline:
	...

    async def inlet(self, body: dict, user: Optional[dict] = None) -> dict:
        messages = body.get("messages", [])
        user_message = get_last_user_message(messages)

        if user_message is not None:
            # Do something

            for message in reversed(messages):
                if message["role"] == "user":
                    message["content"] = "UPDATED CORRESPONDING CONTENT THAT LLM WILL USE"
                    break

        body = {**body, "messages": messages}
        return body

    async def outlet(self, body: dict, user: Optional[dict] = None) -> dict:
    	messages = body["messages"]
        assistant_message = get_last_assistant_message(messages)

	if assistant_message is not None:
            # Do something

            for message in reversed(messages):
                if message["role"] == "assistant":
                message["content"] = "UPDATED CORRESPONDING CONTENT THAT USER WILL SEE"
                break

        body = {**body, "messages": messages}
        return body
Images are also passed in as part of message so check for "images" in message to get the Base64 encoded images and you can then use that to do any kind of image processing you want.
Tools
Tools are special type of filters where a particular tool is selected based on its description and what the user has asked for e.g. if user asks math question and you want it to actually calculate instead of just hallucinating the answer then Calculator Tool will be the way to go. To create Tools your Pipeline needs to inherit from FunctionCallingBlueprint as it implements the inlet part of filter to do function calling.
import os
import requests
from typing import Literal, List, Optional
from datetime import datetime


from blueprints.function_calling_blueprint import Pipeline as FunctionCallingBlueprint


class Pipeline(FunctionCallingBlueprint):
    class Valves(FunctionCallingBlueprint.Valves):
        # Add your custom parameters/configuration here e.g. API_KEY that you want user to configure etc.
        pass

    class Tools:
        def __init__(self, pipeline) -> None:
            self.pipeline = pipeline

        def calculator(self, equation: str) -> str:
            """
            Calculate the result of an equation.

            :param equation: The equation to calculate.
            """

            try:
                result = eval(equation)
                return f"{equation} = {result}"
            except Exception as e:
                print(e)
                return "Invalid equation"

    def __init__(self):
        super().__init__()
        self.name = "My Calculator Tool Pipeline"
        self.valves = self.Valves(
            **{
                **self.valves.model_dump(),
                "pipelines": ["*"],  # Connect to all pipelines
            },
        )
        self.tools = self.Tools(self)
In above example if you don't want a function in Tools class to be used then prefix it with __ e.g. __helper_function_to_do_something. If you setup a Valve e.g. to get some configuration from user then you can access it in tool as self.pipeline.valves.CUSTOM_PARAM, though in my experience I was able to access it when function was invoked but not in Tools.__init__ as in that case the value was still None for those Valves.
If you are also wondering that which model is used for figuring out the Tool, then the FunctionCallingBlueprint creates a Valve called TASK_MODEL which is used to figure out which function/tool to call. You can update it to whatever you want from the Settings in OpenWebUI if you don't prefer the default.
PipePipe/Manifold pipeline flow which is "Chat request ->Pipe -> Chat response"
This is when you want to take over what happens when user uses chat in OpenWebUI. The "pipe" pipeline allows you to integrate new LLM providers, build workflows that takes the user message and respond, complete RAG system that does retrieval and also generation using the LLM you want.
Basically if you want to take over what happens when user sends a request then you will implement the "pipe" function.
In the scenario I was trying to implement, I opted for this as I wanted to integrate the Stanford Storm Wiki which basically takes a topic, makes multiple calls to LLM to research the topic and create outline and finally write Wiki like article on it.
Manifold
Manifold is a special type of "pipe" Pipeline as it allows user to select specific model. Various LLM integration in OpenWebUI such as Anthropic, Groq uses this as they also tell OpenWebUI the list of models. So if you want to implement a new LLM provider then it likely will be a manifold
class Pipeline:
	...
    def __init__(self):
    	self.type = "manifold"
        ...

    def pipelines(self) -> List[dict]:
    	return ["model-1", "model-2"]

    def pipe(
        self, user_message: str, model_id: str, messages: List[dict], body: dict
    ) -> Union[str, Generator, Iterator]:

        # Here use the `model_id` that user picked
        pass
How to add more PIP dependencies
As the pipeline runs in its own docker which may not have the python package you need. In that case you can specific the requirements in the start of file using the front-matter specification. This can involve description, name, author etc. Along with that you can also specific comma separate "requirements" which will be used to install any new dependencies.
"""
title: Filter Pipeline
author: open-webui
date: 2024-05-30
version: 1.1
license: MIT
description: Example of a filter pipeline that can be used to edit the form data before it is sent to LLM API.
requirements: requests
"""

class Pipeline:
	...
💡The caveat here is that for this to work, you would have add the pipelines when you start the docker. If you install the pipeline through the OpenWebUI interface then it won't install these additional dependencies.```docker run -d -p 9099:9099 --add-host=host.docker.internal:host-gateway -e PIPELINES_URLS="https://github.com/open-webui/pipelines/blob/main/examples/filters/detoxify_filter_pipeline.py" -v pipelines:/app/pipelines --name pipelines --restart always ghcr.io/open-webui/pipelines:main```Here the pipelines installed through PIPELINES_URLS will parse the front matter and install additional dependencies.Other Tips
If you install the pipeline through OpenWebUI, it won't throw any error if it failed to add the pipeline due to dependency issue or code issue. The way I found to debug that is to get the logs from the running docker
docker logs -f container_name
Look at various examples in the pipelines repo to see whats the closest scenario to what you are trying to build. Use that as the starting point and edit those.
Discover how to create a synthetic dataset, select the right metrics for evaluation, and fine-tune your model using LoRA for a narrow scenario. Plus, learn how to serve your model efficiently using LLaMa.cpp on Mac/Linux.
Show full content
Professionally I've been working in Outlook Copilot and building experiences to leverage the LLMs in the email flow. I've been learning more about the technology itself and peeling the layers to get more understanding.
One aspect I was curious about how can I finetune an LLM model for a narrow scenario. The toy scenario I picked was having a model that corrects a sentence for grammar, spelling, punctuation, capitalization, etc.
ℹ️Input: Leavs rustld sftly in autm brze. Output: Leaves rustled softly in the autumn breeze.
I will go over all the steps from data generation, fine tuning and then using that model leveraging LLaMA.cpp on my Mac.
✅The fine tuned 3B parameters model beat the base model it was trained on by a big margin and even beat the 7B Mistral model.
Before we go in details, following are the validation results.
Creating a dataset, which will be used for training and validation
Deciding the metrics used to evaluate
Creating a baseline with existing models
Fine tuning using the LoRA
Serving model using LLaMA.cpp with GGUF conversion
Dataset creation
Once you have the requirements of the problem you are trying to solve and also evaluating that LLMs is the right approach then to finetune you would need to create a dataset. If you already have a dataset that is clean and of high quality then awesome but I'm assuming that's not the case.
In my scenario, I was able to generate synthetic dataset. The beauty of having more powerful LLMs is that you can use them to generate data to train the smaller language models. I went through the following process.
First, I created a prompt in a playground with the more powerful LLM of my choice and tried out to see if it generates both incorrect and correct sentences in the way I'm expecting.
Once I had that, the next step was to make them parsable so I leveraged the ability of these powerful models to output JSON (or XML). Using this I was able to generate approx. 100 samples. This was done in a zero shot way to create my bootstrapping dataset which will be used to generate more similar samples. You should go over these bootstrapped samples thoroughly to check for quality of data. From reading and learning about the finetuning process, quality of dataset is one of the most important aspect so don't just skimp over it.
Once I had the initial bootstrapping dataset I created a Python script to generate more of such samples using few shot prompting.
ℹ️Zero shot prompting: The prompt doesn't contain any example of the data I'm asking it to generate.
Few shot prompting: In the prompt to generate data, I also give few examples of the data so it can generate more similar samples.
Following is the prompt I used to generate bootstrapping dataset and then later updated it to contain examples.
Generate unique sentences of varied length between small and long length. Some of them should also contain multiple. For each of those now write them in a way where a person who is not good at typing and types very quickly with partial and incorrect words will write but still being close to the intended sentences.
# Guidelines to follow:

* Create {TOTAL_LENGTH} such examples.
* Don't prefix them with number.
* Include examples from various domains such as science, math, literature, social media, slang etc.
* Create a diverse set of sentences, some containing all the way from only one error to all the way to errors across the sentence.
* Each of them should have numbers in it but keep the number same.
* Add various variety of errors e.g. typos, homophones, grammatical mistakes, omissions, capitalizations, and transpositions to accurately reflect real-world mistakes.

Always returns response in JSON the following format. The **array should have {TOTAL_LENGTH} items**.

```json
{
    "DataArray: [
        {
            "Correct": "The correct string",
            "FastTyped": "The fast typed string"
        },
        {
            "Correct": "The correct string",
            "FastTyped": "The fast typed string"
        }
    ]
}
```
ℹ️I observed that if I asked LLM to return a JSON like the following, it mostly failed
[ { incorrect, correct} ]
But if I changed it to return the following then it complied
{ data: [{ incorrect, correct }] }
Using this approach, I was able to create a dataset with approx. 2000+ samples.
I then further generated synthetic data to add random capitalization issues, partial sentences etc. This was done so I don't pigeon hole my data to only complete sentences with only grammatical issues i.e. adding diversity to my dataset so it can work for wide set of scenarios.
Lastly you can put all of this in Pandas Dataframe and split it into training, validation and test set and save it so you can use it in training process. If you created further synthetic data, as I did with captialization and partial sentences, then make sure that each of train, validation and test set contain and consistent number of such data e.g.
# Split the dataframe into train, test and validation sets with equal fraction of rows according to 'PartialSentence', 'LowerCase' and 'RandomCase' columns

    train_df = df.groupby(
    		list(df.columns.difference(['FastTyped', 'Correct']))
        ).apply(lambda x: x.sample(frac=0.7, random_state=seed))
Code to split the data and also distributing various groups of synthetic data across the train, validation and test set.Selecting metrics and baseline
You need to form a baseline so that you can empirically measure that if your finetuned model is actually doing better or if it became worse.
Hugging Face has a good inventory of various metrics along with a guide of choosing the metric. I liked the Hugging Face evaluate library, which is a good one stop shop for many of the metrics. The metrics I decided to evaluate were the following
BLEU: It attempts to evaluate the quality of the machine generated text with the ground truth (our target correct) using n-gram overlap.
ROUGE: ROUGE-L attempts to measure the longest common subsequence between generated text and ground truth while ROUGE-N uses an N-gram overlap approach.
Exact Match: This matches if the generated text is exactly as the target text.
The BLEU and ROUGE are more flexible as they are not binary score and evaluate based on quality and how it deviates from target. I added exact match at the mix to see how much it exactly gets right.
Creating a baseline with existing models
Once you figured these, the next step was to create a baseline with existing models. I choose the Mistral 7B (Q8), Stable LM Zephyr 3b (Q8). How I ran the evaluation was that I downloaded the GGUF and ran it using LLaMA.cpp server which supports the OpenAI format. Then I used python to create my evaluation script and just point the openai.OpenAI API to URL that was localhost, being served by LLaMA.cpp.
Store these results for your test, validation data.
Fine tuning using the LoRA
Low-Rank Adaptation aka LoRA is a technique used to finetuning LLMs in a parameter efficient way. This doesn't involve finetuning whole of the base model, which can be huge and cost a lot of time and money. LoRA, instead adds a small number of trainable parameters to the model while keeping the original model parameters frozen.
You don't have to write the code frome scratch, rather there are already tools available that will help you kickstart the whole thing. The one I used was the lit-gpt from Lightning AI. There are other alternatives that you can also try e.g. Axolotl. I'll use lit-gpt for this tutorial.
Clone/Fork the lit-gpt, as you will be copying and adding some scripts to fit your need.
Prepare dataset for using in finetuning
Copy scripts/prepare_alpaca.py and rename it to something relevant to your project. In that program I updated the generate_prompt function to use the instruction template that Zephyr3B uses. As by default the instruction template it has was Alpaca style which looks like
Below is an instruction that describes a task, paired with an input that provides further context.
Write a response that appropriately completes the request.

###Instruction:
{example['instruction']}

### Input:
{example['input']}

### Response:
Instruction template for Alpaca
While Zephyr3B has the following instruction template.
Its important to use the right instruction template otherwise the model may not generate responses as expected. You can generally find the instruction template supported by models in the Huggingface Model Card, at least for the well documented ones. If you are using some esoteric model which doesn't have that info, then you can see if its a finetune of a more prominent model which has those details and use that.
I also made some changes to the prepare function in that file to change the destination and checkpoint path, along with removing some of the things I didn't need e.g. doing a train/validation split, as I already had my own split done earlier so I just reused them.
Copy the finetune/lora.py and rename it to something relevant to your project. Here I also changed the directions for checkpoints, output and where my data is. I also added a Weight & Biases (if you haven't used it, I would recommend checking it out) logger as that helps me keep tabs on how things are going.
The main change here to do is that in validate function, I picked a random sample from my validation data and use that to check the loss as the model gets trained. This way I was able to see how its progressing.
Start the finetune
Once I had all these setup, all I needed was an environment with GPUs to use for finetuneing. I opted for paperspace.com. Once you have the prepared data and the scripts downloaded you can then run them as follows.
First we download the model and convert it into format that lit-gpt works with
And finally start the finetuning. If you added wandb, make sure you have setup using CLI and added the credentials.
python finetune/lore_copy.py
Continue to monitor the training and once its complete then you should be good to start using it.
Using your finetuned model
I like working with LLaMA.cpp as it works on multiple platforms, is pretty performant and comes with a lot of customizability. To run model on LLaMA.cpp you have to convert it to GGUF format.
The model you finetuned stored the LORA weights separately, so first you need to merge it with base model so you can have one model that contains both the base model and your finetune on top of it. lit-gpt already comes with scripts to do that.
Here it takes your merged model (checkpoint_path), converts to Hugging Face model (output_path) and uses the config to set certain parameters (config_path).
P.S: I haven't explored much on what the config currently contains and what it all means.
Now finally, in LLaMa.cpp there is convert-hf-to-gguf.py script that you can use to convert the previously converted Huggingface model to GGUF.
Now you shohuld have a GGUF model that you can use LLaMa.cpp to run
main --model /notebooks/corrections-slm/lora/corrections_run_2/merged/ggml-model-f16.gguf -p "<|system|>\nFix the text.<|endoftext|>\n<|user|>whts gng on<|endoftext|>\n<|assistant|>"
I am still learning how to better prepare dataset, train models and evaluate them. So please take it as a beginners path I took to do it and I'm sure there are much better ways to go about this, and I'll continue my journey to learn them :).
Learn how to use Python with Supabase for web development for all your AI/LLM backend needs. Create a secure Python service that validates JWT tokens from Supabase and integrates with Next.js.
Show full content
With the recent advances in Large Language Models and a lot of the innovation happening in regards to that in Python, it's becoming more advantageous to use Python not only for research purpose but also for building products that end users will use.
In the realm of JavaScript and Frontend, Supabase has been getting a great deal of traction as a Firebase alternative. It provides multiple services that you can use to build a whole SaaS product with the authentication, Postgres, Storage services it provides. It also has edge functions that leverage Deno but that means you'll be in the JavaScript ecosystem or move over to WASM.
What do you do if you need Python service as part of your stack and want an authenticated service so you can do operations at a user level?
You can deploy Python service to your favorite cloud infra (Fly.io, Digital Ocean etc.) and use JWT (JSON Web Tokens) to validate authenticated requests. This way you can continue leverage Supabase capabilities and also Python when you need it. In this tutorial we will see how to setup such a service.
What is JWT
JWT (JSON Web Token) is a compact, self-contained way to represent information securely between two parties.
A JWT consists of three parts: the Header, the Payload, and the Signature.
Header: Describes the type of the token and the algorithm used for encryption.
Example: {"alg": "HS256", "typ": "JWT"}
Payload: Contains the 'claims', which are statements about the user. This is where you can add further information you need in your service.
The same Secret that is used to create the signature is also used to validate the secret on the other end.
How it matters in our case is that Supabase generates JWT token using the Secret. We can deploy the same Secret to our Python service and then when we get the JWT token in our Python API, we can re-compute the signature and validate it's the same. If it is same then it means the token was created by trusted party.
BEWARE: If your Secret gets compromised then the person/s can decode and create any JWT token to compromise your service. So handle it with same care as passwords e.g. don't make it part of code, don't store it openly etc.
Python Service
I'll be using FastAPI with Fly.io but you can use whatever cloud platform you are comfortable with to deploy a Python service.
Lets have a service that will just output the user full name if authenticated and we will go over the details of how it is implemented.
from fastapi import FastAPI, Depends
from typing import Annotated

from models import User
from auth import  ValidUserFromJWT

app = FastAPI()

@app.get('/name')
async def name(user: Annotated[User, Depends(ValidUserFromJWT())]):

    return Response(
    	content={"full_name": user.full_name},
        media_type="application/json")
Here the key is user: Annotated[User, Depends(ValidUserFromJWT())], as that will validate the JWT and get the user from the Database and assign it to user. So, by the time the function body is executed it means the request was authenticated and you can trust the request.
Unpacking ValidUserFromJWT
from fastapi import Request, HTTPException
from fastapi.security import HTTPBearer, HTTPAuthorizationCredentials

class ValidUserFromJWT:
    def __init__(self):
        pass

    async def __call__(self, request: Request):
        credentials: HTTPAuthorizationCredentials = await HTTPBearer()(request)
        if credentials:
            if not credentials.scheme == "Bearer":
                raise HTTPException(status_code=403, detail="Invalid authentication scheme.")
            if not verify_jwt(credentials.credentials):
                raise HTTPException(status_code=403, detail="Invalid token or expired token.")
            user = get_user_from_JWT(credentials.credentials)
            if not user:
                raise HTTPException(status_code=403, detail="Invalid token")

            return user
        else:
            raise HTTPException(status_code=403, detail="Invalid authorization code.")
How the token is passed in the request is using the following header
Authorization: Bearer TOKEN...
Here the await HTTP Bearer(request) extracts this information and then we check
If the token is of type Bearer
verify_jwt: Verify the token is valid
get_user_from_JWT: Get the user corresponding to the token from Database
If any of those checks fail then we respond back with a HTTP Status code 4xx to let the caller know that something went wrong.
Here we use the jwt python library that helps us do the validation so we don't have to build our own logic. For it to work you need to do the following
Deploy JWT_SECRET as an environment variable to your service so you can access it from code. You can find the token from your Supabase dashboard.
2. Ensure the Algorithm used is the same one that Supabase used. In my testing, it is by default set to "HS256"
Here the code validates the token and then makes sure the token isn't expired. Once we decode the token successfully, we get the payload which is described here and it looks something like following
Here sub is the id of the user, so now you can use that to fetch the user from the database. I use Peewee as the ORM to make it easier for me to interact with database in Python.
def get_user_from_JWT(token: str) -> User | None:
    payload = decodeJWT(token)
    user_id = payload["sub"]

    if user_id is not None:
        try:
        	# Get the user from database with the user id
            return User.get(User.id == user_id)
        except:
            return None

    return None
As this tutorial is not about Peewee so I won't be diving into it but following is what the simple models look like.
from peewee import UUIDField, TextField, ForeignKeyField, PostgresqlDatabase, Model
from uuid import UUID

db: PostgresqlDatabase = connect(DB_CONNECTION_STRING)
db.connect()

class BaseModel(Model):
    class Meta:
        database = db

# The authentication table created by Supabase
class AuthUser(BaseModel):
    id = UUIDField(primary_key=True)

    class Meta:
        table_name = "auth.users"

# Your User table that links to the auth table
class User(BaseModel):
    id = UUIDField(primary_key=True, constraints=[ForeignKeyField(AuthUser, field='id')])
    full_name = TextField(null=True)

    class Meta:
        table_name = 'users'

    @staticmethod
    def get_user_with_id(id: UUID):
        return User.get(User.id == id)
Now onto how to call your service from your Next.js Supabase front end.
BEWARE: As the Peewee won't do any row level security here so you should make sure whenever you are fetch database rows to filter it down to ones that only user has access to.
Calling your Python service from Next.js
I'm using the nextjs-subscription-payments bootstrap project to setup my initial Supabase. Once you have that then you can get the user session, if they are logged in, and get the token to make a call to your service. Here is an example.
import { getSession } from '@/app/supabase-server';
import { redirect } from 'next/navigation';

export const dynamic = 'force-dynamic';

export default async function UserInfo() {
  const session = await getSession();

  const user = session?.user;

  if (!session) {
    return redirect('/signin');
  }

  return <UserName accessToken={session.access_token} />
}
Here we first get the user sessions, if there is none then it means user hasn't been signed in, so we redirect them to signin page. If the user is signed in, then the JWT token is available in session.access_token which we will use to make the service call.
This is a client side component so when it's rendered we make a service call, passing the access token in headers and then once we get a successful response we get the full_name from the returned JSON.
Conclusion
This is how you can setup a Python service which validates the token so you can do user level operations securely and build your AI/LLM services that you can use in your Next.js front end.
Onboarding remote Software Engineers can be challenging. Here are some suggestions from my experience of onboarding multiple engineers remotely to make them become part of team.
Show full content
In this post I'll go over on approach for onboarding new early hires remotely that I've formed from my experience. Hope it helps you and your team in the process.
I transitioned to Engineering Management role, around 2 and half years ago. During that time most of it was spent managing the team remotely but I don't claim to be an expert at it but rather student as I go along and learn.
Before last year, most of the team I managed were based in same city though working from home due to COVID. These were the people I've met and worked with in person. My team recently hired multiple engineers (early in SWE career), some in different state in USA and others in LATAM.
It was an interesting challenge onboarding them, so they become productive, make them feel part of the team, get them energized around the mission and work they are doing. I'm glad to see them now contributing to our product and team. Few things you should know about it
It will take time commitment both you as their manager, onboarding buddy/mentor and other members of the team.
There are managerial challenges you will have to understand due to different countries and laws (equipment, benefits, holidays etc.).
Building connection with the team members and between them and team happens gradually but only with conscious effort.
Here are learnings from my experience and suggestions on what I currently think provides a good onboarding model
Homework before start date
You goal should be that in the first week have the new team member setup their machines and complete their first check-in. For this you have to do some homework before their first day
Make sure all the steps to setup their machine for development, cloning repo etc. are written down (more on writing later).
You need to pick an onboarding buddy/mentor but it shouldn't be random member from team. Think about what area you want the new engineer to continue working in about 3-6 months. Pick the onboarding buddy who owns that area. That will help build a relationship between them from the get-go and they will be more open to discuss issues when they work on complex projects.
Allocate time in onboarding buddy/mentor sprint for this. Make mentoring an explicit goal for them, this will ensure they don't take it as an extra ask alongside their regular sprint.
Ask the onboarding buddy to find couple of easy bugs that would be suitable for someone new to tech stack and code.
Create a PowerPoint/Email and ask your team members to share some details about themselves. For example, what they work on, preferred communication mode, fun fact about themselves, picture etc. This will be a great way for the new person to know the team, understand their preferred times and communication mechanism (sync/async). Send it on their starting day as a first thing.
Before they join, send them a welcoming email and do include your contact so they can reach to you if Teams/Zoom doesn't work.
On their first week
Have a 1-1 with them on the start of their first day. You can do introductions, share what team does, how they should get started etc. Basically sharing all the homework you did to set them up for a good first week.
Schedule your regular 1-1, at minimum once per week. If you generally do bi-weekly cadence, still have once per week for first few weeks and then later you can transition to bi-weekly cadence. It's essential they get face time with you to discuss their issues, understand more about the work, team culture and company.
In the first week, would highly recommend doing quick check-in, at least once in 2 days. Have their onboarding buddy setup a daily (preferable) 1-1 with them. People can be hesitant to reach out for help so having face time with their onboarding buddy will ensure they are not stuck.
Growing responsibilities and support
I hope with above instructions they were able to get in few quick wins (check-ins) and feel confident navigating parts of the codebase, tools and processes.
Initially you would give them bug level items and smaller work so they build confidence in the first month. After that start forming a plan to have them work on a certain feature or larger change in the area of work you determined earlier.
By this time they will be comfortable working with their mentor who is also the owner of the area where they'll be working. Make sure that you continue to sync with them in 1-1, understanding how they are progressing.
In the beginning there can be unnecessary stress exacerbated by being remote. They may think they are underperforming as they don't have anything to gauge it. Understanding how they perceive about their own progress; you can help calm their nerves. If they are doing well, appreciate and communicate that. If they are struggling reach out to understand how you and team can support them.
Culture of writing
Our team previously had some knowledge written down but most of it was tribal knowledge passed during meetings, conversations etc. In a world where the whole team is in same space, this is not optimal but the fact that people are accessible puts a band aid on this problem.
In all remote or hybrid situation that band aid is ripped out so now you have to fix the problem. The solution is simple, write things down. Execution takes repeated effort and reminder. Following are some of the things that you should have written down. I don't claim my team or I are 100% done with it but we are improving and that's the goal.
How to setup machine
Tech stack used and primer on it
Architecture of the system
Good patterns to use
Various tools at developers disposal and how to use them
Team meetings and processes (what various team meetings are, expectation from attendees etc.)
Dev specs (one of the real benefits of it is when there are many approaches why a particular decision was made)
You as a manager should be promoting things to be written down. Whenever you hear something that would be beneficial for others, ask the person to write it down in team wiki.
Culture of sharing
As we work remotely, sharing can become harder as there is no hallway conversation to ask people what they are working on, no in person gatherings to demo stuff.
You need to have a way for people to share technical learnings and sharing about the work they do. This could be newsletter, Teams/Slack channel or a weekly meeting but there should be a platform where it's expected to share and celebrate the work being done. This platform shouldn't be restricted to your immediate team but a broader organization (not more than approx. 50 people).
This helps in recognizing the work the new team members are doing.
See what others are working on. This helps make connections which will be beneficial when working on more broader projects.
It creates energy by seeing how the team is moving towards a goal and how their contributions are part of the bigger whole.
Sharing technical knowledge e.g. things that didn't go well, new techniques learned etc.
I recently built findvaccinefor.me which gets data from WA state sources such as vaccinelocator.doh.wa.gov and prepmod.doh.wa.gov and presents it in a more convenient way (IMO). I built this over few weekends as a tool for me to see where I can get vaccine
Show full content
I recently built findvaccinefor.me which gets data from WA state sources such as vaccinelocator.doh.wa.gov and prepmod.doh.wa.gov and presents it in a more convenient way (IMO). I built this over few weekends as a tool for me to see where I can get vaccine shots and in the process maybe help few other folks like me. It certainly doesn't solve all the problems.
Professionally I work on a full stack product and overtime have gotten some sense of what a good or bad user experience feels like (at least I would like to think that). The thing I generally try to focus on is friction in user flows. Each time we make something slightly harder the funnel of users completing the flow becomes narrower.
I don't have any data but my intuition is that existing vaccine scheduling systems introduce so much problems that it might result in actual harm by people delaying vaccination.
Lets go over some of the gripes I have with existing tools and why user experience is very essential even for a mundane thing as scheduling an appointment.
Problem 1: Finding clinicFinding vaccine with zip code
In the age where everyone uses some form of maps e.g. Google maps, Apple maps it's hard to parse through information based on zipcode and how many miles away it is. I believe majority of us are habituated to use maps for searching for a location and understanding it's closeness and convenience of getting there.
Vaccine site showing dates in past
Why is it showing me dates all the way back to 2016. It should only show the dates in future, I thought that would be obvious. But it should also filter out dates for which there are no appointments available. As a user looking for vaccine, I'm only interested in dates which have an appointment available so I can pick the most convenient one out of them. Currently user has to try out multiple dates and hope there is an appointment available or browse through bunch of listing to find the right date where vaccine is also available.
Showing vaccine clinic without any availabilities
Hmmm, why show me a place where there is no appointment available. What are they expecting me to do with that info? This just adds to the friction as I parse the list. Though I'm glad prepmod.doh.wa.gov shows the map but its not much useful when I can't see where the location is in relation to me.
Problem 2: Different scheduling websitesDifferent scheduling websites
Can you spot the problem in above picture? Yep, you guessed right. Each clinic has a different scheduling system, some even points to a Facebook page. As a user everytime you click for scheduling, you are in for a surprise and have to go through the pain of understanding each system.
I believe prepmod.doh.wa.gov tries to solve that problem but it only has few bigger vaccination sties and most of the places around you would likely have their own system. These systems make you fill a form before you can even see the vaccine is available at a time that is convenient for you. This results in a lot of time spent in filling forms unnecessarily to realize they don't have it.
Instead, please show me what's available and when, only when I select they can go through the process of filling all the forms they want.
I understand why we currently have such a disconnected system, likely because each provider wants to do their own thing. I think a world wide pandemic requires a response which is more national or at least at a state level even for digital experiences, otherwise I think we run a risk of a slower vaccination pace and likely more economic hit due to it.
Its also nice to see that all these websites are dynamic and work well on mobile phone.
Mobile friendly websites
This is not to dis the people helping build it as I tend to believe they probably did what they could with the resources they had. But it's just a criticism of the general laissez faire approach to building digital experience for the goverment and not investing much time and money on it.
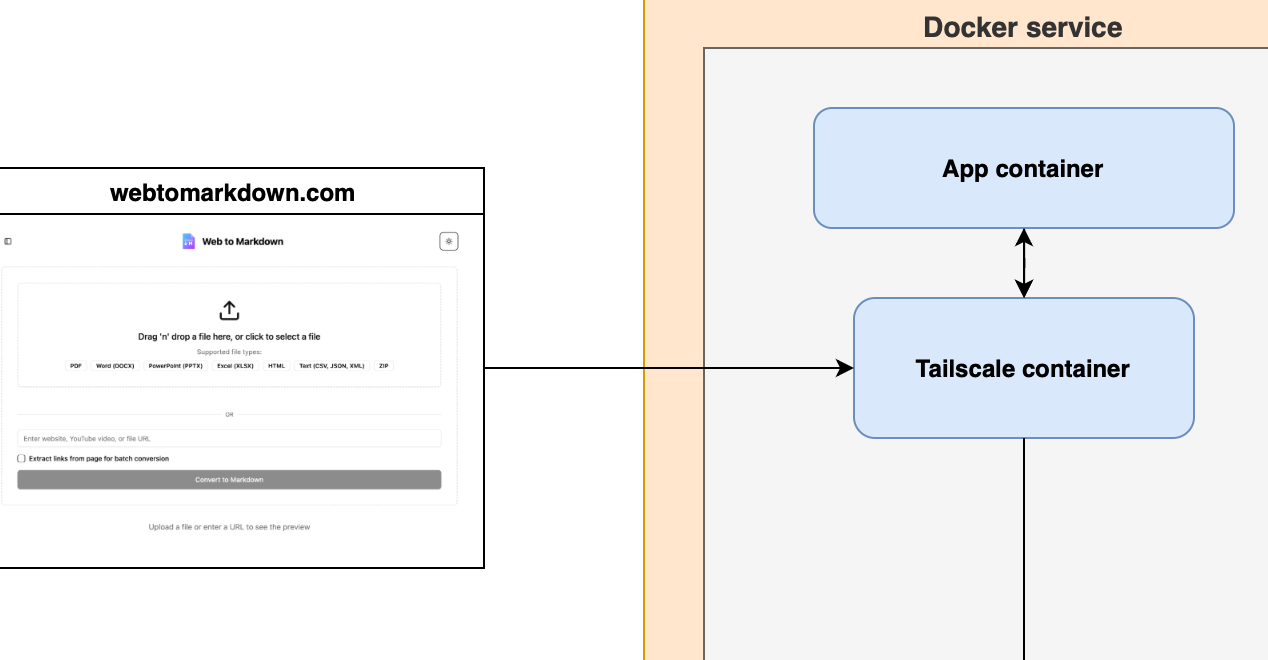

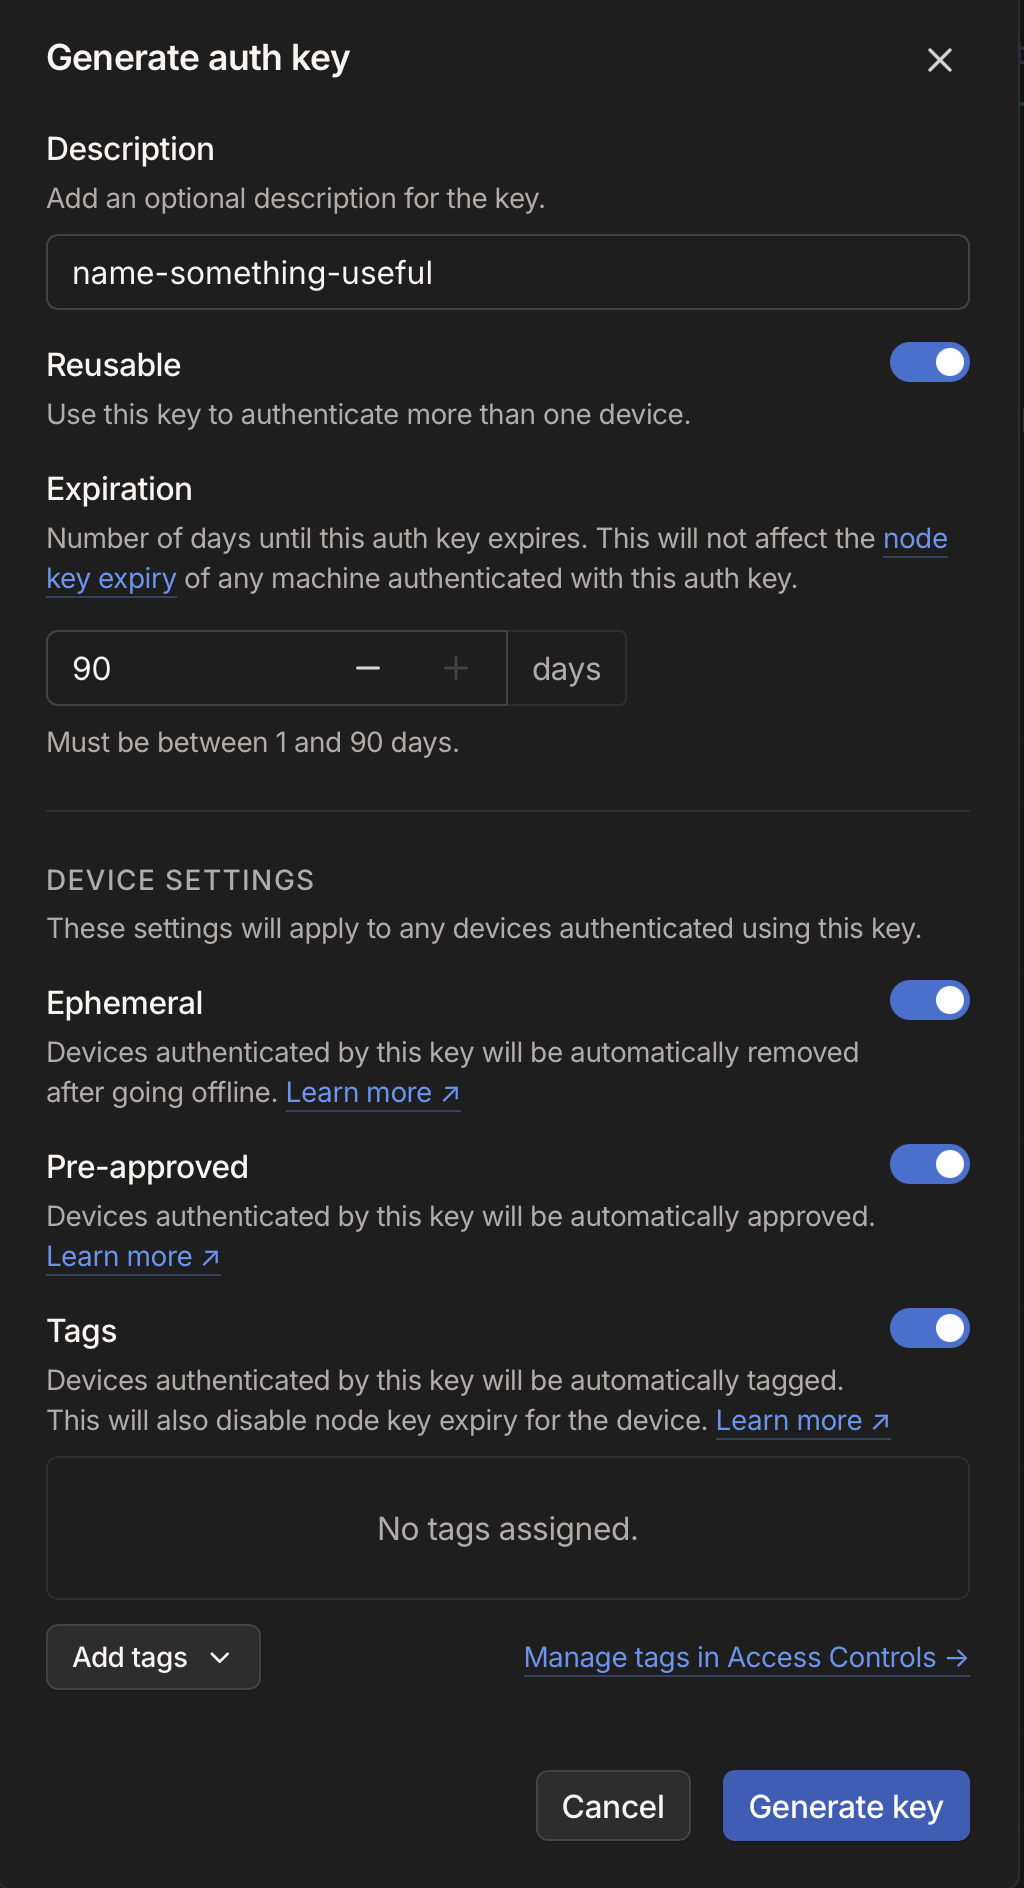

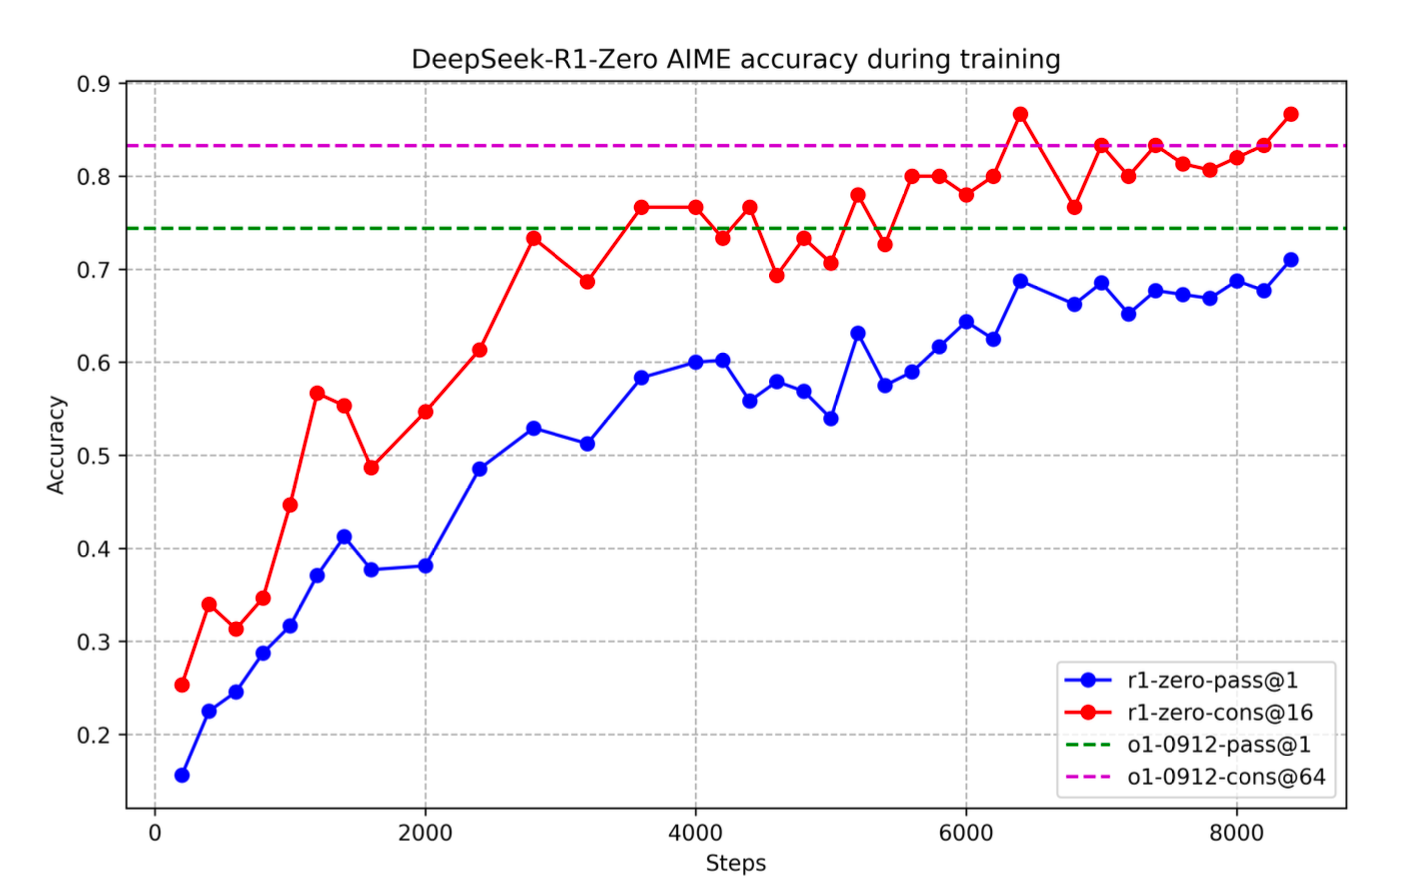
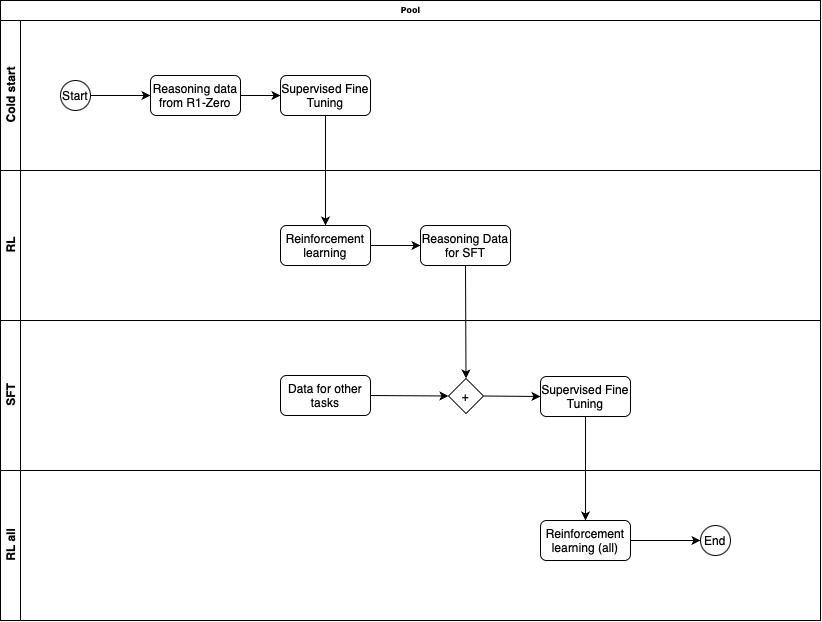
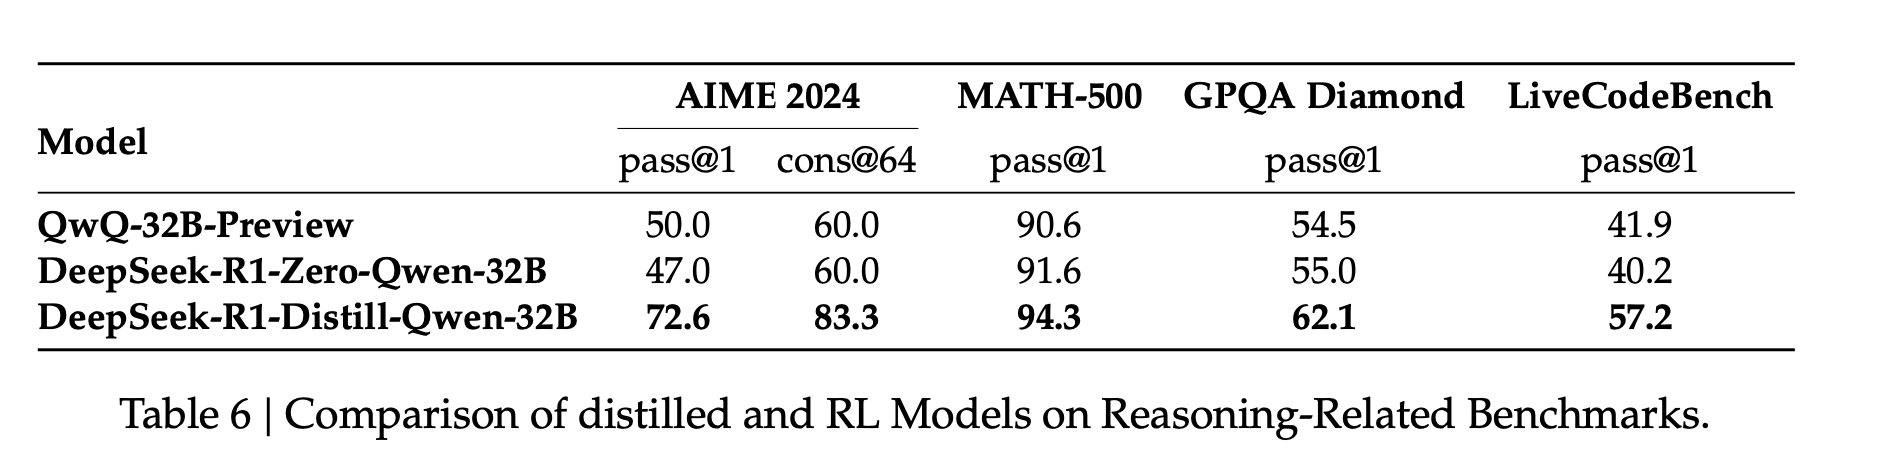
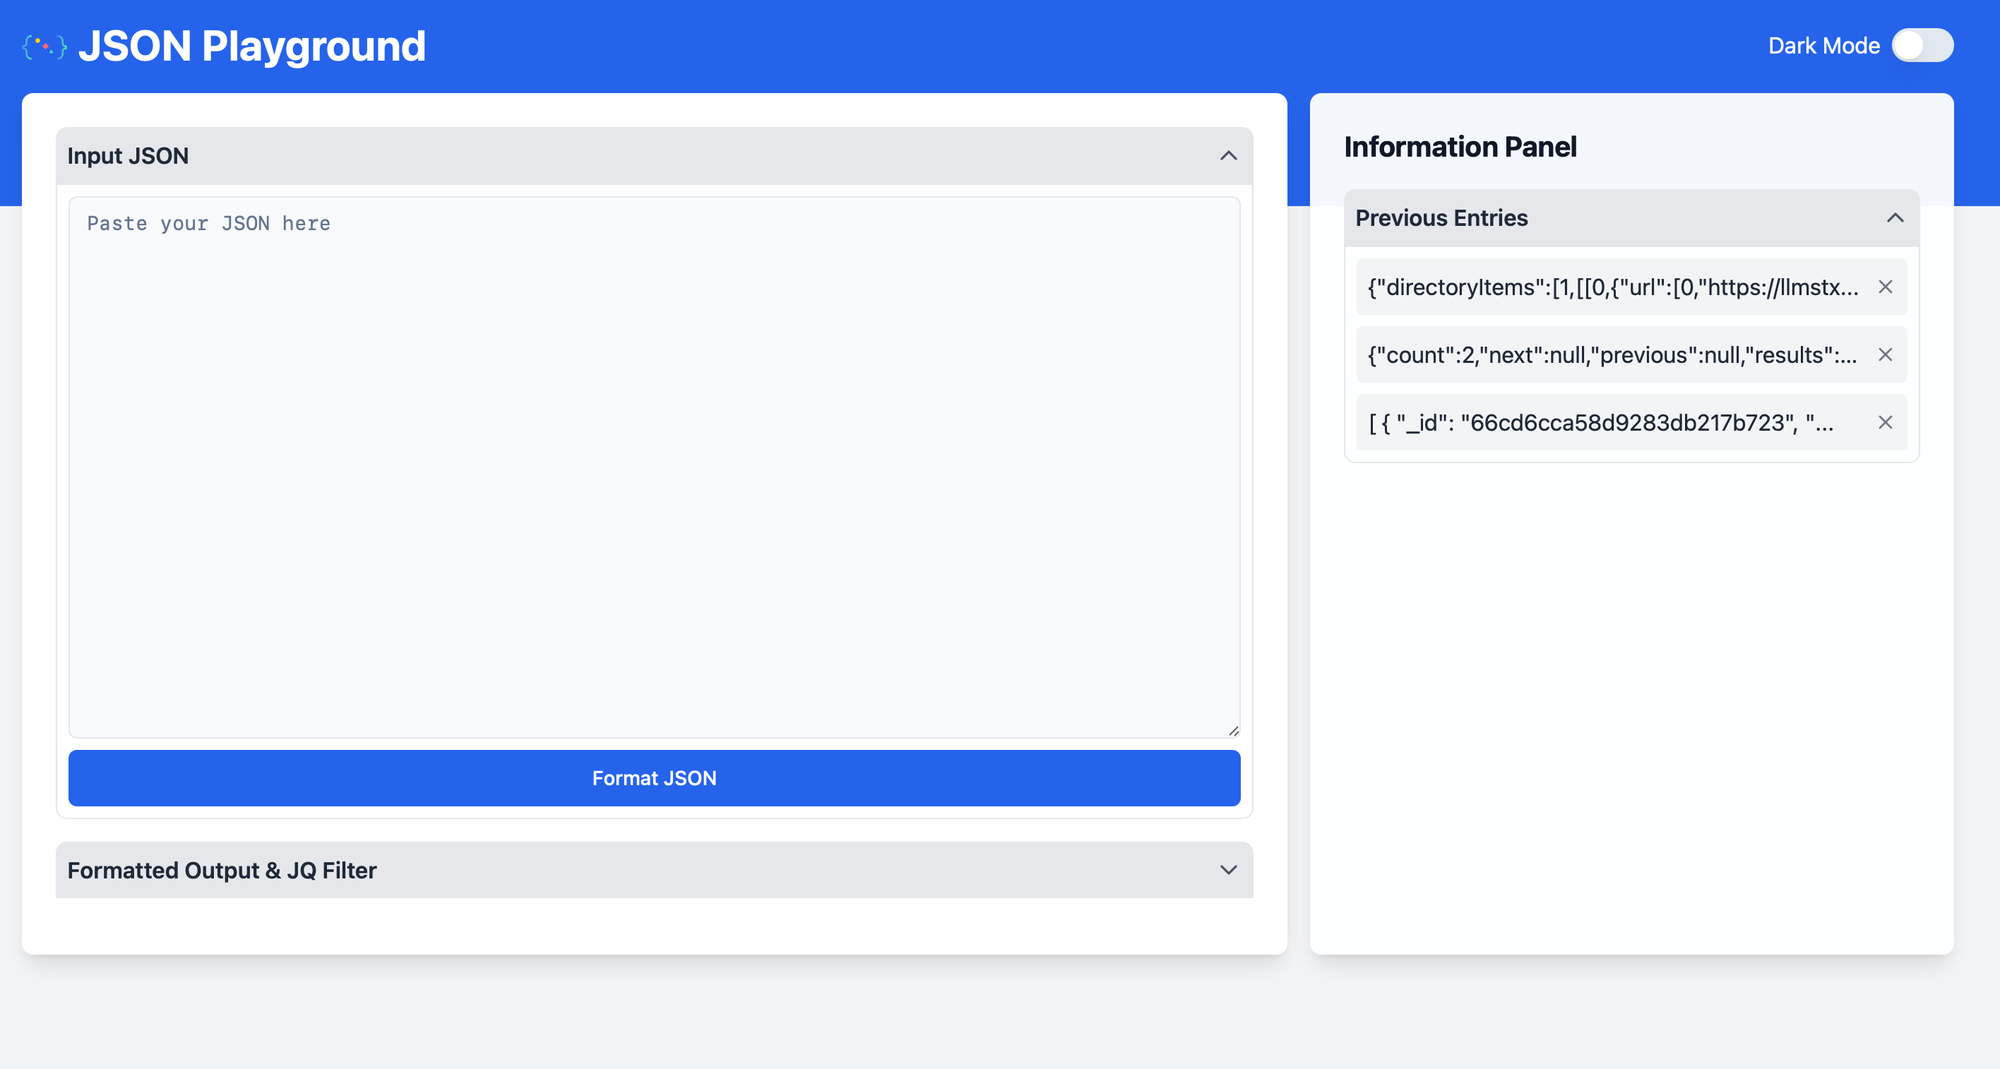

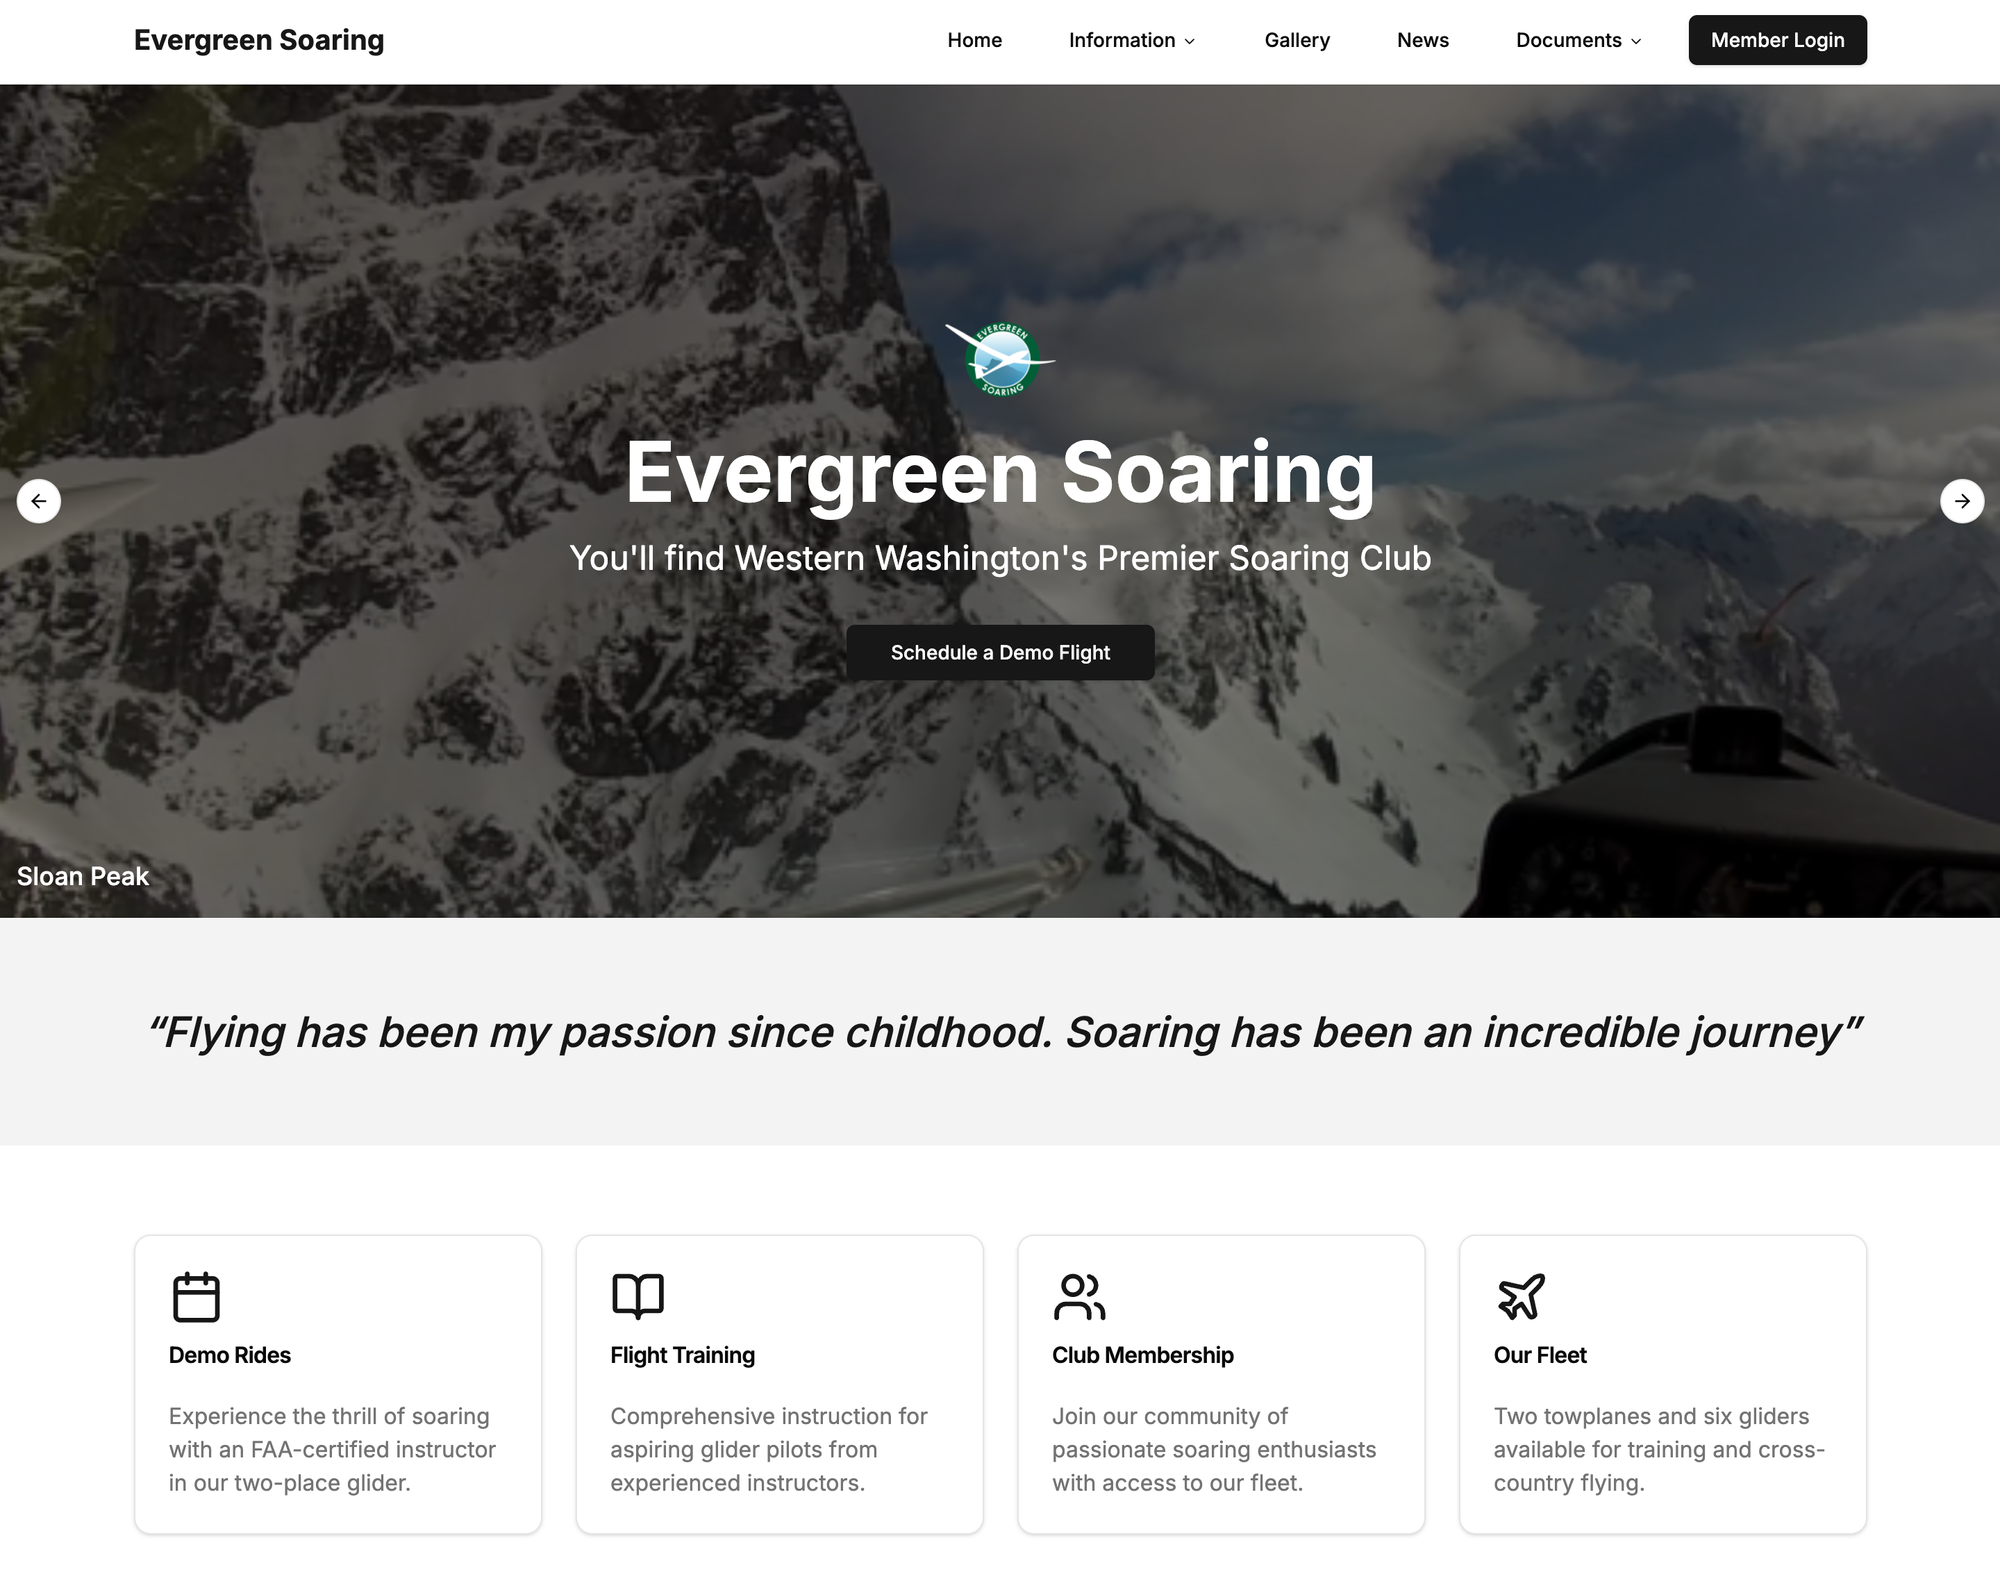
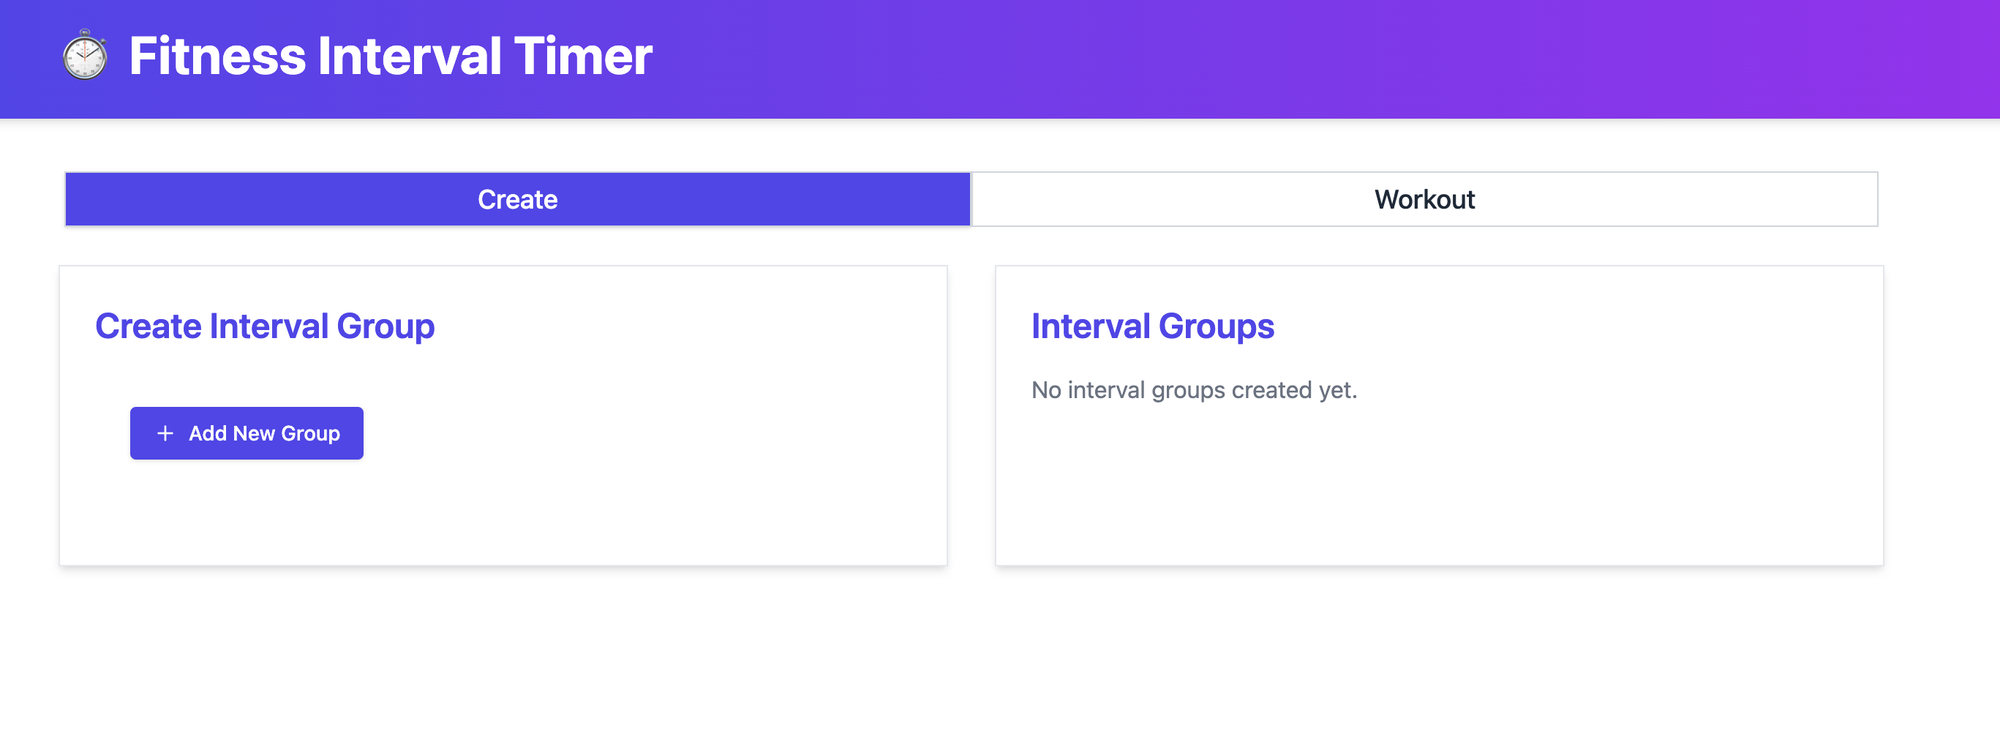

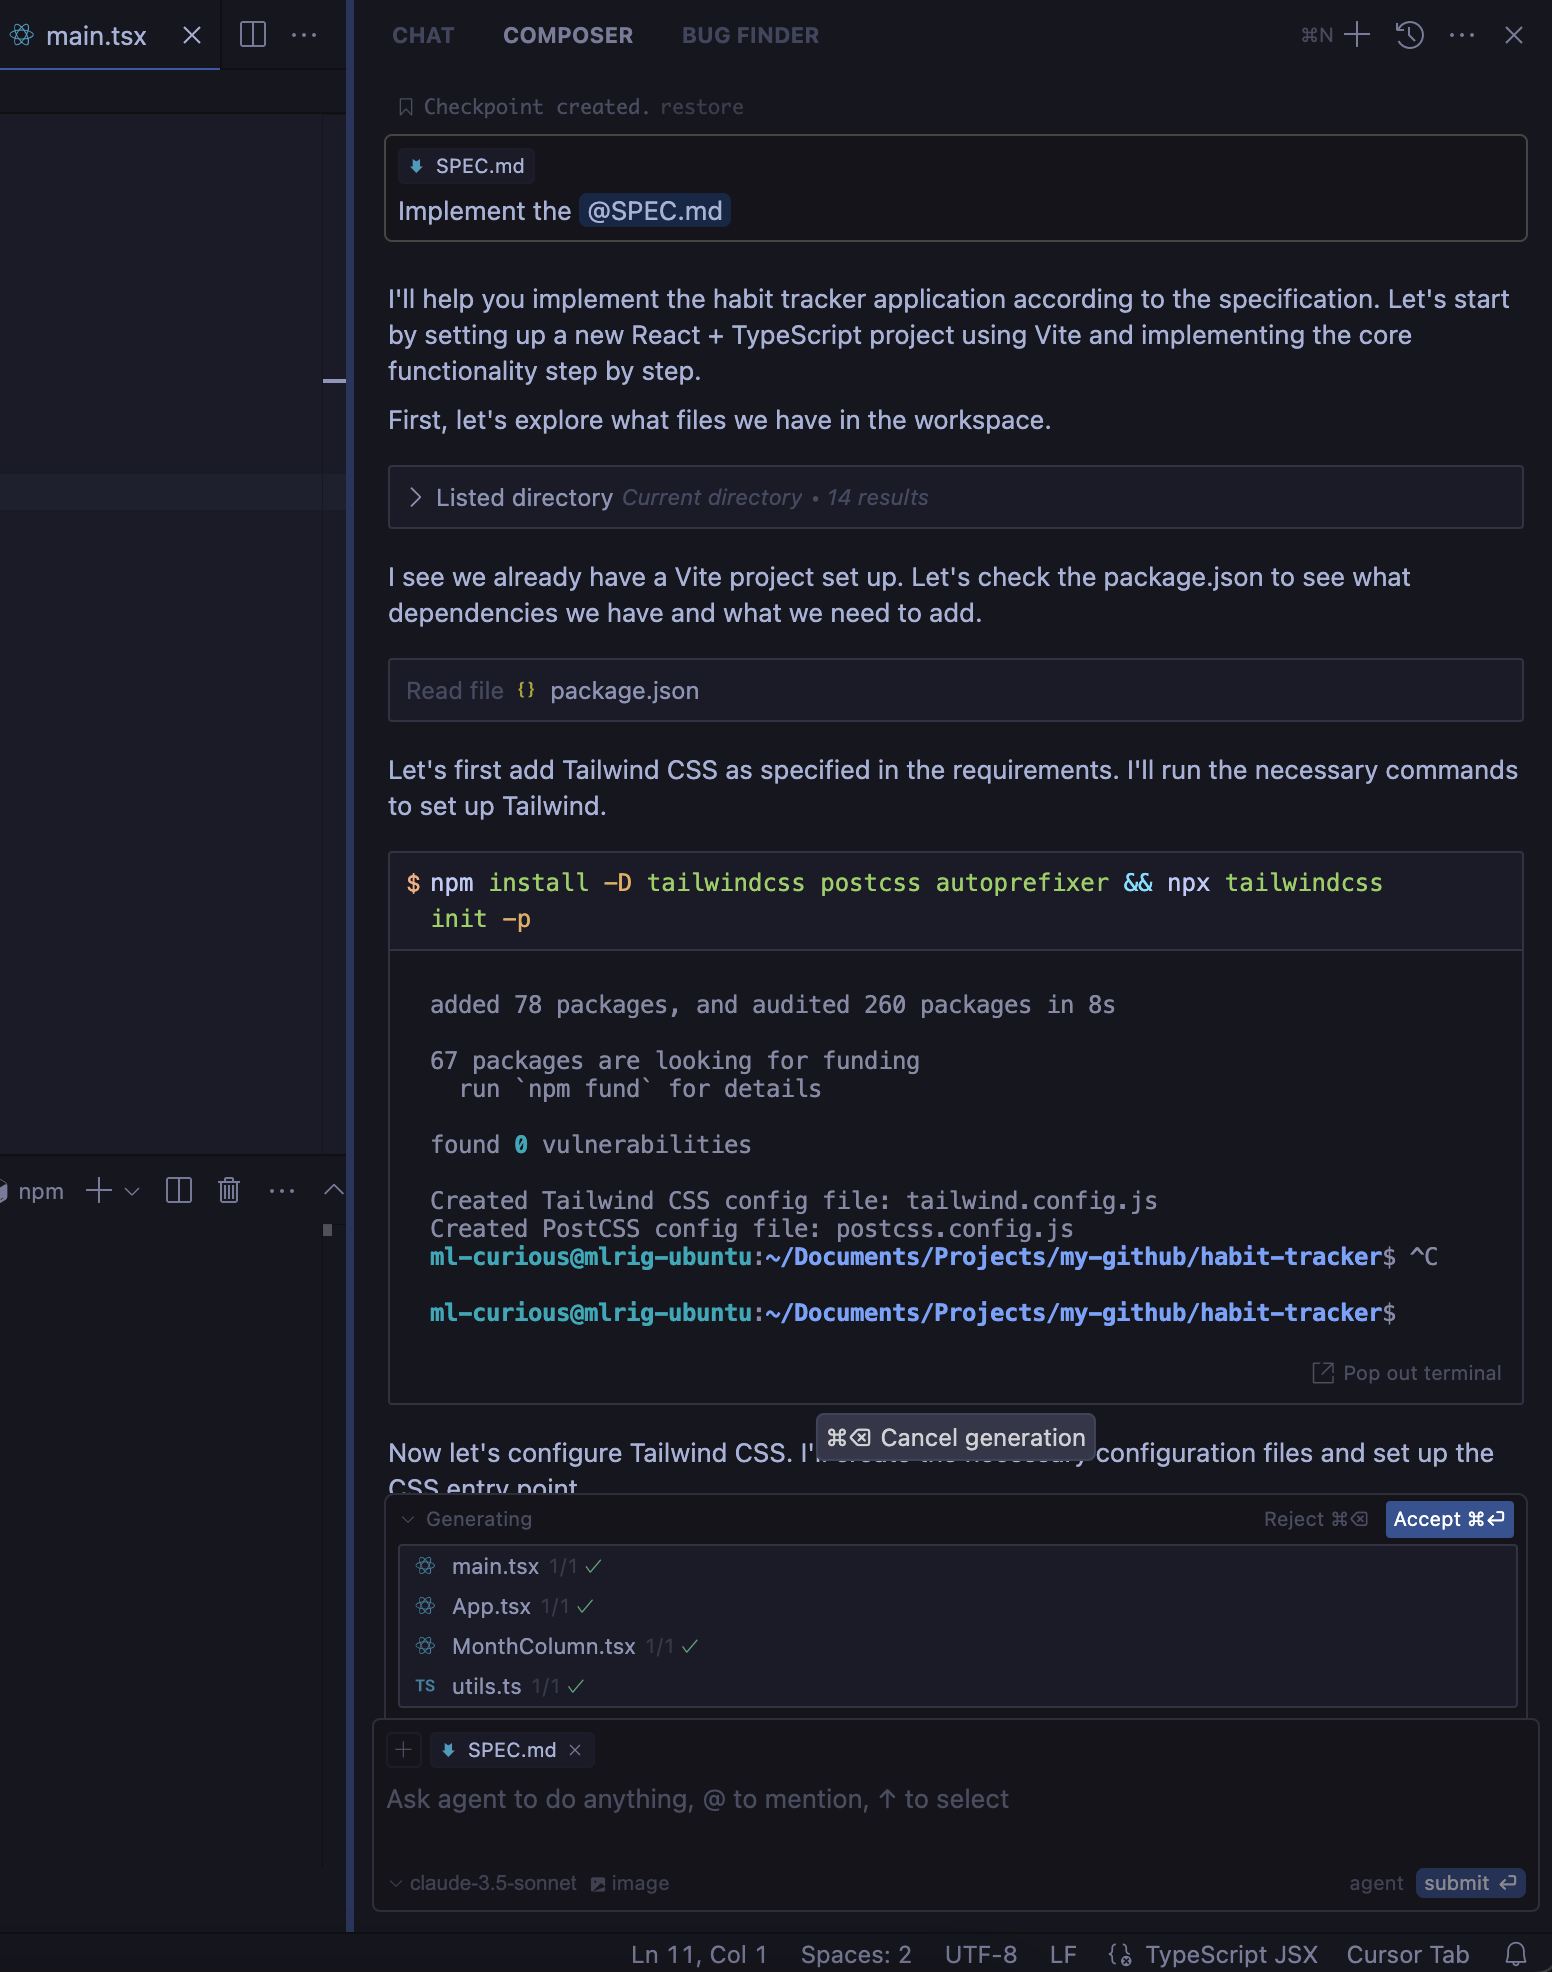
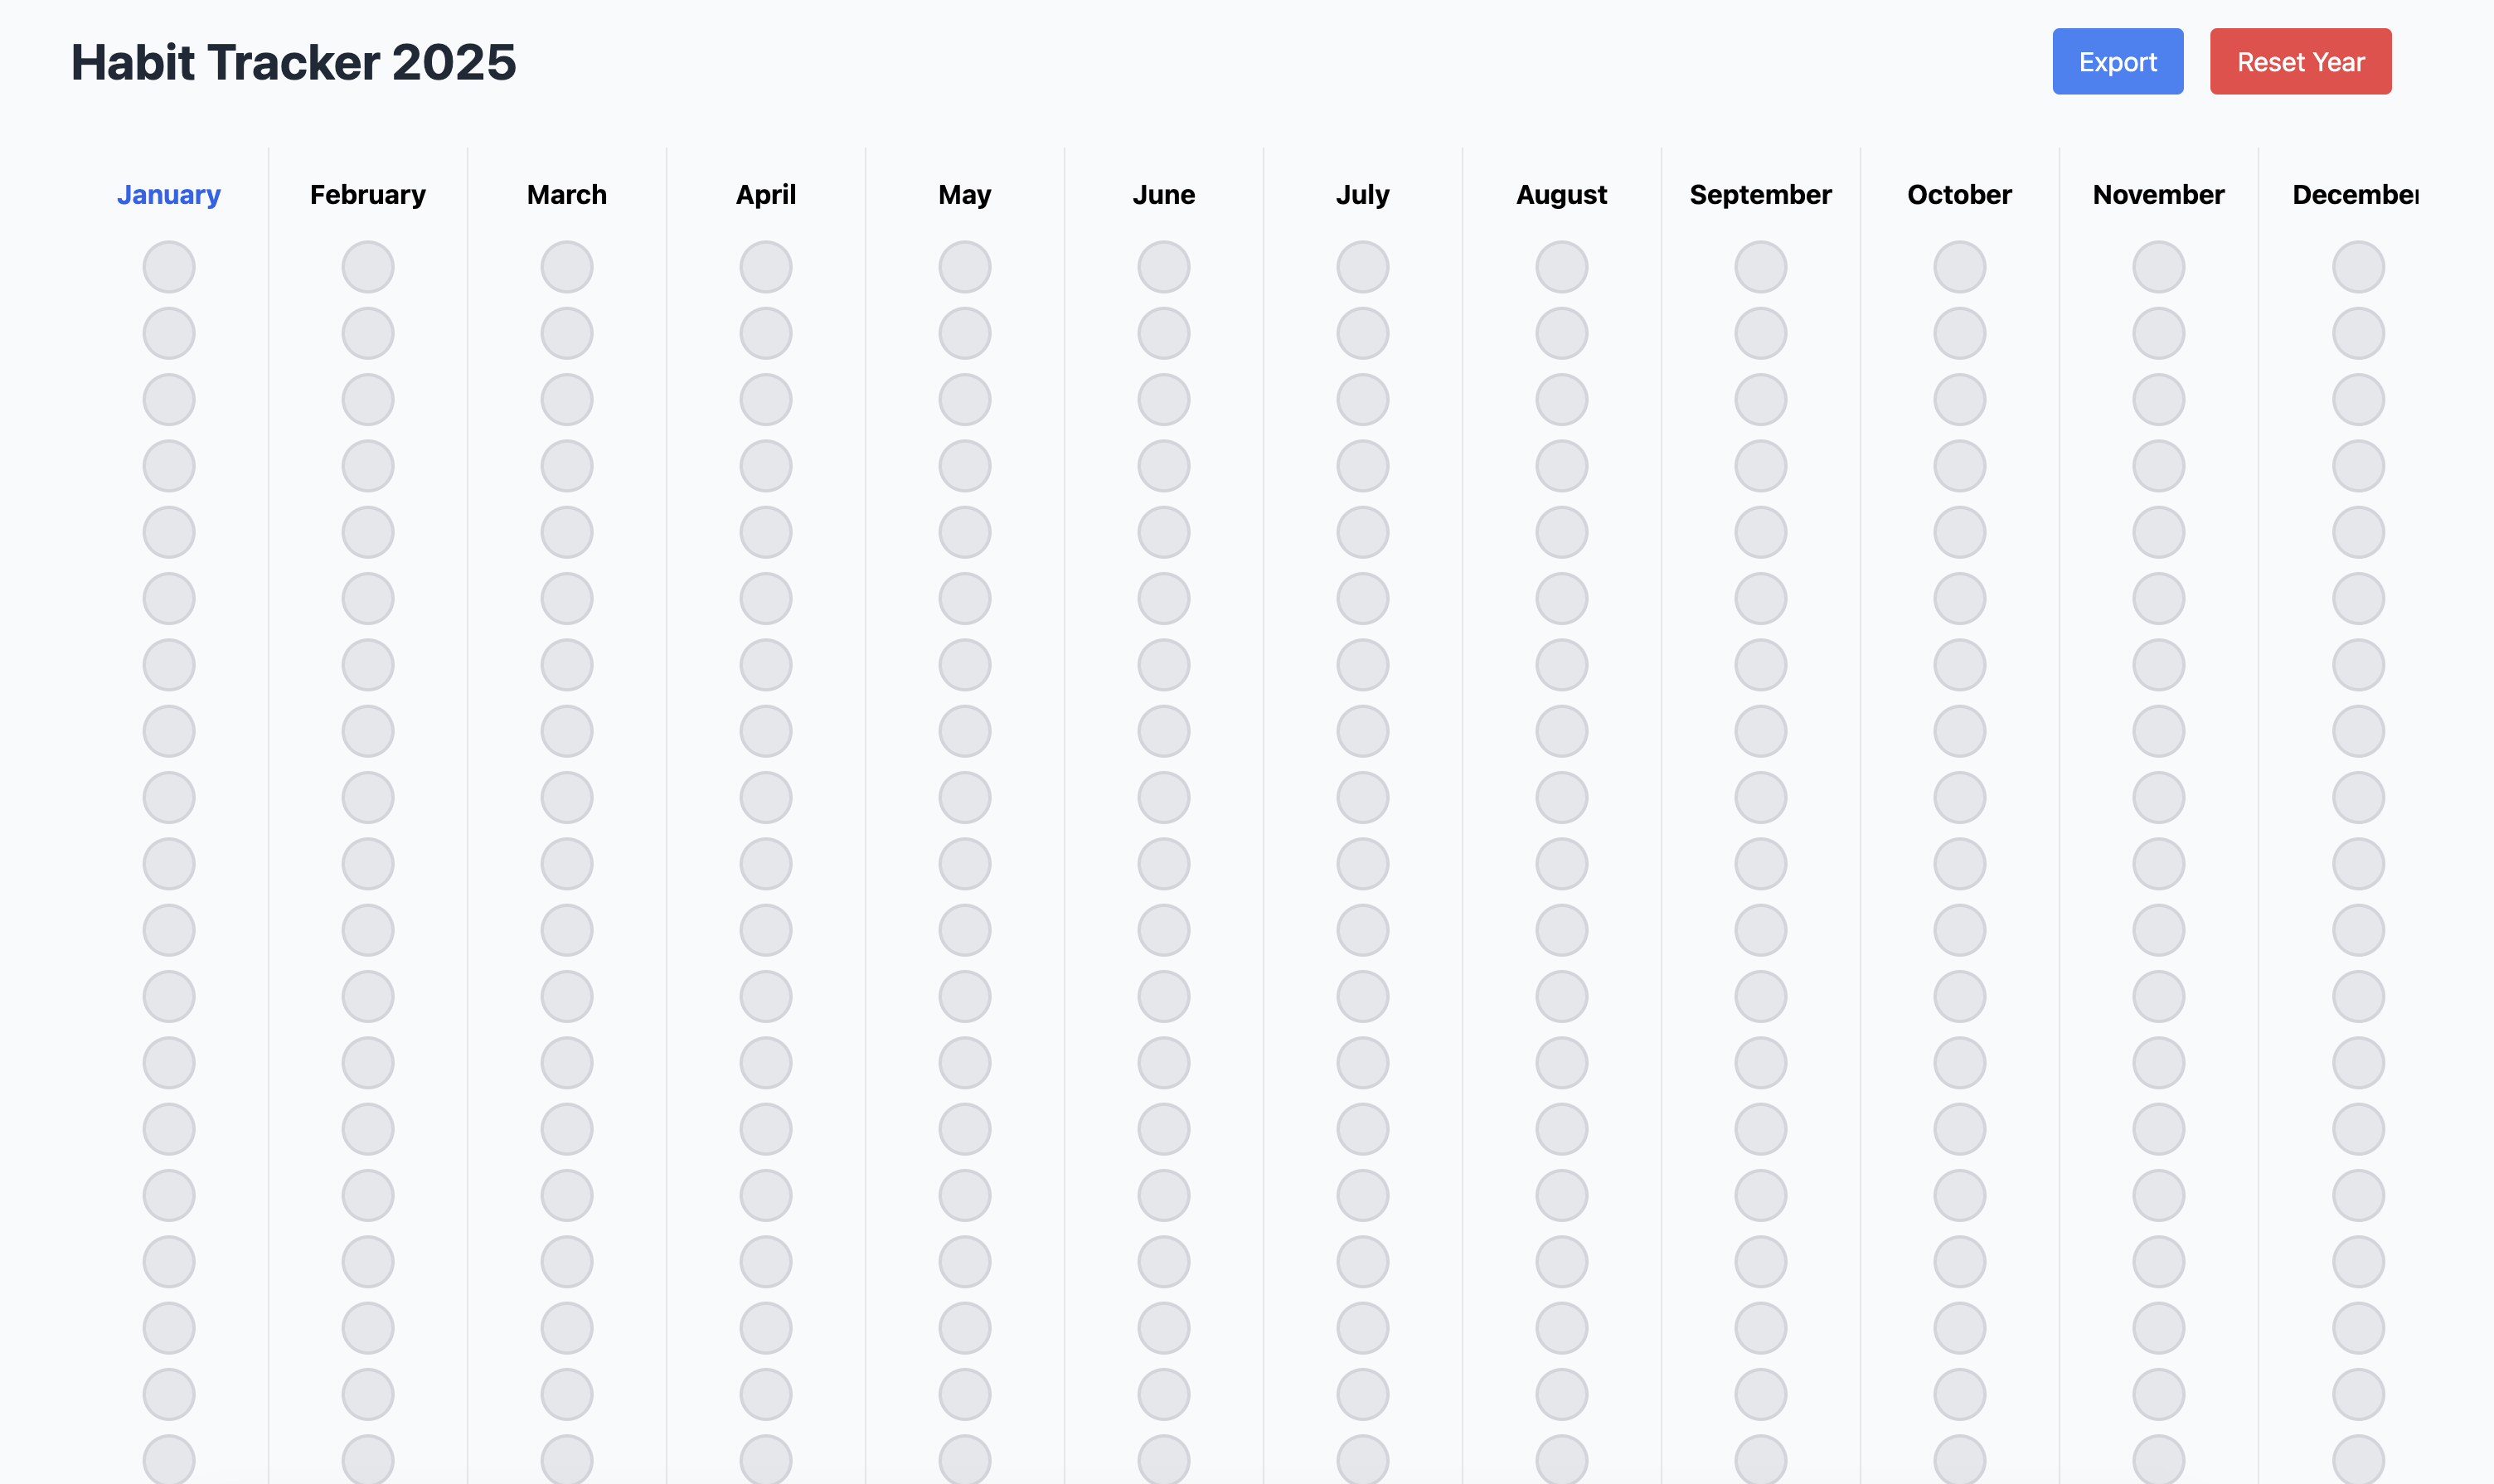
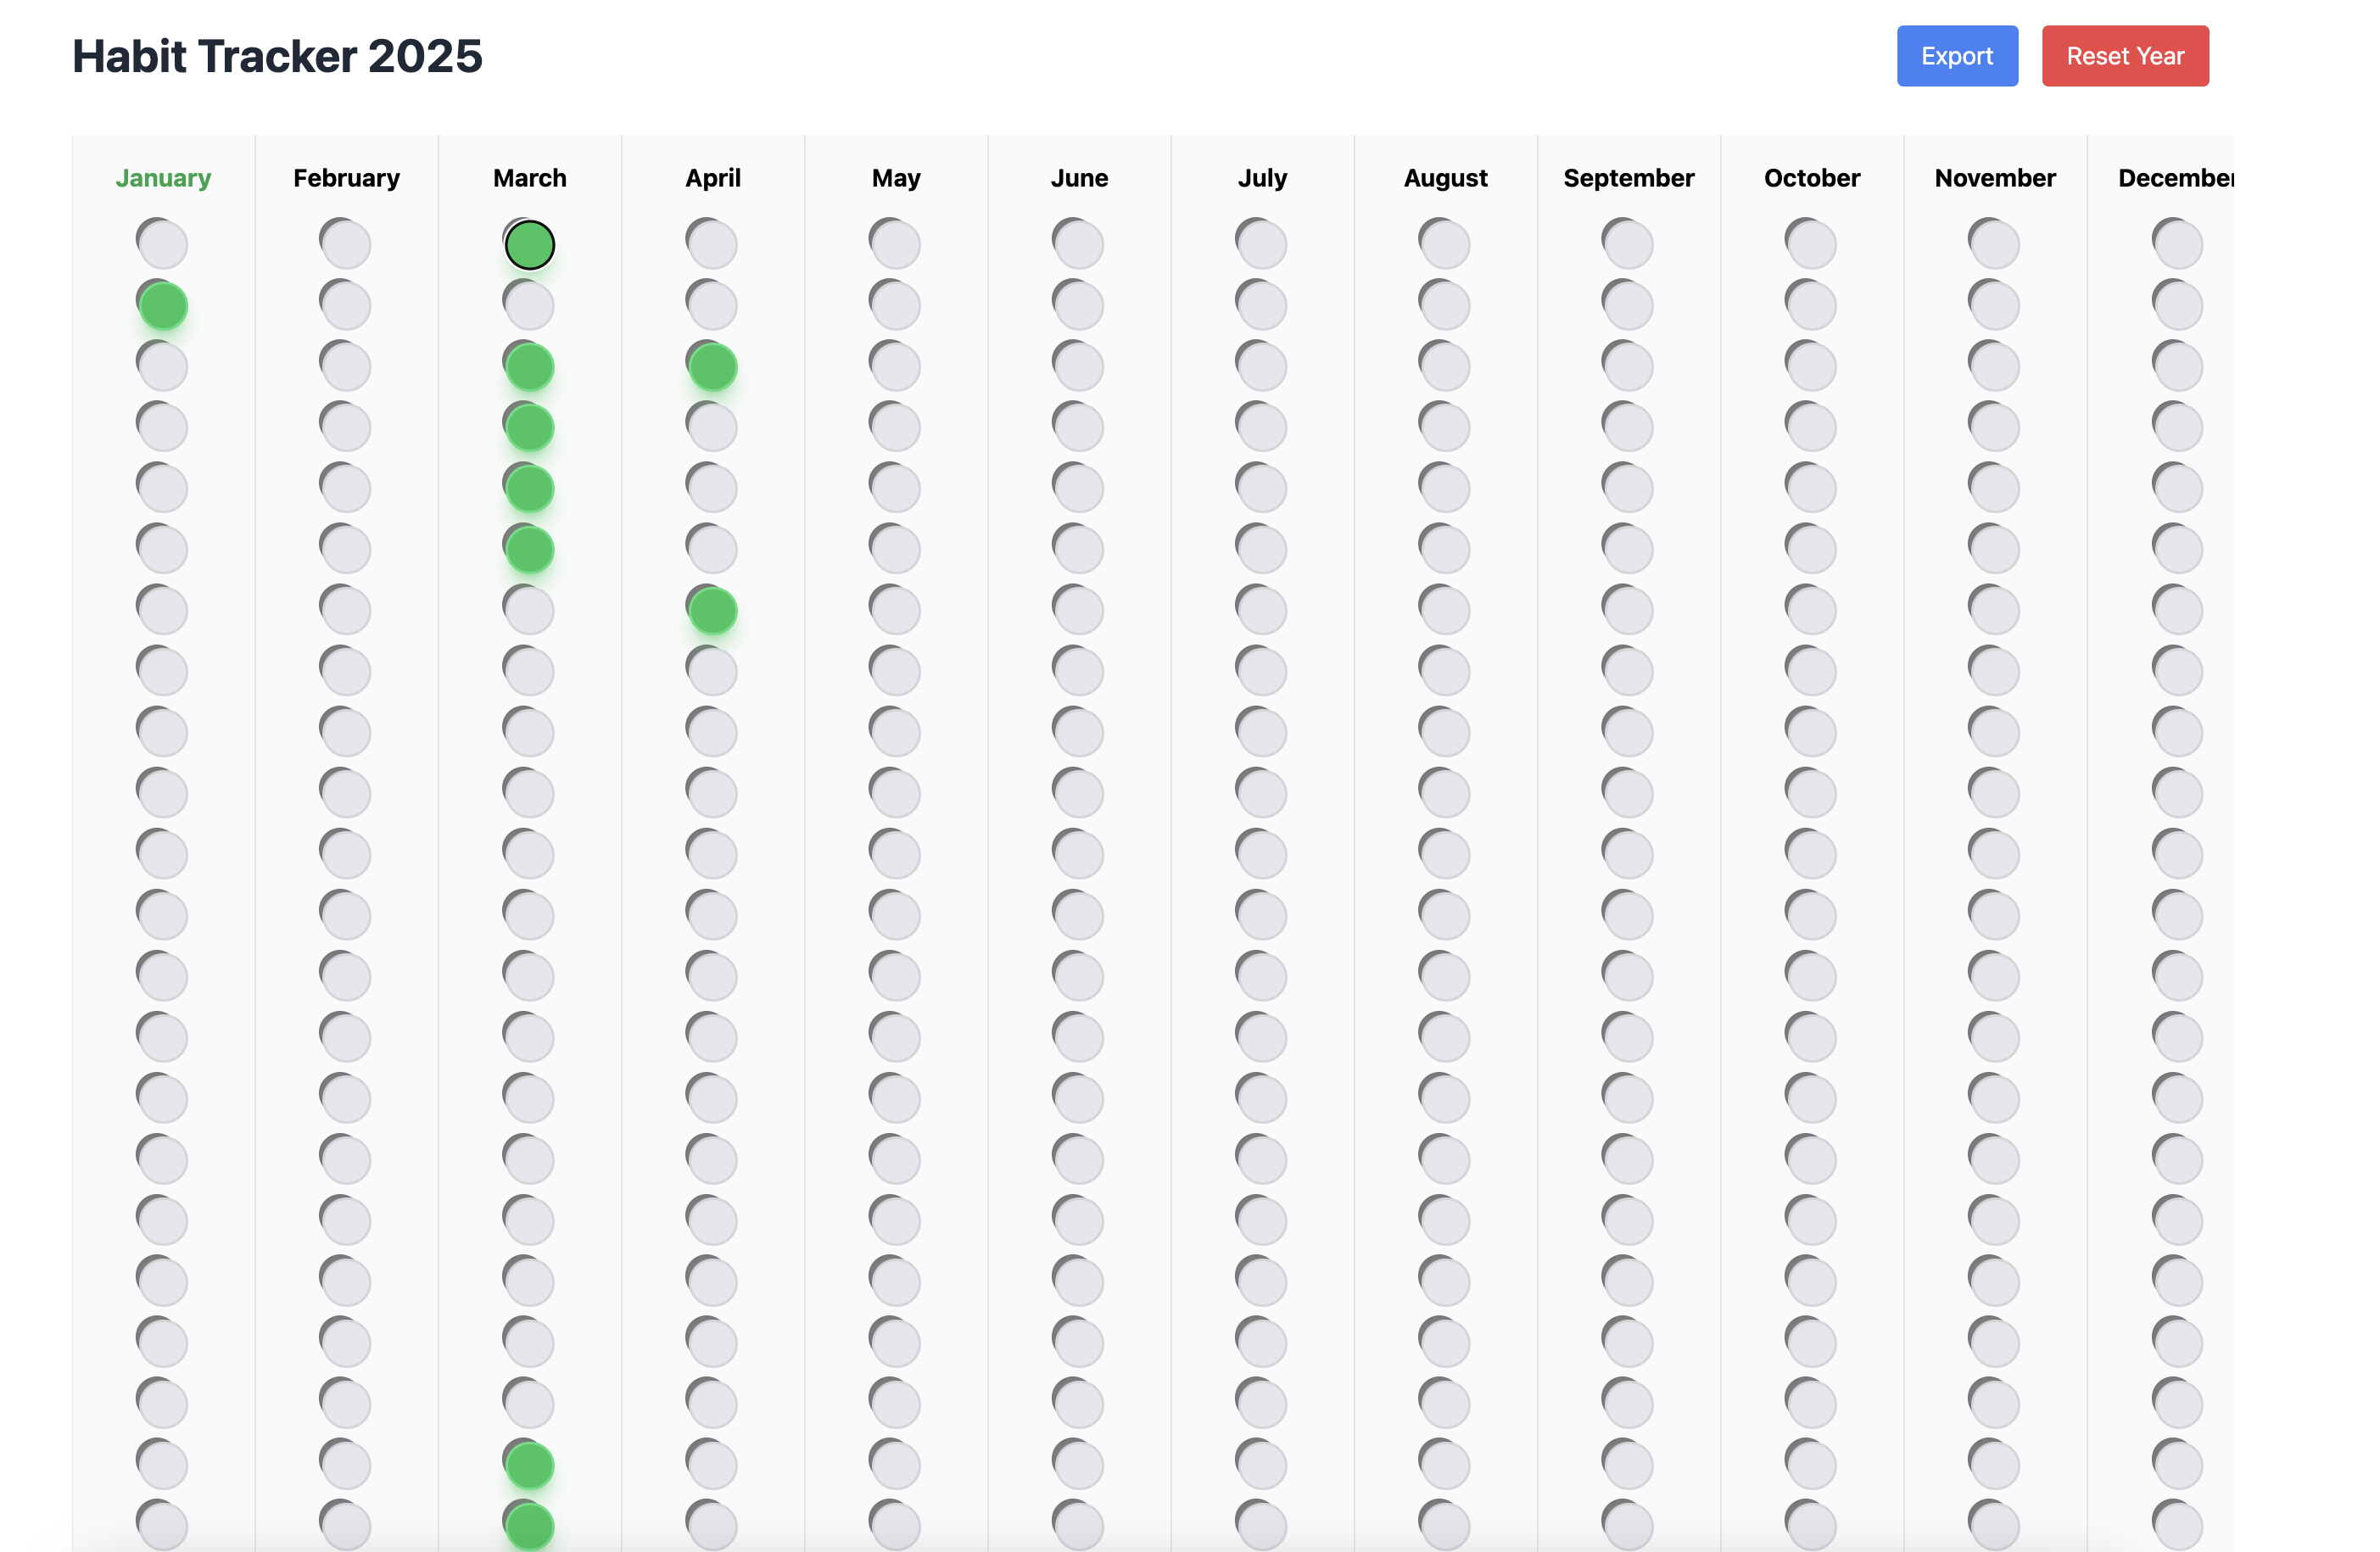
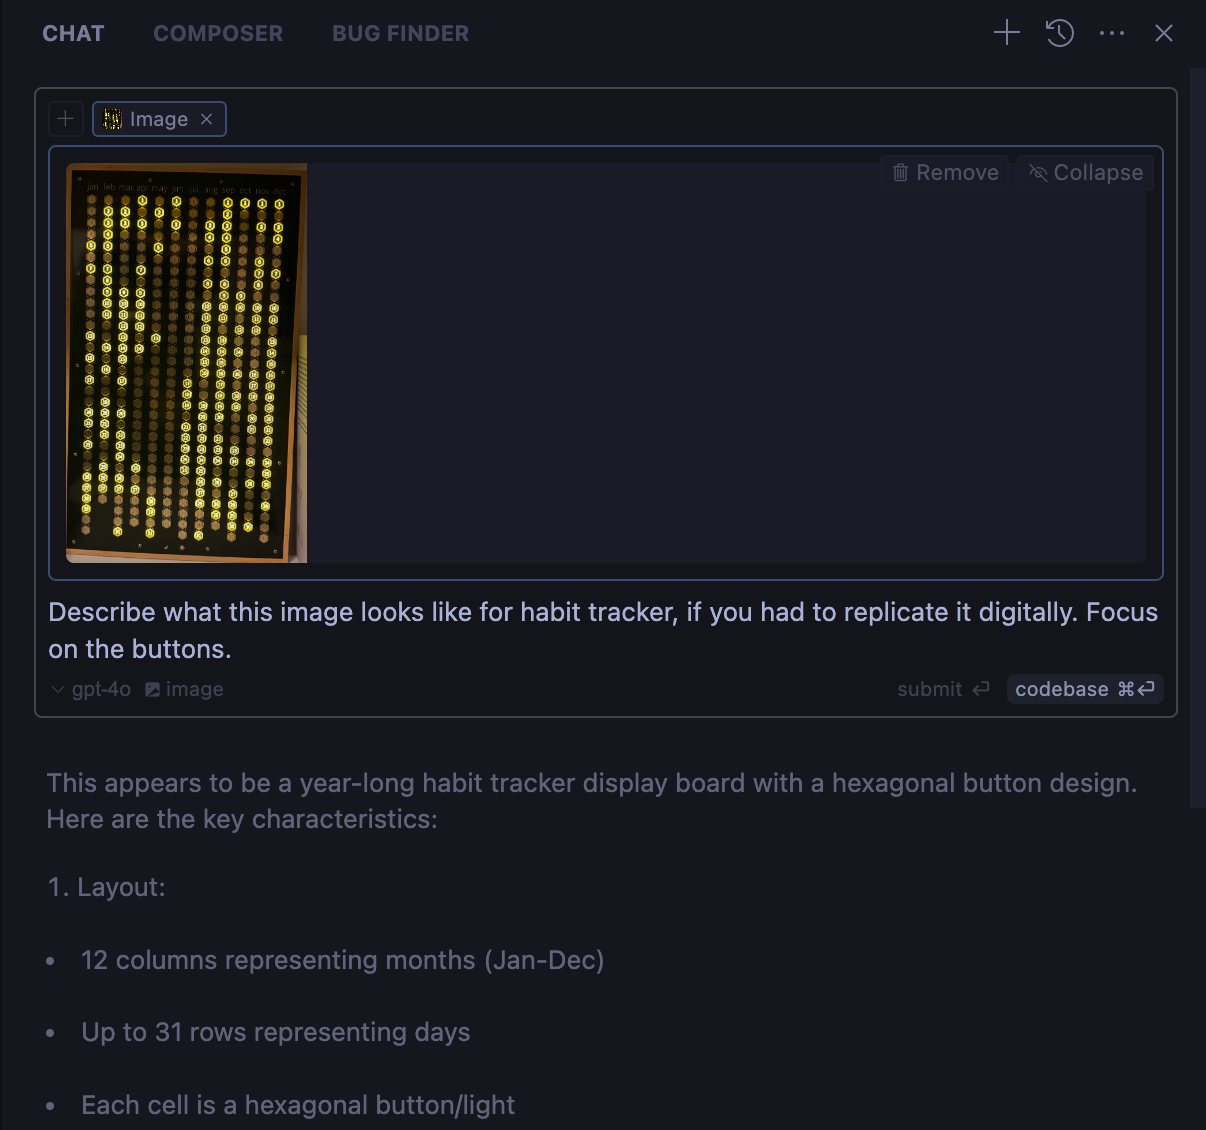
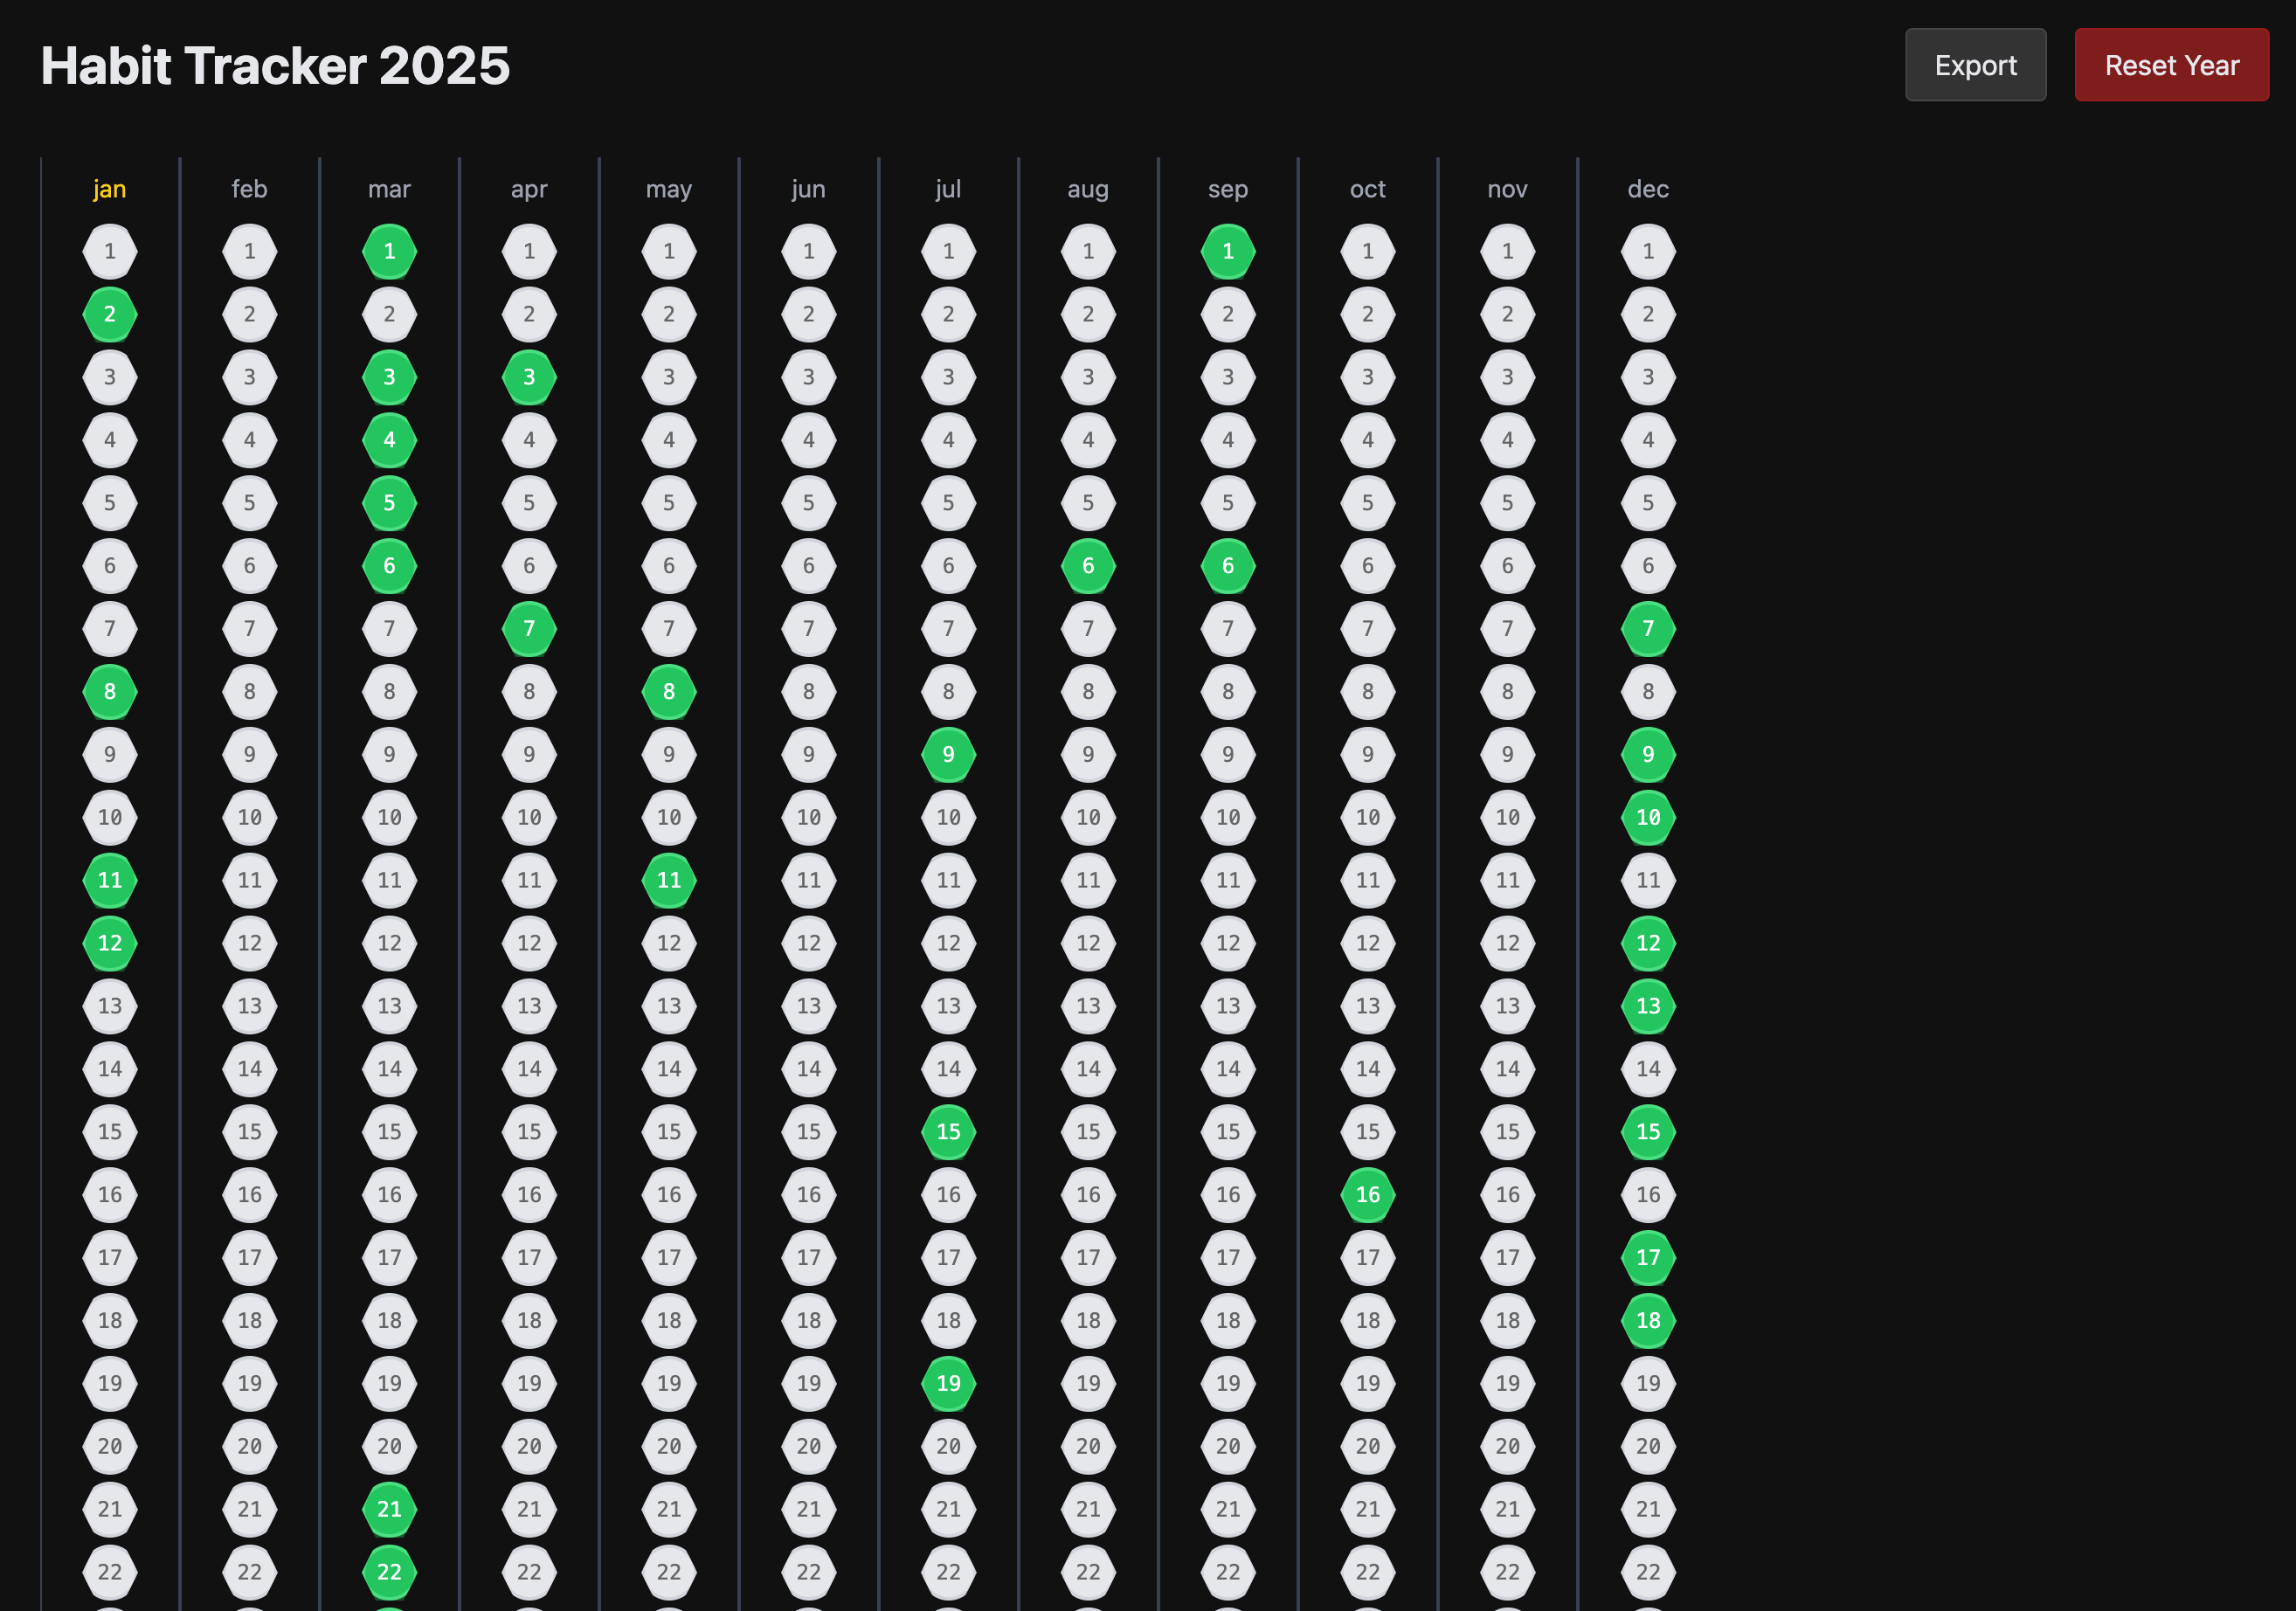
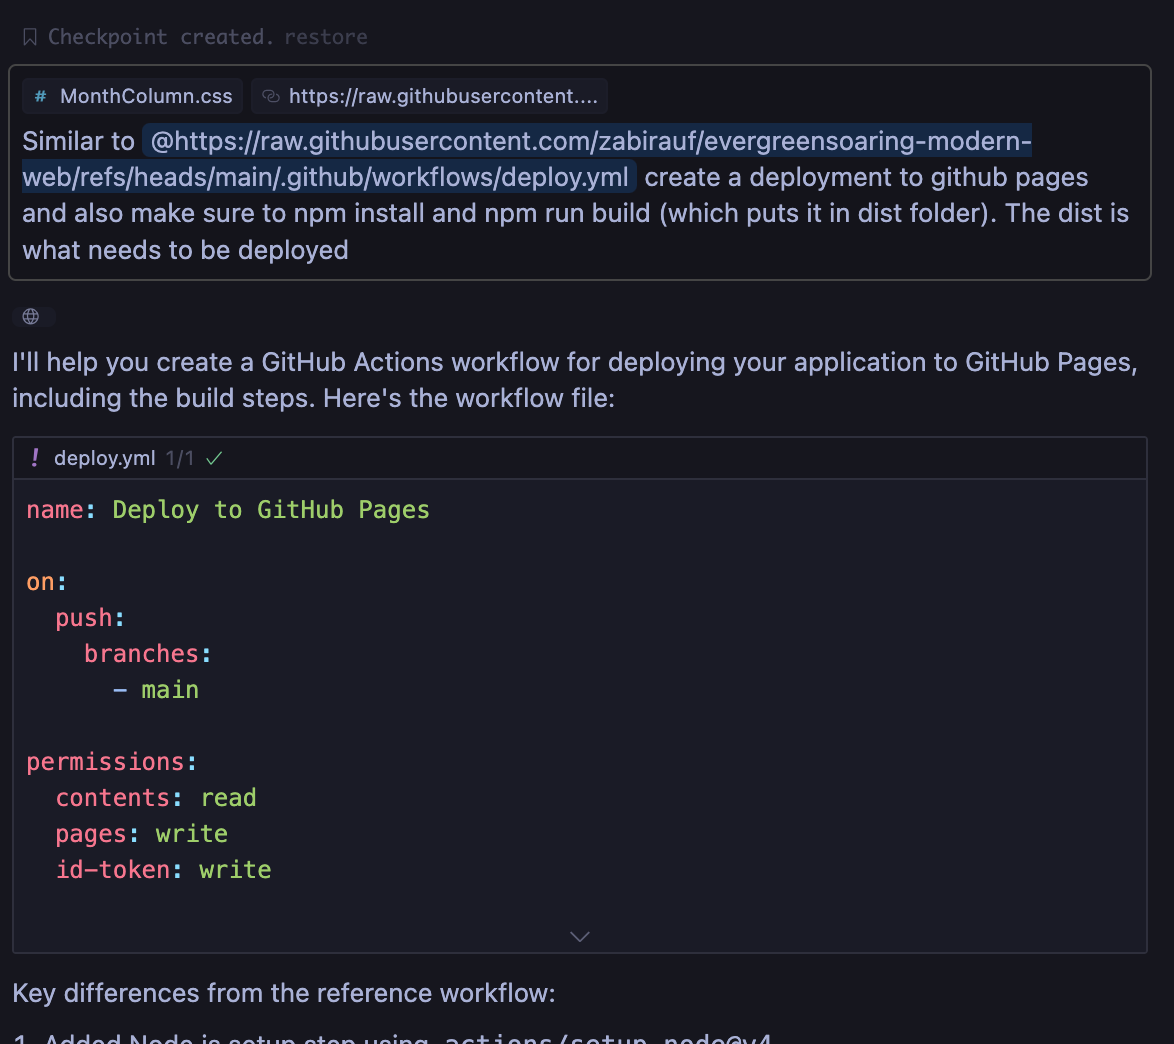
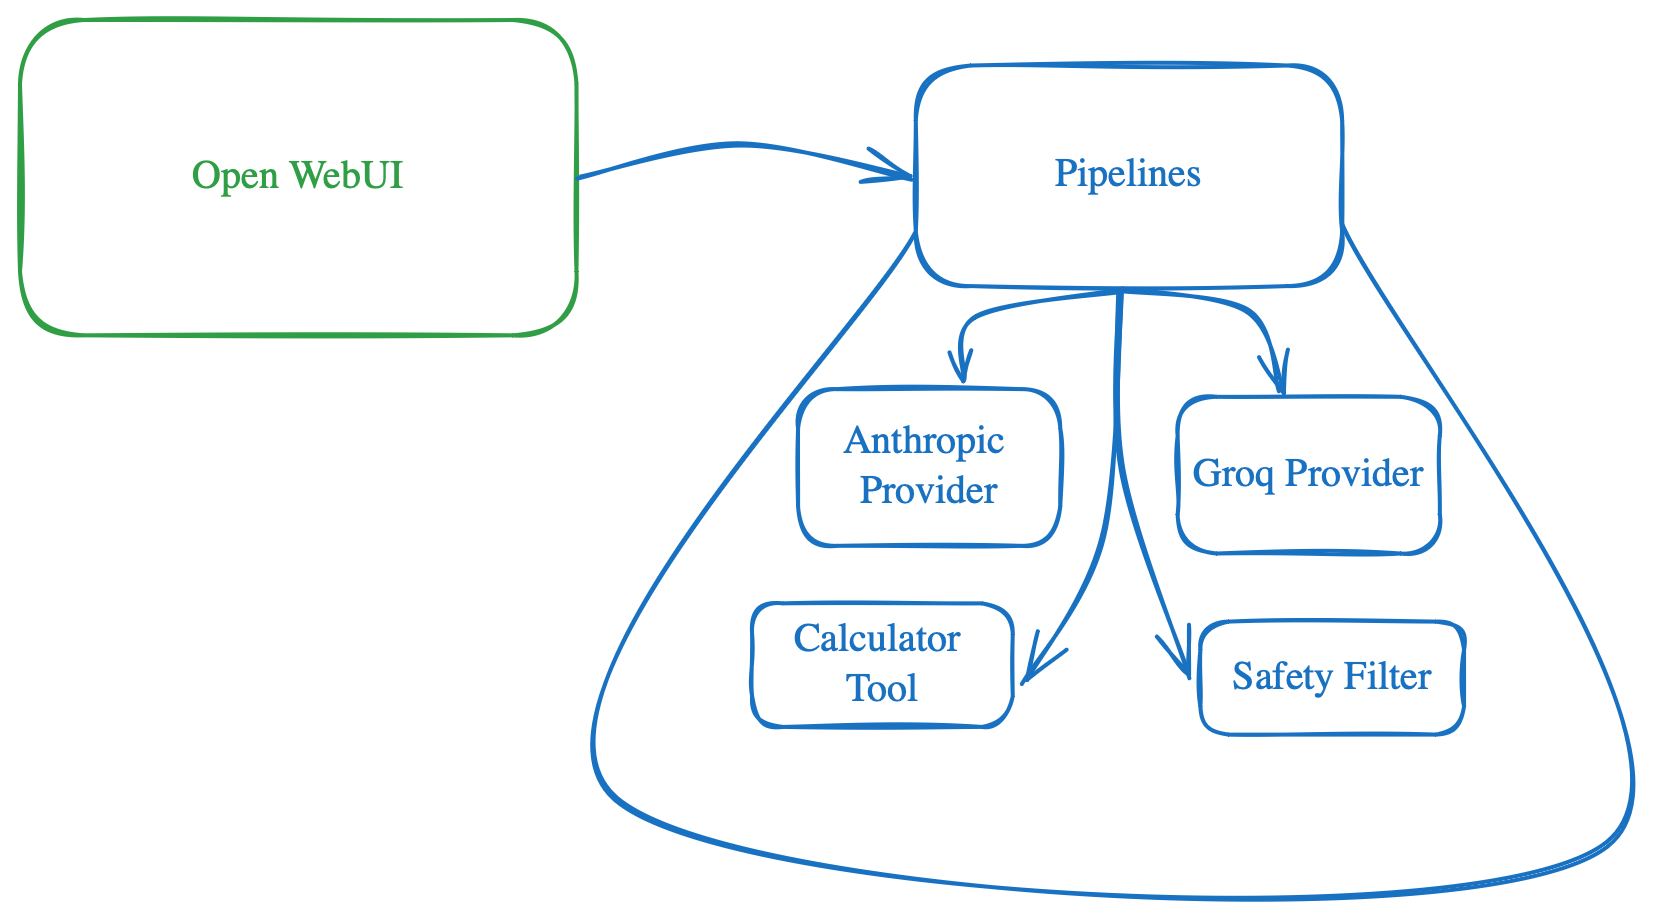


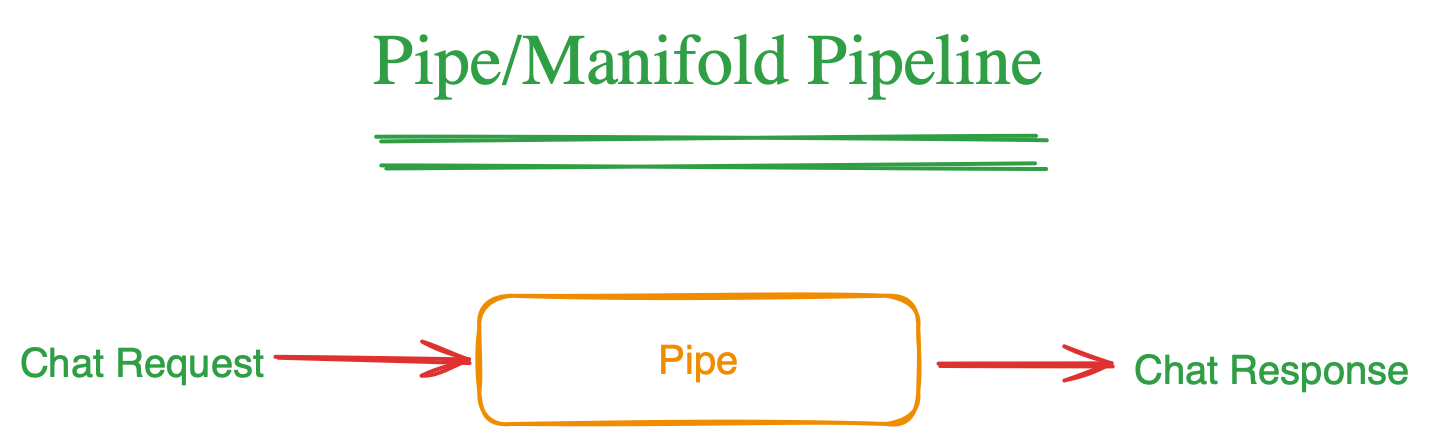
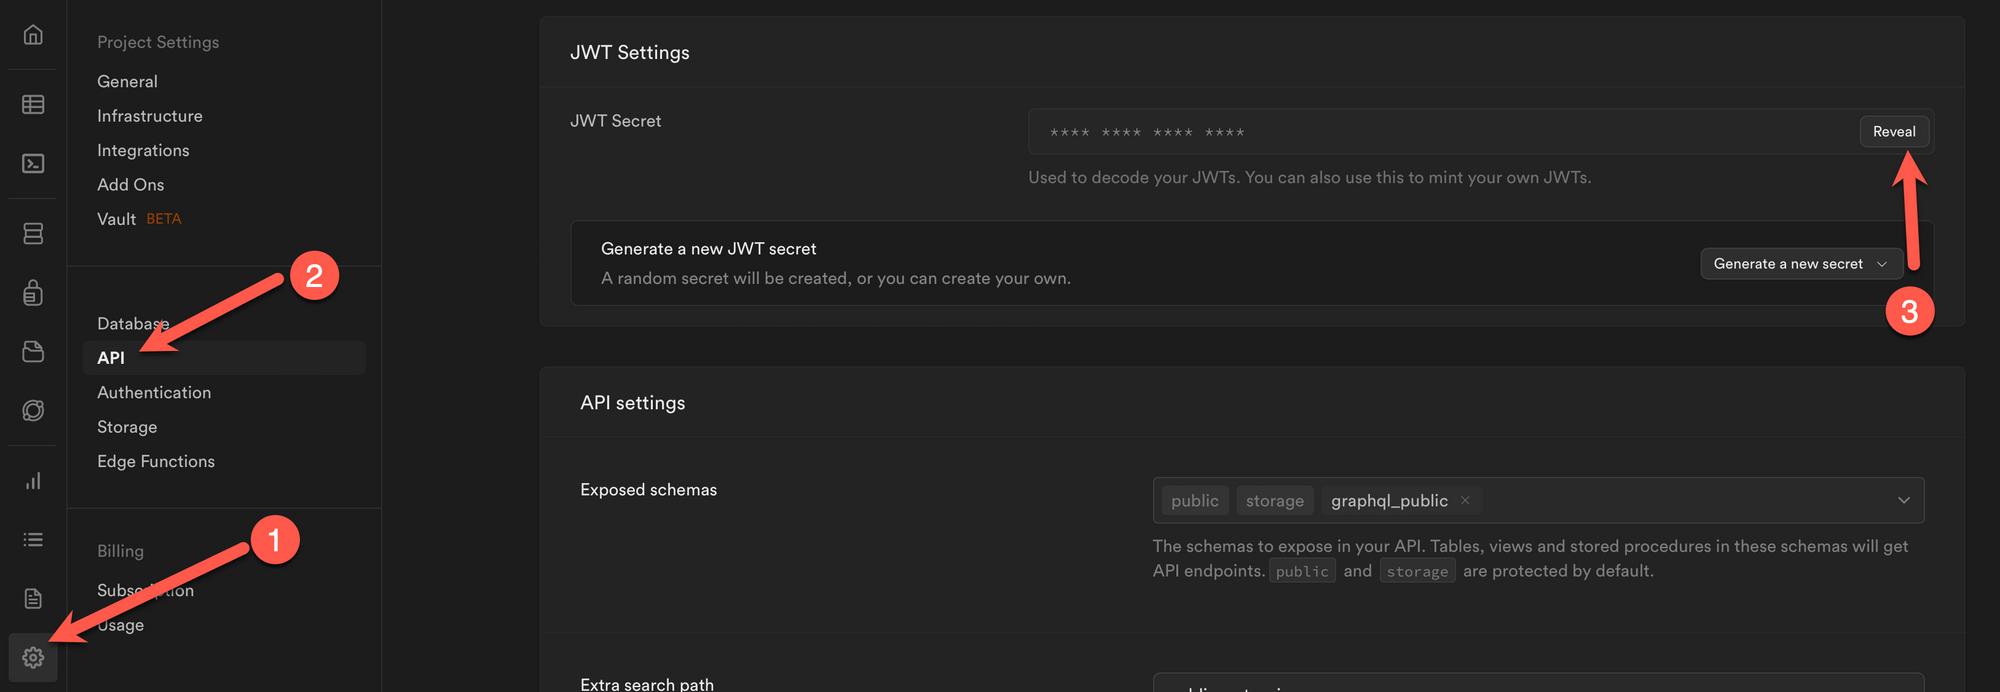

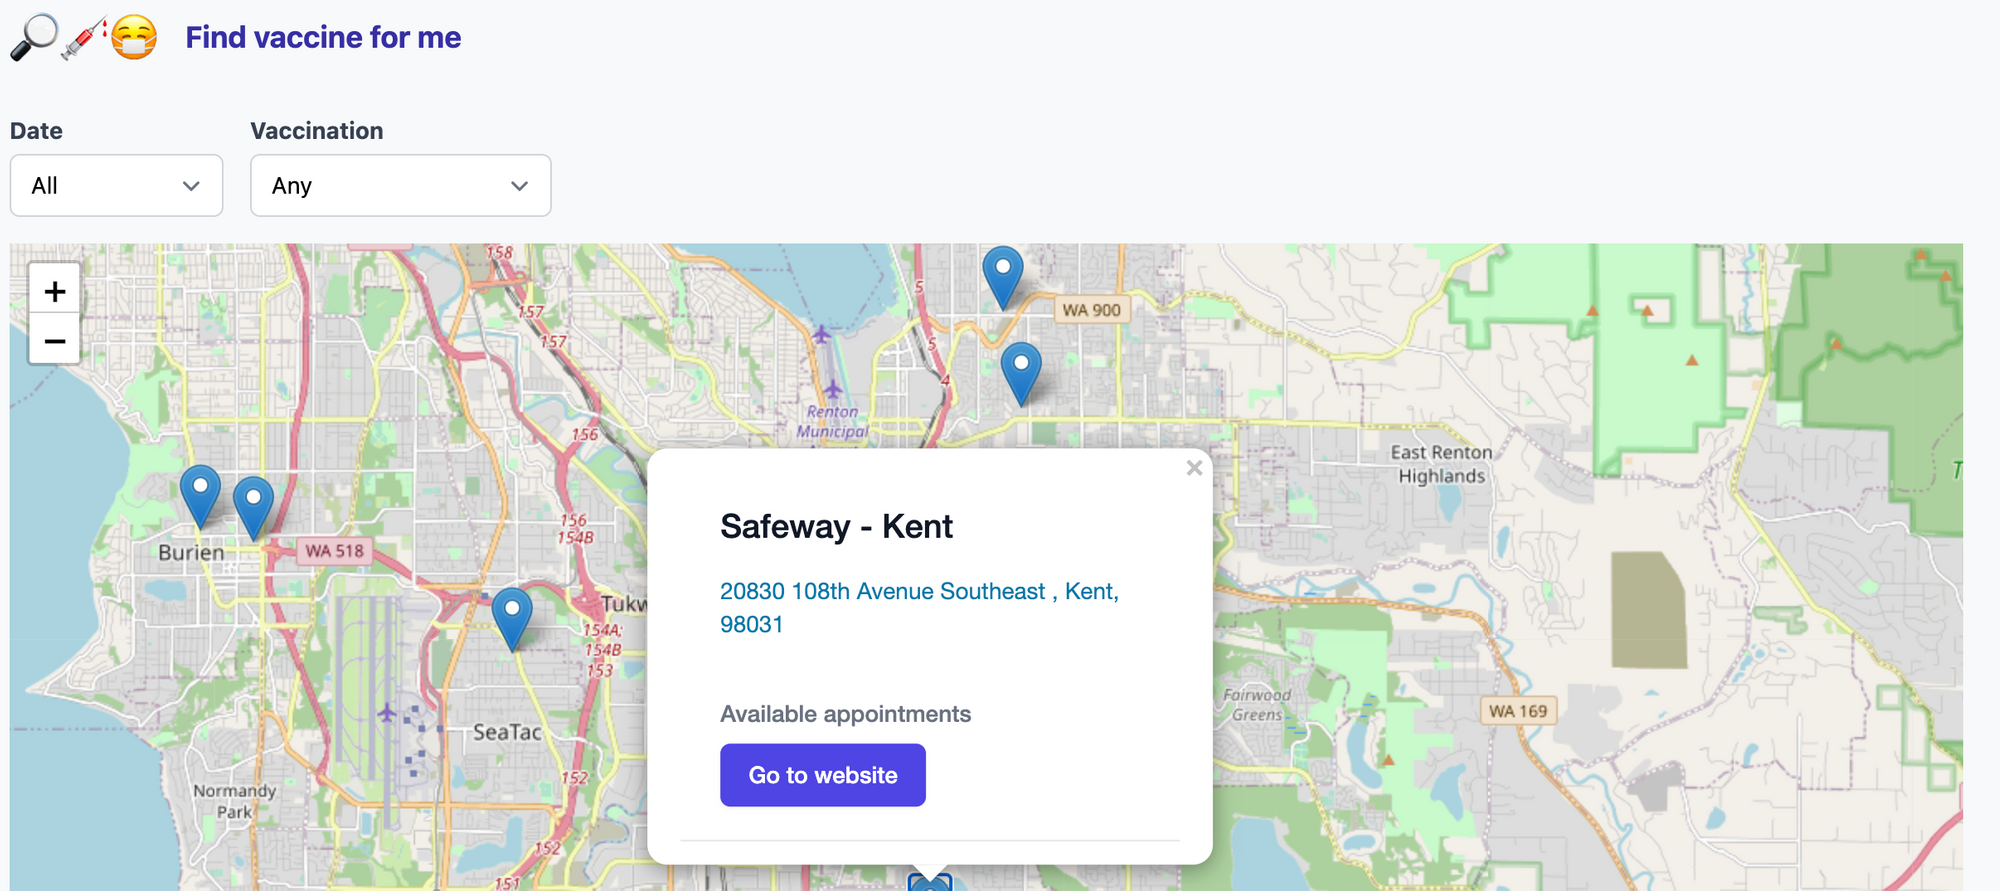

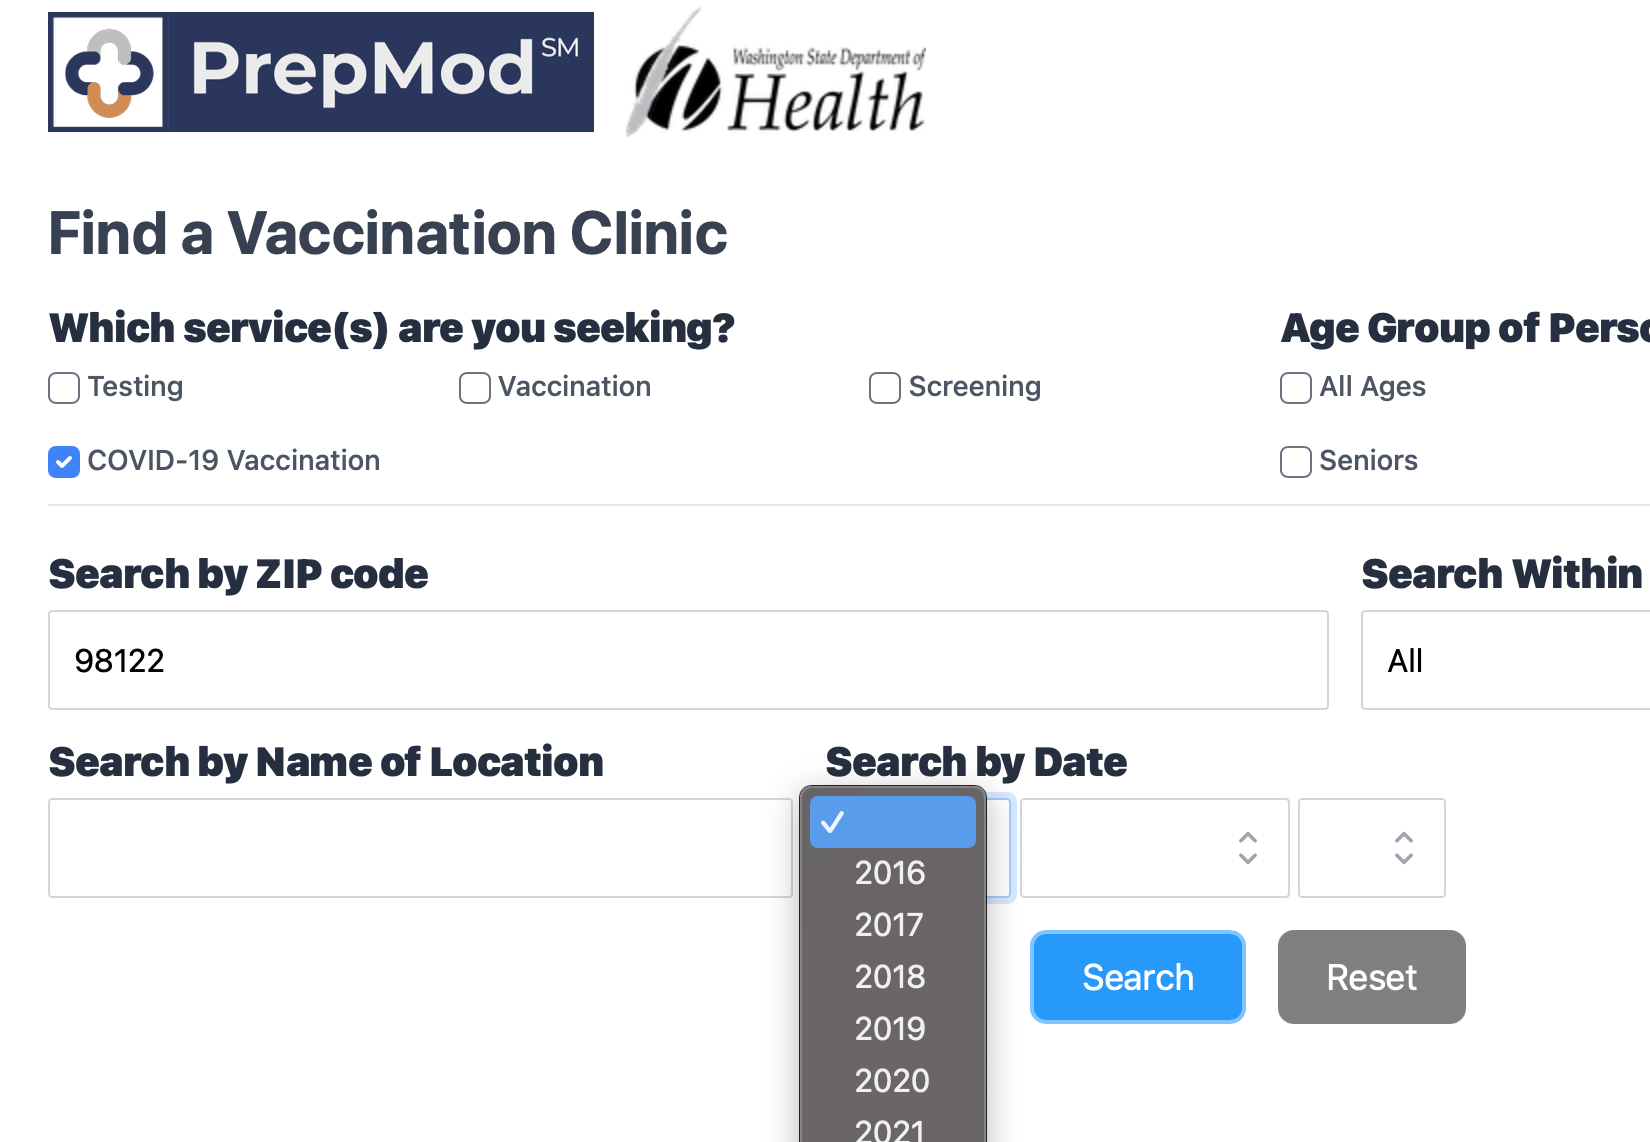


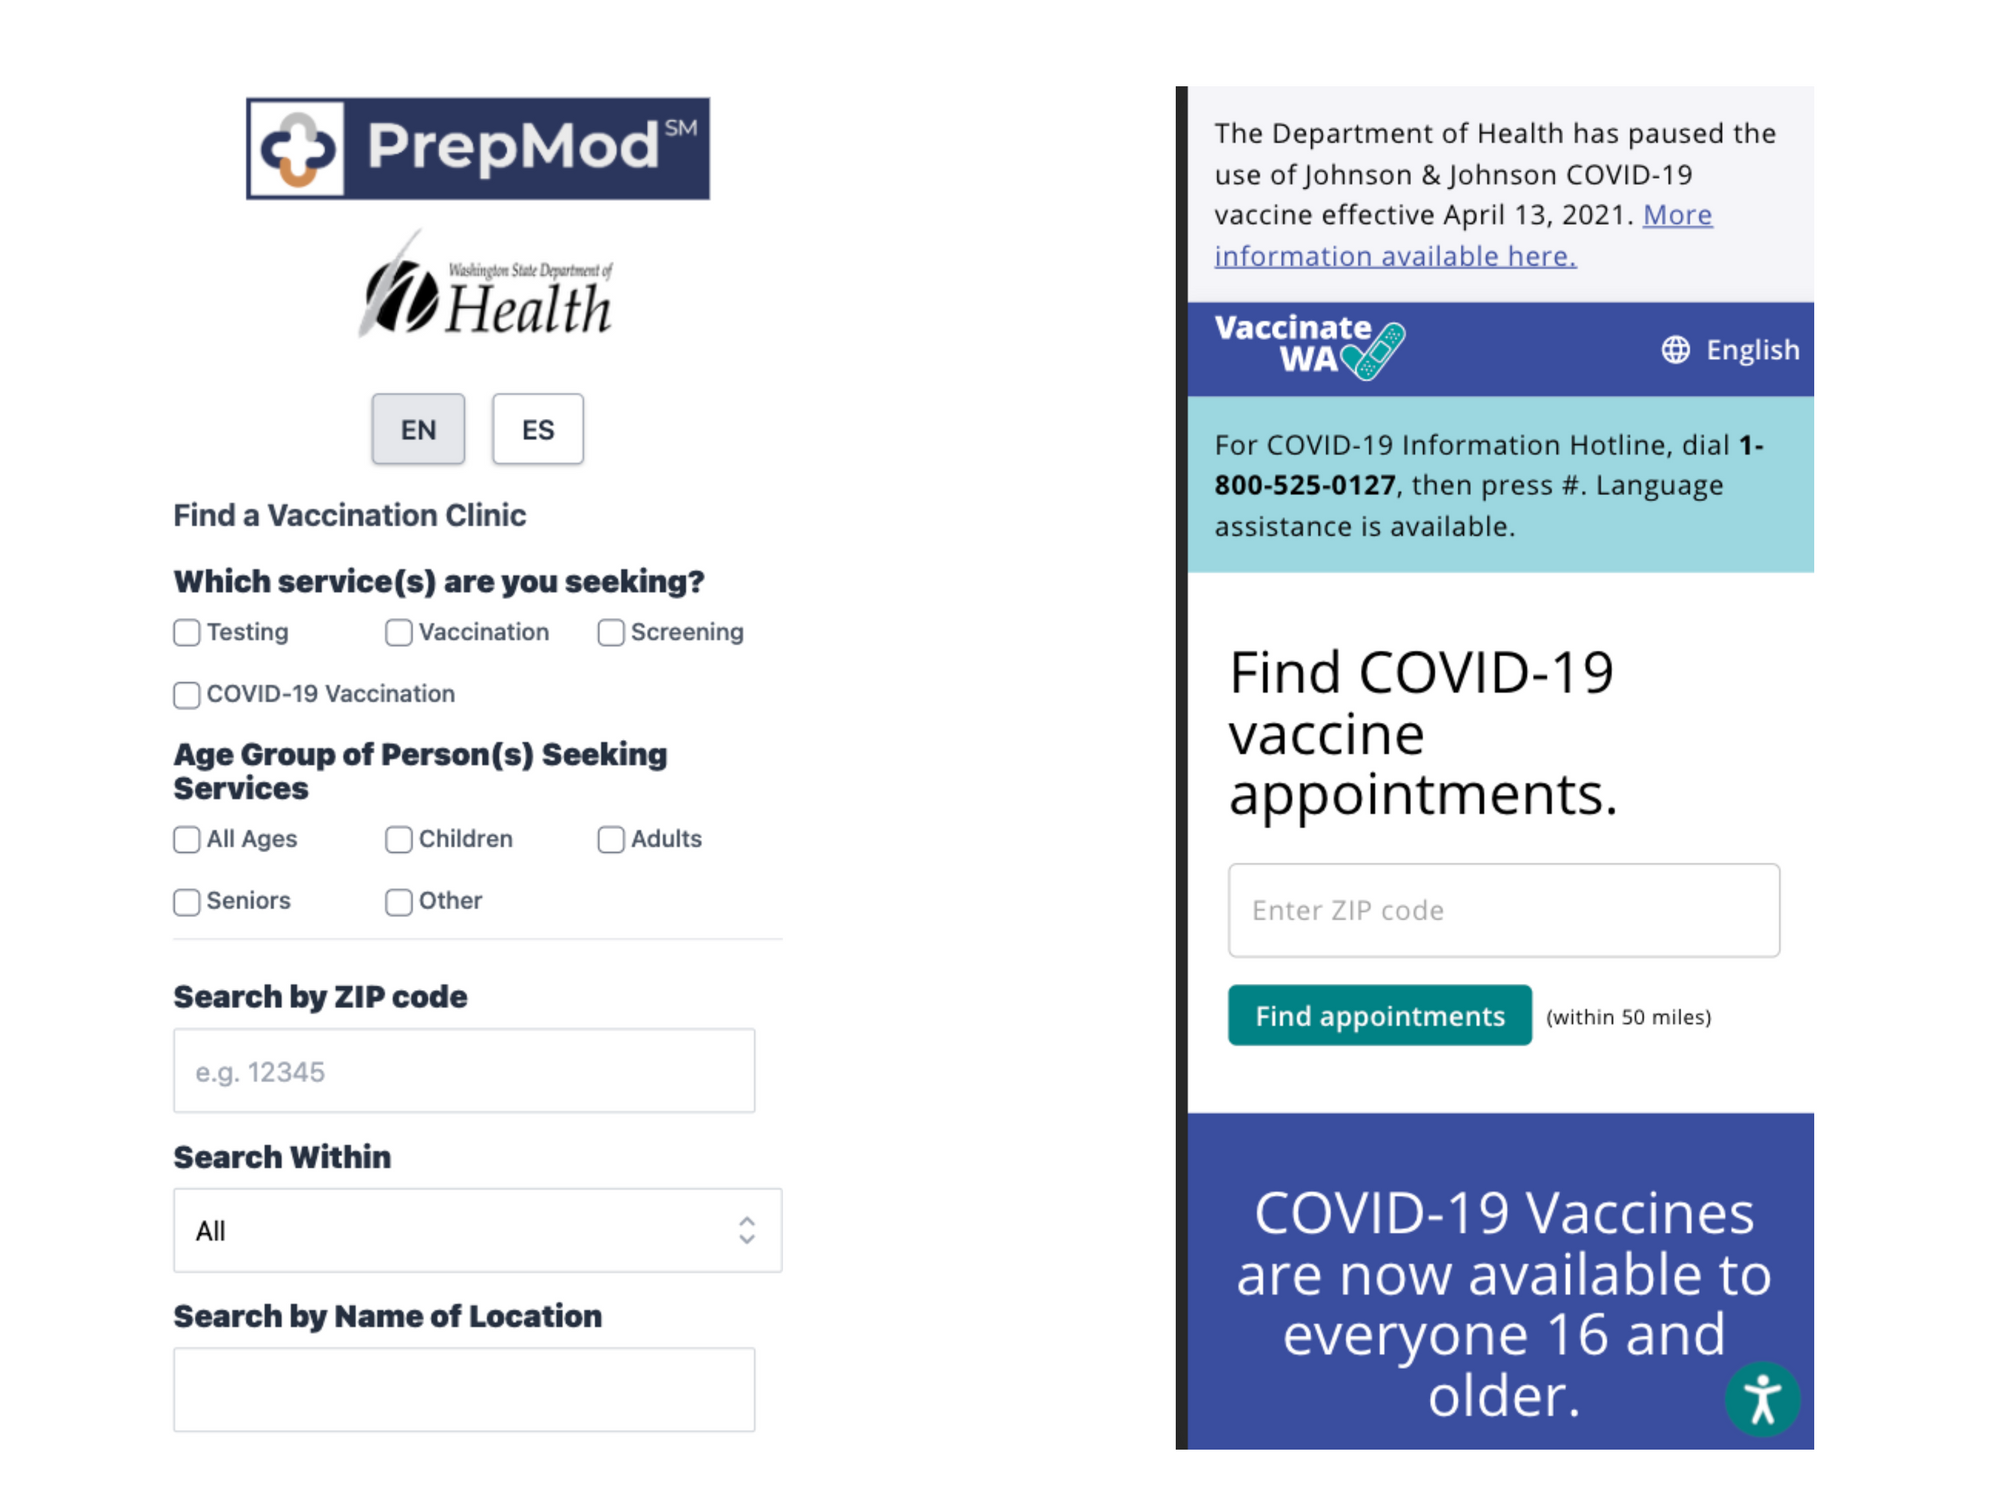