Show full content
ByteCast #7 - 3 Columns SwiftUI Split View | iOS | macOS | visionOS
Published at Sep 09, 2024
In this video, we’re going to implement 3 column navigation Split View using a news app as the example. YouTube Channel.
Published at Sep 09, 2024
In this video, we’re going to implement 3 column navigation Split View using a news app as the example. YouTube Channel.
Published at Sep 05, 2024

In this video, we’re going to implement a caching for network request. This is very suitable If your app doesn’t need to display data that changes frequently such as news, recent stock prices, transaction histories, etc. YouTube Channel.
Published at Aug 31, 2024

In this 5th episode, we’re going to create a generic Swift Cache that can be used to cache value for any Swift type with optional date expiration timestamp support. We will be using NSCache, which is an in-memory based cache Apple provides to temporarily store key and value pairs that are subject to eviction when system’s memory is low. YouTube Channel.
Published at Aug 22, 2024

In this 4th episode, we’re going to learn on how to use SwiftUI Task Modifier to fetch data from remote API in SwiftUI. We will be focusing on the lifecycle of the task modifier such as fetching the data before the view appears and refreshing the data when a specified value changes. YouTube Channel.
Published at Aug 16, 2024

In this 3rd episode, we’re going to implement network monitor to detect Network Reachability status using Apple native NWPathMonitor. We will then create a SwiftUI modifier to display network status as banner on top of any view. YouTube Channel.
Published at Aug 10, 2024

In this 2nd episode, I’m going to show you how to handle data race in your app. This happens when multiple threads read and update a property at the same time without synchronization, causing data corruption in memory and the heap, which can lead to crashes. YouTube Channel.
Published at Aug 04, 2024

In this episode, I’m going to show you on how to implement search from remote API using Combine debounce with observable macro in SwiftUI YouTube Channel.
Published at July 08, 2024
This is the third part of a series where we will add an AI Receipt Scanner to the Expense Tracker App which will make easier for users to add expenses from a receipt image. It uses GPT-4o Vision under the hood
Published at June 10, 2024
This is the second part of a series where we will add an AI Assistant Capabilities to our Expense Tracker SwiftUI App using ChatGPT Function Calling
Published at May 09, 2024
This is the first part of a new series where we will build an AI Assistant Expense Tracker SwiftUI App from scratch!
In this first part, we’re going to focus on 3 main tasks:
Published at March 29, 2024
In this video, we’re going to learn how to secure public API Key for third party providers from iOS or any front-end clients. We will use Firebase Cloud Functions for the HTTP endpoint and Firebase Authentication for managing users in client as well verify the user auth token in the server side.
Published at Feb 04, 2024
In this video, we're going to build a modern Windows App using Swift and Microsoft WinSDK, WinUI, WinRT
Published at Dec 17, 2023

In this video, we're going to build AI Sticker Generator App using GPT-4 with Vision & DALL·E 3 YouTube Channel.
Published at Nov 27, 2023

In this video, we're going to build an AI Voice Assistant SwiftUI App using OpenAI latest GPT4 LLM model, Whisper API to convert speech to text, and TTS API to convert response text to speech. YouTube Channel.
Published at Nov 11, 2023

In this video, we're going to build an AI WhatsApp Sticker Generator SwiftUI App using OpenAI new DALL·E 3 API! YouTube Channel.
Published at Oct 15, 2023

In this video, we’re going to build WhatsApp Sticker Maker App by using the new iOS 17 Vision Subject Lifting API YouTube Channel.
Published at Oct 02, 2023

In this video, we're going to build an AirQuality Index iOS App that shows air quality conditions around a given location in a Map using SwiftUI & Google AQI API YouTube Channel.
Published at Sept 18, 2023

In this video, we're going to learn on how to use Swift Open API Generator Plugin to generate OpenAI Swift Client based on openAPI YAML Specs file. We'll build Text2Image iOS App using Generated OpenAI Swift Client to interact with DALL-E API YouTube Channel.
Published at September 03, 2023
In this video, we will add a USDZ Scanner where the user can capture a real life object and transform it into a USDZ directly from the App using Photogrammetry to the Inventory Tracker App
Published at August 04, 2023
In this video, we’re going to build visionOS & iOS AR Inventory Tracker SwiftUI App! It’s an App where users can manage their items with seamless Augmented Reality integration!
Published at July 23, 2023
In this video, we're going to build visionOS Live Polls Realtime Multi Window App where users can create a poll with multiple options, share, and vote in realtime.
Published at July 11, 2023
In this video, we're going to build Live Polls App where users can create a poll with multiple options, share, and vote in realtime. We'll add support for push token based LiveActivity as well
Published at June 25, 2023
In this video, we're going to build a full VisionOS SwiftUI App from Scratch. A Football Stats App that displays latest standings table and top scorers from best competitions around the world such as EPL, Serie A, La Liga, Bundesliga, Ligue1, and many more!
Published at June 18, 2023
In this video, we're going to add CloudKit Syncing to the SwiftData Notes App that we have built in previous video.
Published at June 11, 2023
In this video, we're going to add interactivity to a News Widget using the new iOS 17 WidgetKit & App Intent integration
Published at June 07, 2023
In this video, we're going to learn and experiment with SwiftData by building a note App with many to many relationship schema and query with custom Predicate, SortOrder, and Orderby
Published at June 04, 2023
In this video, we will be adding PaLM Chatbot using Google Generative AI SDK and support for Multi LLM Providers so users can select select ChatGPT or PaLM API as the LLM Chatbot. This is a continuation of the previous tutorials in "Build SwiftUI ChatGPT series"
Published at May 20, 2023
In this video, we're going to add Cancel Streaming Response to the ChatGPT iOS App using Swift Task Concurrency Cancellation. This is a continuation of the previous tutorials in "Build SwiftUI ChatGPT series"
Published at April 20, 2023
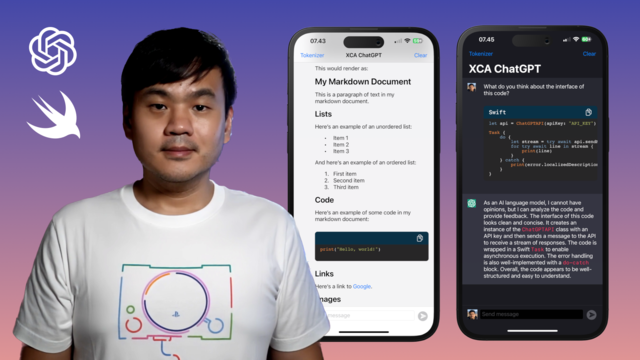
In this video we’re going to add support for Markdown Rendering & Code Syntax Highlighting to the ChatGPT iOS SwiftUI App that we have built in the previous video tutorial.
By the end of this tutorial, our ChatGPT App should be able to render markdown element such as heading, paragraph, list, links, quote, and code block given a string with markdown syntax from ChatGPT API response.
We will render using SwiftUI Native View and Attributed String, so no embedded WebView will be used.
Published at March 31, 2023

In this video, we’ll build the GPT Tokenizer SwiftUI app which can as a tool to calculate tokens count within a piece of text. We can use the result to calculate prompt usage cost before making request to the API
Published at March 22, 2023
Introducing XCA ChatGPT, a Flutter based Web App that you can use to interact with OpenAI ChatGPT Official API using your own API Key.
Published at March 09, 2023

In this video, we're going to update ChatGPT Swift API to add Linux support and build a simple CLI App.
Published at March 03, 2023

In this video, we're going to update ChatGPT Swift API to the official OpenAI ChatGPT API Endpoint.
Published at February 09, 2023

In this video, we're going to build a SwiftUI ChatGPT based tvOS application using SwiftUI and OpenAI API
Published at February 07, 2023
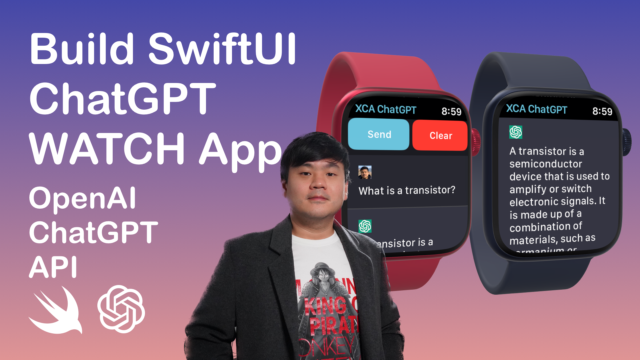
In this video, we're going to build a SwiftUI ChatGPT based watchOS application using SwiftUI and OpenAI API
Published at February 05, 2023
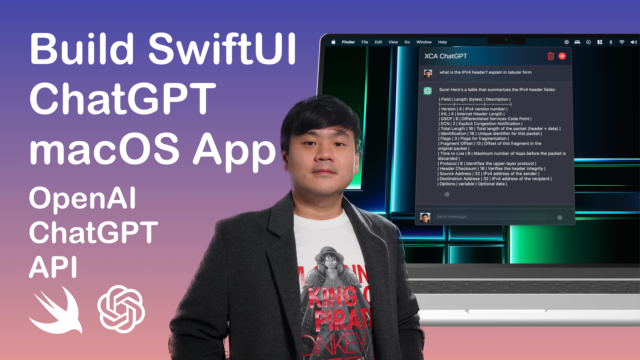
In this video, we're going to build a SwiftUI ChatGPT based macOS application using SwiftUI and OpenAI API
Published at February 03, 2023

In this video, we're going to build ChatGPT based application using SwiftUI and OpenAI API
UPDATEAt the time this video is published, the leaked model to access ChatGPT using Completion API endpoint had been taken down by OpenAI, so it won't work. But most of the concept should remain the same for building the application UI and state management. When the official API is released, you can simply update to use the public model and official endpoint for ChatGPT :) I'll also update the GitHub repo and create a follow-up video when it will be released in near future.
Published at November 28, 2022
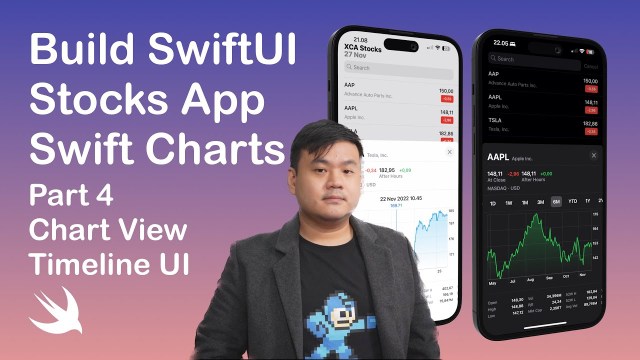
This is the 4th part of "Build Stocks App with SwiftUI & Swift Charts" series. In this part, we're going to create a Chart View to display stock prices over a series of time.
Part 2 - My Ticker Symbols List & Search Tickers
Published at October 20, 2022
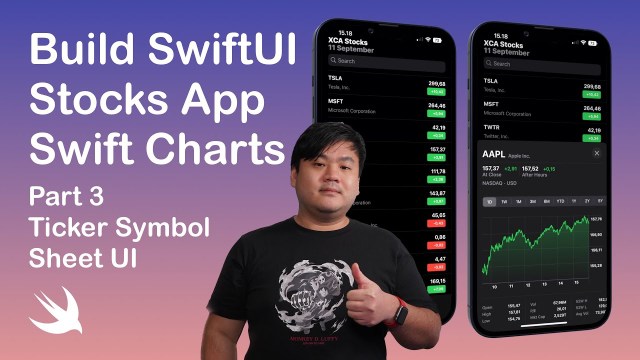
This is the 3rd part of "Build Stocks App with SwiftUI & Swift Charts" series. In this part, we're going to create an Ticker Symbol Sheet UI containing quote price details.
Published at October 02, 2022
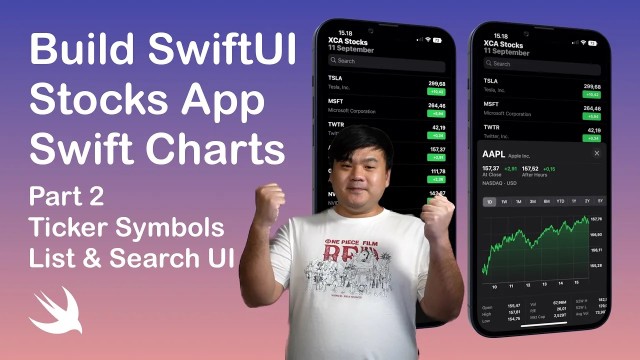
This is the 2nd part of "Build Stocks App with SwiftUI & Swift Charts" series. In this part, we're going to create an iOS 16 SwiftUI App to Ticker Symbols List & Search View.
Published at September 12, 2022

This is the 1st part of "Build Stocks App with SwiftUI & Swift Charts" series. In this part, we're going to create an API Service SPM Library to interface with Yahoo Finance REST API using Swift.
We will learn on how to flatten Nested JSON to Swift models using Custom CodingKeys and init decoder.
Completed Project Swift Package GitHub Repository - XCAStocksAPI
Published at July 16, 2022
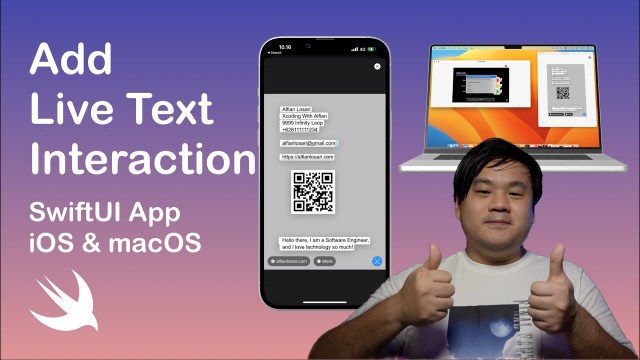
In this video, we are going to use VisionKit API to add Live Text Interaction to SwiftUI iOS & macOS App!
Starter Project GitHub Repository
Completed Project GitHub Repository
Part 1 - Build a Live Barcode and Text Scanner iOS App with SwiftUI & VisionKit https://youtu.be/QQjLOlkxpvc
GitHub Project Repository: https://github.com/alfianlosari/BarcodeTextScannerSwiftUI
Published at July 03, 2022

In this video, we are going to add macOS & Linux support for the previous Flutter Windows News App that we have built using Fluent UI.
Published at Jun 22, 2022
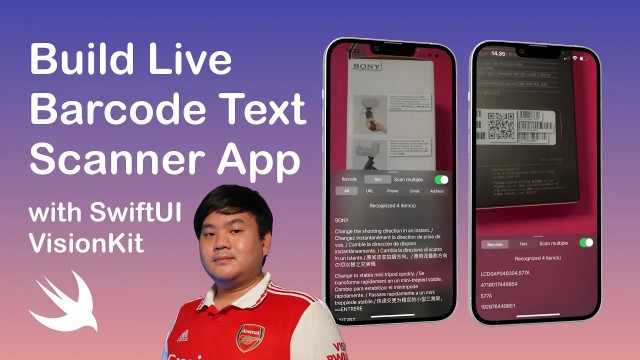
In this video, we are going to build a Live Barcode and Text Scanner App with SwiftUI & VisionKit.
Published at June 07, 2022
WWDC 2022 has just been started today. There are so many great software announcements such as iOS/iPadOS 16, macOS 13 Ventura, watchOS 9, and tvOS 16. From hardware side, MacBook Air/Pro with M2 chipset are also announced as well.
In this article, I am going to give a recap on all the new software technologies that Apple Engineers announced during the Platform State of the Union keynote from Swift, SwiftUI, and System Experiences APIs.
Xcode Cloud
Xcode Cloud is a CI/CD service build into Xcode and hosted in Cloud. It supports development for all Apple platforms. It integrates with TestFlight and App Store Connect as well as every major git based source control provider. It even has REST APIs to help connect to other aspects of your development workflow.
It was announced at WWDC 21 last year and has since been in developer preview. Today Apple makes Xcode Cloud publicly available to all developers.
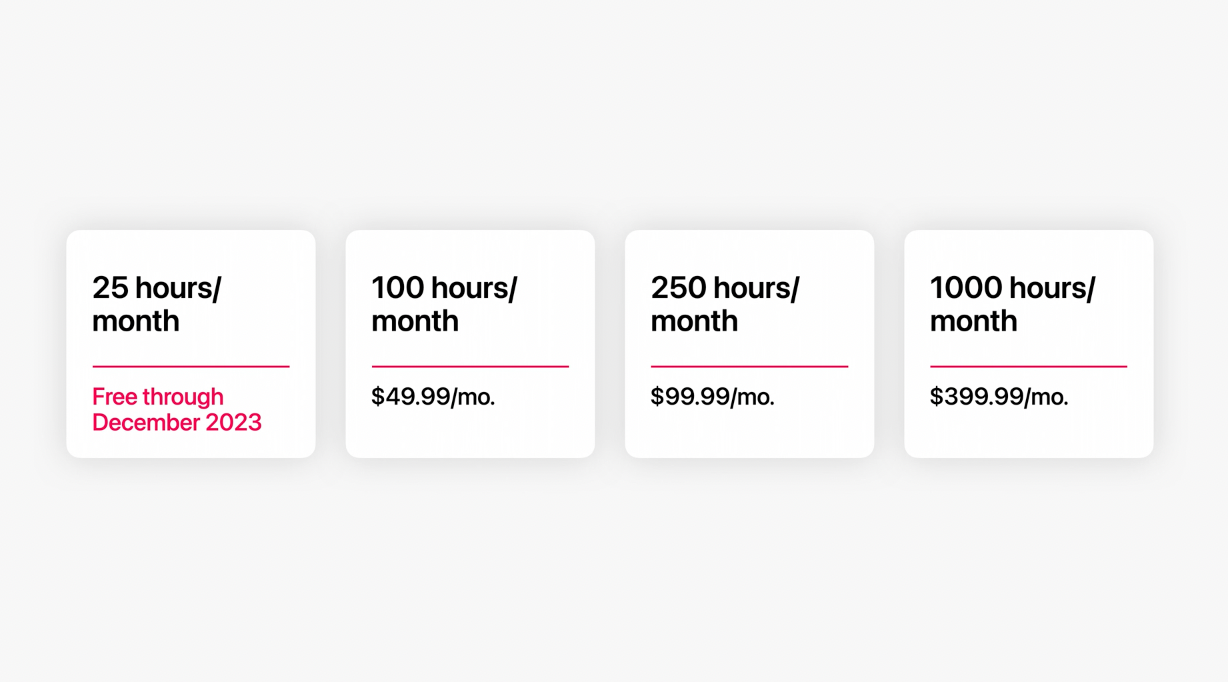
Apple is offering 25 hours/month subscription fee to all Apple Developer Program members through end of 2023. Then, we're be able to subscribe to other tiers right from the Developer app this summer.
Vision For Platform
A great developer platform provides tight integration between programming language, frameworks and tools. With these three complement one another, it benefits everyone. Customers get a consistent experience, like scrolling that always feels perfect. And developers are able to focus time and effort on what makes the app unique.
Objective-C, AppKit/UIKit, Interface Builder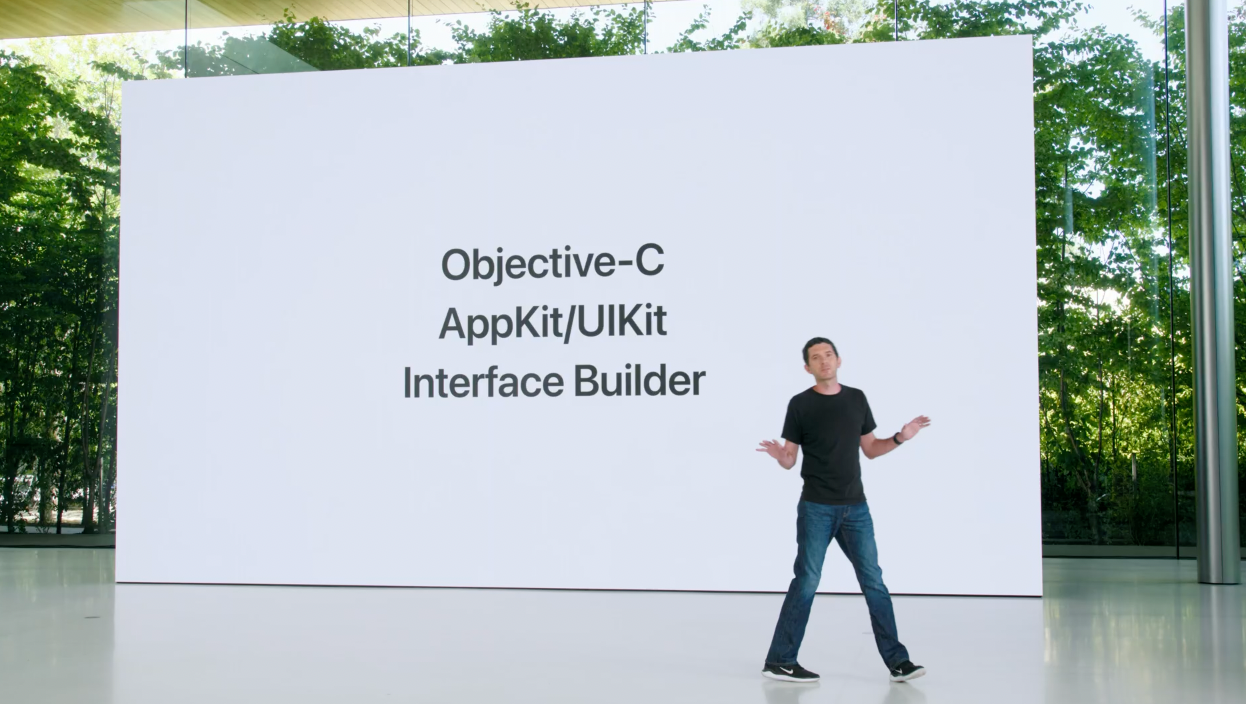
They have empowered generations of developers. These technologies were built for each other, and Apple ensures that it will continue to serve them well for a long time to come.
What's next for Developers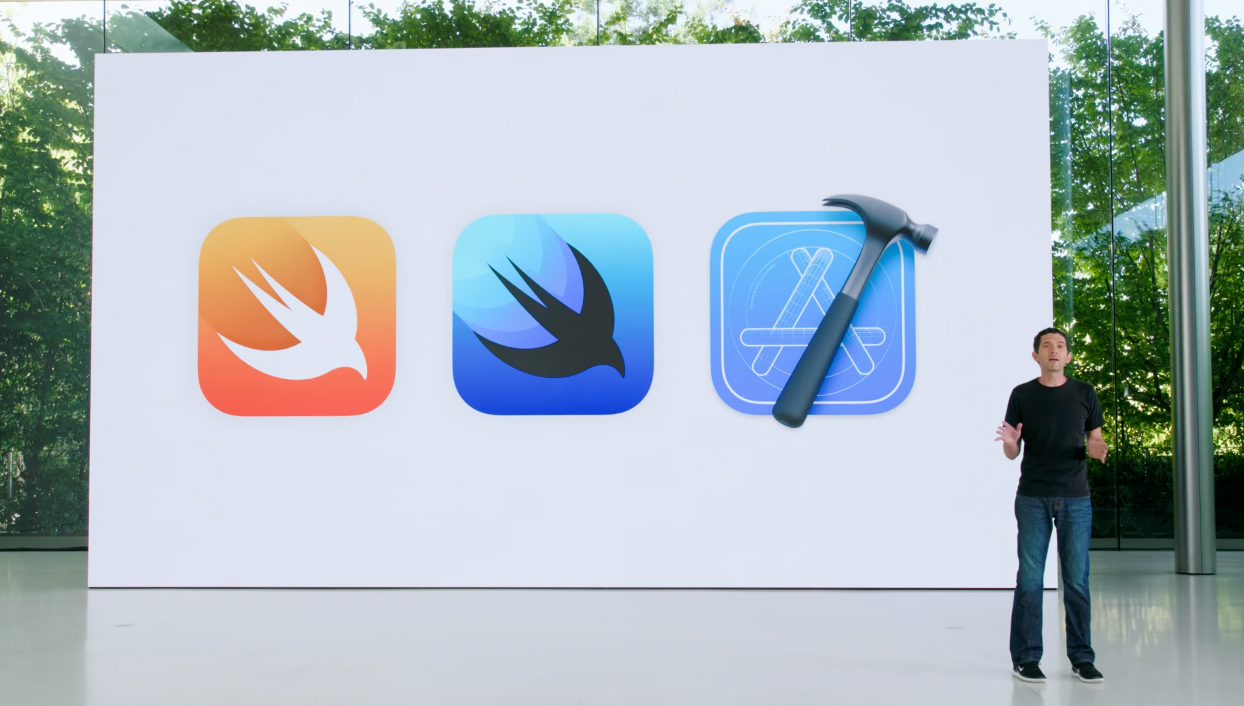
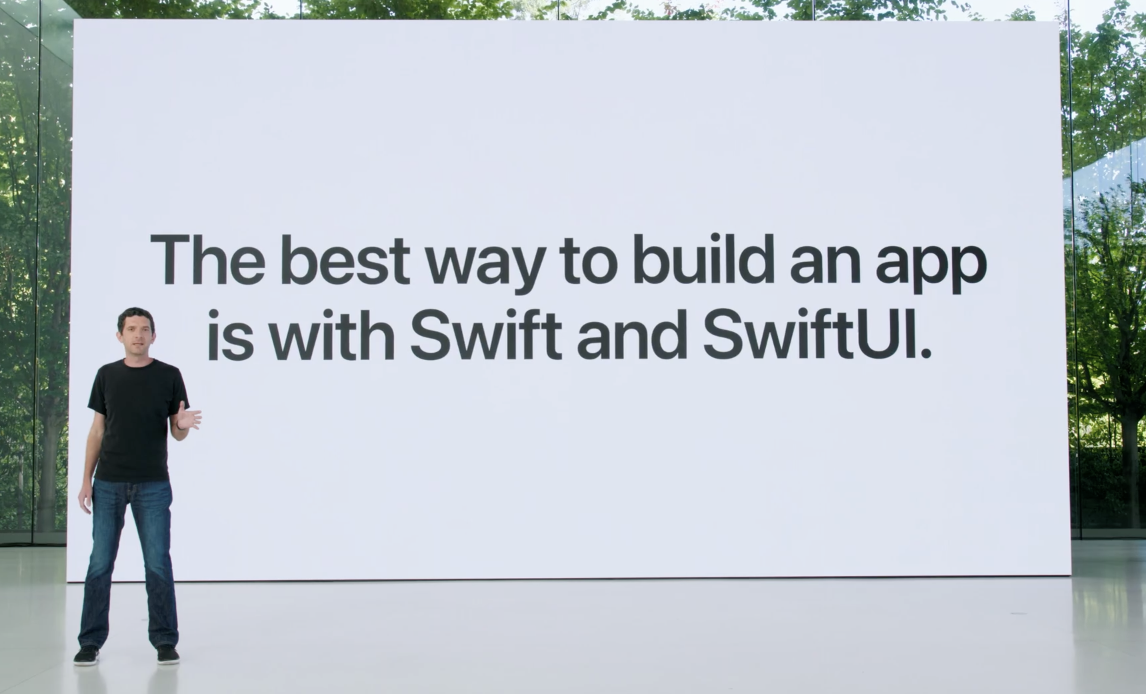
As time goes by new abstractions become necessary. The next generation of the technologies are Swift, SwiftUI, and Xcode Previews.
Current State of Swift and Upcoming 5.7 Features
Open Source Swift Community had announced new initiatives like Diversity in Swift and the Swift Mentorship Program, and advancing the language with working groups on topics like Swift on server, and C++ interoperability.
Swift Concurrency
Swift Concurrency dramatically simplified reading and writing code that runs in parallel, and has been a huge hit, with more than 40,000 apps in the App Store adopting it in just the first year.
It's now possible to deploy code with Swift Concurrency to all operating systems released in the last three years
Swift Async Algorithms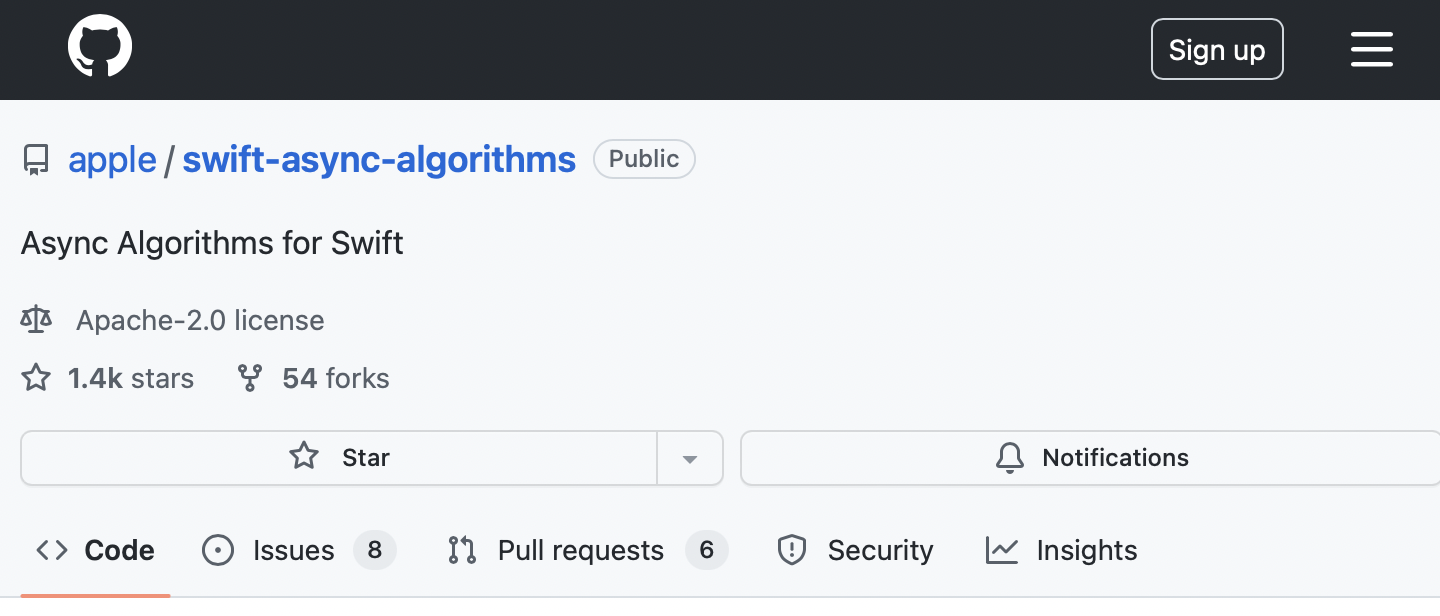
This year, there's a new, open-source package that brings concurrency to Swift's rich set of existing sequence algorithms. It's called async algorithms.
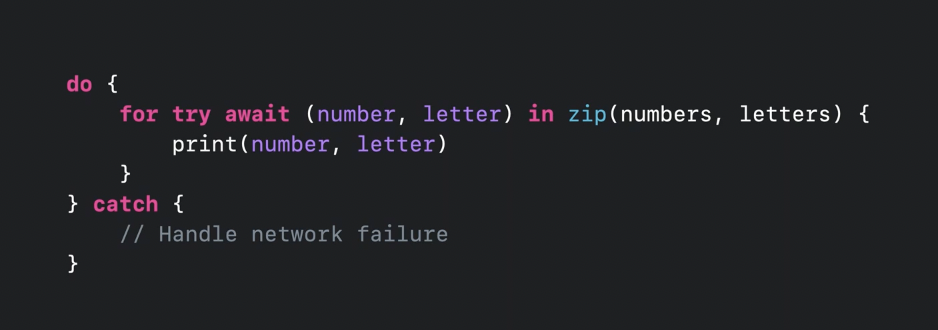
For example, where Swift's sequence protocol supports a zip algorithm to combine two sequences, async algorithms brings a version for zipping together two asynchronous sequences.
Because async sequences are integrated directly into the Swift language, they use familiar constructs like 'for' loops that, thanks to the async/await syntax, looks like regular straight-line code. You're also able to use the familiar try/catch pattern to handle things like network failures from asynchronous data streaming over the network.
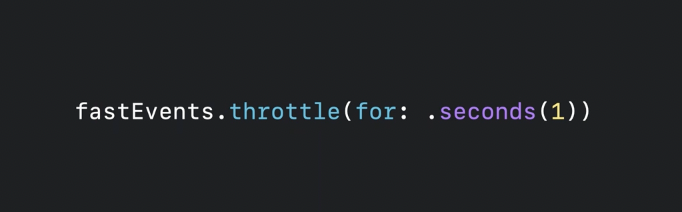
Swift now includes a new set of clock types for representing time units, and async algorithms builds on them to provide many time-based algorithms, like throttle here, which can help slow down updates from a sequence.
Distributed Actors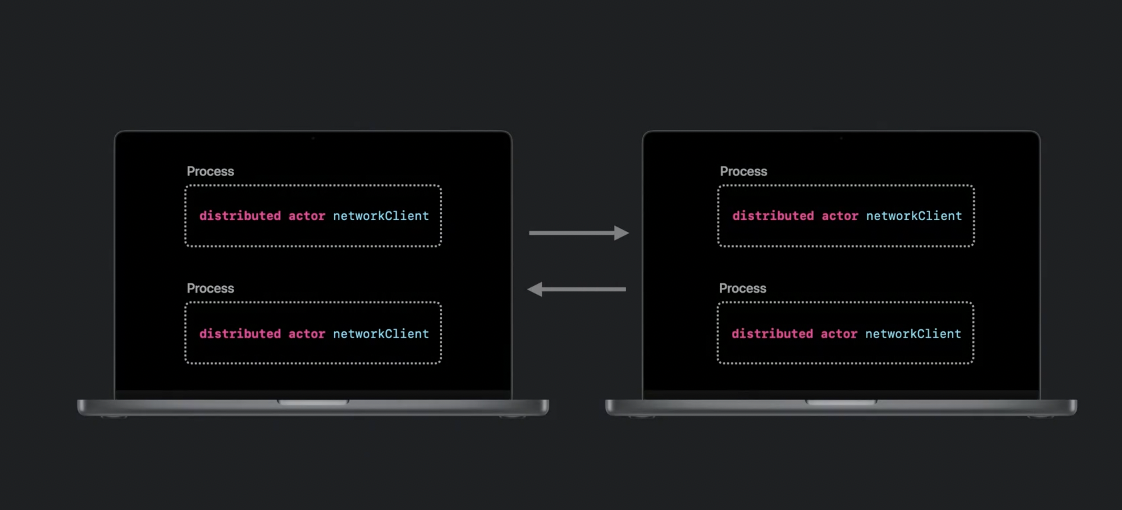
Distributed actors can communicate across multiple processes or devices. The "distributed" keyword marks these actors and methods that can be accessed remotely, whether that's between separate processes on your Mac, peer to peer between different devices, or from a device talking to your backend written with Swift on Server.
Just as actors help Swift protect your state data from race conditions, distributed actors help Swift make them available outside your process, using a pluggable transport mechanism. The Swift compiler can then perform checks that help guarantee correct behavior in a distributed environment
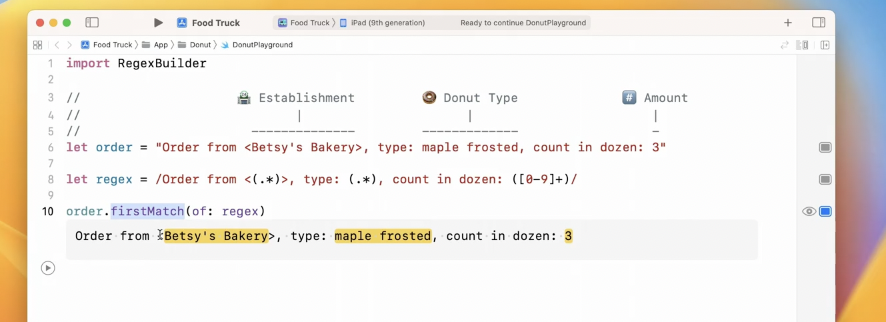
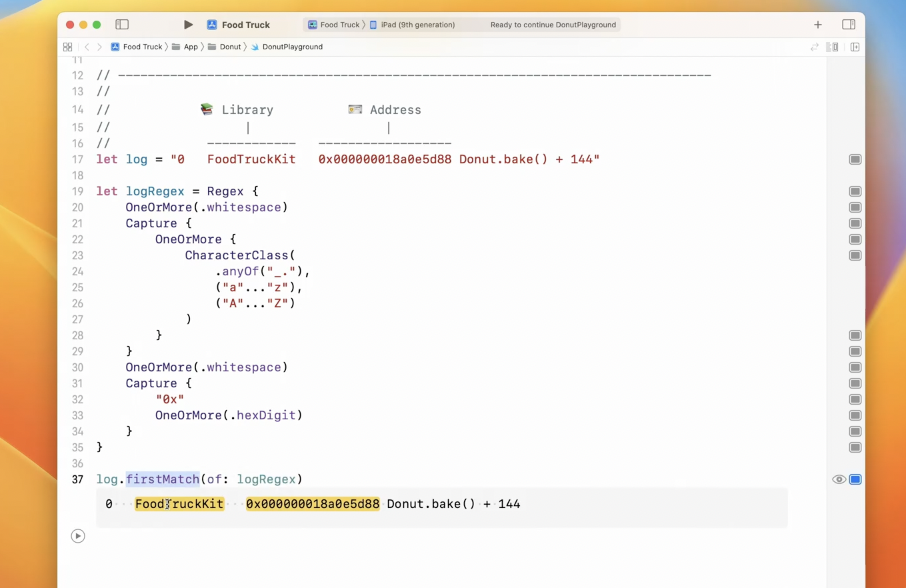
New String Regular Expression Literal & Builder
They're built directly into the language, allowing the Swift compiler to check for correctness. And they unlock the power of Swift's type system when you're extracting information with a regular expression. And they take full advantage of Swift's best-in-class Unicode support.
Example:
 Generic Collection some Keyword in Function Parameter
Now in Swift, writing a function that accepts some collection of generic type is as easy as using the some keyword to tell Swift about the parameter. You get the same meaning, but with less code.
Now this code:

Can be written with lesser code and easier to read:
 Store Dynamic Any Collection Type
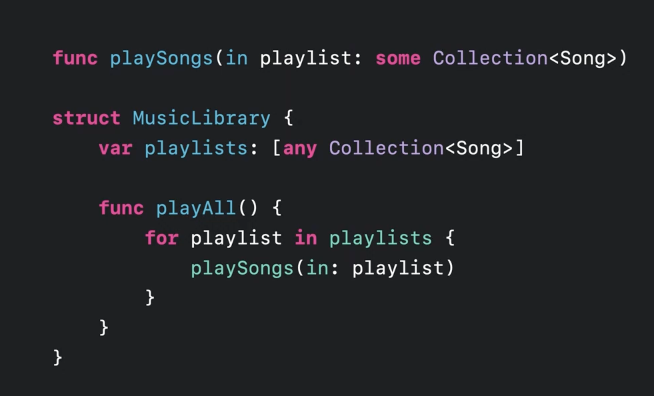
You might need store dynamic type of collection, like with this music library's array of playlists, which might need to contain different types of collections of songs– sets of songs, or arrays of songs. That's where the new 'any' keyword can help. The 'any' keyword is built right into Swift, and allows you to express a type that can hold any collection of songs. And it works seamlessly with generic functions too.
Package Plugins for Swift Package Manager
This year, the Swift Package Manager is amplifying the ways you can create and build code with all-new Package Plugins. Plugins are Swift packages you can add to your project as easily as any other dependency. They download and build automatically on a fresh checkout, except instead of being code in your app, they're code that helps build your app.
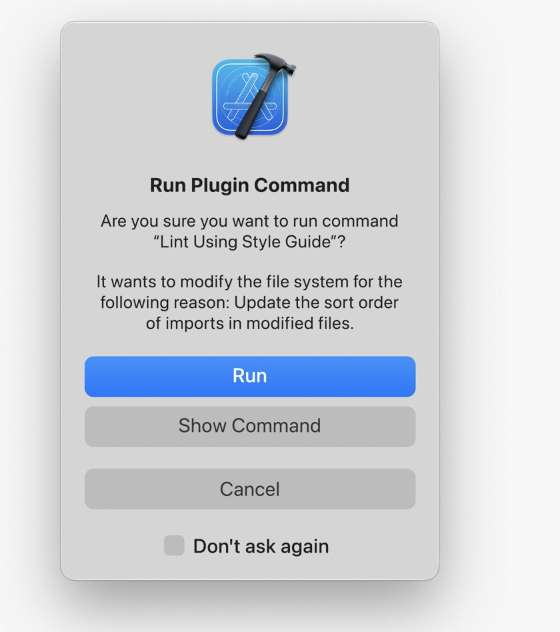
Package Plugins can be invoked from the command line or within Xcode, either as part of your build phase or on-demand. They run in a sandbox environment which prompts you for permission before reading or modifying your code.
There are endless possibilities for extending your workflow with Package Plugins. You could use them to lint and format your code to match the team style guide with packages like SwiftLint or SwiftFormat or automatically generate source code at build-time with tools like Sorcery.
With Swift package plugins, you can create your own commands, customize builds locally and in Xcode Cloud, and then share those plugins with others.
Other Swift 5.7 Features
Swift has some impressive changes under the hood. Building Swift projects is quicker than ever. Thanks to new parallelization efforts, link time is up to twice as fast. And the Swift concurrency runtime is now more tightly integrated with the OS to better ensure the priority of your asynchronous tasks, helping your apps stay efficient and responsive.
Launch time for apps written in Swift is dramatically faster on iOS 16, with apps like Lyft or Airbnb launching almost twice as fast thanks to improvement in the dynamic linker.
With these under-the-hood improvements, new abilities in tooling, an evolved syntax that's easier to read and write, and improvements in concurrency, there has never been a better time to develop in Swift.
SwiftUI 4.0
Since its introduction in 2019, Apple has been continually expanding SwiftUI's API coverage, guided by the developers feedback. This year, it is even easier to adopt SwiftUI incrementally in existing apps, and Apple have made some exciting enhancements to its power and flexibility.
All New Navigation API
The new navigation API makes it easy to express the style of navigation that best fits the needs of your app. With robust programmatic control over the presentation of your app's views, you can easily save and restore selection, and even replace the full contents of a navigation stack. This is really useful when handling important behaviors like setting the launch state of your app, managing transitions between size classes, and responding to deep links.
New Grid API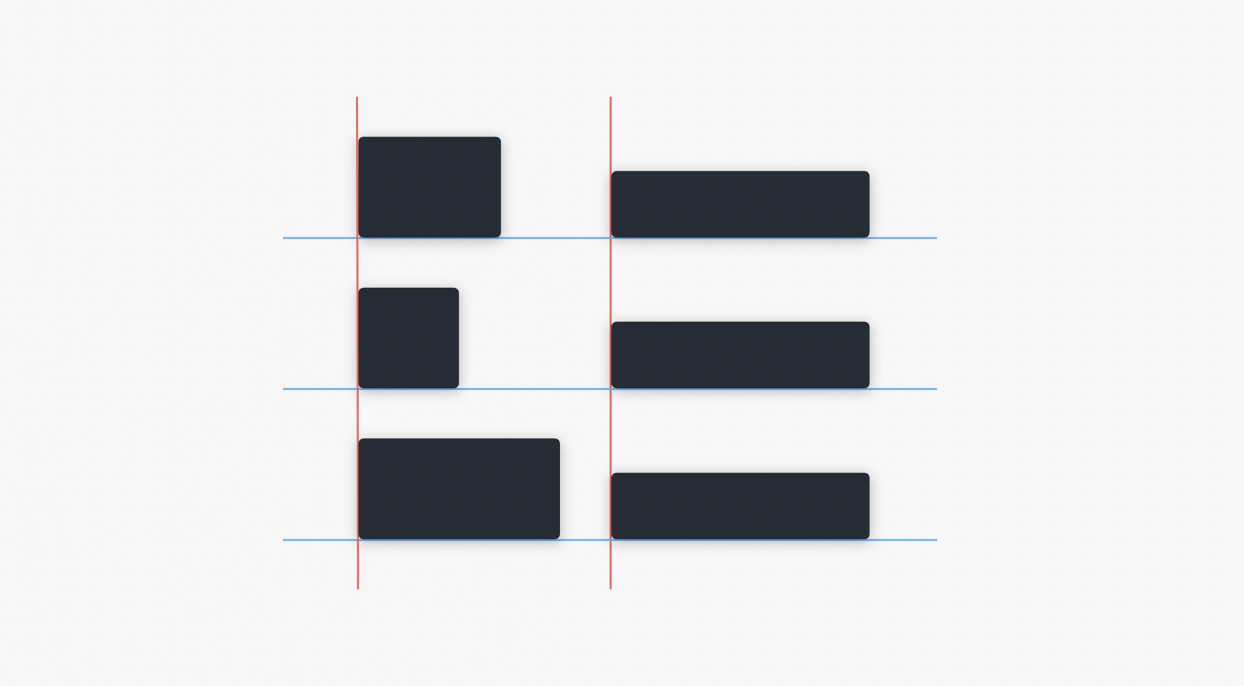
A new Grid API, which makes it easier to lay out a set of views aligned across multiple rows and columns.
All New Custom Layout API

The custom layout API gives you the flexibility to build any type of layout you want. For example, you could create a flow layout where your views are arranged like the content of a newspaper, wrapping to the next column when more space is needed. Or you could create a radial layout that draws your views in a circle, like the numbers on a watch face.
Half Sheets
A Secondary views that slide above a main view. These are great to provide quick access to information on smaller screens.
Share Sheet with new Transferable Protocol
SwiftUI now supports Share Sheets, so your app can easily leverage all of the Share extensions available on a user's device. Share Sheet support is powered by the new Transferable protocol, which introduces a type-safe API for transferring app data.
Host SwiftUI View in UIKit Collection View Cell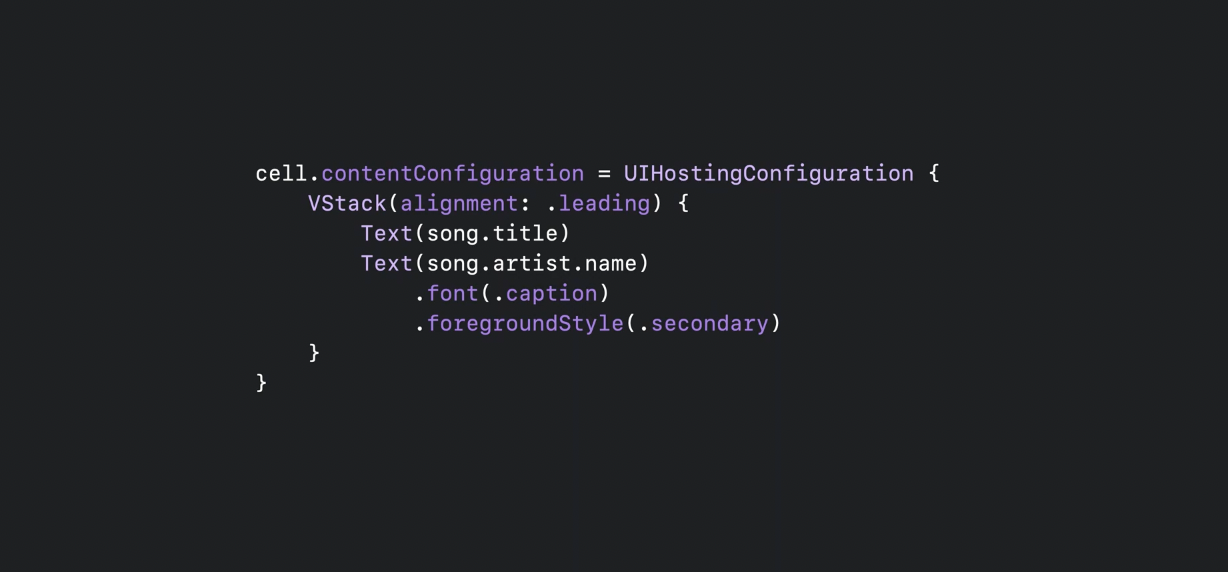
Use a special collection view cell that can host SwiftUI views to adopt SwiftUI incrementally in existing UIKit apps. If you already have a collection view in your UIKit app, you can now write custom cells using SwiftUI's declarative syntax. These cells are tightly integrated with UIKit, supporting swipe actions, cell backgrounds, and all the other features of UICollectionView.
Swift Charts
Swift Charts is a highly customizable charting framework built on top of SwiftUI that makes it easy to create gorgeous visualizations. It uses the same declarative syntax as SwiftUI to make it easy to read and write code which conveys visual information.
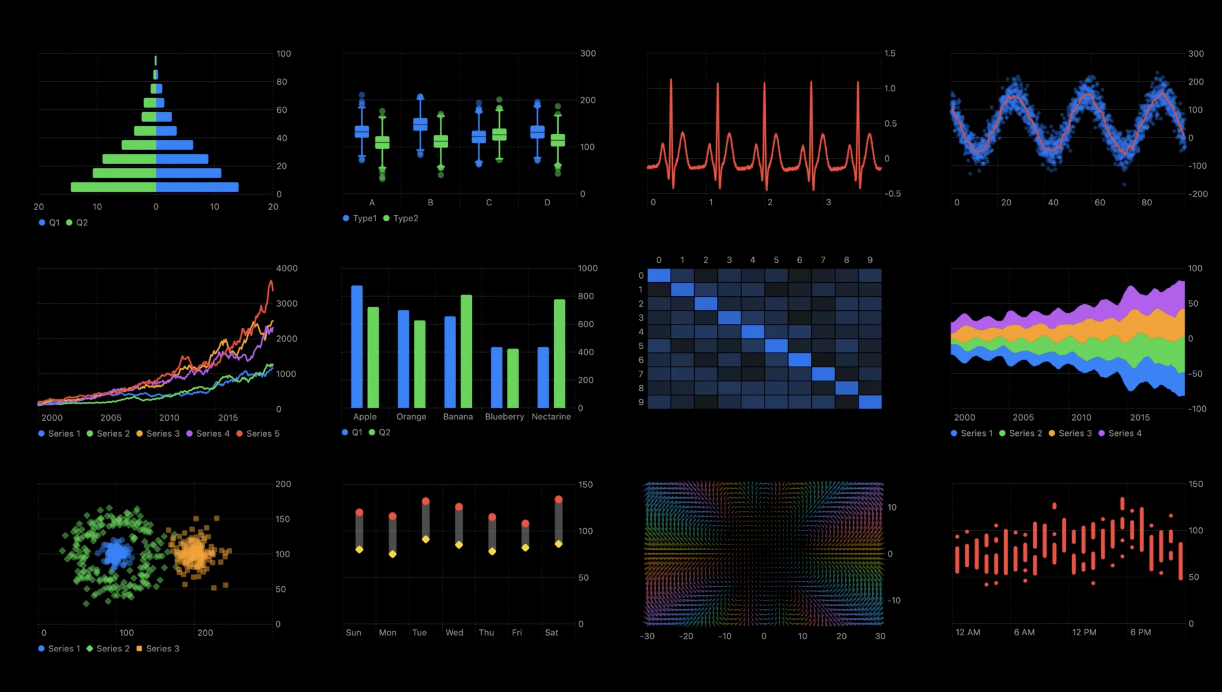
Swift Chart lets you customize the presentation of information to best fit the needs of your app to create everything from line and bar charts to more sophisticated examples like heat maps and stream graphs, and many, many more types.
Charts have support for accessibility features, customizable VoiceOver experience. Being built on SwiftUI also means it supports animation and works across all devices.
SwiftUI Redesigned Xcode Preview Canvas
The redesigned preview area makes it easier than ever to see how view looks in different environments.
See view in Dark and Light model look at layout in every interface orientation, all without adding a single additional preview.
Flexible Layout with ViewThatFits
ViewThatFits provides dynamic switch between a vertical and a horizontal stack, depending on the available space.
Navigation Split View
All new NavigationSplitView with a Sidebar to track the selection and a NavigationStack that changes its content as the sidebar selection changes.
 Supported Destination Settings to add supported platforms in 1 click
It's now only a few clicks add supported destinations such as macOS, AppleTV from Xcode Target General Settings.
With just a single target backing your app, you can share almost all your code, and SwiftUI makes your app look great on each platform.
Menu Bar Extra View for macOS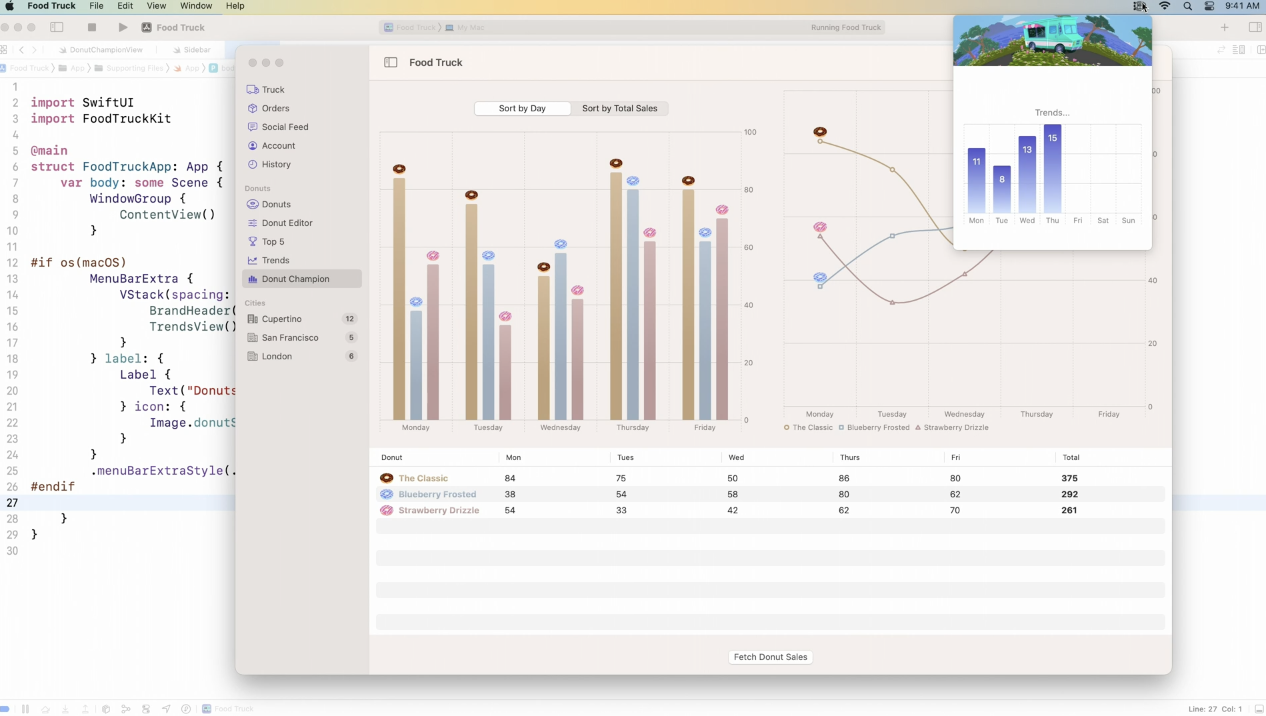
New MenuBarExtraView for macOS to add icon on Menu Bar just like Wi-Fi and Spotlight.
Apple SwiftUI Adoption in Apple System Apps & System Interfaces
Apple is continuing to expand adoption of SwiftUI across system apps and system interfaces. For example, iOS's new Lock Screen widgets were designed from the ground up using SwiftUI. The new Font Book app was completely rewritten with it. And the modern, forward-looking design of the new macOS System Settings app was built using it.
System Experience New API
Apps are about turning ideas, code, and APIs into user experiences. And the best apps are the ones that can meet users where they are in the moment. Apple have created ways to help you take user experience beyond your apps, and build it into the system experience on Apple devices.
Lock Screen & watchOS 9 Complications powered by WidgetKit, New Widgets.
In reimagining the Lock Screen, Apple set out to make it even more personal and beautiful, while improving everyday utility. As part of this, they knew they needed to bring the power of widgets to the all-new Lock Screen.
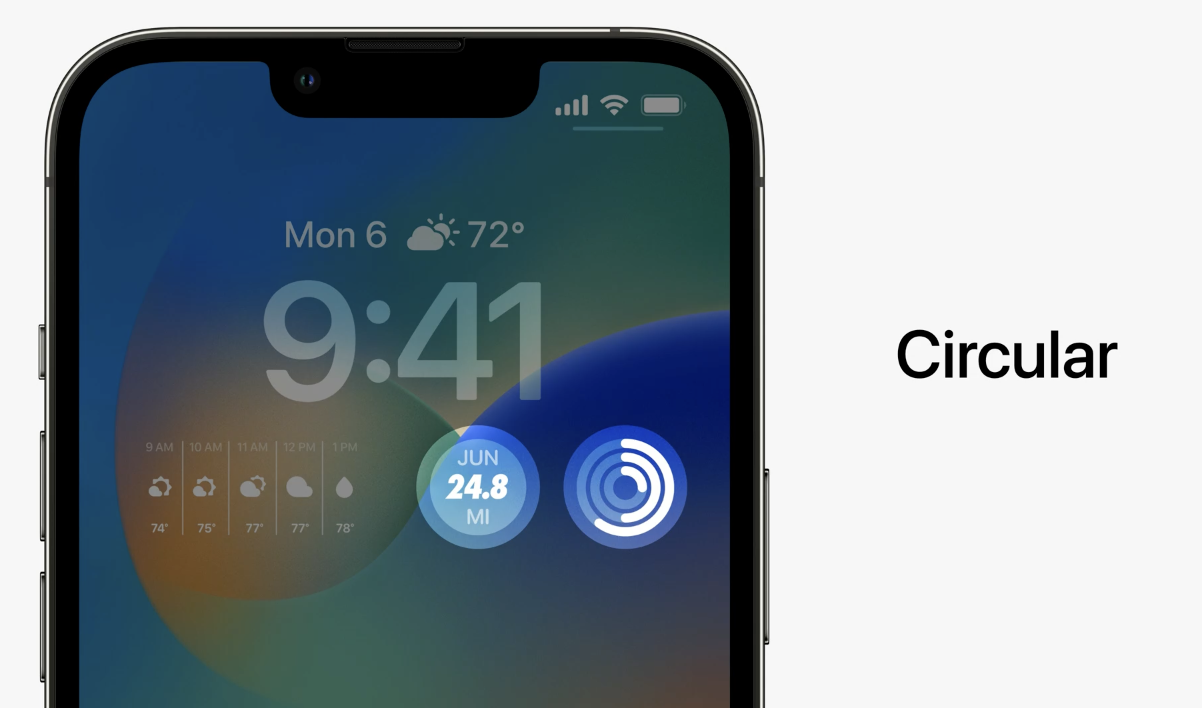
Using WidgetKit, they brought some of watchOS Complications designs to widgets on the Lock Screen, including Circular, Rectangular, Inline Widgets.
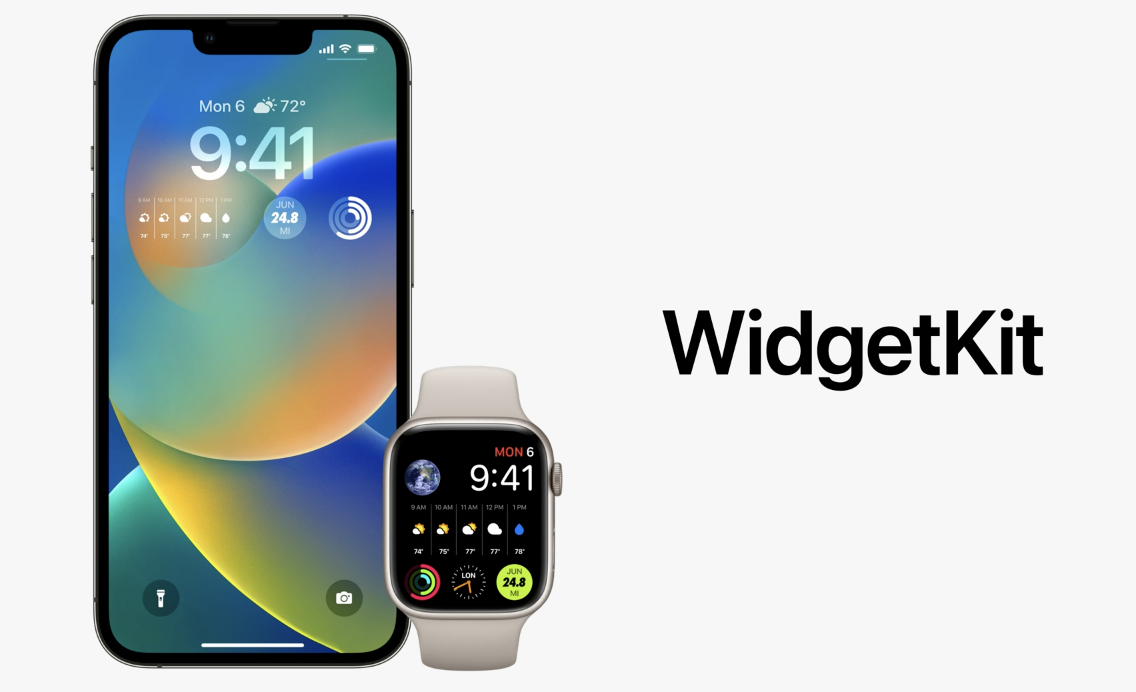
All of these widgets work on both iOS and watchOS because starting in watchOS 9, complications are also powered by WidgetKit. For the first time, you can use the same code to generate glanceable data on both platforms. WidgetKit manages platform differences for you automatically, using the appropriate system fonts by default, and tinting the widgets on the Lock Screen for maximum legibility.
Live Activities Widget Upcoming Support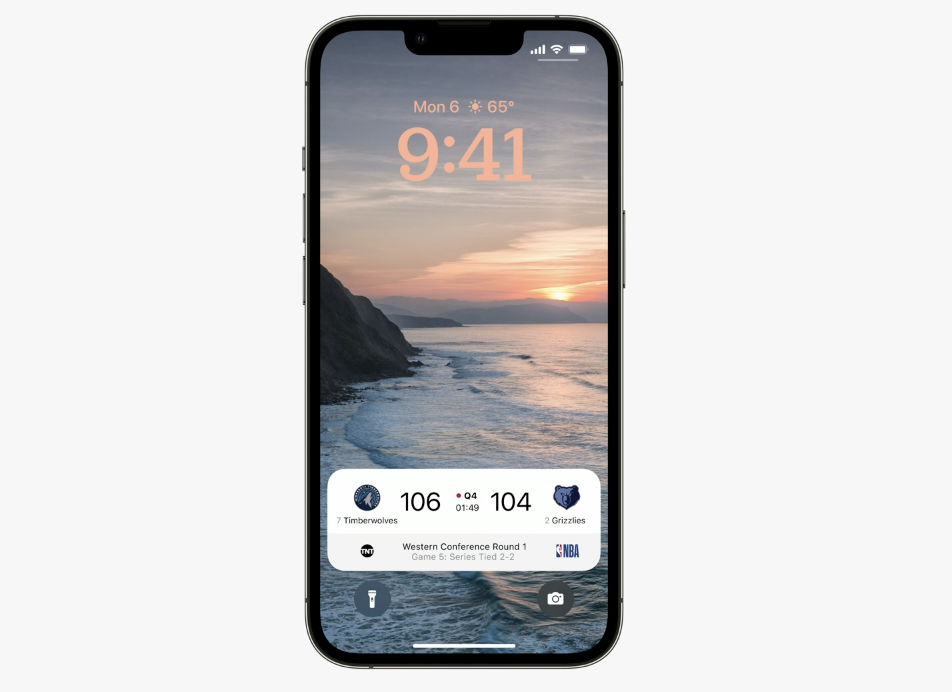
Live Activities makes it easier to stay on top of things that are happening in real time, right from the Lock Screen. Things like the latest score from a game, the progress of a ride share, or a workout, right on the Lock Screen, and always up-to-date. Just like with widgets, you create Live Activities with WidgetKit. The difference is, you update your Live Activity's presentation and state in real time.
Since they're built with SwiftUI, you can even animate your updates from one state to the next. These updates make sure your Live Activities has the most current information when the user chooses to glance at it. Live Activities will be available starting in an update to iOS 16 later this year.
Messages Collaboration API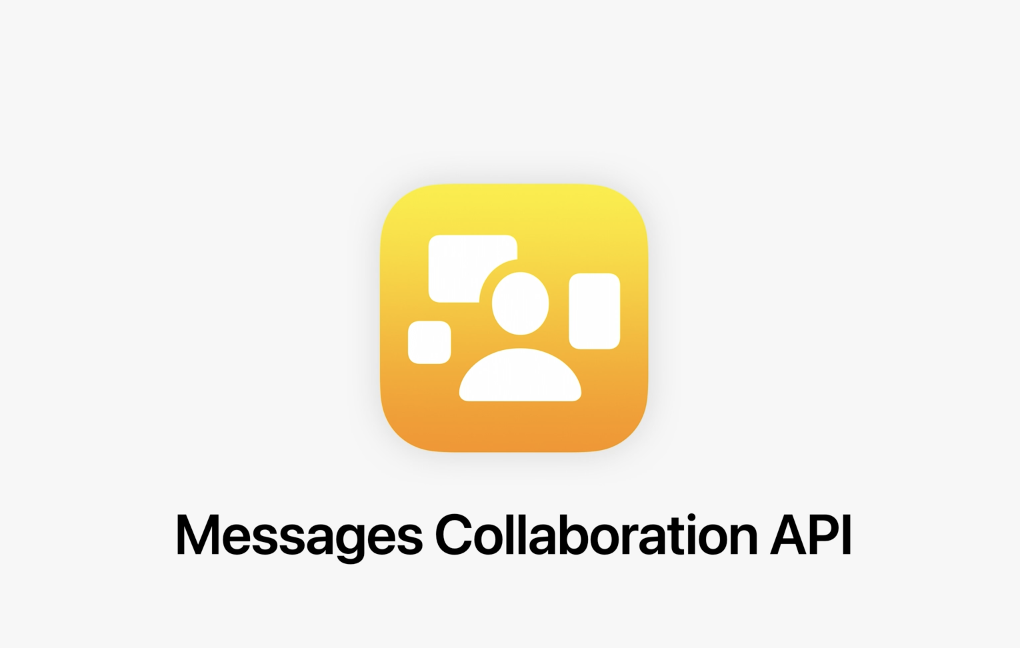
With the new Messages Collaboration API, you can bring your app's existing collaboration experiences into Messages and FaceTime. When users share a link to content in your app, the API makes it easy for you to mark that link as collaborative, enabling a seamless experience. This works without compromising privacy. Messages identities and app identities remain private and are not shared.
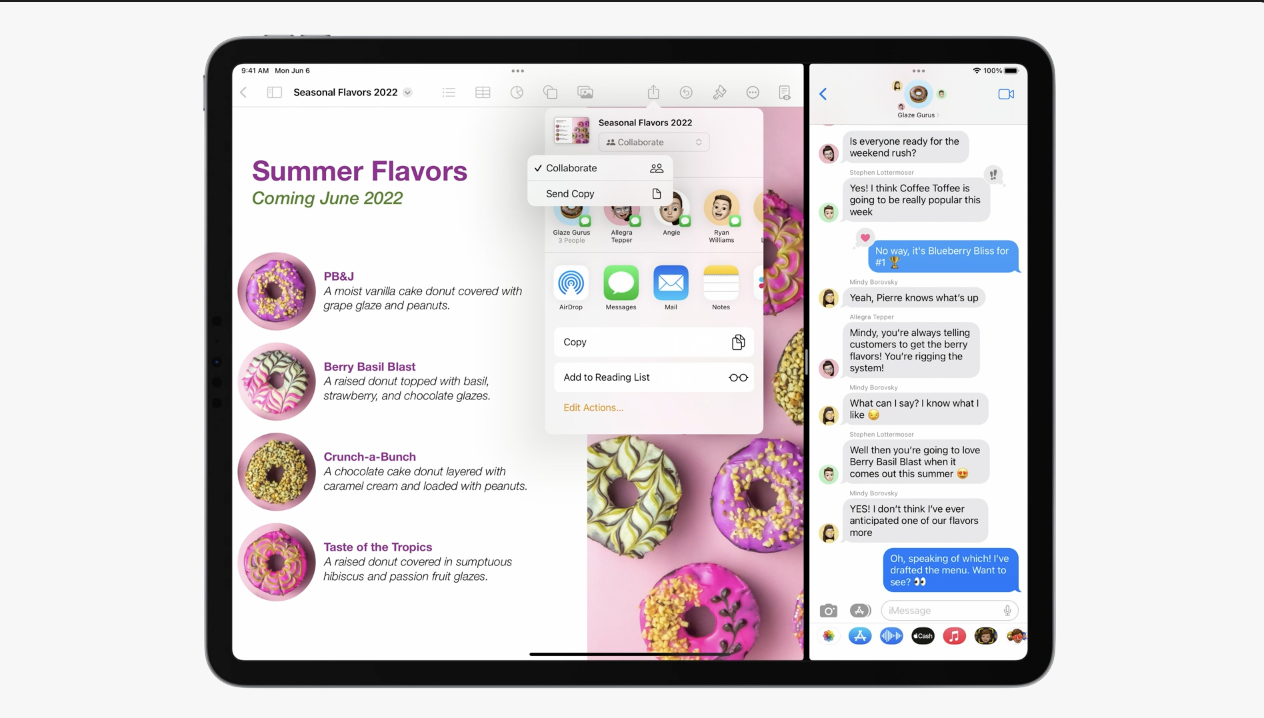
With one object, your users can initiate collaboration in two convenient ways that they're already familiar with. One, the Share Sheet, which has been updated to put collaboration front and center.
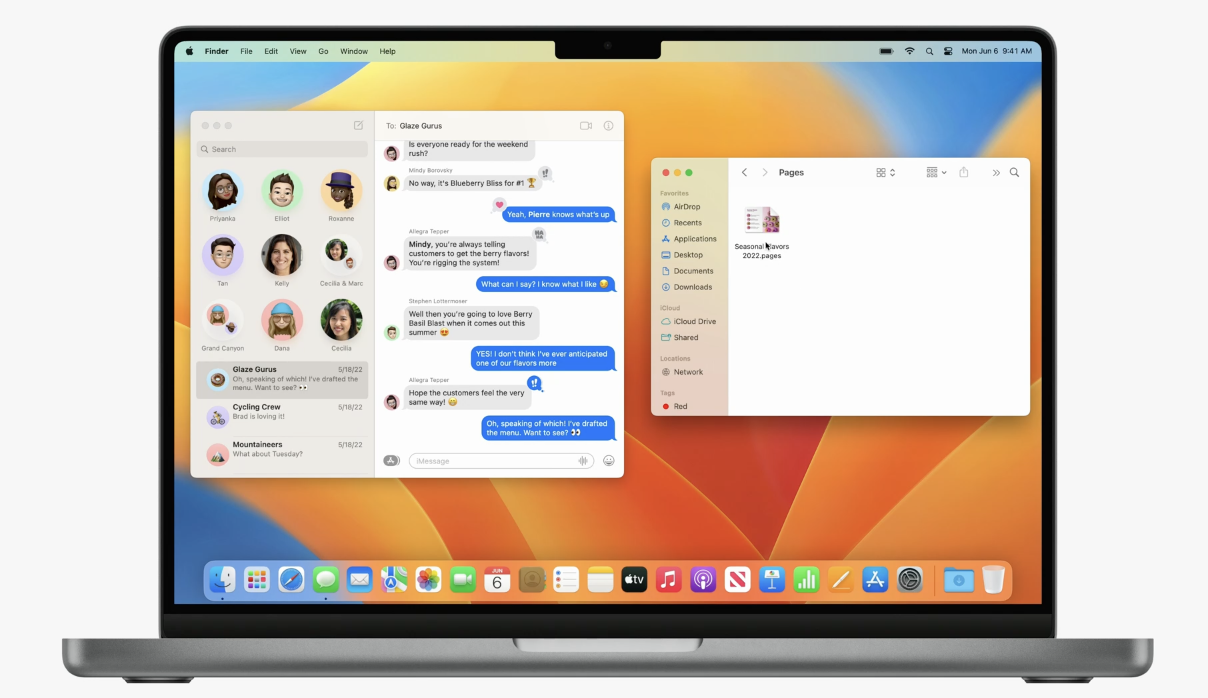
And two, drag & drop, where you can share content you want to collaborate on by dragging it directly into the Messages conversation. And once the conversation is started, you can even post notices about content updates right to the Messages conversation.
With a couple lines of code, your users can get back to collaborating in your app with a single tap in Messages. And with the collaboration popover, your users can get back to the conversation in Messages or FaceTime right from your app
App Intents Framework. Say Goodbye to Manual Add to Siri Button and Complex Intent Definition file for Custom Intent Shortcuts
App Intents framework makes your app's features available to the system, so people can use them automatically through Siri and Shortcuts.

Today, people have to add shortcuts manually before they can use them at all. Apple is making this automatic in iOS 16 with the new App Intents framework.
App Intents is the next step for the SiriKit Intents framework that Apple introduced in iOS 10. If you adopt Intents to integrate with Widgets or domains like media or messaging, you should keep using the SiriKit Intents framework, but for developers who build custom intents for Siri and Shortcuts, you should go ahead and upgrade to App Intents.
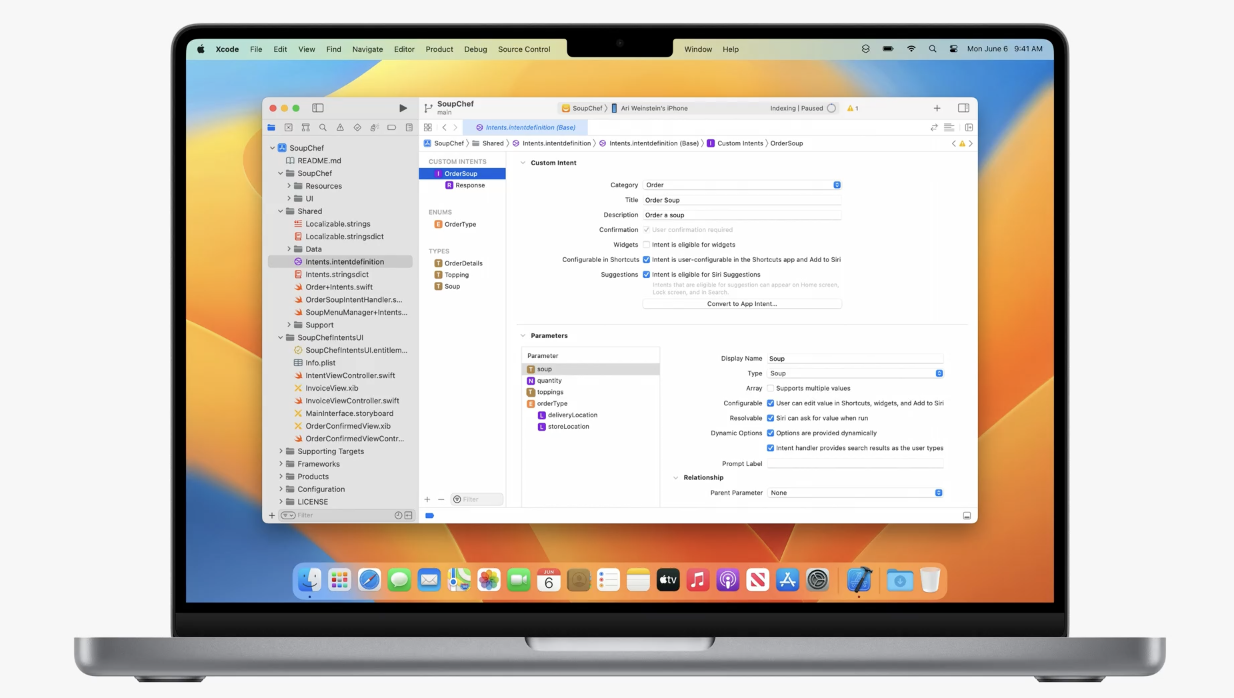
You can easily upgrade to App Intents in Xcode by pushing the Convert button in your intent definition file. Xcode will generate the equivalent App Intents source code, and then you fill in the blanks with your intent handling code.
The App Intents framework is really easy to develop for because it's designed from the ground up for Swift, and it requires much less code. The Swift code that you write is the only source of truth, There's no separate intent definition files or code generation to keep in sync.
Passkeys
Passkeys will streamline your authentication flows and address the top security issues with passwords. Passkeys were designed to be incredibly easy to use. The interface uses familiar Autofill-style UI and FaceID and TouchID for biometric verification.
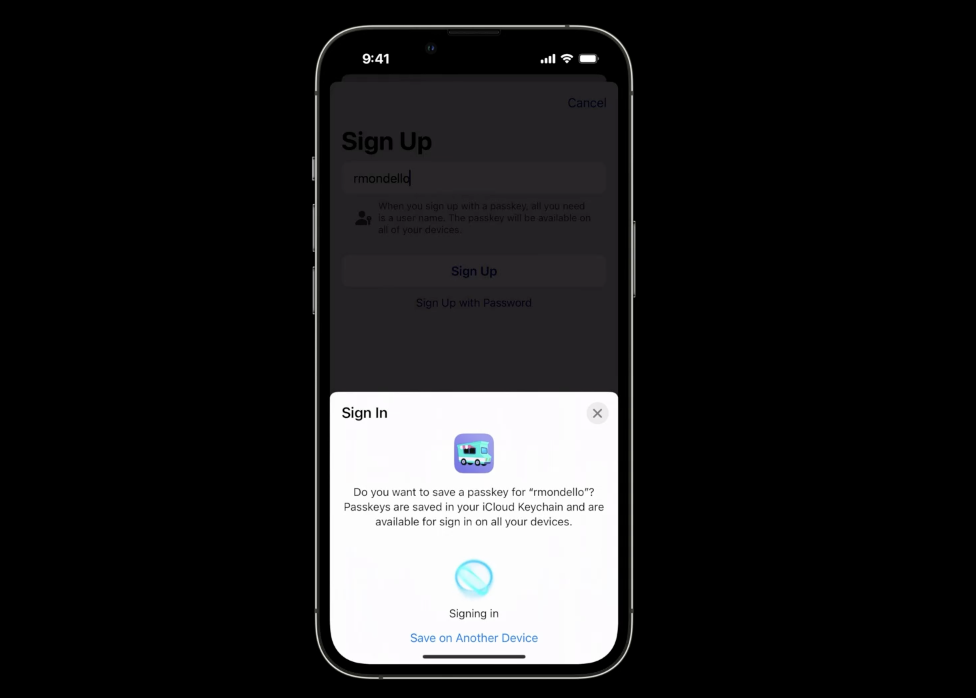
When setting up an account with a passkey, you don't need to create a password. Just type a user name and save the passkey to your iCloud Keychain. This will securely sync this passkey to all of your other Apple devices.

Because passkeys are built on open industry standards that platforms are adopting, you can use the passkey you just created on your iPhone to sign into your app website on a Windows PC. On the website, just type your username, submit, and choose the option to sign in using a phone, scan the QR code, let the iPhone and PC securely connect, and you're signed in.

When creating a passkey, the device generates a unique key that is specific to the website or app it was created for and protects it behind biometrics. It's impossible to have a weak passkey. It can't be forgotten, reused, or guessed. Passkeys are based on public key cryptography, which makes credential leaks from servers a thing of the past. Instead of storing salted, hashed passwords, that can leak and be cracked, your server keeps only a public key.
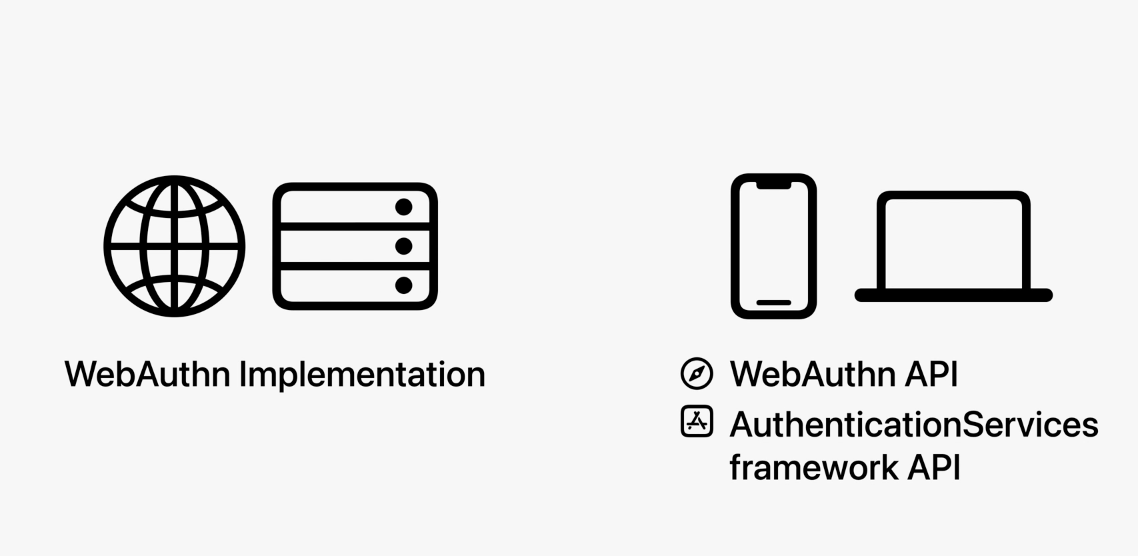
Bringing passkeys to your app and website takes only a few steps. First, you'll teach your account backend to store public keys and issue authentication challenges. Then, on your website and in your app, you'll offer passkeys to users and adopt API to create a new passkey and sign in with it.
Passkeys are based on the Web Authentication, or WebAuthn, standard, which has been a collaborative effort across the industry from both platform vendors and service owners. The standard itself is mature and well documented.
iPadOS 16 UI Updates & DriverKit support
With iPadOS 16, There's a seamless find-and-replace experience for UI text views that your apps get automatically, as well as updates to the navigation bar, toolbars, the document menu, that make it easy for your users to manage documents and customize their experience.

To enable even more powerful applications of iPad with connected hardware, DriverKit comes to iPad, helping to unlock the incredible power of the M1 chip. It's the same API that's available on Mac today, enabling you to easily deliver support for your USB, audio, and PCI devices to an even larger audience.
watchOS 9 CallKit Framework & Bluetooth-Connected Medical Devices Robust Connectivity
The CallKit framework in watchOS 9 includes a new Voiceover IP background mode that lets apps make voice calls directly from Apple Watch, with the same familiar user experience as FaceTime audio and phone calls. And Bluetooth-connected medical devices get more robust connectivity and data delivery, allowing for timely alerts when a critical condition is detected.

tvOS 16 gives you new ways to create connected experiences between your apps on Apple TV and iPhone, iPad, or Apple Watch apps on nearby devices. So a workout could use motion data from Apple Watch, or you could use iPhone or iPad as a custom controller for your turn-based games, And tvOS manages device discovery and connection for you, so your app doesn't even need to be running on the other device. In fact, if your app isn't installed, the user is automatically prompted to download it right from the App Store.
AR and LIDAR Room Scanning with ScanKit and Room Plan
Now, on iPhone and iPad, there are new cool features that use AR and LiDAR scanning with ScanKit and RoomPlan. These APIs let your apps create rich 3D parametric room models in USD and USDZ formats.

So you can create a variety of workflows and experiences, from architecture and design, to retail and hospitality, and the models include furniture classification for categories such as sofas, cabinets, TVs, and yes, even kitchen sinks.
Metal 3 with Accelerated ML, Game Loading MetalIO API and, MetalFX Resolution Upscaling
Metal 3, with powerful new features that help you render immersive graphics with even higher frame rates and enable new levels of computational performance. For instance, you'll get huge performance gains for the machine learning framework, PyTorch, which now uses the new Metal backend to enable ML training with the GPU.
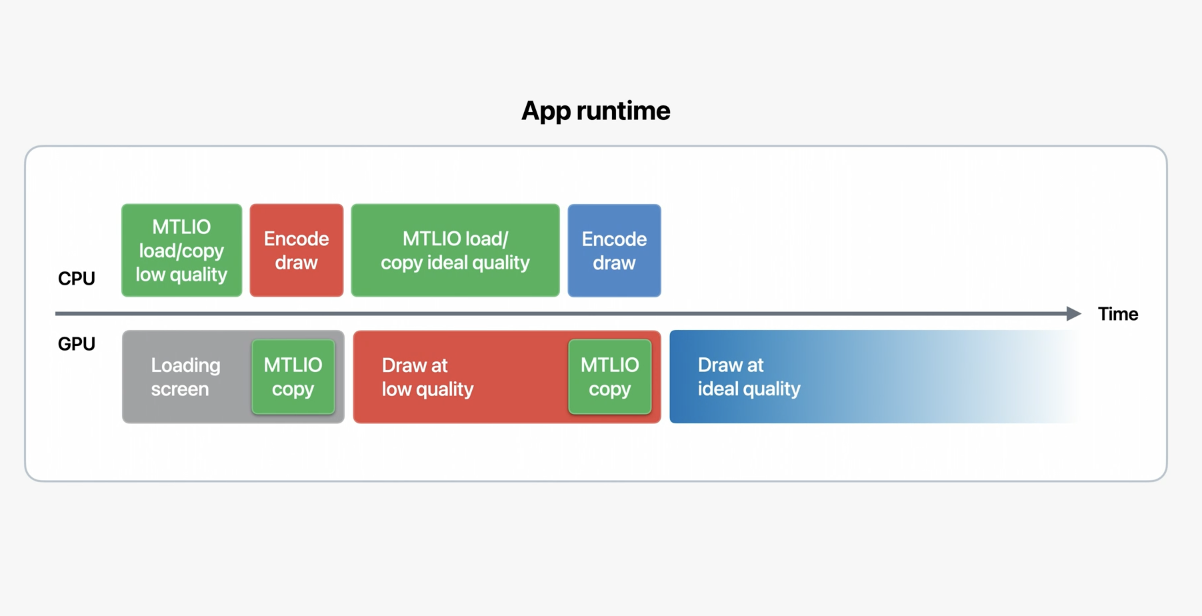
Metal 3 introduces fast resource loading with the Metal IO API that takes advantage of the Apple GPU's unified memory architecture to minimize loading overhead and ensures that the high-speed SSD storage that ships with every Apple silicon Mac has enough requests in its queues to maximize throughput. This new API provides faster and more consistent performance so that more time is spent drawing at the ideal quality.

MetalFX upscaling helps you render immersive graphics in less time per frame. Here's how it works. Previously, you would render your full frame at native resolution, but the GPU render time might not hit the target frame time. Now, you can render the same complex scene at a lower resolution to meet the target frame times, and use MetalFX framework to perform temporal antialiasing and upscaling to the target resolution. This is a similar technology used by Nvidia DLSS and AMD FidelityFX.
MapKit Update & Apple Maps Server APIs
MapKit 3D City Experience available to all developers in iOS 16. Users of your apps will be able to see incredible details, like 3D elevation, turn lanes, crosswalks and bike lanes, and amazing handcrafted 3D landmarks like the Golden Gate Bridge, or the Ferry Building.

The additional detail of the map allows you to provide context and precision that was never before possible. You can, for example, show that a point of interest is between the crosswalk and where the bike lane starts.
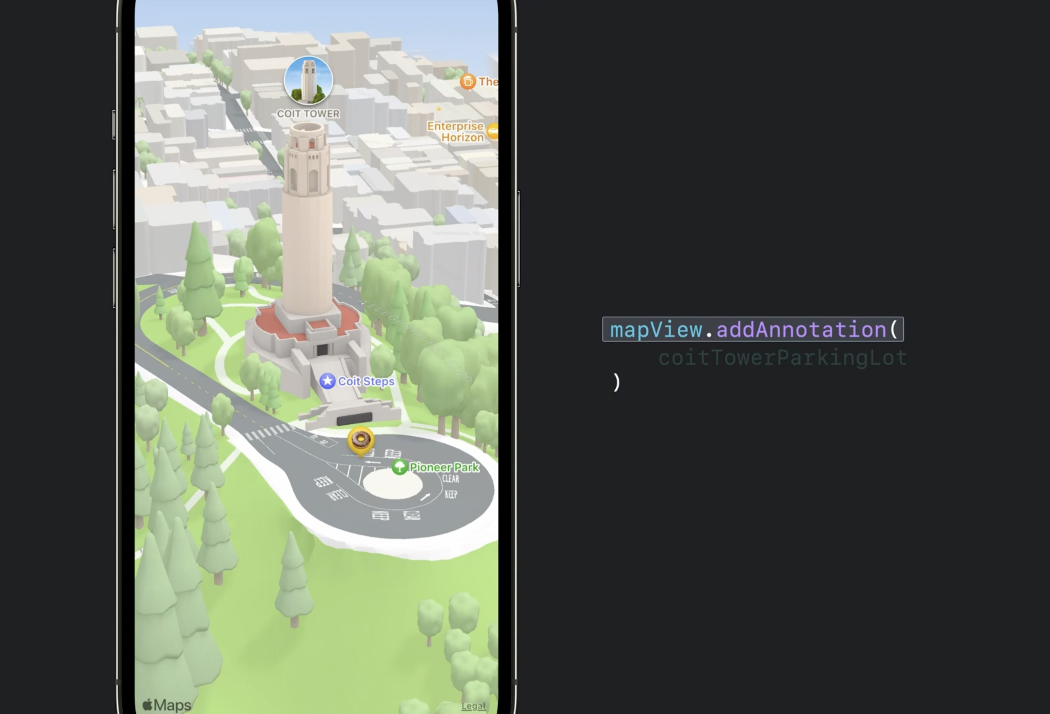
MapKit has powerful controls that allow us to position the camera in 3D space to create a precise view of the map. When adding an annotation or a route line sourced from MapKit's Directions API, MapKit automatically handles elevation and will adjust the annotation or route line by placing it on top of the 3D terrain. Animating the camera heading by adding a slow pan really brings the map view to life.
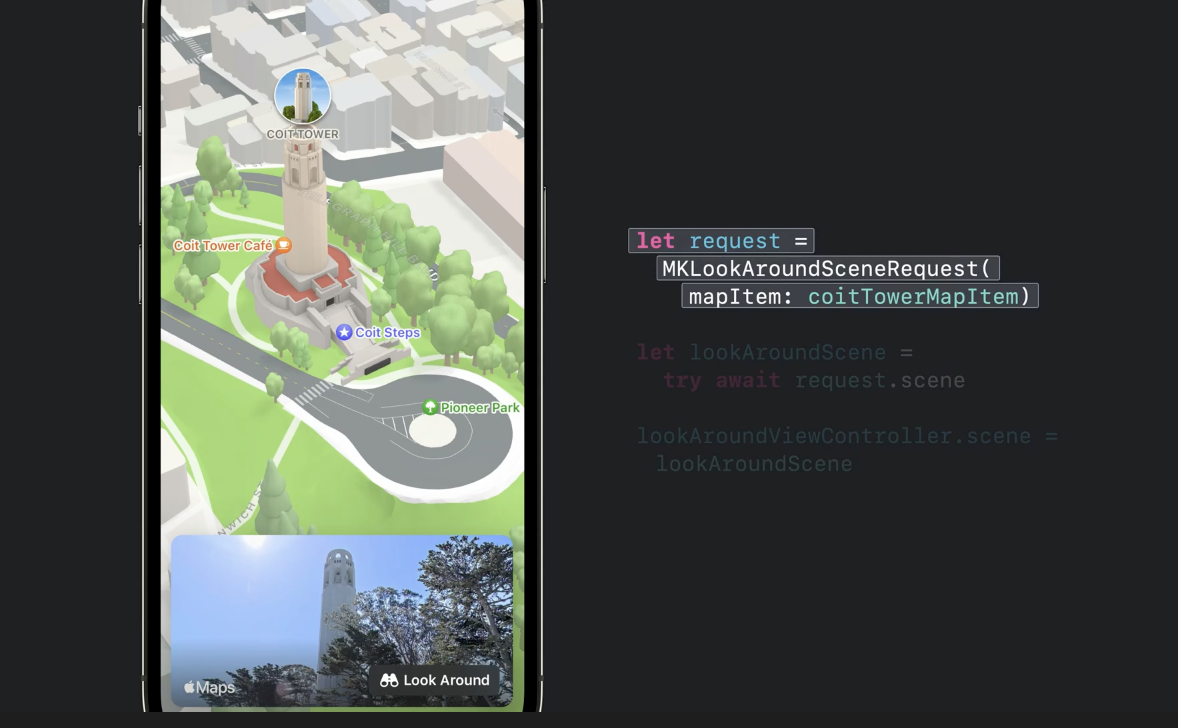
In addition, Apple is also bringing another popular Apple Maps feature to MapKit, Look Around, which is a great way to explore the world at ground level, with high resolution 3D photography and smooth animations. Users can simply tap to move down the street.
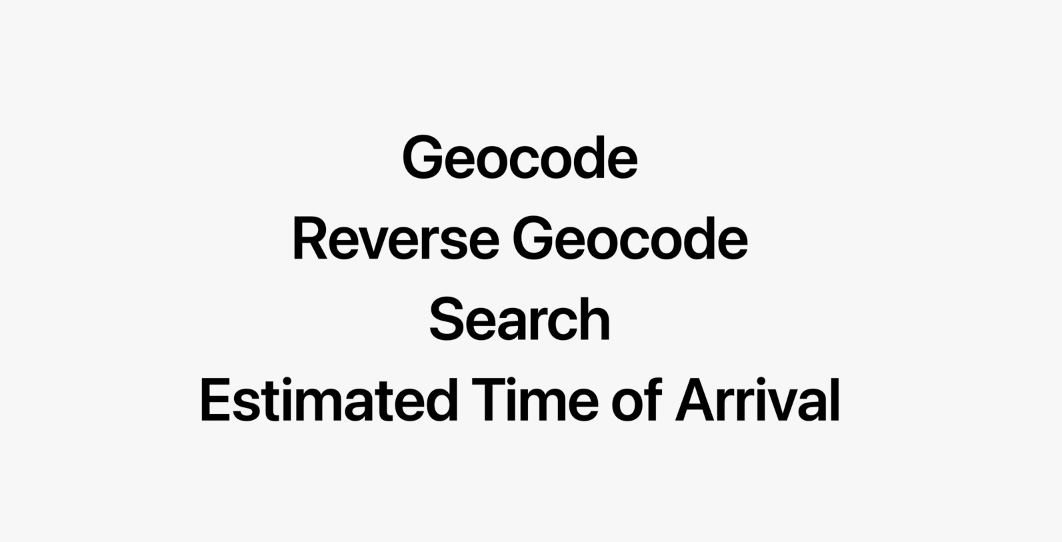
Maps Server APIs are RESTful and support four of the most used functions of MapKit: Geocode, which turns a lat/long into an address; Reverse Geocode, which does the opposite– it turns an address into GPS coordinates; Search; and Estimated Times of Arrival. Our new Maps Server APIs are a great way to make your own backend services richer and more performant. Of course, MapKit is built from the ground up on the same foundation of privacy as Apple Maps, and does not associate users' data with their identity or keep a history of where they've been.
WeatherKit
WeatherKit is a native Swift API for all Apple platforms, and a REST API you can use from anywhere. These APIs deliver accurate, hyperlocal weather forecasts, to help your users stay safe, informed, and prepared.
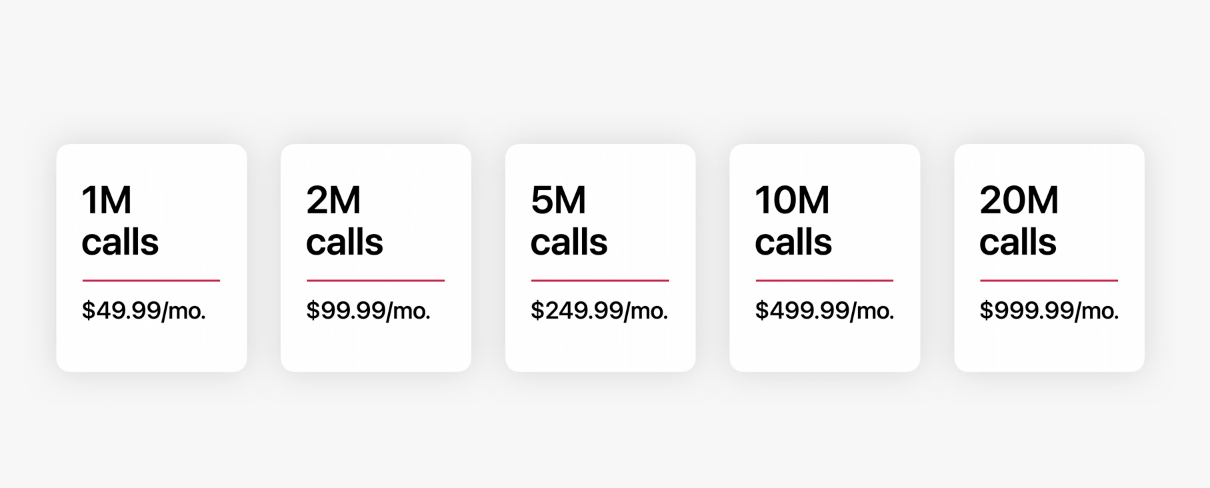
Apple are including 500,000 weather(for:location) API calls per month in your Apple Developer Program membership. Those of you who need more will be able to purchase additional tiers of service right in the developer app, starting this fall.
Live Text API VisionKit
The Live Text API unlocks the ability to analyze image content, allowing users to interact with text and QR codes found in photos and paused video frames, and it provides quick actions so your users are just a tap away from taking action on relevant data.

And the Data Scanner API unlocks the ability to analyze a live camera feed. It dramatically simplifies text and barcode ingestion for users. All you need to do is add any overlays or custom controls that tailor the live camera experience to the needs of your app. This is especially useful for consumer apps that rely on QR codes or enterprise apps built for back-of-warehouse inventory management, pick-and pack delivery services, and point of sale kiosks.
Both the Live Text and Data Scanner APIs support automatic detection of nine languages.
Conclusion
There are so many new APIs and update to existing APIs that has been announced this year. And to understand them deeper, there are 175 sessions that we can watch to learn all of these amazing new SDKs.
That's it, let's keep on being a lifelong learner. Stay safe and healthy, have a great WWDC!
All the screenshoots in this article, Swift, SwiftUI, the Swift logo, Swift Playgrounds, Xcode, Xcode Cloud, iPhone, iPad, watchOS, tvOS, macOS, Safari, AppStore, TestFlight are trademarks of Apple Inc.
Summaries of each recap are referenced from transcript in Apple Official Developer App.
Published at May 29, 2022
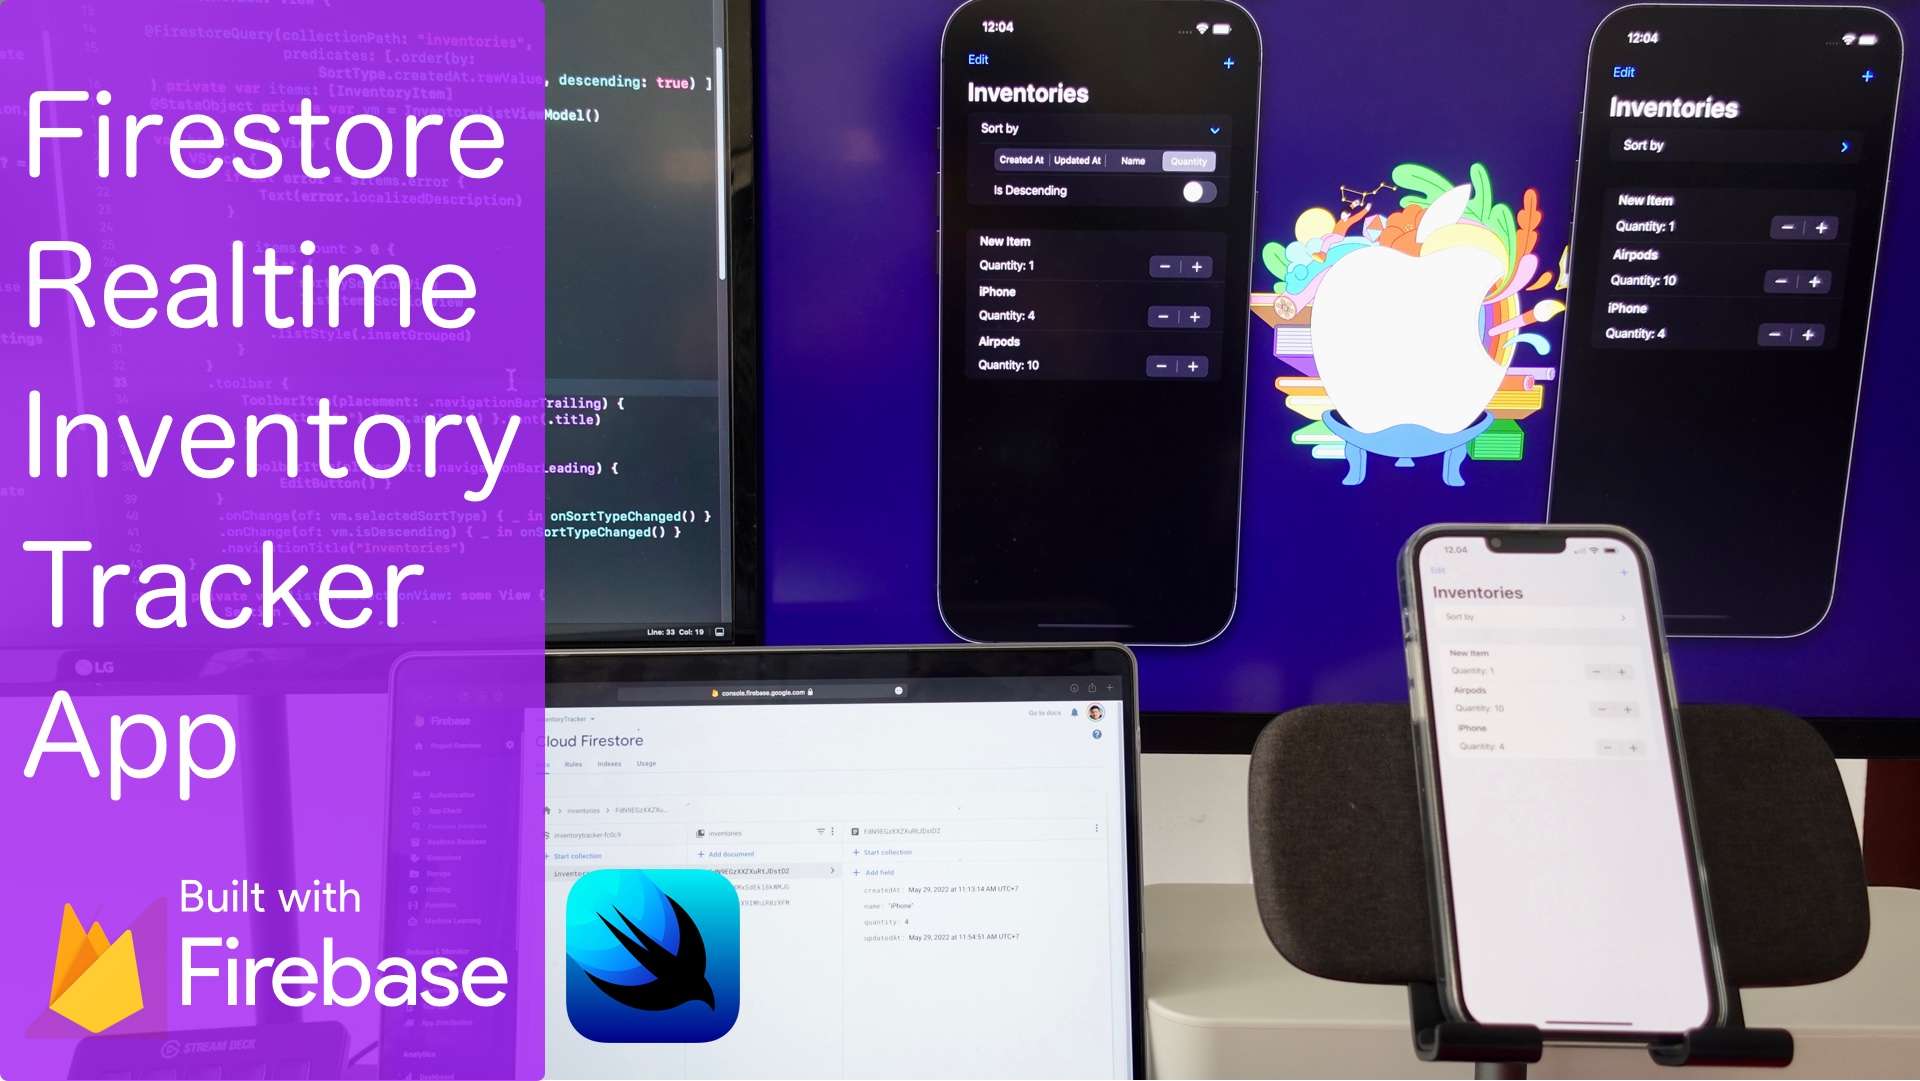
In this video, we are going to build a real-time inventory tracking SwiftUI app that support cloud on and offline syncing accross devices and platforms using Firestore DB.
Here is the list of topics that we will be learning:
Published at May 22, 2022
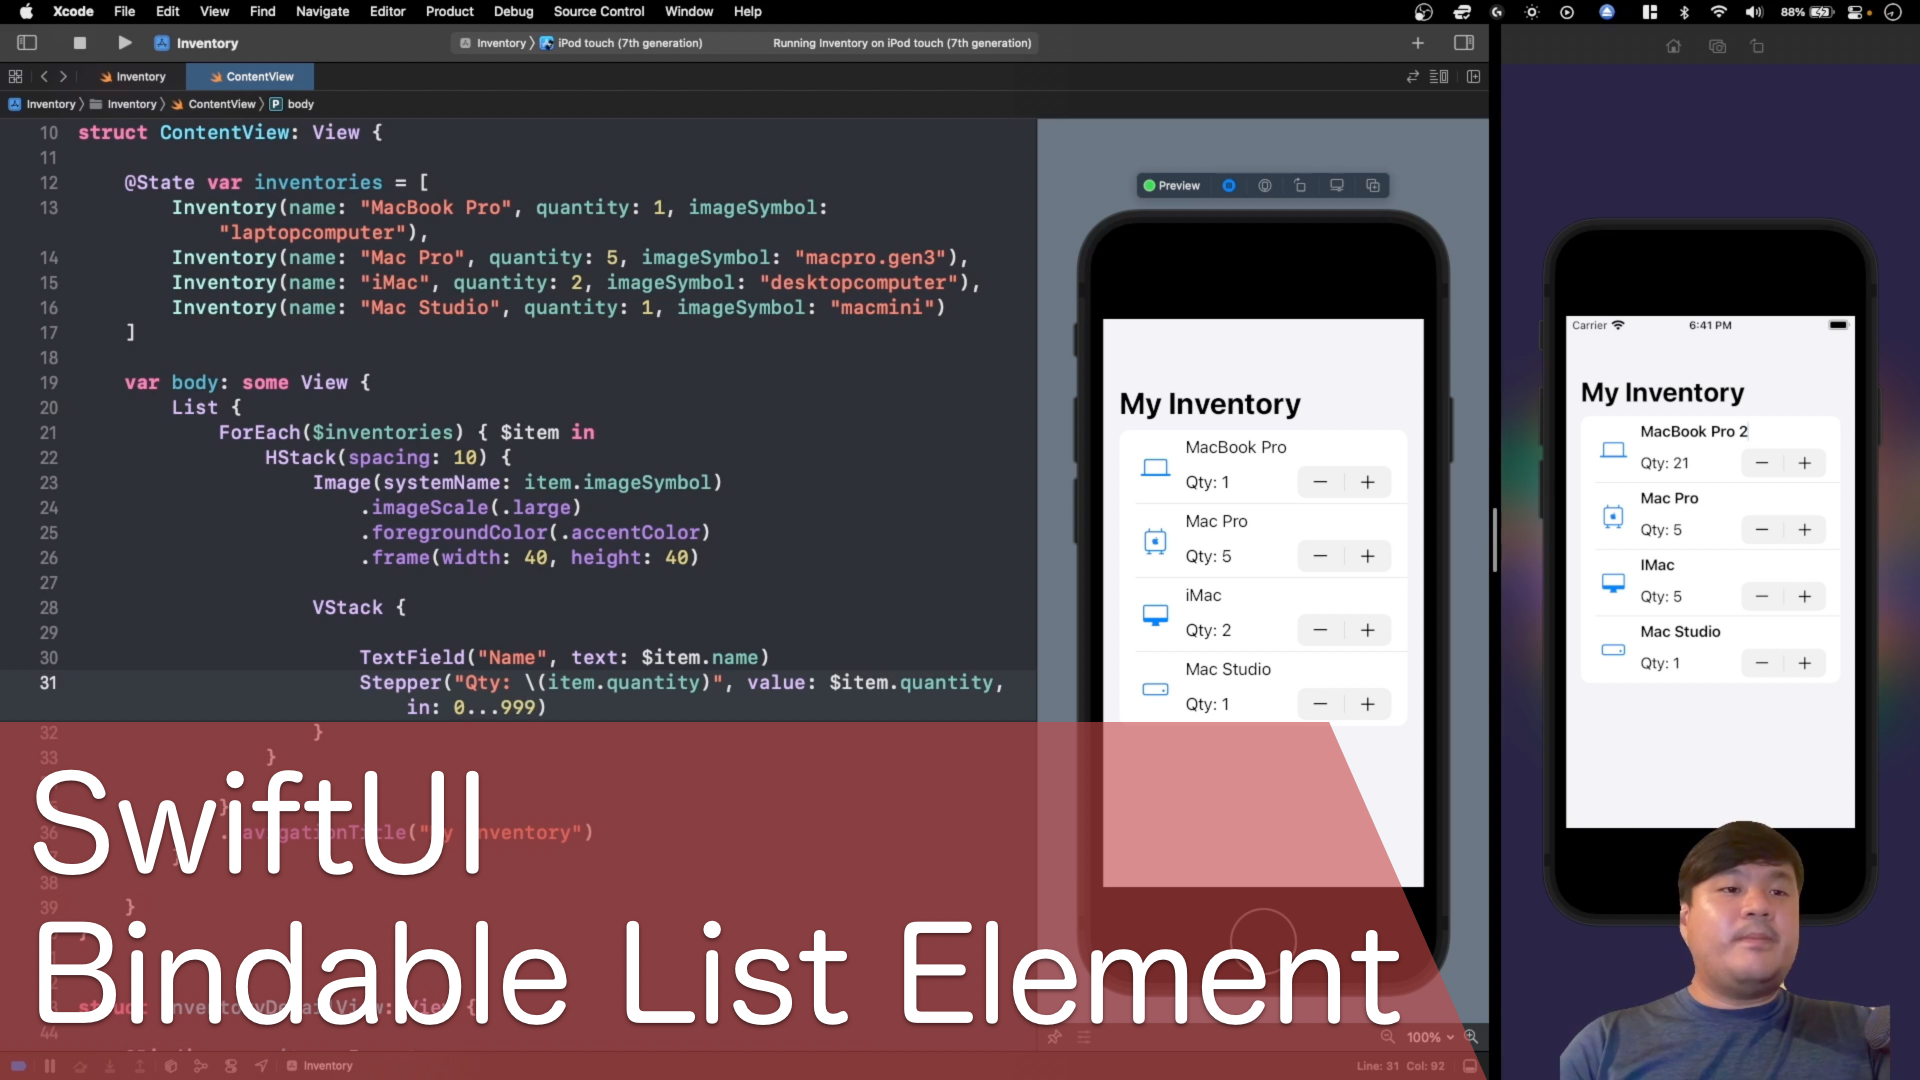
Hi Xcoders, in this bite sized video, we are going to learn on how to propagate change from children inside List back to the parent using SwiftUI Bindable List Element.
Published at May 01, 2022
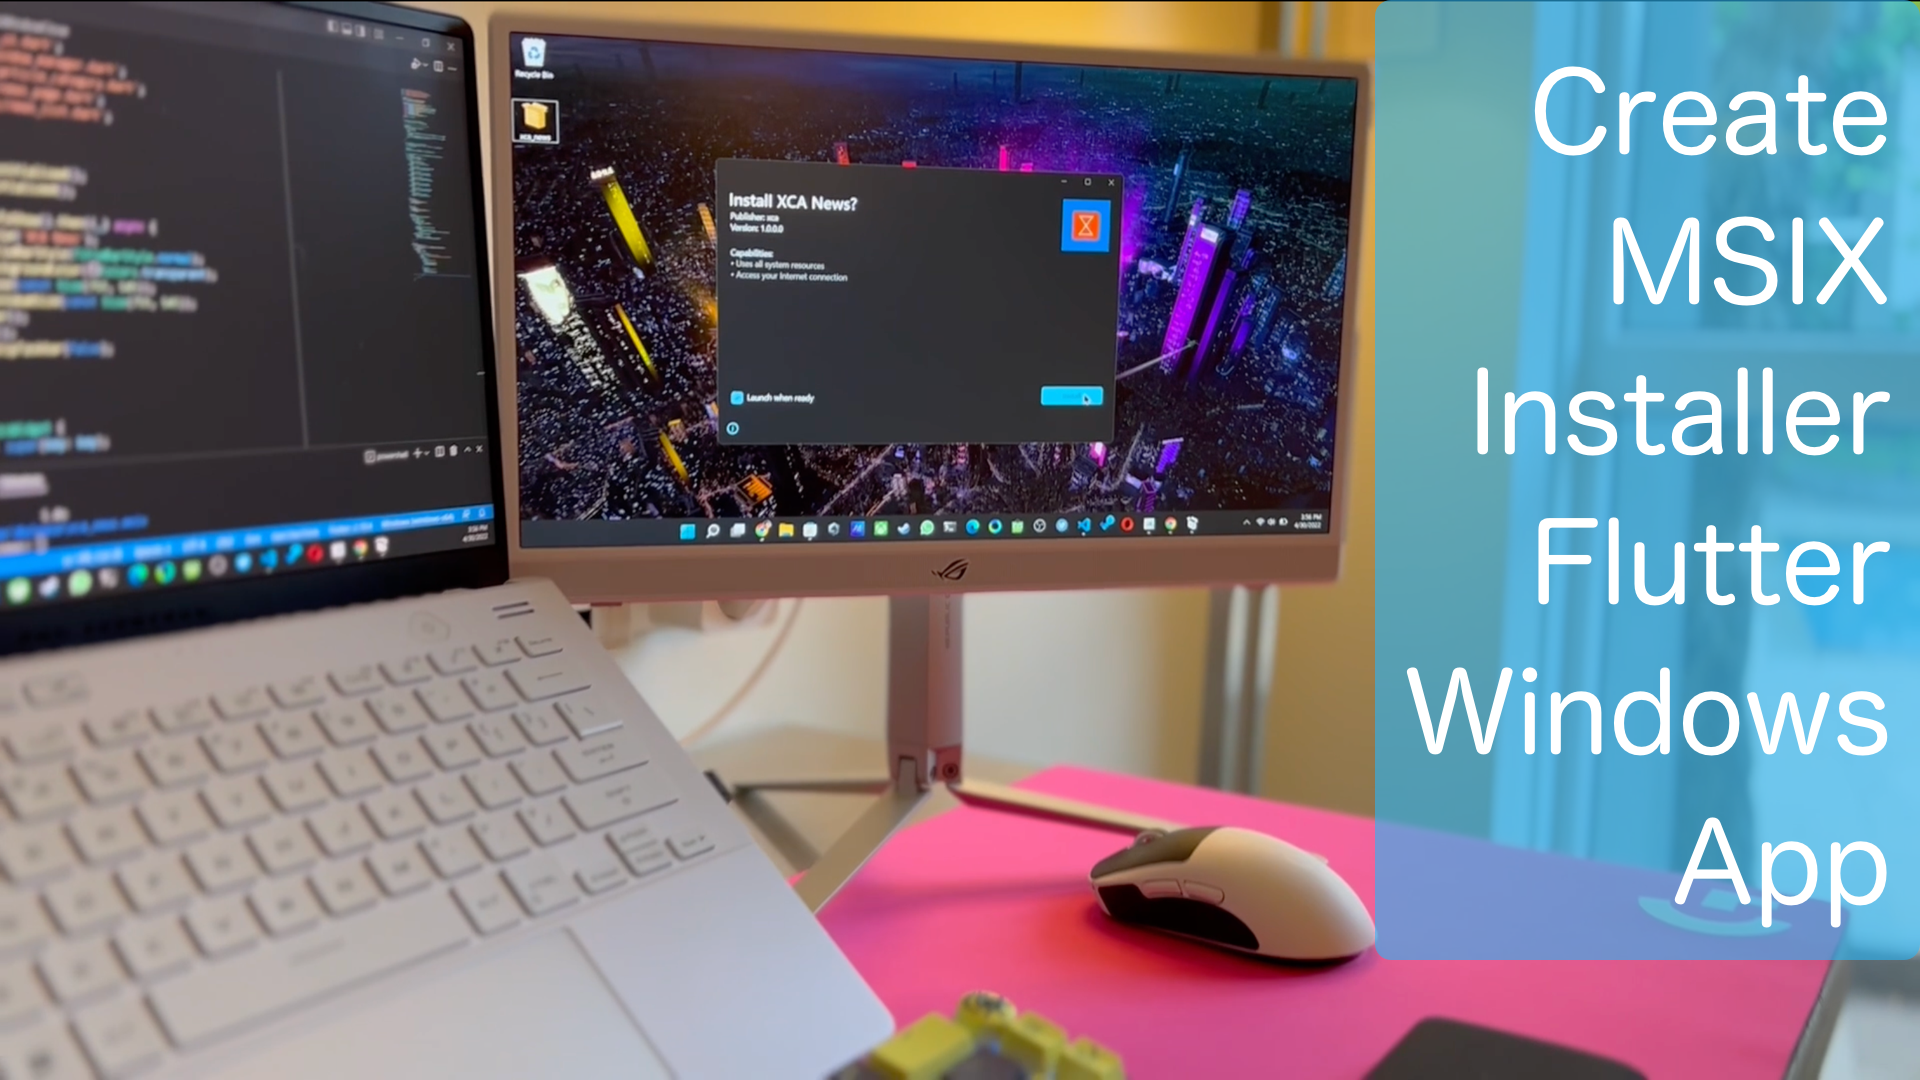
In this video, we are going to create a MSIX Installer for Flutter News Windows App. We'll learn on how to use Flutter msix installer package to create local app installer with self signed certificate and upload msix to Microsoft Store dashboard.
Published at Apr 17, 2022

In this video, we are going to build a native Windows News App using Flutter and Fluent UI Theme. We are going to utilize newsapi.org to fetch the articles and uses multiple dependencies such as window manager, url sharing, and many more!
Published at Mar 27, 2022

We're going to build the CLI Tool for Ubuntu Linux and macOS using Swift Argument Parser Lib.
Here are the main features that we will build in this full tutorial video:
Published at Mar 20, 2022

Generate & Export Asset Icons easily to your iPhone, iPad, Mac, and Apple Watch.
What we will build and learn on this video:
Published at Feb 17, 2022
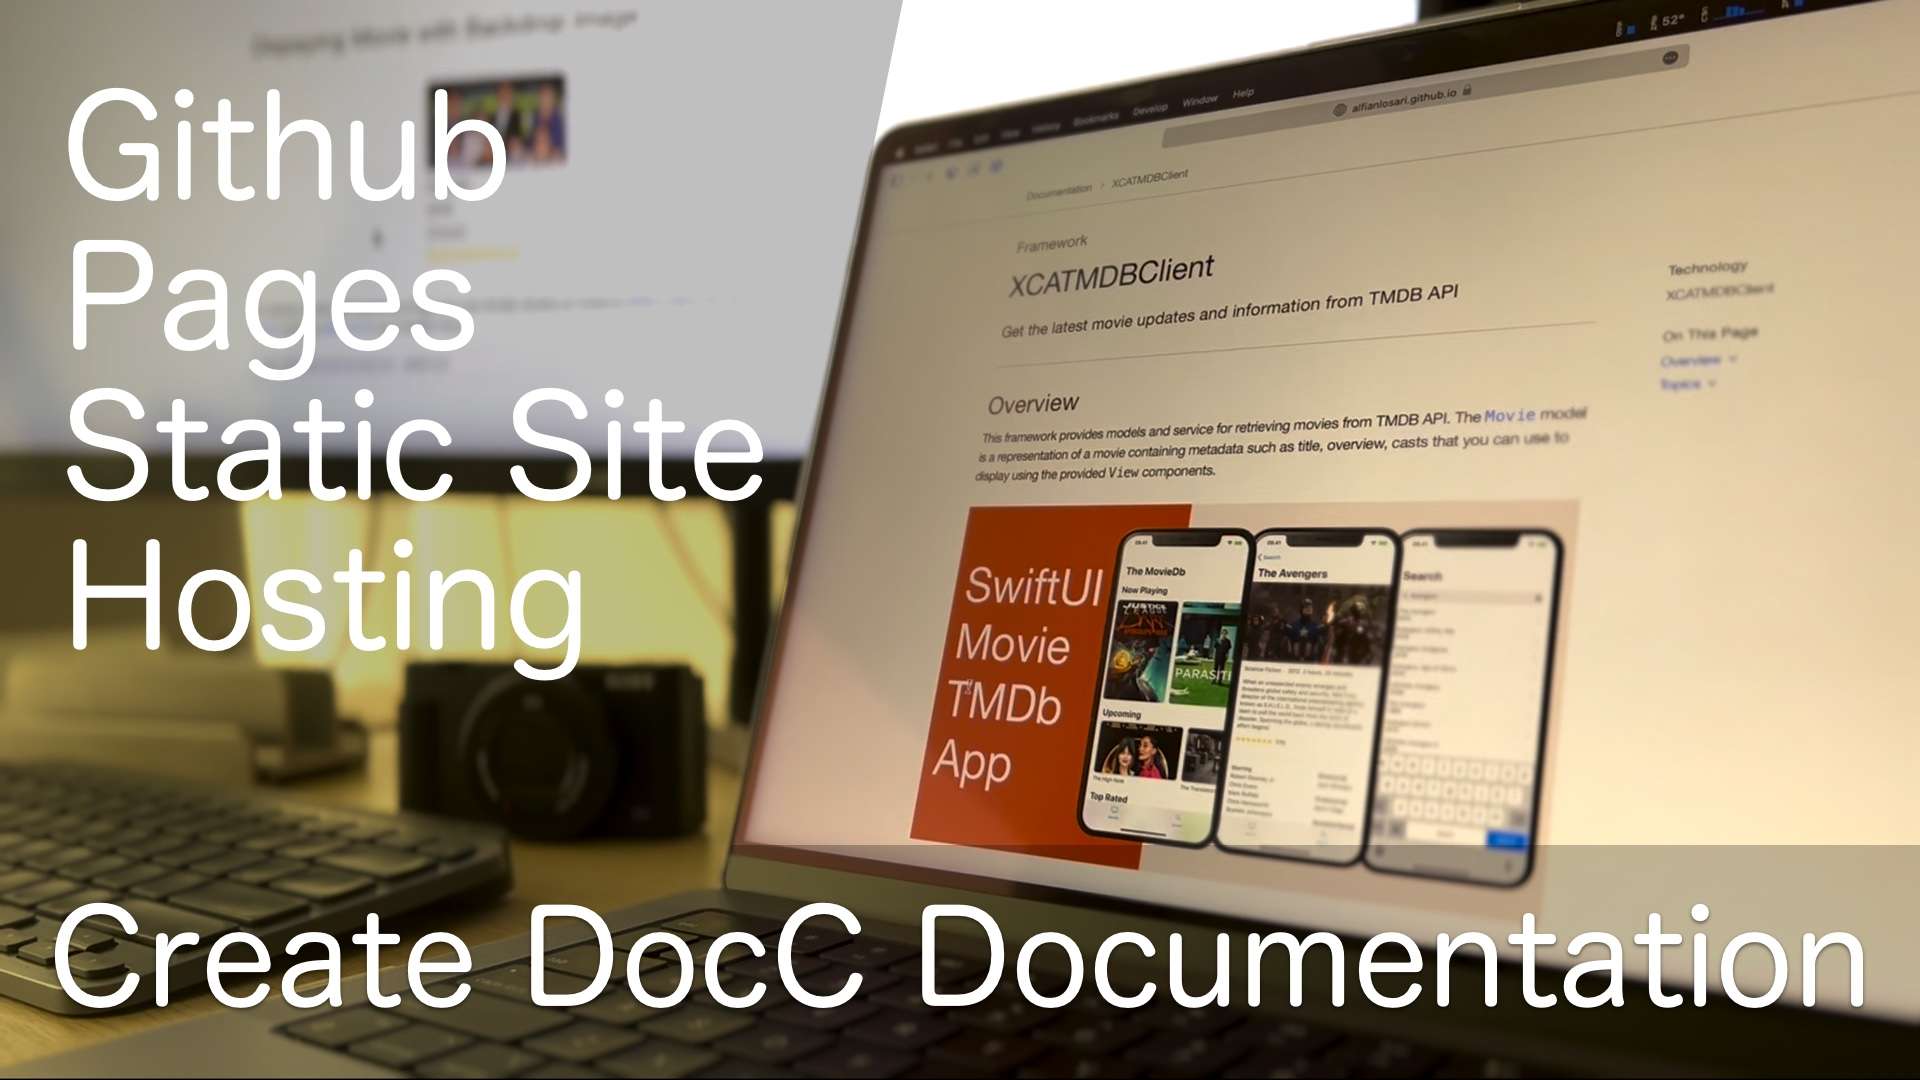
In this video, we are going to learn and have a hands on with DocC to create rich documentation for Swift Framework and host it to GitHub Pages Static Hosting Site.
Here are the main features that we will build in this full tutorial video:
Published at Feb 04, 2022

In this video, we're going to build a macOS Menu Bar App with SwiftUI & WebSocket to show realtime currency price from coincap.io
Here are the main features that we will build in this full tutorial video:
Published at Dec 02, 2021
Here are the main features that we will build in this full tutorial video:
Published at Nov 02, 2021
Here are the main tasks that we will implement to update to SwiftUI 3.0:
Published at Oct 19, 2021
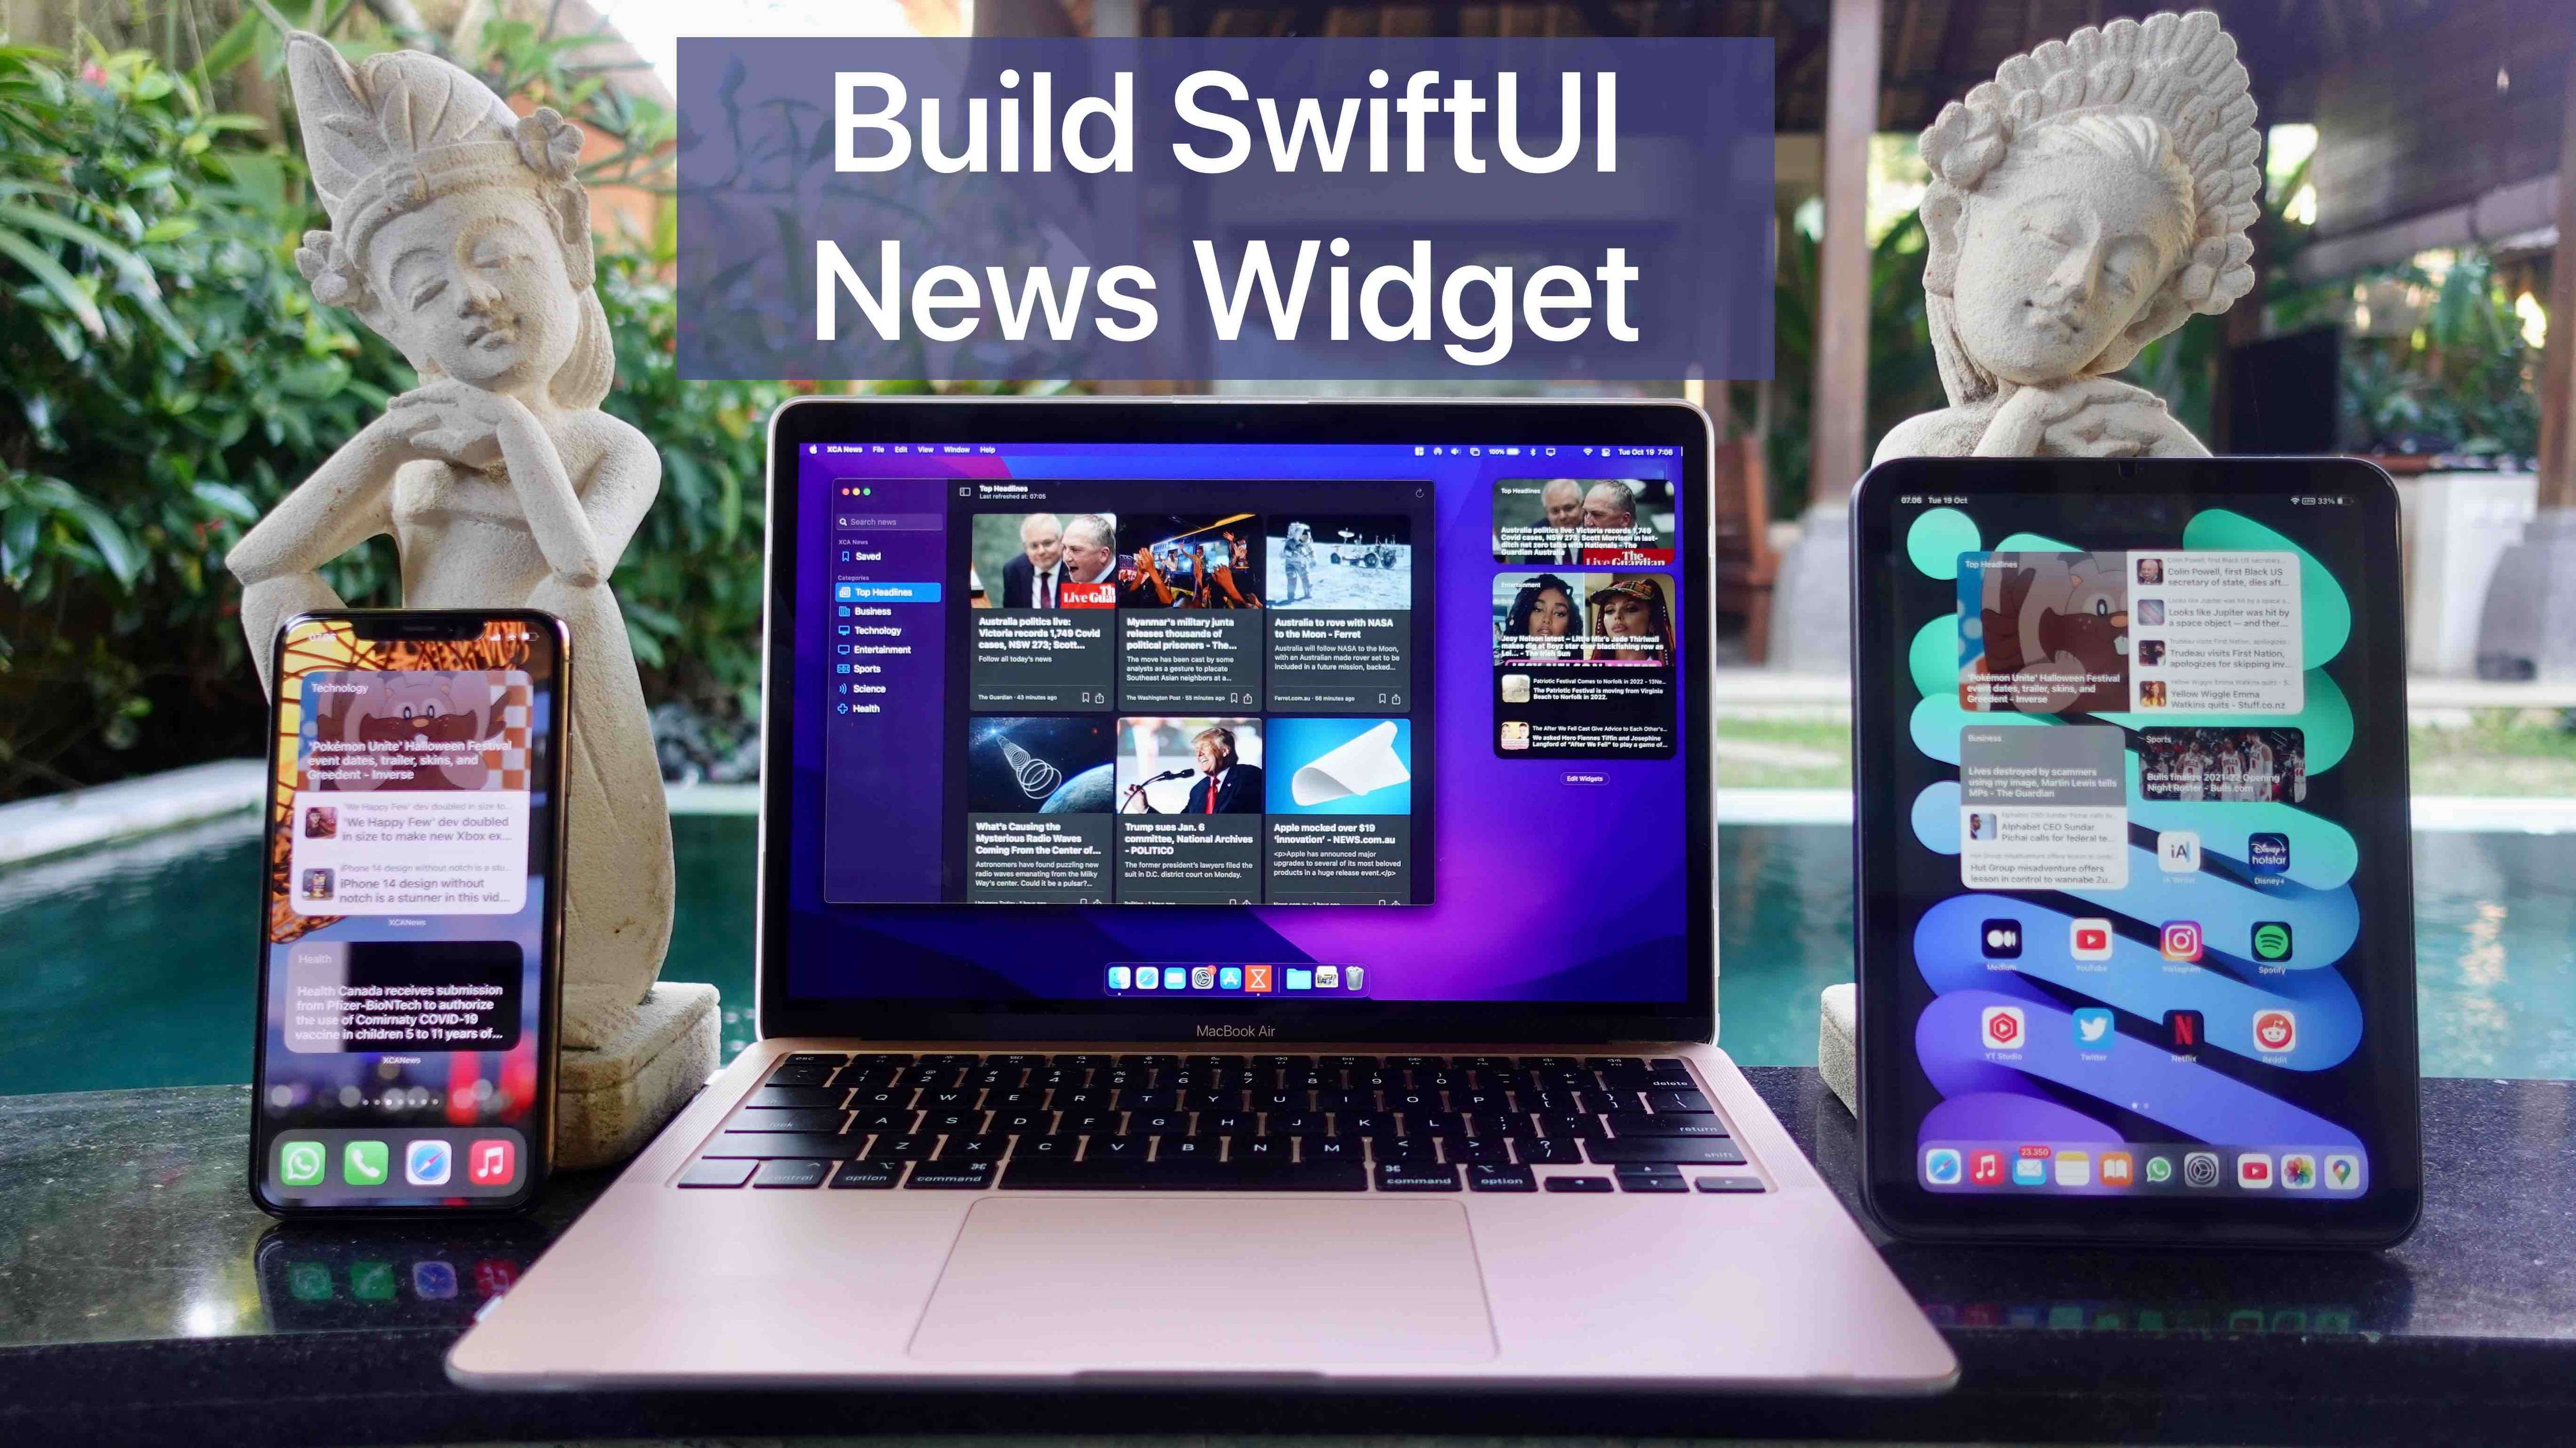
We are going to add Widgets to the SwiftUI News App for iOS, iPadOS, and macOS. We’ll learn to build User Intent Configurable Widget and Composable UI for All system family sizes from small, medium, large, and extra large
Published at Sep 28, 2021
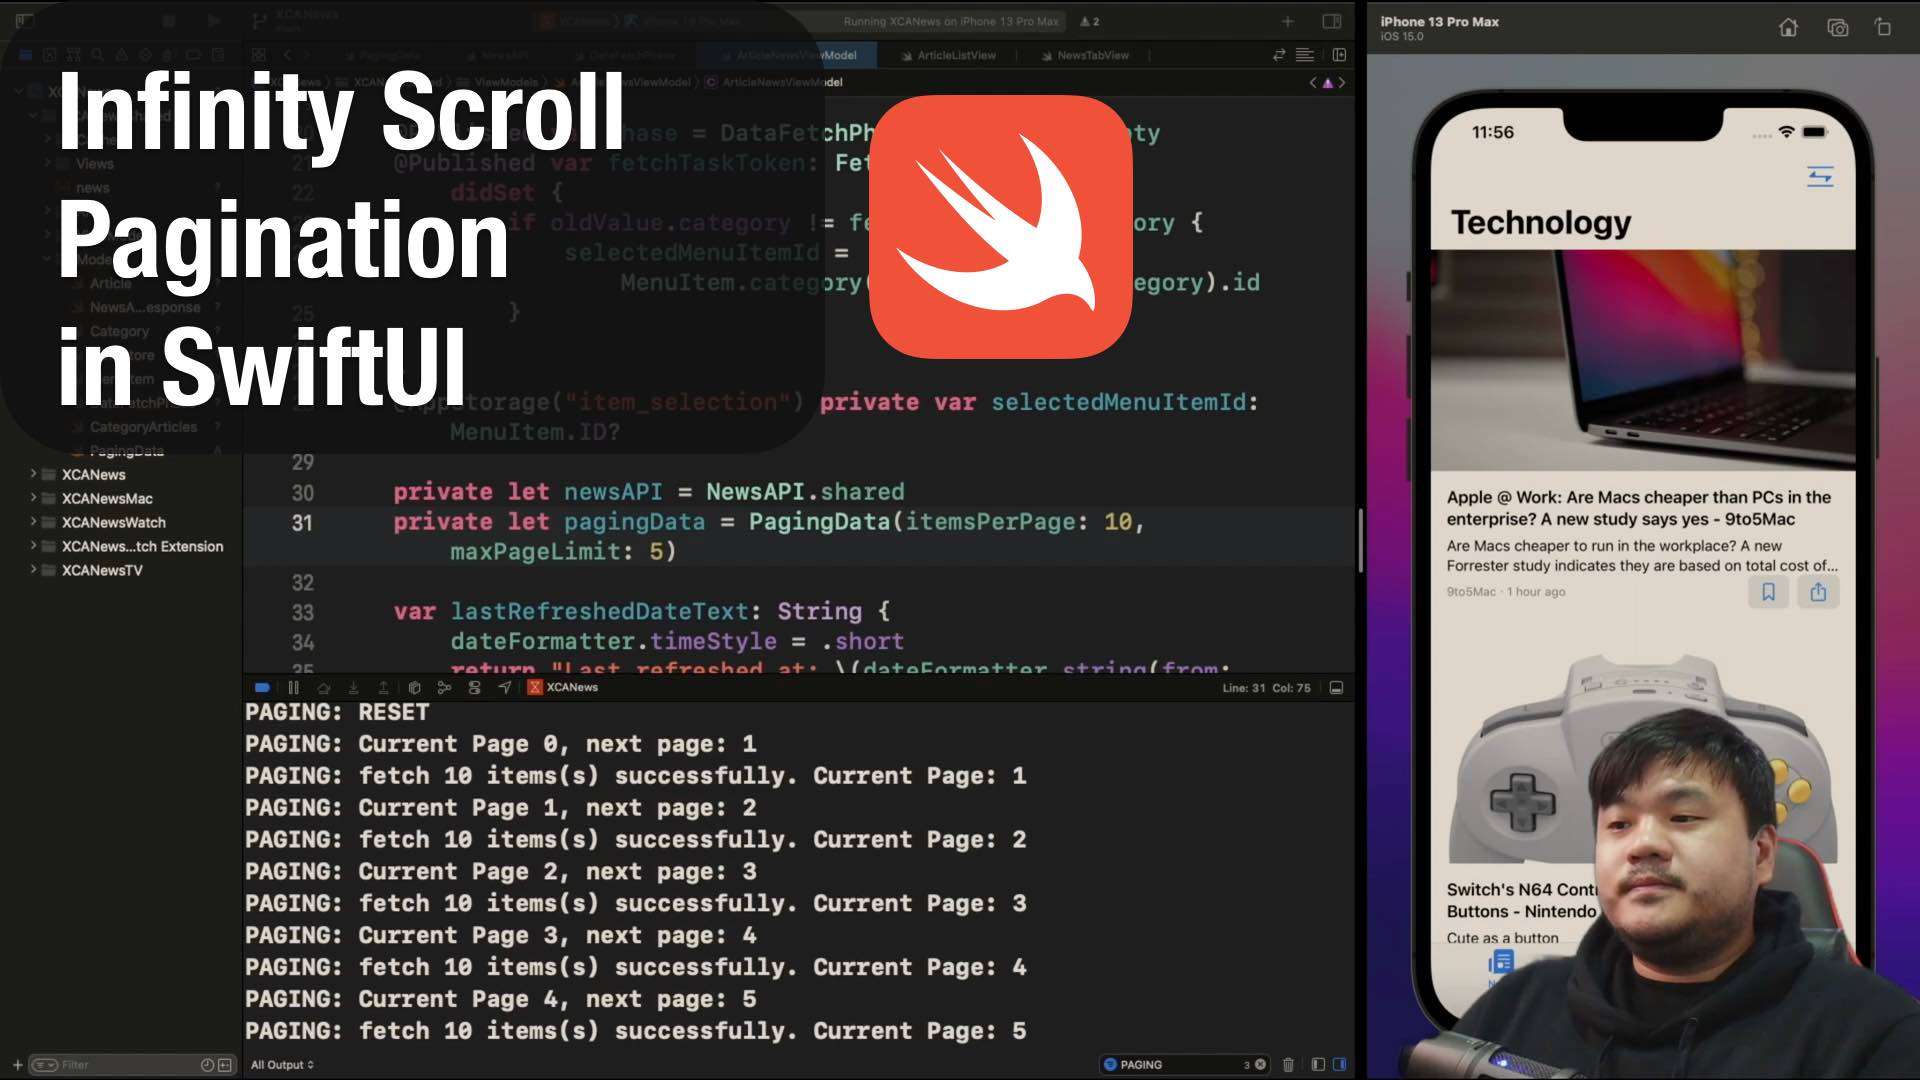
We are going to add Infinity Scroll Pagination functionality to an existing News App which fetches the data from NewsAPI.org and displays the article in a List or Grid depending on the target platform.
For this video, here are the following 5 main tasks which we'll implement:
Published at Sep 14, 2021
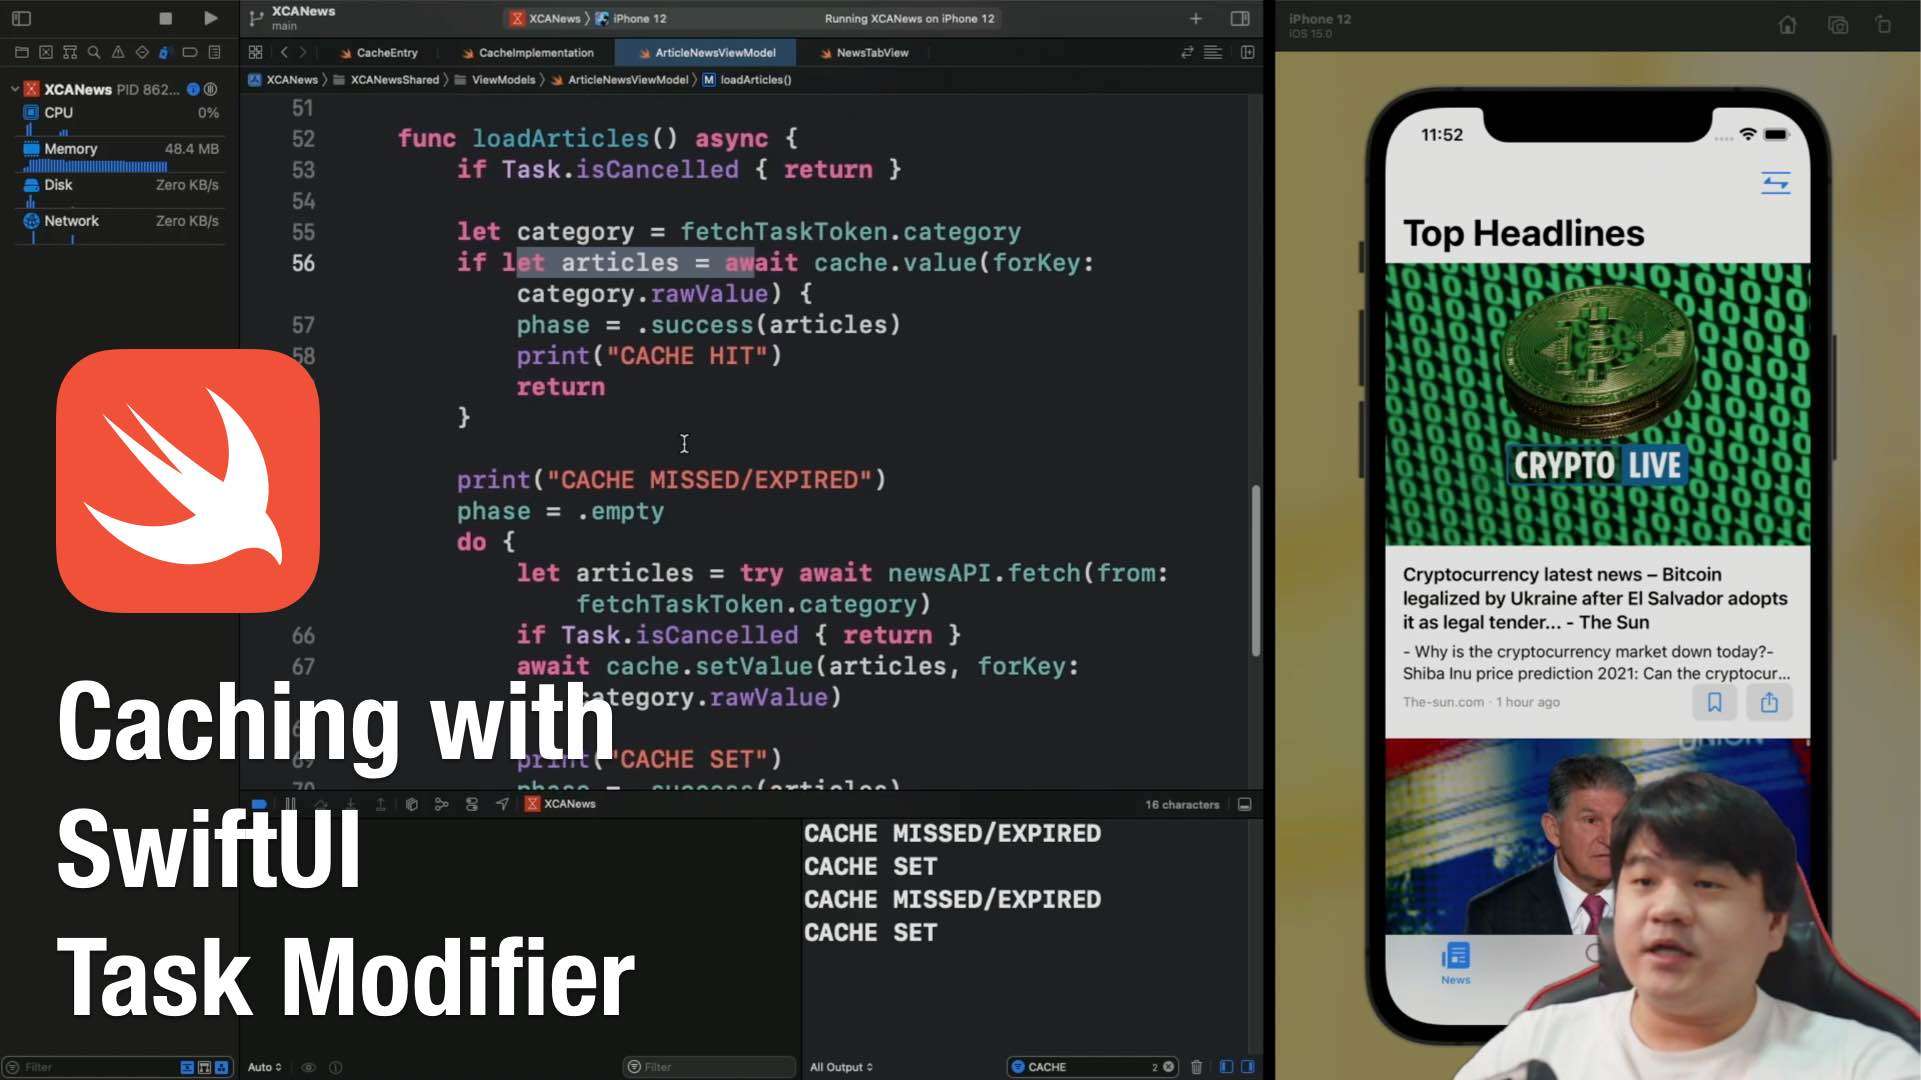
We are going to learn on how to implement Caching Layer to a News App that currently using iOS 15 SwiftUI Task Modifier to trigger data fetching. At the end of this video, we should be able implement the Cache with these requirements below to improve the efficiency of our app:
Published at Aug 31, 2021

In this course, we are going to build a Full News App for tvOS 15 with the following main features:
Published at Aug 17, 2021
In this course, we are going to build a Full NewsApp for watchOS 8 with the following main features:
Published at Jul 27, 2021

Here are the main features of the News App we'll build:
Published at Jul 12, 2021

Here are the main features we'll build:
Published at Jun 29, 2021

Here are the main features of the News App we'll build:
Published at May 30, 2021
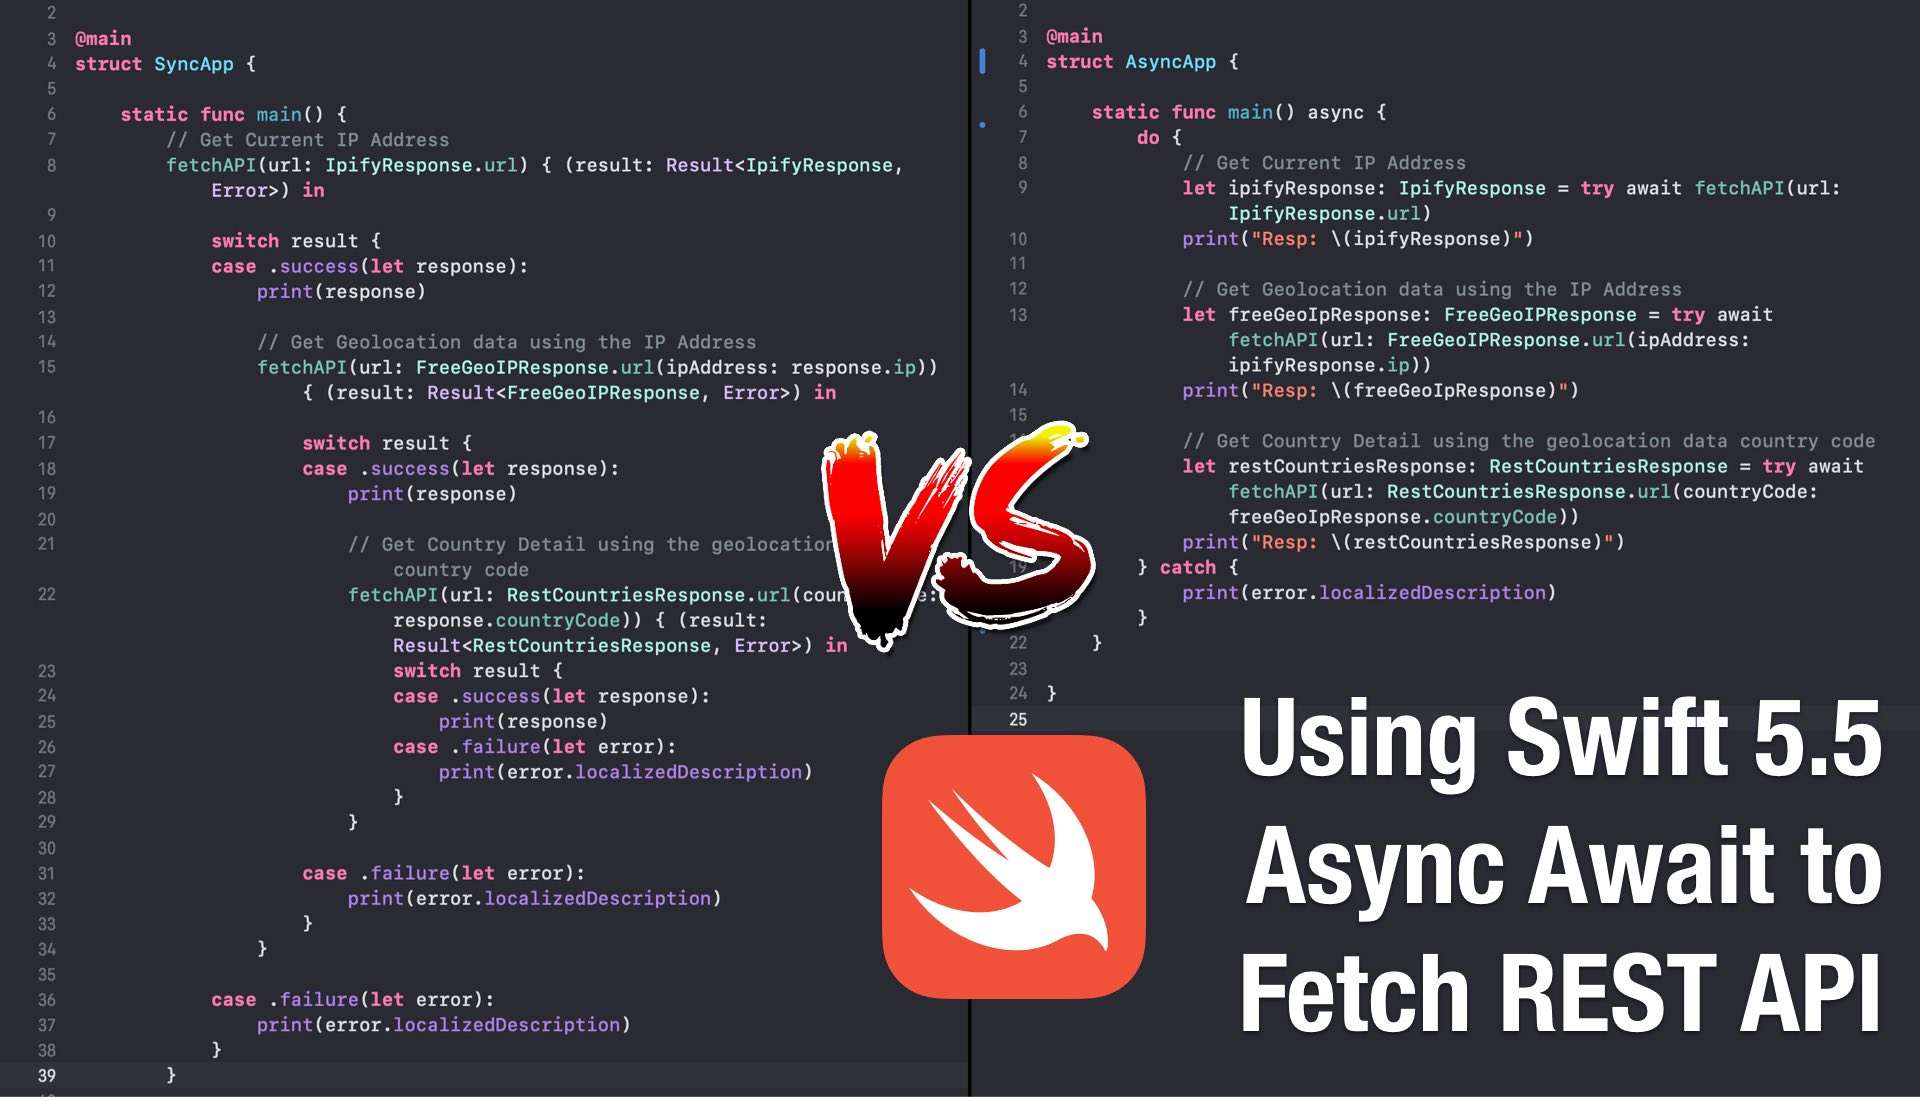
As an iOS developer, most probably you already have lot of experiences to fetch REST API from multiple endpoints. In some instances, the call to the API endpoints need to be in sequential order as they need the response of previous API call to be passed in HTTP Request.
Let me give you an illustation for such scenario with these given steps:
If the final code we ended written will have 3 callbacks that are nested like the picture below, then welcome to Pyramid of Doom aka callback hell! The code is not easily readable, complicated, and harder to maintain as the codebase growth. Let's say we need to use country detail response to fetch another API, we will add the 4th callback making the nesting become even much deeper.
The pyramid of doom callbacks problem has already been raised as one of the most requested issue that the Swift Language should eliminate. At 2017, Chris Lattner (Swift creator) had even written the Swift Concurrency Manifesto discussing his visions and goals to handle concurrency with imperative code using async await.
Finally with the accepted Swift Evolution Proposal (SE-0296), Async Await has been implemented in Swift 5.5 (Currently still in development as this article is written). The proposal provides the motivation to tackle 5 main problems:
Async Await provides the mechanism for us to run asynchronous and concurrent functions in a sequential way. This will help us to eliminate pyramid of doom callback hell and making our code easier to read, maintain, and scale. Take a look at the picture below showing how simple and elegant async await code is compared to using callback.
 What We Will Learn and Build
In this article, we will be learning and experimenting Swift Async Await to solve these 2 tasks:
Here are 2 main topics that we will learn along the way:
Getting StartedSwift 5.5 is currently in development as this article is written, i am using Xcode 12.5 with Swift Nightly 5/29 Development Snapshot from swift.org. There might be an API changes that break the current code when Swift 5.5 stable is released in the future.
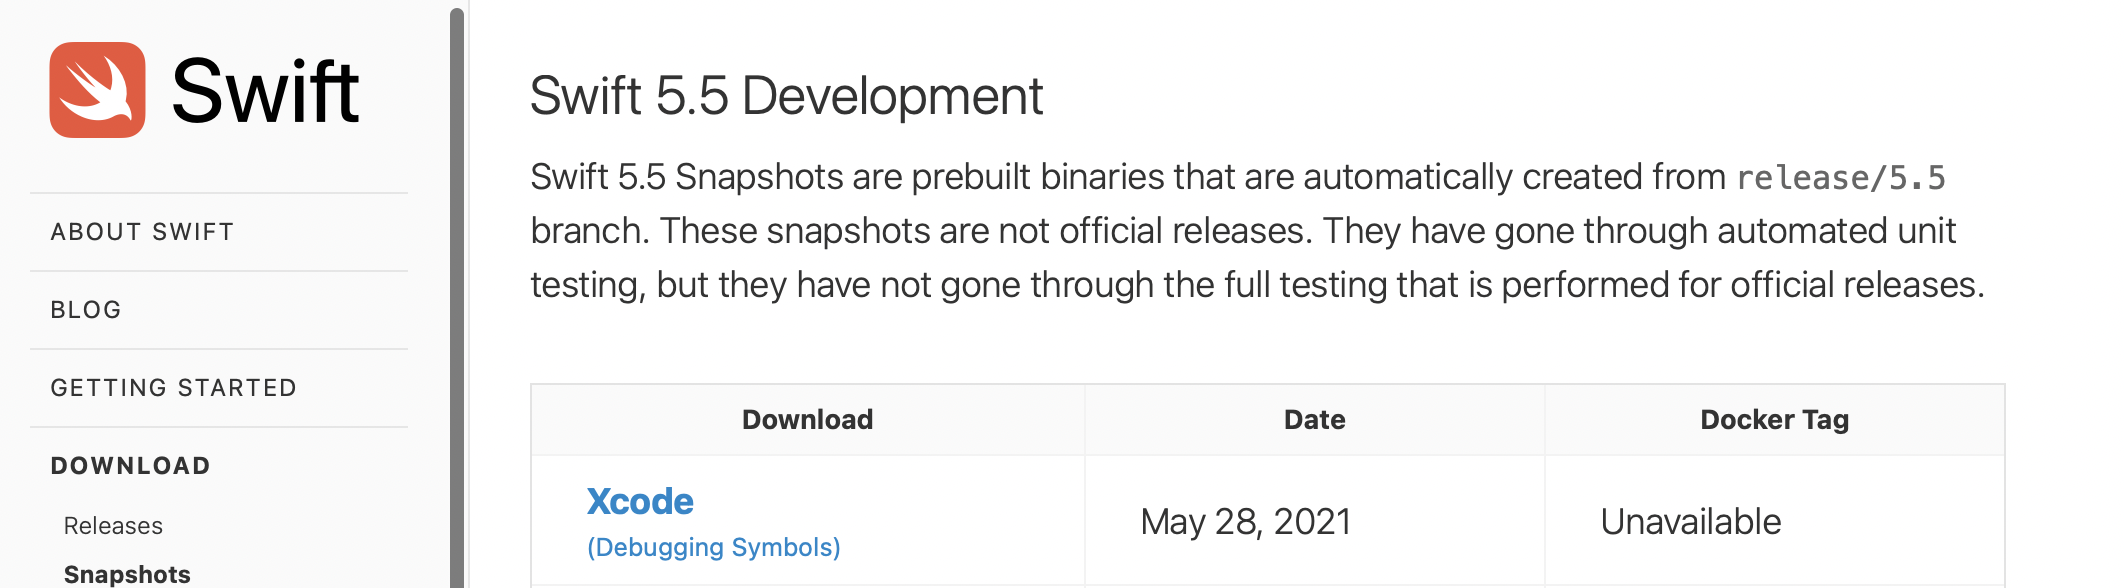
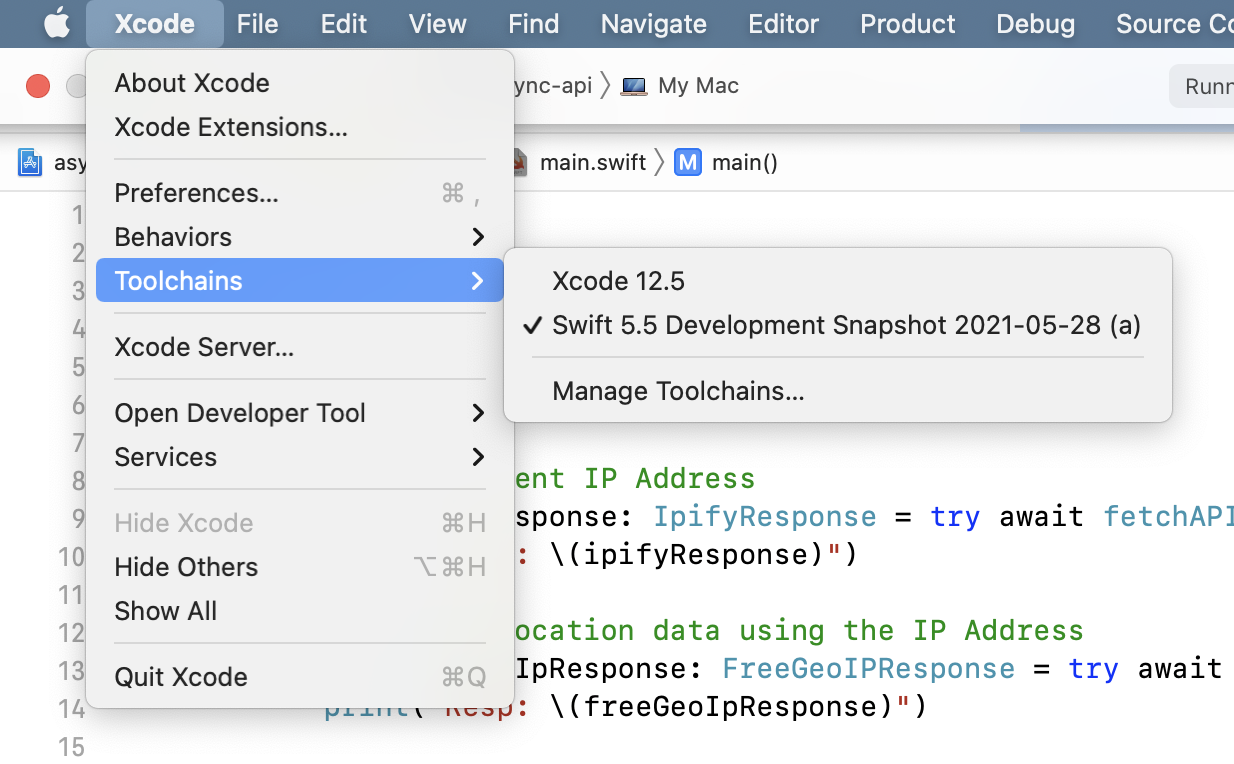
Please download and install the Swift 5.5 Xcode toolchain from this swift.org link. Then, open Xcode and select File > Toolchains > Swift > Swift 5.5 Development Snapshot 2021-05-28.
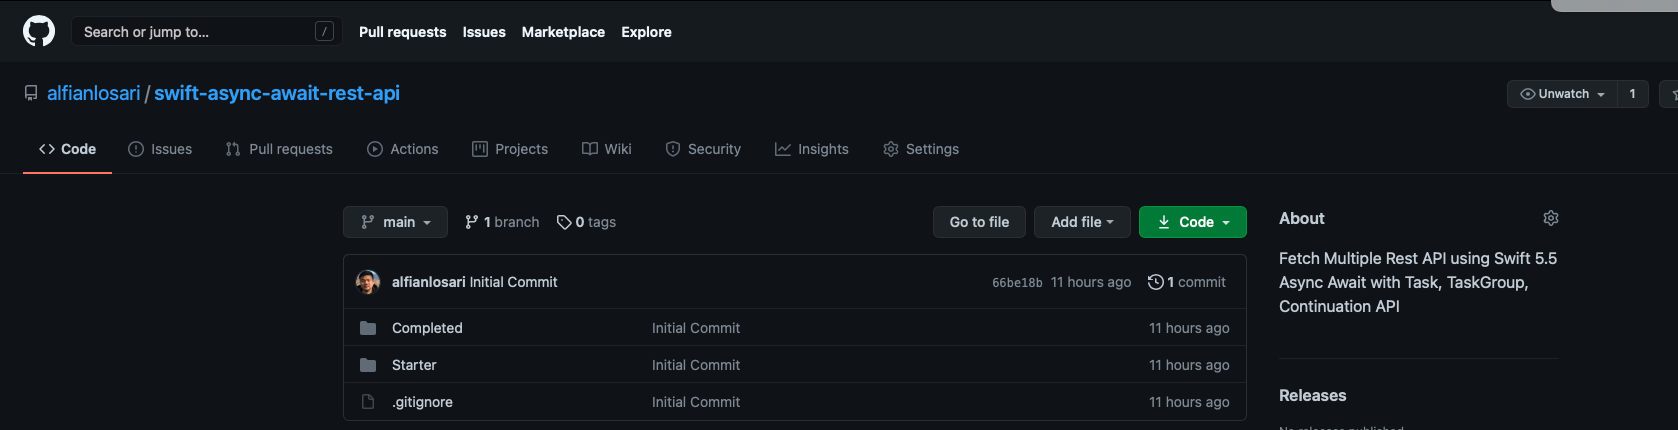
Next, you need to clone or download the Starter Project from my GitHub Repository. It contains the starter code as well as the completed project.
As Async Await in Swift 5.5 development build currently doesn't have the support to run in iOS and macOS Cocoa GUI based App, the project is set as a macOS console based App. I have already added 3 additional flags in Package.swift to help us experiment with async await:
"-Xfrontend", "-enable-experimental-concurrency". Enable the async await feature."-Xfrontend", "-disable-availability-checking". Eliminate the build error of macOS9999 availability checking when using Task based API"-Xfrontend", "-parse-as-library". Eliminate the build error when declaring async main function so we can invoke async function in main.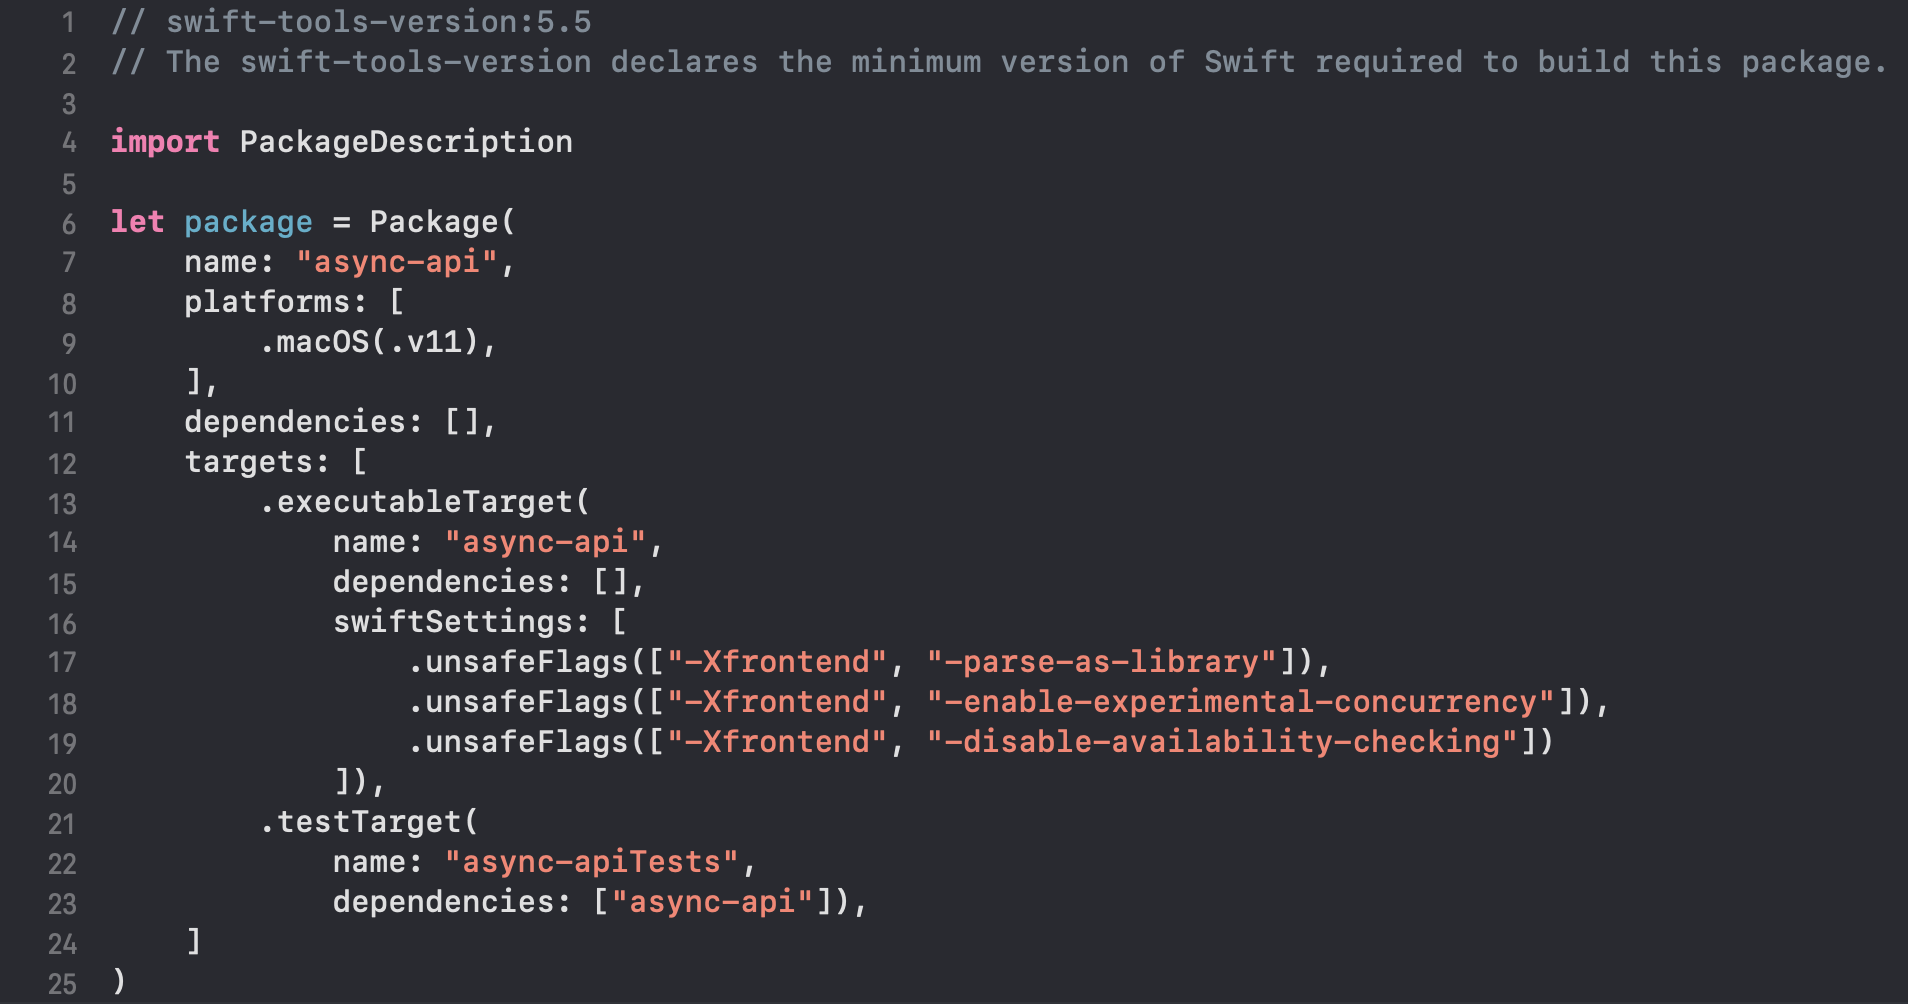
Open the Starter folder and click on async-api.xcodeproj to open the project in Xcode. The starter project already provides the Models that conform to Decodable when fetching the data from remote APIs:
SWAPI, we have SWAPIResponse, Film, and People structs.GeoIP, we have IpifyResponse, FreeGeoIPResponse, and RestCountriesResponse.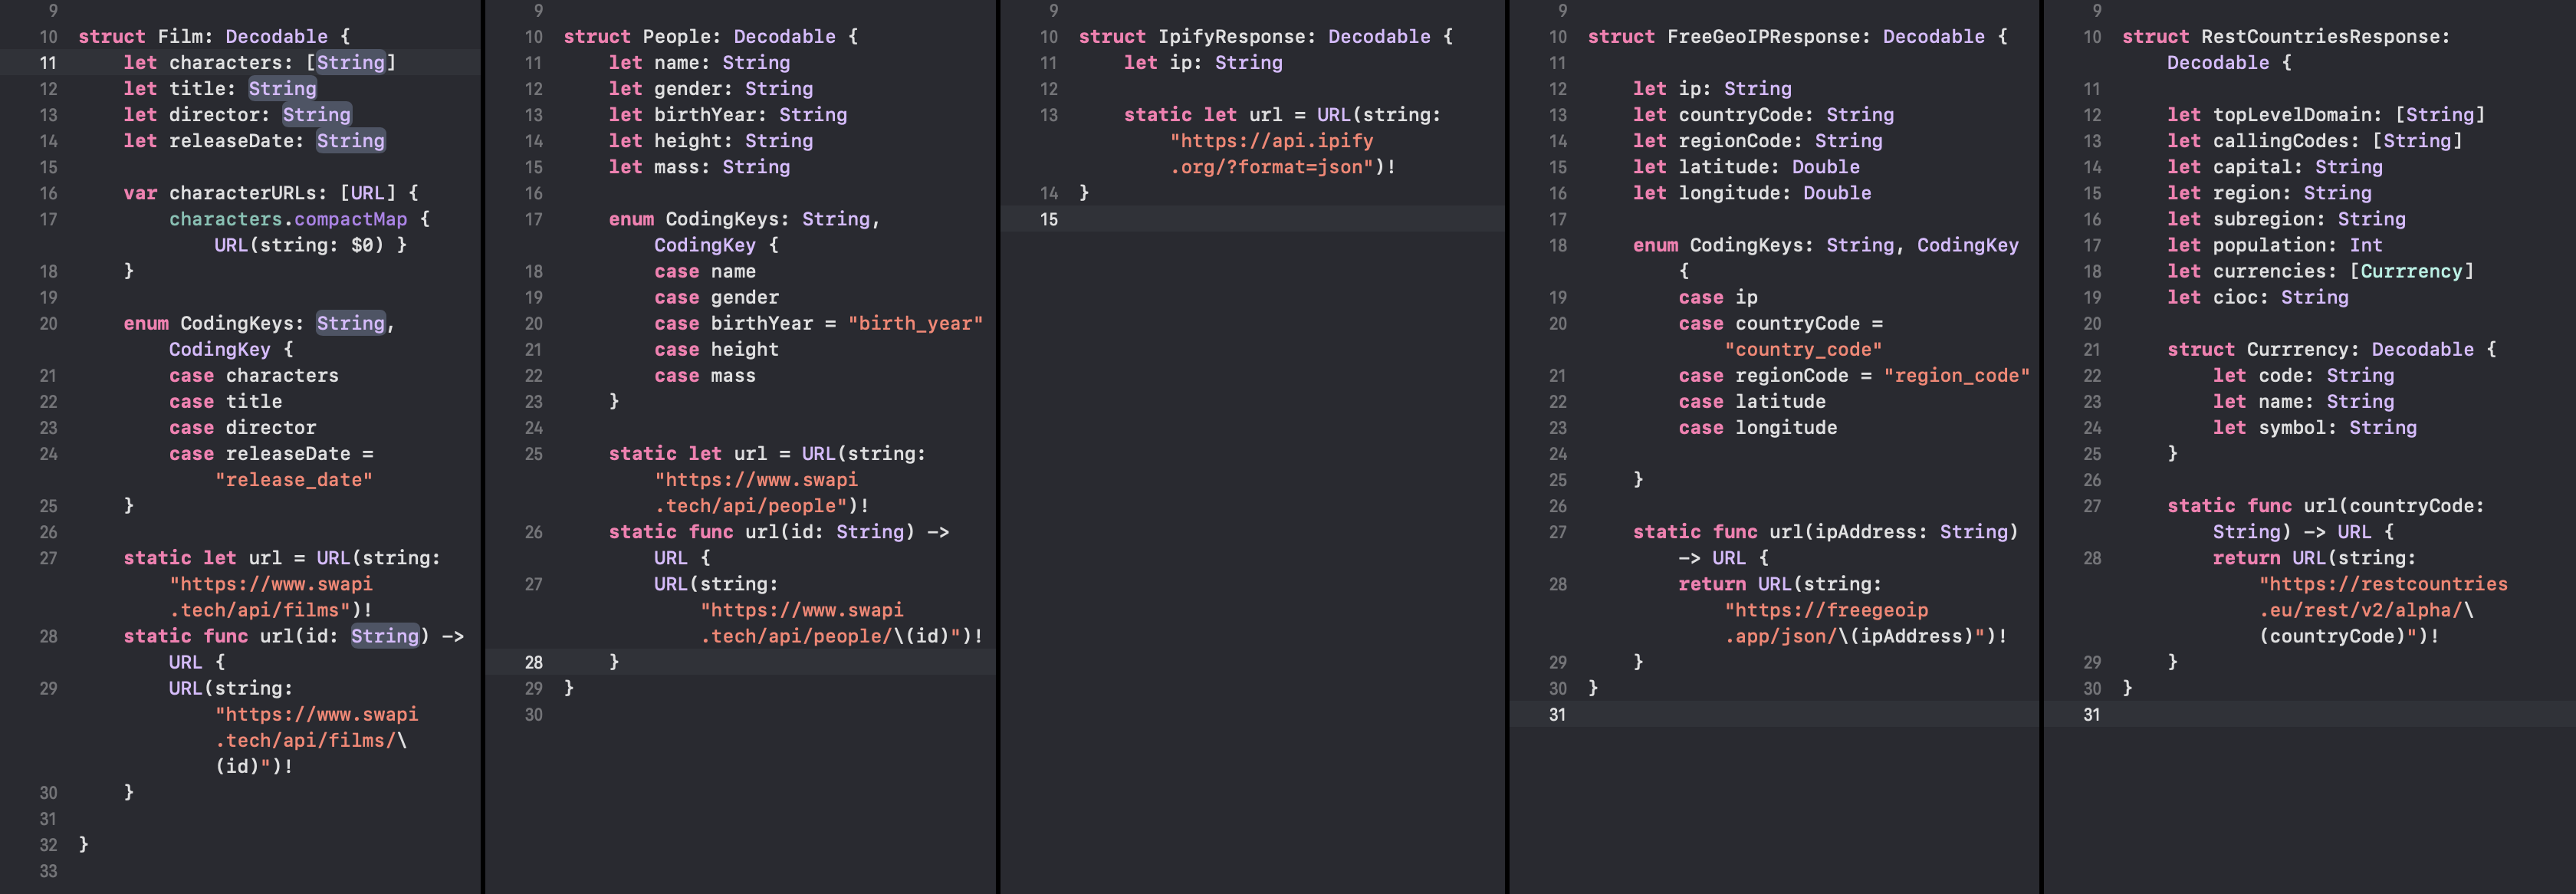
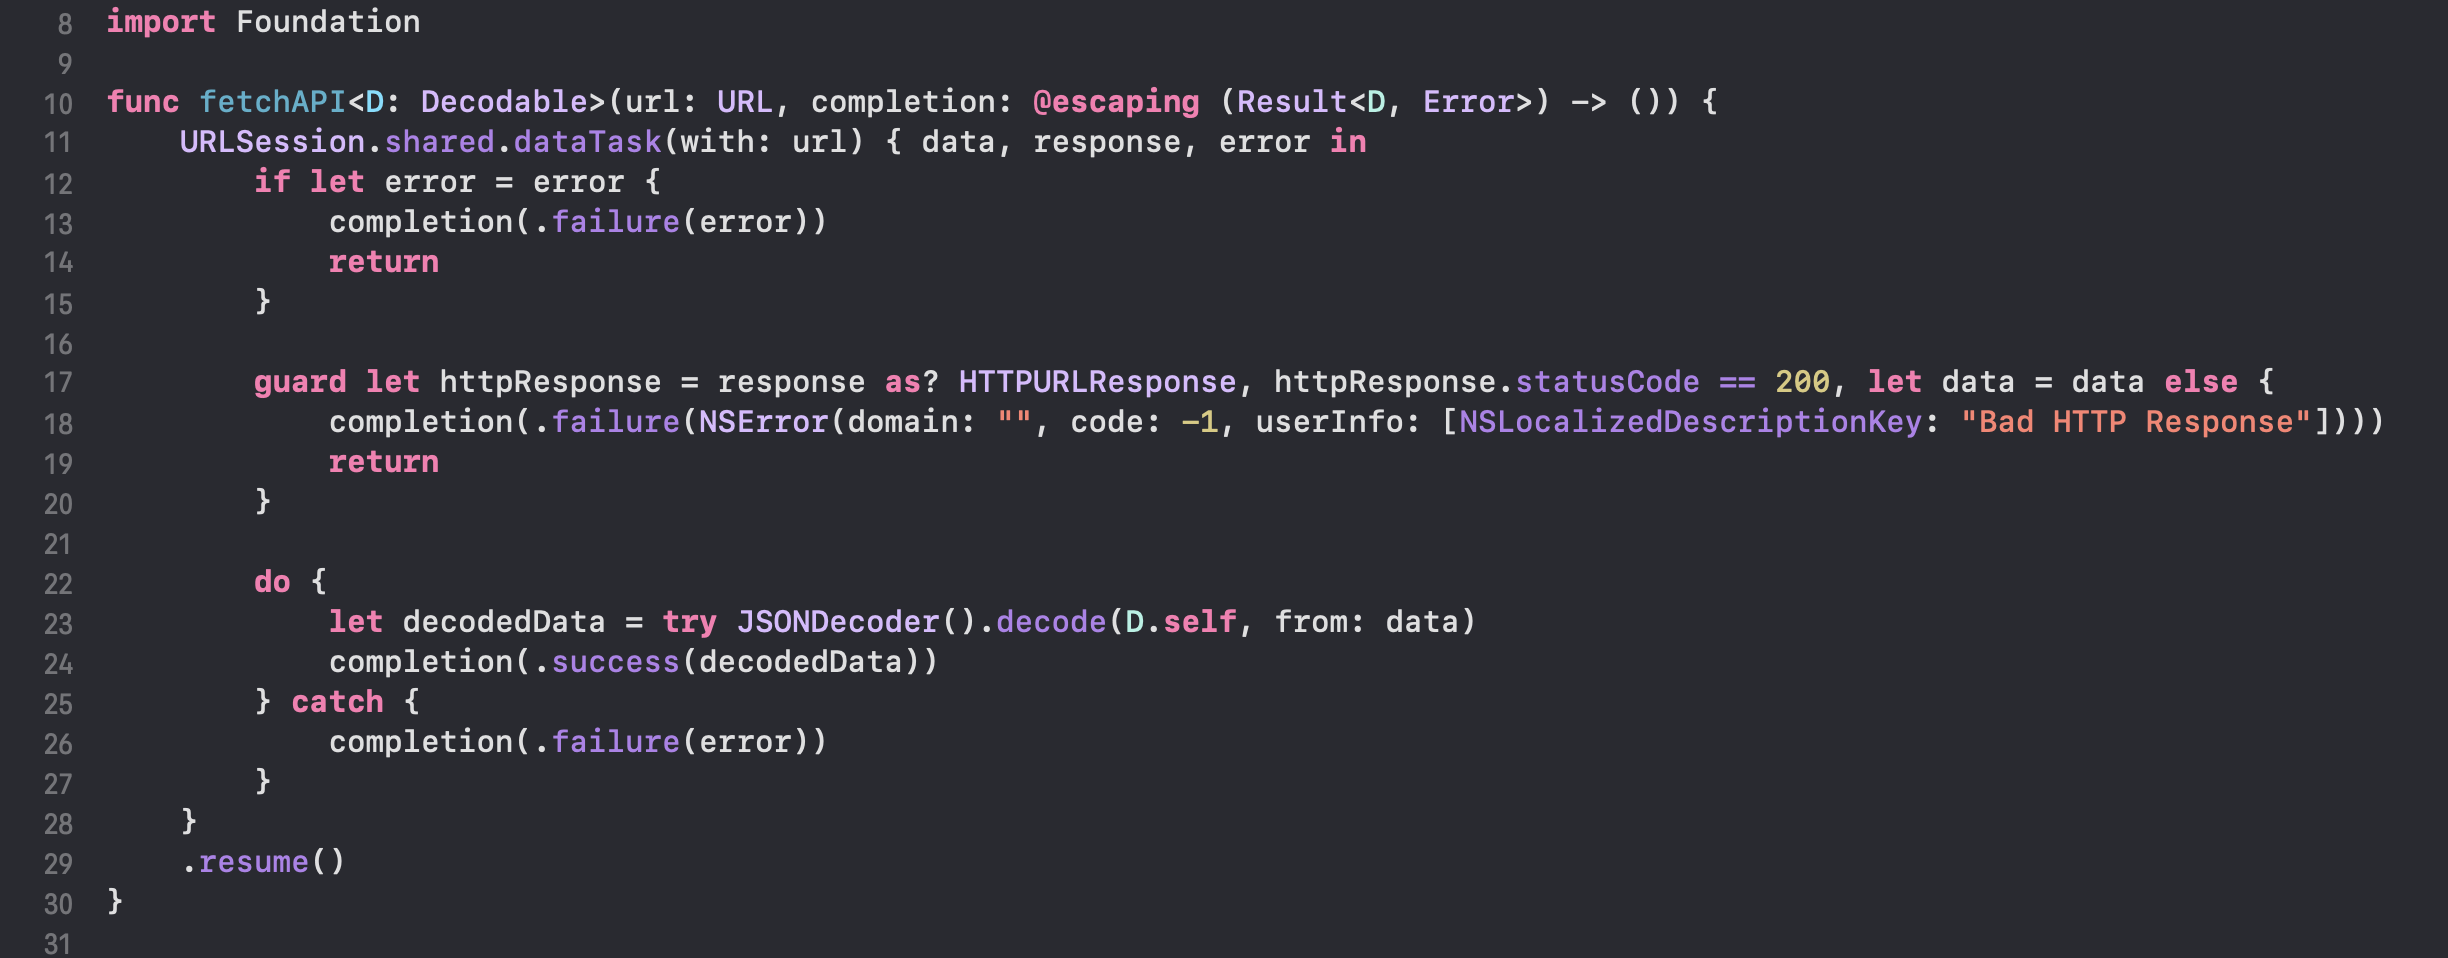
In the FetchAPITask.swift file, i provided a global method to fetch remote API and decode the response data using URLSession data task and callback generic Result handler.
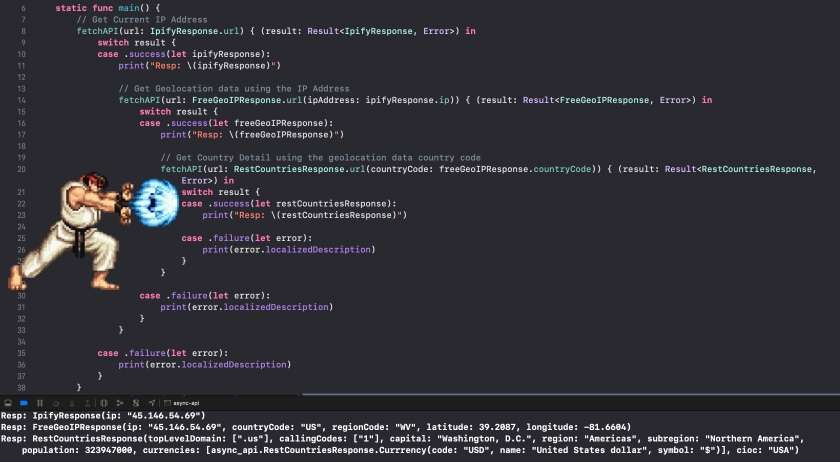
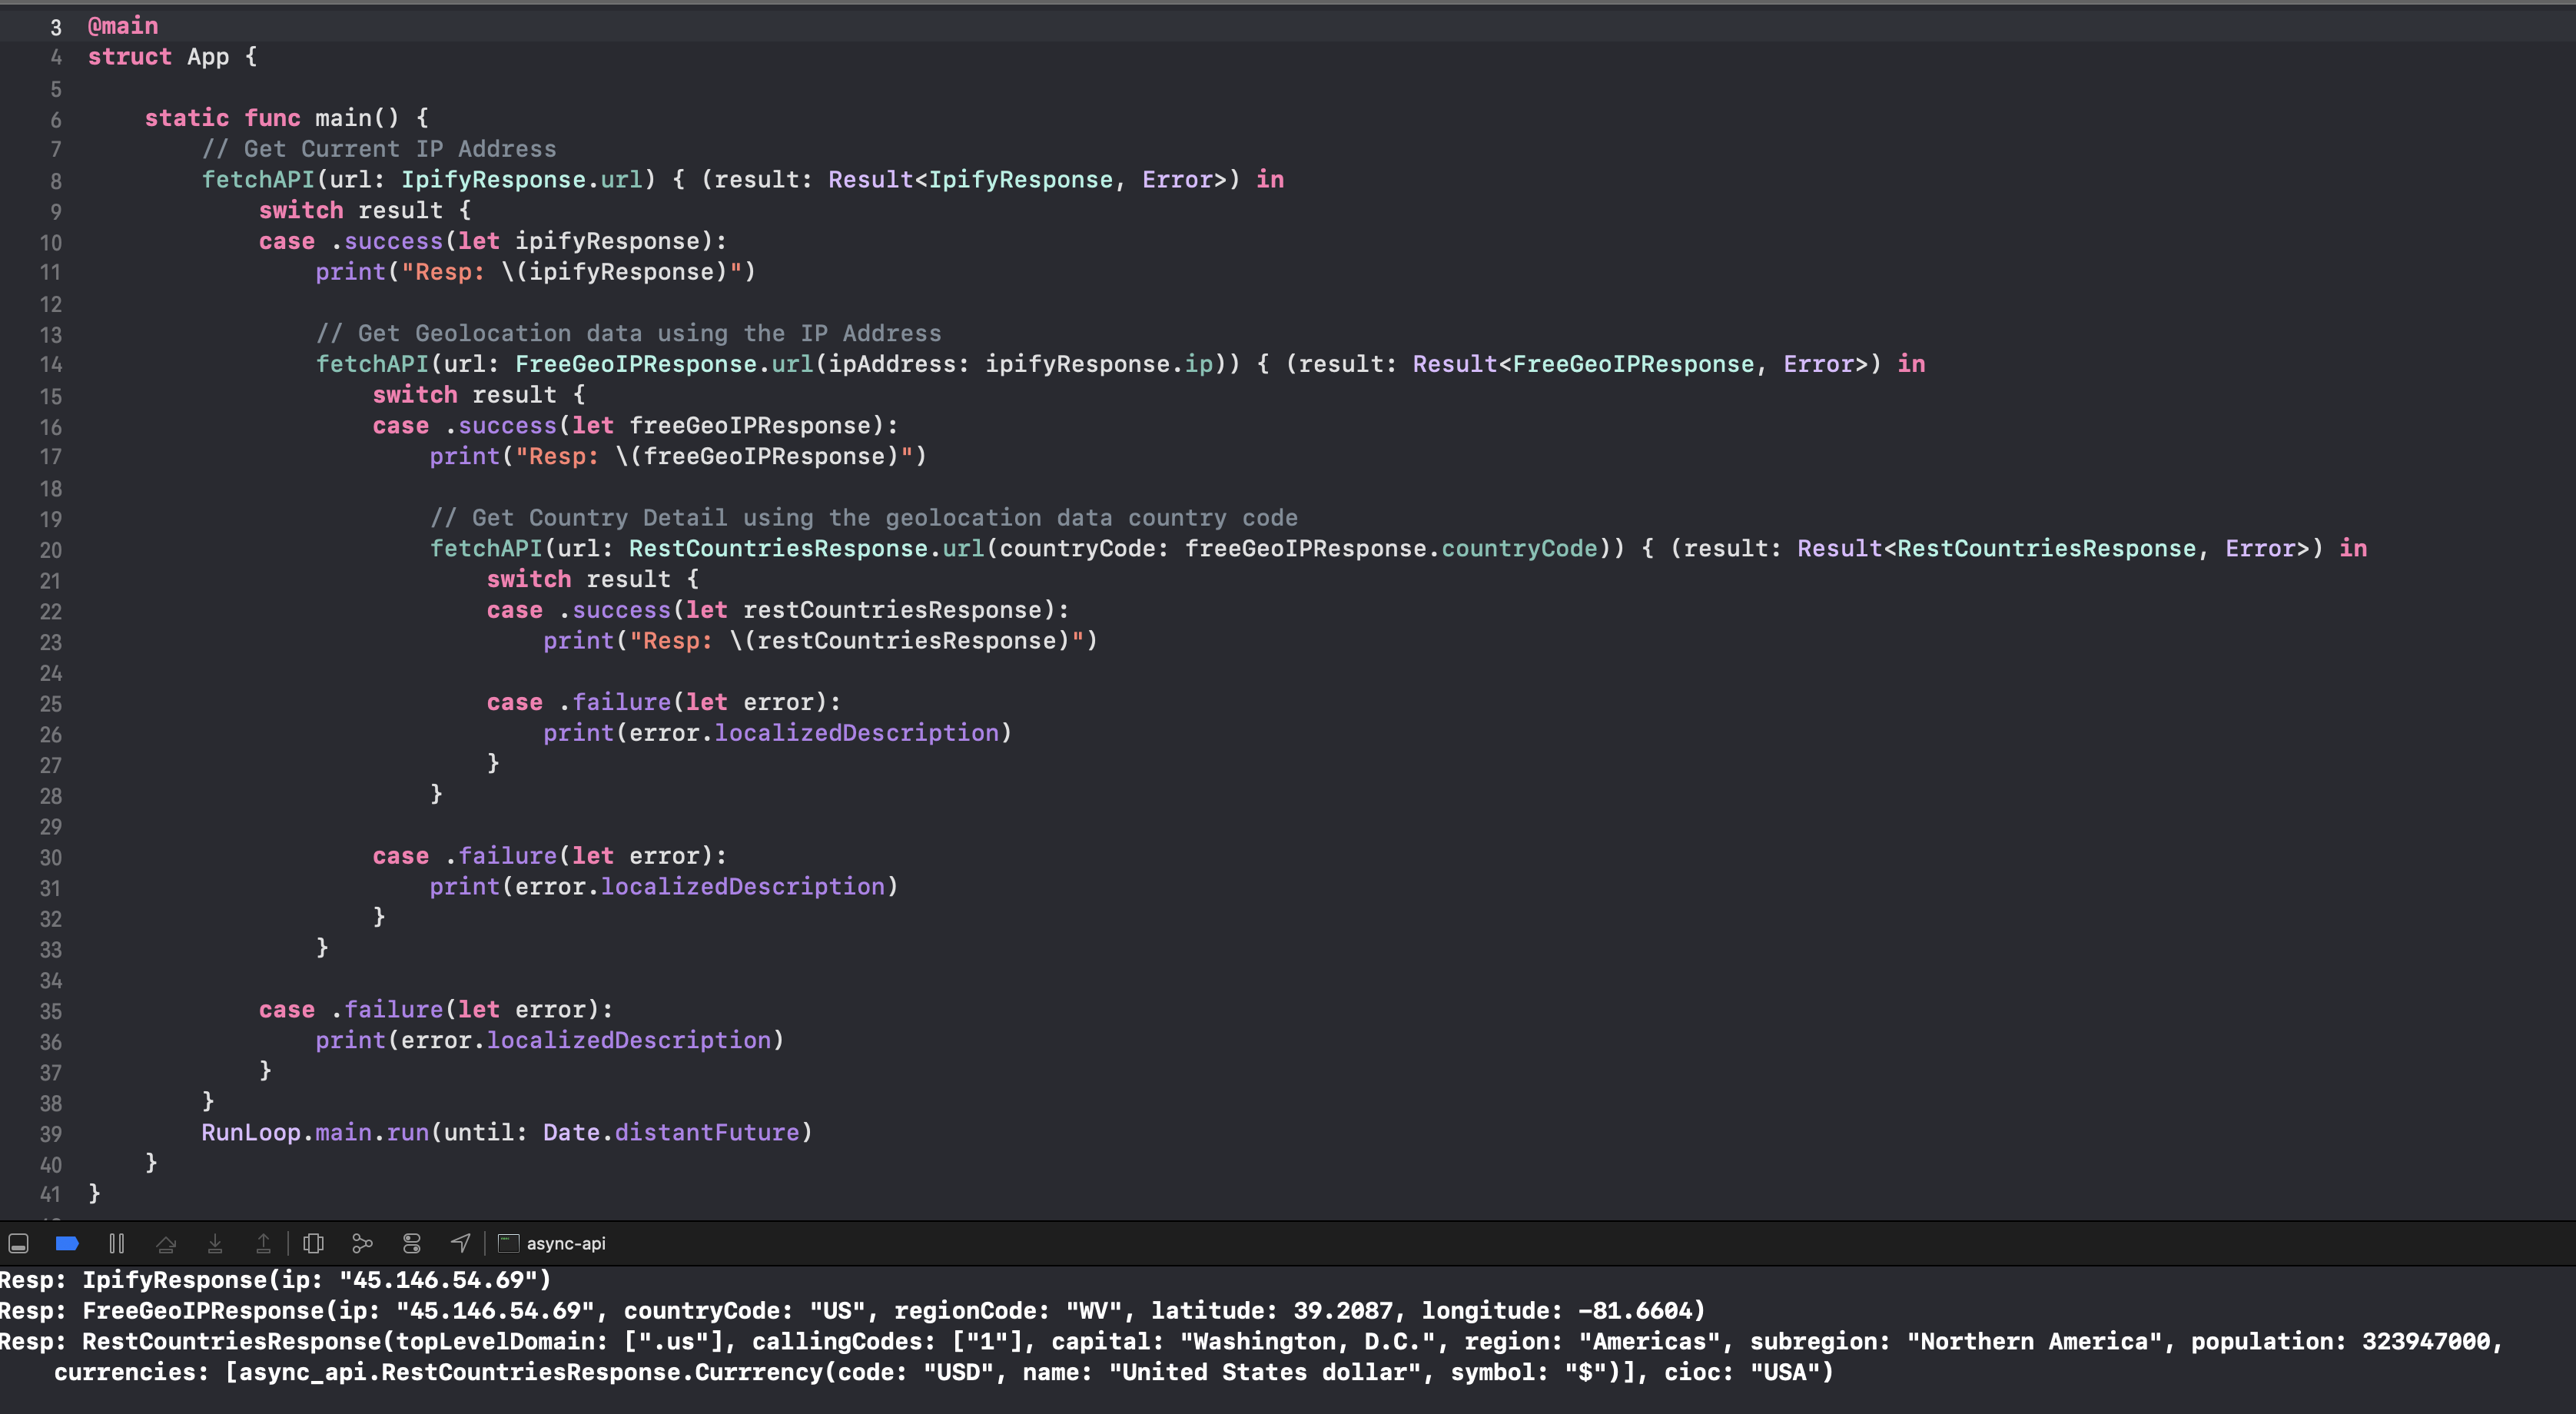
The entry-point of the App is in static main method in struct App inside the main.swift file. It is declared using the @main keyword introduced in Swift 5.3. Currently, it fetches the APIs using callbacks. You can try to build and run the app to see the results printed in the console, make sure you have internet connection before.
Let's move on to our first task, which is to create our own async function to fetch REST API concurrently using the all new Structured Concurrency Task based API.
The async await proposal (SE-0296) itself doesn't introduce the mechanism to handle concurrency. There is another proposal called structured concurrency (SE-0304) which enables the concurrent execution of asynchronous code with Task based API model for better efficiency and predictability.
Based on the Task public interface, we can initialize a single task passing the optional TaskPriority param and mandatory operation param containing the closure with the return type. One of the initializer also support throwing error. For TaskPriority, we can pass several options such as none, background, default, high, low, userInitiated, utility. If nil is passed, system will use the current priority.
extension Task where Failure == Never {
    public init(priority: TaskPriority? = nil, operation: @escaping @Sendable () async -> Success)
    public init(priority: TaskPriority? = nil, operation: @escaping @Sendable () async throws -> Success)
}
Open FetchAPITask.swift file and type/copy the following code from the snippet.
// 1
func fetchAPI<D: Decodable>(url: URL) async throws -> D {
    // 2
    let task = Task { () -> D in
        // 3
        let data = try Data(contentsOf: url)
        let decodedData = try JSONDecoder().decode(D.self, from: data)
        return decodedData
    }
    // 4
    return try await task.value
}
fetchAPI function using a generic D type that conforms to Decodable, it accepts a single URL parameter and returns the generic D type. Notice the async and throws keywords after the parameter. It is an async function that can throws.Task without passing the TaskPriority and use trailing closure for the operation parameter. It has no parameter and return the generic D type.async context and another thread assigned by the system. Here, we fetch the data from the API using the Data(contentsOf:) throwing initializer which accepts an URL. This is a blocking synchronous API used to fetch data and is bad for performance, but as we are running on another thread, it should be ok for now (later, we will learn on how to interface using URLSession DataTask). Then, we decode the response data using JSONDecoder to the generic D Type and return it.value property to wait for the task to complete and returning (or throwing) its result. This property is async , so we need to prefix the call using await keyword. One thing to remember is we can only use await an async function in an async context. So, we cannot simply use this if our function is not an async function. For your info, there is another result property which returns the Result type instead of the value.
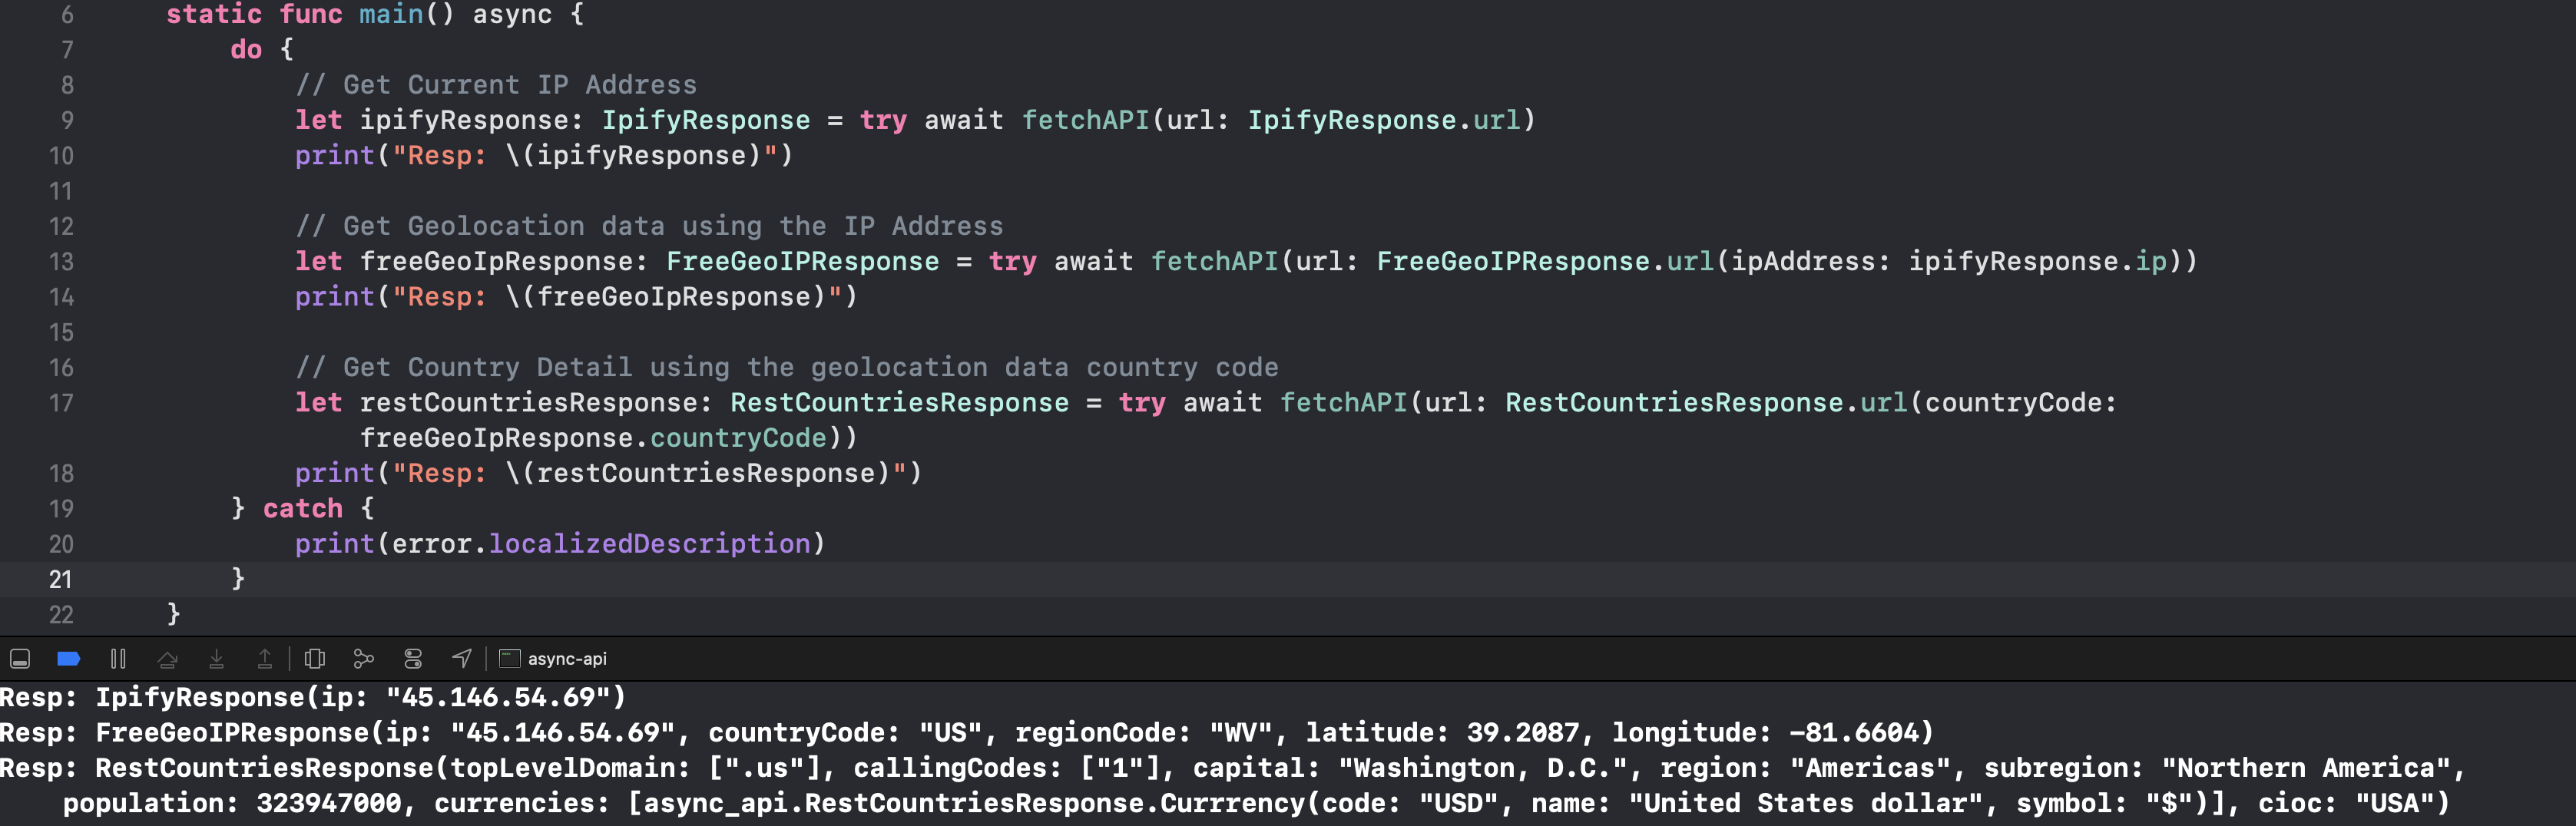
Next, let's go back to the main.swift file and replace the current static main code method with the following snippet.
// 1
static func main() async {
    // 2
    do {
        // 3
        let ipifyResponse: IpifyResponse = try await fetchAPI(url: IpifyResponse.url)
        print("Resp: \(ipifyResponse)")

        // 4
        let freeGeoIpResponse: FreeGeoIPResponse = try await fetchAPI(url: FreeGeoIPResponse.url(ipAddress: ipifyResponse.ip))
        print("Resp: \(freeGeoIpResponse)")

        // 5
        let restCountriesResponse: RestCountriesResponse = try await fetchAPI(url: RestCountriesResponse.url(countryCode:  freeGeoIpResponse.countryCode))
        print("Resp: \(restCountriesResponse)")
    } catch {
          // 6
        print(error.localizedDescription)
    }
}
async keyword to the static main method. Without this, we won't be able to invoke and await async functions.Ipify API. We pass the url address from the IpifyResponse struct static constant. We declare the ipifyResponse constant with the type of IpifyResponse so the fetchAPI method able to infer the D Generic placeholder as IpifyResponse struct, we need to use try await as fetchAPI is an async function.FreeGeoIPResponse struct as the type that will be decoded by the fetchAPI.RestCountriesResponse struct is the type of decodable data.
That's it! try to run and build with active internet connection to see the responses printed in the console. We have successfully implement the Async function to fetch data from multiple REST API sequentially. You should be proud of the code that we write for this as it is very clean and readable.
I have said before that we can't call async function in a synchronous function. Actually, there is another approach to do this using the detach API.
  static func main() {
    detach {
        do {
            let ipifyResponse: IpifyResponse = try await fetchAPI(url: IpifyResponse.url)
            //...
        } catch {
            print(error.localizedDescription)
        }
    }
    RunLoop.main.run(until: Date.distantFuture)
}
Basically this task will run independently of the context which it is created. You might be wondering about this code RunLoop.main.run(until: Date.distantFuture). As this is a console based app with synchronous main function, the process will get terminated immediately as the function ends, using this, we can keep the process running until a specified date so the detach task can be executed.
Let's move on to the the second task, which is to fetch multiple APIs in parallel using async await. You might be wondering how can we achieve this as we don't want to sequentially fetch the APIs, it will be very slow and doesn't maximize the potential of our hardware such as M1 based SoC with 8 Cores (4x High Performance + 4x Efficiency)
The Task API from the Structured Concurrency proposal got you covered as it provides the GroupTask API to execute group of async functions in parallel.
Using the GroupTask we can spawn new async child tasks within the async scope/closure. We need to complete all the child tasks inside the scope before it exits.
Navigate to the FetchAPITask.swift file and type/copy the following code snippet.
// 1
func fetchAPIGroup<D: Decodable>(urls: [URL]) async throws -> [D] {
    // 2
    try await withThrowingTaskGroup(of: D.self) { (group)  in
        // 3
        for url in urls {
            group.async {
                let data = try Data(contentsOf: url)
                let decodedData = try JSONDecoder().decode(D.self, from: data)
                return decodedData
            }
        }

        // 4
        var results = [D]()
        for try await result in group {
            results.append(result)
        }
        return results
    }
}
fetchAPIGroup function that use generic D type that conforms to Decodable. The parameter accepts an array of URL, it means we can have dynamic number of URLs. The return type is an array of D generic type. We declare the async and throws keywords after the parameter to make this an async function that can throw.withThrowingTaskGroup API passing the return type of D and the closure with group as the single parameter without return type. We need to invoke this code using try await as it is an async function.Data(contentsOf:) initializer, decode the data as D type, and return. You might be thinking why don't we call fetchAPI instead, please don't do this as the app will crash. I am not really sure why, please tell me the reason if you know the reason.AsyncSequence to iterate and use try await at the group child tasks, the child task that finish first is appended to results array. Finally, we return the array after all the child tasks has been completed. TaskGroup itself implements AsyncIterator so it has the next() method for iteration, you can take a look at the Async Sequence proposal (SE-0298) to learn more about the detail.
One thing to consider when using withThrowingTaskGroup is if one of the child task threw an error before the closure completes, then the remaining child tasks will be cancelled and error will be thrown. If we want one of the child fails without making the remaining tasks cancelled, we can use withTaskGroup instead and return optional value instead of throwing. Next, navigate back to the main.swift file and replace the static main method with the following snippet.
// 1
static func main() async {
   do {
       // 2
       let revengeOfSith: SWAPIResponse<Film> = try await fetchAPI(url: Film.url(id: "6"))
       print("Resp: \(revengeOfSith.response)")

       // 3
       let urlsToFetch = Array(revengeOfSith.response.characterURLs.prefix(upTo: 3))
       let revengeOfSithCharacters: [SWAPIResponse<People>] = try await fetchAPIGroup(urls: urlsToFetch)
       print("Resp: \(revengeOfSithCharacters)")
   } catch {
       // 4
       print(error.localizedDescription)
   }
}
main static method is declared with async method to enable async context.fetchAPI async function, the URL is retrieved from the Film struct static url method passing id of 6. (6 is the film id of Revenge of the Sith in SWAPI). The Film response provided by SWAPI contains an array of the characters URLs.fetchAPIGroup async function passing the film's characterURLs property, we slice the array using prefix method to get the first 3 elements. The return type of this is Array of SWAPIResponse<People>.
That's it, make sure to run and build with internet connection to see the responses printed in the console. We have successfully implemented async function to group child tasks so it can be executed in parallel concurrently.
Before we conclude this article, there is one more thing that we need to learn, the Continuation API. This API is super important as we can use it to convert our current synchronous code with callback to async function. As an example for this article, we'll convert the URLSession DataTask as an async function.
Create a new Swift file named URLSession+Async.swift, we'll create the async method as an extension URLSession. Type/copy the following code snippet into the file.
import Foundation

extension URLSession {

    // 1
    func data(with url: URL) async throws -> Data {
        // 2
        try await withCheckedThrowingContinuation { continuation in
            // 3
            dataTask(with: url) { data, _, error in
                // 4
                if let error = error {
                    continuation.resume(throwing: error)
                } else if let data = data {
                    continuation.resume(returning: data)
                } else {
                    continuation.resume(throwing: NSError(domain: "", code: -1, userInfo: [NSLocalizedDescriptionKey: "Bad Response"]))
                }
            }
            .resume()
        }
    }

}
data method inside URLSession extension. It provides a single parameter that accepts URL. The return type is Data. The async and throw is declared to make this a throwing async method.try await on withCheckedThrowingContinuation function. Here we need to pass the closure with a single parameter continuation. Basically, we need to invoke the resume method passing the returning data or the throwing error. Make sure to invoke the resume method exactly once to avoid undefined behavior. withCheckedThrowingContinuation will crash if we invoke it twice, but it has runtime performance cost. Swift also provides withUnsafeThrowingContinuation to avoid this. In this case, the system won't crash if we invoke resume twice and can lead to undefined behavior!
That's it! now we can fetch our REST API using URLSession and remove the Data(contentsOf:) blocking API. Let's navigate back to FetchAPITask.swift file and type/copy the following snippet.
func fetchAndDecode<D: Decodable>(url: URL) async throws -> D {
    let data = try await URLSession.shared.data(with: url)
    let decodedData = try JSONDecoder().decode(D.self, from: data)
    return decodedData
}
The fetchAndDecode async function basically fetches the data using shared URLSession data(with:) async method we created previously. Then, it decode data using the generic placeholder and return the decoded model.
Now, let's replace the fetchAPI and fetchGroupAPI to use this new function to fetch and decode data.
func fetchAPI<D: Decodable>(url: URL) async throws -> D {
    let task = Task { () -> D in
        try await fetchAndDecode(url: url)
    }
    //...
}

func fetchAPIGroup<D: Decodable>(urls: [URL]) async throws -> [D] {
    try await withThrowingTaskGroup(of: D.self) { (group)  in
        for url in urls {
            group.async { try await fetchAndDecode(url: url) }
        }
        //...
    }
}
That's all! now try to build and run to make sure everything work just like before. You can check the completed project from the repository link above.
What's NextAs async await itself is a pretty big API with so many features, i won't be able to cover everything in single article. So please read the proposals themselves to learn the things i haven't covered in this article such as:
I also recommend you to read Hacking with Swift by Paul Hudson - What's new in Swift 5.5. That one article, is also one of my source and inspiration to write this article
Also, so far, i haven't discussed on how to handle race condition and data isolation between different threads. There is another proposal named Actors (SE-0306) that solves this problem in case you are interested to learn more. I believe it is a very important concept to understand and implement so we can produce much stable code in production without race condition bugs.
ConclusionCongratulations on making it so far reading this long article. Before i conclude the article, i want to give my own points on the async await API:
It is such an amazing time to be a part of Swift developers community and build wonderful things to solve complex challenging problems using technology. So, let's keep on becoming a lifetime learner and coder!
Published at Dec 01, 2020

In this video, we will learn several things:
Published at Nov 15, 2020

In this video, we are going to learn and implement the Collection View Compositional Layout:
Published at Nov 05, 2020

In this video, we're going to learn all about editing data with diffable data source and snapshot with several features:
Published at Oct 29, 2020

In this video, we're going to learn all about diffable data source from scratch:
Published at Oct 19, 2020
In this video, we are going to learn and build list in collection view using the new modern collection view architecture with 2 main parts:
Published at Oct 10, 2020
In this video, we are going to learn and implement modern cell registration in collection view to help us register and dequeue cell with Swift strongly typed generic parameters. YouTube Channel.
Published at Oct 04, 2020

In this 3 part series we will learn how to implement UICollectionView from scratch using UICollectionViewFlowLayout and UICollectionViewDataSource:
In this tutorial video, we'll build the Character Collection View Cell and Supplementary Collection Reusable Header View using programatic auto layout constraints + SwiftUI Live Preview!
In this part 2 of UICollectionView From Scratch, we will continue to: 1. Create Single Section Collection View 2. Implement UICollectionViewDataSource 3. Setup Collection View Flow Layout 4. Adapt Self-Sizing Cells for accessibility 5. Adapt to Trait Collection Changes
In this part 3 of UICollectionView From Scratch, we will continue to: 1. Implement Single Section Collection View Batch Updates with 1D array Data Diffing. 2. Implement Multiple Sections Collection View Batch Updates with 2D array Data Diffing.
Published at Sep 14, 2020

In this video tutorial, we will learn on how to add and test the App Clips target to the MovieDB iOS App so the user can instantly access the app using NFC Tags without downloading from the App Store. Please like, share, and subscribe to the YouTube Channel.
Published at Aug 31, 2020

In this video tutorial series, we'll learn on how to build Covid19 Stats Widget using the WidgetKit framework introduced in iOS 14. YouTube Channel.
Part 1 - Building COVID-19 API Stats Widget UI | Static Configuration
In this tutorial video, we'll learn all about WidgetKit by building the Widgets UI from scratch to complete. The widget support all the sytem family sizes and use Static Configuration.
In the second part of the WidgetKit tutorial series, we will extend the COVID-19 stats Widget to use Intent Configurable Widget that accepts custom country parameter.
In the third part of the WidgetKit tutorial series, we’re going to add support for different kind of widgets with Widget Bundle & Deeplink URL to the Covid19-Stats App.
Published at Jul 28, 2020

In this tutorial video, we'll learn about the fundamentals of the LazyVGrid and GridItem, difference between grid item type such as fixed, flexible, and adaptive using the live preview. Using the fundamentals, we’re going to build an iOS app that uses a single Vertical Grid to build a list that supports 3 different layouts. We should be able to switch the layout in the runtime using a segmented picker.
Please like, share, and subscribe to the YouTube Channel.
Published at July 22, 2020
Building an expandable list with nested items is quite a complex and error prone task to implement when using UITableView in UIKit. Luckily with SwiftUI 2.0, Apple introduced OutlineGroup and DisclosureGroup. With the views in our arsenal, we can build a hierarchical expandable and collapsible list with minimal lines of code using declarative syntax and reactive state management.
What We Will Build
We’re going to explore about OutlineGroup and DisclosureGroup, and how we can use them in practice to build List that represent hierarchical data in the UI by building three different kind of screens:
You can download the completed project Source from the GitHub repository. Completed Project GitHub Repository - Github.com
Let’s move on to the first example, which is showing list of items that have nested items inside of them.
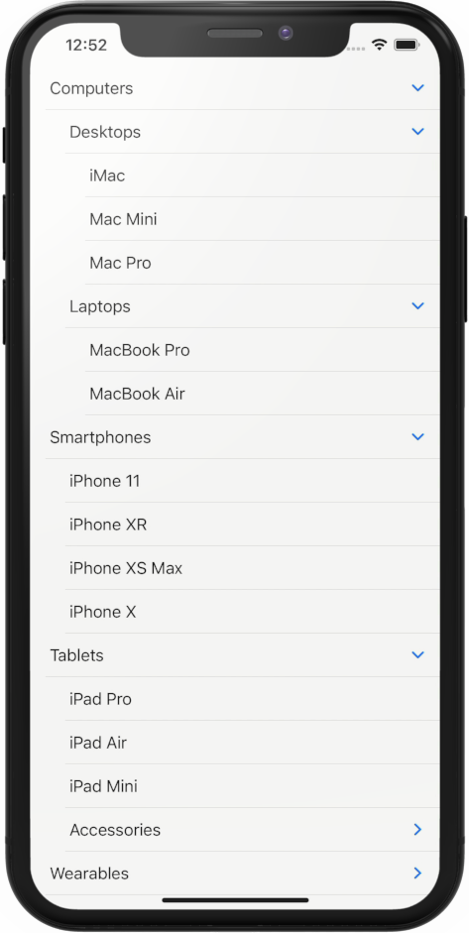
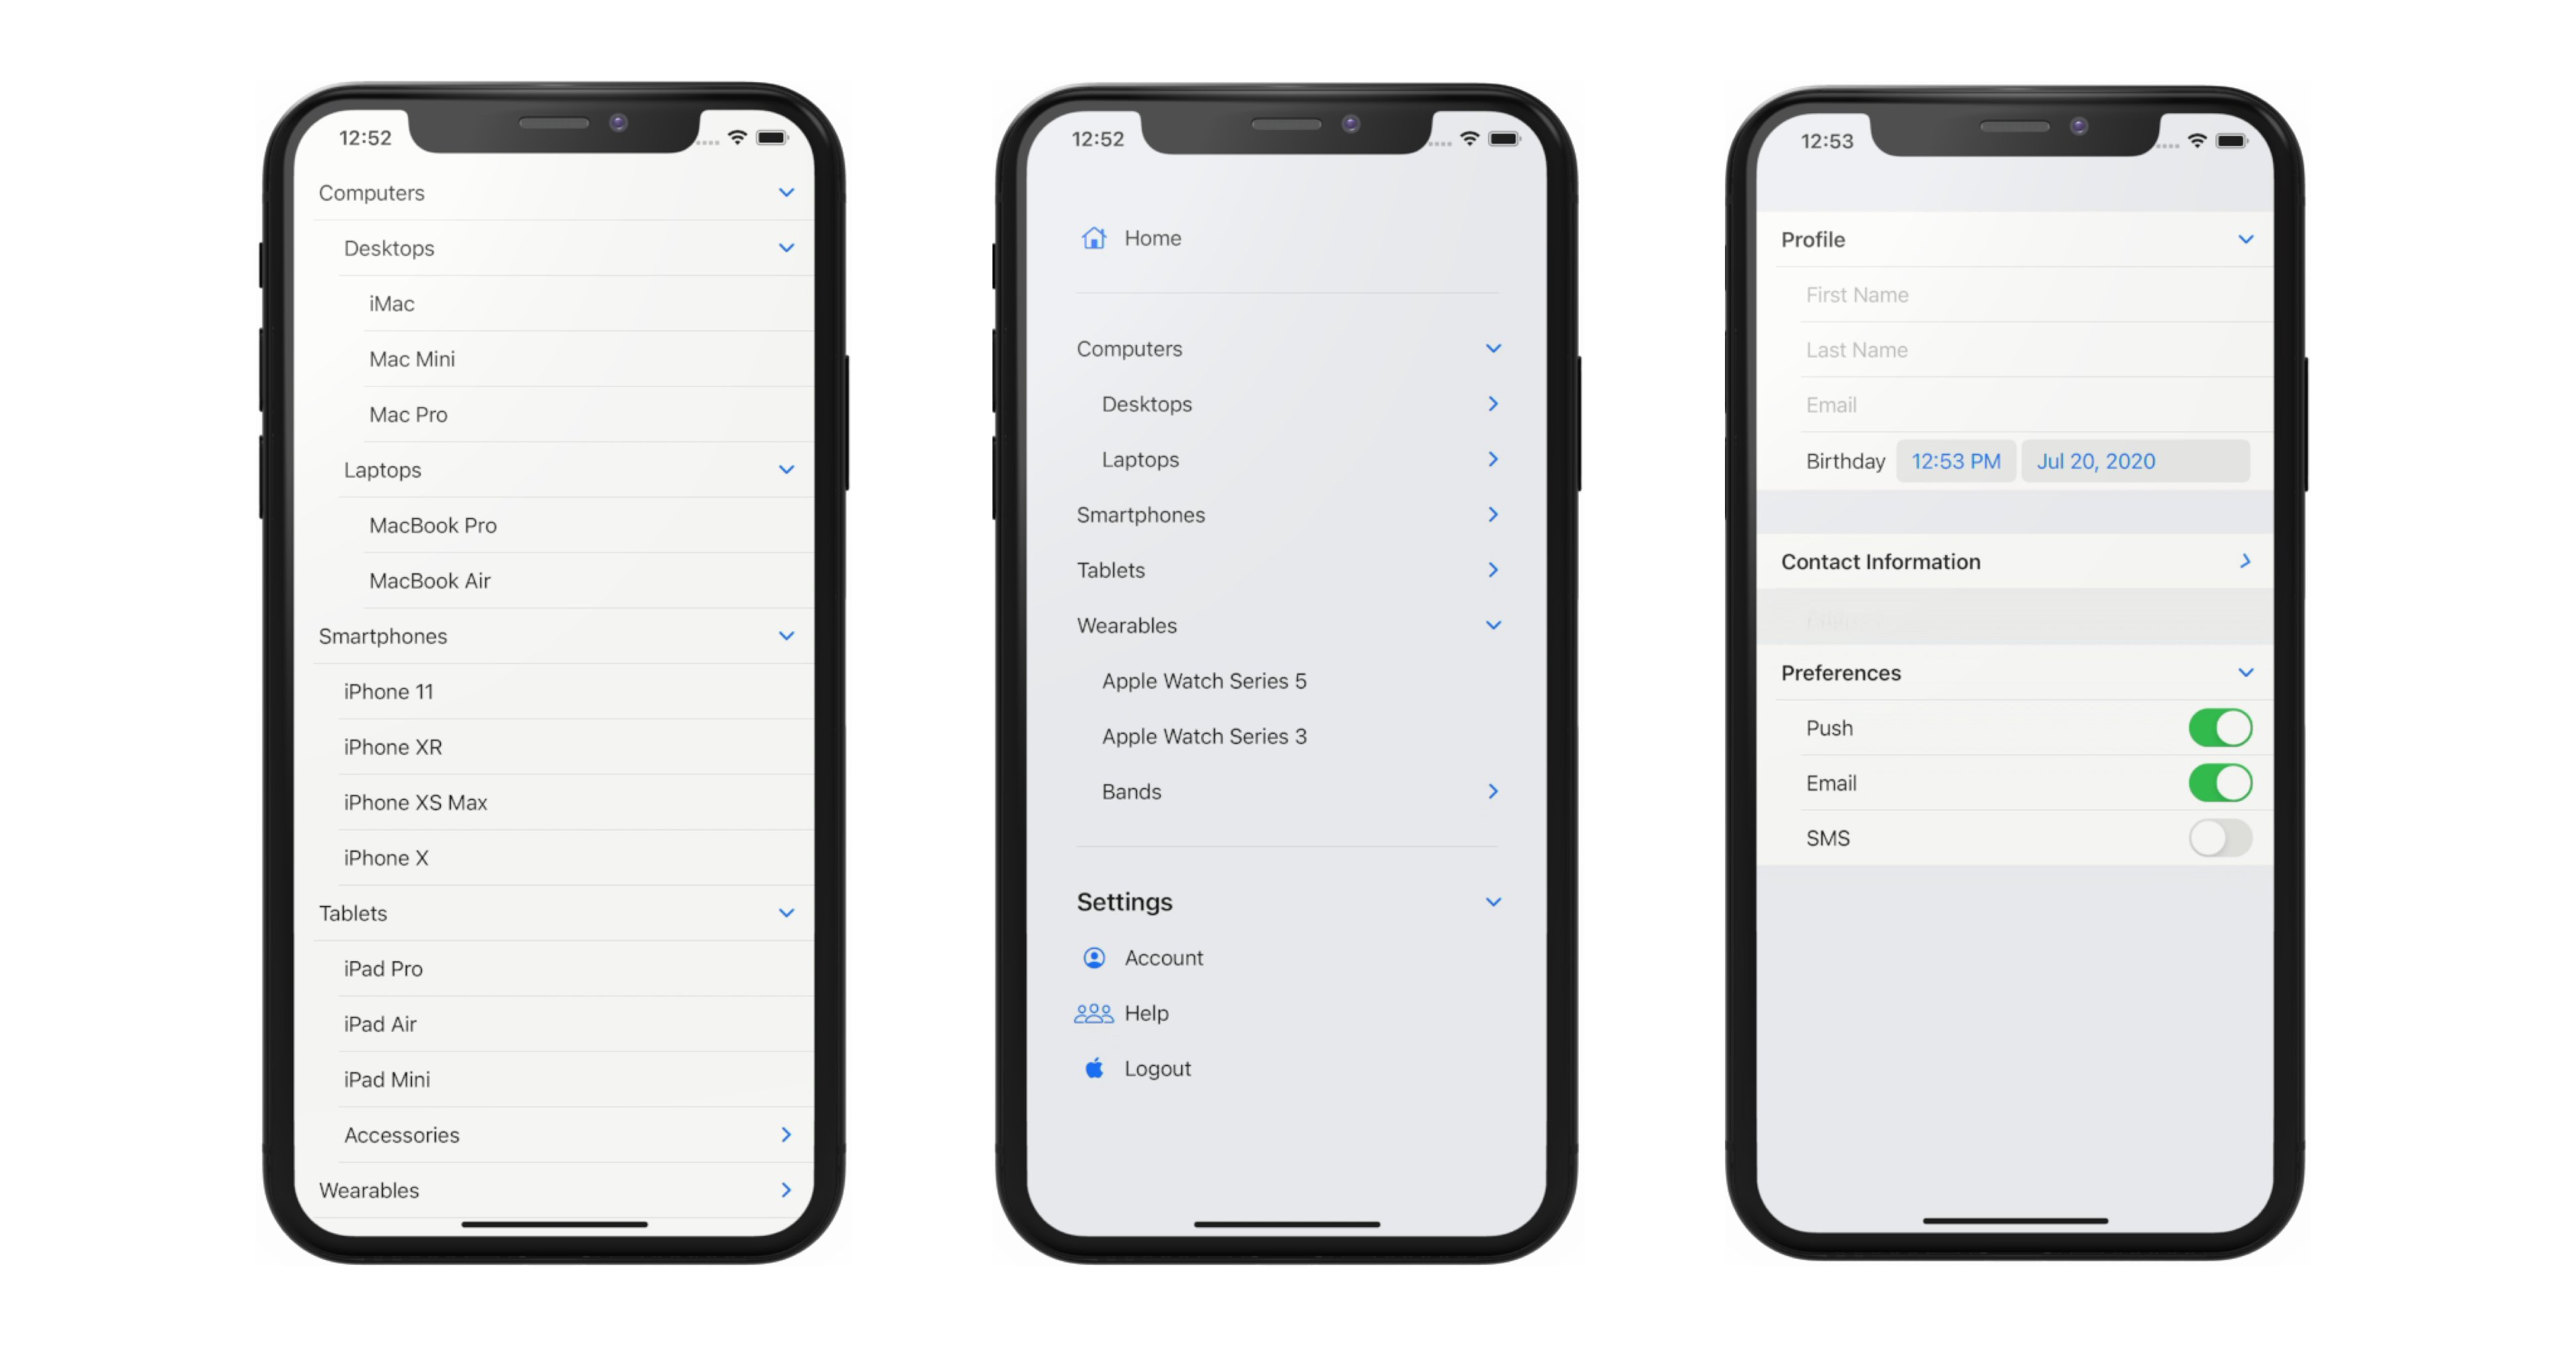
By looking at the screenshoot above, we can see that at the root level, we have items such as Computers, Smartphones, Tablets, and, Wearables.
Inside the Computers, we have desktop and laptops. Inside the desktops, we have the children such as iMac, Mac Mini, Mac Pro. For the children of the Laptops, we have MacBook Pro, MacBook Air, and MacBook Pro. In this case, the depth of the Computers category is 3.
Inside the smartphones, we have the children such as iPhone 11, iPhone XS, iPhone XR, iPhone X, iPhone SE. In this case the depth of the Smartphones category is 2.
Let’s dive into Xcode and learn how SwiftUI can help us to build this UI with very minimal lines of code. Create a new Xcode Project, give it any name that you prefer to.
Create Item Modelstruct Item: Identifiable {
let id = UUID()
let title: String
let children: [Item]?
}
First, we'll create a model to represent the item in the list. Create a new file named Item.swift. Declare the Item as a struct that conforms to Identifiable. Let's declare the id property to satisfy the protocol requirement. We'll use UUID as the type of the id as well as assigning it with default value. When we initialize UUID instance using the default initializer, the value will be unique.
Next, let's declare the title property with type of String, we'll use this to render the Text. Continuing on, to represent the children in the model, we need to declare a property containing the Array of the Item as this will be used by SwiftUI to determine whether the current item has children in the hierarchy. Let's declare and named it as children.
struct ItemList: View {

    let items: [Item]

    var body: some View {
        List(items, children: \.children) {
            Text($0.title)
        }
    }
}
Let's move on to build the View. Create a new file named ItemList.swift. Declare an instance property named items which is an array of Item. Inside the body implementation, we just need to initialize List passing the items. To enable the nesting of the children, we need to pass the keypath property name that contains the array of the Item to the children parameter. In our case, we pass the \.children as the keypath. Inside the view builder closure, we just need to render the Item inside the text using the title property.
extension Item {

    static var stubs: [Item] {
        [
            Item(title: "Computers", children: [
                Item(title: "Desktops", children: [
                    Item(title: "iMac", children: nil),
                    Item(title: "Mac Mini", children: nil),
                    Item(title: "Mac Pro", children: nil)
                ]),
                Item(title: "Laptops", children: [
                    Item(title: "MacBook Pro", children: nil),
                    Item(title: "MacBook Air", children: nil),
                ])
            ]),
            Item(title: "Smartphones", children: [
                Item(title: "iPhone 11", children: nil),
                Item(title: "iPhone XR", children: nil),
                Item(title: "iPhone XS Max", children: nil),
                Item(title: "iPhone X", children: nil)
            ]),
            Item(title: "Tablets", children: [
                    Item(title: "iPad Pro", children: nil),
                    Item(title: "iPad Air", children: nil),
                    Item(title: "iPad Mini", children: nil),
                    Item(title: "Accessories", children: [
                        Item(title: "Magic Keyboard", children: nil),
                        Item(title: "Smart Keyboard", children: nil)
                    ])]),
            Item(title: "Wearables", children: [
                Item(title: "Apple Watch Series 5", children: nil),
                Item(title: "Apple Watch Series 3", children: nil),
                Item(title: "Bands", children: [
                    Item(title: "Sport Band", children: nil),
                    Item(title: "Leather Band", children: nil),
                    Item(title: "Milanese Band", children: nil)
                ])
            ])
        ]
    }
}
Before we can preview the UI, we need to inject the Stub data into the preview. At the bottom of the source file, create an extension for the Item to help us stub the model. Declare the static constant stubs with type of Item Array. The first item will be computers, it has 2 children, desktops, and laptops. The desktops has 3 children: iMac, Mac Pro, and Mac Mini. The laptops has 2 children: MacBook Pro and MacBook Air. Let's try this first, we just need to pass this when initializing the ItemList inside the preview like so.
struct ItemList_Previews: PreviewProvider {
    static var previews: some View {
        ItemList(items: Item.stubs)
    }
}
The computers is shown in the preview with a disclosure indicator. To enable interaction in the live preview, make sure to press on the play button. Click on the indicator to make it expands to show the desktops and laptops. Try to also expand the desktops and laptops. As you can see with only 3 lines of UI related code, we're able to show hierarchical nested data inside our SwiftUI list! It works recursively until the item has no more children.
You might be thinking, how can we display different kind of views and data in the list. No worries, we can use the new OutlineGroup to handle this scenario. Let's take a look at the second screen we'll build!
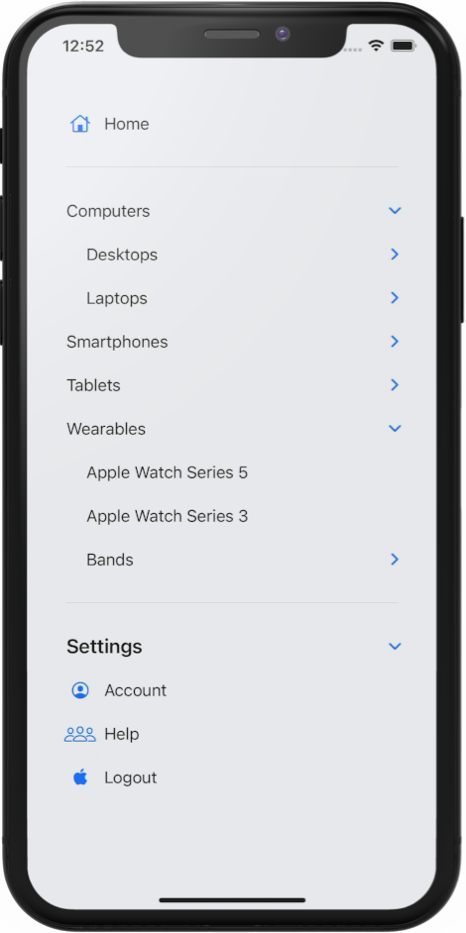
We have a Sidebar List containing menu items. At the top we, have the home menu, then at the middle section, we have the hierarchical items we have created before, finally at the bottom, we have the settings section which is also expandable containing the Account, Help, and Logout menu.
struct SidebarList: View {
    let items: [Item]

    var body: some View {
        List {
            Label("Home", systemImage: "house")

            Divider()

            OutlineGroup(items, children: \.children) {
                Text($0.title)
            }

            Divider()

            Section(header: Text("Settings")) {
                Label("Account", systemImage: "person.crop.circle")
                Label("Help", systemImage: "person.3")
                Label("Logout", systemImage: "applelogo")
            }
        }
        .listStyle(SidebarListStyle())
    }
}

struct SidebarList_Previews: PreviewProvider {
    static var previews: some View {
        SidebarList(items: Item.stubs)
    }
}
Let’s create a new SwiftUI view named SidebarList.swift. Declare an instance property named items which is an array of Item` model. Let’s pass the stub items in the preview class to the initializer and activate the live preview.
In the body implementation, declare an empty List, also add a ListStyle modifier passing the newly available SidebarListStyle. This style is suitable for sidebar list of menus especially in iPad.
At the top of view builder closure, declare a Label passing Home as the title and house as the systemImage. Label is a new view in SwiftUI 2.0 that renders a text as the leading item and a SF Symbol image as the trailing item.
To render our hierarchical items, we can use the OutlineGroup passing the array of items and keypath of the children property containing the array of the items. In the view builder closure, we can just render a text using the title of the item. Using the live preview, try to expand and collapse the items from the live preview to make sure it works.
Let’s move to the bottom section. By using SidebarListStyle as the ListStyle, we can use the Section View, this will add the expand and collapse behavior automatically for the views inside.
Let’s implement this, declare a Section, then pass the Text with Setting string as the Header. In the view builder, declare the 3 labels for account, help, and logout. Finally, add the Divider between each section.
Run the live preview, the settings section now provides the disclosure indicator where we can use it to expand or collapse the section. Awesome!
Using DisclosureGroup for Expandable/Collapsible Behavior to Group of Views with State BindingLast, i want to show you the DisclosureGroup view which we can use to add expand and collapse behavior for a group of views within the same hierarchy. Let's take a look at the screenshoot below.
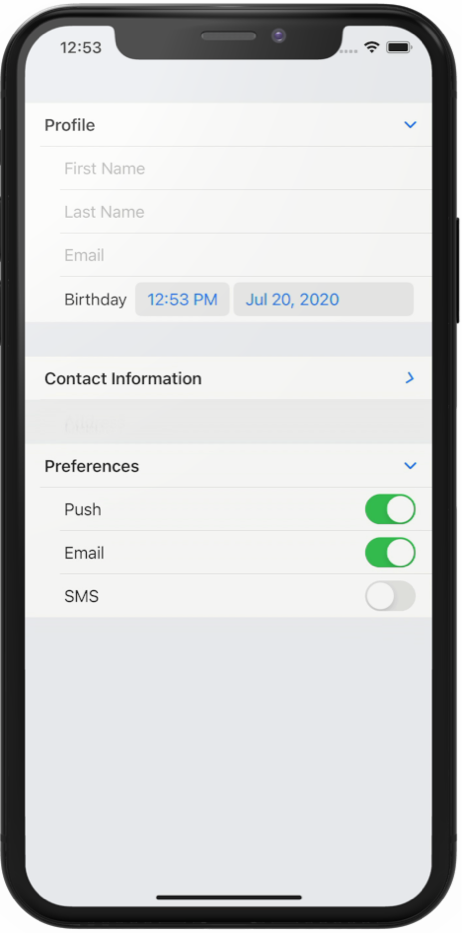
At the top of the Form, we have the personal information section containing textfields for names and email. Then, we have a datepicker for birthday. The section within the form can be collapsed and expanded, and the default state for the personal info section is expanded.
In the next section, we have a preferences notification section. It has three toggles where user can opt-in to receive notifications via email, sms, and push notification. The default state for the section is collapsed.
Let’s go back to Xcode and implement the form using DisclosureGroup. Create a new SwiftUI file named FormList.swift.
struct FormList: View {

    @State var isProfileExpanded = true
    var body: some View {
        Form {
            Section {
                DisclosureGroup(isExpanded: $isProfileExpanded) {
                    TextField("First Name", text: .constant(""))
                    TextField("Last Name", text: .constant(""))
                    TextField("Email", text: .constant(""))
                    DatePicker("Birthday", selection: .constant(Date()))
                } label: {
                    Text("Profile")
                        .font(.headline)
                }
            }

            Section {
                DisclosureGroup {
                    Toggle("Push", isOn: .constant(true))
                    Toggle("Email", isOn: .constant(true))
                    Toggle("SMS", isOn: .constant(false))
                } label: {
                    Text("Preferences")
                        .font(.headline)
                }
            }
        }
    }
}

struct FormList_Previews: PreviewProvider {
    static var previews: some View {
        FormList()
    }
}
In the body implementation, declare Form as the root view. Inside the view builder, declare a DisclosureGroup. Inside view builder, the Let’s declare the texfields and DatePicker. For the simplicity of this example, i just passed an inline constant as the binding instead of passing state properties. Let’s set the label parameter with Text passing Personal Information string. This syntax is part of the multiple trailing closure feature of Swift 5.3.
Let’s see the result in the live preview by clicking on the disclosure indicator to expand and collapse the section.
Next, let’s declare the notification preferences section. Declare a DisclosureGroup. Inside the view builder, declare the three toggles. For the label, just pass the Text containing the notification preferences setting.
To control the expand and collapse state of a DisclosureGroup manually, we can pass a binding containing a boolean. Let’s declare a state property isProfileSectionExpanded and assign true as the default value. On the Profile DisclosureGroup, we can pass the binding of the state to the isExpanded parameter.
Let’s rebuild the app and run the live preview. As we can see, the profile section has an expanded state as the default behavior.
ConclusionThat’s it for this quick and practical example of how we can build a List with hierarchical data using OutlineGroup and Disclosure Group.
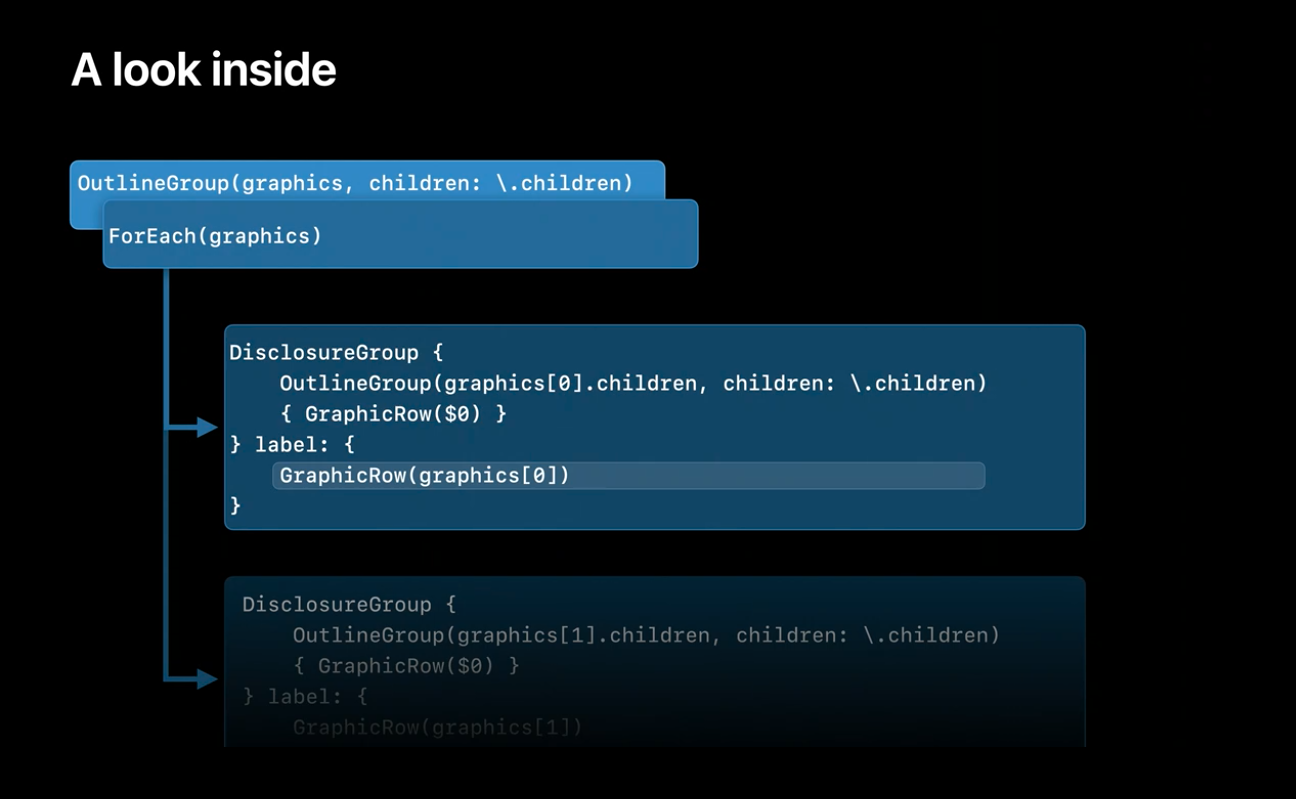
You can watch the related WWDC 2020 session to learn more about how the view work. You will be amazed that in at implementation level, Apple basically used DisclosureGroup and OutlineGroup recursively to enable the nesting for List and OutlineGroup! Apple WWDC 2020 Session - Stacks, Grids, and Outlines in SwiftUI
Until the next one, lets keep the lifelong learning goes on!
Published at July 12, 2020
Last month, The Swift Core Team & Swift Server Work Group had announced the availability of Swift AWS Lambda Runtime as well as support of Swift on Amazon Linux 2 OS. With both of this announcement, we finally have some official support to run Swift on AWS Lambda environment.
Swift has many advantages such as low memory footprint, high performance, and quick start time. The Swift AWS Lambda runtime also uses SwiftNIO to provide high performance non blocking networking engine for us to run asynchronous event driven code.
Swift Amazon Linux 2 Distro - Swift.org
Swift AWS Lambda Runtime Introduction- Swift.org
The runtime itself provides built-in support for many Lambda supported events such as HTTP request event from API Gateway, S3 object storage event, Simple Notification Service, and Simple Queue Service.
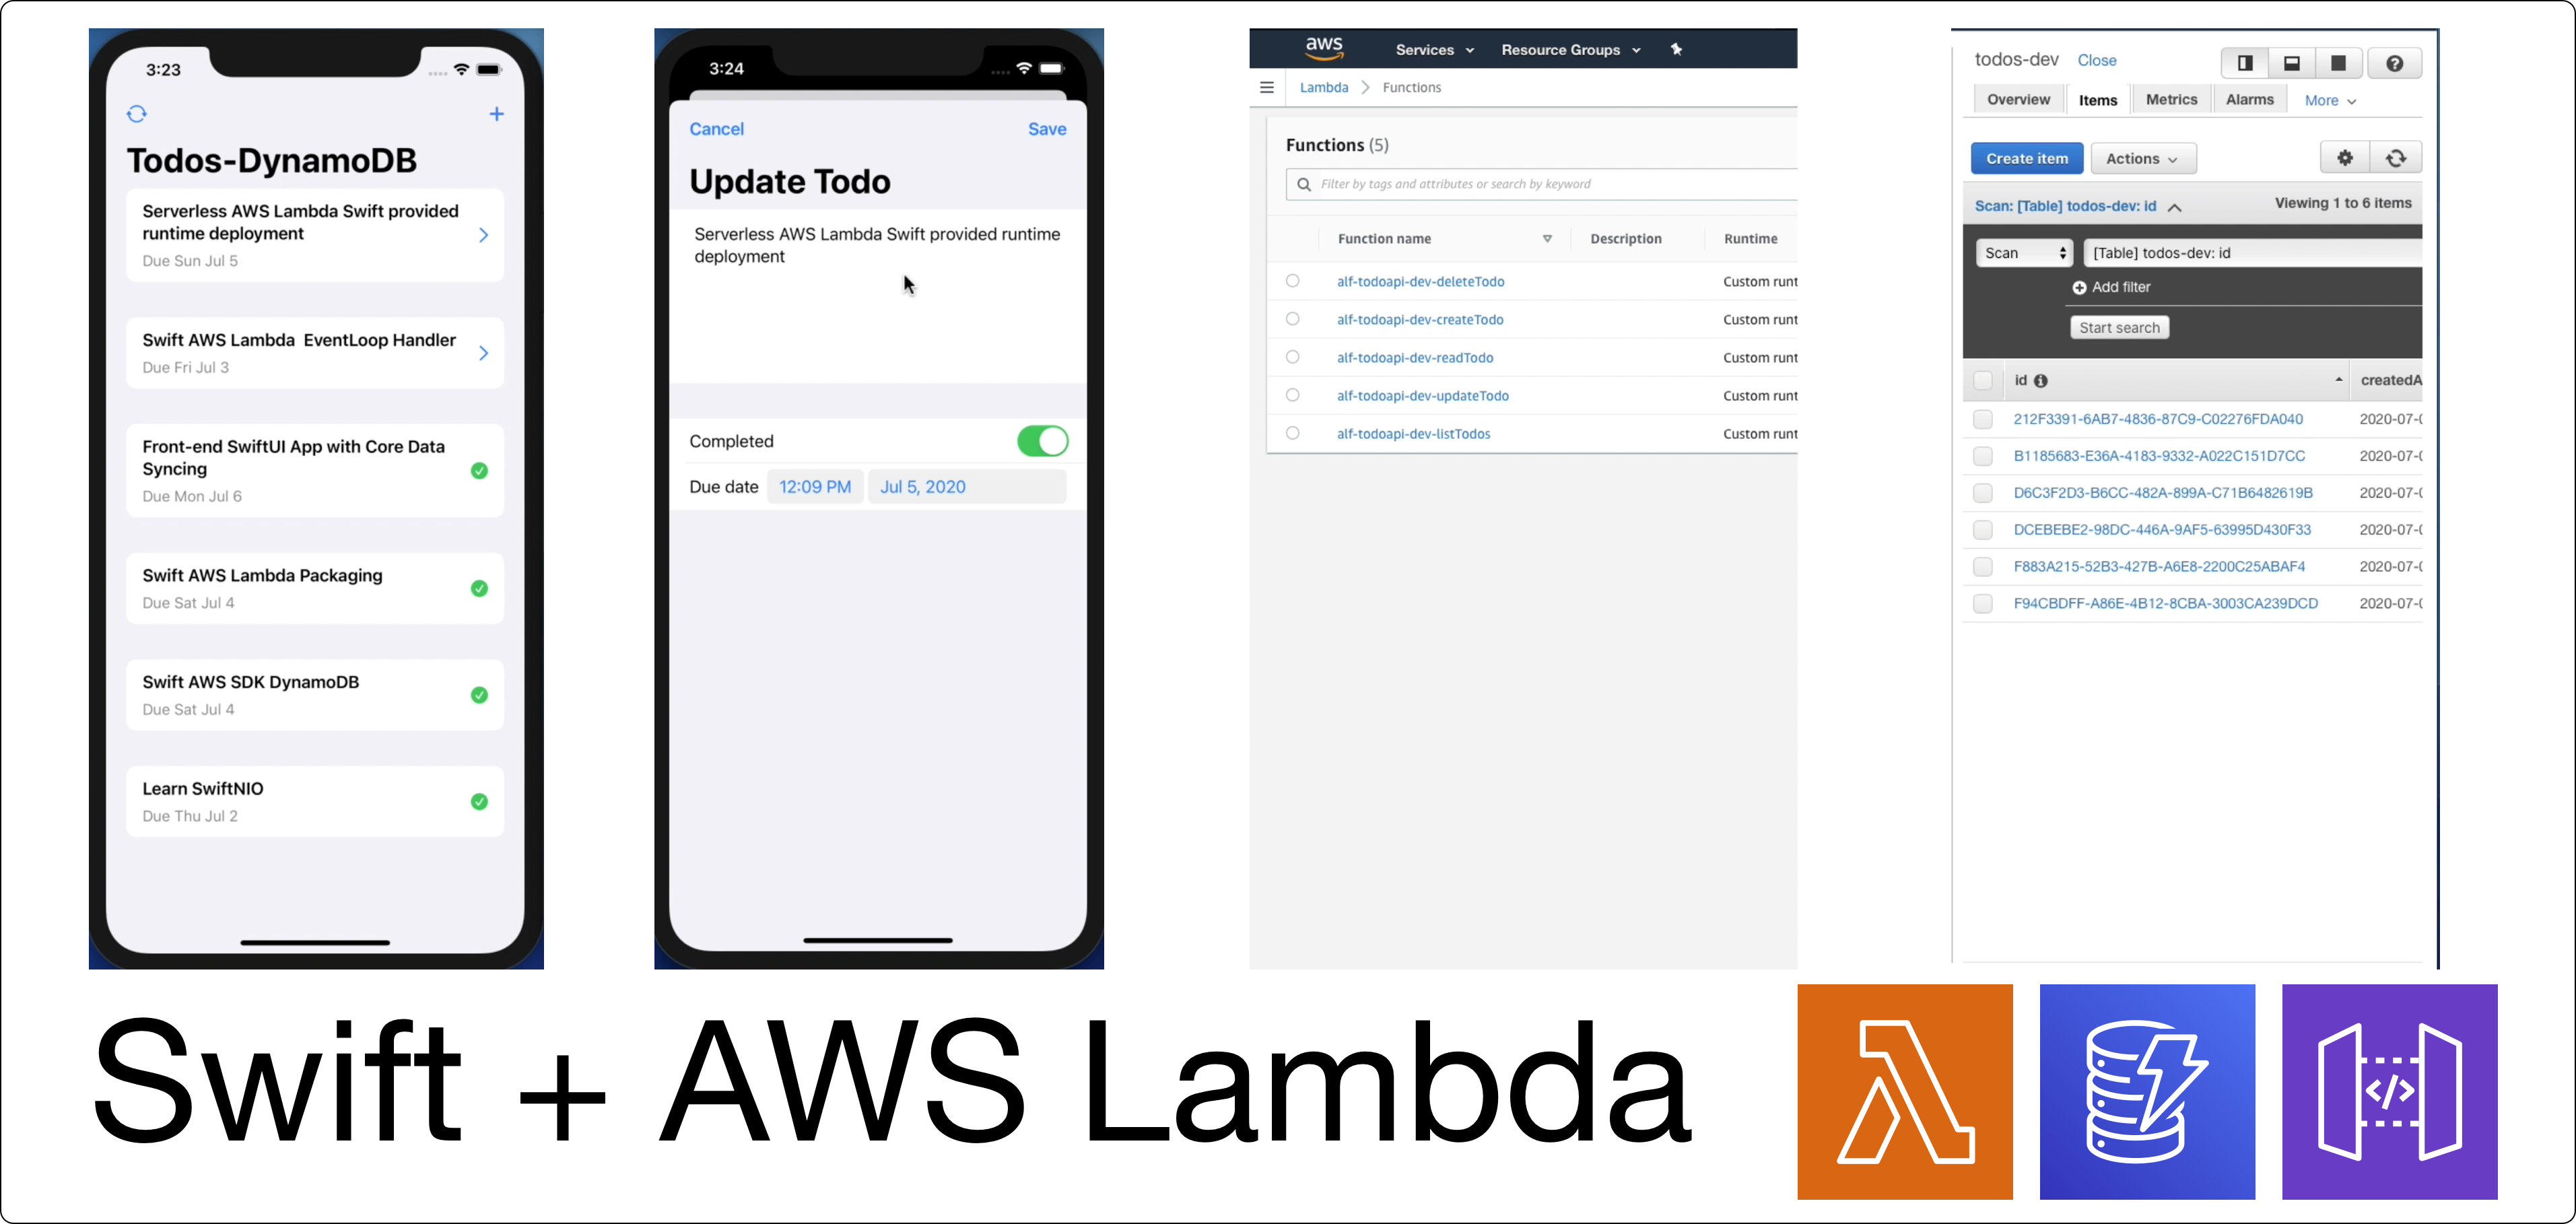
What We Will Build
In this tutorial, we'll build a simple Swift Serverless REST API endpoints to create, update, delete, and retrieve list of todo. Here are the topics we'll learn:
You can download the completed project Source from the GitHub repository. I have provided the backend and iOS client app under one repository. Please follow the instruction on the README file to build. Completed Project GitHub Repository - Github.com
Let's begin to create a new Swift project and build the Todos REST API app.
Project & Dependencies SetupFirst, let's open terminal, create a new directory named TodoAPI. You can put it anywhere you want.
mkdir TodoAPI && cd TodoAPI
Create a new swift executable using swift package init passing executable to the type flag. If you are using macOS, double click on the Package.swift file to open the project in Xcode automatically.
swift package init --type executable
Let’s add the required dependencies for our backend app. Open Package.swift file from the navigator and copy the following code
// swift-tools-version:5.2

import PackageDescription

let package = Package(
    name: "TodoAPI",
    platforms: [
        .macOS(.v10_14)
    ],
    dependencies: [
        .package(url: "https://github.com/swift-server/swift-aws-lambda-runtime.git", from: "0.2.0"),
        .package(url: "https://github.com/swift-aws/aws-sdk-swift.git", from: "5.0.0-alpha.4")
    ],
    targets: [
        .target(
            name: "TodoAPI",
            dependencies: [
                .product(name: "AWSDynamoDB", package: "aws-sdk-swift"),
                .product(name: "AWSLambdaRuntime", package: "swift-aws-lambda-runtime"),
                .product(name: "AWSLambdaEvents", package: "swift-aws-lambda-runtime")
            ]),
        .testTarget(
            name: "TodoAPITests",
            dependencies: ["TodoAPI"]),
    ]
)
Here's the things the we have added in the package:
macOS v10_14 as the platform.Swift AWS Lambda Runtime package provided by The Swift Server Work Group, currently the version is 0.2.0 and its in pre-release stage.Swift AWS SDK, this package provides native Swift API for us to interact with various AWS Services such as DynamoDB, S3, and many more.AWSDynamoDB, AWSLambdaRuntime, and AWSLambdaEvents added as the dependencies into the TodoAPI target.Make sure to save the file using Command + S shortcut. This will download and the resolve all the dependencies. You can view the progress from the dependencies section on the navigator.
After all packages has been downloaded, try to build and run to make sure there is no build time error.
Handling Function InvocationLet's explore on how AWS Lambda Runtime handle the function invoked. There are 2 types of handler provided by the Swift AWS Lambda Runtime.
The first one is to use closure/callback. In this example, the request payload is a string, it can be also a JSON that conforms to decodable, and various AWS events such as S3, API Gateway, and many more. Make sure to invoke callback passing the response we want to return in the function.
import AWSLambdaRuntime

Lambda.run { (context, payload: String, callback) in
  callback(.success("Hello, \(payload)"))
}
The second one is to use EventLoopLambdaHandler, which is more suited to performance sensitive function, in this case the function will run in the same thread as the networking handlers, so no need for performance cost because of context switching between networking and processing threads. It used SwiftNIO EventLoop primitives, in this case our handler will return an event loop.
import AWSLambdaRuntime
import AWSLambdaEvents
import NIO

struct Handler: EventLoopLambdaHandler {
    typealias In = APIGateway.Request
    typealias Out = APIGateway.Response

    func handle(context: Lambda.Context, event: In) -> EventLoopFuture<Out> {
           return context.eventLoop.makeSucceededFuture(APIGateway.Response(
            statusCode: .ok,
            headers: [:],
            multiValueHeaders: nil,
            body: "Hello",
            isBase64Encoded: false
        ))
    }
}

Lambda.run(Handler())
If you are familiar with Javascript, the EventLoop concept is very similar to a Promise, which means the value will be resolved in the future.
We’ll be using the EventLoop lambda handler to build our REST API.
Let's create the model for the Todo first, create new directory named Models, and create a new Swift file named Todo. Then, let's create a Todo struct that conforms to Codable protocol. It has six properties:
id as String.name as String.isCompleted as Boolean.dueDate, createdAt, updatedAt as Date.
Also to help us later when writing the model to dynamoDB dictionary, let's create a struct named DynamoDBField inside Todo struct. In this case, we just need to provide the key for each of the property using static constant.
public struct Todo: Codable {
    public let id: String
    public let name: String
    public let isCompleted: Bool
    public var dueDate: Date?
    public var createdAt: Date?
    public var updatedAt: Date?

    public struct DynamoDBField {
        static let id = "id"
        static let name = "name"
        static let isCompleted = "isCompleted"
        static let dueDate = "dueDate"
        static let createdAt = "createdAt"
        static let updatedAt = "updatedAt"
    }
}
Let's create a new file name Utils.swift, we'll use this to store the date formatter using ISO8601 format using the static constant inside the Utils struct. As DynamoDB doesn't provide support to store date as data type, we need to convert the date to the ISO8601 string using the formatter and store the date as string.
public struct Utils {

    public static let iso8601Formatter: DateFormatter = {
        let formatter = DateFormatter()
        formatter.dateFormat = "yyyy-MM-dd'T'HH:mm:ss.SSS'Z'"
        formatter.timeZone = TimeZone(secondsFromGMT: 0)
        return formatter
    }()

}

extension Date {

    var iso8601: String {
        Utils.iso8601Formatter.string(from: self)
    }
}
Below, let's create a simple extension for Date to convert the instance to iso8601 string using computed property. In this case, we just need to use Utils date formatter to convert to the date using the string(fromDate:) method passing self as the parameter.
Next, create a new file named APIError. We declare the APIError as enum that conforms to Swift Error protocol. Let's declare 3 cases: decodingError, requestError, todoNotFound.
enum APIError: Error {
    case decodingError
    case requestError
    case todoNotFound
}
Next, create a new file named Todo+DynamoDB.swift. In this file, we'll create an extension for Todo that will help us to convert Todo instance to dynamoDB dictionary. This will be used when we want to create and update item into DynamoDB. Make sure to import DynamoDB at the top of the source file.
import AWSDynamoDB
import Foundation

extension Todo {

    public var dynamoDbDictionary: [String: DynamoDB.AttributeValue] {
        var dictionary = [
            DynamoDBField.id: DynamoDB.AttributeValue(s: id),
            DynamoDBField.name: DynamoDB.AttributeValue(s: name),
            DynamoDBField.isCompleted: DynamoDB.AttributeValue(bool: isCompleted)
        ]

        if let dueDate = dueDate {
            dictionary[DynamoDBField.dueDate] = DynamoDB.AttributeValue(s: Utils.iso8601Formatter.string(from: dueDate))
        }

        if let createdAt = createdAt {
            dictionary[DynamoDBField.createdAt] = DynamoDB.AttributeValue(s: Utils.iso8601Formatter.string(from: createdAt))
        }

        if let updatedAt = updatedAt {
            dictionary[DynamoDBField.updatedAt] = DynamoDB.AttributeValue(s: Utils.iso8601Formatter.string(from: updatedAt))
        }

        return dictionary
    }

    public init(dictionary: [String: DynamoDB.AttributeValue]) throws {
        guard let id = dictionary[DynamoDBField.id]?.s,
            let name = dictionary[DynamoDBField.name]?.s,
            let isCompleted = dictionary[DynamoDBField.isCompleted]?.bool,
            let dueDateValue = dictionary[DynamoDBField.dueDate]?.s,
            let dueDate = Utils.iso8601Formatter.date(from: dueDateValue),
            let createdAtValue = dictionary[DynamoDBField.createdAt]?.s,
            let createdAt = Utils.iso8601Formatter.date(from: createdAtValue),
            let updatedAtValue = dictionary[DynamoDBField.updatedAt]?.s,
            let updatedAt = Utils.iso8601Formatter.date(from: updatedAtValue) else {
                throw APIError.decodingError
        }

        self.id = id
        self.name = name
        self.isCompleted = isCompleted
        self.dueDate = dueDate
        self.createdAt = createdAt
        self.updatedAt = updatedAt
    }

}
The dictionary uses String as the key and DynamoDB.AttributeValue as the value. We'll use the DynamoDBField constant that we have declared before inside Todo Struct as the key. Then, we can initialize DynamoDB.AttributeValue instance passing the correct data type, for string it will be s: and boolean is bool:. Make sure to convert the Date into the String before putting it into the dictionary.
Next, we also need to create an initializer that accepts DynamoDB Dictionary to initialize Todo instance. This will be used later when we retrieve todo items from DynamoDB SDK.
In this case, using the guard statement, we make sure all the properties exists in the dictionary and can be casted to the actual data type before we assign them to the properties. If one of them is not exists or the data type is incompatible, we throw a DecodingError.
Let's move on to create TodoService, this service has the responsibility to interact with AWSDynamoDB SDK to get list of items and also to read, create, update, and delete a single item.
Create a new file named TodoService.swift file and import AWS DynamoDB at the top of the source file. Declare TodoService class, we'll need 2 instance property. First is the instance of DynamoDB itself, the second one is the tableName of the todo item in AWS. We create an initializer to inject those 2 properties.
public class TodoService {

    let db: DynamoDB
    let tableName: String

    public init(db: DynamoDB, tableName: String) {
        self.db = db
        self.tableName = tableName
    }
}
Next, create a new method named getAllTodos that returns an EventLoopFuture of Todo Array. In the implementation, we need to create the DynamoDB ScanInput instance passing the tableName. Next, we can use the dynamoDB scan method passing the input. We're going to chain the ScanOutput to todos array using the FlatMapThrowing operator, if you are familiar with Javascript promise patterN, you can think of this as the then operator. In case of this, as the mapping can throw an error, we need to use FlatMapThrowing operator.
//...
public func getAllTodos() -> EventLoopFuture<[Todo]> {
    let input = DynamoDB.ScanInput(tableName: tableName)

    return db.scan(input).flatMapThrowing { (output) -> [Todo] in
        try output.items?.compactMap { try Todo(dictionary: $0) } ?? []
    }
}
Let's create the method to read a single item given an ID of the Todo. We give it a name of getTodo and pass id of type String as single parameter. This will return an EventLoopFuture of Todo. In the implementation, we use the DynamoDB's GetItemInput passing the key, which is the dictionary containing the id key and DynamoDB Attribute value of String, we also need to pass the tableName. Then, we can use the GetItem passing the input as the parameter. We use FlatMapThrowing to convert the GetItemOutput to the TodoInstance passing the dictionary from the item, also if the output's item is nil, we'll throw a TodoNotFound APIError.
//...
public func getTodo(id: String) -> EventLoopFuture<Todo> {
    let input = DynamoDB.GetItemInput(key: [Todo.DynamoDBField.id: DynamoDB.AttributeValue(s: id)], tableName: tableName)

    return db.getItem(input).flatMapThrowing { (output) -> Todo in
        if output.item == nil { throw APIError.todoNotFound }
        return try Todo(dictionary: output.item ?? [:])
    }
}
For creating todo, create a new method named createTodo with a single parameter of Todo Model, the return type is EventLoopFuture of Todo. In the implementation, we copy the Todo struct to a new variable, then initialize current date. Then, we assign the updatedAt and createdAt property with the date. Next, we create a DynamoDB's PutItemInput passing the todo dynamoDB dictionary using the computed property we created before as well as the tableName. At last we invoke putItem method on the DB passing the input. In this case, we can just return the instance of Todo.
//...
public func createTodo(todo: Todo) -> EventLoopFuture<Todo> {
    var todo = todo
    let currentDate = Date()

    todo.updatedAt = currentDate
    todo.createdAt = currentDate

    let input = DynamoDB.PutItemInput(item: todo.dynamoDbDictionary, tableName: tableName)

    return db.putItem(input).map { (_) -> Todo in
        todo
    }
}
For updating Todo, create a new method named updateTodo with a single parameter of Todo Model, the return type is EventLoopFuture of Todo. Create a new variable to copy the Todo struct instance, then we just assign the updatedAt with current Date. Implementation of UpdateItemInput is quite complex compared to CreateItemInput. We'll need to create the expressionAttributeNames Array containing the keys we want to update, then we create the expressionAttributeValues Array which are the values we want to update. Pass the key, which is the ID, returnValues to allNew, then make sure to pass the tableName, at last we use the update expression literal passing the placeholder attribute names and values we have created. At last, we can use the updateItem passing the input, then using FlatMap, we invoke the getTodo it em passing the ID to return a EventLoopFuture of Todo.
//...
public func updateTodo(todo: Todo) -> EventLoopFuture<Todo> {
    var todo = todo

    todo.updatedAt = Date()

    let input = DynamoDB.UpdateItemInput(
        expressionAttributeNames: [
            "#name": Todo.DynamoDBField.name,
            "#isCompleted": Todo.DynamoDBField.isCompleted,
            "#dueDate": Todo.DynamoDBField.dueDate,
            "#updatedAt": Todo.DynamoDBField.updatedAt
        ],
        expressionAttributeValues: [
            ":name": DynamoDB.AttributeValue(s: todo.name),
            ":isCompleted": DynamoDB.AttributeValue(bool: todo.isCompleted),
            ":dueDate": DynamoDB.AttributeValue(s: todo.dueDate?.iso8601 ?? ""),
            ":updatedAt": DynamoDB.AttributeValue(s: todo.updatedAt?.iso8601 ?? ""),

        ],
        key: [Todo.DynamoDBField.id: DynamoDB.AttributeValue(s: todo.id)],
        returnValues: DynamoDB.ReturnValue.allNew,
        tableName: tableName,
        updateExpression: "SET #name = :name, #isCompleted = :isCompleted, #dueDate = :dueDate, #updatedAt = :updatedAt"
    )

    return db.updateItem(input).flatMap { (output)  in
        self.getTodo(id: todo.id)
     }
}
At last, to delete an item, we need to create deleteTodo method passing the id of string as single parameter. The return type of this will be an EventFuture of Void. In the implementation, create DynamoDB deleteItemInput passing the key and tableName. At last, we invoke the db's deleteItemMethod passing the input. Using map we return a void closure.
//...
public func deleteTodo(id: String) -> EventLoopFuture<Void> {
    let input = DynamoDB.DeleteItemInput(
        key: [Todo.DynamoDBField.id: DynamoDB.AttributeValue(s: id)],
        tableName: tableName
    )

    return db.deleteItem(input).map { _ in }
}
That's it for the TodoService class. With this, we'll be able to perform CRUD operation to DynamoDB! Let's move on to create our LambdaHandler!
Create a new file named TodoLambdaHandler.swift. We need to import several frameworks into the source code.
import Foundation
import AWSLambdaEvents
import AWSLambdaRuntime
import AsyncHTTPClient
import NIO
import AWSDynamoDB
First, let's declare the TodoLambdaHandler as a struct that implements EventLambdaHandler Protocol. The protocol itself used associatedtype for the event Input and the response Output. In our case, we're going to use APIGateway Request for the input event and APIGateway Response for the output response. There are several other options you can explore such as S3, SQS, or DynamoDB events.
typealias In = APIGateway.Request
typealias Out = APIGateway.Response
The handler itself need to have reference to the DynamoDB instance and TodoService, as well as the HTTPClient. Let's declare this as the instance properties.
let db: AWSDynamoDB.DynamoDB
let todoService: TodoService
let httpClient: HTTPClient
Next, we need to create the initializer that accepts the Lambda.Initialization context, basically we need to initialize the DynamoDB instance and TodoService in the implementation.
First let's create HTTPClient instance, we need to pass this when initializing DynamoDB later. Declare the timeout variable and initialize it with HTTPClient.Configuration.Timeout passing 30 seconds to both connect and read parameters. Next, lets declare the httpClient variable and initialize HTTPClient passing the .shared with the current context eventLoop as the eventLoopGroupProvider, then for the configuration, we initialize HTTPClient.Configuration passing the timeout variable we created before.
let timeout = HTTPClient.Configuration.Timeout(
    connect: .seconds(30),
    read: .seconds(30)
)

let httpClient = HTTPClient(
    eventLoopGroupProvider: .shared(context.eventLoop),
    configuration: HTTPClient.Configuration(timeout: timeout)
)
Next, we need to retrieve the name of the table for our DynamoDB todo item, we'll be storing the tableName, AWS_REGION, and _HANDLER as the environment variables when we we deploy our function to AWS Lambda.
To retrieve the environment variable, we can use Lambda.env static method passing the name of the variable we want to retrieve from the environment.
Declare the tableName constant and pass the string of TODOS_TABLE_NAME as the parameter.
let tableName = Lambda.env("TODOS_TABLE_NAME") ?? ""
For the region, we pass AWS_REGION as the parameter, then using the value, we initialize the Region enum passing it to the rawValue parameter, if it doesn't exists, we provide a default fallback region which is us-west-2 at Oregon, US.
let region: Region
if let envRegion = Lambda.env("AWS_REGION") {
    region = Region(rawValue: envRegion)
} else {
    region = .uswest2
}
Next, we need to initialize the AWSDynamoDB instance. Declare the db constant and using DynamoDB initializer we pass the region and the httpClientProvider.
let db = AWSDynamoDB.DynamoDB(region: region, httpClientProvider: .shared(httpClient))
let todoService = TodoService(db: db, tableName: tableName)

self.httpClient = httpClient
self.db = db
self.todoService = todoService
For the TodoService, we can initialize it passing the instance of the db and the tableName.
At last, we assign all the property into the instance properties so we can reference to them later. That's it for the initialization! we have the DB instance and TodoService to perform the CRUD handling operation.
Handling CRUD Operation with Handler Enum
There is one required method we need to implement acting as the entry-point when handling the request into our app. It is handle(context:event:)->EventLoopFuture. This will be invoked passing the context and the request API Gateway event containing the HTTP payload. The return type expected is EventLoopFuture API Gateway response which is the representation of the HTTP response we want to return to the client.
As we are going to use a single binary to perform all the CRUD operations, we need to be able to know the type of the operation we need to perform when user hits our API. To do this, we need to create an enum named Handler. Basically, this enum represents all the supported operations in our API.
Create a new file named Handler inside Model folder. Import AWSLambdaRuntime at the top, and then declare enum Handler with type of String. Our API supports 5 different operations, create, update, delete, read, and list. To get the handler value, we'll declare a static computed property named current that returns the handler. We'll retrieve the handler from the environment variable named _HANDLER, we will set this environment variable for each of the operation when we deploy our function later using Serverless framework.
enum Handler: String {

    case create
    case update
    case delete
    case read
    case list

    static var current: Handler? {
        guard let handler = Lambda.env("_HANDLER") else {
            return nil
        }
        return Handler(rawValue: handler)
    }
}
Before implementing the Handler, let's create a helper extension for the APIGateway Request and Response that will help us to decode the request into the Model and encode the model into the response as JSON string.
Create a new folder named extensions, then create a new file named APIGateway+Extension.swift inside. At the top import Foundation and AWSLambdaEvents.
First, let's declare the extension for the APIGateway.Request. We declare one helper method that will help us to decode the JSON body of the request to a Decodable type using generic placeholder. Let's declare the jsonDecoder static constant and set the date decoding strategy to custom formatter passing the ISO8601 date formatter from the Utils struct.
private static let jsonDecoder: JSONDecoder = {
    let decoder = JSONDecoder()
    decoder.dateDecodingStrategy = .formatted(Utils.iso8601Formatter)
    return decoder
}()

func bodyObject<D: Decodable>() throws -> D {
    guard let jsonData = body?.data(using: .utf8) else {
        throw APIError.requestError
    }
    let object = try APIGateway.Request.jsonDecoder.decode(D.self, from: jsonData)
    return object
}
In the bodyObject implementation, using the if let statements, we check whether the body data exists, if not we throw a Request Error. Then, using the JSON decoder, we just decode the type passing the jsonData, and finally return the decoded instance.
Next, let's create the helper extension for APIGateway Response. Let's begin by declaring the jsonEncoder static constant. Similar to the JSONDecoder, we set the dateDecodingStrategy to use custom ISO8601 date formatter.
private static let jsonEncoder: JSONEncoder = {
    let encoder = JSONEncoder()
    encoder.dateEncodingStrategy = .formatted(Utils.iso8601Formatter)
    return encoder
}()
Next, lets' declare the constant for the defaultHeaders. The value itself is a dictionary with type of String as the key and value. This will be used to set the HTTP response headers to allow CORS when invoked from a website and to allow all HTTP methods.
public static let defaultHeaders = [
    "Content-Type": "application/json",
    "Access-Control-Allow-Origin": "*",
    "Access-Control-Allow-Methods": "OPTIONS,GET,POST,PUT,DELETE",
    "Access-Control-Allow-Credentials": "true",
]
Let's move on to create a new initializer that accepts error and AWSLambdaEvents.HTTPResponseStatus. In this case we just invoke the initializer passing the status code, then pass the defaultHeaders to the HTTP headers, also in the body we pass hardcoded JSON string with the key of error and string value of the error. We'll use this later when we want to return an error as the response.
public init(with error: Error, statusCode: AWSLambdaEvents.HTTPResponseStatus) {
    self.init(
        statusCode: statusCode,
        headers: APIGateway.Response.defaultHeaders,
        multiValueHeaders: nil,
        body: "{\"error\":\"\(String(describing: error))\"}",
        isBase64Encoded: false
    )
}
The second initializer accepts an encodable object using generic placeholder and the HTTPResponseStatus. This will be helpful later when we want to return instance of Todo or Todo array as they both conforms to Codable protocol. In the implementation, we encode the instance using JSONEncoder and assign the String of the data to the body variable using UTF-8 encoding. At last, we invoke the initializer passing the status code, defaultHeaders, and the body.
public init<Out: Encodable>(with object: Out, statusCode: AWSLambdaEvents.HTTPResponseStatus) {
    var body: String = "{}"
    if let data = try? Self.jsonEncoder.encode(object) {
        body = String(data: data, encoding: .utf8) ?? body
    }
    self.init(
        statusCode: statusCode,
        headers: APIGateway.Response.defaultHeaders,
        multiValueHeaders: nil,
        body: body,
        isBase64Encoded: false
    )
}
At the bottom, create a new Struct named EmptyResponse that conforms to Encodable. The implementation is empty, as this will be used when we want to return a response with empty body such as when deleting a Todo item.
struct EmptyResponse: Encodable {}
Finally, let's move back to the TodoLambdaHandler to implement the handler method!
Using Enum Handler Enum to Handle Incoming Event
First, let's use a guard statement to get the current type of the handler operation using the Handler.current static property, if it is not exits, we just return a resolved successful eventLoopFuture passing the APIGateway.Response instance with APIError and badRequest HTTP Status Type. This will returns the response with 400 as the HTTP Status code containing the error message in the body.
guard let handler = Handler.current else {
    return context.eventLoop.makeSucceededFuture(APIGateway.Response(with: APIError.requestError, statusCode: .badRequest))
}
Then, we use the switch statement on the enum instance to handle all the possible operations. We'll create a method to handle each of the operation. All of them accept Lambda.Context and APIGateway.Request, then returns EventLoopFuture of APIGateway.Response.
switch handler {
case .create:
    return handleCreate(context: context, event: event)
case .read:
    return handleRead(context: context, event: event)
case .update:
    return handleUpdate(context: context, event: event)
case .delete:
    return handleDelete(context: context, event: event)
case .list:
    return handleList(context: context, event: event)
}
First, let's declare the handleCreate method to handle creating single Todo Item. Using the guard statement, we decode the request body to Todo instance, if it doesn't exists, we return a resolved EventLoopFuture passing the APIGateway.Response of RequestError and badRequest httpStatus. Next, we invoke TodoService's createTodo method passing the todo instance. As this returns a Future of Todo, we need to map it to APIGateway.Response using the map operator. In the closure body, we initialize the APIGateway.Response passing the Todo instance and ok as the HTTPResponseStatus. This will encode the instance into the JSON data, then put in the response body and set the HTTP status code to 200.
Also in case there is an error in the eventLoop chain, we need to catch it and return the appropriate error. Let's declare a method named catchError that accept a Lambda context and error as the parameter, then return EventLoopFuture of APIGateway.Response. In the body, we just need to initialize the APIGateway.Response and pass the error, then return the resolved future passing the response.
func catchError(context: Lambda.Context, error: Error) -> EventLoopFuture<APIGateway.Response> {
    let response = APIGateway.Response(with: error, statusCode: .notFound)
    return context.eventLoop.makeSucceededFuture(response)
}
Going back to create method, to catch the error, we can use the flatMapError operator. This will be invoked if there is an error thrown in one of the upstream, think of this as the catch error promise in Javascript. In this case, we can just invoke the catchError method we created before to return the APIGateway.Response.
.flatMapError {
    self.catchError(context: context, error: $0)
}
Next, let's create the handleRead method. In the implementation, we check if the pathParameters dictionary contains value with key of id, if not we just return resolved promise of response with request error and http status 400. Then, we just need to invoke todoService's getTodo method passing the value of id. Using map operator we transform the Todo instance to Response passing the todo instance to be encoded in the HTTP Body and set the status code to 200.
func handleRead(context: Lambda.Context, event: APIGateway.Request) -> EventLoopFuture<APIGateway.Response> {
    guard let id = event.pathParameters?[Todo.DynamoDBField.id] else {
        return context.eventLoop.makeSucceededFuture(APIGateway.Response(with: APIError.requestError, statusCode: .notFound))
    }
    return todoService.getTodo(id: id)
        .map { todo in
            APIGateway.Response(with: todo, statusCode: .ok)
        }.flatMapError {
            self.catchError(context: context, error: $0)
        }
}
To update a todo item, let's create the handleUpdate method. Just like the handleCreate method, using the guard statement, we decode the http body to Todo instance. If fails, we just return resolved promise with response containing requestError and 400 as the http status code. Then, we invoke todo's service updateTodo method passing the updatedTodo item. Using the map operator, we transform the result of the todo item to APIGateway passing the todo instance to be encoded as JSON in the HTTP body, and set the status code to 200.
func handleUpdate(context: Lambda.Context, event: APIGateway.Request) -> EventLoopFuture<APIGateway.Response> {
    guard let updatedTodo: Todo = try? event.bodyObject() else {
        return context.eventLoop.makeSucceededFuture(APIGateway.Response(with: APIError.requestError, statusCode: .badRequest))
    }
    return todoService.updateTodo(todo: updatedTodo)
        .map { todo in
            APIGateway.Response(with: todo, statusCode: .ok)
        }.flatMapError {
            self.catchError(context: context, error: $0)
        }
}
Next, let's create the handleDelete for deleting a todo item. Just like handleRead method, we need to get the id to delete from the pathParameters passing id as the key to the dictionary. After that, we just invoke todoService's deleteTodo method passing the id. In this case, we just need to return APIGateway response with empty body and status code of 200.
func handleDelete(context: Lambda.Context, event: APIGateway.Request) -> EventLoopFuture<APIGateway.Response> {
    guard let id = event.pathParameters?[Todo.DynamoDBField.id] else {
        return context.eventLoop.makeSucceededFuture(APIGateway.Response(with: APIError.requestError, statusCode: .badRequest))
    }
    return todoService.deleteTodo(id: id)
        .map {
            APIGateway.Response(with: EmptyResponse(), statusCode: .ok)
        }.flatMapError {
            self.catchError(context: context, error: $0)
        }
}
The last handler, is the handleList method. In this handler, we just invoke todoService's getAllTodos method, then transform the result of the Todo Array into APIGateway Response passing the array to be encoded as JSON into the HTTP body and set the status code as 200.
func handleList(context: Lambda.Context, event: APIGateway.Request) -> EventLoopFuture<APIGateway.Response> {
    return todoService.getAllTodos()
        .map { todos in
            APIGateway.Response(with: todos, statusCode: .ok)
        }.flatMapError {
            self.catchError(context: context, error: $0)
        }
}
That's it for the TodoLambdaHandler, now let's put this into main.swift where we will run the Lambda passing the handler.
Lambda.run(TodoLamdaHandler.init)
We have completed building the app, now let's build the app and archive the app into a Zip file so it can be uploaded to AWS Lambda!
Building and Packaging Using Docker Swift Amazon Linux 2 Distro
Before we begin the process, make sure to install Docker into your operating system. Check the link to install docker from the description if you haven’t installed. We’re going to use Docker Container using official Swift Amazon Linux 2 Image to build the release, and package the binary into the bootstrap file required by the AWS Lambda to run the function.
Let's follow the instruction from Fabian Fett's website. He is one of the contributor of the Swift AWS Lambda library. He posted a great tutorial on building and packaging Swift into the zip file ready to be used in AWS.
Getting Started with Swift AWS Lambda Runtime - Fabian Fett
Creating The Dockerfile
In this step, we need to create a Dockerfile on the project directory. So, let's open terminal and navigate to the project directory. Then, create a new file named Dockerfile. Open it in your editor, then copy and paste into the file.
FROM swiftlang/swift:nightly-amazonlinux2

RUN yum -y install \
    git \
    libuuid-devel \
    libicu-devel \
    libedit-devel \
    libxml2-devel \
    sqlite-devel \
    python-devel \
    ncurses-devel \
    curl-devel \
    openssl-devel \
    tzdata \
    libtool \
    jq \
    tar \
    zip
This will use the the Swift Nightly image for Amazon Linux 2 from SwiftLang docker repository, then add the required dependencies to build and run Swift.
Next, let's build the container using the Dockerfile. Let's give it a name of swift-lambda-builder. Type the following syntax.
docker build -t swift-lambda-builder .
Wait after the container are created, then let's build the binary from the Docker container using this syntax.
docker run \
     --rm \
     --volume "$(pwd)/:/src" \
     --workdir "/src/" \
     swift-lambda-builder \
     swift build --product TodoAPI -c release
This will run the swift-lambda-builder container and set the current directory as the working directory, then execute swift build command passing the TodoAPI as the product flag and compile it in release mode.
Next, let's create package the executables for the deployment. Basically, we need to create the bootstrap file and symlink all the executables, we also need to copy several Swift runtime library into the folder. To help us do this, let's create shell script. Create a new folder called scripts, then inside the folder, create a new shell file named package.sh. Copy and paste the code into the file, replace SquareNumber with TodoAPI.
#!/bin/bash

set -eu

executable=$1

target=.build/lambda/$executable
rm -rf "$target"
mkdir -p "$target"
cp ".build/release/$executable" "$target/"
cp -Pv \
  /usr/lib/swift/linux/libBlocksRuntime.so \
  /usr/lib/swift/linux/libFoundation*.so \
  /usr/lib/swift/linux/libdispatch.so \
  /usr/lib/swift/linux/libicu* \
  /usr/lib/swift/linux/libswiftCore.so \
  /usr/lib/swift/linux/libswiftDispatch.so \
  /usr/lib/swift/linux/libswiftGlibc.so \
  "$target"
cd "$target"
ln -s "$executable" "bootstrap"
zip --symlinks lambda.zip *
Don't forget to set the file as executable using
sudo chmod +x package.sh
Navigate back to project directory and run this syntax
docker run \
    --rm \
    --volume "$(pwd)/:/src" \
    --workdir "/src/" \
    swift-lambda-builder \
    scripts/package.sh TodoAPI
Just like before, this will run the swift-lambda-builder container, then execute package.sh inside the scripts folder.
We can check the result of the final zipped package, by navigating to build/lambda/TodoAPI. The Lambda.zip file should exists in the directory.
That's it for packaging! now let's move on to the next step, where we will use Serverless framework to handle deployment of our function to AWS.
To begin, please make sure you have node.js installed in your system, you can install using the installer from the official website or using brew package manager.
After that run:
sudo npm install -g serverless
I assume you have already setup the AWS credentials in your user directory ~/.aws/credentials. If not, please create an IAM role from AWS console with required privileges, in my case, i usually provide full access to provision resources in my main machine.
To use serverless, we just need to create a Serverless yaml file in the project directory. This YAML contains all the declaration we need to provision the service. Let's create serverless.yml file in our project directory.
Open it with your code editor, be very careful with indentation when editing a YAML file, as it uses indentation to structure the data. It is preferred to use spaces instead of tabs when editing YAML file. In this case i use 2 spaces for the indentation.
service: alf-todoapi

package:
  artifact: .build/lambda/TodoAPI/lambda.zip

custom:
  todosTableName: todos-${self:provider.stage}

provider:
  name: aws
  runtime: provided
  stage: ${opt:stage, 'dev'}
  region: ${opt:region, 'us-west-2'}
  environment:
    TODOS_TABLE_NAME: "${self:custom.todosTableName}"
  iamRoleStatements:
    - Effect: Allow
      Action:
        - logs:CreateLogGroup
        - logs:CreateLogStream
        - logs:PutLogEvents
      Resource: "*"
    - Effect: Allow
      Action:
        - dynamodb:UpdateItem
        - dynamodb:PutItem
        - dynamodb:GetItem
        - dynamodb:DeleteItem
        - dynamodb:Query
        - dynamodb:Scan
        - dynamodb:DescribeTable
      Resource:
        - { Fn::GetAtt: [TodosTable, Arn] }

functions:
  createTodo:
    handler: create
    memorySize: 256
    events:
      - http:
          path: /todos
          method: post
          cors: true
  readTodo:
    handler: read
    memorySize: 256
    events:
      - http:
          path: /todos/{id}
          method: get
          cors: true
  updateTodo:
    handler: update
    memorySize: 256
    events:
      - http:
          path: /todos/{id}
          method: put
          cors: true
  deleteTodo:
    handler: delete
    memorySize: 256
    events:
      - http:
          path: /todos/{id}
          method: delete
          cors: true
  listTodos:
    handler: list
    memorySize: 256
    events:
      - http:
          path: /todos
          method: get
          cors: true

resources:
  Resources:
    TodosTable:
      Type: AWS::DynamoDB::Table
      Properties:
        TableName: ${self:custom.todosTableName}
        AttributeDefinitions:
          - AttributeName: id
            AttributeType: S
        KeySchema:
          - AttributeName: id
            KeyType: HASH
        BillingMode: PAY_PER_REQUEST
At the top, let's declare the service, you should provide your own unique value here. In this case, i named it as alf-todoapi. Next, declare the package, inside the package, we have one key, artifact. Let's put the directory of where our Lambda.zip is located inside the build folder. This will be used for deploying to AWS later.
Next, lets' declare custom key used for referencing resources in this YAML. We'll have one key which is todosTableName with value of todos-${self:provider.stage}.
Next, let's declare the provider. Inside the provider, set the name to aws and runtime as provided. For stage, we'll set it as dev, and region to us-west-2. For the environment, we have one variable, which is the TODOS_TABLE_NAME and for the value we can retrieve it from the custom.todosTableName we created earlier. Next let's declare the IAM role for the functions. For our functions, we only provide 2 IAM role, one is to write logs to CloudWatch, and the other one is to perform CRUD operation to DynamoDB. Other than those 2, our function won't be able to access other AWS services and resources.
Next, let's declare the functions. We have five functions that triggered from HTTP events:
createTodo with handler of create, we set the path to /todos, method to POST, and enable CORS.readTodo with handler of read, set the path to /todos/{id}. method to GET. the id placeholder can be retrieved from the pathParameters dictionary in the event request from API Gateway.updateTodo with handler of update, set the path to /todos/{id} and method to PUT. Make sure to enable CORS.deleteTodo with handler of delete, set the path to /todos/{id} and method to DELETE.listTodos with handler of list, set the path to /todos and method to GET.
The handler value itself can be accessed from the _HANDLER environment variable. We are using that to initialize the handler operation in the code we have created.
Next, we need to provision the DynamoDB table resource. We need to put inside the resources. Give it name of TodosTable. The type is AWS::DynamoDB::Table. For the properties, TableName value can be retrieved from the custom.TodosTableName variable. The AttributeDefinition will have one single Attribute Name which is used as The Key for this table. Finally, set the BillingMode as PAY_PER_REQUEST.
That's it for the Serverless YAML file, you can learn more about Serverless by visiting the website that i provide in description below. Other than AWS, it also supports deployment to Google Cloud Function and Azure Function.
To deploy, from the project directory in terminal, we can just type:
sls -v deploy
This will parse the serverless YAML, create the resources on CloudFormation, upload the code to S3 bucket, provision the DynamoDB table, and handle the creation of API Gateway for our function!
Wait until, the deployment has completed. The output will provide us the endpoint that we can use to hit our CRUD API. We can also check the AWS Lambda web dashboard to check the status and logs of our function. Try to use POSTMAN or CURL to hit the endpoint. In my case, i already provided the iOS client app in the completed project repository which you can use to test. It is built with SwiftUI and use CoreData to sync the data.
ConclusionThat's if for this tutorial. To summarize, we have learned to build a backend REST API with Swift and DynamoDB as persistence layer in the cloud, then deploy it to AWS Lambda using Serverless framework. There are many other various cases we can use to build serverless app, such image processing after an image has been uploaded to S3 bucket, processing notification from SNS, and many more. Keep exploring, and i hope this video will be helpful to all of you.
Until the next one, let's keep the lifelong learning goes on. Bye!
Published at June 10, 2020
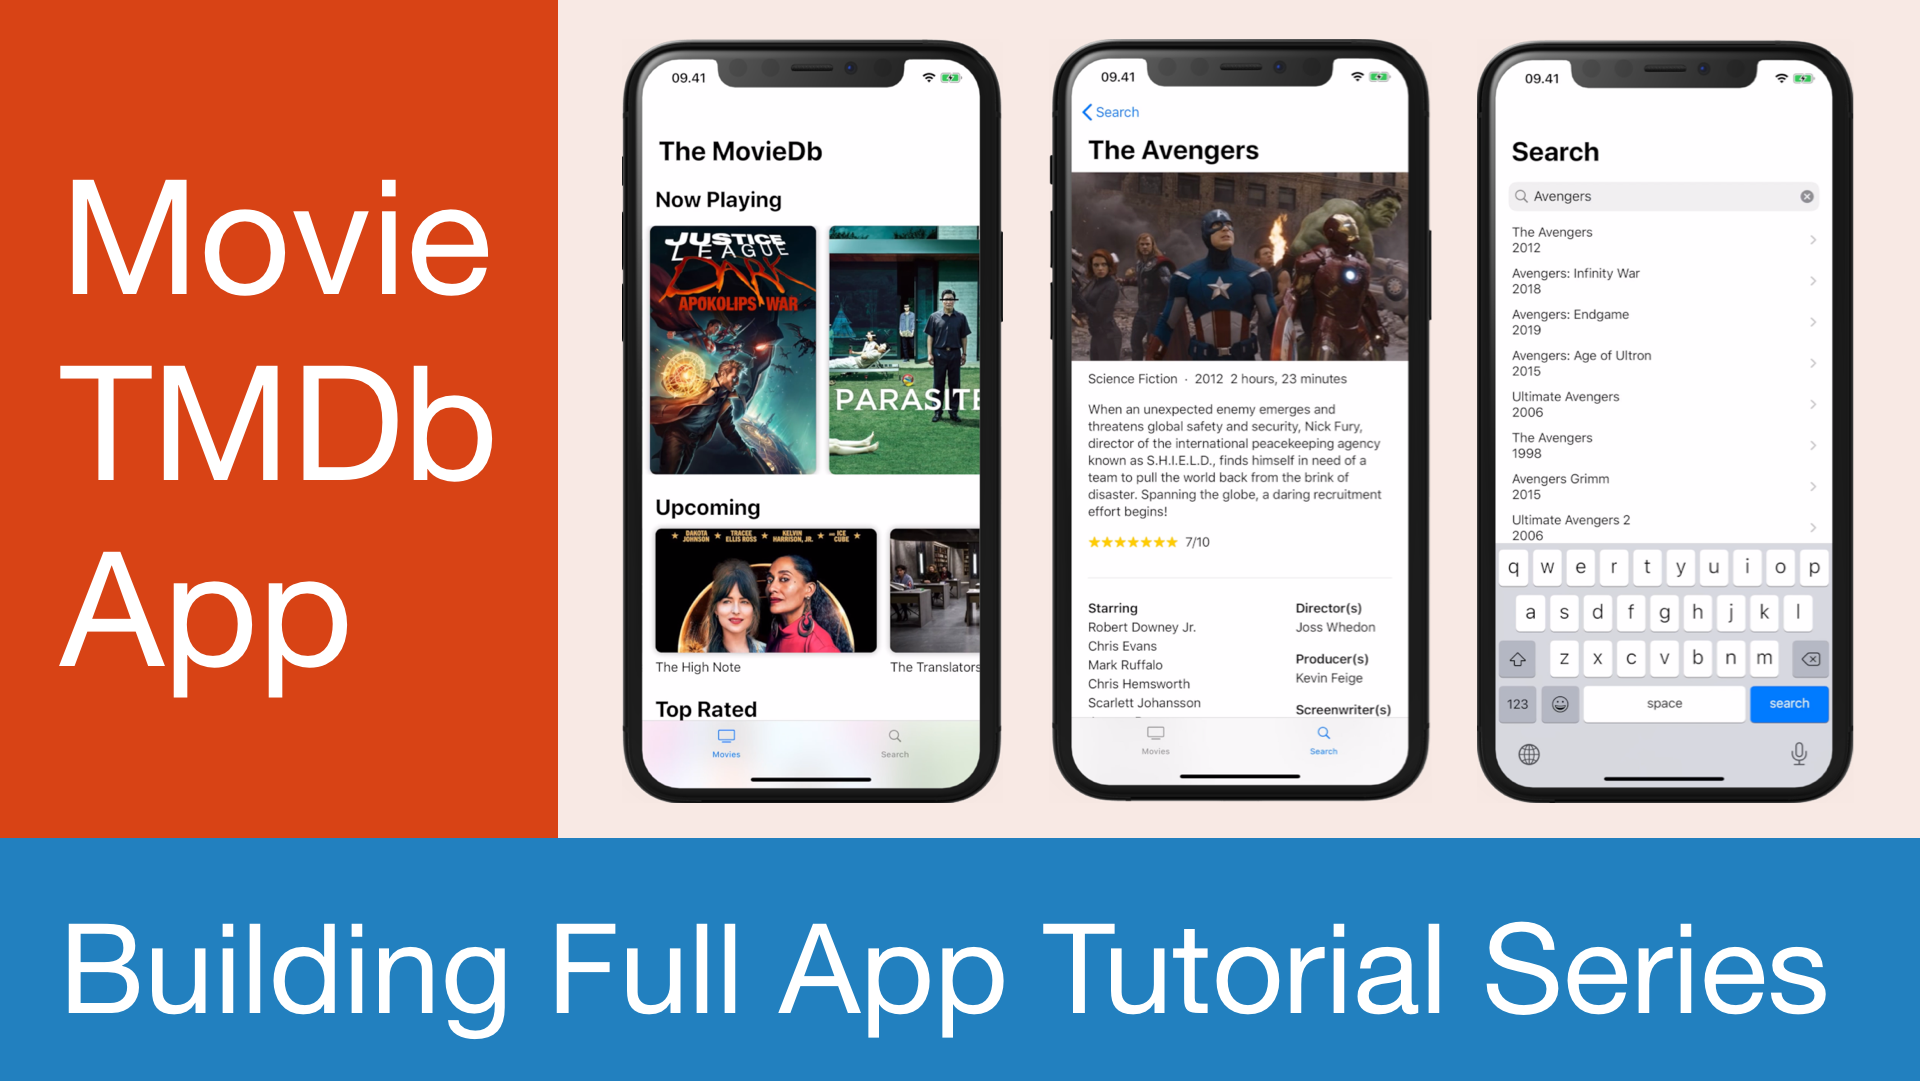
In this video tutorial series, we'll learn on how to build a full iOS app that fetches data from TMDb API with features to display movie in list, show movie detail, and search movie. Please like, share, and subscribe to the YouTube Channel.
Part 1 - Introduction & API Setup
In this introduction video, i am going to show the demo of all the features that we'll build in the tutorial series using the simulator. We'll also take a dive into TMDb API and the endpoints for list, search, and movie detail.
In the second part of the tutorial series, we're going to build the Movie model, MovieService protocol, and implement the MovieStore class API Client to fetch data from TMDb API. We also learn to stub our model using a JSON file.
In the third part of the tutorial, we're going to build the Movie List Screen. Along the way, we'll build the view components for poster and backdrop image to display it in a horizontal carousel. Also, we'll learn to deal with downloading asynchronous data such as Image or JSON from the network by using Observable Object.
In the forth part of the tutorial, we'll build the view components for showing movie banner image, rating, overview, credits, and videos. Also, we'll learn on how to present a SafariViewController to play video from YouTube website in SwiftUI.
We're going to build search movies feature into the app:
Here are the main tasks that we will implement to update to SwiftUI 3.0: - Fix existing bugs, improve efficiency and performance (e.g using the new LazyHStack instead of HStack for the movies carousel) - Use @StateObject property wrapper - Use Searchable, Refreshable, and Task Modifiers - Adopt Swift 5.5 Concurrent APIs such as Async Function, GroupTask, and MainActor. - Refactor current codebase to make the views more composable, modular, and reusable.
Published at May 26, 2020
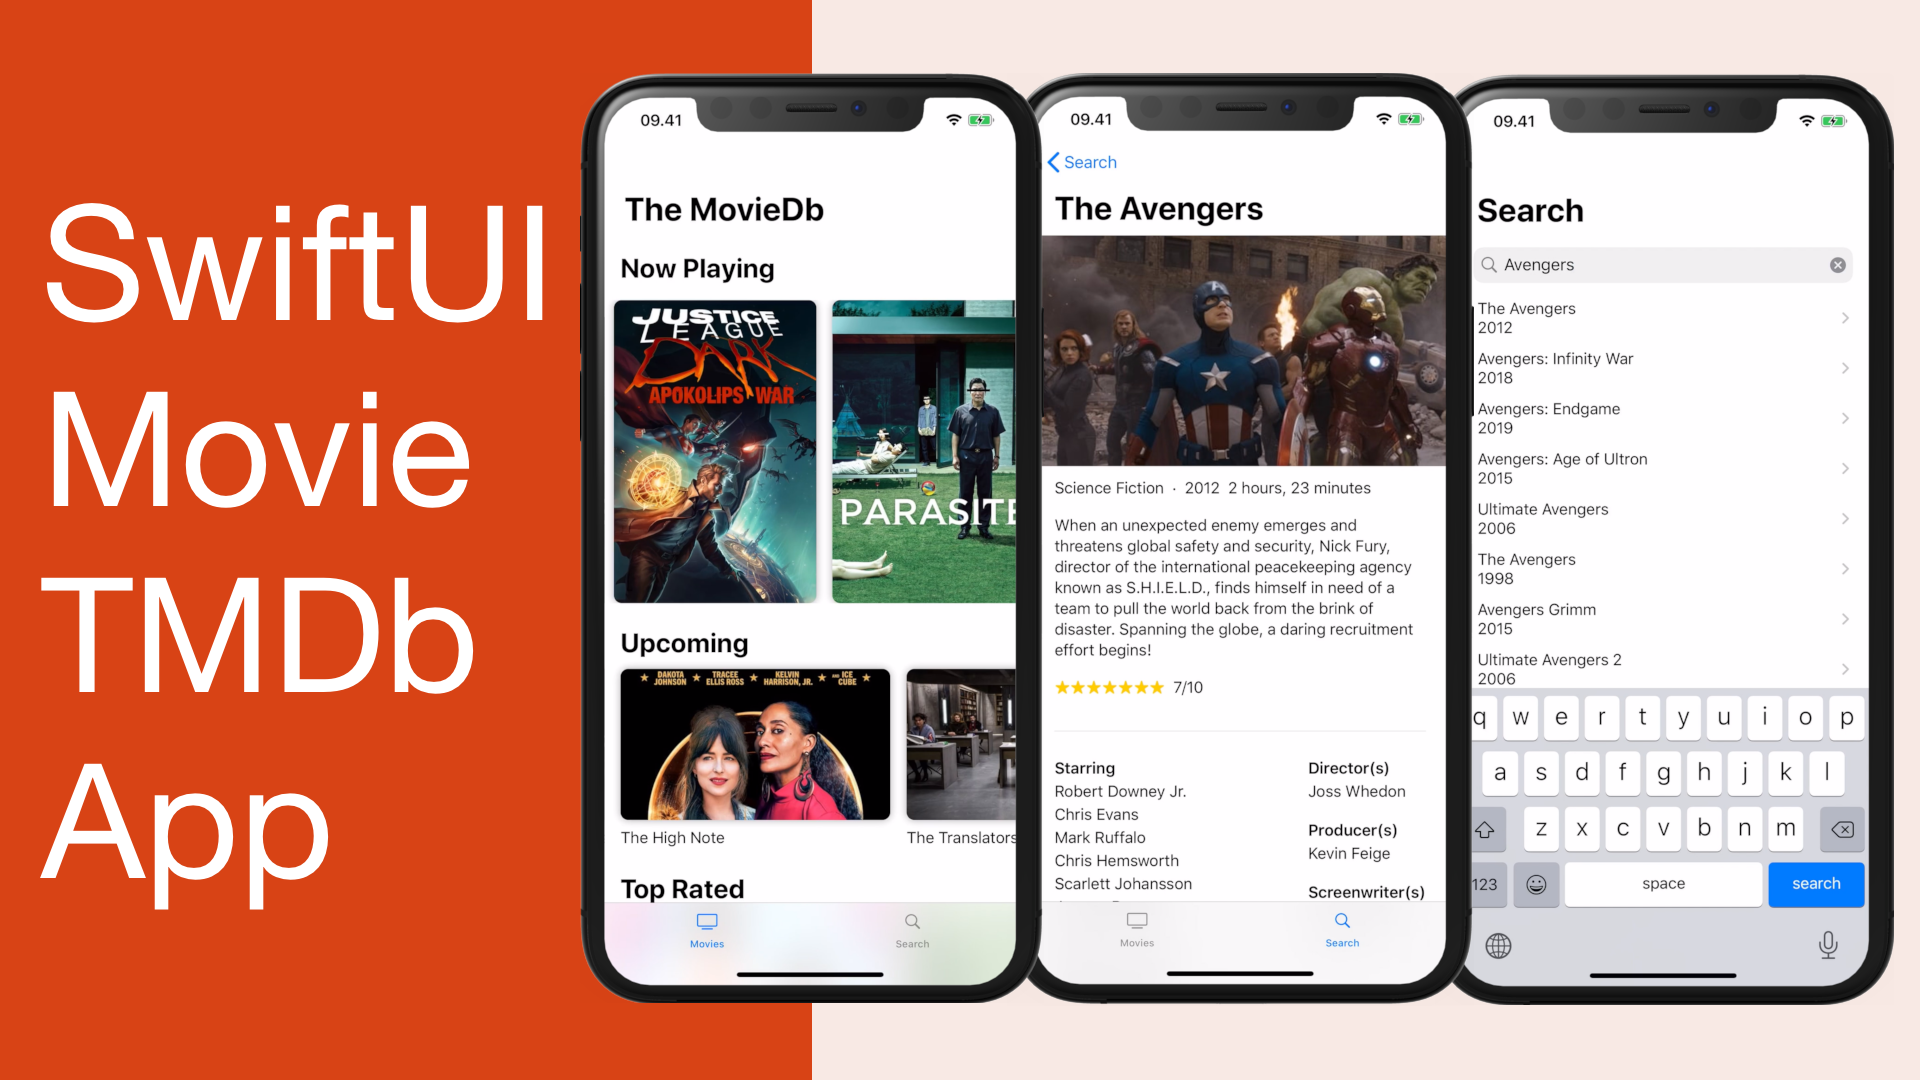
Launching Xcoding With Alfian Youtube Channel. The first video is a speed code on building SwiftUI Movie App with TMDb API from scratch to finish. Please watch and subscribe!
Published at May 15, 2020
This tutorial is the final part of the tutorial series on how to build an expense tracker cross-platform App with SwiftUI, Core Data, & CloudKit. I recommend all of you to read the previous tutorials first before continuing, here are the previous tutorials:
tvOS is the operating system used by Apple TV to deliver immersive and rich contents, media, games, apps to users through the living room. As developers, we can use many existing Apple technologies such as UIKit, CoreData, CloudKit, and Metal to create anything from utility apps, media streaming, and high performance 3D games. It also supports many new technologies such as 4K HDR10, Dolby Vision, and Dolby Atmos to deliver the best video and audio experience.
tvOS uses Siri Remote as the main input for users. With the touchpad, we can use gestures such as swipe, tap, and clicking to navigate through the operating system. It also has built-in accelerometer and gyroscope that can be used to built an interactive control for games.
Focus is used as the focal point when users navigate through each UI element using the remote. When element is in focus, it will be highlighted so users won't get lost when navigating through the contents. When designing app for tvOS, we need to really consider what elements are focusable.
Apps need to be immersive and maximizing the horizontal edge to edge space of the TV. As users will be interacting with the TV in distance, the UI elements such as Text and Button should be legible and large enough. You can learn more about the design guidelines from Apple HIG website on Apple TV.
We can leverage SwiftUI to build user interface for tvOS. The declarative, composable, and reactive paradigms of SwiftUI enables us to build dynamic user interface rapidly. Using SwiftUI, we can learn once and apply our knowledge to build user interfaces for any devices.
What We Will Build
In this tutorial, we'll be focusing to build Expense Tracker Apple TV App with the following features:
Dashboard View to view total spending for each category in a Pie Chart and List.List view to show expenses with details such as name, amount, date, and category.Form View to create, edit, and delete expense.
To build our app, there are several main components we need to build along the way, here they are:
You can download the completed app from the GitHub repository. Try to play around with it using the Apple TV simulator in Xcode!
To begin this project, you need to download the starter project from the GitHub repository. The starter project already includes many components that will help us to just focus on building the user interface for the current app, here they are:
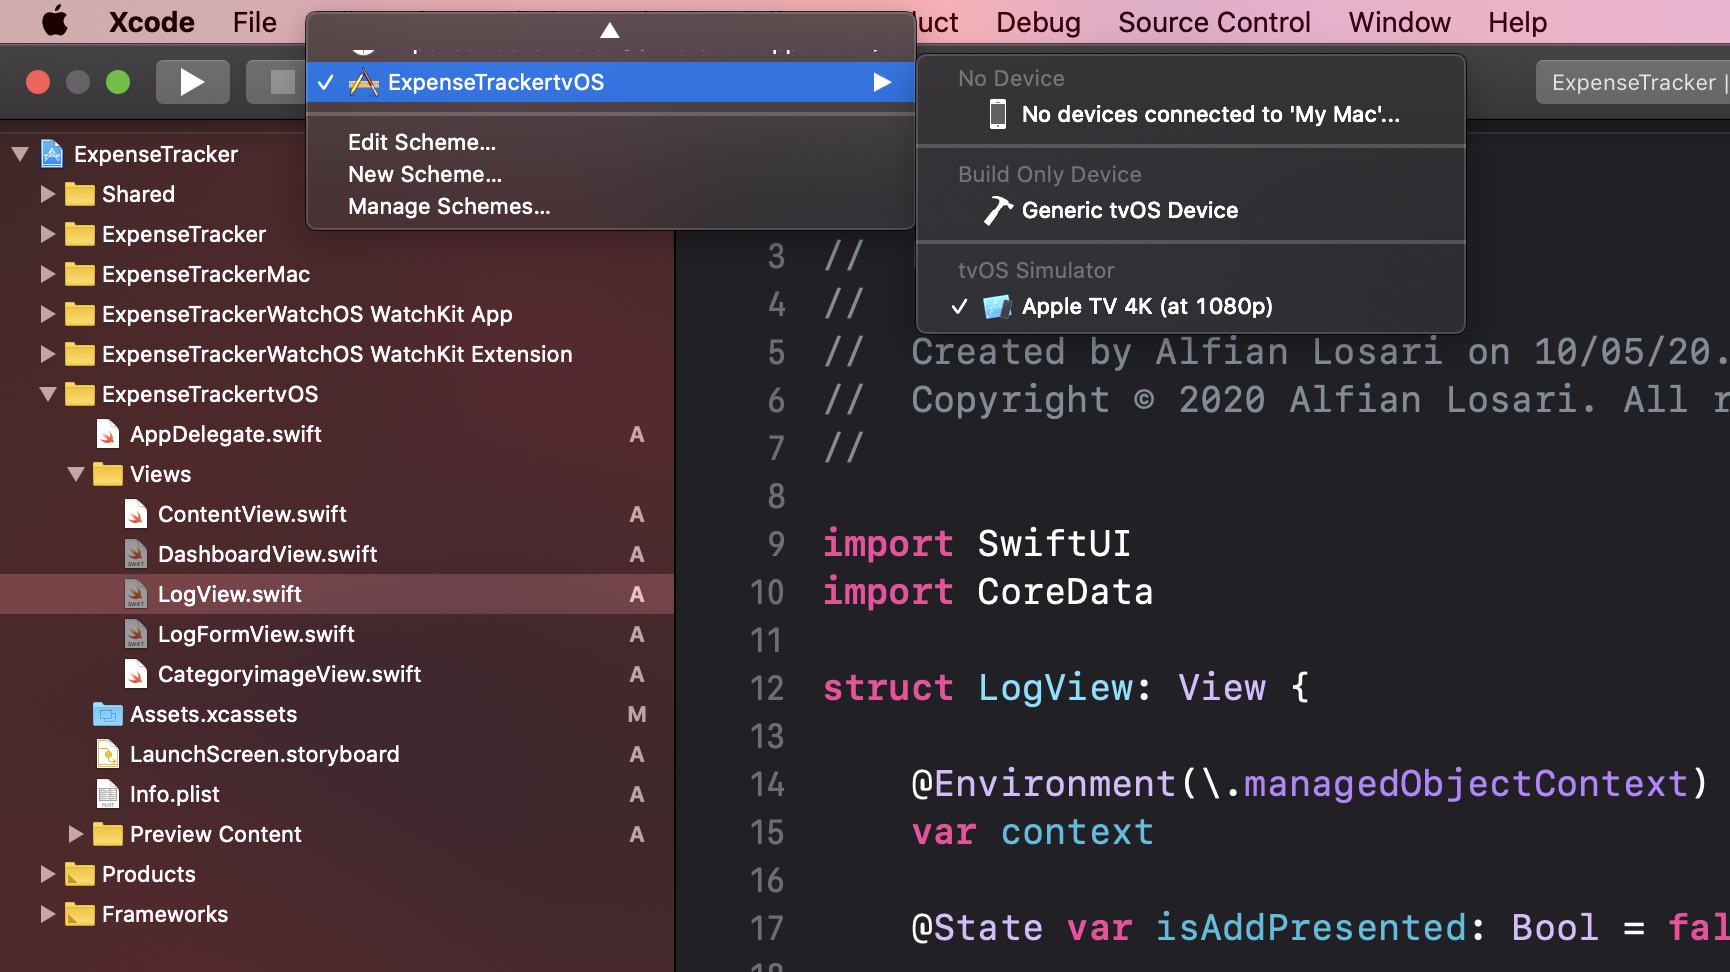
Make sure to select ExpenseTrackertvOS and Apple TV simulator from the scheme to build and run the project. Let's move on to the next section, where we will create the root tab based navigation for our App.

The Root View uses Tab Bar to group the Dashboard and Log View in the same hierarchy at the App level. The tab bar stays pinned at the top of the screen while people navigate between the view. Whenever user click on the menu button, the focus will return to tab bar.
Navigate to ContentView.swift, and copy the following code.
import SwiftUI

struct ContentView: View {

    @State private var selection = 0

    var body: some View {
        TabView(selection: $selection){
            DashboardView()
                .tabItem {
                    HStack {
                        Image(systemName: "chart.pie")
                        Text("Dashboard")
                    }
                }
                .tag(0)

            LogView()
                .tabItem {
                    HStack {
                        Image(systemName: "dollarsign.circle")
                        Text("Expenses")
                    }
                }
                .tag(1)
        }
    }
}
We use TabView passing the selection state property to bind the selected index. In the ViewBuilder, we declare the DashboardView and LogView with their respective tabItem. Each TabItem uses HStack to display the icon and text for the tab.
To pass the managed object context down to the app tree, we'll use environment modifier. Navigate to AppDelegate.swift, and copy the following code.
@UIApplicationMain
class AppDelegate: UIResponder, UIApplicationDelegate {

    var window: UIWindow?
    let coreDataStack = CoreDataStack.shared

    func application(_ application: UIApplication, didFinishLaunchingWithOptions launchOptions: [UIApplication.LaunchOptionsKey: Any]?) -> Bool {

        // Create the SwiftUI view that provides the window contents.
        let contentView = ContentView()
            .environment(\.managedObjectContext, coreDataStack.viewContext)
                // ...
    }
    // ...
}
We declare the CoreDataStack instance and store it as property, then we pass the viewContext using the environment modifier after we declare the ContentView. This will inject the context at the root level of the View.
Try to build and run the app, you should be able to see the tab bar at the top and to navigate between dashboard and log view!
Building The Log ViewTo navigate in Apple TV Simulator, you can use the
arrow keysto simulate swipe,enterto simulateclick, andescapeto simulate clickingmenu.
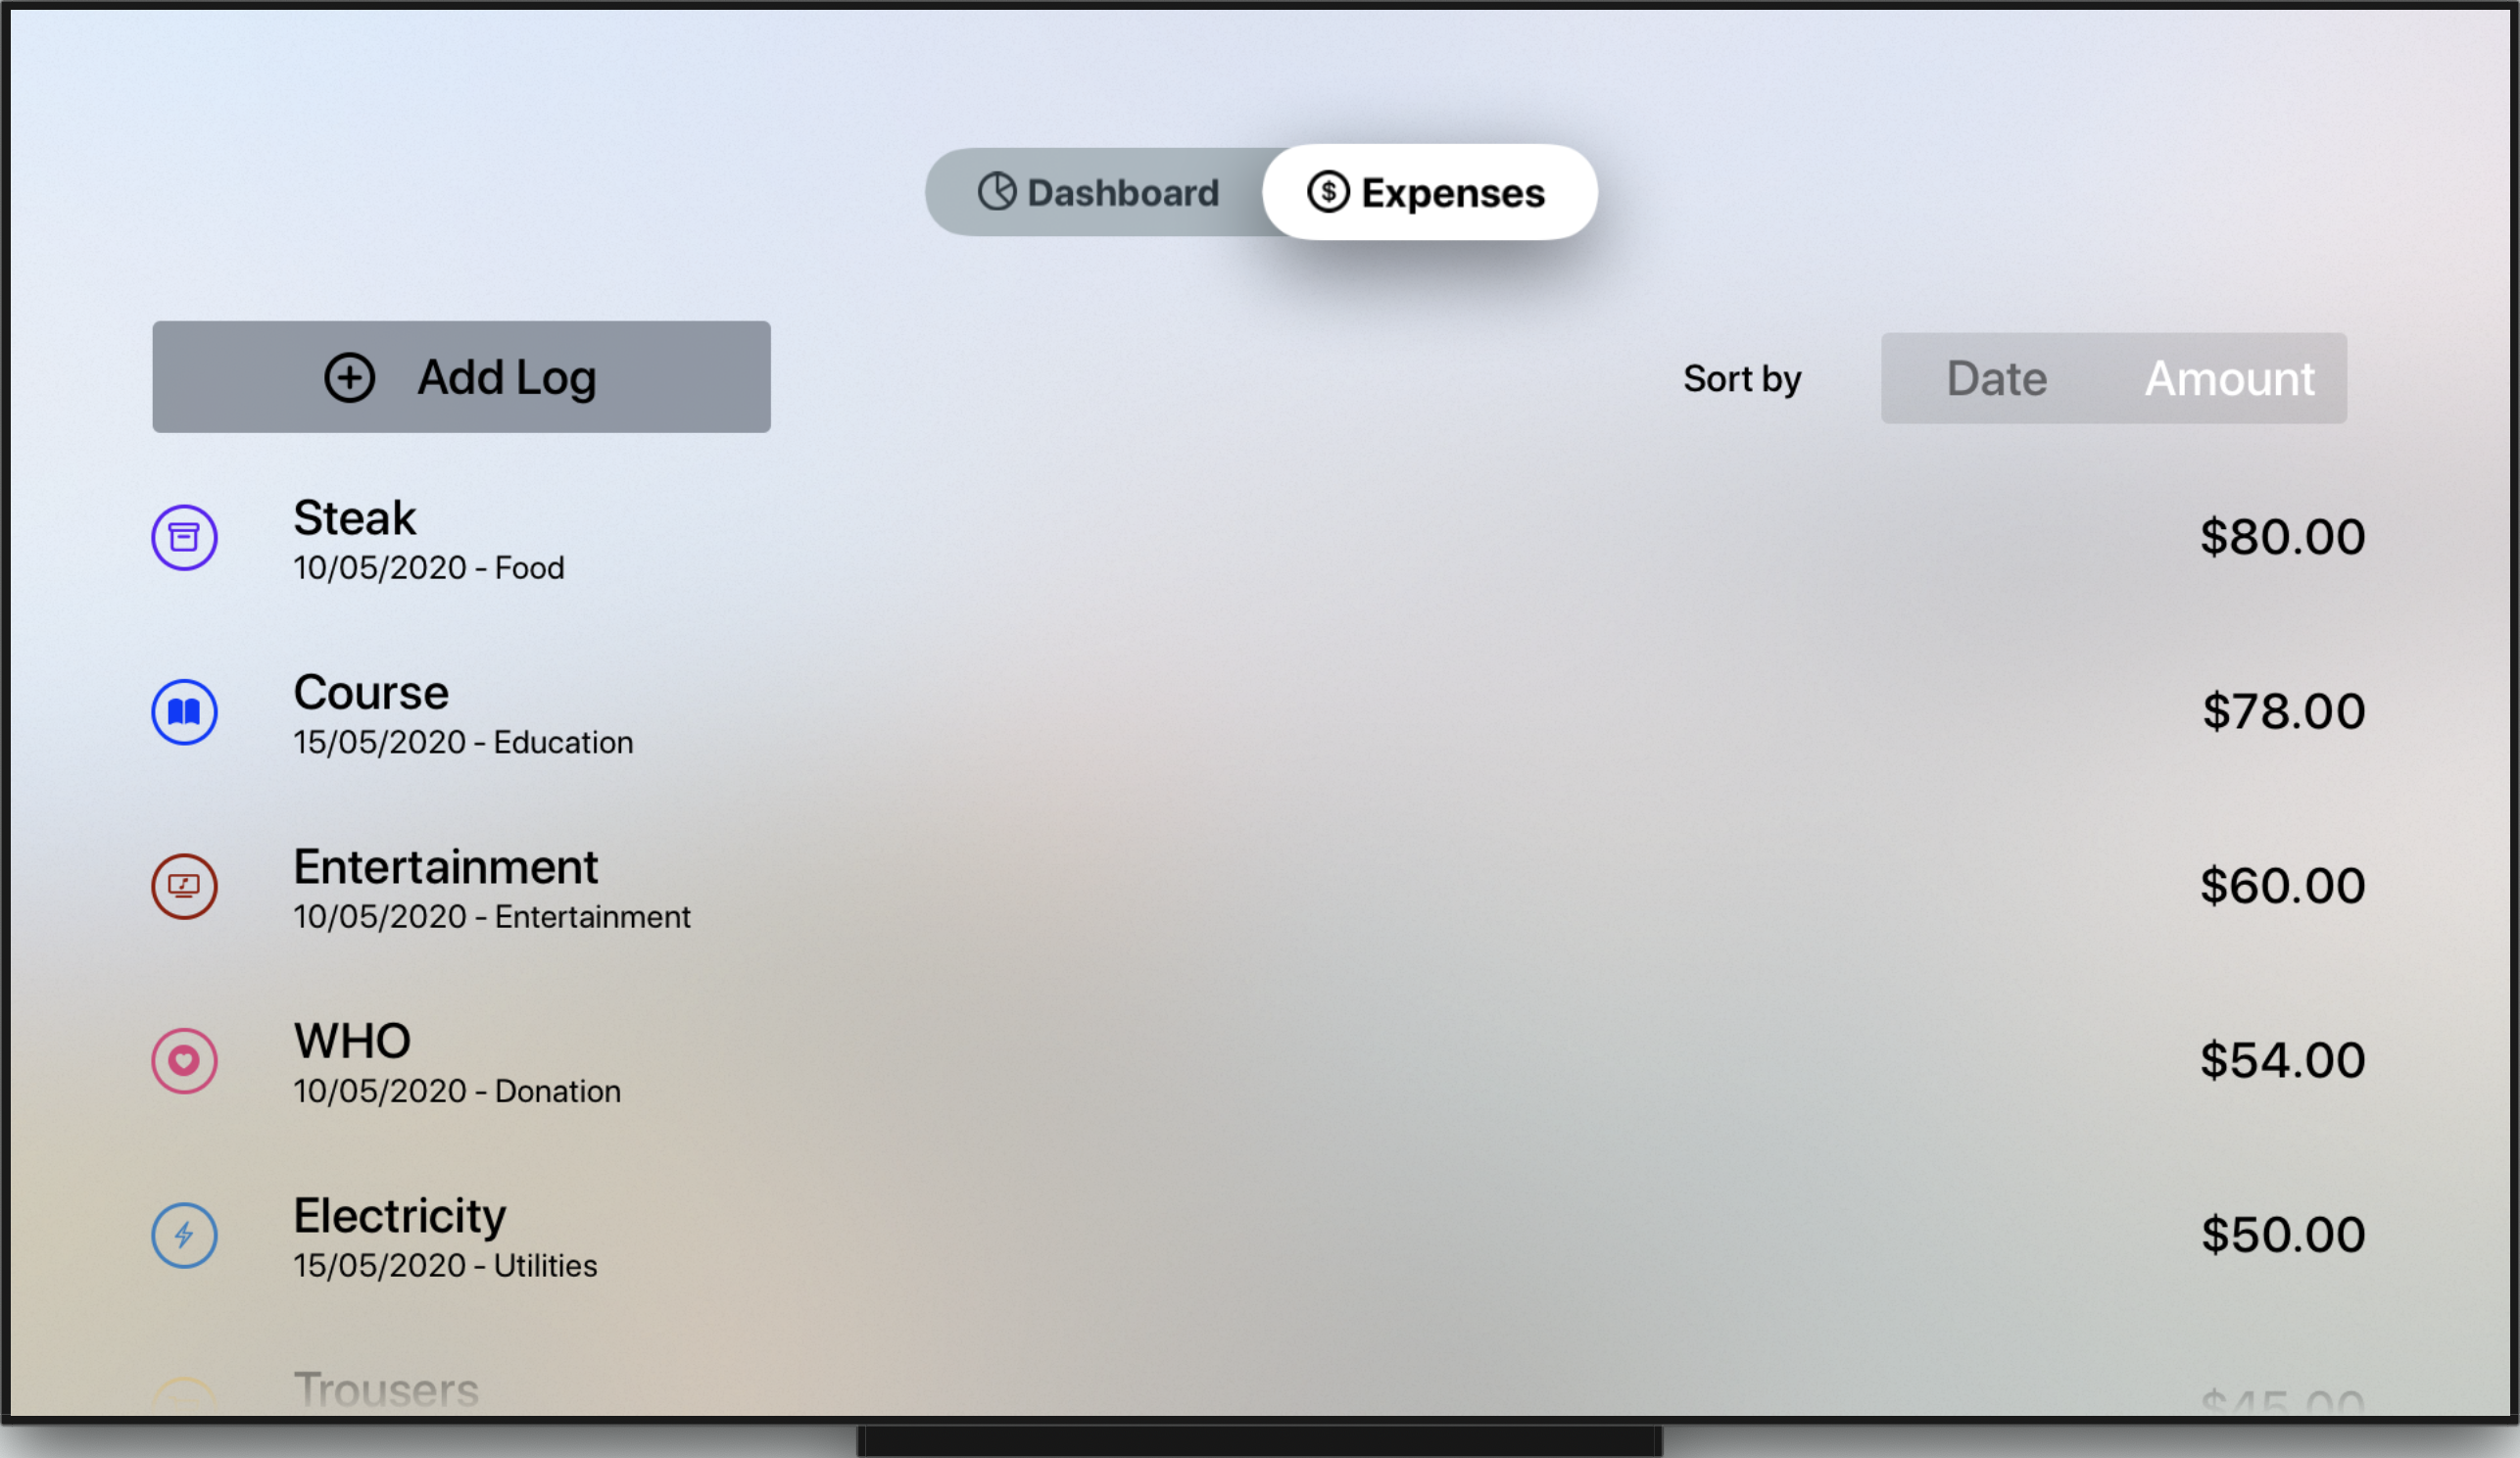
The LogView consists of List of expenses, Add Button, and Sort by Picker with Segmented style. We'll put the List into LogListView and the segmented picker into SelectSortOrderView.
Create a new SwiftUI View named SelectSortOrderView, and copy the following code.
struct SelectSortOrderView: View {

    @Binding var sortType: SortType
    private let sortTypes: [SortType] =  [.date, .amount]

    var body: some View {
        HStack {
            Text("Sort by")
            Picker(selection: $sortType, label: Text("Sort by")) {
                ForEach(sortTypes) { type in
                    Text(type.rawValue.capitalized)
                        .tag(type)
                }
            }
            .pickerStyle(SegmentedPickerStyle())
        }
        .padding(.horizontal)
    }
}
We use HStack to put a Text label and Picker. In the picker's ViewBuilder, we use ForEach to an array containing the SortType enum cases for date and amount. To bind the selected sort type, we declare the sortType property with @Binding so the parent view can pass the state down and get notification when the value changes.
The LogListView contains the expenses from the FetchedResults to the ExpenseLog entity using @FetchRequest property wrapper. To show each expense in a row, we'll need to build and use the LogRowView.
struct LogRowView: View {

    @Binding var log: ExpenseLog

    var body: some View {
        HStack {
            CategoryImageView(category: log.categoryEnum)
            VStack(alignment: .leading) {
                Text(log.nameText)
                HStack(spacing: 4) {
                    Text(log.dateText)
                    Text("-")
                    Text(log.categoryText)
                }
                .font(.caption)
            }
            Spacer()
            Text(log.amountText)
        }
        .font(.headline)
        .padding(.vertical)
    }
}
Using HStack, we use the provided CategoryImageView to show the image of the category, followed by a VStack containing the name and nested HStack of date and category text. Last, we show the amount text, to push to the trailing edge, we put a Spacer in between.
With LogRowView in place, now we can build the LogListView.
struct LogListView: View {

    @Environment(\.managedObjectContext)
    var context

    @State var logToEdit: ExpenseLog?
    @FetchRequest(
        entity: ExpenseLog.entity(),
        sortDescriptors: [
            NSSortDescriptor(keyPath: \ExpenseLog.date, ascending: false)
        ]
    )
    var result: FetchedResults<ExpenseLog>

    init(sortDescriptor: NSSortDescriptor) {
        let fetchRequest = NSFetchRequest<ExpenseLog>(entityName: ExpenseLog.entity().name ?? "ExpenseLog")
        fetchRequest.sortDescriptors = [sortDescriptor]
        _result = FetchRequest(fetchRequest: fetchRequest)
    }

    var body: some View {
        ForEach(self.result) { (log: ExpenseLog) in
            Button(action: {
                self.logToEdit = log
            }) {
                LogRowView(log: log)
            }
        }
        .sheet(item: self.$logToEdit) { (log: ExpenseLog) in
                // TODO: LogFormView
        }
    }
}
We use @FetchRequest property wrapper to fetch the ExpenseLog into FetchedResults. As the user can change the sort order based by amount or date, we'll add a custom initializer where we can inject a sortDescriptor to construct a new fetch request with it. Before we're able to fetch data with FetchRequest , we need to inject managed object context using the @Environment property wrapper.
In the body of the View, we use ForEach passing the fetched results array. In the ViewBuilder, we use Button passing an action closure to assign the logToEdit state property with the selected log. At last, in the button's ViewBuilder, we return the LogRowView passing the log. The logEdit state determines whether the modal sheet to present the form will be shown.
Buttonis afocusableelement which will get highlighted when the user navigates through it. When user click on the Siri Remote, it will invoke the action closure.
Finally, we can build the LogView from all the previous components we just built. Navigate to LogView and copy the following code.
struct LogView: View {

    // 1
    @State private var sortType = SortType.date
    @State private var isAddPresented: Bool = false

    var body: some View {
          // 2
        List {
                // 3
            HStack {
                Button(action: {
                    self.isAddPresented = true
                }) {
                    HStack(spacing: 32) {
                        Spacer()
                        Image(systemName: "plus.circle")
                        Text("Add Log")
                        Spacer()
                    }
                }
                .buttonStyle(BorderedButtonStyle())
                .font(.headline)

                Spacer()
                SelectSortOrderView(sortType: $sortType)
            }

            // 4
            LogListView(sortDescriptor: ExpenseLogSort(sortType: sortType, sortOrder: .descending).sortDescriptor)
        }
        .padding(.top)
        .sheet(isPresented: $isAddPresented) {
                // 5
                        // TODO: Return Log Form View
        }
    }
}
To explain all the code above, i provided several main points in a list, here they are:
sortType to bind the selected sort type in SelectedSortOrderView, and isAddPresented as a boolean state to determine the presentation of modal sheet when user taps on the Add Button.List is the main container for all the views. Views placed in the ViewBuilder are scrollable.List is a HStack. The stack shows the Add Button and the SelectSortOrderView segmented picker.LogListView passing the sort descriptor to the initializer. Notice that we use ExpenseLogSort struct to construct the sort descriptor based on the sort type and default descending sort order.sheet modifier to the List. We'll return the LogFormView that we'll build on the next section.
That's it for the Log Tab! Try to build and run the project, you should be able to navigate to the expenses tab showing the add button and segmented picker. The list is empty for now, in the next section, we'll build the LogFormView so users can add and edit the expense!
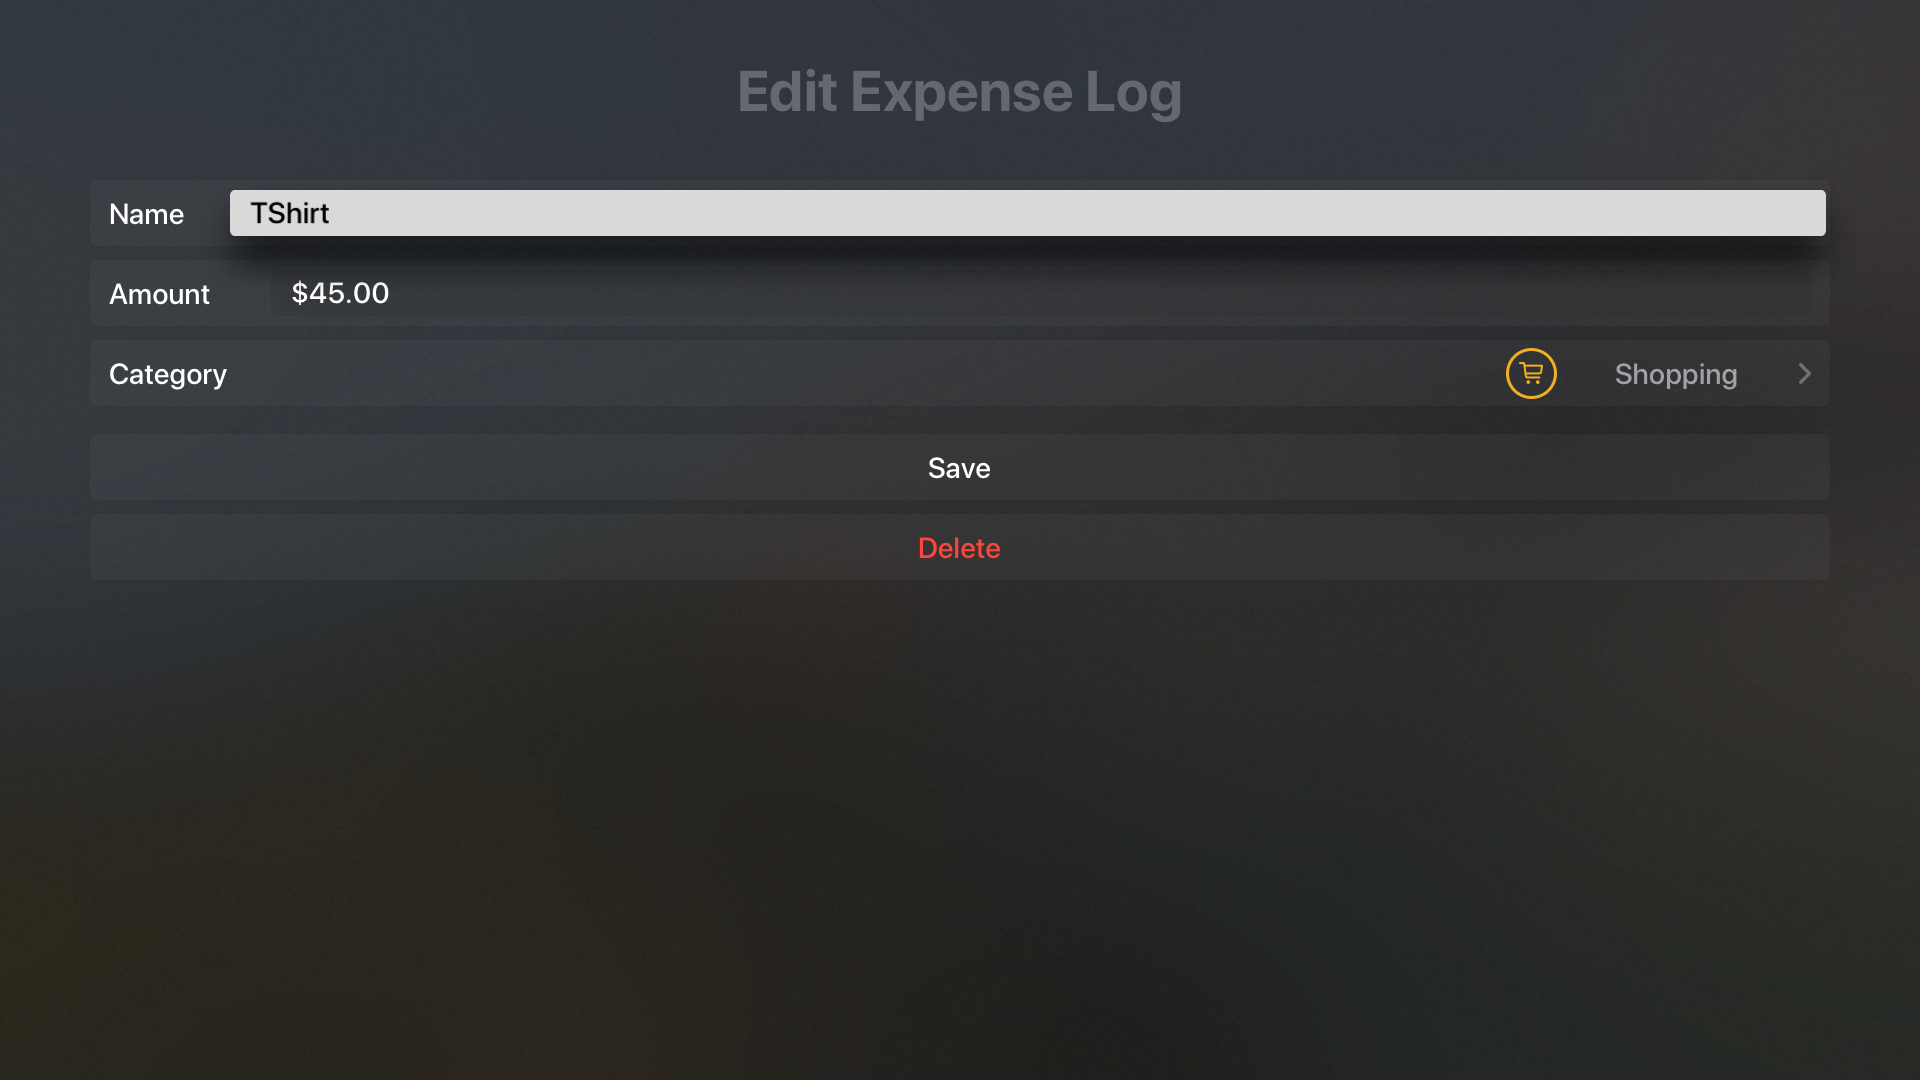
The LogFormView is a View containing the Form for the user to create or edit expense name, amount using the TextField and Picker for assigning category.
Create a new file named LogFormView.swift and copy the following code.
struct LogFormView: View {

    // 1
    @State private var name: String = ""
    @State private var amount: Double = 0
    @State private var category: Category = .utilities

    @Environment(\.presentationMode)
    var presentationMode

    // 2
    var logToEdit: ExpenseLog?
    var context: NSManagedObjectContext

    // 3
    var title: String {
        logToEdit == nil ? "Create Expense Log" : "Edit Expense Log"
    }

    var body: some View {
            // 4
        NavigationView {
            Form {
                  // 5
                Section {
                    HStack {
                        Text("Name")
                        Spacer()
                        TextField("Name", text: $name)
                    }

                    HStack {
                        Text("Amount")
                        Spacer()
                        TextField("Amount", value: $amount, formatter: Utils.numberFormatter)
                    }

                    Picker(selection: $category, label: Text("Category")) {
                        ForEach(Category.allCases) { category in
                            HStack {
                                CategoryImageView(category: category)
                                Text(category.rawValue.capitalized)
                            }
                            .tag(category)
                        }
                    }
                }

                // 6
                Section {
                    Button(action: self.onSaveTapped) {
                        HStack {
                            Spacer()
                            Text("Save")
                            Spacer()
                        }
                    }

                    if self.logToEdit != nil {
                        Button(action: self.onDeleteTapped) {
                            HStack {
                                Spacer()
                                Text("Delete")
                                    .foregroundColor(Color.red)
                                Spacer()
                            }
                        }
                    }
                }
            }
            .navigationBarTitle(title)
        }
    }

    // 7
    private func onSaveClicked() {
        let log: ExpenseLog
        if let logToEdit = self.logToEdit {
            log = logToEdit
        } else {
            log = ExpenseLog(context: self.context)
            log.id = UUID()
            log.date = Date()
        }

        log.name = self.name
        log.category = self.category.rawValue
        log.amount = NSDecimalNumber(value: self.amount)
        do {
            try context.saveContext()
        } catch let error as NSError {
            print(error.localizedDescription)
        }
        self.presentationMode.wrappedValue.dismiss()
    }

    // 8
    private func onDeleteClicked() {
        guard let logToEdit = self.logToEdit else { return }
        self.context.delete(logToEdit)
        try? context.saveContext()
        self.presentationMode.wrappedValue.dismiss()
    }
}
To help explaining all the code above, i have break down them into several main points, here they are:
Form, we declare 3 state properties: name, amount, and category.logToEdit which will be passed when user edit an existing log and context which is the managed object context to save the expense.title is a computed property, the value is determined by the logToEdit. If it exists, the value will be create and vice versa, the value will be edit.NavigationView as the root view in the body. We need to use this for the Picker to work properly when user click and navigate to the category selection screen. In the ViewBuilder we use Form to wrap all the remaining views.name and amount. To be able to bind the amount text field to the amount property with type of double, we need to pass the NumberFormatter which will be used to convert the string to double when user taps return on the keyboard. For category selection, we use Picker passing all cases of the category.Save Button that will invoke the onSaveTapped method when clicked. In addition, when users edit log, we show a Delete Button that will invoke the onDeleteTapped method when clicked.onSaveClicked method, we create a new ExpenseLog instance with unique UUID and current Date if logToEdit is nil. Then, we retrieve and assign all the state properties to the expense log. At last, we save the context and dismiss the modal sheet using presentation mode that we retrieve using the @Environment.onDeleteClicked method, we delete the logToEdit from the context, save, and dismiss the modal sheet.
Before we can use the LogFormView, we need to add it in 2 places: LogView and LogListView. Navigate to LogView, find the sheet modifier, and add the following code.
.sheet(isPresented: $isAddPresented) {
    LogFormView(context: self.context)
}
Navigate to LogListView, find the sheet modifier, and add the following code.
  .sheet(item: self.$logToEdit) { (log: ExpenseLog) in
    LogFormView(
        logToEdit: log,
        context: self.context,
        name: log.name ?? "",
        amount: log.amount?.doubleValue ?? 0,
        category: Category(rawValue: log.category ?? "") ?? .food
    )
}
In the edit form, we'll also pass the log attributes it can fill the textfields and picker with the existing value.
Try to build and run the project, you should be able to click the Add Button from the expenses tab. Fill the form using your keyboard and save. Also, try to edit and delete an expense log to make sure all the features are working properly.

The DashboardView shows the Pie Chart of the total spending distribution for each category and List of category rows with total amount text side by side using a HStack . Before we build the DashboardView, let's build the CategoryRowView component first.
Create a View named CategoryRowView, and copy the following code.
struct CategoryRowView: View {
    let category: Category
    let sum: Double

    var body: some View {
        HStack {
            CategoryImageView(category: category)
            Text(category.rawValue.capitalized)
            Spacer()
            Text(sum.formattedCurrencyText)
        }
        .font(.headline)
        .padding(.vertical)
    }
}
We use HStack to show the CategoryImageView, name, and formatted amount text horizontally. To make sure the texts are legible, we add the headline font modifier.
With CategoryRowView in place, navigate to DashboardView and copy the following code.
struct DashboardView: View {

    // 1
    @Environment(\.managedObjectContext)
    var context

      // 2
    @State private var totalExpenses: Double?
    @State private var categoriesSum: [CategorySum]?

    var body: some View {
              // 3
        ZStack {
                // 4
            HStack(alignment: .center, spacing: 64) {
                if totalExpenses != nil && totalExpenses! > 0 {
                    VStack(alignment: .center, spacing: 2) {
                        Text("Total expenses")
                            .font(.headline)

                        if categoriesSum != nil  {
                            PieChartView(
                                data: categoriesSum!.map { ($0.sum, $0.category.color) },
                                style: Styles.pieChartStyleOne,
                                form: CGSize(width: 512, height: 384),
                                dropShadow: false
                            ).padding()
                        }
                        Text(totalExpenses!.formattedCurrencyText)
                            .font(.title)
                    }
                }

                // 5
                if categoriesSum != nil {
                    List(self.categoriesSum!) { (categorySum: CategorySum) in
                        Button(action: {}) {
                            CategoryRowView(category: categorySum.category, sum: categorySum.sum)
                        }
                    }
                    .listRowBackground(Divider())
                }
            }
            .padding(.top)

            // 6
            if totalExpenses == nil && categoriesSum == nil {
                Text("No expenses data\nPlease add log from the Expenses tab")
                    .multilineTextAlignment(.center)
                    .font(.headline)
                    .padding()
            }
        }
        .onAppear(perform: fetchTotalSums)
    }

    // 7
    func fetchTotalSums() {
        ExpenseLog.fetchAllCategoriesTotalAmountSum(context: self.context) { (results) in
            guard !results.isEmpty else {
                self.totalExpenses = nil
                self.categoriesSum = nil
                return
            }

            let totalSum = results.map { $0.sum }.reduce(0, +)
            self.totalExpenses = totalSum
            self.categoriesSum = results.map({ (result) -> CategorySum in
                return CategorySum(sum: result.sum, category: result.category)
            })
        }
    }
}
Explanation of each points in the code:
@Environment property wrapper to retrieve the managed object context passed down from the parent view.totalExpenses which is the value of the total spending for all categories combined and categoriesSum which is the array of CategorySum struct representing total spending of a category.ZStack as the root view so we're able to add an Text showing info to users when the expenses are empty. We'll also add the onAppear modifier that will invoke the fetchTotalSums method when the view appears.PieChart and List side-by-side horizontally, we use HStack. At leading side, we check if totalExpense is not nil and the value is larger than zero before we show the PieChart and the total expense text in a VStack.List, we check if the categoriesSum is not nil. If exists, we declare List passing the categoriesSum which already conforms to Identifiable protocol. To make the row focusable when user scrolls, we wrap the CategoryRowView in a Button with empty action closure.totalExpenses and categoriesSum are nil, we show a Text containing the information for users to add new expense from the expenses tab.fetchTotalSums method, we invoke the ExpenseLog static method to fetch the total sum for all the categories. In the closure, we assign the totalExpense property by using reduce method to sum all the categories total sum. For categoriesSum, we transform the results using map method by returning CategorySum instance containing the category with total sum.
Build and run the project to view the stats in PieChart and List in their glory! Make sure you have added several expense log with different categories before.
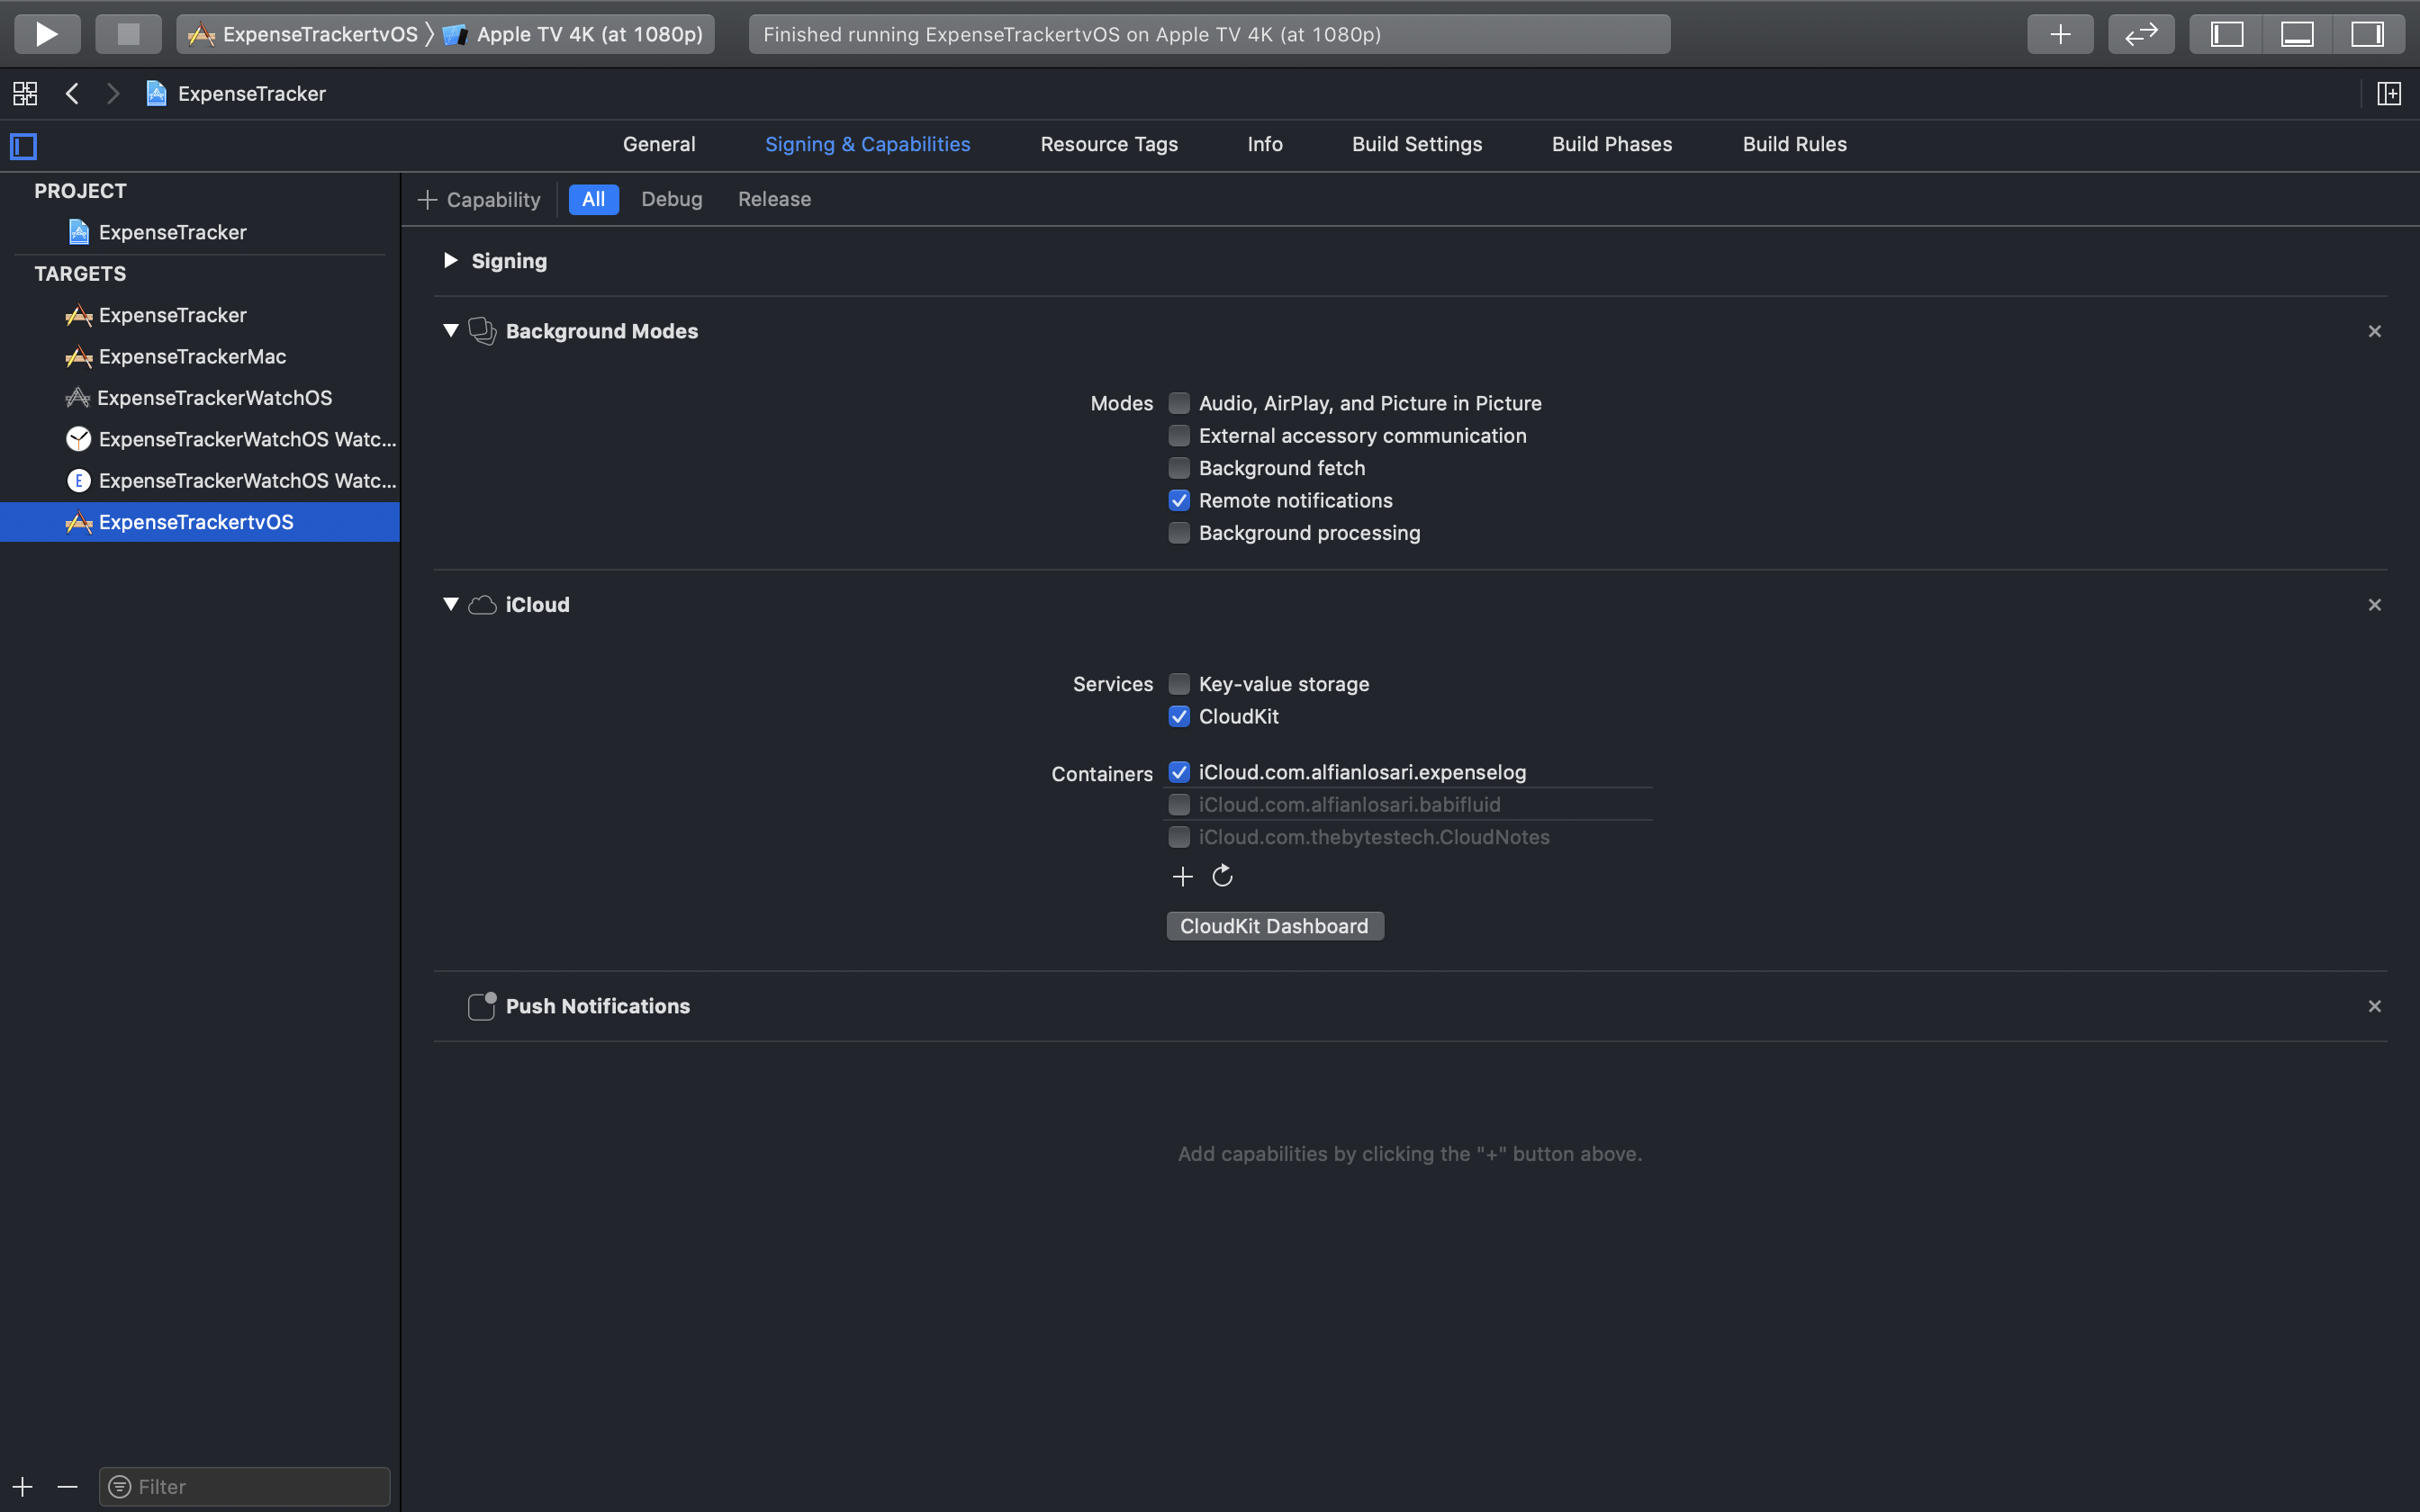
To make sure Core Data CloudKit syncing is working, you need to add a valid CloudKit container with the same identifier to all the targets. To try this, make sure you sign in into iCloud in the simulator or your physical devices when you want to test.
ConclusionCongratulations! you have successfully built the Expense Tracker Apple TV App with SwiftUI and Core Data. With this knowledge and experience, you should be able to create more amazing apps with your awesome creativity and ideas. This final part concludes the tutorial series on building an Expense Tracker cross-platform App with SwiftUI and Core Data.
Until the next one! Let's keep the lifelong learning goes on!
Published at May 07, 2020
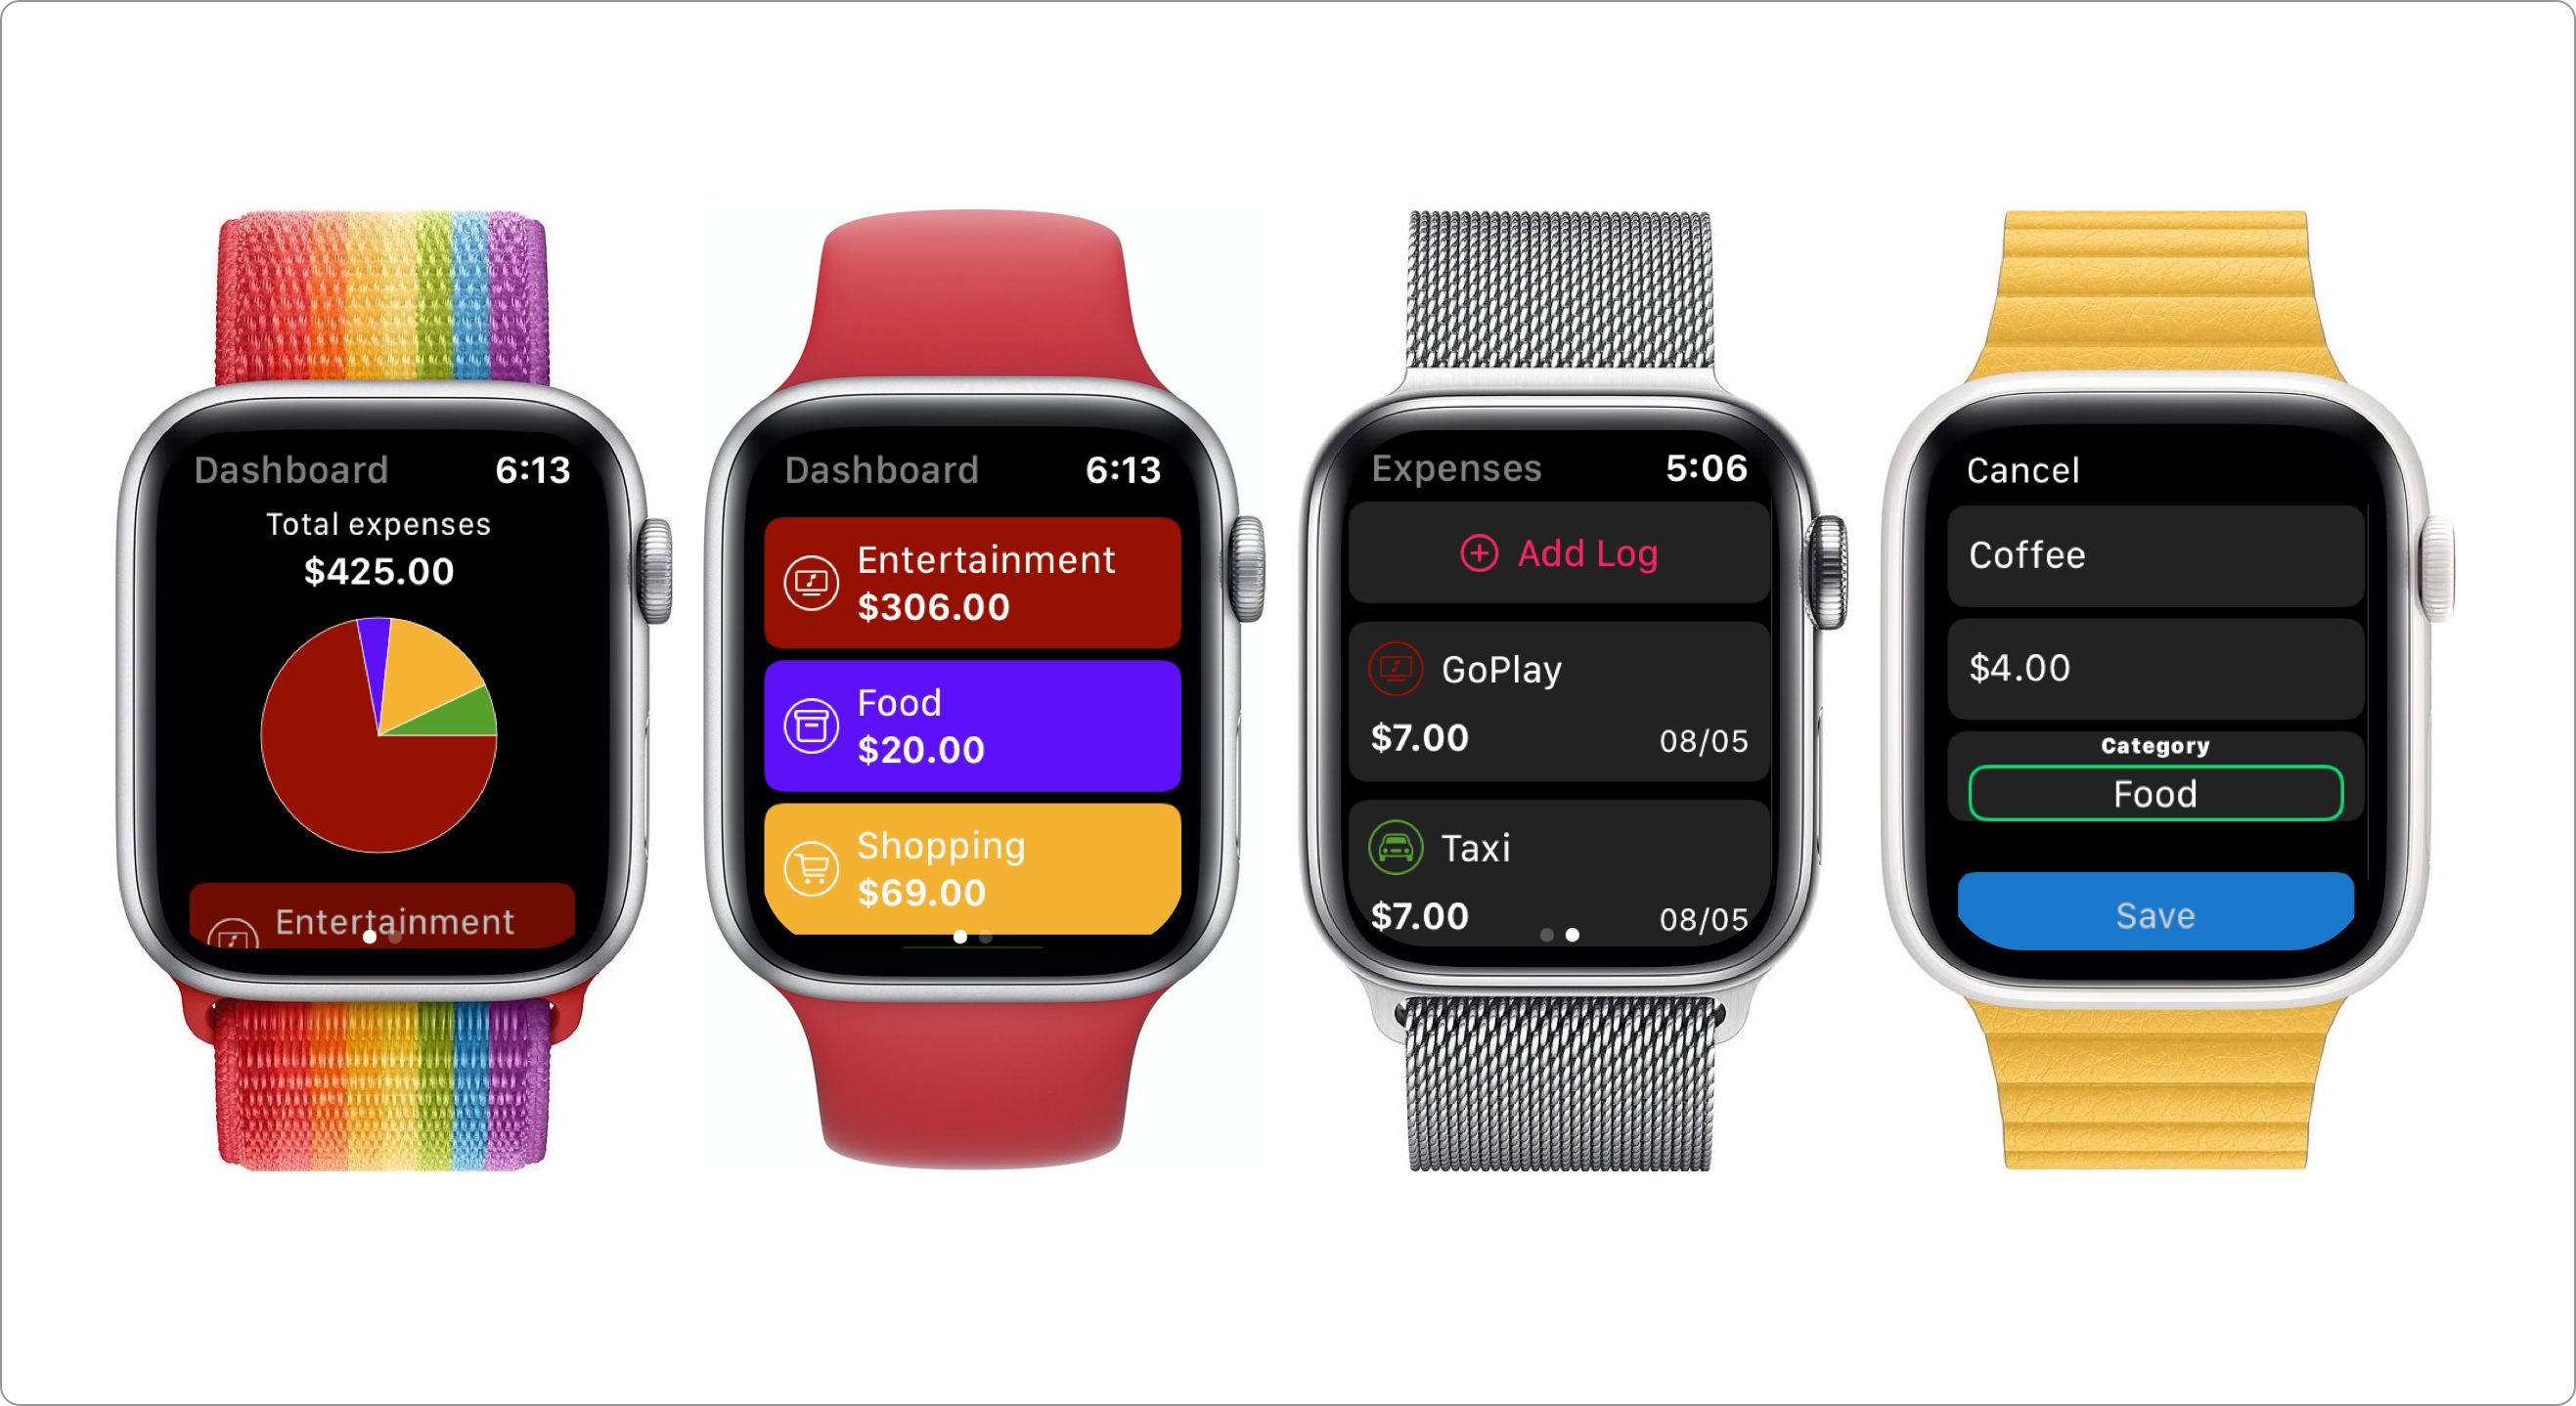
This tutorial is part 3 of the tutorial series on how to build an expense tracker cross-platform App with SwiftUI, Core Data, & CloudKit. I recommend all of you to read the previous tutorials first before continuing, here are the previous tutorials:
With the introduction of watchOS 6 in WWDC 2019, Apple finally provided the capability for developers to create a fully independent App Experience on Apple Watch without a companion app on iOS. Also, users can discover and download apps directly from the built-in App Store without an iPhone.
WatchOS 6 SDK also provides SwiftUI support for developers to build native and optimized Apple Watch user experience complete with custom views, animation, and digital crown haptic support out of the box. It also supports many native frameworks and features such as Core Data, CloudKit, Sign in with Apple, and many more. To learn more about developing Apps for watchOS, you can visit Apple Developer Website on watchOS.
What We Will Build
In this tutorial, we'll be focusing on building the Expense Tracker independent watchOS App. Similar to the iOS & macOS app in the previous article, our App will also have the dashboard and expense log list screen as well as the form to create and edit log.
When developing an Apple Watch App, we need to consider several design guidelines provided by Apple in their Human Interface Guidelines such as:
Lightweight interactions. The App needs to provide simplified, focused, and essential information where users can interact at a glance without too much visual distraction. We won't need features such as multi categories filer and sort selection from the log list so users can take a glance at essential information from the App.Holistic design. We'll use native SwiftUI List with watchOS Carousel so users can seamlessly scroll the content the digital crown on Apple Watch with smooth native animation.
Here are the main components that we'll be focusing to build in this tutorial:
You can download the completed project from the GitHub Repository.
To begin this tutorial, please download the starter project from GitHub Repository. The starter project has already provided several components such as:
Make sure to select ExpenseTrackerWatchOS WatchKit App and Apple Watch simulator from the scheme to build and run the project. Let's move on to the next section, where we will create the root page based navigation for our App.
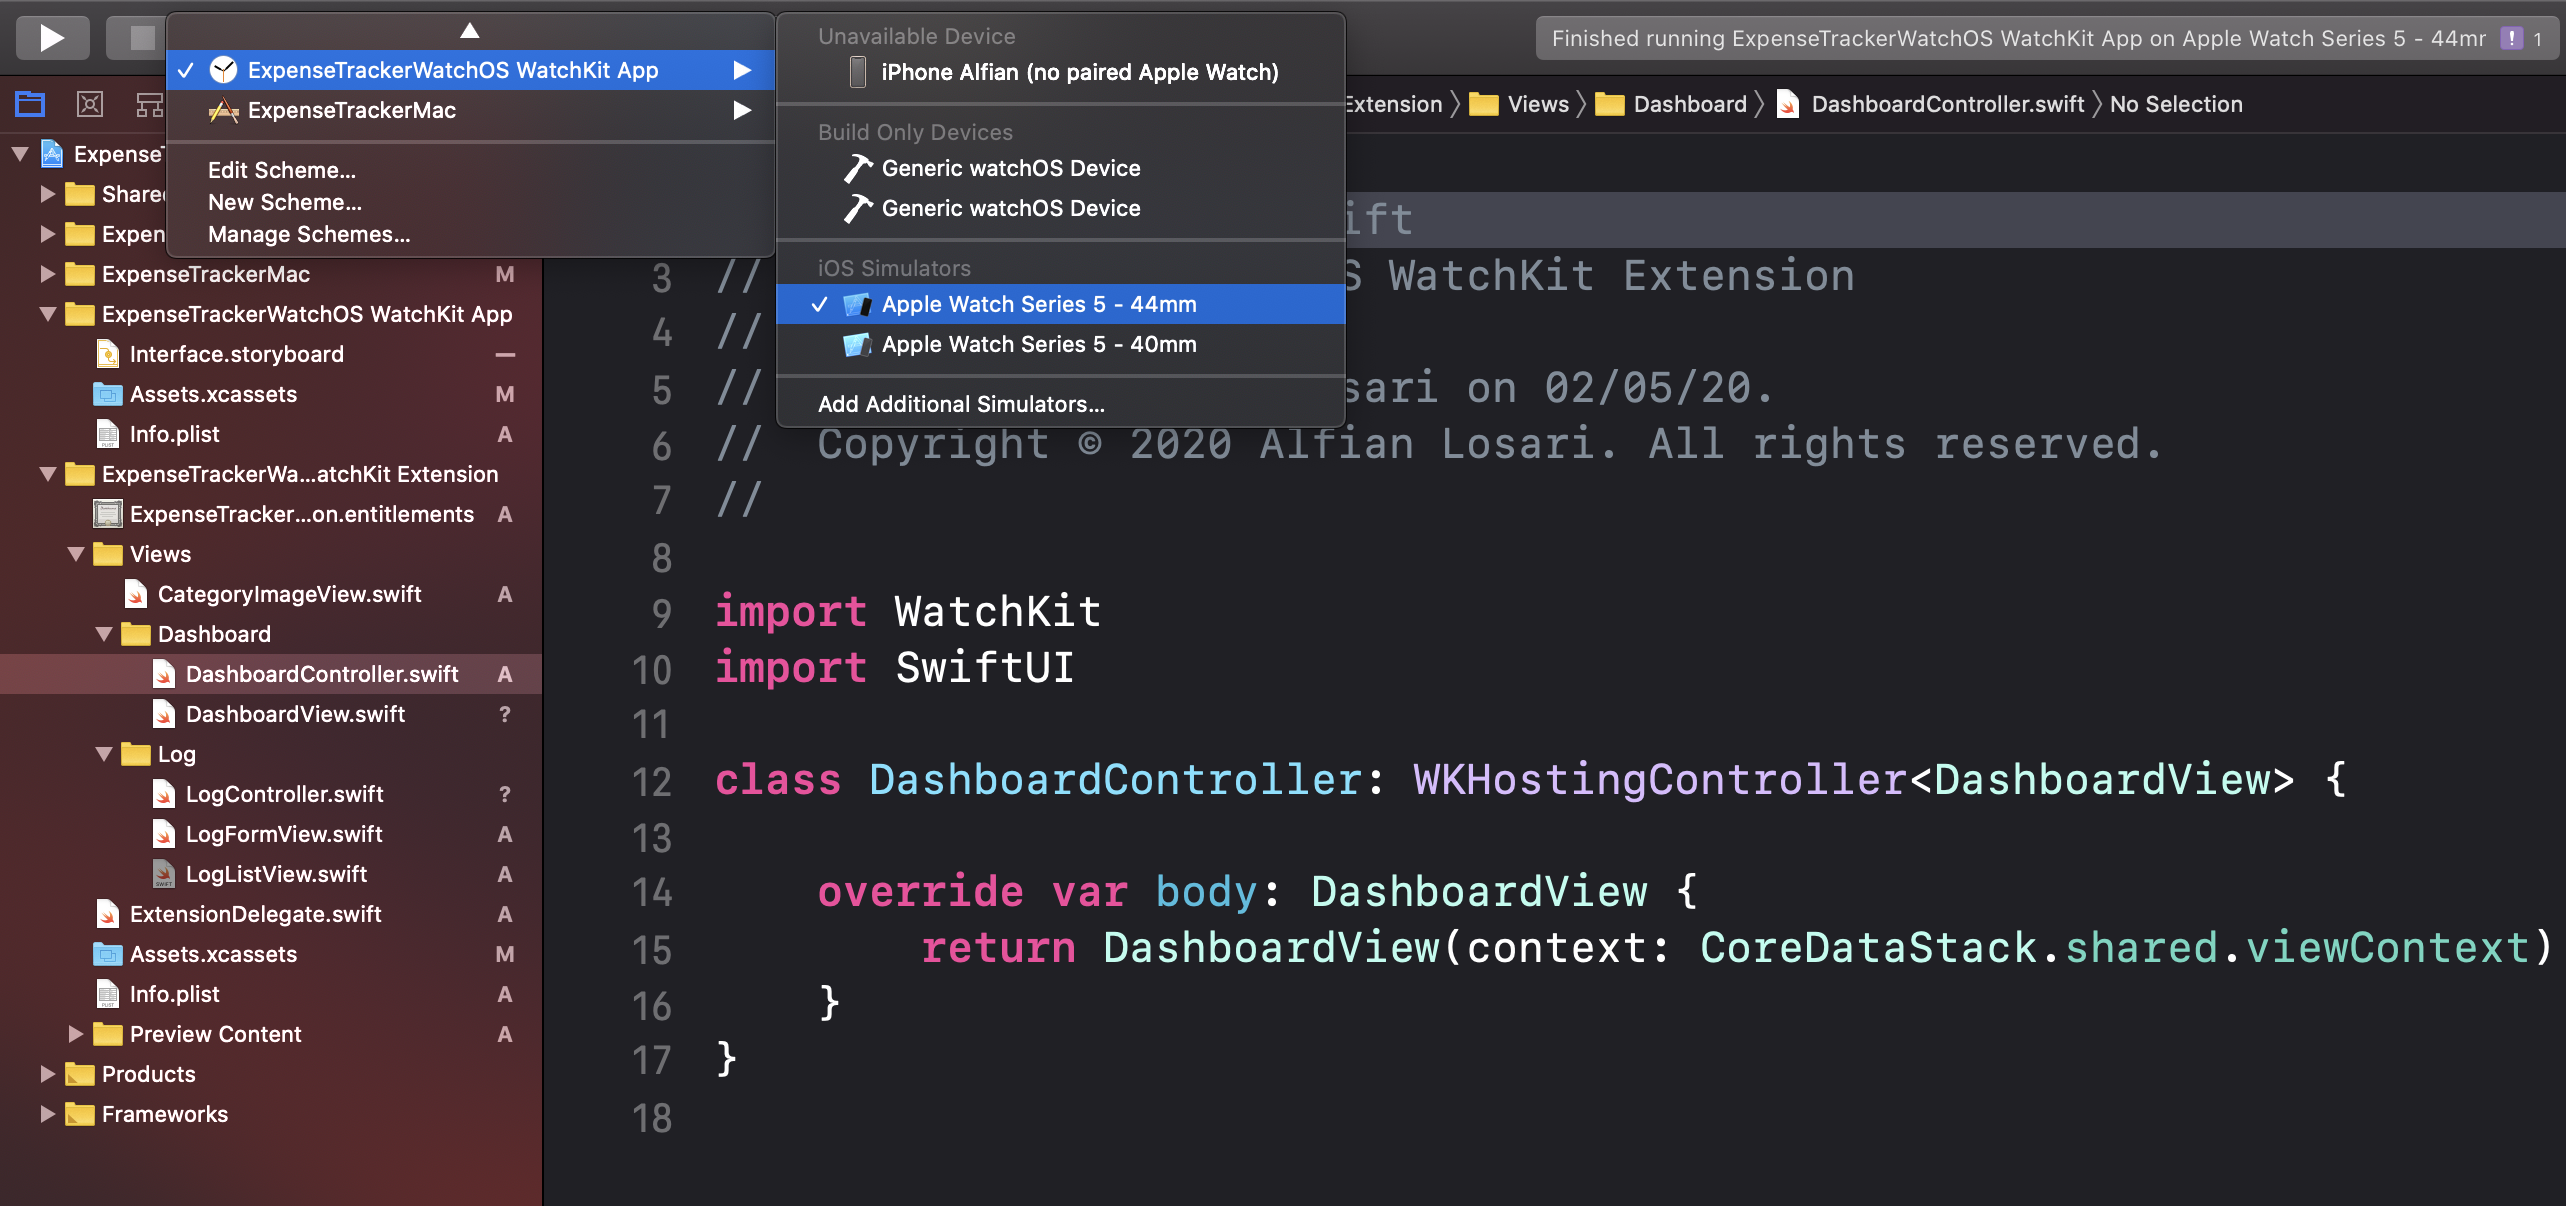 Building Page Based Navigation for Dashboard and Log Views
WatchOS uses WKInterfaceController as an equivalent of UIViewController in UIKit as the View Controller. To enable SwiftUI in watchOS, Apple provides WKHostingController as the subclass of WKInterfaceController where we can return SwiftUI View by overriding body computed property. The API doesn't use Swift Opaque type, so we need to fill the generic placeholder using the concrete View.
Navigate to the ExpenseTrackerWatchOS WatchKit Extension folder, create a new file named DashboardView.swift and copy the following code.
import SwiftUI
import CoreData

struct DashboardView: View {

    var context: NSManagedObjectContext

    var body: some View {
        Text("Dashboard")
    }
}
Next, create a file named DashboardController.swift and copy the following code.
import WatchKit
import SwiftUI

class DashboardController: WKHostingController<DashboardView> {

    override var body: DashboardView {
        return DashboardView(context: CoreDataStack.shared.viewContext)
    }
}
Here, we just return the DashboardView passing the managed object context from CoreDataStack singleton—the managed object context itself used by the fetch request to query our data later.
Navigate to the ExpenseTrackerWatchOS WatchKit Extension folder, create a new file named LogView.swift and copy the following code.
import SwiftUI
import CoreData

struct LogListView: View {

    @Environment(\.managedObjectContext)
    var context

    var body: some View {
        Text("Logs")
    }
}
Next, create a file name LogController.swift and copy the following code.
import WatchKit
import SwiftUI
import CoreData

class LogController: WKHostingController<LogView> {

    override var body: LogView {
        return LogView(context: CoreDataStack.shared.viewContext)
    }
}

struct LogView: View {

    var context: NSManagedObjectContext

    var body: some View {
        LogListView()
            .environment(\.managedObjectContext, context)
    }
}
Here, we need to create proxy LogView where we'll return in the LogController body property passing the managed object context. There are two reasons:
WKHostingController doesn't support Swift Opaque type for SwiftUI View. If we just return a view by applying an environment modifier to pass the managed object context, the compiler will raise an error because the type is View.@FetchRequest property wrapper, we need to pass the managed object context via @Environment property wrapper by injecting it from the parent View.
Navigate to the ExpenseTrackerWatchOS WatchKit App, and click on the Interface.storyboard. We'll put our initial controller and create page-based navigation.
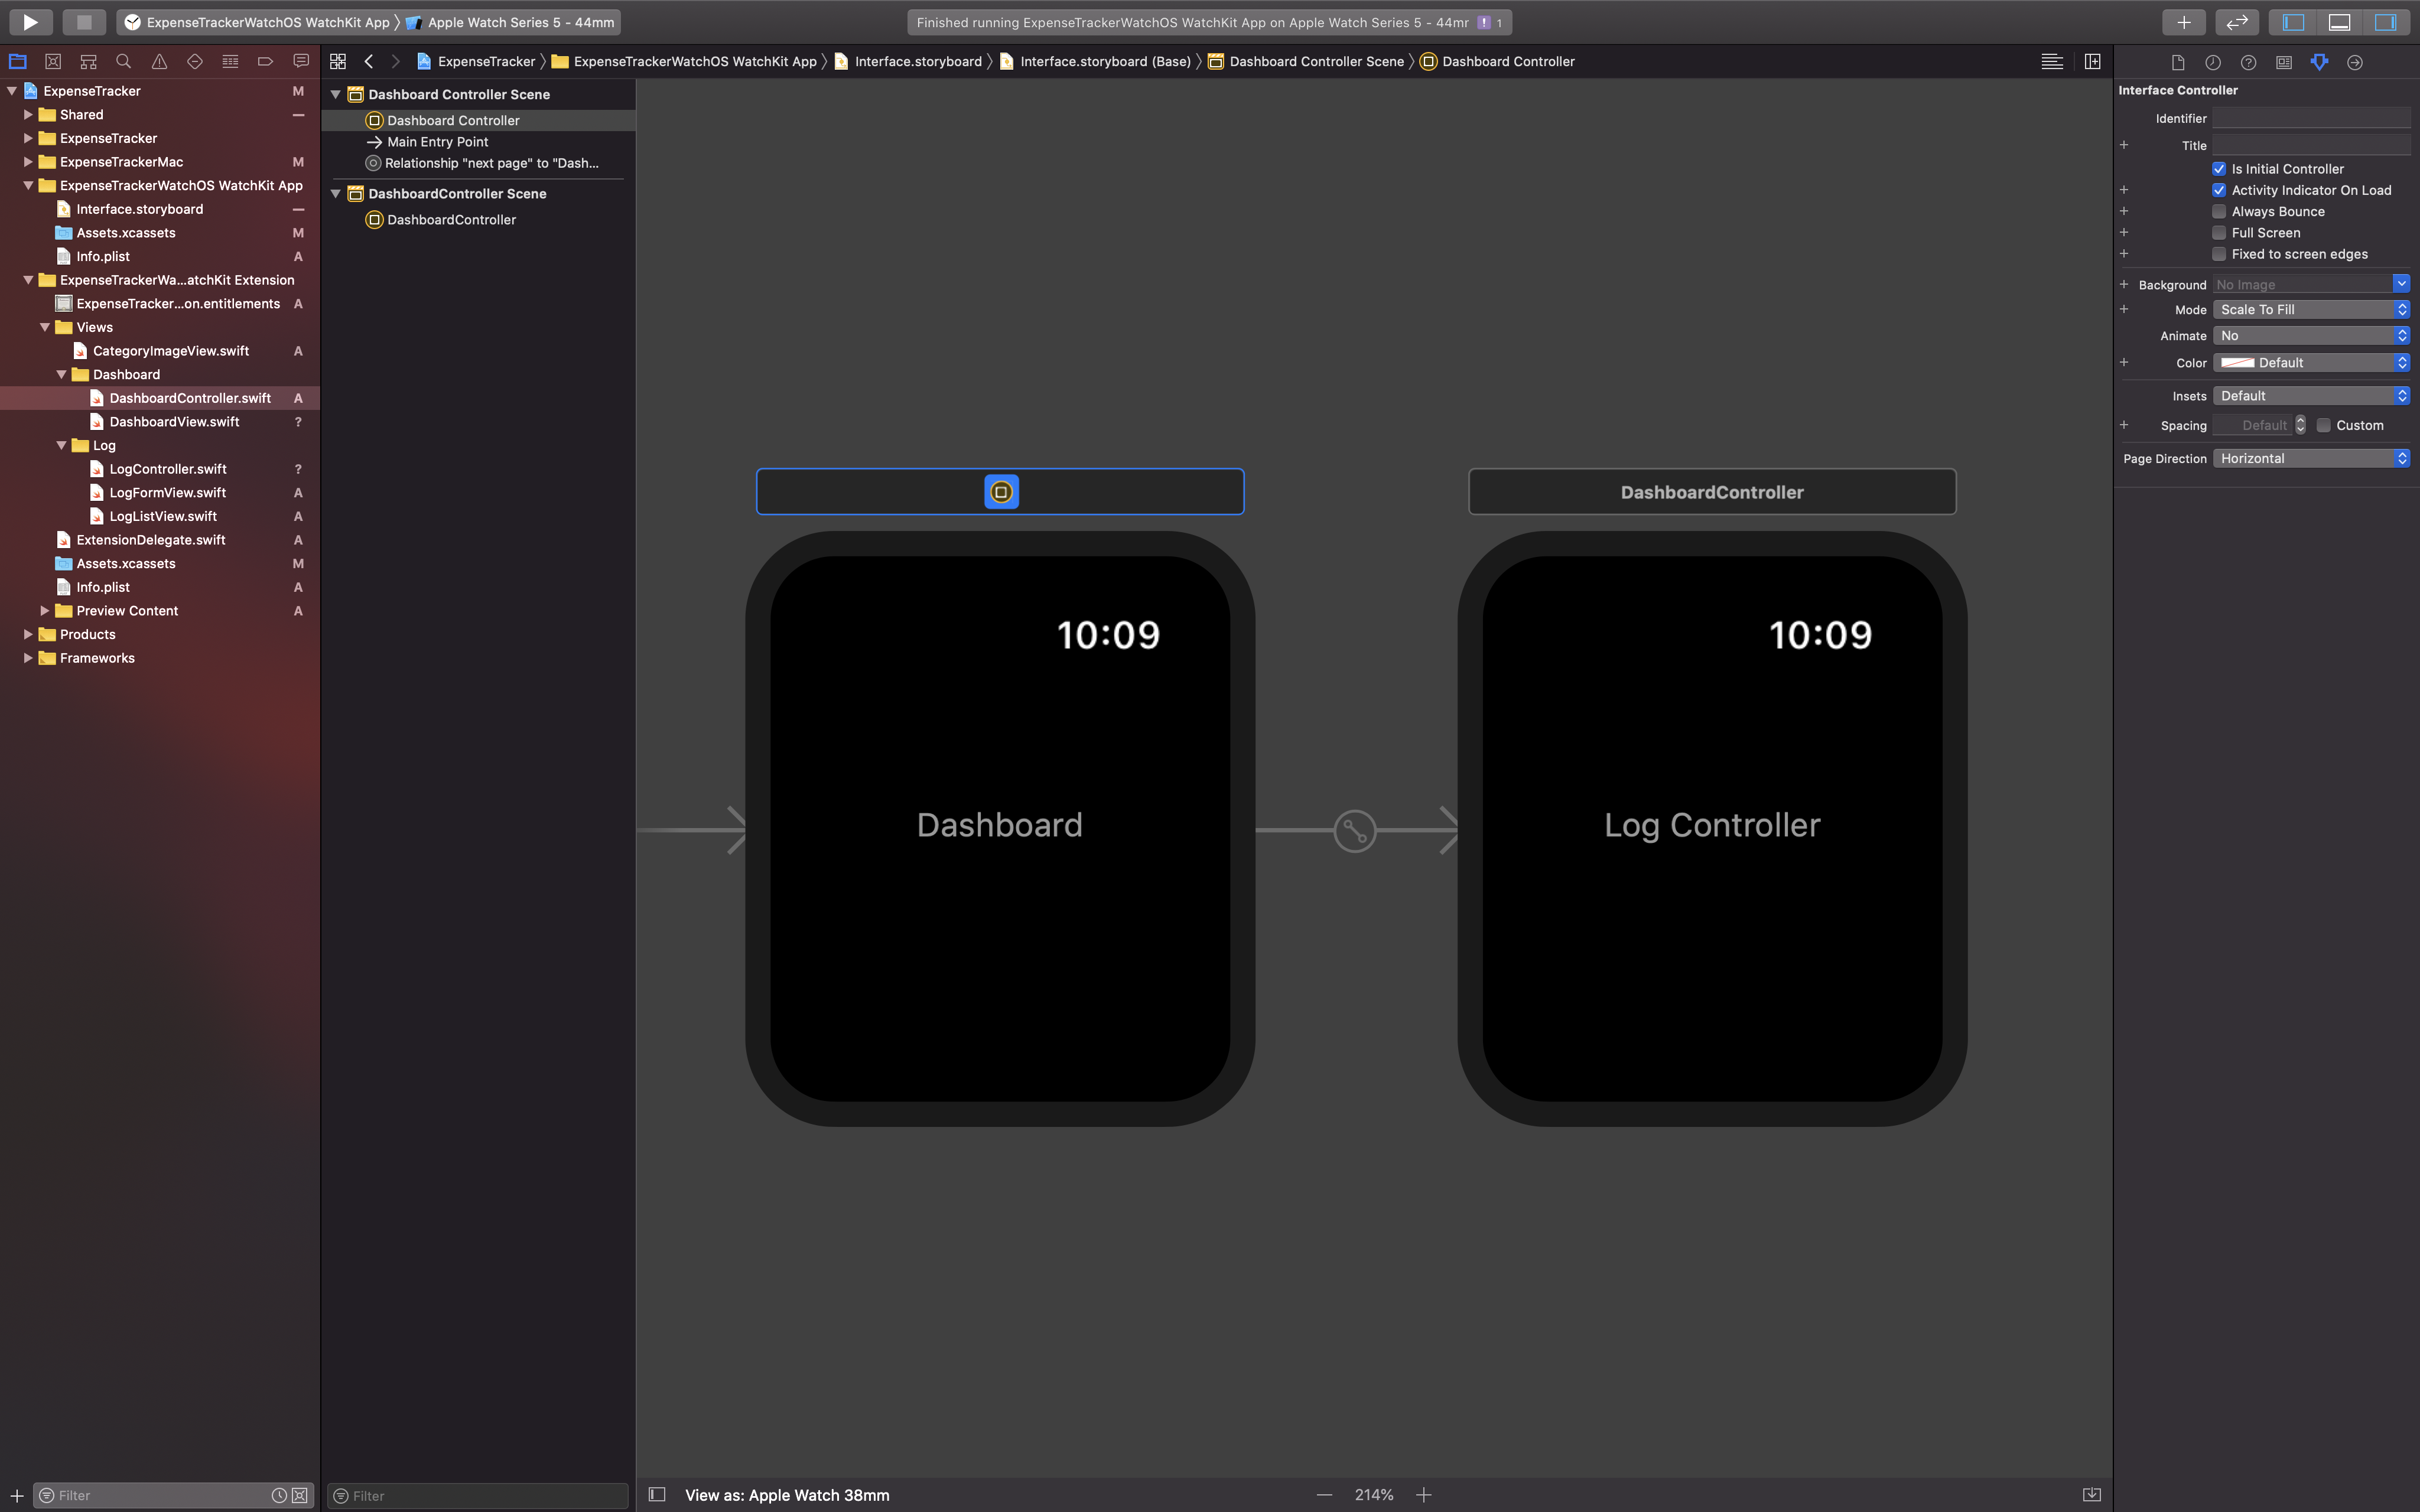
From the object library, drag a HostingController into the storyboard, click on the Identity Inspector and assign DashboardController as the class. Then, click on the Attributes Inspector and check Is Initial Controller.
Next, drag the second HostingController into the storyboard. Assign LogController as the class from Identity Inspector.
To create page-based navigation, Hold Ctrl key on the DashboardController and drag the blue line to the LogController. It will ask you to create relationship segue with next page as the only option, make sure to check it.
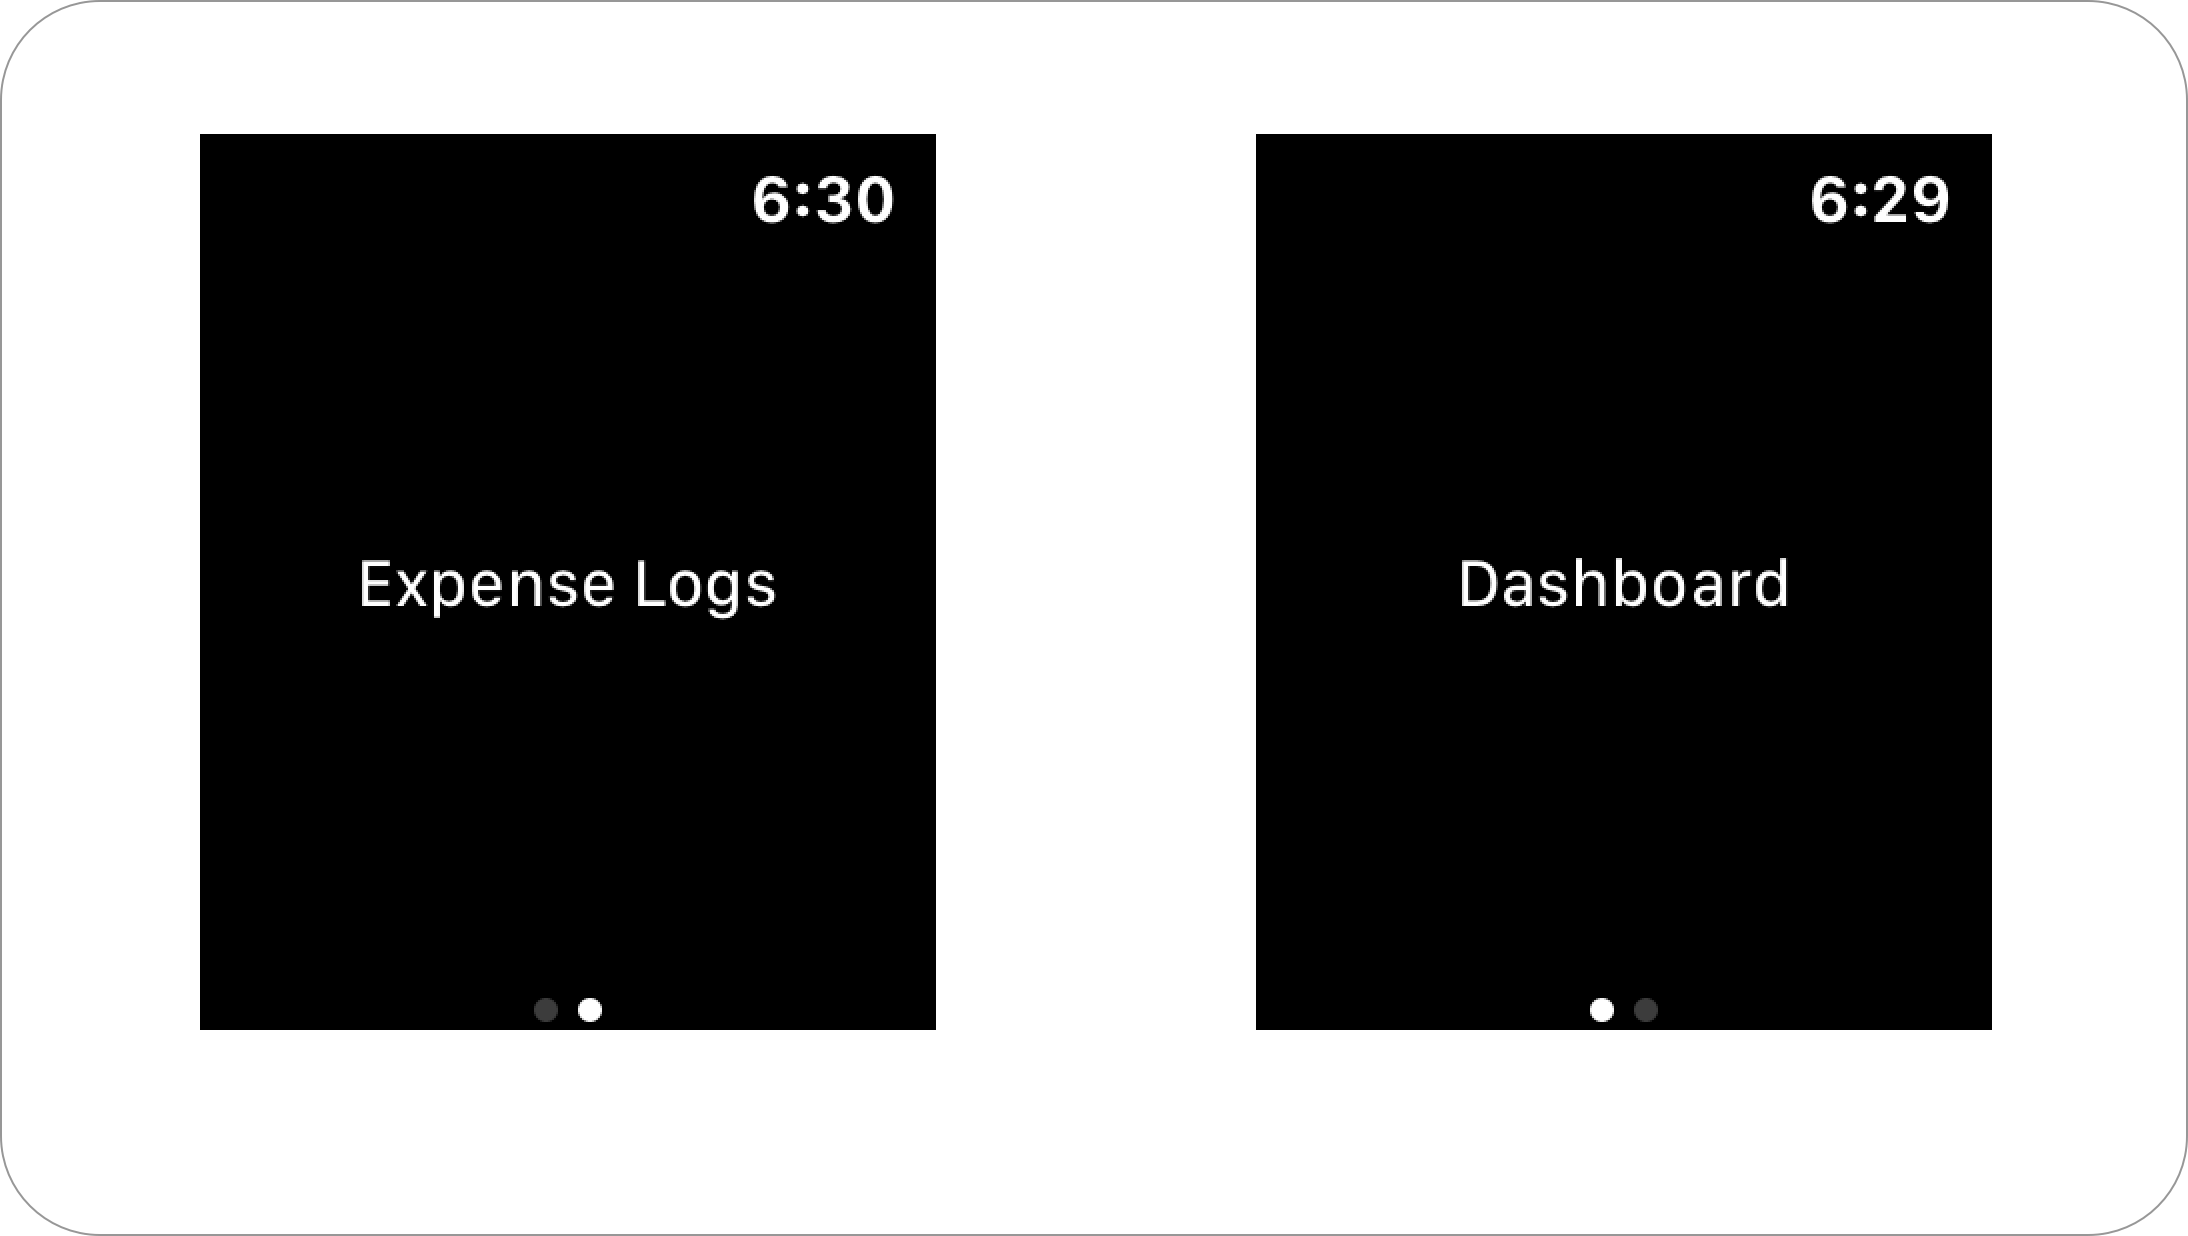
We have successfully build page based navigation for our watchOS app for the Dashboard and Log View. Build and run App in the simulator, and you should be able to navigate between pages using the swipe gesture.
Building Category Image ViewBefore creating the LogListView, let's create the CategoryImageView first. This View displays the category image in our Dashboard and Log page.
Create a new file named CategoryImageView.swift. Copy the following code.
struct CategoryImageView: View {

    let category: Category
    var color: Color = .white

    var body: some View {
        Image(systemName: category.systemNameIcon)
            .resizable()
            .aspectRatio(contentMode: .fit)
            .frame(width: 15, height: 15)
            .padding(.all, 4)
            .foregroundColor(color)
            .overlay(
                Circle()
                    .stroke(color, style: StrokeStyle(lineWidth: 1)
                )
        )
    }
}
Here, we use the category systemNameIcon property to retrieve the image using SF Symbols system name for the respective category. We constrained the frame to have the width and height of 15 and add 4-pts of padding around. At last, we add an Overlay containing the Circle Shape, which we stroke with the the color property. Default color is white, but it can be costumized by injecting it from the initializer.
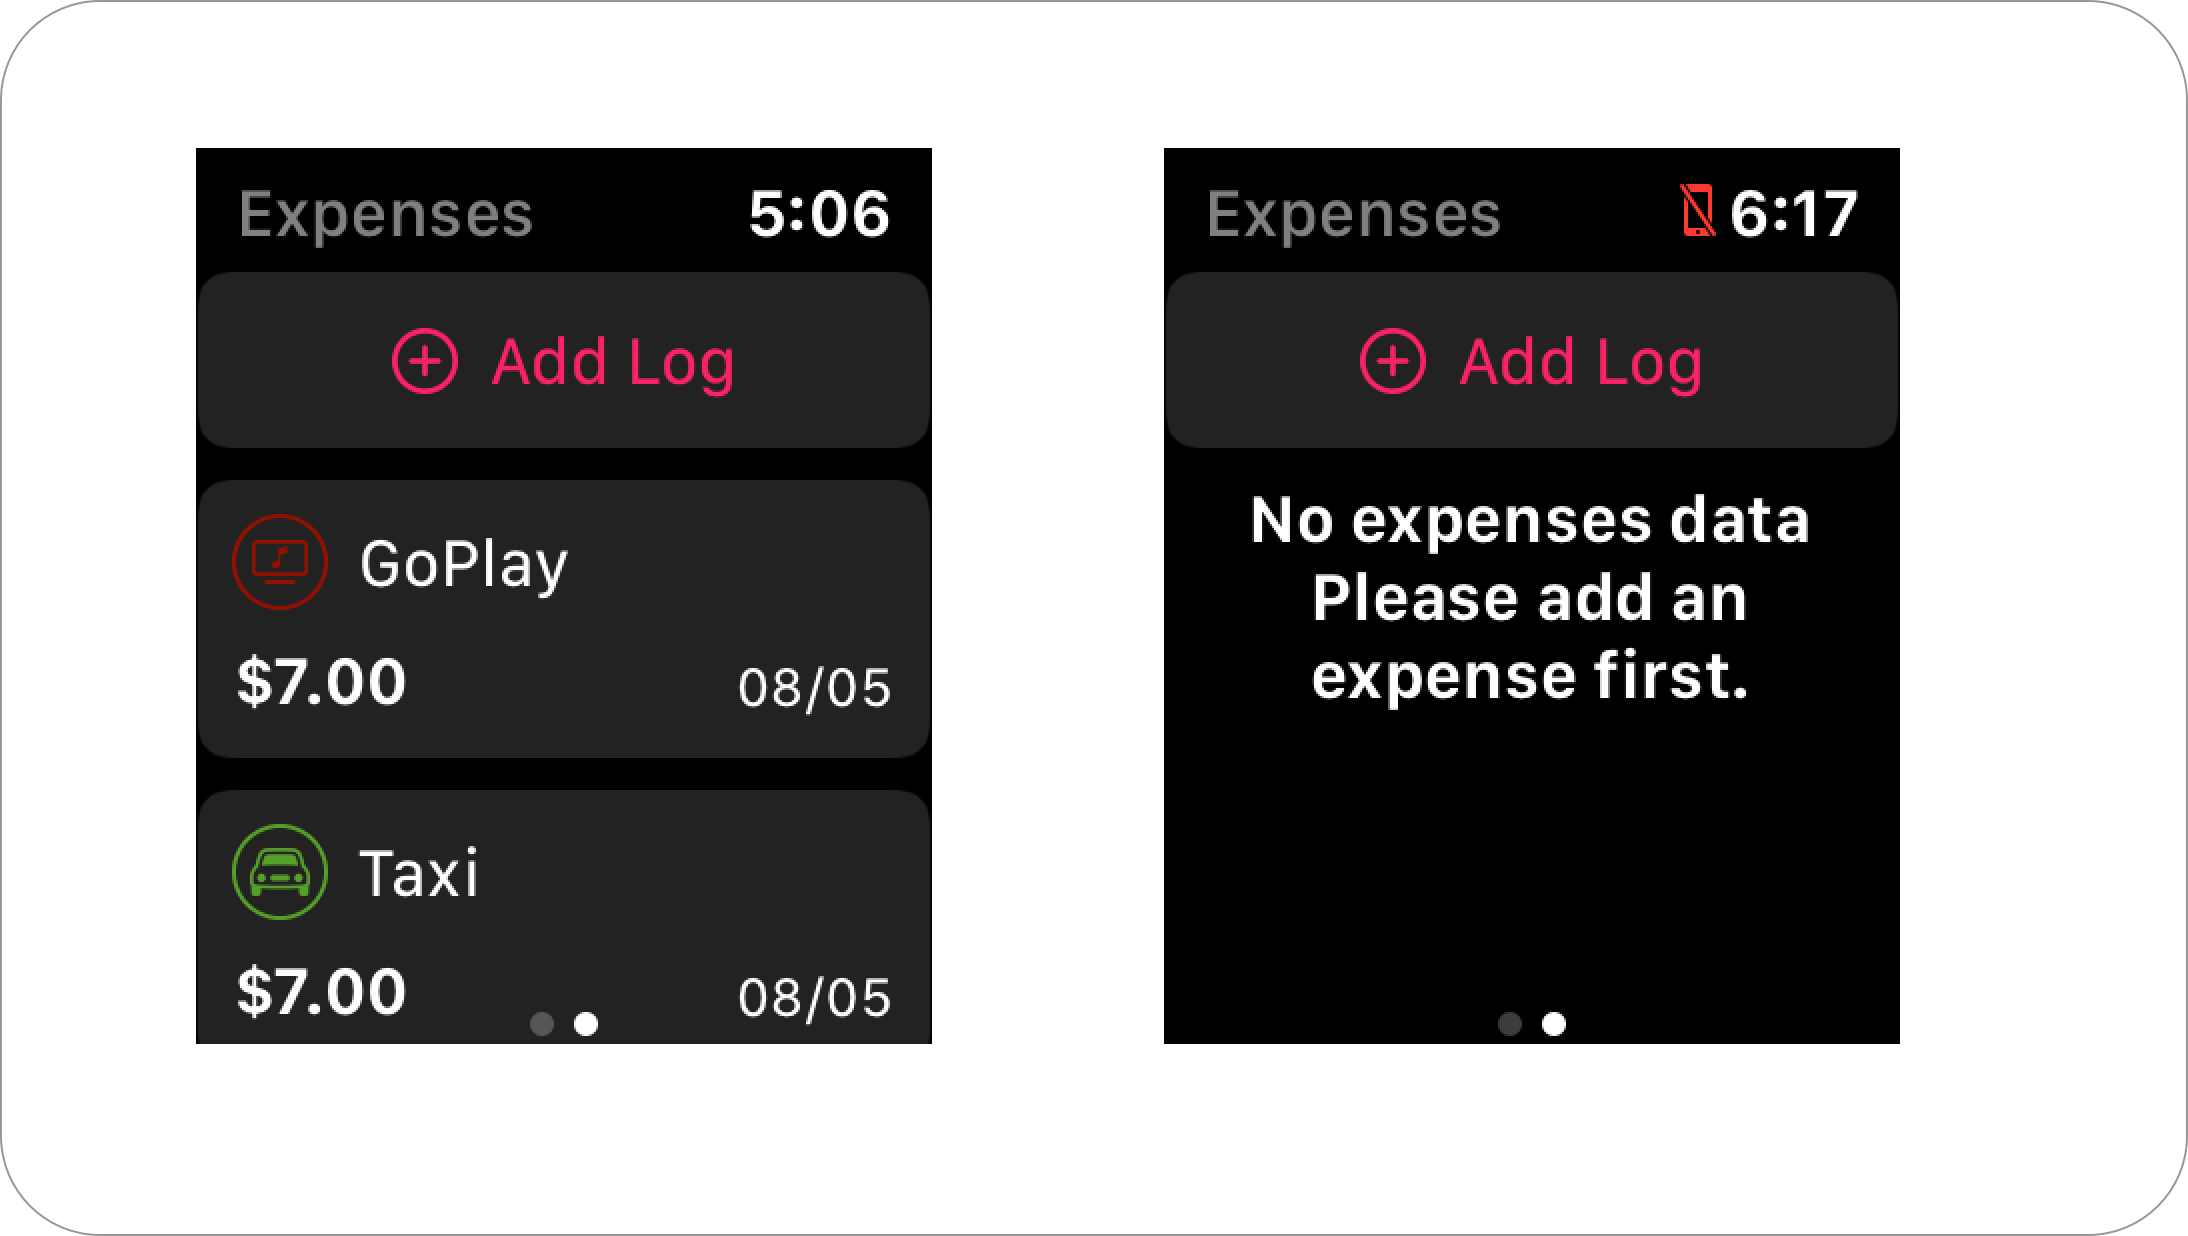
Next, navigate to LogListView.swift file. This main view shows the list of expense logs sorted by a recent date. Copy the following code.
import SwiftUI
import CoreData

struct LogListView: View {

    // 1
    @Environment(\.managedObjectContext)
    var context

    @State private var logToEdit: ExpenseLog?
    @State private var isAddPresented: Bool = false

    // 2
    @FetchRequest(
        entity: ExpenseLog.entity(),
        sortDescriptors: [
            NSSortDescriptor(keyPath: \ExpenseLog.date, ascending: false)
        ]
    )
    private var result: FetchedResults<ExpenseLog>

    var body: some View {
        // 3
        ZStack {
            // 4
            ScrollView {
                Button(action: {
                     self.isAddPresented = true
                }) {
                     HStack {
                         Spacer()
                         Image(systemName: "plus.circle")
                         Text("Add Log")
                         Spacer()
                     }
                     .foregroundColor(Color(hexString: "#F92365"))
                }

                // 5
                ForEach(result) { (log: ExpenseLog) in
                    Button(action: {
                        self.logToEdit = log
                    }) {
                        LogRowView(log: .constant(log))
                    }
                }
                .sheet(item: self.$logToEdit) { (log: ExpenseLog) in
                    // TODO: return LogFormView for editing log
                }
            }

            if result.isEmpty {
                Text("No expenses data\nPlease add an expense first.")
                    .multilineTextAlignment(.center)
                    .font(.headline)
                    .padding(.horizontal)
            }
        }
        .navigationBarTitle("Expenses")
        .sheet(isPresented: $isAddPresented) {
            // TODO: return LogFormView for adding log
        }
    }

    private func onDelete(with indexSet: IndexSet) {
        indexSet.forEach { index in
            let log = result[index]
            context.delete(log)
        }
        try? context.saveContext()
    }
}

struct LogRowView: View {

    @Binding var log: ExpenseLog

    var body: some View {
        VStack(alignment: .leading) {
            HStack {
                CategoryImageView(category: log.categoryEnum, color: log.categoryEnum.color)
                Text(log.nameText)
                    .font(.body)
            }
            HStack(alignment: .firstTextBaseline) {
                Text(log.amountText)
                    .font(.headline)

                Spacer()
                Text(log.dateText)
                    .font(.footnote)
            }
        }
        .padding(.horizontal, 2)
        .padding(.vertical)
        .listRowPlatterColor(log.categoryEnum.color)
    }
}
Here are the explanations for all the points in the code above:
@Environment property wrapper to pass the managed object context from a parent. To handle presenting the LogFormView sheet, we declare isAddPresented state property for adding log and logToEdit for editing log.@FetchRequest property wrapper passing the expense log entity and default sort descriptor by a recent date. It will use the @Environment managed object context to fetch the request automatically.ZStack is the main container view. With this, we can add a Text to inform the user to add a new log in case the fetched result is empty.Add Log button located at the top where the user can use it to add a new log using the Log Form View we'll build in the next section.ScrollView instead of List because currently it crashes when adding/updating/deleting with List . We pass the FetchedResults so the list will be updated whenever the logs get added, updated, or deleted automatically. We'll add onTapGesture to assign the logToEdit property when the user taps on each row to present the LogFormView in a sheet. Finally, we'll add onDelete modifier to delete the respective row whenever the user swipes on the row.LogRowView. It uses a combination of HStack and VStack to show the image of the log's category, name, amount, and date. Notice that we pass the log using @Binding so the row can be updated whenever the item changes.
Try to build and run the project, and you should be able to navigate to the Log View. Currently, it only shows an Add Log button with a text telling the user to add a new expense log. Next, we'll be going to build the Log Form View so the user can add and edit log.
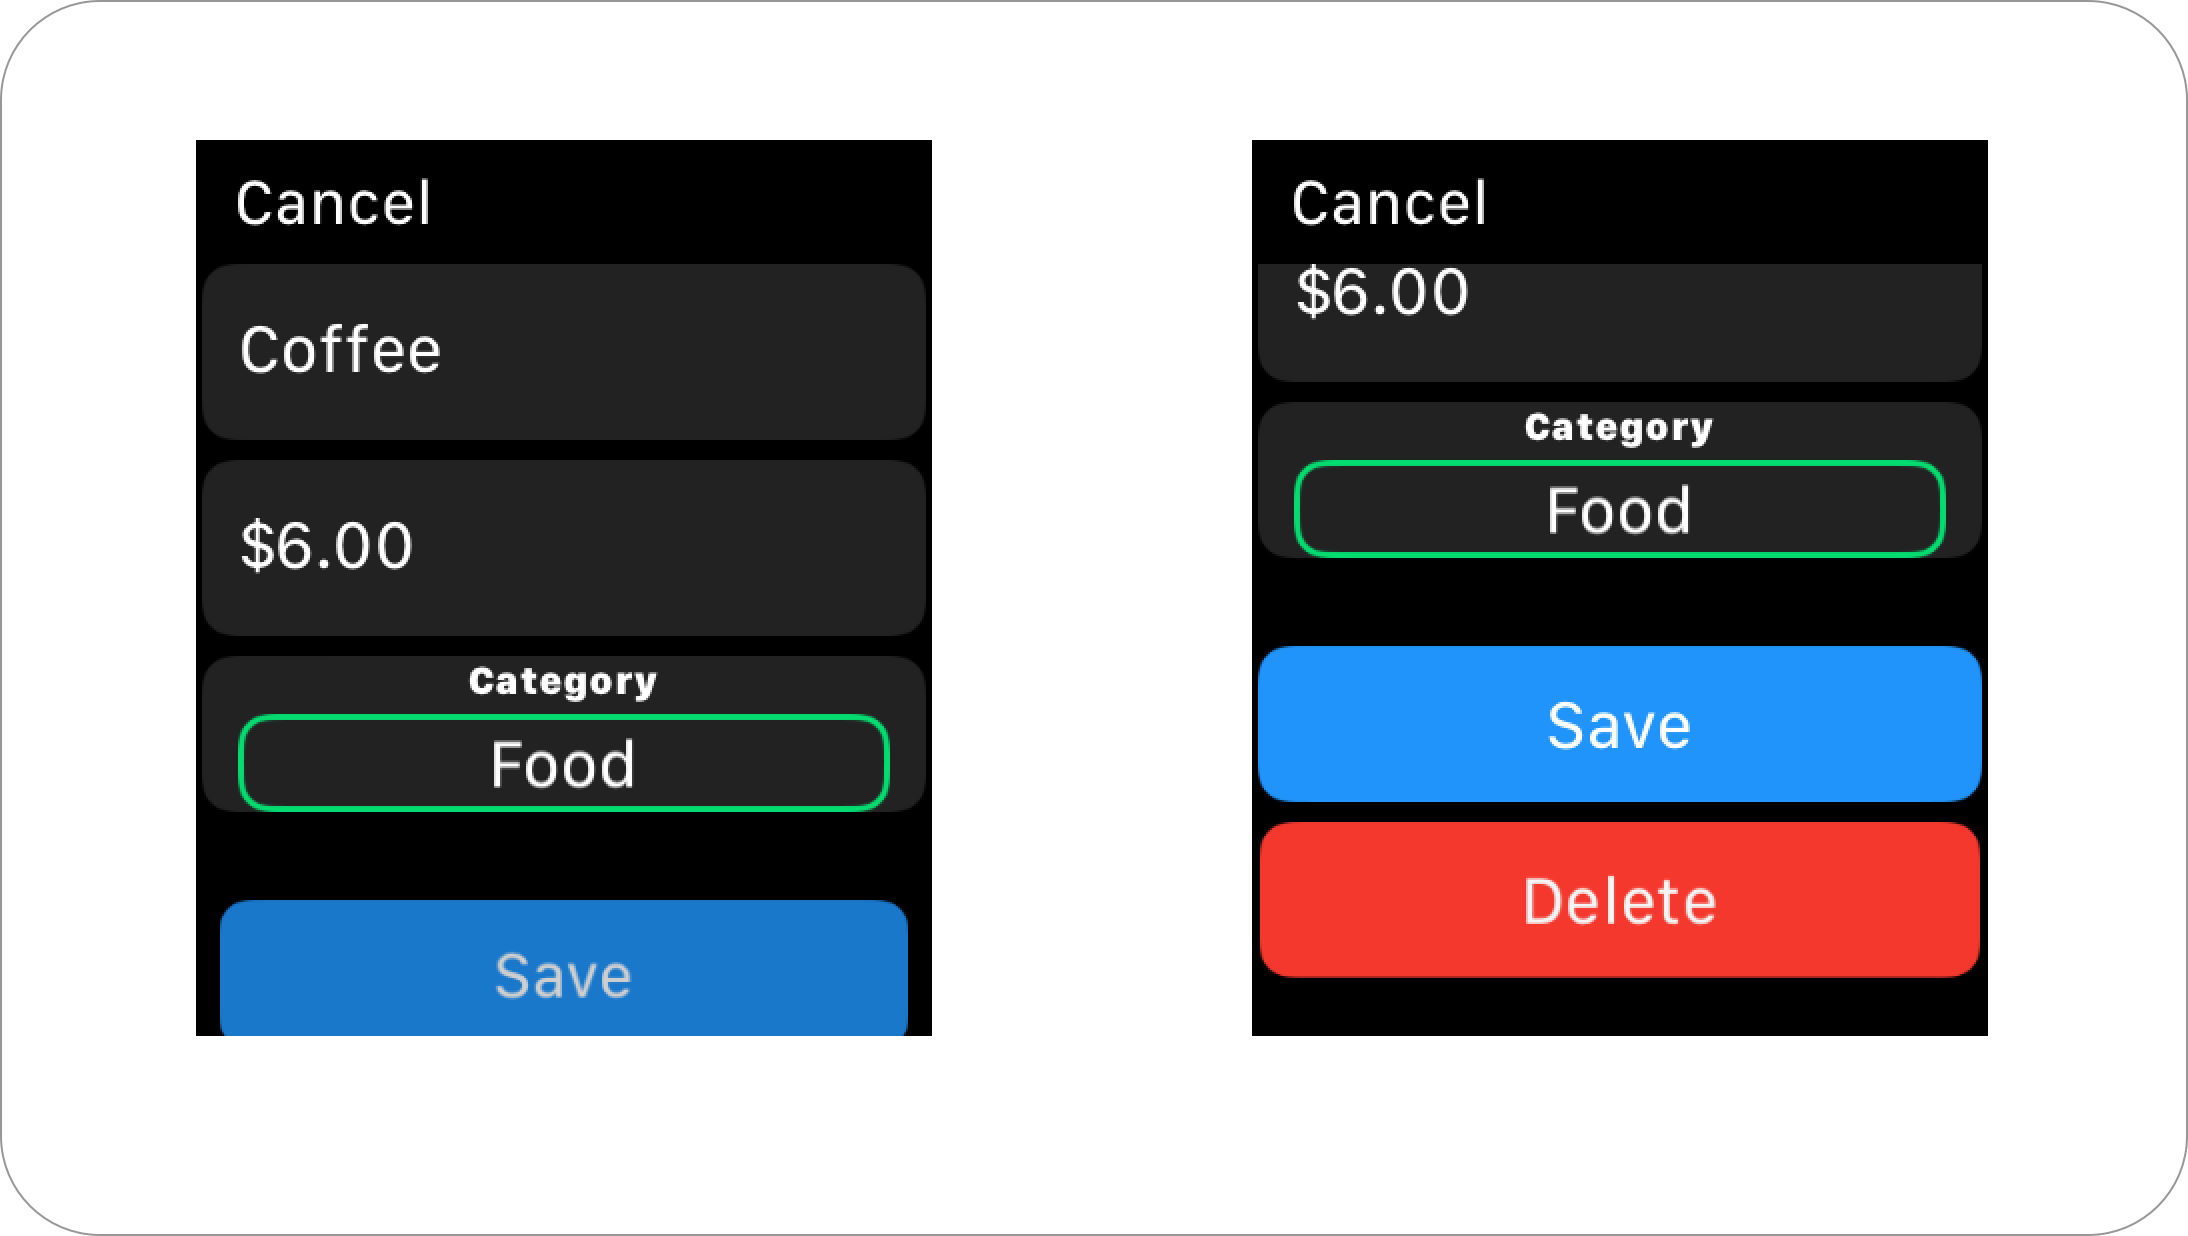
Next, create a file named LogFormView.swift. The LogFormView uses Form containing text fields for name, amount, and a picker for selecting a category. Copy the following code into the file.
import SwiftUI
import CoreData

struct LogFormView: View {

    // 1
    var logToEdit: ExpenseLog?
    var context: NSManagedObjectContext

    @Environment(\.presentationMode)
    var presentationMode

    // 2
    @State var name: String = ""
    @State var amount: Double = 0
    @State var category: Category = .utilities

    var body: some View {
        // 3
        Form {
            Section {
                TextField("Name", text: $name)
                TextField("Amount", value: $amount, formatter: Utils.numberFormatter)
                Picker(selection: $category, label: Text("Category")) {
                    ForEach(Category.allCases) { category in
                        Text(category.rawValue.capitalized).tag(category)
                    }
                }
            }

            // 4
            Section {
               Button(action: self.onSaveTapped) {
                   HStack {
                       Spacer()
                       Text("Save")
                           .foregroundColor(Color.white)
                       Spacer()
                   }
               }
               .listRowPlatterColor(Color.blue)

               if self.logToEdit != nil {
                   Button(action: self.onDeleteTapped) {
                       HStack {
                           Spacer()
                           Text("Delete")
                               .foregroundColor(Color.white)
                           Spacer()
                       }
                   }
                   .listRowPlatterColor(Color.red)
               }
           }
        }
    }

    // 5
    private func onSaveTapped() {
        let log: ExpenseLog
        if let logToEdit = self.logToEdit {
            log = logToEdit
        } else {
            log = ExpenseLog(context: self.context)
            log.id = UUID()
            log.date = Date()
        }

        log.name = self.name
        log.category = self.category.rawValue
        log.amount = NSDecimalNumber(value: self.amount)
        do {
            try context.saveContext()
        } catch let error as NSError {
            print(error.localizedDescription)
        }
        self.presentationMode.wrappedValue.dismiss()
    }

    // 6
    private func onDeleteTapped() {
         guard let logToEdit = self.logToEdit else { return }
         self.context.delete(logToEdit)
         try? context.saveContext()
         self.presentationMode.wrappedValue.dismiss()
     }
}
Here are the explanations for all the points in the code above:
logToEdit is an optional property that will be passed when the user taps on the row in the LogList View for editing a log. We use NSManagedObjectContext so we can save the created or updated log after user taps on the save button. At last, we use @Environment to access PresentationMode to dismiss the sheet after save.@State properties for name, amount, and category. These will be used as bindings for the text fields and picker in the Form.Form is the main container for all the text fields and picker. We have text fields to bind the name and amount state. Notice, for amount we are passing a NumberFormatter with currency type so the String can be converted to Double after the user commits the change. As for the category selection, we use Picker passing the Category enum using CaseIterable protocol to retrieve all the cases.Save button that triggers the onSaveTapped method when the user taps. Also, we show a Delete button when user edit an item.onSaveTapped method, we create a new log if logToEdit value is nil, otherwise we use it as the log. We'll assign all the state properties such as name, amount, and category to the log. Notice that we're assigning a current date for the new log to simplify the form. At last, we invoke the managed object context save method and dismiss the sheet.onDeleteTapped method, we delete the logToEdit from the managed object context, then save, and dismiss the sheet.
Before we try our new LogFormView, we'll need to add it in 2 places inside LogListView:
logToEdit binding. This property will be used in the case when the user taps on the log row. Here, we need to pass the logToEdit as well the states for name, amount, category to the initializer. Those states are going to populate the text fields and picker.isAddPresented binding. This property will be used in the case when the user taps on the Add Log button, we need to pass the managed object context.struct LogListView: View {
// ...
var body: some View {
ZStack {
ScrollView {
// ..
.sheet(item: self.$logToEdit) { (log: ExpenseLog) in
// 1
LogFormView(
logToEdit: log,
context: self.context,
name: log.name ?? "",
amount: log.amount?.doubleValue ?? 0,
category: Category(rawValue: log.category ?? "") ?? .food
)
}
}
// ...
}
// ..
.sheet(isPresented: $isAddPresented) {
// 2
LogFormView(context: self.context)
}
}
// ...
}
Try to build and run the project, create several new logs to make sure the list gets updated. Also, try to edit and delete several logs to make sure it's working properly.
Building Dashboard View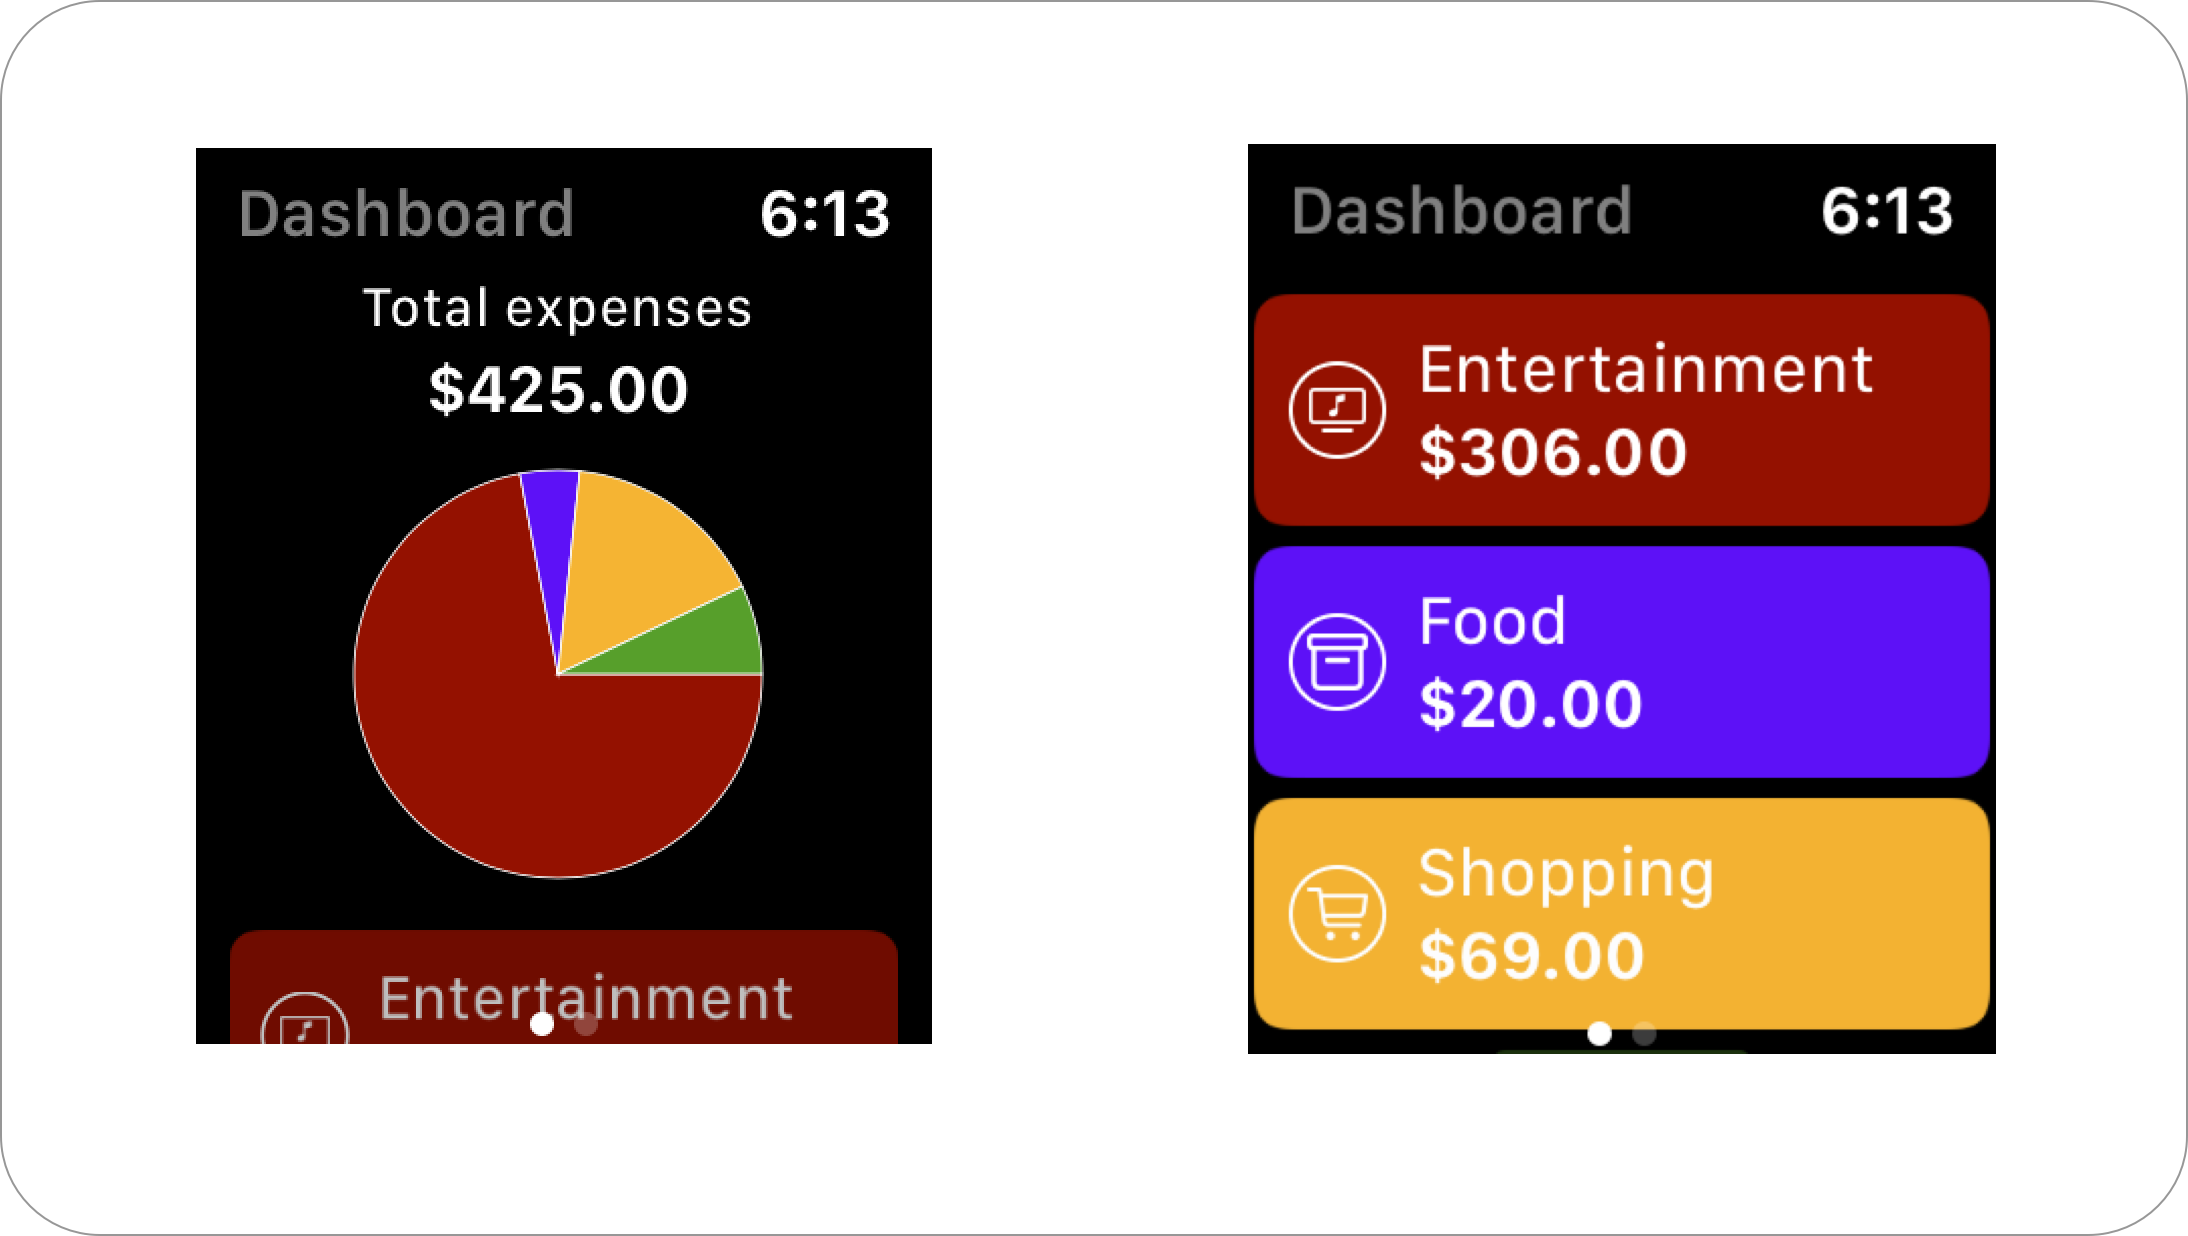
Try to build and run the project, create several new logs to make sure the list gets updated. Also, try to edit and delete several logs to make sure it's working correctly.
import SwiftUI
import CoreData

struct DashboardView: View {

    // 1
    var context: NSManagedObjectContext

    @State var totalExpenses: Double?
    @State var categoriesSum: [CategorySum]?

    var body: some View {
        // 2
        List {
            // 3
             if totalExpenses != nil && totalExpenses! > 0 {
                VStack(alignment: .center, spacing: 2) {

                    Text("Total expenses")
                        .font(.footnote)
                    Text(totalExpenses!.formattedCurrencyText)
                        .font(.headline)

                    if categoriesSum != nil {
                        PieChartView(
                            data: categoriesSum!.map { ($0.sum, $0.category.color) },
                            style: Styles.pieChartStyleOne,
                            form: CGSize(width: 160, height: 110),
                            dropShadow: false
                        ).padding()
                    }
                }
                .listRowPlatterColor(.clear)
            }

            // 4
            if categoriesSum != nil {
                ForEach(self.categoriesSum!) {
                    CategoryRowView(category: $0.category, sum: $0.sum)
                }
            }

            // 5
            if totalExpenses == nil && categoriesSum == nil {
                Text("No expenses data\nPlease add your expenses from the logs page.")
                    .multilineTextAlignment(.center)
                    .font(.headline)
                    .padding()
            }

        }
        .listStyle(CarouselListStyle())
        .navigationBarTitle("Dashboard")
        .onAppear(perform: fetchTotalSums)
    }

    // 6
    func fetchTotalSums() {
        ExpenseLog.fetchAllCategoriesTotalAmountSum(context: self.context) { (results) in
            guard !results.isEmpty else {
                self.totalExpenses = nil
                self.categoriesSum = nil
                return
            }

            let totalSum = results.map { $0.sum }.reduce(0, +)
            self.totalExpenses = totalSum
            self.categoriesSum = results.map({ (result) -> CategorySum in
                return CategorySum(sum: result.sum, category: result.category)
            })
        }
    }
}

struct CategoryRowView: View {
    let category: Category
    let sum: Double

    var body: some View {
        HStack {
            CategoryImageView(category: category)
            VStack(alignment: .leading) {
                Text(category.rawValue.capitalized)
                Text(sum.formattedCurrencyText).font(.headline)
            }
        }
        .listRowPlatterColor(category.color)
        .padding(.vertical)
    }
}
Here are the explanations for all the points in the code above:
@Environment property wrapper because we don't use @FetchRequest to fetch our total categories sum data. We have two state properties, one for the total expense sum for all categories. The other state property is an array of CategorySum which stores the total sum for a category.List with CarouselListStyle to display the data, an onAppear modifier is added, so we can fetch the data when the view appears. With CarouselListStyle, we can have digital crown animation and animation as user scrolls the content.List, we use a VStack to display the total sum expense for all categories using a Text. We'll also show the total sum for each category inside a PieChart. We are using a conditional statement only to render this row if totalExpense state is not nil.categoriesSum array is not nil, then using ForEach, we pass the categoriesSum array. In the ViewBuilder closure, we return the CategoryRowView. You can see the declaration of this view at the bottom of the source code. It's using HStack to display the image of the category using CategoryImageView, then VStack as a sibling containing the text of category name as well as the total formatted sum.fetchTotalSums will be invoked onAppear. In this case, we'll use ExpenseLog static method to fetch all the categories with the total sum for each category. In the closure, we assign the totalExpense property using reduce to sum all the value. At last, we transform the results and assign it to the categoriesSum array. These assignments will trigger a view update.
That's it! Try to build and run the project, and you should be able to see the total expenses sum, pie chart, and the list containing the amount of spending for each category.
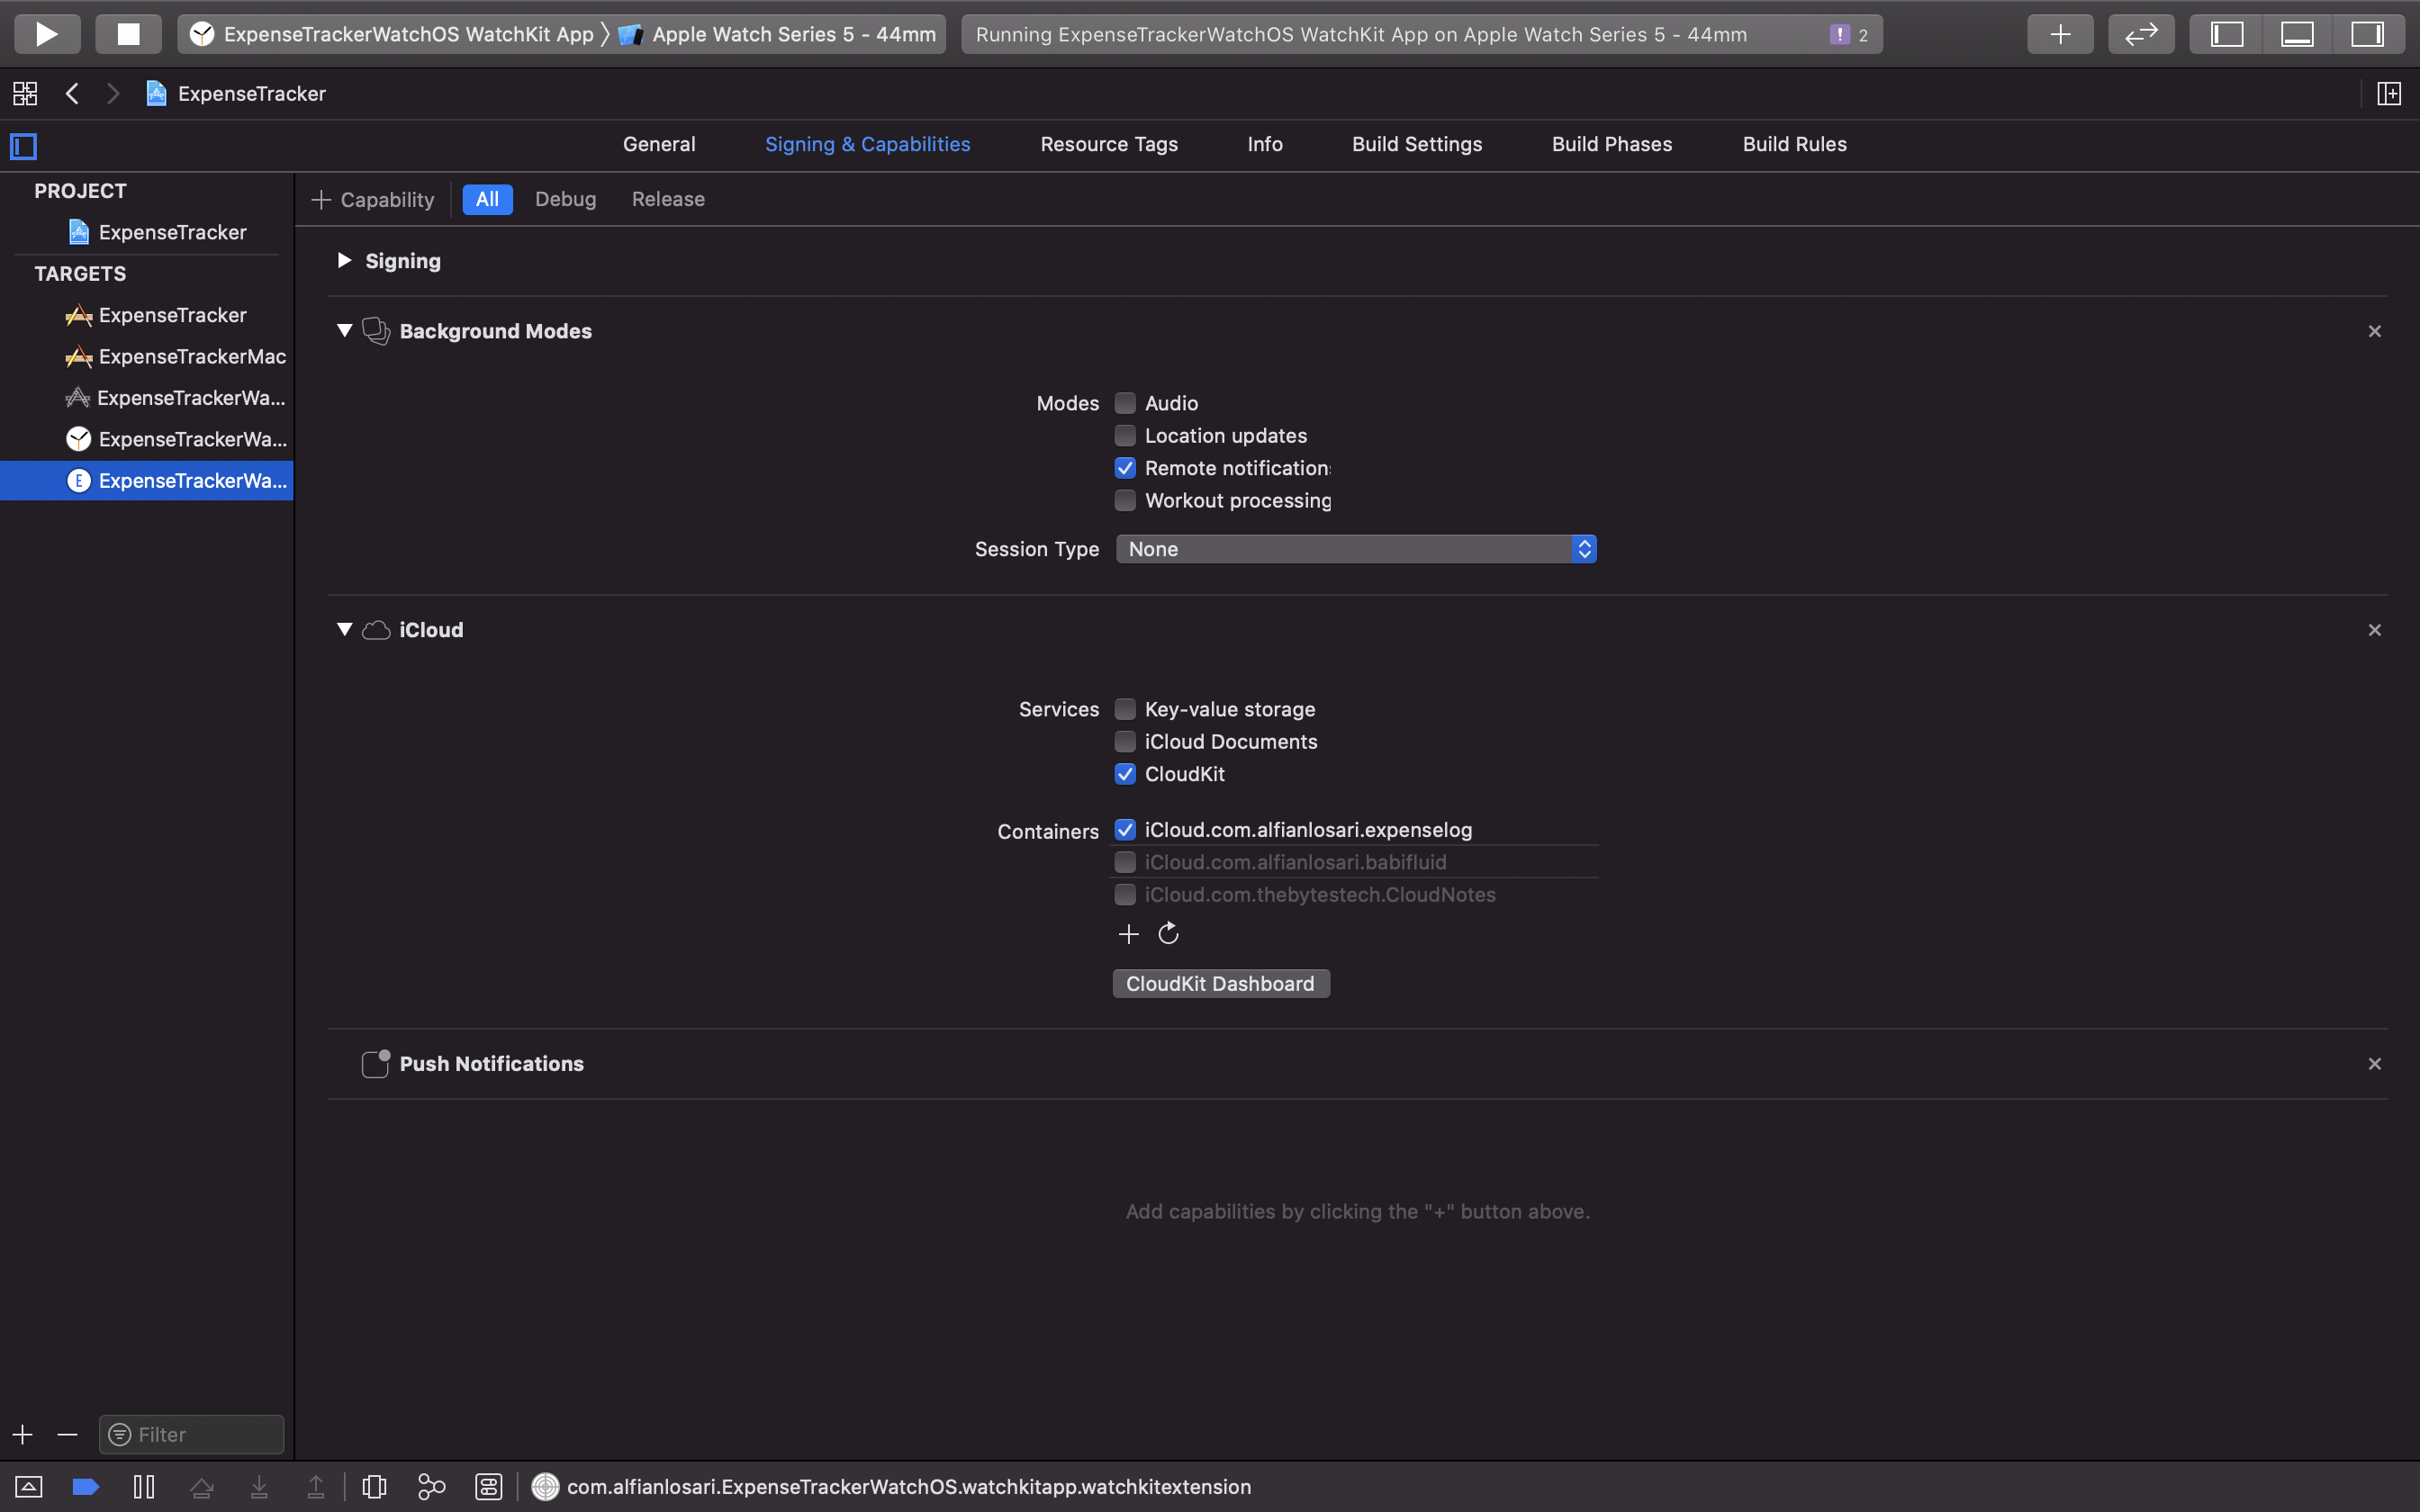
To make sure Core Data CloudKit syncing is working, you need to add a valid CloudKit container with the same identifier to all the targets. To try this, make sure you sign in into iCloud in the simulator or your physical devices when you want to test.
Try to add items on iOS. In 1 minute, it should sync the data to the other platforms.
ConclusionCongratulations! You have successfully built the watchOS Expense Tracker App with SwiftUI. With Core Data + CloudKit, we're able to persist data locally as well as syncing the data to iCloud across all our Apple devices.
With SwiftUI, building an independent watch App has never become so much simple and fast! We're able to apply our learning to create unique app experiences across Apple platform. With simple modifiers such as passing CarouselListStyle for the listStyle, we're able to use the digital crown combined with sliding animation to provide an immersive experience and focus to the users when they use the app at a glance.
Until the next one! Let's keep the lifelong learning goes on!
Published at Apr 28, 2020
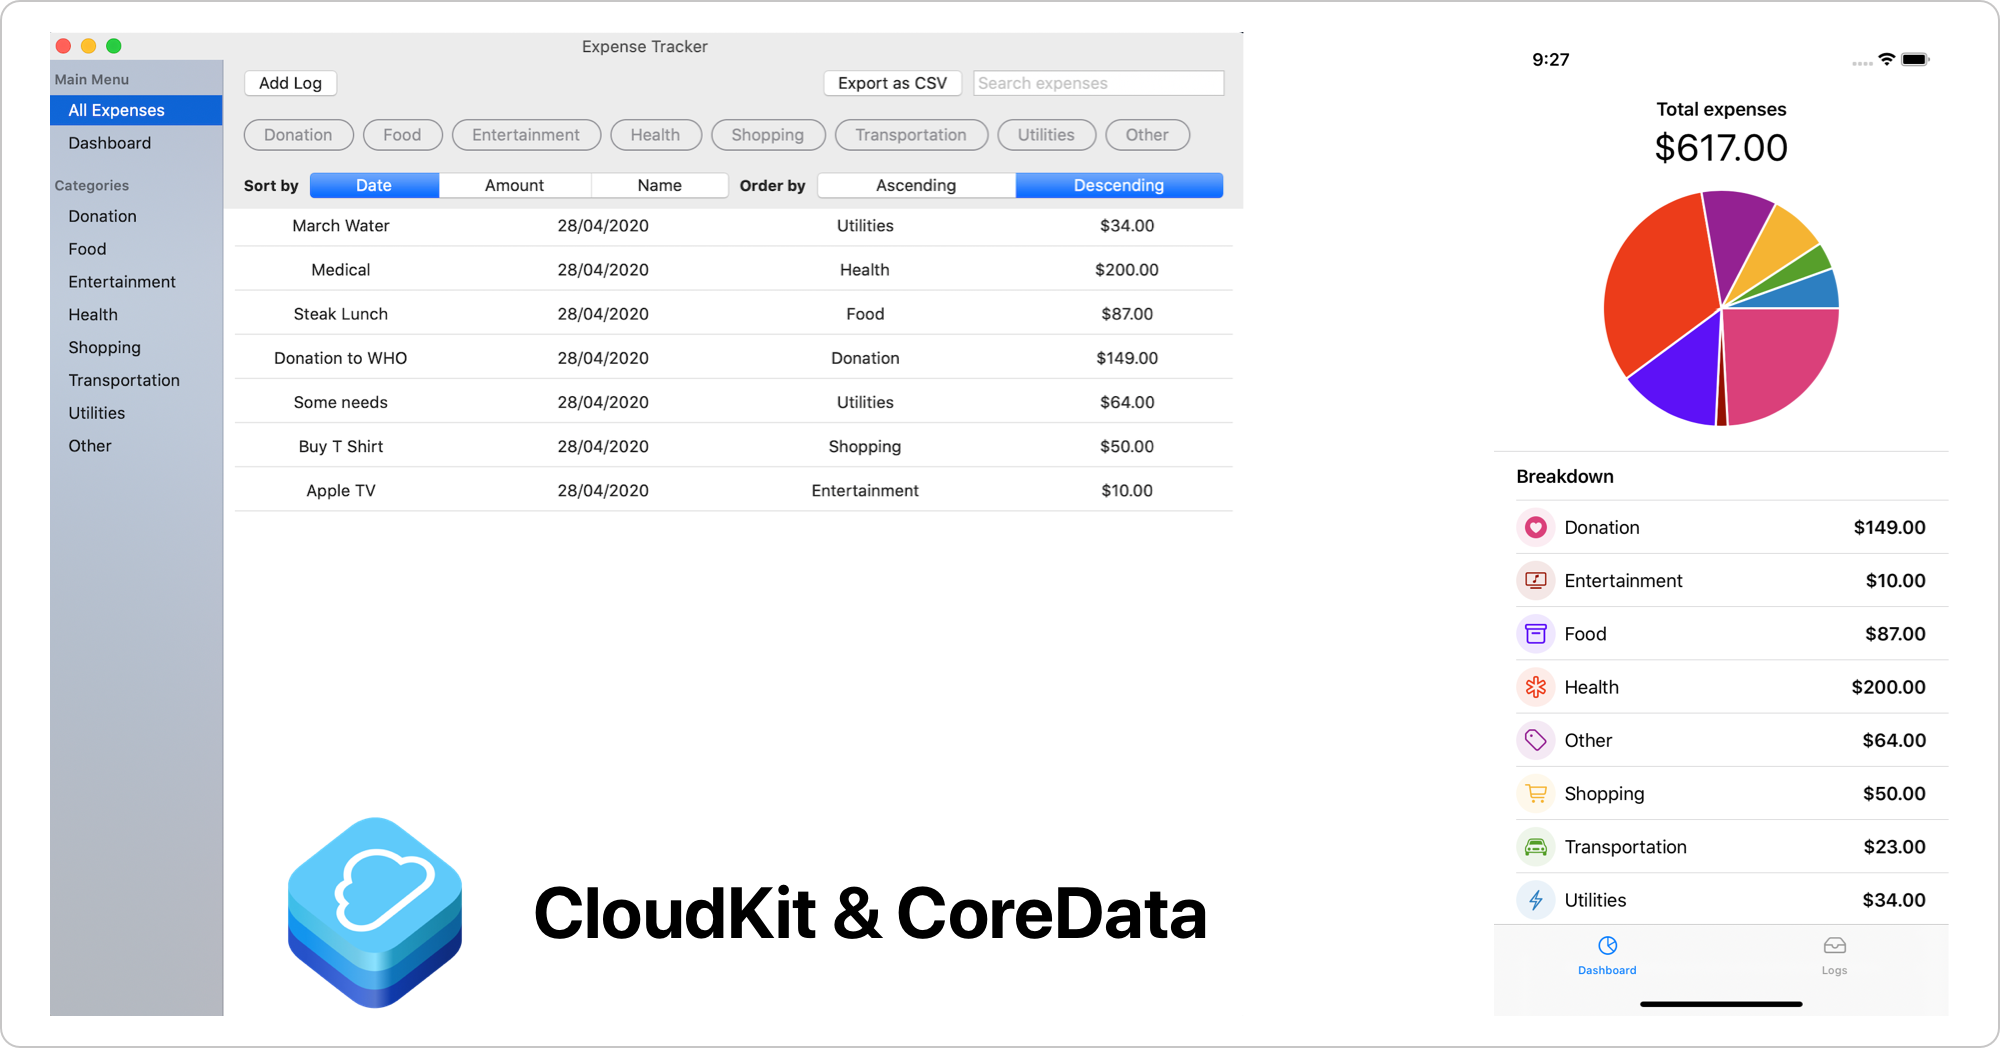
In the previous tutorial, we have learned on how to build expense tracker iOS app with Core Data & SwiftUI.
Continuing on the tutorial, now we are going to expand our expense tracker SwiftUI app to target macOS as well as integrating CloudKit Core Data sync so we can synchronize user data across their iOS and macOS devices.
CloudKit is a framework by Apple where developers can use to build an app with iCloud integration to store data in a database or assets within containers. It provides support for all Apple platforms using native API as well as third party platforms such as Web using CloudKit JS API.
Also, the cost is pretty cheap, as user data and documents are counted toward their own iCloud account total usage. It also provides free tier 10GB Asset Storage, 100MB public database storage, 2GB data transfer, and 40 Request per second. The limit of free tier cost will scale as the number of active users grows. You can calculate the cost using Apple CloudKit cost calculator in their website.
While using CloudKit to store data in the Cloud is fantastic, Apple said it is not a replacement for the app's existing data objects and persistence as it provides minimal offline caching support. It also requires the user to sign in to their iCloud account before they can store their data (user can still access data stored in the public database without sign in).
Apple already has Core Data as an object graph persistence framework that can be used to cache and persist data locally. It is very natural for Apple to integrate Core Data with CloudKit, so managed object instance can be transformed and synced to the CloudKit's CKRecord. We can do this manually, but there are many boilerplates code we need to write edge-case scenarios we need to handle ourselves.
In WWDC 2019, Apple finally introduced Core Data with CloudKit integration by introducing a new persistent container class, NSPersistentCloudKitContainer. It provides many amazing features out of the box automatically to save us writing thousand lines of code such as:
NSManagedObject to CKRecord.store description configuration.
While it has many amazing features, there are also things we need to consider when architecting our app data model using NSPersistentCloudKitContainer such as:
No unique constraint for the attribute field.relationship between entities is optional.No Cascade delete support between entities.data collaboration, aka conflict resolution merge policy manually.
You can learn more about the detail and best practices about using Core Data with CloudKit from Apple WWDC 2019 Session 202.
In this tutorial, we're going to focus on integrating Core Data Cloud with CloudKit using NSPersistentCloudKitContainer to an existing expense tracker iOS & macOS app. By targeting both, we can try the Core Data synchronization between platforms. You can clone the completed project from the GitHub repository.
If you want to learn more about the detail of building the expense tracker app with Core Data from the beginning, i recommend you to read the previous tutorial, Building Expense Tracker iOS app with Core Data & SwiftUI.
Starter ProjectTo begin, please download the starter project from the GitHub repository. The starter project already contains several main components, such as:
NSSavePanel.
Here is the breakdown of tasks that we will do to build the completed App:
NSPersistentCloudKitContainer in Core Data Stack.First, open the Xcode project and navigate to the project target list and editor. We have the following two targets scheme:
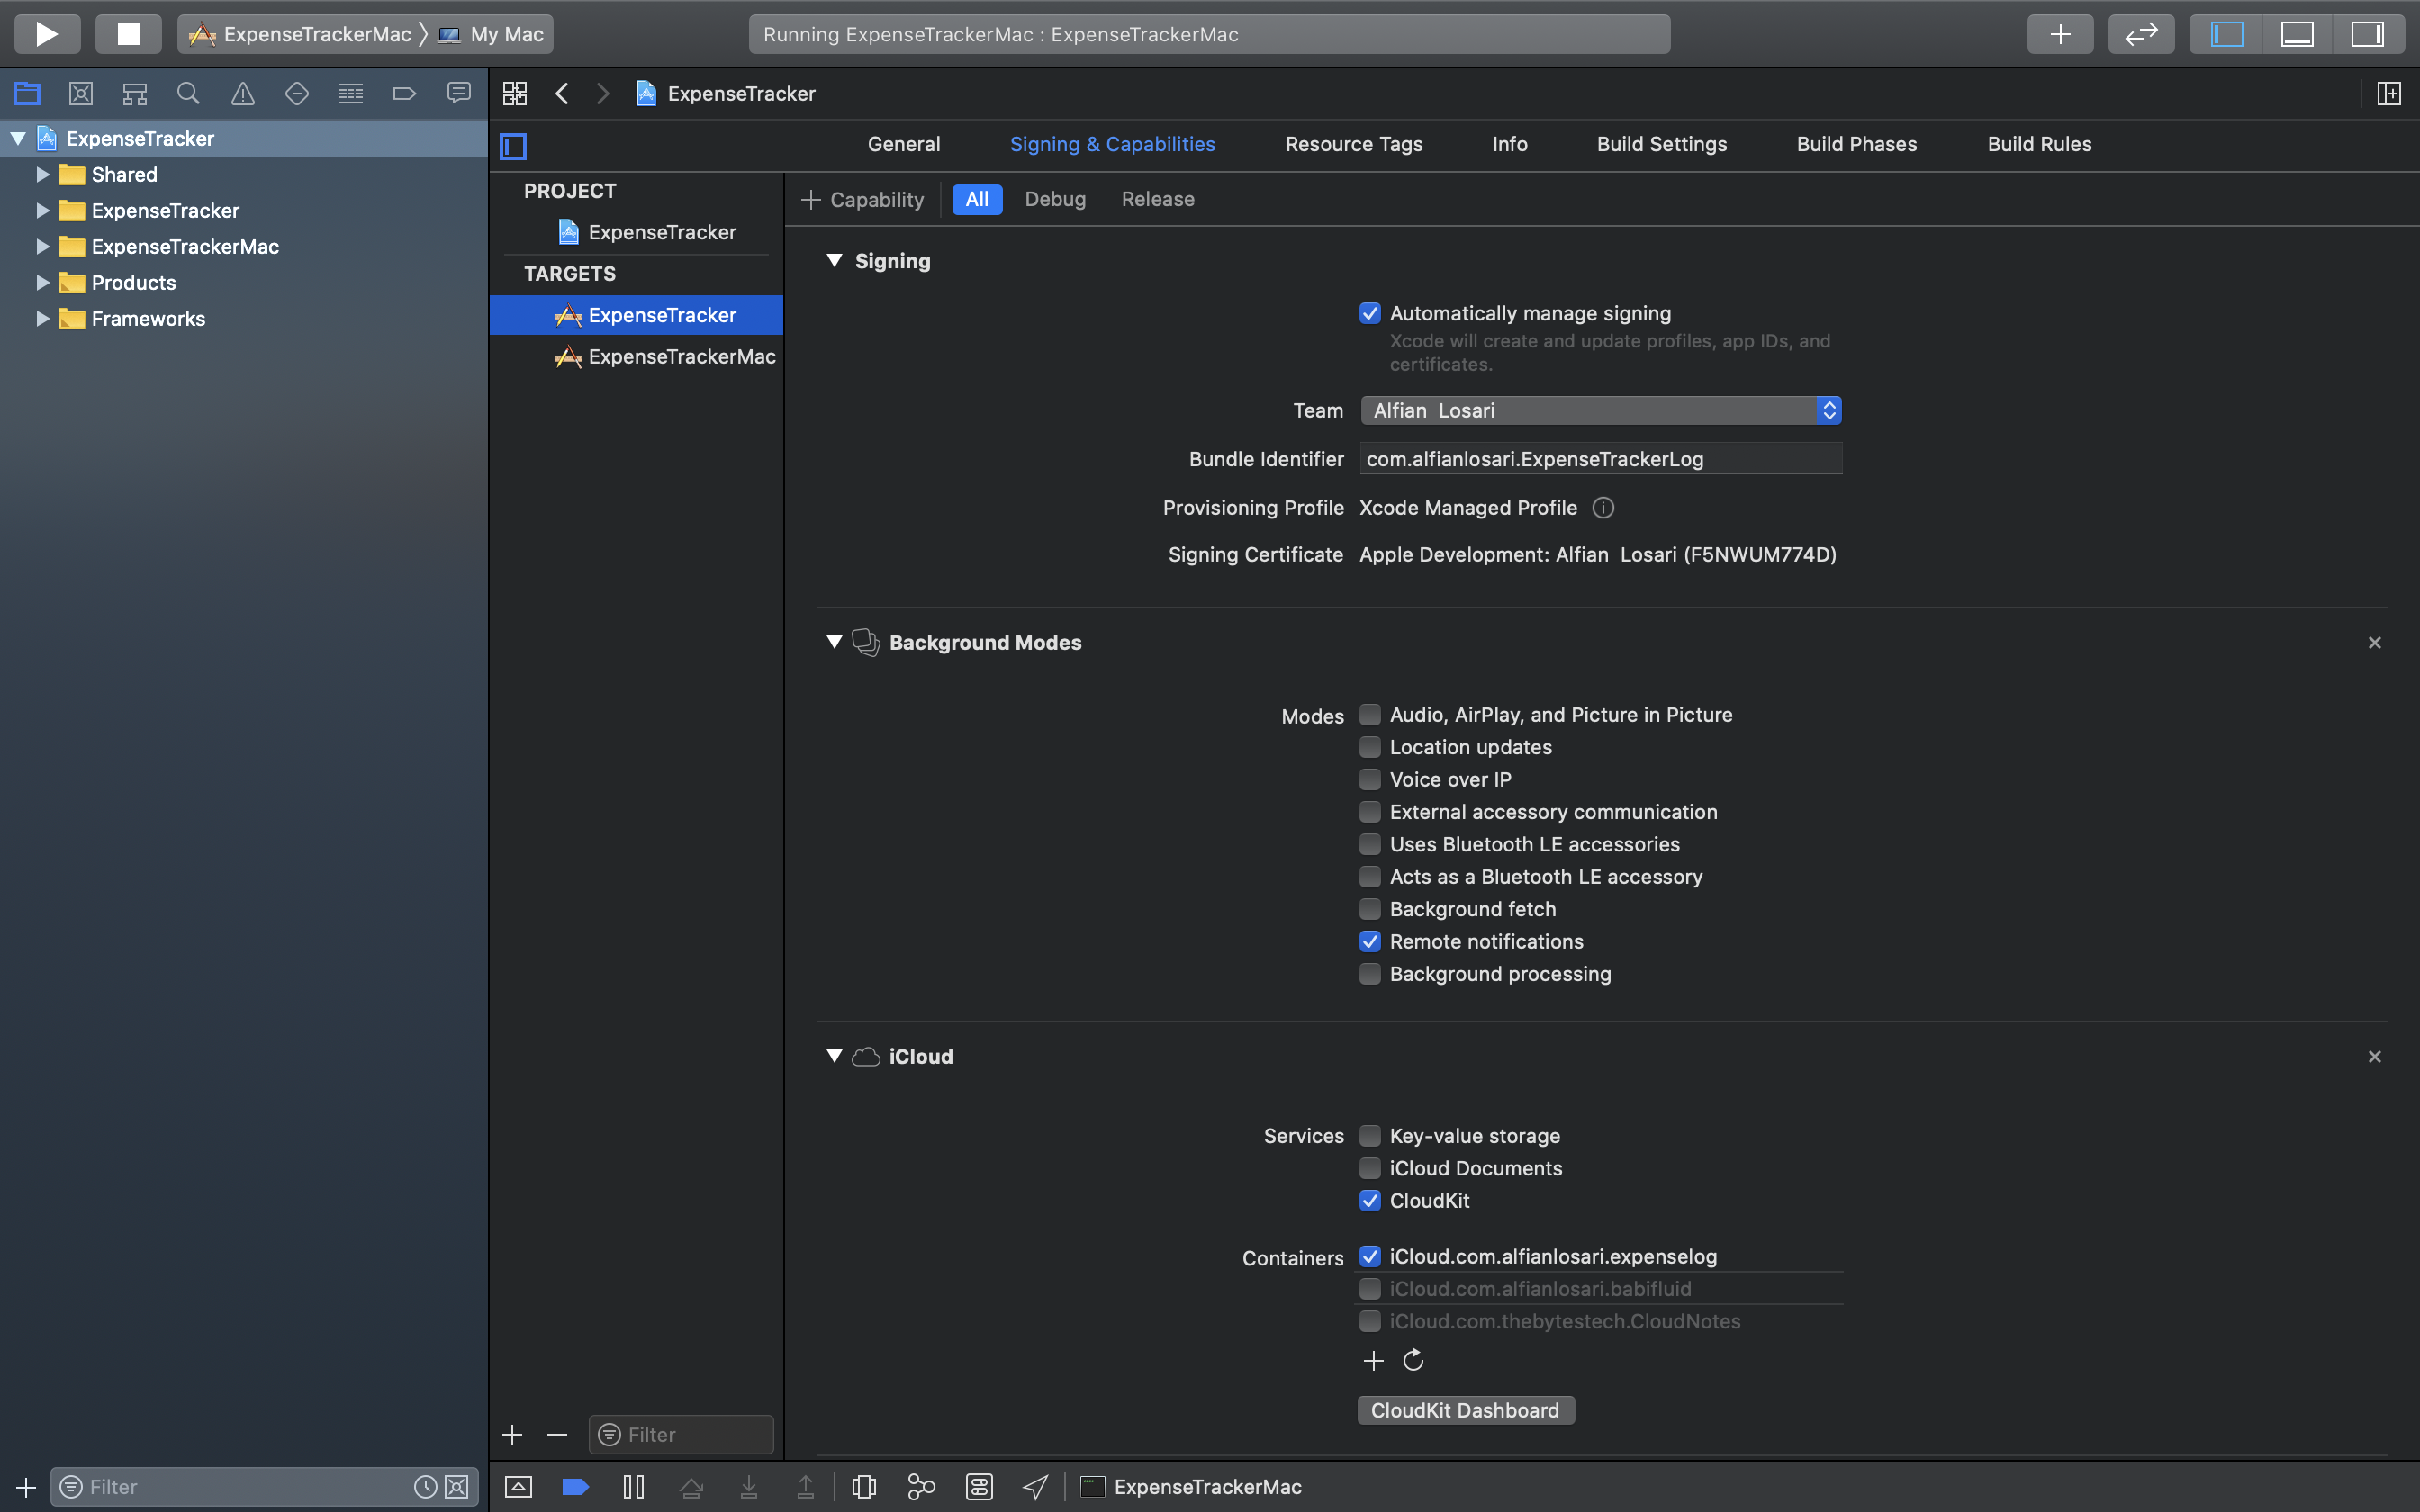
Click on the ExpenseTracker target from the list, then click on the Signing & Capabilities Tab. Provide your own unique App/bundle ID to the target. To add capabilities, click on the + button and type iCloud to the search text field to find and add it. Check the CloudKit checkbox to enable it. After that, add an iCloud container with your unique identifier. Make sure to check the box.
Next, we need also to add background mode capability so our App can be notified when new data arrives in the background via push notification. Click on the + button, search background mode from the search text field, and add it. Check the remote notification from the checkbox to enable it.
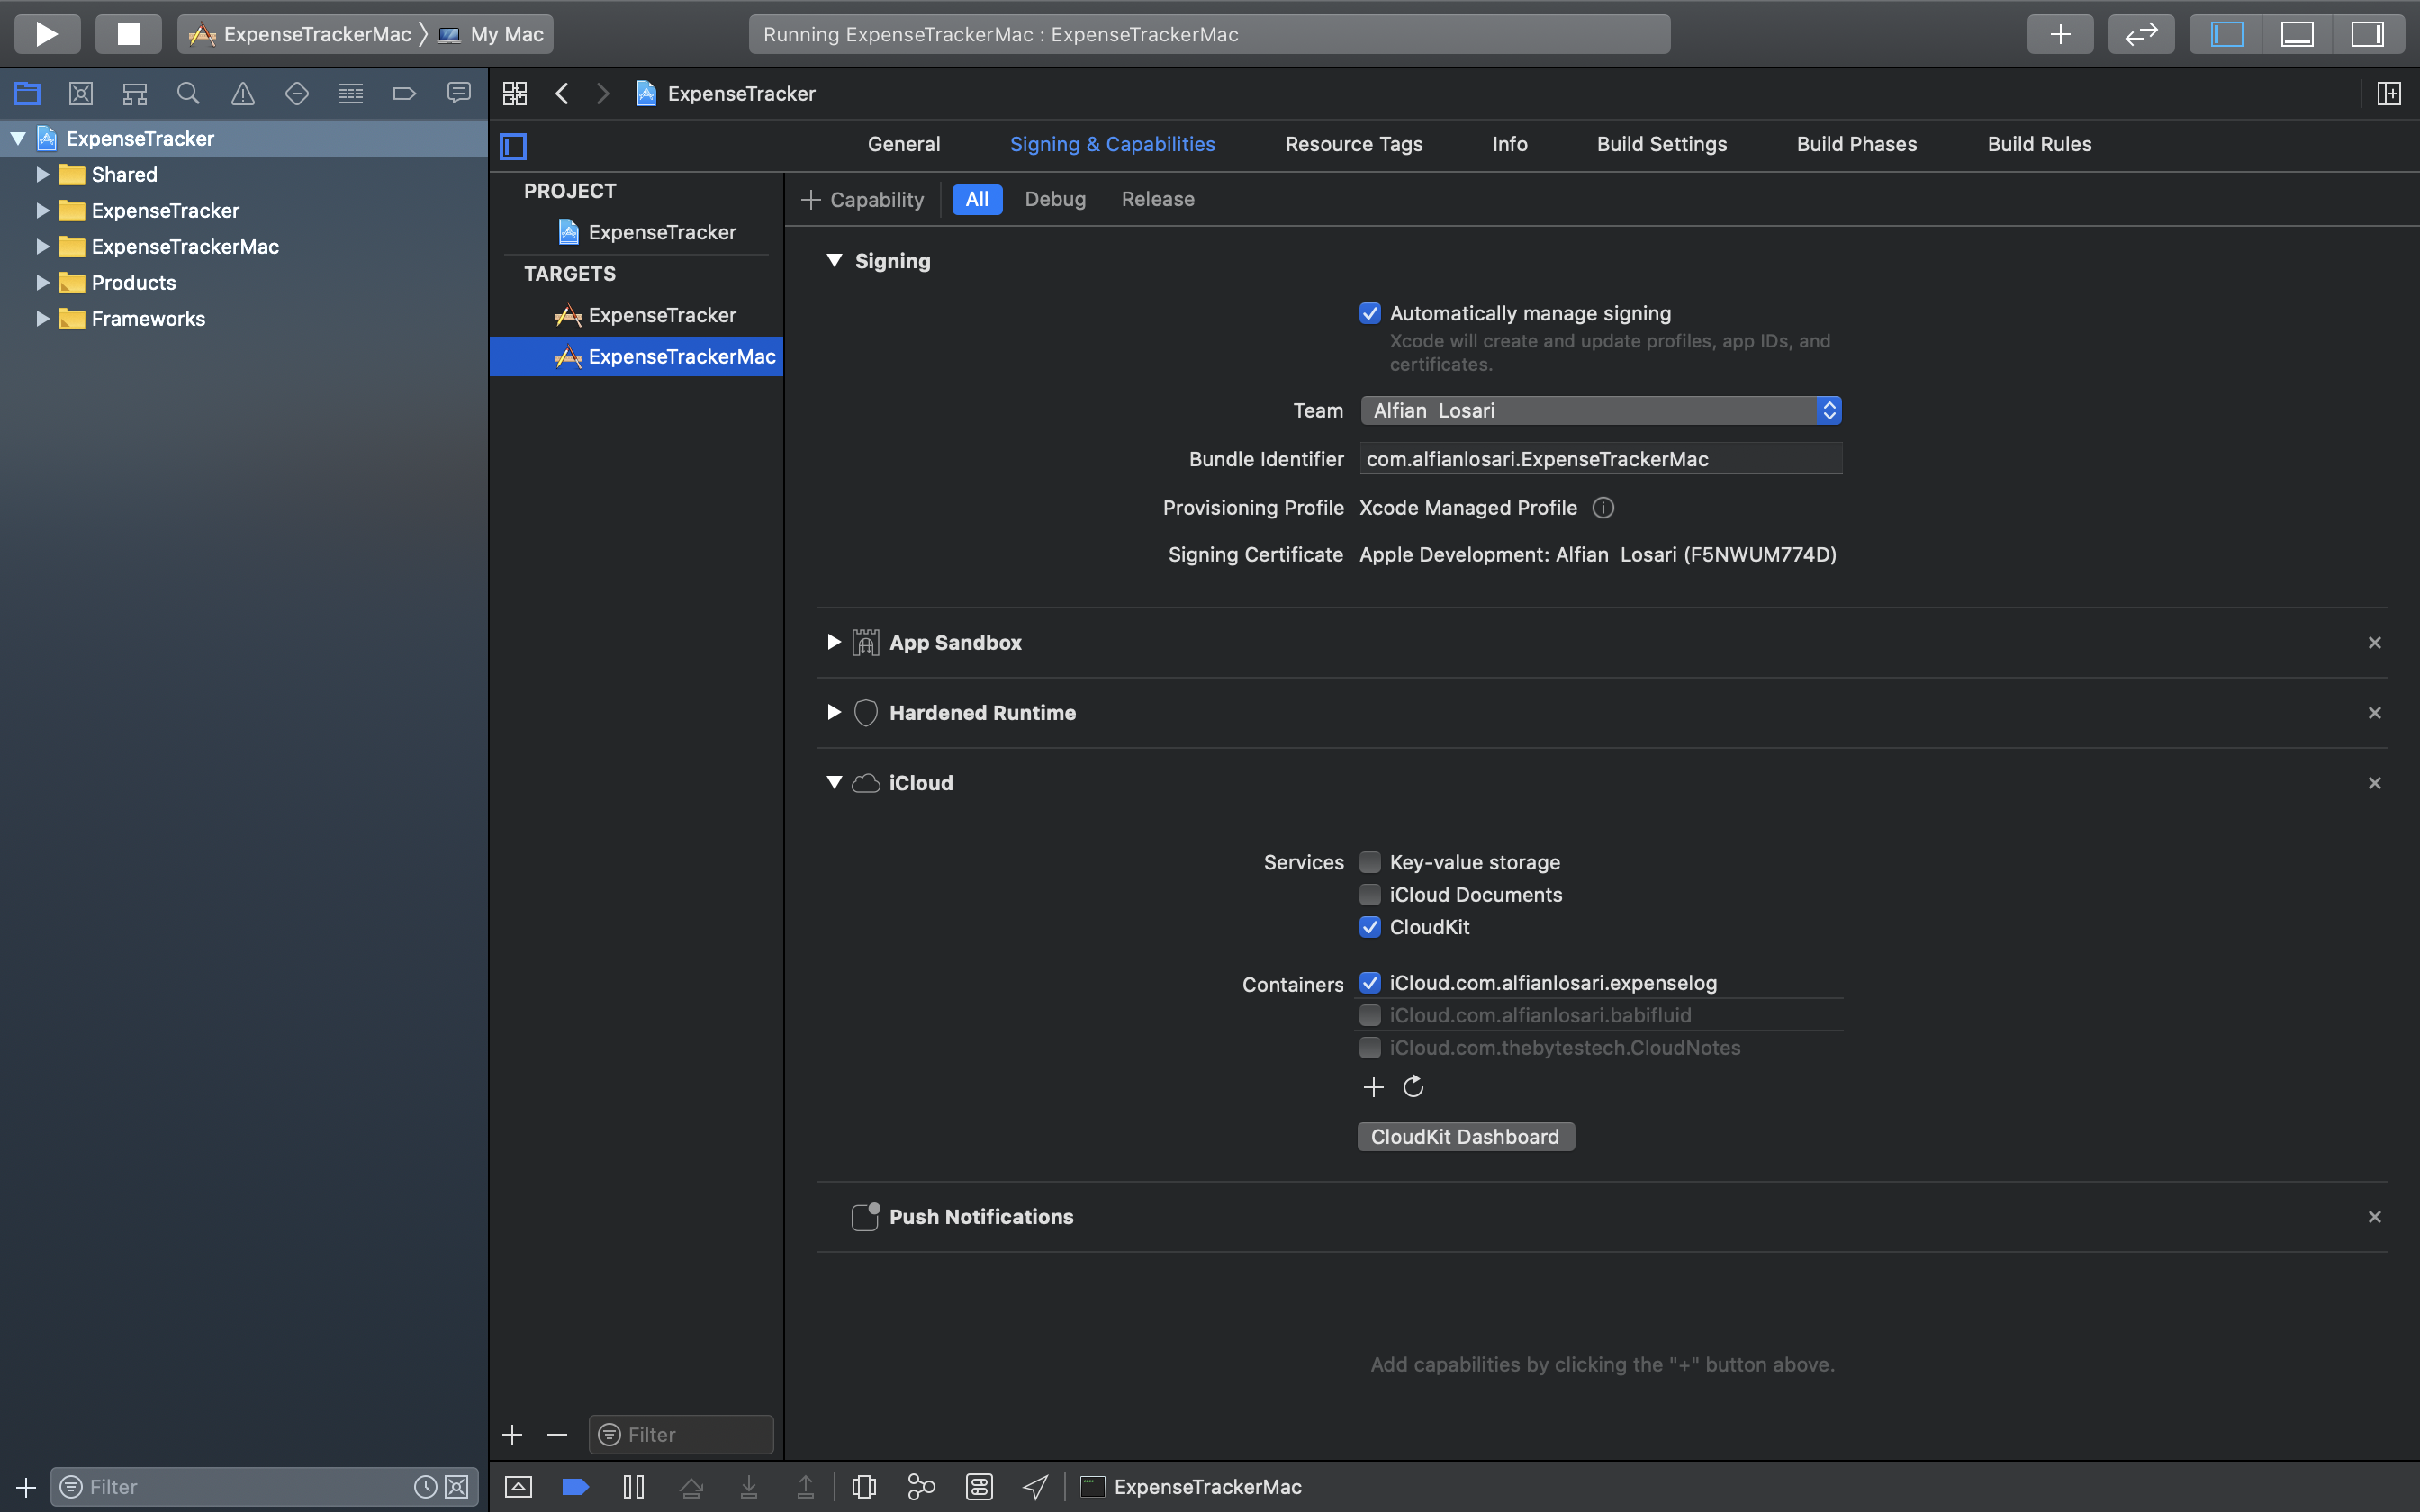
That's it! let's move to the ExpenseTrackerMac target and do the same steps to add capabilities.
Enable CloudKit in Core Data Managed Object Model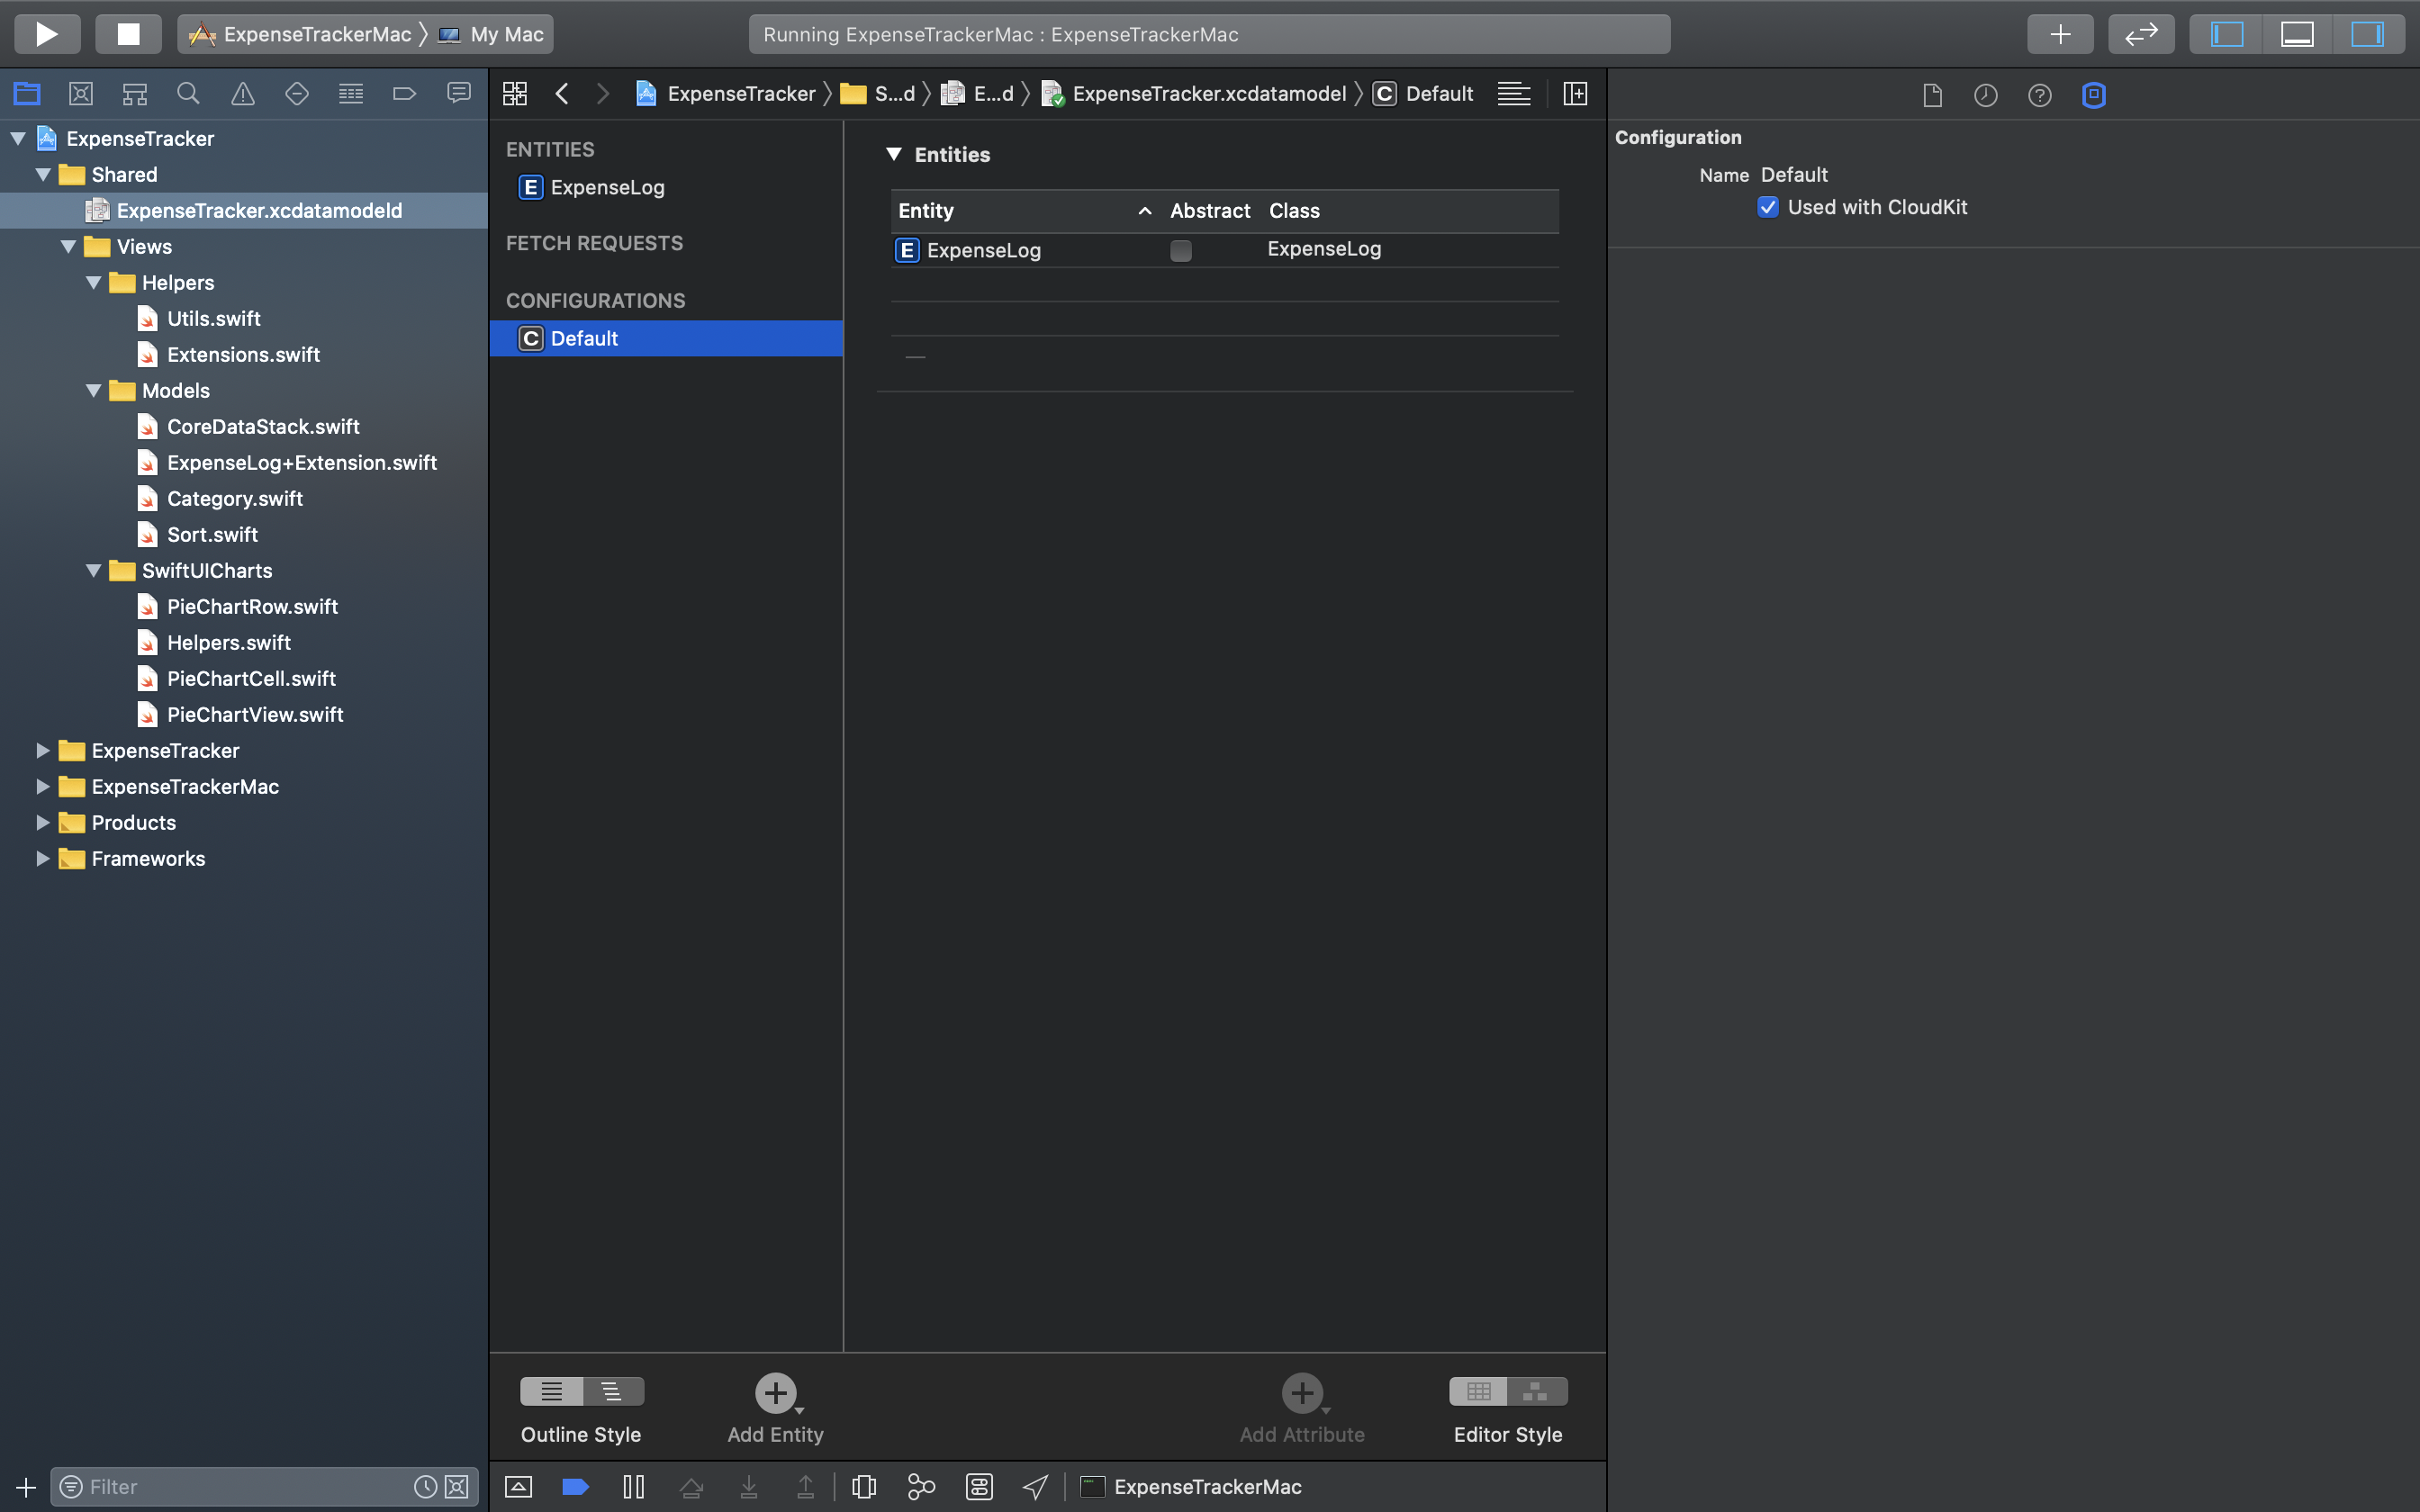
Next, find the ExpenseTracker.xcdatamodeld file from the project navigator, then click it to open the Core Data editor.
From the configuration section, click on default. As you can see, the ExpenseLog entity is already added by default. From the right Core Data Model inspector, check on used with CloudKit box to enable it.
That's it! We have enabled Core Data to our default store. Apple also provides multiple stores support to the NSPersistentCloudKitContainer, for example, a local-only store and a cloud store with CloudKit syncing. We can do this by adding configurations and explicitly add each store description when initializing NSPersistentCloudKitContainer.
From the project navigator, open the CoreDataStack.swift file. Here, we just need to change the default NSPersistentContainer to use NSPersistentCloudKitContainer. As we are using default configuration with a single store, we only need to initialize it and passing the managed object model name. By default, it will automatically use the CloudKit store description using the first CloudKit container identifier from the app capabilities entitlement.
Navigate to SceneDelegate.swift file in iOS target. Then, add the following line to the code.
class SceneDelegate: UIResponder, UIWindowSceneDelegate {
        // ...

    func scene(_ scene: UIScene, willConnectTo session: UISceneSession, options connectionOptions: UIScene.ConnectionOptions) {
        coreDataStack.viewContext.automaticallyMergesChangesFromParent = true
        // ...
    }
}
For macOS, we need to add it in the AppDelegate.swift file. Copy the following code.
class AppDelegate: NSObject, NSApplicationDelegate {

    //...

    func applicationDidFinishLaunching(_ aNotification: Notification) {
        coreDataStack.viewContext.automaticallyMergesChangesFromParent = true
        // ...
    }

}
The code will make sure the managed object context automatically merges and update the View whenever the store updates, for example, when syncing data using remote background notification.
That's it! We don't need to manually handle all the scenario for registering remote push notification, scheduling upload, and download tasks!
Running and Debugging the AppIn this part, let's try the Core Data CloudKit syncing by running the App. Synchronization for CloudKit is not happening in real-time; it can take about 30 seconds to 1 minute before you can see your changes on other devices. Also, the device needs to enable push notification to make it work. Otherwise, the sync will only happen in the beginning each time the app restarts.
The simulator doesn't support remote push notification as of right now, Xcode 11.4 remote push notification simulation won't work with CloudKit syncing until we restart the App. I recommend you to use iOS physical device for testing. For macOS target, the remote push notification is working as expected when debugging with Xcode.
You also need to be signed in to your iCloud account in both targets as we are storing user records to their iCloud storage.
Build and run the App using both the target scheme, or you can run the App using multiple iOS physical devices. Create several expenses on one device, and your changes should be reflected on your other device from the expense list. (Dashboard view doesn't use @FetchRequest property wrapper, so it doesn't update the View in real-time when the store updated.
If the sync doesn't happen, check the debug log for error and try to make sure you have good internet connection on both devices, then restart the app. You can also see the Core Data and CloudKit debug log from the debug console if you want to have more insight.
Accessing CloudKit Web Dashboard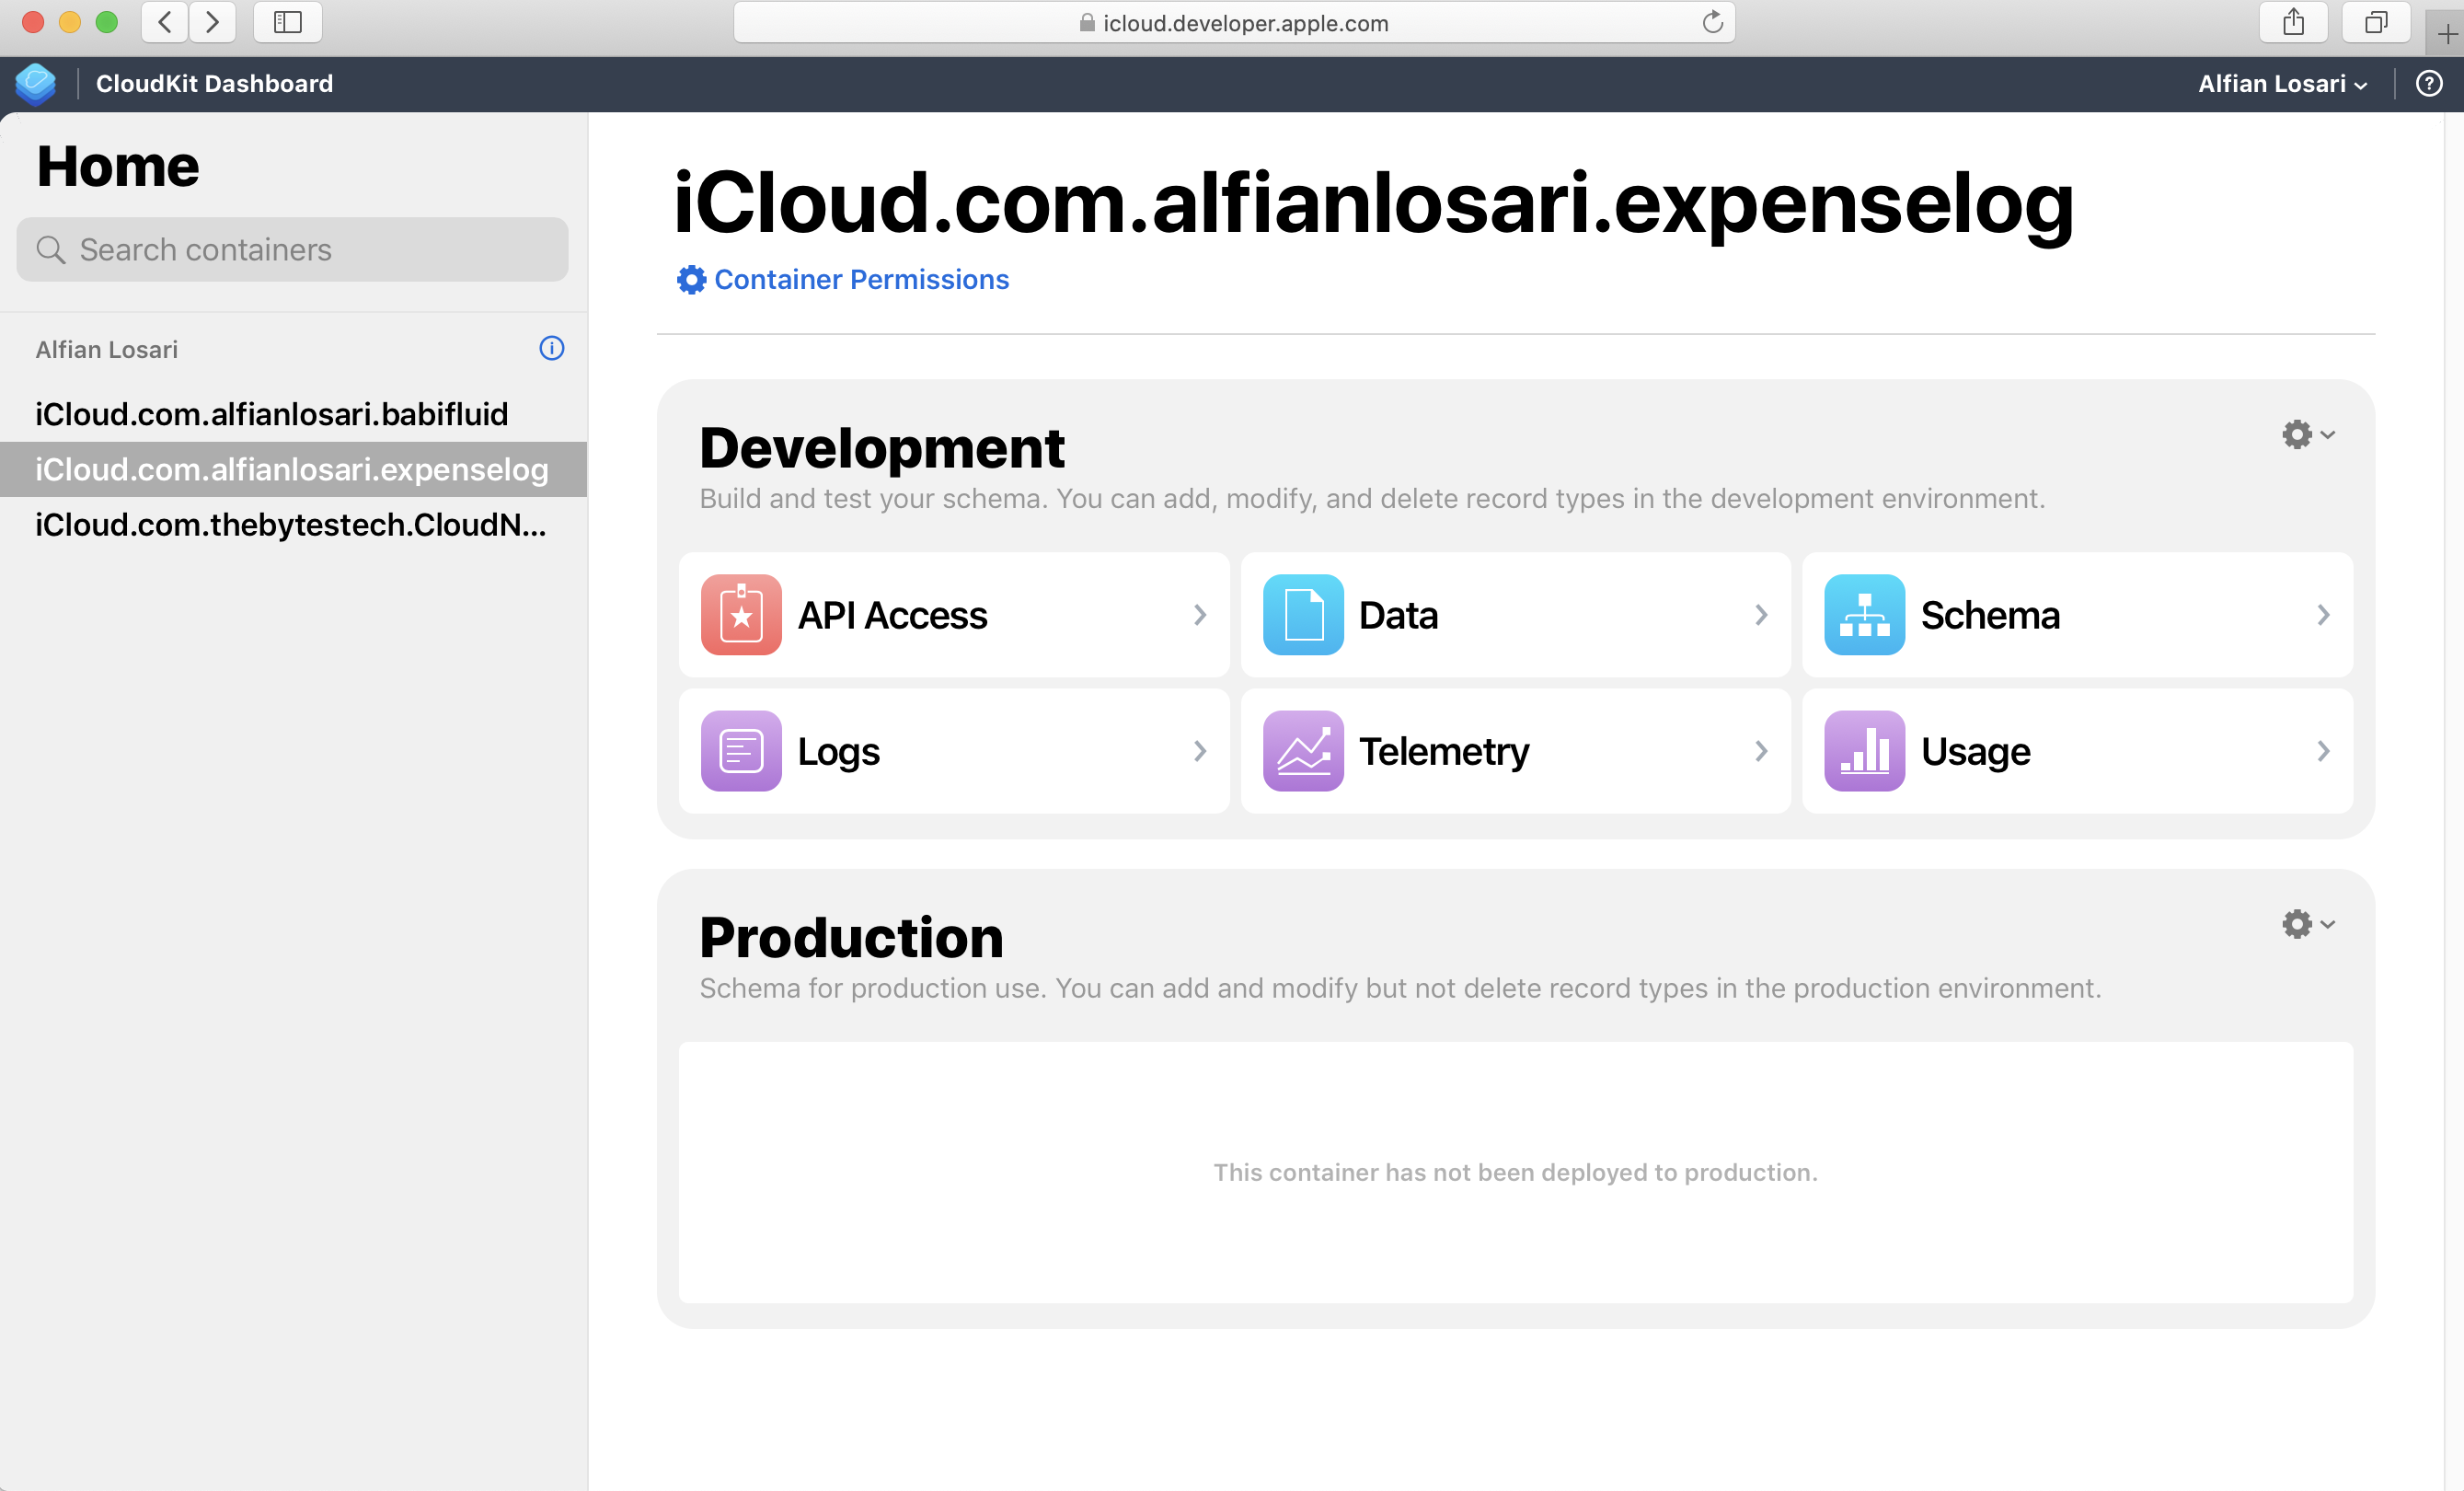
Finally, you can access the CloudKit Dashboard from the Web to fetch records, view usage stats, logs in a container created by your App.
ConclusionCongratulations! You have successfully built a cross-platform SwiftUI App for both iOS & macOS with seamless Core Data synchronization using CloudKit. As our App has just one single entity, the integration process is pretty smooth and straightforward.
As our app complexity increases with more data entities, relationships, and collaboration models, we need to be extra careful when architecting our Core Data Schema as well as how to handle merge policy with conflict resolution.
I believe with the introduction of NSPersistentCloudKitContainer by Apple; it will be the base foundation of the improvement that we can expect Apple to build on over the years. I hope it will make our life as developers become so much easier to build apps with complex requirements with native data persistence solutions.
Until the next one, let's keep the lifelong learning goes on!
Published at Apr 20, 2020
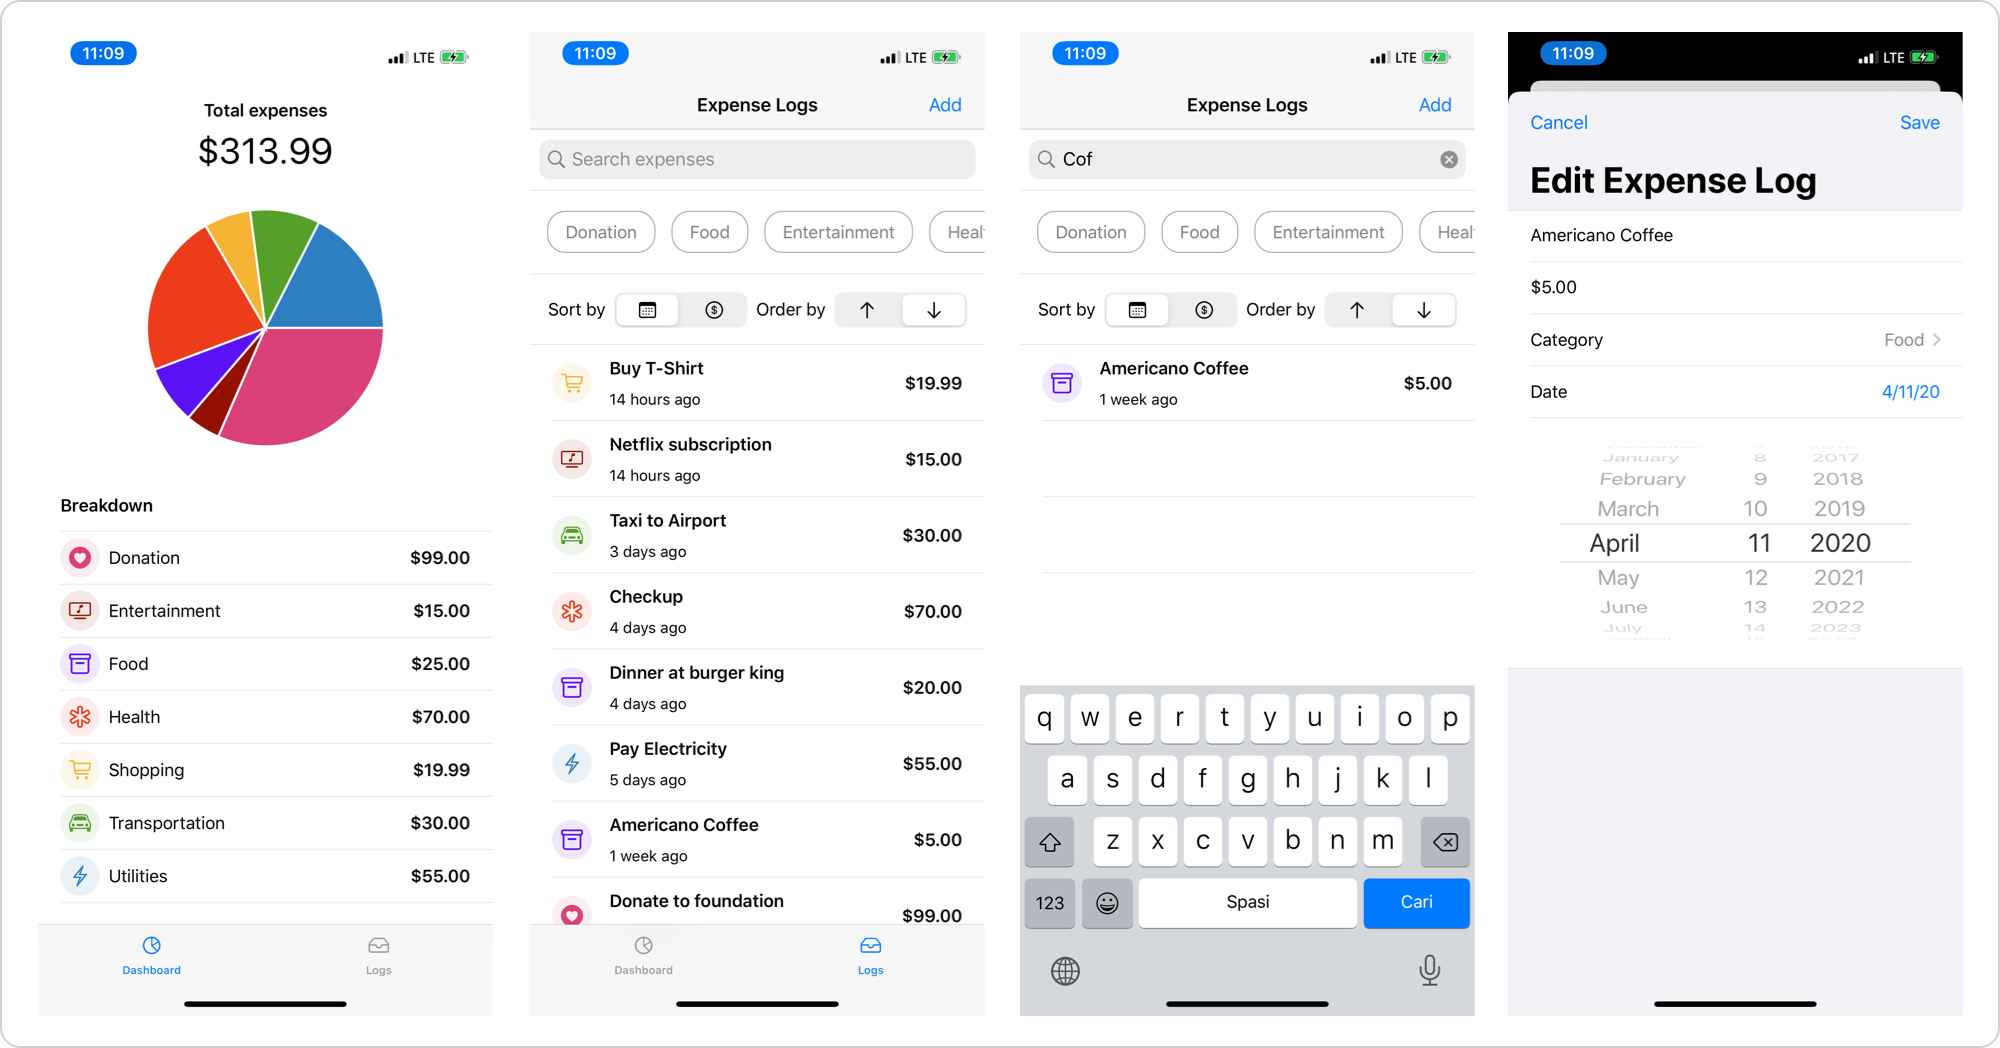
Persisting user data in a productivity-based offline application is the essential primary feature that we need to provide to users. There are many different data types associated with the recommended native storage solution in iOS, such as:
BLOB (Binary Large Object) type. Music, image, video, JSON, Plist archive files fall under this type. Apple recommends storing this in a file under the User document or temporary cache directory folder.UserDefaults Key-Value storage type. It is a dictionary-based type suitable for storing bite-sized user preferences.Core Data object graph-based storage. It's the best for storing relational based object similar to a database.
According to Apple, Core Data is recommended to use when we want to store data permanently for offline use or even as a cache when there is no internet connection. Under the hood, Core Data uses high performance and compact SQLite database as its default persistent store. There are many advantages of using Core Data instead of accessing SQLite API manually such as:
object graph to the database storage.fault and batch to load the object and property as needed.Undo and Redo of individual or batched changes.background data task API to handle large dataset imports without blocking main UI thread.UIKit, FetchedResultsController can be used to sync data changes in table and collection views. While in SwiftUI, we can use @FetchedResults property wrapper to update the state of the View whenever the data source changes.versioning and migration when schema changes.
At last, our app size won't be affected as Core Data is built into the platform itself. Apple also uses it in most of its productivity-based apps, so we can ensure it is a reliable and battle-tested framework.
In this tutorial, we are going to build an expense tracker iOS app using Core Data and SwiftUI. Here are the main features of the app:
Create, edit, and delete expense logs.list of expenses.Filter expenses by categories and search query.Sort expenses by date or amount in the order of descending or ascending.dashboard of total expense sum for all and each category.pie chart.
Before you begin, you can download and play around with the app from the completed project GitHub
To begin, you need to download the Starter Project from GitHub. Most of the UI components, standard models, and helpers are already included in the starter project, so we can focus on implementing Core Data Stack within the app.
Here are the main models provided inside the starter project:
Category enum. It is an abstraction for the expense category, such as entertainment, food, transportation, utilities, etc . Each expense log belongs to a category.SortOrder and Sort type enums . Both are an abstraction for the representation of sorting by date/order in ascending/descending order.Utils struct provides a static property to retrieve formatter for number and date inside the app.
The app has two primary tabs, dashboard and logs tabs. For Views, we have several main components, such as:
DashboadTabView. It showcases the sum of the total expenses for all categories, individual categories, and categories expenses sum distribution inside a pie chart.LogsTabView. This tab is a container that consists of the filters selection, sort by and order selection, and list of logs.LogFormView. This view is a form used for creating and editing log. It has text fields for name and amount as well as a picker for date and category selection.FilterCategoriesView. It is a carousel scroll view where users can apply multiple selections of categories as a filter. It accepts the binding of Set<Category> to bind the data from the parent state.SelectSortOrderView. It is a HStack where the user can pick sort-by and order by type using segmented controls. It accepts the binding of SortOrder and SortType to bind the data from the parent state.PieChartView. It is a Pie Chart View by AppPear. I cloned and made a slight modification to the source code so it can display different colors for each category.
Try to build the app and play around with it. The dashboard tab will be empty as we don't have any data yet to display. While in the logs tab, you can play around by applying categories filter and sort order types. Try to tap on the add button; the form will be presented, but the save button won't create a new log for now as we haven't implemented the Core Data persistence into the app.
To begin, let's create a new managed object data model file. Click on Menu Bar > New > File. Select Data Model from Core Data section and click next. You can also type data model from the filter text field to find it. Give it ExpenseTracker.xcdatamodeld as the filename.
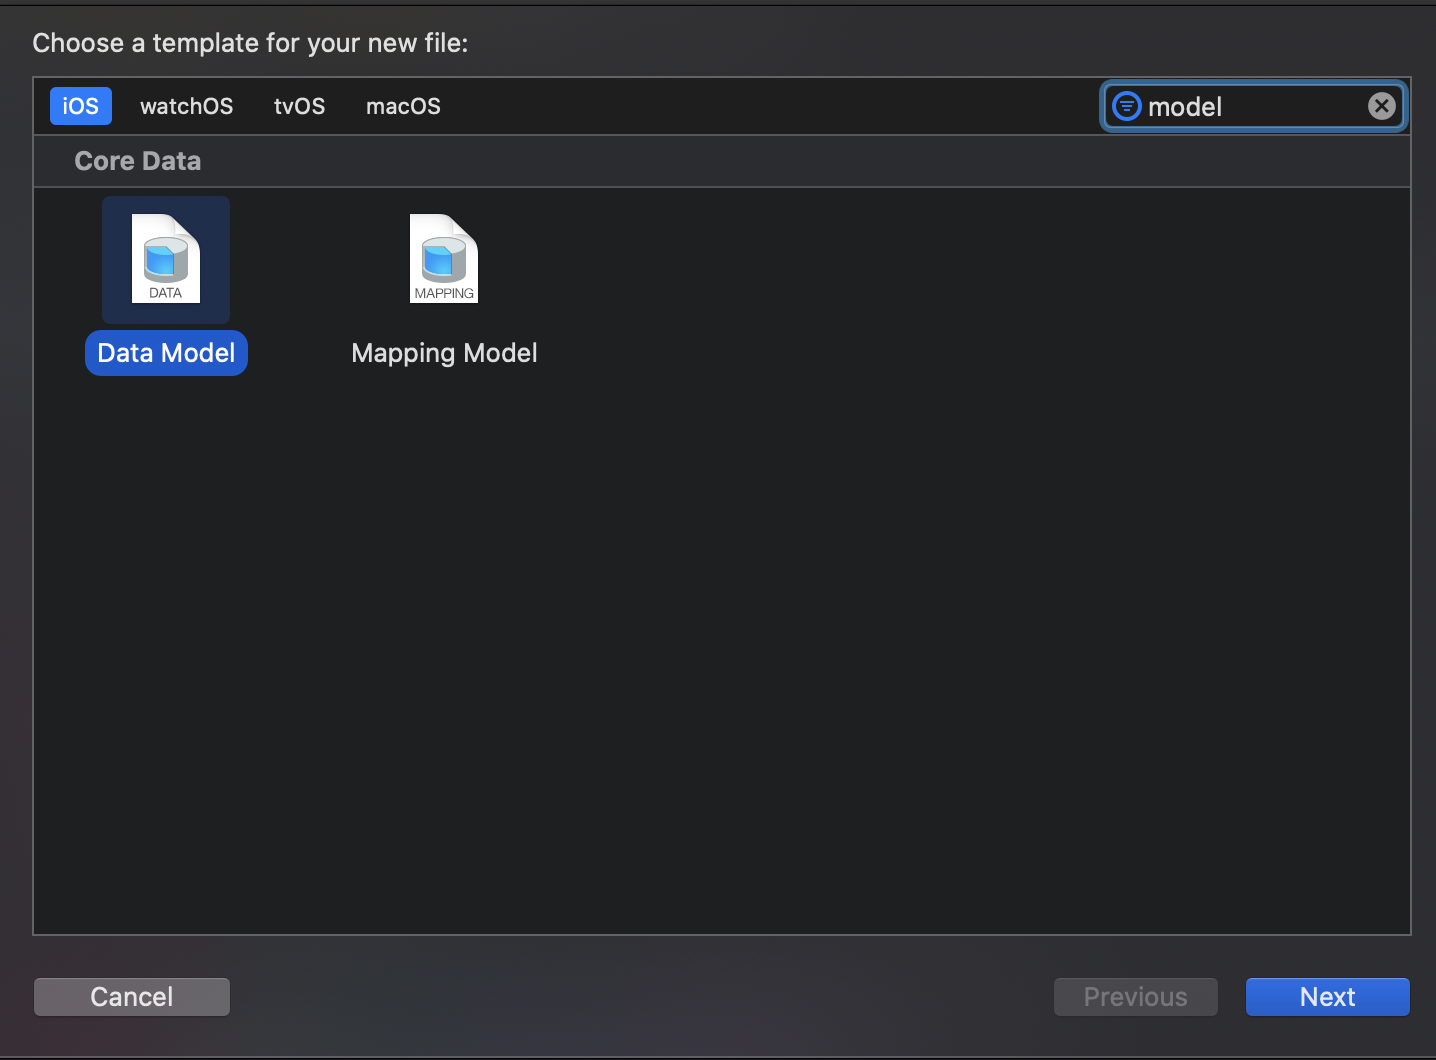
Click on the new file. It will open the Core Data editor. Click on the Add Entity button at the bottom to create one entity. Rename the entity to Expenselog. Click on the ExpenseLog, from the editor attributes section, click on + button 5 times to create new attributes. Here are the attributes with name and type association:
amount: Decimal.date: Date.category: String.id: UUID.name: String.
Rename all the attributes to match the list above. Xcode will automatically generate the managed object model subclass for the ExpenseLog. Close and reopen the Xcode to make sure the autogenerated class is added correctly to the project by Xcode.
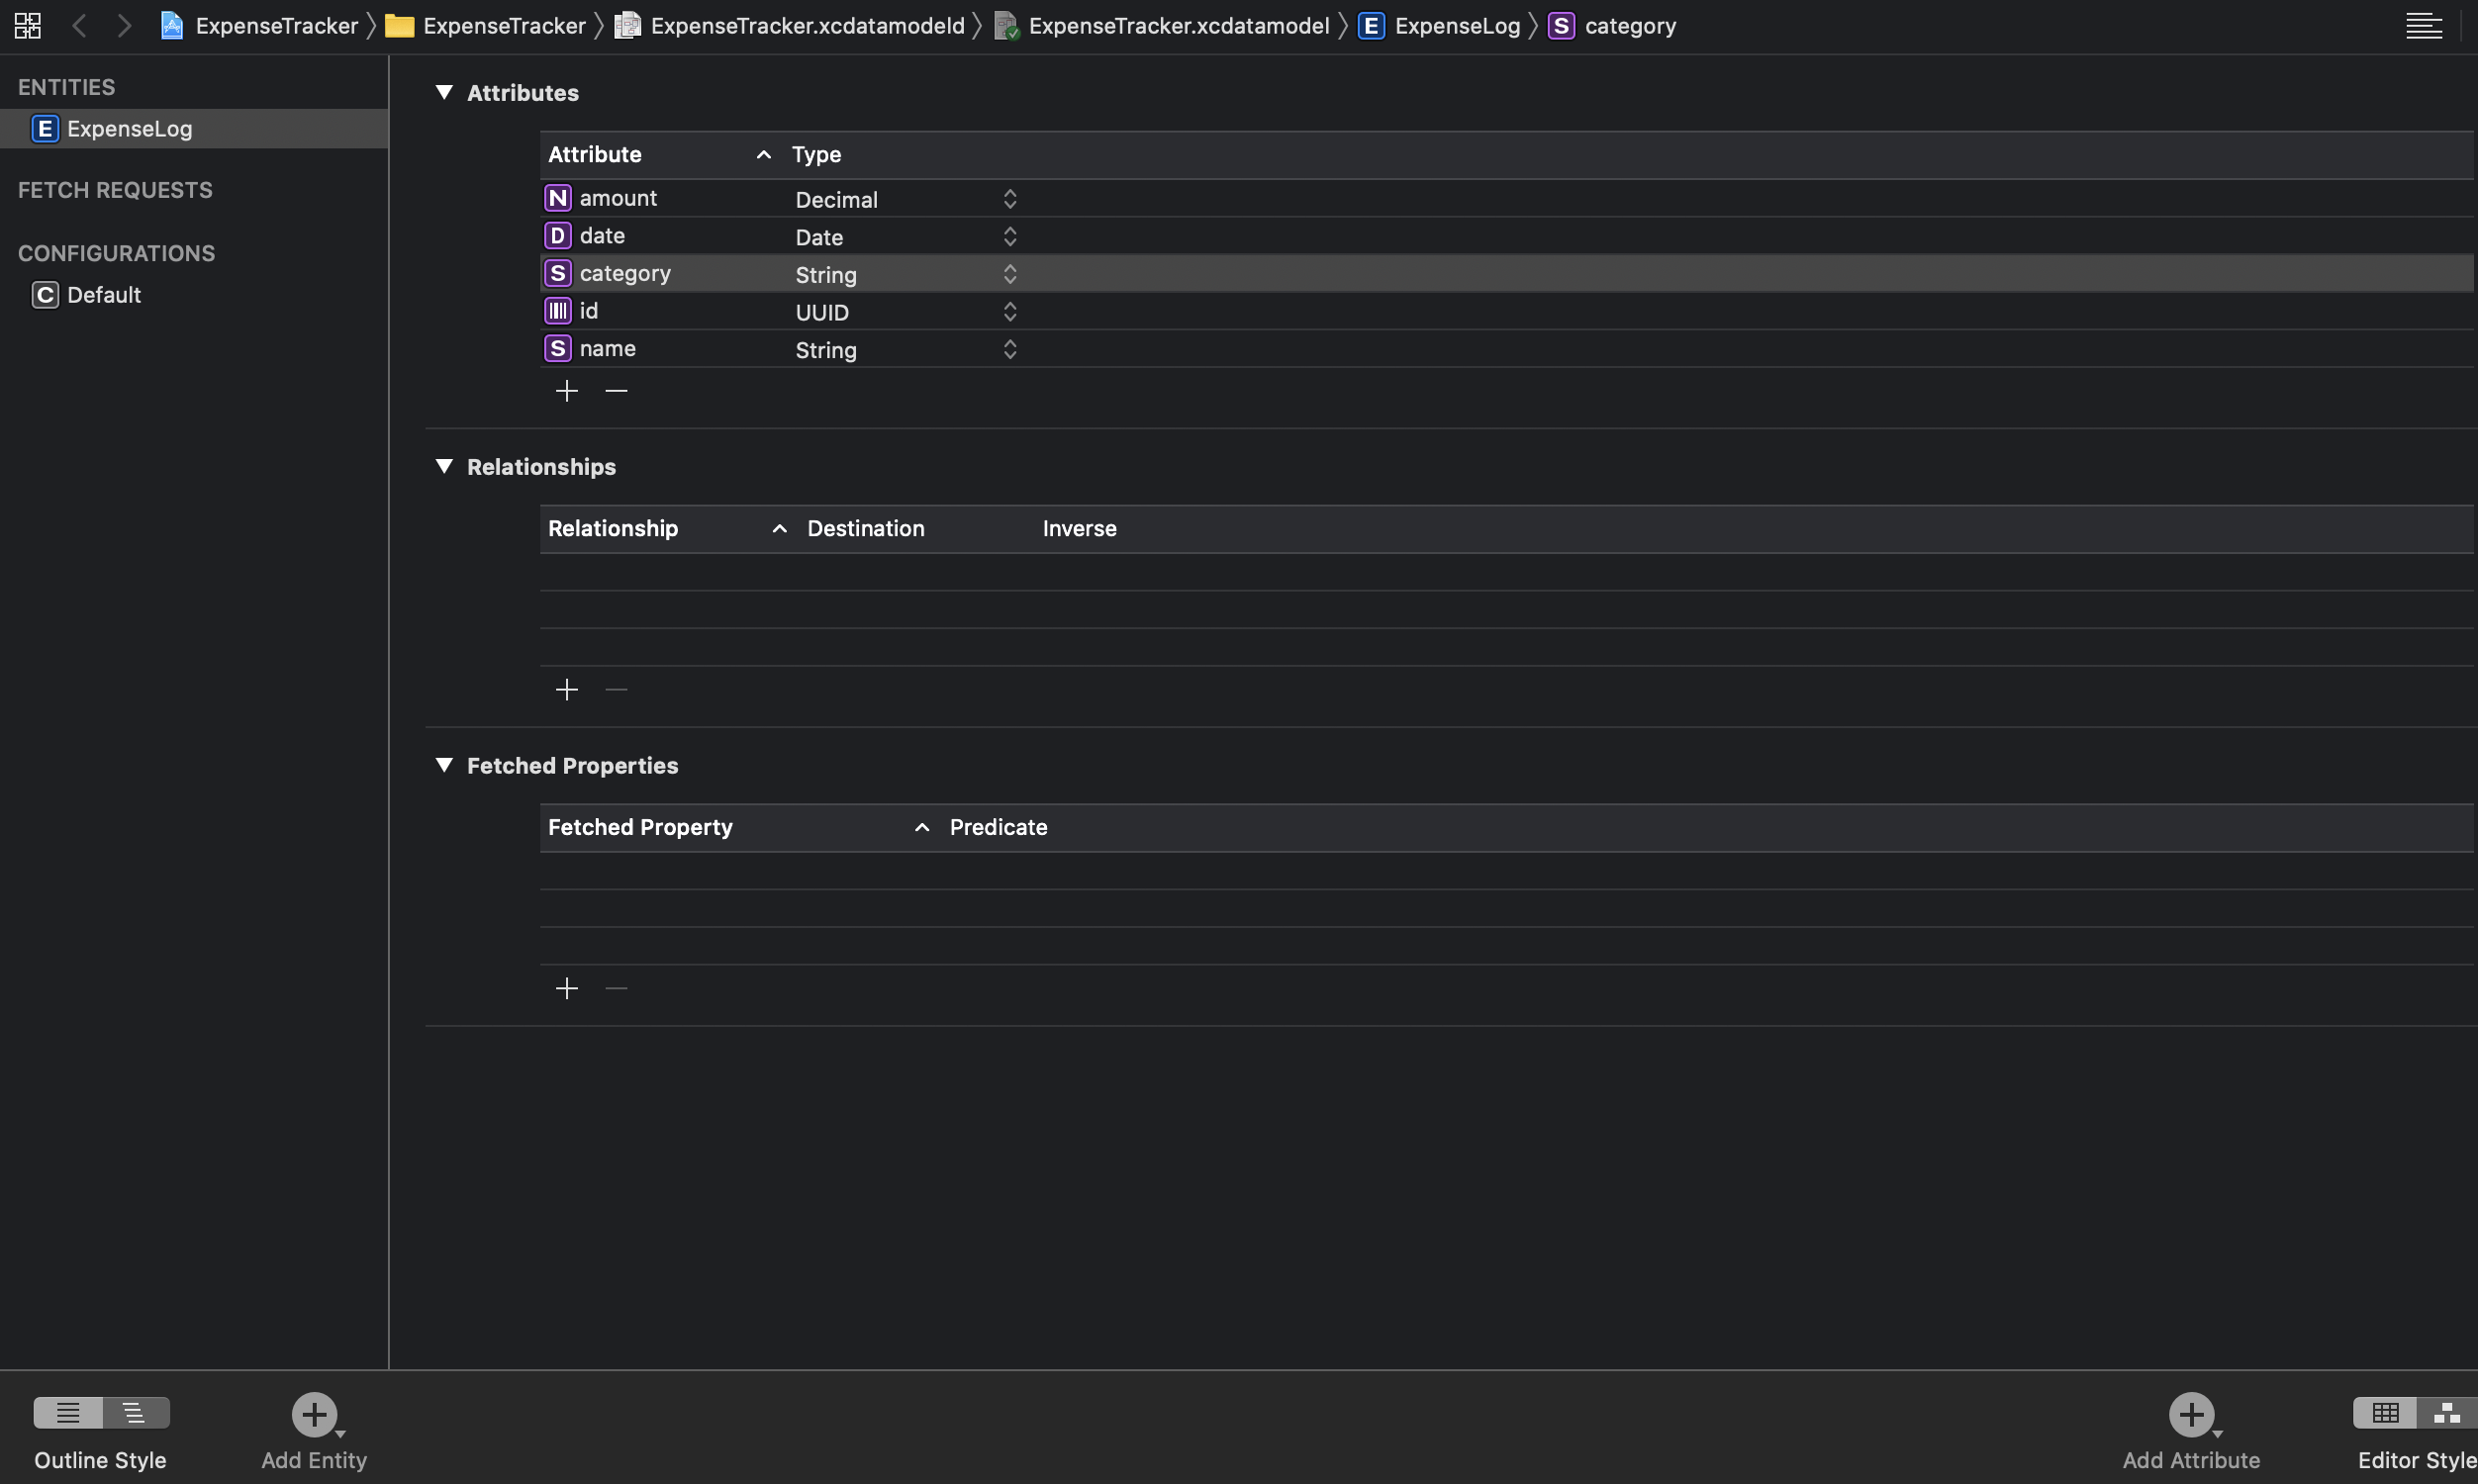 Create Core Data Stack and Inject Managed Object Context Dependency
Before we can use Core Data, we need to initialize a NSPersistentContainer at first. We will encapsulate this into the CoreDataStack class. In the initializer, we pass the containerName for initializing NSPersistentContainer, the container name itself is the name of the xcdatamodeld file, which in our case is ExpenseTracker.
Using NSPersistentContainer that was introduced by Apple in iOS 10, we don't have to manually initialize all Core Data Stacks such as the persistent store coordinator, description, file URL, main managed object context. It will automatically handle it for us as well as exposing property for the UI context and a function to generate a background thread context.
The ManagedObjectContext class itself will be the main workhorse where all the managed object models will be stored. It is not a thread-safe object, so we have to be very careful only to use the main thread context when fetching data from UI. A background thread context is suitable when we want to import large datasets from an API on the internet.
Create a new Swift File named CoreDataStack and copy the following code below. I also added a simple extension to save context only if it has changed.
import CoreData

class CoreDataStack {

    private let containerName: String
    var viewContext: NSManagedObjectContext { persistentContainer.viewContext }

    private lazy var persistentContainer: NSPersistentContainer = {
        let container = NSPersistentContainer(name: containerName)
        container.loadPersistentStores(completionHandler: { (storeDescription, error) in
            if let error = error as NSError? {
                print(error.localizedDescription)
            }
            print(storeDescription)
        })
        return container
    }()

    init(containerName: String) {
        self.containerName = containerName
        _ = persistentContainer
    }
}

extension NSManagedObjectContext {

    func saveContext() throws {
        guard hasChanges else { return }
        try save()
    }
}
Next, we will inject the managed object context into the root view using SwiftUI Environment so all the children view can explicitly receive this using environment keypath. We will do this in the SceneDelegate, copy the following code into the file.
class SceneDelegate: UIResponder, UIWindowSceneDelegate {

    var window: UIWindow?

    var coreDataStack = CoreDataStack(containerName: "ExpenseTracker")

    func scene(_ scene: UIScene, willConnectTo session: UISceneSession, options connectionOptions: UIScene.ConnectionOptions) {

        let contentView = ContentView()
            .environment(\.managedObjectContext, coreDataStack.viewContext)

        if let windowScene = scene as? UIWindowScene {
            let window = UIWindow(windowScene: windowScene)
            window.rootViewController = UIHostingController(rootView: contentView)
            self.window = window
            window.makeKeyAndVisible()
        }
    }
}
Before we begin integrating the Core Data model to our views, we will create an extension for the ExpenseLog model that will make our life easier later. In here, we declare several properties such as:
categoryEnum. Core Data doesn't support enum as the attribute for an entity. We store the category as String, so using this computed property, we can easily access the category enum type for our ExpenseLog.nameText. Core Data attributes are optional, so to make it easier integrating with SwiftUI, we create a non-optional computed property to return the name String with an empty string as default value.dateText. In our LogListView, we use a relative date formatted text to display the date of the expense relative to the current date.amountText. This helps us to display the amount as a currency number formatted text.
Create a new Swift file named ExpenseLog+Extension inside the Models folder and copy the following code.
import Foundation
import CoreData

extension ExpenseLog: Identifiable {

    var categoryEnum: Category {
        Category(rawValue: category ?? "") ?? .other
    }

    var nameText: String {
        name ?? ""
    }

    var dateText: String {
        Utils.dateFormatter.localizedString(for: date ?? Date(), relativeTo: Date())
    }

    var amountText: String {
        Utils.numberFormatter.string(from: NSNumber(value: amount?.doubleValue ?? 0)) ?? ""
    }
Before we move to the next section, navigate to Sort.swift file, and implement the sortDescriptor computed property to return the NSSortDescriptor based on the sort type of date or amount. We will use this on the next section to create a fetch request in the LogListView
struct ExpenseLogSort {
      // ....
    var sortDescriptor: NSSortDescriptor {
        switch sortType {
        case .date:
            return NSSortDescriptor(keyPath: \ExpenseLog.date, ascending: isAscending)
        case .amount:
            return NSSortDescriptor(keyPath: \ExpenseLog.amount, ascending: isAscending)
        }
    }
}
In this section, we are going to add FetchRequest on the LogListView to query our expense logs dataset from CoreData. To query data from a managed object context, we need to use NSFetchRequest. It will have several parameters to configure:
NSSortDescriptor to configure the order of the result set from Core Data. It uses the property key and sorts it in ascending or descending order.NSPredicate object where we can filter the results set by constraining the result to match a specific expression and value (similar to WHERE statement in SQL)
In SwiftUI, Apple creates a property wrapper named @FetchRequest where it drives and binds the View using a NSFetchRequest. Whenever the result set changes, it will update the View depending on the state of the data source. It makes sure the View and data source are synchronized automatically.
Navigate to the LogListView file, then copy the following code below:
import SwiftUI
import CoreData

struct LogListView: View {

    // 1
    @Environment(\.managedObjectContext)
    var context: NSManagedObjectContext

    // 2
    @FetchRequest(
        entity: ExpenseLog.entity(),
        sortDescriptors: [
            NSSortDescriptor(keyPath: \ExpenseLog.date, ascending: false)
        ]
    )
    private var result: FetchedResults<ExpenseLog>

    // 3
    init(predicate: NSPredicate?, sortDescriptor: NSSortDescriptor) {
        let fetchRequest = NSFetchRequest<ExpenseLog>(entityName: ExpenseLog.entity().name ?? "ExpenseLog")
        fetchRequest.sortDescriptors = [sortDescriptor]

        if let predicate = predicate {
            fetchRequest.predicate = predicate
        }
        _result = FetchRequest(fetchRequest: fetchRequest)
    }

    // 4
    var body: some View {
        List {
            ForEach(result) { (log: ExpenseLog) in
                Button(action: {
                    // TODO: Implement Edit
                }) {
                    HStack(spacing: 16) {
                        CategoryImageView(category: log.categoryEnum)
                        VStack(alignment: .leading, spacing: 8) {
                            Text(log.nameText).font(.headline)
                            Text(log.dateText).font(.subheadline)
                        }
                        Spacer()
                        Text(log.amountText).font(.headline)
                    }
                    .padding(.vertical, 4)
                }
            }
            .onDelete(perform: onDelete)
        }
    }

    private func onDelete(with indexSet: IndexSet) {
        // TODO: Implement Delete
    }
}
To help you understand the detail of the code, I provided a detailed explanation for each of the number points:
@Environment property wrapper, we inject the managed object context-dependency from the parent view.@FetchRequest property wrapper, we provide a default initializer and store the FetchedResults in a property named result. The default fetch request won't have any predicate and sort the result by date in descending order.LogListView while sort descriptor will be used to sort the result based on amount or date in ascending or descending order.List, we use ForEach passing the result of ExpenseLog that is already conforming to Identifiable protocol. In each loop, we wrap the row inside a Button so it can be tappable to invoke a function. The row itself uses HStack containing the icon, text for name, formatted date, and amount.
Next, let's move to ExpenseLog+Extension file to add a method to generate NSPredicate based on the selected categories and search text. Copy the following code into the body of extension.
extension ExpenseLog {

    // ...
    // 1
    static func predicate(with categories: [Category], searchText: String) -> NSPredicate? {
        var predicates = [NSPredicate]()

        // 2
        if !categories.isEmpty {
            let categoriesString = categories.map { $0.rawValue }
            predicates.append(NSPredicate(format: "category IN %@", categoriesString))
        }

        // 3
        if !searchText.isEmpty {
            predicates.append(NSPredicate(format: "name CONTAINS[cd] %@", searchText.lowercased()))
        }

        // 4
        if predicates.isEmpty {
            return nil
        } else {
            return NSCompoundPredicate(andPredicateWithSubpredicates: predicates)
        }
    }
}
Here is the detailed explanation for each of the number points above:
String. In the beginning, we initialize an empty array of NSPredicate.NSPredicate using the IN expression to only return the category is contained inside the array.NSPredicate using CONTAINS[cd]. This will only return the result if the name attribute contains the searchText String using case insensitive comparison .NSCompoundPredicate to combine the predicates in the array using similar AND expression in SQL. If it is empty, we return nil, which won't filter the results in the fetch request.
Finally, let's move to the LogsTabView file and add the following code where we initialize the LogListView.
LogListView(predicate: ExpenseLog.predicate(with: Array(selectedCategories), searchText: searchText), sortDescriptor: ExpenseLogSort(sortType: sortType, sortOrder: sortOrder).sortDescriptor)
Here, we initialize the LogListView using the predicate from the helper method we create before. The LogListView itself already provided the states for the set of selected filters, selected sort type and sort order, as well as the search text string. ExpenseLogSort sort is a wrapper that accepts the sort type and sort order and generates a sort descriptor based on those two values.
Try to build and run the project to make sure it compiled successfully. As of now, we don't have any data yet to display. So, let's move on to the next section, where we will implement create expense log!
Create or Edit Expense Log from LogFormViewIn this section, we'll be working on the create expense log feature using Core Data. The included LogFormView already provide a form where user can input the expense data such as name, amount, category, and date. We just need to handle the save function by creating an expense log managed object and save it into the managed object context.
Navigate to LogFormView file and add the following code.
import SwiftUI
import CoreData

struct LogFormView: View {

    // ....
    //1
    var logToEdit: ExpenseLog?
    var context: NSManagedObjectContext

    // 2
    var title: String {
        logToEdit == nil ? "Create Expense Log" : "Edit Expense Log"
    }
        // ...

        // 3
    private func onSaveTapped() {

        let log: ExpenseLog
        if let logToEdit = self.logToEdit {
            log = logToEdit
        } else {
            log = ExpenseLog(context: self.context)
            log.id = UUID()
        }

        log.name = self.name
        log.category = self.category.rawValue
        log.amount = NSDecimalNumber(value: self.amount)
        log.date = self.date

        do {
            try context.save()
        } catch let error as NSError {
            print(error.localizedDescription)
        }

        self.presentationMode.wrappedValue.dismiss()
    }
}
Here is the detailed explanation for each of the number points above:
logToEdit property that will be passed when we want to edit a log.title computed property to dynamically return the title for the navigation bar, depending on whether the logToEdit exists or not.onSaveTapped method, there are two possibilities of the log object depending on whether the logToEdit exists. If it exists, we assign that as the log, otherwise we initialize a new ExpenseLog in the context as well as assigning unique UUID. Next, we assign all the attributes using the value from the properties of the state. Finally, we just need to save the context and dismiss the presented form view.
Next, let's move to the LogsTabView. In this View, we have a navigation button item where the user can tap to create a new log. In SwiftUI, to be able to present a model view, we can use the sheet modifier. The sheet uses the state to determine whether it should be displayed. In this case, we use isAddFromPresented boolean property to toggle this to true when the user taps on the add button. Inside the sheet, we just need to declare the LogFormView passing the managed object context. Don't forget we also need to inject the managed object context property using the @Environment property wrapper.
struct LogsTabView: View {


      @Environment(\.managedObjectContext)
      var context: NSManagedObjectContext
            // ....

        var body: some View {
        NavigationView {
            ...
            .sheet(isPresented: $isAddFormPresented) {
                LogFormView(context: self.context)
            }
                      ...
        }
    }
}
Finally, let's move on to the LogListView. In this View, the user can tap on the row of the expense log to edit the associated log. In this case, we already wrapped our row inside a Button. Inside the action closure, we just need to assign the logToEdit state property with the selected log. The logToEdit state property will control whether the sheet containing the LogFormView will be presented using the binding passed to the initializer. If logToEdit is not nil, the sheet will be presented. In this case, we declare the LogFormView passing the logToEdit as well as initializing all the form properties using the existing log attributes values.
struct LogListView: View {
    // ...
    @State var logToEdit: ExpenseLog?

    var body: some View {
        List {
            ForEach(result) { (log: ExpenseLog) in
                Button(action: {
                    self.logToEdit = log
                }) {... }
             ...
            .onDelete(perform: onDelete)
            .sheet(item: $logToEdit, onDismiss: {
                self.logToEdit = nil
            }) { (log: ExpenseLog) in
                LogFormView(
                    logToEdit: log,
                    context: self.context,
                    name: log.name ?? "",
                    amount: log.amount?.doubleValue ?? 0,
                    category: Category(rawValue: log.category ?? "") ?? .food,
                    date: log.date ?? Date()
                )
            }
        }
    }
    // ...
}
That's it! Try to build and run the project. Create several logs to play with the filtering and sorting! If you have a problem setting the amount text field, make sure to press enter/return on the keyboard before assigning the value so it can be properly formatted to number.
For the deletion of log, we just need to implement the onDelete(with:IndexSet. This method will be invoked when the user performs a left swipe gesture to delete a row in the list. It will pass the IndexSet containing the index of rows. In this case, we can loop, retrieve the log, and pass it to the context for deletion. Also, we need to save the context for the deletion to be committed to the data store.
      private func onDelete(with indexSet: IndexSet) {
            indexSet.forEach { index in
             let log = result[index]
             context.delete(log)
        }
        try? context.saveContext()
    }
In this section, we are going to focus on the DashboardTabView. We need to fetch the sum of the total expenses for grouped by each of the categories so we can display it in a List as well as the Pie Chart.
Navigate to the ExpenseLog+Extension.swift file and copy the following code into the body of extension.
extension ExpenseLog {

        // ....

        // 1
    static func fetchAllCategoriesTotalAmountSum(context: NSManagedObjectContext, completion: @escaping ([(sum: Double, category: Category)]) -> ()) {

            // 2
        let keypathAmount = NSExpression(forKeyPath: \ExpenseLog.amount)
        let expression = NSExpression(forFunction: "sum:", arguments: [keypathAmount])

        let sumDesc = NSExpressionDescription()
        sumDesc.expression = expression
        sumDesc.name = "sum"
        sumDesc.expressionResultType = .decimalAttributeType

        // 3
        let request = NSFetchRequest<NSFetchRequestResult>(entityName: ExpenseLog.entity().name ?? "ExpenseLog")
        request.returnsObjectsAsFaults = false
        request.propertiesToGroupBy = ["category"]
        request.propertiesToFetch = [sumDesc, "category"]
        request.resultType = .dictionaryResultType

        // 4
        context.perform {
            do {
                let results = try request.execute()
                let data = results.map { (result) -> (Double, Category)? in
                    guard
                        let resultDict = result as? [String: Any],
                        let amount = resultDict["sum"] as? Double, amount > 0,
                        let categoryKey = resultDict["category"] as? String,
                        let category = Category(rawValue: categoryKey) else {
                            return nil
                    }
                    return (amount, category)
                }.compactMap { $0 }
                completion(data)
            } catch let error as NSError {
                print((error.localizedDescription))
                completion([])
            }
        }

    }
}
Here is the detailed explanation for each of the number points above:
Category associated with the value of the total sum for it.NSExpression passing the keyPath of amount to the initializer. We create a second NSExpression passing :sum for the function to the initializer as well as passing the previous expression to the arguments. Finally, we create a NSExpressionDescription and assigns the expression and name. The expression result type is a .decimalAttributeType as our amount attribute type is Decimal.NSFetchRequest passing the ExpenseLog as the entity name. We assign category as the propertiesToGroupBy as we want the result grouped by category. For propertiesToFech, we pass the sum expression and category so the request can return those two values in a single result. At last, we set the result type as .dictionaryResultType. In this case, the results will be an array of Dictionary with values of sum and category instead of managed object model.map for each of result so we can transform it to a tuple of category and value of total sum by parsing the dictionary using the sum and category key. Finally, we pass the array to the closure completion handler.
To integrate this, navigate to DashboardTabView and implement the fetchTotalSums method with the following code.
struct DashboardTabView: View {

    @Environment(\.managedObjectContext)
    var context: NSManagedObjectContext
    // ....

    func fetchTotalSums() {
        ExpenseLog.fetchAllCategoriesTotalAmountSum(context: self.context) { (results) in
            guard !results.isEmpty else { return }

            let totalSum = results.map { $0.sum }.reduce(0, +)
            self.totalExpenses = totalSum
            self.categoriesSum = results.map({ (result) -> CategorySum in
                return CategorySum(sum: result.sum, category: result.category)
            })
        }
    }

}
Here, we just use the static method from ExpenseLog to fetch the total sum for each category. Then, in the completion handler, we use reduce to get the total expenses for all categories and assign it to the totalExpenses state. At last, we map the array of a tuple into an array of CategorySum struct as this type implements Identifiable and will be used to drive the list of categories expense and the Pie Chart.
Try to build and run the project to see the final result of the project!
ConclusionThat's it! Congratulations on building your own expense tracker app using Core Data for persistence. With Core Data, we can create model entities, fetch data using complex predicate query filters, and sort descriptors. We also don't have to worry about view synchronization as we can use @FetchRequest property wrapper to bind between UI and data source change. In the next article, we will explore how we can sync our Core Data to the cloud using CloudKit integration.
Until the next time, let's keep the lifelong learning goes on!
ChallengeI have several challenges for you all to improve this App to be much better in terms of features with your new knowledge. There are several essential features that the App are still missing, such as:
Published at Mar 23, 2020
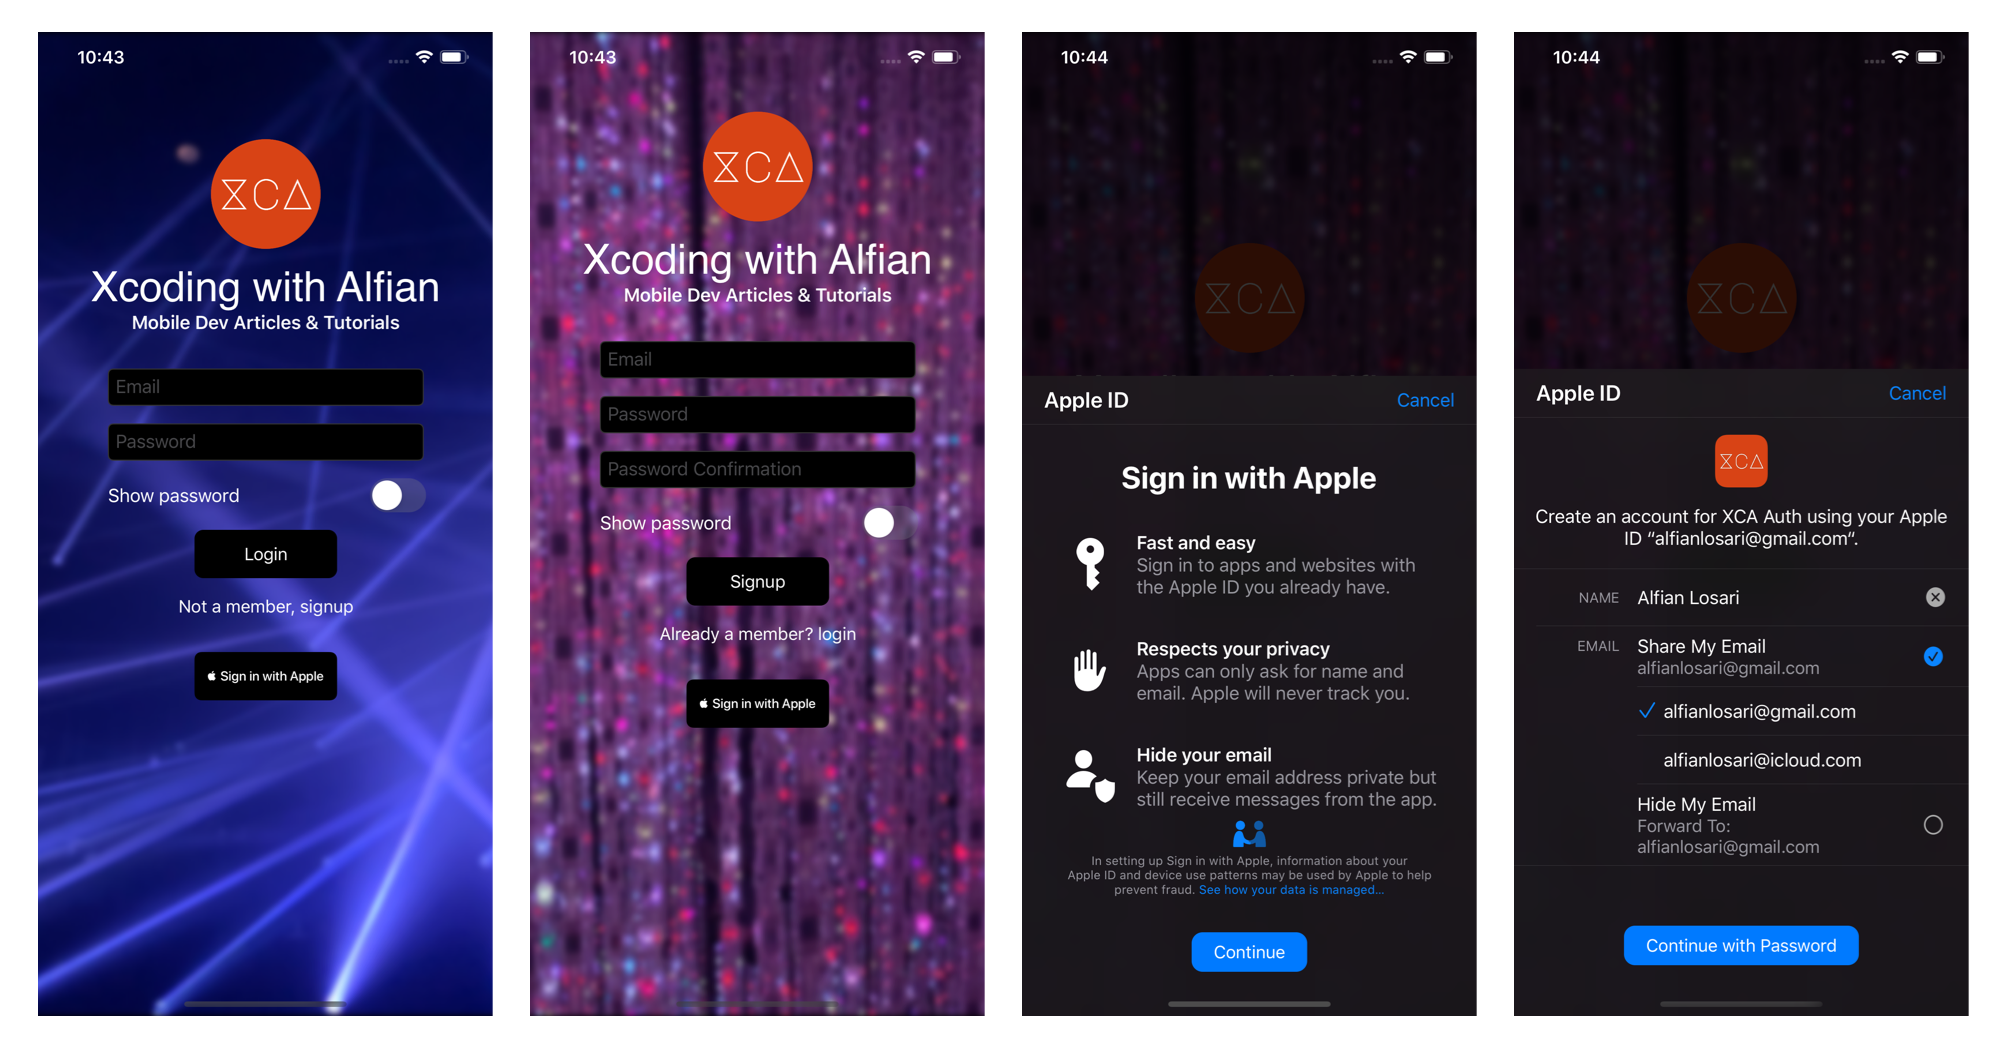
When we build a mobile app, we might need to authenticate and save the identity of our users so we can provide a unique experience to each of the users. As mobile developers, building an authentication system by ourselves is not a pretty straightforward task. We have to create our backend and database, as well as to make sure our authentication system is secure and safe. We also need to handle third party federated identities provides like Google, Apple, Facebook, and many more using OAuth 2.0.
Luckily we have Firebase, which is a mobile platform by Google that we can integrate into our app with services ranging from authentication, database, analytics, and many more. Google manages the services, so we don’t have to worry about provisioning and to scale our infrastructure as well as handling the security manually. It’s a timesaver for us, so we can focus on building our product experience. For this tutorial, we will be focusing on integrating Firebase Auth SDK into an iOS app.
Firebase Auth SDK provides many features such as:
In this tutorial, we will use SwiftUI to build an authentication screen where the user can signup and login via email and password as well as login using the new iOS 13 Sign in with Apple. We will be utilizing Firebase Auth SDK to implement those features. Also, we will make sure our app show screen based on the authentication state of the user. You can download the completed project repository from the GitHub repository.
Starter Project and Dependencies SetupTo begin the project, you can clone or download the starter project repository from the GitHub repository. The starter project provides several components and resources that we can use to build the app, such as:
Assets, such as icons and background images.ProgressView. SwiftUI view to render loading indicator backed by UIKit UIActivityIndicatorView.WebView. SwiftUI view to render web content backed by WKWebView. It will be displayed in the HomeView.SignInWithAppleButton. SwiftUI view to render Sign in with Apple button using AuthenticationServices API styling.CryptoKit to generate random nonce token and SHA256 hashing for authentication using Sign in With Apple.XCAButtonStyle. SwiftUI custom button style implementation to render button with custom styling.
After you download the project, make sure to run pod install to download FirebaseAuth dependency. Last, open the project from .xcworkspace, go to the target signing and capabilities tab, then update the bundle identifier using your custom identifier. We will use this token on the next section when we add a new iOS app to the Firebase project.

In this part, we will create a new Firebase project from the website dashboard. You can sign in with your Google Account and create a new project from the console. Give the project any name you want to. From the dashboard, click on Authentication from the side panel. From the list, click on email/password sign in and enable it. Also, click ok sign in with Apple and enable it.
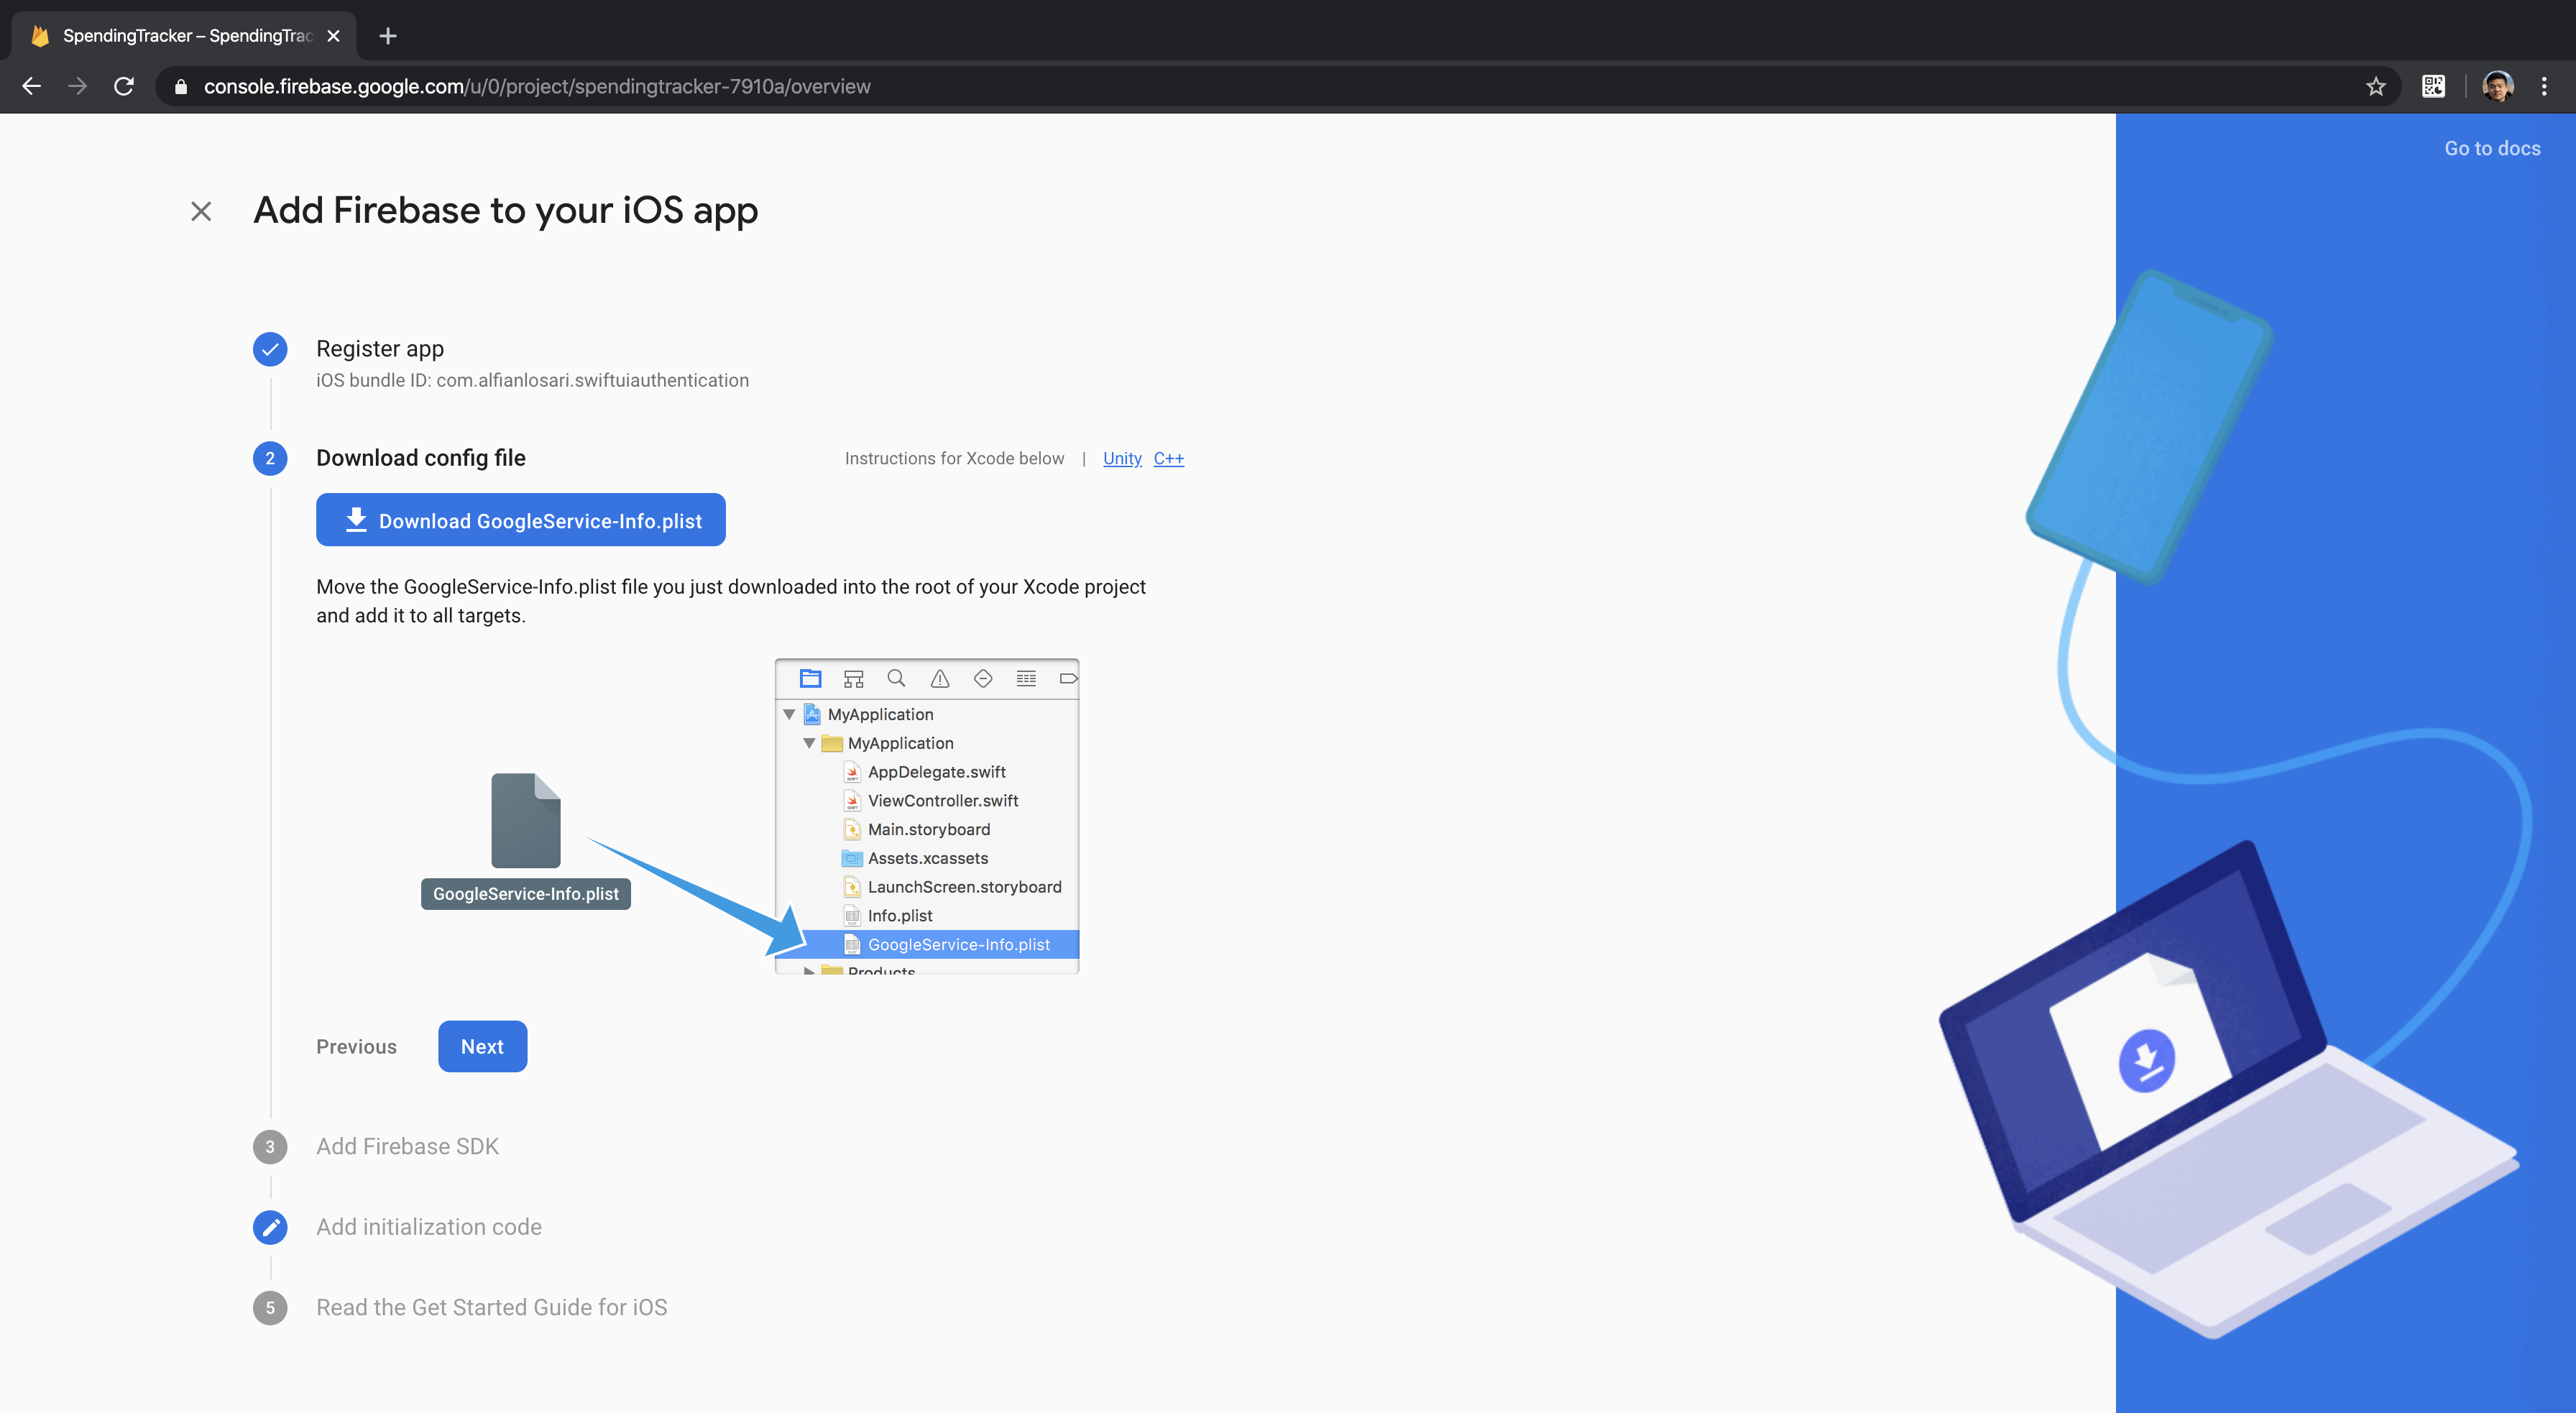
Go to the main dashboard project overview, and click on create a new iOS app. Provide your unique app/bundle identifier from the previous section. Click on next, then download the GoogleServices-Info.plist into your local machine. Then copy the plist file into the project. Finally, go to AppDelegate, import Firebase, and add the following code to configure Firebase when the app launch.
import UIKit
import Firebase

@UIApplicationMain
class AppDelegate: UIResponder, UIApplicationDelegate {

    func application(_ application: UIApplication, didFinishLaunchingWithOptions launchOptions: [UIApplication.LaunchOptionsKey: Any]?) -> Bool {
        // Override point for customization after application launch.
        FirebaseApp.configure()
        return true
    }

    // ...
}
To manage the state of user authentication in our app, create a new file named AuthenticationState. It is a singleton class that inherits NSObject and implements the ObservableObject protocol. Copy the following code into the source file.
class AuthenticationState: NSObject, ObservableObject {

    @Published var loggedInUser: User?
    @Published var isAuthenticating = false
    @Published var error: NSError?

    static let shared = AuthenticationState()

    private let auth = Auth.auth()
    fileprivate var currentNonce: String?

    func login(with loginOption: LoginOption) {
        self.isAuthenticating = true
        self.error = nil

        switch loginOption {
            case .signInWithApple:
                handleSignInWithApple()

            case let .emailAndPassword(email, password):
                handleSignInWith(email: email, password: password)
        }
    }

    func signup(email: String, password: String, passwordConfirmation: String) {
        // TODO
    }

    private func handleSignInWith(email: String, password: String) {
        // TODO
    }

    private func handleSignInWithApple() {
        // TODO
    }
}
In here, we also declare a LoginType enum to differentiate the case between login via email and Sign in with Apple. Here are the properties and methods we have declare in this class:
auth. It is a FirebaseAuth instance responsible for all the authentication.loggedInUser. A published property that stores the current signed in user.isAuthenticating. A published property that represents whether the object is currently making an Authentication request to Firebase API.currentNonce. A random nonce string we will generate to make request for sign in with Apple.error. A published property that represents NSError if the authentication request failed.signup:(email:password:passwordConfirmation: method. The method to sign up a new user using email and password.loginWith:loginOption method. The method that we expose to the View for making login request passing the login type.handleSignInWith:email:password:. Private method for making email and password sign in.handleSignInWithApple. Private method for Sign in with Apple authentication request.
We will implement those empty methods in the later sections. Let’s move on to observing the authentication state section!
In this part, we will be using FirebaseAuth SDK feature to listen whenever the authentication state changes and update the user published property accordingly inside the AuthenticationState object. The child views can listen and react to the changes by adding @EnvironmentObject as the property. The root ContentView will be using Group and conditional statements to determine which view will be rendered. When AuthenticationState user property exists, the HomeView is rendered. Otherwise, the AuthenticationView is rendered. We'll also add a simple bottom transition animation modifier when the views inside the Group updated.
struct ContentView: View {

    @EnvironmentObject var authState: AuthenticationState
    var body: some View {
        Group {
            if authState.loggedInUser != nil {
                HomeView()
            } else {
                // TODO: Implement Authentication Screen
                Text("Authentication Screen")
            }
        }
        .animation(.easeInOut)
        .transition(.move(edge: .bottom))
    }
}
We will inject AuthenticationState at the root of the view using the environment object modifier inside the SceneDelegate.
import UIKit
import SwiftUI

class SceneDelegate: UIResponder, UIWindowSceneDelegate {

    func scene(_ scene: UIScene, willConnectTo session: UISceneSession, options connectionOptions: UIScene.ConnectionOptions) {
        let authState = AuthenticationState.shared
        let contentView = ContentView()
            .environmentObject(authState)

        // ...
    }

    // ...
}
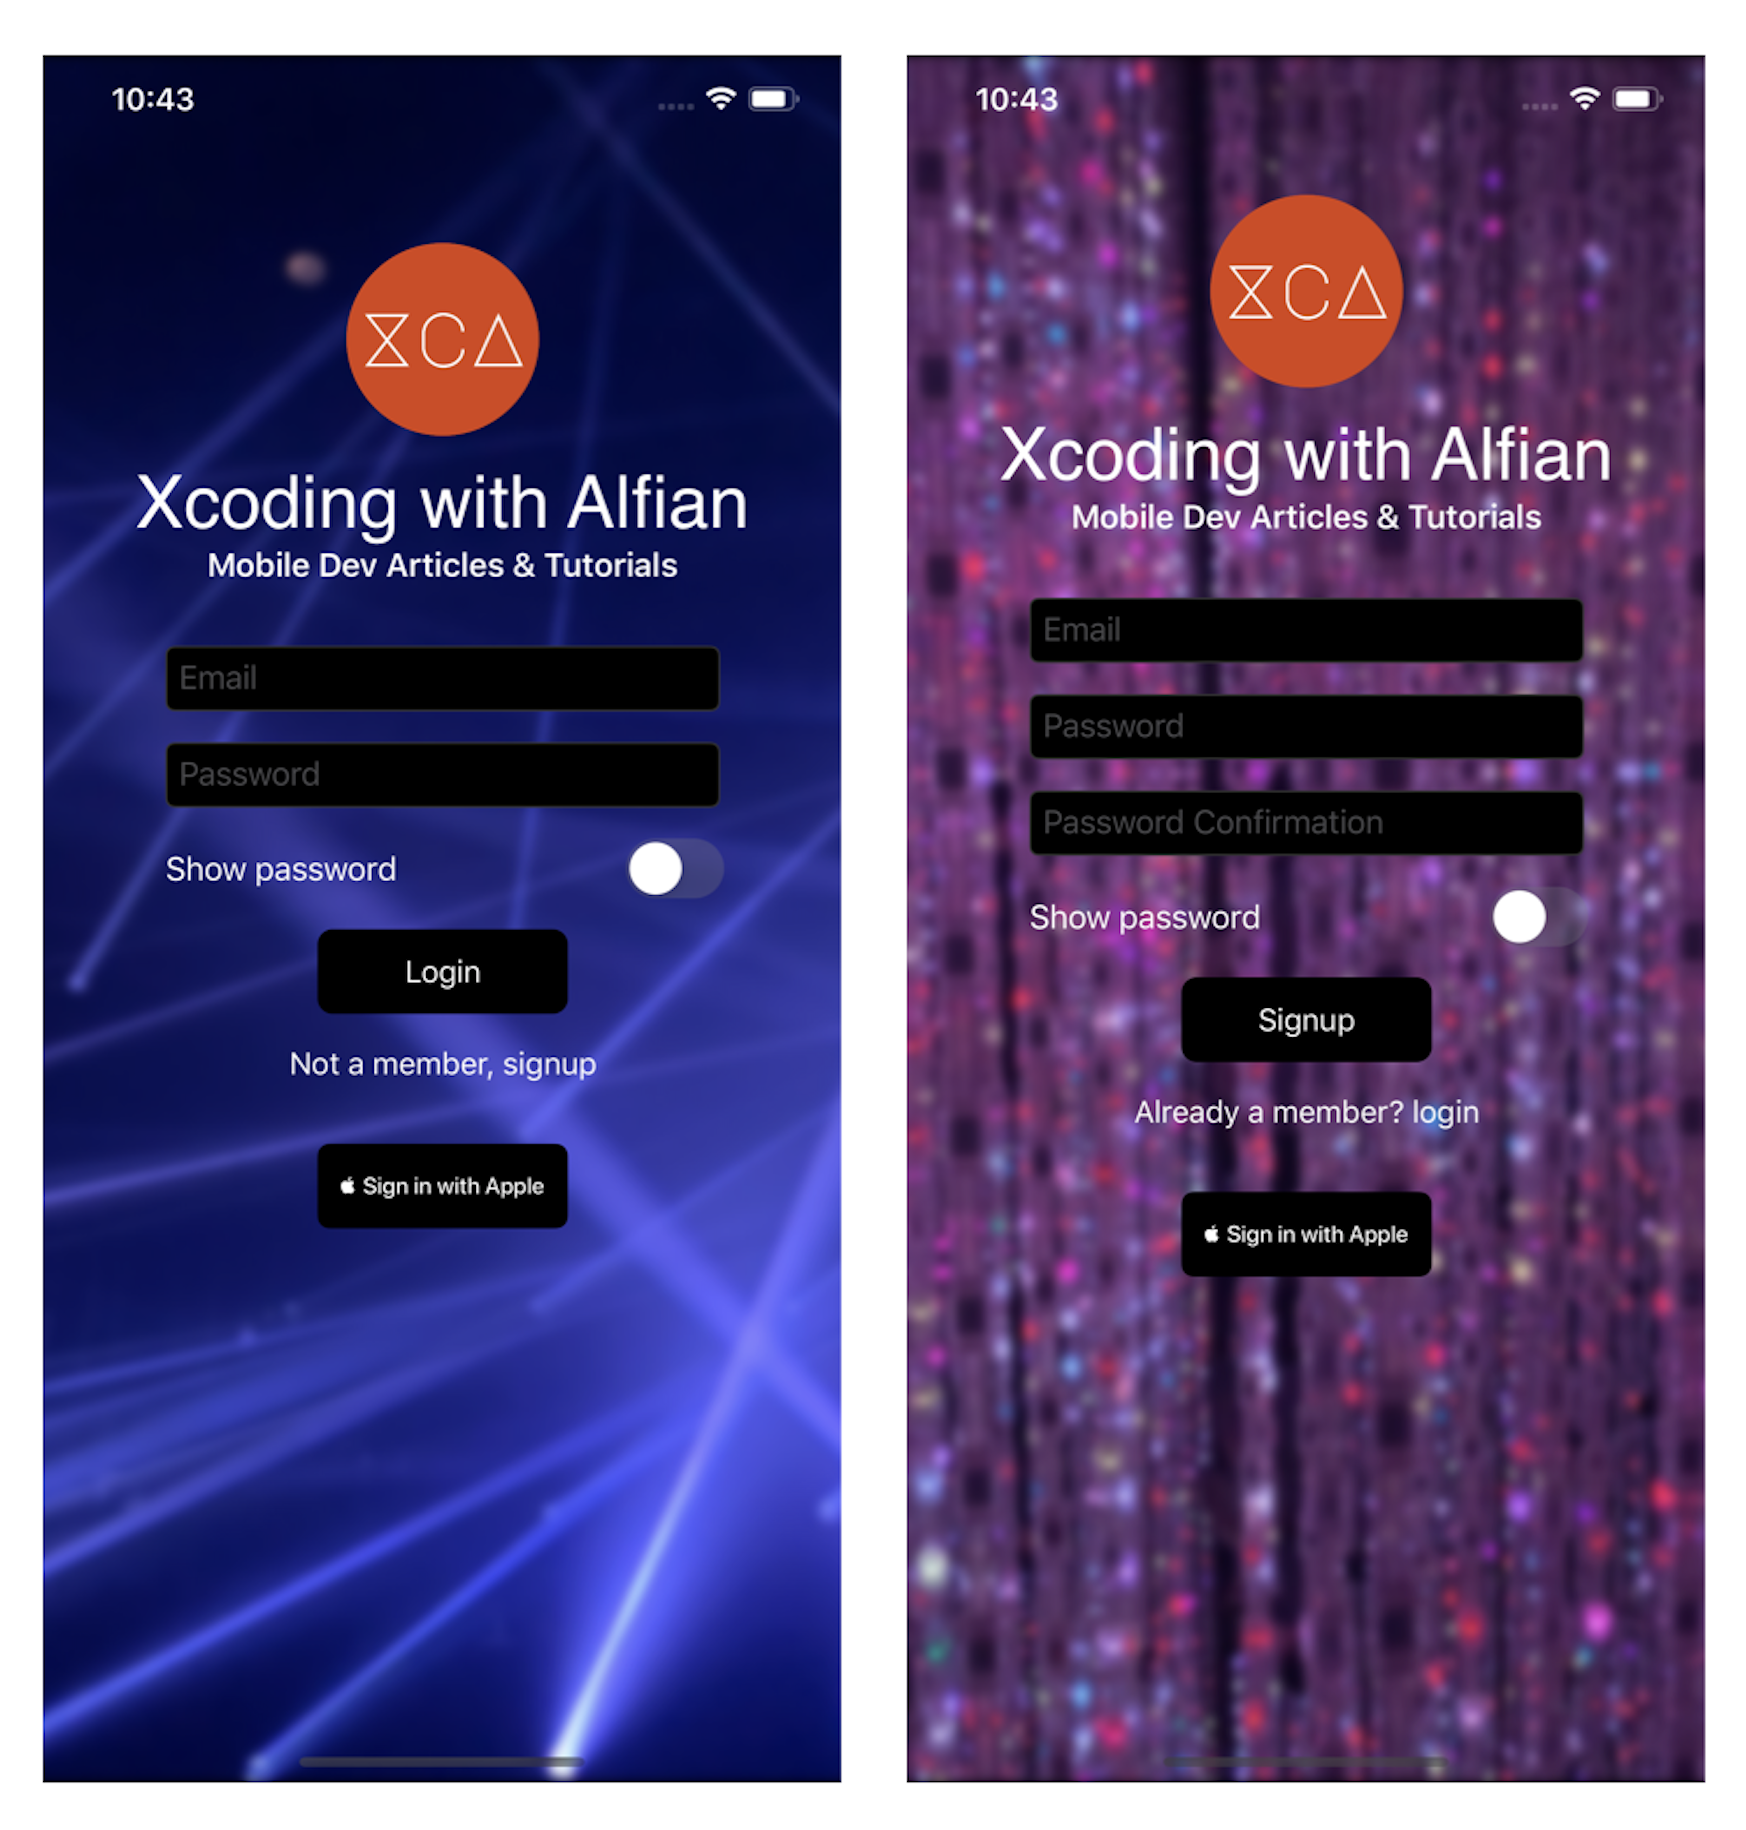
The Authentication View has AuthenticationType enum @State property. Whenever the value of the state changes, it displays different background asset images depending on the case, login, or signup. Next, we are going to add several properties to the AuthenticationView:
AuthenticationState @EnvironmentObject property. It uses the isAuthenticating property to show the loading indicator and hide the FormView. It will also be used to invoke Sign in with Apple when the user taps on the button.AuthType @State property that will be providing asset background name for displaying image depending on the state.
Copy the following code to implement the properties.
struct AuthenticationView: View {

    @EnvironmentObject var authState: AuthenticationState
    @State var authType = AuthenticationType.login

    var body: some View {
        // TODO: Implement SplashScreenView
        // TODO: Implement LogoTitleView
        // TODO: Implement AuthenticationFormView
        Text("Hello Authentication")
    }
}
Then, inside the models folder, create a new file named AuthenticationType.swift.
enum AuthenticationType: String {
    case login
    case signup

    var text: String {
        rawValue.capitalized
    }

    var assetBackgroundName: String {
        self == .login ? "login" : "signup"
    }

    var footerText: String {
        switch self {
            case .login:
                return "Not a member, signup"

            case .signup:
                return "Already a member? login"
        }
    }
}

extension NSError: Identifiable {
    public var id: Int { code }
}
Next, we'll create SplashScreenView to display the background image. This view accepts the imageName string containing the asset name to initialize the Image. We also apply several modifiers to resize the image into a 1:1 aspect ratio and content mode fill.
struct SplashScreenView: View {

    let imageName: String

    var body: some View {
        Image(imageName)
            .resizable()
            .aspectRatio(1/1, contentMode: .fill)
            .edgesIgnoringSafeArea(.all)
    }
}
Next, we'll create LogoTitleView to display our app logo, title, and tagline. The Image, text title, and tagline are contained within a VStack.
struct LogoTitle: View {
    var body: some View {
        VStack {
            Image("logo")
                .resizable()
                .frame(width: 100, height: 100)

            Text("Xcoding with Alfian")
                .font(.custom("SF-Pro", size: 38))
                .lineLimit(2)

            Text("Mobile Dev Articles & Tutorials")
                .font(.headline)

        }
        .foregroundColor(.white)
    }
}
The AuthenticationFormView renders email and password text fields, when the authType property is set to signup, it shows additional password confirmation text field.
The AuthenticationFormView has several properties:
AuthenticationState @EnvironmentObject property. It will be used to invoke the login and signup method passing the correct parameter. The error property is used to display an alert sheet containing the error message. An extension of NSError that implements the Identifiable protocol is declared for binding it to the alert sheet; in this case, we use the code to return the id.Email, password, passwordConfirmation @State properties for text fields bindings.isShowingPassword @State property for binding the toggle switch. This will show or hide the password field depending on the boolean valueauthType @Binding property to determine the text value of the buttons and to show additional password confirmation text field for signup state.
Copy the following code into a new struct called AuthenticationFormView.
struct AuthenticationFormView: View {

    @EnvironmentObject var authState: AuthenticationState

    @State var email: String = ""
    @State var password: String = ""
    @State var passwordConf: String = ""
    @State var isShowingPassword = false

    @Binding var authType: AuthenticationType

    var body: some View {
        // 1
        VStack(spacing: 16) {
            // 2
            TextField("Email", text: $email)
                .textContentType(.emailAddress)
                .keyboardType(.emailAddress)
                .autocapitalization(.none)

            // 3
            if isShowingPassword {
                TextField("Password", text: $password)
                .textContentType(.password)
                .autocapitalization(.none)
            } else {
                SecureField("Password", text: $password)
            }

            // 4
            if authType == .signup {
                if isShowingPassword {
                    TextField("Password Confirmation", text: $passwordConf)
                        .textContentType(.password)
                        .autocapitalization(.none)
                } else {
                    SecureField("Password Confirmation", text: $passwordConf)
                }
            }

            // 5
            Toggle("Show password", isOn: $isShowingPassword)
                .foregroundColor(.white)

            // 6
            Button(action: emailAuthenticationTapped) {
                Text(authType.text)
                .font(.callout)
            }
            .buttonStyle(XCAButtonStyle())
            .disabled(email.count == 0 && password.count == 0)

            // 7
            Button(action: footerButtonTapped) {
                Text(authType.footerText)
                .font(.callout)
            }
            .foregroundColor(.white)
        }
        .textFieldStyle(RoundedBorderTextFieldStyle())
        .frame(width: 288)
        // 8
        .alert(item: $authState.error) { error in
            Alert(title: Text("Error"), message: Text(error.localizedDescription))
        }
    }

    private func emailAuthenticationTapped() {
        switch authType {
        case .login:
            appState.login(with: .emailAndPassword(email: email, password: password))

        case .signup:
            appState.signup(email: email, password: password, passwordConfirmation: passwordConf)
        }
    }

    private func footerButtonTapped() {
        clearFormField()
        authType = authType == .signup ? .login : .signup
    }

    private func clearFormField() {
        email = ""
        password = ""
        passwordConf = ""
        isShowingPassword = false
    }
}
Here is the explanation of each of the step number:
VStack with Spacing of 16 with default center alignment.email state property. Additional modifier is added for setting the textContentType and keyboardType to use emailAddress.isShowingPassword, we'll display a normal TextField with textContentType of password if the value is true. Otherwise, we use the SecureField to hide the password. Both will bind the password state property.authType is signup, we display an additional form for password confirmation. We will use the same approach to hide and show the password using TextField and SecureField based on the value of isShowingPassword. Both fields will bind the passwordConf state property.Tooggle to switch between the isShowingPassword state property using default UISwitch control.emailAuthenticationTapped method. Depending on the value of authType it will display different text and invoke a different method in the AuthenticationState. For login, it displays the Login text and invoke login method. In the case of signup, it displays the Signup text and invokes signup method.footerButtonTapped method. This will switch the authType state between login and signup and rest all the state properties.authState error property is not nil; the message from the error will be displayed inside the alert dialog.Next, we'll connect all the previous views we have created into the AuthenticationView. We use ZStack as the container view, then at the bottom we put SplashScreenImage, then we add a VStack with spacing of 32. Inside the VStack, we have the LogoTitle and conditional logic to display ProgressView if authState is authenticating and the AuthenticationFormView in vice versa. At the bottom, we also add SignInAppleButton with action to invoke the authState login passing signInWithApple login type. At last, to make sure the keyboard is not covering the form field, we offset the y to -75 if the device is bigger than iPhone 5S, SE.
struct AuthenticationView: View {

    // ...

    var body: some View {
        ZStack {
            SplashScreenView(imageName: authType.assetBackgroundName)
            VStack(spacing: 32) {
                LogoTitle()
                if (!authState.isAuthenticating) {
                    AuthenticationFormViewView(authType: $authType)
                } else {
                    ProgressView()
                }

                SignInAppleButton {
                    self.authState.login(with: .signInWithApple)
                }
                .frame(width: 130, height: 44)
            }
            .offset(y: UIScreen.main.bounds.width > 320 ? -75 : 0)
        }
    }
}
Also, make sure to update the ContentView to replace the Text placeholder to use the AuthenticationView passing login as the authType like so.
struct ContentView: View {

    // ...
    var body: some View {
        Group {
            if authState.loggedInUser != nil {
                HomeView()
            } else {
                AuthenticationView(authType: .login)
            }
        }
        // ...
    }
}
You can try and build the project to view the result on the screen! In the next sections, we will be adding the handler for signup & sign in via email and password as well as Sign in with Apple.
Implement Sign in and Signup with Email and Password with FirebaseNext, let's implement the sign in via email and password. Go to AuthenticationState.swift class and update the method with the following code.
class AuthenticationState: NSObject, ObservedObject {

    // ...
    private func handleSignInWith(email: String, password: String) {
        auth.signIn(withEmail: email, password: password, completion: handleAuthResultCompletion)
    }

    func signup(email: String, password: String, passwordConfirmation: String) {
        guard password == passwordConfirmation else {
            self.error = NSError(domain: "", code: 9210, userInfo: [NSLocalizedDescriptionKey: "Password and confirmation does not match"])
            return
        }

        self.isAuthenticating = true
        self.error = nil

        auth.createUser(withEmail: email, password: password, completion: handleAuthResultCompletion)
    }

    private func handleAuthResultCompletion(auth: AuthDataResult?, error: Error?) {
        DispatchQueue.main.async {
        self.isAuthenticating = false
            if let user = auth?.user {
                self.loggedInUser = user
            } else if let error = error {
                self.error = error as NSError
            }
        }
    }
}
In the handleSignIn method body, we just add the FirebaseAuth signIn API method passing the email and password as well the callback handler. We declare handleAuthResultCompletion as the callback handler that accepts optional AuthDataResult and error as the parameters. Inside, we set the isAuthenticating value to false, then update the loggedInUser and error using the value from parameters.
For signup, we assert whether the password and passwordConfirmation text are equal. If not, we'll set the error property using a custom NSError and return. If both values are equal, we set the isAuthenticating value to true and error to nil. Finally, we invoke FirebaseAuth createUser API passing the email and password as well as the handleAuthResult completion handler.
Try to build and run the project, after you signup the user, the SDK will automatically authenticate the user, and HomeView will be shown. You can open the Firebase web dashboard and go to Authentication to see the list of users. Next, we'll implement the signOut method.
To implement sign out, we can just invoke FirebaseAuth API signOut method. This method will trigger the authStateDidChangeListener and set the value of authenticated user to nil. This will trigger the AuthenticationState change that will render the AuthenticationView replacing the HomeView.
class AuthenticationState: NSObject, ObservedObject {

    // ....
    func signout() {
        try? auth.signOut()
    }
}
Also, go to HomeView and add the AuthenticationState @EnvironmentObject as property, then add the implementation inside the signoutTapped method.
struct HomeView: View {

    @EnvironmentObject var authState: AuthenticationState
    // ....

    private func signoutTapped() {
        authState.signout()
    }
}
Build and run the project, try tapping the Logout button inside the trailing navigation bar to go back to Authentication View. You can also try to sign in again using email and password that you used for signup before.
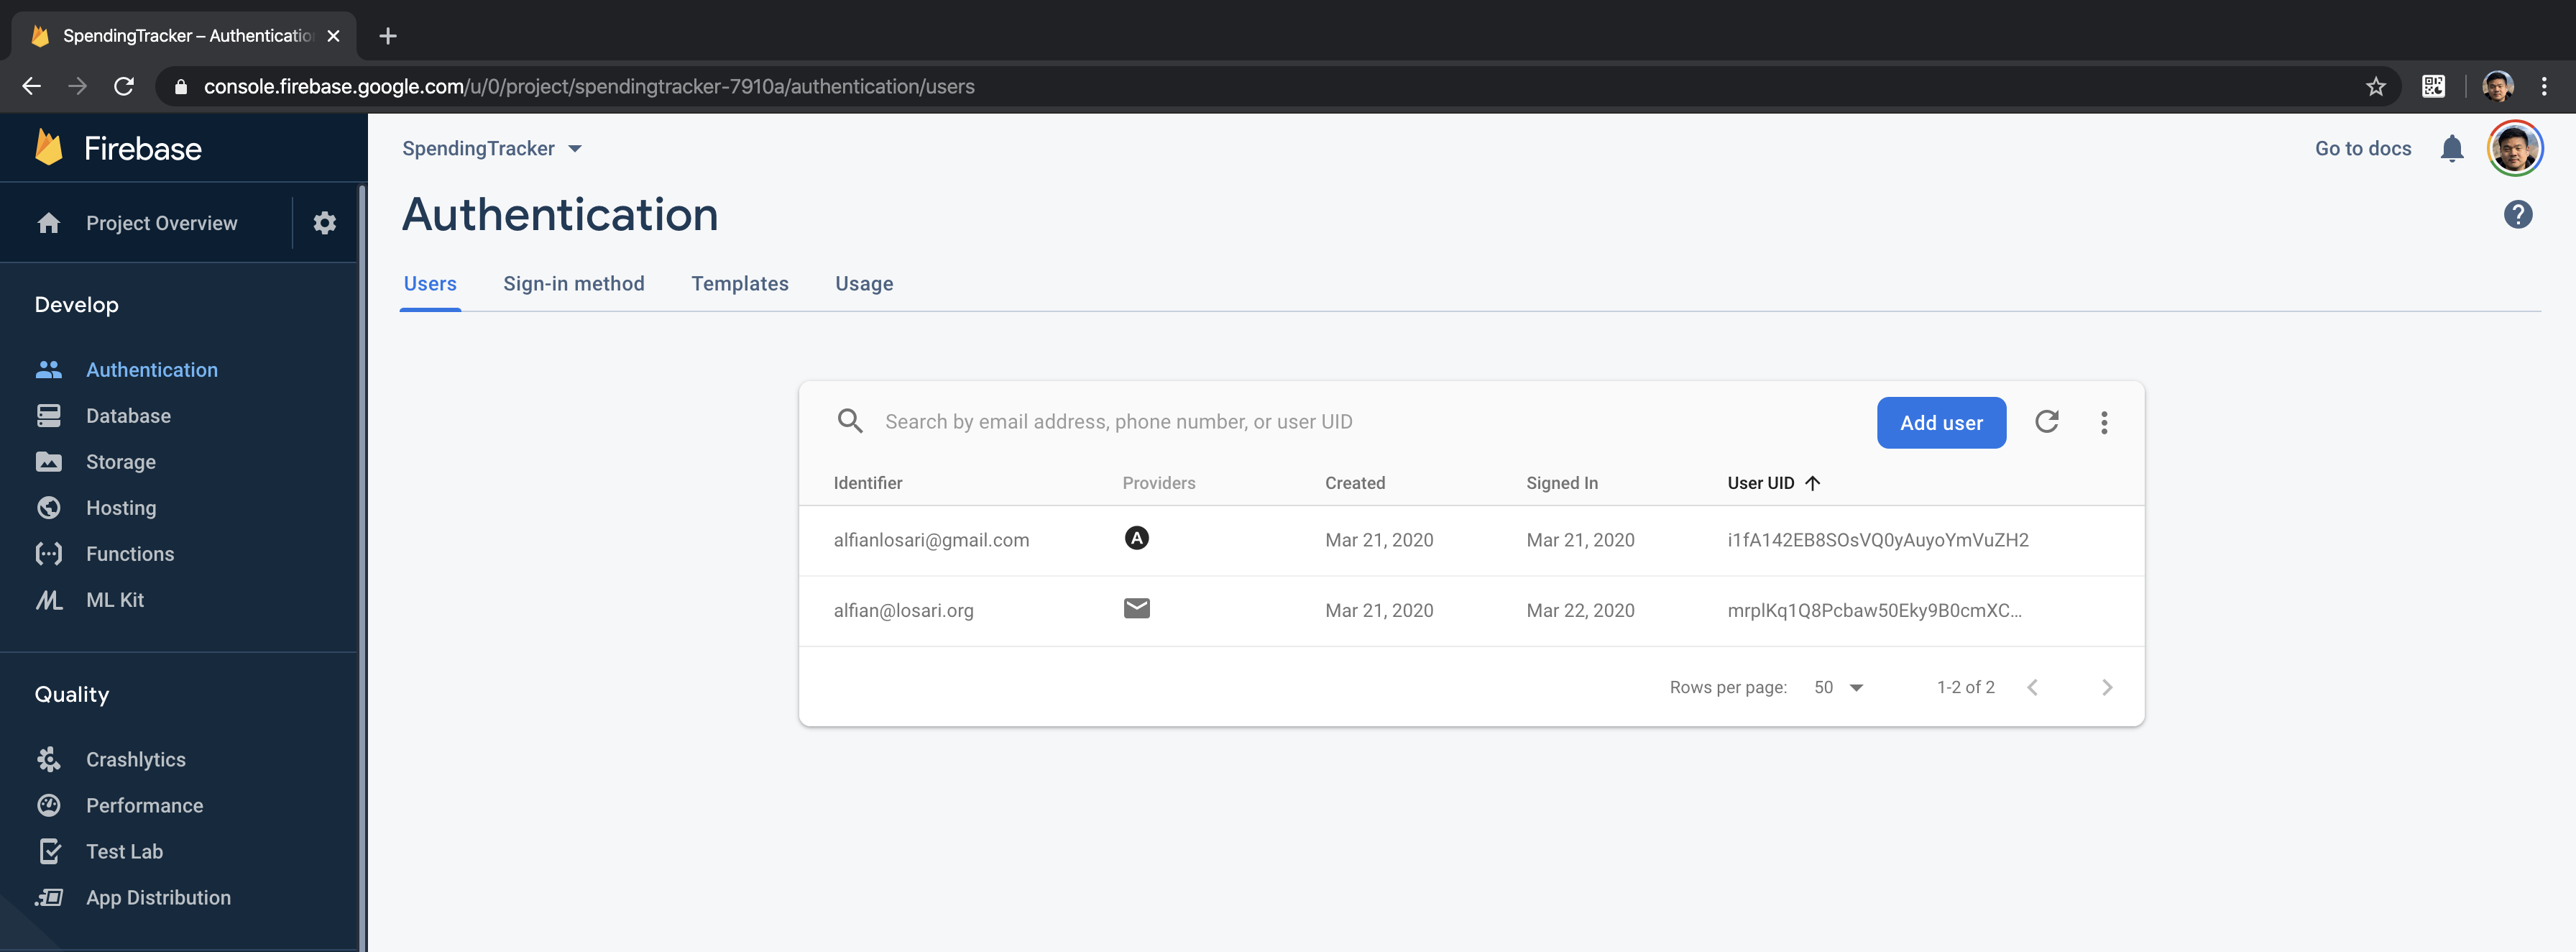 Using AuthenticationServices to integrate sign in with apple and authenticate with Firebase using OAuth credentials
In this last section, we will be using Apple AuthenticationServices framework to implement sign in with Apple. As a requirement, we need to make AuthenticationState to implement ASAuthorizationControllerDelegate and ASAuthorizationControllerPresentationContextProviding protocols. We will create an extension for AuthenticationState and move the handleSignInWithApple method into the extension. Copy the following code.
extension AuthenticationState: ASAuthorizationControllerDelegate, ASAuthorizationControllerPresentationContextProviding {

    // 1
    private func handleSignInWithApple() {
        let nonce = String.randomNonceString()
        currentNonce = nonce

        let appleIDProvider = ASAuthorizationAppleIDProvider()
        let request = appleIDProvider.createRequest()
        request.requestedScopes = [.fullName, .email]
        request.nonce = nonce.sha256

        let authorizationController = ASAuthorizationController(authorizationRequests: [request])
        authorizationController.delegate = self
        authorizationController.presentationContextProvider = self
        authorizationController.performRequests()
    }

    // 2
    func presentationAnchor(for controller: ASAuthorizationController) -> ASPresentationAnchor {
        return UIApplication.shared.windows[0]
    }

    // 3
    func authorizationController(controller: ASAuthorizationController, didCompleteWithAuthorization authorization: ASAuthorization) {
        if let appleIDCredential = authorization.credential as? ASAuthorizationAppleIDCredential {
            guard let nonce = currentNonce else {
                fatalError("Invalid state: A login callback was received, but no login request was sent.")
            }
            guard let appleIDToken = appleIDCredential.identityToken else {
                print("Unable to fetch identity token")
                return
            }
            guard let idTokenString = String(data: appleIDToken, encoding: .utf8) else {
                print("Unable to serialize token string from data: \(appleIDToken.debugDescription)")
                return
            }

            // Initialize a Firebase credential.
            let credential = OAuthProvider.credential(withProviderID: "apple.com",
            idToken: idTokenString,
            rawNonce: nonce)

            // Sign in with Firebase.
            Auth.auth().signIn(with: credential, completion: handleAuthResultCompletion)
        }
    }

    // 4
    func authorizationController(controller: ASAuthorizationController, didCompleteWithError error: Error) {
        print("Sign in with Apple error: \(error)")
        self.isAuthenticating = false
        self.error = error as NSError
    }

}
Here is the detailed explanation of each step:
handleSignInWithApple method, we use the extension method from String+Extension to generate a random nonce string and store it into the currentNonce property. We then create ASAuthorizationAppleIDProvider and request. We set the request scope to retrieve email and full name. Also, we need to pass the nonce string with SHA-256 hash. At last, we initialize ASAuthorizationController passing the request, we also set the delegate and presentationContextProvider to the AuthenticationState before invoking performRequest method.presentationAnchor:forController: method, we need to return the anchor. In this case, we use the AppDelegate to use the first window as the anchor for presentation.authorizationController:didCompleteWithAuthorization authorization:, we retrieve the credential and id token from ASAuthorizationAppleIDCredential. Then, we construct the OAuth credential using apple.com as the provider id and pass the id token as well as the nonce string. At last, we use the FirebaseAuth API to sign in passing the credential and handleAuthCompletion closure.authorizationController:didCompleteWithError error: , we set the isAuthenticating property to false and set the error property using the passed error cast as NSError.Make sure to add capabilities for Sign in With Apple into your target from Xcode. To test from simulator or devices, you need to sign into iCloud before you can test the feature. Build and run the project, then tap on the Sign in with Apple button to begin the authorization process.
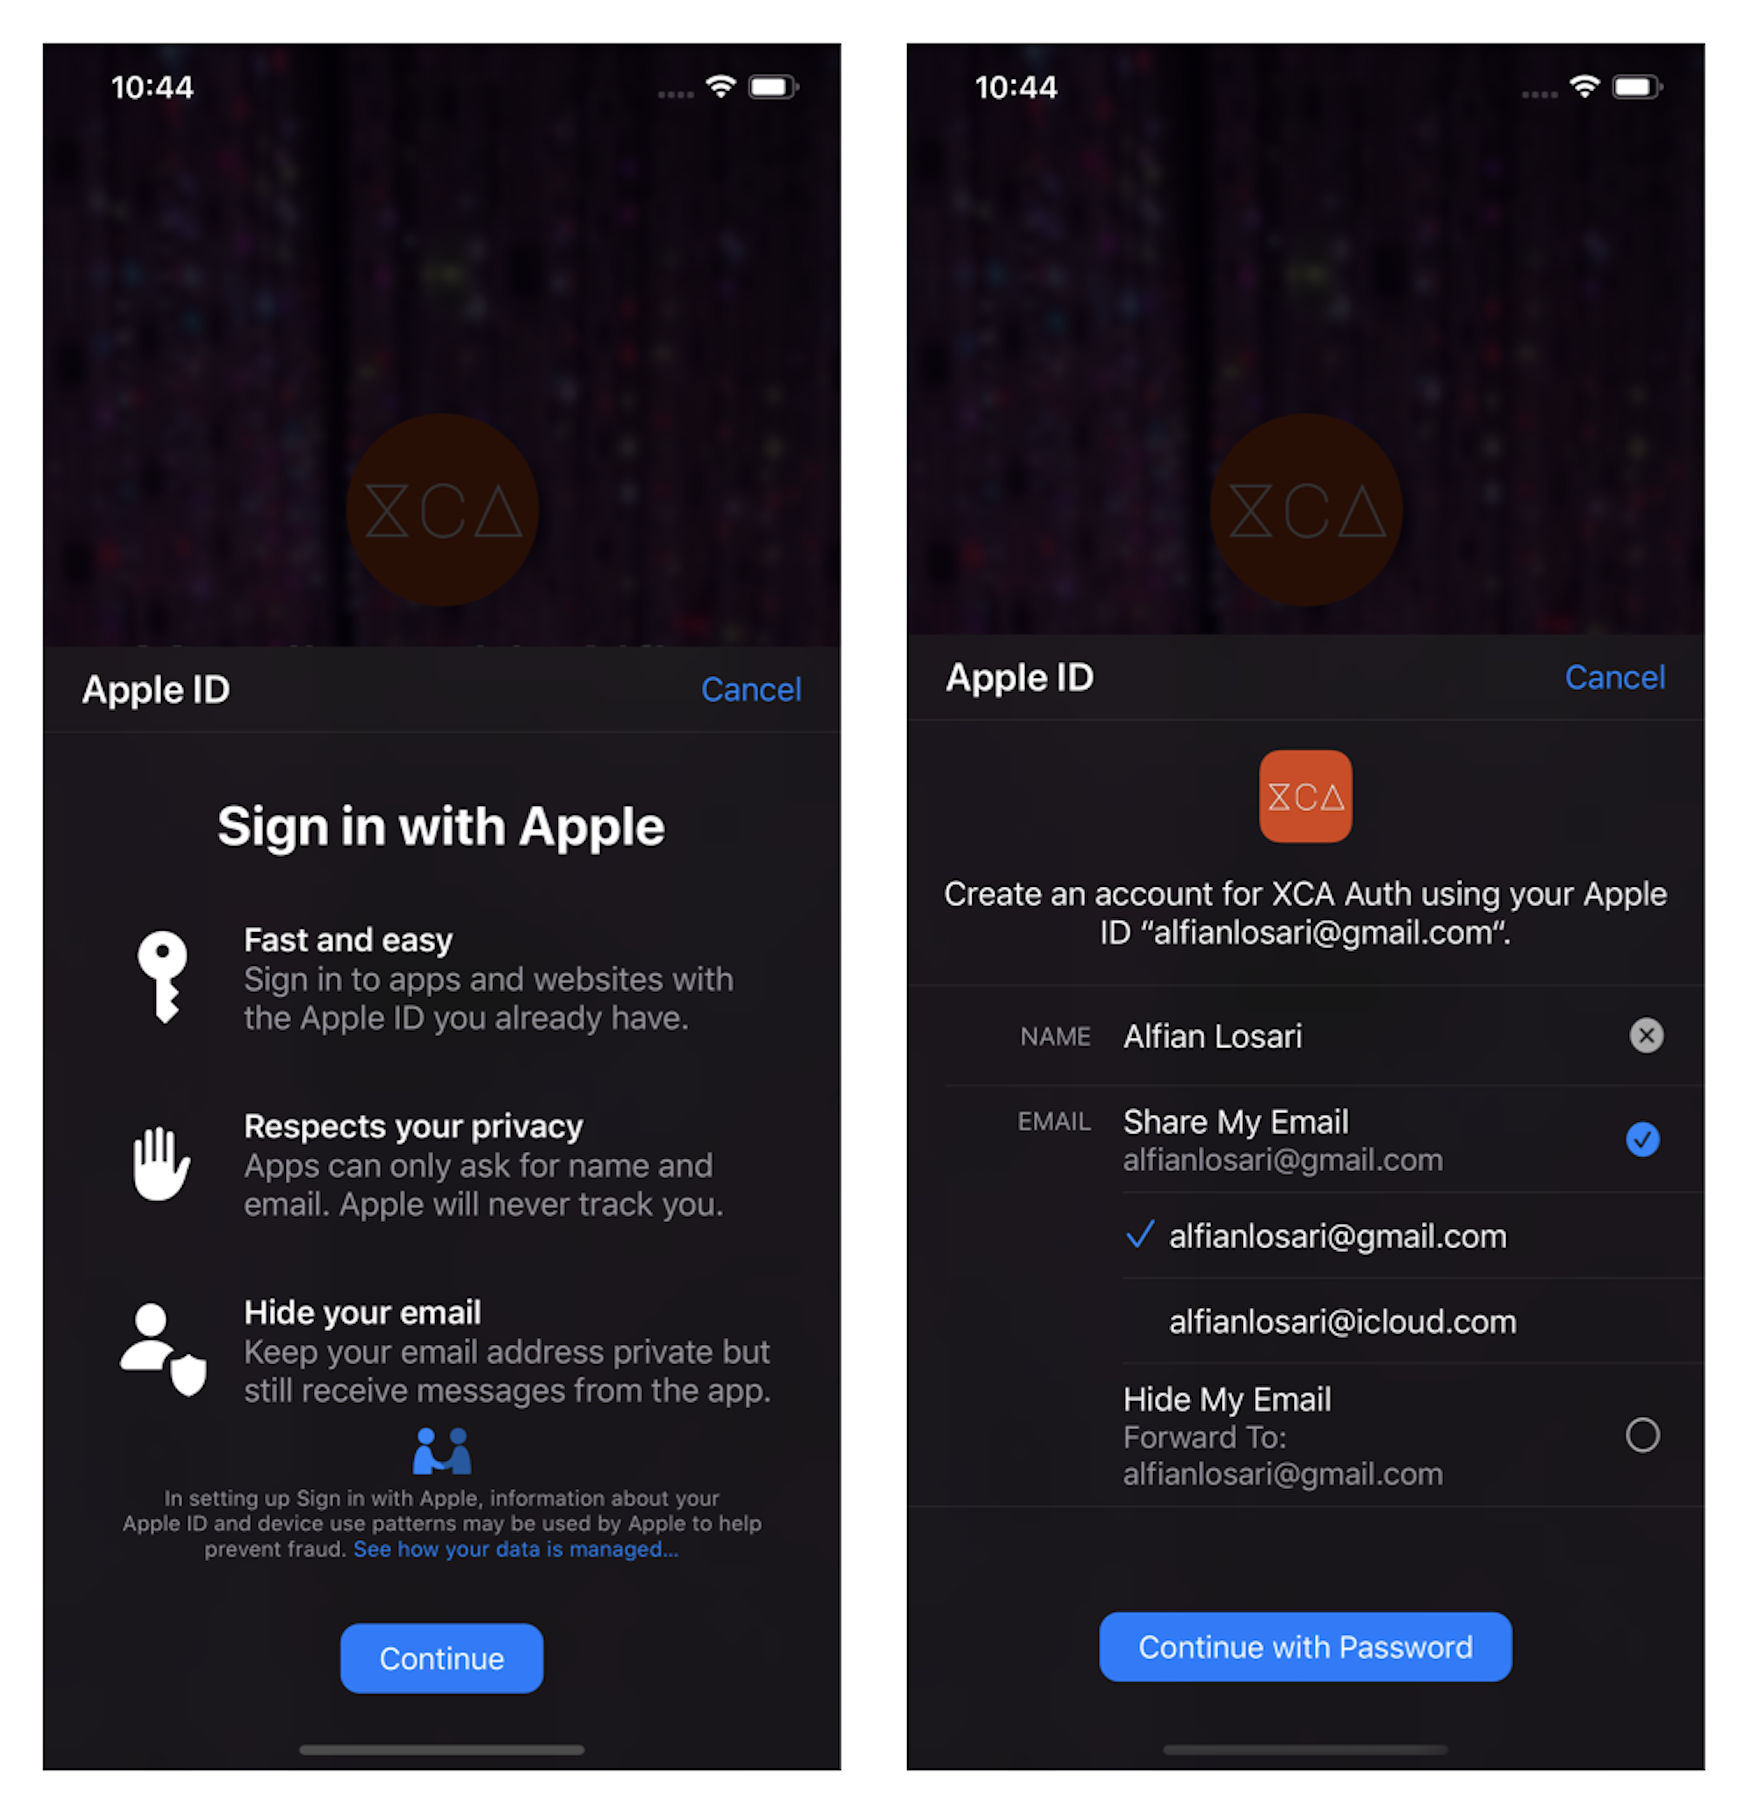 Conclusion
Congrats on finishing the tutorial! We have learned how to create authentication mechanism in SwiftUI using Firebase Auth SDK and Sign in With Apple. Using Observable Object binding, we can easily manage the authentication state of the application and update the view accordingly. With Firebase Auth SDK, we don't have to spend time building our authentication system. Instead, we can rely on Google trusted security as the authentication system. Let's keep the lifelong learning goes on!
ChallengeOne more thing, I have provided a challenge section if you want to implement more authentication features. I have provided three challenges for you to add into the app as features:
Published at Mar 16, 2020
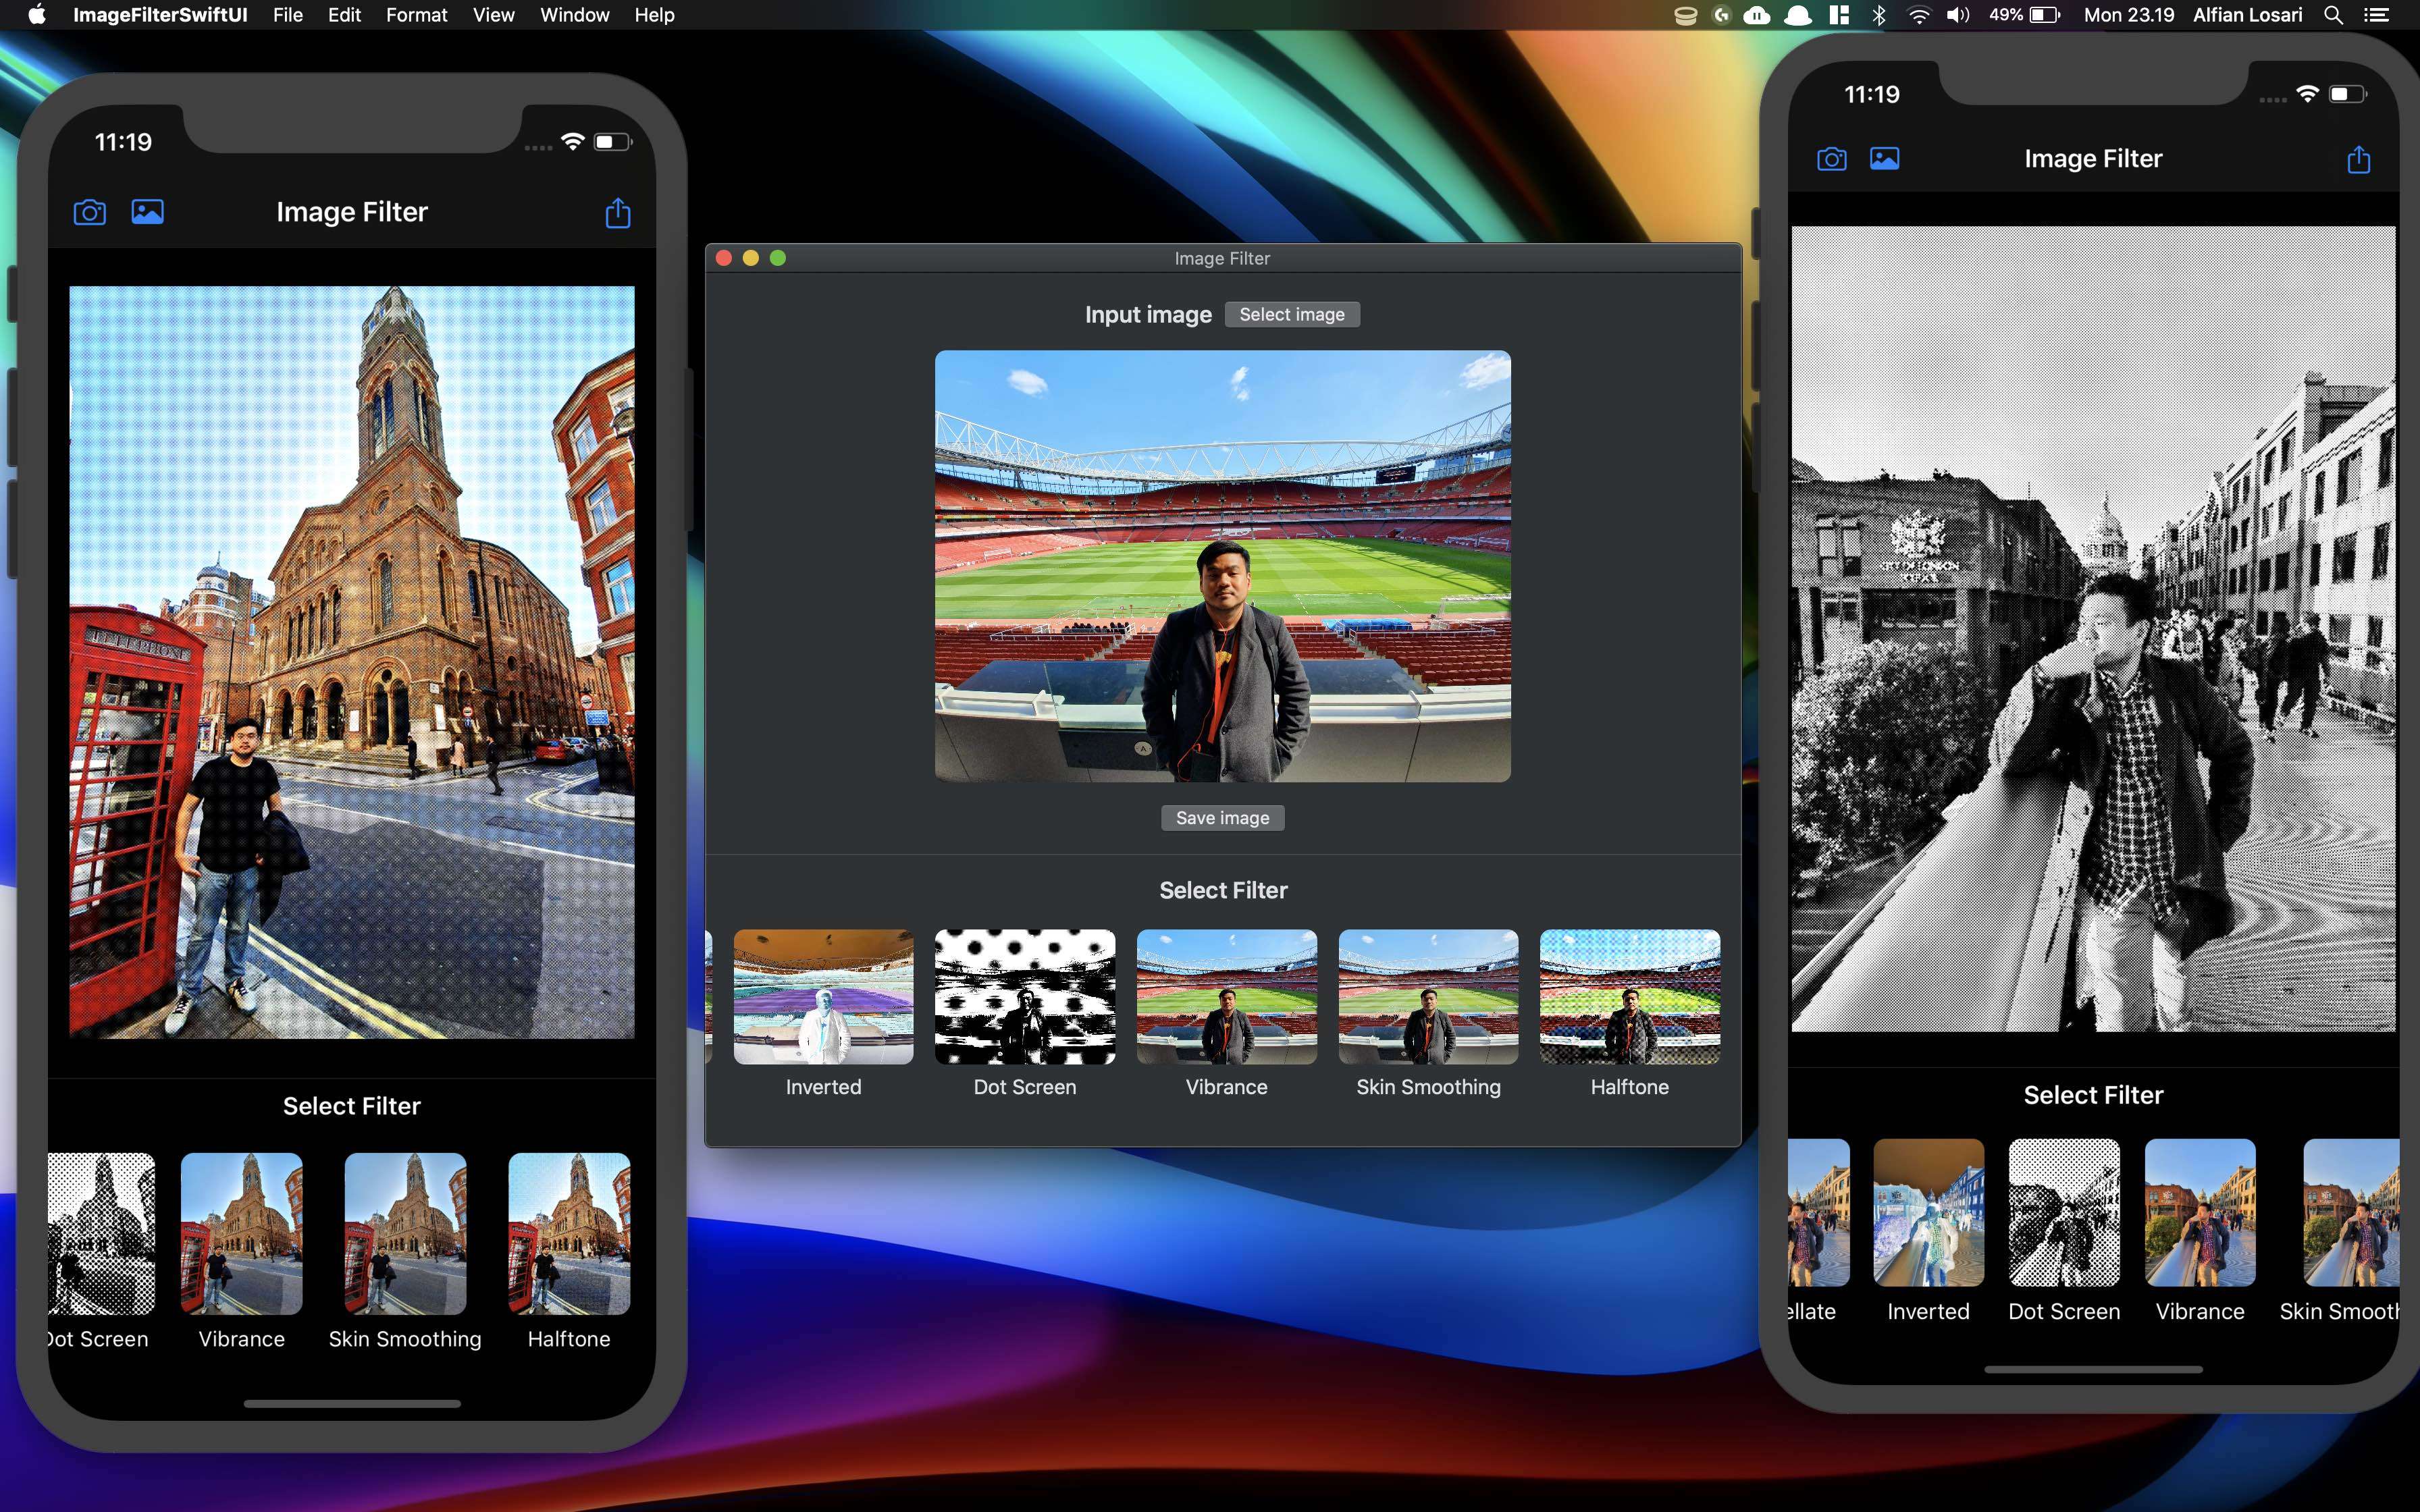
In the previous project, we have successfully built the Image Filter macOS app with SwiftUI. In this tutorial, we are going to expand our target platform to the mobile, iOS. Most of the SwiftUI APIs are cross-compatible between AppKit, WatchKit, UIKit in iOS & tvOS with some of the differences, especially in navigations and controls based Views. SwiftUI provides common views such as control views (Toggle, Picker, TextField, Button) and layout views (ZStack, VStack, HStack). The common views render natively respective to the target platform (Toggle as Checkbox in macOS and as Switcher in iOS).
The main goal of SwiftUI design philosophy is not to Write code once, and run anywhere, but to Learn once, apply anywhere. Apple declared this goal in WWDC 2019 session titled SwiftUI on All Devices. As developers, we don't have to force ourselves to write the UI code only once because each device have their characteristics and strengths. Although, we should aim to share all the models and services code between platform as they are independent of the UI. We can also share some of the Views code if the design is compatible across platforms. You can find all the details by watching the session video from this link WWDC 2019-SwiftUI on All Devices.
In this tutorial, we are going to add and build iOS target to the current SwiftUI macOS app. Here are the outlines of the tasks to do:
Single App template.NSImage in AppKit and UIImage in UIKit.ImageFilter model, observed objects (AppState, ImageFilterObservable) compatible for all the target platforms using target membership.CarouselFilterView and ProgressView.UIActivityViewController.To begin the project, you can download the starter project repository from GitHub. The starter project contains several things, such as:
Make sure to run pod install, then open the project xcworkspace, try to build and run the macOS app to play around. You can select the image using a file picker or drag image to the app to filter. A carousel containing built-in filters will be displayed where you can click to apply the filter.
You can also clone or download the completed project from the GitHub repository. Let's begin building our iOS app!
Create new iOS TargetTo begin, let's add a new iOS target in the project. From the Menu bar click File > New > Target. From the select template window, select iOS and select Single View App from Application. You can also type in the text field to filter the selection. Give the name ImageFilteriOS as the product name, then click Finish to create the new target.

Close the project from Xcode, using your favorite text editor to open the Podfile and add the new MetalPetal dependency on the new iOS target. After that, run pod install.
target 'ImageFilteriOS' do
  use_frameworks!

  pod 'MetalPetal'
end
Open Xcode project, then change the target to ImageFilteriOS, You can change the target by clicking the target button at the top tab bar beside the stop debug button. Try to build the project to make sure it is successfully built.
Our main app feature is to filter the image. As we know, AppKit uses NSImage while UIKit uses UIImage to deal with an image type. The first problem we want to tackle is how we can make NSImage and UIImage cross-compatible, and be can be used across the targets under the same type. To solve this problem, we can use Swift typealias combined with conditional import and declaration using preprocessor macros. Create a new Swift file named CPImage and copy the following code.
import SwiftUI

#if os(iOS)
    import UIKit
    public typealias CPImage = UIImage
#elseif os(OSX)
    import AppKit
    public typealias CPImage = NSImage
#endif
With the code above, we are going to check the current target OS and import the respective framework for the matching platform, UIKit for iOS, and AppKit for OSX. We also declare typealias named CPImage for both types (CPImage means CrossPlatformImage, as we don't want to use Image because it is already used in SwiftUI).
We also want to create a simple extension to make conversion between CPImage, CIImage, and CGImage simpler between platforms to use in ImageFilter enum.
// CPImage.swift
...

extension CPImage {

    var coreImage: CIImage? {
        #if os(iOS)
        guard let cgImage = self.cgImage else {
            return nil
        }
        return CIImage(cgImage: cgImage)
        #elseif os(OSX)
        guard
            let tiffData = tiffRepresentation,
            let ciImage = CIImage(data: tiffData)
            else {
                return nil
        }
        return ciImage
        #endif
    }
}

extension CGImage {

    var cpImage: CPImage {
        #if os(iOS)
        return UIImage(cgImage: self)
        #elseif os(OSX)
        return NSImage(cgImage: self, size: .init(width: width, height: height))
        #endif
    }
}

extension Image {

    init(cpImage: CPImage) {
        #if os(iOS)
        self.init(uiImage: cpImage)
        #elseif os(OSX)
        self.init(nsImage: cpImage)
        #endif
    }
}
Let's update the ImageFilter enum to use the cross-platform compatible new extension. Update the processFilterWithMetal method inside the ImageFilter.swift file by copying the following code.
// ImageFilter.swift
...
private func processFilterWithMetal(image: NSImage, filterHandler: (MTIImage) -> MTIImage?) -> CPImage {
     guard let ciImage = image.coreImage else {
         return image
     }

     let imageFromCIImage = MTIImage(ciImage: ciImage).unpremultiplyingAlpha()

     guard let outputFilterImage = filterHandler(imageFromCIImage), let device = MTLCreateSystemDefaultDevice(), let context = try? MTIContext(device: device)  else {
         return image
     }
     do {
         let outputCGImage = try context.makeCGImage(from: outputFilterImage)
         let filteredImage = outputCGImage.cpImage

         return filteredImage
     } catch {
         print(error)
         return image
     }
 }
Next, we are going to find all the references to NSImage in our code and replace it using CPImage typealias. To help us do the task, we can utilize the Xcode Find and Replace feature, which we can access from the Find Navigator. Make sure to select Matching Case instead of IgnoringCase because SwiftUI Image uses nsImage as the parameter in the initializer, which we don't want to replace.
Make sure to run and build the project successfully.
Building Progress View Shared ViewNext, we will make the current Progress View compatible with iOS target. Currently, macOS is using AppKit NSProgressIndicator wrapped in NSViewRepresentable, so it can be used in SwiftUI. NSProgressIndicator is not available to use in UIKit environment. Instead, UIKit provides UIActivityIndicatorView to display a circular spinning loading view. We also need to use UIViewRepresentable instead of NSViewRepresentable in UIKit. To implement this, we are going to use preprocessor macro conditional os checking again.
// ProgressView.swift

import SwiftUI

#if os(iOS)
import UIKit
struct ProgressView: UIViewRepresentable {
    func makeUIView(context: UIViewRepresentableContext<ProgressView>) -> UIActivityIndicatorView {
        UIActivityIndicatorView(style: .large)
    }

    func updateUIView(_ uiView: UIActivityIndicatorView, context: UIViewRepresentableContext<ProgressView>) {
        uiView.startAnimating()
    }

}

#elseif os(OSX)
import AppKit
struct ProgressView: NSViewRepresentable {

    func updateNSView(_ nsView: NSProgressIndicator, context: NSViewRepresentableContext<ProgressView>) {
        nsView.style = .spinning
        nsView.startAnimation(self)
    }

    func makeNSView(context: NSViewRepresentableContext<ProgressView>) -> NSProgressIndicator {
        let progressIndicator = NSProgressIndicator()
        return progressIndicator
    }
}
#endif
In SwiftUI, we want to share models and services so it can be used across all platforms. There are 2 ways to achieve this:
For the sake of simplicity of this tutorial, we will be using the first approach as we only need to tick the checkbox for the iOS platform in each of the shared source files. You can visit the tutorial on Ray Wenderlich Creating a Framework for iOS to understand more about creating a shared framework.
To do this, we need to select the file in the navigator. Then, in the file inspector target membership, make sure to tick the ImageFilteriOS checkbox. This will make sure the source code is available to use in both targets. Here are all the files that we need to add the target membership:
ImageFilter.swiftCPImage.swiftImageFilterView.swiftProgressView.swiftAppState.swiftImageFilterObservable.swift
Make sure to successfully build and run using both macOS and iOS target. Next, we will focus primarily on building the UI for iOS.
Before we begin building our main view, we need to create a view where user can select image both from photo library or camera. SwiftUI doesn't provide this kind of view internally, so to do this, we need to use UIKit UIImagePickerController wrapped in UIViewControllerRepresentable. The ImagePicker has Coordinator class that is acting as UIImagePickerControllerDelegate so it can receive a callback after user selecting or capturing the image. It has 2 instance properties, the image with @Binding and sourceType of image picker. After the user selecting the image from UIImagePickerController, it will assign the value of the image to the binding property so the parent state can update its views using the newly selected image.
Create a new file named ImagePicker and copy the following code.
import SwiftUI

struct ImagePicker: UIViewControllerRepresentable {

    @Environment(\.presentationMode) var presentationMode
    @Binding var image: UIImage?

    var sourceType: UIImagePickerController.SourceType

    func updateUIViewController(_ uiViewController: UIImagePickerController, context: UIViewControllerRepresentableContext<ImagePicker>) {}

    func makeCoordinator() -> Coordinator {
        Coordinator(self)
    }

    class Coordinator: NSObject, UINavigationControllerDelegate, UIImagePickerControllerDelegate {
        var parent: ImagePicker

        init(_ parent: ImagePicker) {
            self.parent = parent
            super.init()
        }

        func imagePickerControllerDidCancel(_ picker: UIImagePickerController) {
            parent.presentationMode.wrappedValue.dismiss()
        }

        func imagePickerController(_ picker: UIImagePickerController, didFinishPickingMediaWithInfo info: [UIImagePickerController.InfoKey : Any]) {
            if let uiImage = info[.originalImage] as? UIImage {
                parent.image = uiImage.fixOrientation
            }
            parent.presentationMode.wrappedValue.dismiss()
        }


    }

    func makeUIViewController(context: UIViewControllerRepresentableContext<ImagePicker>) -> UIImagePickerController {
        let imagePicker = UIImagePickerController()
        imagePicker.sourceType = sourceType
        imagePicker.delegate = context.coordinator
        return imagePicker
    }
}

extension UIImage {

    var fixOrientation: UIImage {
        if (imageOrientation == .up) {
            return self
        }

        UIGraphicsBeginImageContextWithOptions(size, false, scale)
        let rect = CGRect(x: 0, y: 0, width: size.width, height: size.height)
        draw(in: rect)

        let normalizedImage = UIGraphicsGetImageFromCurrentImageContext()!
        UIGraphicsEndImageContext()

        return normalizedImage
    }
}

extension UIImagePickerController.SourceType: Identifiable {
    public var id: Int { rawValue }
}
Inside, we also provide an additional extension for UIImage to fix the image orientation because sometimes, when capturing an image using the camera, the orientation can be messed up. Additionally, we also make the UIImagePickerController.SourceType conform to Identifiable by providing the unique rawValue.
Finally, we need to add additional privacy photo library and camera usage description in the info.plist file inside the ImageFilteriOS target. Add 2 following permissions:
The root view for our app is Navigation View. Inside, we embed a VStack for the input image and horizontal carousel containing the image filters. We also use the Navigation Bar Leading and Trailing items for the select photo library, capture from the camera, and sharing buttons.
We will have 2 instance properties inside the Content View:
appState @EnvironmentObject providing published state properties for the selected input image and selected filtered image. We will pass the input image property as a binding to the ImagePicker.imagePickerSourceType @State as a binding to determine whether the ImagePicker sheet should be presented. The initial value is nil, and when the user taps on the photo library or camera button, the value will be set, triggering the presentation of the sheet containing ImagePicker.
Open ContentView.swift and copy the following code.
import SwiftUI

struct ContentView: View {

    @EnvironmentObject var appState: AppState
    @State var imagePickerSourceType: UIImagePickerController.SourceType?

    var body: some View {
        NavigationView {
            VStack {
                Spacer()
                ZStack {
                    if appState.image != nil {
                        Image(cpImage: appState.filteredImage != nil ? appState.filteredImage! : appState.image!)
                            .resizable()
                            .aspectRatio(contentMode: .fit)
                    } else {
                        Text("Add Picture from Photo Library or Camera")
                            .font(.headline)
                            .padding()
                    }
                }
                .padding(.vertical)

                Spacer()
                Divider()

                CarouselFilterView(image: appState.image, filteredImage: self.$appState.filteredImage)
                    .equatable()
            }
            .navigationBarItems(leading:
                HStack(spacing: 16) {
                    if UIImagePickerController.isSourceTypeAvailable(.camera) {
                        Button(action: {
                            self.imagePickerSourceType = .camera
                        }) {
                            Image(systemName: "camera")
                        }
                    }
                    Button(action: {
                        self.imagePickerSourceType = .photoLibrary
                    }) {
                        Image(systemName: "photo")
                    }
                }
                , trailing:
                Button(action: self.shareImage) {
                    Image(systemName: "square.and.arrow.up")
                }
            )
                .navigationBarTitle("Image Filter", displayMode: .inline)
                .sheet(item: self.$imagePickerSourceType) {
                    ImagePicker(image: self.$appState.image, sourceType: $0)
            }
        }
    }

    private func shareImage() {
        // TODO: Add share using UIActivityViewController
    }
}
Try to build and run the project using your iOS device, and you should be able to select an image from both the camera and photo library from the image picker. Play around with applying filters from the built-in carousel!
Handle Sharing ImageTo share the filtered image, we will use UIActivityViewController. In this case, we can just instantiate and pass the filtered image to share. To present this view controller, we retrieve the application window root view controller and present the view controller with the modal presentation.
Copy and paste the following code into the Content View shareImage method.
// ContentView.swift
...
private func shareImage() {
    guard let image = self.appState.filteredImage ?? self.appState.image else {
        return
    }
    let imageToShare = [image]
    let activityViewController = UIActivityViewController(activityItems: imageToShare, applicationActivities: nil)
    UIApplication.shared.windows.first?.rootViewController?.present(activityViewController, animated: true, completion: nil)
}
Build and run the app to try the sharing feature. We can share with our installed social media apps such as Instagram, WhatsApp, etc. Also, we can save to the photo library and share it locally with Airdrop.
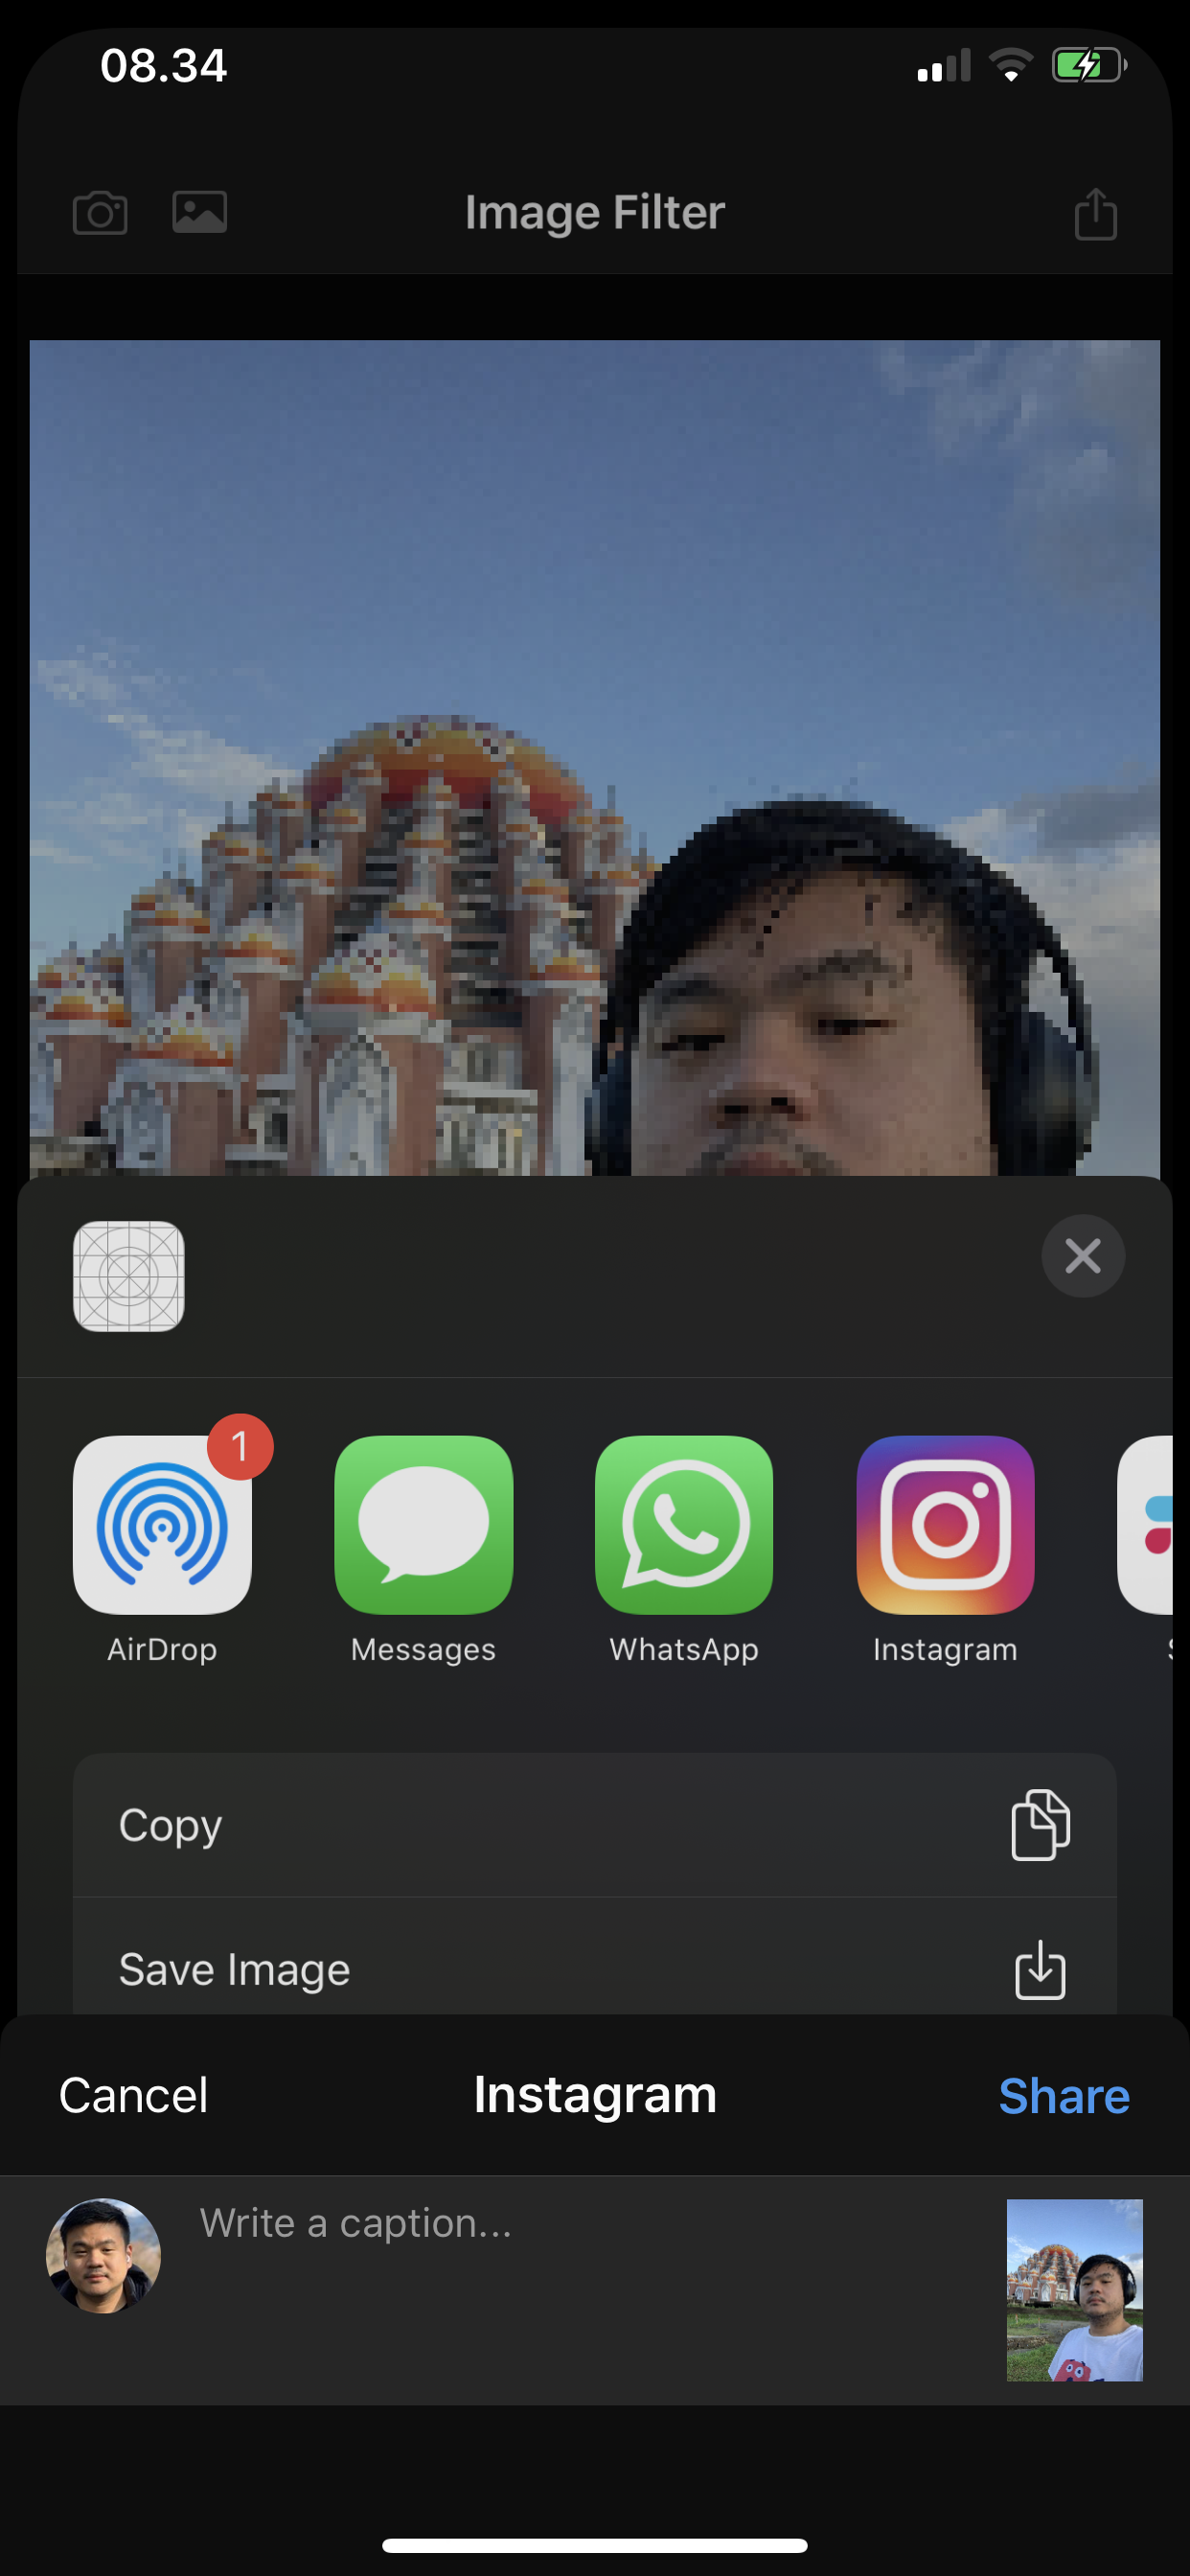 Conclusion
Congrats on finishing the iOS app! With SwiftUI, we can learn and build our skillset that can be applied for building user interface on any devices ranging from wearable, smartphone, tablet, laptop to living room entertainment device. Remember that the main goal is not to write UI code once to run anywhere instead to learn and apply the same skill anywhere. As designers and front end developers, we need to provide the best user experience for each platform. Until the next one, let’s keep the lifelong learning goes on!
Published at Mar 1, 2020
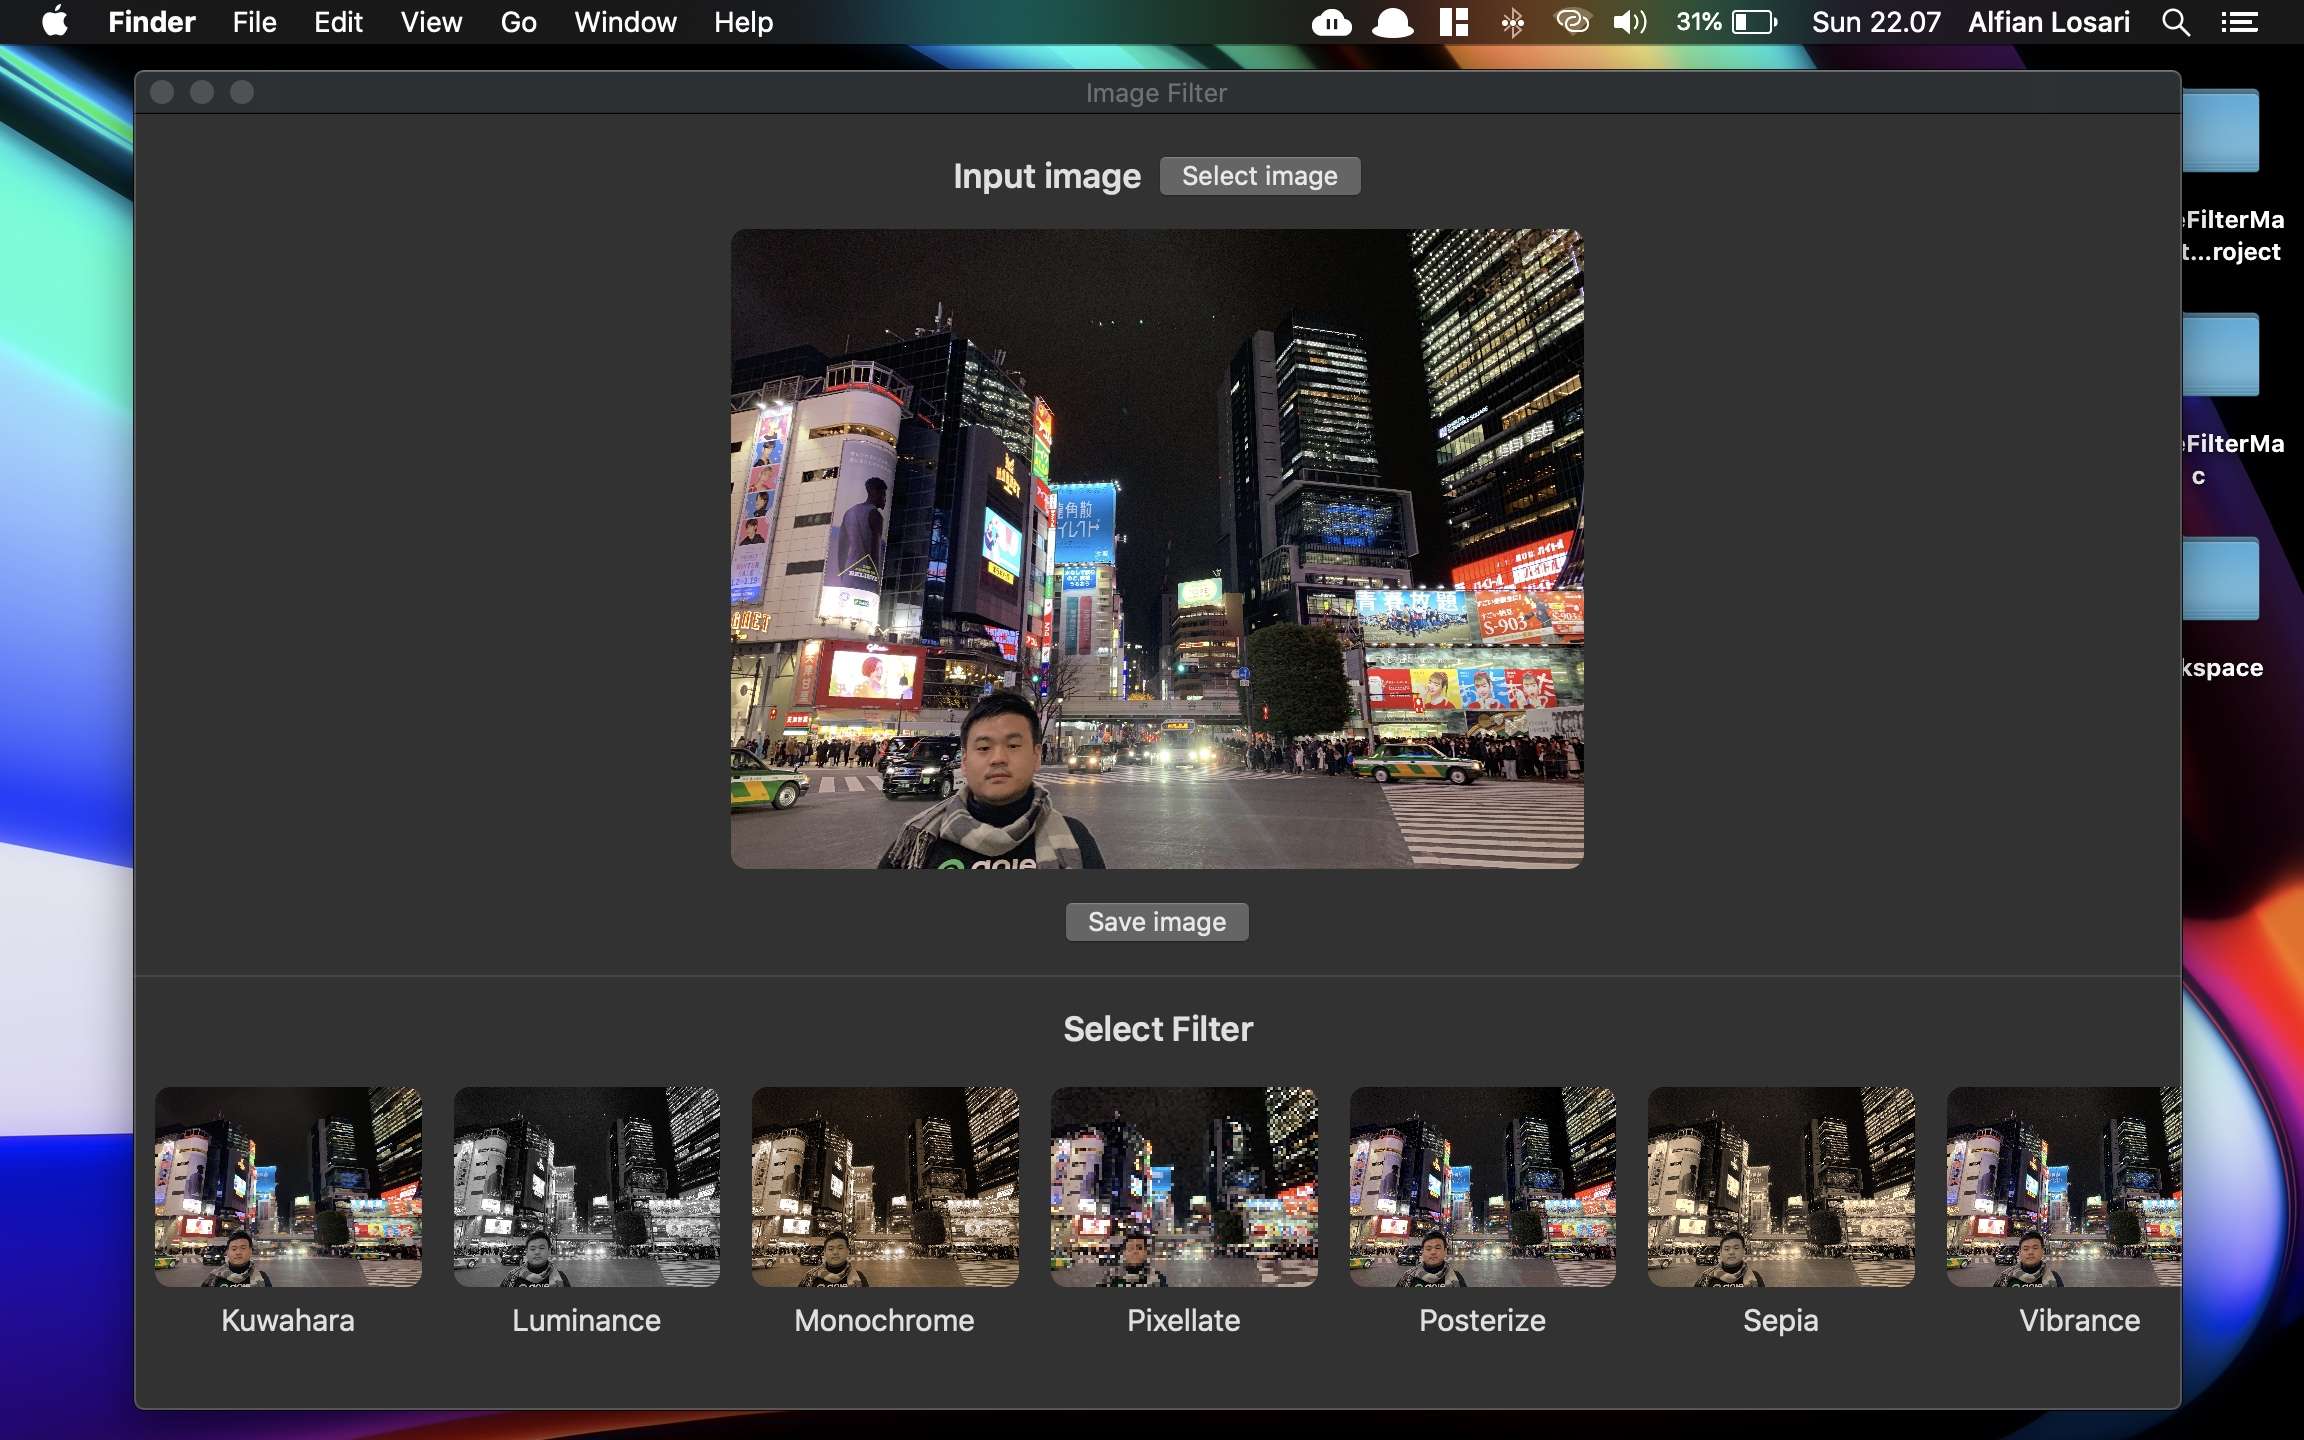
SwiftUI enables developers to use unified tools and API for building full native applications across Apple platforms. We can target specific platforms and build the UI component without having expertise for each target specific framework such as UIKit (iOS & tvOS), AppKit (macOS), and WatchKit (watchOS). As a developer, we can build apps much faster with declarative syntax, safer with reactive binding and state management between UI and model. At last, we don't have to do context switching when building across platforms.
In this tutorial, we will build a native Image Filter macOS App with the following features:
NSOpenPanel).NSSavePanel).ObservableObject and EnvironmentObject.Binding to update value from child view back to the parent view.
Before we begin, here are the minimum requirements you need to follow this tutorial:
To begin, you need to download the starter project from the GitHub repository at Starter Project Repository. You can also play around and download the completed project repository at Completed Project Repository.
The starter projects has already provided the following components:
GPUImage2 dependency using Swift Package Manager.ImageFilter enum with predefined filter represented as cases. It also provided a helper method to filter an NSImage in a serial background thread using GPUImage pipeline.ProgessView NSViewRepresentable struct. Because currently SwiftUI has no progressive indicator component, we can use the AppKit NSProgressIndicator by wrapping it under the NSViewRepresentable protocol.
The application is divided into 2 main views:
InputView. The top part section of the UI, where the input image located. It also has a select input file button, and additionally save-image button for the filtered image.CarouselFilterView. The bottom part section of the UI that displays filters of the image in a horizontal carousel. It only is shown after the user has selected the input image.
For handling the application state, there are 2 observable objects:
AppState. It is the application state that has 2 @Published properties, the user-selected input image, and filtered image. Each time the input image is assigned, the selected filter image sets to nil.ImageFilter. The responsibility of this observed object is to handle the asynchronous image filter process when filtering using GPUImage2. It's the best approach not to block the main thread by moving massive computational tasks to the background thread. Several predefined filters are smooth toon, vignette, polkadot, monochrome, sepia, and many more.
Take a closer look at the diagram above to understand the whole application UI and data state flow. Next, let's begin building our app by creating the AppState observable object!
Create a new Swift file named AppState. Copy or type the following code.
import Combine
import Cocoa

class AppState: ObservableObject {

    // 1
    static let shared = AppState()
    private init() {}

    // 2
    @Published var image: NSImage? {
        didSet {
            // 4
            self.filteredImage = nil
        }
    }

    // 3
    @Published var filteredImage: NSImage?
}
Here is the explanation of each of the points for the class:
Singleton object, which means there is only a single instance of this class in the runtime. It provides access via static shared property. Initialization of this class outside is forbidden using the private initializer.image property is the stored property of the user-selected input image. The declaration uses @Published keyword. This particular keyword is used by the SwiftUI View that has reference to this ObservedObject to trigger the update of the view body if the property is updated and used within the body declaration.filteredImage property is the stored property of the user-selected filter image. It is also declared using @Published keyword.didSet property observer is used to reset the filtered image to nil whenever the user selects a new input image.
Next, open the AppDelegate.swift. In here, we will inject the app state using the environmentObject modifier added to the ContentView.
let appState = AppState.shared
let contentView = ContentView()
    .environmentObject(appState)
By using environmentObject at the root of the View, all the child nodes can access this observed object by using the @EnvironmentObject keyword when declaring the property. Remember to consider the usage of this pattern if your app has many complex nested views, as it can increase recalculating and update of the view hierarchy each time the properties in this object are updated.
Create a new SwiftUI file named InputImageView. Copy or type the following code.
struct InputImageView: View {

    let image: NSImage?
    let filteredImage: NSImage?

    var body: some View {
        ZStack {
            if image != nil {
                Image(nsImage: filteredImage != nil ? filteredImage! : image!)
                    .resizable()
                    .aspectRatio(contentMode: .fit)
            } else {
                Text("Drag and drop image file")
                    .frame(width: 320)
            }
        }
        .frame(height: 320)
        .background(Color.black.opacity(0.5))
        .cornerRadius(8)
    }
}
In this view, we use a ZStack as a container for the image or text. If the input image exists, we display the image by using a ternary operator checking if the filtered image exists, making sure to assign that image as the priority then fallback to the input image. We also use the provided resizable modifier combined with aspectRatio to make sure the content mode set to fit where the image size is adjusted to fit the view bounds while still maintaining the original aspect ratio.
If the Image doesn't exist, we display a Text to inform the user to drag and drop the image to the view. We will cover drag and drop in the next section. At last, we set the ZStack height frame to 320, background color to black with 0.5 opacity, and corner radius to 8 for making the edge a bit rounded. You can delete InputImageView_Previews struct for the sake of this tutorial as we are not going to use the instant preview feature at all.
Next, we're going to add the drag and drop capability to the InputImageView. This is pretty simple to achiever with SwiftUI. By adding a simple onDropmodifier to the ZStack , passing the supported file types, and the closure callback when the object is dropped. In this case, we support the public.file-url to retrieve the url file of the image in the file system.
In the completion callback, we just need to load the item URL, then initialize the NSImage with the URL to get the image data into our application. We need to declare an additional property with the type of closure with an input parameter of NSImage and return type of void to inform the user of this View as InputImageView has no observable properties.
struct InputImageView: View {

        ...
    let onDropHandler: (NSImage) -> ()

      var body: some View {
        ZStack {
           ...
        }
        ...
        .onDrop(of: ["public.file-url"], isTargeted: nil, perform: handleOnDrop(providers:))
    }

     private func handleOnDrop(providers: [NSItemProvider]) -> Bool {
        if let item = providers.first {
            item.loadItem(forTypeIdentifier: "public.file-url", options: nil) { (urlData, error) in
                DispatchQueue.main.async {
                    if let urlData = urlData as? Data {
                        let url = NSURL(absoluteURLWithDataRepresentation: urlData, relativeTo: nil) as URL
                        guard let image = NSImage(contentsOf: url) else {
                            return
                        }
                        self.onDropHandler(image)
                    }
                }
            }
            return true
        }
        return false
    }
Let's wait a bit before we can try this drag and drop in action. Next, we will add an InputView to contain InputImageView as well as additional buttons for selecting the image from file picker and saving the image to file.
Next, create a new SwiftUI file named InputView, also delete InputView_Previews at the bottom. This View consists of VStack containing Buttons for open file and saving file as well as our previous InputImageView component.
We also have the image and filteredImage properties that are passed from the ContentView as well as onImageReceived handler that will pass the selected or dropped image back to ContentView. The methods for opening and saving the file are being handled in this struct via selectFile and saveToFile methods.
struct InputView: View {

    let image: NSImage?
    let filteredImage: NSImage?
    let onImageReceived: (NSImage) -> ()

    var body: some View {
        VStack(spacing: 16) {
            HStack {
                Text("Input image")
                    .font(.headline)
                Button(action: selectFile) {
                    Text("Select image")
                }
            }

            InputImageView(image: image, filteredImage: filteredImage, onDropHandler: onImageReceived)

            if image != nil {
                Button(action: saveToFile) {
                    Text("Save image")
                }
            }
        }
    }

    private func selectFile() {
        NSOpenPanel.openImage { (result) in
            if case let .success(image) = result {
                self.onImageReceived(image)
            }
        }
    }

    private func saveToFile() {
        guard let image = filteredImage ?? image else {
            return
        }
        NSSavePanel.saveImage(image, completion: { _ in  })
    }
}
I already provided extension helper inside the FilePanel+Extension.swift file for dealing with opening and saving the image for both NSOpenPanel and NSSavePanel. If the user selects an image from the macOS file panel, we'll trigger the onImageReceived closure passing the selected image. For saving the image, we check if the filtered image exists with fallback to the input image before asking the user for the filename and location to save the image.
Next, let's move to the root ContentView to put the InputView. First, we need to declare the AppState using @EnvironmentObject keyword. Inside the body, we use VStack as a container for the InputView passing the image and filteredImage from the AppState. We also provide the closure to handle onImageReceived by assigning the image to the AppState image property. This will trigger the view update to render the InputView with a new image.
struct ContentView: View {

    @EnvironmentObject var appState: AppState

    var body: some View {
        VStack(spacing: 16) {
            InputView(image: appState.image, filteredImage: appState.filteredImage, onImageReceived: { self.appState.image = $0 })

            Spacer()
        }
        .padding(.top, 32)
        .padding(.bottom, 16)
        .frame(minWidth: 768, idealWidth: 768, maxWidth: 1024, minHeight: 648, maxHeight: 648)
    }
}
We also set the frame height to a maximum and a minimum of 648. For the width, the user can expand the width to a maximum of 1024, but the minimum is 648. Now you can try to build and run the project. Try paying with drag and drop the image to the InputImageView as well as clicking on the button to select the image file from the file panel. Next, let's move to the main course, which is displaying and selecting image filters using the carousel!
Before we build our carousel image filter view, we need to create an image filter observable object. Create a new SwiftUI file named ImageFilterObservable. Copy or type the following code.
import Combine
import Cocoa

class ImageFilterObservable: ObservableObject {

    // 1
    @Published var filteredImage: NSImage? = nil

    // 2
    let image: NSImage
    let filter: ImageFilter
    init(image: NSImage, filter: ImageFilter) {
        self.image = image
        self.filter = filter
        self.filterImage()
    }

    // 3
    func filterImage() {
        self.filter.performFilter(with: self.image) {
            self.filteredImage = $0
        }
    }
}
Here is the explanation of each point:
filteredImage using the @Published keyword. This image is the result of the asynchronous filter operation.input image and image filter enum as a stored property. Both of them passed through the initializer parameters.filterImage method performs the filter operation asynchronously. In the completion callback, it assigns the filteredImage property with the output image. The process publishes the change that invokes the view update.Next, we will build the ImageFilterView to display the image that has been filtered. Create a new SwiftUI file named ImageFilterView. Copy or type the following code into the file.
struct ImageFilterView: View {

    @ObservedObject var observableImageFilter: ImageFilterObservable
    let onImageSelected: (NSImage) -> ()

    var body: some View {
        VStack {
            ZStack {
                Image(nsImage: observableImageFilter.filteredImage != nil ? observableImageFilter.filteredImage! : observableImageFilter.image)
                    .resizable()
                    .aspectRatio(contentMode: .fit)
                    .frame(height: 100)
                    .cornerRadius(8)

                if observableImageFilter.filteredImage == nil {
                    ProgressView()
                }
            }

            Text(observableImageFilter.filter.rawValue)
                .font(.subheadline)
        }
        .onTapGesture(perform: handleOnTap)
    }

    private func handleOnTap() {
        guard let filteredImage = observableImageFilter.filteredImage else {
            return
        }
        onImageSelected(filteredImage)
    }
}
Because the filtering operation is asynchronous, the view needs to have state. In this case, we can use the ImageFilterObservable as the observed object. First, we display the input image with a loading progress view overlay, and then after the image filtering operation finishes, we display the filtered image.
The view accepts and stores the ImageFilterObservable via the initializer. It also has the onImageSelected closure to handle passing the filtered image to the parent view when the user taps on the view.
The VStack is the main container. Inside, the ZStack is used to display the image based on the condition of the filtered image. With the frame modifier, the height of the image is constrained to 100, and content mode is set to fit. The Loading progress view will be displayed on top of the image when the filter operation is executing. Below the ZStack, we have the text to display the name of the filter based on the enum case. Next, let's build the carousel for displaying all the ImageFilter enum inside the ImageFilterView.
Create a new SwiftUI file named CarouselFilterView. Copy or paste the following code.
struct CarouselFilterView: View {

    // 1
    let image: NSImage?
    let onImageFilterSelected: (NSImage) -> Void

    // 2
    let imageFilters: [ImageFilter] = ImageFilter.allCases

    // 3
    var body: some View {
        VStack {
            if image != nil {
                Text("Select Filter")
                    .font(.headline)

                // 4
                ScrollView(.horizontal, showsIndicators: true) {
                    HStack(alignment: .top, spacing: 0) {
                        ForEach(imageFilters) { filter in
                            // 5
                        ImageFilterView(observableImageFilter: ImageFilterObservable(image: self.image!, filter: filter), onImageSelected: self.onImageFilterSelected)
                                .padding(.leading, 16)
                                .padding(.trailing, self.imageFilters.last == filter ? 16 : 0)
                        }
                    }
                    .frame(height: 140)
                }
            }
        }
    }
}
Here is the explanation of each of the points:
image NSImage and onImageFilterSelected closure. The image is the input image passed from the ContentView while the closure will be invoked when user tap on the image, passing the selected filtered-image back to the ContentView.imageFilters constant is initialized with a default value, which is ImageFilter enum array. Because ImageFilter enum conforms to CaseIterable protocol, the compiler automatically synthesize the allCases property that returns all the enum cases in an array.VStack as the main container. Inside, it also checks the input image existence before displaying all the Select Filter Text and ScrollView Carousel.ScrollView with the horizontal axis. The important things are to use HStack combined with using ForEach. We initialize ForEach passing the image filters enum array. ImageFilter enum already conforms to Identifiable so it can be used by SwiftUI to perform the diffing operation of the list when the state is updated.ImageFilterView initializer, we pass the initialized ImageFilterObservable passing the input image and the current enumerated filter. We also add additional paddings modifier for the leading. For trailing padding, we only set it to 16 if it is the last enumerated filter. We also constraint the height of the HStack using to 140 using the frame modifier.Last, we need to put the FilterCarouselView inside the ContentView. Copy or type the following code.
import SwiftUI

struct ContentView: View {
    ...

    var body: some View {
        VStack(spacing: 16) {
            ...

            Divider()
            CarouselFilterView(image: appState.image) {
                self.appState.filteredImage = $0
            }
            ...
        }
        ...
    }
}
With this, we pass the appState image property to the CarouselFilterView. It updates the view whenever the AppState property changes. Try to build and run the app to see app the image filtering in action!
Currently, whenever we instantiate the ImageFilterView inside the ForEach, we also initialize a new ImageFilterObservable object and performing filter operation. This is not very efficient if we add more filters in the future, as this will initialize and filter even before the filter view appears on the screen. To improve, first we need to understand how ForEach works under the hood. ForEach accepts an array of objects that conforms to Identifiable. It is used by the SwiftUI for diffing the collection whenever the view and state updates. Currently, we only pass the ImageFilter enum array, so SwiftUI won't be able to understand the difference when the input image is updated. It is working currently, because we are initializing and invoking filterImage inside the ImageFilterObservable.
To solve this, we can create a new fileprivate struct named CarouselImageFilter that stores the image and filter, also conforming to Identifiable protocol providing the unique combination ImageFilter rawValue and Image hashValue as the identifier.
fileprivate struct CarouselImageFilter: Identifiable {

    var id: String {
        filter.rawValue + String(image.hashValue)
    }

    var filter: ImageFilter
    var image: NSImage
}
Next, we need to update the CarouselFilterView to map array of ImageFilter to the new CarouselImageFilter and use it in the ForEach statement.
struct CarouselFilterView: View {

    ...
    fileprivate var imageFilters: [CarouselImageFilter] {
        guard let image = self.image else { return [] }
        return ImageFilter.allCases.map { CarouselImageFilter(filter: $0, image: image) }
    }

    var body: some View {
        VStack {
            if image != nil {
                ...

                ScrollView(.horizontal, showsIndicators: true) {
                    HStack(alignment: .top, spacing: 0) {
                        ForEach(imageFilters) { imageFilter in
                            ImageFilterView(observableImageFilter: ImageFilterObservable(image: imageFilter.image, filter: imageFilter.filter), filteredImage: self.$filteredImage)
                                .padding(.leading, 16)
                                .padding(.trailing, self.imageFilters.last!.filter == imageFilter.filter ? 16 : 0)
                        }
                    }
                    .frame(height: 140)
                }
            }
        }
    }
}
Next, update the ImageFilterObservable by removing the filterImage invocation in the initializer.
class ImageFilterObservable: ObservableObject {

    ...
    init(image: NSImage, filter: ImageFilter) {
        self.image = image
        self.filter = filter
    }
    ...
}
At last, inside the ImageFilterView add the onAppear modifier that invokes the imageFilterObservable filterImage method. This will make sure to filter the image when the view appears on screen!
struct ImageFilterView: View {

    // ...
    var body: some View {
        // ...
        .onAppear(perform: self.observableImageFilter.filterImage)
        // ...
    }
}
There is one small bug that we can fix to improve the overall UX of the app. Try to run the app and select the filter, each time you select the filter, the CarouselFilterView will be rendering again performing all the filter operations.
It happens because, in the ContentView, we pass the AppState image property to the CarouselFilterView. It means, whenever one of the AppState is updated, the ContentView will be updated, and all the child view will be rendered again. To avoid this, we need to tell SwiftUI that our view needs to be updated only in a specific condition. In this case, whenever the previous and current input image is equal.
To do this, we need to make the CarouselFilterView implements the Equatable protocol and override the static == function to perform this equality check.
extension CarouselFilterView: Equatable {

    static func == (lhs: CarouselFilterView, rhs: CarouselFilterView) -> Bool {
        return lhs.image == rhs.image
    }
}
After this, you need to add equatable modifier after the CarouselFilterView in ContentView.
...
CarouselFilterView(image: appState.image) {
  self.appState.filteredImage = $0
}
.equatable()
...
Try to run the app to see the final result!
ChallengeAs you can see, there are so many closures callbacks from the child's views back to parent view in our application. We can improve this by using @Binding keyword that we can declare in the child's views. The parent view will pass the state binding for the property to the children. To update the value, the children can just assign the new value to the binding property, and the state will get updated. The challenge is for you all to remove all the callback closure handler and replace it with Binding property. You can visit the GitHub completed project repository if you get stuck to see the final solution, I already provided the link above at the Starter Project section.
Congratulations! We have built the Image Filter macOS app using SwiftUI. We don't even have to learn and understand many of the AppKit UI components to accomplish this big achievement. SwiftUI really is the future of front end development across Apple platforms. Unlike UIKit that needs to have two separate codes to handle UI and updating the model, SwiftUI declarative syntax unified both the UI declaration and state management.
Next, my challenge to you all is to keep learning, build, and share more amazing SwiftUI things to the community. Let's keep lifelong learning goes on!
Published at Feb 17, 2020
Since iOS 10, Apple has already provided rich notification support for push notification with the introduction of new frameworks, UserNotifications and UserNotificationsUI. Using this framework, we can customize our push notification with abilities such as:
content/UI of push notification.
Besides all this rich notification support, Apple also added new interactive custom UI support in iOS 13. Before, we can only customize the actions for the user to select in action-sheet like iPhone UI. With the interactive notification, we can provide any user interface and interaction that we want in our push notification.
This addition is a real game-changer for push notification. For example, we can provide controls like text field, switch, slider, stepper, and any custom control that we want. Finally, we have the freedom to customize our push notification preview the way we want it to be.
In this article, we are going to build an interactive custom push notification UI to display a video preview of a trailer with buttons for users to add and favorite. Users can also provide ratings using the star and comment using a text field. Here is the list of tasks to do:
To simulate a remote push notification in the simulator, you need to download and install
Xcode 11.4beta from Apple developer website
You can download the completed project from the GitHub repository here.
Setup Project and DependenciesTo begin, create a new Xcode project using your unique Bundle Identifier. Then, navigate to the project signing & capabilities tab. Click on + Capabilities button and select push notifications from the list. The purpose is to associate the push notification with the App ID of the project.
Next, we are going to add a new app extension target for the custom content notification UI. From the menu bar, click on File > New > Target. On the filter text field, type notification. Finally, select Notification Content Extension from the list. Give the name and click finish. After that, you can activate the scheme when in the alert dialog. Close the project.
Next, we are going to initialize Cocoapods for the project and declare the dependencies. Using the terminal, navigate to the project folder, and type pod init. After that, open the Podfile using your text editor and add the dependencies to the targets of the app. There are 2 dependencies to add:
AVPlayer. (warning: YouTube policy only allow the app to use WebView with iFrame to play video in-app).# Uncomment the next line to define a global platform for your project
# platform :ios, '9.0'
target 'apnspushsimulate' do
# Comment the next line if you don't want to use dynamic frameworks
use_frameworks!
# Pods for apnspushsimulate
pod "XCDYouTubeKit", "~> 2.9"
pod 'Cosmos', '~> 21.0'
end
target 'test' do
# Comment the next line if you don't want to use dynamic frameworks
use_frameworks!
# Pods for test
pod "XCDYouTubeKit", "~> 2.9"
pod 'Cosmos', '~> 21.0'
end
Run pod install to install all the dependencies to all the targets. Open the project.xcworkspace in your Xcode to begin. Try to build with Command + B to make sure everything is good to go.
Next, we need to register permission to allow push notification in our app using the UNUserNotificationCenter. We add the code to do that in the AppDelegate inside the (_:didFinishLaunchingWithOptions:). Make sure to import the UserNotifications framework at the top of the source file. Here are the steps to do:
requestAuthorization passing the array of authorization options. In this case, we want the alert, badge, and sound.UNNotificationCategory passing the unique category string identifier. In this case, we don't want to have custom actions, so we pass an empty array.setNotificationCategories passing our custom notification category type inside an array.import UIKit
import UserNotifications
@UIApplicationMain
class AppDelegate: UIResponder, UIApplicationDelegate {
func application(_ application: UIApplication, didFinishLaunchingWithOptions launchOptions: [UIApplication.LaunchOptionsKey: Any]?) -> Bool {
let center = UNUserNotificationCenter.current()
center.requestAuthorization(options: [.alert, .sound, .badge]) { _, _ in }
let testNotificationCategory = UNNotificationCategory(identifier: "testNotificationCategory", actions: [], intentIdentifiers: [], options: [])
UNUserNotificationCenter.current().setNotificationCategories([testNotificationCategory])
return true
}
...
}
Xcode 11.4 finally introduced a new feature to simulate remote push notification locally. It's pretty simple to begin. We need to create the apns json file containing the payload. We also need to add additional key beside the aps, which is the Simulator Target Bundle containing the App ID of our app. The filename extension of the file must be using .apns instead of .json. You can take a peek of our sample apns file below.
{
   "aps" : {
      "alert" : {
         "title" : "A new trailer has arrived for you",
         "body" : "Fast and Furious F9 Official Trailer"
      },
      "category" : "testNotificationCategory",
      "sound": "bingbong.aiff",
      "badge": 3,
   },
   "videoId" : "Kopyc23VfSw",
   "description": "Release date: 05-21-2020",
   "Simulator Target Bundle": "com.alfianlosari.apnspushsimulate"
}
In this case, we also provide the additional key for videoId and description so we can retrieve the YouTube video URL and display custom description in the custom UI. To test the notification, run the app, and accept the notification permission. Then, put the app in background, drag, and drop the apns file into the simulator.
 Setup Notification Extension target info plist.
We need to add additional keys to the notification content application extension info.plist. Under the NSExtension > NSExtensionAttributes dictionary make sure you add all these keys and values:
UNNotificationExtensionDefaultContentHidden. This key determines whether to hide the default push notification title and body labels. In our case, we want to hide it, so we set the value to NO.UNNotificationExtensionUserInteractionEnabled. This key determines whether to make the UI interactive. We set this to YES.UNNotificationExtensionCategory. We need to set the value of this using the notification type category identifier that we register at the AppDelegate, which is testNotificationCategory.UNNotificationExtensionInitialContentSizeRatio. The initial content size ratio when the preview appears the first time. We set this to default, 1. Setup UI for the notification content preview
Let's move to the notification content preview UI. Open the MainInterface.storyboard in the notification extension target. Here are the steps to do:
Align top, leading, and trailing to Safe Area. Set the height constraints to 240. Rename this view to Player View. This is the video player view that embeds the AVPlayer View.Stack View to the View Controller below the Player View. Add these constraints: Top Space to Player View with 16. Align leading, trailing, bottom to Safe Area . Set the axis to vertical, alignment and distribution to fill, and set spacing to 16. Rename this to Outer Stack View.Stack View as a subview of the Outer Stack View. Add 2 labels inside this stack view, video title label and video description label. Set the axis to vertical, alignment and distribution to fill, and set spacing to 4. Set the video title label line limit to 2.Stack View as a subview of the Outer Stack View. Add 2 buttons inside this stack view, subscribe button and favorite button. Set the axis to horizontal, alignment to fill, distribution to fill equally, and set spacing to 4.Button as a subview of the Outer Stack View, rename this to Review Button. Set the text to Review.Label as a subview of the Outer Stack View, rename this to Submit Label. Set the text to Your review has been submitted!Stack View as a subview of the Outer Stack View. Set the axis to vertical, alignment and distribution to fill, and set spacing to 24. Rename this to Review Stack View.View as a subview of the Review Stack View. Set the class to CosmosView. In the attribute inspector, set the start margin to 16 and star size to 50. Set the height constraint to 59.Stack View as a subview of the Review Stack View, below the Cosmos View. Add a label inside this stack view, comment label, TextView, and Button. Set the axis to vertical, alignment and distribution to fill, and set spacing to 8. Set the height constraint to 100. Make sure to set the Comment label text to comment.Button as a subview of the Review Stack View at the bottom. Set the text to Submit, and constraint the height to 40. Handle on receive notification and UI interaction in code.
Open the NotificationViewController.swift file. There is a NotificationViewController class that subclass UIViewController and implements the UNNotificationContentExtension. The didReceive(_:) method is invoked when the push notification arrives passing the payload. Here is the brief overview of the code handling for the view, properties setup, didReceive and interaction handler:
AVKit, UserNotifications, UserNotificationsUI, XCYoutubeKit, and Cosmos at the top of the source file.@IBAction method handling when the user taps on the respective button. In this case, subscribe, favorite, review, and submit handler.isSubscribed and isFavorited with the property observer. In this case, the text and color of the button change depending on the boolean state.viewDidLoad, set up the initial view state of buttons and stack views. The Review Stack View and Submit Label are hidden; the first time view appears.didReceive, we retrieve the content and set the text of labels for title and description. Also, we get the videoID and use the XCDYouTubeClient to get the video URL passing the identifier.URL, initialize AVPlayerViewController with the URL, embed the view inside the Player View container view, and play the content.Review Stack View. When they tap on the submit button, hide the Review Stack View and show the submit label. For subscribing and favoriting, toggle the property to update the text and color of the buttons.import UIKit
import AVKit
import UserNotifications
import UserNotificationsUI
import XCDYouTubeKit
import Cosmos
class NotificationViewController: UIViewController, UNNotificationContentExtension {
@IBOutlet weak var playerView: UIView!
@IBOutlet weak var reviewStackView: UIStackView!
@IBOutlet weak var reviewButton: UIButton!
@IBOutlet weak var videoTitleLabel: UILabel!
@IBOutlet weak var videoDescriptionLabel: UILabel!
@IBOutlet weak var submitLabel: UILabel!
@IBOutlet weak var subscribeButton: UIButton!
@IBOutlet weak var favoriteButton: UIButton!
var playerController: AVPlayerViewController!
let standardHeight: CGFloat = 432
let reviewHeight: CGFloat = 658
var isSubscribed = false {
didSet {
self.subscribeButton.tintColor = self.isSubscribed ? UIColor.systemGray : UIColor.systemBlue
self.subscribeButton.setTitle(self.isSubscribed ? " Added" : " Add", for: .normal)
}
}
var isFavorited = false {
didSet {
self.favoriteButton.tintColor = self.isFavorited ? UIColor.systemGray : UIColor.systemBlue
self.favoriteButton.setTitle(self.isFavorited ? " Favorited" : " Favorite", for: .normal)
}
}
override func viewDidLoad() {
super.viewDidLoad()
subscribeButton.setImage(UIImage(systemName: "calendar"), for: .normal)
favoriteButton.setImage(UIImage(systemName: "star"), for: .normal)
reviewButton.setImage(UIImage(systemName: "pencil"), for: .normal)
reviewStackView.isHidden = true
submitLabel.isHidden = true
}
func didReceive(_ notification: UNNotification) {
playerController = AVPlayerViewController()
preferredContentSize.height = standardHeight
videoTitleLabel.text = notification.request.content.body
videoDescriptionLabel.text = notification.request.content.userInfo["description"] as? String ?? ""
guard let videoId = notification.request.content.userInfo["videoId"] as? String else {
self.preferredContentSize.height = 100
return
}
XCDYouTubeClient.default().getVideoWithIdentifier(videoId) { [weak self] (video, error) in
guard let self = self else { return }
if let error = error {
print(error.localizedDescription)
return
}
guard let video = video else {
return
}
let streamURLS = video.streamURLs
if let url = streamURLS[XCDYouTubeVideoQuality.medium360] ?? streamURLS[XCDYouTubeVideoQuality.small240] ?? streamURLS[XCDYouTubeVideoQuality.HD720] ?? streamURLS[18] {
self.setupPlayer(with: url)
}
}
}
private func setupPlayer(with url: URL) {
guard let playerController = self.playerController else {
return
}
let player = AVPlayer(url: url)
playerController.player = player
playerController.view.frame = self.playerView.bounds
playerView.addSubview(playerController.view)
addChild(playerController)
playerController.didMove(toParent: self)
player.play()
}
@IBAction func submitTapped(_ sender: Any) {
UIView.animate(withDuration: 0.3) {
self.reviewStackView.isHidden = true
self.submitLabel.isHidden = false
self.preferredContentSize.height = self.standardHeight
}
}
@IBAction func reviewTapped() {
UIView.animate(withDuration: 0.3) {
self.preferredContentSize.height = self.reviewHeight
self.reviewStackView.isHidden = false
self.reviewButton.isHidden = true
}
}
@IBAction func subscribeTapped(_ sender: Any) {
self.isSubscribed.toggle()
}
@IBAction func favoriteTapped(_ sender: Any) {
self.isFavorited.toggle()
}
}
Before building and run, make sure to connect all the @IBOutlets and @IBActions from the storyboard to the code. To test, just drag and drop the apns file to the simulator, make sure to use the correct App ID. You can try to play with the videoId value of the file by using your video identifier. You can retrieve this from the URL parameters of the YouTube video in the browser address bar.
That's it! Congrats on your achievement on building the custom interactive push notification UI. There are many possibilities and use cases that you can explore using this new capability. To handle sharing data between the main app and extension target, you need to create app group id. Then, you can initialize a shared UserDefaults to store and retrieve local data. You can explore more about the UserNotifications framework from Apple documentation
Let's keep the lifelong learning goes on!
Published at Feb 14, 2020

Xcoding with Alfian is a blog focusing on mobile development articles, tutorials, tips, and tricks. My main focus is on topics about the development of Apple technologies from Swift, SwiftUI, iOS, Catalyst, macOS, watchOS, and tvOS. Aside from those things, i also explore several new technologies such as Flutter, React, Android, AI, and Cloud technologies. I've been writing in Medium for the past 2 years, and I finally decided to move all the content to this blog at the beginning of 2020.
My mission to create this blog is to share and contribute back to the software development community around the world about some of the little things that I learned along with my experience in software development. As a self-taught Software Engineer, I am nothing without this amazing community.
Technology is my biggest passion, and in this rapidly changing industry, we need to keep lifelong learning goes on as technology will always keep evolving. So let's learn together and build insanely great things with technology.
Published at Nov 11, 2019
Since the beginning of iOS SDK, UITableViewDataSource is the protocol that had the responsibility to drive the data and provide the cells in TableView. As good developers, we need to implement the protocol methods and making sure to sync our backing model with the data source properly to avoid any crashes because of inconsistencies between them.
optional func numberOfSections(in tableView: UITableView) -> Int
func tableView(_ tableView: UITableView, numberOfRowsInSection section: Int) -> Int
func tableView(_ tableView: UITableView, cellForRowAt indexPath: IndexPath) -> UITableViewCell
Also, when we need to perform granular updates for sections and rows in our TableView, we need to use the API like the sample code below.
tableView.beginUpdates()
// Delete section 3 and 4
tableView.reloadSections([3,4], with: .automatic)
// Insert at section 1 and row 0
tableView.insertRows(at: [IndexPath(row: 0, section: 1)], with: .automatic)
// delete at section 1 and row 1
tableView.deleteRows(at: [IndexPath(row: 1, section: 1)], with: .automatic)
tableView.endUpdates()
It's actually pretty hard to make sure all the section and rows are correctly updated for each insert, reload, and deletion based on the value between the old and new data. This is the error that UIKit threw when we incorrectly update the TableView.
*** Terminating app due to uncaught exception 'NSInternalInconsistencyException', reason: 'Invalid update: invalid number of sections. The number of sections contained in the table view after the update (10) must be equal to the number of sections contained in the table view before the update (10), plus or minus the number of sections inserted or deleted (0 inserted, 1 deleted).'
***
Just in time for WWDC 2019, Apple introduced a new API for managing data source for UITableView and UICollectionView in a much more simpler and safer way for developers to use without building their own diffing solution. It is called Diffable Data Source.
Diffable Data Source API helps us to manage data sources both in TableView and CollectionView by using snapshot. Snapshot acts as a source of truth between our view and data source, whenever there are changes in our model, we just need to construct a new snapshot and applies it to the current snapshot. All the diffing, view update with animation will be performed automagically for us. Also, we don't need to deal with indexPath when we dequeue our cell, the exact model will be given to us to render in the cell based on generic API.
You can read more about it by watching the Apple WWDC 2019 session Advances in Data Sources by Apple engineers. Advances in UI Data Sources.
Diffable Data Source Diffing MechanismThere is a mandatory requirement that developer must follow to make sure the diffing works correctly. We need to provide sections and item type representation that can provide unique value. Both of them need to implement to Hashable protocol as we can see in the declaration of UITableViewDiffableDataSource class below.
@available(iOS 13.0, tvOS 13.0, *)
open class UITableViewDiffableDataSource<SectionIdentifierType, ItemIdentifierType> : NSObject, UITableViewDataSource where SectionIdentifierType : Hashable, ItemIdentifierType : Hashable
As we can see the SectionIdentifierType and ItemIdentifierType are generic that we must provide when we declare and initialise the class. We also need to make sure the hashValue are unique for each instance to avoid hash collision.
Let's start working on a simple project to display data in UITableView using DiffableDataSource API!. There are several features that we want to build such as:
You can start by cloning the project from the GitHub Repository at StarterTableViewDiffableDataSource.
The starter project already provides the resources such as cells, image assets, and JSON stubs file for the cities and places. There are 3 JSON files representing city such as Osaka, Kyoto, and Tokyo. Here are the essential components from the starter project:
CityPlaceViewController. Our main ViewController class, it is a subclass of UITableViewController. With this, we already have built in TableView without additional setup.Bundle+Extension. A simple extension of Bundle class that provide static method to load a decodable model from the main bundle resource given a filename of the JSON file.PlaceTableViewCell. A TableViewCell that we will use to display the place. It has a thumbnail image view, along with title and description of the place.
Let's begin building our app by creating the model next!
Our section will be represented by the City enum. In this case we have 3 cities: Osaka, Kyoto, and Tokyo. The enum underlying raw type will be String. This enum will automatically conforms to Hashable protocol using the rawValue as the unique hashValue.
Create a new file called City.swift inside the Models folder. Fill the file using the code below to create the enum for the City.
enum City {
    case kyoto
    case osaka
    case tokyo
}
For the row representation, we will create struct called Place. The struct has several underlying properties such as name, description, imageName. We also have the UUID as the properties to make sure each of the place instance is unique.
Create a new file called Place.swift inside the Models folder. Fill the file using the code below to create the struct for the Place.
struct Place: Decodable {
    let uuid: String
    let name: String
    let description: String
    let imageName: String
}
Next, we need to make it conform the Hashable protocol. Below the code, create an extension for the Place that implements Hashable. Then, we need to provide the hasher value that will be used to create the hashValue. In this case we combine all the properties of the Place into the hasher.
extension Place: Hashable {

    func hash(into hasher: inout Hasher) {
        hasher.combine(uuid)
        hasher.combine(name)
        hasher.combine(description)
        hasher.combine(imageName)
    }
}
That's it our model for section and row are now unique and ready to be used for the snapshot diffing 😋.
Loading Stub Data for Places in CitiesTo display data in the TableView we will be loading stub data from JSON file and decode it into Place instances. The starter project already provide a helper extension method for the bundle to load the data from a JSON file and decode it using generic method with Decodable type as the placeholder. You can take a peek at how it is implemented in the Extension+Bundle.swift file.
Inside the Place.swift source code, create an extension for Array with generic constraint for the element equal of Place. With the constraint, the extension will only be applied to array of Place. In the extension, we just create 3 static computed property that returns array of place for Osaka, Kyoto, and Tokyo using our extension bundle static method.
extension Array where Element == Place {

    static var osakaStubs: Self {
        try! Bundle.decodeJSONFromMainResources(filename: "osaka")
    }

    static var kyotoStubs: Self {
        try! Bundle.decodeJSONFromMainResources(filename: "kyoto")
    }

    static var tokyoStubs: Self {
        try! Bundle.decodeJSONFromMainResources(filename: "tokyo")
    }
}
Next, we will associate the stub places for each of the City enum. Go to City.swift source code and create an extension for the City. We declare a static computed property with array of tuple containing the city associated with array of places.
extension City {

    static var stubCitiesWithPlaces: [(city: City, places: [Place])] {
        [
            (.osaka, .osakaStubs),
            (.kyoto, .kyotoStubs),
            (.tokyo, .tokyoStubs)
        ]
    }
}
That's it! We now have our model with the stub data as well, let's move on to our ViewController to build our TableView using Diffable Data Source.
Using the TableViewDiffableDataSource in ViewControllerNext, we will move on to the CityPlaceViewController source file. As a reminder, we are not going to use any of UITableViewDataSource protocol methods to drive the TableView. Instead, we are going to use the UITableViewDiffableDataSource class.
We will be subclassing the UITableViewDiffableDataSource for this app because we need to override one of the method to provide city name as the header for our section. If your app don't have any section header, you don't need to subclass it. Declare the file at the top of the source code and fill the class like so.
class CityPlaceTableViewDiffableDataSource: UITableViewDiffableDataSource<City, Place> {

    override func tableView(_ tableView: UITableView, titleForHeaderInSection section: Int) -> String? {
        return snßapshot().sectionIdentifiers[section].rawValue.uppercased()
    }
}
In this case we just need to override one method, tableView(_:titleForHeaderInSection:). In the implementation, we can just access the snapshot property section identifiers array and passing the section index to retrieve the associated City. Then, we can access the rawValue and capitalized the string to be displayed in the header. We also fill the generic placeholder in the class declaration to make the City as the section and Place as the Item/Row.
Next, Let's move on to the CityPlaceViewController class!
Let's begin by declaring the instance properties that we will be using, there are 2 instance properties:
diffableDataSource. The type of this will be the CityPlaceTableViewDiffableDataSource.citiesWithPlaces. This will be our stub data, the array containing tuple of a city associated with places. City will be the section, and the places will be the rows inside the section.
Also, we need to add a method in the PlaceTableViewCell to setup the labels and image view given a place to render like so.
func setup(with place: Place) {
    titleLabel.text = place.name
    subtitleLabel.text = place.description
    placeImageView.image = UIImage(named: place.imageName)
}
Next, we will create setupTableView method in CityPlaceViewController. There are several tasks that we will perform inside this method, such as:
PlaceTableViewCell nib to our TableView with reuse identifier.CityPlaceTableViewDiffableDataSource. The initializer accepts the TableView and a closure. The closure parameter are the TableView, IndexPath, and the associated Place, this closure will be invoked when the TableView needs to dequeue the cell.
We don't need to retrieve the place manually using the IndexPath anymore as it is already passed in the parameter. In this case we just need to dequeue the cell from the TableView using the reuse identifier and setup the cell with the place.
private func setupTableView() {
    tableView.register(UINib(nibName: "PlaceTableViewCell", bundle: nil), forCellReuseIdentifier: "Cell")
    diffableDataSource = CityPlaceTableViewDiffableDataSource(tableView: tableView) { (tableView, indexPath, place) -> UITableViewCell? in
        let cell = tableView.dequeueReusableCell(withIdentifier: "Cell", for: indexPath) as! PlaceTableViewCell
            cell.setup(with: place)
            return cell
    }
}
For building and applying snapshot to diffable data source, we will create a method called buildAndApplySnapshot. Here are things that we will perform in this method:
NSDiffableDataSourceSnapshot class using the City and Place as the generic placeholder to represent the section and item.citiesWithPlaces instance property array, for each element we are appending the section/city to the snapshot and also the associated items/places to the section/citydiffableDataSource apply method passing the new snapshot and set the diffing animation to true.
Next, we need to add the invocation of the methods in the viewDidLoad like so.
  override func viewDidLoad() {
    super.viewDidLoad()

    setupNavigationItems()
    setupTableView()
    buildAndApplySnapshot()
}
Try to build and run the app, voila we have successfully display cities and places using the Diffable Data Source in the TableView!
Implement the shuffle methodFinally, we are going to add the shuffle mechanism, that will shuffle our citiesWithPlaces property. In the shuffleTapped method, we will shuffle the cities and places in random position. At last, we just invoke the buildAndApplySnapshot to build new snapshot and apply it to the current snapshot with diffing animation.
@objc func shuffleTapped(_ sender: Any) {
    self.citiesWithPlaces = citiesWithPlaces.map {
        ($0.city, $0.places.shuffled())
    }.shuffled()

    buildAndApplySnapshot()
}
That's it folks! Pat yourself on the shoulder as you all have successfully build TableView using the new Diffable Data Source API. The API it's pretty simple and easy to use as well as providing safety for us by providing single source of truth for the data source in our app.
As SwiftUI is still in infancy, we can still use many UIKit class to build our app. Remember that diffable data source is also available for CollectionView and by using it with new Compositional Layout, we can create complex user interface easier and faster.
Let's keep the lifelong learning goes on and happy Swifting!!!
You can also download the completed project from the GitHub repository at CompletedTableViewDiffableDataSource.
Published at Nov 11, 2019
Alongside many new feature that come with the Swift 5.1, one of the most interesting feature is Property wrappers. Basically, it’s a layer/delegate that sits in the middle between how the declared property should behave and how the property will be stored. Property wrappers can be defined by using struct, class, or enum. It can be used when we declare properties inside of those types also.
Swift has already provided several built in wrappers before Swift 5.1 such as lazy, @NSCopying, but with the introduction of Property Wrappers, developer can now also implement custom wrappers without making the language become more complex. You can read the reasoning behind this proposal (SE-258) in the Swift Evolution link.
There are property implementation patterns that come up repeatedly. Rather than hardcode a fixed set of patterns into the compiler (as we have done for lazy and @NSCopying), we should provide a general "property wrapper" mechanism to allow these patterns to be defined as libraries.
Property Wrappers is also heavily used in SwiftUI. There are many wrappers provided by the framework such as:
@State. A property wrapper which value binds to the view where it’s declared in.@Binding. It’s a property that is passed down from the view parent’s Stateproperty using $ projected value.@ObservedObject. Similar like @State, but used for a property which conforms to ObservableObject protocol. An ObservableObject needs to be a class type and will update the View whenever the properties that are marked with @Published changes.@Published. It’s a wrapper that can be used for properties that are declared in ObservableObject. Whenever the value changes, it will invoke objectWillChange method so View can react to the changes published.@EnvironmentObject. Similar like @ObservedObject, but it can be used to share data across many views from top to bottom of view hierarchy without passing down the property explicitly to child view.@Environment. It is used to inject and override system wide configuration such as system color scheme, layout direction, content size category into a View.
Property wrappers is not exclusively limited to SwiftUI, with Swift 5.1 we can create our own custom property wrapper!. Here are some of the things we can do by creating our own custom wrappers:
Those are just small examples of the wrappers that we can create, the possibilities ahead are endless!. Next, let’s implement some of those property wrappers and see how we can use them to simplify our code!.
You can download sample SwiftUI application of using the custom property wrappers that we are going to create. Check the project GitHub repository below at
SwiftUI Property Wrappers Demo on GitHub
Using Property Wrapper in a nutshellCreating a new property wrapper it’s pretty simple. Here are some of the steps to create it:
@propertyWrapper keyword before we declare the type that we want to use as property wrapper. It can be struct, class, or enum.wrappedValue property. Most of the time we declare custom setter and getter in this property. This property can be a computed or stored property.wrappedValue when we assigning the property a value when we declare it. We can also create our own custom initializer with additional properties. We’ll see more on this later in the examples of @Ranged wrapper.projectedValue property of any type. This can be accessed using $ from the property.@ as the prefix when we declare the property in our type.
Next, let’s begin implementing custom property wrappers!.
@propertyWrapper
struct Uppercased {
    private var text: String
    var wrappedValue: String {
        get { text.uppercased() }
        set { text = newValue }
    }
    init(wrappedValue: String)  {
        self.text = wrappedValue
    }
}

struct User {
    @Uppercased var username: String
}

let user = User(username: "alfianlo")
print(user.username) // ALFIANLO
For this @Uppercased wrapper, we want to make sure the String is uppercased anytime a value is assigned into the property. Here are the things that we do to implement this:
@Uppercased keyword in front of the property.@propertyWrapper
struct Ranged<T: Comparable> {
private var minimum: T
private var maximum: T
private var value: T
var wrappedValue: T {
get { value }
set {
if newValue > maximum {
value = maximum
} else if newValue < minimum {
value = minimum
} else {
value = newValue
}
}
}
init(wrappedValue: T, minimum: T, maximum: T) {
self.minimum = minimum
self.maximum = maximum
self.value = wrappedValue
self.wrappedValue = wrappedValue
}
}
struct Form {
@Ranged(minimum: 17, maximum: 65) var age: Int = 0
}
var form = Form()
form.age = 100 // 65
form.age = 2 // 17
@Ranged wrapper can be used to clamp value of number by providing maximum and minimum value. Whenever the value is assigned, comparison will be performed and value will be assigned based on these conditions:
To accept minimum and maximum parameter, a custom initializer is created. When we declare the property, we also need to pass the maximum and minimum value after the @Ranged declaration.
@propertyWrapper
struct ISO8601DateFormatted {
    static private let formatter = ISO8601DateFormatter()
    var projectedValue: String { ISO8601DateFormatted.formatter.string(from: wrappedValue) }
    var wrappedValue: Date
}

struct Form {
    @ISO8601DateFormatted var lastLoginAt: Date
}

let user = Form(lastLoginAt: Date())
print(user.$lastLoginAt) // "dd-mm-yyTHH:mm:ssZ"
Property wrappers can also be used to project another value of any type using the projectedValue property, it can be accessed using the $ operator by prefixing the property. For ISO8601DateFormatter , a static private ISO8601DateFormatter is used whenever projectedValue is read to convert the date from the wrappedValue stored property.
@propertyWrapper
struct Localizable {
    private var key: String
    var wrappedValue: String {
        get { NSLocalizedString(key, comment: "") }
        set { key = newValue }
    }
    init(wrappedValue: String) {
        self.key = wrappedValue
    }
}

struct HomeViewModel {
    @Localizable var headerTitle: String
    @Localizable var headerSubtitle: String
}

let homeViewModel = HomeViewModel(headerTitle: "HOME_HEADER_TITLE", headerSubtitle: "HOME_HEADER_SUBTITLE")
print(homeViewModel.headerTitle) // "Title"
print(homeViewModel.headerSubtitle) // "Subtitle"
The @Localizable property wrapper is used to wrap the NSLocalizedString API, when a property declared using @Localizable keyword, the value assigned will be stored in the private key property and will be used whenever the wrappedValue is accessed by passing it to NSLocalizedString(key:comment:) initializer to get the localized string from the app.
@propertyWrapper
struct UserDefault<T> {
    var key: String
    var initialValue: T
    var wrappedValue: T {
        set { UserDefaults.standard.set(newValue, forKey: key) }
        get { UserDefaults.standard.object(forKey: key) as? T ?? initialValue }
    }
}

enum UserPreferences {
    @UserDefault(key: "isCheatModeEnabled", initialValue: false) static var isCheatModeEnabled: Bool
    @UserDefault(key: "highestScore", initialValue: 10000) static var highestScore: Int
    @UserDefault(key: "nickname", initialValue: "cloudstrife97") static var nickname: String
}

UserPreferences.isCheatModeEnabled = true
UserPreferences.highestScore = 25000
UserPreferences.nickname = "squallleonhart"
UserDefaults API can be very cumbersome for us, everytime we want to persist and retrieve value from user defaults. We can simplify this by creating a simple property wrapper that will hide the implementation of those API calls for whenever we assign and retrieve value from a property.
The @UserDefault wrapper accepts 2 parameter in the initializer, the key and initialValue in case of the value for the key is not available in UserDefaults . The wrappedValue itself is a computed property, whenever a value is assigned, it will set the value using the key stored. And whenever the property is read, the key is used to retrieve the value as cast it using generic . If the value is not available, the initialValue will be returned instead.
Property Wrappers is a really amazing feature that we can use to provide custom shared patterns and behaviour in properties that we declare in our type to simplify our code. I really hope in the future there will be many great wrappers created and shared by the community.
At last, keep on learning and evolving to become a more better coder to build insanely great things through technology. Let’s keep the lifelong learning goes on and happy Swifting!.
Published at September 23, 2019
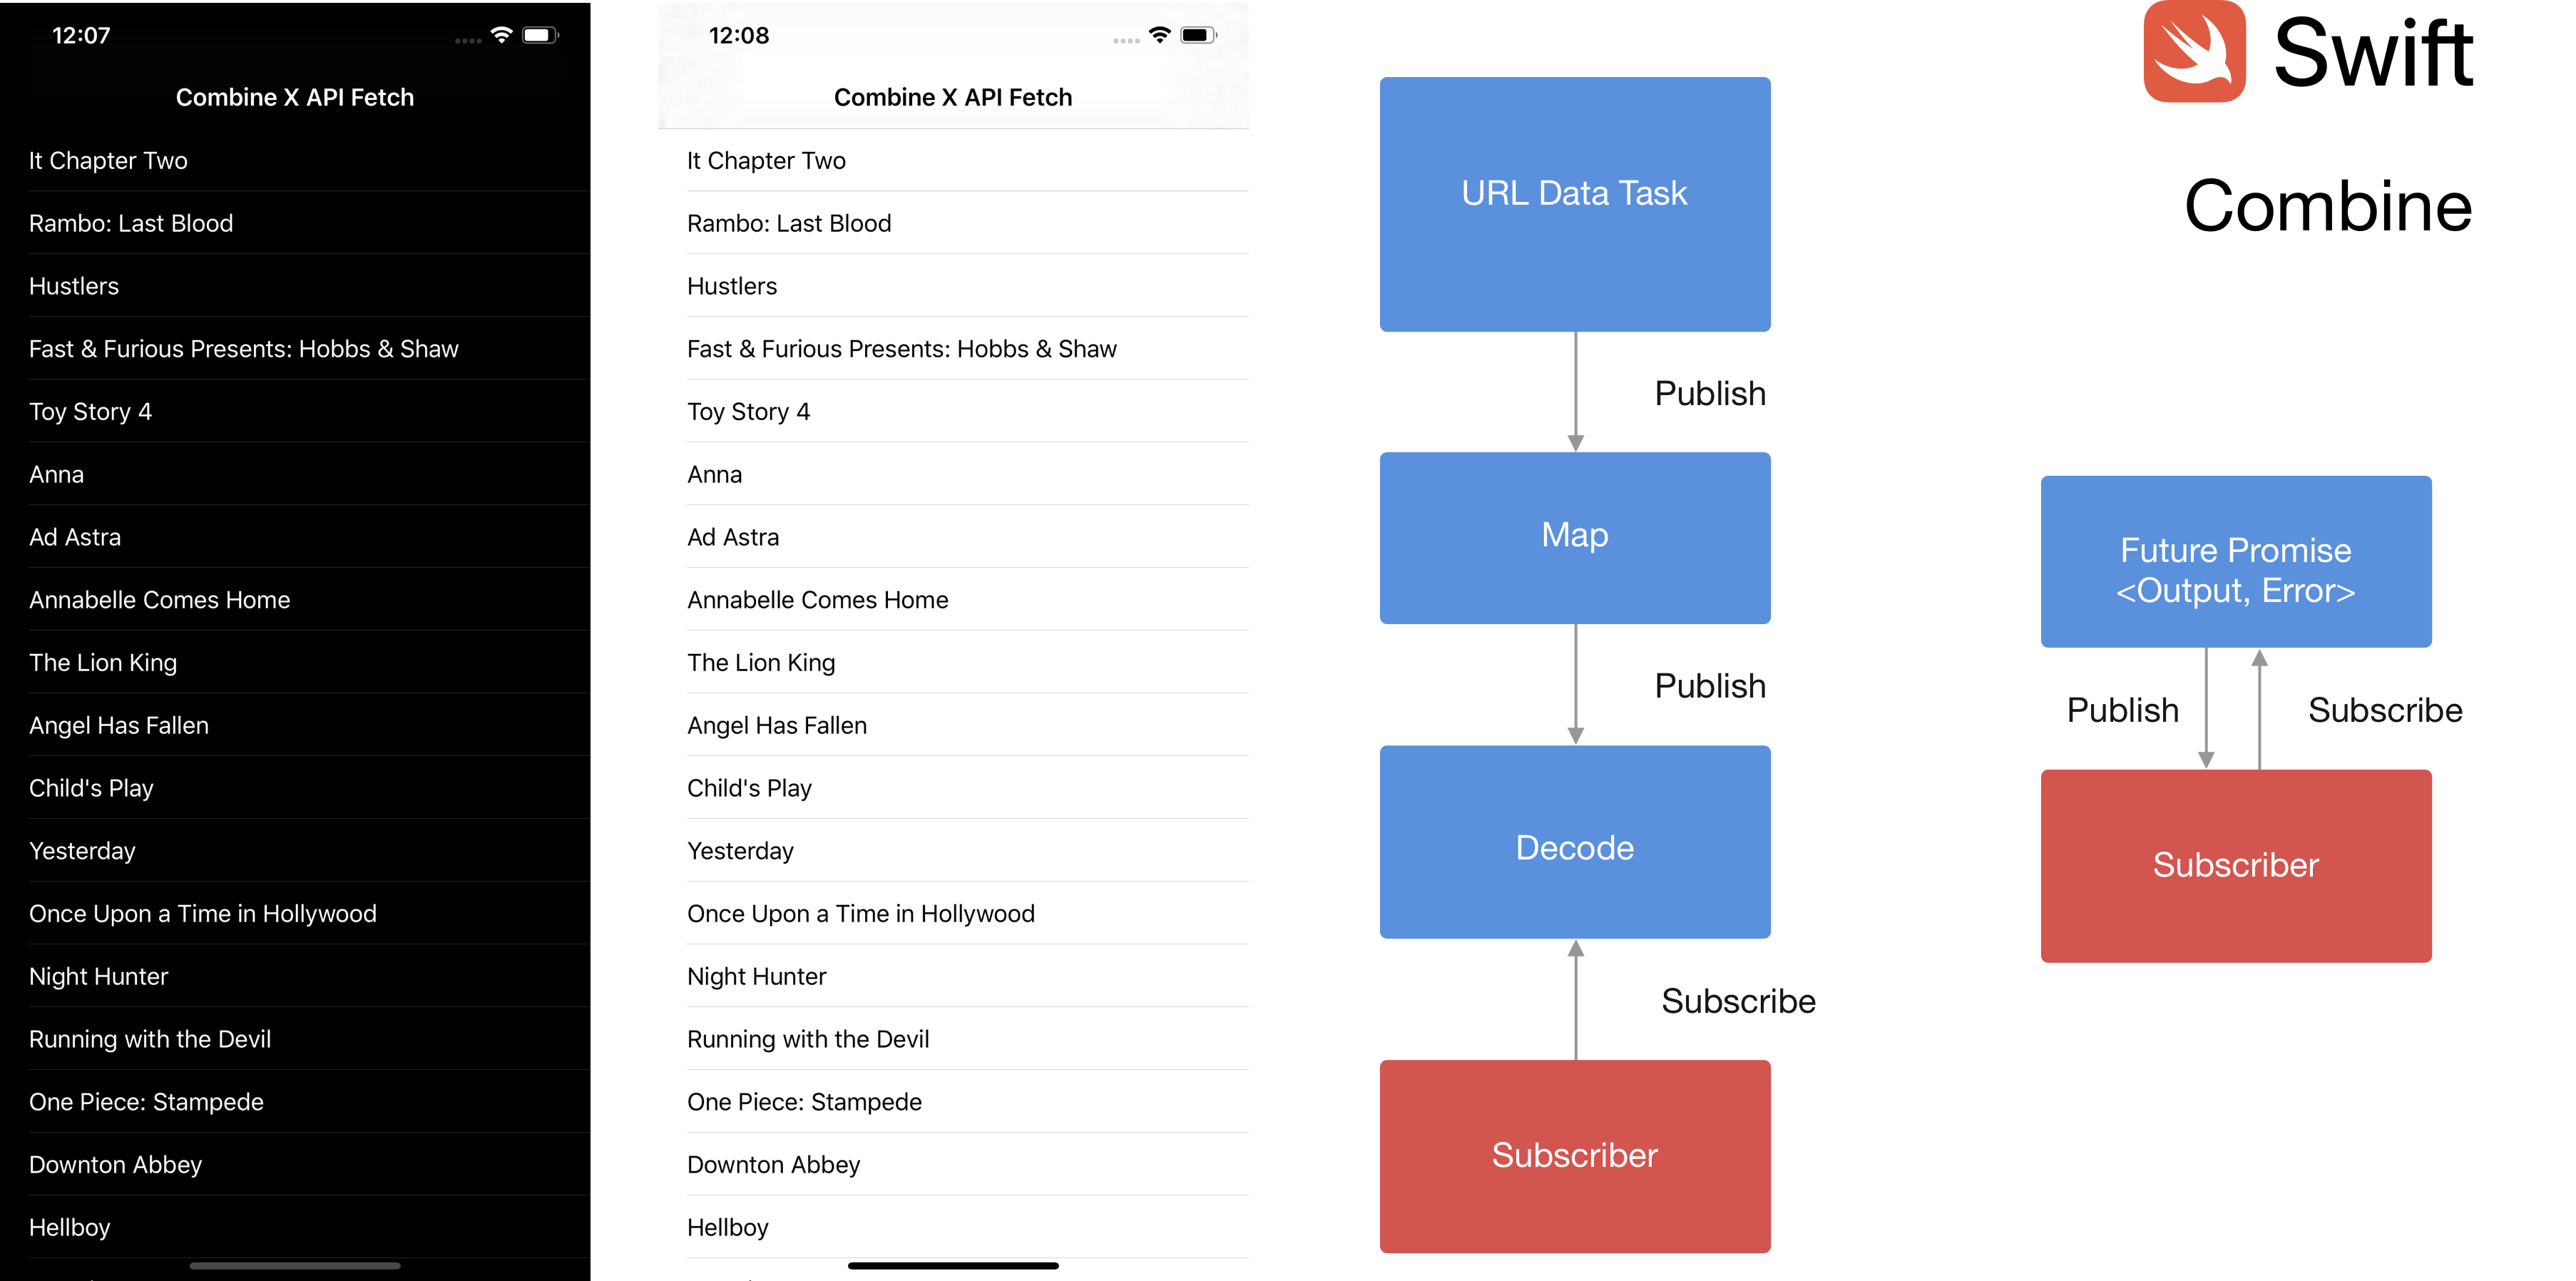
Combine is a framework that has just been recently released for all Apple platforms and it is included in Xcode 11. By using combine, it’s easier to process sequence of value over time whenever it is updated. It also helps us to simplify asynchronous code by not using delegation and avoiding complex nested callbacks.
There are several main components of Combine sych as:
Publisher. It’s a protocol that provides interface to publish value to the subscribers. Sometimes, it’s also referred as the upstream source. It provides generic for the Input type and Failure error type. A publisher that never publish an error uses Never as the Failure type.Subscriber. It’s a protocol that provides for interface to subscribe value from publisher. It is the downstream destination in the sequence chain. It provides generic for Output type and Failure error type.Subject. It’s a protocol that provides interface to the client to both publisher and subscriber.Operator. By using operator, we can create a new publisher from a publisher by transform, filter, and even combine values from the previous or multiple upstream publishers.
Apple also provides several built in Combine functionality inside the Foundation framework such as Publishers for URLSession datatask, Notification, Timer, and KVO based property observing. Those built in interoperability really helps for us to integrate the framework into our current project.
To learn more about the basic of Combine such as, you can visit Ray Wenderlich site below. It’s a great introduction to learn about the basic of Combine. Ray Wenderlich intro to Combine link
What we will learn to buildIn this article, we will learn on how we can leverage Combine Framework to fetch movies data using TMDb API. Here are the things that we will learn together:
Sink operator to subscribe from Publisher using a closure.Future Publisher to produce a promise with single value or failure.URLSession Datatask Publisher to subscribe data published from an URL data task.tryMap operator to transform data into another Publisher .decode operator to transform data into a Decodable object and publish then to downstream.Before we start, you need to register for an API key in the TMDb website using the link at TMDb API Dev website.
You also need to download the starter project from the GitHub repository at Combine Starter project
Make sure to put the API key in the MovieStore class under the apiKey constant. Here are the the basic building blocks that the sample project provide us to build our project:
Movie.swift file are the models that we will be use in our project. The root MoviesResponse struct implements Decodable protocol that we will use to decode JSON data into the model. It also contains results property that also conforms to decodable protocol.MovieStoreAPIError enum that implements the Error protocol. Our API service will be using this enum to represent the error in the API such as URLError , DecodingError , and ResponseError.MovieService protocol with one single method that fetch movies based on the endpoint passed. Endpoint itself is an enum that represent the endpoint in the TMDb API such as latest, popular, top rated movies.MovieStore class is the concrete class that implements the MovieService protocol to fetch data using TMDb API. Inside this class, we will implement the fetchMovies method using Combine.MovieListViewController class is the main View Controller that we will implement the subscription to fetch movies method that returns a Future , then update the TableView with the movies data using the new DiffableDataSourceSnapshot API.
Before we begin, let’s learn some of the basic Combine components that we will use to fetch the remote API.
The most simple way to subscribe from a Publisher is to use sink . With this, we can subscribe to a publisher using a closure whenever we receive new value or when the publisher finishes emitting the value.
let subscription = [1,2,3,4].publisher
.sink(receiveCompletion: { print($0)},
receiveValue: { print($0)})
Remember that in Combine , every subscription returns a Cancellable that will be disposed after the scope of the function finishes. To maintain the subscription for indefinite sequence, we need to store the subscription as a property.
Combine Future is pretty similar to the promise/future in other programming languages such as Javascript or Java. The Future can be used to provide Result asynchronously using a closure. The closure will be invoked with one parameter which is (Result<Output, Failure>) -> Void using Promise as typealias.
Future<Int, Never> { (promise)
  DispatchQueue.main.asyncAfter(deadline: .now() + 2)
    promise(.success(Int.random(in: 0...100))
  }
}
The snippet code above creates a Future with the success result of Int and failure error of Never. Inside the fulfil closure handler, we use DispatchQueue AsyncAfter to delay the execution after 2 seconds to mimic asynchronous behaviour. Inside the closure, we invoke the promise success passing random integer between 0 and 100.
To begin, open the starter project and navigate to fetchMovies method with empty implementation.
public class MovieStore: MovieService {
  //...
  func fetchMovies(from endpoint: Endpoint) -> Future<[Movie], MovieStoreAPIError> {
    // TODO: Implement Future Publisher to fetch api
  }
}
Let’s begin by initializing Future with callback handler, we will also return this Future. Inside the callback handler we invoke the generate
func fetchMovies(from endpoint: Endpoint) -> Future<[Movie], MovieStoreAPIError> {
  return Future<[Movie], MovieStoreAPIError> {[unowned self] promise in
    guard let url = self.generateURL(with: endpoint) else {
      return promise(.failure(.urlError(URLError(URLError.unsupportedURL))))
    }
    // TODO: Implement URL Session Data task publisher
  }
}
To fetch and subscribe data from URL, we can utilize the built in URLSession datatask publisher method that accepts an URL as the parameter and returns a Publisher with Output of (data: Data, response: URLResponse) and Failure of URLError.
func fetchMovies(from endpoint: Endpoint) -> Future<[Movie], MovieStoreAPIError> {
  return Future<[Movie], MovieStoreAPIError> {[unowned self] promise
    //...
    self.urlSession.dataTaskPublisher(for: url)
    // TODO: Implement tryMap operator to chain publishers
  }
}
Next, we will use the tryMap operator to create a new publisher based on the previous upstream publisher. Compared to map, tryMap can also throws an Error inside the closure that returns the new Publisher . In our case, we want to check the http response status code to make sure it is between 200 and 300. If not, we throws an responseError enum passing the status code. Otherwise, we just return the data as the downstream publisher.
func fetchMovies(from endpoint: Endpoint) -> Future<[Movie], MovieStoreAPIError> {
  return Future<[Movie], MovieStoreAPIError> {[unowned self] promise
    //...
    self.urlSession.dataTaskPublisher(for: url)
      .tryMap { (data, response) -> Data in
        guard let httpResponse = response as? HTTPURLResponse, 200...299 ~= httpResponse.statusCode else {
          throw MovieStoreAPIError.responseError((response as? HTTPURLResponse)?.statusCode ?? 500)
      }
      return data
    }
    // TODO: Implement decode of data into model
  }
}
Next, we will utilize the decode operator that decodes the output JSON data from previous tryMap upstream publisher into the MovieResponse model using JSON Decoder.
func fetchMovies(from endpoint: Endpoint) -> Future<[Movie], MovieStoreAPIError> {
  return Future<[Movie], MovieStoreAPIError> {[unowned self] promise
    //...
    self.urlSession.dataTaskPublisher(for: url)
      .tryMap { (data, response) -> Data in
       // ...
    }
    .decode(type: MoviesResponse.self, decoder: self.jsonDecoder)
    // TODO: Implement Scheduler to make sure completion runs on main thread
  }
}
To make sure the subscription handling runs on main thread, we can utilize the receive(on:) operator and pass the RunLoop.main to make sure the subscription receives the value in the main Run Loop.
func fetchMovies(from endpoint: Endpoint) -> Future<[Movie], MovieStoreAPIError> {
  return Future<[Movie], MovieStoreAPIError> {[unowned self] promise
    //...
    self.urlSession.dataTaskPublisher(for: url)
      .tryMap { (data, response) -> Data in
       // ...
    }
    .decode(type: MoviesResponse.self, decoder: self.jsonDecoder)
    .receive(on: RunLoop.main)
    .sink(receiveCompletion: { (completion) in
      if case let .failure(error) = completion
        switch error {
          case let urlError as URLError:
            promise(.failure(.urlError(urlError)))
          case let decodingError as DecodingError:
            promise(.failure(.decodingError(decodingError)))
          case let apiError as MovieStoreAPIError:
            promise(.failure(apiError))
          default:
            promise(.failure(.genericError))
        }
      }
    }, receiveValue: { promise(.success($0.results)) })
  }
}
Finally we arrived at the end of the chain, we’ll utilize sink to receive subscription from Publisher upstream. There are 2 things that you need to provide when initializing Sink, although one is optional:
receiveValue:. This will be invoked whenever the subscription receives a new value from the publisher.receiveCompletion:(Optional). This will be invoked after the publisher finishes publishing the value, it passes the completion enum that we can use to check whether it finished with error or not.
Inside the receiveValue closure, we just passed invoke the promise passing the success case and the value which is the Movies array. In the receiveCompletion closure, we check if the completion has an error , then pass the appropriate error to the promise failure case.
func fetchMovies(from endpoint: Endpoint) -> Future<[Movie], MovieStoreAPIError> {
  return Future<[Movie], MovieStoreAPIError> {[unowned self] promise
    //...
    .receive(on: RunLoop.main)
  }
}
Set<AnyCancellable> propertyRemember that a subscription is an Cancellable , this type of protocol will be cancelled and cleared from the function scope, to make sure the subscription works until it finishes, we need to store the subscription into the instance property. In here, we use the Set<AnyCancellable> as the property and invoke store(in: passing the property to make sure the subscription still works after the function execution finished.
private var subscriptions = Set<AnyCancellable>()func fetchMovies(from endpoint: Endpoint) -> Future<[Movie], MovieStoreAPIError> {
  return Future<[Movie], MovieStoreAPIError> {[unowned self] promise
    //...
    .receive(on: RunLoop.main)
    .sink(receiveCompletion: { (completion) in
      // ...
    }, receiveValue: { promise(.success($0.results)) })
    .store(in: &self.subscriptions)
  }
}
That’s it, the fetchMovies method is completed and we are using combine operator to implement it!. Let’s try this API in our TableViewController.
Here is the complete implementation of the fetchMovies.
func fetchMovies(from endpoint: Endpoint) -> Future<[Movie], MovieStoreAPIError> {
      return Future<[Movie], MovieStoreAPIError> {[unowned self] promise in
          guard let url = self.generateURL(with: endpoint) else {
              return promise(.failure(.urlError(URLError(URLError.unsupportedURL))))
          }

          self.urlSession.dataTaskPublisher(for: url)
              .tryMap { (data, response) -> Data in
                  guard let httpResponse = response as? HTTPURLResponse, 200...299 ~= httpResponse.statusCode else {
                      throw MovieStoreAPIError.responseError((response as? HTTPURLResponse)?.statusCode ?? 500)
                  }
                  return data
          }
          .decode(type: MoviesResponse.self, decoder: self.jsonDecoder)
          .receive(on: RunLoop.main)
          .sink(receiveCompletion: { (completion) in
              if case let .failure(error) = completion {
                  switch error {
                  case let urlError as URLError:
                      promise(.failure(.urlError(urlError)))
                  case let decodingError as DecodingError:
                      promise(.failure(.decodingError(decodingError)))
                  case let apiError as MovieStoreAPIError:
                      promise(.failure(apiError))
                  default:
                      promise(.failure(.genericError))
                  }
              }
          }, receiveValue: { promise(.success($0.results)) })
              .store(in: &self.subscriptions)
      }
  }
Navigate to the MovieListViewController.swift file and to the empty fetchMovies method. Here, we’ll invoke the movieAPI fetchMovies method passing the .nowPlaying endpoint as the parameter. In the returned Future, we subscribe using sink providing receiveCompletion closure handler that will check if there is an error and prompt an alert to the user displaying the error message. In receiveValue closure handler, we just invoke the generateSnapshot method passing the movies. This function will generate a new Diffable Data Source Snapshot using the movies and apply the snapshot to the TableView diffable datasource.
func fetchMovies() {
    self.movieAPI.fetchMovies(from: .nowPlaying)
        .sink(receiveCompletion: {[unowned self] (completion) in
            if case let .failure(error) = completion {
                self.handleError(apiError: error)
            }
        }, receiveValue: { [unowned self] in self.generateSnapshot(with: $0)
        })
        .store(in: &self.subscriptions)
}
Build and run the project, to see the combine publisher and subscriber in action 😋!. You can download the final project from the GitHub repository here. Combine Completed project
ConclusionUsing Combine framework to process sequence of value time asynchronously is really simple and easy to implement. The operators provided by the Combine are so powerful and flexible. We can avoid complex asynchronous code by using Combine by chaining upstream publishers, applying operators to downstream subscribers. SwiftUI also relies heavily on the Combine framework for it’s ObservableObject, Binding .
iOS developers have waited for a very long time for Apple to officially provide this kind of framework and finally they have provided the answer to us this year. For developers that has been using Rx for several years should not have the difficulty to adapt to the Combine framework as mostly the principle is the same between them. One last thing, let’s keep the lifelong learning goes on!.
Published at September 8, 2019
Opaque return types is a new language feature that is introduced in Swift 5.1 by Apple. It can be used to return some value for function/method, and property without revealing the concrete type of the value to client that calls the API. The return type will be some type that implement a protocol. Using this solution, the module API doesn’t have to publicly leak the underlying internal return type of the method, it just need to return the opaque type of the protocol using the some keyword. The Swift compiler also will be able to preserve the underlying identity of the return type unlike using protocol as the return type. SwiftUI uses opaque return types inside its View protocol that returns some View in the body property.
Here are some of the essential things that opaque return types provides to keep in our toolbox and leverage whenever we want to create API using Swift:
To understand more about the opaque return type and why it is different than just using protocol as return type, let’s dive into some code examples on how we can use it.
Declaring Protocol with associatedtypeLet’s say we have a protocol called MobileOS . This protocol has an associatedtype called Version and a property to get the Version for the concrete type to implement.
protocol MobileOS {
    associatedtype Version
    var version: Version { get }
    init(version: Version)
}
Let’s define two concrete types for this protocol, which is iOS and Android. Both of them has different version semantics. The iOS uses float type while Android uses String (although they just changed it recently in Android 10 😋).
struct iOS: MobileOS {
    var version: Float
}struct Android: MobileOS {
    var version: String
}
Let’s say we want to create a new function that returns the MobileOS protocol as the return type. The naive approach is to write it like this:
Solution 1 (Returns Protocol Type):func buildPreferredOS() -> MobileOS {
return iOS(version: 13.1)
}// Compiler ERROR 😭
Protocol 'MobileOS' can only be used as a generic constraint because it has Self or associated type requirements
As you can see, the compiler fails to build because our protocol has a constraint that uses associatedtype. The compiler doesn’t preserve the type identity of the returned value when using protocol as return type. Let’s try another solution which is returning the concrete type directly.
Solution 2 (Returns Concrete Type):func buildPreferredOS() -> iOS {
return iOS(version: 13.1)
}// Build successfully
This solution works, but as you can see the API now leaking the concrete type to the caller. This code will be need so much refactoring if in the future we are changing our minds and returns Android as the return type of the function.
Solution 3 (Generic Function Return)func buildPreferredOS<T: MobileOS>(version: T.Version) -> T {
return T(version: version)
}let android: Android = buildPreferredOS(version: "Jelly Bean")
let ios: iOS = buildPreferredOS(version: 5.0)
Yes, this approach works elegantly. But now the caller of the API needs to provide the concrete type of the returned function. If we truly want to make the caller doesn’t have to care about the concrete return type, then this is still not the correct solution.
Final Solution (Opaque Return Type to the rescue 😋:)func buildPreferredOS() -> some MobileOS {
return iOS(version: 13.1)
}
Using the opaque return type, we finally can return MobileOS as the return type of the function. The compiler maintains the identity of the underlying specific return type here and the caller doesn’t have to know the internal type of the return type as long as it implements the MobileOS protocol
Opaque returns types can only return one specific typeYou might be thinking that like the protocol return type, we can also return different type of concrete value inside an opaque return type like so.
func buildPreferredOS() -> some MobileOS {
   let isEven = Int.random(in: 0...100) % 2 == 0
   return isEven ? iOS(version: 13.1) : Android(version: "Pie")
}// Compiler ERROR 😭
Cannot convert return expression of type 'iOS' to return type 'some MobileOS'func buildPreferredOS() -> some MobileOS {
   let isEven = Int.random(in: 0...100) % 2 == 0
   return isEven ? iOS(version: 13.1) : iOS(version: "13.0")
}// Build Successfully 😎
The compiler will raise a build time error if you are trying to return different concrete type for opaque return value. You can still return a different value of the same concrete type though.
Simplify complex and nested type into an opaque return type for the API CallerThe final example of opaque return value is a really a good example of how we can leverage Opaque return type to hide complex and nested type into a simple opaque protocol type that can be exposed to the client.
Consider a function that accepts an array that uses generic constraint for its element to conform to numeric protocol. This array performs several things:
The caller of this API doesn’t need to know the return type of the function, the caller just want to able to perform for loop and print the value of the sequence to the console.
Let’s implement this naively using a simple function.
Solution 1: Using Generic Return Functionfunc sliceFirstAndEndSquareProtocol<T: Numeric>(array: Array<T>) -> LazyMapSequence<ArraySlice<T>, T> {
return array.dropFirst().dropLast().lazy.map { $0 * $0 }
}sliceFirstAndEndSquareProtocol(array: [2,3,4,5]).forEach { print($0) }
// 9
// 16
As you can see the return type of this function is very complex and also nested LazyMapSequence<ArraySlice<T>,T> , while the client only using it to loop and print each element.
func sliceHeadTailSquareOpaque<T: Numeric>(array: Array<T>) -> some Sequence {
    return array.dropFirst().dropLast().lazy.map { $0 * $0 }
}sliceHeadTailSquareOpaque(array: [3,6,9]).forEach { print($0) }
// 36
Using this solution, the client doesn’t have to know about the underlying return type of the function as long as its conforms to the sequence protocol that can be used by the client.
Opaque Return Types in SwiftUIThe SwiftUI also relies heavily on this approach so the the body in the View doesn’t have to explicitly reveal the concrete return type as long as it’s conform to the View protocol. Otherwise the inferred return type can be very nested and complex like this.
struct Row: View {
    var body: some View {
        HStack {
           Text("Hello SwiftUI")
           Image(systemName: "star.fill")
        }
    }
}
The inferred return type of the body is:
HStack<TupleView<(Text, Image)>>
It’s pretty complex and nested 🤯, remember it will also change whenever we add a new nested view inside the HStack . The opaque return type really shines in SwiftUI implementation, the client of the API doesn’t really care about the underlying internal concrete type of the View as long as the return type conforms to the View protocol.
Learning more about Opaque return typeTo learn more about opaque return type, you can follow the link that i provide below. They are official proposal, documentation and video from Apple:
It’s been a very amazing and incredible journey for us Swift developers that has been learning and adopting Swift since its inital release in WWDC 2014. Remembering back then, the language doesn’t even have some amazing features that opens a new paradigm of building an API like protocol extension, generic in protocol with associatedtype, and even cool features like Codable protocol to simplify the decoding and encoding of a model to specific data type.
Only because Apple releases Swift as an open source programming language that we can harness the power of collectiveness from developers all around the world that want to improve the language through Swift Evolution proposals. There is even a proposal implementation that has been accepted to Swift Language by a high schooler (default synthesized initalizer for struct in Swift 5.1 by Alejandro Alonso 👏🏻).
The impact of Swift technology to the world ahead can be very significant as the language matures ahead. It is also the programming language that i love the most because of its expressiveness. At last, keep on learning and have beginner mindset, don’t be afraid to fail, learn from your failure, try and repeat. Keep the lifelong learning goes on and happy Swifting!!!
Published at Aug 9, 2019

SwiftUI is a new UI framework introduced by Apple at WWDC 2019 which can be used to build user interface for all Apple platforms from watchOS, tvOS, iOS, and macOS using single unified API and tools. It is using declarative syntax to describe the user interface. The smallest component, View is a protocol to conform for building custom view so it can be reused and composed together to build layout. It has many built in View from List, Stacks, NavigationView, TabView, Form, TextField, and many more that can be used out of the box to create app.
One of the coolest feature for developers even UX designers is the new built in Xcode Live design tools that can be used to build live UI as we type the code, the compiler instantly recompiles the application to reflect the change in the UI. It also supports drag and drop of the View component to build your user interface. Preview is also configurable, from fonts, localization, and Dark Mode. Right now, this feature is only supported when you run Xcode 11 on macOS 10.15 Catalina.
What we will learn to buildIn this article, we will be building a real life practical SwiftUI app using IGDB API with the following main features:
We will learn about how SwiftUI handles the flow of data along as we build the app. To be able to use the IGDB API, you need to sign up for the API key for free from the link at IGDB: Free video Game Database API
Prerequisites to be able to build and run the app:
I already setup a starter project to download, it has several components:
You can download it from the GitHub repository link at alfianlosari/SwiftUI-GameDB-Starter
After you download it, navigate to the project directory using your Terminal and run pod install . Open the project xcworkspace, then open the GameStore.swift file and paste your IGDB API key in line 19 inside the $0.userKey variable assignment. That’s all for the setup, let’s begin to build our app!
Building Game List ViewLet’s build our first SwiftUI View, the GameListView. Create a new file called GameListView.swift . In the body, we use NavigationView to embed the List . For starting, we put Text containing Hello List.
struct GameListView: View {  var body: some View {
    NavigationView {
      List {
        Text("Hello List")
      }
    }
  }
}
Go to SceneDelegate.swift , update the initialization of UIHostingController by passing the GameListView in the rootView parameter. This will uses GameListView as the root view of the app. Try to build and run the app in simulator to see your SwiftUI app running!
...func scene(_ scene: UIScene, willConnectTo session: UISceneSession, options connectionOptions: UIScene.ConnectionOptions) {
  ...
  window.rootViewController = UIHostingController(rootView: GameListView())
  ...
}
The flow of data in SwiftUI is different than the flow of data that we usually use in imperative programming (MVC, VIPER, etc). The SwiftUI is more similar to MVVM, which observes states of your data model and update the View whenever the states value is updated. It also uses Bindings for bidirectional communications, for example we can bind the state of variable with boolean value to a Switch control so the whenever user the switch the value of the variable will get updated.
SwiftUI uses property wrapper for variable state declaration that will be stored and connected to the SwiftUI View. Whenever those properties get updated, View will update its appearance to match the state of the data model in the variable.
Here are several type of basic property wrappers for data available to use in SwiftUI:
Next, we will fetch the list of games from IGDB API. Let’s create a GameList class that conforms to ObservableObject protocol. We declare several properties such as isLoading for the View to display a loading indicator if the value is true and games array containing the list of games that we will retrieve using IGDB API. Those properties are declared using the @Published property wrapper so it can notify the View when the value is updated. The gameService property will be used to retrieve the game list from IGDB API.
Next, we declare a single method called reload that accepts a parameter for the platform that we will use to fetch the video game. It has ps4 as its default value. In the implementation, we set the games array to empty and set isLoading state to true, then invoke the fetchPopularGames method from gameService passing the platform. In the completion handler, we set isLoading to false and check the result enum. If it is success, we retrieve the associated value containing the games and assign it the games instance property.
class GameList: ObservableObject {

    @Published var games: [Game] = []
    @Published var isLoading = false

    var gameService = GameStore.shared

    func reload(platform: Platform = .ps4) {
        self.games = []
        self.isLoading = true

        gameService.fetchPopularGames(for: platform) { [weak self]  (result) in
            self?.isLoading = false

            switch result {
            case .success(let games):
                self?.games = games

            case .failure(let error):
                print(error.localizedDescription)
            }
        }
    }
}
Next, let’s integrate the GameList model into the GameListView . We simply add a property using the @ObservedObject property wrapper for the gameList. Inside the Group layout, we check if the gameList isLoading is set to true, then we simply display a Text with loading as the message. Otherwise, we initialize List passing the games array from the gameList . Game model already conforms to Identifiable protocol so it can be used as a diffing whenever the array gets updated. For now, we just display the name of the game using Text in each row of the list.
struct GameListView: View {  @ObservedObject var gameList: GameList = GameList()  var body: some View {
    NavigationView {
      Group {
        if gameList.isLoading {
          Text("Loading")
        } else {
          List(gameList.games) { game in
            Text(game.name)
          }
        }
      }
    }.onAppear {
      self.gameList.reload()
    }
  }
}
To trigger the loading of the API, we use the onAppear modifier in the NavigationView . The closure inside will be invoked, only when the view gets rendered on the screen. Try to build and run the app to see the list of games fetched from the remote API and displayed on the list!
 Building LoadingView by hosting UIKit UIActivityIndicatorView in SwiftUI
As of right now, SwiftUI doesn’t have an activity indicator View that we can use to show loading indicator like the UIActivityIndicatorView in UIKit.We can use UIKit component in our app by conforming to UIViewControllerRepresentable to wrap UIViewController and UIViewRepresentable for UIView.
Let’s create LoadingView wrapper for UIActivityIndicatorView. This LoadingView conforms to UIViewRepresentable and need to implement 2 methods. In the makeUIView: , we initialize UIActivityIndicatorView and return it. Then in updateUIView, we start animating the activity indicator. It’s using associatedtype under the hood for the UIView generic placeholder inside the protocol.
import SwiftUI
import UIKit

struct LoadingView: UIViewRepresentable {
  func makeUIView(context: UIViewRepresentableContext<ProgressView>) -> UIActivityIndicatorView {
    let activityIndicator = UIActivityIndicatorView(style: .medium)
    return activityIndicator
  }

  func updateUIView(_ uiView: UIActivityIndicatorView, context: UIViewRepresentableContext<ProgressView>) {
    uiView.startAnimating()
  }
}
Just replace the Text with loading message with our new LoadingView to see it is working in perfectly!
//...
if gameList.isLoading {
  LoadingView()
} else {
  //...
}
Before we start to improve the UI of the row in the List, we need to create an ImageLoader ObservableObject for loading image in the View. It’s has a static NSCache dictionary that we can use to create a simply image caching mechanism using the url string as the key and UIImage as the value. The only @Published property that we use is the image property that exposes the UIImage to be observed. In the downloadImage(url:) method, we retrieve the absolute string of the url, then retrieve the image from the cache using the url if it is exists. If not exists, we just use URLSession to retrieve the image using the url, assign it to the cache, then assign it to the image property.
class ImageLoader: ObservableObject {

    private static let imageCache = NSCache<AnyObject, AnyObject>()

    @Published var image: UIImage? = nil

    public func downloadImage(url: URL) {
        let urlString = url.absoluteString

        if let imageFromCache = ImageLoader.imageCache.object(forKey: urlString as AnyObject) as? UIImage {
            self.image = imageFromCache
            return
        }

        URLSession.shared.dataTask(with: url) { (data, res, error) in
            guard let data = data, let image = UIImage(data: data) else {
                return
            }
            DispatchQueue.main.async { [weak self] in
                ImageLoader.imageCache.setObject(image, forKey: urlString  as AnyObject)
                self?.image = image
            }
        }.resume()
    }
}
Next, we create a GameRowView that will represent each row of the game in our List. It has 2 property, one is the game property and the other one is the ImageLoader property that we will use with @ObserverdObject property wrapper.
Inside the body, we use ZStack to overlay the views on top of another. The most bottom view will be the Image, then on top of that we use VStack to stack the Texts vertically. We display the name, release data, and publisher of the game. We assert the ImageLoader if the image is exists, then we display the Image and resize it properly using SwiftUI modifiers. Try to play around with the value of modifiers to customize the View!. At last, we add onAppear modifier in the row, so it will only fetch the image when the row is displayed on the screen.
import SwiftUI

struct GameRowView: View {

    var game: Game
    @ObservedObject var imageLoader: ImageLoader = ImageLoader()

    var body: some View {
        ZStack(alignment: .bottomLeading) {
            if (imageLoader.image != nil) {
                GeometryReader { geometry in
                    Image(uiImage: self.imageLoader.image!)
                        .resizable(resizingMode: Image.ResizingMode.stretch)
                        .aspectRatio(contentMode: .fill)
                        .frame(maxWidth: geometry.size.width)
                        .clipped()
                }
            }
            VStack(alignment: .leading) {
                Text(game.name)
                    .font(.headline)
                    .foregroundColor(Color.white)
                    .lineLimit(1)
                Text(game.releaseDateText)
                    .font(.subheadline)
                    .foregroundColor(Color.white)
                    .lineLimit(2)
                Text(game.company)
                    .font(.caption)
                    .foregroundColor(Color.white)
                    .lineLimit(1)
            }
            .frame(maxWidth: .infinity, alignment: .bottomLeading)
            .padding(EdgeInsets.init(top: 16, leading: 16, bottom: 16, trailing: 16))
            .background(Rectangle().foregroundColor(Color.black).opacity(0.6).blur(radius: 2.5))
        }
        .background(Color.secondary)
        .cornerRadius(10)
        .shadow(radius: 20)
        .padding(EdgeInsets.init(top: 8, leading: 0, bottom: 8, trailing: 0))
        .frame(height: 300)
        .onAppear {
            if let url = self.game.coverURL {
                self.imageLoader.downloadImage(url: url)
            }
        }
    }
}
Replace the Text inside the List with GameRowView passing the game as the parameter for initalizer.
//..
List(self.gameList.games) { (game: Game) in
  GameRowView(game: game)
}
Finally, remove the GameRowView_Previews right now so our project can be build and run!. We do this because we don’t have a stub game to pass in Debug for the live preview to render.
 Building and Navigate to Game Detail View
Next, we create GameDetailView . This view will display the full image poster of the game, summary, storyline, and other additional information. It will accept the id of the game as the parameter so we can use it to fetch the game metadata from the API when the view get pushed on the navigation stack. For now let’s display the id in the screen with Text . Also, just remove the GameDetailView_Previews for now so it can be build and run.
struct GameDetailView: View {
  var gameId: Int
  var body: some View {
    Text(String(gameId))
  }
}
Next, we add NavigationLink and pass the GameDetailView to the destination parameter inside the list in GameListView like so.
//...
List(self.gameList.games) { (game: Game) in
  NavigationLink(destination: GameDetailView(gameDetail:
GameDetail(gameService: GameStore.shared), gameId: game.id)) {
    GameRowView(game: game)
  }
}
Try to build and run the app, then tap on the row in the list to navigate to GameDetailView successfully 😋!
Fetching Game Detail from IGDB API and Observe with SwiftUIJust like the GameListView , we need to fetch the detail of the game from the IGDB API. We create GameDetail object and conforms to ObservableObject protocol. We’ll declare 2 properties using @Published property wrapper, one for loading state and the other one for storing the fetched game.
In the reload method, we pass the id of the game as the parameter. We fetch the detail of the game using the GameService object. In the completion, we assign the game property with the game we successfully fetched from the API.
class GameDetail: ObservableObject {

    @Published var game: Game? = nil
    @Published var isLoading = false

    var gameService: GameService = GameStore.shared

    func reload(id: Int) {
        self.isLoading = true

        self.gameService.fetchGame(id: id) {[weak self] (result) in
            self?.isLoading = false

            switch result {
            case .success(let game):
                self?.game = game

            case .failure(let error):
                print(error.localizedDescription)
            }
        }
    }
}
Let’s put the GameDetail model in use inside the GameDetailView . We simply declare @ObservedProperty to store the GameDetail , also we need to the ImageLoader as well to load the poster image or the game.
struct GameDetailView: View {
  @ObservedObject var gameDetail = GameDetail()
  @ObservedObject var imageLoader = ImageLoader()  var gameId: Int  //...
}
In the body of the view, we create a List and put the Image on the top followed by a section containing all of the texts for storyline, summary, etc. We only load the image when the game is successfully fetched.
You can see all the declarative implementation of the UI from the snippet below. In this snippet you can see that we can create composable small views to build a larger view. The poster view and game section are views.
struct GameDetailView: View {

    @ObservedObject var gameDetail = GameDetail()
    @ObservedObject var imageLoader = ImageLoader()

    var gameId: Int

    var body: some View {
        Group {
            if (self.gameDetail.game != nil) {
               List {
                    PosterView(image: self.imageLoader.image)
                        .onAppear {
                            if let url = self.gameDetail.game?.coverURL {
                                self.imageLoader.downloadImage(url: url)
                            }
                    }

                    GameSectionView(game: self.gameDetail.game!)
                }
            } else {
                ProgressView()
            }
        }
        .edgesIgnoringSafeArea([.top])
        .onAppear {
            self.gameDetail.reload(id: self.gameId)
        }
    }
}

struct PosterView: View {

    var image: UIImage?
    var body: some View {
        ZStack {
            Rectangle()
                .foregroundColor(.gray)
                .aspectRatio(500/750, contentMode: .fit)

            if (image != nil) {
                Image(uiImage: self.image!)
                    .resizable()
                    .aspectRatio(500/750, contentMode: .fit)
            }
        }

    }

}


struct GameSectionView: View {

    var game: Game

    var body: some View {
        Section {
            Text(game.summary)
                .font(.body)
                .lineLimit(nil)

            if (!game.storyline.isEmpty) {
                Text(game.storyline)
                    .font(.body)
                    .lineLimit(nil)

            }
            Text(game.genreText)
                .font(.subheadline)
            Text(game.releaseDateText)
                .font(.subheadline)
            Text(game.company)
                .font(.subheadline)
        }
    }
}
Build and run the app to see the game information in its glory 🎮😁
 One more thing! TabView in SwiftUI
For the grand finale, we will embed 3 GameListView into a TabView . Each of the view will display games for specific platform such as PS4, Xbox One, and Nintendo Switch. Before we add the view, let’s refactor GameListView to accept platform as the parameter in the initializer. Also in the onAppear , we pass the platform to the GameList reload method so it can fetch the game list for specific platform.
struct GameListView: View {

    @ObservedObject var gameList: GameList = GameList()
    var platform: Platform = .ps4

    var body: some View {
        NavigationView {
            Group {
                if gameList.isLoading {
                    ProgressView()
                } else {
                    List(self.gameList.games) { (game: Game) in
                        NavigationLink(destination: GameDetailView(gameId: game.id)) {
                            GameRowView(game: game)
                        }
                    }
                }
            }
            .navigationBarTitle(self.platform.description)
        }
        .onAppear {
            if self.gameList.games.isEmpty {
                self.gameList.reload(platform: self.platform)
            }
        }
    }
}
We create a GameRootView . In the body implementation, we use TabView , the use ForEach passing all of our platform enum cases , and inside the closure we declare the GameListView assigning the platform to the initializer. We also use modifiers to set the tag, tab item image asset name and text. PS: i already included the asset logo for each platform in xcassets.
import SwiftUI

struct GameRootView: View {

    var body: some View {
        TabView {
            ForEach(Platform.allCases, id: \.self) { p in
                GameListView(platform: p).tag(p)
                    .tabItem {
                        Image(p.assetName)
                        Text(p.description)
                }
            }
        }
        .edgesIgnoringSafeArea(.top)
    }
}
Finally, go to SceneDelegate.swift and replace the assignment of root view for UIHostingController with GameRootView.
...func scene(_ scene: UIScene, willConnectTo session: UISceneSession, options connectionOptions: UIScene.ConnectionOptions) {
  ...
  window.rootViewController = UIHostingController(rootView: GameRootView())
  ...
}
Build and run your project to see the tab view containing all the platforms!
 Conclusion
That’s it fellow Swifters! our SwiftUI app is finished and ready to use to fetch your latest video games information. SwiftUI really makes building the user interface our app pretty simple and straightforward using it’s declarative syntax. The data is flowing using state, binding, and observable without us need to do it imperatively as we used to be when using UIKit. SwiftUI is also compatible with UIKit component using UIViewRepresentable and UIViewControllerRepresentable, so we can still use the good old UIKit component in our SwiftUI app!.
Just one more final thing, i am currently waiting for Dragon Quest XI S, Death Stranding, and Final Fantasy VII Remake to be released 😋. Until then, let’s keep on gaming and keep the lifelong learning goes on!. Happy Swifting!!!.
You can download the completed project from the GitHub repository at alfianlosari/SwiftUI-GameDB-Completed
Published at Jun 28, 2019
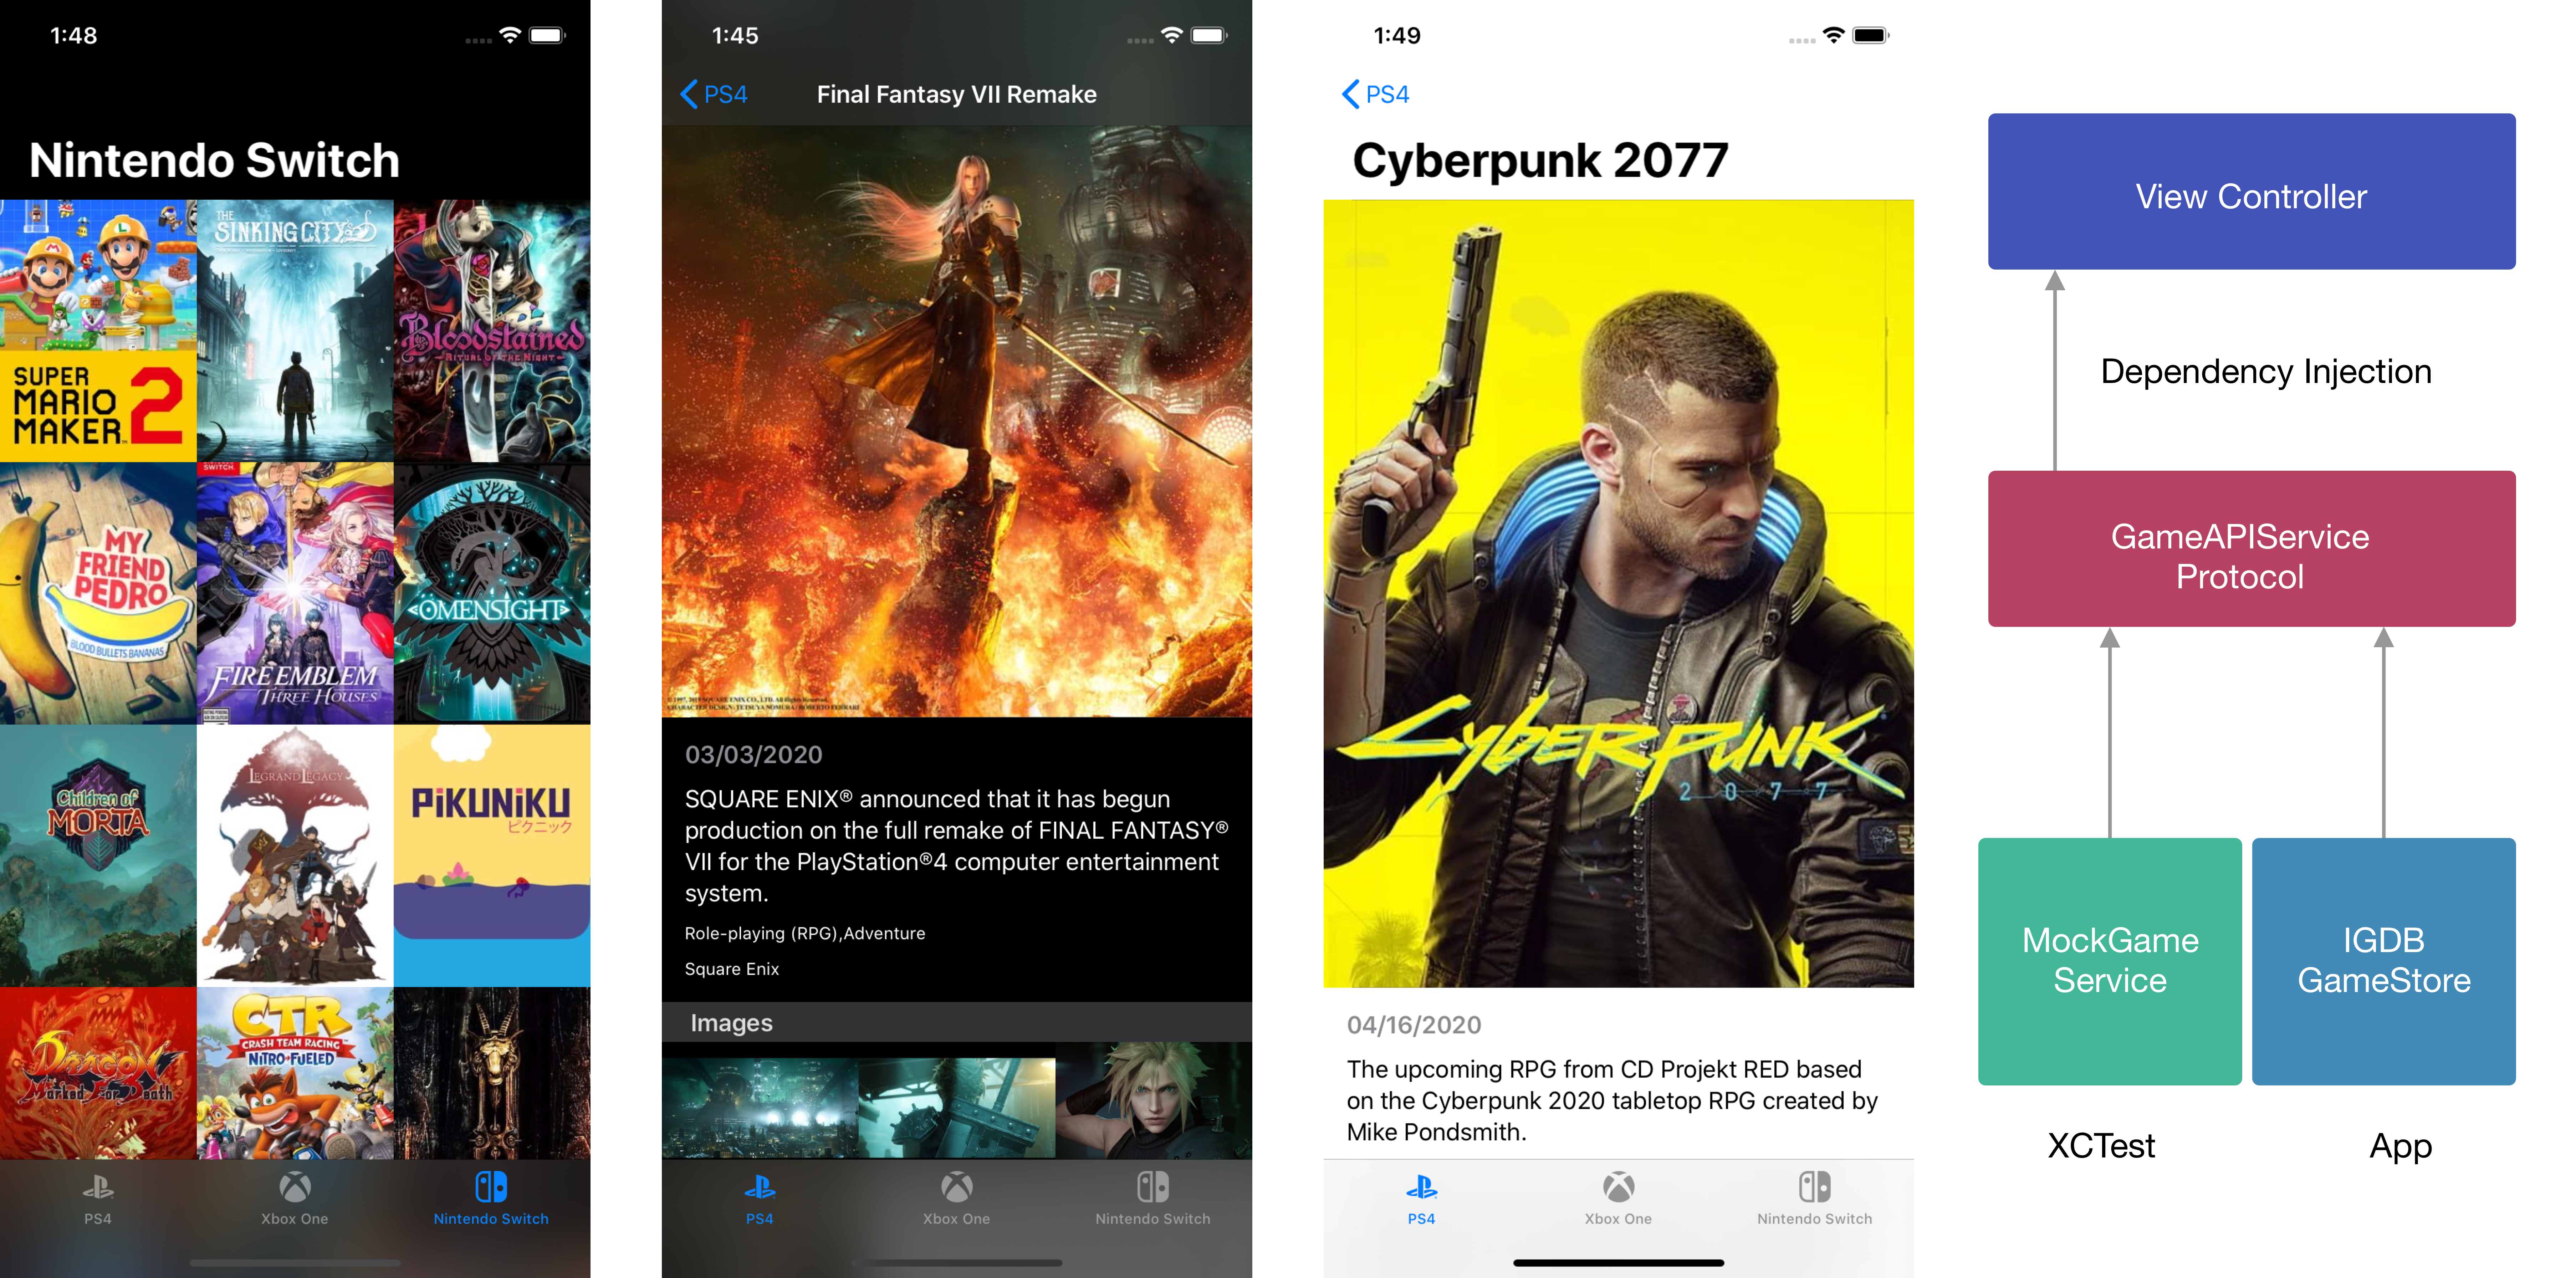
Dependency Injection is a software engineering technique that can be used to pass other object/service as a dependency to an object that will use the service. It’s sometime also called inversion of control, which means the object delegates the responsibility of constructing the dependencies to another object. It’s the D part of the SOLID design principles, dependency inversion principle.
Here are some of the advantages of using dependency injection in your code:
There are 3 approaches that we can use for implementing dependency injection in our class.
Using InitializerWith initializer, we declare all the parameter with the interface that will be injected into the class. We assign all the parameters to the instance properties. Using this approach we have the option to declare all the dependent instance properties as private if we want.
class GameListViewController: UIViewController {  private let gameService: GameService  init(gameService: GameService) {
    self.gameService = gameService
  }
}
Using Setter. With setter, we need to declare the dependent instance properties as internal or public (for shared framework). To inject the dependencies, we can just assign it via the setter.
class GameListViewController: UIViewController {  var gameService: GameService!}let gameVC = GameListViewController()
gameVC.gameService = GameService()
Here, we declare a method with all the required parameters just like the initializer method.
class GameListViewController: UIViewController {  private var gameService: GameService!  func set(_ gameService: GameService) {
    self.gameService = gameService
  }
}
The most common approaches being used are the injection via initializer and setter.
What we will RefactorNext, let’s refactor a simple GameDB app that fetch collection of games using the IGDB API. To begin, clone the starter project in the GitHub repository at alfianlosari/GameDBiOS-DependencyInjection-Starter
To use the IGDB API, you need to register for the API key in IGDB website at IGDB: Video Game Database API
Put the API Key inside the IGDBWrapper initializer in the GameStore.swift file Try to build and run the app. It should be working perfectly, but let’s improve our app to the next level with dependency injection for better separation if concerns and testability. Here are the problems with this app:
To begin our refactoring journey, we will create a protocol to represent the GameService API as a contract for the concrete type to implement. This protocol has several methods:
In this case, we can just copy the methods in the GameStore to use it in this protocol.
protocol GameService {
    func fetchPopularGames(for platform: Platform, completion: @escaping (Result<[Game], Error>) -> Void)
    func fetchGame(id: Int, completion: @escaping (Result<Game, Error>) -> Void)
}
Next, we can just implement the GameService protocol for the GameStore class. We don’t need to do anything because it already implemented all the required method for the protocol!
class GameStore: GameService {
    ...
}
Let’s move on to the GameListViewController, here are the tasks that we’ll do:
class GameListViewController: UICollectionViewController {

    private let gameService: GameService
    private let platform: Platform

    init(gameService: GameService, platform: Platform) {
        self.gameService = gameService
        self.platform = platform
        super.init(collectionViewLayout: UICollectionViewFlowLayout())
    }

    private func loadGame() {
        gameService.fetchPopularGames(for: platform) { (result) in
            switch result {
            case .success(let games):
                self.games = games

            case .failure(let error):
                print(error.localizedDescription)
            }
        }
    }

    // ...
}
Next, we need to update the initialization of GameListViewController in the AppDelegate . Here, we just pass the platform and the GameStore instance to the initializer parameter like so.
@UIApplicationMain
class AppDelegate: UIResponder, UIApplicationDelegate {

   func application(_ application: UIApplication, didFinishLaunchingWithOptions launchOptions: [UIApplication.LaunchOptionsKey: Any]?) -> Bool {
        let window = UIWindow(frame: UIScreen.main.bounds)
        let tabController = UITabBarController()
        let gameService = GameStore.shared

        let controllers = Platform.allCases.map { (platform) -> UIViewController in
            let gameVC = GameListViewController(gameService: gameService, platform: platform)
            gameVC.title = platform.description
            gameVC.tabBarItem = UITabBarItem(title: platform.description, image: UIImage(named: platform.assetName), tag: platform.rawValue)
            return UINavigationController(rootViewController: gameVC)
        }

        tabController.setViewControllers(controllers, animated: false)
        window.rootViewController = tabController
        window.makeKeyAndVisible()
        self.window = window
        return true
    }
}
Let’s move on to the GameDetailViewController, here are the tasks that we’ll do, it will pretty similar to GameListViewController changes:
class GameDetailViewController: UITableViewController {

    private let id: Int
    private let gameService: GameService

    init(id: Int, gameService: GameService) {
        self.id = id
        self.gameService = gameService
        super.init(style: .plain)
    }

    private func loadGame() {
        gameService.fetchGame(id: id) {[weak self] (result) in
            switch result {
            case .success(let game):
                self?.buildSections(with: game)
            case .failure(let error):
                print(error.localizedDescription)
            }
        }
    }

    // ...
}
Next, we need to update the initialization of GameDetailViewController in the GameListViewController . Here, we just pass the id and the GameStore instance to the initializer parameter like so.
class GameListViewController: UICollectionViewController {

  // ...

  override func collectionView(_ collectionView: UICollectionView, didSelectItemAt indexPath: IndexPath) {
      let game = games[indexPath.item]
      let gameDetailVC = GameDetailViewController(id: game.id, gameService: gameService)
      navigationController?.pushViewController(gameDetailVC, animated: true)
  }
}
Next, create a new target and select iOS Unit Testing Bundle from the selection. This will create a new target for testing. To run the test suite, you can press Command+U .
Let’s create a MockGameService class for mocking game service in view controller integration tests later. Inside each method, we just return the stub hardcoded games for stub data.
@testable import DependencyInjection
import Foundation

class MockGameService: GameService {

    var isFetchPopularGamesInvoked = false
    var isFetchGameInvoked = false

    static let stubGames = [
        Game(id: 1, name: "Suikoden 7", storyline: "test", summary: "test", releaseDate: Date(), popularity: 8.0, rating: 8.0, coverURLString: "test", screenshotURLsString: ["test"], genres: ["test"], company: "test"),
        Game(id: 2, name: "Kingdom Hearts 4", storyline: "test", summary: "test", releaseDate: Date(), popularity: 8.0, rating: 8.0, coverURLString: "test", screenshotURLsString: ["test"], genres: ["test"], company: "test"),
    ]


    func fetchPopularGames(for platform: Platform, completion: @escaping (Result<[Game], Error>) -> Void) {
        isFetchPopularGamesInvoked = true
        completion(.success(MockGameService.stubGames))
    }

    func fetchGame(id: Int, completion: @escaping (Result<Game, Error>) -> Void) {
        isFetchGameInvoked = true
        completion(.success(MockGameService.stubGames[0]))
    }

}
Next, let’s create test cases for GameListViewController , create a new file for unit test called GameListViewControllerTests.swift . Inside the sut (system under test) will be the GameListViewController . In the setup method we just instantiate the object and also the MockGameService object then assign it to the instance properties.
The first test is to test whether the GameService is invoked in the viewDidLoad method of GameListViewController . We create a function test case called testFetchGamesIsInvokedInViewDidLoad . Inside we just trigger the invocation of viewDidLoad , and then check the MockGameService isFetchPopularGamesInvoked is set to true for the assertion.
The second test is to test whether the fetchPopularGames method invocation fills the collection view with stub data. We create a function called testFetchGamesReloadCollectionViewWithData . Inside, we trigger the invocation of viewDidLoad and assert the number of items in the collection view is not equal to 0 for the test to pass.
import UIKit
import XCTest
@testable import DependencyInjection

class GameListViewControllerTests: XCTestCase {

    var sut: GameListViewController!
    var mockGameService: MockGameService!

    override func setUp() {
        super.setUp()
        mockGameService = MockGameService()
        sut = GameListViewController(gameService: mockGameService, platform: .ps4)
    }

    func testFetchGamesIsInvokedInViewDidLoad() {
        _ = sut.view
        XCTAssertTrue(mockGameService.isFetchPopularGamesInvoked)

    }

    func testFetchGamesReloadCollectionViewWithData() {
        _ = sut.view
        XCTAssertTrue(sut.collectionView.numberOfItems(inSection: 0) != 0)
    }
}
Try to build and run all the tests with Command+U to view all the green symbols which means all tests passed successfully 😋!. For challenge, try to create the test cases for GameDetailViewController 🥰 using the MockGameService!
You can clone the end project in the GitHub repository at alfianlosari/GameDBiOS-DependencyInjection-Completed
ConclusionDependency injection is a really important software design principle that really help us to write more loosely coupled code between modules that lead to improved maintainability and flexibility in our codebase as the complexity of our app grow.
We can also use a centralized container to build our dependencies, and then resolve the dependencies only we require them in our class. This is really helpful, if our app navigation hierarchy is quite deep as we only need to pass the container down. So let’s keep the lifelong learning goes on and write better code.
Published at May 26, 2019
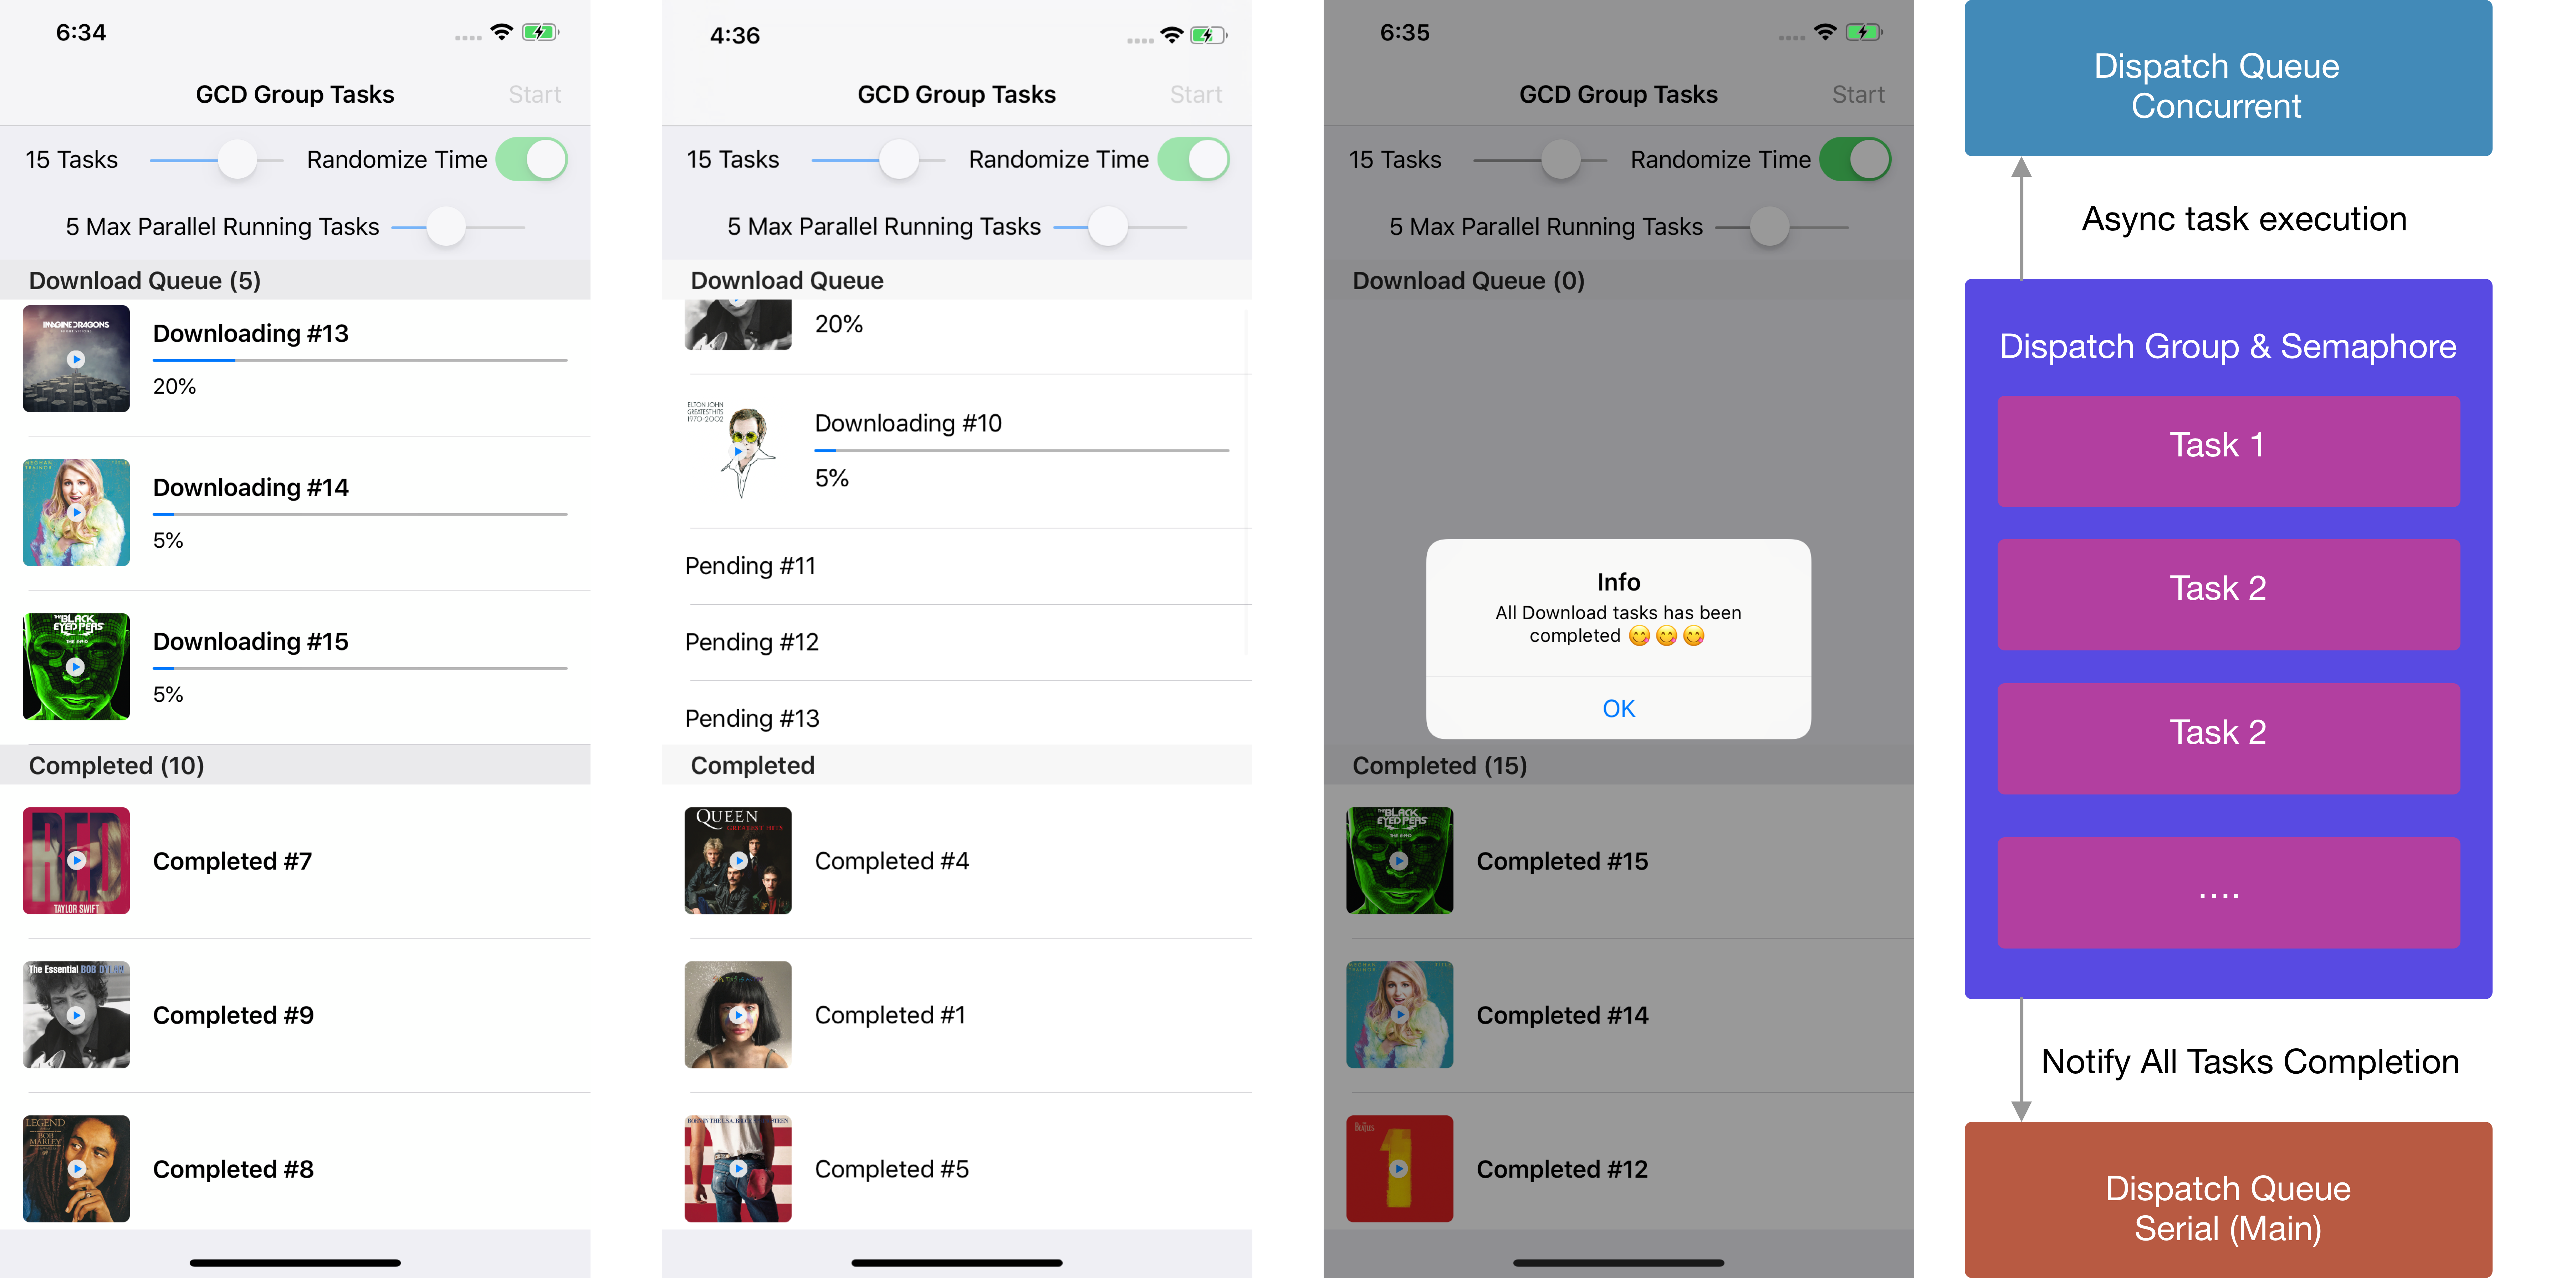
Grand Central Dispatch (GCD) is a framework provided by Apple that was released in 2009 with OS X Snow Leopard & iOS 4. It provides easy to use API for the developers to to run background tasks by creating queue in serial or concurrent style without managing threads by themselves.
GCD abstracts the assignment of threads for computation into dispatch queue. Developers only need to create their own dispatch queue or they can use Apple provided built in global dispatch queue with several built-in Quality of Service (QoS) from user interactive, user initiated, utility, and background. GCD will handle the thread assignment in a thread pool automatically.
There are some instances when we as a developer need to perform multiple batch asynchronous tasks in the background, and then receive the notification when all the job is completed in the future. Apple provides DispatchGroup class that we can use to do this kind of operation. Here are the brief summary of what the DispatchGroup is by Apple.
Groups allow you to aggregate a set of tasks and synchronize behaviors on the group. You attach multiple work items to a group and schedule them for asynchronous execution on the same queue or different queues. When all work items finish executing, the group executes its completion handler. You can also wait synchronously for all tasks in the group to finish executing.
While the DispatchGroup can also be used to wait synchronously for all tasks in the group to finish executing, we won’t doing this in this tutorial.
We’ll also will use the DispatchSemaphore to limit the number of concurrent simultaneous tasks that we execute in a queue. According to Apple DispatchSemaphore is:
An object that controls access to a resource across multiple execution contexts through use of a traditional counting semaphore.
Here are also some of the real use cases that we might encounter as an developer:
We will be exploring on how we can leverage DispatchGroup & DispatchSemaphore by creating a simple project that will perform a simulation of simultaneous background downloads, when all the download tasks completed successfully, we will display successful alert message in the UI. It also has several capabilities such as:
To begin, please download the starter project from the GitHub repository link at alfianlosari/DispatchGroupExample-Starter.
The Starter ProjectThe starter project contains all the view controller , cells that has been prepared before so we can focus on how to use the dispatch group & dispatch semaphore. We will simulate the action of performing multiple downloading of files in the background by using the dispatch group. We’ll also look into how we can use dispatch semaphores to limit the number of simultaneous concurrent download to a specific number.
The Download TaskThe DownloadTask class will be used to simulate the download of a file in the background. Here are breakdown of the class:
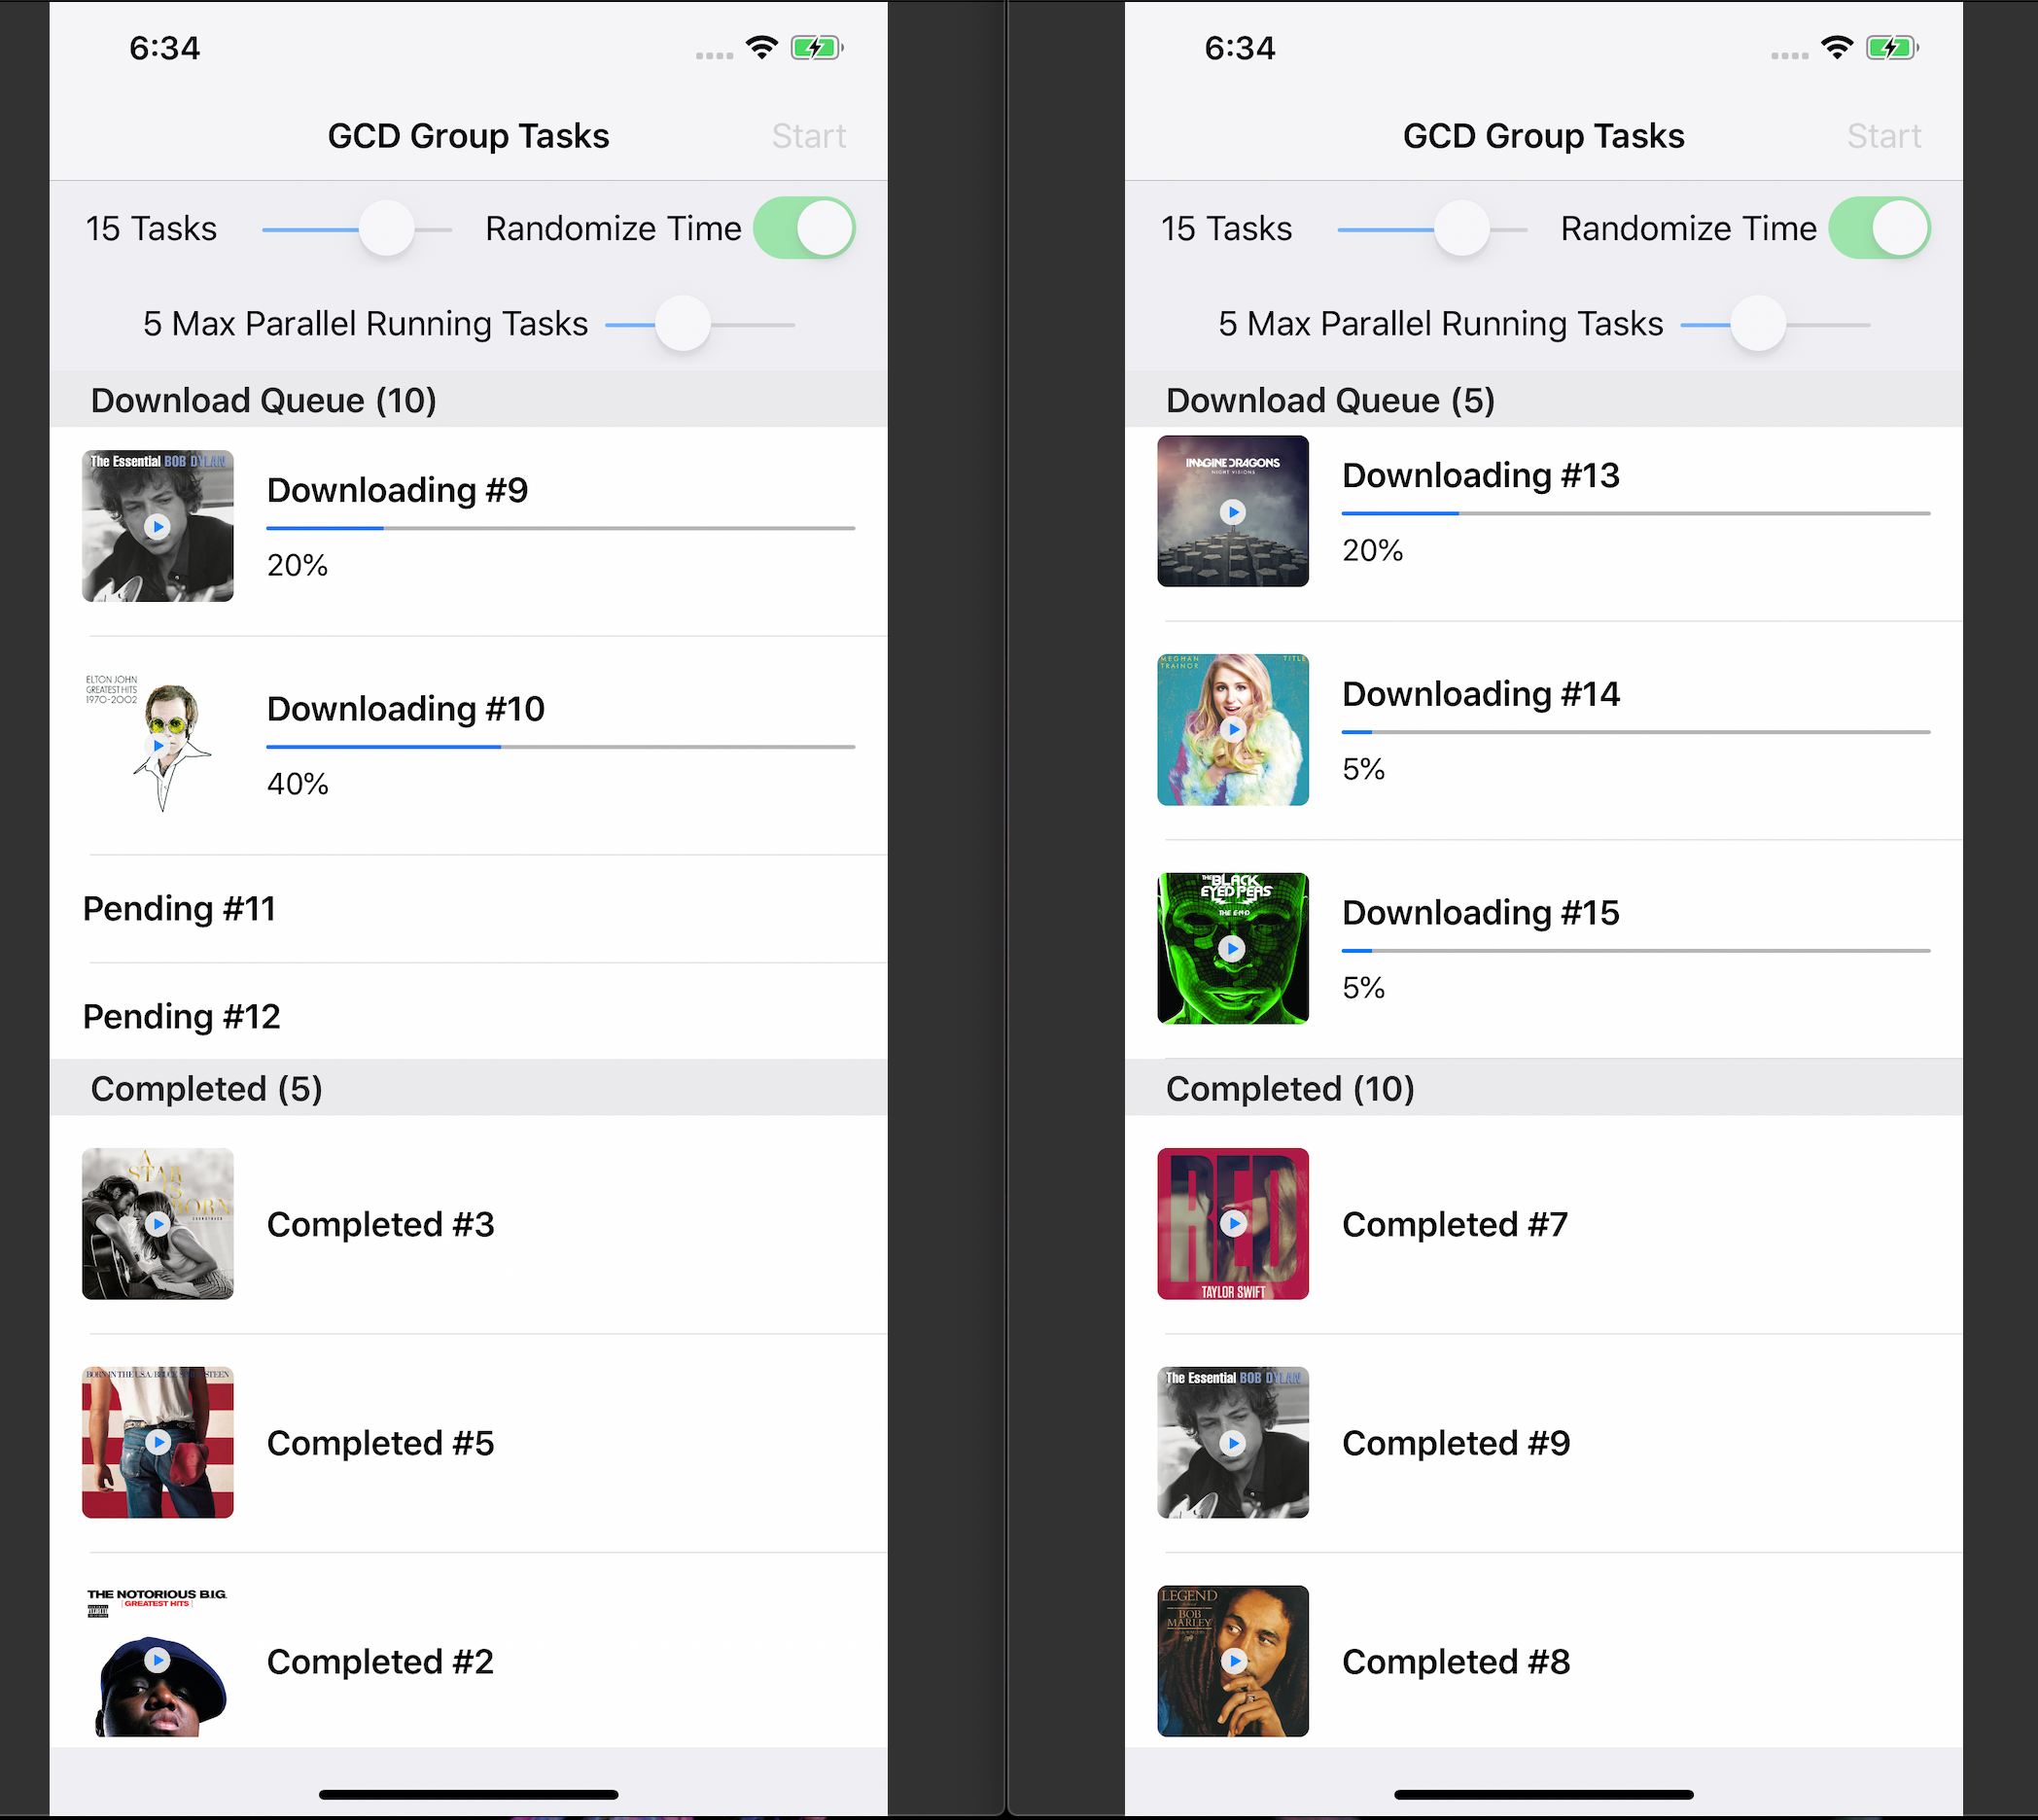
The main JobListViewController consists of 2 table view, one is for displaying download tasks and one is for is displaying completed tasks. There are also several sliders and a switch that we can configure. Here are the breakdown of the class:
Let’s begin by simulating the operation when user taps on the start bar button item that will trigger the startOperation selector that is currently empty.
Creating DispatchQueue, DispatchGroup, & DispatchSemaphoreTo create all the the instances of those 3 we can just instantiate them with their respective class, then assign it to a variable like so. The DispatchQueue intializer is given a unique identifier (using a reverse domain dns name as the convention), then we set the attributes to concurrent so we can perform multiple jobs in parallel asynchronously. We also set DispatchSemaphore value using the maximumAsyncTaskCount to limit the number of simultaneous download task. At last, we also make sure to disable the user interaction of all the buttons, sliders, and switch when the operation starts.
@objc func startOperation() {
      downloadTasks = []
      completedTasks = []

      navigationItem.rightBarButtonItem?.isEnabled = false
      randomizeTimeSwitch.isEnabled = false
      tasksCountSlider.isEnabled = false
      maxAsyncTasksSlider.isEnabled = false

      let dispatchQueue = DispatchQueue(label: "com.alfianlosari.test", qos: .userInitiated, attributes: .concurrent)
      let dispatchGroup = DispatchGroup()
      let dispatchSemaphore = DispatchSemaphore(value: option.maxAsyncTasks)

}
Next, we just create the tasks based on the number of the maximumJob count from the option property. Each DownloadTask is instantiated with an identifier, then in the task update state closure, we pass the callback. Here are the breakdown of the callback implementation:
@objc func startOperation() {
// ...
downloadTasks = (1...option.jobCount).map({ (i) -> DownloadTask in
let identifier = "\(i)"
return DownloadTask(identifier: identifier, stateUpdateHandler: { (task) in
DispatchQueue.main.async { [unowned self] in
guard let index = self.downloadTasks.indexOfTaskWith(identifier: identifier) else {
return
}
switch task.state {
case .completed:
self.downloadTasks.remove(at: index)
self.completedTasks.insert(task, at: 0)
case .pending, .inProgess(_):
guard let cell = self.downloadTableView.cellForRow(at: IndexPath(row: index, section: 0)) as? ProgressCell else {
return
}
cell.configure(task)
self.downloadTableView.beginUpdates()
self.downloadTableView.endUpdates()
}
}
})
})
}
Next, we will start the downloading of task by assigning the job into the DispatchQueue and DispatchGroup. Inside the startOperation method, we will enumerate all the tasks and invoke the startTask method passing the dispatchGroup, dispatchQueue, and dispatchSemaphore. We also pass the randomizeTimer from the option to simulate random download time.
In the DownloadTask startTask method, we invoke the dispatchQueue async method passing the dispatch group. In the execution closure, here are the things we will do:
@objc func startOperation() {
// ...
downloadTasks.forEach {
$0.startTask(queue: dispatchQueue, group: dispatchGroup, semaphore: dispatchSemaphore, randomizeTime: self.option.isRandomizedTime)
}
}
class DownloadTask {
var progress: Int = 0
let identifier: String
let stateUpdateHandler: (DownloadTask) -> ()
var state = TaskState.pending {
didSet {
self.stateUpdateHandler(self)
}
}
init(identifier: String, stateUpdateHandler: @escaping (DownloadTask) -> ()) {
self.identifier = identifier
self.stateUpdateHandler = stateUpdateHandler
}
func startTask(queue: DispatchQueue, group: DispatchGroup, semaphore: DispatchSemaphore, randomizeTime: Bool = true) {
queue.async(group: group) { [weak self] in
group.enter()
semaphore.wait()
self?.state = .inProgess(5)
self?.startSleep(randomizeTime: randomizeTime)
self?.state = .inProgess(20)
self?.startSleep(randomizeTime: randomizeTime)
self?.state = .inProgess(40)
self?.startSleep(randomizeTime: randomizeTime)
self?.state = .inProgess(60)
self?.startSleep(randomizeTime: randomizeTime)
self?.state = .inProgess(80)
self?.startSleep(randomizeTime: randomizeTime)
self?.state = .completed
group.leave()
semaphore.signal()
}
}
private func startSleep(randomizeTime: Bool = true) {
Thread.sleep(forTimeInterval: randomizeTime ? Double(Int.random(in: 1...3)) : 1.0)
}
}
At last, to receive the signal when all the background download tasks has been completed, we need to invoke the group notify method passing the queue and the closure that will be invoked when all the download has been finished.
Inside the closure, we just invoke the present alert method passing the completion message. Finally, we need to make sure to enable all the button, sliders, and switch user interaction property back.
@objc func startOperation() {
// ...
dispatchGroup.notify(queue: .main) { [unowned self] in
self.presentAlertWith(title: "Info", message: "All Download tasks has been completed 😋😋😋")
self.navigationItem.rightBarButtonItem?.isEnabled = true
self.randomizeTimeSwitch.isEnabled = true
self.tasksCountSlider.isEnabled = true
self.maxAsyncTasksSlider.isEnabled = true
}
}
Try to build and run the project. Play with all the sliders and switch to see the different behaviors of the app based on the number of tasks, simultaneous running task, and simulated download timer.
You can download the completed project GitHub repository from the link at alfianlosari/GCDGroup-Complete
ConclusionThat’s it! As the next release evolution of Swift to utilize async await to perform asynchronous job, GCD still provides the best performance for us when we want to write an asynchronous job in the background. With DispatchGroup and DispatchSemaphore we can group several tasks together, perform the job in queue we want, and get notification when all the tasks has been completed.
Apple also gives us an option to use higher level abstraction using OperationQueue to perform async tasks. It has several advantages such as suspending, adding dependencies between tasks. Let’s keep the lifelong learning and keep on building great things with Swift 😋!
Published at May 16, 2019
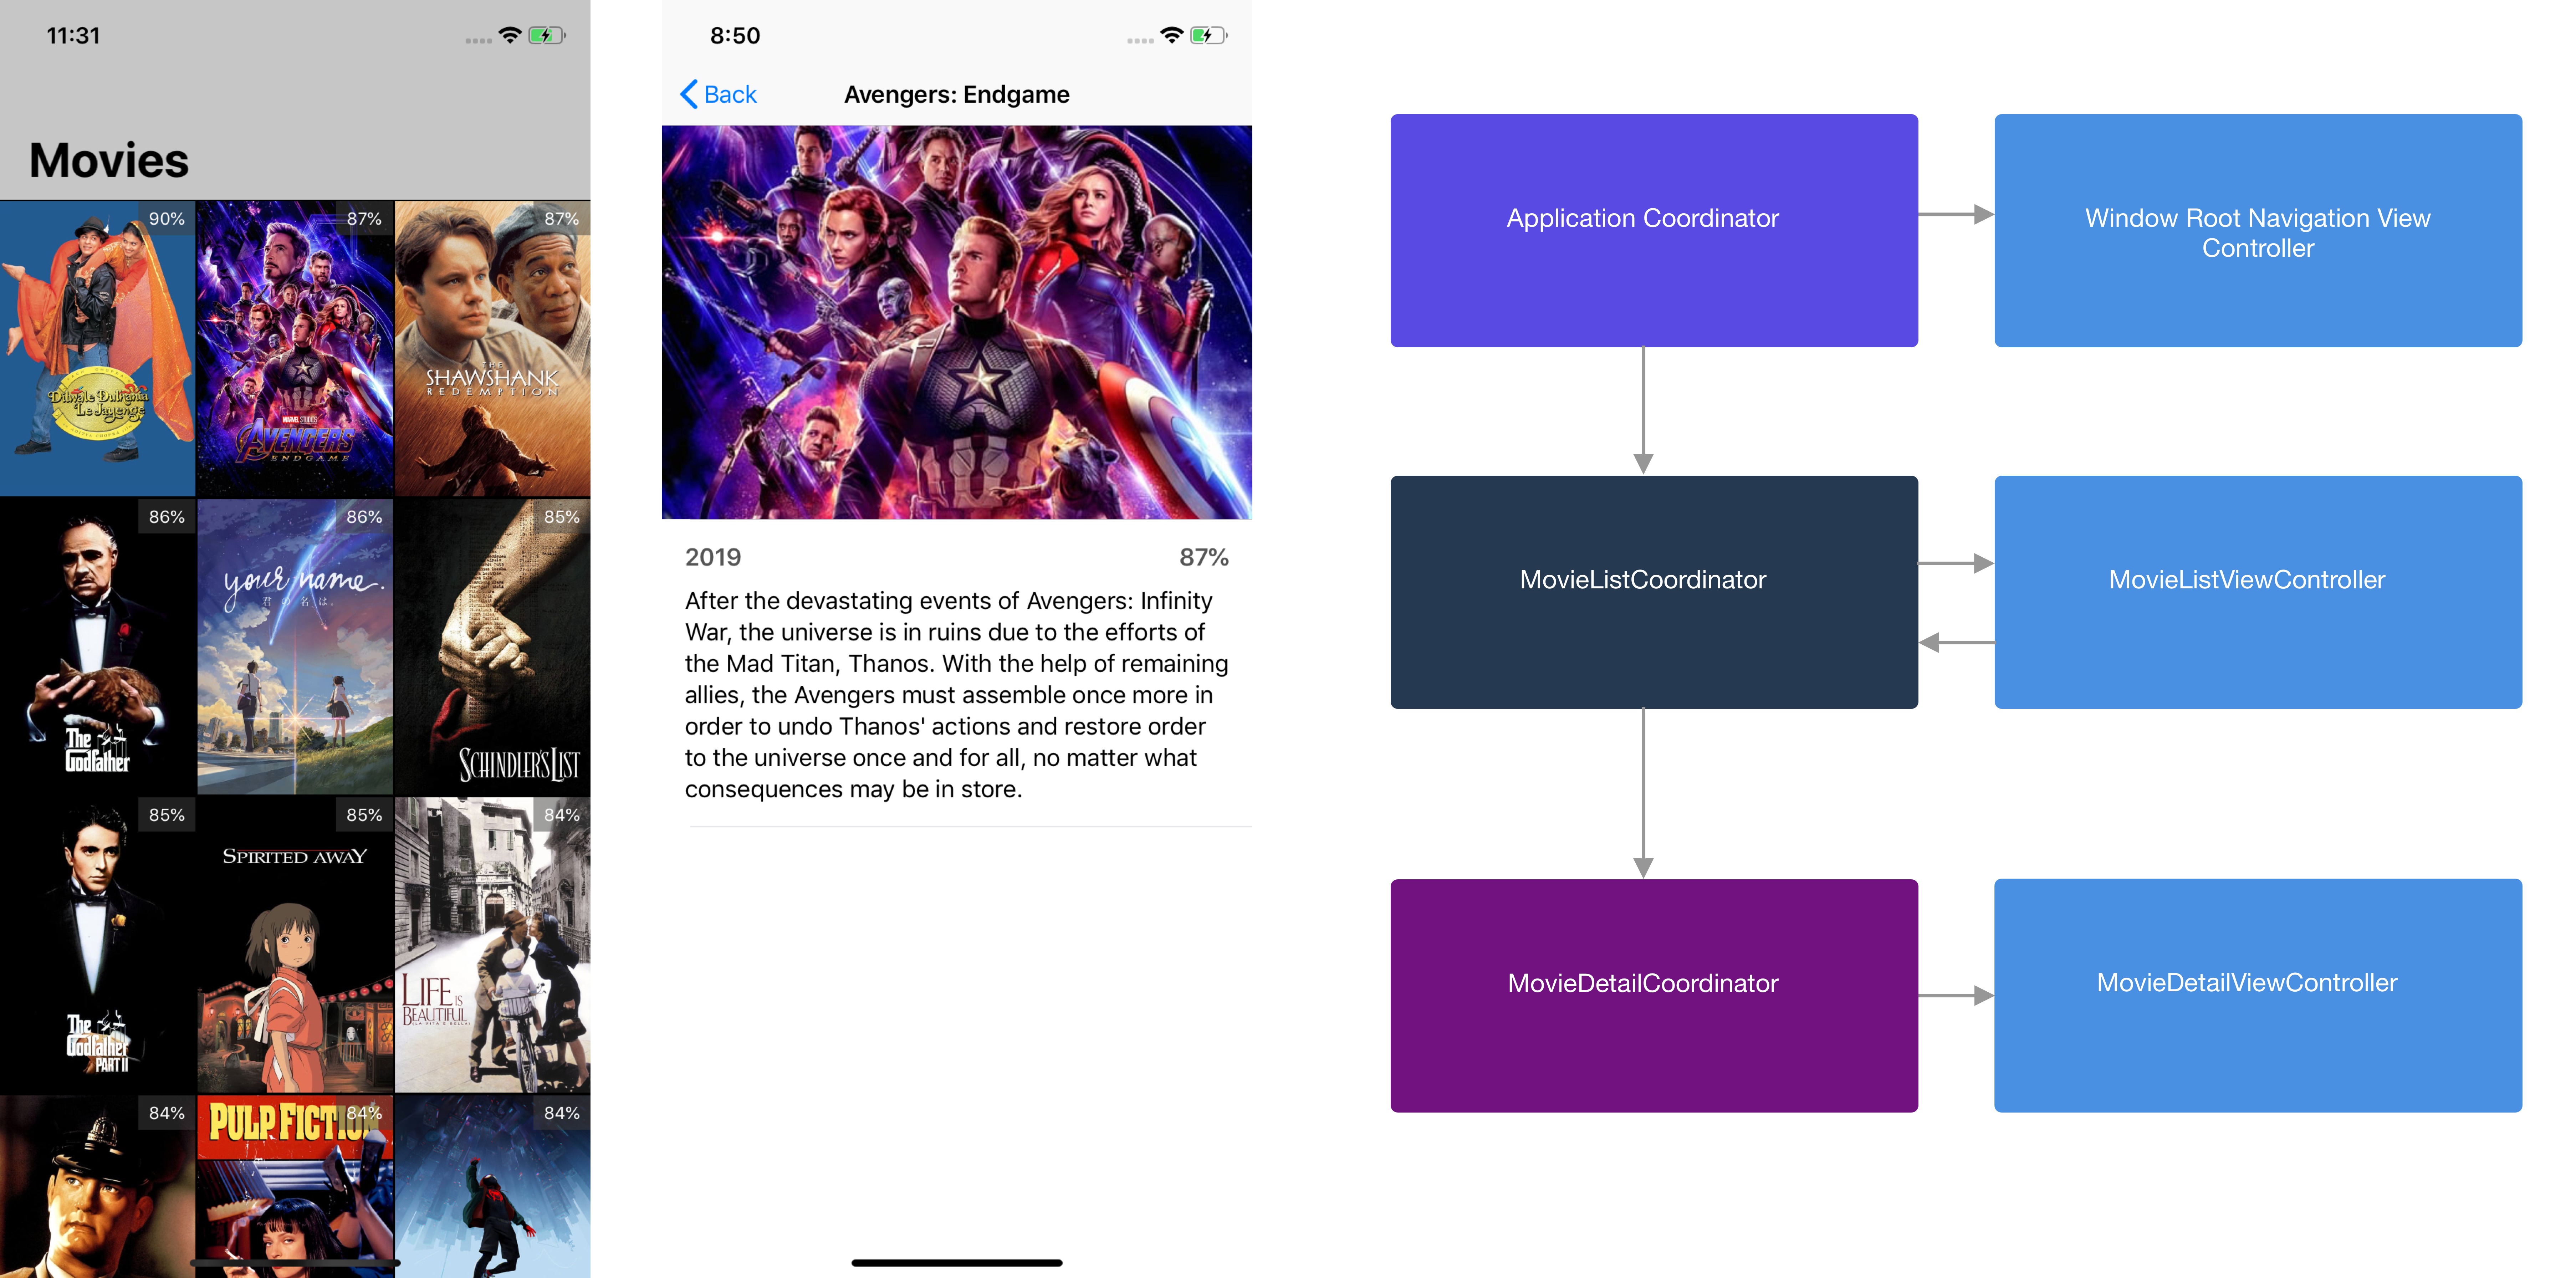
In a typical iOS app that uses MVC as the architecture, the View Controller has to handle the navigation between other View Controllers. It means that the View Controller must know in advance the other controllers that it will navigate to. This creates a tight coupling between the controllers that we should avoid whenever possible.
class MovieListViewController: UICollectionViewController {
//...
override func prepare(for segue: UIStoryboardSegue, sender: Any?) {
guard let movieDetailVC = segue.destination as? MovieDetailViewController, let cell = sender as? UICollectionViewCell, let indexPath = collectionView.indexPath(for: cell) else {
fatalError("Unexpected View Controller")
}
let movie = movies[indexPath.item]
movieDetailVC.movie = movie
}
}
This approach also add additional responsibility for the View Controller thus violating the single responsibility principle (SRP).
Enter the Coordinator PatternIn recent years, there is a new pattern that emerges to solve this navigation problem, it’s called the Coordinator pattern. Here are the breakdown of how it works:
That’s the overview of the Coordinator, let’s move to the next section where we will refactor an app that uses standard storyboard segue to navigate between view controller.
What we will refactor
The app has 2 separate screens, one is the MovieList screen and the other one is MovieDetail screen. Whenever user taps on the MovieCell in the list, it will perform the segue to the MovieDetail screen passing the Movie in the selected index. Here are the things that we will do to refact the app navigation into Coordinator pattern:
To begin, let’s clone the starter project using the GitHub repository below. It contains all the View Controllers, model, the cells for Table View and Collection View. alfianlosari/MovieCoordinator-Starter-Project. Run pod install , then try to build and run the app, then play with it a bit.
Defining Coordinator ProtocolTo begin, let’s create a new Protocol with the name of Coordinator , this protocol only has one function start which will be invoked to setup and perform the navigation in concrete class.
protocol Coordinator {
func start()
}
Next, let’s create the coordinator for the MovieDetailViewController , which is the MovieDetailCoordinator. Here are the details of the implementation:
import UIKit
class MovieDetailCoordinator: Coordinator {
private let presenter: UINavigationController
private var movieDetailViewController: MovieDetailViewController?
private let movie: Movie
init(presenter: UINavigationController, movie: Movie) {
self.presenter = presenter
self.movie = movie
}
func start() {
let movieDetailViewController = MovieDetailViewController()
movieDetailViewController.movie = movie
self.movieDetailViewController = movieDetailViewController
presenter.pushViewController(movieDetailViewController, animated: true)
}
}
Next, let’s move to the MovieListViewController . First, we have to set how the MovieListViewController will communicate with the coordinator. We are going to use a delegate for this. So declare the MovieListViewControllerDelegate like so.
protocol MovieListViewControllerDelegate: class {
func movieListViewController(_ controller: MovieListViewController, didSelect movie: Movie)
}
Navigate to the declaration of MovieListViewController to add a new weak variable with the type of MovieListViewControllerDelegate . Also delete the prepareForSegue method and update the collectionView(_didSelectItemAtIndexPath:) method like the code below to invoke the delegate and pass the user selected movie.
class MovieListViewController: UICollectionViewController {
weak var delegate: MovieListViewControllerDelegate?
//.....
override func collectionView(_ collectionView: UICollectionView, didSelectItemAt indexPath: IndexPath) {
let movie = movies[indexPath.item]
delegate?.movieListViewController(self, didSelect: movie)
}
}
Next, let’s create the MovieListCoordinator class for the MovieListViewController . Here are the breakdown of how we will implement the Coordinator pattern for this class:
import UIKit
class MovieListCoordinator: Coordinator {
private var presenter: UINavigationController
private var movieDetailCoordinator: MovieDetailCoordinator?
private var movieListViewController: MovieListViewController?
private var movies: [Movie]
init(presenter: UINavigationController, movies: [Movie]) {
self.presenter = presenter
self.movies = movies
}
func start() {
let movieListViewController = MovieListViewController()
movieListViewController.movies = movies
movieListViewController.delegate = self
self.movieListViewController = movieListViewController
presenter.pushViewController(movieListViewController, animated: true)
}
}
extension MovieListCoordinator: MovieListViewControllerDelegate {
func movieListViewController(_ controller: MovieListViewController, didSelect movie: Movie) {
let movieDetailCoordinator = MovieDetailCoordinator(presenter: presenter, movie: movie)
self.movieDetailCoordinator = movieDetailCoordinator
movieDetailCoordinator.start()
}
}
The final part of the puzzle is building the ApplicationCoordinator . Here are the breakdown of the coordinator implementation:
import UIKit
class ApplicationCoordinator: Coordinator {
private let window: UIWindow
private let rootViewController: UINavigationController
private var movieListCoordinator: MovieListCoordinator?
init(window: UIWindow, movies: [Movie]) {
self.window = window
rootViewController = UINavigationController()
rootViewController.navigationBar.prefersLargeTitles = true
movieListCoordinator = MovieListCoordinator(presenter: rootViewController, movies: movies)
}
func start() {
window.rootViewController = rootViewController
movieListCoordinator?.start()
window.makeKeyAndVisible()
}
}
At last, we need to delete main.storyboard file for the project, as we will be instantiating our app window programatically. Make sure to also delete main interface name in General tab in the project.

In AppDelegate , we need to perform several configurations:
import UIKit
@UIApplicationMain
class AppDelegate: UIResponder, UIApplicationDelegate {
var window: UIWindow?
var applicationCoordinator: ApplicationCoordinator?
func application(_ application: UIApplication, didFinishLaunchingWithOptions launchOptions: [UIApplication.LaunchOptionsKey: Any]?) -> Bool {
let window = UIWindow(frame: UIScreen.main.bounds)
let appCordinator = ApplicationCoordinator(window: window, movies: Movie.dummyMovies)
self.window = window
self.applicationCoordinator = appCordinator
appCordinator.start()
return true
}
}
That’s it try to build and run the project to see the Coordinator pattern in action! You can clone the completed project GitHub repository at alfialosari/MovieCoordinator-Completed.
ConclusionThat’s it!, we have successfully decouple all the navigation logic inside the View Controllers using the Coordinator pattern. It reduces responsibility of the View Controller for navigation to a separate coordinator object. Using this pattern helps us to write a much better encapsulated and separate abstraction of responsibilities between classes. Let’s keep the lifelong learning goes on and keep on building with Swift 😋😋😋.
Published at Apr 23, 2019

At Google Cloud Next 2019, Google has just introduced Google Cloud Run. It’s a serverless computing service, which means we don’t have to manage the infrastructure by ourselves. It is based on containers, so we only need to provide the Dockerfile that contains our HTTP server application and deploy. The service will be invocable via the HTTP request from the client and the payment will be using pay per use model.
There are many features that Google Cloud provides for the Cloud Run, such as:
You can learn more about the Cloud Run directly from Google with the official link Cloud Run | Google Cloud.
What we will buildIn this article, we will deploy a simple Swift HTTP Server app to Google Cloud Run using Dockerfile. We will use the Google Cloud SDK with Command Line for this. There are only 4 main tasks that we need to perform:
Before you begin, here are the things that you require to have: 1. Register and Sign in to the Google Cloud Platform. (https://console.cloud.google.com/). 2. Download and install Google Cloud SDK to your machine. (https://cloud.google.com/sdk/install). 3. Create a new project from the Google Cloud Console. 4. Make sure to follow all these steps in here to activate the Google Cloud Run API for your project. (https://cloud.google.com/run/docs/setup).
Prepare our HTTP Swift ApplicationOpen your terminal/shell, create a new directory named hello-swift-cloudrun and navigate to that directory.
mkdir hello-swift-cloudrun
cd hello-swift-cloudrun
Inside the directory, create a new swift package.
swift package init --type executable
Next, open Package.swift and copy the following code into the file. We will add the Swifter tiny HTTP server library as the dependency to run our HTTP Server in Swift.
/ swift-tools-version:5.0
// The swift-tools-version declares the minimum version of Swift required to build this package.import PackageDescriptionlet package = Package(
name: "hello-swift-cloudrun",
dependencies: [
.package(url: "https://github.com/httpswift/swifter.git", .upToNextMajor(from: "1.4.6"))
],
targets: [
.target(
name: "hello-swift-cloudrun",
dependencies: ["Swifter"]),
.testTarget(
name: "hello-swift-cloudrunTests",
dependencies: ["hello-swift-cloudrun"]),
.]
)
Next, open the main.swift file from the Sources directory. Copy the following code.
import Swifter
import Dispatch
import Foundation
let dateFormatter = DateFormatter()
dateFormatter.locale = Locale(identifier: "en_US")
dateFormatter.dateStyle = .full
dateFormatter.timeStyle = .full
let server = HttpServer()
server["/html"] = { req -> HttpResponse in
return .ok(.html("""
<h1>Swift Hello World from Google Cloud Run Serverless</h1>
<p>Current time is \(dateFormatter.string(from: Date()))</p>
"""))
}
server["/api"] = { req -> HttpResponse in
return .ok(.json([
"result": """
Swift Hello World from Google Cloud Run Serverless\n
Current time is \(dateFormatter.string(from: Date()))
"""
] as AnyObject))
}
let semaphore = DispatchSemaphore(value: 0)
do {
let port: Int = Int(ProcessInfo.processInfo.environment["PORT"] ?? "8080") ?? 8080
try server.start(UInt16(port))
print("Server has started ( port = \(try server.port()) ). Try to connect now...")
semaphore.wait()
} catch {
print("Server start error: \(error)")
semaphore.signal()
}
Here are the things that it performs:
Try to build and run the server by typing these commands the terminal.
swift build
swift run
To test, open your browser and navigate to the address http://localhost:8080/html. You should see the text printed with the current time in your browser.

.
Build the DockerfileNext, we will containerize our app by creating the Dockerfile. Create the file and copy the following code below.
FROM ibmcom/swift-ubuntu:latest
WORKDIR /usr/src/app
COPY . .
RUN swift build --configuration release
CMD [ "swift", "run", "--configuration", "release" ]
This will copy all the file to the container image, then run the swift build using release configuration. It will also run the server after the build has been finished.
Upload to Container RegistryNext, we need to upload our container to Cloud Registry. Make sure to retrieve your project id for your project. Run the command below.
gcloud builds submit --tag gcr.io/[PROJECT-ID]/hello-swift-cloudrun
Wait for the container builds process to finish and then uploaded to container registry. It will print the success message to the terminal.
You can check the list of the successfully uploaded container using this command.
gcloud container images list
At last, we need the deploy the image to the Google Cloud Run. Type these following command.
gcloud config set run/region us-central1
gcloud beta run deploy --image gcr.io/[PROJECT-ID]/hello-swift-cloudrun --memory 512M --allow-unauthenticated
Here are several things that it performs:
You can configure other things, from memory, concurrency, and request timeout. Check the link at Configuring memory limits | Cloud run | Google Cloud.
After the deployment finished successfully, the terminal will print the URL endpoint of the deployed service that we can use. Open your browse and navigate to:
You can view all your deployed services to Cloud Run fromt the console dashboard.
https://console.cloud.google.com/run
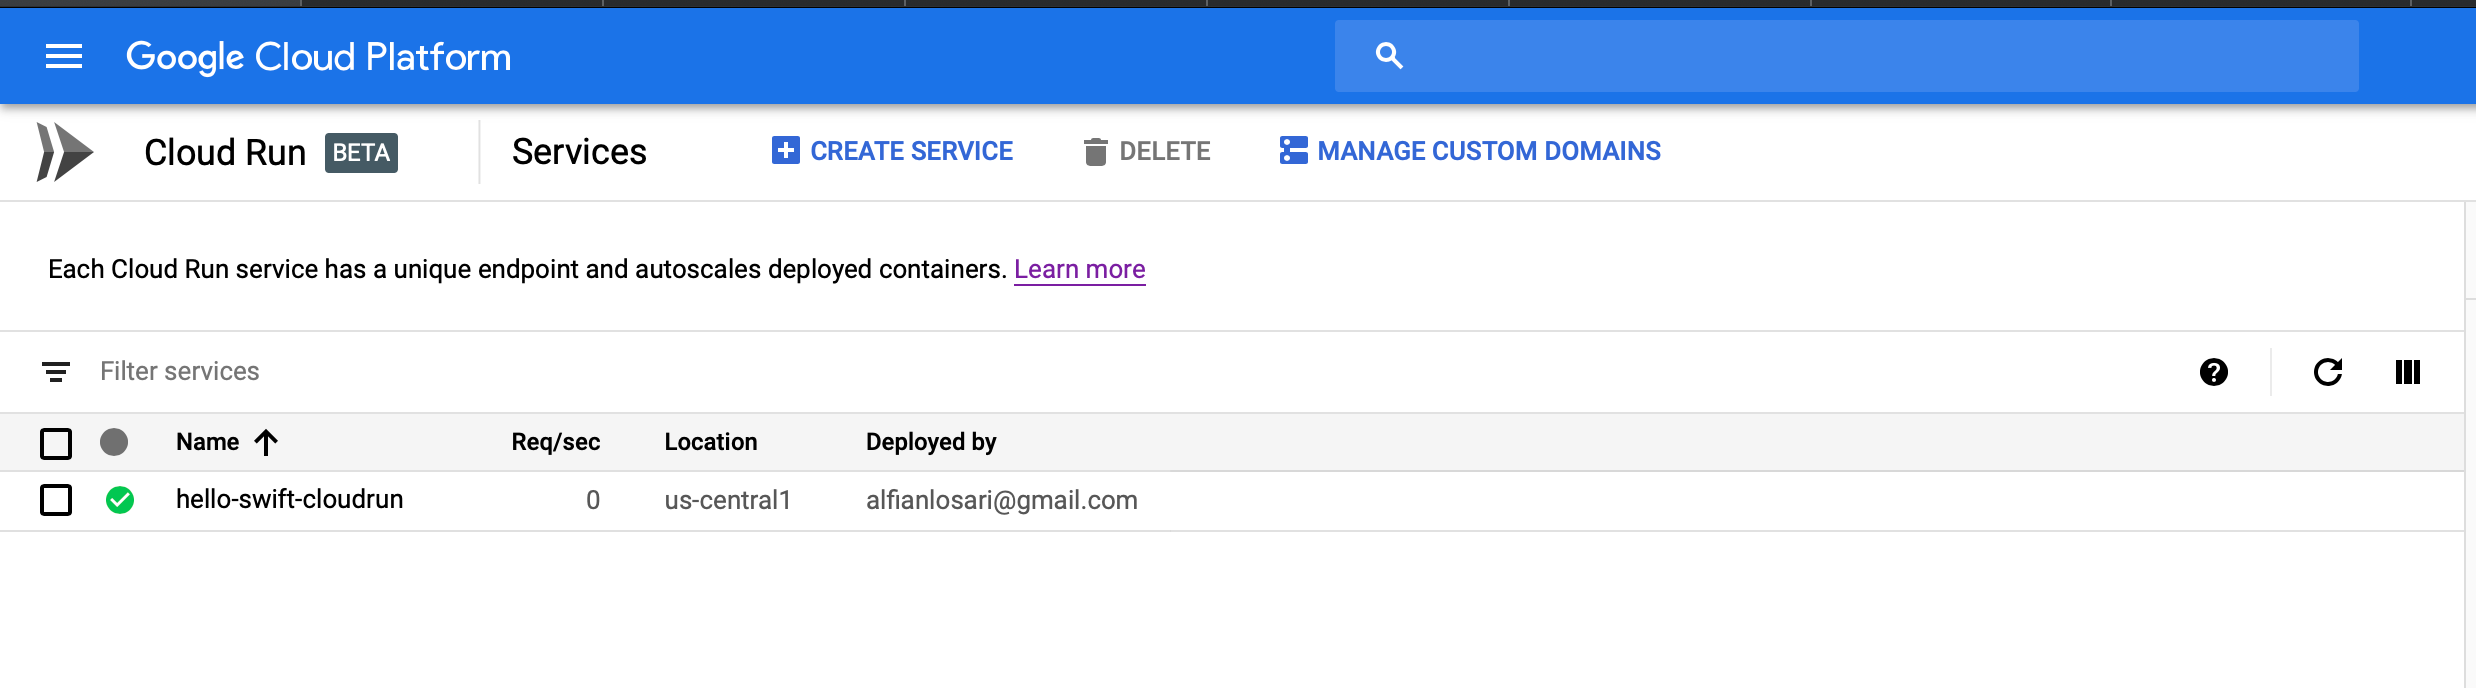
In here you can also manage the custom domains, delete and create services, and view the logs of your deployed services.
!!!Make sure to delete all the resources that you have created after you finish this article to avoid billings!!!
ConclusionYou can clone the completed project in the repository at alfianlosari/SwiftCloudRun.
That’s it, in just a simple steps we have deployed our serverless backend using Docker to the Google Cloud Run managed autoscaling service. The serverless paradigm provide us speed and reliability to execute rapidly as the size of our application grows over time ⚡️⚡️⚡️.
Published at Mar 29, 2019

Swift 5 has finally been released by Apple to the stable channel at the end of March 2019. It’s bundled in Xcode 10.2 for macOS. Swift 5 provided ABI stability to the Swift Standard Library in Apple platform. This means, all the future Swift version will be binary compatible with the apps written in Swift 5 code. It also introduces App Thinning, shrinking the app size as the ABI stability means the binary doesn’t have to embed all the Swift Standard Library inside the app bundle thus reducing the app size. The operating system will include the Swift runtime and standard library, beginning with iOS 12.2.
You can read all the information related to the future of Swift regarding Module stability and Library evolution in the link at ABI Stability and More.
In this article, we’ll talk about the new Result type for Swift 5 and how we can utilize that to create an asynchronous API request and simplify handling the completion handler closure.
Before we begin, let’s see how we usually create an asynchronous function in Swift. There are several approaches that we usually use.
1. Objective-C StyleUsing Objective-C style, we create a single callback closure with several parameters containing the optional result value and the optional error in the asynchronous function.
func fetchMovies(url: URL, completionHandler: @escaping ([Movie]?, Error?) -> Void) {
...
}
In this style, we create 2 completion closures. One is for handling success with the result value as the parameter, and one is for handling failure with the error as the parameter.
func fetchMovies(url: URL, successHandler: @escaping ([Movie]) -> Void, errorHandler: @escaping (Error?) -> Void) {
...
}
Swift 5 finally introduces new Result type to handle the result of an asynchronous function using an enum. There are only 2 cases that both uses Swift Generic with associated value:
The Result type really helps us to simplify handling the result of an asynchronous function as there are only 2 cases to handle, success and failure. Let’s begin by creating a simple extension for the URLSession data task that use the Result type for the completion handler closure.
Extending the URL Session Data Task with Result TypeAs we all know when making a data task using URLSession, we need to pass the completion handler closure with the parameters of URLResponse, Data, and Error. Their type all are optionals, which we need to check using if let or guard statement to check the http response status code, retrieve the data, and decode the data into the model.
let url = URL(string: "https://exampleapi.com/data.json")!URLSession.shared.dataTask(with: url) { (data: Data?, response: URLResponse?, error: Error?) in
if let error = error {
// Handle Error
return
} guard let response = response else {
// Handle Empty Response
return
} guard let data = data else {
// Handle Empty Data
return
} // Handle Decode Data into Model
}
This approach is really cumbersome to handle every time. We can create a better solution using the Result Type. So, let’s make a simple extension for the URLSession to handle data task with Result type.
extension URLSession { func dataTask(with url: URL, result: @escaping (Result<(URLResponse, Data), Error>) -> Void) -> URLSessionDataTask {
return dataTask(with: url) { (data, response, error) in
if let error = error {
result(.failure(error))
return
} guard let response = response, let data = data else {
let error = NSError(domain: "error", code: 0, userInfo: nil)
result(.failure(error))
return
}
result(.success((response, data)))
}
}
}
We can call this function like we usually invoke the dataTask passing the URL, instead this time we will pass the completion closure with Result Type as the parameter.
URLSession.shared.dataTask(with: url) { (result) in
switch result {
case .success(let response, let data):
// Handle Data and Response
break case .failure(let error):
// Handle Error
break
}
}
This approach looks pretty simple and clean compared to using previous completion handle without Result type.
Create API Service for The MovieDB (TMDb) APILet’s use our new knowledge to build a simple MovieServiceAPI class that used The Movie Database (TMDb) API to retrieve movies by category, single movie by Id. You can register for the API key in the link at API Docs TMDb
First let’s create the Model that implements the Codable to handle decoding the JSON data into the Swift Model.
public struct MoviesResponse: Codable {
public let page: Int
public let totalResults: Int
public let totalPages: Int
public let results: [Movie]
}public struct Movie: Codable {
public let id: Int
public let title: String
public let overview: String
public let releaseDate: Date
public let voteAverage: Double
public let voteCount: Int
public let adult: Bool
}
Next, let’s create the class with all the properties such as the baseURL, apiKey, jsonDecoder and endpoint that is being represented by enum.
class MovieServiceAPI {
public static let shared = MovieServiceAPI() private init() {}
private let urlSession = URLSession.shared
private let baseURL = URL(string: "https://api.themoviedb.org/3")!
private let apiKey = "PUT_API KEY HERE" private let jsonDecoder: JSONDecoder = {
let jsonDecoder = JSONDecoder()
jsonDecoder.keyDecodingStrategy = .convertFromSnakeCase
let dateFormatter = DateFormatter()
dateFormatter.dateFormat = "yyyy-mm-dd"
jsonDecoder.dateDecodingStrategy = .formatted(dateFormatter)
return jsonDecoder
}() // Enum Endpoint
enum Endpoint: String, CustomStringConvertible, CaseIterable {
case nowPlaying = "now_playing"
case upcoming
case popular
case topRated = "top_rated"
}
}
We also need to create an Error enum to represent several error case in our API request.
class MovieServiceAPI {
...
public enum APIServiceError: Error {
case apiError
case invalidEndpoint
case invalidResponse
case noData
case decodeError
}
}
Next, let’s create a private function that fetch resource using Swift Generic Constraint withdecodable type. This function will accept the URL that will be used to initiate the URLsession data task with Result Type.
private func fetchResources<T: Decodable>(url: URL, completion: @escaping (Result<T, APIServiceError>) -> Void) { guard var urlComponents = URLComponents(url: url, resolvingAgainstBaseURL: true) else {
completion(.failure(.invalidEndpoint))
return
} let queryItems = [URLQueryItem(name: "api_key", value: apiKey)]
urlComponents.queryItems = queryItems guard let url = urlComponents.url else {
completion(.failure(.invalidEndpoint))
return
}
urlSession.dataTask(with: url) { (result) in
switch result {
case .success(let (response, data)):
guard let statusCode = (response as? HTTPURLResponse)?.statusCode, 200..<299 ~= statusCode else {
completion(.failure(.invalidResponse))
return
}
do {
let values = try self.jsonDecoder.decode(T.self, from: data)
completion(.success(values))
} catch {
completion(.failure(.decodeError))
}
case .failure(let error):
completion(.failure(.apiError))
}
}.resume()
}
In the URLSession dataTask with completion closure, we check the result enum. If success, we retrieve the data then check the response HTTP status code to make sure it’s in the range between 200 and 299. Then, using jsonDecoder we decode the json data with the generic decodable constraint of the model from the function parameter.
Fetch Movie List from EndpointNext, let’s create our first method to retrieve list of movies using specific endpoint. First, we start defining the URL by appending the baseURL with the endpoint passed. Then, let’s use the fetchResource method that we have created before to retrieve the movies array that is already decoded.
class MovieServiceAPI {
...
public func fetchMovies(from endpoint: Endpoint, result: @escaping (Result<MoviesResponse, APIServiceError>) -> Void) { let movieURL = baseURL
.appendingPathComponent("movie")
.appendingPathComponent(endpoint.rawValue)
fetchResources(url: movieURL, completion: result)
}
To use the method, we can call it just like this:
MovieAPIService.shared.fetchMovies(from: .nowPlaying) { (result: Result<MoviesResponse, MovieAPIService.APIServiceError>) in switch result {
case .success(let movieResponse):
print(movieResponse.results) case .failure(let error):
print(error.localizedDescription)
}
}
For retrieving single movie using a movie id, we’ll construct the url by appending movie id, then using the same fetchResource method we retrieve a single decoded movie for the result.
class MovieServiceAPI {...
public func fetchMovie(movieId: Int, result: @escaping (Result<Movie, APIServiceError>) -> Void) {
let movieURL = baseURL
.appendingPathComponent("movie")
.appendingPathComponent(String(movieId)) fetchResources(url: movieURL, completion: result)
}
To use the method, we can call it just like this:
MovieAPIService.shared.fetchMovie(movieId: 1234) { (result: Result<Movie, MovieAPIService.APIServiceError>) in
switch result {
case .success(let movie):
print(movie)
case .failure(let error):
print(error.localizedDescription)
}
}
That’s it, our API service looks pretty simple and clean with Result Type as the completion handler. There are many other features for Result Type such as map and flatMap Result to another Result. Result type really simplify the callback completion handler into success and failure case.
Swift 5 is super amazing and i believe there are many more amazing new features that we can look forward for the next evolution of Swift. Keep the lifelong learning goes on and happy Swifting 😋.
Published at Mar 14, 2019

MVC is the app architecture that Apple recommends to the developers when developing iOS application. It provides clear separation between view, model, and controller. The controller sits at the middle and acts as a glue between view and model. Almost all the logic, data transformation from model to view is thrown inside the controller.
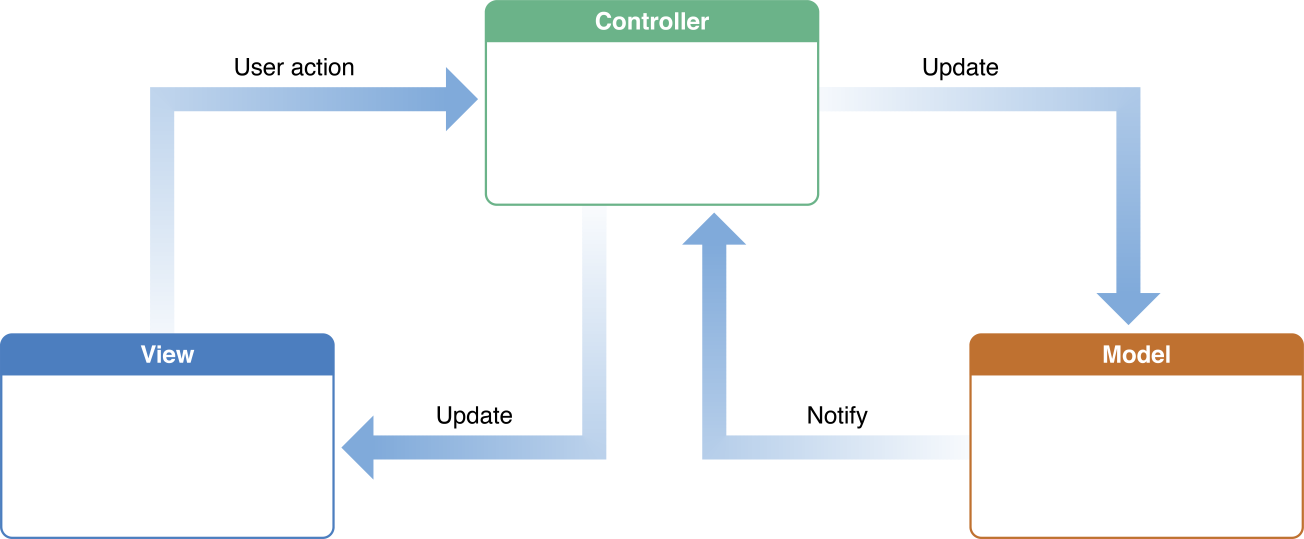
Overtime as the features and requirements grow, the view controller become so massive by all the logic, state management, data transformation, it will become tightly coupled and become very hard to test as an unit. Although is not always the case, if we carefully manage it properly. See Dave De Long blog post on better MVC.
Introducting MVVMModel View View Model is the application architecture that was first actually invented by Microsoft with their .NET framework back in 2005 as a way to build event driven user interface.
MVVM as an architecture provide several main responsibilities, such as:
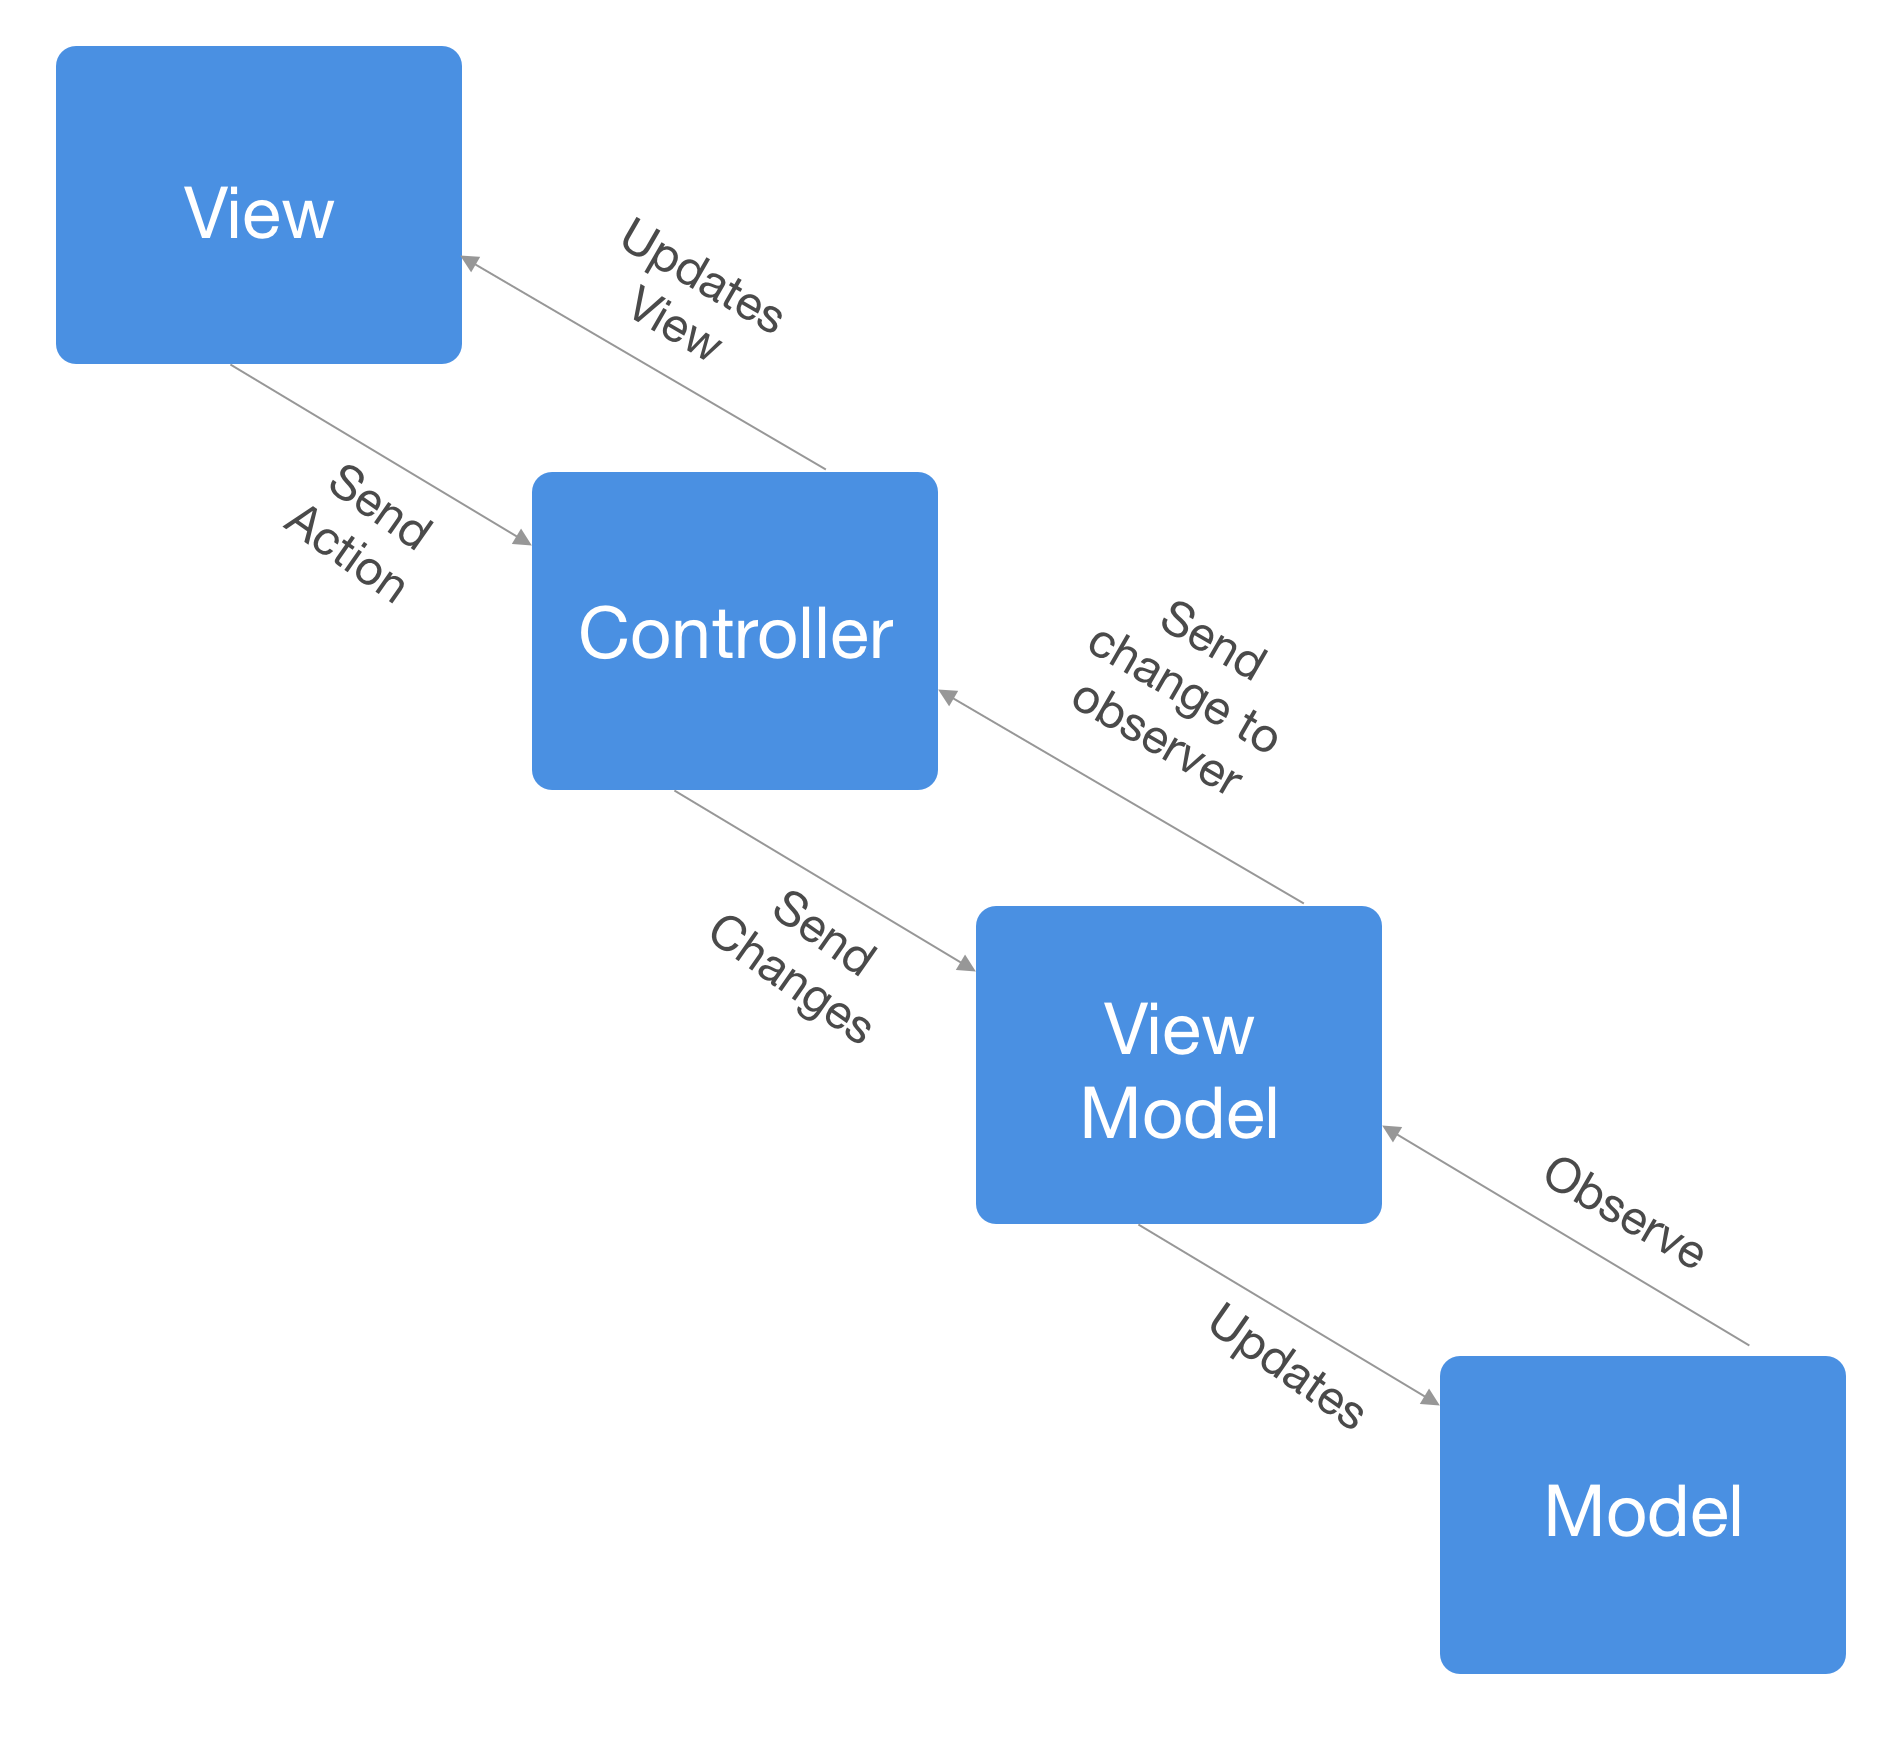
With MVVM, all the data transformation from model, for example formatting date to be displayed as a text in UILabel will be implemented by the View Model and exposed to the controller as property. View Controller responsibility is to configure the binding of properties from the View Model into the View and to send all the action from the view back to View Model. This way, the application state will always be in sync between the view and the View Model.
There are several important rules that applies:
MVVM provides better encapsulation of the business logic and data transformation from the model, it is also very easy to test as an unit. Not all View Model need to provide binding to their properties, it can still be a lightweight object that can be used to configure view with the data transformation as we will see later when building our app.
Several of the binding options are available, like using key value observing and closures. In this article, we are going to use RxSwift library that provide reactive observable sequence to build our MVVM app.
What we will buildWhat we will build
In this article, we are going to refactor current iOS app that used MVC as its app architecture into MVVM. It is a movie info app that uses The Movie Database (TMDb) API with several main features:
We will see how the MVVM architecture will help us build a much more lighter view controller and several View Models that have their own responsibility.
Please register and get your API Key from TMDb. https://www.themoviedb.org/documentation/api.
You can clone the starter project in the GitHub repository at alfianlosar/MovieInfoStarterProject.
Starter Project
The starter project uses storyboard to configure its view controllers. Take a peek at the Main.storyboard file to view the configuration.

The app’s initial view controller is a Tab Bar Controller with 2 children, each of them is embedded into a Navigation Controller. Here’s a quick introduction the children:
Both of the View Controllers use TableView to display the list of movies using MovieCell that is configured to display the data in tableView(_:cellForRowAt:) table view data source method.
The app has the models object inside the Movie.swift file. There are several models inside the files that already implements the Codable protocol and can be used out of the box to decode the response from TMDb API.
The app also has the MovieStore object that implements the MovieService protocol. The MovieStore object uses the TMDb API to perform url session request to the specified enpdoint, decode the result into the response object, and invoke the successful handler closure passing the response.
Make sure to open the MovieStore.swift file and paste your own API Key into the apiKey constant inside the class, then build and run the project. Play with it for a while to understand the app features. Next, we will start our refactoring process step by step starting from the configuration of the movie cell to display the data.
The MovieViewViewModelThe first refactoring will be pretty simple, take a look inside both MovieListViewController and MovieSearchViewController tableView(_:cellForRowAt:) method. We can see that all the data transformation especially the release date and rating text is performed inside it before they are being set into the Movie Cell ui elements, the View Controller should not handle this data transformation.
func tableView(_ tableView: UITableView, cellForRowAt indexPath: IndexPath) -> UITableViewCell {
let cell = tableView.dequeueReusableCell(withIdentifier: "MovieCell", for: indexPath) as! MovieCell
let movie = movies[indexPath.row] cell.titleLabel.text = movie.title
cell.releaseDateLabel.text = dateFormatter.string(from: movie.releaseDate)
cell.overviewLabel.text = movie.overview
cell.posterImageView.kf.setImage(with: movie.posterURL) let rating = Int(movie.voteAverage)
let ratingText = (0..<rating).reduce("") { (acc, _) -> String in
return acc + "⭐️
}
cell.ratingLabel.text = ratingText
return cell
}
Let’s begin by create a new file for our View Model which we call MovieViewViewModel. Here are several things that it will do:
import Foundation
struct MovieViewViewModel {
private var movie: Movie
private static let dateFormatter: DateFormatter = {
$0.dateStyle = .medium
$0.timeStyle = .none
return $0
}(DateFormatter())
init(movie: Movie) {
self.movie = movie
}
var title: String {
return movie.title
}
var overview: String {
return movie.overview
}
var posterURL: URL {
return movie.posterURL
}
var releaseDate: String {
return MovieViewViewModel.dateFormatter.string(from: movie.releaseDate)
}
var rating: String {
let rating = Int(movie.voteAverage)
let ratingText = (0..<rating).reduce("") { (acc, _) -> String in
return acc + "⭐️"
}
return ratingText
}
}
For the next part, we can update the MovieCell class so it provide a configure method that accepts a MovieViewViewModel.
import UIKit
import Kingfisher
class MovieCell: UITableViewCell {
@IBOutlet weak var posterImageView: UIImageView!
@IBOutlet weak var titleLabel: UILabel!
@IBOutlet weak var overviewLabel: UILabel!
@IBOutlet weak var releaseDateLabel: UILabel!
@IBOutlet weak var ratingLabel: UILabel!
func configure(viewModel: MovieViewViewModel) {
titleLabel.text = viewModel.title
overviewLabel.text = viewModel.overview
releaseDateLabel.text = viewModel.releaseDate
ratingLabel.text = viewModel.rating
posterImageView.kf.setImage(with: viewModel.posterURL)
}
}
At last, inside both the view controllers we can update the tableView(_:cellForRowAt:) method so it can initialize the MovieViewViewModel and invoke the MovieCell configure method passing the view model to configure the cell UI.
func tableView(_ tableView: UITableView, cellForRowAt indexPath: IndexPath) -> UITableViewCell {
let cell = tableView.dequeueReusableCell(withIdentifier: "MovieCell", for: indexPath) as! MovieCell
let movie = movies[indexPath.row
let viewModel = MovieViewViewModel(movie: movie)
cell.configure(viewModel: viewModel)
return cell
}
That’s it for our first View Model!. We simply move all the logic to transform data inside the view controller into a separate View Model object that doesn’t have to know about the controller or the view. P.S, you can also delete the DateFormatter property inside the view controllers for the sake of lean view controller 😋. Run and build the project to make sure it still works.
Brief introduction about Reactive Programming with RxSwiftBefore we begin our next refactoring, i’m going to provide a simple introduction about reactive programming with RxSwift in case some of you never try it before. It can also be a refresher if you have already using reactive programming before. In Reactive programming, data is a flow of sequence (stream) that starts at publisher, going to several transformation using operator, and then ends at the subscribers. Take a look the marble diagram below for better visualization:
The line at the top of diagram are the observables sequence that are published, then filter transformation is applied at the middle, and at the end the observer/subscribe will only receive the value that has passed through the transformation. There are many more operators like combine, zip, merge, throttle, that we can use as transformation in the pipeline. Make sure to check the RxSwift documentation to learn for more.
http://reactivex.io/documentation/operators.html
There are several key terms that we need to know and understand to use RxSwift properly:
That’s all for the quick intro about Reactive programming with RxSwift, let’s begin our next refactoring for MovieListViewController!
MovieListViewController Current MVC Stateimport UIKit
class MovieListViewController: UIViewController {
@IBOutlet weak var tableView: UITableView!
@IBOutlet weak var activityIndicatorView: UIActivityIndicatorView!
@IBOutlet weak var infoLabel: UILabel!
@IBOutlet weak var segmentedControl: UISegmentedControl!
let movieService: MovieService = MovieStore.shared
var movies = [Movie]() {
didSet {
tableView.reloadData()
}
}
var endpoint = Endpoint.nowPlaying {
didSet {
fetchMovies()
}
}
override func viewDidLoad() {
super.viewDidLoad()
segmentedControl.addTarget(self, action: #selector(segmentChanged(_:)), for: .valueChanged)
setupTableView()
fetchMovies()
}
private func fetchMovies() {
self.movies = []
activityIndicatorView.startAnimating()
infoLabel.isHidden = true
movieService.fetchMovies(from: endpoint, params: nil, successHandler: {[unowned self] (response) in
self.activityIndicatorView.stopAnimating()
self.movies = response.results
}) { [unowned self] (error) in
self.activityIndicatorView.stopAnimating()
self.infoLabel.text = error.localizedDescription
self.infoLabel.isHidden = false
}
}
private func setupTableView() {
tableView.tableFooterView = UIView()
tableView.rowHeight = UITableView.automaticDimension
tableView.estimatedRowHeight = 100
tableView.register(UINib(nibName: "MovieCell", bundle: nil), forCellReuseIdentifier: "MovieCell")
}
@objc func segmentChanged(_ sender: UISegmentedControl) {
endpoint = sender.endpoint
}
}
extension MovieListViewController: UITableViewDataSource, UITableViewDelegate {
func tableView(_ tableView: UITableView, numberOfRowsInSection section: Int) -> Int {
return movies.count
}
func tableView(_ tableView: UITableView, cellForRowAt indexPath: IndexPath) -> UITableViewCell {
let cell = tableView.dequeueReusableCell(withIdentifier: "MovieCell", for: indexPath) as! MovieCell
let movie = movies[indexPath.row]
let viewModel = MovieViewViewModel(movie: movie)
cell.configure(viewModel: viewModel)
return cell
}
}
Let’s take a look at the current MovieListViewController implementation. There are several responsibilities it currently has:
There are many tasks that MovieListViewController need to perform, from state management when fetching movies, storing, and tracking all the properties. All of this logic and state make the View Controller tightly coupled and hard to test in encapsulation. So, let’s reduce all the burden of the View Controller and move to our next refactoring, which is to create a MovieListViewViewModel.
Refactor into MovieListViewViewModelLet’s create new file for our View Model using MovieListViewViewModel as the filename. Next, let’s import the RxSwift and RxCocoa frameworks, then declare the class.
import Foundation
import RxSwift
import RxCocoa
class MovieListViewViewModel {
private let movieService: MovieService
private let disposeBag = DisposeBag()
private let _movies = BehaviorRelay<[Movie]>(value: [])
private let _isFetching = BehaviorRelay<Bool>(value: false)
private let _error = BehaviorRelay<String?>(value: nil)
var isFetching: Driver<Bool> {
return _isFetching.asDriver()
} var movies: Driver<[Movie]> {
return _movies.asDriver()
} var error: Driver<String?> {
return _error.asDriver()
} var hasError: Bool {
return _error.value != nil
} var numberOfMovies: Int {
return _movies.value.count
}
}
Let’s break down all the declarations into several points:
Next, let’s declare the initializer and methods for this View Model.
class MovieListViewViewModel { ...
init(endpoint: Driver<Endpoint>, movieService: MovieService) {
self.movieService = movieService
endpoint
.drive(onNext: { [weak self] (endpoint) in
self?.fetchMovies(endpoint: endpoint)
}).disposed(by: disposeBag)
}
func viewModelForMovie(at index: Int) -> MovieViewViewModel? {
guard index < _movies.value.count else {
return nil
}
return MovieViewViewModel(movie: _movies.value[index])
}
func fetchMovies(endpoint: Endpoint) {
self._movies.accept([])
self._isFetching.accept(true)
self._error.accept(nil)
movieService.fetchMovies(from: endpoint, params: nil, successHandler: {[weak self] (response) in
self?._isFetching.accept(false)
self?._movies.accept(response.results)
}) { [weak self] (error) in
self?._isFetching.accept(false)
self?._error.accept(error.localizedDescription)
}
}
}
Let’s break down all of it into several main points:
Next, we need to update the MovieListViewController to use the View Model we just created.
...
import RxSwift
import RxCocoa
class MovieListViewController: UIViewController {
...
var movieListViewViewModel: MovieListViewViewModel!
let disposeBag = DisposeBag()
override func viewDidLoad() {
super.viewDidLoad()
movieListViewViewModel = MovieListViewViewModel(endpoint: segmentedControl.rx.selectedSegmentIndex
.map { Endpoint(index: $0) ?? .nowPlaying }
.asDriver(onErrorJustReturn: .nowPlaying)
, movieService: MovieStore.shared)
movieListViewViewModel.movies.drive(onNext: {[unowned self] (_) in
self.tableView.reloadData()
}).disposed(by: disposeBag)
movieListViewViewModel
.isFetching
.drive(activityIndicatorView.rx.isAnimating)
.disposed(by: disposeBag)
movieListViewViewModel
.error
.drive(onNext: {[unowned self] (error) in
self.infoLabel.isHidden = !self.movieListViewViewModel.hasError
self.infoLabel.text = error
}).disposed(by: disposeBag)
setupTableView()
}
....
}
In here, there are several things that we have updated:
At last, let’s update the table view data source implementation to use our new View Model.
extension MovieListViewController: UITableViewDataSource, UITableViewDelegate {
func tableView(_ tableView: UITableView, numberOfRowsInSection section: Int) -> Int {
return movieListViewViewModel.numberOfMovies
}
func tableView(_ tableView: UITableView, cellForRowAt indexPath: IndexPath) -> UITableViewCell {
let cell = tableView.dequeueReusableCell(withIdentifier: "MovieCell", for: indexPath) as! MovieCell
if let viewModel = movieListViewViewModel.viewModelForMovie(at: indexPath.row) {
cell.configure(viewModel: viewModel)
}
return cell
}
}
In here, we just need to update the numberOfRowsInSection method to just return the MovieListViewViewModel numberOfMovies property. In tableView(_:cellForRowAt:) , we can use the MovieListViewViewModel viewModelForMovieAtIndex: to return the MovieViewViewModel on the respective indexPath row.
That’s it for the MovieListViewController refactoring to use MVVM. We can also delete all the properties and method that we don’t actually use anymore. They have been moved into the MovieListViewViewModel for better encapsulation!
MovieSearchViewController Current MVC Stateimport UIKit
class MovieSearchViewController: UIViewController {
@IBOutlet weak var tableView: UITableView!
@IBOutlet weak var infoLabel: UILabel!
@IBOutlet weak var activityIndicatorView: UIActivityIndicatorView!
var service: MovieService = MovieStore.shared
var movies = [Movie]() {
didSet {
tableView.reloadData()
}
}
override func viewDidLoad() {
super.viewDidLoad()
setupNavigationBar()
setupTableView()
}
private func setupNavigationBar() {
navigationItem.searchController = UISearchController(searchResultsController: nil)
self.definesPresentationContext = true
navigationItem.searchController?.dimsBackgroundDuringPresentation = false
navigationItem.searchController?.hidesNavigationBarDuringPresentation = false
navigationItem.searchController?.searchBar.sizeToFit()
navigationItem.searchController?.searchBar.delegate = self
navigationItem.hidesSearchBarWhenScrolling = false
navigationController?.navigationBar.prefersLargeTitles = true
}
private func setupTableView() {
tableView.tableFooterView = UIView()
tableView.rowHeight = UITableView.automaticDimension
tableView.estimatedRowHeight = 100
tableView.register(UINib(nibName: "MovieCell", bundle: nil), forCellReuseIdentifier: "MovieCell")
}
private func searchMovie(query: String?) {
guard let query = query, !query.isEmpty else {
return
}
self.movies = []
activityIndicatorView.startAnimating()
infoLabel.isHidden = true
service.searchMovie(query: query, params: nil, successHandler: {[unowned self] (response) in
self.activityIndicatorView.stopAnimating()
if response.totalResults == 0 {
self.infoLabel.text = "No results for \(query)"
self.infoLabel.isHidden = false
}
self.movies = Array(response.results.prefix(5))
}) { [unowned self] (error) in
self.activityIndicatorView.stopAnimating()
self.infoLabel.isHidden = false
self.infoLabel.text = error.localizedDescription
}
}
}
extension MovieSearchViewController: UITableViewDataSource, UITableViewDelegate {
func tableView(_ tableView: UITableView, numberOfRowsInSection section: Int) -> Int {
return movies.count
}
func tableView(_ tableView: UITableView, cellForRowAt indexPath: IndexPath) -> UITableViewCell {
let cell = tableView.dequeueReusableCell(withIdentifier: "MovieCell", for: indexPath) as! MovieCell
let movie = movies[indexPath.row]
let viewModel = MovieViewViewModel(movie: movie)
cell.configure(viewModel: viewModel)
return cell
}
}
extension MovieSearchViewController: UISearchBarDelegate {
func searchBarSearchButtonClicked(_ searchBar: UISearchBar) {
searchBar.resignFirstResponder()
searchMovie(query: searchBar.text)
}
func searchBarCancelButtonClicked(_ searchBar: UISearchBar) {
searchBar.resignFirstResponder()
self.movies = []
self.infoLabel.text = "Start searching your favourite movies"
self.infoLabel.isHidden = false
}
func searchBar(_ searchBar: UISearchBar, textDidChange searchText: String) {
self.movies = []
if searchText.isEmpty {
self.infoLabel.text = "Start searching your favourite movies"
self.infoLabel.isHidden = false
}
}
}
Let’s take a look at the current MovieSearchViewController implementation. It has many many similarities with the MovieListViewController such as:
For the sake of not repeating what those things are, you can refer to the detail in MovieListViewController current MVC state section of this article.
Instead, we will focus on the differences, here they are:
That’s all for the detail of the current state, let’s move on to refactoring by creating MovieSearchViewViewModel.
Refactor into MovieSearchViewViewModelLet’s create new file for our View Model using MovieSearchViewViewModel as the filename. Next, let’s import the RxSwift and RxCocoa frameworks, then declare the class.
import Foundation
import RxSwift
import RxCocoa
class MovieSearchViewViewModel {
private let movieService: MovieService
private let disposeBag = DisposeBag()
private let _movies = BehaviorRelay<[Movie]>(value: [])
private let _isFetching = BehaviorRelay<Bool>(value: false)
private let _info = BehaviorRelay<String?>(value: nil)
var isFetching: Driver<Bool> {
return _isFetching.asDriver()
}
var movies: Driver<[Movie]> {
return _movies.asDriver()
}
var info: Driver<String?> {
return _info.asDriver()
}
var hasInfo: Bool {
return _info.value != nil
}
var numberOfMovies: Int {
return _movies.value.count
}
}
The properties are almost pretty much identical compared to MovieListViewViewModel , the only differences here is we replace error property with the info property. In search, we are also displaying placeholder text when the search bar text is empty. You can see more detail about those properties in the Refactoring into MovieListViewViewModel section of this article.
Next, let’s declare the initializer and methods that will be pretty different compared to MovieListViewViewModel.
import Foundation
import RxSwift
import RxCocoa
class MovieSearchViewViewModel {
init(query: Driver<String>, movieService: MovieService) {
self.movieService = movieService
.query
.throttle(1.0)
.distinctUntilChanged()
.drive(onNext: { [weak self] (queryString) in
self?.searchMovie(query: queryString)
if queryString.isEmpty {
self?._movies.accept([])
self?._info.accept("Start searching your favorite movies")
}
}).disposed(by: disposeBag)
}
func viewModelForMovie(at index: Int) -> MovieViewViewModel? {
guard index < _movies.value.count else {
return nil
}
return MovieViewViewModel(movie: _movies.value[index])
}
private func searchMovie(query: String?) {
guard let query = query, !query.isEmpty else {
return
}
self._movies.accept([])
self._isFetching.accept(true)
self._info.accept(nil)
movieService.searchMovie(query: query, params: nil, successHandler: {[weak self] (response) in
self?._isFetching.accept(false)
if response.totalResults == 0 {
self?._info.accept("No result for \(query)")
}
self?._movies.accept(Array(response.results.prefix(5)))
}) { [weak self] (error) in
self?._isFetching.accept(false)
self?._info.accept(error.localizedDescription)
}
}
}
Let’s break down all of it into several main points:
Next, we need to update the MovieSearchViewController to use the View Model we just created.
import UIKit
import RxCocoa
import RxSwift
class MovieSearchViewController: UIViewController {
@IBOutlet weak var tableView: UITableView!
@IBOutlet weak var infoLabel: UILabel!
@IBOutlet weak var activityIndicatorView: UIActivityIndicatorView!
var movieSearchViewViewModel: MovieSearchViewViewModel!
let disposeBag = DisposeBag()
override func viewDidLoad() {
super.viewDidLoad()
setupNavigationBar()
let searchBar = self.navigationItem.searchController!.searchBar
movieSearchViewViewModel = MovieSearchViewViewModel(query:
searchBar.rx.text.orEmpty.asDriver(), movieService: MovieStore.shared)
movieSearchViewViewModel
.movies.drive(onNext: {[unowned self] (_) in
self.tableView.reloadData()
}).disposed(by: disposeBag)
movieSearchViewViewModel
.isFetching
.drive(activityIndicatorView.rx.isAnimating)
.disposed(by: disposeBag)
movieSearchViewViewModel.info.drive(onNext: {[unowned self] (info) in
self.infoLabel.isHidden = !self.movieSearchViewViewModel.hasInfo
self.infoLabel.text = info
}).disposed(by: disposeBag)
searchBar.rx.searchButtonClicked
.asDriver(onErrorJustReturn: ())
.drive(onNext: { [unowned searchBar] in
searchBar.resignFirstResponder()
}).disposed(by: disposeBag)
searchBar.rx.cancelButtonClicked
.asDriver(onErrorJustReturn: ())
.drive(onNext: { [unowned searchBar] in
searchBar.resignFirstResponder()
}).disposed(by: disposeBag)
setupTableView()
} ...
}
In here, it works almost the same with the MovieListViewController viewDidLoad method but instead of declaring MoveListViewViewModel , we declare MovieSearchViewViewModel . In the viewDidLoad , we instantiate it passing the search bar extension with RxCocoa that exposes the text property as driver. Also, we use are handling the search bar searchButtonClicked and cancelButtonClicked using RxCocoa to dismiss the on screen keyboard whenever new event is delivered.
At last, let’s update the table view data source implementation to use our new View Model.
extension MovieSearchViewController: UITableViewDataSource, UITableViewDelegate {
func tableView(_ tableView: UITableView, numberOfRowsInSection section: Int) -> Int {
return movieSearchViewViewModel.numberOfMovies
} func tableView(_ tableView: UITableView, cellForRowAt indexPath: IndexPath) -> UITableViewCell { let cell = tableView.dequeueReusableCell(withIdentifier: "MovieCell", for: indexPath) as! MovieCell
if let viewModel = movieSearchViewViewModel.viewModelForMovie(at: indexPath.row) {
cell.configure(viewModel: viewModel)
}
return cell
}
}
In here, we just need to update the numberOfRowsInSection method to just return the MovieSearchViewViewModel numberOfMovies property. In tableView(_:cellForRowAt:)we can use the MovieSearchViewViewModel viewModelForMovieAtIndex: to return the MovieViewViewModel on the respective indexPath row.
That’s all for the MovieSearchViewController refactoring to MVVM, you can also remove the implementation of Search Bar delegate as we already using RxCocoa to subscribe and handle those events from the search bar!.
That’s it!, try to build the app to make sure it runs properly with all the refactoring. You can check the project complete source code in the GitHub repository at alfianlosari/MovieInfoMVVMiOS.
ConclusionBuilding an app with MVVM as an architecture is not really that complex. In the long run, ViewModel really helps the View Controller become more lightweight and encapsulate our data transformation. Testing on the View Model is also pretty simple and straightforward without worrying about the View Controller.
Although RxSwift can become quite complex and has steep learning curve for developers that has just exposed to reactive programming, it is also has powerful feature like throttle and many more to explore. Next time, let’s explore about how to perform unit testing on View Model with RxSwift’s RxTest & RxBlocking. So until then, let’s keep the lifelong learning, keep growing and building. Happy Swifting 😋.
Published at Mar 14, 2019
UICollectionView is an UIKit view that manages collection of ordered items and presents the items using customizable layout. It was introduced by Apple in WWDC 2012 with the release of iOS 6 SDK. UICollectionView interface is quite similar with the old UITableView as it provides DataSource as a source to display the data and Delegate to handle interaction for each item.
Unlike UITableView that display each row using a fixed list layout inside UITableViewCell, UICollectionView provides flexibility and customizability for developers to provide their own layout by subclassing UICollectionViewLayout, it also supports custom decoration view, customizable size for each individual section view and cells. Apple itself provides us one layout out of the box to use called UICollectionViewFlowLayout.
UICollectionViewFlowLayout is the layout that displays items using grid system, with supports of headers and footers. It also provides 2 scroll directions, vertical and horizontal.
In vertical direction, the width of the item is constrained with the width of the collection view, so in each row it will try to fill as many item as possible inside the bounds of collection view width before it falls down to the next row so user can scroll the content vertically.
While on the horizontal direction, the height of the content is constrained with the height of the collection view, so in each column it will as many item as possible before it moves right to next column so user can scroll horizontally. Horizontal scroll direction is very suitable if you want to build a carousel using collection view.
What We Will BuildIn this article we are going to build a responsive movie list app that is adaptive to various form factors from the small iPhone 5 up to largest iPad Pro using UICollectionViewFlowLayout. Users will have the options to display the movies using list, small grid, and large grid layout. Here are the tasks that we will be doing:
To begin the project, you can download the starter project in the GitHub repository at alfianlosari/responsive-ios-collection-view-starter.
The starter project contains several assets, collection view cells for list and grid item layout that we will use for the Collection View.
Building the ModelLet’s create our model to represent the Movie. Create a new File and name it Movie.swift. Copy the declaration below to create the Movie struct with all the properties.
import UIKit
struct Movie {
let title: String
let description: String
let posterImage: UIImage?
}
extension Movie {
static let dummyMovies: [Movie] = [
Movie(title: "The Godfather Part I", description: "Marlon Brando", posterImage: UIImage(named: "godfather")),
Movie(title: "The Godfather Part II", description: "Al Pacino", posterImage: UIImage(named: "godfather2")),
Movie(title: "American Beauty", description: "Kevin Spacey", posterImage: UIImage(named: "americanbeauty")),
Movie(title: "American History X", description: "Edward Norton, Edward Furlong", posterImage: UIImage(named: "historyx")),
Movie(title: "The Shining", description: "Jack Nicholson", posterImage: UIImage(named: "shining")),
Movie(title: "The Departed", description: "Leonardo DiCaprio, Matt Damon", posterImage: UIImage(named: "departed")),
Movie(title: "The Dark Knight", description: "Christian Bale, Heath Ledger", posterImage: UIImage(named: "darkknight")),
Movie(title: "Interstellar", description: "Matthew McConaughey, Anne Hathaway", posterImage: UIImage(named: "interstellar")),
Movie(title: "The Matrix", description: "Keanu Reeves, Laurence Fishborne", posterImage: UIImage(named: "matrix")),
Movie(title: "Star Wars Episode V: Empire Strikes Back", description: "Harrison Ford, Mark Hamill", posterImage: UIImage(named: "starwarsv")),
Movie(title: "The Avengers: Infinity War", description: "Robert Downey Jr., Chris Hemsworth", posterImage: UIImage(named: "avengers")),
Movie(title: "Fight Club", description: "Brad Pitt", posterImage: UIImage(named: "fightclub"))
]
}
We will also create another model to represent to Layout using enum. The LayoutOption enum will have 3 unique cases that represent the list, small grid, and large grid.
import Foundation
enum LayoutOption {
case list
case smallGrid
case largeGrid
}
Let’s create our only View Controller for the app. Open the main.storyboard file, drag the Collection View Controller from the Object Library to the scene editor. Then embed it into a Navigation Controller. Select the Collection View, then set the background color to #292A2F in the attributes inspector.
Next, create a new File and name it MainListViewController.swift. It is a subclass of UICollection ViewController. Here are the things that we will setup initially:
import UIKit
private let listReuseIdentifier = "ListCell"
private let gridReuseIdentifier = "GridCell"
class MainListCollectionViewController: UICollectionViewController {
private let movies = Movie.dummyMovies
private var layoutOption: LayoutOption = .list {
didSet {
setupLayout(with: view.bounds.size)
}
}
override func viewDidLoad() {
super.viewDidLoad()
setupCollectionView()
setupNavigationBarItem()
setupLayout(with: view.bounds.size)
}
private func setupCollectionView() {
collectionView.register(UINib(nibName: "MovieLayoutListCollectionViewCell", bundle: nil), forCellWithReuseIdentifier: listReuseIdentifier)
collectionView.register(UINib(nibName: "MovieLayoutGridCollectionViewCell", bundle: nil), forCellWithReuseIdentifier: gridReuseIdentifier)
}
private func setupLayout(with containerSize: CGSize) {
guard let flowLayout = collectionView.collectionViewLayout as? UICollectionViewFlowLayout else {
return
}
switch layoutOption {
case .list:
break
case .largeGrid, .smallGrid:
break
}
collectionView.reloadData()
}
private func setupNavigationBarItem() {
let barButtonItem = UIBarButtonItem(title: "Layout", style: .plain, target: self, action: #selector(layoutTapped(_:)))
navigationItem.rightBarButtonItem = barButtonItem
}
@objc private func layoutTapped(_ sender: Any) {
let alertController = UIAlertController(title: "Select Layout", message: nil, preferredStyle: .actionSheet)
alertController.popoverPresentationController?.barButtonItem = navigationItem.rightBarButtonItem
alertController.addAction(UIAlertAction(title: "List", style: .default, handler: { (_) in
self.layoutOption = .list
}))
alertController.addAction(UIAlertAction(title: "Large Grid", style: .default, handler: { (_) in
self.layoutOption = .largeGrid
}))
alertController.addAction(UIAlertAction(title: "Small Grid", style: .default, handler: { (_) in
self.layoutOption = .smallGrid
}))
alertController.addAction(UIAlertAction(title: "Cancel", style: .cancel, handler: nil))
present(alertController, animated: true, completion: nil)
}
}
extension MainListCollectionViewController {
override func collectionView(_ collectionView: UICollectionView, numberOfItemsInSection section: Int) -> Int {
return movies.count
}
override func collectionView(_ collectionView: UICollectionView, cellForItemAt indexPath: IndexPath) -> UICollectionViewCell {
switch layoutOption {
case .list:
let cell = collectionView.dequeueReusableCell(withReuseIdentifier: listReuseIdentifier, for: indexPath) as! MovieLayoutListCollectionViewCell
let movie = movies[indexPath.item]
cell.setup(with: movie)
return cell
case .largeGrid:
let cell = collectionView.dequeueReusableCell(withReuseIdentifier: gridReuseIdentifier, for: indexPath) as! MovieLayoutGridCollectionViewCell
let movie = movies[indexPath.item]
cell.setup(with: movie)
return cell
case .smallGrid:
let cell = collectionView.dequeueReusableCell(withReuseIdentifier: gridReuseIdentifier, for: indexPath) as! MovieLayoutGridCollectionViewCell
let movie = movies[indexPath.item]
cell.setup(with: movie)
return cell
}
}
}
Let’s build the list layout, in this layout, the cell items will render like UITableViewCell with subtitle style plus an UIImageView. Take a peek in MovieLayoutListCollectionViewCell provided by the starter project to see the layout.
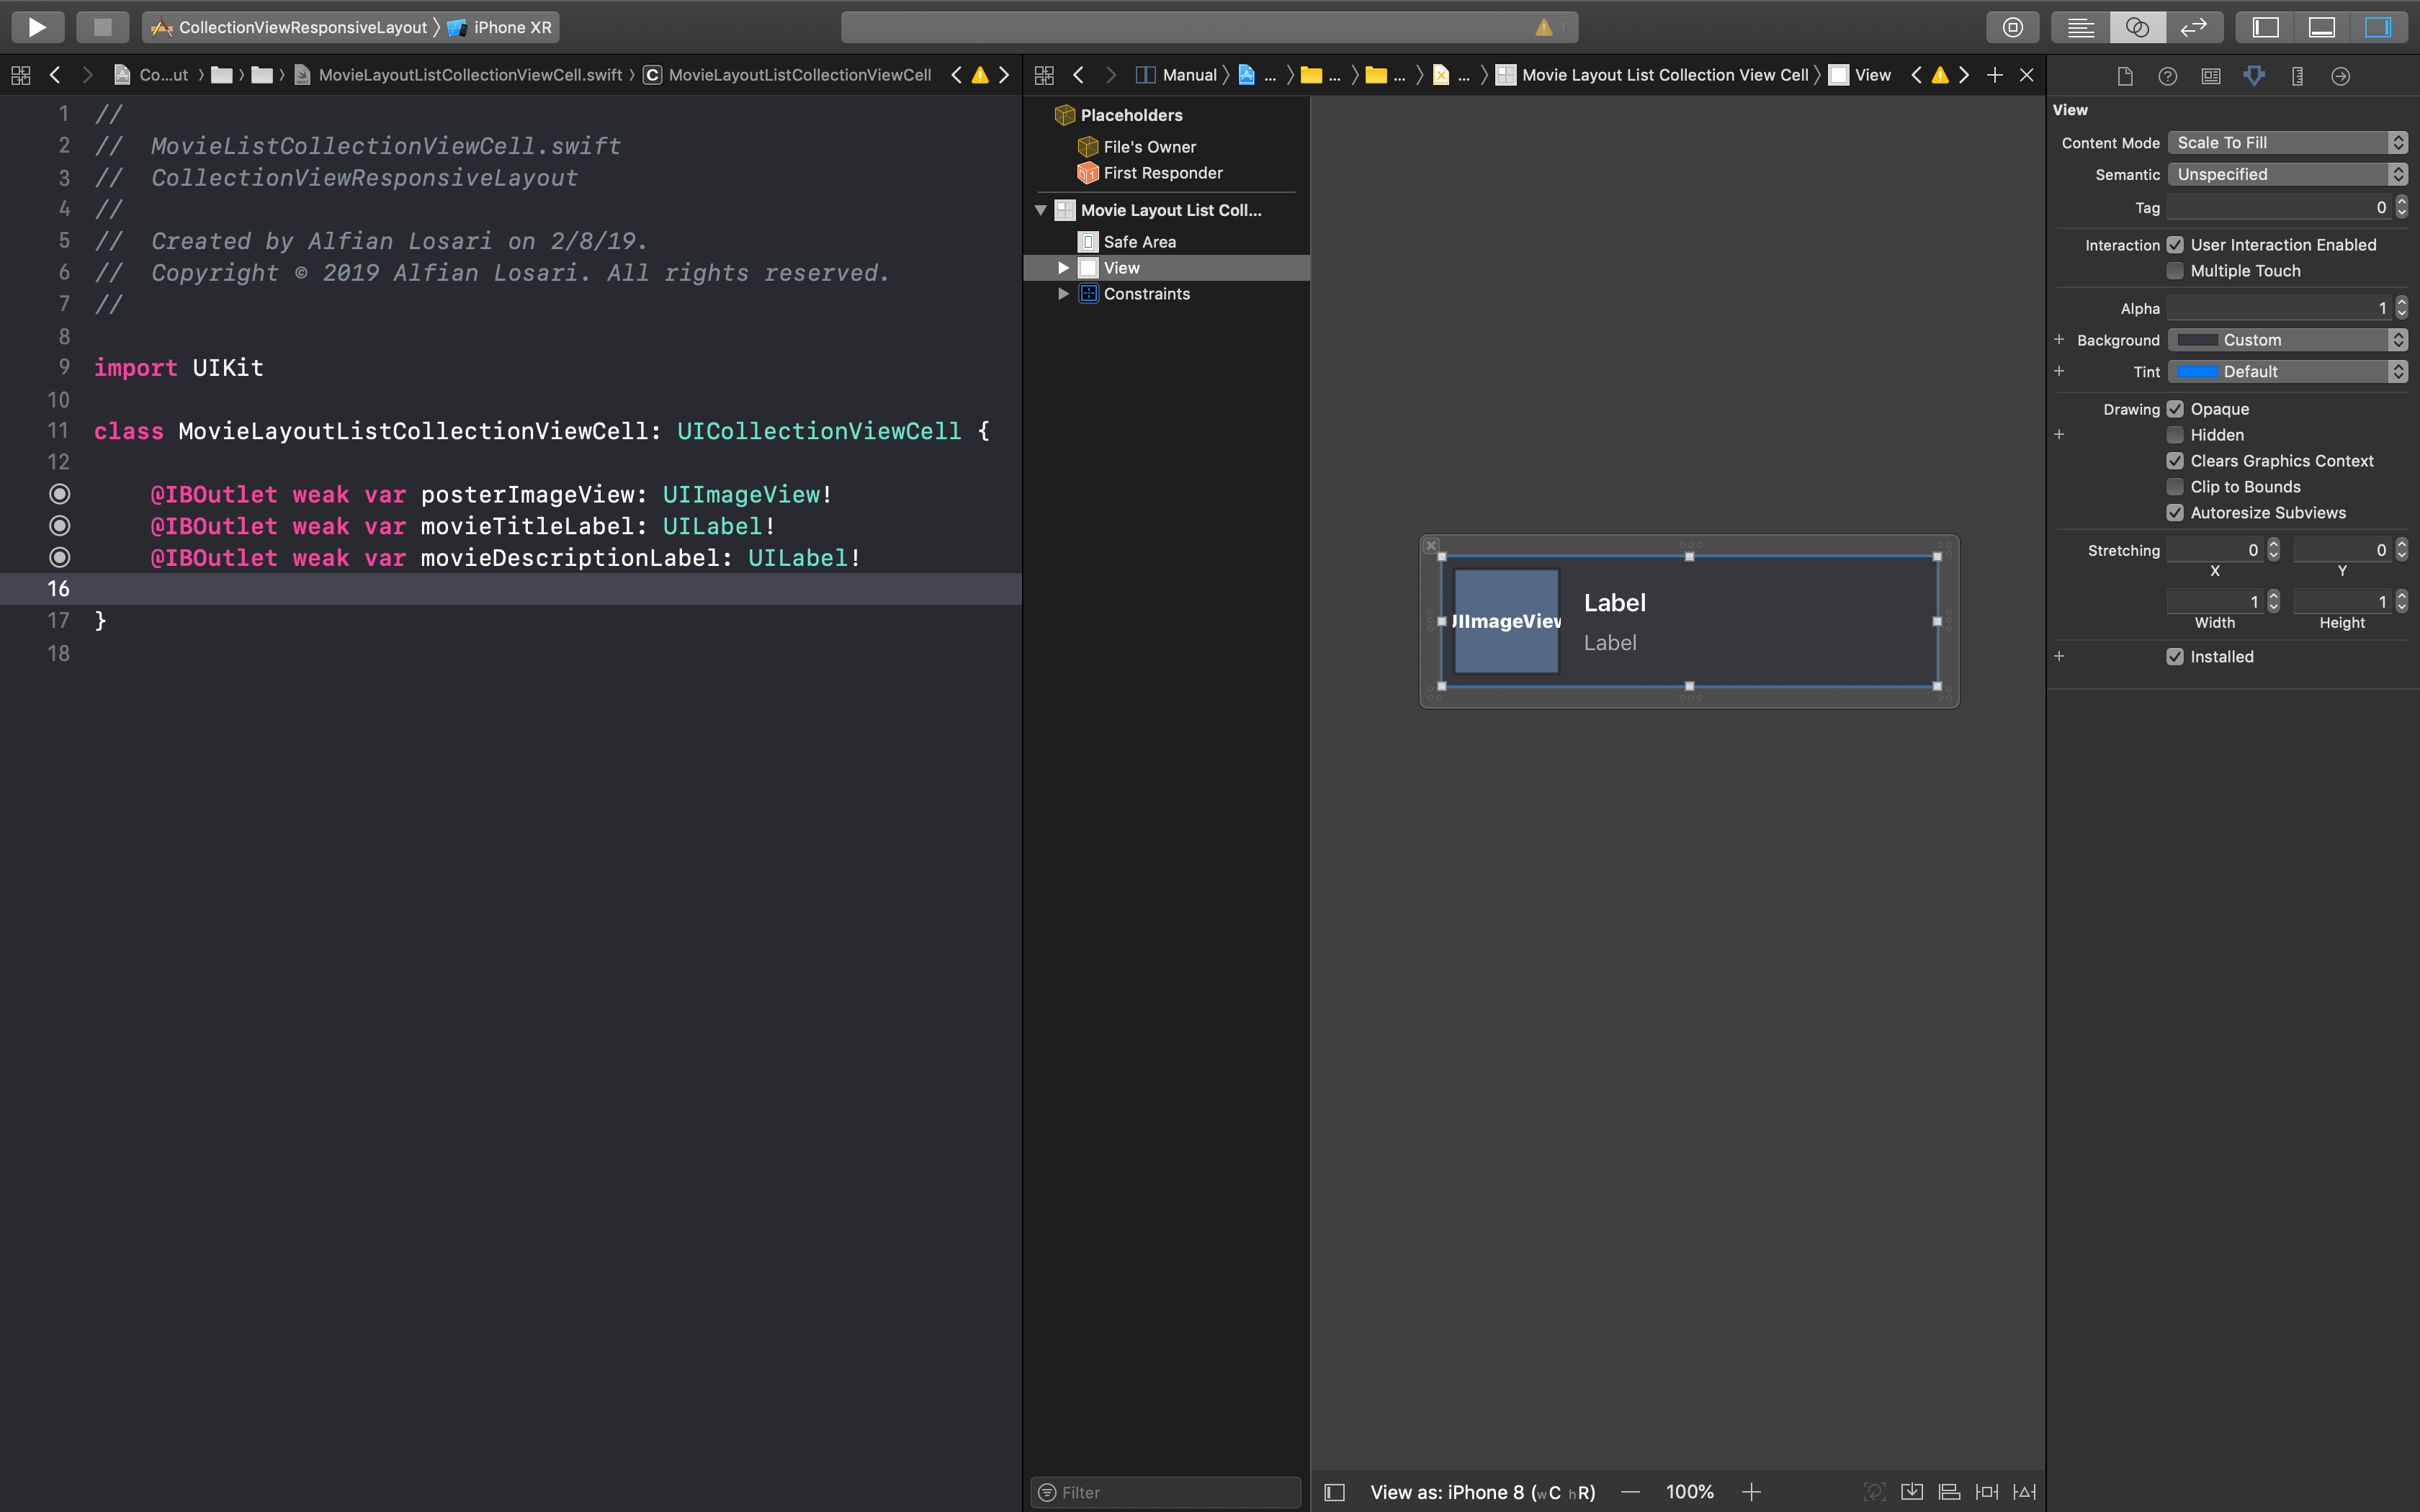
In the MainListViewController setupLayout(with:), we will get the collection view flow layout instance and perform switch statement on the layout option. In list layout, when the horizontal trait class is compact, each cell will take the full width of the collection view, other than that it will use 300 minimum item width, then calculate the maximum number of item inside the row, and readjust the size if there is any fraction remainder when calculating the items in the row. The height for the item will be fixed at 91.
In situation where the horizontal trait class is not compact, such as using iPhone Plus, XS Max in landscape, any iPad the item will be divided into at least 2 columns, the columns will increase when the width of the device increases. We also set the section insets for top and bottom with the value of 8 to add some spacing.
Because our app supports multiple orientation, we need to make also trigger the layout update with the new size when the device is rotated or the device trait classes has been updated. There are 2 methods that we should override:
// MovieListViewController
private func setupLayout(with containerSize: CGSize) {
guard let flowLayout = collectionView.collectionViewLayout as? UICollectionViewFlowLayout else {
return
}
switch layoutOption {
case .list:
flowLayout.minimumInteritemSpacing = 0
flowLayout.minimumLineSpacing = 0
flowLayout.sectionInset = UIEdgeInsets(top: 8.0, left: 0, bottom: 8.0, right: 0)
if traitCollection.horizontalSizeClass == .regular {
let minItemWidth: CGFloat = 300
let numberOfCell = containerSize.width / minItemWidth
let width = floor((numberOfCell / floor(numberOfCell)) * minItemWidth)
flowLayout.itemSize = CGSize(width: width, height: 91)
} else {
flowLayout.itemSize = CGSize(width: containerSize.width, height: 91)
}
case .largeGrid, .smallGrid:
break
}
collectionView.reloadData()
}
override func viewWillTransition(to size: CGSize, with coordinator: UIViewControllerTransitionCoordinator) {
super.viewWillTransition(to: size, with: coordinator)
setupLayout(with: size)
}
override func traitCollectionDidChange(_ previousTraitCollection: UITraitCollection?) {
super.traitCollectionDidChange(previousTraitCollection)
setupLayout(with: view.bounds.size)
}
We also need to make sure to update the MovieLayoutListCollectionViewCell, in here we create a method setup(movie:) so we can setup the label and image view when the movie is passed.
import UIKit
class MovieLayoutListCollectionViewCell: UICollectionViewCell {
@IBOutlet weak var posterImageView: UIImageView!
@IBOutlet weak var movieTitleLabel: UILabel!
@IBOutlet weak var movieDescriptionLabel: UILabel!
func setup(with movie: Movie) {
posterImageView.image = movie.posterImage
movieTitleLabel.text = movie.title
movieDescriptionLabel.text = movie.description
}
}
Build and run the project to see our list layout in action, try to run using devices like iPhone XS Max and iPad Pro in various orientation to see the list columns.
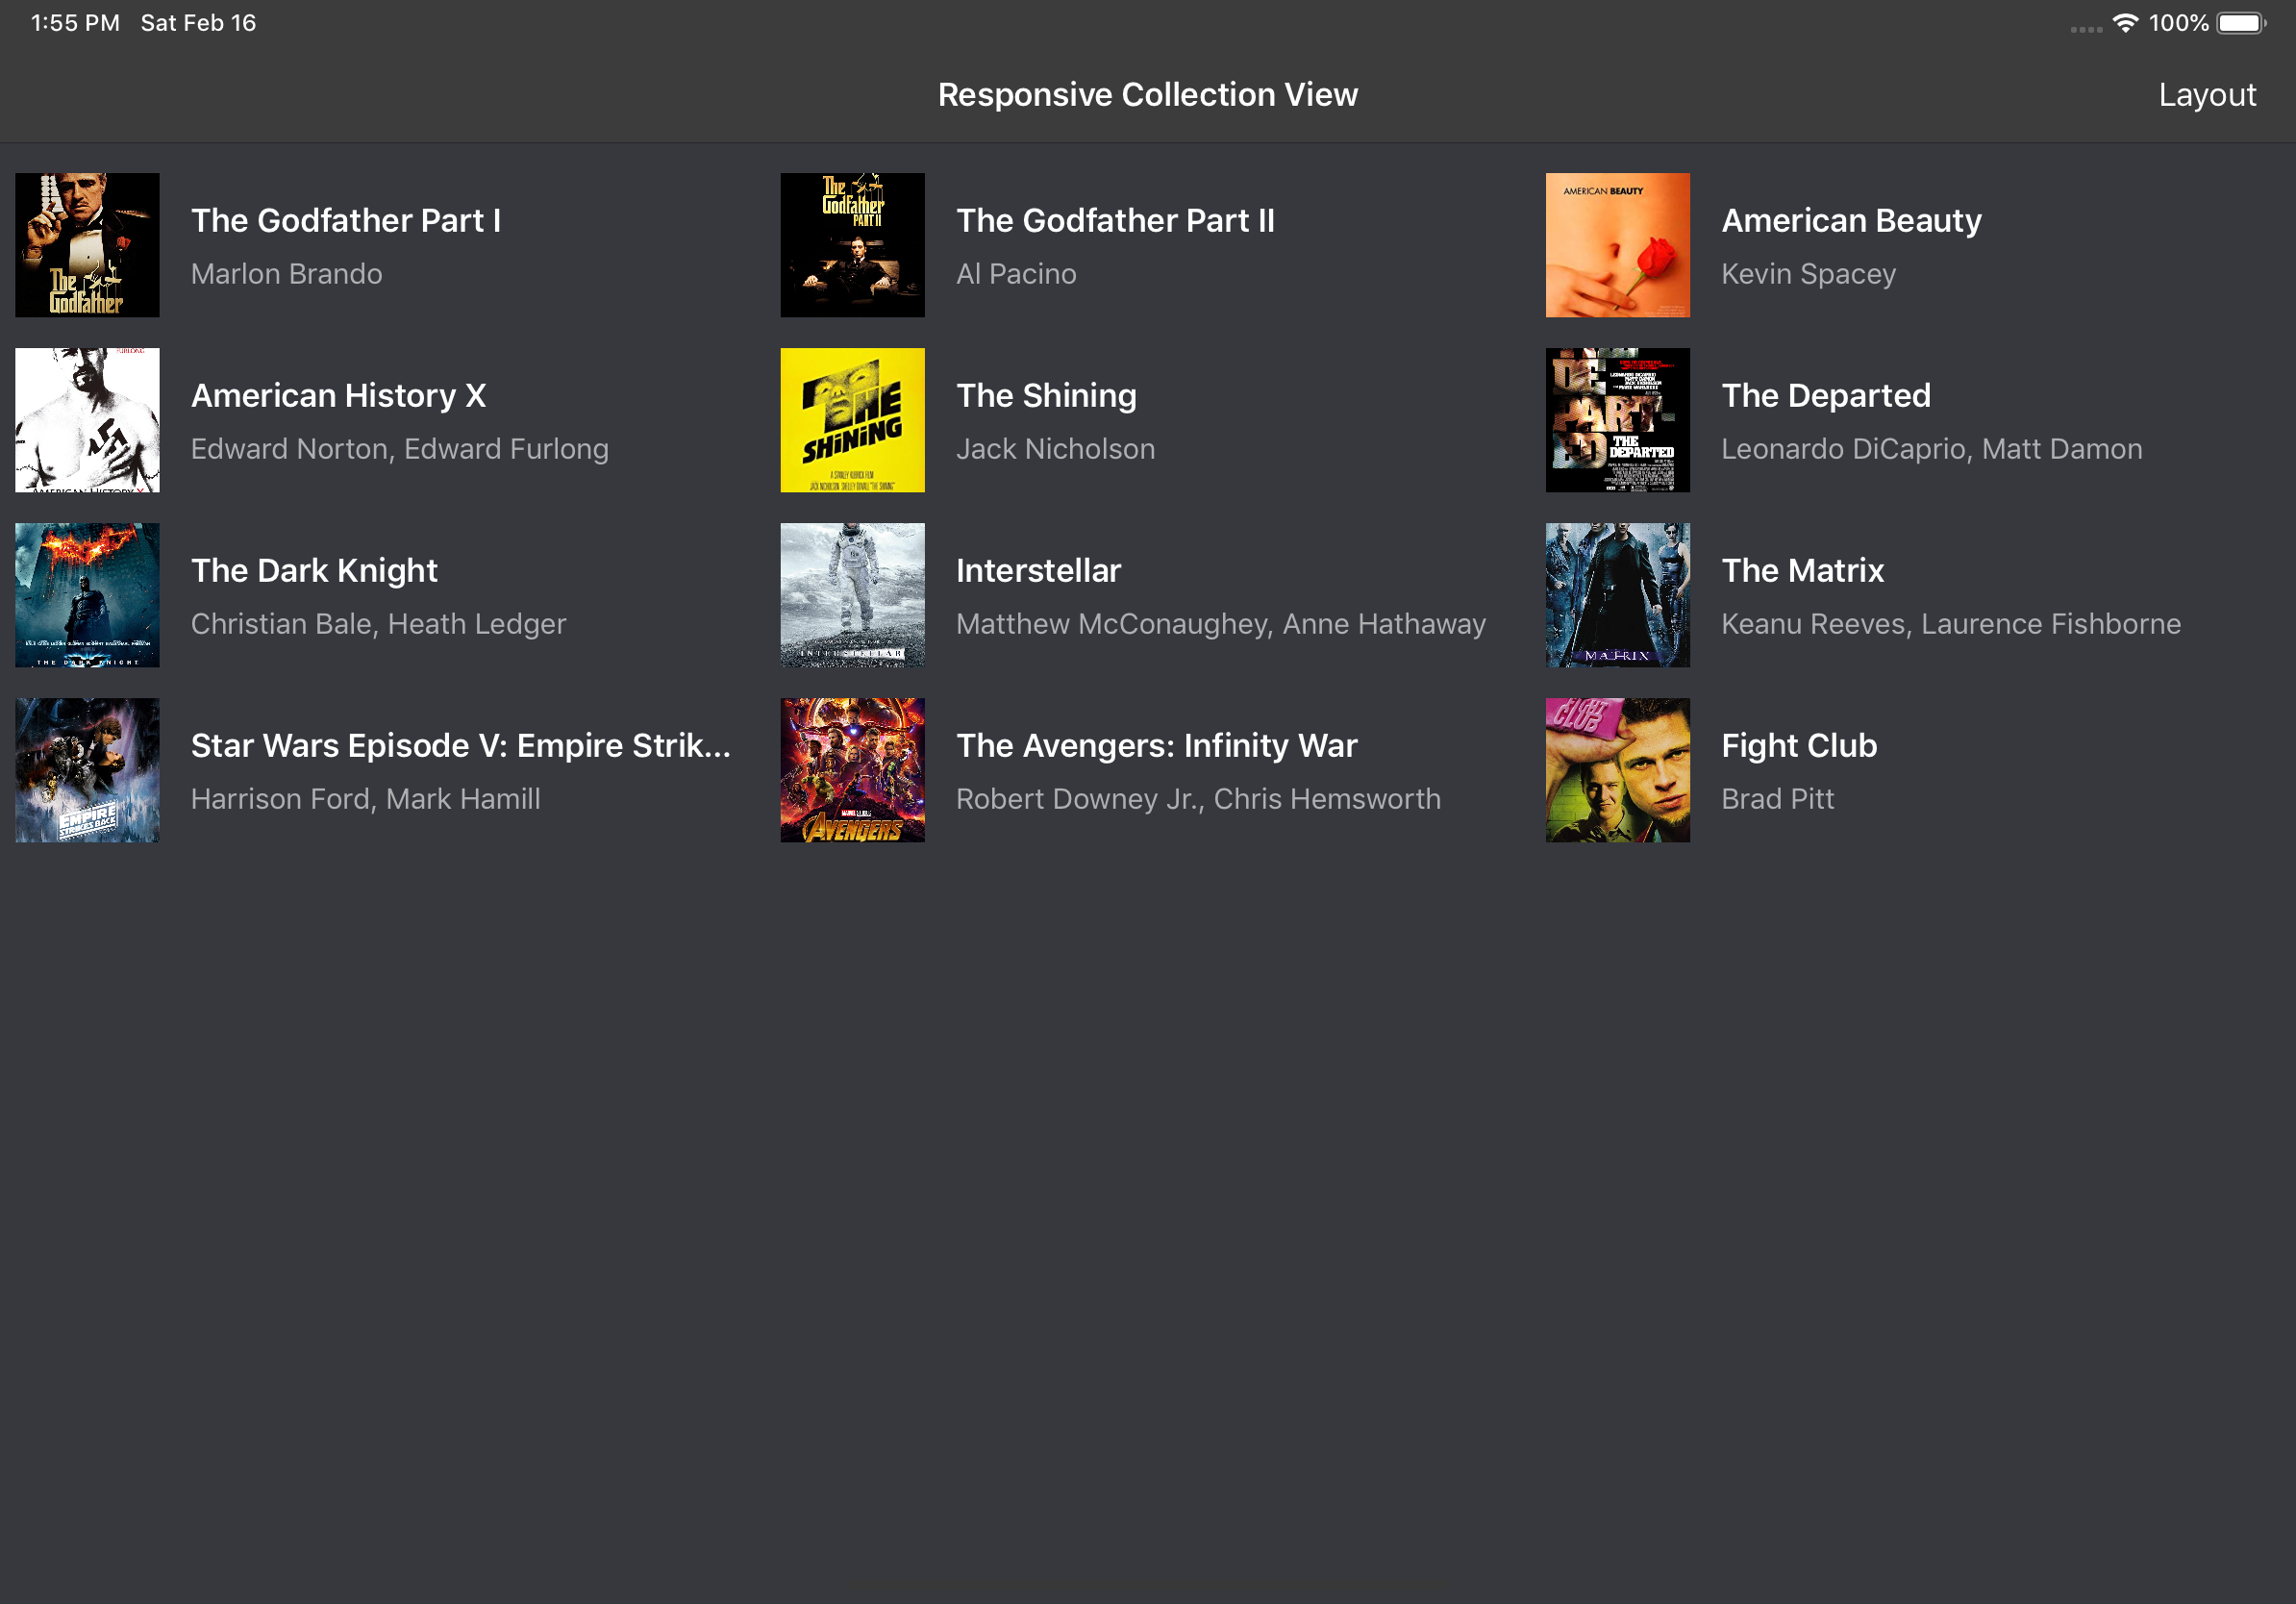 Building the Grid Layout
Let’s build the grid layout, in this layout each cell will display only the poster image of the movie inside each cell. Take a peek in MovieLayoutGridCollectionViewCell provided by the starter project to see the layout.
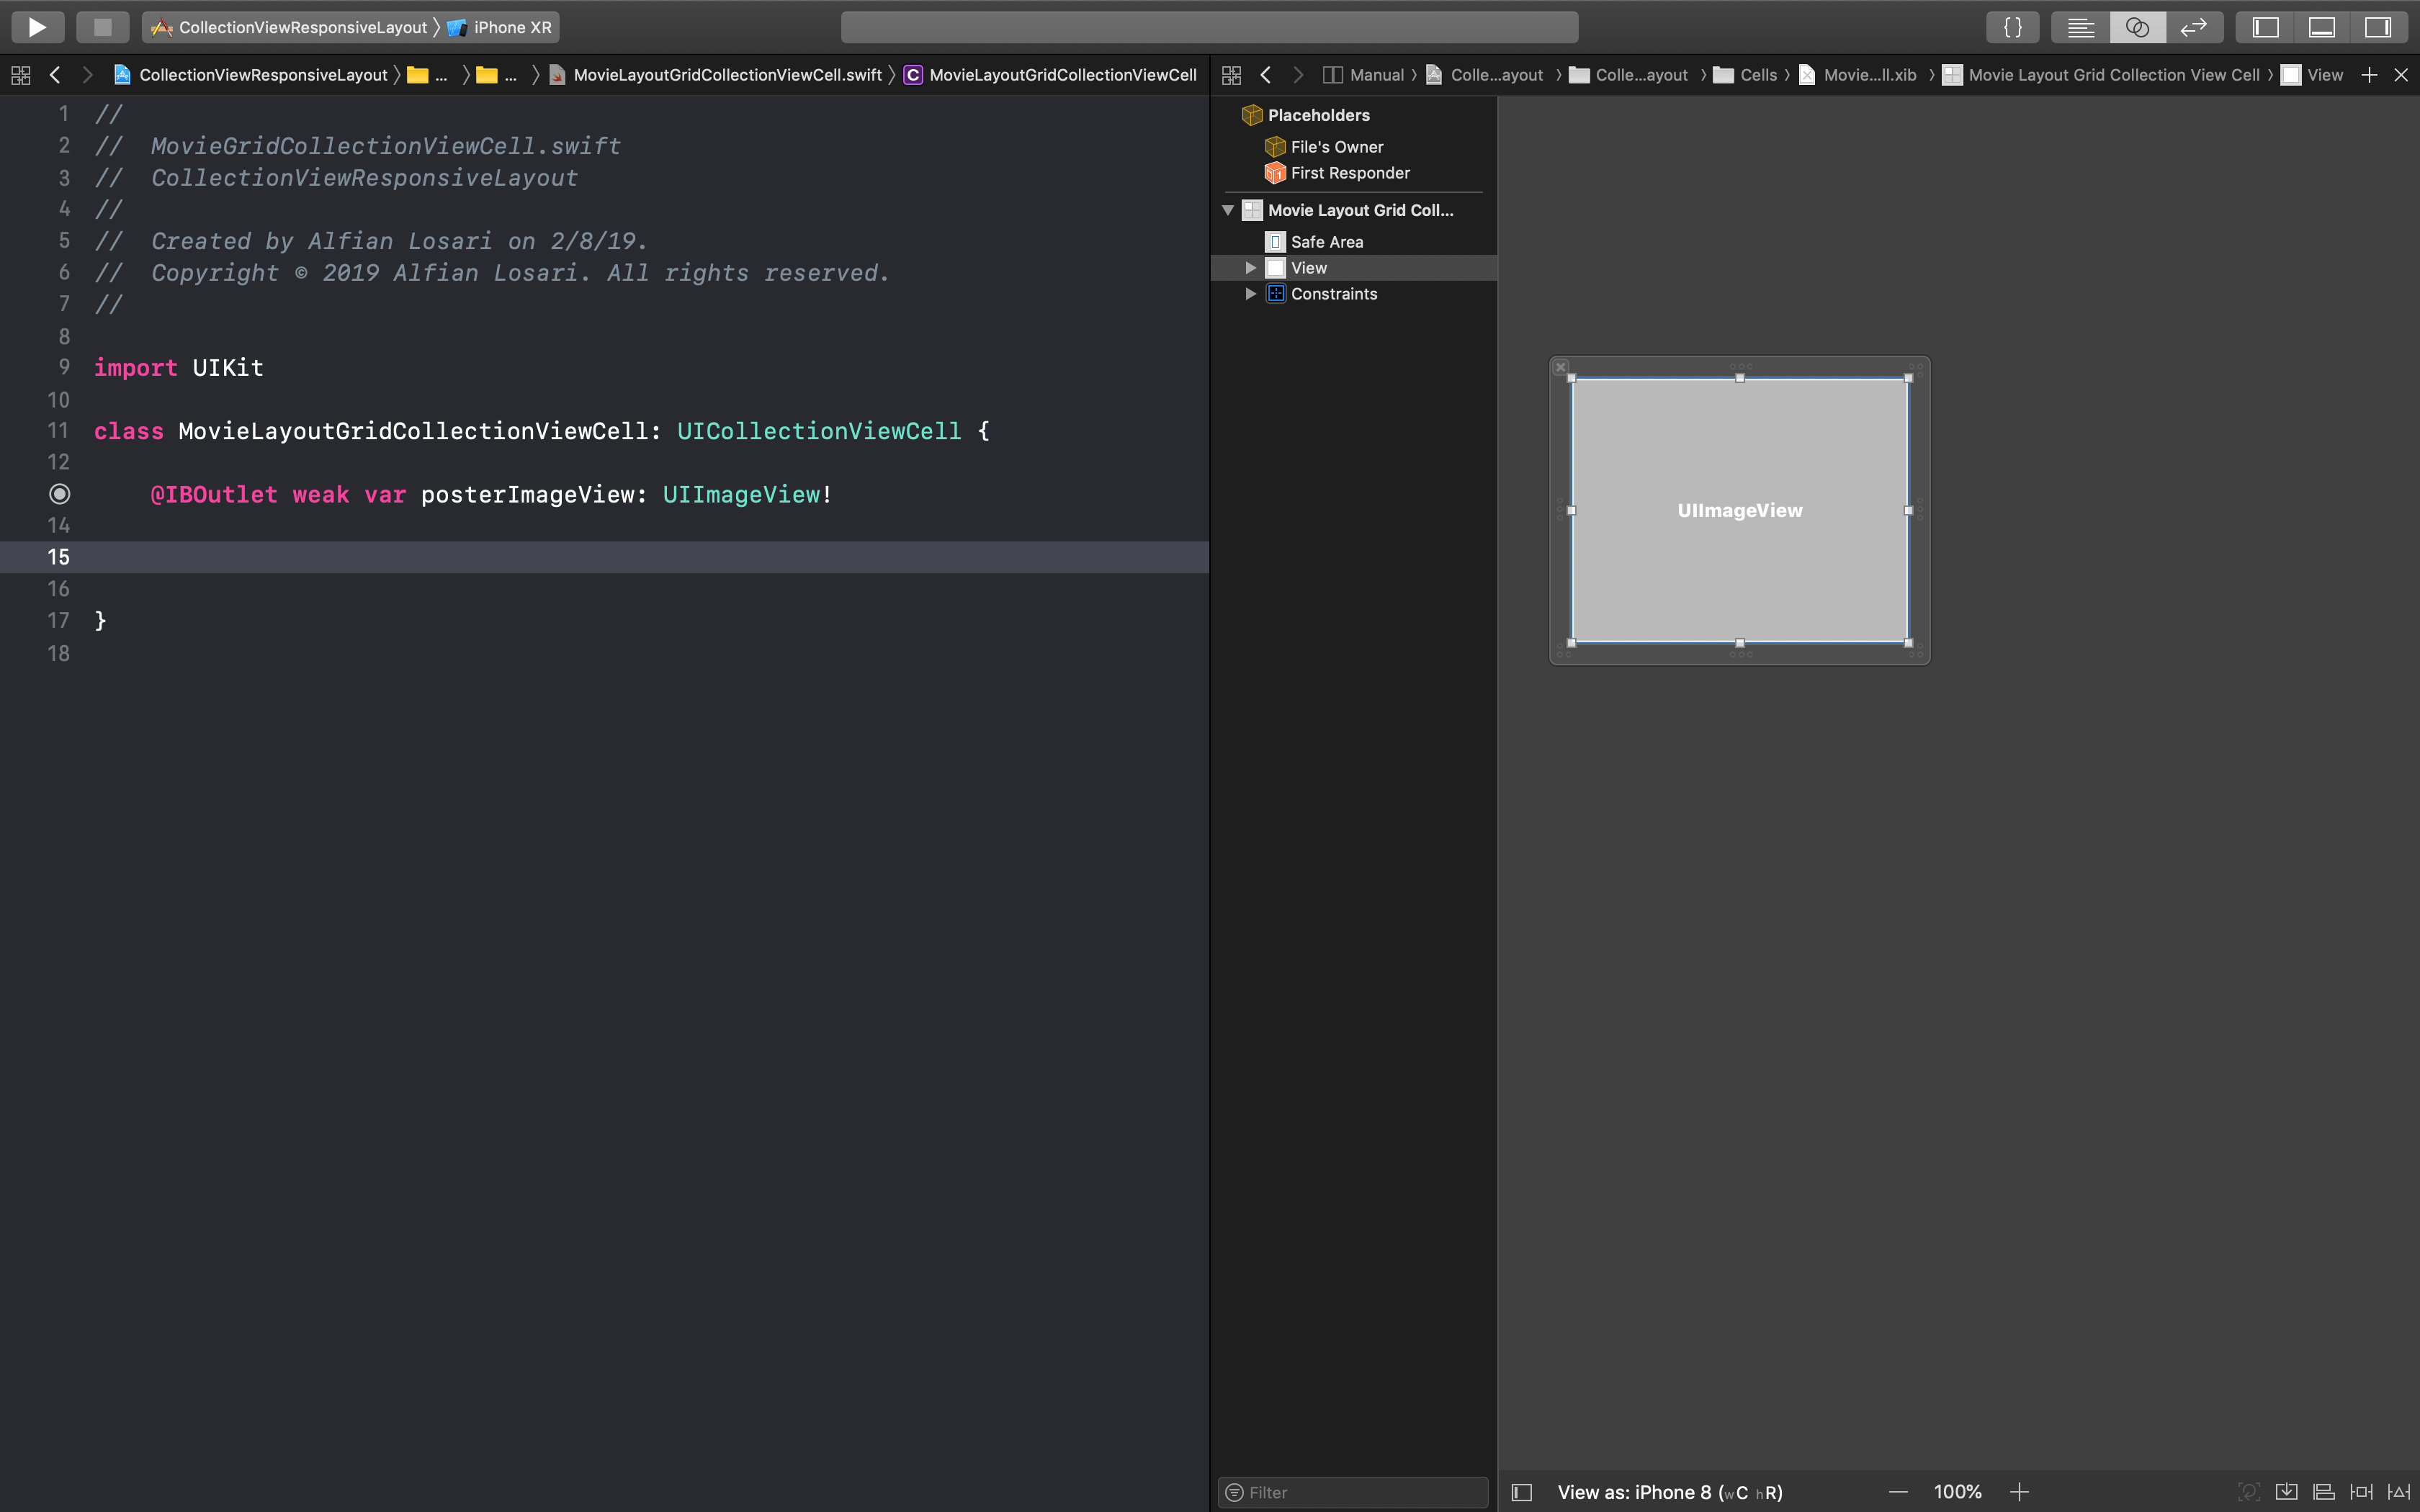
We will add additional case for small grid and large grid cases inside the MainListViewController setupLayout(with:). In here, we will declare the minimum item size width for small grid to be 106 and for the large grid to be 160. Then, using the same technique as the list layout, we will calculate the maximum number of item in row by dividing the collection view width with the minimum width, then use the remainder fraction to find the adjusted width to fit the row. The movie poster will have the aspect ratio of 3:4, so based on this we will calculate the height of the cell using the adjusted width we calculate before.
private func setupLayout(with containerSize: CGSize) {
guard let flowLayout = collectionView.collectionViewLayout as? UICollectionViewFlowLayout else {
return
}
switch layoutOption {
case .list:
// ....
case .largeGrid, .smallGrid:
let minItemWidth: CGFloat
if layoutOption == .smallGrid {
minItemWidth = 106
} else {
minItemWidth = 160
}
let numberOfCell = containerSize.width / minItemWidth
let width = floor((numberOfCell / floor(numberOfCell)) * minItemWidth)
let height = ceil(width * (4.0 / 3.0))
flowLayout.minimumInteritemSpacing = 0
flowLayout.minimumLineSpacing = 0
flowLayout.itemSize = CGSize(width: width, height: height)
flowLayout.sectionInset = .zero
}
collectionView.reloadData()
}
Make sure to update the MovieLayoutGridCollectionViewCell, in here we create a method setup(movie:) so we can setup the image view when the movie is passed.
import UIKit
class MovieLayoutGridCollectionViewCell: UICollectionViewCell {
@IBOutlet weak var posterImageView: UIImageView!
func setup(with movie: Movie) {
posterImageView.image = movie.posterImage
}
}
Build and run the project, then tap on the bar button item to change the layout to small or large grid to see our grid layout option in action.
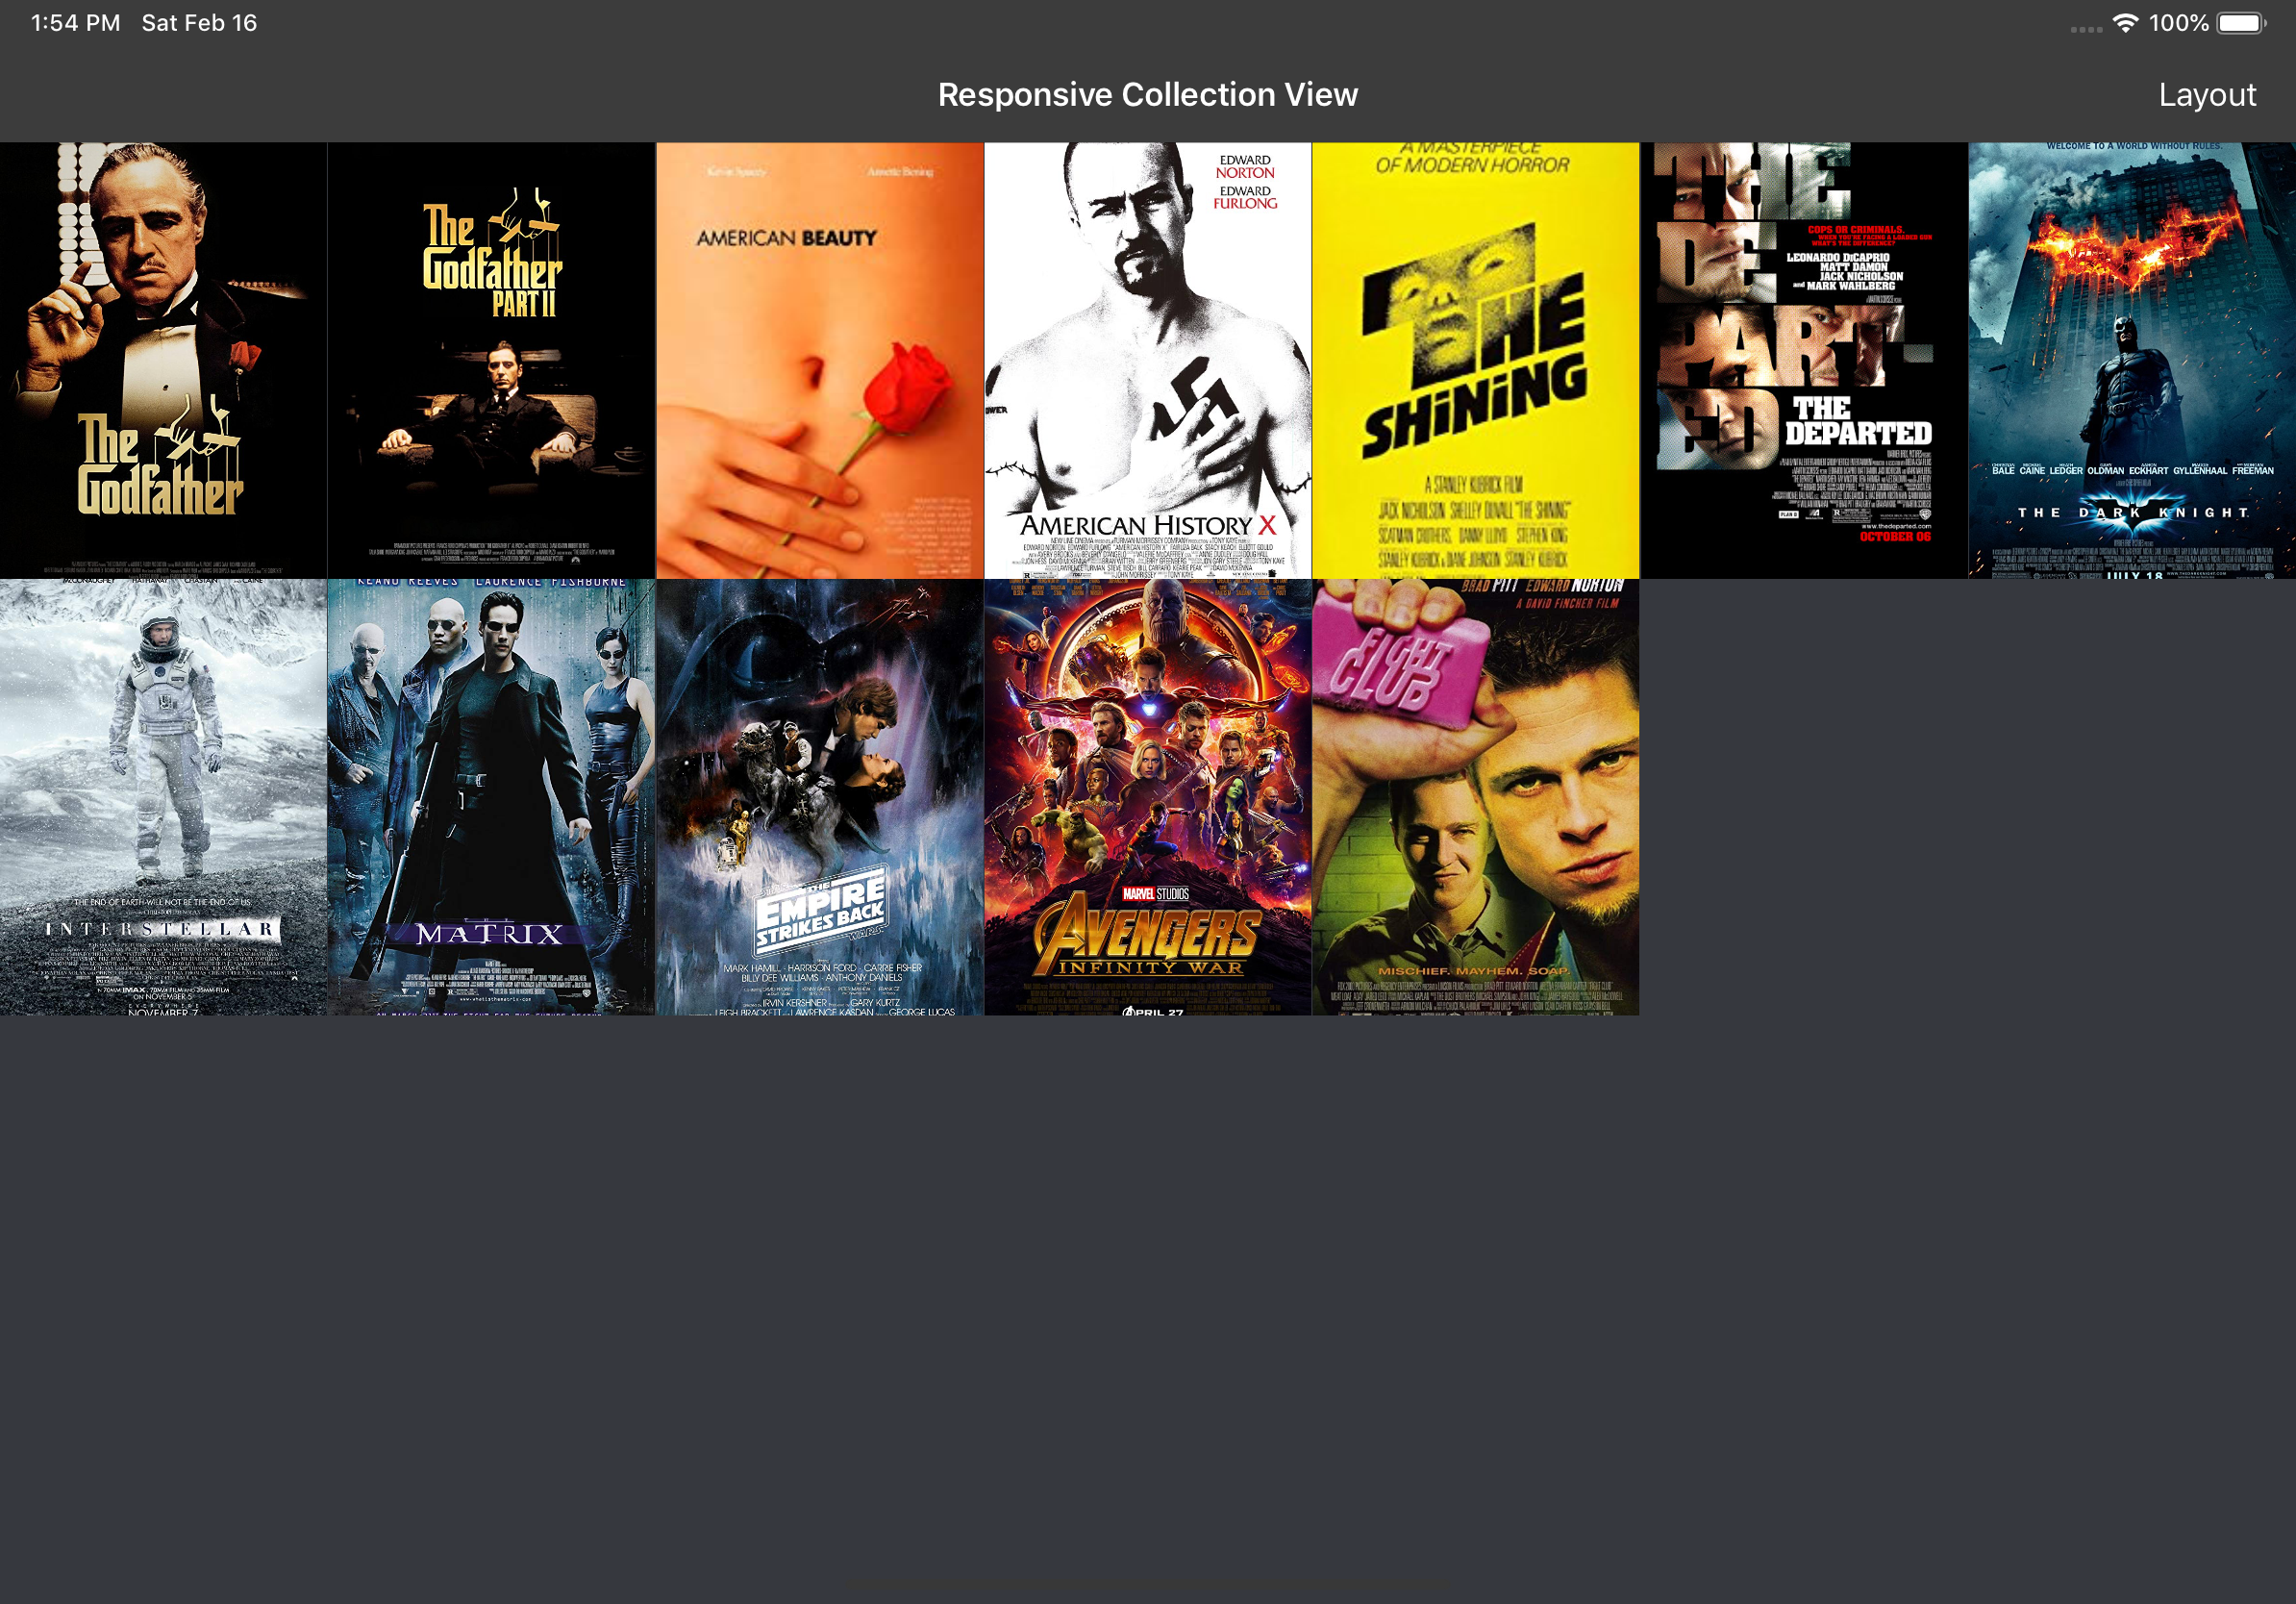 Conclusion
Finally, we have successfully build responsive and adaptive iOS app using Collection View, congratulations!!. Building an adaptive and responsive iOS app is not that hard with the help of Cocoa Touch Trait Classes combined with UIKIt classes like UICollectionView and UIStackView. It also provides us advantage so we can utilize just one single codebase for iPhone & iPad for better maintainability. Keep up on lifelong learning and Happy Swifting 😋.
You can clone the completed project source code GitHub Repository at alfianlosari/ResponsiveCollectionView.
Published at Feb 3, 2019
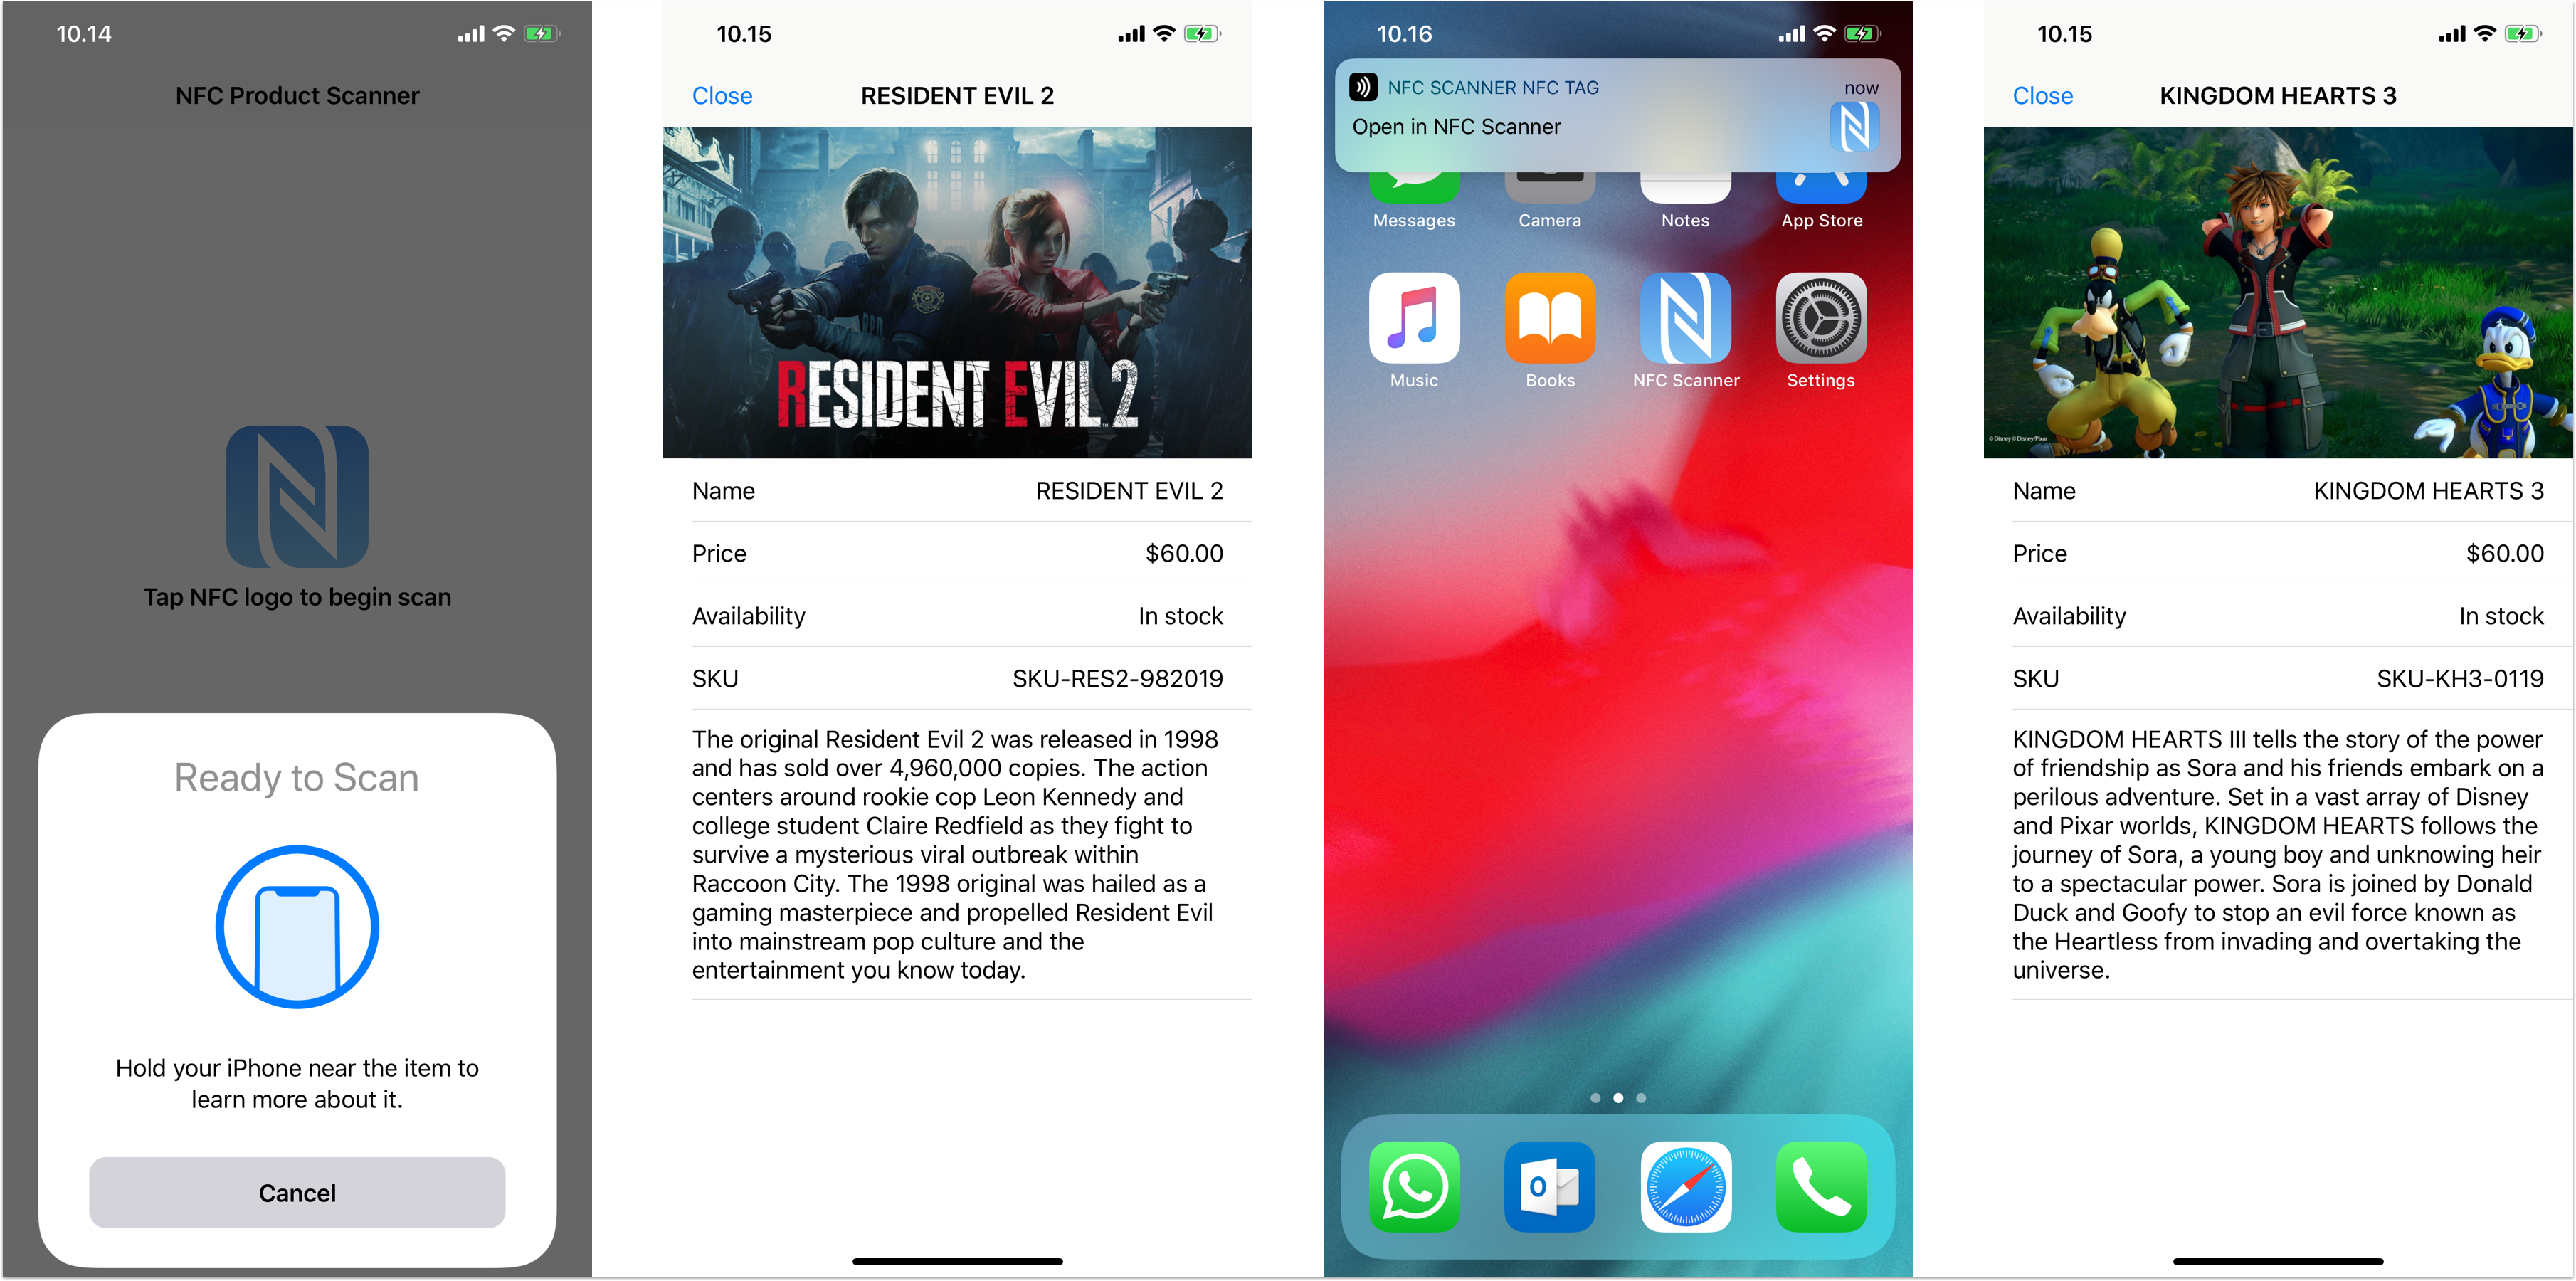
Near-field communication (NFC) is the technology that enables contactless communication between 2 devices within a certain distance (usually about 4 cm).
Nowadays, NFC is being utilized in contactless payment systems, electronic identification card, electronic tickets, and to share information such as contacts, photo, video, or URL. Such labels or cards that can be used to read the information using NFC are called NFC Tags.
According to Wikipedia, there are 3 communication modes that can be performed in a full NFC device:
NFC in iOS was started with the release of Apple Pay in 2014. iPhone 7 & iPhone 7 Plus were the first devices with built in NFC hardware that can be used to perform contactless payment using Apple Pay. However, Apple didn’t provide any API for third party developers to use the NFC capability beyond Apple Pay functionality.
In iOS 11, Apple finally introduced the CoreNFC framework that enabled third party developers to read NFC tags within their apps. The API only supports reading NFC tags when the app is running on the foreground.
In iOS 12, with the release of Apple new iPhones: Xr, Xs, Xs Max, Apple finally introduced the ability to scan NFC tags without running the app using those devices. It also handles redirecting the scan to the associated app using Apple Universal Link mechanism.
As of right now, CoreNFC doesn’t have the capability to write to NFC tags. I really wish iOS 13 will provide the capability for third party apps to write to tags as the hardware needed to perform the write is already there.
What We Will BuildIn this tutorial, we are going to build a simple app that act as a product scanner. Here are the main features of the app:
You can clone the starter project source code from the GitHub Repository at alfianlosari/NFCScanneriOSStarter.
The starter project contains all the custom table view cells, assets that we will use in our app UI, and the Product model.
Product Model & Local Data StoreWe use a Product model with several attributes to represent a product. Keep in mind that the ID of the product is the unique identifier for each product and it will be used by the store to find the product.
struct Product {
let id: String
let name: String
let description: String
let price: String
let inStock: Bool
let image: UIImage?
}
Next, let’s create the ProductStore class. This is a Singleton object that stores the hardcoded products array in memory. It provides the interface to get the associated product with the given SKU ID. If you want, you can store the product inside the local storage using Core Data, SQLite, or even retrieve it from network.
struct ProductStore {
static let shared = ProductStore()
private init() {}
func product(withID id: String) -> Product? {
return products.first { $0.id.lowercased() == id.lowercased() }
}
let products = [
Product(id: "SKU-RES2-982019", name: "RESIDENT EVIL 2", description: """
The action centers around rookie cop Leon Kennedy and college student Claire Redfield as they fight to survive a mysterious viral outbreak within Raccoon City.
""", price: "$60.00", inStock: true, image: UIImage(named: "res2")),
Product(id: "SKU-KH3-0119", name: "KINGDOM HEARTS 3", description: """
KINGDOM HEARTS III tells the story of the power of friendship as Sora and his friends embark on a perilous adventure.
""", price: "$60.00", inStock: true, image: UIImage(named: "kh3")),
Product(id: "SKU-IPXSM-2018", name: "iPhone Xs Max", description: """
The smartest, most powerful chip in a smartphone. And a breakthrough dual-camera system.
""", price: "$999.00", inStock: false, image: UIImage(named: "xsmax"))
]
}
The main screen contains only the single UILabel and UIButton for the user to tap and begin the NFC scanning session. All the code for the main screen is written within the MainViewController. Later, we will add the handler inside the scanTapped: method to begin our scanning session.
The Product Detail Screen UI
The product detail screen is a subclass of UITableViewController. It will populate the rows using the product passed from the presenting view controller. The screen displays the name, image, description, and availability of a product. The code is contained in ProductViewController class.
Prepare NFC Tags with Related SKU ID
To perform this step, you need to buy NFC tags that you can use to write to. To write data to the tags, you can use an Android phone that has a NFC capability. You can use various app from the Google Play Store to write the SKU ID to the tags. Here is the link for the app I used NFC Tools - Apps on Google Play].
You need to write the SKU in the following format:
https://example.com/$SKU_ID
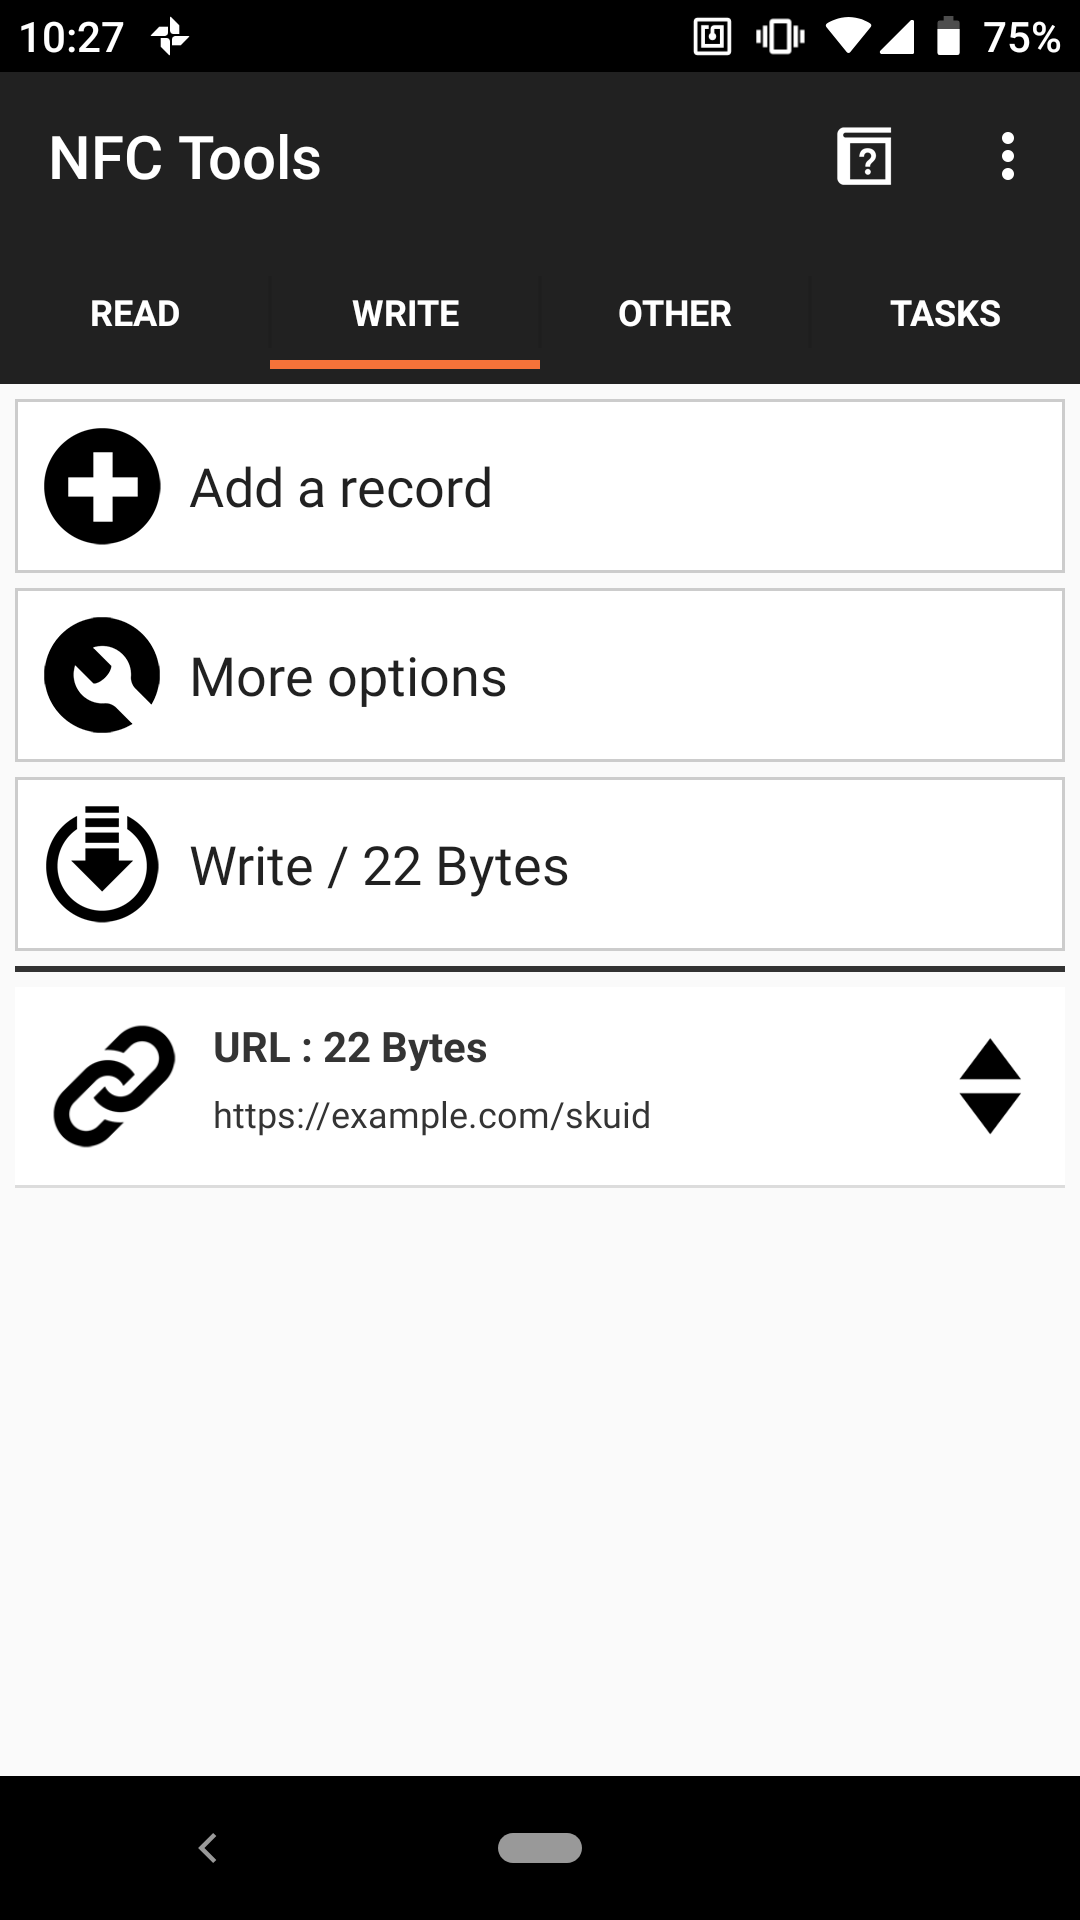
The app will read the tags that contain payload with an URI format. Then, it will get the last path of the URI. In this case, the last path will be the SKU ID of the product. Use the SKU ID from one of the products above as a test.
Using Core NFC API to Start Scanning SessionLet’s start writing the actual code to begin the NFC scanning session. With the SDK, you will be amazed how simple it is to implement NFC in your iOS apps. Here is the sample code:
import UIKit
import CoreNFC
class MainViewController: UIViewController {
var session: NFCNDEFReaderSession?
var productStore = ProductStore.shared
@IBAction func scanTapped(_ sender: Any) {
guard session == nil else {
return
}
session = NFCNDEFReaderSession(delegate: self, queue: nil, invalidateAfterFirstRead: true)
session?.alertMessage = "Hold your iPhone near the item to learn more about it."
session?.begin()
}
override func viewWillDisappear(_ animated: Bool) {
super.viewWillDisappear(animated)
session = nil
}
}
extension MainViewController: NFCNDEFReaderSessionDelegate {
// MARK: - NFCNDEFReaderSessionDelegate
/// - Tag: processingTagData
func readerSession(_ session: NFCNDEFReaderSession, didDetectNDEFs messages: [NFCNDEFMessage]) {
guard
let ndefMessage = messages.first,
let record = ndefMessage.records.first,
record.typeNameFormat == .absoluteURI || record.typeNameFormat == .nfcWellKnown,
let payloadText = String(data: record.payload, encoding: .utf8),
let sku = payloadText.split(separator: "/").last else {
return
}
self.session = nil
guard let product = productStore.product(withID: String(sku)) else {
DispatchQueue.main.asyncAfter(deadline: .now() + 3) { [weak self] in
let alertController = UIAlertController(title: "Info", message: "SKU Not found in catalog",preferredStyle: .alert)
alertController.addAction(UIAlertAction(title: "OK", style: .default, handler: nil))
self?.present(alertController, animated: true, completion: nil)
}
return
}
DispatchQueue.main.asyncAfter(deadline: .now() + 3) { [weak self] in
self?.presentProductViewController(product: product)
}
}
func presentProductViewController(product: Product) {
let vc = storyboard!.instantiateViewController(withIdentifier: "ProductViewController") as! ProductViewController
vc.product = product
let navVC = UINavigationController(rootViewController: vc)
navVC.modalPresentationStyle = .formSheet
present(navVC, animated: true, completion: nil)
}
/// - Tag: endScanning
func readerSession(_ session: NFCNDEFReaderSession, didInvalidateWithError error: Error) {
// Check the invalidation reason from the returned error.
if let readerError = error as? NFCReaderError {
// Show an alert when the invalidation reason is not because of a success read
// during a single tag read mode, or user canceled a multi-tag read mode session
// from the UI or programmatically using the invalidate method call.
if (readerError.code != .readerSessionInvalidationErrorFirstNDEFTagRead)
&& (readerError.code != .readerSessionInvalidationErrorUserCanceled) {
let alertController = UIAlertController(
title: "Session Invalidated",
message: error.localizedDescription,
preferredStyle: .alert
)
alertController.addAction(UIAlertAction(title: "OK", style: .default, handler: nil))
DispatchQueue.main.async {
self.present(alertController, animated: true, completion: nil)
}
}
}
// A new session instance is required to read new tags.
self.session = nil
}
}
First, we need to import CoreNFC at the top of the file and declare a property to store the NFCNDEFReaderSession object. Inside the scanTapped: method, we initialize the scanning session with an alert message for detecting NFC Data Exchange Format (NDEF) tags. You do not need to worry about the UI of the scanning session which will be provided by the framework. You only need to set the delegate to be notified when the tags are found. Also, you have to provide the delegates to handle errors. In this case, we set the MainViewController as the delegate.
The MainViewController class needs to implement the NFCNDEFReaderSessionDelegate protocol. There are 2 required methods to implement:
Here are the steps we perform inside the processing tag method:
If an error occurs or the scanning session has ended, we will:
Build and run the app. Tap the begin scan button, and then tap your tags. It should present the product detail screen related to the SKU ID it read from the tag.
 Implementing Background NFC Scan Using Apple Universal Link
To implement the background NFC scan, you need to have a valid URL domain that hosts the AASA (apple-app-site-association) file. This file will be used to associate your website domain with the app. The file will contain the app’s Bundle ID and the path that allows the app to access.
Here is the format of the file, it’s using JSON structure. Remember to replace the following appID with your Bundle ID. The prefix JFGXEWX is the Team ID. For testing purpose, we will just allow the app to access all the paths using the wildcard “*”.
{
"applinks": {
"apps": [],
"details": [
{
"appID": “JFGXEWX.com.alfianlosari.NFCProductScanner",
"paths": [
"*"
]
}
]
}
}
The next step is to host the file in your domain by uploading the file to your server. Put the file either at https://<<yourdomain>>/apple-app-site-association or at https://<<yourdomain>>/.well-known/apple-app-site-association. Make sure your domain support https and you upload the file without the json extension. You can use the free domain hosting services like Firebase Hosting, GitHub Hosting, or many other free options to host the file.
The last step is to add the associated domains inside the project’s Xcode Capabilities Tab.

The format of the associated domain is applinks:YOUR_DOMAIN.
Handling Background Reading of NFC inside App DelegateYou can test the background scan using the NFC tags. Make sure you have written the URL in your NFC Tag with the format of https://YOURDOMAIN/SKUID.
In home screen, tap the NFC tags and it should display a notification banner that you can tap on. The system will redirect it automatically to your app using the Apple Universal Link which we have set up earlier.
The app will just display the main UI and do nothing. In order to let the app respond appropriately from the background scan, we need to override the continueUserActivity method in AppDelegate:
import UIKit
@UIApplicationMain
class AppDelegate: UIResponder, UIApplicationDelegate {
var window: UIWindow?
var productStore = ProductStore.shared
func application(_ application: UIApplication, didFinishLaunchingWithOptions launchOptions: [UIApplication.LaunchOptionsKey: Any]?) -> Bool {
return true
}
func application(_ application: UIApplication, continue userActivity: NSUserActivity, restorationHandler: @escaping ([UIUserActivityRestoring]?) -> Void) -> Bool {
guard userActivity.activityType == NSUserActivityTypeBrowsingWeb else {
return false
}
// Confirm that the NSUserActivity object contains a valid NDEF message.
let ndefMessage = userActivity.ndefMessagePayload
guard
let record = ndefMessage.records.first,
record.typeNameFormat == .absoluteURI || record.typeNameFormat == .nfcWellKnown,
let payloadText = String(data: record.payload, encoding: .utf8),
let sku = payloadText.split(separator: "/").last else {
return false
}
guard let product = productStore.product(withID: String(sku)) else {
return false
}
guard let navigationController = window?.rootViewController as? UINavigationController else {
return false
}
navigationController.dismiss(animated: true, completion: nil)
let mainVC = navigationController.topViewController as? MainViewController
mainVC?.presentProductViewController(product: product)
return true
}
}
Let’s look into the tasks we perform inside this method.
Run and build the project. Then, scan the tags from the home screen and tap the notification banner. The app should open the corresponding product detail screen.
 Conclusion
Congratulations! We finally finished building our NFC product scanner iOS app. This technology is really useful when you want to communicate and pass data easily. It’s useful for commerce business, payment system, and many more industries. Let’s hope Apple will add the capability to write to NFC tags in iOS 13 later this year. Happy Swifting 😋!
Here is the completed source code for the project on GitHub repository at alfianlosari/CoreNFCScanneriOS.