GeistHaus
log in · sign up

https://saccade.com/blog/feed

rss
10 posts
Polling state
Status active
Last polled May 19, 2026 05:21 UTC
Next poll May 20, 2026 06:54 UTC
Poll interval 86400s
ETag "8556be996068bcaaefd802d2bbbf7501-gzip"
Last-Modified Tue, 07 Oct 2025 20:55:04 GMT

Posts

Online IDEs and Learning Docker
ReviewsSoftwareDockerOnline IDE
A little over ten years ago, I started on a software project that was part hobby, part work-related. What it actually does isn’t relevant here. Instead, let’s talk about the components it has, and the tools to create it. It started out as a web page with some JavaScript code that loaded images and operated read more »
Show full content

A little over ten years ago, I started on a software project that was part hobby, part work-related. What it actually does isn’t relevant here. Instead, let’s talk about the components it has, and the tools to create it. It started out as a web page with some JavaScript code that loaded images and operated on them. Later, the JavaScript code invoked a Python CGI script on the web server it runs from to do some OpenCV image processing. So we have the following ingredients:

  • HTML web page, for overall layout
  • JavaScript files, loaded by the above web page
  • Python code, invoked by the JavaScript as a CGI (Common Gateway Interface) script running on the server
  • OpenCV, called by the Python code to do image processing
  • Apache web server to serve the HTML/JavaScript/image files and run the Python scripts

Read on to learn about how I used Online IDEs and Docker for creating a portable web app.

Online IDEs

In order to develop this project I used On-line IDEs (Integrated Development Environments).

Online IDE running in a web browser

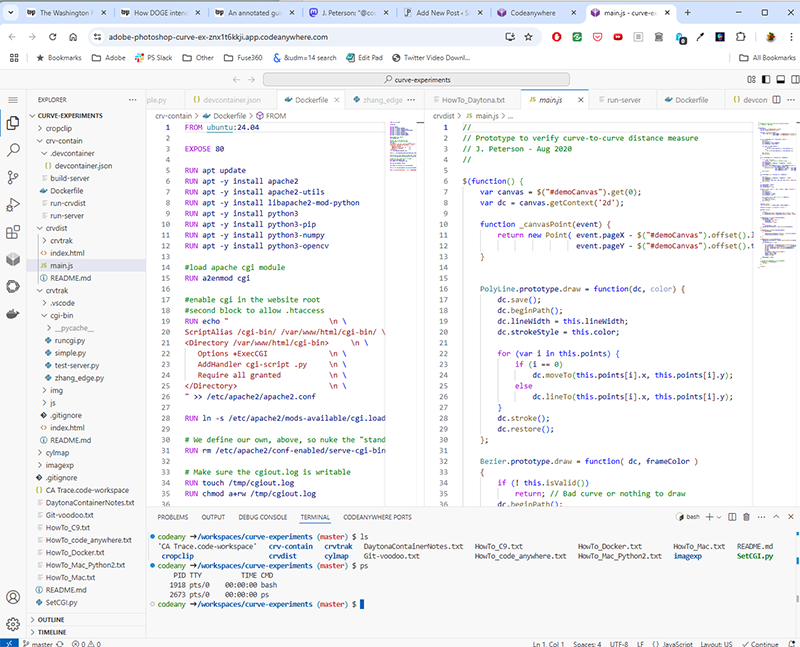
An on-line IDE runs from a web site in a browser window. Inside that window you have all the things you’d associate with a code development tool like Apple’s XCode or Microsoft’s Visual Studio, but running on a remote Linux box. The IDE in the browser window has panels with code editors, file browsers, debugging tools and a shell window where you can type commands. To test the code, I started the web server on my remote Linux box and opened a new browser window running my app.

This worked great. What I loved about it was the extreme availability. I could be anywhere – work, home, a relatives house, etc. As long as I could get to a web browser, I could pick up my project right where I left off by just logging into the online IDE. When I added the Python script to do image processing, the setup got more complicated. I found myself having to learn arcane details about the web server (Apache2) to configure it to run my Python scripts the code in my web page was invoking. But once I had the configuration working, I moved on and focused on my project.

Typically an online IDE vendor offers a “free” level to let you try it out, but it shuts down your workspace if you leave it inactive for a while. You don’t lose any data, but it takes a minute or two to start it back up and open everything again to resume working. For a small fee – $8 to $10 a month, you get a “dedicated” workspace that’s always up and running. Everything is right where you left it as soon as you log in again. Definitely worth it.

One problem with Online IDEs is while it’s a great concept, it apparently isn’t a great business. I started out a over ten years ago with with Koding.com. It worked great for a few years. Then their business morphed into – something, I’m not sure what – and it no longer worked as an IDE. From there I moved to Cloud9. This was really good. I happily used it for a few years until Amazon bought them and buried the product deep within AWS. From there, I moved to CodeAnywhere. This one is still in business! But I didn’t work on my project for a couple of years until now. While I was away, my credit card lapsed, and my workspace was shut down. When I came back they are now part of Daytona.io, some sort of AI company. Setting it up again, the “new generation” environment had completely changed (now based on a web version of VSCode), and my app’s web server configuration no longer worked.

The environment. Yeah. Even though all of the IDEs were running “Linux”, the reality is they all required unique and specific setup and configuration to get the software I needed (Python, OpenCV, Apache2) installed and running. The setup on every one of these platforms (include old CodeAnywhere and new CodeAnywhere) was different. Every time, I would have to dig through documentation, forum posts, support messages, and experiment to get the right software installed and the configuration files set up so my app could run again. Configuring a web server with application scripts is complicated, and every new platform required this unique setup. I tried porting my app to run locally on a Mac, and there it required yet another completely different setup and configuration to get the web server working.

Docker

When I reached out for tech support at the “new” CodeAnywhere, the support person more or less insisted I use Docker to set up a “container”, and do my work with that. I had vaguely heard of Docker, like, something server-bros used? Time to learn about it.

Docker sets up a virtual Linux machine, and runs your server on that VM inside whatever system you’re using it on. No matter what your platform is – online IDE, Mac, Windows PC, etc. the system and applications running in the Docker container sees itself running on the exact Linux machine you created. You specify your setup and configuration for this system once, and by the sheer brute force of executing that entire Linux installation as a virtual machine, you can run it anywhere. No more configuring the web server for every different new platform!

Docker allows you to mount the host’s file system in the VM, so you can edit and manage your work using your development environment’s regular editor and source control tools (Github, etc). You don’t need to re-launch the VM to update your work. You can also open an interactive shell inside the VM, in case you need to check its behavior or modify its configuration on the fly.

As an experiment, I tried porting my Docker installation from CodeAnywhere to a Mac. After installing the Docker desktop application on the Mac, I was able create and run the same Docker container there, and have it run with no changes in my code and no extra setup work. This is huge. Previously, each platform my app ran on required about two pages of instructions about how to set up and configure the platform. Now, this voodoo was figured out once, and baked into the virtual machine Docker creates.

Is Docker a lot of overhead? Well, the Docker application requires a few gigabytes to install, and the virtual machine images it creates are a few gigabytes more. But we live in a world now where 5GB of disk space – even for SSDs – costs less than twenty cents and will only get cheaper. Docker is free for individual / small business use, and rents for about $150/yr for larger corporations. I’m looking forward to no longer fiddling with web server configuration challenges to run my app on new platforms.

Note: Nothing here is a paid promotion. I paid for CodeAnywhere (and the previous online IDEs) myself. Docker is included for free with CodeAnywhere. Work covered the cost of the Docker Desktop app at my request.

https://saccade.com/blog/?p=971
Extensions
Some Boots for the Lelo Self-Balancing Triangle
3DBalance
One of the cool things modern tech has made straightforward is the ability for gadgets to balance themselves. Spinning reaction wheels allow a device to change its position and hold it in place, even if it’s balancing on a point. Last century, this would have been a major (and expensive!) engineering challenge. Today inexpensive nano-tech read more »
Show full content

One of the cool things modern tech has made straightforward is the ability for gadgets to balance themselves. Spinning reaction wheels allow a device to change its position and hold it in place, even if it’s balancing on a point. Last century, this would have been a major (and expensive!) engineering challenge. Today inexpensive nano-tech gyroscopes, direct-drive motors and microcontrollers have reduced automatic balancing to an engineering class project.

I’d love to learn more about this and build such a device. Check out this YouTube channel for a whole variety of homemade balancing devices. In the mean time, you can buy a fun demo from Nikolatoy: The Lelo self-balancing triangle. This is a commercial version of an open-source project that apparently is very popular in China (YouTuber RemRC’s version is here).

One of the clever tricks Nikolatoy used to reduce the cost of their triangle was to make the frame out of the circuit boards. Unfortunately, the edges of the boards have poor traction, and it’s difficult for the triangle to balance itself without getting stuck slipping back and forth.

I solved this by creating a set of “boots” to put around the edge of the boards, giving the triangle a lot more grip.

This dramatically improves the ability of triangle to function (see the video below). I’ve posted the STLs if you want to print your own, using a soft, flexible material such as TPU. Or, (shameless plug!) you can simply buy a set of them from me on Shapeways (remember to order two of them). [Sadly, as of July 2024, Shapeways.com has gone out of business. You can find other venders by googling “TPU 3D printing services”]

https://saccade.com/blog/?p=898
Extensions
After Ten Years, a New Computer
MiscellaneousReviewsMacintoshPCUpgradeWindows
Forty years ago, Moore’s Law was on a tear when it came to personal computing. Every year or two, CPU clock speeds doubled, RAM prices fell by half, and the compute power your OS and applications expected increased accordingly. You really had to buy a new machine every 2-3 years, or else your computer was read more »
Show full content
Four decades of personal computer purchases

Forty years ago, Moore’s Law was on a tear when it came to personal computing. Every year or two, CPU clock speeds doubled, RAM prices fell by half, and the compute power your OS and applications expected increased accordingly. You really had to buy a new machine every 2-3 years, or else your computer was hopelessly slow and out of date.

This slowed down by the late 2000s. The CPU chips had made the jump from 32 to 64 bits wide, and the clock speeds the processing chips ran at leveled off at around 3 – 4GHz or so. You could comfortably use the same computer for several years before replacing it. This is why the PC sales rate is a fraction of what it was 20 years ago.

My approach for buying my previous two computers was to get a top-end Macintosh and run Windows on it (I’ll explain the OS choice later). The fit, finish and performance of Apple hardware was excellent, and the selection process was very straightforward. When he returned to Apple, Steve Jobs paired the Mac product line down to simple groupings of computers making it easy to choose the right one. The rate of obsolescence had slowed down to almost a decade between replacements (though I may procrastinate on this longer than most). Read on for some history and how I selected a new machine…

In 2006 I purchased a Macbook Pro “lunch tray” laptop. With the Macbook I finally learned the lesson that if your computer spends 90% of its time on your desk, you should definitely just get a desktop computer. The ergonomics are better, the cost is lower, and a desktop system is generally more robust.

When it was time to move on from the Macbook Pro in 2013, the Mac Pro “trashcan” was Apple’s only “pro” desktop option that wasn’t literally glued shut. It easily opens up for upgrades or maintenance. I also liked it was small enough to fit on the desktop. I hate machines that chew up floor space, requiring you to crawl on the floor to plug in a peripheral. But by last year the Mac Pro was showing its age, and many of the apps I frequently use no longer supported its GPU. (Kudos to AMD for regularly updating the trashcan’s Windows GPU driver for a full decade!). In addition to the obsolete GPU, Windows 11 now requires hardware security features the Mac Pro lacks.

The logical choice to replace the trashcan is the Mac Studio, but buying Apple hardware and running Windows on it is no longer a thing. Apple switched to their own proprietary CPU chips in 2020, and stopped supporting Windows on the Mac in the process. Time to look elsewhere.

As I mentioned previously, I hate tower systems. These huge, ugly boxes are typically filled mostly with air. Too big to fit on a desk, they’re left bashing into your knees on the floor. Fortunately smaller options for PCs exist. Intel has a whole line of compact PCs they call NUC (“Next Unit of Computing”). These have been through many iterations over the past decade. They now range from very basic PCs to monster rigs, all crammed into as little space as possible. I chose the current top-end model, the NUC13. It supports three-slot graphics cards, allowing you to add a high-end GPU to the system, yet it still fits comfortably on your desk.

Intel NUC 13; Apple Mac Studio

It’s interesting to compare the NUC13 to the Mac Studio. In terms of style, Intel’s black stamped metal box is no match for Apple’s classy machined aluminum curves.  On all other aspects however, the NUC13 wins. My configuration has an i9-13900K CPU, 2.5T SSD, 64GB RAM, RTX 4080 GPU. This configuration (from SimplyNUC, with the GPU purchased separately at BestBuy) costs $4,108. A similarly equipped Mac Studio runs $5,400. The NUC13 is a bit faster than the studio on CPU tasks and (despite Apple’s claims otherwise) Apple’s GPU is not as fast as a high-end nVidia card.
NOTE: comparisons above are from December 2022

The NUC13 has other advantages beyond price and performance. Opening up a Mac Studio requires tearing off a glued-down rubber base, removing a lot of screws, and unplugging many connectors. The RAM is soldered directly to the CPU and the GPU is literally on the same silicon as the processor. Upgrading them is impossible. You can unplug the Studio’s internal storage device, but it’s proprietary and apparently software locked to the computer. Attempts by iFixit to swap in a larger one didn’t work.

Even if you’re satisfied with never upgrading the hardware, there’s another reason disassembly is important: dust. With my Mac Pro, every 12-18 months I would notice the fan speeds (thanks to Macs Fan Control) slowly creeping up as the cooling started to degrade. After taking out half a dozen screws and unplugging a few connectors, I was able to vacuum out the dust accumulating on the Mac Pro’s fan and heatsink and get it running cool again. With the Mac Studio, such a cleaning is much more challenging, as the machine must be completely disassembled in order to reach the fans. I suspect some of these Macs will be having thermal problems after 2-4 years of use.

This is in stark contrast to the NUC13. The NUC’s top and side covers are easily removed in seconds, making it trivial to vacuum out any dust inside. Hardware upgrades – storage, RAM, GPU etc. are similarly simple. Intel even provides an Ikea-style instruction book showing how to easily open and access every upgradable part.

I’m comparing the Mac Studio with the NUC13 because they both fill the same niche – compact desktop computers that are excellent at handling heavy creative workloads. If you’re a long-time Mac user with an investment in Mac software, by all means you should get the Studio – the savings of the NUC13 isn’t worth the headaches of switching to a new OS and new application software. But as a Windows user who regularly bought Apple hardware, I’m happy to find a solid PC equivalent to the Mac Studio.

On Operating Systems

I used to be a serious Macintosh fan. In college, I got one of the original 128K Macs to use at home when they first became available. My first introduction to Mac programming was a seminar taught by Andy Hertzfeld and Larry Tesler. After grad school I even went to work for Apple in Cupertino for four years. So what caused me to switch to Windows in the mid 1990s? It came down to two features Windows had well before the Mac did:

  • Protected Memory
  • Preemptive Multitasking

These are not mere check-off items in a long list of features. They crucially affect how reliable and responsive your computer is. Without protected memory, any piece of software – OS, device driver, application, you name it – is capable of crashing the machine by overwriting memory it shouldn’t have anywhere in the entire address space. The result is even a minor bug can crash the system. As a software developer I was dealing with buggy software more often than most. Even trivial errors often wiped out your work and left you waiting for your Mac to reboot.

With protected memory, hardware in the CPU partitions the memory address space into sections. Each piece of software can only access the memory in its assigned space. An errant application reaching outside of its section of memory may fail, but the other applications and the OS are left alone and still functioning.

Similarly, preemptive multitasking uses hardware to force the CPU to divide its time among all of the tasks currently running. This prevents any single application or system function from getting stuck in a loop and locking up the machine.

Frustrated with the Mac’s instability, I switched to Windows for my personal use in the mid-1990s. In the early 2000s Apple finally fixed the Mac OS stability issues by switching to Mac OS X, based on NeXTstep and Unix, but by then I’d invested in Windows software and was more accustomed to that environment. Microsoft and Apple have been stealing duplicating each other’s features for decades, so by now the two systems are functionally identical. And the applications – where you spend most of your time – are the same. Chrome is Chrome, Adobe apps are Adobe apps, MS Office is MS Office, etc.

Of course, there are still differences, and by now OS preference comes down to habit and your investment in applications and ecosystem. I use both interchangeably in my day job. Other than tripping over the command vs. the control key, they feel very similar. One area where Microsoft still excels is backwards compatibility. An email client I’ve used for decades, Eudora, still runs now under Windows 11. In the same span of time, Apple has replaced the CPU architecture three times, as well as the entire OS and application APIs. Any Mac software more than a just few years old has no hope of running now.

System Chronology

Here’s a list of all of the machines illustrated at the top. In some cases, I’ve had to guess at the RAM and storage specs – often these were upgraded, even for machines owned just a couple of years.

YearComputerCPURAMStorage1984Mac 128KM68000 8Mhz0.128MB0.0014 GB1987Mac IIM68020 16Mhz1MB0.04 GB1989Mac IIcxM68030 16Mhz4MB0.04 GB1991Mac Quadra 700M68040 25Mhz / PPC 601 50MHZ8MB0.16 GB1994PowerMac 8100/80PPC 601 / 80Mhz16MB0.5 GB1997Fujitsu Lifebook 655txIntel Pentium MMX 150Mhz16MB0.8 GB1999Dell Inspiron 3500Pentium II 333 Mhz64MB1.5 GB2002Dell Inspiron 4100Pentium III 1GHz256MB80 GB2006Macbook Pro 17”Core Duo 2.2GHz / 2 cores1,024MB120 GB2014Mac Pro (trashcan)Xeon E5 3.7 GHz / 4 cores16 GB1024 GB2023Intel NUC 13I9-13900K 3.5 GHz / 8+16 cores64 GB2,512 GB
https://saccade.com/blog/?p=798
Extensions
Mac Software Lives Again
SoftwareEmulationMac
Back in the mid/late 1980s I wrote a couple of cool (to me at least) Macintosh Applications. Macintosh Pico This is an image processing language demo based Gerard Holzmann’s book Beyond Photography – The Digital Darkroom. The app lets you interactively type expressions in Holzmann’s language and see the results in another window. Wallpaper for read more »
Show full content

Back in the mid/late 1980s I wrote a couple of cool (to me at least) Macintosh Applications.

Macintosh Pico

This is an image processing language demo based Gerard Holzmann’s book Beyond Photography – The Digital Darkroom. The app lets you interactively type expressions in Holzmann’s language and see the results in another window.

Wallpaper for the Mind

This app creates chaotic patterns based on a formula published in Scientific American‘s Computer Recreations column. You can vary the formula’s parameters and instantly see the effects on the pattern, as well as zoom and pan around the results.

These were both implemented as fun demos. Neither app had much in the way of commercial potential, so I gave them away for free. Both were originally written to run on 68K Macintoshes running System 7, typical of the late-80s. Read on to learn about their new lease on life.

Within ten years of creating them, the apps were essentially dead. Apple switched to a different CPU (the PowerPC) and eventually stopped supporting the emulator allowing older apps built for the 68K processor to run. This was a death blow to Macintosh Pico, since it compiled the expressions in the app directly to 68K code. I apparently did update Wallpaper to be a “fat binary” able to run on both the 68K and PowerPC, but Apple eventually stopped supporting the graphics it depended on.

By the early 2000s, when I moved my web site to a new host, I glumly took down the web page distributing the apps (I’ve resurrected a copy here). The Apple hardware and operating systems the apps ran on were no longer commonly available.

Emulation to the rescue

But! We live in the future, and our new computers are so fast they emulate old ones with ease. Even more amazing, the Internet Archive’s Emularity is able to run vintage software right in your browser, so you can experience the software with one click. Nothing to install or set up. Visit Macintosh Pico or Wallpaper for the Mind at The Archive and click on the splash screen. An early-90’s era Mac boots up in your browser, and you double-click the applications to run them. Just like you did in 1992.

The emulations, running in the browser, are approximately as fast as the original hardware was 30 years ago. This is amazing given the multiple layers of abstraction conspiring to make it happen.

If you really want to get into it, try installing an emulator onto your computer locally (details here). If you run the emulator directly on your modern PC, the old code runs orders of magnitude faster than it did on the vintage hardware. Back in the day, booting up a Mac took the better part of a minute. Now when emulated directly on current PCs it takes less than a second for the emulated Mac to boot. As someone who spent many hours in front of 68K Macs decades ago, the effect is almost comic, like watching a familiar movie suddenly flying by on fast forward. It’s fun to see these apps running far faster than they ever did when I wrote them.

[Actually, I did briefly witness the hyper-fast Mac almost 30 years ago when I worked at Apple. A friend showed me a lab prototype of a Mac based on Motorola’s 68060 CPU, stuffed into the case of an old Mac IIfx. Such a machine was never released by Apple (they pivoted to using the PowerPC instead). But that 68060 prototype, running an older copy of System 7, did boot up in about a second. ]

https://saccade.com/blog/?p=737
Extensions
The Return of Attic
Miscellaneous
Many years ago, I repurposed an ageing Dell tower PC into a household server named “Attic.” After the fire, we had to move out of the house for a while, and it no longer made sense to keep it. So I kept the hard drives, and junked the aging PC hardware. The original machine ran read more »
Show full content
2011 Mac Mini

Many years ago, I repurposed an ageing Dell tower PC into a household server named “Attic.” After the fire, we had to move out of the house for a while, and it no longer made sense to keep it. So I kept the hard drives, and junked the aging PC hardware. The original machine ran Linux (Debian), simply because I find it a slightly more useful way to configure as a remotely accessed device than a Mac or PC. But to quote @jwz: “Linux is free only if your time is worth nothing“. Nearly two decades later, that’s still true.

I still missed having the server though. I found another leftover computer, this time a 2011 Mac Mini my son used in middle school, and set it up again as a household sever.

The installation is the easy part, everything else is messy. It’s Linux: meaning it’s nobody’s job to make sure everything works. Or rather, it’s everybody’s job to make sure anything works. The good news is all the nerds use Linux and post about it, so help is usually just a few searches away. Click “read more” for a running brain dump of what I’ve discovered so far while getting it on the air.

Initial installation

Setup is way easier now:

  • Download the Ubuntu distro to thumb drive. I used rufus to create a bootable version of Ubuntu Server 20.04 ISO image.
  • Plug the Mac Mini’s HDMI output into a screen, and plug in a USB keyboard.
  • Boot the Mac mini with the option key down and let it boot off the thumb drive.
  • Let it take over the disk and install.
  • Log in, and create additional accounts for everybody using it with sudo adduser username.

After this, it’s possible to log into the server using the hostname you chose during installation over the network via ssh on another Unix machine or a shell window on a Mac. On a PC, install putty to access it.

Note this approach overwrites all contents on the Mac. So if you had anything you wanted on that computer, save it first!

The Wifi

I had an idea it might be nice to get the Mac Mini’s wifi to work. The default Ubuntu install doesn’t support it. I downloaded the driver:

$ sudo apt update
$ sudo apt install firmware-b43-installer
$ sudo reboot now

Then, to see what’s going on, I added:

$ sudo apt install network-manager      # Get the nmcli command
$ ls /sys/class/net                     # Shows the installed net devices
$ sudo nmcli dev wifi connect SSID password 'YourPassword'

The last command, where SSID is your Wifi name, gets you on the air. This doesn’t happen automatically though, so I put this command in /etc/init.d/wifi_login and used

$ sudo chown a+x /etc/init.d/wifi_login
$ sudo ln -s /etc/init.d/wifi_login /etc/rc3.d/S05wifi_login

To make it part of the boot process. This seemed to work. On the air with Wifi. Great!

…until I installed something else. Was it Apache? Was it Samba? Who knows, but something I did down the line killed the wifi. I installed (sudo apt install) wpasupplicant, and wireless-tools.

If the Wifi is dead, I found

$ sudo wpa_cli
> reassociate

Works to revive it, but you must wait about 10-15 seconds before exiting wpa_cli for it to take effect.

I fiddled (for hours) with the Wifi, thinking it would make placing Attic much more flexible. I found I could not make it consistently come up without the reassociate procedure above. However, the Mac Mini is small enough, quiet enough, and attractive enough that placing it near an Ethernet cable isn’t much of a burden.

Disks

WARNING: The following procedures can immediately destroy the contents of entire disk drives. Use at your own risk!

After installing Linux, I was annoyed to discover df reporting less than half of the drive’s rated capacity. Googling around, I found something new since I last did any serious Linux configuration is “Volume Groups” and “Logical Volumes”. It turns out, the default install created a “logical volume” with half the space of the disk drive. To find out what’s actually plugged into your computer, use:

$ sudo lsblk -e7 -f -m -p

This displays the sizes of the physical devices and their associated partitions. To get the space back, use:

$ sudo vgdisplay      # Reports "volume groups", displays Alloc vs. free space
$ sudo lvdisplay      # Reports "logical volume (LV Path)

$ sudo lvextend -l +100%FREE <LV Path>
$ sudo resize2fs <LV path>

In the last two commands, <LV path> is the LV Path reported by lvdisplay. In my case it was /dev/ubuntu-vg/ubuntu-lv, YMMV. Some background.

Upgrading the disk

Even with the space recovered, 500GB wasn’t going to be enough space, so I upgraded the SSD in the Mac Mini to 2TB. The first step is copying the original drive to the new (larger) one. I used a USB adapter to plug the new drive in externally. The boot drive device is usually /dev/sda and if you plug the new drive into a USB adapter, it’ll be something like /dev/sdb. Use lsblk as above to verify which is which. To duplicate the drive:

$ sudo dd if=/dev/sda of=/dev/sdb status=progress

BE EXTREMELY CAREFUL WITH THIS COMMAND. It is a low-level, block by block copy, and if you get the “input file” (if) and/or “output file” (of) mixed up, you will immediately obliterate the wrong disk. Copying 500GB with a USB adapter on the Mini is slow. Like, 7MB/sec. If you do the math, that’s 20 hours.

After you copy the disk, the partition table on the new drive still thinks it’s the original size (remember, block by block duplicate). Here’s how to use the parted disk partitioning utility to expand partition #3 to use the rest of the space. Note we’re changing /dev/sdb, be sure to use the drive ID appropriate for your setup. Like everything else in this section, go slow and read up. Utilities like parted can do lots of damage in single command.

$ sudo parted /dev/sdb                # user input in bold
GNU Parted 3.3
Using /dev/sdb
Welcome to GNU Parted! Type 'help' to view a list of commands.

(parted) print                        # Display the current partitions
Model: ATA CT2000BX500SSD1 (scsi)
Disk /dev/sdb: 2000GB
Sector size (logical/physical): 512B/512B
Partition Table: gpt
Disk Flags:

Number  Start   End     Size    File system  Name  Flags
 1      1049kB  538MB   537MB   fat32              boot, esp
 2      538MB   1612MB  1074MB  ext4
 3      1612MB  500GB   499GB
        500GB   2000GB  1.4TB   Free Space

(parted) resizepart 3 100%            # Expand partition 3 to use all the free space

iFixit provides nice directions on how to swap the new drive into the Mac Mini. After swapping the new 2TB drive into the Mac Mini, it booted up just fine. However, df still reported only 500G of space. Well, remember the virtual/logical volume stuff? Yeah, that was still set for the old 500GB drive as well. Here’s the incantation to fix it, assuming the root partition is on /dev/sda3: (Note the new drive is /dev/sda now that it’s mounted internally).

$ sudo pvresize /dev/sda3
$ sudo lvextend -r -l +100%FREE /dev/mapper/ubuntu-vg/ubuntu-lv

That last parameter to lvextend is the logical volume reported by lvdisplay. YMMV. In the process of upgrading the disk drive, I discovered, iFixit sells a kit allowing a second drive to be mounted in the case. So the 500GB drive may yet come back inside the Mac Mini. Update Nov-2021: I acquired the 2nd drive kit, and tedious installation aside, it works.

Restoring the old Attic drives

I’d saved the old spinning 3.5″ hard drives from Attic. With an inexpensive external case, it’s easy to hook them up to a USB port. However, to actually see the contents, you need to:

$ sudo mkdir /media/hd            # Create a directory to mount the drive on
$ sudo lsblk -e7 -f -m -p         # To see the filesystems
$ sudo mount /dev/sdb1 /media/hd  # Mount the drive (look at the previous output to see the /dev/XXX to use)

Now you can copy the contents from the old drive partition on /media/hd to the internal drive. Remember some things (particularly in home directories) may be hiding in invisible files or folders beginning with a “.”. Files copied from another Unix system may have owners and groups that don’t match the new one, so you’ll need to fix it with commands like this:

$ sudo chown -R user:group /dir/to/change    # Fix ownership
$ sudo chmod -R u=rwx,go=r /dir/to/change    # Fix permissions
File Sharing with Samba

Samba works well for sharing files; both PCs and Macs know how to talk to it. Useful setup tutorials: one, two. The basic gist is to install it:

$ sudo apt update
$ sudo apt install samba
$ sudo ufw allow samba    # Update firewall rules to allow Samba traffic

To configure it, edit /etc/samba/smb.conf (you’ll need to do this as root). Below are the relevant sections I used; there are helpful comments in the default file, and lots of documentation and reference online.

# This sets up access to a "share" folder in everybody's home directory
# that'll appear when they access the server.
[homes]
   comment = Home Directories
   browseable = no
   path = /home/%u/share

# This disables guest access
[global]
  security = user
  encrypt passwords = true
  map to guest = bad user
  guest account = nobody

# This allows access to a global sharing folder on /share
[share]
   comment = Main share folder
   valid users = @share
   path = /share
   read only = no
   browsable = yes
   create mask = 0775
   directory mask = 0775

Use sudo smbpasswd -a username to add users to Samba. It does not automatically allow access from the existing system logins – you need to do this extra step. You also still need to create the ~user/share folders and /share, and set the permissions on them; the /etc/samba/smb.conf entries just makes them accessible. After changing the configuration files, you’ll need to

$ sudo service smbd restart

To get any configuration changes to take affect.

Once Samba is up and running, use \\attic to access it on a PC. On the Mac, use “Go > Connect to server…” in the Finder, and enter smb://attic (where “attic” is the hostname you configured).

Update 29-Aug-2022

I tried to do-release-upgrade to update Attic to Ubuntu 22.04.

COMPLETE FIASCO

Apparently it got confused about the boot volume, likely related to the issue of both drives (new large one & old small one) having the exact same ID’s, because of using dd to do a bit-by-bit copy of the old to the new drive.

The symptom was the boot would fail with various file system errors. It could be booted manually by attaching a keyboard & screen, and selecting “recovery” mode from the console, but the ultimate result was /boot on one drive, and the rest of Linux on another, with a kernel/release mismatch. Ick.

In retrospect, it would have been wise to completely reformat the old drive as soon as I installed it, possibly avoiding this particular mess.

Anyhow…

It was time to re-install Linux from scratch. I don’t have the expertise or patience to attempt the component-level repair of a broken Linux system. This time, I adopted the philosophy of putting only the OS/boot on the smaller drive, and all of my actual data on the larger drive. That way, if the OS needs to get nuked again, most my files are outside of the blast radius.

The first step was do a fresh re-install of` Ubuntu 22.04 onto the smaller drive. You must be very careful when doing the install to make sure you don’t blow away the larger drive.

The 22.04 installer also has an option to not create a logical volume, leaving you with an old-fashioned flat partition. This is much easier to deal with than all of the logical volume stuff I’ve described above. I wish I had this when I installed the original system, doing so simplifies the procedures above considerably. Unfortunately, there’s no way to “flatten” an LV drive back to a regular filesystem without reformatting it first.

Q & A

So old! So slow! Not really. Relative to what you’d get out of, say, a Raspberry Pi, the speed (2.5Ghz x2 cores, 4G RAM) and bandwidth is plenty for this server. The Apple hardware, even ten years old, is still nice and solid (and quiet and sleek). This is also very cheap; other than $180 for the new 2TB SSD, everything else is recycled.

Why not leave it as a Mac? The overhead for Mac OS is considerably more than Linux, and the Mac is not as convenient to manage in a “headless” configuration. Once the initial setup is done, everything is done remotely.

You know you can buy off the shelf solutions for this, right? Yes, but understanding Linux (and Unix in general) is a useful skill to have. I first learned the Unix shell commands over four decades ago, and they’re still remarkably the same. When it comes to computer operating systems, Unix is, more or less, the survivor. Android, iOS, MacOS and Linux are all decedents of Unix. The latest versions of Windows even offer Unix based subsystems.

When I started with computers, most every hardware manufacturer had their own unique operating system, and larger companies offered several. Now, we’re down to just two in widespread use; Unix and Windows. Your phone, your TV, your radio, your home security system, your cloud services, your Wifi toaster, are all likely running some ancestor of Unix. As Unix co-founder Dennis Ritchie said in The Unix-Haters Handbook: “The [competing] systems you remember so fondly … are not just out to pasture, they are fertilizing it from below”.

For all of Unix’s cryptic inscrutability, it’s not going away. Best learn to live with it.

https://saccade.com/blog/?p=647
Extensions
The Fit Testing Block
3Dfit test
How Accurate is Your 3D Print?I Tested Several Services to Find Out Update January 2025: Added a few more prints from Jawstec and JLC3DP. Update September 2024: Several of the entries in this post referred to services (e.g., Shapeways) that are no longer in business, or 3D printing tech that is now obsolete. I’ve archived read more »
Show full content
largesteel
Fantasy version of the fit testing set, milled to the micron in stainless steel
How Accurate is Your 3D Print?
I Tested Several Services to Find Out

Update January 2025: Added a few more prints from Jawstec and JLC3DP.

Update September 2024: Several of the entries in this post referred to services (e.g., Shapeways) that are no longer in business, or 3D printing tech that is now obsolete. I’ve archived these old reviews elsewhere, but removed them from this post for brevity. Even though Shapeways is no longer around, I left the story about their process variations as a useful story of what can happen even with a particular process at a specific vendor. This post has been updated with reviews of several contemporary services.


Decades ago, if you wanted to create your own printed circuit board, you had to make it yourself. This was quite involved – you bought a copper plated blank board, created the circuit patterns on it with resist (tape, rub-on patterns, or Sharpie), then dunked it in noxious chemicals to etch the unmarked copper away. It was also up to you to drill the holes. Then you tracked down problems because too much (or not enough) copper was dissolved, opening or shorting your circuits. It was messy, tedious and frustrating.

Here in the future, all those problems are solved. You design the board in a CAD program, then the Internet whisks the design to a far-off fabrication house. A few weeks later your boards arrive, perfectly manufactured with solder masks, silk-screen markings, plated through holes – things you’ll never get making them at home. 

I do some amount of 3D printing, but I have no desire to own a 3D printer. Running your own 3D printer still feels like those early days of homemade circuit boards. The tedious details of bed leveling and heating, getting the model to stick in place, support sprues, filament moisture content, speed settings all have to be carefully looked after to get good results. I prefer the modern circuit board model for 3D prints – send the model off to a factory with equipment and materials you’ll never afford, and get your polished results back in the mail.

When I started ordering 3D prints, I had a basic question: when designing two parts that fit together, how much space do you need to leave between them to fit properly? To research this, I designed a set of fit-testing sets and printed them with various processes to see what sort of tolerances are necessary. So far I’ve tried nine different prints, and (unlike circuit boards) the results vary considerably.

The fit testing sets consist of two parts, a pair of pegs, each with round and square ends. One peg has 5mm ends, the other is 10mm. The other component is a block with a range of holes of different sizes to test fit each peg. Printing these and testing which hole each peg fits in helps to determine how much extra margin your design needs to have parts fit together well. For example, if the peg fits comfortably in the +0.2mm hole, that means you’d better leave a 0.2mm gap in your design for the parts to work smoothly.

The first blocks I made ranged from -9.85 to 10.15 (in increments of 0.05mm) for the large holes, and -4.875 to 5.125 (with 0.025mm steps) for the small ones. I quickly discovered this wasn’t enough range for coarser printing processes, so I created additional blocks with wider ranges of 9.7 to 10.3 (9.75 to 10.25) and 0 to 0.6 (0 to 0.5). These doubled the increment steps of the previous blocks, from 0.05 / 0.025 mm to 0.1 / 0.05.

The last block works well for the coarsest printing technologies, and is the best place to start for basic FDM (fused deposition modelling) printers. The rendering above also shows some quarter-step peg sets I modeled for even more precise tests, but you won’t need those anywhere outside of a Swiss watch factory.

Over the past few years I’ve printed blocks and pegs with a number of different services, to get a feel for the accuracy and tolerances of each. Read on for a review of what I discovered.

Process Variations

Keep in mind that even with the same material and vendor, your experiences may still vary. A story: I printed a Slideways Cube puzzle with Shapeways regular plastic, using the 0.1mm tolerance (0.2mm gap between pieces) I’d determined for this material with the fit-testing block. The first one I got back fit together perfectly. I made another, but this time Shapeways didn’t provide the smooth polished surface I requested, so the pieces required some light sanding before working together smoothly.

Different surface quality variations (pieces are about 6cm across)

Since they hadn’t provided the smooth finished I requested, I asked Shapeways to re-make the puzzle. They did, but for some bizarre reason they made each of the three pieces a week apart, each arriving in a separate shipment. The fit was a disaster, and required serious amounts of sanding before they fit together. Because the pieces were made at different times, I suspect changes in machines or settings exaggerated the differences between the pieces.

The Sample Prints

Below is a set of brief reviews for each of the peg & block sets I’ve printed using a variety of services and materials. For each print, I’ve collected the following data:

  • The Date is when I ordered the print, and the price is the cost for a block, 10mm & 5mm pegs, and shipping at the time I purchased the print. As you’ll see from the dates, I’ve been doing this over a period of years. Note several samples were ordered from 3D Hubs, back when it was an “Uber for 3D printers” service. Sadly, they discontinued this business. At the time it was a great way to try out various printing technologies.
  • The Fit 10mm □ / ○ and Fit 5mm □ / ○ are the holes in the block the corresponding round / square pegs fit into. By “fit”, I mean the peg easily slides in without any significant force. This gives a basic idea of the printing margins you’ll need to create parts that fit together.
  • Overall dim is the difference, length ✕ width ✕ height, between the measured size of the block and its CAD specification. Note this is approximate – with some processes, it’s not unusual to see variation in height or width from one end of the block to another.
  • Large □ hole, Large □ peg, Small □ peg, are the differences (width ✕ height) between the 10mm square hole, the 10mm square peg and the small (5mm) peg, and the actual specification.

All measurements were made with the same pair of Mitutoyo calipers, with a rated accuracy of 0.02mm. And don’t forget, your experience with a given process may well be different – re-read my story about the puzzle pieces.

I’ve provided close-up photos of each sample, to provide a sense of the fit and finish you can expect. For scale, remember the larger holes are 10mm (0.4″) across.


Dirty SLA

Dirty SLA is a service out of China, producing one of the best sets I got back. Very smooth finish, very close fit. I recommend paying extra for the tracked shipping, as I’ve had shipments lost with the less expensive methods. This uses a Stereo lithography (SLA) process, where a liquid resin is hardened by exposure to a precisely positioned laser beam.

Print DatePriceFit 10mm □ / ○ Fit 5mm □ / ○ Nov 2017$50.00 -0.05 / -0.05-0.075 / -0.05Overall dimLarge □ holeLarge □ pegSmall □ peg0.21 ✕ 0.13 ✕ 00.13 ✕ 0.12-0.06 ✕ -0.02-0.02 ✕ -0.05

HP Jet Fusion 4200

The HP Jet Fusion process is somewhat similar to laser sintering, but relies on special fusion materials printed into the plastic medium. I used the 3D Hubs service to order the print. While the feel of the plastic is solid and looks good, the 10mm pegs only fit in the 0.6mm hole in my print – quite a margin.

Print DatePriceFit 10mm □ / ○ Fit 5mm □ / ○ 6-July-2017$84.840.6 / 0.60.5 / 0.45Overall dimLarge □ holeLarge □ pegSmall □ peg0.56 ✕ 0.12 ✕ 0.190.07 ✕ -0.060.38 ✕ 0.030.25 ✕ 0

Sculpteo Nylon PA12

This was printed in Sculpteo‘s SLS (Selective Laser Sintering) Nylon. For some reason, it has the worst text rendition of any of the blocks I printed with an SLS process. Something to keep in mind if your print uses that.

Print DatePriceFit 10mm □ / ○ Fit 5mm □ / ○ 16-May-2018$56.290.3 / 0.30.35 / 0.40Overall dimLarge □ holeLarge □ pegSmall □ peg0.12 ✕ 0.0 ✕ 0.14-0.14 ✕ – 0.100.05 ✕ 0.070.03 ✕ 0.06

Xometry – Ivory Solid ABS M30

Like the Flash Forge print, this is ABS FDM output. It’s similar to what you’d get with a high-end personal 3D printer. Note the peg fits are estimates, because I didn’t print the x2 block. The cost is high given the mediocre quality of the print.

Print DatePriceFit 10mm □ / ○ Fit 5mm □ / ○ 28-Oct-2016$95.680.5? / 0.5?0.5? / 0.5?Overall dimLarge □ holeLarge □ pegSmall □ peg0.02 ✕ -0.05 ✕ 0.250 ✕ -0.010.15 ✕ 0.080.24 ✕ 0.14

PCBWay Transparent Resin UTR-8100

This clear plastic print from PCBWay came out beautiful. Details are sharp and crisp, and the finish is excellent, just like a precision molded part. For parts to fit, a gap of 0.2 – 0.25 is needed. Shipping was $25.

Print DatePriceFit 10mm □ / ○ Fit 5mm □ / ○ 22-May-2021$60.000.02 / 0.030.25 / 0.25Overall dimLarge □ holeLarge □ pegSmall □ peg+0.31 ✕ +0.02 ✕ -0.150.04 ✕ 0.050.08 ✕ 0.07+0.17 ✕ +0.15

PCBWay Standard White Resin UTR-3100

For an inexpensive print, this came out great. Almost perfect fit, and details are very crisp. Shipping from Asia was $25.

Print DatePriceFit 10mm □ / ○ Fit 5mm □ / ○ 22-May-2021$35.00-0.05 / 0.00-0.05 / 0.0Overall dimLarge □ holeLarge □ pegSmall □ peg+0.05 ✕ +0.02 ✕ -0.150.34 ✕ 0.20-0.04 ✕ 0.03+0.07 ✕ -0.04

InkBit3D – Titan Epoxy 85

I discovered InkBit3D at the SIGGRAPH 2023 conference in Los Angeles. I was very impressed with the samples they had at the conference, so I requested a sample print of the Fit Testing block via their web site. They graciously sent two Fit Block sets printed with their process. The first is in their “Titan” Epoxy, the second was in Vulcan Soft Elastomer 30. The dimensional accuracy and detail on the Epoxy print is one of the best. The surface of the Epoxy print is a bit rough; I suspect if it was finished smooth the parts would be even more accurate. Keep in mind my calipers are only guarantied to ±0.02mm accuracy. I haven’t measured the Elastomer print, simply because it’s hard to get an accurate read with my calipers on a squishy material. This is one of the only prints able to resolve the tiny “jp” logo on the end of the 5mm square peg.

Print DatePriceFit 10mm □ / ○ Fit 5mm □ / ○ 24-Aug-2023$104.100.15 / 0.050.050 / 0.025Overall dimLarge □ holeLarge □ pegSmall □ peg+0.13 ✕ +0.09 ✕ +0.040.03 ✕ 0.060.04 ✕ 0.06+0.02 ✕ +0.04

CraftCloud / Hudson Creative Group – PLA / FDM

After the demise of Shapeways, I’ve started looking for another “go to” source for getting parts 3D printed. This was printed via CraftCloud. CraftCloud is similar to what 3DHubs was, a broker server for various companies offering 3D printing services. This print is a basic FDM / PLA print, similar to what you’d get off of a home 3D printer. The dimensional accuracy isn’t bad, and the cost is quite low, but fine detail like the text doesn’t come through well. The material (printed at 80% infill) has a very solid feel but a finish that screams “this is 3D printed”.

Print DatePriceFit 10mm □ / ○ Fit 5mm □ / ○ 15-July-2024$27.000.3 / 0.20.2 / 0.2Overall dimLarge □ holeLarge □ pegSmall □ peg-0.07 ✕ -0.1 ✕ +0.17-0.07 ✕ -0.05-0.04 ✕ +0.04+0.08 ✕ +0.08

CraftCloud / zone3Dplus – Aluminum Deburred

Zone3DPlus is a fabrication shop in China. Being on the other side of the planet, shipping is time consuming and more expensive ($24 of the price was getting the blocks shipped), but the printing costs are very reasonable. As with most metal printing processes, the dimensional accuracy is grim, even printing the block with the largest range, none of the pegs fit. To be fair to Zone3DPlus, they warned me the small text would not print clearly. I authorized them to print it anyway, and it’s still readable, but it fell below their specs for dimensional details. Unlike the metal prints I got from Shapeways, there was no warping – straight lines are straight.

Print DatePriceFit 10mm □ / ○ Fit 5mm □ / ○ 15-July-2024$79.00NONENONEOverall dimLarge □ holeLarge □ pegSmall □ peg-0.3 ✕ -0.0 ✕ +0.2-0.3 ✕ -0.3+0.3 ✕ +0.3+0.3 ✕ +0.3

CraftCloud / zone3Dplus -Tough Resin Standard (Gray)

This resin print came out great. Accurate details, nice finish, very solid feeling material. Cost is very reasonable. The three pieces were $6.50 each (likely their minimum) with another $24 for shipping.

Print DatePriceFit 10mm □ / ○ Fit 5mm □ / ○ 15-July-2024$44.000.1 / 0.30.15 / 0.3Overall dimLarge □ holeLarge □ pegSmall □ peg0.0 ✕ 0.1 ✕ +0.060.0 ✕ -0.050.0 ✕ -0.040.0 ✕ +0.05

PCBWay PA12 Nylon

I tried PCBWay’s Nylon PA12 in hopes of finding a replacement for Shapeway’s “versatile plastic”. It’s not bad, but shipping from China is expensive ($27 of the cost is shipping). The default finish isn’t quite a smooth as Shapeway’s was.

Print DatePriceFit 10mm □ / ○ Fit 5mm □ / ○ 15-August-2024$55.000.4 / 0.30.4 / 0.35Overall dimLarge □ holeLarge □ pegSmall □ peg0.0 ✕ 0.23 ✕ +0.1-0.2 ✕ -0.2-0.05 ✕ -0.050.0 ✕ 0.0

CraftCloud Zelta3D SLS Nylon PA12

Zelta3D produces their prints in Singapore, and like PCBWay, the shipping is expensive ($38!). This is probably the closest the the Shapeways default plastic, and it is available in a variety of colors and finishes.

Print DatePriceFit 10mm □ / ○ Fit 5mm □ / ○ 15-August-2024$57.000.5 / 0.50.45 / 0.45Overall dimLarge □ holeLarge □ pegSmall □ peg0.05 ✕ -0.12 ✕ +0.1-0.15 ✕ -0.20.2 ✕ 0.10.0 ✕ 0.1

CraftCloud / Advanced Additive Innovations – High Detail Resin MSLA

The finish on this is just fantastic. And unlike fabricators in Asia, the shipping cost is reasonable ($8). The accuracy is very high, and the details like the text marking come out looking like it came from a precision mold. The one downside is some amount of warping. The block isn’t perfectly flat, you can see a gap of perhaps 0.5mm if you hold a ruler across the top of the block, and one of the longer edges shows some rounding.

Print DatePriceFit 10mm □ / ○ Fit 5mm □ / ○ 15-August-2024$32.000.2 / 0.20.1 / 0.1Overall dimLarge □ holeLarge □ pegSmall □ peg0.0 ✕ -0.3 ✕ +0.1-0.05 ✕ -0.050.2 ✕ 0.10.0 ✕ 0.1
Jawstec – SLS Nylon PA 2200

This is a good candidate to replace the standard Shapeways plastic, though it’s a bit on the pricey side. Shipped in about a week for $5.

Print DatePriceFit 10mm □ / ○ Fit 5mm □ / ○ 9-September-2024$47.000.1 / 0.20.1 / 0.2Overall dimLarge □ holeLarge □ pegSmall □ peg-0.75 ✕ -0.04 ✕ +0.10.0 ✕ 0.0-0.02 ✕ -0.030.01 ✕ -0.06
Jawstec – SLA HighTempTS

I was hoping Jawstec would be a good candidate for an US vendor for Nylon / Resin prints. However, the higher fabrication costs offset the higher shipping costs from Asia. Worse, for this part the delivery time was over six weeks! Not acceptable.

Print DatePriceFit 10mm □ / ○ Fit 5mm □ / ○ 10-October-2024$41.000.3 / 0.20.35 / 0.25Overall dimLarge □ holeLarge □ pegSmall □ peg0.5 ✕ 0.4 ✕ -0.03-0.04 ✕ -0.040.05 ✕ 0.150.13 ✕ 0.21
JLCPCBSLA JLC Black Resin

JLCPCB, along with PCBWay are the two large Chinese fabrication houses that cater to western customers (there are many more for Asian markets). Both offer a wide range of materials and services, with excellent finishes and quick turn around, even given the shipping from Asia. The price quoted here is artificially low due to a number of “new customer” discounts. Their fabrication costs, however, are very reasonable. The catch is the shipping, which usually starts at close to $20 (again, heavily discounted here). Without the discounts, the print probably would have run around $30 (shipped) or so – still cheaper than many US fabricators.

Print DatePriceFit 10mm □ / ○ Fit 5mm □ / ○ 22-December-2024$16.000.1 / 0.20.1 / 0.15Overall dimLarge □ holeLarge □ pegSmall □ peg0.05 ✕ 0.1 ✕ -0.050.0 ✕ 0.05-0.05 ✕ -0.030.0 ✕ -0.03

Test Your Own Process

I’ve posted STL files for the pegs and blocks on Thingiverse. There are three different blocks:

The original block I designed has
holes ranging from -0.15 to +0.15
of the 10mm base. Except for the
most precise processes, this is too
narrow a range. The X2 block extends the range
from -0.3mm to +0.3mm. Very few
processes actually need the
negative holes.The Plus block goes from
0 to +0.6mm. Start here for most
FDM printers.

I’m interested to hear what your experiences are with various processes – feel free to leave them in the comments.

http://saccade.com/blog/?p=133
Extensions
Design Lesson Learned: Model the Environment
3D
On a recent trip I picked up a art-glass marble for my wife. She liked it so much she bought a nice lighted display stand for it. The stand wasn’t designed to display that particular marble though, so it didn’t work too well. This was a problem easily solved with a bit of 3D printing. read more »
Show full content

On a recent trip I picked up a art-glass marble for my wife. She liked it so much she bought a nice lighted display stand for it. The stand wasn’t designed to display that particular marble though, so it didn’t work too well.

This was a problem easily solved with a bit of 3D printing. I figured it’d be trivial to make an adapter ring for the marble to sit securely on. However, when I examined the stand, I discovered the LEDs were flush with the base, and likely to get in the way. The marble needed to be held up above them. Before starting on the adapter, I did a simple model of the stand, so I could check everything cleared.

With the stand and LEDs modeled, I could verify my design properly fit. The project worked great, and fit perfectly with the first print. Success.

The next CAD project I did was a stand for a screwdriver set I purchased. I carefully measured the handle and the various blades, but (perhaps over-confident) didn’t bother to model them.

It wasn’t until I got the print back I discovered a major ergonomic fail: You can’t easily reach the handle because the blades are in the way! Had I taken the time to actually model the blades and handle, I would have visualized this immediately, and chosen another layout.

Moral – it’s a good idea to model the whole environment, not just the piece you’re printing.

http://saccade.com/blog/?p=483
Extensions
A Clip for the Apple Pencil
Miscellaneous
The original Apple Pencil, in addition to its phenomenally bad charging method, has no means to keep it with the iPad. The nice leather Sena case we keep the iPad in doesn’t have a loop for the pencil. I solved the problem by coming up with a clip that’s easily tucked into the case when read more »
Show full content
Render of the Apple Pencil clip

The original Apple Pencil, in addition to its phenomenally bad charging method, has no means to keep it with the iPad. The nice leather Sena case we keep the iPad in doesn’t have a loop for the pencil. I solved the problem by coming up with a clip that’s easily tucked into the case when it’s closed.

This was a quick project, created in less than an hour of CAD work. The first print back from Shapeways had a couple of problems. I made the inner radius of the clip match the pen, thinking it would shrink enough from the spec dimensions to fit securely. Nope, it fit perfectly – and slid right off. The second issue was the original spike was only about 1.5mm thick; turns out that’s pretty bendy in Shapeway’s nylon. For the second revision, I made the clip diameter a full millimeter less than the pencil and it clips on securely now. Making the spike about 3mm across is rigid enough to stay in place.

Ironically, Sena now sells the case with a loop to store the pencil. But it’s still fun to solve the problem in less than an hour of design time. The STL is up on Thingiverse if you want to print one.

http://saccade.com/blog/?p=470
Extensions
How to Make Apple’s Mac Pro Holes
3D3D DesignMac Pro
Apple’s recently introduced Mac Pro features a distinctive pattern of holes on the front grill. I’m not likely to own one anytime soon (prices for a well configured machine approach a new car), but that pattern is very appealing, and re-creating it is a fun exercise. The best clue about the pattern comes from this read more »
Show full content

Apple’s recently introduced Mac Pro features a distinctive pattern of holes on the front grill. I’m not likely to own one anytime soon (prices for a well configured machine approach a new car), but that pattern is very appealing, and re-creating it is a fun exercise.

The best clue about the pattern comes from this page pitching the product. About halfway down, by the heading “More air than metal” is a short video clip showing how the hemispherical holes are milled to create the pattern.

Let’s start with a screen grab of the holes from the front. The holes are laid out with their centers equally spaced apart and the tops of the lower circles fall on the same line as the bottom of the circles above them. So the circles are spaced 2r apart vertically, where r is the radius of the circle.

The horizontal spacing is a bit more work. The angles of the equilateral triangle formed by the centers are 180°/3 = 60° (or π/3 as they say in the ‘hood). If you draw a vertical line from the center of the top circle to the line connecting the centers of the bottom circles, that line (as you see above) is 2r long. With a bit of trig, you can find half the horizontal spacing x by using the right triangle formed by that line, x and the side of the equilateral triangle. The angle from the vertical center line to the equilateral triangle edge is half of π/3, π/6. So,

\[x=2r\tan \frac{\pi }{6}\]

and 2x is the horizontal spacing of the circles.

The hemispherical holes are milled into both sides of the plate, but the holes on the other side are offset so the hole centers on one side fall exactly in the middle of the triangle formed by the hole centers on the other side:

You already know the horizontal offset for the centers from one side to the other is x, but how far up do you go to hit the center of that triangle? Let’s call that h.

You’ll use the same tan(π/6) trick we used above, this time using the triangle formed by x and h. Like the triangle used to find x, the angle here is also π/6. So:

\[h=x\tan \frac{\pi }{6}\]

Let’s clean this up a bit:

\[h=x\tan \frac{\pi }{6}=2r\tan \frac{\pi }{6}\tan \frac{\pi }{6}\]
\[\tan \frac{\pi }{6}=\frac{1}{\sqrt{3}}\] so…
\[h=2r\frac{1}{\sqrt{3}}\frac{1}{\sqrt{3}}=\frac{2r}{3}\]

There’s still the issue of how thick the plate is, relative to the size of the holes. I took screen grabs of the film clip and compared them by counting pixels:

Examining the images, the thickness was about 101, with the diameter (2r) of the holes coming in at 176. Now, these numbers aren’t at all precise, because of the perspective introduced by whatever animation software was used. But I can’t help but notice the following coincidence:

\[ \frac{101}{176}=0.573\approx \tan \frac{\pi }{6}=\frac{1}{\sqrt{3}}=0.577\]

Yeah. The ratio of the plate thickness to the hole diameter is just like the ratio of the hole horizontal spacing to the hole diameter. So let’s turn this around, and summarize by saying for a plate of any thickness t, use:

\[r=\frac{t\sqrt{3}}{2}\]
\[x=2r\tan \frac{\pi }{6}=\frac{2r}{\sqrt{3}}=t\]
\[h=\frac{2r}{3}\]

Where r is the radius (half the diameter) of the spheres and 2x is the horizontal spacing of the sphere centers on a given row. For the next row, the centers are offset by x horizontally from the centers of the previous row. The rows are spaced 2r apart vertically, from sphere center to center. The same grid of spheres carved into the back side is displaced by x horizontally, and h vertically from the spheres in the front. The centers of the front spheres are on the front surface of the plate, the back spheres on the back.

So to CAD this up, all you need to do is start with a rectangular block of thickness t, and use the formulas above to place the centers of the spheres (with diameter 2r) on the front and back of the block.

If you just want to quickly print or look at the result in 3D, I’ve posted some sample STL files on Thingiverse.

http://saccade.com/blog/?p=406
Extensions
Delete – A Design History of Computer Vaporware
Book reviewsReviews
Even if “history is written by the victors”, that doesn’t mean the losers don’t have interesting stories to tell. Delete – a Design History of Computer Vaporware is the story of various computer systems that either never saw the light of day, or saw relatively little of it. This is one of the most unique read more »
Show full content
Amazon

Even if “history is written by the victors”, that doesn’t mean the losers don’t have interesting stories to tell. Delete – a Design History of Computer Vaporware is the story of various computer systems that either never saw the light of day, or saw relatively little of it. This is one of the most unique computer history books I’ve run across.

The book introduces the concept of vaporware – systems promised but never delivered. It starts off with the grandfather of all computer vaporware, Babbage’s difference engine. Conceived in the early 1800s as a way to accurately print mathematical tables, Babbage kept tweaking and improving the design, instead of finishing it. The device became a moving engineering target that was never hit, with only a small section actually fabricated in his lifetime. Undaunted, Babbage went on to conceive the Analytical Engine, a full programmable computer made of shafts and gears. It was never fabricated.

From there the book moves on to the evolution of computers post WWII. The book covers the developments in Europe, in particular several early computer projects in Scandinavia I’d never heard of before. As the early mainframes transitioned to minicomputers in the 60s and 70s, the book covers machines like Honeywell’s “kitchen computer”. Featured in the 1969 Neiman-Marcus Christmas catalog as an absurd home accessory, the vaporware product nevertheless generated a welcome shot of publicity for both Honeywell and the retailer.

The IBM “Yellow Bird” and “Aquarius” prototypes.

Some of Atkinson’s best revelations surround the development of the personal computer in the 1970s and ‘80s. In the 70s, IBM created a bright yellow plastic PC prototype called the “Yellow Bird” and another colorful red machine, the Aquarius. These were designed in response to the success of early computers by Apple and Atari. They were much more charming than the bland white IBM PC of 1981, and featured (then) exotic technologies such as bubble memory for mass storage. Alas, neither made it out of IBM’s labs.

The book reviews the influence of Xerox PARC’s research in the 1970s. Their creation of the Alto prototype with bitmapped displays displaying overlapping windows is well known. Atkinson, however, also reveals the “Notetaker”, another Alan Kay design for a luggable computer with a keyboard fastening over the display screen on the top. This design was successfully commercialized by other companies, including Osborn, Kaypro and Compaq. From there, the book moves through PCs to pen computing in the 1990s, the precursor to today’s touchscreen phones and tablets.

Atkinson’s primary focus for much of the book is industrial design; what the devices looked and felt like. Often, the work of the same designer reverberated across multiple product concepts, even if it only rarely made it to store shelves. The book is beautifully illustrated, filled color photographs of ingenious computer designs. I did find a few minor quibbles with his history (Berkeley Unix fans won’t appreciate Sun co-founder William Joy described as a “fellow Stanford graduate”), but on the whole, he sheds welcome light on a fascinating swath of the history of computer design.

Published in 2013, Delete isn’t a new book. However, the evolution of physical computer design seems to have plateaued since then anyway. Phones – everybody’s primary computer these days – have devolved into featureless glass slabs. And one of my favorite computer designs, the Macbook Air, is over a decade old now. The vaporware covered in Delete had significant influence on today’s computer products, even if they never made it to the store shelves themselves.

http://saccade.com/blog/?p=389
Extensions