GeistHaus
log in · sign up

https://richardg867.wordpress.com/feed

atom
9 posts
Polling state
Status active
Last polled May 18, 2026 23:49 UTC
Next poll May 20, 2026 00:24 UTC
Poll interval 86400s
ETag W/"5ad0700b96f096c715a6e32f5f6c672a"

Posts

Ensoniq AudioPCI ES1371 and the driver bug nobody found
Product line mess and emulation overshadowing the real thing create a perfect storm.
Show full content

Ensoniq’s AudioPCI sound cards were notorious when they came out back in the latter half of the 1990s. A manufacturer best known for synthesizers built the first mass-market PCI sound solution for PCs, with software-based backwards compatibility for older DOS games which had the rest of the industry stuck on the aging ISA bus. This notoriety led industry giant Creative Labs to acquire a struggling Ensoniq at the dawn of 1998, adding AudioPCI cards to their Sound Blaster family, and harnessing the existing backwards compatibility software for the Sound Blaster Live! later that year.

In typical Creative fashion, the AudioPCI line-up eventually became a mess; did you know there was an AudioPCI-based “Sound Blaster 16 PCI” which was a completely different card to the million ISA Sound Blaster 16 models? All sorts of cards were made under different names by different OEMs, using an assortment of chips with Ensoniq and/or Creative logos and model numbers. There’s a lot of misinformation about these chips available online, not helped by their similarity in look, behavior, branding and sometimes drivers; this is a rundown of what I’ve gathered over the years:

Chip Description Ensoniq ES1370 The original, paired with Asahi Kasei AK4531 codec Creative 5507 Rebadged ES1370 Ensoniq ES1371 Replaced AK4531 codec with the then-new AC’97 standard Creative ES1373 Added S/PDIF digital output and I2S digital input Creative CT5880 Added quadraphonic output with a 4-channel AC’97 codec Creative EV1938 CT5880 + 4-channel AC’97 codec combined in one chip

The aforementioned driver similarity is best seen in the AC’97 sub-family, where all ES1371, ES1373 and first-revision CT5880 chips share the same PCI device ID of 1274:1371, only changing in their revision codes. This results in Creative/Ensoniq’s Windows drivers being interchangeable when they shouldn’t really be, and this post is all about one way they are not universally compatible.

Accurate bug emulation

I fell down this rabbit hole when we at the 86Box project decided to overhaul our ES1371 emulation, since the existing one (inherited from PCem) had issues with quite a few drivers, especially the DOS compatibility and Linux ones. OBattler went through the datasheet, implementing proper default values, read-only bits and access width checks (“this can only be read as 32 bits”) on all of the chip’s configuration registers, while I added a proper AC’97 codec implementation, and a third contributor fixed up the NMI system used by the DOS driver. After some tweaks, everything seemed fine… except for the latest and often-used 5.12.01 WDM driver for Windows 98 SE and newer.

Mildly annoying noise warning.

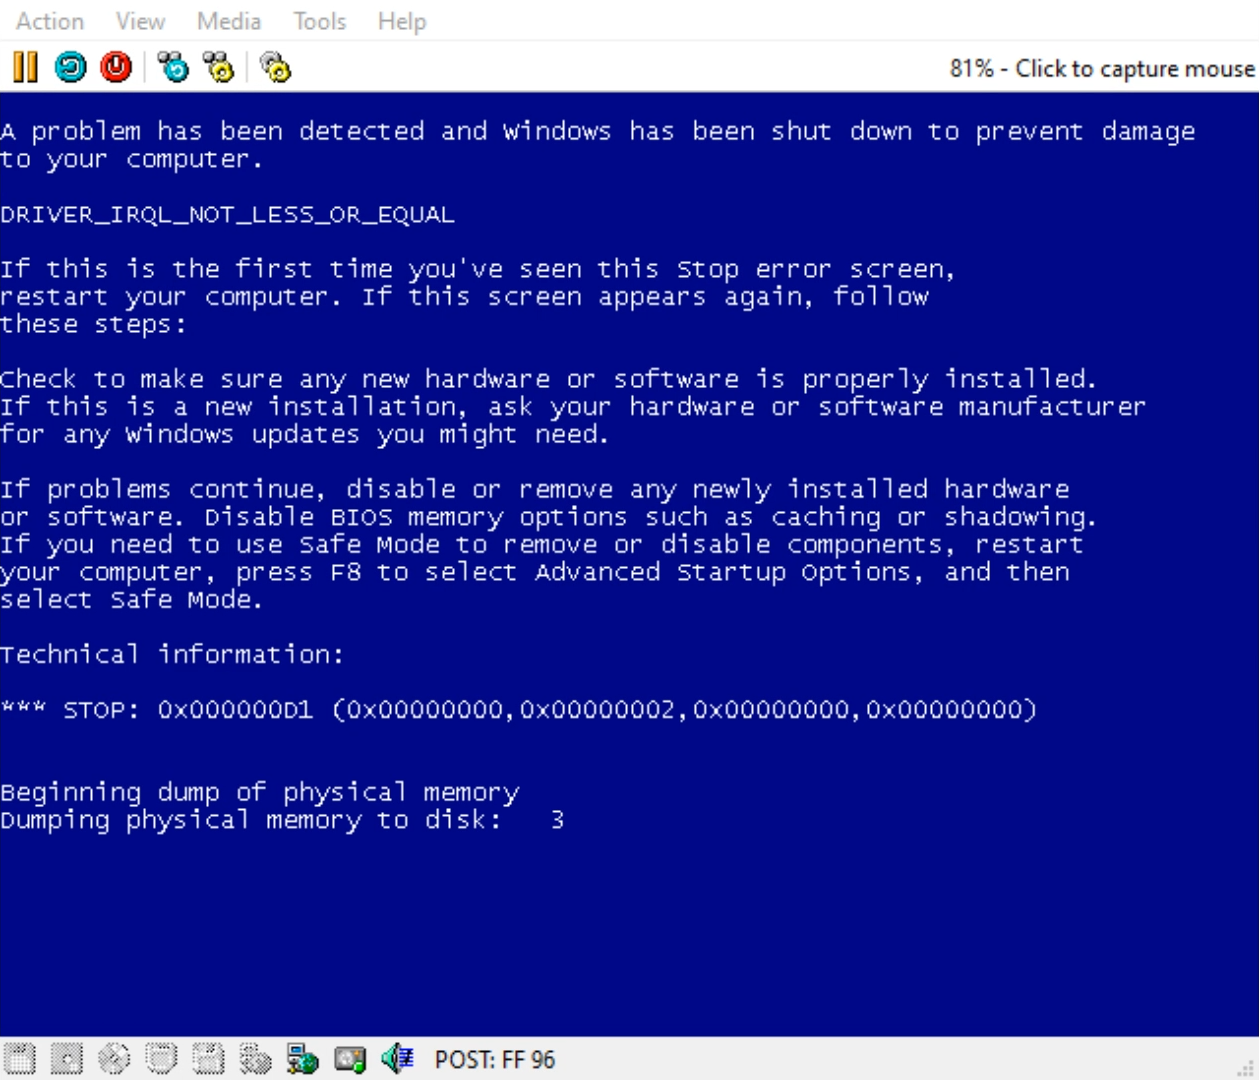
With that driver, distributed by Creative’s support website to this day on its “Ensoniq AudioPCI” section and perfectly installable on ES1371 cards, the system ends up blue screening almost as soon as it starts playing audio, no matter if it’s running Windows 98 SE, XP or even 7. The crash details are not helpful, just indicating that something somewhere attempted to read from invalid memory address 0x00000000, and logging on 86Box indicates an interrupt had just been triggered. While this driver which identifies as sbpci.sys is affected, the older es1371mp.sys driver shipped with Windows 2000, XP and even Vista works perfectly fine.

We did all the testing we could to try and diagnose this issue without access to a real card. Trying out VMware which emulates an ES1371 card of its own yet is not affected, changing the access width checks, trying other PCI revision codes… and then it hit. Setting the PCI revision code to a value greater than or equal to 0x04 fixed the BSOD with no further ill effects; however, the Linux ALSA driver source code, as well as the appearance of an “enable S/PDIF” option in a Windows 9x driver control panel, suggested that the “fix” was just pretending to be the very similar ES1373 chip instead, and that’s how it actually sat for a few versions of 86Box.

Viable options were running out, but a new one eventually showed up…
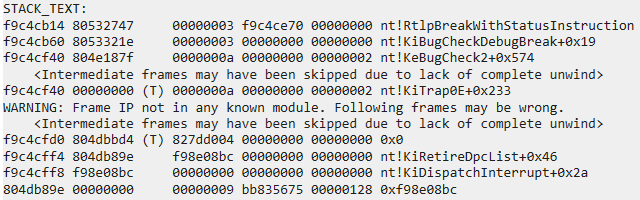
Debugging driver DPCs

With the addition of serial passthrough to 86Box, I could finally attach a proper kernel debugger to an emulated machine running Windows XP, reproduce the bug and determine where the fault came from. Nowhere did the sbpci.sys driver show up in the fault log; however, the stack trace suggested that the KiRetireDpcList kernel function was attempting to call another function at unmapped address 0x00000000, triggering a page fault, handled by KiTrap0E which gets rightfully confused and throws the DRIVER_IRQL_NOT_LESS_OR_EQUAL bugcheck.

sbpci.sys BSOD stack trace

If you’ve ever done pro audio or other real-time work on a modern Windows machine, you may have heard of DPC latency as a metric for how reliably the system can maintain itself in real-time tasks. Deferred Procedure Calls (DPCs) are a mechanism provided by the Windows NT kernel to device drivers, which allows them to schedule work to be done as soon as the CPU is available, instead of, say, hogging the device’s hardware interrupt handler to disastrous performance consequences. A DPC is represented by a KDPC data structure containing a pointer to the function to be executed.

Armed with this knowledge, I loaded the offending driver into IDA and looked for any calls to the KeInsertQueueDpc function, which adds a given KDPC to the execution queue managed by KiRetireDpcList. There was just one call, right in the interrupt service routine.

sbpci.sys DPC scheduling code

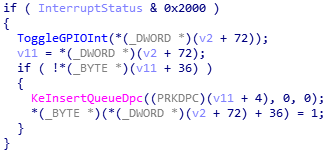
The interrupt handler code reads the interrupt status register at I/O offset 0x04, checks if bit 13 is set (status AND 0x2000), calls a function then schedules the DPC if it wasn’t already scheduled (the flag at offset 72+36). What do the available AudioPCI datasheets say about status bit 13?

  • ES1371: reserved, always reads as 1
  • ES1373: GPIO[1] interrupt pending

This looks innocent enough. The ES1373 added a feature to trigger interrupts from logic level changes to its general purpose input pins, and some reserved bits were repurposed to allow software to check for that. The driver sees one specific GPIO interrupt flag, calls the function I’ve named ToggleGPIOInt to clear it by disabling then reenabling interrupts for that GPIO, and schedules the DPC to do something I can’t quite figure out which involves calling a timer - that’s a second DPC! - which then mutes all analog and digital outputs, messes around with the sample rate converter RAM, and finally unmutes all outputs.

The kicker is that, for some reason, the interrupt handler doesn’t check if GPIO interrupts are actually supported by the chip, and always schedules the DPC if the bit is set, which on paper is always true on ES1371 cards. Even if we set aside the massive performance implication of constantly scheduling a DPC for execution, it should not crash if the KDPC is initialized properly… right… right?

Can you believe no one tested this?

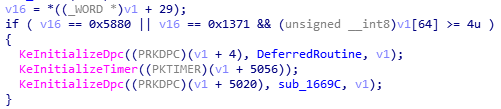
One of the driver’s initialization functions is in charge of setting up both DPCs, and it only does that if the chip is supposed to have the GPIO interrupt feature, which by its definition is PCI device ID 0x1371 with a revision code greater than or equal to 0x04, or device ID 0x5880 with any revision, the latter used by all but the first CT5880 chips which were still 1274:1371 with revision 0x07.

sbpci.sys DPC initialization code

Since the chip model is only checked during initialization and within the DPC functions themselves (returning STATUS_NOT_SUPPORTED on the latter), if these criteria are not met but the GPIO interrupt condition is set like it always is on ES1371, the first interrupt to come in - usually issued by the chip when it’s done transferring the first chunk of currently-playing audio samples - ends up scheduling an uninitialized DPC with a null function pointer, breaking the kernel the next time it goes to execute DPCs, as kernel-mode drivers have higher expectations of doing their job right.

That 0x04 revision code check explains how 86Box managed to make the driver work properly by pretending to be an ES1373. Changing the specific GPIO interrupt bit to read as 0 naturally also worked fine, though the datasheet table states it should always be 1, and that’s corroborated by the listed default value. We’ve learned to not trust datasheets over the years - I once ran around in circles for days trying to decipher VIA’s documentation to fix a chipset’s IDE controller - however, this situation showed itself to be probably worth the benefit of the doubt, as we’ve also faced a fair amount of actually broken drivers in those same years.

But there’s absolutely no way Creative could ship a driver that is broken like that… right… right… RIGHT?
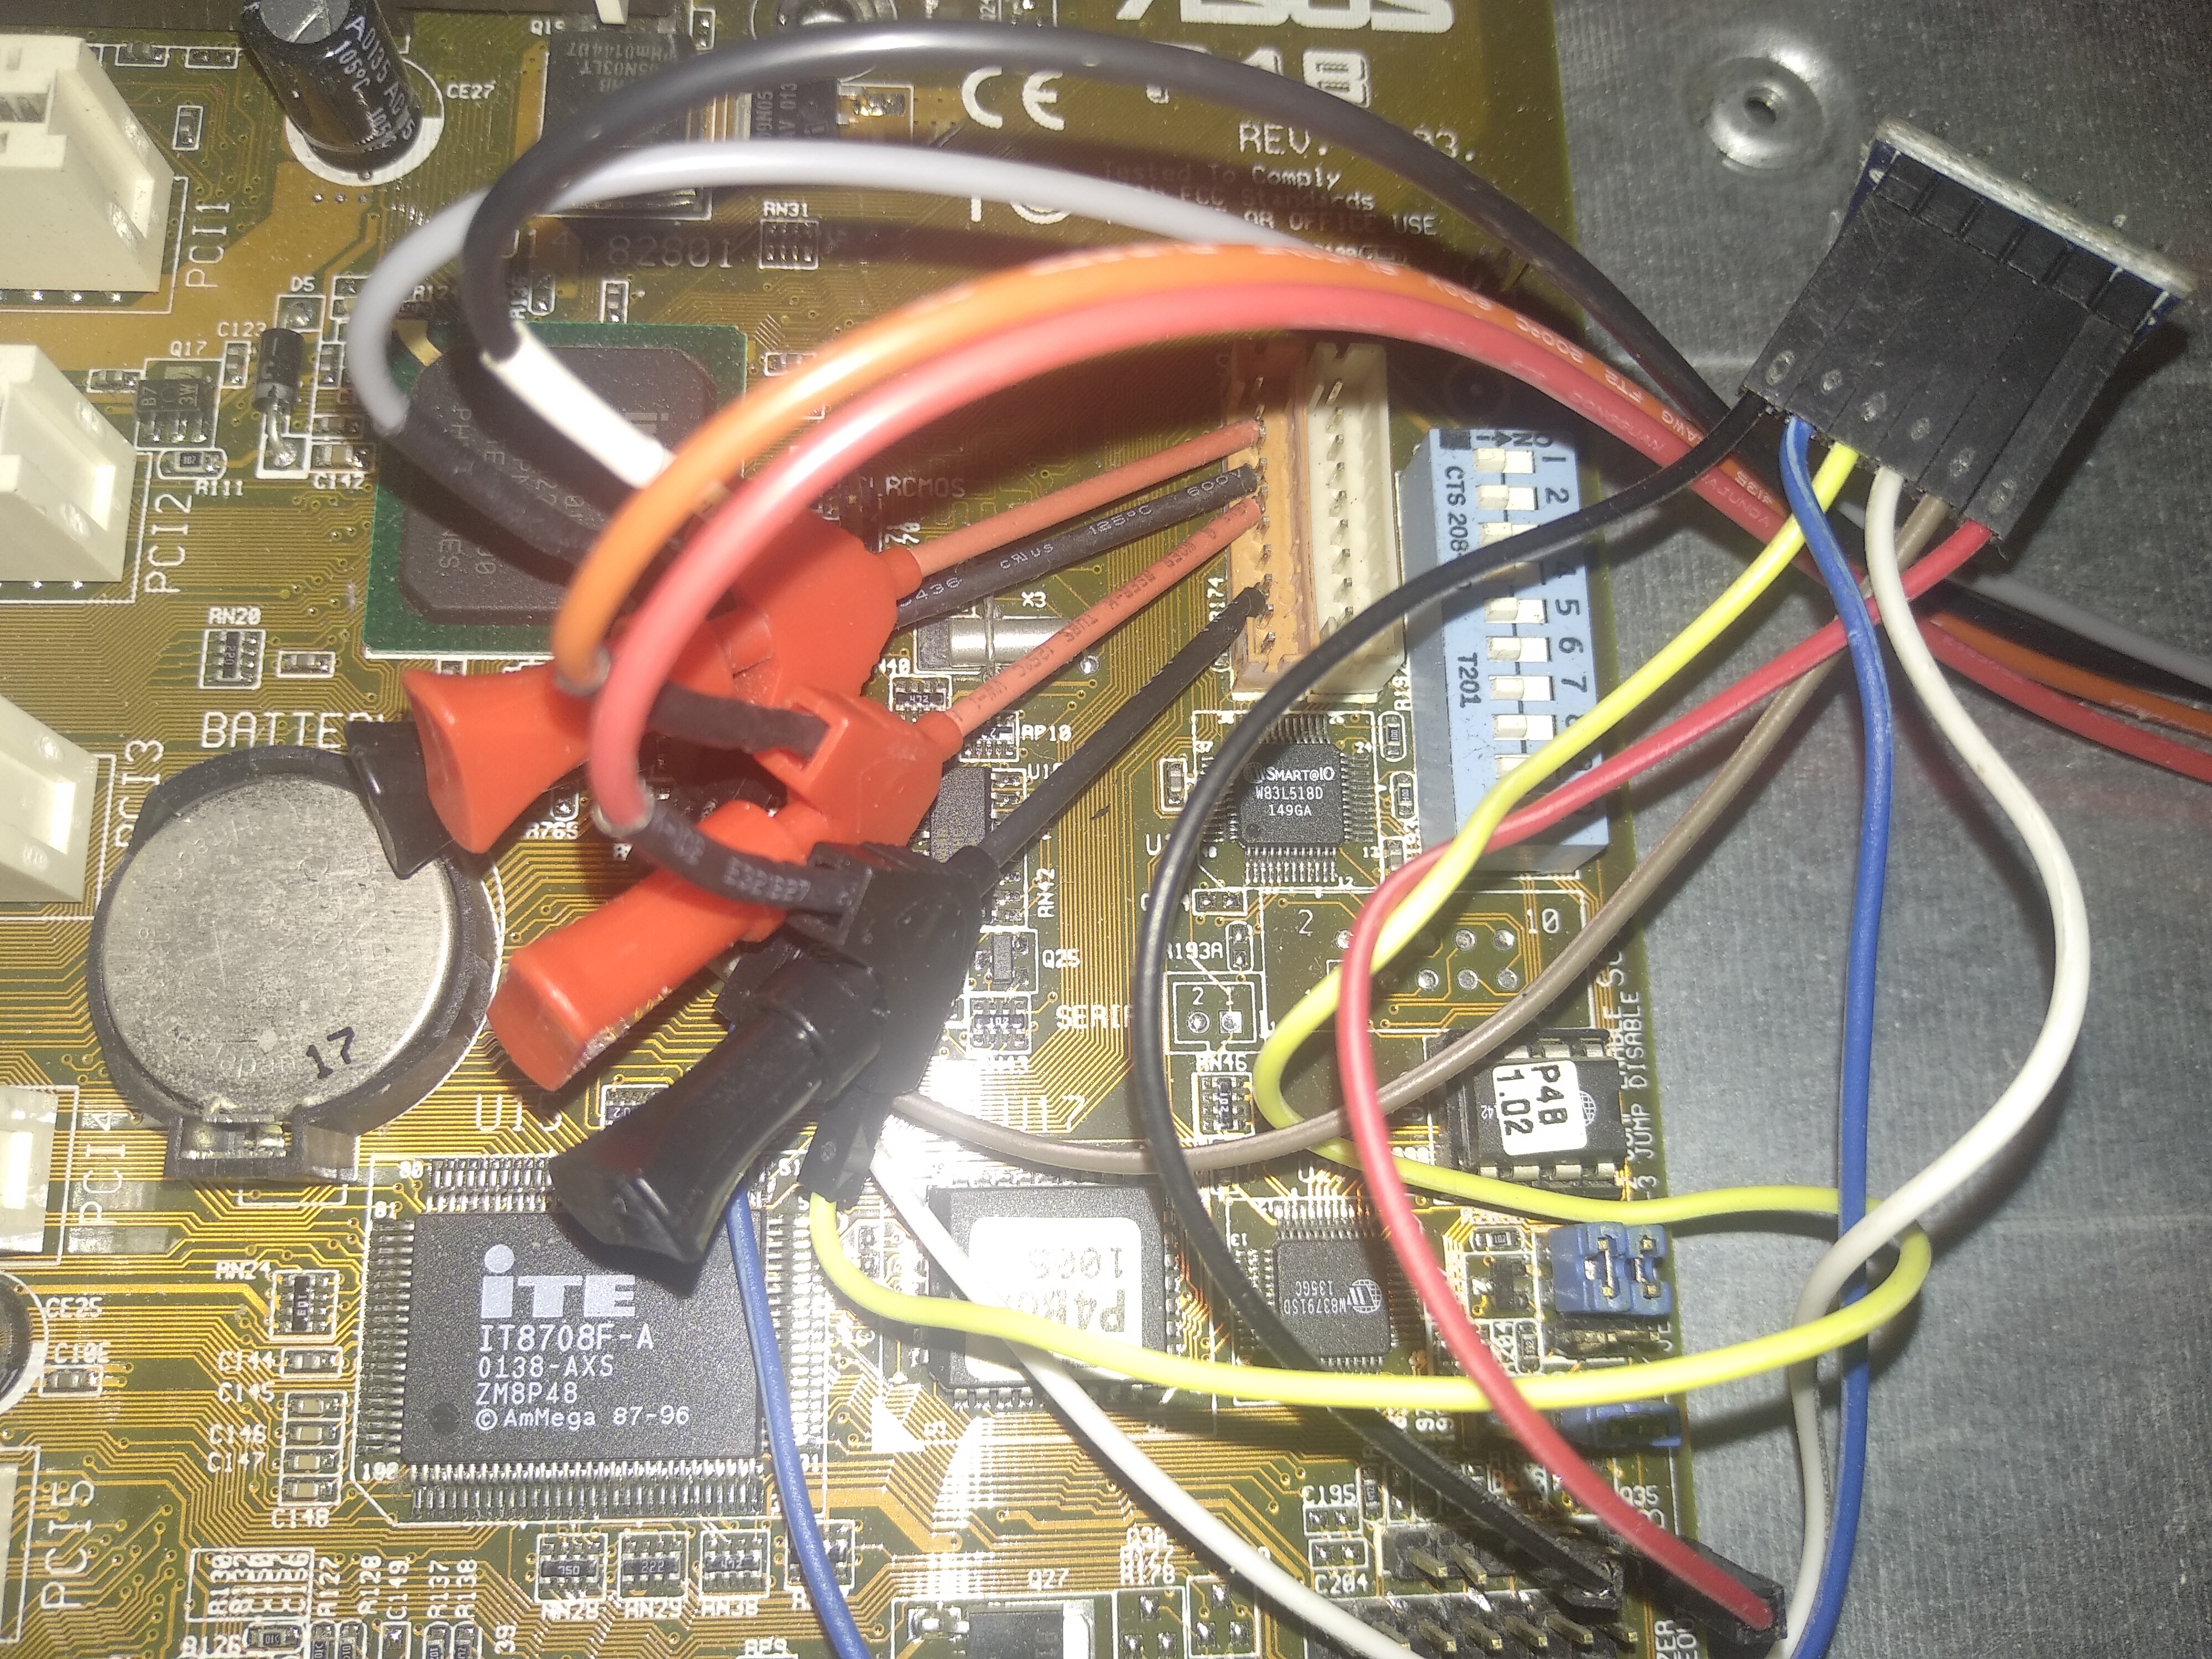
Stranger than fiction

This was one of those situations that would really benefit from access to the real thing: an actual ES1371 card. However, these were far less common than the earlier ES1370 or newer ES1373 or CT5880, with most online recognition around the ES1371 based on VMware’s emulation, which probably subsequently led PCem and later 86Box to emulate it as well. When we asked around some retro hardware communities, we only got offers for those different cards, or at the closest, an integrated ES1371 chip on a dead motherboard that tells no tales.

It all changed when a non-programming (but still important) contributor to 86Box noticed our frustrations and offered to hook us up with an ES1371 card, as those are plenty available where they live, not the case where any of us live. With the card in hand, they loaded it up into a Windows 7 machine to make logistics easier - we know the driver works just fine there, despite being from around the time of Windows XP’s release - and I remoted in and installed the driver.

Almost immediately, the click sound effect produced by Windows Explorer when changing folders BSODed the system, to the amusement of that contributor who was sitting at the system and watching the situation unfold. As expected, it entered a boot loop from trying and failing to play the startup sound, but at least we now knew that the driver is indeed broken.

Real ES1371 driver crash on Windows 7

Does it still count as taken moments before disaster if it’s frozen?

Detour through VMware

Through all this effort, I would often joke that there are more VMware users out there than actual ES1371 cards in circulation; rightfully so, as the absolute majority of PCI device listings containing a 1274:1371 revision 0x02 posted in forums, mailing lists and other places are from VMware users. Once this driver bug and its circumstances were figured out, I did some probing into VMware’s emulation to see what it does differently to make this driver work. My pcireg tool for DOS can be used to locate the ES1371 on the PCI bus and get the base I/O address assigned to its registers by the BIOS, after which, the I/O ports can be accessed through good old DEBUG.

Interrupt status register on VMware ES1371

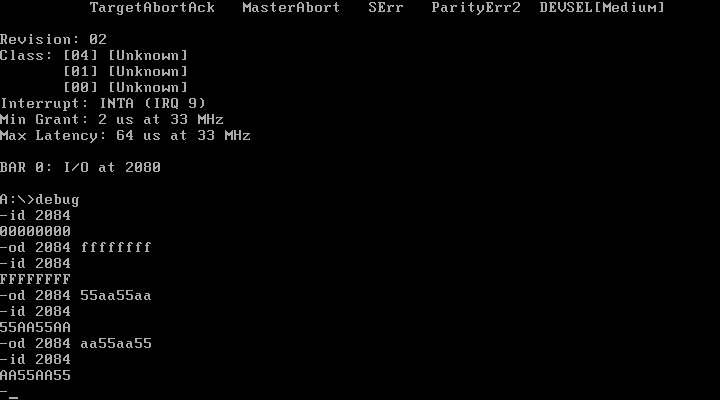
Small pro-tip for pro tinkerers: the FreeDOS version of DEBUG can perform 32-bit I/O operations and runs perfectly on MS-DOS 6 and higher.

It turns out the VMware ES1371 implementation is not very accurate to begin with. Most if not all registers are initialized to 0x00000000 instead of their datasheet-specified default values, never triggering the GPIO interrupt code path, and there is no masking of the interrupt status register’s read-only bits, as shown by the successful writing and reading back of different bit patterns (all 1s as well as alternating bits in 0x55AA55AA and 0xAA55AA55) above; the access width constraints appear not to be implemented either. In further testing with the real card, all the documented behaviors are indeed present in hardware, and the default values on a cold power-on do match where it matters.

The devil is in the details

Going back to Creative’s website, this mess definitely originates from the WDM driver’s download listing, as its short blurb does list “Sound Blaster Ensoniq AudioPCI” as a supported card, which sounds about right since ES1371 is AudioPCI…

This package is meant for Sound Blaster® Vibra128, Sound Blaster 16 PCI, Sound Blaster PCI 128, Sound Blaster 4.1 Digital, and Sound Blaster Ensoniq AudioPCI users...

…until you expand the description, which ends in a very interesting note.

This release works with the CT4816, CT4751, CT5808, CT4740 and the CT4815. This package is not applicable to model CT4730 2-channel audio card. Installation WILL NOT proceed.

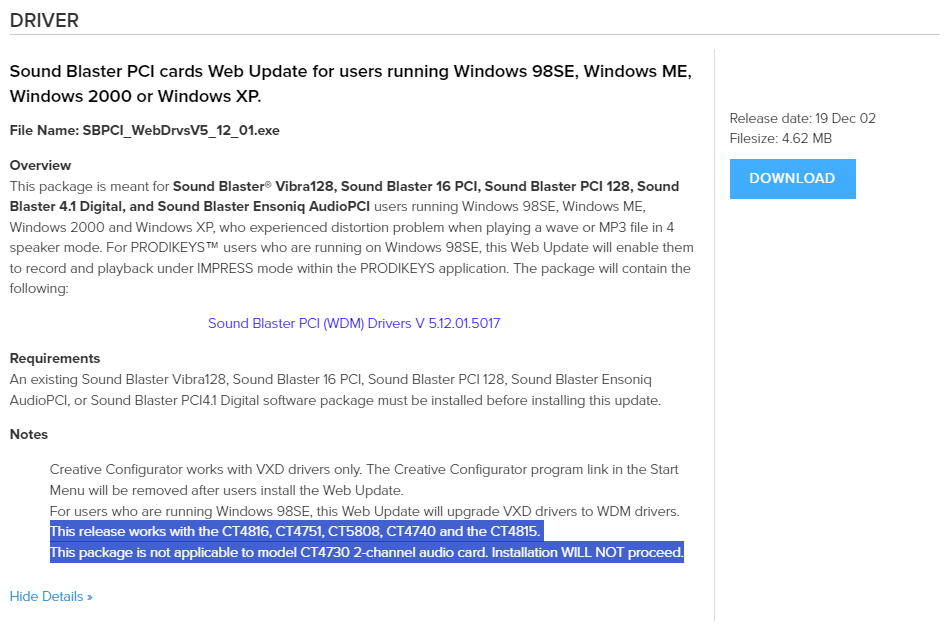
It appears as though this driver has a shortlist of supported cards that nobody read. From what I could gather, all listed models have CT5880 or at least ES1373 chips; while low-resolution pictures don’t do any favors, you can easily tell ES1370, ES1371 and early ES1373 chips from a distance by the black-on-white logo etching they use. At least one of these models was pictured in a Creative-branded “Ensoniq AudioPCI” box, while the CT4730 listed as specifically incompatible uses the later EV1938 chip which has its own PCI ID.

This situation is also not helped by the numerous redistributions of this package on retro driver websites, sometimes under different file names, without this note about card compatibility because let’s be real, it works on all of the very common suspects - VMware’s ES1371 as well as actual ES1373 and CT5880 cards - and statistically nobody had actual ES1371 cards.

One working driver, please

While the latest Creative driver is troublesome on ES1371 cards, both in the flesh and in 86Box 4.0 and higher, other options do still exist:

  • For Windows 98 SE and Me, the VxD driver for 95/98 FE does still work and provides DOS compatibility; select Windows 95 on the download page and get “Standalone driver for Creative ENSONIQ AudioPCI on Windows 95/98”.
  • For Windows 2000, XP and Vista, the inbox driver included with those versions does not have this bug and works perfectly fine, as mentioned earlier.
  • There’s no inbox driver on Windows 7, but the Windows Update driver package for Vista might just work.

After all, one of my most successful posts is also about finding a working driver for an obtuse piece of hardware, so rambling about obtuseness while not including a solution would feel like a disservice.

https://messaroundery.net/2023/09/19/ensoniq-es1371-driver-bug
Extensions
Oddware: ASUS P4B card reader and talking BIOS
Motherboard gimmicks were pretty different in the early 2000s.
Show full content

The year is 2001. Digital cameras, audio players (especially after the introduction of the iPod), PDAs and other then-high-tech consumer electronics are on the rise. These gadgets helped fuel the market for memory cards: little flash-based devices which store an astonishing amount of data for their size, increasing every year - some people still can’t get over the fact you can store half a terabyte of data in a fingernail-sized card. This led to a format war, where the Secure Digital and (to a lesser extent) Memory Stick formats prevailed in the consumer space.

Meanwhile, ASUS was probably looking for gimmicks to put on their motherboards for the Pentium 4 and Athlon XP, so they decided to build SD and Memory Stick card readers into these boards, as well as a talking BIOS.

It’s not USB

I’ve recently rescued an old Pentium 4 PC built around the P4B motherboard, and while performing a visual inspection to make sure no capacitors are blown, I found two headers labeled “SD” and “MS” and immediately thought: did they build some kind of proprietary card reader hardware onto the board? Seasoned PC builders will know internal SD card readers usually connect over USB 2.0 through a front panel USB header, but this system only supports the not-so-great USB 1.1.

SD/MS headers on the motherboard

The manual (still available from ASUS) confirmed my suspicion. These headers are intended to interface with a series of front panel card reader accessories, which they did make, but apparently in limited quantities - there are forum posts from 2002 questioning the availability of these accessories, and the only 3rd party picture I could find is on this Japanese website. The headers and the Winbond W83L518D card reader controller they are driven by appear on the P4B, P4B266, P4S333, P4S533, A7V333 and possibly other models.

SD/MS headers on the manual
Card reader accessories listed on the ASUS website c. 2002

The card reader is disabled by default and must be enabled through the Advanced > I/O Device Configuration menu on the BIOS. There is no way to enable both readers at once, even though they’re on separate headers, and the W83L518D supports both SD and MS on separate pins unlike the smaller W83L519D which shares pins.

Once enabled, the card reader is recognized as an ISA PnP device with ID WEC0518 by the operating system, as the W83L518D is an LPC (Low Pin Count) bus device. LPC is essentially a serial version of ISA used to maintain compatibility with legacy I/O devices such as PS/2, serial and parallel ports - modern systems still use it for the Super I/O controller handling the aforementioned legacy I/O, as well as (optionally) a Trusted Platform Module - so attaching a card reader to this bus is quite odd.

Enabling the card reader on the BIOS
At least I tried…

Since there appears to be no actual hardware to plug into those headers, I’ve built a really janky contraption using a microSD to pin header breakout board, originally designed for interfacing said cards with an Arduino board through the SPI bus. Figuring out what pin goes where was a challenge, as both the motherboard’s manual and the W83L518D datasheet refer to the SD card pins as SDCLK and SDn (n=1..5), instead of the more familiar CLK, CMD and DATn (n=0..3) - I ended up matching them through the SD card socket pin numbers on the W83L518D datasheet’s sample circuit, and a pinout diagram for SPI mode for the breakout board’s pins.

The headers are JST connectors with 2mm pitch instead of the typical 2.54mm, so lots of SMD grabber probes (as well as stealing 3.3V and ground from nearby headers) were involved. The probes have two ends, so I connected one end to the breakout board through jumper cables, and the other end to a Kingst LA1010 logic analyzer.

SD card reader contraption

At first I tried using Linux, which is supposed to support the W83L51xD chips through the wbsd driver. The driver registered its MMC interface despite failing to recognize the controller’s vendor ID, however, it failed to detect a known good 2 GB microSD card, with nothing on the kernel log even with debugging turned on (dyndbg module parameter) and even after a reboot.

[ 1274.723554] wbsd: Winbond W83L51xD SD/MMC card interface driver
[ 1274.723559] wbsd: Copyright(c) Pierre Ossman
[ 1274.723655] wbsd [wbsd_pnp_probe()]: PnP resources: port 248 irq 5 dma -1
[ 1274.723691] wbsd: Unknown hardware (id 8708) found at 2e
[ 1274.723702] wbsd: Unknown hardware (id 8708) found at 2e
[ 1274.723715] wbsd: Unknown hardware (id 5181) found at 4e
[ 1274.723726] wbsd: Unable to confirm device presence - you may experience lock-ups
[ 1274.762600] mmc0: W83L51xD
[ 1274.762607]  at 0x248 irq 5
[ 1274.762611]  FIFO
[ 1274.762612]  PnP

Thinking it could be an issue related to the vendor ID, I added the 0x8708 ID to the driver’s valid_ids array and recompiled the kernel - a task which probably should have been done on something other than a 1.6 GHz Pentium 4 with 512 MB RAM, taking upwards of 16 hours only to lock up during the linking stage and require a second attempt - but no change was observed, other than a warning about the chip being unconfigured.

Moving on to Windows XP, I installed “Winbond MS/SD Memory Card Reader Drivers for Windows 2000(V1.0.2000.0822) and Win98/ME(V1.0.98.0827)” (also still available from ASUS under the Windows 2000 section), which did recognize the reader as an ISA device and did create a new Removable Disk (S:) drive, though it still didn’t recognize the card.

Winbond SD card reader driver

Looking through a logic analyzer, SD1 starts out as low and is set to high when the driver is loaded, although there’s no activity afterwards. SD2 and SD3 are always high. The issue could be the wiring, the pinout, the breakout board (which does have pull-up/pull-down resistors), or the Winbond chip being incompatible with single-bit SDIO mode, which is all I can manage with that SPI-specific breakout board. I could have spent more time trying to chase this issue down - maybe by soldering the jumper wires directly to the pins of a microSD adapter as some SD-card-related DIY mods do - but there’s really no point in doing so for such a novelty device.

In practice, this card reader would probably have terrible bandwidth. According to Intel’s specification, the LPC bus’s total bandwidth is in the order of single-digit MB/s, which would have been faster than USB 1.1’s theoretical maximum of 1.5 MB/s half-duplex and probably just enough for the slow SD cards of the time, but is quickly overtaken by USB 2.0’s theoretical maximum of 60 MB/s half-duplex, as well as newer, higher-speed cards (eventually standardized under the Speed Class rating system). It also wouldn’t be compatible with SD cards above 2 GB, which use the incompatible SDHC protocol - that 2 GB microSD card is the only non-SDHC card I happen to have.

Speech POST Reporter: the talking BIOS

The I/O Device Configuration BIOS menu has one more interesting option, called “Speech POST Reporter”. With this option enabled, a compressed female voice reports on the system’s startup status over the onboard audio’s line output. That gimmick stuck around longer than the card reader did, because to be honest, anything is better than beep codes.

The voice is generated by the Winbond W83791SD chip, located not far away from the card reader circuit. Despite being marketed as a “speech synthesis” device, that chip is not actually capable of performing text-to-speech conversion, and instead relies on pre-recorded audio samples loaded from the nearby W55F10A flash chip - a socketed DIP8 device with an unusual protocol and pinout which no cheap programmers (like the MiniPro) support as far as I know.

Winbond developed a “Voice Editor” Windows utility for replacing these samples with any .wav file, as long as it fits in the 128 KB flash chip. That utility is reportedly included in the driver CDs for motherboards equipped with the Speech POST Reporter. At least two versions are available, and each one works on a different set of motherboards - the P4B requires version 1.0, still available from the ASUS download server as of writing.

Any replacement samples must be located in C:\Program Files\Winbond\Voice Editor\english, as there is no “Browse” button to select arbitrary .wav files. The “Write” button applies all changes by slowly reprogramming the entire flash chip over SMBus. Replacing the “computer now booting from operating system” sample with the Windows XP startup sound took me just over 14 minutes in “safe” programming mode, and of course, the finished product sounded pretty terrible - there’s definitely some kind of voice-optimized downsampling going on behind the scenes.

Programming a new sound sample
https://messaroundery.net/2020/04/30/oddware-asus-p4b-card-reader-and-talking-bios
Extensions
More notes on Red Star OS 3.0
Exploring more of North Korea's home-grown Linux distribution.
Show full content

Five years ago, I wrote a post on Red Star OS 3.0, the latest version of North Korea’s home-grown Linux distribution to make its way outside of the country’s walled garden. That post was one of the internet’s first guides on exploring this peculiar distro, so it gathered way more attention than I would ever expect. I’m now back with additional, more specific notes on Red Star’s built-in applications.

Installing from Windows

It turns out there is more to the install.exe Windows executable located in the installation disc. According to a comment in the previous post - as well as Google Translate - the error message displayed by that executable tells you to copy the installation files to your hard drive. Once I copied the DVD’s file structure to the Documents folder and ran install.exe from there, the error message changed to a confirmation request, which apparently asks if I want to reboot to continue.

Installation confirmation

Clicking the blue button reboots the system to reveal a new “RedStar Setup” entry on the Windows boot menu, set to start automatically after 1 second. That boot entry is automatically removed by the installer once it is up and running.

Windows boot menu entry

The installer pulls this off by copying a few boot files to the root of the Windows partition, then registering \RS\rsloader.mbr as a real-mode boot option - often used to chainload into other bootloaders - on Windows’ BCD (Boot Configuration Data); \RS\BCD is presumably a backup of the previous BCD. This is not an unseen tactic, as a few Linux distributions have also shipped Windows-based installation kickstarters in the past, which also leverage the Windows boot manager to start the Linux-based installer without asking the user to fiddle around with BIOS settings and boot menus.

Red Star Windows boot setup

Starting the installer in English is still possible by hammering the E key as soon as the Windows boot menu screen disappears. This will force the Grub bootloader to enter its command line editor. Add lang=en to the end, press Enter to save and B to boot.

grub command line edited

Another method is breaking out of the automatic boot (hammer any arrow key on the boot menu), booting into Windows and editing \m_rs.lst with a text editor which can handle UNIX line endings, such as WordPad or Windows 10’s Notepad. Run the editor as administrator, open that file, replace lang=ko with lang=en on the kernel parameters, and save. It’s also worth noting the additional parameters used by the installer to find itself:

  • RS3URL= points to the installation files’ location within the Windows partition;
  • BOOTUUID= points to the Windows partition by its volume serial number;
  • BOOTMGRUUID= points to the partition containing the Windows boot manager, which is usually the hidden System Reserved partition if your system has one.
Editing the boot file with WordPad

The installer’s disk utility refuses to alter the Windows partition containing the installation files in any way. You must leave some unallocated space or a partition for Red Star prior to booting the installer, or install to a different drive.

Can't touch the Windows partition

As with other Linux distributions, the installer adds a second boot menu entry which chainloads into the Windows boot manager.

Windows boot entry
Sogwang Office

The Sogwang Office suite is a fork of OpenOffice.org 3.0 with a North Korean language pack. The option to change the interface language was removed, but the English language pack is still present. Run the following commands as root to remove part of the Korean language pack, forcing all suite applications to load English text instead:

cd /Applications/SGOffice.app/Contents
rm RedStar/resource/*ko.res share/registry/Langpack-ko.xcd

It might be possible to change the language by editing configuration files, however, I couldn’t figure out where the language preference is stored within OpenOffice’s rather complex configuration system. Leave a comment if you happen to know something about OpenOffice’s internals.

Sogwang Office Writer
Crosswin

The Crosswin compatibility layer is a wrapper around Wine 1.2.2, consisting of a helper application and some Korean-only documentation. It’s an optional component which can be selected on the installer’s Customize window, though it appears you can install optional components after the fact by opening the Software Manager application, selecting the only entry on the list, clicking Modify and selecting the components to install (double-click expands the categories).

Once installed, Crosswin can be reached through the Applications > AppLink > [Korean text] 3.0 menu. The “Install” application provides a few presets for installing common software - apparently just Photoshop, which the North Koreans would have totally legitimate copies of - as well as an Add/Remove Programs interface, a shortcut to winecfg and a font installer.

Crosswin software installer

I’ve attempted to install Photoshop CS2 using the preset, but it didn’t work. After clicking Install, the application asks for some executable, which I assume to be Setup.exe on the Adobe CS2 disc. Selecting it starts the installer, which displays a splash screen for a few moments, closes itself, then the application claims Photoshop was successfully installed, which it clearly wasn’t.

Crosswin claims Photoshop CS2 is installed

Crosswin can also be invoked by opening .exe files from the file manager. The screenshot below shows a few old Windows XP applications which I’ve opened directly from another drive. Paint doesn’t let you type in text, the Calculator is braindead, and 3D Pinball (minimized) is unplayable due to the plunger and flippers not actuating. The only 3rd-party application on that drive was the PC version of Sonic & Knuckles, which runs fine but with no music due to the lack of a MIDI synthesizer.

Windows XP applications on Crosswin
APM

The LAMP stack, oddly named APM - which definitely stands for Apache, PHP, MySQL - is yet another optional component. When installed, it adds a little menu bar gadget allowing you to control the stack’s services. The menu is produced by the APM Manager application, one of the system’s numerous fully custom applications which were never translated to English.

The stack provides a Webmin management interface on http://localhost:10000 - selecting the last option on the aforementioned menu will open that URL on Naenara Browser. Run the following commands as root to change Webmin’s language to English:

sed -i 's/ko_KP.UTF-8/en/g' /etc/sat/config /usr/share/sat/web-lib.pl
service sat restart

Refresh the page to apply. Log in as root with the password you set when enabling root access.

Accessing Webmin

The Webmin install (located on /usr/share/sat) is pretty barebones, containing just the Apache Webserver, MySQL Database Server, PHP Configuration and Webmin Users modules. None of the modules Webmin provides for managing itself or the system as a whole are present. For what it’s worth, the limited selection of modules reduces the attack surface - Webmin’s system management modules have faced many CVEs over the years - but iptables on Red Star is configured to block all incoming connections from outside the machine by default anyway.

Webmin Apache configuration
/Applications

Red Star mimics the OS X .app bundle format for its applications. The executables themselves are inside Contents/RedStar, and the name, icon and executable path are determined by Contents/info.desktop, a standard KDE .desktop file. Some apps like Sogwang Office and GIMP are contained entirely within the bundle. They didn’t go very far with mimicking the OS X filesystem structure, though; /System/Library is a symlink to /usr/share and that’s about it.

Here are all the other applications I haven’t covered:

  • Address Book, Calculator, Font Book, Grab, kCal (Calendar), kPhoto (iPhoto), Preview, QuickTime Player, Stickies and System Preferences (internally named kcontrol) are custom-designed clones of their OS X counterparts. Preview hides a copyright string in the executable: “(C) 2009-2012, KCC CHONGBONG CENTER”. QuickTime Player was developed using GTK instead of Qt for some reason.
  • CD/DVD Writer is K3B, complete with the old Crystal icons from KDE 3. There’s also an OS X Automator icon hiding in the Preferences window.
  • CHMViewer is literally kchmviewer.
  • compress is an archiver made to look a bit like WinZip.
  • GIMP, internally named Hwansang.app, is GIMP 2.4 with a custom splash screen.
  • Kooka has a poor English translation despite it being a KDE app for some reason, judging by the “Device is not connected or you don’t select” error message if no scanner is found.
  • Mail loosely follows OS X’s Mail.
  • PDFEditor hides yet another copyright string in the executable: “(C) 2009-2014 KCC  INTELLIGENCE INFORMATION RESEARCHER”
  • PhotoBooth is Cheese.
  • Ryugyong Janggi is a janggi (Korean chess) game, yet another custom job without an English translation.
  • Simple Text is a clone of… SimpleText from the Classic Mac OS? That’s one big throwback.
  • SWF Player is Gnash, specifically qt4-gnash.
  • Software Manager allows for installing optional components from the installation media, as mentioned in the Crosswin section. There’s also a system updater, which is not configured by default, though it would presumably download updates through the North Korean intranet. Its executable hides the incredibly useful copyright string “(C) 2008 djh”.
  • UnBangUI is a musical score composer, also missing an English translation. A Windows version might exist, given how the toolbar icons are Windows-like and the application itself is developed using wxWidgets. It includes a handful of sample songs demonstrated in the video below. At least 3 of those appear to be Richard Clayderman compositions according to YouTube’s copyright flag system; leave a comment if you know anything about the other ones.

In the Utilities folder:

  • Activity Monitor, Disk Utility, Key Store (Keychain Access), Network Utility and System Profiler continue the trend of custom-designed applications that clone their OS X counterparts. Activity Monitor and Disk Utility hide a copyright string: “(c) 2009 Osandok Information Center”. System Profiler hides another string: “(C) 2012 mhi”.
  • Bokem is a file and disk encryption utility, demonstrated on the 31C3 talk starting at 11:45.
  • RSLogBrowser loosely follows OS X’s Console.

In the AppLink Development folder:

  • Companero is the Eclipse IDE. It comes with Java support for the built-in OpenJDK 1.6.0_17 and there is no Install New Software option for installing plugins.
  • KDbg, MySQL Query Browser, Qt4 Assistant and Qt4 Designer are exactly what you’d expect, though it appears MySQL Query Browser had its English translation removed.
  • SamTaeSong 3.0 IDE is KDevelop, including KDevelop Assistant (STS Assistant) and KDevDesigner (STS Designer).
Further developments

Red Star 4.0 Server was released (page 6) around January 2019, reportedly featuring UEFI support and improved server management tools. It has not leaked yet as of writing.

https://messaroundery.net/2020/03/31/more-notes-on-red-star-os-3-0
Extensions
USB-C done cheap: when 2 ports become 1
How PC hardware is implementing USB-C in a way that may or may not violate standards.
Show full content

I’ve recently upgraded my main computer to an AMD Ryzen-based setup, with the ASUS TUF B450-Plus Gaming motherboard. Unlike the Gigabyte motherboard on my previous Intel Skylake-based setup, this one has an USB Type-C port. It’s a good motherboard for its price point, but one thing in the spec sheet struck me as odd (quite literally): it has a total of 13 USB ports, split between 6 on internal headers, 6 USB-A and a single USB-C; whereas the Ryzen SoC and B450 chipset provide a combined total of 14 ports. Motherboards very often tap into all USB ports that their platform provides, with high-end ones going as far as adding external USB controllers, so why does this one happen to be one port short? Did they run out of room or budget to add one more connector?

The answer is simple: that single USB-C port consists of two USB ports masquerading as one.

USB-C implementation

USB-C is a complex beast. The connector’s mirrored, orientation-agnostic design, as well as its ability to carry more than just USB data, add to the complexity of implementing it on a device. There’s also the matter of USB-C connectors costing more than Micro-USB connectors - a chicken-and-egg problem where Micro-USB is such a common part that prices are driven to rock bottom - which is why you don’t see it being used everywhere just yet.

In order to cut down on the aforementioned complexity for simpler USB 2.0-only devices, the USB-C specification1 allows female receptacles to common/short the USB 2.0 differential pair - the D+ and D- pins - across both orientations (table 3-4 footnote 1 and table 3-5 footnote 2), eliminating the requirement for orientation detection circuitry and signal muxes on such devices. However, the SuperSpeed pairs used for USB 3.x data are designed to be on fixed locations and cannot be commoned together due to stricter signal integrity requirements, necessitating the use of a signal switch/mux, even if the port only supports single-lane modes such as USB 3.x Gen1 or Gen2 (section 4.5.1.1). In this post, I’ll tell you all about one way manufacturers are skirting this requirement.

USB-C lane routing diagram

The “correct” way to go about implementing a single-lane USB-C port - outlined in Figure 4-4 as well as the diagram above - is by using a mux, which probes the Configuration Channel (CC) pins to determine the plug’s orientation and activate the correct SuperSpeed lanes on the receptacle. From a consumer electronics manufacturing standpoint of “a penny saved is a penny earned”, such muxes are expensive - let’s look into a few parts specified for USB 3.x Gen1, and how much they cost in quantity at retail (manufacturers obviously pay less than this) as of writing:

  • The TI HD3SS3202 is a generic differential mux also rated for USB-C operation (datasheet sections 9.2.1 and 9.3.1) costing $0.61, which also requires an external CC controller such as the TPS25821 ($0.35) to determine the cable’s orientation.
  • The TI TUSB542 is an all-in-one mux, redriver and CC controller, costing $1.85.
  • The Pericom PI3USB302-A is another mux which requires an external CC controller such as the PI5USB30216C. Diodes/Pericom does not disclose direct prices on their website, but these parts have similar unit prices to their TI counterparts on retailers such as Mouser and Digi-Key.
  • An honorable mention to the VIA Labs VL160, another all-in-one mux. I could not find it on any retailers (LCSC carries some of their parts but not this one), but from what I can guess - I’m just a software guy who has never done electronics for a living, let alone IC negotiation - these Eastern manufacturers tend to offer more affordable solutions overall.

The “cheap” way I suspect my motherboard is using takes advantage of the fact USB 3.x Gen1 only uses one of the two SuperSpeed lanes present on the USB-C connector, and unlike Gen2, it often does not require a redriver to improve signal integrity. This mux-free “hack” entails using two discrete logical USB ports for a single USB-C connector, by wiring one port to one side/orientation of the connector and another port to the other. A downside to this configuration is that Alt Modes such as DisplayPort cannot be supported, but these are rarely ever implemented on lower-end hardware.

Testing this theory

The easiest way to check if this holds true for a given computer’s USB-C port is by obtaining an USB-C device which supports USB 3.x Gen1 or Gen2 (but not Gen2x2 or USB 2.0), using an utility such as HWiNFO to check which logical port of the USB controller the device ends up being connected to, changing the device’s orientation, and using the utility again2 to check if the device is on a different logical port. The port also cannot support Alt Modes, as mentioned above.

The device I’m using for this test is a Gen1 flash drive attached to an USB-C to USB-A adapter. The picture below shows one orientation results in the flash drive being connected to logical port 7, and another orientation results in it being connected to logical port 8. I’ve also repeated this test with an USB 2.0 flash drive, and it always appears on logical port 3 regardless of the adapter’s orientation, indicating that the D+ and D- pins are commoned across both sides of the connector as allowed by the specification. This USB controller happens to be the one built into the Ryzen CPU, with 4 physical USB 3.x ports3 and therefore 4 logical USB 2.0 ports + 4 logical USB 3.x ports4; if I were to guess, the lower 4 ports displayed in HWiNFO correspond to USB 2.0 and the upper 4 correspond to USB 3.x, which makes port 3 the USB 2.0 counterpart to port 7, leaving port 4 unused.

usbcports

Let’s have a look at the motherboard itself. There are no large mux-like components located behind the USB-C connector, further proving the point that the engineers at ASUS wired two ports into a single connector in order to save a buck or two on the bill of materials. The Pericom PI3EQX1004B1 chip is a redriver for the pair of USB-A Gen2 ports off to the right.

The largest active component in the area is the unidentified 8-pin “V35S”, which is probably an USB power switch of some kind, judging by its proximity to a large capacitor. The motherboard surprisingly does comply with Section 2.3.1 by only powering the VBUS pins once a device connection is detected through the CC pins, tested by plugging the USB-C end of an USB-A to USB-C cable to the port and measuring VBUS on the USB-A end; there’s also a BIOS option to toggle power to the port.

As for power delivery, my Xiaomi Mi A1 phone charges from the port (with a 3 A USB-C to USB-C cable) at the default current of 500 mA, which indicates the port has its CC termination configured as Default USB Power (Rd = 5.1 kΩ), or the phone does not support USB-C power negotiation (requiring legacy USB Battery Charging negotiation instead), or both. 2021 update: I now have a Samsung Galaxy A72, which supports both USB-C power negotiation and USB Power Delivery; with the same 3 A USB-C cable, it successfully negotiates 5 V @ 3 A fast charging with the port.

USB-C port on the ASUS TUF B450-Plus Gaming
Technically against the specification?

Section 4.5.1.1 states that the use of a switch/mux is mandatory for single-lane modes:

In the case of USB 3.2 SuperSpeed USB or USB4 TX/RX signals in a single-lane implementation, [the plug] requires the functional equivalent of a switch in both the host and device to appropriately route the TX and RX signal pairs to the connected path through the cable.

Right after Figure 4-4, the same section delegates the specific details on signal routing to the USB 3.x specifications:

The functional requirements for implementing TX/RX data bus routing for the USB Type-C receptacle are not included in the scope of this specification.

However, the USB 3.0 and 3.1 specifications predate USB-C and make no mention of it, and the USB 3.2 specification delegates the mechanical portion to the USB-C specification as well as a separate document for legacy connectors, while the electrical portion makes no mention of whether or not wiring different logical ports - not the same logical port as used by Gen2x2 - to each lane of an USB-C connector is a valid practice. If we take the USB-C specification’s word for it, it’s technically not valid due to the lack of a mux.

Other products doing this

AliExpress and eBay are full of inexpensive products which implement USB-C the way outlined in this post. You can easily tell them by the lack of components behind the USB-C port and the weird overall amount of USB ports. Here are a few I could find:

This USB 3.0 card provides 3 physical ports with a 4-port VIA Labs controller.
Same idea, with a Renesas controller + bonus passive SATA to M.2 passthrough.
This front panel device uses a 4-port hub controller to the same effect.
A dual-port USB 3.0 front panel header to single-port USB-C adapter.
USB 3.0 header to USB-C header adapter, for cases with integrated USB-C.
A reverse header adapter. Only one of the header's ports is supposed to work.

As for motherboards, the ASUS Prime B450-Plus is a plain version of my model - which I would have taken instead but no store had it in stock - with the same PCB layout and therefore the same “cheap” USB-C port. The Intel-based TUF B360-Pro Gaming has a similar layout as well. At the moment, I’m not aware of any models by other manufacturers with a single USB-C port standing out.

Should you feel cheated?

Not really. Despite this being a cost-saving measure, it is very clever, and allows USB-C to spread on to more hardware at the lower end.

Making a passive adapter to break out each of the two individual ports is technically possible but impractical, as it would essentially be an “USB hub with extra steps” with regards to its footprint and cost. An active hub controller would be required for handling USB 2.0 communication, as the USB 2.0 portion of the connector is often commoned together instead of being wired to the separate logical ports; at this point you technically have an USB hub. User experience is another issue, since non-technical users would expect the adapter to behave like a hub when it’s not one, failing the duck test, just like those passive A/V adapter cables which people expect to do signal conversion when they’re just passive breakouts made for some specific device.

  1. All references on this post are valid for Revision 2.0 (August 2019). Further revisions may invalidate the references. 

  2. HWiNFO does not rescan USB devices automatically, so make sure to restart it after reconnecting the device. 

  3. The information AMD has released to the press isn’t entirely clear on what USB 3.x generation is supported by the Ryzen 3000 USB controller; they haven’t released any kind of I/O documentation for the AM4 platform. All CPU-provided ports on my motherboard are Gen1 only. 

  4. USB 2.0 and 3.x have independent physical layers, therefore one physical USB 3.x port maps to two different logical ports in software. 

https://messaroundery.net/2020/02/29/usb-c-done-cheap
Extensions
Old ATI graphics crashing on boot with Linux
The importance of BIOS updates as a troubleshooting step.
Show full content

As of 2018, the Linux kernel seems to have an issue with some ATI laptop GPUs from the R500 range (circa 2005-2006), such as the Mobility Radeon X1300 and X1400. Booting most Linux distributions on an affected device (such as a ThinkPad T60 equipped with the Mobility Radeon X1300) will result in a blank screen and a semi-responsive system: on Debian, it does connect to a wired network and obtain a DHCP lease, but sshd does not start up.

Disabling the accelerated radeon driver by setting nomodeset or modprobe.blacklist=radeon on the kernel command line allows the system to boot up. Once booted with the radeon module blacklisted, running modprobe radeon to manually load it triggers a kernel oops:

[ 1887.690895] [drm] radeon kernel modesetting enabled.
[ 1887.691335] [drm] initializing kernel modesetting (RV515 0x1002:0x7149 0x17AA:0x2005 0x00).
[ 1887.691830] ATOM BIOS: M54CSP/M52CSP
[ 1887.691861] [drm] Generation 2 PCI interface, using max accessible memory
[ 1887.691869] radeon 0000:01:00.0: VRAM: 128M 0x0000000000000000 - 0x0000000007FFFFFF (64M used)
[ 1887.691873] radeon 0000:01:00.0: GTT: 512M 0x0000000008000000 - 0x0000000027FFFFFF
[ 1887.693304] [drm] Detected VRAM RAM=128M, BAR=128M
[ 1887.693307] [drm] RAM width 64bits DDR
[ 1887.693413] [TTM] Zone  kernel: Available graphics memory: 440506 kiB
[ 1887.693415] [TTM] Zone highmem: Available graphics memory: 512638 kiB
[ 1887.693416] [TTM] Initializing pool allocator
[ 1887.693423] [TTM] Initializing DMA pool allocator
[ 1887.693474] [drm] radeon: 64M of VRAM memory ready
[ 1887.693476] [drm] radeon: 512M of GTT memory ready.
[ 1887.693497] [drm] GART: num cpu pages 131072, num gpu pages 131072
[ 1887.694481] [drm] radeon: power management initialized
[ 1887.705319] [drm] radeon: 1 quad pipes, 1 z pipes initialized.
[ 1887.707819] [drm] PCIE GART of 512M enabled (table at 0x0000000000040000).
[ 1887.707873] radeon 0000:01:00.0: WB enabled
[ 1887.707880] radeon 0000:01:00.0: fence driver on ring 0 use gpu addr 0x0000000008000000 and cpu addr 0x57b36282
[ 1887.707886] [drm] Supports vblank timestamp caching Rev 2 (21.10.2013).
[ 1887.707887] [drm] Driver supports precise vblank timestamp query.
[ 1887.707889] radeon 0000:01:00.0: radeon: MSI limited to 32-bit
[ 1887.707906] [drm] radeon: irq initialized.
[ 1887.707919] [drm] Loading R500 Microcode
[ 1887.707939] radeon 0000:01:00.0: firmware: failed to load radeon/R520_cp.bin (-2)
[ 1887.708042] radeon 0000:01:00.0: Direct firmware load for radeon/R520_cp.bin failed with error -2
[ 1887.708120] [drm:r100_cp_init [radeon]] *ERROR* Failed to load firmware!
[ 1887.708186] radeon 0000:01:00.0: failed initializing CP (-2).
[ 1887.708249] radeon 0000:01:00.0: Disabling GPU acceleration
[ 1887.708309] [drm] radeon: cp finalized
[ 1887.709440] [drm] Radeon Display Connectors
[ 1887.709442] [drm] Connector 0:
[ 1887.709443] [drm]   VGA-1
[ 1887.709446] [drm]   DDC: 0x7e40 0x7e40 0x7e44 0x7e44 0x7e48 0x7e48 0x7e4c 0x7e4c
[ 1887.709447] [drm]   Encoders:
[ 1887.709448] [drm]     CRT1: INTERNAL_KLDSCP_DAC1
[ 1887.709449] [drm] Connector 1:
[ 1887.709450] [drm]   LVDS-1
[ 1887.709453] [drm]   DDC: 0x7e60 0x7e60 0x7e64 0x7e64 0x7e68 0x7e68 0x7e6c 0x7e6c
[ 1887.709453] [drm]   Encoders:
[ 1887.709455] [drm]     LCD1: INTERNAL_LVTM1
[ 1887.709456] [drm] Connector 2:
[ 1887.709457] [drm]   DVI-I-1
[ 1887.709458] [drm]   HPD1
[ 1887.709460] [drm]   DDC: 0x7e50 0x7e50 0x7e54 0x7e54 0x7e58 0x7e58 0x7e5c 0x7e5c
[ 1887.709461] [drm]   Encoders:
[ 1887.709462] [drm]     DFP1: INTERNAL_KLDSCP_TMDS1
[ 1888.072596] [drm] fb mappable at 0xD8040000
[ 1888.072599] [drm] vram apper at 0xD8000000
[ 1888.072600] [drm] size 3145728
[ 1888.072601] [drm] fb depth is 24
[ 1888.072602] [drm]    pitch is 4096
[ 1888.072744] fbcon: radeondrmfb (fb0) is primary device
[ 1888.096241] PCI registers are not implemented
[ 1888.096255] BUG: unable to handle kernel NULL pointer dereference at 00000124
[ 1888.096363] IP: atom_get_src_int+0x5c6/0x6a0 [radeon]
[ 1888.096365] *pdpt = 0000000033e73001 *pde = 0000000000000000
[ 1888.096372] Oops: 0000 [#1] SMP
[ 1888.096375] Modules linked in: radeon(+) ttm drm_kms_helper drm i2c_algo_bit fuse appletalk ax25 ipx(C) p8023 p8022 psnap llc coretemp kvm irqbypass evdev arc4 iwl3945 joydev pcspkr pcmcia iTCO_wdt iTCO_vendor_support snd_hda_codec_analog snd_hda_codec_generic iwlegacy serio_raw sg mac80211 snd_hda_intel yenta_socket pcmcia_rsrc cfg80211 snd_hda_codec pcmcia_core snd_hda_core snd_hwdep snd_pcm thinkpad_acpi snd_timer nvram snd soundcore rfkill shpchp battery ac tpm_tis tpm_tis_core tpm rng_core video button acpi_cpufreq ip_tables x_tables autofs4 ext4 crc16 mbcache jbd2 crc32c_generic fscrypto ecb crypto_simd cryptd aes_i586 uas usb_storage sd_mod sr_mod cdrom ata_generic ata_piix psmouse libata scsi_mod i2c_i801 ehci_pci uhci_hcd ehci_hcd lpc_ich usbcore usb_common e1000e ptp pps_core thermal
[ 1888.096494] CPU: 1 PID: 1064 Comm: modprobe Tainted: G         C       4.16.0-2-686-pae #1 Debian 4.16.12-1
[ 1888.096496] Hardware name: LENOVO 200746P/200746P, BIOS 79ET61WW (1.06 ) 05/24/2006
[ 1888.096588] EIP: atom_get_src_int+0x5c6/0x6a0 [radeon]
[ 1888.096590] EFLAGS: 00010202 CPU: 1
[ 1888.096594] EAX: 00000000 EBX: 00000049 ECX: f3e2d718 EDX: 00000009
[ 1888.096597] ESI: f3eb0000 EDI: 00000000 EBP: f3e2d6d8 ESP: f3e2d6b8
[ 1888.096600]  DS: 007b ES: 007b FS: 00d8 GS: 00e0 SS: 0068
[ 1888.096603] CR0: 80050033 CR2: 00000124 CR3: 2df130a0 CR4: 000006f0
[ 1888.096607] Call Trace:
[ 1888.096703]  atom_op_div+0x7d/0x150 [radeon]
[ 1888.096795]  ? atom_op_setfbbase+0xa0/0xa0 [radeon]
[ 1888.096887]  atom_execute_table_locked+0xf5/0x2f0 [radeon]
[ 1888.096981]  atom_execute_table_scratch_unlocked+0x53/0x70 [radeon]
[ 1888.097073]  atom_execute_table+0x2b/0x40 [radeon]
[ 1888.097179]  atombios_digital_setup+0x17b/0x2b0 [radeon]
[ 1888.097286]  ? radeon_atom_encoder_dpms+0x140/0x140 [radeon]
[ 1888.097391]  radeon_atom_encoder_mode_set+0x29c/0x370 [radeon]
[ 1888.097404]  ? drm_crtc_helper_set_mode+0x37c/0x560 [drm_kms_helper]
[ 1888.097510]  ? radeon_atom_encoder_dpms+0x140/0x140 [radeon]
[ 1888.097520]  drm_crtc_helper_set_mode+0x399/0x560 [drm_kms_helper]
[ 1888.097541]  drm_crtc_helper_set_config+0x75d/0x8a0 [drm_kms_helper]
[ 1888.097640]  radeon_crtc_set_config+0x44/0x110 [radeon]
[ 1888.097664]  __drm_mode_set_config_internal+0x53/0xd0 [drm]
[ 1888.097759]  ? radeon_crtc_cursor_move+0x40/0x40 [radeon]
[ 1888.097780]  drm_mode_set_config_internal+0x21/0x40 [drm]
[ 1888.097791]  restore_fbdev_mode+0xcf/0x150 [drm_kms_helper]
[ 1888.097802]  drm_fb_helper_restore_fbdev_mode_unlocked+0x46/0xa0 [drm_kms_helper]
[ 1888.097813]  drm_fb_helper_set_par+0x2a/0x60 [drm_kms_helper]
[ 1888.097821]  fbcon_init+0x4ae/0x610
[ 1888.097829]  visual_init+0xc0/0x120
[ 1888.097835]  do_bind_con_driver+0x178/0x340
[ 1888.097841]  ? device_create_groups_vargs+0x61/0xd0
[ 1888.097847]  do_take_over_console+0x72/0x180
[ 1888.097852]  do_fbcon_takeover+0x5d/0xd0
[ 1888.097857]  fbcon_event_notify+0x587/0x760
[ 1888.097862]  ? fbcon_scroll+0xd30/0xd30
[ 1888.097868]  notifier_call_chain+0x51/0x80
[ 1888.097873]  blocking_notifier_call_chain+0x3b/0x50
[ 1888.097878]  fb_notifier_call_chain+0x16/0x20
[ 1888.097882]  register_framebuffer+0x21c/0x350
[ 1888.097895]  __drm_fb_helper_initial_config_and_unlock+0x211/0x470 [drm_kms_helper]
[ 1888.097907]  drm_fb_helper_initial_config+0x35/0x40 [drm_kms_helper]
[ 1888.098003]  radeon_fbdev_init+0xe6/0x150 [radeon]
[ 1888.098098]  radeon_modeset_init+0x441/0x950 [radeon]
[ 1888.098187]  radeon_driver_load_kms+0x187/0x2a0 [radeon]
[ 1888.098208]  drm_dev_register+0x133/0x1b0 [drm]
[ 1888.098229]  drm_get_pci_dev+0x86/0x160 [drm]
[ 1888.098316]  radeon_pci_probe+0x111/0x160 [radeon]
[ 1888.098324]  ? __pm_runtime_resume+0x51/0x80
[ 1888.098411]  ? radeon_pmops_runtime_idle+0xa0/0xa0 [radeon]
[ 1888.098416]  pci_device_probe+0xc7/0x160
[ 1888.098422]  driver_probe_device+0x2dc/0x470
[ 1888.098427]  __driver_attach+0xb1/0xe0
[ 1888.098431]  ? driver_probe_device+0x470/0x470
[ 1888.098436]  bus_for_each_dev+0x5a/0x90
[ 1888.098440]  driver_attach+0x19/0x20
[ 1888.098444]  ? driver_probe_device+0x470/0x470
[ 1888.098448]  bus_add_driver+0x12f/0x230
[ 1888.098452]  ? 0xf86b2000
[ 1888.098456]  driver_register+0x56/0xd0
[ 1888.098459]  ? 0xf86b2000
[ 1888.098463]  __pci_register_driver+0x3d/0x40
[ 1888.098548]  radeon_init+0x8c/0xaa [radeon]
[ 1888.098554]  do_one_initcall+0x49/0x168
[ 1888.098561]  ? free_unref_page_commit+0x73/0xe0
[ 1888.098567]  ? _cond_resched+0x17/0x40
[ 1888.098573]  ? kmem_cache_alloc_trace+0x107/0x1d0
[ 1888.098578]  ? do_init_module+0x21/0x1dc
[ 1888.098582]  ? do_init_module+0x21/0x1dc
[ 1888.098587]  do_init_module+0x50/0x1dc
[ 1888.098593]  load_module.constprop.56+0x1d40/0x25f0
[ 1888.098603]  SyS_finit_module+0x8a/0xe0
[ 1888.098611]  do_fast_syscall_32+0x7f/0x1b0
[ 1888.098616]  entry_SYSENTER_32+0x4e/0x7c
[ 1888.098618] EIP: 0xb7f4ad09
[ 1888.098620] EFLAGS: 00000292 CPU: 1
[ 1888.098623] EAX: ffffffda EBX: 00000007 ECX: 004391cc EDX: 00000000
[ 1888.098627] ESI: 0221d980 EDI: 0221d120 EBP: 00000000 ESP: bf93cd1c
[ 1888.098630]  DS: 007b ES: 007b FS: 0000 GS: 0033 SS: 007b
[ 1888.098633] Code: ff ff 8b 0d 38 9d a8 f8 85 c9 0f 84 6b fd ff ff 56 68 46 66 a7 f8 e8 69 d3 75 e1 58 5a e9 59 fd ff ff 8d 76 00 8b 45 e4 8b 40 08  1c 98 e9 a6 fa ff ff 53 68 0a 66 a7 f8 e8 46 d3 75 e1 5e 58
[ 1888.098799] EIP: atom_get_src_int+0x5c6/0x6a0 [radeon] SS:ESP: 0068:f3e2d6b8
[ 1888.098801] CR2: 0000000000000124
[ 1888.098806] ---[ end trace 99335fff91d33938 ]---

One line in the kernel oops log stood out to me and the helpful people on #radeon IRC:

[ 1888.096496] Hardware name: LENOVO 200746P/200746P, BIOS 79ET61WW (1.06 ) 05/24/2006

This ThinkPad T60 is running an early BIOS revision from 2006, probably containing an old video BIOS which the radeon mode-setting driver doesn’t like. The latest BIOS revision for a non-widescreen T60 is 79ETE7WW (2.27 ) 03/21/2011. I updated to it through a bootable MS-DOS USB drive (IBM/Lenovo BIOS updaters do not work on FreeDOS) and started up the same Debian testing system which was giving me trouble before. It now boots properly with the radeon module enabled (see kernel log below), and everything including 2D acceleration appears to work.

[   15.176836] [drm] radeon kernel modesetting enabled.
[   15.177318] [drm] initializing kernel modesetting (RV515 0x1002:0x7149 0x17AA:0x2005 0x00).
[   15.177374] resource sanity check: requesting [mem 0x000c0000-0x000dffff], which spans more than PCI Bus 0000:00 [mem 0x000d4000-0x000d7fff window]
[   15.177381] caller pci_map_rom+0x66/0x110 mapping multiple BARs
[   15.177748] ATOM BIOS: M64CSP/M62CSP/M54CSP/M52CSP
[   15.177785] [drm] Generation 2 PCI interface, using max accessible memory
[   15.177792] radeon 0000:01:00.0: VRAM: 128M 0x0000000000000000 - 0x0000000007FFFFFF (64M used)
[   15.177795] radeon 0000:01:00.0: GTT: 512M 0x0000000008000000 - 0x0000000027FFFFFF
[   15.178933] [drm] Detected VRAM RAM=128M, BAR=128M
[   15.178937] [drm] RAM width 64bits DDR
[   15.179064] [TTM] Zone  kernel: Available graphics memory: 440490 kiB
[   15.179066] [TTM] Zone highmem: Available graphics memory: 512590 kiB
[   15.179067] [TTM] Initializing pool allocator
[   15.179074] [TTM] Initializing DMA pool allocator
[   15.179129] [drm] radeon: 64M of VRAM memory ready
[   15.179130] [drm] radeon: 512M of GTT memory ready.
[   15.179151] [drm] GART: num cpu pages 131072, num gpu pages 131072
[   15.180179] [drm] radeon: power management initialized
[   15.189480] [drm] radeon: 1 quad pipes, 1 z pipes initialized.
[   15.191979] [drm] PCIE GART of 512M enabled (table at 0x0000000000040000).
[   15.192068] radeon 0000:01:00.0: WB enabled
[   15.192074] radeon 0000:01:00.0: fence driver on ring 0 use gpu addr 0x0000000008000000 and cpu addr 0x90f68200
[   15.192077] [drm] Supports vblank timestamp caching Rev 2 (21.10.2013).
[   15.192078] [drm] Driver supports precise vblank timestamp query.
[   15.192081] radeon 0000:01:00.0: radeon: MSI limited to 32-bit
[   15.192105] [drm] radeon: irq initialized.
[   15.192122] [drm] Loading R500 Microcode
[   15.192152] radeon 0000:01:00.0: firmware: failed to load radeon/R520_cp.bin (-2)
[   15.192270] firmware_class: See https://wiki.debian.org/Firmware for information about missing firmware
[   15.192381] radeon 0000:01:00.0: Direct firmware load for radeon/R520_cp.bin failed with error -2
[   15.192454] [drm:r100_cp_init [radeon]] *ERROR* Failed to load firmware!
[   15.192567] radeon 0000:01:00.0: failed initializing CP (-2).
[   15.192672] radeon 0000:01:00.0: Disabling GPU acceleration
[   15.192782] [drm] radeon: cp finalized
[   15.193956] [drm] Radeon Display Connectors
[   15.193958] [drm] Connector 0:
[   15.193959] [drm]   VGA-1
[   15.193962] [drm]   DDC: 0x7e40 0x7e40 0x7e44 0x7e44 0x7e48 0x7e48 0x7e4c 0x7e4c
[   15.193963] [drm]   Encoders:
[   15.193964] [drm]     CRT1: INTERNAL_KLDSCP_DAC1
[   15.193966] [drm] Connector 1:
[   15.193967] [drm]   LVDS-1
[   15.193969] [drm]   DDC: 0x7e60 0x7e60 0x7e64 0x7e64 0x7e68 0x7e68 0x7e6c 0x7e6c
[   15.193970] [drm]   Encoders:
[   15.193971] [drm]     LCD1: INTERNAL_LVTM1
[   15.193972] [drm] Connector 2:
[   15.193973] [drm]   DVI-I-1
[   15.193974] [drm]   HPD1
[   15.193977] [drm]   DDC: 0x7e50 0x7e50 0x7e54 0x7e54 0x7e58 0x7e58 0x7e5c 0x7e5c
[   15.193977] [drm]   Encoders:
[   15.193979] [drm]     DFP1: INTERNAL_KLDSCP_TMDS1
[   15.566150] [drm] fb mappable at 0xD8040000
[   15.566152] [drm] vram apper at 0xD8000000
[   15.566153] [drm] size 3145728
[   15.566155] [drm] fb depth is 24
[   15.566156] [drm]    pitch is 4096
[   15.566296] fbcon: radeondrmfb (fb0) is primary device
[   15.688090] [drm] Initialized radeon 2.50.0 20080528 for 0000:01:00.0 on minor 0

Lesson learned: if you’re having weird issues with Linux like this one, try updating your system’s BIOS.

https://messaroundery.net/2018/07/27/old-ati-graphics-crashing-on-boot-with-linux
The Eee PC SYSLINUX bug
Broken BIOS from the pre-UEFI era breaks UEFI partitions.
Show full content

Important update 2018-07-27: This issue is likely related to the “Boot Booster” feature using the same partition type code as EFI System Partitions (0xEF), resulting in the BIOS corrupting ESPs even if said feature is off. This extends the bug’s scope to any hybrid BIOS+UEFI bootloader installed to an EFI partition, not just SYSLINUX, but I no longer have any Eee PC units to test that. The original post is saved below for posterity.

I ran into a weird issue with my own embedded Debian-based Linux system image on an old ASUS Eee PC netbook: the system could boot from the USB installation drive, however, it could not boot from the hard drive once the image was installed. Booting from the hard drive resulted in a blinking cursor (displayed on the second line of text), and no response to Ctrl+Alt+Del. Both drives have identical contents, as the installation drive essentially clones itself to the hard drive.

There appears to be a bug in the BIOS firmware for these devices, which corrupts the first sectors of a SATA hard drive upon attempting to boot from it. Said bug seems to only affect the SYSLINUX bootloader on a FAT/FAT32 filesystem, when not using the boot menu to select a boot device. I’ve reproduced this issue on models 1005HA and 1201T, although I have reason to believe most (if not all) models with the boot screen pictured below are affected.

2552237678_a1f65d2bb7_b

Image from ADM Blog (the screen on those things is so reflective I couldn’t take a picture myself)

The only documented instance of this issue so far comes from the CloudReady Chromium OS distribution (official documentation, forum post), which specifically warns Eee PC users to always boot from USB drives through the boot menu. CloudReady uses SYSLINUX for both the installer and the installed system, although according to them, only the USB installer is affected.

A workaround is to use EXTLINUX instead of SYSLINUX. EXTLINUX operates on Linux filesystems intead of FAT/FAT32. From my own testing, replacing SYSLINUX on a FAT32 partition with EXTLINUX on an ext4 partition (disabling the 64bit filesystem option as required) fixed the corruption on my model 1201T unit. I no longer have the 1005HA, where I had used another workaround which escapes me.

https://messaroundery.net/2018/06/16/the-eee-pc-syslinux-bug
Extensions
Using an LG TV Wi-Fi adapter on a PC
Reusing the AN-WF100 Wi-Fi dongle from "smart" TVs gone dumb.
Show full content
LG AN-WF100 Wi-Fi adapter

Some old LG smart TV models did not have integrated Wi-Fi, instead requiring the AN-WF100 USB Wi-Fi adapter (pictured above). Since none of the “smart” features on those TVs work anymore, re-using the Wi-Fi adapter on a PC may seem like a good idea. The adapter is based on a standard Broadcom chipset, and can be used on a Windows PC with the steps below:

  1. Download the Netgear WNDA3100v2 driver.
  2. Install the driver normally. A Netgear Genie screen will ask you to plug in the adapter; close it by right-clicking its taskbar button and clicking Close.
  3. Optionally disable the “WNDA3100v2.exe” startup entry using Task Manager (on Windows 10 and newer), msconfig or AutoRuns to stop Netgear Genie from bothering you on every startup.
  4. Connect the LG adapter to your PC. It will be detected as an unknown “Remote Download Wireless Adapter” device.
  5. Open Device Manager, right-click the unknown “Remote Download Wireless Adapter” device, select “Update Driver…”, choose to browse for driver software, then to pick from a list of device drivers.
  6. Select the “Network adapters” category, wait for it to load, scroll down to “Netgear” and select “Netgear WNDA3100v2 N600 Wireless Dual Band USB Adapter”.
  7. Ignore the warning about driver compatibility.

After following these steps, Wi-Fi should be working. If it doesn’t, you have the wrong adapter (this guide is for the AN-WF100 only), or you’ve done something wrong. Unlike stated in a previous version of this post, the adapter does support 5 GHz networks as well, but I could not test this at the time of writing.

2016-01-04_23-16-16
https://messaroundery.net/2015/08/18/using-a-lg-tv-wi-fi-adapter-on-a-pc
Extensions
Notes on Red Star OS 3.0
How to navigate North Korea's home-grown Linux distribution.
Show full content

Updated 2020-03-31: Part 2 is now up.

The latest version of North Korea’s custom Linux distribution, Red Star OS - that one with the Mac OS X style interface - has leaked onto the internet. While the individual who talked about technology in North Korea at the 31C3 conference claimed he didn’t see anybody using Red Star seriously, it’s still an interesting distribution to check out.

LLBMKWg
Installation

The Korean installer is quite easy to go through blind. All you need to watch out for is the network configuration, which is not set to DHCP by default. Some extras, including compilers and a LAMP stack, are available through the Customize screen. The installer - a customized version of Fedora’s Anaconda - can be started in English by two different methods:

Method 1: As soon as your machine starts booting from the Red Star installation media - for example, right after pressing Enter on the BIOS boot menu - keep pressing Esc repeatedly for a few seconds. You’ll be stuck on a screen with nothing but a blinking cursor. Type the following command line (which won’t appear on the screen) and press Enter: linux lang=en Method 2: Modifying the ISO file. In /isolinux/isolinux.cfg, replace lang=ko with lang=en on the kernel parameters.

Some minor parts of the UI remain untranslated as they are static images. The installed system will still be in Korean, but we’ll fix that later.

Red Star 3-2015-01-01-20-47-52
Obtaining root access

Just like OS X, the root user is disabled by default and the system provides an utility to enable it, however getting to said utility through the Korean user interface is a challenge. Luckily, it can be executed from a terminal, which is relatively easy to get to:

  1. Click the Applications folder on the dock
  2. Click the plain folder (called “AppLink” in English)
  3. Click the Utilities folder with a hammer and wrench icon (on a full install, there will be another folder with a hammer icon, which is not the one you should click)
  4. Click the Terminal icon

Run the rootsetting command to open the root utility. Click the padlock to unlock the settings, enter your password and click the blue button.

Running and unlocking rootsetting

Check the checkbox. You’ll be prompted to enter and confirm a password for the root user. Type the password into both boxes and click the blue button. The root user is now enabled; the utility can be closed.

Enabling root and setting a password

My old rootsh RPM - which takes advantage of the unprivileged package installer - is still available here for reference.

English

Like the installer, the system can run in English, and the included apps have English translations as well. After enabling root access through a terminal as described above, run the su command to log in as root, then run the following command to change the language (thanks davidiwharper on OSNews):

sed -i 's/ko_KP/en_US/g' /etc/sysconfig/i18n /usr/share/config/kdeglobals

Reboot the system (through the menus or by running the reboot command) to apply the changes. These steps are reported to work on Red Star 2.5 Server as well, with the difference that su is not required since you’re already logged in as root.

Red Star 3-2015-01-02-13-50-04
Internet connectivity

For some reason, Red Star’s iptables firewall is set to only allow outgoing connections to certain ports. DNS is blocked as North Korea’s intranet uses IP addresses only, so you can’t get a proper internet connection on Red Star by default. To fix that, run the following commands as root to clear Red Star’s default firewall rules:

rm /etc/sysconfig/iptables
service iptables restart

The included “Naenara Browser” is Firefox 3.5 with a custom skin and a Korean language pack. Its language can be changed to English by disabling the language pack (thanks Chocohead):

  1. Go to the second-to-last menu
  2. Select the third option
  3. Go to the second-to-last tab
  4. Select the “(ko-KP)” add-on and click the first button to disable it
  5. Click the button on the yellow bar to restart the browser
  6. The browser will ask for confirmation if more than one tab is open, click the blue button if it does
Disabling the browser's Korean language pack

Despite the browser being configured to browse on the North Korean intranet, it works on the internet (about as well as Firefox 3.5 does these days) once you apply the iptables fix above.

Red Star 3-2015-01-02-22-23-36
Dubious components

As highlighted on the 32C3 follow-up talk, Red Star contains several shady components, including but not limited to a file watermarking system service and a supposed “virus scanner”. The speakers provided instructions on how to disable these components.

Other notes
  • This version of Red Star was released no sooner than June 2013, according to file dates.
  • There appears to be a system file modification detector, which warns about modified system files when you log in. It might warn you about the kernel and initramfs images in some configurations. To disable it, run this command as root to remove its autorun entry:

    rm /usr/share/autostart/intcheck_kde.desktop

  • The 32C3 talk also mentions a similar service which automatically reboots the system if files related to the aforementioned malicious components are modified.
  • The disc includes a Windows executable named install.exe, which displays a window with two buttons. The leftmost one displays an error message, presumably telling you to boot from the DVD, and the rightmost one closes the window. The windows consist of static images stored in the EXE’s Bitmap resources, and strangely there are a few more of them - it remains to be seen what are they for.
  • Press Esc on the boot splash for verbose boot.
  • English or South Korean locales were replaced to accommodate the new North Korean locales throughout the system.
  • The English translation is surprisingly good. One theory is that all English text was taken straight out of OS X.
  • The “Crosswin” Windows compatibility layer is a wrapper around Wine 1.2.2.
https://messaroundery.net/2015/01/01/notes-on-red-star-os-3-0
Extensions
Linux, Intel HDA, VIA codec and headphones
Linux doesn't always enable headphone detection for onboard audio.
Show full content

Yesterday, I finally got around to setting up Debian 7 on my main system (with Intel High Definition Audio and a VIA VT1705 codec), but I ran into an issue where headphone jack detection didn’t work: audio comes out of the rear output normally, but as soon as anything is plugged into the front panel output, both outputs are disabled.

All solutions I could find relate to systems with Realtek codecs, which is not my case. Here’s what solved it on mine:

  1. Start alsamixer
  2. Scroll all the way to the right
  3. Select the “Smart 5.1” option
  4. Press . (period) to unmute it
hda_alsamixer

Despite this option being (oddly) named “Smart 5.1”, enabling it will make headphone jack detection work.

https://messaroundery.net/2014/06/15/138
Extensions