GeistHaus
log in · sign up

https://railsadventures.wordpress.com/feed

rss
10 posts
Polling state
Status active
Last polled May 19, 2026 06:48 UTC
Next poll May 20, 2026 07:56 UTC
Poll interval 86400s
Last-Modified Sat, 21 Feb 2026 23:38:20 GMT

Posts

6 Metrics to Watch for on Your Kubernetes Cluster
DevOpskubernetes
Kubernetes. Nowadays it seems companies in the industry are divided into two pools: those that already use it heavily for their production workloads and those that are migrating their workloads into it. The issue with Kubernetes is that it is not a single system the way Redis RabbitMQ or PostgreSQL are. It is a combination […]
Show full content

Kubernetes. Nowadays it seems companies in the industry are divided into two pools: those that already use it heavily for their production workloads and those that are migrating their workloads into it.

The issue with Kubernetes is that it is not a single system the way Redis RabbitMQ or PostgreSQL are. It is a combination of several control plane components (for example etcd, api server) that run our workloads on the user (data) plane over a fleet of VMs. The number of metrics coming out of control plane components, VMs and your workloads might be overwhelming at first glance. Forming a comprehensive observability stack out of those metrics requires decent knowledge and experience with managing Kubernetes clusters.

So how can you handle the flood of metrics? Reading this post might be a good place to start with 🙂

We’ll be covering the most critical metrics based on k8s’s metadata which form a good baseline for monitoring your workloads and making sure they’re in a healthy state. In order to have these metrics available you’ll need to install kube-state-metrics and Prometheus to scrape the metrics it exposes and store them for querying later on. We’re not going to cover the installation process here but a good lead is the Prometheus Helm Chart which installs both with default settings.

The Most Critical Kubernetes Metrics to Monitor

For each of the listed metrics we’ll cover what the metric signifies, why you should care about it and how you should set your alerting according to it.

1. CPU / Memory Requests vs Actual Usage

What: Every container can (and should!) define requests for CPU and memory. These requests are being used by the Kubernetes scheduler to make sure it selects a node that has the capacity to host the pod. It does that by calculating the unused resources on the node considering its capacity minus the current scheduled pods requests.

Let’s look at an example to make this clearer: Let’s say you have a node with 8 CPU cores running 3 pods each with a single container that requests 1 CPU core. The node has 5 unreserved CPU cores for the scheduler to work with when it is assigning pods.

5 cores available for other pods

5 cores available for other pods

Keep in mind that by “available” we’re not referring to actual usage but rather to CPU cores that haven’t been requested (reserved) by pods currently scheduled into the node. A pod that requires 6 CPU cores won’t be scheduled into this node since there are not enough available CPU cores to host it.

The “actual usage” metric tracks how much of a resource the pod uses during runtime. When we measure actual usage it is usually across a fleet of pods (deployment, statefulset etc) so we should refer to a percentile rather than a single pod’s usage. The 90th percentile should be a good starting point for this matter. For example, a deployment that requires 1 CPU core per pod might be actually using 0.7 cores on the 90th percentile across its replicas.

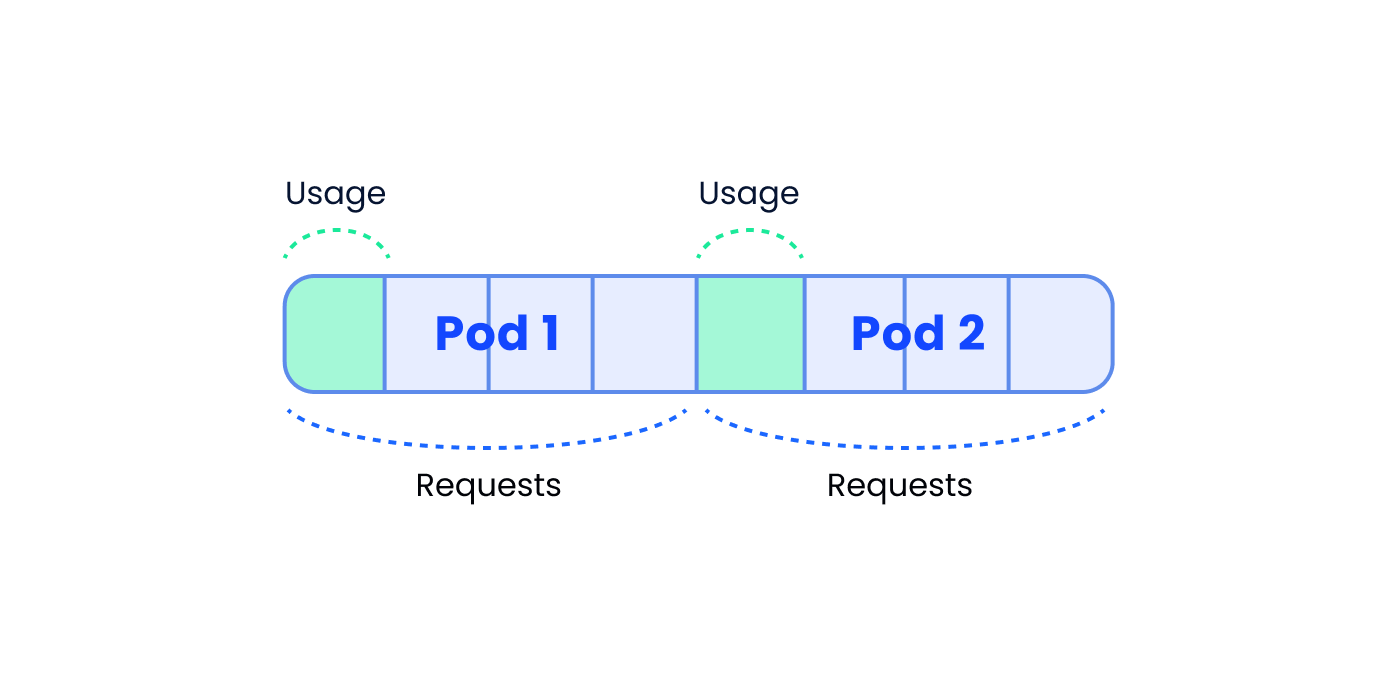
Why: Keeping the requests and the actual usage aligned is important. Requests that are higher than the actual usage leads to inefficient resource usage (under utilization). Think of what happens when a pod that requests 4 cores uses 1 core on the 90th percentile. K8s might schedule this pod into a node with free 4 cores which means no other pod will be able to use the reserved 3 cores that are not in use. In the diagram below we can clearly see that each pod reserved 4 cores but actually uses a single core meaning we’re “wasting” 6 cores on the node which will remain unused.

multiple pod requests

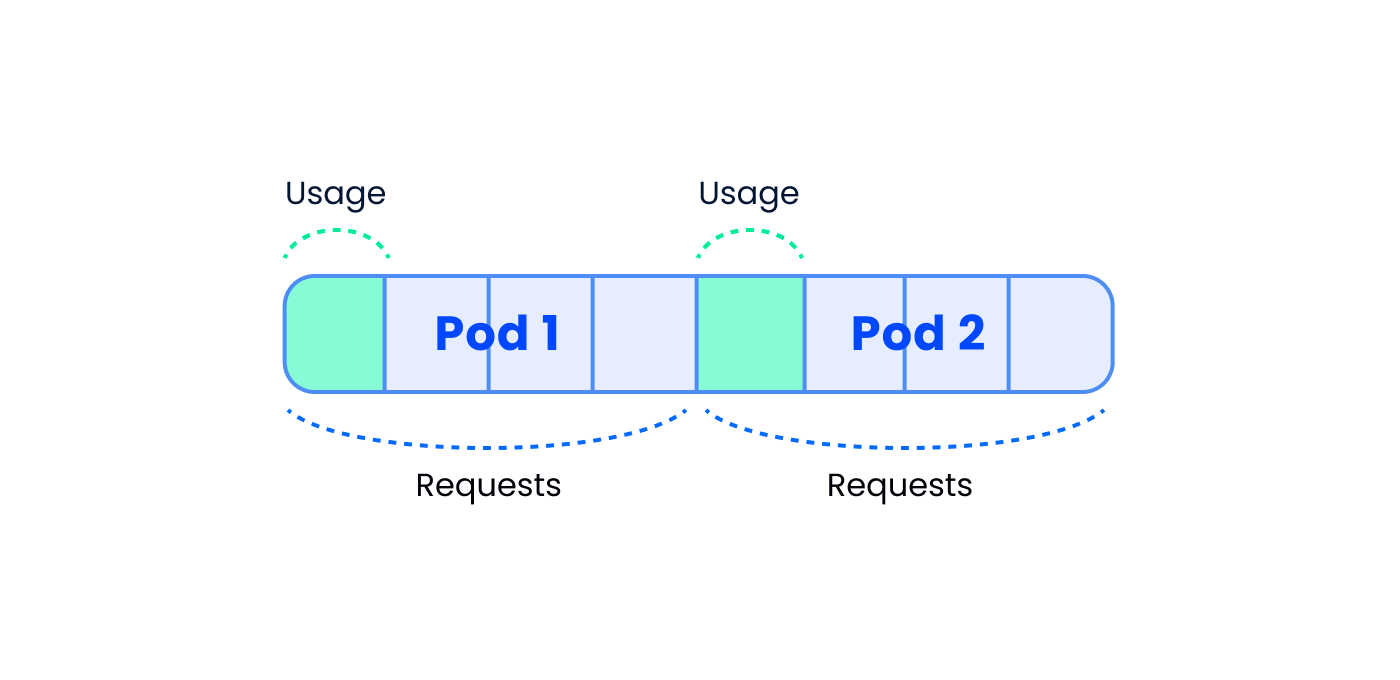
Requests are higher than actual usage = underutilization

Same goes for memory — if we set the request higher than the usage we’ll end up not using available memory.

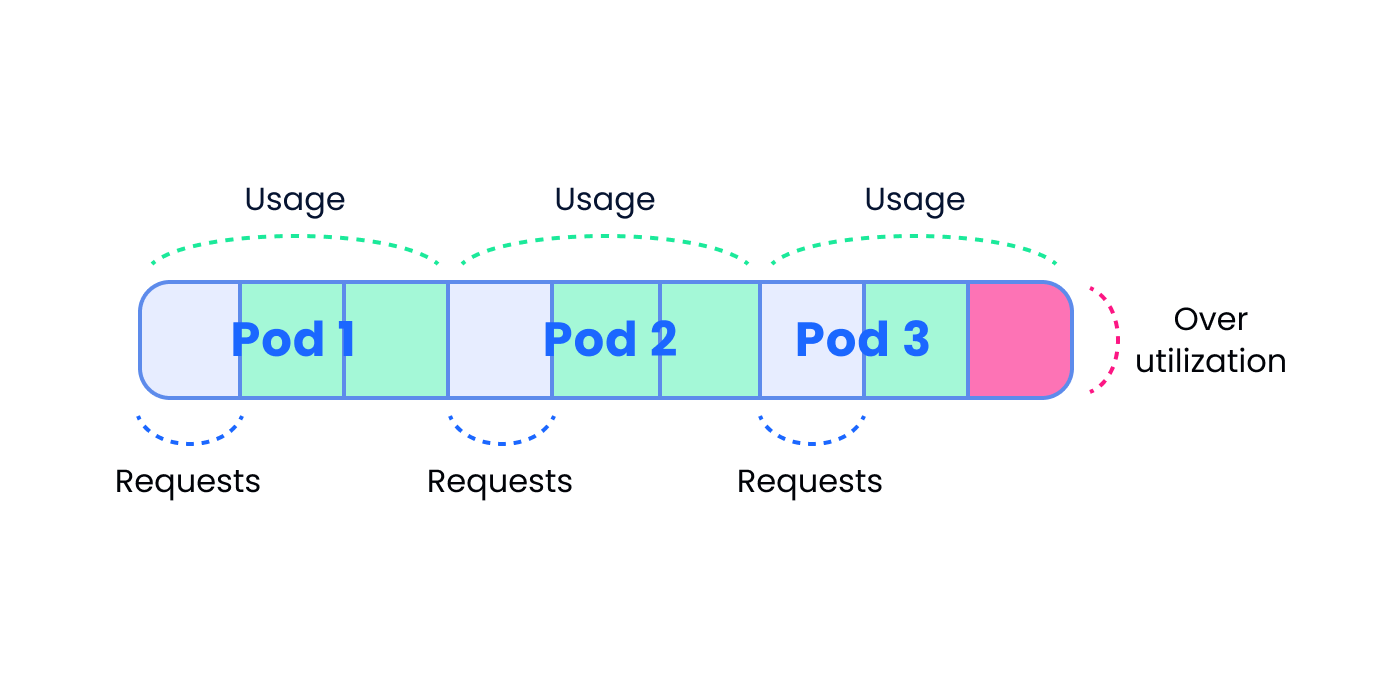
The other option for misalignment is that the pod’s requests are lower than its actual usage (over utilization). In case of CPU overutilization your applications will work slower due to insufficient resources on the node. Imagine 3 pods, each of them requests 1 core but actually uses 3. These 3 pods might be scheduled into a 8 core machine (1 request * 3 =3<8) but when they do, they’ll contest for CPU time since their actual usage — 9 cores — exceeds the number of cores on the node.

actual usage exceeds number of cores on a node

Pods actual usage exceeds the number of cores on a node

While with CPU you would experience slow application execution when memory requests are lower than required you might get into other kinds of issues. If we have 3 pods, each requests 1 GB of memory but uses 3 GB, they might all get scheduled into a node with 8GB of memory. On runtime, when a process tries to allocate more memory than the node has, it will get OOMKilled (Out Of Memory Killed) by the kernel and in the context of K8s, it will restart. When our process gets OOMKilled it will probably lose any inflight requests, be unavailable until it boots back up which leaves us under capacity and once it has booted, might suffer from a cold start due to cold caches or empty connection pools to its dependencies (databases, other services…).

How: Let’s define the pod requests as 100%. A sane range for actual usage (CPU or memory, it doesn’t really matter) would be 60%–80% on the 90th percentile. For example, if you have a pod that requests 10GB of memory, its 90th percentile of actual usage should be 6GB-8GB. If it is lower than 6GB you would be underusing your memory and wasting money. If it is higher than 8GB you’d get to a point where you’re risking getting OOMKilled due to insufficient memory. The same rule we applied for memory requests can be applied for CPU requests.

2. CPU / Memory Limit vs Actual Usage

What: While resource requests are being used by the scheduler to schedule workloads into nodes, resource limits allow you to define boundaries for the resource usage of your workloads during runtime.

Why: It is very important to understand the way CPU and memory limits are being enforced so you are aware of the implications of your workloads crossing them:
When a container reaches the CPU limit it will get throttled meaning it would get less CPU cycles from the OS than it could have and that eventually results in slower execution time. It doesn’t matter if the node hosting the pod has free CPU cycles to spare or not — the container is throttled by the docker runtime.

It is very dangerous to be CPU throttled without being aware of it. Latencies of random flows in the system spike up and it might be very hard to pinpoint the root cause if one of the components in the system is being throttled and you haven’t set the required observability beforehand. This situation could lead to partial service disruption or a full unavailability in case the throttled service takes part in core flows on our system.

Memory limits are being enforced differently than CPU limit: when your container reaches the memory limit it would get OOMKilled which has the same effect of it being OOMKIlled due to insufficient memory on the node: the process will be dropping inflight requests, the service will be under capacity until the container restarts and then it would have a cold start period. If the process accumulates memory fast enough, it might get into CrashLoop state — this state signals that the process is either crashing on boot or a short time after starting over and over again. Crashlooping pods usually translate to unavailability of the service.

How: The way to monitor resource limits is similar to the way we monitor CPU/memory requests. You should aim for up to 80% actual usage out of the limit on the 90th percentile. For example, if we have a pod that has a CPU limit of 2 cores and memory limit of 2GB the alert should be set for 1.6 cores of CPU usage or 1.6GB of memory usage. Anything above that introduces the risk of your workload being throttled or restarted according to the crossed threshold.

3. Percentage of Unavailable Pods Out of Desired Replicas

What: When you deploy an app you set the number of desired replicas (pods) it should be running. Sometimes some of the pods might not be available due to several reasons, such as:

  • Some pods might not fit to any of the running nodes in the cluster due to their resource requests — these pods will transition into Pending state until either a node frees up resources to host them or a new node that meets the requirements joins the cluster.
  • Some pods might not pass liveness/readiness probes meaning they are either restarting (liveness) or being taken out of the service endpoints (readiness).
  • Some pods might reach their resource limits as mentioned above and get into Crashloop state.
  • Some pods might be hosted on a malfunctioning node for various reasons and if the node is not healthy most chances are the pods hosted on it won’t function well.

Why: Having pods unavailable is obviously not a healthy state for your system. It may result anywhere between a minor service disruption to a complete service unavailability depending on the percentage of unavailable pods out of the desired number of replicas and the importance of the missing pods in core flows on your system.

How: The function we want to monitor here is the percentage of unavailable pods out of the desired number of pods. The exact percentage you should aim for in your KPIs depends on the criticality of the service and each of its pods in your system. For some workloads we might be OK with 5% of the pods being unavailable for a certain period as long as the system returns to a healthy state by itself and there’s no impact on customers. For some workloads even 1 unavailable pod might become an issue. A good example for that would be statefulsets in which each pod has its unique identity and having it unavailable might not be acceptable.

4. Desired Replicas Out of HPA Maximum Replicas

What: Horizontal Pod Autoscaler (HPA) is a k8s resource that allows you to adjust the number of replicas a workload is running according to a target function you define. The common use case is to auto scale by the average CPU usage of pods across a deployment compared to the CPU requests.

Why: When a deployment’s number of replicas reaches the maximum defined in the HPA you might get to a situation where you need more pods but the HPA can’t scale up. The consequences might differ according to the scale up function you’ve set. Here are 2 examples to shed more clarity:

  • If the scale up function uses CPU usage then the existing pods’ CPU usage will increase to a point where they’ll reach their limit and get throttled (see bullet 2 for more on that). This eventually results in lower throughput for your system.
  • If the scale up function uses custom metrics like the number of pending messages in a queue then the queue might start to fill up with pending messages introducing delay in your processing pipeline.

How: Monitoring this metric is pretty simple — you need to set a X% threshold for the division of the current number of replicas by the HPA max replicas. A sane X could be 85% to allow you to make the required changes before you hit the maximum. Keep in mind that increasing the number of replicas might affect other parts of the system so you might end up changing a lot more than an HPA configuration to enable this scale up operation. A classic example for that would be a database that hits its maximum connection limit when you increase the number of replicas and more pods try to connect to it. This is why taking a large enough buffer as preparation time makes a lot of sense in this case.

5. Nodes Failing Status Checks

What: kubelet is a k8s agent that runs on each of the nodes on the cluster. Among its duties, the kubelet publishes a few metrics (called Node Conditions) to reflect the health status of the node it runs on:

  • Ready — True if the node is healthy and ready to accept pods
  • DiskPressure — True if the node’s disk is short of free storage
  • MemoryPressure — True if the node is low on memory
  • PIDPressure — True if there are too many processes running on the node
  • NetworkUnavailable — True if the network for the node is not correctly configured

A healthy node should report True on the Ready condition and False on all other four conditions.

Why: If the Ready condition turns negative or any of the other conditions turns positive it probably means some or all of the workloads running on that node are not functioning well and this is something you should be aware of.

For DiskPressure, MemoryPressure and PIDPressure the root causes are pretty obvious — a process writes to disk / allocates memory / spawns processes at a rate which the node cannot sustain.

The Ready and NetworkUnavailable conditions are a bit trickier and require further investigation to get to the bottom of the issue.

How: I’d start by expecting exactly 0 nodes to be unhealthy so that every node that becomes unhealthy would trigger an alert.

6. Persistent Volume Utilization

What: Persistent Volume (PV) is a k8s resource representing a block of storage that can be attached and detached to pods in the system. PV’s implementation is platform specific, for example, if your Kubernetes deployment is based on AWS, a PV would be represented by an EBS volume. As with every block storage, it has a capacity and might get filled with time.

Why: When a process uses a disk that has no free space hell breaks loose as the failure might be symptomized in a million different ways and the stack traces do not always lead to the root cause. Apart from saving you from a future failure, watching this metric could also be used for planning on workloads that record and add data with time. Prometheus is a great example for such a workload — as it writes data points to its time series database, the amount of free space in the disk decreases. Since the rate Prometheus writes data at is pretty consistent, it is easy to use the PV utilization metric to forecast the time you would need to either delete old data or purchase more capacity for the disk.

How: The kubelet exposes both PV usages and capacity so a simple division between them should do the trick to provide you with the PV utilization. It’s a bit hard to suggest a sane alert threshold as it really depends on the trajectory of the utilization graph but as a rule of thumb give yourself at least two-three weeks heads up before you deplete your PV storage.

Summary

As you already figured out, handling a Kubernetes cluster is not an easy task. There are tons of metrics available and it requires a lot of expertise to pick the important ones.

Having a dashboard monitoring key metrics for your cluster could be used both as a preventive measure to avoid issues in the first place or as a tool to troubleshoot issues in your system once they sneak in.

erezrabih
5 cores available for other pods
multiple pod requests
actual usage exceeds number of cores on a node
http://railsadventures.wordpress.com/?p=1433
Extensions
On Sprint Planning and Peeling Potatoes
DevOps
I really like finding analogies between my work and “real” life. I recently found a cool one which I’m going to share in this post. So what does sprint planning have to do with potato peeling? Apparently a lot! Let’s go for a ride. The Grocery Store Last Friday I went to the grocery store […]
Show full content

I really like finding analogies between my work and “real” life. I recently found a cool one which I’m going to share in this post.

So what does sprint planning have to do with potato peeling? Apparently a lot! Let’s go for a ride.

The Grocery Store

Last Friday I went to the grocery store to buy some potatoes to cook for dinner. When I arrived at the store, I saw a heap of potatoes and they were all tiny, very small potatoes. I wasn’t glad, to say the least, to see these tiny potatoes — I knew I was going to work hard to peel all of them. I needed about 2kg of potatoes and I really wished to find 4–5 large potatoes I could easily peel but instead of that I had to purchase (and eventually peel) dozens of them.

I remember that all I could think about when I waited in line to pay was sprint planning. I didn’t know exactly how, but I had a strange feeling there’s a connection between these potatoes and story points. I could feel the thought crawling up my spine, arriving to my head and starting to get a form and a clear shape. And then it hit me — this is a great demonstration for why story points don’t add up!

Wait, what?!

Story Points

At nanit, we use story points to reflect capacity when we plan sprints. We also have a rough mapping between story points and estimated time for a task:

1 point -> up to an hour of work
2 points -> several hours of work (not more than half a day)
3 points -> half a day up to 2 days
5 points -> 2 days up to 5 days
8 points -> 5 up to 10 days of work

Now that’s strange — 8 tasks of 1 point add up to 8 points, the same as a single task of 8 points, but the time they reflect is significantly different:
8 tasks of 1 point add to up to ~8 hours of work
1 task of 8 points reflects ~5 to 10 days of work.
If we consider an agile team working in two-weeks sprints and a sprint velocity of 8 points — both fill up the team’s whole sprint but they sum up to a totally different amount of work hours.

How could that be that 8 tasks of 1 point, which add up to ~8 hours of work, takes the capacity of a full sprint (the whole two weeks)? It’s understandable with a single task of 8 points since we have 10 work days in a sprint but it doesn’t make any sense for 8 tasks of 1 point.
Have we just proved mathematically that 8×1 != 1×8 ??
Are story points totally broken?

Of course not — back to potatoes!

Potatoes

To cook my meal, I had to generate 2kg of peeled potatoes. I could achieve that by peeling 5 large potatoes or 30 small ones. I was very frustrated to see they only had small ones because unconsciously I realized I would have to work harder to peel that 2kg heap of potatoes.
In other words I knew it would take me a lot more time to peel 2kg of potatoes if I had to peel 30 potatoes instead of 5.

If we try to think why does it take us longer to peel the same weight of potatoes, we can break it down to several reasons:

  1. Let’s start with the obvious one: there’s more peel to peel if we have more potatoes. Try to imagine a single, huge 2kg potato. Now split it in the middle to two 1kg potatoes — suddenly you have a peel in the middle right? and on both potatoes’ inner sides! That’s outrageous!

The minimum amount of work we would need to invest to peel 2kg of potatoes would be if we had a single 2kg potato. The more potatoes we have, the more peel we have to peel and that means we would have to invest more time to finish the job.

2. Every potato has a different shape, curves and angles. After a few repeated peeling movements, you start getting into the zone and peeling becomes easier and faster as your hand muscle memory adjusts to the potato’s curves, delivering a dance-like peeling experience. I’m exaggerating of course but I am sure you can relate.
Shifting between many potatoes breaks the flow of peeling since our hand has to memorize a new potato topology until it reaches top speed peeling and we’re “in the zone” again.

3. After peeling a potato, we might decide to put down our peeler, take a break or cleanup a bit before we move to the next one. If we had a single potato the chances for all of these to happen are slimmer since we’re already in the zone of peeling. By having many potatoes there are more options for mental breaks before we start peeling the next potato.
These breaks might prolong the total time it takes us to peel the 2kg potato heap.

So now we understand the practical reasons that make peeling a bag of 30 potatoes slower than peeling a bag of 5 potatoes, even if both bags are the same weight.

Let’s take this knowledge and apply it on the process of creating software.

Why Story Points Don’t Add Up

Explaining this fact now is going to be easy because, fortunately, each of the reasons described in the former section apply to software engineering in some way or another (each bullet refers to the matching bullet in the former section):

  1. The same way many potatoes have more peel to peel, many tasks imply more work: we have to commit the code, open a Pull Request, address the feedbacks, deploy to a staging environment, go through some sanity checks, deploy to production and eventually monitor our changes. This list of actions is per task and it takes time, so with each task comes the overhead of the activities we go through to deliver it. Eventually it means that delivering a task takes time in the same way typing the code for the task takes time and we have to somehow account for that when we plan our capacity.
  2. The same way that we start to peel faster when peeling a single potato, we work faster when we’re on the same task/project. The mental model of the project sits well in our minds, we’re getting familiar with the code topology and where we should make the changes and each project has its own domain and nuances that need to be taken into account.
    Working on a single project allows us to use the project-specific knowledge we gained and have faster progress.
    Jumping between projects (context switching) requires us to go through this cold start over and over again and by this slows us down.
  3. When we finish a task we have the tendency to take a pause before we go on to the next one. We might take a break, use the time to reply to emails / slack messages or read a blog post on the web. I’m not saying everyone work this way — there will always be those that can jump from a task to another task in a blink of an eye but many of us just need this pause to refresh our minds and take a deep breath before we deep dive into a new project.
    Working on a single project does not generate this artificial break so we can work continuously and use our time in a more efficient way.
    On the other hand, having many different projects generates more breaks and eventually slows us down.

Now that we understand that each task and moving between tasks slows us down, the fact that story points don’t add up suddenly makes a lot of sense.

If I have 8 tasks, each of them is estimated at 1 point, my work will be slowed down by all the reasons mentioned above so I will have to devote much more time to achieve these 8 points (in total).

If I have a single 8 points task I’ll be able to stay focused, won’t suffer from context switching and will work faster once I’m “in the zone” where my task’s mental model sits well in my head and I’m able to translate my thoughts to work more efficiently.

Summary

The fact that story points don’t add does not mean the story points system is broken, on the contrary: in my opinion this is where story points shine. It takes the number of tasks, the context switches between them and the overhead introduced by each task into account in our capacity planning.

If we would have estimated tasks by time (and not story points) we’d either have to take all of these into account ourselves or wonder how come we did not accomplish our goals for the sprint due to undocumented time spent moving between tasks.

Hope you enjoyed and don’t forget to pick those larger potatoes — it will make your life easier and your meal taste better 🙂

potatoes
erezrabih
http://railsadventures.wordpress.com/?p=1422
Extensions
6 Years of Professional Clojure
clojuresoftware-development
TL;DR Clojure is a great programming language due to its functional nature, lack of objects / concentration on primitive values and the vast JVM eco system available via the seamless Java interop On the downside, recruiting and building engineering teams of Clojure engineers is challenging compared to other programming languages due to the lack of […]
Show full content
TL;DR
  • Clojure is a great programming language due to its functional nature, lack of objects / concentration on primitive values and the vast JVM eco system available via the seamless Java interop
  • On the downside, recruiting and building engineering teams of Clojure engineers is challenging compared to other programming languages due to the lack of its popularity and the absence of a large pool of experienced engineers
Preface

After years of working mainly with Ruby I arrived to Nanit. I didn’t really know Clojure back then, so in my first stages I did mostly Ruby work to provide quick value. Chen, Nanit’s SVP R&D, had already implemented some services in Clojure and that’s how I was introduced to Clojure as a language. More than 6 years have passed since and today Clojure is one of the strongest tools in my toolbox and the language I feel most productive with.

During these years Nanit’s backend group became larger and the question regarding choosing Clojure as our main programming language rose over and over again mainly due to the lack of experienced Clojure engineers which affected recruiting and introduced a longer onboarding process until a new engineer could be productive.
When I tried to provide an answer to this question I always felt like I have to recollect my thoughts and organize them into coherent arguments even though Clojure’s strengths were very clear to me all along. I came to a decision that one day I’ll pour my thoughts about Clojure out on a blog post.
This day has arrived 🙂

I always like to say that even though I’ve been working with Clojure for more than half a decade now, I’m in no way a “Clojure expert”. Since I consider myself someone that tends to dive deep into topics I think this reflects more on Clojure as a language rather than on me as a software engineer. It’s just that compared to other programming languages, Clojure is quite simple, and simplifying a topic turns expertise to esoteric. In other words, Clojure allows you to achieve a lot with little knowledge since there is not a lot to know, which is really great.

Simplicity should not be confused with weakness. On the contrary, Clojure’s simplicity is its main strength, as you can achieve everything you could have achieved with other languages like Ruby, Java or Python with less overhead and accidental complexity in your code.

I want to try and avoid the “language wars” with an absolute conclusion that Clojure is the best language on earth. Clojure is another tool in my toolbox and might fit better to certain use cases than others. Instead I will try to list the objective parameters that made my life easier working with Clojure along with some topics that I’ve had difficulties with both technically with Clojure as a language and building a team of software engineers practicing mainly Clojure as their tool.

Functional Programming

Clojure is a functional programming (FP) language. For me, as a software developer, FPs biggest advantage is that most of the codebase is composed out of “pure functions”. Pure functions have two traits that make them easier to test, refactor and compose together into more complex functions:

  1. They are free of side effects. Side effects include network IO, disk interaction or mutating the system state.
  2. Their output relies solely on their arguments. They are not dependent in external state to compute their return value.

When I think of how I spend my time creating software I can divide it to 4 main activities:
read the existing code and try to understand it
refactor code that requires refactoring
design new code before I write it
I write new code with tests — this code probably re-uses existing code

The combination of the two traits above makes any of the listed activities easier for me:

  1. Pure functions make code design easier: In fact, there’s very little design to be done when your codebase consists mostly of pure functions. You don’t have to build class hierarchy with interfaces, extensions and implementations. There’s no need for advanced design tricks like composition over inheritances or the visitor pattern. You don’t have to find creative solutions to the multiple inheritance problem or the dreaded diamond diagram. I haven’t dealt with any of these for the last 6 years and yet I produced well crafted, tested, maintainable, readable, extensible production-grade code (or at least that’s what I would like to believe 🙂 ).
  2. Pure functions are easier to re-use: I can use a pure function as many times as I’d like without having to take how it affects the system into consideration since there aren’t any side effects. It’s like the WYSIWYG of computer programming — the function follows its body and nothing else. No hidden considerations to be accounted for.
    Pure functions encourage code re-use by removing the extra overhead of having to investigate whether the code I’m going to re-use affects the system and if so what are the implications of that.
  3. Pure functions are easier to read and understand: Each pure function is an isolated, consistent and predictable piece of code that only relies on its arguments. You don’t need to be familiar with the database schema or the RabbitMQ architecture to reason about the code — it’s all about the arguments and the data transformations done in the function body.
  4. Pure functions are easier to test: Since they don’t rely on external state all you have to do to test the function is to apply it on its arguments. There’s no need to create fixtures on the database or mock an HTTP request. Also, since pure functions don’t apply any changes on the system all you have to test is the return value.
  5. Pure functions are easier to refactor: Their lack of external dependencies and their statelessness turns them into an isolated building blocks that are easily replaceable and composable.
Only Values, Only Primitives

Clojure does not have “objects”. I mean, it does, but most of the time you won’t feel any need for those. Instead, Clojure relies on primitive values and collections of those (arrays, dictionaries, sets etc). 99% of what I do in Clojure is working with arrays and dictionaries that contain primitive values.

Dealing with primitive values is easier for me as a software engineer:

  1. My code focuses on business logic and data transformations rather than describing the domain and its relations. Every line of code is executing business logic and by this the business logic is very prominent across the codebase.
  2. I don’t have to be familiar with hundreds of unique objects and the behaviors coded into them to be effective:
    An incoming HTTP request? it is a plain Clojure dictionary.
    You want to form an SQL query? build a dictionary and pass it on to the SQL library for formatting.
    You want to return an HTTP response? You return a dictionary with the keys of status code, header and body.
    Want to read a message from a RabbitMQ queue? Yep, you guessed it — you get a dictionary.
    If you’re familiar with Clojure operations on its basic data structures like dictionaries you become effective in HTTP, SQL, RabbitMQ and every other domain specific part of your system.
    It reduces the complexity and the level of familiarity you need to have in a domain to the minimum required since from the software side, all you do is repeatedly building, transforming and moving dictionaries from one function to the other.
Minimal Syntax

Clojure’s syntax is built out of its own data types. This property is called homoiconicity. It sounds strange at first but I’ll try to demonstrate:

Clojure vectors (arrays in other languages) look like this [1 2 3 4]
Clojure lists look like this: (1 2 3 4)

To define a function you would write:

(defn my-sum [arg1 arg2] (+ arg1 arg2))

As you see, the code is a Clojure list with the symbol defn, the function name and then comes a vector of arguments. The body is a list with the function as the first member (+) and the arguments follow.

Why is that a good thing you might ask yourself? Good question!

  1. Generating code via macros feels very natural. Since most of what we do in Clojure is transforming and generating data structures in favor of business logic, doing the same, with the same data structures, to generate code is mostly unnoticeable.
  2. It reduces the number of special symbols and characters you have to be familiar with to minimum. Code and data become one as they share the same data structures, behaviors and syntax.
Concurrency

Concurrency feels like a non-issue when working with Clojure mainly due to 2 reasons:

  1. The majority of Clojure’s values are immutable which prevents race conditions and allows code that is free from shared access controls like mutexes and locks.
    Those who are not immutable (atoms for example) provide safe ways to manipulate the data they store.
  2. Clojure has a great collection of tools for concurrent programming called clojure.async. The highlights of these tools, at least from my experience, is Channels, which allow safe inter-thread communication and selection over a set of channels much like Golang’s select directive.
Java Interop

Clojure is not a widespread programming language, and as a such, many libraries are missing for common use cases. Fortunately, Clojure’s interop with Java is seamless so in practice the vast eco system of Java is at your fingertips. This way you can enjoy working with Clojure but do not suffer from its lack of popularity and libraries.

It’s not all flowers and butterflies

Yes, Clojure is great, but like most decisions we make in life, the decisions that were made with Clojure are also tradeoffs.

The first aspect of Clojure that made my hard life is the JVM and for 3 reasons:

  1. The JVM is a known memory eater and it is very hard to predict your application memory requirements. Also, it always seems to require more memory than needed to run the application. I am sure that the same applications would take significantly less memory on other runtimes (although I never took the time to prove it).
  2. Debugging memory leaks and heap size in remote servers is very hard. We tried VisualVM but since Clojure memory consists mostly of primitives (Strings, Integers etc) it was very hard to understand which data of the application is being accumulated and why. I assume that in common Java based application most of the memory consists of Java objects so the memory profiling would be easier.
  3. The boot time for Clojure projects might become very long as the project is growing in size. Although there are solutions like GraalVM I haven’t had the chance to experience them in production to testify on their matureness and robustness.

To sum it up, I’m not a fan of the JVM, but I do understand the reasoning behind the decision of targeting Clojure’s runtime to the JVM.

The second topic I find difficulty with when working in large, unfamiliar Clojure codebases is Typing. Clojure is a dynamic language which has its advantages but not once I stumbled upon a function that received a dictionary argument and I found myself spending a lot of time to find out what keys it holds. Sometimes I had to put a log in our integration environment to see what message it receives and what are the fields that are available for me in that message. Sometimes I would go to the tests for that function and look for the example argument value we used in the tests but that might not be enough because there might be other fields that exists in that dictionary and are just not being used in the function at the moment so they might be missing from the test value as well. Sometime I would look at the function’s call site to understand what argument has been passed and how it was built.
There are solutions to that as well, like core.typed but I never experienced them myself and I am not sure of how comprehensive and usable they are.

The last thing that feels hard with Clojure, and I’ve already touched it earlier in this post, is recruiting and onboarding. Recruiting is hard because the pool of existing Clojure engineers is very small and some engineers deliberately refrain from working with unpopular languages due to career advancement considerations. Other engineers gain expertise with specific languages and would like to continue and work with these languages so Clojure is not an option for them.
Onboarding also requires more attention and guidance since most engineers arrive with little to no knowledge of Clojure and its eco system. When a NodeJS engineer joins a company, they already know javascript, they’re familiar with the eco system, they have a favorite IDE and plugins and they know what tools makes their local development environment as productive as it can be.
When engineers join an organization that works with Clojure without prior knowledge, they have to learn the language, find an IDE they’re comfortable with, adapt a new development flow and configure their development environment to be able to be productive. It’s almost like learning to tie your showed all over again and it has to come with the right amount of guidance and availability from existing engineers.

Another interesting issue that the lack of Clojure popularity introduces is that it is hard for new engineers to bring Clojure specific knowledge from outside into the company and enrich the existing team. Going to the NodeJS example again, an engineer with vast experience that joins a new team may introduce new tools / libraries / work methodologies / development flows they gained expertise with in prior companies. Engineers that come with no prior experience with a specific domain cannot really enrich the team in the same way so the team has to rely on self learning and improvement rather than bringing knowledge from the outside.

Summary

I think that every software engineer needs to at least get theirselves familiar with one functional programming language just to open their mind and see outside the OOP paradigm. Learning Clojure made me doubt everything I practiced before as a software engineer and ask questions on the very basics of how I spend my energy on the right direction to provide the company I’m working at value.

I think that Clojure, being a mature, production ready and a simple programming language, is a great candidate for that exploration. You may choose to use it professionally, for side projects or not at all, but the experience of exposing yourself to this language will surely enrich the way you think of programming and make you a better developer.

Asset 2@4x
erezrabih
http://railsadventures.wordpress.com/?p=1417
Extensions
Nanit’s Gangnam Style
DevOps
I assume most of the readers of this blog post have heard about youtube’s famous incident with its video view counter but if you haven’t here’s a brief summary: When youtube first launched, they used a 32-bit signed integer to hold the views count for each video. They never thought that a single video would […]
Show full content

I assume most of the readers of this blog post have heard about youtube’s famous incident with its video view counter but if you haven’t here’s a brief summary: When youtube first launched, they used a 32-bit signed integer to hold the views count for each video. They never thought that a single video would have more than 2³¹-1 (2,147,483,647) views, which is the highest value of a signed 32-bit integer (I recommend this video for a bit more info [pun intended]). Eventually, they changed the counter to a 64-bit integer, a limit I honestly believe no video will reach (reminder to myself — check this claim in a decade from now).

Now that we clarified the Gangnam Style reference, we can continue on to how nanit’s engineering team dealt with a similar problem.

Nanit’s camera generates multiple data streams about the baby. In particular, the data stream we’re going to discuss here is what we call the“states stream”. A state is a closed time range signifying the baby’s status at that time. For example a state stream for a baby could look like:

From 8:30pm to 9:15pm the baby was awake
From 9:15pm to 5:30am the baby was asleep
From 5:30am to 9:00am the baby was absent (not in the crib)

All these states are being written to the states table in a PostgreSQL RDS instance. When we first created this table, we never imagined one day we would have more than 2,147,483,647 rows in it, so we felt safe using PostgreSQL SERIAL, a 32 bit integer, as the table’s primary key. Fortunately (or unfortunately), nanit’s sales and user base grew in a very fast pace which lead us to 1.5 billion rows in the states table, at which point we decided to start working on a migration for the ID column on the states table from serial to bigserial which is a 64-bit integer.

The obvious and easiest thing to try is a migration to change the ID column type:

ALTER TABLE states ALTER COLUMN id SET DATA TYPE bigint

Unfortunately, the above query locks the table for both reads and writes. In a table as large as we had, this query runs for 5–6 hours which is unacceptable for us, so we had to find another solution.
Since we couldn’t perform the operation on the live table itself, the only sensible idea was to run it on another table. We decided to run the migration on another DB instance to avoid any service disruption to our production workloads.

Applicative Changes

Code-wise, we changed our application to write to the current and new databases simultaneously. Since the current database is still our main one, we wrote to it first, then wrote the resulting row to the new DB. This is important because of the way SERIAL columns work on postgreSQL— behind the scenes there is a sequence object that generates integers for the ID column. If we had written to both databases without taking the ID value from the current one, we might have had race conditions that would result in inconsistency between the current and new database row ids.
To give an example of such scenario, let’s look at a simple case of 2 empty tables and two app instances writing to these tables:

  1. App1 writes row1 to current db with auto-generated id 1
  2. App2 writes row2 to current db with auto-generated id 2
  3. App2 writes row2 to new db with auto-generated id1
  4. App1 writes row1 to new db with auto-generated id 2

Row 1 has ID 1 on the current db and ID 2 on the new db
Row 2 has ID 2 on the current db but ID 1 on the new db

To overcome this, we came up with the following implementation:

Image for post
  1. App1 writes row1 to the current db. This row does not have an ID yet.
  2. The resulting row includes the id value as generated by the sequence generator on the current db.
  3. App1 writes row1, including the id given from the first step, to the new db.

We made both writes in a transaction against the current db to reduce risk of a row being written to the current database and not to the new one.
We also read from the new database using a configurable probability. This will allow us to gradually rollout to the new db when we feel confident enough.

At this point, we had an application ready to safely write to 2 different databases, and read from both with a configurable probability. We were ready to bring up the new database.

Infrastructure Changes

We had a daily snapshot of our RDS instance which we thought is a good starting point for our new database. As soon as the snapshot finished, we used it to restore a new RDS instance. Right after the new database was ready to receive traffic, we deployed the new application version writing states to both instances.

Since the database creation took almost half an hour and the deployment itself takes a bit of time, there was already a gap between the current database and the new one in terms of rows in the states table. To be able to accurately copy the missing rows from the current db to the new one, we saved the max ID we had on the states table from the snapshot and the first ID we wrote on the new application version after the deployment. Everything between the two IDs should be copied from the current database to the new one.

Image for post

We made a simple script to copy all the rows in the range of these ids in bulks.
After this script was done the new database had all the rows in the current database so we could safely start reading from the new database.

Take 1

We set the read percentage from the new database to be 1%. The results were terrible.

We saw increased disk queue size mostly due to surges in write IOPs that depleted our IOPs balance on the RDS instance, causing service disruptions all over. We knew it wasn’t a load issue since the current database could easily handle the same write rate with 99% of read rate. Something was clearly off with the new database.

Rolling back to working with the current database was the only sane option at that point. After rolling back, we started reading a bit about restored RDS instances acting weird.
Apparently, RDS snapshot is based on EBS volumes. Restored EBS volumes (and RDS Snapshots as a result) may appear as fully restored to the end user but in reality not all the data is on the restored volume. The data is on S3 and being read lazily only when required. This sounds like a good idea in general but when a database needs to download data from S3 to serve queries it’s a disaster. We verified our suspicions with AWS support and they had 2 recommendations for us:

  1. run SELECT *on large tables to warm up the EBS volume and force it to retrieve the data
  2. run VACCUM ANALYZE to both fix disk fragmentation and update the index stats of the table
Take 2

We went through the whole process again: snapshot, restore from snapshot, save max id.
Before we deployed the new application we ran the two queries to warm up the database and prepare it for production load.
The two operations finished in about 18 hours and after that we continued to deploying the new application version and copying the gap of rows from the current database to the new one.

This time we started with a modest 0.01% of read percentage from the new database. We monitored it for 2 days and continued increasing the read probability on a daily basis until we reached 100% reads from the new database.

We now had an application that reads only from the new database, but writes to both. We were ready to get rid of the current database and stay only with the new one.

Small Last Step

If you remember from the beginning of this post, SERIAL columns in postgreSQL have a sequence generator behind them to generate the ID values. The thing is, when a row is inserted with a given ID, the generator is not triggered and its last value is not increased. Until now, all rows inserted to the new database were inserted with an ID generated by the current database, so the generator on the new database never increased its last_value which still holds the max ID we had on the restored snapshot. If we had tried to start writing to the new database without altering the sequence object, we would have received a duplicate key exception since the table already had rows with those IDs.

To get the last value of the states ID sequence we used the following query:

SELECT sequence_name,LAST_VALUE FROM states_id_seq

We saw the the current max ID is far higher than the last_value of the sequence.

To fix it, we used the set_val command to set the last_value to be the current maximum ID in the table:

SELECT setval('states_id_seq', (SELECT max(id) FROM states), true);

Only after applying this change, we could rely on the sequence generator to generate valid IDs and safely write rows without ID values to the new database.

Summary

Working on these kinds of projects is not easy. Every operation takes hours, if not days. The feedback loop is horrible. Every failure and retry takes days if not weeks. And all of this, with a very clear deadline of reaching the 32-bit signed int limit. Literally, a race against the clock.

I think we learned a lot from this journey and I am glad we went through it. It shows that nanit’s business is prospering and demonstrates the backend team ability to gracefully deal with and eliminate the resulting scale issues.

We now use BIGSERIAL for all of our tables. Who knows what the future plans for us 🙂

P.S. While we went through this, I was wondering if we’re missing an easier, built-in ability to make this transition. If you know of such, I would love hearing about it.

erezrabih
Image for post
Image for post
http://railsadventures.wordpress.com/?p=1412
Extensions
From Graphite To Prometheus – Things I’ve Learned
DevOpsgraphitekubernetesMonitoringPrometheus
For a long time, the StatsD + Graphite stack was the go-to solution when considering backend stacks for time-series collection and storage. In recent years, with the increased adoption of Kubernetes, Prometheus has been gaining more and more attention as an alternative solution for the classic Graphite + StatsD stack. As a matter of fact, […]
Show full content

For a long time, the StatsD + Graphite stack was the go-to solution when considering backend stacks for time-series collection and storage.

In recent years, with the increased adoption of Kubernetes, Prometheus has been gaining more and more attention as an alternative solution for the classic Graphite + StatsD stack. As a matter of fact, Prometheus was initially developed by SoundCloud exactly for that purpose — to replace their Graphite + StatsD stack they used for monitoring. Later on, in July 2016, the Cloud Native Computing Foundation (CNCF), the organization responsible for Kubernetes and multiple other related projects (Helm for example), has adopted Prometheus as an official project of the foundation.

As many other companies in the industry, we’ve been using the Graphite stack for almost 4 years now. Since we are long time users of Kubernetes (used on production since 2015, ~ v1.3) it was only natural for us to evaluate Prometheus as a more modern, community driven and well maintained monitoring stack. Listed below are the main differences between the two monitoring stacks and mainly how Prometheus provides solutions to situations where Graphite might have difficulties in.

Notes:

  1. This post refers to Prometheus’s stable helm chart installation on kubernetes
  2. We’re using Grafana for visualiztion and alerting so I didn’t cover visualization capabilities or Prometheus’s alert manager here.
Pull vs. Push

The first and most notable difference between Graphite and Prometheus is the way they receive metrics.

Graphite: metrics arrive to StatsD usually by sending UDP packets from the clients. StatsD aggregates the metrics for a time period called “flush interval” and at the end sends them to Graphite for persistence. Graphite has “push” semantics — the client is the one pushing the data into the backend.

Prometheus: metrics arrive to the backend by “scraping”. The Prometheus server issues an HTTP call once every scrape_interval (which is configurable of course). Prometheus “pulls” the metrics directly from its clients. There is no aggregation component in the middle similar to StatsD.

Note: While you could use push semantics to push metrics to Prometheus via PushGateway, it is not the recommended way to go so it isn’t presented here as an option.

Client Setup

StatsD clients require almost zero setup: all you need is a UDP socket to start sending metrics to the backend. It’s so easy, that a simple bash one-liner is a valid StatsD client. For example, the following will increase a counter:

echo “auth_service.login.200.count:1|c” | nc -w 1 -u statsd.example.com 8125

Prometheus, on the other hand, requires a more complicated setup on the client side. Clients should run an HTTP server and serve the metrics on an exposed port and path. It means that even if your application is a simple, offline queue consumer, you’ll have to go through the hassle of importing HTTP capabilities into your project, configuring the server and setting up the networking needed for that server to be able to serve the metrics to Prometheus.
Another requirement of Prometheus is the registry — an object that must be initialized on the client with the type, name and label set of all metrics it would like to report. Reporting a metric that does not exist in the registry might even throw a runtime exception in some Prometheus clients.

Graphite requires almost zero setup on the client, while Prometheus’s client setup is a lot more complicated.

Discovery

Graphite: To be able to send metrics all your clients need is your StatsD host — there’s no client discovery taking place.

Prometheus: Prometheus has to be aware of all clients it would like to pull metrics from. That complicates things a bit since it means the Prometheus server must have discovery capabilities as well as scrape job configurations to be able to properly identify clients and fetch data from them.
Specifically for Kubernetes the default Prometheus installation includes a job that scrapes all pods with the following annotation:

prometheus.io/scrape: “true”

You can also specify the path and port to scrape data from with the following annotations:
prometheus.io/path: “/internal/metrics”
prometheus.io/port: “3000”

so while it is an additional setup, most of the work is done by Prometheus’s kubernetes service discovery plugins and default scrape job configurations.

Graphite requires no discovery since it is not aware of its clients, while Prometheus requires discovery capabilities and scrape jobs configurations to be able to fetch data.

Monitoring Ephemeral Processes

Graphite: short running jobs can open a UDP socket and start sending metrics to StatsD. The fact that the process does not live for a long time has no effect on its ability to send metrics.

Prometheus: As we’ve already learned, Prometheus requires a scrapable HTTP endpoint to pull data from which makes getting metrics from short running jobs problematic since they might not be available at the time Prometheus runs its scrape loop. Prometheus’s solution to this is the push gateway. Short running processes can push metrics to the gateway which is a stable process that acts as a metrics cache and provides an endpoint for Prometheus server to scrape. Communication with the push gateway is done via HTTP requests.

Reporting metrics from ephemeral processes is very easy on Graphite. Prometheus requires a more complicated setup in the form of the push gateway.

Metrics Naming

Graphite’s metrics are dot-oriented, for example

<myservice>.<request_type>.200.count
specific example:
auth_service.login.200.count

is a typical counter of HTTP 200 responses for a specific request.

Prometheus has label-based metric names so the same metric as above would look like

http_requests{service="myservice",request="request_type",response_code="200"}
specific example: http_requests{service="auth_service",request="login",response_code="200"}

Prometheus’s naming system is a lot better in my opinion for the following reasons:

  1. Graphite’s metrics naming system imply hierarchy which is not always intuitive. For example, let’s say we have a service located on different AWS regions we would like to monitor — would we name the metric region.service.metric_name or service.region.metric_name ?
  2. Graphite’s naming convention also makes querying more difficult on since it requires complete knowledge of the metric structure. A good example would be summing all 200 responses for all services in our system:
    Graphite query: sumSeries(*.*.200.count) pay attention how we’re completely aware of the metric structure — we know it has 4 period separated parts, that the service name is on the first part and the request type is on the second .
    Prometheus query: sum(rate(http_requests{response_code=”200"}[1m]))
    Notice how we’re completely unaware of other labels the metric has like service and request type. Querying does not require any knowledge on a metric structure, except for the names of the labels we would like to perform the query on.
  3. Graphite’s strict metrics naming convention becomes very cumbersome when metric structure changes. Let’s assume we’re going multi-region and want to add the region in the beginning of the metric name so instead of service.request.response_code.count we now have region.service.request.response_code.count
    As a consequence, we have to change all existing queries to reflect the new metric structure. sumSeries(*.*.200.count) isn’t a valid query anymore since the metric now has 5 parts and not 4 as before. This makes adding data to existing metrics near impossible when the system is large and there are thousands of queries that requires changing.
    Prometheus, on the other hand, has no such problem. Adding a region label to the metric does not invalidate existing queries. It means that as long as we don’t change existing label names, we’re free to add data to our metrics without fearing of breaking existing queries.

Prometheus metrics naming system is more concise, flexible and tolerant for changes.

Note: We haven’t used Graphite’s tagging ability which was only added on 1.1.x version so it is not covered in this section

Query Language

Graphite has a set of functions you can use while Prometheus came up with PromQL. It might be a matter of taste but I feel PromQL is a bit more modern and conveys the intent of the query better than Graphite’s functions and I’ll try to demonstrate with an example: lets take the classic case of per-service error rate — for each service we would like to divide the total number of errors by the total number of requests. We define an error as a response with a status code ≥ 499.

Graphite: assuming metrics would be of the form
<service_name>.<request_type>.<response_code>.count
This is how the query would look like

applyByNode(*.*.*.count, 0, “asPercent(sumSeries(%.*.{499,5*}.count), sumSeries(%.*.*.count))”, “%”)

It looks a bit cryptic and very hard to reason about. This is one of these queries you write once and never touch again.

Prometheus: assuming we have metrics of the form
http_requests{service=<service>,request=<request>,response_code=<code>}
The PromQL version of per-service error rates would look like that:

sum(rate(http_requests{response_code=~"499|5.."}[1m])) by (service) / 
sum(rate(http_requests[1m])) by (service)

In my opinion, the PromQL version of the query is a lot cleaner and conveys the purpose of the calculation in a more readable and manageble way.

This is just a single example of course but it demonstrates the power and simplicity of PromQL which is reflected in other cases as well.

Aggregations

StatsD is Graphite’s aggregator: it aggregates all metrics received in a flush interval and writes a single point to graphite with the aggregated value. If 100 different processes report a single increment on a counter service.errors to StatsD, StatsD sums all the increments every flush interval and writes to Graphite a single point with the value 100 and series name service.errors. The same goes for timings, so percentiles are calculated over all of the data received in a flush interval. This also means, that if we would like to have per-instance data on Graphite, we would have to explicitly put an instance identifier inside the metric name.

Prometheus works differently: since it pull data from all of the instances, it can easily add a label with the instance id (pod name in kubernetes) to every scraped metric. This means that Prometheus has per-instance metrics by default. Aggregations are done on the server side at query time via PromQL operators such as sum, avg and quantile. In the example above, we would have had a series errors{kubernetes_pod_name=”<pod_name>”} for each of the pods being scraped. To get the total error rate we would run the PromQL query sum(rate(errors[1m)).

Another subtlety worth mentioning is the way percentiles are calculated: StatsD percentiles calculation is very straight forward since it has all the data points available at hand to calculate the accurate percentile. The percentiles themselves has to be set when the metrics are received and can’t be calculated backwards so if we decide at some point that we want the 99th percentile of some metric retroactively we can’t have it unless it was already configured to record the 99th percentile.

Prometheus has two means to calculate statistical aggregations: Histograms and Summaries. I strongly recommend reading this blog post and this one to get a better understanding on how both works but the important points for our discussion are, assuming the use of Histograms:

  • Histograms are a set of counters. Each counter has a preset value (buckets) and will be incremented for any observation with value lower than the counter value. For example, if we have a Histogram with 3 buckets — 10ms 50ms and 100ms, a 5ms observations increments all counters and a 40ms observation increments both 50ms and 100ms counters. There are two additional counters — one for the number of observations and one for total sum of observations value.
  • Calculating percentiles does not require specifying them beforehand and can be calculated retroactively
  • Since all Prometheus keeps are bucketed observations, percentiles can only be statistically approximated

To sum this section up:
1. Graphite’s datapoints are usually already aggregated on all clients while Prometheus saves per client data and aggreagtiosn are done via PromQL
2. Graphite’s statistical aggregations are accurate but less flexible since the percentiles we would like to track have to be set beforehand. Prometheu’s statistical aggregations are less accurate, but more flexible since aggregation is done via PromQL and allows us to retroactively calculate different percentiles without specifying them anywhere.

Measuring Client Uptime

Uptime is a strong KPI in every monitoring system. Let’s assume we have a pod and would like to get alerted if it is not responsive.

Graphite: We would have to run an infinite loop on a dedicated thread on the client side to report a heartbeat to StatsD. The heartbeat metric could be a simple counter incremented to 1 on every cycle. We could then form a query to get the number of heartbeats in the last minute: summarize(service.pod_name.heartbeats, '1min', 'sum)

Prometheus has pull mechanics so it is already sampling the client in an infinite loop to fetch metrics which makes discovering downtimes very natural. Every Prometheus scrape job produces a up series that will be set to 0 if an instance did not reply to Prometheus’s HTTP request. This means that with zero effort we could just get all instances that failed to reply with a simple PromQL query: up == 0 and set up an alert.

Prometheus’s uptime monitoring requires zero setup because of its pull mechanics, while Graphite requires us to set an infinite report loop on the client and query it.

Missing Data Points

As with any monitoring system, both Prometheus and Graphite are subject for data retrieval errors. It could be because the Prometheus/Graphite server itself is down or because of a network error that prevents the server from receiving metrics from the client. As we are going to see, Prometheus is designed to be fault tolerant (as much as possible of course) to missing data points.

Graphite: StatsD writes a data point to Graphite every flush interval and resets its stored statistics. If a data point was not persisted to Graphite that data point is forever lost. Let’s take an example data set of an errors counter assuming StatsD flushes metrics to Graphite every 1 minute:

Time:           08:01 08:02 08:03 08:04 08:05 08:06
Errors Counter:   2     5    100   170    2     1

Until 08:01 StatsD received 2 increments for the errors counter, wrote it to Graphite and reset it to 0. In the minute between 08:01 and 08:02 StatsD received 5 increments for the errors counter, wrote it to Graphite, reset it to 0 and so on.
If the data points of 08:03 and 08:04 could not be persisted for any reason this is how the final data set on Graphite would look like:

Time:    08:01 08:02 08:03 08:04 08:05 08:06
Graphite:  2     5    NULL  NULL   2     1

The knowledge that we had an error spike of 270 errors from 08:02 to 08:04 is lost and won’t be reflected in any way. The graph would look pretty low with data points at 2, 5, 2 and 1. We completely lost the occurrence of an error spike.

Prometheus: Prometheus is designed to handle missing data points, be it because of Prometheus downtime or a scrape failure, very well:

  • Metrics are saved on the client side and are never reset. Counters, for example, are an ever increasing value.
  • Metrics and PromQL functions are designed around counters to allow extrapolation of missing data points.

Let’s take the same scenario described above and see how Prometheus handles it better:

Time:                08:01 08:02 08:03 08:04 08:05 08:06
Num. Errors:           2     5    100   170    2     1
Prometheus counter:    2     7    107   277   279   280

Notice how the counter, which is saved on the client side, is ever increasing and does not reflect a point-in-time value.
Assuming the scrapes at 08:03 and 08:04 have failed and the next one, at 08:05 has succeeded, we end up with the following data set persisted on the Prometheus server:

Time:                08:01 08:02 08:03 08:04 08:05 08:06
Prometheus counter:    2     7   NULL  NULL   279   280

We still know that there were 272 errors between 08:02 and 08:05 because 279 — 7 = 272. We won’t know exactly in which minute we had the error surge but it is easy to identify that the rate of errors during these minutes is higher than the rest of the period.
To properly draw the graph of this counter we use the PromQL rate function which approximates the rate during a time period by dividing the subtraction of the values by the period of time: the rate between 08:01 and 08:02 is calculated as
(7 — 2) / (08:02 — 08:01) = 5/60 = 0.083 errors/sec
The rate for 08:02 to 08:05 would be
(279 — 7) / (08:05 — 08:02) = 272 / 180 = 1.51 errors/sec

An alert on error rate would have been triggered here even though we missed the data points of the event itself.

Now this might look like a very specific case but the fact is that all of Prometheus’s ecosystem is built around counters to provide fault tolerant metrics. Another great example for counters usage is CPU utilization: In every other metric system CPU utilization would be persisted the following way:

Time:  08:01  08:02  08:03  08:04  08:05  08:06
CPU%:   5%     10%    95%    95%    30%     5%

But here again, we are subject for data loss: if the data points of 08:03 and 08:04 are missing we are unaware of the CPU surge we had in that period.

Prometheus takes another approach for measuring CPU utilization: it does not persist the CPU% for every point in time, but has a counter for the total number of seconds a process used the CPU. If a process had 10% utilization during a 60 seconds period it means it used the CPU for 6 seconds. The same data set above would look on Prometheus as:

Time:                08:01  08:02  08:03  08:04  08:05  08:06
CPU%:                  5%    10%    95%    95%    30%     5%
Seconds Used:          3      6     57     57     18      3
Prometheus Counter:    3      9     66     123    141    144

To go from Prometheus counter to CPU% we use again the rate function: between 08:01 and 08:02 the rate was (9-3) / 60 = 6/60 = 0.1 (10%)

If we lose the 08:03 and 08:04 data points (the CPU surge of 95%), we can still see the CPU surge because the data point at 08:05 is 141 so we get: (141-9)/180 = 132/180 = 0.73 = 73%
So we won’t have the original 95% CPU usage but we will still see a significant increase in CPU usage during that interval.

Prometheus use of ever increasing counters, saved on the client, makes it more fault tolerant to missing data points than Graphite.

Exporters

This is where Prometheus really shines in my opinion, and is one of the strongest incentives for migrating from Graphite. Exporters are components that fetch data from applications and expose Prometheus compatible metrics. There are exporters for almost every application you can think of — RabbitMQ, PostgreSQL, Redis, Kubernetes and the list goes on.

Exporters are usually plug and play — you provide them an address of the application you’d like to fetch metrics from (Redis host, RabbitMQ host etc) and they fetch the data and expose it to Prometheus for scraping. This is awesome because:

  1. it spares you the time of writing a component that will fetch the data from each application and organize it
  2. there are many community driven Grafana dashboards around these exporters’ metrics that creates very useful visualizations and KPIs for your applications
  3. since applications now have conventional metrics, there is a lot of knowledge sharing and blog posts about creating alerts from these metrics

An excellent example for exporter usage is the way we monitored RabbitMQ with Graphite and the way we do it with Prometheus:

Graphite: We had a jenkins job that ran every minute. The job had a ruby script that used RabbitMQ’s HTTP API to fetch metadata on queues, exchanges and consumers. The script parsed the data, formed Graphite compatible metrics out of it and sent them to StatsD using a UDP socket. On Grafana, we built a dashboard around these metrics to visualize the data and set alerts.

Prometheus: There is an exporter ready to be used. We added it as a sidecar container to our RabbitMQ pod and added the proper annotations to flag Prometheus this pod should be scraped. We imported an existing Grafana dashboard to visualize the data. All we were left to do ourselves is to set alerts according to our monitoring needs.

The exporters ecosystem that grew around Prometheus provides an (almost) end-to-end monitoring solution: from fetching the data, organizing it, serving to Prometheus, visualizing it on Grafana and setting alerts. If a few years ago every company would have its custom RabbitMQ monitoring stack, today there’s a widely used and community driven exporter andGrafana dashboard. With almost zero knowledge of how RabbitMQ works we already have great visibility on our cluster.
Some applications, RabbitMQ among them, took this approach even further and started exposing a Prometheus metrics endpoint from the core app so there’s even no need for exporter — Prometheus can just scrape the application itself.

The idea of exporters could be also implemented with Graphite — there is no reason preventing applications from pushing metrics to a provided StatsD/Graphite host. In fact there were some Graphite exporters around — collectd for example. collectd serves a purpose similar to Prometheus’s node exporter: it exports node metrics and had a great Graphite integration. But collectd was an exception as most applications have never had an easy solution for exporting metrics the way exporters do with Prometheus today.

Conclusion

If I had to choose a monitoring stack today I would probably go with Prometheus. Its flexible metric naming system, ability to handle missing data points and the vast exporter ecosystem that grew around it are good enough reasons to overcome its client setup complexity. In addition to that, the fact that Prometheus has been adopted and is being developed by the CNCF makes me feel the project is in good hands and has a very bright future ahead of it.

erezrabih
http://railsadventures.wordpress.com/?p=1409
Extensions
8 Tips For Productive Testing
clojureCode Qualitytestingcode qual
In the previous post we discussed the “why” — we went over some of the benefits of integrating automatic testing into your development flow. In this post, we’ll go over the “how” — some guidelines for forming a healthy, safe and rapid development process around your test suite. Continuous Integration (CI) The first and most […]
Show full content

In the previous post we discussed the “why” — we went over some of the benefits of integrating automatic testing into your development flow. In this post, we’ll go over the “how” — some guidelines for forming a healthy, safe and rapid development process around your test suite.

Continuous Integration (CI)

The first and most important thing you can do when dealing with tests is integrating them into your development and shipping process.
To fully enforce the test suite we need to make sure two conditions are satisfied:

  1. Code cannot be pushed directly into master — only pull requests should be used to introduce new code to the master branch.
  2. Pull requests must be approved by the CI server after running all tests and verifying they all pass.

An example of a pull request approved by the CI

Under the assumption that any new code includes tests (more on that on the next section), enforcing these two simple rules in your development process ensures that changes don’t break existing behavior and adds confidence in new functionality added to the system.
CI lays the foundation for having a robust and safe development process around your test suite.

Another important benefit of running tests on the CI server is making sure the system is not dependent in any way on the developer’s local machine since the test suite runs in a neutral, isolated environment.

Test Coverage

Ensuring no tests have failed isn’t enough — an empty test suite allows the project to pass CI since no tests have failed (0 tests = 0 failures). It means that a commit that deletes all the test suite actually passes CI but obviously it is not a healthy situation for a project to be in. We need to make sure our test suite actually covers our source code.

Test coverage measures what percentage of the source code is being ran by the test suite. The output of a test coverage report is pretty detailed — you can see each line of source code, colored by green if it was ran during the test suite or red if it hadn’t. Some tools also show the number of times each line has ran during the tests.
The report allows you to easily identify code paths that weren’t attended by the tests:

An example test coverage report

Coverage reports can also be integrated into the CI process to get coverage insights on pull requests — has the test coverage increased or decreased comparing the two branches? in which files exactly has the coverage increased or decreased?
We’re using codecov.io to achieve that but there are many similar services that can be used for that purpose.

Test coverage integrated into PR process

The above status on the pull request shows us that the coverage has increased by 9.72% in this branch compared to the branch the pull request was opened against, which is generally a good sign.

If the PR introduces new code with no proper tests, the coverage percentage drops, a fact that can be used in order to automatically flag such pull requests and block merges until the coverage reaches a certain threshold accepted by the team members.

Enforce Pull Request Approval & Pay Attention To Test Code

Most code reviews concentrate on the source code itself. I believe the test suite’s code is no less important than the actual source code. Like any other code base, if your test suite’s code isn’t being regularly reviewed, it will eventually become unmaintainable and a burden on your team rather than an enabler for rapid development.

When reviewing a pull request, try going over the test suite’s code first. Look for places to improve on the following aspects:

  1. Do the tests actually validate and verify the behavior they claim to test?
  2. Are they comprehensive? do they cover enough cases?
  3. Is it clear from the test code/description what is it trying to validate?
  4. Is the test suite’s DRY ? Can we re-use existing functionality or extract test functionality to a shared?

Approval of at least one team member should be enforced on pull requests to make sure both the added functionality and the accompanied tests are at high standards.

Pick Inputs Wisely

First I would like to explain what I consider as inputs. Our code’s behavior is affected by two factors: direct input values and state. For example, a function that serves vodka to users by their age might look like that:

.gist table { margin-bottom: 0; }


This file contains hidden or bidirectional Unicode text that may be interpreted or compiled differently than what appears below. To review, open the file in an editor that reveals hidden Unicode characters.
Learn more about bidirectional Unicode characters

Show hidden characters


(def millis-in-year (* 1000 60 60 24 365)) (defn serve-vodka [user-id] (let [user (user/find-by-id user-id) millis-since-born (- (System/currentTimeMillis) (:birthtime user)) years-since-born (/ millis-since-born millis-in-year)] (if (>= years-since-born 21) "Here's your vodka!" "Too Young!")))

view raw

alcohol.clj

hosted with ❤ by GitHub

The user-id here is a direct input value, while the user record in the database is the state. We use fixtures to set up the state in which our test run, and arguments to pass direct input values to our test code.
When we think of our test inputs we have to take both state and direct input values into consideration.

Since testing every possible input combination is both impossible and counter productive, picking the right inputs can become the difference between an efficient test suite and a useless one.
But how do we pick the right inputs?
There are two very clear rules and a third, kind of obscure one:

  1. Pick values to cover all code paths:
    a. fixture of user with birth date of more than 21 years ago + that user id
    b. fixture of user with birth date of less than 21 years ago + that user id
  2. Pick values to challenge your code:
    a. fixture of user with birth date of exactly 21 years ago + that user id
    b. pass nil as a user_id argument
    c. pass a user_id that doesn’t have a matching record on the database
    d. set up a fixture of a user without a birth date — relevant if that field isn’t mandatory — and pass its user_id as an argument
  3. Pick values to cover more user stories:
    “Cheating” on tests is pretty easy — you can easily follow the two above rules and have a 100% covered code with all test passing but that doesn’t necessarily means the test suite is good enough. Try to think about other states the system might be in and which inputs might be given to transition it. The feature (product) spec is your best candidate to get some ideas of which test cases should be added to the test suite. By covering more user stories we reduce the chances for bugs when releasing the feature.

As the developer assigned with the task, you know the system, its interactions and the spec you’re working by better than anyone else. Use that knowledge to make sure your test suite is comprehensive and covers a reasonable amount of cases.

Don’t Neglect Side Effects

A function has two distinct roles:

  1. It returns a value
  2. It might have one or more side effects

We have to make sure we test for both.
As an example let’s take a REST endpoint for user registration. A typical request spec would look like:
Request: POST /register {"email": "my@email.com", password: "secret"}
Response: 201 CREATED {"id": 1, "email": "my@email.com"}

The server is expected to:
1. Create a new user record on the database with the user’s email and a randomly generated confirmation token
2. Send an email to my@email.com with a link allowing the user to confirm their email with the confirmation token
3. Return a 201 status code with the created user record. Obviously, the response should not include the confirmation token.

This is a classic case in which we have an input (the HTTP request), an output (the HTTP response) and two side effects: database changes and a confirmation email. The easiest test would be verifying a simple request <-> response flow but it leaves a large gap for bugs. We have to make sure we cover all of the endpoint’s responsibilities, including the side effects, to have a comprehensive test suite:

.gist table { margin-bottom: 0; }


This file contains hidden or bidirectional Unicode text that may be interpreted or compiled differently than what appears below. To review, open the file in an editor that reveals hidden Unicode characters.
Learn more about bidirectional Unicode characters

Show hidden characters


(deftest register-test (let [email "my@email.com" response (request :post "/register" {:email email})] (testing "http response" (testing "should return 201 status code" (is (= 201 (:status response)))) (testing "should return the created user in response body" (is (= email (-> response :body :email))) (is (integer? (-> response :body :id)))) (testing "should not return the confirmation token in the response body" (is (not (contains? (:body response) :confirmation_token))))) (testing "should create the user in the database" (let [created-user (user/find-by-email email)] (is (not (nil? created-user))) (testing "should have a confirmation token" (is (not (nil? (:confirmation_token created-user))))))) (testing "should send a confirmation email" (is (confirmation-sent? email)))))

view raw

user_registration_test.clj

hosted with ❤ by GitHub

Note: this is only a happy path test — tests for duplicate emails, wrong email format and other failure scenarios should exist but I wanted to keep this short.

When these tests pass, we can be pretty sure our registration endpoint works as expected. Test will fail if any of the following occurs:
1. returned status code is not 201
2. we don’t return the created user and its id in the response body
3. we do return the confirmation token in the response body (security breach)
4. we don’t create a database record with the provided email
5. we don’t generate a confirmation token for the created user
6. we don’t send a confirmation email to the provided email.
The confirmation email is actually the only gap here since confirmation-sent? is mocked to avoid network calls in our test suite and we haven’t verified the content of the email.

Use Mocks/Stubs Carefully

Mocks are parts of the system we fake solely for test purposes. We use mocks because sometimes we can’t run all the system on our machine or because interacting with some parts is very time consuming — something we can’t afford in tests.

Mocks should be used very carefully and generally should be avoided where possible. We must remember that since they are fake, mocks take us further away from the system as it runs on our production servers. The gap mocks create between our test environment and our actual runtime environment allows bugs to leak from our test suite into our staging/production environments.

Let’s take an example of an application that uses redis to keep an AuthenticationToken=>UserID map. When the user logs in we issue a token and save it in redis with the user’s id as value. When the user performs a request with a token, we can receive the matching user id from redis for authentication:

.gist table { margin-bottom: 0; }


This file contains hidden or bidirectional Unicode text that may be interpreted or compiled differently than what appears below. To review, open the file in an editor that reveals hidden Unicode characters.
Learn more about bidirectional Unicode characters

Show hidden characters


(ns user-authentication) (defn get-user-by-token [token] (if-let [user-id (redis/get token)] (first (db/select users (where {:id user-id}))) :unauthorized))

view raw

user_authentication.clj

hosted with ❤ by GitHub

If the user id is stored (in redis) under the provided token key, we fetch it from the database and return it, otherwise the token is unauthorized.

Let’s assume that for test purposes we decided to mock redis as a simple key value storage:

.gist table { margin-bottom: 0; }


This file contains hidden or bidirectional Unicode text that may be interpreted or compiled differently than what appears below. To review, open the file in an editor that reveals hidden Unicode characters.
Learn more about bidirectional Unicode characters

Show hidden characters


(ns test.redis-mock) (defn mock-redis [f] (let [redis-storage (atom {})] (with-redefs [redis/set (fn [key value] (swap! redis-storage assoc key value)) redis/get (fn [key] (get @redis-storage key))] (f))))

view raw

test_redis_mock.clj

hosted with ❤ by GitHub

And finally to the test code itself:


.gist table { margin-bottom: 0; }


This file contains hidden or bidirectional Unicode text that may be interpreted or compiled differently than what appears below. To review, open the file in an editor that reveals hidden Unicode characters.
Learn more about bidirectional Unicode characters

Show hidden characters


(deftest get-user-by-token-test (let [user-fix (db/insert users {:id 1 :name "username"})] (testing "authorized token" (redis/set "authorized-token" 1) (testing "should return its respective user from the database" (is (= user-fix (get-user-by-token "authorized-token"))))) (testing "unauthorized token" (testing "should return unauthorized" (is (= :unauthorized (get-user-by-token "unauthorized-token")))))))

view raw

user_authentication_test.clj

hosted with ❤ by GitHub

The tests pass, but when deploying this code to staging/production all requests will be unauthorized and errors will be flying all over the place.
There are very small chances you can trace the reason for this massive failure from going over the code — There is a mild difference between the mock redis and the real one:
redis only stores binary strings as plain values so
(redis/set "authorized-token" 1)
yields "1" and not 1, when fetching the value.
(redis/get "authorized-token") # => "1" and not 1

Since our mock didn’t take that into account the code fails when trying to fetch the user by its id from the database [user_authentication.clj, line 5].

The important point here is that by introducing the redis mock to our test suite, we created a gap between our test runtime environment and our production environment. This gap allowed a bug to go through our test suite into our servers. If we had used a “real” redis for the test environment as well, this bug wouldn’t have gone through our test suite into our production environment since the tests would fail.

When it makes sense prefer running dependencies rather than mocking them in test environment.

Mock As Accurate As possible

There are cases we have to use mocks for. In these cases, make sure to mock the tightest you can to the code flow.

Let’s take an example of a function that’s supposed to return a file metadata from a S3 bucket:

.gist table { margin-bottom: 0; }


This file contains hidden or bidirectional Unicode text that may be interpreted or compiled differently than what appears below. To review, open the file in an editor that reveals hidden Unicode characters.
Learn more about bidirectional Unicode characters

Show hidden characters


(ns example (:require [amazonica.aws.s3 :as s3])) (defn get-file-metadata [bucket filename] (try (s3/get-object :bucket-name bucket :key filename) (catch com.amazonaws.services.s3.model.AmazonS3Exception e nil)))

view raw

s3.clj

hosted with ❤ by GitHub

The implementation is very simple — we issue a GetObject request with the given bucket and filename path to S3 and if it didn’t raise an exception we’re all good.

When testing this method, we will likely mock the S3 GetObject request to avoid network calls


.gist table { margin-bottom: 0; }


This file contains hidden or bidirectional Unicode text that may be interpreted or compiled differently than what appears below. To review, open the file in an editor that reveals hidden Unicode characters.
Learn more about bidirectional Unicode characters

Show hidden characters


(deftest get-file-metadata-test (let [example-metadata {:example "valid metadata"}] (testing "should return file metadata in case file exists" (with-redefs [s3/get-object (fn [& args] example-metadata)] (is (= example-metadata (get-file-metadata "some-bucket" "some-file")))))))

view raw

s3_test.clj

hosted with ❤ by GitHub

We set an example metadata, mock the s3/get-object call (line 4) and make sure we get the metadata back from the method. All tests are green.

A few days later a commit is made to change the original method:


.gist table { margin-bottom: 0; }


This file contains hidden or bidirectional Unicode text that may be interpreted or compiled differently than what appears below. To review, open the file in an editor that reveals hidden Unicode characters.
Learn more about bidirectional Unicode characters

Show hidden characters


(defn get-file-metadata [bucket filename] (try (s3/get-object :bucket-name "bucket" :key filename) (catch com.amazonaws.services.s3.model.AmazonS3Exception e nil)))

view raw

s3.clj

hosted with ❤ by GitHub

We commit, CI goes through the PR and marks all tests as passing. Because we trust our test suite we deploy to production where things start to break.

The commit surrounded the bucket variable with double quotes (probably an innocent mistake) which made the function constantly return nil. The tests passed because the mock we made is too permissive — it doesn’t even check for the arguments it received and returns the metadata blindly. A well crafted test (and mock) would have alerted us something is wrong with our change:


.gist table { margin-bottom: 0; }


This file contains hidden or bidirectional Unicode text that may be interpreted or compiled differently than what appears below. To review, open the file in an editor that reveals hidden Unicode characters.
Learn more about bidirectional Unicode characters

Show hidden characters


(deftest get-file-metadata-test (let [example-bucket "some-bucket" example-filename "some-file" example-metadata {:example "valid metadata"}] (testing "should return file metadata in case file exists" (with-redefs [s3/get-object (fn [& {:keys [bucket-name key]}] (when (and (= bucket-name example-bucket) (= key example-filename)) example-metadata))] (is (= example-metadata (get-file-metadata example-bucket example-filename)))))))

view raw

s3_test.clj

hosted with ❤ by GitHub

The new mock will only return the metadata if the values we pass to
get-file-metadata are passed into the :bucket-name and :key of s3/get-object respectively. As a result, this test would have failed the PR alerting us we’re no longer passing the values to the method as expected.

When using mocks, make sure they’re as tight as possible around the expected behavior.

Fix Bugs By First Creating A Failing Test

Bugs are inevitable. No matter how experienced, disciplined and professional your team members are, and even if your system has the most comprehensive test suite, they will find their way into your code.

When you are testing your code you produce example data sets (AKA initial state) and run your code on them. The majority of the bugs occur because our code was introduced with a state we haven’t considered in our test suite. Thus, a bug is an opportunity for us to expand our test suite to cover cases we haven’t taken into consideration. The way I like approaching bug fixes is the following:

  1. I reproduce the state that caused the bug to appear, and set the expected result
  2. The test suite should fail (otherwise we wouldn’t have had a bug at first place)
  3. I change the code to make the test pass

Following this procedure for bug fixing has some amazing advantages:

Firstly, we can be pretty sure we actually fixed the bug. It might sound obvious but I am sure you are well familiar with cases of bug-fix deployments that haven’t actually fixed anything. The case here is different — we “proved” there was a bug by demonstrating an example of a state our system doesn’t provide the desired results for.
Secondly, we expanded our test suite to include more edge (unpredicted) cases. The chances this bug will re-occur somewhere in the future are slim.

Conclusion

Making changes to large software systems is not an easy experience for a developer. The fear of breaking things might become paralyzing and reduce development velocity by an order of magnitude.

A healthy development process is a process that makes you trust your test suite. A process that allows you to add new features as well as change existing ones with as much confidence as possible.

Following the above guidelines is definitely a right step towards such a process. It increases the team’s trust in the test suite which allows the team members to apply changes in a more safe, rapid and confident manner.

testing
erezrabih
http://railsadventures.wordpress.com/?p=1401
Extensions
3 Reasons You Should Start Testing Today
Code Quality
Preface This series has been heavily influenced by Robert Martin’s clean code series which I extremely recommend for every developer. Software testing has always been a controversial topic. Some say it is a waste of time while others say that it is the only sane way to develop and extend large software systems. Personally, I […]
Show full content
Preface

This series has been heavily influenced by Robert Martin’s clean code series which I extremely recommend for every developer.

Software testing has always been a controversial topic. Some say it is a waste of time while others say that it is the only sane way to develop and extend large software systems.

Personally, I belong to the latter camp. I believe testing is one of the greatest practices one could apply to produce high quality systems while keeping them maintainable for the long run.

There are 3 main reasons that make testing such an essential tool in software development:

  1. Avoid Unintended Changes

Let’s take an example of a system with two modules: FeatureX and Common. Another developer works on adding FeatureY and changes methods in Common module to support the new requirements.

How can they know their changes to Common affected FeatureX?
What if the system doesn’t have a single feature and a single common module, but hundreds of feature modules and dozens of common modules, with a mixture of dependencies?
How could one possibly make changes to the system without having a safety net?
I know only one good answer to this question: Automatic test suits.

As a developer, writing tests for my code is my way to ensure that future developers that change it won’t break existing behavior without having at least one test fail to warn them. It is my way to alert them and get their attention to changes they may have caused to other parts of the system. Tests are my tool to protect my code from unintended behavior changes.
Failing tests make the developer confront with important questions: why did it fail? what does this failure mean? is it how I want things to behave or have I broken existing behavior? They will probably use their more experienced peers to make sure they haven’t.
If the changes are desired, they now have to adjust the tests to reflect the new system behavior. This forms a very solid and safe development cycle.
When code I wrote is broken by the work of another developer and none of the tests have failed — I see it is a personal failure of mine since this is my responsibility to make sure not only that my code works today but also that it survives the inevitable system evolution.

2. Fast Development Cycles

You’re adding a new feature to your API server, you think you’re done and you want to make sure it works as expected. You enter into the REPL and run some commands: you create some fake data and use some of the new modules you wrote just to see they work well. Then you run the web server and run curl commands from bash to examine the output. You also open a connection to the database to see changes has been persisted correctly.
You just invested 20 minutes to manually test your feature. The next time you make changes to it, you’ll have to spend the exact same 20 minutes to make sure it didn’t break.
I claim automatic tests are a far better investment of time: They provide faster, incremental feedback and they serve you throughout all of your future changes to the system. I mean, you have to invest some time in testing, either manual or automatic, so why not invest it in a more efficient and productive way?
You can use TDD (Test Driven Development) or even create the tests after the actual code — it doesn’t really matter. Having the tests during development allows you to make sure your code works in small steps, without running the whole system, be it a web server, a background job processing or a mobile application. In a matter of milliseconds, you know whether your code does what it should or not.
The next time you or one of your teammates make changes to the system, they won’t have to come up with a testing procedure — they already have one and it is ready to run.
Deployments to the dev or staging environment become more of a final validation rather than an initial test for the code.

3. Document System Behavior and Indirect Considerations

You’re working on a multi-threaded system and you set a constant value in the code NUM_OF_THREADS=4. You leave a comment before the declaration:

— — — CAUTION!!!! — — —
On production our m4.xlarge nodes currently support only 4 threads. Raising this value to a higher number might require changing the type of nodes we’re working with.
— — — CAUTION!!!! — — —

But the file is already full of comments (actually there are more comment lines than actual code), the comments themselves are displayed with a weak, faded color and the tired developer overlooks your precious reminder. They change the value and deploy to production. You’re starting to get alerts all over the place.

Comments have a few inherent problems:
1. They rot since changing the code does not enforce the developer to change them as well. When that happens, comments become deceiving and misleading since they don’t reflect the system behavior anymore.
2. They clutter the code and in some cases, become more dominant in our codebase than our actual code. They become so widespread that we train our minds to ignore them to be able to focus the code itself.
3. They are prone to human errors because they rely developers to actively pay attention to them.

Tests, on the other hand, are the exact opposite:
1. They cannot rot because when we change the code in a way that makes them untrue, the CI fails the change and forces the developer to either correct the test or the code.
2. They are completely separate from our actual source code so they don’t clutter at all.
3. They integrate into automatic procedures such as CI and when enforced correctly does not rely on human awareness at all — changes cannot be applied until all tests pass.

That’s why I believe tests are the ultimate documentation for your system behavior and for indirect considerations needed to be taken into account when changing it.

The Fear of Change

The outcome of having a well formed test suit is gaining confidence in your ability to change the system without having the fear of breaking it.

  • Refactoring to improve code quality becomes a fun exercise rather than a nerve-wracking episode.
  • Changes to existing behavior are done with full awareness to consequences on other parts of the system rather than fearing the unknown.
  • Features arrive to staging and production faster, with fewer bugs and much less manual QA.

Even though testing does take its toll when it comes to development time, your developers will end up happier and more productive working on a well-tested system.

In the next post in the series, we’ll take a look at a few guidelines to build an efficient, time and cost effective, test suit for your system.

11
erezrabih
http://railsadventures.wordpress.com/?p=1394
Extensions
Our Journey to EKS
DevOpsDockerkubernetes
<TLDR> Check out eks_cli — a one stop shop for bootstrapping and managing your EKS cluster </TLDR> Preface We’ve been running Kubernetes over AWS since the very early kube-up.sh days. Configuration options were minimal and were passed tokube-up.sh with a mix of confusing environment variables. Concepts like high availability, Multi-AZ awareness and cluster management almost didn’t exist […]
Show full content

<TLDR> Check out eks_cli — a one stop shop for bootstrapping and managing your EKS cluster </TLDR>

Preface

We’ve been running Kubernetes over AWS since the very early kube-up.sh days. Configuration options were minimal and were passed tokube-up.sh with a mix of confusing environment variables. Concepts like high availability, Multi-AZ awareness and cluster management almost didn’t exist back then.

When kops came to life things became much better. Working with a command line utility made cluster creation a lot easier. Environment variables got replaced by well documented flags. Cluster state was saved and changes could be easily made to existing clusters thanks to the dry-run mechanism that allowed you to review upcoming infrastructure changes before you actually applied them. kops became the de-facto standard for managing Kubernetes clusters on AWS.

A few months ago AWS released their native support for Kubernetes clusters — EKS. As a company that heavily relies on Kubernetes, checking EKS was almost an inevitable step. The process of evaluating EKS lead us to come with eks_cli — A one stop shop for bootstrapping and managing your EKS cluster.

EKS In Action

Creating an EKS cluster is not a pleasant experience, to say the least. You have to go through several manual steps, record and collect each step’s outputs (IAM roles, VPC ids etc) and feed them into the next steps. You also have to keep all these outputs for future changes you’d like to perform on the cluster. Cluster creation time can also be frustrating when creating ad-hoc clusters: it takes no less than 12 minutes from the cluster creation request to the time the Kubernetes control plane actually responds to requests.

When the Kubernetes control plane is up you need to start adding worker nodes (or node groups) to the cluster to run your workloads. This process is tedious as well — you have to manually create a CloudFormation stack, feed all previous mentioned outputs, wait for the stack creation to end and alter an aws-auth ConfigMap on the cluster with the stack Role ARN to allow these nodes to register themselves on the cluster. It means that adding several node groups requires you to keep a record of all cluster node groups so you can properly edit the ConfigMap.

So, you have several node groups up, they have all successfully registered to the cluster (you filled their Role ARNS one by one) — everything should be working properly now, right? not exactly. Apparently, node groups cannot communicate within themselves by default. I encountered that when our Jenkins instance could not resolve a DNS query since the kube-dns pod was scheduled to a different node group. We had to manually create a Security Group with proper ingress/egress rules and attach it to all our node groups instances for them be able to communicate with each other.

Sharing cluster access with co-workers is also a manual process: You can either create a IAM Role or use the AWS IAM User. Either way you have to manually edit the same aws-auth ConfigMap on the cluster. Just remember not to mess up the node groups Role ARN because they won’t be able to register themselves on the cluster anymore.

So… cluster is up, node groups happily communicate and even your co-workers have access to the cluster. What you’re going to find next is that there are no sane defaults set: no default storage class is set and dns-autoscaler is not installed so you’re left with a single DNS pod running. These two are a must on any production grade Kubernetes cluster so be sure to add them to your cluster bootstrap list.

Other things we found inconsistent with previous Kubernetes installations we worked with:

  • Kubernetes API proxy doesn’t work in basic auth mode. We used it to expose different services under the Kubernetes API server domain. To solve this we had to change all proxied services to LoadBalancer type and assign specific DNS records to point at them.
  • Nodes have no ExternalIP in their IP addresses list. I am pretty sure it is not AWS’s fault (see kubelet issue here — https://github.com/kubernetes/kubernetes/issues/63158) but still, it is worth mentioning if you had any dependency on public ips.

The last thing I want to mention is the lack of roadmap and progress on EKS development. Kubrenetes is a fast paced project. Decisions taken today might be affected by EKS development and it doesn’t seem AWS treats it that way. For some companies (nanit, for example), cluster upgrades require a lot of attention and work. The absent of in-place cluster upgrades feature might make us look for other alternatives. The AWS team doesn’t state anywhere whether in-place upgrade will be available or not.
Another example would be postponing transition to EKS until version 1.11 is supported. We tried getting some info regarding 1.11 support (https://forums.aws.amazon.com/thread.jspa?threadID=285220) but no real answer was given.
In general, getting info regarding upcoming features and time frames is nearly impossible.

Final Words

Creating a production grade EKS cluster was a long journey. I remember the word that echoed in the back of my head during most this process — “Really?!”.

To sum up, I think EKS’s current state is a half baked service. It involves far more manual intervention than I’d expect from an AWS service. Luckily projects like eksctl and eks_cli have been created to mitigate EKS lack of automation.
I am more than confident that the AWS team will transition EKS into a mature and complete service in the future, but until then we’re left with external projects to automate the process for us.

AWS_EKS_logo
erezrabih
http://railsadventures.wordpress.com/?p=1391
Extensions
RabbitMQ Retries – The Full Story
DevOps
RabbitMQ is one of the most widely used message brokers today. A large portion of nanit’s inter-service communication goes through RabbitMQ, which led us on a journey of finding the best way to retry processing a message upon failure. Surprisingly, RabbitMQ itself does not implement any retry mechanism natively. In this blog post I explore 4 different […]
Show full content

RabbitMQ is one of the most widely used message brokers today. A large portion of nanit’s inter-service communication goes through RabbitMQ, which led us on a journey of finding the best way to retry processing a message upon failure.
Surprisingly, RabbitMQ itself does not implement any retry mechanism natively. In this blog post I explore 4 different ways to implement retries on RabbitMQ. On each option we will go through:

  1. The RabbitMQ topology diagram
  2. The flow of retrying
  3. An example ruby code to replicate the topology and a subscriber which retries processing a message
  4. The output of running the ruby code
  5. A summary of advantages and disadvantages

The example code for each os the scenarios can be found on our Github Repository.
I strongly suggest you to run the code examples and play with them as you read through the post.

Before we go on to the details let’s get a better understanding of how nanit’s RabbitMQ topology looks like:

  • Users API is a publisher which publishes to a direct exchange — nanit.users
  • We use direct exchanges with the naming convention of nanit.object_name — in this case nanit.users
  • Each service (mailman/subscriptions) creates a queue named service_name.object_name.routing_key and binds it to the corresponding exchange with the appropriate routing key. In the above case both subscriptions and mailman services are registered to the user created event but only mailman is registered to the user deleted event.
  • The service then consumes the created queue.
Dead Letter Exchanges

Another subject worth mentioning before we dive into the specifics is Dead Letter Exchange (DLX). A Dead Letter Exchange is just a regular RabbitMQ exchange. If exchange ex1 is set as the DLX of a queue q1 a message is forwarded from q1 to ex1 if:

  1. A message was rejected on q1 with requeue=false
  2. A message TTL has expired on q1
  3. q1‘s queue length limit has exceeded

We are going to use Dead Letter Exchanges throughout the tutorial quite a lot.

Now that we know how our topology looks like and what a dead letter exchange is, we can asses a few options to implement retries.

Option 1: Reject + Requeue
Option 1 — Reject + Requeue

Topology:

Nothing fancy here — We didn’t have to create any additional exchanges or queues.

Flow:

  1. A message arrives a mailman consumer
  2. The consumer fails processing the message and rejects it with the requeue flag set to true. The message is put to the head of the queue.
  3. The message arrives a consumer again, this time with the redeliveredflag set to true.
  4. To avoid entering a retry loop on that message the consumer should only requeue if the message was not redelivered

Output:

$> OPTION=1 make run-example
14:11:48 received message: hello | redelivered: false
         first try, rejecting with requeue=true
14:11:48 received message: hello | redelivered: true
         already retried, rejecting with retry=false
14:11:53 Bye

This method allows us only 1 retry per message with no delay at all.

Option 2: Reject + DLX topology

Topology:

We added here two exchanges and one queue.

We set nanit.users.retry1 as the dead letter exchange of the queue mailman.users.created so when a message is rejected from that queue it is immediately passed to nanit.users.retry1.

nanit.users.wait_queue, the wait queue, is where messages are being held between retries. It has a TTL set via x-message-ttl and when that TTL expires the message is forwarded to nanit.users.retry2 which is set as its dead letter exchange.

Flow:

  1. A message arrives a mailman consumer from nanit.users.created queue
  2. The consumer fails processing and rejects the message
  3. The message is forwarded to the queue’s Dead Letter Exchange nanit.users.retry1. We replace the original message routing key created with the queue name the message originated from — nanit.users.created. This will be explained later on.
  4. A single queue nanit.users.wait_queue is bound to the DLX by all routing keys thus the message is passed on to that queue
  5. The wait queue has a TTL set up via the x-message-ttl argument. Once the TTL is over the message is passed to the second exchange, nanit.users.retry2, which is set as nanit.users.wait_queue Dead Letter Exchange.
  6. The original queue, nanit.users.created is bound to the exchange nanit.users.retry2 by a routing key matching its own name so the message only arrives the exact queue it was rejected from and not to all queues bound by the created key *(see note)

*Note: We must replace the original message routing key created with the name of the queue the message was rejected on mailman.users.created. If we had left the created routing key as is, both mailman and subscriptions services would have re-processed the message while only mailman failed processing it. To have the message’s routing key replaced upon dead lettering we set the
x-dead-letter-routing-key header on the queue. Once set, the message’s routing key is replaced by the one defined on that header value when it is forwarded to the Dead Letter Exchange.

Output:

$> OPTION=2 make run-example
14:12:50 received message: hello | retry_count: 0 
         rejecting (retry via DLX)
14:12:55 received message: hello | retry_count: 1 
         rejecting (retry via DLX)
14:13:00 received message: hello | retry_count: 2 
         rejecting (retry via DLX)
14:13:05 received message: hello | retry_count: 3 
         max retries reached - acking
14:13:11 Bye

This topology allows us to define maximum retry attempts with a constant delay between retries.
To get the current retry count for a message we can use the count field on the x-death header which is incremented by RabbitMQ each time a message is dead-lettered.
The retry delay is constant since it is defined on the wait queue and not on a per-message basis.

Option 3: Republishing to a Retry Exchange
Republish Topology

Topology:

The topology here is pretty similar to the previous topology except for the fact that nanit.users.retry1 is not set as a dead letter exchange since we republish the failed message rather than rejecting it.

Flow:

  1. A message arrives a mailman consumer from nanit.users.created queue
  2. The consumer fails processing the message, acknowledges it and publishes it to nanit.users.retry1 exchange. Since we do not reject the message, RabbitMQ won’t save the x-death header for us and we have to take care of retry count ourselves. We can easily do so via incrementing (or initializing) a customer header on the message — x-retries for example. We also have to take care of the TTL: since it is no longer set on the wait queue, we have to publish the message with a per-message TTL. We can do so by setting the expiration field to be a multiple of base-retry-delayand the current number of retries. This way, the retry delay increases with the number of retries. The last thing to note is that we publish the message with a routing key matching the queue it arrived from. In this case it would be mailman.users.created.
  3. The message is delivered via the nanit.users.retry1 exchange to nanit.users.wait_queue. This time, the queue has no default TTL since we’re specifying the TTL per message.
  4. When the TTL on the message expires, it is passed from the wait queue to its DLX nanit.users.retry2 using the key it originally arrived with — mailman.users.created.
  5. The original queue, nanit.users.created is bound to the DLX nanit.users.retry2 by a routing key matching its own name so the message only arrives the exact queue it was rejected from and not to all queues bound by the created key.

Output:

$> OPTION=3 make run-example
14:14:32 received message: hello | retry_count: 0
         publishing to retry exchange with 3s delay 
14:14:35 received message: hello | retry_count: 1
         publishing to retry exchange with 6s delay 
14:14:41 received message: hello | retry_count: 2
         publishing to retry exchange with 9s delay 
14:14:50 received message: hello | retry_count: 3
         max retries reached - throwing message
14:14:53 Bye

This implementation allows us to specific both retry limit and have an increasing retry delay per message. The retry number is being traced on the x-retries header and the message expiration is always calculated by retry count and some base expiration we set.

Option 4: Delayed Exchange

The final option and the one we at nanit actually use is a delayed exchangewhich is a RabbitMQ plugin. It allows us to easily definea TTL per message without setting an additional wait queue and Dead Letter Exchanges.

Option 4 — delayed exchange

Topology:

The topology is pretty simple — we have a single retry exchange which is a delayed exchange. When the consumer fails processing a message it publishes it to this exchange with an increasing delay as long as we’re below the retries limit. This setup achieves the same goals of option 3 with a simpler topology and flow.

Flow:

  1. mailman consumer receives a message from RabbitMQ and fails processing
  2. It then ACK’s the original message and publishes it to the delayed exchange with an incremented x-retries header, a calculated x-delayheader to have the message delayed before it is being forwarded on and a routing key matching the name of the queue the message originated from (mailman.users.created).
  3. When the TTL (delay) expires the delayed exchange forwards the message back to the queue mailman.users.created which is attached to it via a routing key of its name.
  4. mailman consumes the message again

Output:

$> OPTION=4 make run-example
14:15:43 received message: hello | retry_count: 0 
         publishing to retry (delayed) exchange with 3s delay 
14:15:46 received message: hello | retry_count: 1 
         publishing to retry (delayed) exchange with 6s delay 
14:15:52 received message: hello | retry_count: 2 
         publishing to retry (delayed) exchange with 9s delay 
14:16:01 received message: hello | retry_count: 3 
         max retries reached - throwing message
14:16:04 Bye

Using Retries Smartly

While having a retry mechanism is always a good idea, we have to remember it has its price: it means more messages are passing through RabbitMQ and as a result more messages are being consumed by our consumers. In the end it translates to higher CPU/memory/network usage. This is the reason it is important to differentiate between failures in order to decide if a message should even be considered for a retry or ignored immediately.
A malformed message would be an example to a message we should not attempt to retry processing since nothing is going to make it processable the next time it arrives the consumer.
An example for a message worth retrying would be a service that uses a third party API and receives a 503 temporarily unavailable response. It is reasonable to believe that the third party API will be available in the future and the message might become processable in that case.

Summary

I hope this guide gave you some insights as to how we at nanit use RabbitMQ.
You are invited to check out our open source RabbitMQ on Kubernetes setup.

RabbitMQ Retries
erezrabih
http://railsadventures.wordpress.com/?p=1382
Extensions
Writing an Elixir Plug Library
Elixir
Plug is an Elixir specification for composable modules between web application. That’s a very nice way to describe middlewares. For those of you that come from the Ruby world it pretty much takes the role of Rack middlewares. A few weeks ago I searched Google for a Plug library to validate path and query parameters […]
Show full content

Plug is an Elixir specification for composable modules between web application. That’s a very nice way to describe middlewares. For those of you that come from the Ruby world it pretty much takes the role of Rack middlewares.

A few weeks ago I searched Google for a Plug library to validate path and query parameters declaratively on the router. I got a single result but it didn’t have any documentation and from going over the code it didn’t provide what I was looking for.
In my vision I would write my app routes as:

.gist table { margin-bottom: 0; }


This file contains hidden or bidirectional Unicode text that may be interpreted or compiled differently than what appears below. To review, open the file in an editor that reveals hidden Unicode characters.
Learn more about bidirectional Unicode characters

Show hidden characters


get “/users/:id”, private: %{validate: %{id: &validate_integer/1, active: &validate_boolean/1}} do # Controller logic goes here end

view raw

routes.exs

hosted with ❤ by GitHub

This would validate that the path param id is a valid integer and that the query param active is a valid boolean string value (either “true” or “false”).
I also wanted to be able to run a callback function of my own when some or all validations fail. This callback might, for example, return a 422 status code with an appropriate message.

I had the need, I had the vision. I decided to write my own Plug library.

Starting a New Project

To start a fresh elixir project we type
$> mix new plug_validator --module Plug.Validator

The default module name would have been PlugValidator. I named it explicitly via the --module flag to follow the pattern of Plug.Router and friends.
To complete the initial files structure I created some directories and moved around some files:

$> mkdir lib/plug
$> mv lib/plug_validator.ex lib/plug/validator.ex
$> mkdir test/plug
$> mv test/plug_validator.ex test/plug/validator.ex

Just to make sure everything is intact we can run
$> mix test

And see that the tests passes and we haven’t broken anything.

Testing Before Implementing

When I start with a clear vision of what I would like to have, I tend to go TDD.
TDD is a shortcut for Test Driven Development and promotes the following workflow:

  1. Write tests for the module/code you’re about to create
  2. Run the tests and see them fail
  3. Write the minimal code to pass the tests
  4. Run the tests again and see them pass
  5. Go back to 1

Following this exact procedure might become tedious so I allow myself not to strictly follow these five steps and make shortcuts from time to time. The important thing for me is to write the tests before I write the implementation code itself. Later on I’ll explain why I feel it makes my development process and end result a lot better.

The first thing I did was to create a dummy router and some validation functions to work with. Two important decisions I made at this stage:

  1. Plug.Validator should be plugged between plug :match and plug :dispatch. This is to ensure we only run the validation function after the route has been matched.
  2. A validation function should return {:error, the_error} in case of failed validation. Any other value returned indicates the validation has passed. This is to follow a common Elixir convention in return values.
  3. The validation declaration will be made in the private storage of Plug.Conn. As the documentation for theprivate storage states:

This storage is meant to be used by libraries and frameworks to avoid writing to the user storage

Exactly what I needed.

I thought the appropriate place to put the dummy router and the validation files in is test/support/ since they do not contain any tests per-se.

.gist table { margin-bottom: 0; }


This file contains hidden or bidirectional Unicode text that may be interpreted or compiled differently than what appears below. To review, open the file in an editor that reveals hidden Unicode characters.
Learn more about bidirectional Unicode characters

Show hidden characters


defmodule Plug.Support.Router do import Plug.Conn use Plug.Router import Plug.Support.Validators, only: [validate_integer: 1, validate_boolean: 1, on_error_fn: 2, json_resp: 3] plug :match plug Plug.Validator, on_error: &on_error_fn/2 plug :dispatch get "/users/:id", private: %{validate: %{id: &validate_integer/1, active: &validate_boolean/1}} do json_resp(conn, 200, %{id: 1, name: "user1"}) end end

view raw

dummy_router.exs

hosted with ❤ by GitHub

The dummy router shows exactly how plug validator should be used (line 8). I placed plug Plug.Validator between the match and dispatch plugs . I also provided an error callback that receives the conn and the error list in case of a failed validation.
The route definition itself (line 12) uses the private storage of conn to hold the required validations.

The next step was to implement the methods imported from Plug.Support.Val

.gist table { margin-bottom: 0; }


This file contains hidden or bidirectional Unicode text that may be interpreted or compiled differently than what appears below. To review, open the file in an editor that reveals hidden Unicode characters.
Learn more about bidirectional Unicode characters

Show hidden characters


defmodule Plug.Support.Validators do import Plug.Conn def validate_integer(v) do case Integer.parse(v) do :error -> {:error, "could not parse #{v} as integer"} other -> other end end def validate_boolean(v) do case v do nil -> false "true" -> true "false" -> false _other -> {:error, "could not parse #{v} as boolean"} end end def on_error_fn(conn, errors) do json_resp(conn, 422, errors) |> halt end def json_resp(conn, status, body) do conn |> put_resp_header("content-type", "application/json") |> send_resp(status, Poison.encode!(body)) end end

view raw

validations.exs

hosted with ❤ by GitHub

I created two very simple validations for integers and boolean values. Pay attention to the return value structure of {:error, the_error} in case of validation failures. I also created an error callback that returns a 422 status code and halts Plug’s pipeline execution.

Now that we created the support files we should add them to test/test_helpers.exs since all files under test/support/* are not loaded by default.

.gist table { margin-bottom: 0; }


This file contains hidden or bidirectional Unicode text that may be interpreted or compiled differently than what appears below. To review, open the file in an editor that reveals hidden Unicode characters.
Learn more about bidirectional Unicode characters

Show hidden characters


Code.load_file("test/support/validators.exs") Code.load_file("test/support/router.exs") ExUnit.start()

view raw

test_helper.exs

hosted with ❤ by GitHub

So much code and still not a single line to implement the Plug’s functionality.
All I did until now is create a “client code” for my library. By starting from the client code I describe how I, as a developer, would have liked to use the library. For me, being able to feel how my library is going to be used before I even created it is priceless. It makes me focus on exactly what my library needs to do and puts the developer who uses it in top priority. It also allows me to iterate on the public interface of the library to make it as comfortable and natural as possible before I even write a single line of implementation code.

The last step before I go on to implement the functionality is to create a test against the dummy router. I decided to create all the tests at once and not to do it iteratively as TDD suggests because I felt they were trivial enough.

.gist table { margin-bottom: 0; }


This file contains hidden or bidirectional Unicode text that may be interpreted or compiled differently than what appears below. To review, open the file in an editor that reveals hidden Unicode characters.
Learn more about bidirectional Unicode characters

Show hidden characters


defmodule Plug.ValidatorTest do use ExUnit.Case use Plug.Test @subject Plug.Support.Router @opts @subject.init([]) def assert_json_response(request_url, expected_status, expected_body) do conn = conn(:get, request_url) conn = @subject.call(conn, @opts) assert conn.state == :sent assert conn.status == expected_status body = Poison.decode!(conn.resp_body, keys: :atoms) assert body == expected_body end test "valid request" do assert_json_response("/users/1?active=true", 200, %{id: 1, name: "user1"}) end test "invalid path params" do assert_json_response("/users/not-an-integer", 422, %{id: "could not parse not-an-integer as integer"}) end test "multiple invalid params" do assert_json_response("/users/not-an-integer?active=not-a-boolean", 422, %{id: "could not parse not-an-integer as integer", active: "could not parse not-a-boolean as boolean"}) end test "one valid one invalid" do assert_json_response("/users/1?active=not-a-boolean", 422, %{active: "could not parse not-a-boolean as boolean"}) end end

view raw

validator_text.exs

hosted with ❤ by GitHub

The tests are pretty straight forward. The first test case checks for a valid request and then there are a few examples of invalid parameters. The tests fail at this stage since I haven’t implemented anything yet. If I run the tests now I get the following error message:

** (UndefinedFunctionError) function Plug.Validator.init/1 is undefined or private

That’s because the only method we have in Plug.Validator is the default hello method generated by mix. The minimal plug module implementation is the following one:

.gist table { margin-bottom: 0; }


This file contains hidden or bidirectional Unicode text that may be interpreted or compiled differently than what appears below. To review, open the file in an editor that reveals hidden Unicode characters.
Learn more about bidirectional Unicode characters

Show hidden characters


defmodule Plug.Validator do def init(opts), do: opts def call(conn, opts), do: conn end

view raw

plug_minimal.exs

hosted with ❤ by GitHub

If we run the tests with this plug implementation the first test case passes but all the other cases fail since no validation is being performed yet.
The validation logic is pretty simple:

  1. Collect all invalid parameters by running the validations against the given conn parameters.
  2. If the invalidation set is empty return the conn for further processing.
  3. Otherwise apply the given error callback on conn and the invalidation set.

Let’s see the final Plug module:

.gist table { margin-bottom: 0; }


This file contains hidden or bidirectional Unicode text that may be interpreted or compiled differently than what appears below. To review, open the file in an editor that reveals hidden Unicode characters.
Learn more about bidirectional Unicode characters

Show hidden characters


defmodule Plug.Validator do def init(opts), do: opts def call(conn, opts) do case conn.private[:validate] do nil -> conn validations -> validate(Conn.fetch_query_params(conn), validations, opts[:on_error]) end end defp validate(conn, validations, on_error) do errors = collect_errors(conn, validations) if Enum.empty?(errors) do conn else on_error.(conn, errors) end end defp collect_errors(conn, validations) do Enum.reduce(validations, %{}, errors_collector(conn)) end defp errors_collector(conn) do fn {field, vf}, acc -> value = conn.params[to_string(field)] case vf.(value) do {:error, msg} -> Map.put(acc, field, msg) _ -> acc end end end end

view raw

validator.exs

hosted with ❤ by GitHub

This code satisfies all of our test cases.
If you would like to try your package as a dependency before publishing it to Hex you can use your local source code in the following way:
{:plug_validator, path: “path/to/plug_validator”}
This allows you to use your code as if it was a package on Hex. Since this is the first package I wrote it was a nice validation before actually publishing it.

All Done

That’s it. All there’s left to do is to publish your package to hex and use it in your dependencies.

I’d be happy to get idea on how I could improve the code/process of this library.

Links Thoughts / Final Words
  1. Should a plug library be tested in context of a dummy router as I did or in a more isolated way?
  2. Only after the fact I found out that it is a best practice to use the namespace PlugValidator and not Plug.Validator since the Plug.* namespace should be saved for the original library.
  3. Things I didn’t cover here are how to publish to Hex and writting module documentation. Here is one of the many good guides for that. The GitHub repo itself includes the docs and you can view them here.
  4. Excuse me for incorrectness in describing/following TDD. I think every developer takes the paradigm to their own place. I know what I described isn’t exactly pure TDD but that’s where I find my balance to be as productive as possible.
erezrabih
http://railsadventures.wordpress.com/?p=1380
Extensions