To keep focus when I start new projects, I early on setup a few simple milestones. Sorted, so the first one is the first to strive for, the second the next aim, etc. Until a milestone has been reached, that milestone is the main focus to accomplish.
For example, when I started to build Let’s Do, I wrote down 3 milestones:
1) 5 beta users
2) 5 active teams
3) 5 paying customers
At the time, they felt far away, the product was just an idea and I was just getting started writing the code that would make the idea come to life.
These are simple milestones, but they have been working great for me as motivation and helping keep focus. I keep them on a page in Notion that I am on regularly to be reminded.
It is a great feeling when you finally tick one off, and realize that you made it.
For me it has been key to keep the milestones tangible and business-oriented. More practical like ”finish MVP” or ”submit for review” doesn’t have the same bang to me. I think that type can get too practical and reaching them is more like completing a task than reaching a goal.
When there are effects like money in the bank, accountability or customer data in the DB, it gets real in another way. And that gets you focused.
I have been using this method for different projects over the years, and it has been a good way to keep focus and be reminded of what is important. Simple yet effective.
I have used loads of task management tools on various platforms over the years. Sometimes, more advanced systems like Jira, PivotalTracker, or Trello make sense. Other times you just want a list of tasks shared with other people.
A simple list of tasks is excellent as there is very little time needed to understand how it works. It is just a list of things that need to get done, sometimes together with metadata like due dates, prioritization, or who is responsible for carrying out the task. Easy to understand, use and follow.
I use to-do lists to organize different parts of my life, in digital tools and on Post-Its, and in notebooks. Easy to reach for, and it works great in different contexts.
Since Slack introduced itself around eight years ago, it has become the de facto way to organize and operate for many organizations. Over the years, I have been part of loads of different Slack workspaces; during my time at Oktavilla working with clients and projects, and during my time as a freelance consultant. Often in the role of managing work and also in the role as an individual contributor.
One thing that I have always come back in one form or another is that Slack could work great to organize work. Both as it is where the communication happens and as a platform to build tools on. The collaborators usually already are in Slack on their own devices and are familiar with the application. It has a standardized UI with a limited set of well-known components. You create clear contexts and processes using channels.
The fallback solution for handling tasks has often been to use an external tool that comes with switching from the primary communication tool to another specifically for tasks. Sometimes it’s needed, but not always. Also, you often want to involve people from another team or organization, and then they have to set up in the task management tool. Another way is to use Slacks native ”Posts” feature, but in my experience, that can quickly get clunky.
Last year I started to experiment with how tasks could be managed within Slack using a Slack app. The underlying idea is that as we already are in Slack all day, it could also be a good idea to use it as the workspace for managing tasks in a small team or for a project. After testing a few different concepts, I come up with a few realizations:
Teams and organizations often create their processes for managing tasks. Provide the tools to handle tasks, due dates, assignments etc., not the process of how to work with tasks.
Embrace the limitations of Slacks API. Trying to innovate within Slack easily becomes confusing. Using the tools available with Slacks API, things must be kept simple and focused to be comprehensible.
One to-do list - one channel. The natural context of channels in Slack also works excellent for creating a context for tasks.
Use native Slack processes instead of coming up with new ones. For example, use regular Slack threads associated with the particular to-do to add a discussion about a to-do.
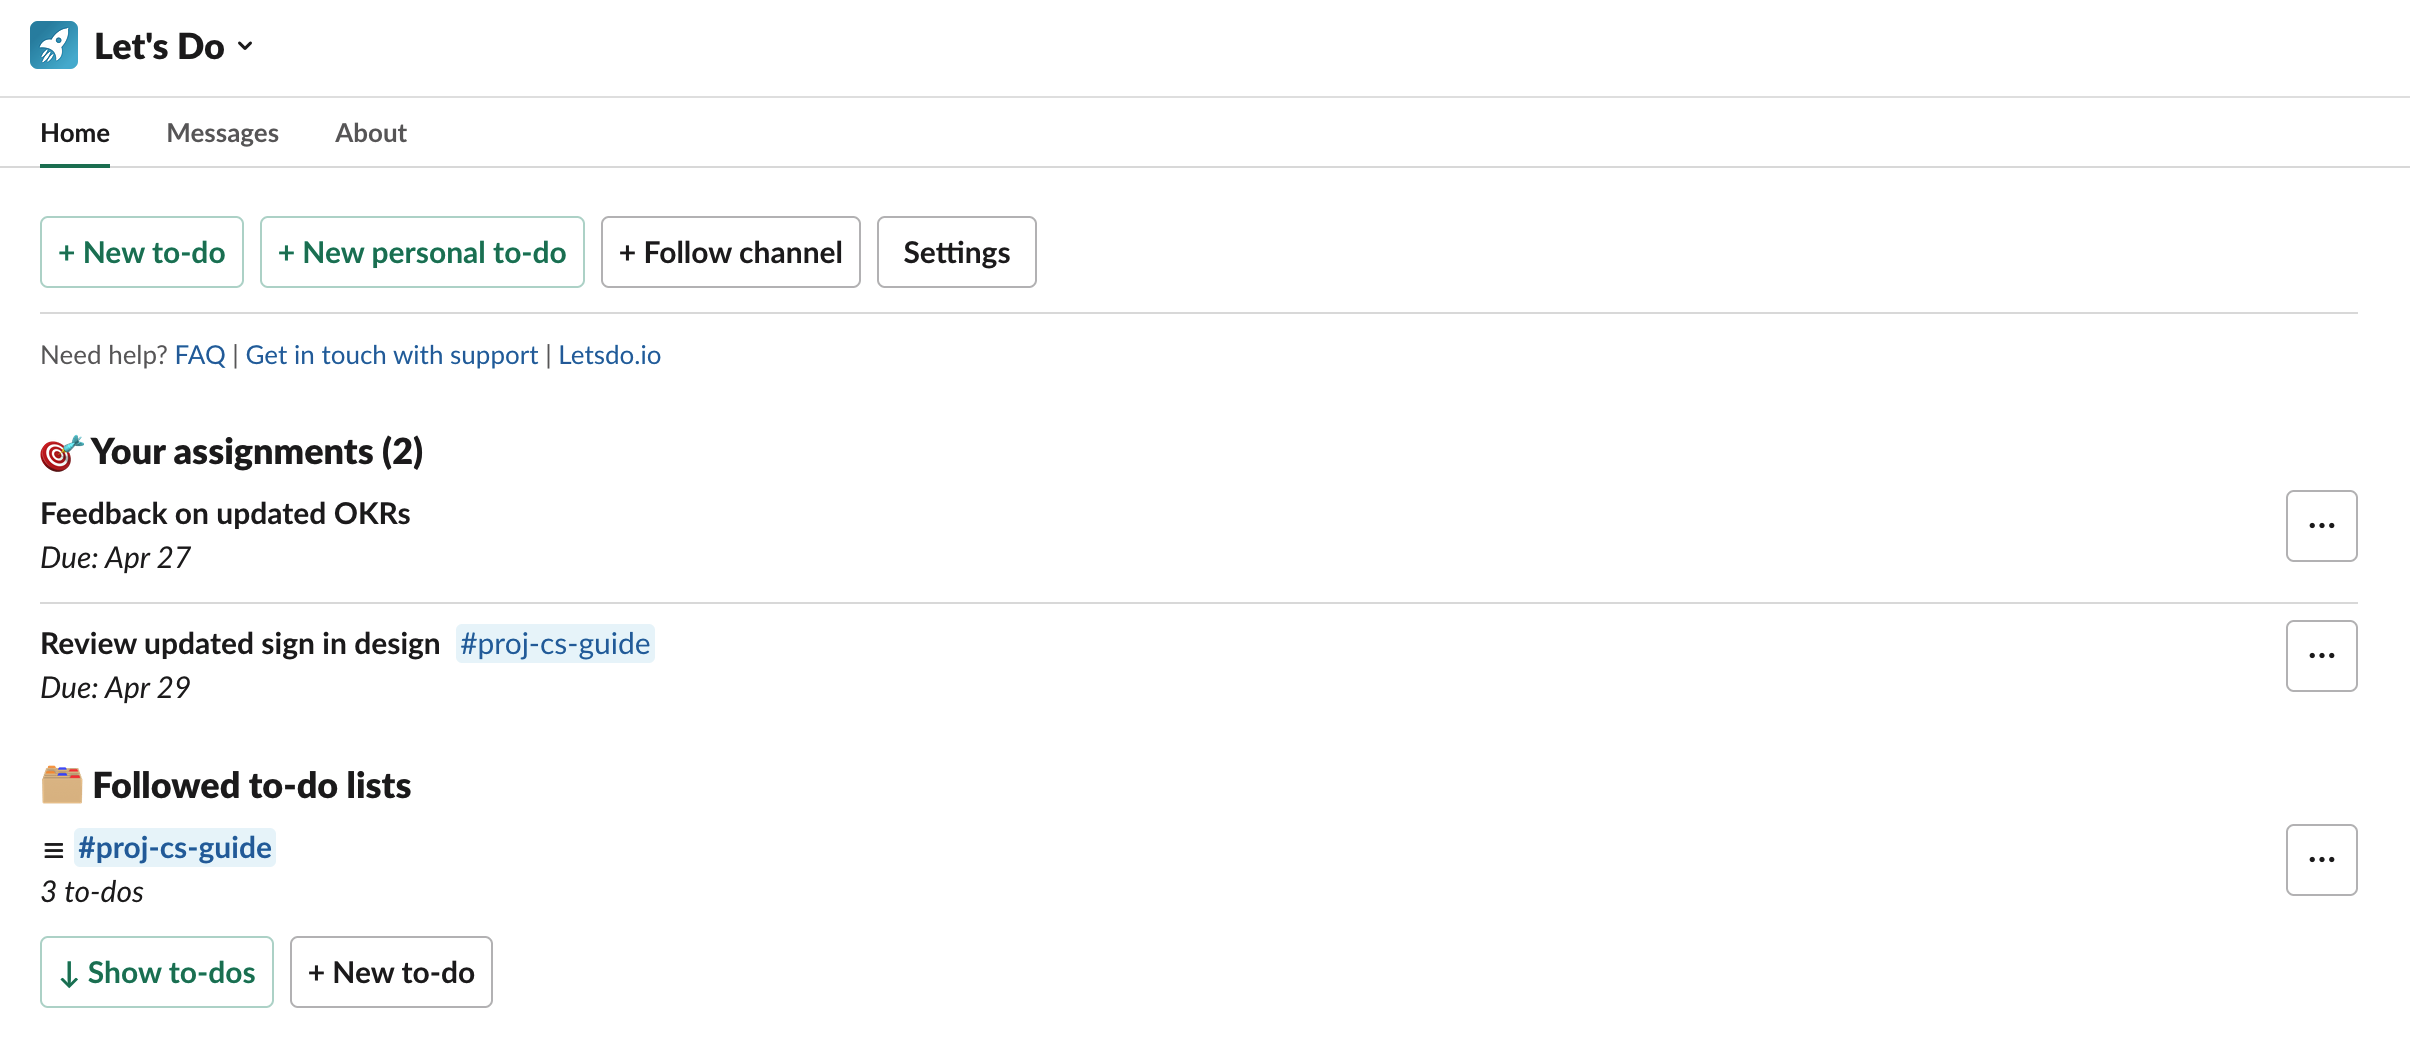
So, I built out my first version of a to-do manager as a Slack app. And then I iterated. In early November, the app was approved to be listed in the Slack app directory and has since then been in open beta.
There has been a steady flow of new user sign-ups and to-dos created. It has provided great feedback and validation of my different ideas for a Slack to-do manager. And I look forward to continuing working on it and creating a tool that gives value to other people and organizations.
At Oktavilla we are in the process of moving a RubyOnRails application from MySQL to PostgreSQL. For this appliction we use the excellent CircleCI to automatically run the test suit when new commits are pushed to GitHub. This application is in swedish so we want to setup the database with collation set to sv_SE.UTF-8 to make sorting work correctly.
This didn’t work out of the box on CircleCI. After some testing and reading we ended up with this.
A custom database.yml for CircleCI. Create a file in config/database.ci.yml with:
First we have to create the system locale using locale-gen. This requires a restart of PostgreSQL and some sleep time to let it finish the startup sequence. Then we override the default database setup and use our own database.ci.yml and create the database.
If you have started any ambitious web site projects the last year a topic that might have surfaced is ”performance budgets”.
The term means that you decide which performance metrics matter for a web site and set limits for each metric. It can be metrics like response time, PageSpeed score or the total file size of JavaScript and CSS files. This gives you a ”budget” for each metric. Every time something new is added to the web site you have to make sure it doesn’t break the performance budget.
By setting up a performance budget and continuously monitor that you stay within budget you ensure a project where high performance is a key consideration.
What to read/watch/listen to on the topic
I have researched performance budgets a bit recently and I thought I should share the resources I have found interesting on the topic. Hopefully these will give you a good idea of what a performance budget is, how to implement one and why they matter.
In this blog post I list some of the applications I use to make my life easier and more productive. These are Mac applications that is constantly open on my laptop in the fall of 2014. I would definitely recommend all of them.
Evernote is great. I use it for almost all of my writing - whether it is meeting notes, e-mail drafts, blog posts or just random scribble. It is so simple and does the job of saving my notes most excellently. The only thing I miss is some kind of syntax highlighting for code and markdown support.
The Hit List is a sophisticated todo list manager. I started to use this application after I had read the Getting things done book a couple of years back. The application is a bit rough around the edges but it really works for me as I continue to use it to do my own basic version of GTD.
Vim takes a while to learn but once you are used to it almost becomes part of your subconscious. There is always something new to learn just when you feel like you have mastered a command. It was well worth learning it as I now have editor that has been customised to my own needs over a couple of years. Also as a bonus it is available on most UN*X like systems which means I always have a familiar editor available when I am working on someone else’s machine.
This is a replacement for Apple’s terminal emulator ”Terminal” that is great. It has a lot of options for customisation. For example I have mapped it so I can use the hjkl-keys to move around between panes and tabs. Just like I am used to from vim. To make it look beautiful I have combined the Tomorrow Night Bright color scheme with the Menlo font.
With Dash you can view and search through documentation for things like Ruby, Rails, HTTP Status codes, Go, CSS, AngularJS, Node.js and much more. I have it running the background all the time and can easily make it foreground with a hot-key (alt-space). The interface is navigable by just using the keyboard so it gets really fast to find the right docs when your writing code and need to look up something. Dash has made looking up documentation such a pleasure.
Mailplane is an application that lets you run Googles Gmail and Calendar web apps as desktop applications. I have a couple of different Gmail accounts that I check at least on a daily basis and this app makes it super easy to handle all the different accounts using one window with each account in its own tab. With Mailplane you can also make Gmail the default handler for e-mail links on web pages.
I regularly move my laptop around and connect different screens. Stay lets me save and restore the position of windows for each combination of displays. For example when I connect my Cinema Display iTerm2 automatically moves to the Cinema Display and The Hit List window moves to the laptop screen. It let me always have a familiar window setup when switching display.
Code is all about communicating with your computer and telling it what you want it to do. To make it easy to pass this knowledge on to our fellow humans we use programming languages that are similar to our human languages.
But, code is hard to read and understand. Even in a small application it is often very difficult to follow the different execution paths through out the code. That is why we need to document the actual code.
We have tools to make our code understandable
We can focus on writing readable code and tests that document the way we expect our code to behave. If we are ambitious we write comments that can generate documentation.
And then we have git. It is a very common distributed version control and source code management tool. It is very common for people who work with development these days use git for version control.
The thing is that if you use the git the right way it will automatically give us a log that describes and documents our code. Right down to every single line.
However, we have a problem
Sometimes we don’t put that much energy into describing our code changes with commit messages.
You often see commits with messages like
fix test
or
Added stats x and z to dashboard
or
:sob:
The problem is when we 6 months later discovers a bug that was introduced in the commit Added stats x and z to dashboard which is 17 changed files with 231 lines added and 29 lines deleted. Then you stare at your screen and wonder what was going through your head when making all these changes. Why did you make this weird control structure.
If we would have just put a little a bit more time on describing the changes the code might have been a bit more easy to understand.
I and many others write commit messages like the ones above sometimes. It is often because of habit, laziness and that you haven’t really thought about the great possibilities commit messages gives us. We just want to tick of another todo and push the new code to master.
How can you write commit messages?
The first step is to divide the work into smaller commits to make it possible to describe each change with a title and a few sentences. If it feels hard to describe the current code change set it is a good sign that is is time to divide the change into smaller commits.
I have started to try to think of my commit messages as e-mail messages to myself that I will read in a year or so. Each commit message has a subject and a body. If there is a related issue in GitHub I include a reference to that in the commit message. I try to remember myself that giving the commit message an extra 30 seconds of thought can possible save me a couple of hours of work in a possible future.
A commit message structure
A style that I think works well is this:
First a subject
Start with a title or subject, which should be about 70 characters long. Most places where you can view git commits expect that the subject line is around 50 characters. GitHub has a generous display limit at 70 characters for example.
If the commit has something to do with an issue and I will add a reference to it the first on the subject
The subject should be a super short summary of the changes done. Technical details are saved for the commit message body.
The subject should not end with a period.
The subject is the part of the commit that is most likely to be shown so it’s good to spend time to make it easily understandable and clear.
Then a blank line
As a divider between the subject and body
Third the body
What is the reason for this code change.
Why did you chose to do in a specific way.
Is there anything that can be useful to think about when you look at the change, something that is not clear or easy to miss?
Please use bullet points to make it clear.
Feel free to add reference links. Like maybe you got inspiration to this way of solving a bug from something you found on StackOverflow.
Use imperative, present tense
It is recommended in the Git docs that commit messages are written in the imperative, present tense. That means that you use use “fix” instead of “fixed” or “add” instead of “added” when writing your commit messages.
You can see an example of this in how git expresses itself when it creates automatic commit messages such as “Merge branch ‘master’ of github.com: example / app”. Think about this like you are describing what happens as each commit is applied to the code.
Also, if you just decide to follow this you never have to think about tense when writing a commit messge.
A closing thought
There is no way that is more right or wrong.
But, I have noticed that when I put more time into my commit messages I have to reflect more on the changes I make in a project. This increases the code quality and produce smaller and coherent commits as it adds a extra step where I am forced to reflect on new code.
I think the main thing is to realize what a fantastic tool git is and how we can use commit messages as a documentation and way to understand a project’s history.
At Oktavilla we regularly start new projects. Over the years we have therefore come up with a few best practices to ensure that it is easy to take part in our projects and reduce errors. We use these in the majority of our projects, both internally and for clients. In the end we deliver high quality web projects and this is one part of that process.
In this blog post I focus on a few practices related to the technical side of things. Like setup and what to think about when choosing tools and processes for a project. Each practice has a link or two in the end to resources with more information.
The README file
Let’s start out with the most important file in any project.
A project must have a README file in its root directory. It contains information on the project and how get started with it. A new team member should easily get a understanding of what this project is and how to get started working with it from reading this file.
When writing the README think of the reader as a novice with basic knowledge of programming environments. Format the text with Markdown to make it easy for the reader to digest. Markdown is both easily read as source code and can be rendered as HTML (GitHub does this automatically for example).
A README should include at least the following sections:
Introduction
A brief explanation of the projects purpose. Also include the projects role if it is a part of larger architecture, who the client might be and any other information that might be good to know at a introductory level.
Dependencies
Include a list of dependencies that need to be installed separately. For example: database servers, package managers and programming languages. Be sure to include what versions are required as well.
Local Development Setup
Someone who is new to the project should easily understand how get to it up and running for local development using the README. Let the reader know what steps to take with a fresh copy of the project’s code. This can be notes on how to install needed packages, start the application and run the tests.
Use concrete examples like what to type into the shell to invoke the different tasks.
Configuration
If the application can be configured using environment variables include a list of these. Explain what each environment variable is used for.
Deploy
Part of working on a project is also being able to deploy your changes. Let the reader know how to deploy code to production and staging environments.
For example, if you use Heroku, include examples on how to set up the different Git remotes used for deployment and how to push code to these.
First of all, use version control. Second, use Git for version control. It is modern, works great and a majority of developers are either comfortable using it or want to start using it.
Deployable at All Times
Keep the master branch deployable at all times. Sooner or later you will get a bug reported on the code running in production that needs to be fixed right away. Keeping your current work in a separate branch allow you to quickly switch to the master branch and fix the bug. It also gives you the peace of mind to deploy without worrying about accidentally pushing any new and untested code to your users.
Commit Messages
Write informative commit messages. A good commit message includes a short title and a body. The title explains the purpose of the change and the body gives more information on why this change was needed. Think of commit messages as documentation of the code
If there is any extra information that might be useful for someone looking at the commit, include that in the body. For example, if there is a corresponding issue in your issue tracker be sure to include a reference to it.
Pull Requests
Use a web based Git hosting alternative like GitHub or BitBucket that supports pull requests for branches. This let you tell other team members about code changes before they are merged into the master branch.
Use this for discussion and to spread knowledge about different parts of the code base by code reviews. Code reviews can be both high level or very thorough. The important thing is that someone else other than the author takes a look at the changes and says “thumbs up” before the code is merged into the master.
Be open to discussion, but don’t let the review process hold back a merge to long. It is every team member’s responsibility to be keep the process quick and smooth within reasonable limits.
It is also a good idea to keep an extra friendly tone in the discussions to avoid misunderstandings and grief. Use emojis to keep the discussion fun and productive.
Most applications have some kind of configuration. It can be a connection URL for a database, API credentials for external services or something else.
Unix-like operation systems have a great method for providing applications with configuration values at run time. It is called environment variables. Use this and store all application configuration as environment variables.
Using environment variables allows for a separation of configuration from the code base. This makes it easy to change configuration values for a deployed application without updating any code.
A good goal is that the application can be open sourced at any time without compromising any credentials.
All projects have some kind of external dependencies on libraries and most programming languages have at least one package manager to handle installation of these. For example ruby has bundler and node.js has npm. Use a package manager and be sure to include the file that specifies package versions in the project.
Go through the list of dependencies once in a while and check which packages have been updated and if the update might be of interest. For example, you can do this easily with bundler using the command bundle outdated or with npm using npm outdated.
A majority of “good” packages use semantic versioning which helps you understand what to expect from a new version of a package. It tells you if a version is backwards compatible, adds new features or just fixes bugs.
The deploy procedure should be automated so it requires a minimum of human interaction. With the information from the README and correct credentials it should be a matter of running a command in the shell or pressing a button to put a new version of the application online.
Automation is important to avoid human errors. If there are any manual tasks involved with making a deploy, sooner or later someone will forget to do them or do them incorrectly. There can be bugs in deploy scripts but once they are discovered and fixed they will not happen again.
An application should be capable of behaving differently depending of what environment it is running in.
Examples of different behaviours that depend on the current environment might be how much detail is displayed on error pages, what goes into log files, javascript minification or if the application should send e-mails. Using environments you get a common way to handle these special cases.
The default environments are development, test, staging and production. Development is the default mode that the application runs in when you run it locally. Test is the environment your tests run in. Staging and production are environments that the application runs in when deployed. The production environment is where the actual end users use the application and staging is a replica of production that is used to test changes before they are pushed to production.
The application picks up what environment to run in from an environment variable. These are usually called something like NODE_ENV or RAILS_ENV.
Static files like images, fonts, CSS and Javascripts for production applications should not be served from the same server as the application to end users. Serve these through a content delivery network, CDN. They are built and optimised for serving static files to users all over the globe fast. A faster experience makes for happier users.
Getting your files on the CDN should be part of your automated deployment procedure. A common way to solve this is using a CDN with a custom origin set up and cache busting by file name. With this the application will add the CDN-host and a hash of the files contents to all files that should be served through the CDN when run in the production environment.
For example, a stylesheet link tag will look like this in the development environment:
When the CDN gets a request for a file it is missing it will request and cache that file from the application. As the hash is unique to the file contents the CDN will always fetch the correct version as long as the app outputs correct links in the markup. This also requires the app to handle fetching of static files with a hash appended to the filename. This can be solved by either a simple route rewrite or a precompilation task run at deploy.
And, remember that Amazon S3 is not a CDN and should not be used as such. This is a common mistake. It is a service for storing files and is not optimised for delivery. CloudFront is the Amazon CDN offering.
All projects are different and of course the practices mentioned in this post are not valid for all projects. However, keeping a set of common practices for how to create, maintain and contribute to projects within an organisation makes things work smoother. It reduces setup time and makes it easy for new project members to start contributing. Just make sure that the documentation for your practices is alive and evolves over time.
Most web apps have different highs and lows of traffic during the day. Maybe you get most of your traffic during daytime and not so much during the night and early morning. If you have this kind of situation it can be a good idea to adjust your number of dynos according to the changes in traffic in order to save a few bucks. When this is done automatic it is sometimes called auto-scaling or process scheduling.
There are a few services that can do this for you. However it is pretty easy to setup by your self, just using Heroku and some ruby code. And it can be for free.
Setup your Heroku API key as environment variable, you find this on your account page:
$ heroku config:set HEROKU_API_KEY=my-api-key
Add the Heroku Scheduler add-on:
$ heroku addons:add scheduler:standard
Open up the schedulers setting page:
$ heroku addons:open scheduler:standard
Set up jobs for when your want to scale your app.
For example if you create a job with the task:
ruby scaler.rb -a my-app -t web -d 3
.. and set the next run to 5:00 UTC. The number of web dynos for the app “my-app” will be scaled to 3 at 5:00 in the morning UTC.
A little advice
If you are planning on doing this on a production app make sure you got some error tracking to get alerted if the scheduled tasks has failed to run. It is mentioned in the docs that “Scheduler is known to occasionally (but rarely) miss the execution of scheduled jobs”. For example I added e-mail alerts and logging to StatHat.
The other day I got into a discussion about storing AWS credentials in a project’s git repository. The credentials were used for deploying a static site to S3 and the argument was that ”it makes it much easier to get started if the credentials already exists in the project when cloned, and as the repo is a private GitHub repository we don’t have to worry about any unauthorised access”.
Years of being forced to handle Ruby On Rails’s database.yml and similar files has made into a habit for me to always keep a projects credentials and sensitive data in separate files that are ignored by git. Approached with the above reasoning made me realise that I might live in a bit of a bubble when it comes to this. Coming from another background you might very well have a another view on how to handle credentials in projects.
I instinctively felt that the above approach was not ideal. Phrasing a sound explanation to why this is a bad idea took some time; the rest of this post is the arguments I came up with.
Why is this important?
We owe it to our customers and our selves to do as much as is reasonably possible to ensure the security of data and credentials. The key way to do this is by minimizing the places where sensitive data exists. Every time you put the sensitive data somewhere you increase the chances of unauthorized access.
Once you have put sensitive data in a git repo it is going to stay in the repository’s history forever (there are ways around this). You never know where a project folder might end up in the future. Stay safe and make it easy for yourself by handling things like this right from the start of a projects life.
GitHub is a truly awesome service and I have much respect for it and the people behind it. Still I feel that it is unwise to put any sensitive data in code that is hosted on GitHub and similar services. The reason for this is that websites gets compromised, even GitHub has been compromised in the past. It is better to minimize the impact if this happens in the future.
Another reason to keep sensitive data out of private repositories on services is external applications that have access to your repositories via for example GitHub’s OAuth2 authentication. Some oftheapps using GitHub’s API request permission to access your private repos. These are great services that have good intentions but once they have access to your private repositories they also introduce another way to get access your sensitive data if it is available in your git repository. Remember, these services can also get hacked.
Finally. Code and configuration (like credentials and sensitive data) is separate parts of a application and varies between different deployments like staging and production. It comes down to good design to keep these separate. The 12 Factor app method describes a great policy regarding this in the Config chapter: ”the litmus test is whether an app could be open sourced at any time without compromising any credentials”.
Handle sensitive data in a project
The main idea is to keep files with sensitive data separate from files with your application code. The files containing credentials should be added to .gitignore to ensure that they are never accidentally committed. The application code then includes these files as they are needed.
The first time someone clones the project the cloner will need to setup these file with the required credentials. It is a good idea to provide templates for these files in the repository and to include some information on setup and where to find the credentials in the projects readme file. I also suggest using a service like Passpack or Swordfish to handle sharing of credentials and other sensitive data.
Another approach is to store your credentials in environment variables and use something like dotenv to setup these when running locally. On the production server you have these setup automatically for the application when launched. Checkout out how Heroku uses environment variables for application configuration for inspiration on this approach.
One thing I find my self doing a couple of times every week is browsing a Gemfile for a project and wanting to checkout the rubygems.org page for a gem. Sometimes I want to see what versions are available, the docs or checkout the project on GitHub.
A couple of months back I decided to write a little Vim plugin to save myself a couple of key strokes the next time I want to open up a gems page.
Here is a demo:
The plugin adds a command to Vim called :Gem. The command basically takes the current word under the cursor and assumes it is a gem name and opens up http://rubygems.org/gems/<GEMNAME> in the browser. Currently it only works on Mac OS X as it uses the open shell command.