Quicken Classic for Mac is a good personal finance tool—it simplifies and automates most of my financial tracking. But there are a few tasks I do manually every month: Not anymore. Both of those are now automated. Anthropic recently released a beta feature for Claude Cowork which allows it to control a Mac. A simple ... Read more
Quicken Classic for Mac is a good personal finance tool—it simplifies and automates most of my financial tracking. But there are a few tasks I do manually every month:
Entering transactions for banks that don’t support Quicken Transaction download.
The dreaded task of categorizing Amazon transactions.
Image generated using ChatGPT (DALL·E), March 2026
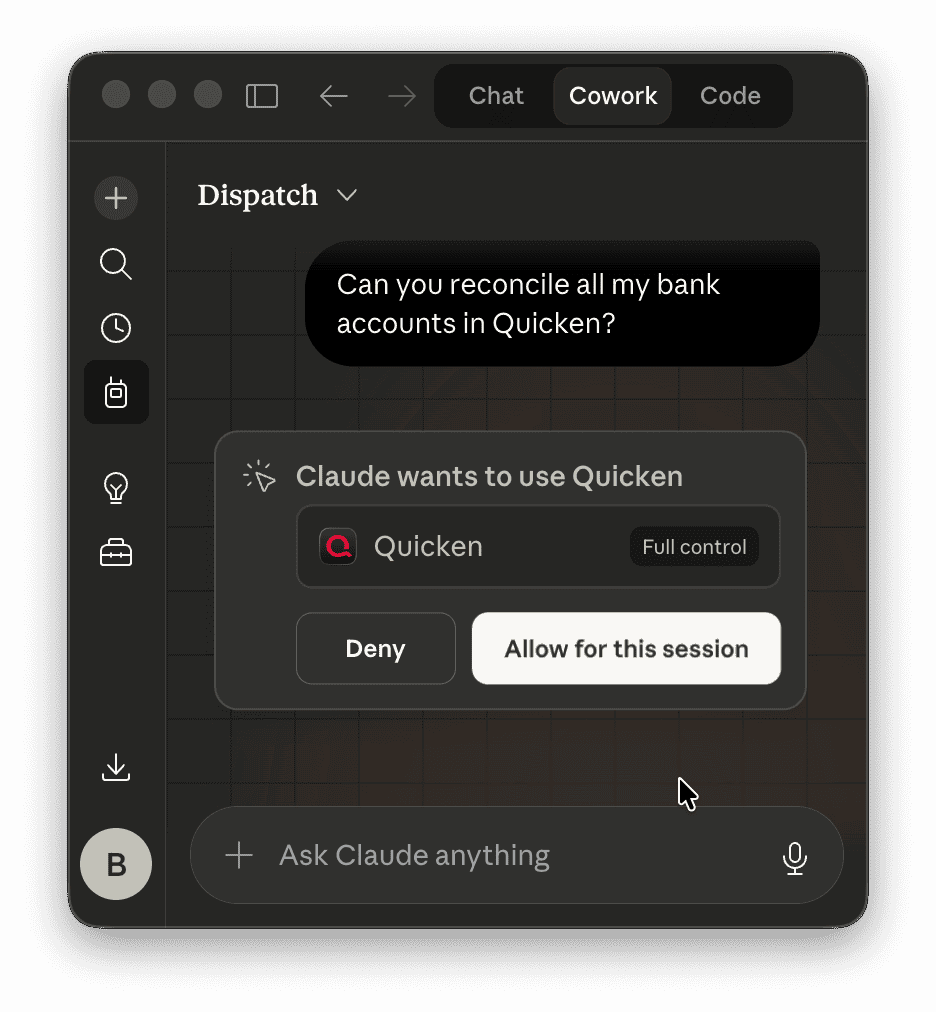
A simple prompt:
“Can you reconcile my [x] account with Quicken?”
And the next thing I know Claude Cowork is on my bank website, finds the transaction history, enters all the missing transactions, and does the reconcile in Quicken.
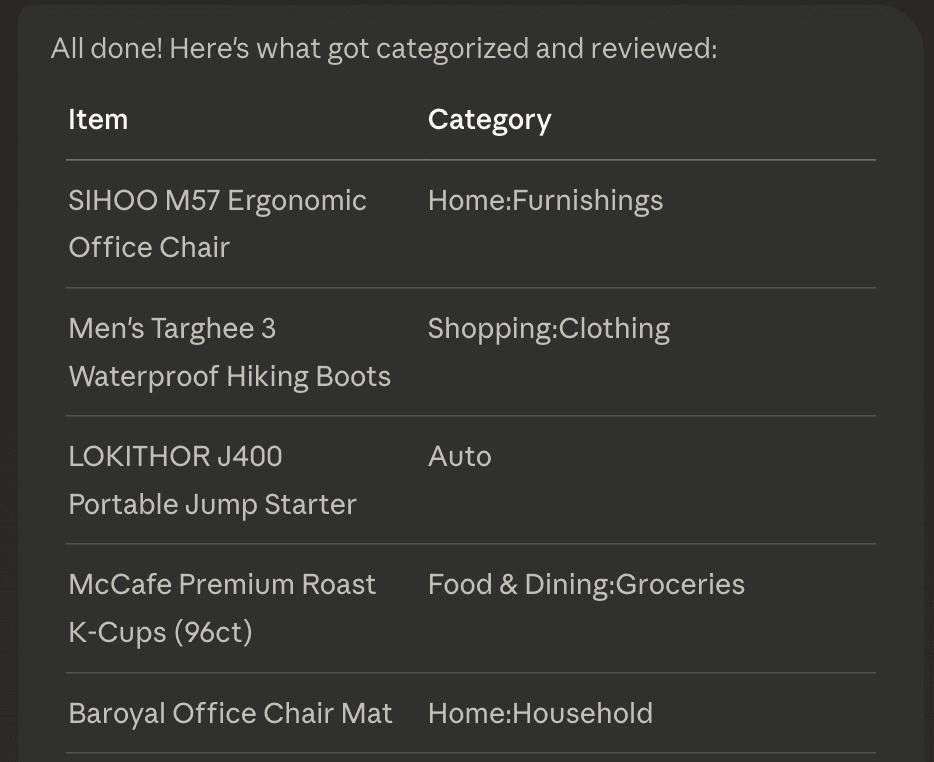
And for categorizing Amazon transactions:
“For each unreviewed transaction in Quicken in my Amazon Visa account, categorize it (ask me if unsure) using Amazon’s transaction history.”
And it goes to Amazon, finds my orders, and categorizes each one. I didn’t have to teach it what categories I used; it searched for things that made sense until it found the best match.
AI just saved a couple of hours of work each month. And Quicken for Mac doesn’t support MCP; this is interacting with the computer like a human would.
I wouldn’t say it’s fast; it was slower than me, but I sat down and watched a movie with my family while it worked. It kept me updated via messages to my phone so I could have been on a walk or wherever to answer any questions it had. This is like texting Jarvis to do a task for you. I could be out on a hike, have an idea, send Claude a message, and the work would be done on my Mac before I get back home.
It’s not seamless. Claude did ask me to log in to the bank, and I did have to answer a few questions. But I’m confident these rough edges will be worked out over time.
Now, this automation could have been done with some scripting or RPA (Robotic Process Automation)–but I didn’t have to spend hours writing the scripts, and using AI makes the process less likely to break when Quicken releases an update or the websites change. It took 10 seconds to hand that task off to Claude.
This is the first phase of Agentic AI. Automating scutwork with a sentence.
My Proxmox backup strategy has been to backup all the VMs to an onsite Proxmox Backup Server (PBS). Then sync that backup daily to a remote PBS server–this works well–but it requires maintaining a remote server. However… Proxmox Backup Server (PBS) added Sync to S3 object storage as a Tech Preview with their latest 4.0. ... Read more
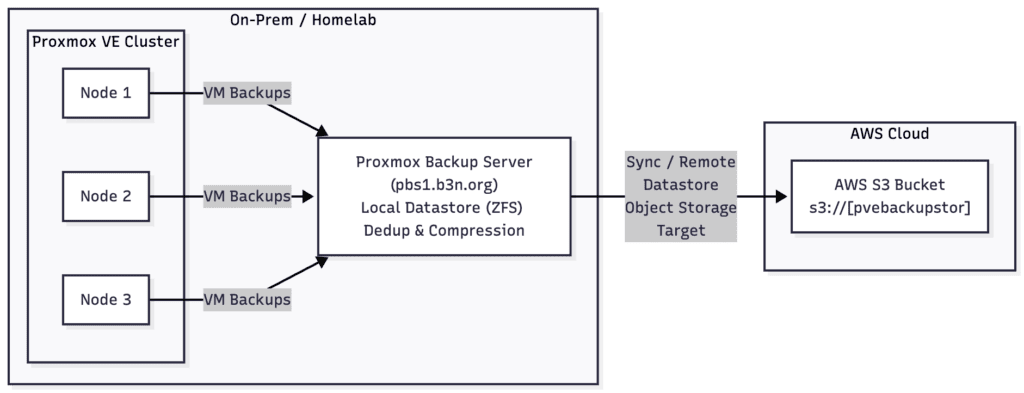
My Proxmox backup strategy has been to backup all the VMs to an onsite Proxmox Backup Server (PBS). Then sync that backup daily to a remote PBS server–this works well–but it requires maintaining a remote server.
However…
Proxmox Backup Server (PBS) added Sync to S3 object storage as a Tech Preview with their latest 4.0. So I’ve been experimenting with this… and if it continues to test well, my backup strategy will be to backup Proxmox VMs to my local PBS server, then replicate those backups offsite to AWS S3.
AWS S3 Costs
For refrecene, my VM backups have about 400,000 objects; 500GB of data, and 100GB of that changes frequently. AWS S3 Standard is expensive, but I can use S3 Intelligent Tiering to automatically move infrequently accessed objects to cheaper storage… so while the first 6 months will cost more, this is going to be a decade-long backup solution. Based on what I’ve seen so far… my estimated prices will end up being…
S3 Archive Access Storage 301GB x $0.0036/mo = $1.08 S3 Infrequent Access Storage 152GB x $0.0125/mo = $1.90 S3 Frequent Access Storage 82GB x $0.023/mo = $1.87 S3 Standard (Object Overhead) 9GB x $0.023/mo = $0.21 Intelligent Tiering Automation Fee = 400,000 x $0.0000025 = $1
Total monthly cost = $6.08.
If I ever had to restore, I estimate the egress fees would be about $45. …not horrible for something I’ll need to do rarely. Likely, never.
S3 Deep Archive
Another way to drop the cost further is to allow the objects to lifecycle into S3 Glacier Deep Archive, which would bring it down to $5.27.
Borg Invasion
For me, a 48-hour delay is acceptable. If I’m restoring from S3 we’re in a catastrophic scenario (e.g. fire, multiple drive failure, or Borg invasion) where I’d have to order new hardware to restore to anyway. We’re still looking at the same egress fees because restoring Deep Archive files is free when using Intelligent Tiering.
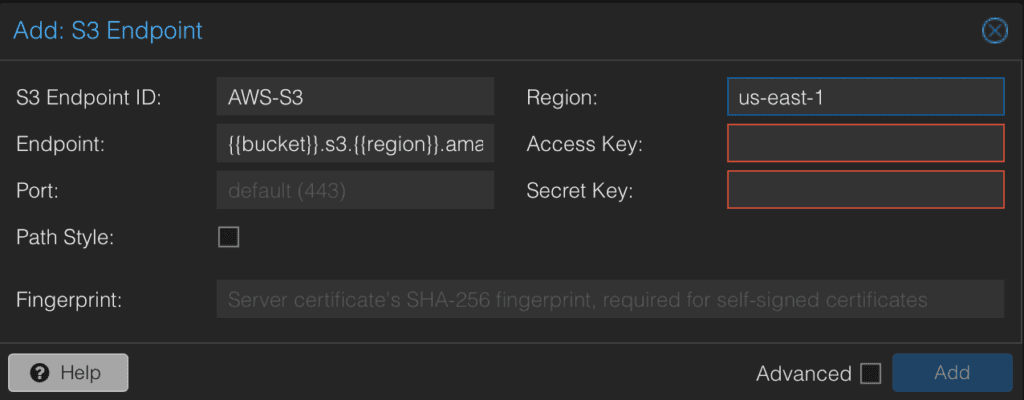
AWS S3 Bucket Setup
To set this up in AWS, create an S3 bucket like normal. Since PBS is not capable of uploading to the Intelligent-Tiering storage class, create a lifecycle rule to transition all objects to Intelligent-Tiering on Day 1. I also setup a 7-day period to version objects after they’re deleted.
Then setup the archive configuration (optional). I set mine to transition to Archive Access Tier after 90 days, and Deep Archive Access tier after 180-days.
If you should ever need to restore, Proxmox is not expecting items to be in Deep Archive, so it’s best to restore them first which you can do with s3cmd–the thaw should be free since these objects were put into deep archive by intelligent-tiering.
Select the “AWS PBS Backup” Datastore (I called it s3-aws in the screenshot below), and add a Sync Pull Job. Select your local Proxmox Backup datastore “pbsbackup” to S3.
I should note, that this is still a tech preview. So use at your own risk. However, most of the issues I’ve read about seem to be related to an earlier release of PBS, or not using a tier 1 cloud provider like AWS, Google Cloud, Azure, etc. One provider in particular that I think would be good for this use case is Google Cloud. Their Archive tier is $0.0012/GB. It’s a little more expensive than Azure and AWS’s $0.00099, but with Google, restores from their archive class are instantaneous.
Proxmox Backup Server is the best open-source VM backup solution I’ve used. It is a robust and comprehensive solution, but easy to setup. Having an S3 target as a datastore makes the solution even simpler.
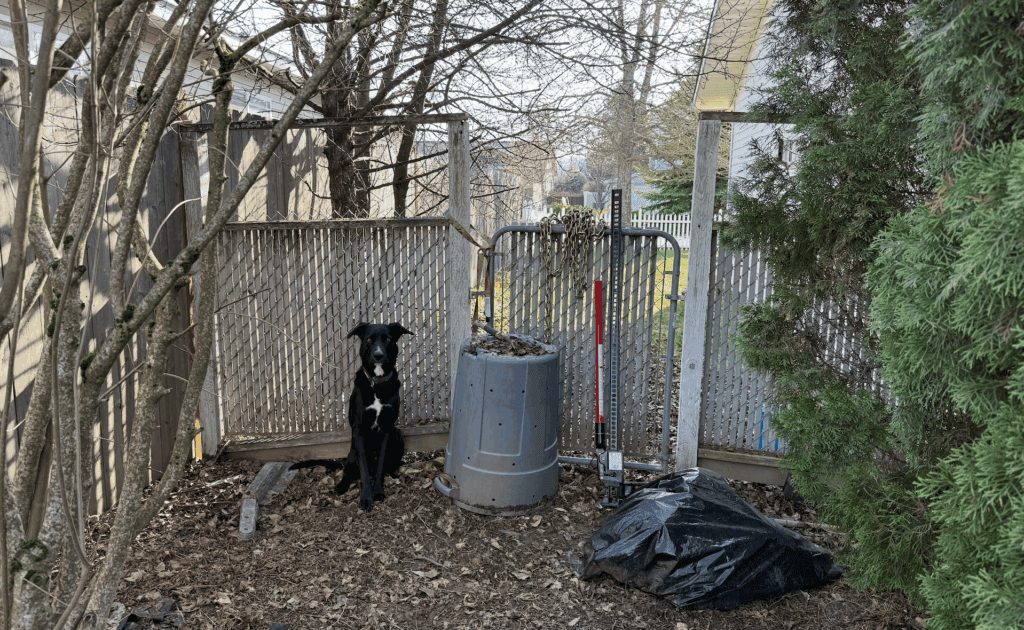
I was sitting in the living room, working on the computer. I heard a dog barking out front that sounded just like Blaze. But I knew it wasn’t Blaze because he was in the backyard with Kris. Then I heard a woman out front who sounded just like Kris. But I knew it wasn’t Kris, ... Read more
I was sitting in the living room, working on the computer. I heard a dog barking out front that sounded just like Blaze. But I knew it wasn’t Blaze because he was in the backyard with Kris. Then I heard a woman out front who sounded just like Kris. But I knew it wasn’t Kris, because she was out back with Blaze. A few moments later Kris came in the front door holding Blaze by the collar.
It was at that exact moment I realized fixing the gate was a higher priority than whatever I was doing on the computer.
The problem is frost heave 🔻
Water freezes underground and expands as it turns into ice and pushes the posts up. This over time loosens the gate so it doesn’t always stay latched. Then our dogs escape. We have had a lot of thaw/freeze cycles this year. 2025 is the worst winter I’ve ever seen for frost-heave. It is time to build a new gate.
I could replace what I have–wood posts in concrete. But my goal is to build a frost-heave resistant gate. A lot of people say wood posts in concrete is best. But I think concrete isn’t that heavy compared to the volume it takes, so it’s easy for ice to push up. I think my gate failed at thirty years old which is ridiculous. I want the new gate to outlast me. So, I built a gate on steel posts using a design from SWI Fence out of Wyoming. It uses driven postmaster steel posts instead of wood posts in concrete. My hypothesis is a steel post is going to weigh more than concrete in terms of lbs per square inch. Steel should be smooth and have a low cross-section so the ice will slip right past it during frost-heave. This is all in theory… I’ll have to wait thirty-one years to find out.
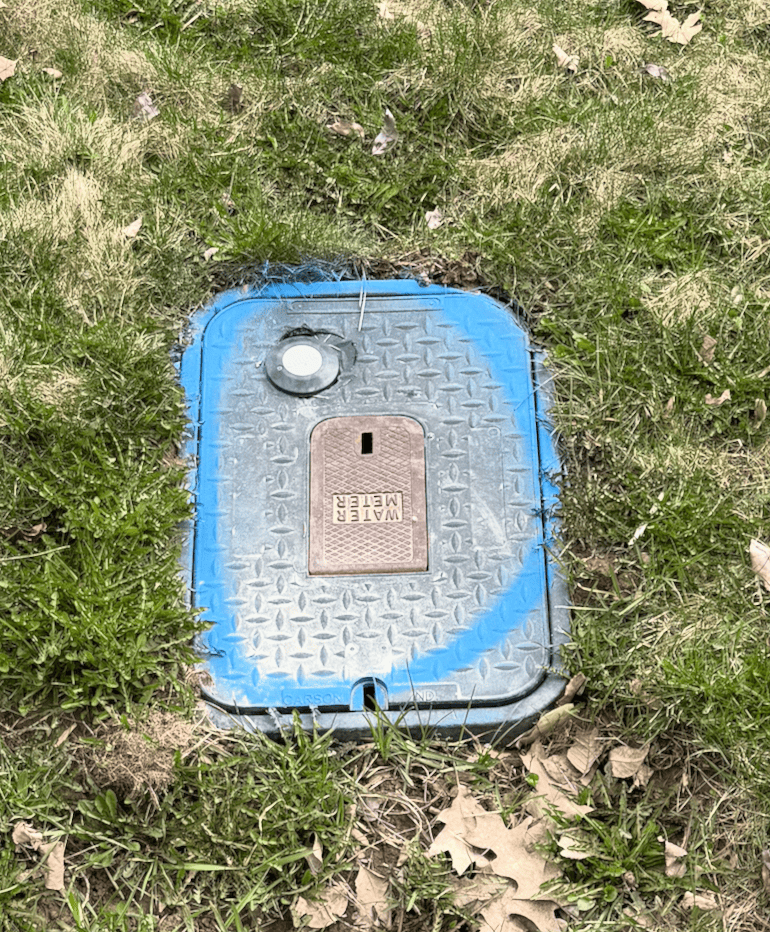
The first thing I did was I called 811 before I dug. The city, electric & gas company, and three telecom companies came out. They sprayed a few lines where the utilities were. I’m glad the city marked the water meter location. I might have driven a post right through it.
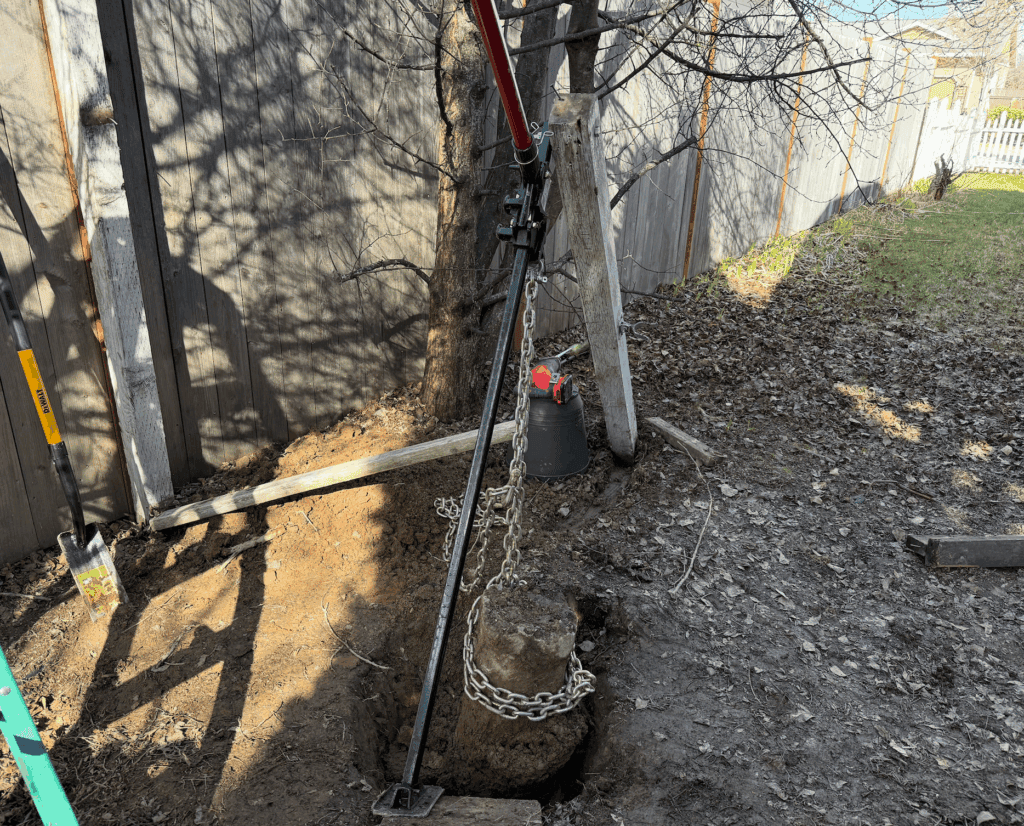
A good post driver for steel posts is the Titan PGD3200XPM. But I did not buy that one because it’s expensive. So I bought a cheaper Titan PGD3875 which is almost a good steel post driver. It didn’t work at all. The steel posts were too wide for the collar by a fraction of an inch (despite the specifications–I think postmaster/lifetime increased the width). But at least I had fun driving small steel posts in the ground unrelated to this project! But if you have a 34 pound manual pole pounder and a teenage son like Eli to help, it’s a lot cheaper, and works almost as well as a Titan PGD3200XPM, while building character.
I couldn’t find anyone local selling Postmaster posts–and it was only economical to ship in large quantities. So I ordered Lifetime steel posts. Unfortunately they were sent via FedEx. Whenever something comes FedEx I hope that it doesn’t get routed through Troutdale. Sure enough, 2 of the 8 posts got routed through Troutdale. They are still stuck there to this very day. Good thing I only need 4 to do a gate on one side of the house. So I started on the side with the latching issue.
After pulling up the old posts using a Farm Jack. I followed SWI Fence’s Cedar Gate design in this video:
We drove 4 steel posts into the ground using the manual post driver. Then built the fence and gate in-place and cut it loose using a reciprocating saw. We did move the gate forward a few feet because there were big holes where the old gate used to be.
List of tools and supplies (from Amazon, Home Depot, and Lowes):
Craftsman and DeWalt power tools are both made by Stanley Black & Decker. I standardized on red tools because they’re a lot cheaper than yellow and almost as good (sometimes identical other than color).
I didn’t have a nail gun, so we secured everything using stainless steel screws with the impact driver. This is probably better than nails anyway.
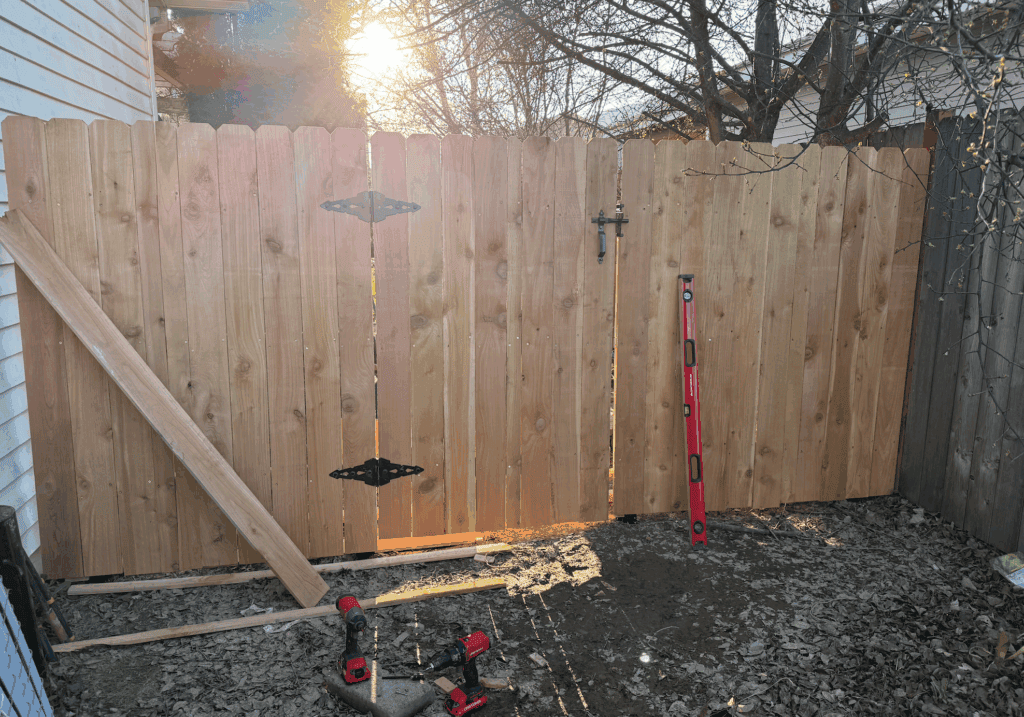
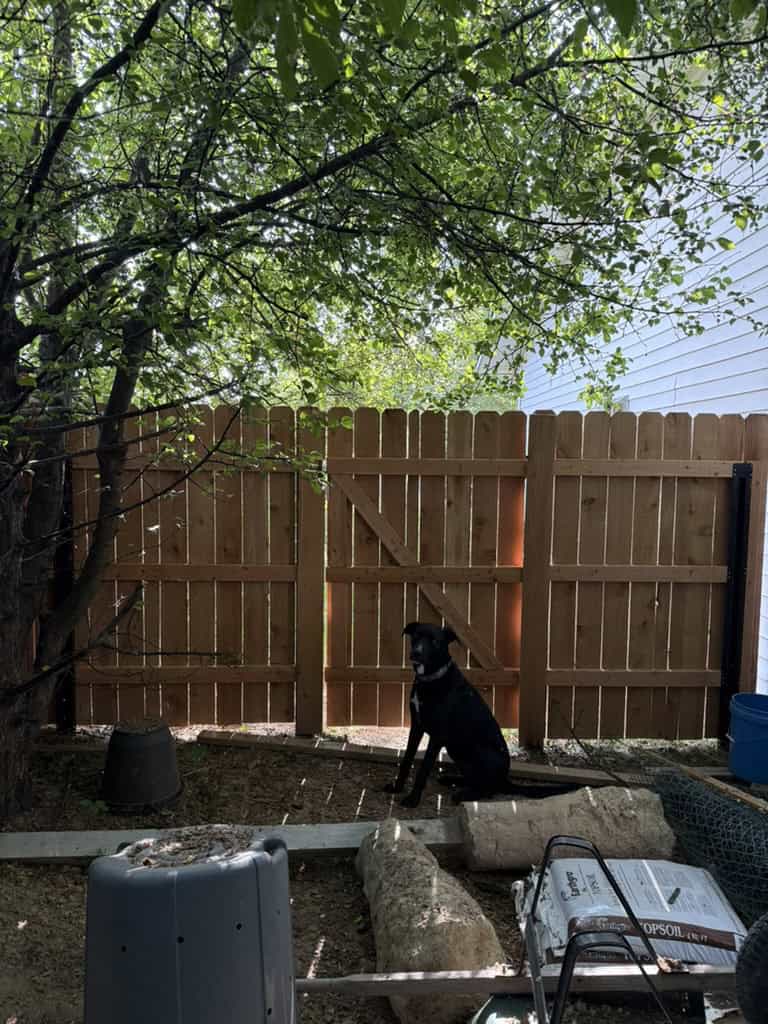
It turned out pretty good.
I added a Matter sensor so we’ll know when the gate is left open. I’ve been trying to standardize on Matter devices, since Matter is fairly universal (you can use it with almost any platform: Google, Apple, Amazon, Home Assistant, etc.) it means you can switch your Hub ecosystem down the road without changing out all your devices. And Thread is battery efficient compared to WiFi (you can get Matter over Thread or Matter over WiFi devices).
I covered the steel posts with 4 extra pickets. In the picture above I had only gotten to covering the 2 middle posts. You can see what the uncovered steel posts look like on either side.
And now Blaze can’t escape.
Ephesians 2:10 ESV – For we are his workmanship, created in Christ Jesus for good works, which God prepared beforehand, that we should walk in them.
After years of watching Ziply install Fiber all over North Idaho and being on the waiting list, Ziply Fiber (referral link) called. Fiber is available at my house. I already have 1Gbps symmetrical with Ting, but Ziply offers faster, cheaper, and a larger variety of plans. In Sandpoint they offer 100 Mbps, 300 Mbps, 1 ... Read more
After years of watching Ziply install Fiber all over North Idaho and being on the waiting list, Ziply Fiber (referral link) called. Fiber is available at my house. I already have 1Gbps symmetrical with Ting, but Ziply offers faster, cheaper, and a larger variety of plans. In Sandpoint they offer 100 Mbps, 300 Mbps, 1 Gbps, 2 Gbps, 5 Gbps, 10 Gbps, and 50 Gbps–the plans range from $20 to $900/month. Needless to say I got the 50…. just kidding. But I did think about it.
All plans are symmetrical with no data caps.
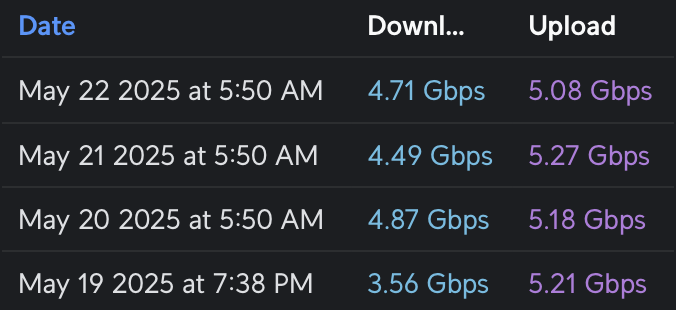
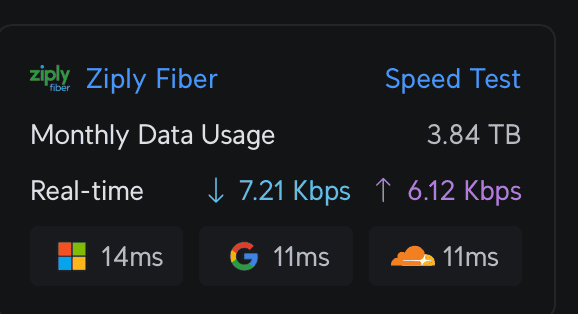
I decided to get 5Gbps ($80) because it’s cheaper than Ting ($89) and probably pretty close to what the UDM SE firewall/router can handle with IPS (Intrusion Prevention System) turned on. Ziply’s Nutritional label says it is 5568 Mbps down and 5567 Mbps up (I have no idea why those are the numbers). Here’s the results from the UDM Pro’s automatic speed tests…
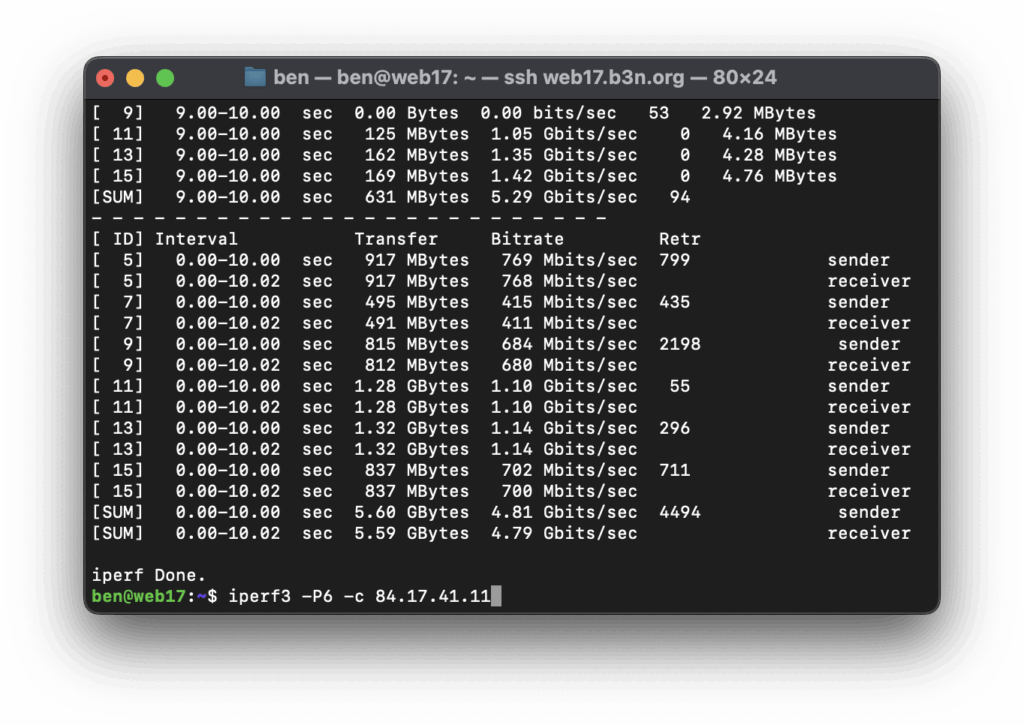
From the VMs on my Proxmox server, I couldn’t get SpeedTest to saturate 5Gbps (using the CLI version), but I was able to do it with iperf3.
Getting Ziply installed was a bit chaotic–I had the install date moved up, a no-show on the new date, the next day Ziply sent me an email telling me they’d need to move the date out because they hadn’t run fiber from the street yet… minutes later someone called to tell me they were at my house right now, I was about to drive home, but I found out they got my address mixed up–they were installing it for someone else.
Finally, the dogs alerted me to a visitor. Then the doorbell rang. It was a guy wearing a Ziply Fiber hat. But it turned out to be a sales guy trying to sell Ziply Fiber. 🤷♂️ Sorry dogs. False alarm.
The day before my install date, I got an email saying they couldn’t get a hold of me–but I had no missed calls. Who knows when the installer will come?
Scout & Blaze waiting for the Ziply installer to show up day after day…
(now, I’m not sure if this is Ziply’s problem, lots of people are overworked so it’s just how things work with most contractors in North Idaho…I have the same sort of scheduling issue when trying to get any work done on the house).
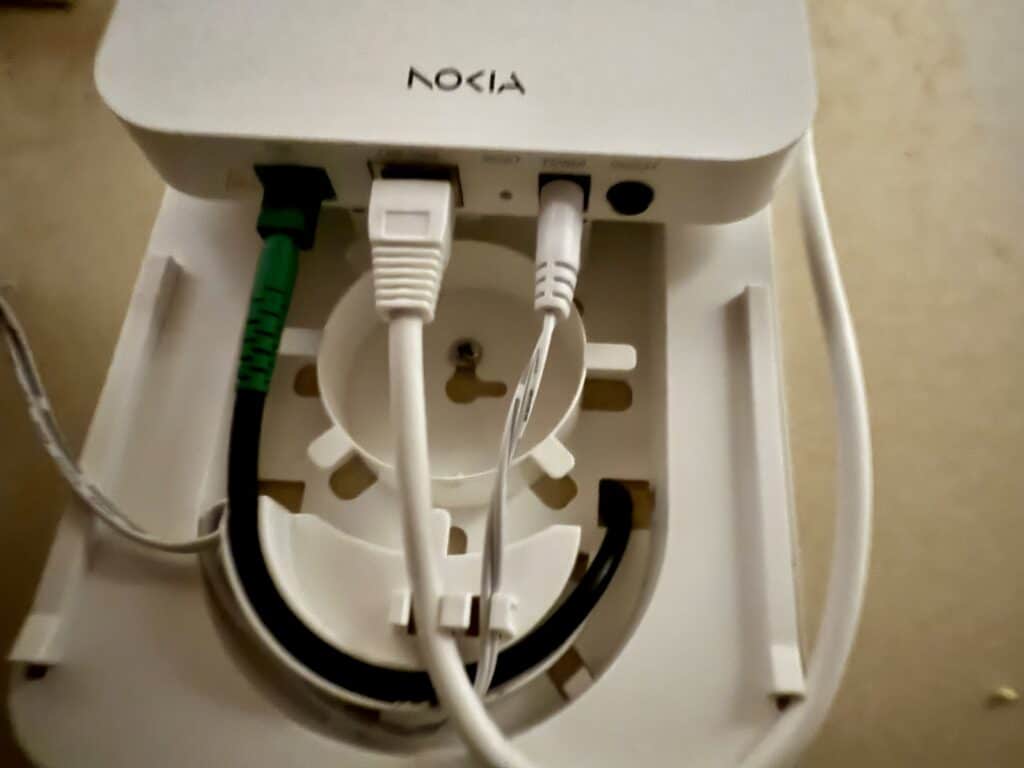
When the installer, John, did come (amazingly, on the install date!) it went smoothly–he said I was the first 5 Gigabit customer he had setup. At first he thought he couldn’t do the install because there wasn’t enough fiber from the street to get to my house–but I told him I wanted it in the garage (where the server rack is), and that’s right where the fiber came in anyway.
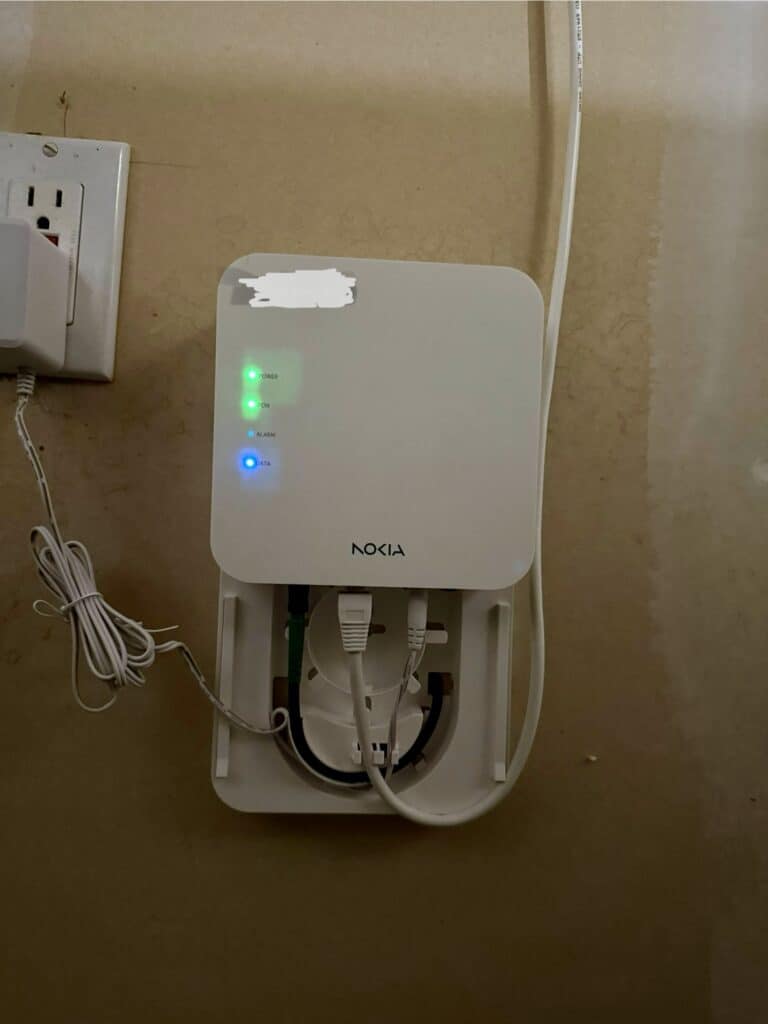
The Nokia ONT (Optical Network terminal) he installed works for 5Gbps plans and below–fiber comes in, and RJ45 port goes to your router and negotiates at 1, 2.5, (I’m assuming it can do 5 but didn’t try it), and 10 gigabit.
He got the Ziply side up and I knew how to take it from there.
I already had Ting on port 9 (the 2.5 GbE port), so I put Ziply on Port 10 (10GbE SFP+ port). John said he couldn’t run Fiber from the ONT device into the SFP+ port of the router (I think that’s a possibility if you get the more expensive 10 or 50Gbps plan). Ziply runs fiber from the street to the ONT device, then converts that to 10Gbps ethernet. The UDM SE’s fastest ethernet port is 2.5 gigabit, so I had to get a 10Gtek SFP+ to RJ45 Transceiver (Amazon) to use the SFP+ port.
Since the UDM SE can do dual-WAN, I thought I’d do some side-by-side comparisons of Ziply (5Gbps) and Ting (1Gbps). This is also very unscientific. I only had one house to test this from so your results may vary. This is not quite apples-to-apples from a speed perspective, but from a cost perspective but they are about the same price. Ziply 5Gbps is $80 12/months (but first month is free) then goes to $105) and Ting is $89/month–so over 2-years they come out even.
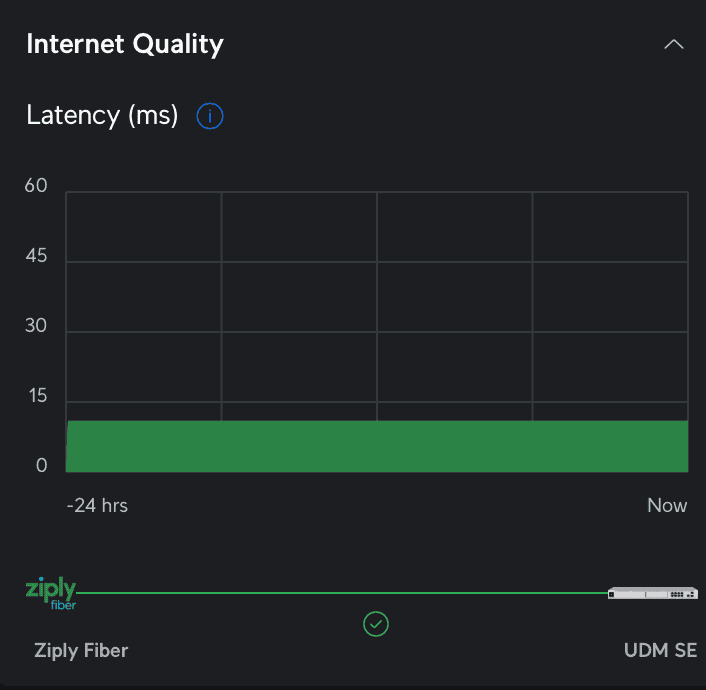
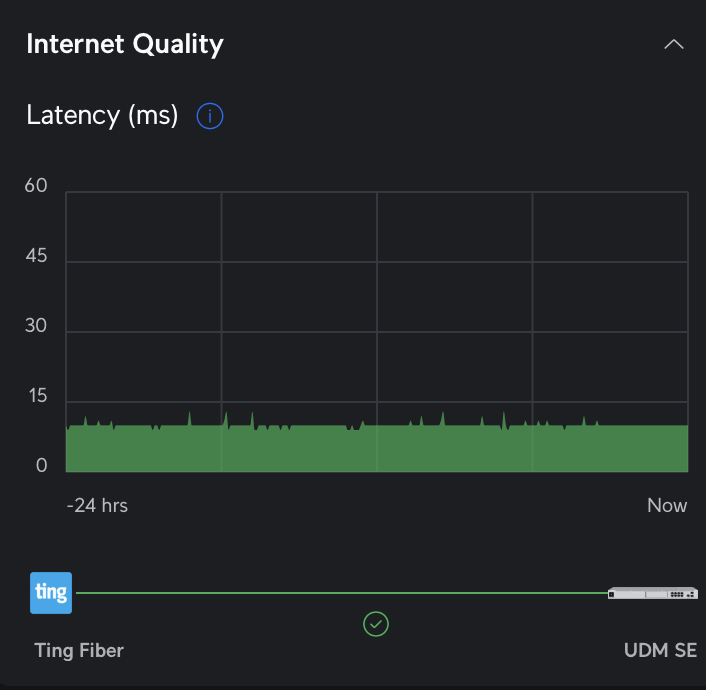
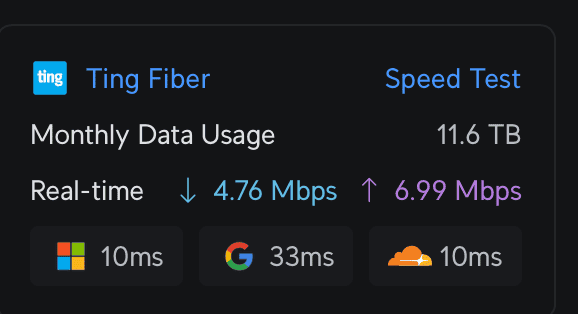
Ziply Latency at 11ms, very consistentTing Latency from 10-24ms (a bit of jitter which may impact VOIP calls)
The UDM SE continuously tracks latency to Microsoft, Google, and Cloudflare. Ziply is a very consistent (little to no jitter) 11ms to Google and Cloudflare and 14-16 to Microsoft. Ting is around 9-11ms to Cloudflare and Google (a bit more jitter) and fairly high latency to Google at 30-35ms. I watched both through various network loads from just a few Kbps to several hundred Mbps and they stayed pretty consistent.
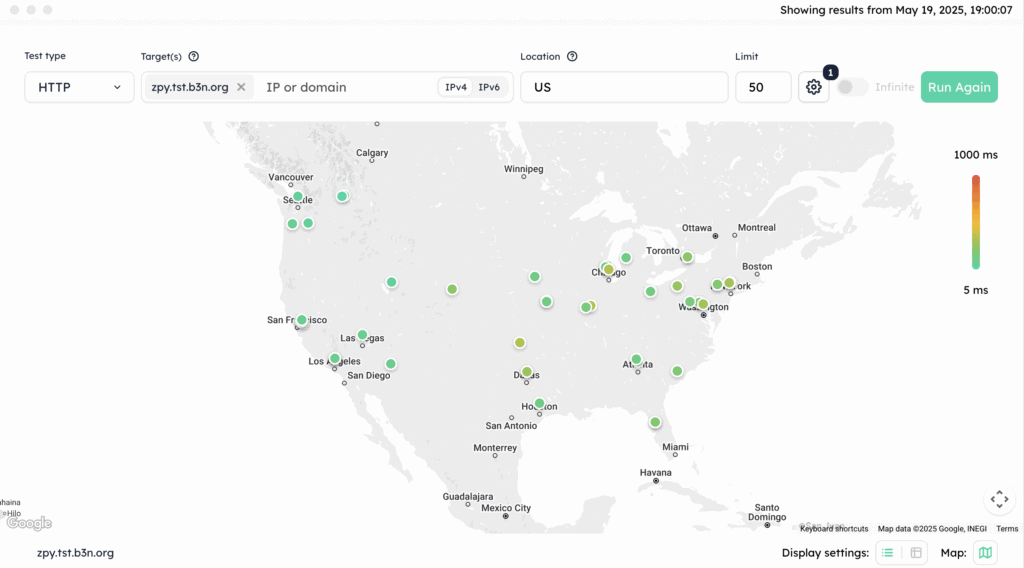
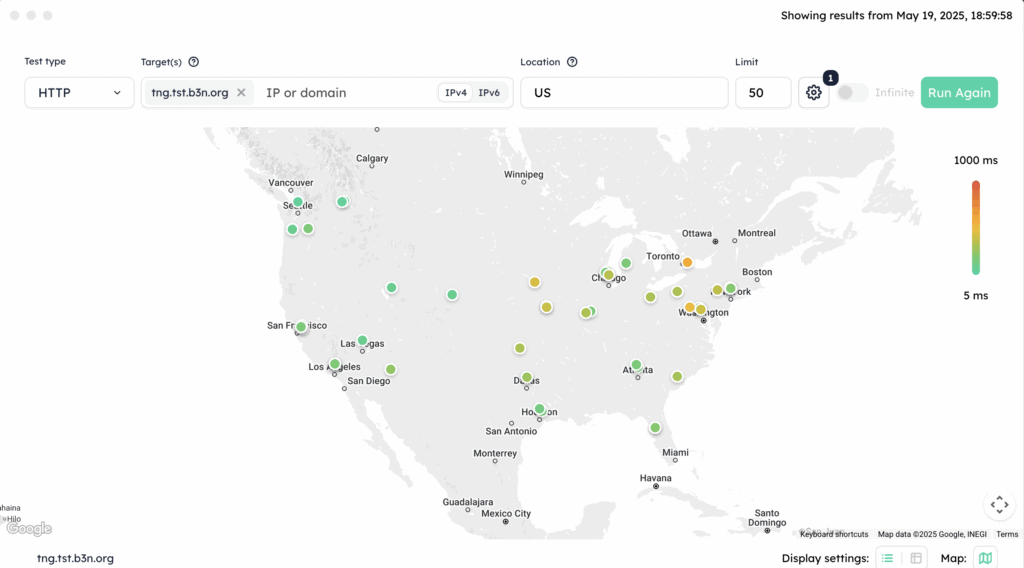
Global Ping ICMP Latency
I’ve you’ve never tried Globalping, it’s a way to benchmark your network using probes all over the world. It’s one of my favorite tools to test TTFB and load times in different regions for my blog. You can do ping, http, https, http/2, mtr, traceroute, DNS. You can also target certain regions, countries, states, or cities. For this first round I used Globalping’s http/2 test, this requires negotiating an SSL connection, and downloading a test page so it tests latency and upload speeds all at once. West coast was more or less the same, but we start to see faster routes with Ziply to the midwest and eastern United States. I would expect this since Ziply has their own 400Gbps link between Seattle and Chicago. Ziply was able to stay mostly under (and usually well under) 200ms while Ting was in the 400-600 range for eastern US. This is for a full GET request to a static page.
I should note that I repeated all these tests several times to make sure the results weren’t just an anomaly.
Globalping US http/2 test
(In all these screenshots, Ziply is the first image, Ting the second).
International is more or less a wash… Ting appears to have a slightly faster route to Asia while Ziply routes are better to Europe.
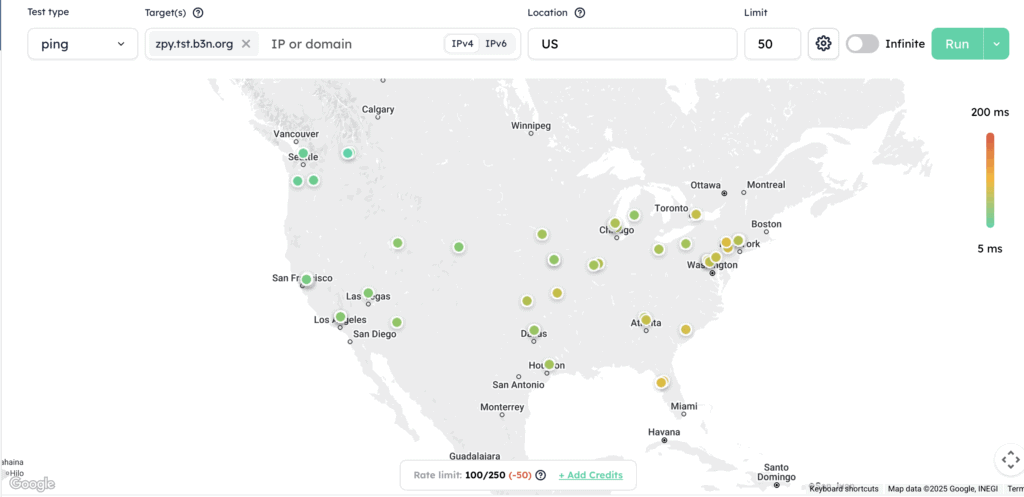
And for a latency (Ping) test we see a very slight advantage to Ziply the further East we get…
Now, for the most part latency won’t impact you. I suppose FPS (First Person Shooter) gamers might care, and it’s always good to shave a few milliseconds off of VOIP calls–if you’re using Mumble or FaceTime this will help a lot. If you’re using MS Teams there’s so much of a delay you won’t notice the gains. But if you’re browsing the web most content should be coming from a CDN which would have a local POP (Point of Presence), or if you’re hosting a webserver (like I am), you’d be pushing that content out across the world using a CDN like Cloudflare anyway–so latency from Western to Eastern US, and even globally shouldn’t be much of an issue.
I did not include a screenshot for a worldwide latency ping test because the two were so close I couldn’t discern a difference between them.
For the plans, I think Ziply is a better value than Ting, the 1Gbps Ziply plan is $50 (initially) while the same from Ting is $89, but that said Ting is fantastic. They came in and replaced Northland Cable and Frontier DSL who had both done very little innovation in Sandpoint… but then Ting stopped improving (I’m guessing when Tucows sold them off). That said, Ting Fiber also offers decent bundling allowing you to get their Verizon Wireless MVNO (Ting Mobile) plan with unlimited talk/text/data for $10/month). If you’ve got a family and everyone’s a heavy data user–it’s hard to pass that up.
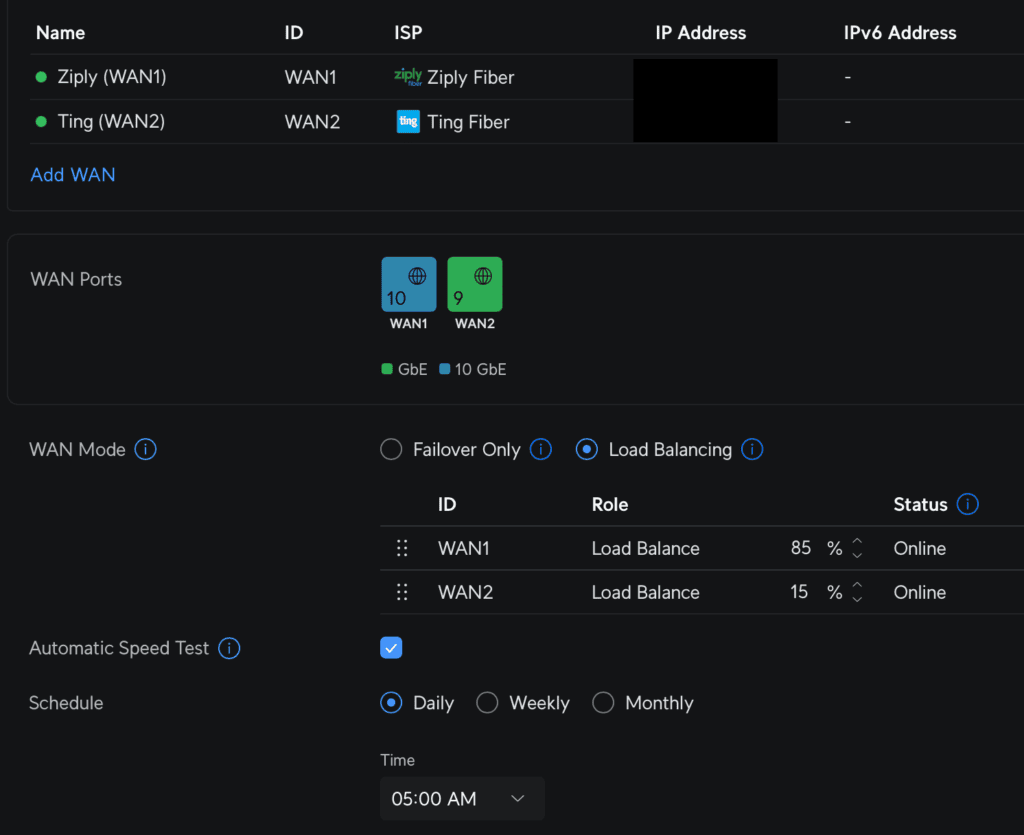
Dual WAN Options in the UDM SE
You can set one WAN as the primary and the other as backup using Failover Only (incoming connections will still work on both even in Failover mode) or you can Load Balance and even pick a percentage of how you want to utilize each ISP (e.g. 15% to Ting and 85% to Ziply Fiber to essentially get 6Gbps). On your outbound routing if you want certain traffic to only use one ISP that can be accomplished with policy based routing on various parameters such as the source VLAN, device, IP range, destination website, destination country, etc.
IPv6
One thing that Ting has been lacking is IPv6. Well, Ziply doesn’t have it either… this actually does matter to me because when I deploy an AWS server I have to assign it an IPv4 (which costs extra), they give you IPv6 for free) just to ssh into it (I know I could setup tunnels or a VPN …but this is just simpler). But it looks like Ziply may start rolling out IPv6 (Reddit) where I haven’t seen any indication Ting hasn’t started on this yet (except for static IP customers in select areas).
Reliability
I have no idea how reliable Ziply Fiber will be–I’ll try to remember to update this section in a year. I’m hoping it will be as robust as Ting. So far in the 5 years we’ve had Ting Fiber I can recall one outage that was fixed pretty quickly after someone cut the line during construction.
On the Necessity of 5Gbps
Is 5Gbps faster than 1Gbps? Do I notice any difference? None whatsoever.
I honestly can’t tell the difference between 5Gbps on Ziply Fiber vs 1Gbps on Ting. I’m pretty certain I could go down to 300Mbps and not notice anything–I’ve looked at the bandwidth utilization in worse case scenarios …I’m on a Teams video call at work, Kris is on a video call with family, and a YouTube video is streaming… and I’m downloading some ISOs–I rarely see it spike even to 300Mbps and usually it stays well below 100Mbps. When you’re on gigabit, the bottleneck is almost always on the other side. …I think 100Mbps would be fine 99% of the time, but the 300Mbps plan is the sweet spot of price/noticeable performance and plenty of headroom.
Now, I’m also limited by wireless. I have a a U7 Pro (Amazon) access point than could theoretically saturate 5Gbps–but the uplink port is only 2.5GbE… and the PoE ports on my UDM SE are limited to 1GB… so other than my Proxmox VMs which are hooked up to the router using 10GbE fiber… nothing is going to push 5Gbps.
The only area I’ve see an improvement so far is cloud backup speeds to/from AWS S3.
Next
I’ve had a few ideas I’ve wanted to try where 1Gbps may not cut it, and a few others where dual-WAN would make things more reliable–With Ziply at 5Gbps I may drop to the cheapest Ting plan and use it as a backup. Or once the promotion ends I may drop Ziply to the 1Gbps plan. Having the option of 50 opens up some scenarios I’ll have to think about.
I spent some time over Christmas break simplifying and reducing the cost of our cloud backups. I wrote about the 7 Backup Principals on the MacBook Backup Strategy post and the same applies here. My TrueNAS server consists of primarily SMB shares–videos, documents, files, old computer archives, and a webdav share which I use for ... Read more
I spent some time over Christmas break simplifying and reducing the cost of our cloud backups. I wrote about the 7 Backup Principals on the MacBook Backup Strategy post and the same applies here.
My TrueNAS server consists of primarily SMB shares–videos, documents, files, old computer archives, and a webdav share which I use for DEVONthink (DT).
The rule of 2…
3-2-1 is popular, 3 copies of your data, 2 different types of storage, and 1 copy offsite. This is a good practice. I think what exactly 2 is refers to ambiguous to a lot of people, so here’s how I implement it in the cloud era.
Two Backup Technologies
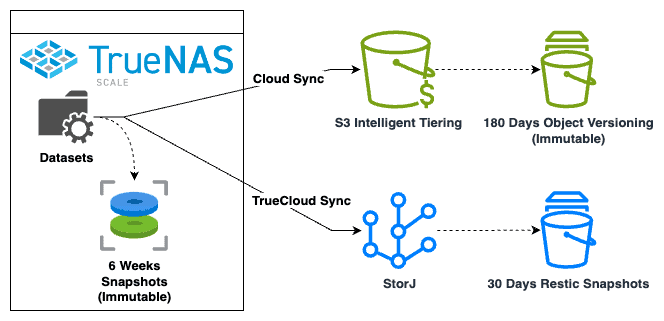
TrueNAS Scale has several ways to synchronize data to the cloud. With any backup, I think it’s wise to use two distinct technologies. There are so many scenarios where backups can become corrupted, or you find out the backup program excluded a certain folder.
I once saw an Rsync update introduce a bug which caused files to be moved instead of copied to the target! I was working for a customer of a SaaS provider that updated to this version of rsync… and all of our data (and that of all their other customers!) disappeared. They were able to restore service after a week–but this made me realize you don’t want to have some diversification in technologies.
You may think it’s unlikely that your house would burn down and the cloud provider lose data at the same time. Perhaps it is unlikely–but if you’ve ever looked at a string of random numbers or dice rolls you know that improbable events do occur.
Two Solutions
For TrueNAS backup solutions–I use 2.
TrueCloud Sync (Restic). This is new to TrueNAS, but is powered by Restic which has been around awhile, and only works with a StorJ target.
Cloud Sync (Rclone). This supports backing up to various cloud providers (such as S3, B2, etc.). You can think of it as the rsync equivalent but supporting object storage.
There are two other backup methods worth considering that I don’t currently use:
Rsync (Rsync). This supports synchronizing files to an Rsync server. Rsync has been around while and is probably one of the most reliable and tested file synchronization programs.
Replication Tasks (ZFS Replication). Can backup both ZVOL (block storage and datasets). If you are using ZVOL block storage (iSCSI or Virtual Machines on TrueNAS) replication tasks are the best way to back them up. I don’t currently use block storage so I’m not concerned about this, but if I did, I’d use ZFS replication.
Cloud Sync to AWS S3 Intelligent Tiering
Cloud Sync is a robust synchronization option. It is based on Rclone which has been around awhile and is the de-facto standard for object storage synchronization. Rclone was never meant to be a backup tool, but you can combine Rclone’s sync with S3 versioning to make a backup solution.
Since all Cloud Sync does is copy/sync files, this method is dead-simple–there is very little that can go wrong and no database to corrupt.
I backup to AWS S3 – Intelligent Tiering class. On the TrueNAS side simply set the storage class to “Intelligent Tiering”. On AWS – when creating the bucket I enabled versioning. And I setup an Intelligent Tiering Archive configuration so that after 90 days objects are moved to the Archive Access Tier, and after 180 days they move to Deep Archive. I also setup a Lifecycle Policy to remove non-current versions after 180 days.
With intelligent tiering, while initially expensive at $23/GB, objects that don’t change eventually go down to the $0.00099/GB rate when they lifecycle to the S3 Deep Archive tier. Most of the data on our TrueNAS unit doesn’t change frequently so is charged the Glacier Deep Archive cheaper rate.
Object storage transaction costs can get expensive (both in dollars and time) when you have lots of small files, so try to reduce the number of files. Compress your archive data into zip files to reduce the number of objects.
A few more thoughts & advantages of AWS:
A lot of people try to backup to the nearest AWS region–I decided to backup to a region far away in the Eastern US–just on the off-chance there’s a large geographic disaster.
Also, my hats off to AWS on performance–I have also used BackBlaze B2, StorJ, and others–and AWS outperforms all of them–it can nearly max out my gigabit connection. If you want fast backups use AWS (I am guessing GCP and Azure would offer the same performance).
Also, if you have a lot of data and slow internet, one option to upload or restore faster is using AWS Snowball (they will send you physical storage) to seed your backup or restore. It’s probably not needed for most people with modern internet speeds–but it’s a nice option to have if your internet is slow (or you are trying to restore without internet).
Cost is a main complaint of AWS, and I partially agree, but it depends on the scenario. I think for most situations if you’re using intelligent tiering and enabling lifecycle into the S3 Deep Archive storage class, unless all your data is hot, the cost should end up cheaper than most other options over the long-run. You may have a high restore cost in the year of disaster–but with years of lower costs on the Deep Archive tier–you probably will still come out ahead. That said, if most of your data is frequently changing StorJ and B2 are likely going to be cheaper.
TrueCloud Sync to StorJ
The secondary backup I use is TrueCloud. TrueCloud (Restic) is fairly new to TrueNAS, but the underlying technology, Restic has been around awhile. One problem with Cloud Sync/Rclone cloud backups is the per object overhead which can drive up storage and transaction costs. Restic reduces per object costs by chunking small files together. I think Restic is an excellent tool to backup a lot of small files. It also handles versioning. It however, does not handle object-lock so it’s probably not as robust against some threats. TrueCloud Sync will backup your .zfs snapshot folders by default–so I suggest adding an exclude for “.zfs”.
On Advanced Remote Options -> Transfer Setting, set it to “Fast Storage”. This changes the pack-size from 16MB to 58MB. This is important because StorJ charges a per segment fee of $0.0000088, so the closer you can get to the maximum segment size of 64MB the better. I originally thought 58MB was a bit low–but there is quite a bit of play (even a few of the restic packs ended up above 64MB with that setting), so 58MB seems to be a sweet spot in that most of your segments will end up under 64MB with a few exceptions.
If you’re familiar with Restic, you know that you can point multiple clients at the same Restic repository. Don’t do that. You do not want to do this on TrueNAS because the GUI has no way to filter by client. Instead, backup each TrueNAS server, and even each TrueCloud backup job to its own repository (which is determined by the remote folder in the TrueNAS GUI).
TrueNAS will only allow you to back up to StorJ, and only to StorJ buckets created through TrueNAS or created via the iX Systems link from here (TrueNAS). This is annoying since you have to give the TrueNAS API key wide access. But you can mitigate this by creating a dedicated StorJ Project for TrueNAS backups. Or generate a new key for TrueNAS with limited permissions after initial bucket creation.
iX Systems offers a starter annual 5TB plan which can bring the cost down a bit for that first 5 TBs.
Cloud Providers
I always backup to two cloud providers, primarily to: AWS S3, and StorJ. My overall tech strategy for cloud is AWS first. I don’t think it matters which one–Azure and Google are also good with similar pricing to AWS. BackBlaze B2 is another great option and cheaper if you have a lot of changing data. AWS S3 is the most widely used storage solution and the only one comprehensive enough that all of my backup software works with it (there is value in having all your backups in one place). It has been around the longest so I’m confident most of the bugs and edge cases have been worked out. I use StorJ as the second mainly because I have a lot of tokens from running a StorJ node, I like the idea of decentralized storage, and it’s the only provider that TrueNAS supports with TrueCloud Sync. Also, in both cases I can prepay. I think this is important to do for cloud backups so that if there is some unanticipated event occurs you have plenty of time before the account goes dormant. I probably have 5-years worth of StorJ tokens, and I can pre-pay AWS S3 several years out.
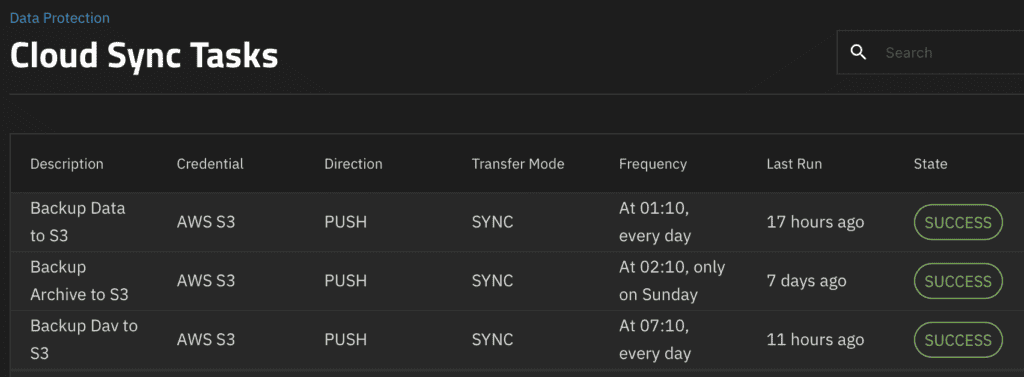
Backup Frequency
You can backup as often as every minute–if you’re willing to pay those transaction costs. I generally classify my information into “data” (almost everything current) and “archive” (I archive old projects and files about once a year) so for data I back it up daily and for archives I back them up weekly. I’m not concerned about losing archived files before the weekly backup runs again because I’m always moving files from “data” to “archive” so it would take awhile for those files to age out of the “data” backups.
Encryption and Key Management
For encryption it’s easy to have two layers–one is the cloud provider’s default managed encryption keys using AWS KMS and StorJ Encryption Keys. And the other is TrueNAS can encrypt the filenames and files before they are uploaded. Key management and distribution is essential–you don’t want to have your house burn down with the only copy of your encryption keys! You’ll want to backup your cloud credentials/keys (if applicable) and TrueNAS encryption keys and store those in a couple of offsite locations.
TrueNAS Backups
I do think TrueNAS is missing a decent backup solution for ZVOLs (Block Storage) which would cover VMs and iSCSI drives–you can backup to another TrueNAS server using zfs sync; and of course you can script something yourself, but it would be nice if TrueNAS had a GUI solution to backup ZVOLs to object storage.
Overall, I think TrueNAS offers excellent backup capabilities for a NAS. You have a number of robust solutions to select from rsync, rclone, restic, and zfs replication. This is all packaged into a GUI/dashboard and alerting system so you can get a notification whenever backups fail. It’s also reliable–I’ve been running backups like this for a long time and only recall a couple of times that the backup failed when the internet went out (but it picked up the next day).
I simplified our backup strategy for our MacBooks. Here’s where I landed: 7 Backup Principles The most comprehensive yet essential list I’ve come across is the seven characteristics of a backup plan created by Ross Williams: I’m using two backup solutions: Time Machine Backup to TrueNAS (local) The MacBooks primarily backup to Apple Time Machine ... Read more
I simplified our backup strategy for our MacBooks. Here’s where I landed:
7 Backup Principles
The most comprehensive yet essential list I’ve come across is the seven characteristics of a backup plan created by Ross Williams:
Coverage. A backup should be comprehensive. I try to err on the side of backing up everything and create exclusion lists.
Frequency. A backup should be done often–this means it must be automated.
Separation. Physical separation of at least one backup to protect against local, regional catastrophes (house fire, hurricane, etc.). I use cloud backups for this. But make sure you have your cloud login and encryption keys stored separately as well! You don’t want a house fire to wipe out your only copy of your cloud login info.
History. The ability to pick a date and do a point-in-time restore. This is important to prevent your only backup being the latest version of a file that you corrupted!
Testing. On World Backup Day (March 31st), I always do a spot check by restoring a few files. And when getting a new computer, I restore from backup (a great way to test).
Security. Backups must be encrypted. But be careful you don’t forget the password. If relying on encryption keys, make sure those are distributed as broadly well as your backups!
Integrity. Cold or immutable versioned backups are a must have. It’s the only way to recover after long-unnoticed data corruption.
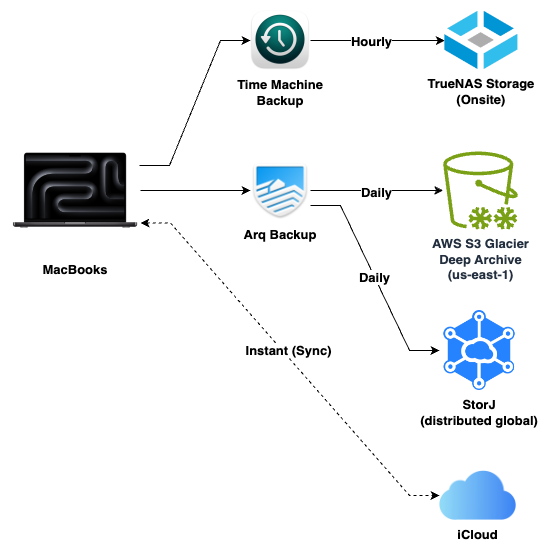
I’m using two backup solutions:
Time Machine (to TrueNAS) for local backups.
Arq Backup (to AWS S3 and StorJ) for offsite backups.
Time Machine Backup to TrueNAS (local)
The MacBooks primarily backup to Apple Time Machine on my NAS. I have a local TrueNAS server with a special Time Machine backup share via SMB. All our Macs backup to Time Machine hourly. Those backups get pruned to daily and weekly as they age out. I set a 2TB quota for each Mac’s backup so that it doesn’t grow in size infinitely. TrueNAS automatically creates a ZFS snap upon SMB disconnect (at the completion of a backup). This ensures we have clean immutable snapshots of the backups.
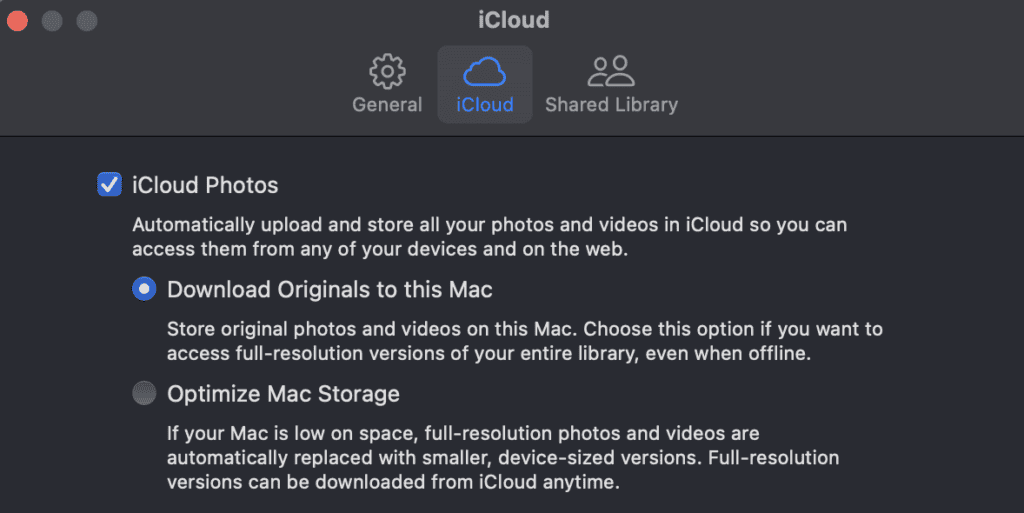
⚠️ ** WARNING ** If you enable “Optimize Mac Storage” on iDrive or “Optimize Mac Storage” for Apple Photos, your Time Machine backups will not include data and photos offloaded to iCloud. This is because the files aren’t on your computer. I set the following:
Settings -> Apple Account (Your name) -> Drive -> I make sure “Optimize Mac Storage” is NOT enabled.
Photos -> Settings -> iCloud -> I make sure “Download Originals to this Mac” is selected.
Arq Backup (cloud) to AWS S3 and StorJ
One problem I’ve had with cloud backups in the past is the restore speed. But I’ve not found that to be a problem recently. With gigabit internet, restoring over the internet is as fast as the LAN.
🧪 If one of Kris & Eli’s home school science experiments blew up the house, destroying the MacBooks and the TrueNAS server, and we somehow survived; maybe I’d want a copy of our insurance policy. I could run over to BestBuy, get a new Mac, go over to a friend’s house with gigabit internet, and download the few files I needed in minutes. Or I could do a complete restore in a few hours.
Arq Backupis designed to perform cloud backups. A family license covers 5 computers.
Arq is one of the few backup tools that can backup data offloaded to iCloud. It can be set to automatically materialize a file in iCloud and then let the system dematerialize it until the file changes again, which allows you to run with “Optimize Mac Storage” enabled (I don’t do this, but a nice option if you have limited space on your computer). Unfortunately this does not apply to the Photos Library. You still want to make sure “Download Originals to this Mac” is selected in the Photos app.
Arq supports object locks on S3, B2, and StorJ, which means it can make cloud backups immutable. It also chunks small files together which helps reduce cloud storage costs.
Cloud Backup Providers
I chose to backup to two cloud locations: AWS and StorJ.
AWS S3 Glacier Deep Archive storage class costs $0.00099/GB/month. The Arq backup data set for my MacBook is 370GB (this includes all my documents, Library, Photos, videos, etc.), so the cost to back it up is $0.37/month. It may be a little closer to $0.42 with the transaction costs.
Retrieval costs: A lot of people mention the retrieval delay and high AWS restore fees and egress fees. But it would only cost around $34.00 to do a bulk (48 hours) restore and download that out of AWS. That’s assuming I needed to restore everything. Chances are most if not all of the data would be available in iCloud. To restore all 3 of our laptops would be around $100. Most flat-fee cloud backup services cost more than that annually.
StorJ is distributed storage network with nodes all over the world. Anyone can run a node. When you upload an object to StorJ it is segmented and split up into 88 pieces–only 29 are needed to rebuild the file. StorJ runs $0.004/GB monthly plus a per-segment fee of $0.0000088. Download is $0.007/GB making it ideal if you need to restore frequently. Arq does a good job at chunking up small files to reduce the number of segments. I mostly use StorJ because I’ve been running a node, so I have a lot of StorJ coins. It’s like trading storage with others node operators.
iCloud (not a backup)
iCloud is a sync and file sharing service. I don’t consider it a backup because its limited version history abilities. It’s better thought of as a sync service. I’ve also noticed it excludes syncing some folders like Videos and some application library data. I’m not confident it would have everything. But, I think it can still be considered as an extra partial copy of your data for some DR (Disaster Recovery) purposes.
Appendix A: MacOS System Restore from Encrypted Time Machine Backups
I use Encrypted Time Machine backups. For restoring individual files you can just use it like normal. Go into Time Machine mode, pick a point in time, and restore the file. Doing a system restore was tricky but here are the steps that worked for me:
Create account. Boot computer, create a temporary account (you don’t need to setup iCloud since it’ll be wiped out).
Migration Assistant. I found if I used the Migration Assistant, it would try and fail to mount the backup with “mount failed” after entering credentials. In Finder, browse to the TrueNAS share and open up the Time Machine backup. Enter the encryption password when prompted and wait until it mounts. Then run the Migration Assistant. Ignore the TrueNAS server this time. You may need to wait a few minutes, but the mounted Time Machine backup will appear. Select that one.
Select the latest point time to restore from.
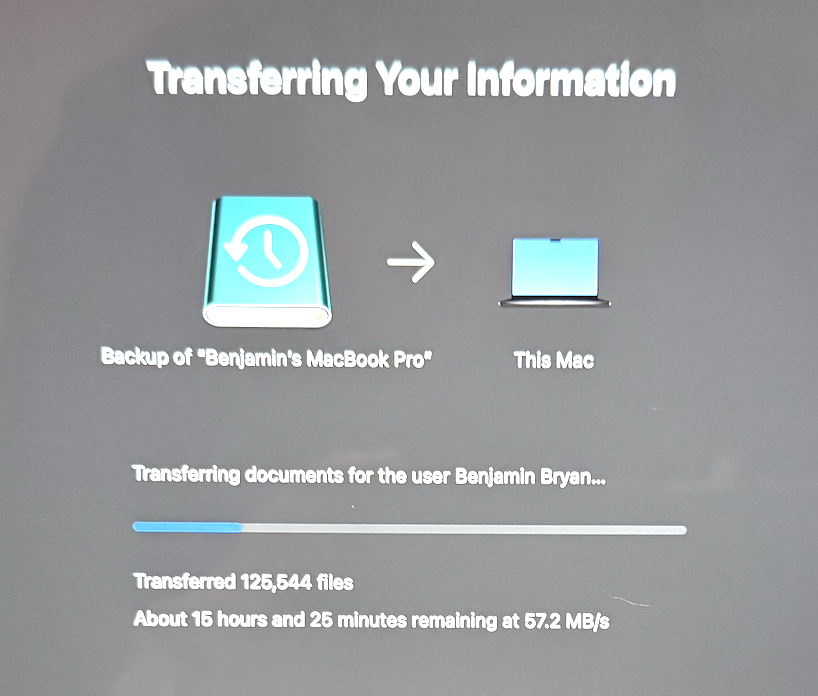
My backup (which was a nearly full 512GB drive with over a million files) took about 12 hours to fully restore over a gigabit wireless connection. The restore is slow. It doesn’t saturate a gigabit. But you can check the TrueNAS network graphs to see that data is transferring. On one of the MacBooks, it got stuck 8 hours in and just hung. I had to start over but it worked the second time.
Appendix B: My Arq Backup Exclusion List
I added exclusions to Arq’s default wildcard exclusion list in case anyone finds it useful… these are things I don’t need backed up. DevonThink3 is already synced to my TrueNAS server which is backed up so I don’t need each and every Mac to back it up, cache, tmp, and temp folders, Logos data, the trashcan, etc.
It was -15°. The furnace died. I cranked up our gas stove in the living room to get us through the week. In the midst of this, our utilities company sent out an alert asking us to conserve gas. Both our primary and secondary heat sources run on gas, so maybe I need to diversify. ... Read more
It was -15°. The furnace died. I cranked up our gas stove in the living room to get us through the week. In the midst of this, our utilities company sent out an alert asking us to conserve gas. Both our primary and secondary heat sources run on gas, so maybe I need to diversify. That was how 2024 started.
If I could sum up 2024, I was spread thin and scattered.
The year started off making a trip to Jeremiah’s wedding (congrats!), then a trip to Las Vegas for a Gartner conference, then taking leadership over another team at work (thank you, Sean, for taking the Dev team!). Then visitors, church meetings, getting sick, and random things. I never took a Summer break. Fall is my favorite time of year because other people get busy… but then things and tasks and random problems seem to spawn more things, tasks, and problems like a Zerg spawning pool spawns Zerg. I keep thinking of Reuel’s words in Exodus 18, “What you are doing is not good.”
I need to work on:
Delegation (transferring ownership of things).
Strategy (doing the right things–perhaps we don’t care about the zerglings in the lower-right quadrant right now since it isn’t a strategic priority).
Eli and I have been enjoying playing board games (and we’ll try to get Kris to play the cooperative ones). And this is all sort of like when you’re playing a game and try to pursue too many paths to victory–you lose every time spreading yourself thin. Doing everything by definition isn’t strategic. Doing what you don’t have any ability to do isn’t a good strategy. You need a strategy that looks at the cards you’ve been dealt and makes a decision of what path you will pursue. And this is what most people miss: that also means deciding which paths to victory you will not pursue.
Books Read
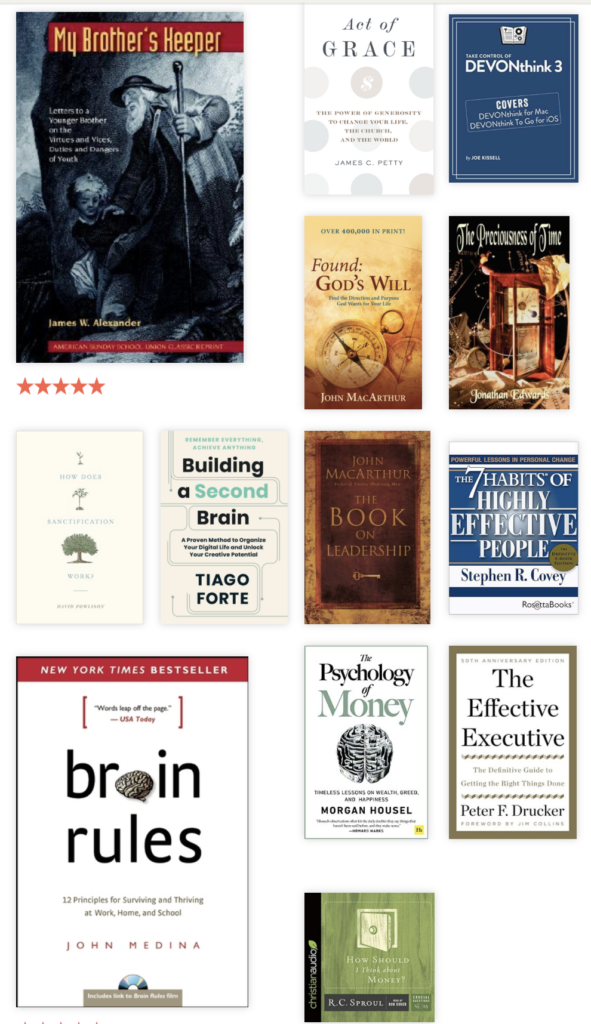
2024 was an improvement on books. Just a reminder, I read more broadly than my beliefs, so this is not an endorsement of all of them. I got in 13, fewer than I wanted but a step in the right direction! A lot of these were re-reads (I re-read MacArthur’s Book on Leadership [which is one of my favorites] with my mentor, Dave; re-read 7 Habits since we were going through that training at work, and Found God’s will). I also really enjoyed the collection of essays in Brother’s Keeper, and the Effective Executive gave me a lot of insights–probably one of the best management books I’ve read.
I’m back from Facebook…
Actually, as far as I can tell, I can’t go back there. I’ve been banned from posting.
Reading between the lines, I think Facebook is saying we don’t like you posting links to your blog without paying us FB advertising fees. That’s the sort of practice that got the internet into the mess that it is today. I appealed the decision twice and have heard nothing back, so I’m giving up on it. While I much prefer the blogosphere, I did try to fly up to Facebook every few months to say “hi” to the people there who, like citizens of California, don’t realize how bad it is. It was a weird 7-year journey, but it will be good to spend more time in the blogosphere, which is where I belong.
So, I won’t be able to visit the people living in the Facebook wastelands. That said, the people living there are more than welcome to visit me. If you ever pass through the Blogosphere, tea is at four. You are welcome anytime. Don’t bother knocking!
My plans for 2025:
In 2023 I put more priority on prayer, and in 2024 our family devotions. In 2025 I want to prioritize scripture memory. Psalm 119:11 ESV – “I have stored up your word in my heart, that I might not sin against you.”
I plan to add more emphasis on learning Strategy. I think that’s a skill that I’m fairly good at in regards to intentions, but I don’t have a good way to defend it so I end up spread too thin.
The theme for 2023 was: Standardize, Simplify, and Secure. 2024 was Standardize, Simplify, and Streamline. I’m certainly starting to see the dividends of simplifying (getting rid of encumbrances and decluttering). For 2025 I’m folding all three into “Simplify” and going to add Strategize and Systematize. My way of working has been morphing from systems to goals, and goals are good if I treat them like a vision, but I’ve found that overall I don’t work as well in a goal driven environment, so I’m bringing my systems approach back this year: So for 2025 the theme will be: Simplify, Strategize, and Systematize. Yes, annual themes must always start with the letter “S”. It’s one of the rules.
And finally, for 2024 I’m thankful for the people God has surrounded me with. It’s been a more challenging year than usual and a lot of things could have been discouraging if it weren’t for my family, extended family, friends, people at church, work, and random people on the internet who drop me a line or leave a comment. Gracious words are like a honeycomb, sweetness to the soul and health to the body. Ps 16:24.
Psalm 8:3-6a ESV –
When I look at your heavens, the work of your fingers, the moon and the stars, which you have set in place, what is man that you are mindful of him, and the son of man that you care for him?
Yet you have made him a little lower than the heavenly beings and crowned him with glory and honor. You have given him dominion over the works of your hands.
I hope you all had a Merry Christmas, and I wish you a Happy New Years!
A couple of people have asked how I keep track of Health Savings Account (HSA) transactions; so here’s how I do it in Quicken. Quick summery of HSA Accounts: Health Savings Accounts are a way to save for health expenses if you have an HSA eligible (HDHP) health insurance plan. I always maximize our family’s ... Read more
A couple of people have asked how I keep track of Health Savings Account (HSA) transactions; so here’s how I do it in Quicken.
Quick summery of HSA Accounts: Health Savings Accounts are a way to save for health expenses if you have an HSA eligible (HDHP) health insurance plan. I always maximize our family’s annual HSA contribution even if I can’t afford to do so. I’d take on debt before not maxing out an HSA because HSA’s have a triple tax advantage:
1. Contributions reduce taxable income. 2. Earnings grow tax-free (and can be invested in funds such as the S&P 500) 3. Withdrawals are tax-free when used for medical expenses.
But you do need to keep good records. In Quicken, there are a few ways to accomplish this. Here’s my way (which is the right way):
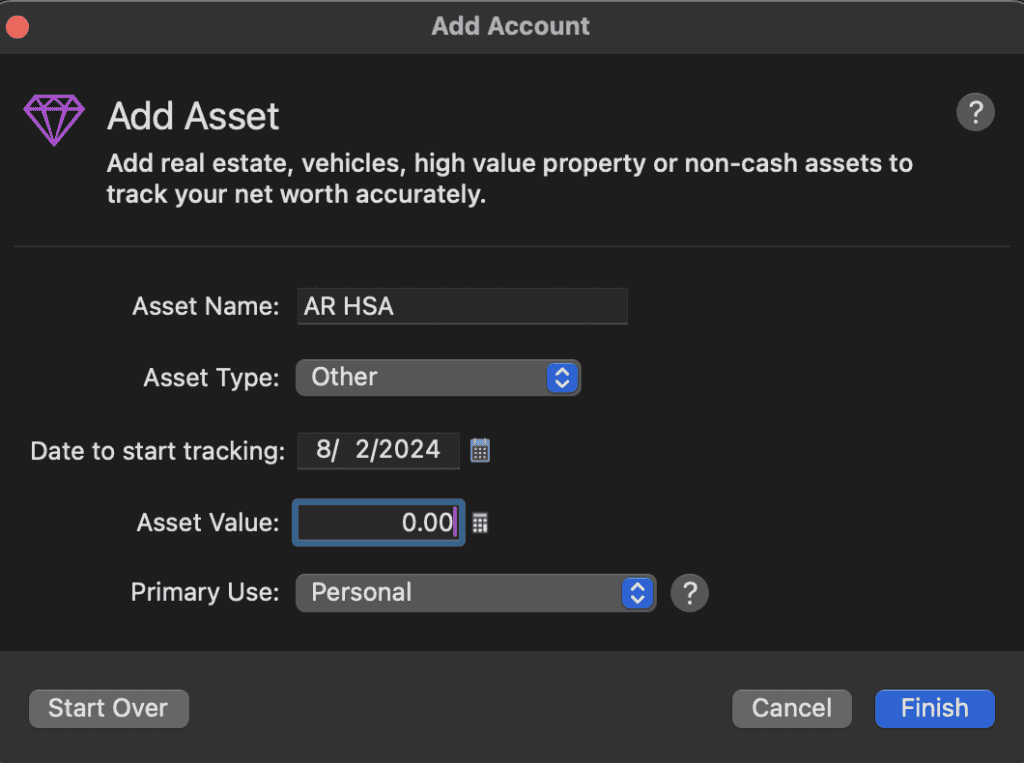
Create the following accounts in Quicken:
“Fidelity HSA”, “AR HSA”, “AP HSA Liability”.
AR = Accounts Receivable (asset account) AP = Accounts Payable (liability account).
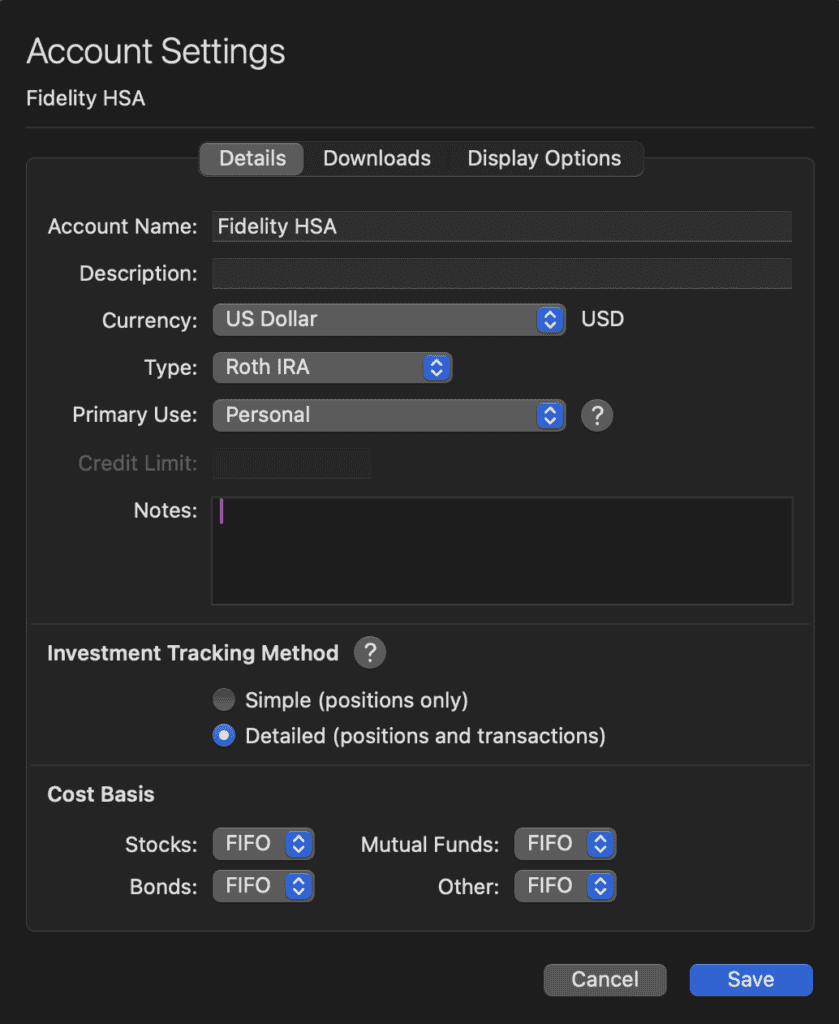
[Fidelity HSA] – This is the physical HSA account, I used Fidelity as an example because their HSA offering is widely regarded as the best option. Unfortunately Quicken does not have an HSA Account type (Quicken team: please add this!), but it is a brokerage account that can behave like a retirement account, and when used properly probably behaves most like a Roth, so I set the type to Roth IRA.
[AR HSA] – This is used as an asset account. This is how much I’m allowed to collect from the HSA. I’ll debit this whenever I make an eligible HSA expense and credit it when I reimburse myself. The balance is how much I’m allowed to withdraw without tax penalties.
Note your eligible medical expenses may exceed your HSA balance–that’s okay because you can apply the expenses against future growth and contributions.
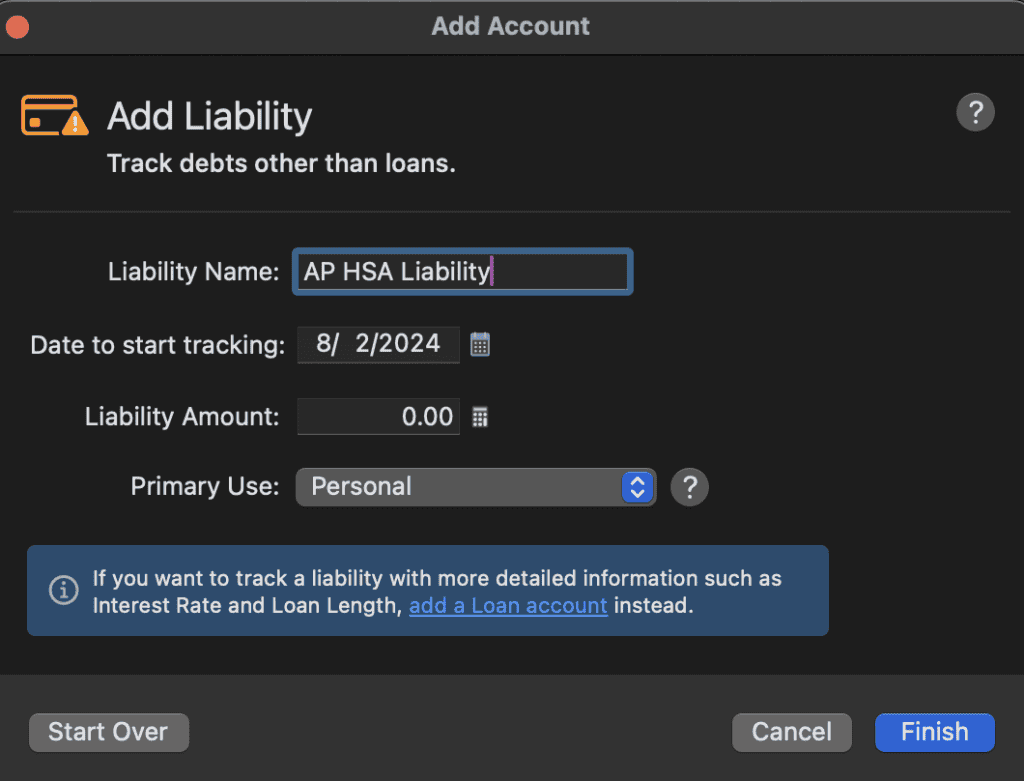
[AP HSA Liability] – This is a liability account that mirrors the [AR HSA] asset account. This is necessary because Quicken is a double-entry accounting system behind the scenes. It seems weird that you need a mirrored account, but this is the correct way to set it up. It is true that [AR HSA] is a receivable but you owe it to yourself, meaning it needs an offsetting liability. Don’t blame me, I’m not an accountant. 🤷♂️
Entering HSA Transactions
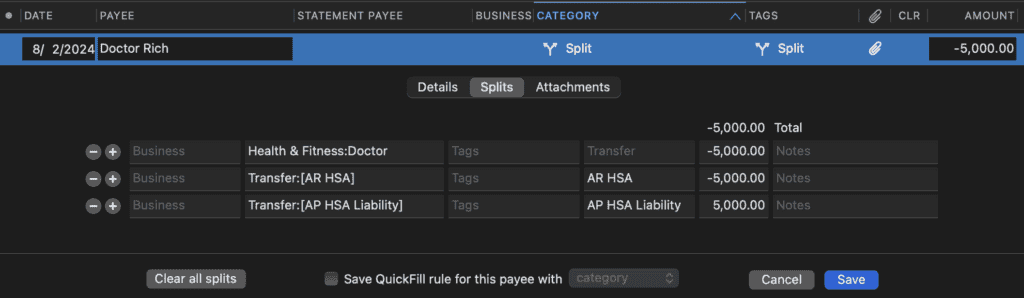
So–let’s say I go to the doctor and insurance covers most of it (haha). The portion that insurance covers is not eligible for HSA reimbursement. But I get a $5,000 bill that’s my portion to pay. First check Publication 969 and Publication 502 (by the time you read this, all the publication numbers and rules may have changed so do your own research) to make sure the medical expense is an eligible medical expense. If not, though beans 🫘.
But if it is eligible, I pay the doctor like normal, credit my Doctor expense category like normal. But I also split the transaction to track how much I’m allowed to withdraw from the HSA to reimburse myself later. Let’s say I pay the doctor from my Credit Card account (which we usually do since we can range anywhere from 2.5-4% cash back–$200 may not seem like much on a $5K transaction but we’ll take it!); I’ll create a split transaction with the following entries:
HSA accounts require good record-keeping. I write the paid date on the paper medical bill, scan it into a PDF using our ScanSnap (Amazon), and then attach the PDF to the Quicken transaction–and keep another copy in DEVONthink. My health insurance always requires medical codes to reimburse us, so I assume the IRS would want to see the same thing if they audited us. 90% of our bills have the codes on them already, but I learned some providers are unwilling to give us the medical codes. But I have a simple trick to get the codes: I withhold payment as leverage; then somehow, they always find a way to produce the codes!
Now, in Quicken you can look at the [AR HSA] asset balance, $5,000, and whatever is there is how much you’re allowed to withdraw from your HSA Account. You can take it out now, or leave it in and continue to let it grow. You’ll also see a negative $5,000 balance on [AP HSA Liability] which is how much you owe yourself.
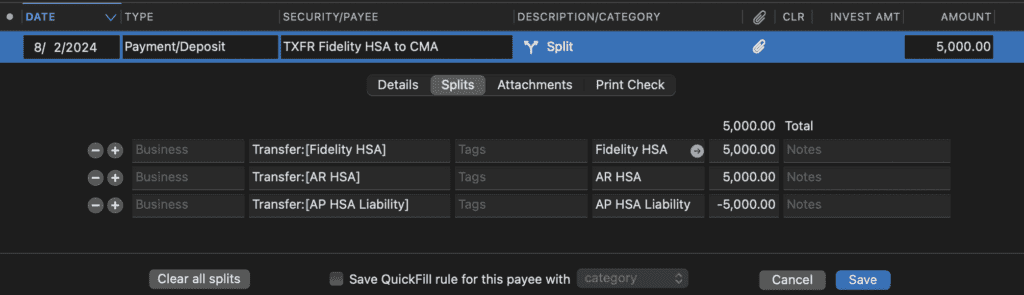
Whenever you decide to reimburse yourself, you simply do the reverse, but instead of the payee being your doctor, it’s your HSA Account. Here’s what it would look like on your Checking Account receiving an HSA Reimbursement:
You’ll note this doesn’t actually hit any expense accounts, and that’s expected. As far as you’re concerned nothing impacted your net worth.
With this method you can use Quicken to keep accurate records and quickly see how much you have available to reimburse yourself from your HSA at any moment in time.
The same method can be used with similar accounts such as state MSAs (Medical Savings Accounts).
It seems like a lot of work, and it is, but the tax savings is well worth the effort.
I’ve always allowed comments on this blog, and even allow people to disagree. I rarely moderate comments except when they’re inappropriate. But one of the issues I have to deal with is comment spam. I moderated the comments by hand for well over a decade but it gradually turned into hours of work each week. ... Read more
I’ve always allowed comments on this blog, and even allow people to disagree. I rarely moderate comments except when they’re inappropriate. But one of the issues I have to deal with is comment spam. I moderated the comments by hand for well over a decade but it gradually turned into hours of work each week.
So, I installed Akismet. It costs $120/year to auto-filter spam. Well worth it. Well, recently I went over the limit–this site gets 14,000 spam checks per month. That puts me on the Enterprise plan, bringing the cost to at least $2,400/year. But I’m just one guy running a personal blog!
I have absolutely avoided captchas. I can’t imagine inflicting on visitors the pain of trying to identify the letters, find all the bicycles on rotating images, or solve a puzzle. Captcha’s have a real cost to humanity:
“Based on our data, it takes a user on average 32 seconds to complete a CAPTCHA challenge. There are 4.6 billion global Internet users. We assume a typical Internet user sees approximately one CAPTCHA every 10 days.
This very simple back of the envelope math equates to somewhere in the order of 500 human years wasted every single day — just for us to prove our humanity.”
Wasting human capital is evil. I don’t want to be responsible for wasting 500 human years a day.
So I switched to Cloudflare Turnstile. It takes a different approach. Instead of filtering spam, it filters bots. Since most spammers are bots this works pretty well. First off–we have to ask when do I care that a visitor is a human vs a bot. I don’t care that a bot reads the content. That can be good. For the purposes of spam, I generally care to stop bots from entering comments. So there’s no degradation of experience at all to both bots and humans if they’re not leaving a comment–bots are welcome.
But as soon as you want to leave a comment, that’s a different story:
Turnstile will run a few tests to see if you’re a human. If Turnstile can determine that you’re human behind the scenes, it’s not even going to make you solve a puzzle. No human capital wasted. You will see nothing at all and can just leave a comment. But if your IP address or behavior looks somewhat suspicious (more likely if you’re using a VPN or using TOR) then it will display a checkbox. Click the checkbox to prove you’re a human–which I think is very minimal cost to leave a comment.
After using Turnstile for a few months–it works really well and I’m going to keep it. Now I do think Akismet is better. Akisment blocks spam, Turnstile merely blocks bots. It so happens that most spam is from bots, but not all. Turnstile has let some non-automated spam through. 2 spam comments total were held in moderation out of 30,000. So I have a 0.000067% failure rate–I’m pretty sure they were left by a human. But to manually delete 2 spam comments every couple months I’ll take the $2,400!