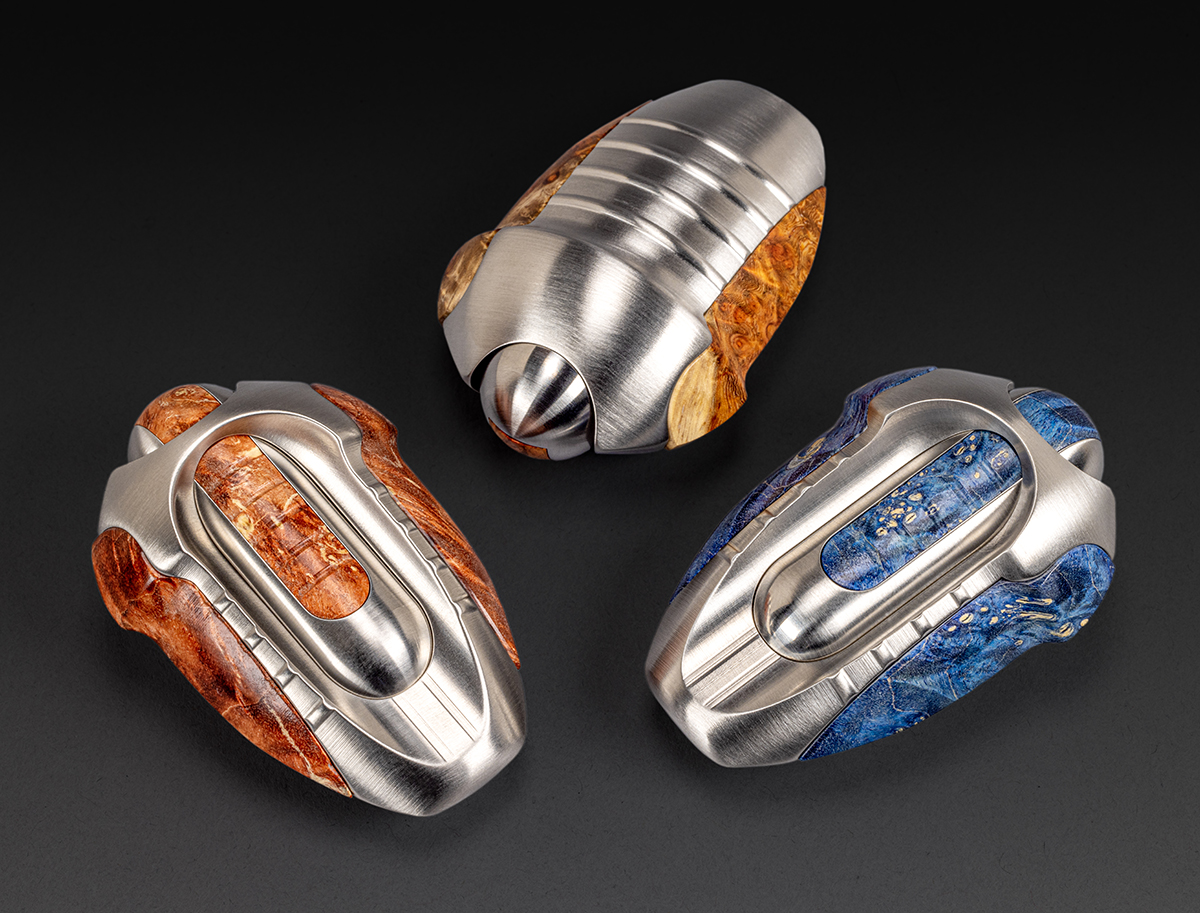
Hello again everyone, I am happy to be writing with a great little sculpture to share. This is the first piece fully conceived and realized in my new shop.
This work is a bit of a sketch really, it exists between many different things that I am working on, and is an attempt to connect and understand them each a little bit better. For starters, the overall shape of this work is derived from at least three places. First is the humble spring collet. Collets come in many shapes and sizes, and I use them daily in my work. I guess I have been looking at them long enough that they have finally infiltrated my design ethos.
A second source of inspiration is from a design I am working on as part of my research collaboration at MIT’s Center for Bits and Atoms. That project is moving along slowly, but one element within it felt worth appropriating it into another, smaller composition. Also, it kind of reminds me of this older work I made over 20 years ago. It is (according to my records) the 13th machined sculpture I ever made. This current one is number 174 by my counting, so it has been quite a journey. Another thread I have been slowly tugging at is the concept of “Tactical Aesthetic”. That is (and this is my observation) there is within many machining circles and various product design genres, a tendency toward an overly menacing, faceted, and technical adornment that exists separately from any sort of real functionality. The idea of “Tactical” not as a description of function, but as an aesthetic. A decorative motif. This Tactical aesthetic flows out of the firearms and security industry, and the many products and gear that support it (knife making included). But this aesthetic has taken on a life of its own, and wormed its way into pen making, watches, flashlights, and countless other unconnected product design spheres. So much so that I see it (intentionally or not) popping up in stranger and stranger places.
Have you ever noticed that a lot of lifestyle products aimed (primarily) at men are overly toothy in some way? Like, what is a tactical wallet anyway? I am not sure. It also permeates many video game and movie aesthetics as well.
While the idea of tactical aesthetic possesses the potential to be politically loaded, I am much more interested in it as an example of an organic visual language. Whatever it is, it seems interconnected with the inherent aesthetic that machine work itself lends, so it is something I feel compelled to understand, if only in a more academic way. One way I approach understanding something is to isolate it, or even place it in a new context, which is why a series of tactical sculptures (whatever that comes to mean) seems like a natural fit. To that end, I am calling this work the Tactical Collet Bead or Tac B for short.
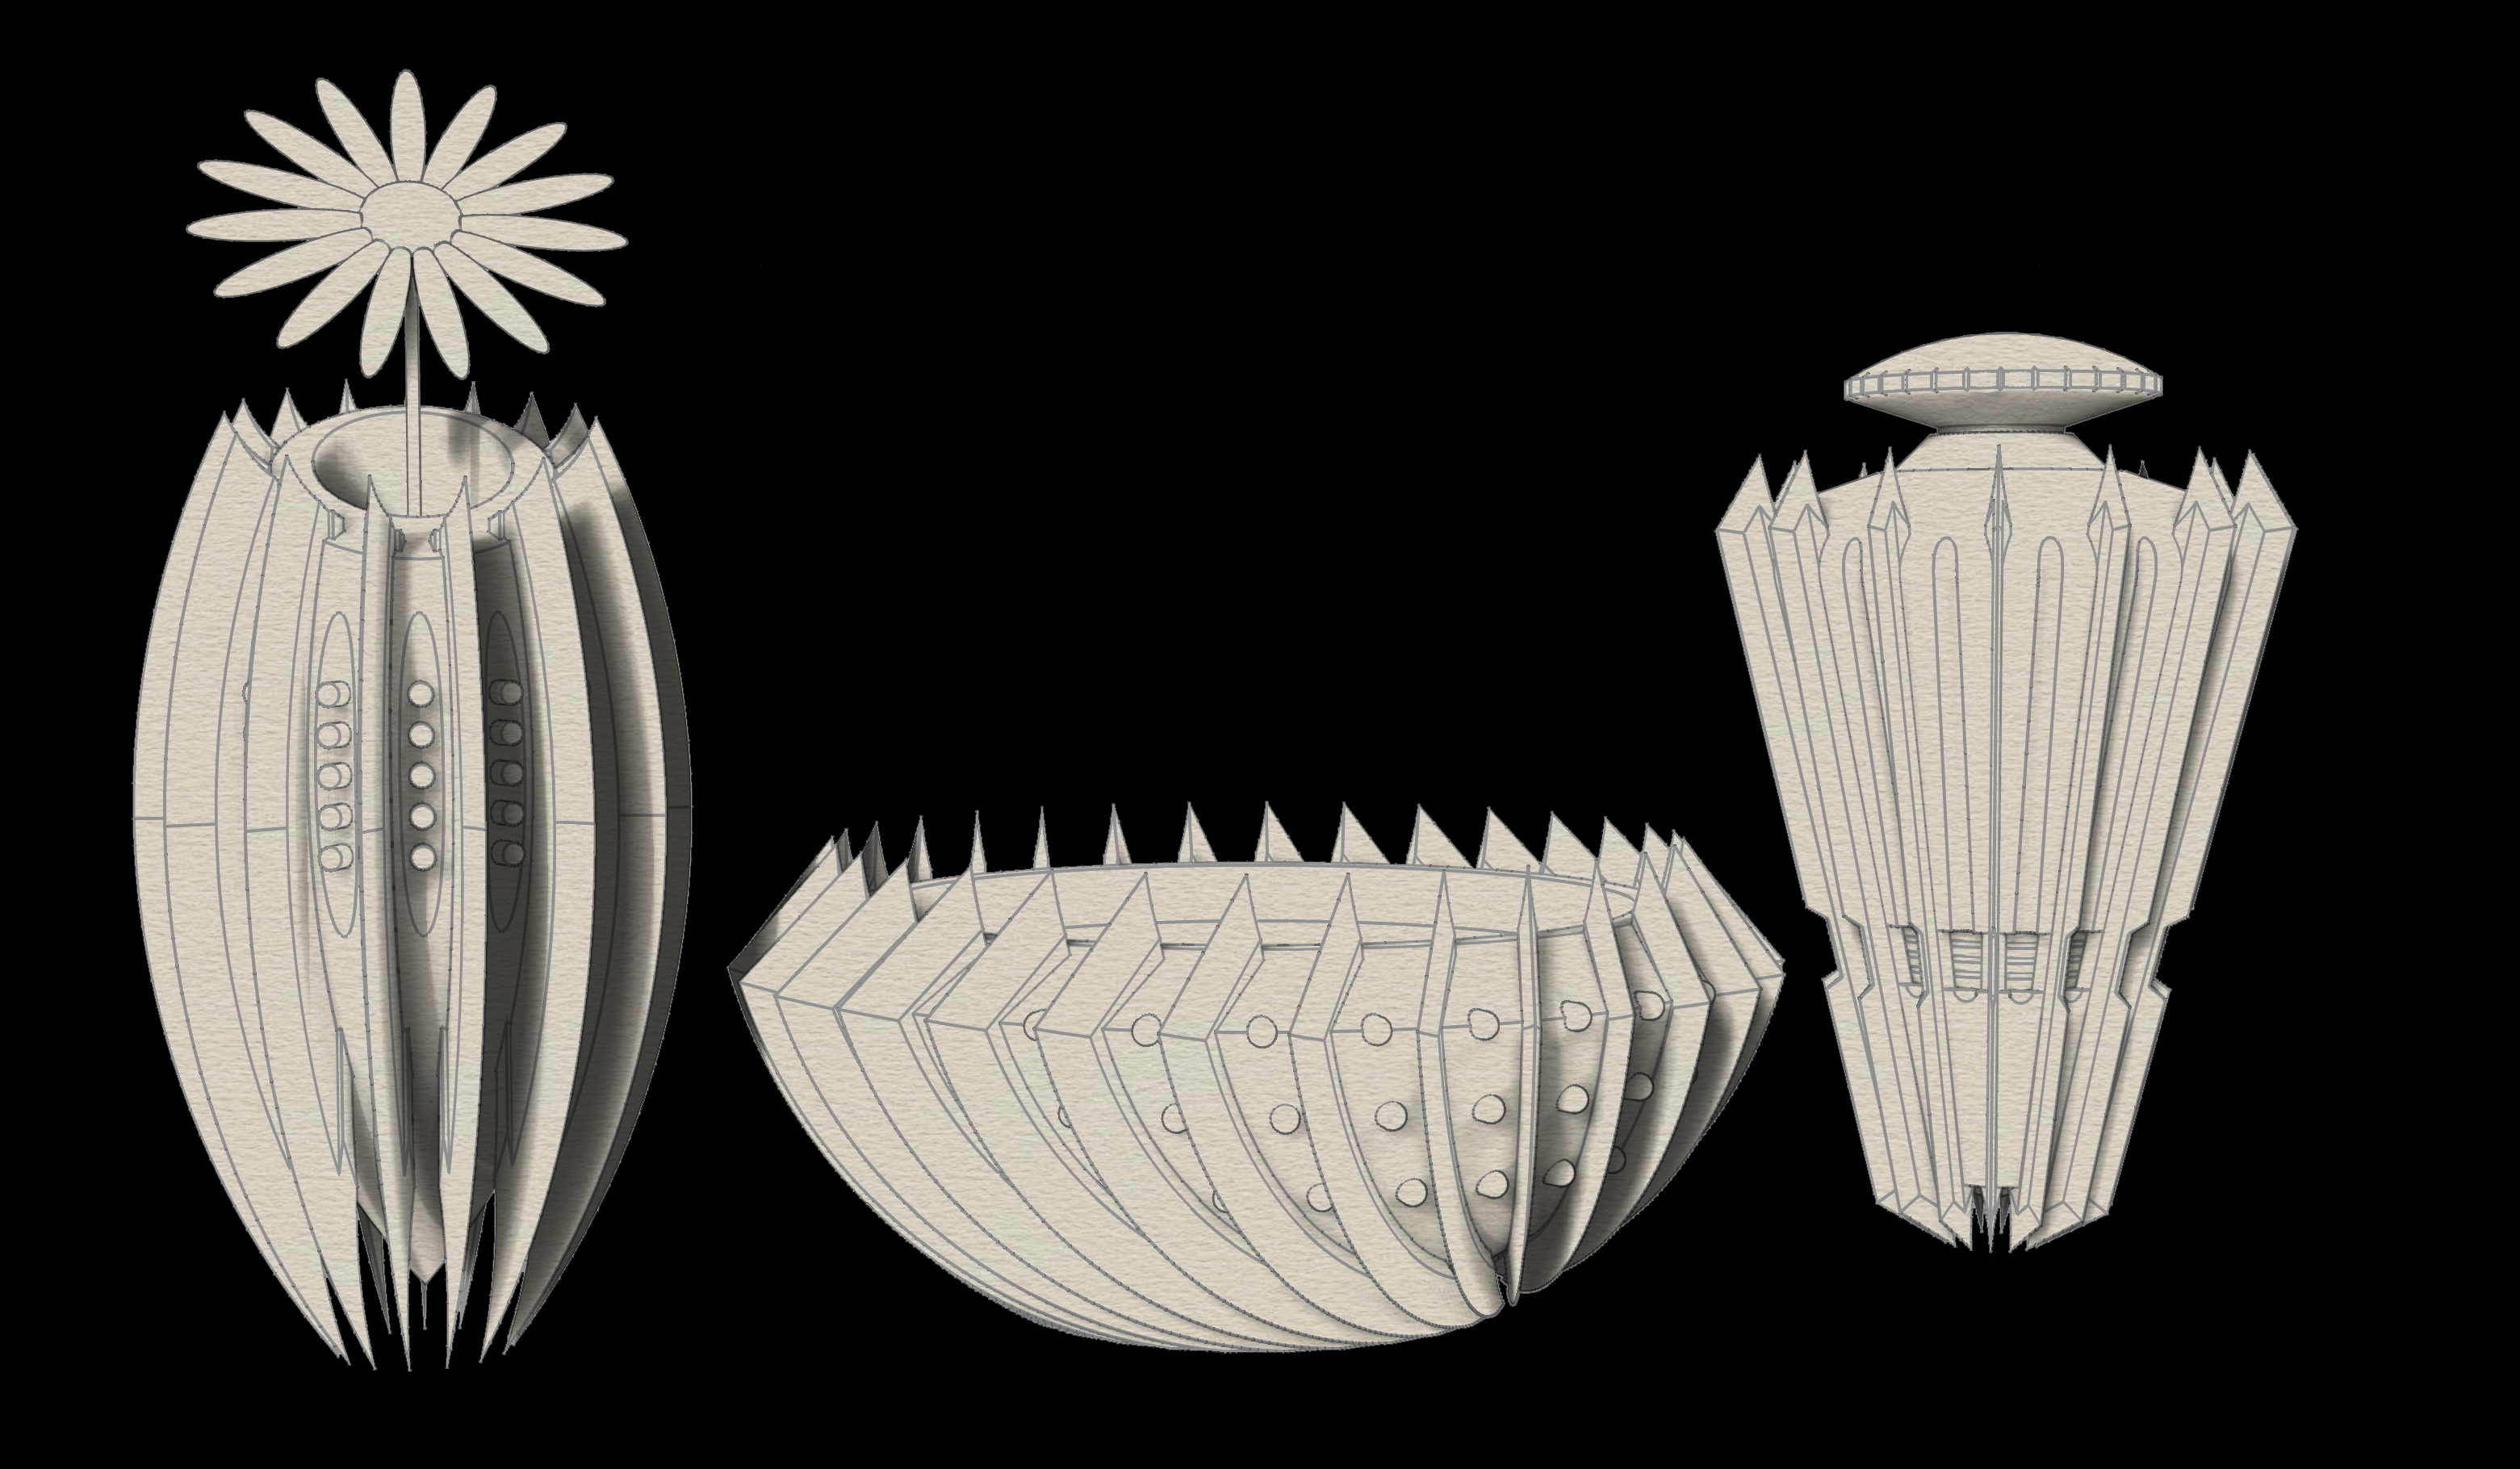
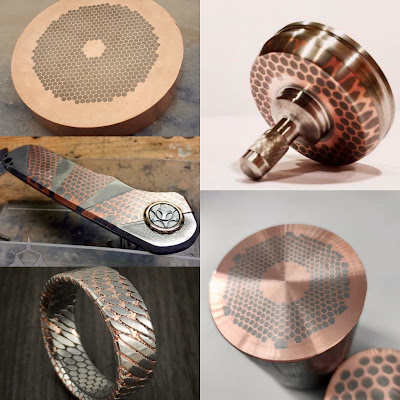
I understand we live in polarizing times and not everyone will be on board with a neutral exploration of this nature, but I am committed to probing this notion on my own terms; in a completely agnostic and anthropological way. So this is a first little stab at something I am trying to get my head around. Technical Notes: There are a few interesting technical aspects of this piece I'd like to note. For starters, the outer shell of this piece was devilishly complicated to machine, as it has long unsupported bits that want to flex and vibrate as it is being cut. It required some real 4D thinking to plan out the order of operations to yield a successful part.
Above you can see the various stages of production. The key was keeping the ends constrained until the last step. Then I was able to insert a plug into the inner diameter and clamp the Outer diameter to it, in order to hold everything in place. Then I could turn off the end stock and free the ends of what became sort of like tines.
I am going to change some cutting operations on the next run, but the basic process was proved out. This work also has a unique assembly method that was inspired by a chance meeting.
One of my newest friends (Zach Fredin) whom I met last summer at Haystack Mountain school of Crafts, pointed me at some of his work using flexures in mechanical assemblies. The work itself is fascinating, but the thing that grabbed me most was how he used taper pins to secure his devices in place. It is simple and clever. The taper pins straddle the interface between two parts in a way that wedges them together and firmly locks them in place. I just love it for its simplicity and effectiveness. A younger me would have put screws everywhere to make this work.
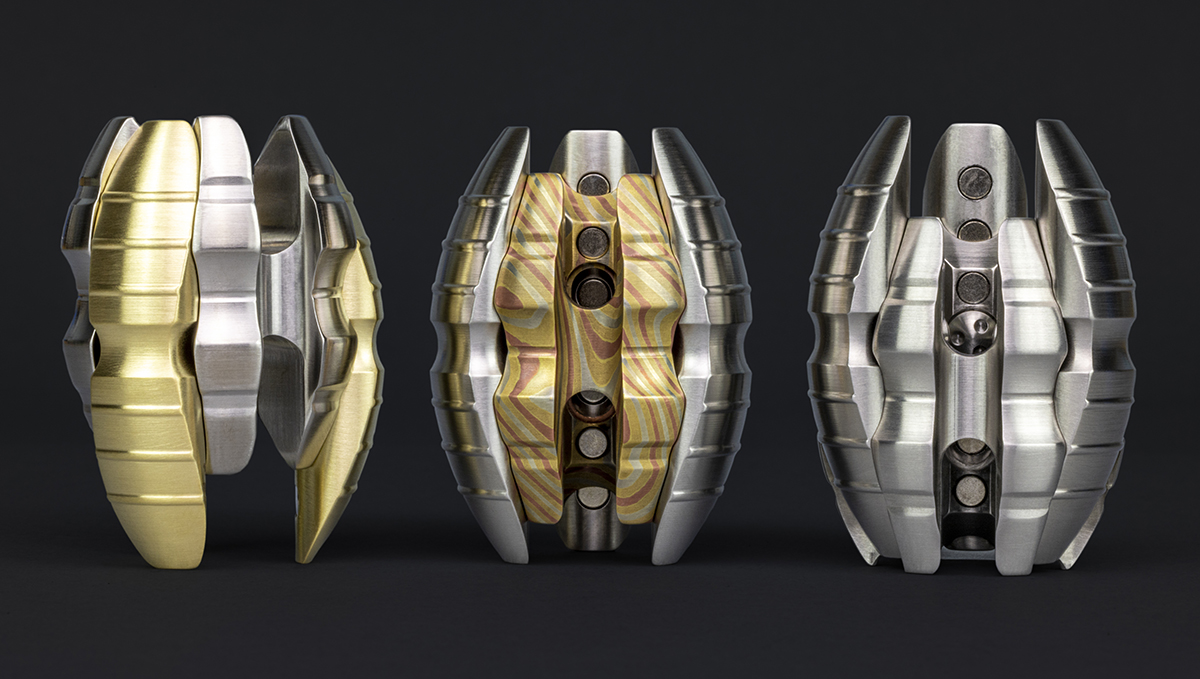
While the taper pin method isn’t what I ended up using with my own work, it did inspired me to think about how to use pins in interesting ways. For this work, I instead used overlapping pins that have interlocking radii.
This takes advantage of the fact that the tines of the outer body are somewhat flexible. This flexing allows just enough movement to push smaller pins past what would otherwise be an obstructed fit. The outer assembly bends out of the way to create clearance to press the smaller pins in place and provides tension that keeps everything nicely trapped in place afterwards.
The video above helps demonstrate the assembly mechanism a little better than my writing. It picks up around the 5 minute mark. Overall dimensions are 2.55" long, and 1.25" Diameter. Note for Collectors: For those of you who collect, I am going to put together a pre-order for a small batch of these works for early next week. If you are interested in adding one of these to your collection. Look for details to land on Tuesday Feb 24th at 11 AM. I will post the usual sign up links, and send an email with pricing and other information for the sale. If there are questions or comments in the meantime, I am happy to hear them.
More soon.
Hello Everyone. Today I want to show of a diptych of works I am calling BVH 522232323434. I think in a lot of design intensive work, there is a natural trend towards ever more complex projects. The desire for growth can result in adding more and more to what came before without taking anything away. I often recognize it in my practice and so frequently cut and simplify designs when they get out of hand. But I must admit I am also guilty of quite the opposite; eschewing things that are too simple even when they pique my interest. That is to say, I nearly decided against making these wonderful little pieces because I thought the idea just wasn't complex enough.
But of course there is nuance and beauty in concision. I think I recognize in these pieces how, in my practice as a whole, taking the long view on a rather simple premise has led me down uncountable rabbit holes. All of which were pleasurable and enriching. So, to the work itself. The kernel of the idea for this diptych was simply to make a sort of hinge. One that holds itself together without extraneous hardware or complex geometry. I came up with two variations, one with a ball as the pivot, and one with a cylinder. Thats it. Thats the whole premise. However it was plenty enough to pour myself into and make my own. I leaned on magnets once again for this mechanic, and I think I mostly achieved what I was after in terms of a lack of hardware, with one caveat; which is that I mounted the smallest magnets with screws. Over the many designs that have employed these cylindrical magnets, I have come to accept their look as a basic visual element. So while it does not personally bother me to have them so prominently visible, I think to some degree, there is a breaking of an illusion. For me, I think it just helps communicate how the piece functions, but I am also reminded that in some of my earliest welded steel works, I intentionally included visible hardware to thwart fictional interpretation. That is, the hardware was their to communicate that all sculptures are constructed objects, and not whatever it is they claim to represent. So I guess some part of this belief is old hat for me. Another thing this work helped me wrestle with is that as I continue to make these small tactile artworks, I am confronted with the reality that a sizable majority of people who interact with them, tend to categorize them as toys. I understand this on many levels, and don’t even disagree with it. I see the relationship between art and play. But! As someone who thinks hard about making art with a process that exists in this space between manufacturing, marketing, commoditization, and the rest of it–I know that the language we use to describe our work matters, so I do not use such words to describe my art. Personally, I am struck by how the simple fact of being able to touch and manipulate a piece of art, can re-contextualize it into a “toy”something equal parts fascinating and troubling to me. I have experienced the word "toy" both as a positive and a negative thing. Calling something a toy can conjure the idea of joy, but it can also paint something as unserious. So much art in our history has been tactile, or even useful, so it is interesting to think about when we started trivializing (both intentionally and unintentionally) things we can manipulate as toys. Is “play” really a bad thing in art? It strikes me that it matters to some degree on which side of the act of creation the play is taking place. Art making itself is often described as play. This is generally considered a good thing. In this context play leads to discovery, connection, and fulfillment. We celebrate this type of play. However on the other side of creation, we have art appreciation. I think it is here where play becomes more problematic (at least for some). This is where the un-seriousness, pretension, and bias against play can creep in. Because art appreciation is very serious business in some circles. Thankfully while I take my work very seriously, I do not take myself all that serious, so it is all just interesting to me. Art is anthropology after all, so I just like to recognize it now and again. I promise I do not have a chip on my shoulder about this. However, maybe in my next post I will try a rant about when people call my sculpture “products” and my uncomfortable relationship with that particular word. We shall see.
Anyway, I hope some of you will appreciate these little gems for what they are. Above is a video where I take them each apart and work through some possibilities on improving them. Note for collectors: I think it is obvious that a small edition of these is in the works. I will post a sign up of some kind next week. Lets just say Tuesday July 29th at 11 AM for those who like to get their names on my pre-orders first. I should have most of the details worked out by then.
As always, thank you for your time and attention. Comments and questions are welcome.
Hello Everyone. It feels like forever since I have posted something new. That is partly because I have been busy splitting my time working on the new studio (The Center for Fine Art Machining is nearly complete!), going on secret artist retreats (I spent a week at Haystack Mountain School of Craft), and planning several new works (there is more than this one coming soon). All while tending to the everyday of my sculpture practice. But with a lot of heavy lifting behind me, I am once again ready (finally!) to launch a new work out into the world.
I am calling this one the “Cves13”. This name may not mean much to a viewer, but it means several things to me (some of them you can probably guess at). But no, I do not intend to share because being cagey with my titles has always been more fun. And as you will see, this post in particular asks far more questions than it answers.
On first impression, this piece most easily fits into my vessel series of works, as it is designed to be a (not so functional, but fascinating nonetheless) sort of bottle. But that is just a starting point, because there are some alternative lineages within my body of work that I can point to that make this piece all the more intriguing as a mashup of some of my favorite concepts. I will highlight just a few. For starters, this piece also fits neatly within my last two releases. Those projects were sort of Ray shaped pieces with a more overt creature-like aesthetic. This zoomorphic thread is a very intentional departure for me. I am interested in how people relate to objects of this nature, but less so in creating specific fictions about my objects. So it is a facet of my work that I continue to undertake with great care. But yes, I would definitely put this work in a camp with the Rays as well.
Lastly, this work is a piece which embodies my love for complex (if unnecessary) turning set ups. It uses dovetail joinery as an excuse to employ some really fun turning techniques on a lathe. Most practical machinist would prefer to use less risky tools or processes to avoid the kind of work I do to create this piece, but where is the adventure in that? I need to come up with a better name for this type of work, but for now lets call it the "extreme eccentric" turning family of processes.
I think the first reaction most will have with this sculpture is a desire to point out what it (does or does not) look like. So let's get the Rorschach test out of the way. All I am willing to say is that if anything, I was going for a sort of a crabby vibe with this work. But since I don’t like to lean too hard into literal interpretation, I am very non committal about that. If it looks like something different to you, then I think you are also correct.
Amusingly, there were plenty of people who felt my last project looked more like a Horseshoe crab than a Ray. So does this actually make this a second crab? Is this actually a crab series? If there is a similar faction of people that forms who feel this work resembles a different creature, I am for it. Please let me know what you feel I've created. Regardless, the point of this project isn’t to make a functional bottle, a crab, or anything else—but instead to find an interesting point in space between several concepts at once. I am beginning to imagine my works are like Venn diagrams of my many interests. This metaphor helps me better explain how utility and aesthetic considerations can orbit one another without colliding. Shaping each other without giving more weight to one or the other. That is to say this piece is ever so slightly functional, but it need not be. This piece is aesthetic, but in a way that tries to speak the same language as its modest utility. If this makes sense, congratulations. If it doesn't, I wouldn't lose too much sleep over it. I am having a good time either way. To circle back to its status as a vessel. The thing that makes this feel like a bottle (albeit a machined one) is mostly attributable to it having a narrow neck. For a bottle, it is incredibly stout—but technically, with a little tweaking and gasket work, this piece could be used to store a liquid of some kind. I am not sure that you would ever want to, but true functionality is never the point. Another thing that reinforces this as a bottle for me is that the lower vessel is suspended from the upper portion. When installed on the lid, it does not touch the table. Like a lab flask or beaker maybe? Are those technically bottles too? In my mind they are. Which begs another question. If the lower section of this work is the bottle, then logic follows that the upper portion of the work is somehow the cap? or lid? If so, that makes it an incredibly over-wrought and oversized bottle cap. Does one get a cap-y vibe from the crab shape? If I squint real hard, I do. Either way, I can live with the cap designation because the goal in machining craft forms from other industrial traditions, is in seeing how the physical properties of my medium transform them in interesting ways. One can explore wildly different proportions when moving from glass to metal. Also conceptually, the extreme inversion of scale between the relatively modest bottle portion of the work, and the huge lid is mildly subversive to me. It humorously challenges what one can get away with and still call a thing a vessel. At what point does something stop being a vessel, and start being just a sculpture with a vessel attached to it? Maybe one day soon, we will find out. On the mechanic for securing the bottle to the lid. I am not entirely sure if there is a proper name for this kind of keeper, but as you can see above, once the bottle rim slides into the split ring enclosure, the top portion rotates to entrap it, creating a close circle. Although it is a relatively simple mechanism with just one moving part, it was a devilishly difficult one to integrate in a way that didn't feel bulky and detract from the aesthetic. Figuring that out was incredibly rewarding. Another mechanically interesting feature is how the legs attach to the lid. It is a sort of dovetail system where the legs are forced into a wedge by a dowel and screw that pierce the length of the lid profile. It looks simple now that it is complete, but finding the form, while leaving room to thread a screw straight through the lid, took a lot of fiddling (the good kind of fiddling). Another rewarding problem solved. One production note: I really didn't anticipate how long it would take to machine the large stainless steel element for the lid. It was by far the biggest time sink of the project. It has geometry and features that do not live at complimentary angles to each other, and so required many individual setups to get a proper attack on each feature. I think I spent three weeks fixture-ing and puzzling out nearly a dozen machine operations to make this one part. That probably sounds like complaining, but it is more interesting to think about in the context of aesthetic considerations causing havoc down the production line. I have some ideas on how to minimize this going forward, but I wanted to share my tribulations as it represents more fun problems yet to be solved.
Producing the six legs of this vessel was an excuse to do what I described earlier as "extreme eccentric" turning. Some may see this as an unnecessary stunt, but to me it feels like a way to ensure I am constantly pushing the boundaries of what can be achieved on each of my tools.
Although I try to take this approach of finding unique capabilities with each of my machines, I take a special pride in cramming the weirdest setups I can think of onto one of my many lathes. If you look at the history of decorative wood turning, you will see this is a common practice among ornamental turners as well. So I count myself in good creative company there. Finally to wrap this up, I have one last (longish) tangent. I spent a lot of time 3D printing test models before attempting to machine this prototype. I don't often do this because I prefer to launch myself right into the fray. But in this case it felt necessary to make sure everything was fitting and playing nice. Throughout this process, I was constantly reminded of when 3D printing first came onto the stage, people often asked me if I was worried that it would make my talents as a sculptor, or elements of my craft, obsolete? To be honest, I was never very worried and I would say as much at the time. But the longer I use 3D printers, the more secure I continue to feel in what I do. I think this image perfectly illustrates why. 3D printing remains incredibly useful as a prototyping and fixture making tool, but the aesthetics and mechanical functionality of its output continue to leave much to be desired. I mean, which of these would you rather have? I know theres high end 3D printing equipment out there hitting some very interesting benchmarks—but process and material each leave a unique mark on a work of art, it's not just a simple matter of creating a sterile shape in digital space. My 3D printer is great for what it does, but I still have not found a way to make anything that feels like my art with it. On a similar note, lately people have been asking me how I feel AI will affect my work? I just have to continue to shrug, because it has yet to enter into my equation. I can see how it might one day, but I suspect it will be just like 3D printing with a niche use. It will be a useful approximation (facsimile?) that leaves something to be desired. There is no question it will be disruptive, it already has been for commercial illustrators and image creators who work in the world of "good enough". But even there, I have not seen it move entirely into creative storytelling spaces. Those who have something real inside them to say are still finding a way to say it. From where I stand, the things I create represent more than an a outcome driven means to an end. I am not trying to solve a specific problem, make a specific thing, or pander to a trend. I am simply inventing interesting problems to solve—problems that then lead to the discovery of still more interesting problems— all for my personal enrichment and enjoyment. The things I make are unique artifacts of a mind in motion experiencing the act of learning. They represent my unique way of seeing, thinking and feeling the world around me. Last time I checked, AI is still just really fancy pattern recognition, and re-combination—It doesn't feel, see, or understand anything. It requires an army of humans (curated and labeled data) to tell it what it is being shown. Philosophically speaking, even if AI could do my job or help me speed up my process in some way, why would I outsource the thing that brings me joy? Why give my hard earned dopamine away to a bot that would feel and appreciate none of it? The overall sense that I get from people who currently use AI is that it automates some things—sadly I am learning, much of the fun part (the discovery, the research, the idea iteration). What it leaves behind is much of the drudgery (the menial labor of polish and format). That simply has no appeal for me at this moment. If AI ever finds its way into my practice, it will be because it can do something that elevates my unique abilities without averaging them out—but as of this writing, it cannot do that. End of digression. The size of this work is roughly 6" wide, by 4" deep, and a bit over 2" tall. As always, comments and questions are welcome. Note for collectors: For the collectors out there, there will be a somewhat limited opportunity to add one of these to your collections.
Unlike my other editions, this work is quite complex, expensive, and time consuming to build. So while I am planning to make a small batch of these, I am going to limit the number of pieces to only ten works.
There are a number of decorative opportunities here I want to explore. I think the bottle lends itself to experimentation with decorative hardwoods provided I can find (or make) some interesting specimens. Because of this, I am going to give myself a little more time than usual to make these. I will probably take the rest of the year to slowly and carefully execute each of these ten works.
If this is something you might be interested in collecting or collaborating on, I will be sending out a second email/post in two days (Thursday July 3rd 11AM EST) with a simple sign up to register your interest. Given the limited numbers, I suspect there to be a good chance interest may exceed supply, so let's just say that the first five spots on the list will be allocated on a first come first serve basis. The remaining spots will be sorted out with some sort of lottery.
I will include a lot more details at that time (including pricing). However, if you do have a burning question, you can drop me an email in the meantime.
Happy new year everyone, I decided to take some much needed time off to close out last year, but now I am back in the studio and putting the finishing touches on my latest project.
This work is the next progression in my "Ray-shaped" series. It builds on what were mostly superficial knife design references from my RR212 piece, and brings them into a more functionally familiar space.
As with all my knife inspired works, I want to start by repeating a phrase I have written often. “I am not a knife maker”.
When I say that, I simply mean that I am a sculptor taking a sculptural approach to a genre I admire, but do not pretend to fully understand. That sort of thing can take a lifetime, so I feel obligated to say that I am just a visitor, not a resident, of knife-land.
With that said, I find myself circling knife design often, and so have endeavored to dip my toe in once again with the goal of saying something new about a craft with a very long tradition.
So lets get started. This piece borrows from the mechanics of your standard issue folding knife, probably the first one you might have had as a kid. Specifically, it uses a slip-joint to articulate a tail-like feature that folds out of the work, either by pulling hard enough to overcome the spring, or when you depress a lever. Originally, I thought I might make the tail a locking feature using a what is called a back-lock arrangement that would hold the tail firmly in place once open. However, I settled on a slip joint because it provides a third neutral position for standing the work up in interesting ways, as well as just working better in terms of tactile response and some other fidgety qualities. Also, a firm locking mechanism would have made it a better piece of art to truly stab something with. That is not really what I want my art to be about, contrary to how some of my pieces have looked over the years. So I went with the more versatile mechanic.
However old the slip joint design might be, I still tried to put my own mark on the mechanism (see video above). Traditional slip joint knives use a rigid metal spring of some variety to provide tension to the lock. However, In place of a proper spring, I have taken the opportunity to use magnets to provide the opposing force in the mechanism. Magnets are better suited in this piece because they provide better haptics to the lock bar. I worked up my prototype thinking I was some sort of pioneer because I had never seen such a knife, but that didn't last long I had assumed this type of spring would be completely impractical in a real knife because magnets tend to attract debris if kept in a pocket and used out in the world (especially for a metal worker), but after discussing my working prototype to a collector friend of mine, he kindly corrected me, and directed to a knife design that already uses a similar principle, but takes it into some very clever territory. All of this is to say, when an ideas time has come, it has come. Regardless of how practical this arrangement might be in a real knife–for a piece of art like this, the magnets work really well. Not too firm, and just click-y enough to give a very unique feel. On the design front, I am usually a bit coy about my visual allusions, but I think it is pretty obvious that I am working with a sort of Ray shape here. I also went out of my way to relocate the bolt hardware from the sides, where they looked more like a utilitarian adornment, to the front of the piece where they have a more obvious creature feel to them. Moving the bolts to the front was both a visual and engineering challenge and really brings some charisma to the piece. And of course there is the tail. I felt that since this is knife inspired, one might assume the fold out should be a proper blade. But it is not really my style to be so obvious. Instead, I have produced a more ambiguous convex spike shape. I think it serves well as both a tail and a blade-form without being too much of either. Turning this pointy bit required me to build a fun little arbor to align this unruly shape with the center line of the lathe.
More on the engineering front: I took a number of extra steps to lighten the weight of this piece to balance how well the tail can support the weight of the work. For starters, the “wing” sections are made in aluminum, which is very lightweight. I did some extra hollowing out on the hidden side to lighten them even further.
I specifically wanted them to be aluminum as well because this piece was screaming for some bold colors. That dark blue is actually a deep deep grey dye that takes on a battleship blue or denim color when left to fully saturate.
I also tried making the tailpiece and lock-bar out of titanium, thinking maybe I would have an opportunity for further anodizing, and because it to is much lighter than stainless steel. But, although I already knew this, it turns out that titanium has very poor sliding qualities and is too prone to galling to work here. I somehow thought I could get away with it, but I underestimated how poor the sliding action between two titanium parts would truly be. It felt downright gross. so I scrapped that idea and switched to stainless steel for the sliding parts. This created a much friendlier bearing surface. For the pieces that I will refer to as “the liners” I prototyped in aluminum, and then worked up a pair in titanium and stainless steel. Both stainless and Ti presented unique challenges here. I ran into some extreme warping issue with the stainless version. Thin stainless steel bar stock has a lot of internal stresses caused by how it is rolled in manufacturing. Once you start cutting into its surface, it loves to curl up like a fish. My first batch of parts warped pretty badly and needed to be bent straight in a press. I know a few ways to mitigate this in the future, however it was a fun to be reminded again of the hidden forces hiding inside various materials. The titanium version stayed much flatter for me, but this material is prone to work hardening and other general mayhem when machining. My test parts here came out with slightly oversized perimeters, and so there was some fitment issues. But after a little fiddling, I ended up with good parts here as well. Now I could assess them in the context of the piece. The titanium liners are lighter, but honestly, I personally like the extra heft of the stainless ones. They feel better to me in the hand. And, it turns out I saved so much weight making the wing parts in aluminum, that this added weight does not seem to be the issue I thought it would be. There are of course lots of reasons to use the titanium liners, chief among them is that titanium opens the door to further anodizing and colored details. Time willing, I will get to explore that next, as I still have a bit of R&D to do to refine the piece, as well as my processes.
But thats my journey so far, and I was eager to share how this mix of design, engineering, and sentimentality has comes together in a work that feels pretty unique. Lets call it another great example of my “not a knife” style work. A note for collectors: Naturally, I am planning to make an edition of these pieces for those interested in adding this work to their collections. I think I will open the sign up this coming Thursday January 9th (my birthday!) and leave it open for a about a week. Then, as is my way, I will close the books on this piece and set to work. Most of you who collect know the drill at this point.
So look for a sign up email and or links at all of my usual places (My blog, My IG, and email) at 11AM EST.
I will have most of the details sorted out by then and will include extra details on the sign up sheet regarding pricing and options. In the meantime, and as always, comments and questions are welcome. Thanks for reading
Hello All, I am back with a new work, and a new exhibition. I held off on posting this blog for a few weeks because I felt what better way to show off a new work, then to do it while sharing where you can come see it. So if you are going to be in the Miami area during Art Week and/or Art Basel, come check out my exhibition at the Phase gallery at Moonlighter FabLab. It is just a stone's throw from the convention center. This show is the second stop on my slow motion book tour, which is to say I am not super keen on simply hawking an art book, so I’d much rather turn the opportunity into a traveling exhibition where everyone can come see me, the book, as well as all of the work itself. The opening for this exhibition is timed to coincide with Miami Art Week and Art Basel, so if you are traveling that way for either of those, do drop by, say hello and yes maybe get a signed copy of my new book while you are at it. You can reserve one if you RSVP for the opening reception on Thursday December 5th.
You can be sure I will continue to plug the show a bit more, so…..with the exhibition announcement out of the way, let's talk about this new sculpture. It's called BM 414162522242621331 I suppose you could say that superficially, this work is a scaled up version of my Mod4 module series. But anyone who knows my work knows that kind of concept is simply a starting point for a completely new piece with different goals and considerations. Scaling a work is akin to continuing a conversation, but not necessarily repeating the same words.
For starters, aside from the basic geometric composition, there are no parts that are a direct 1-1 scale of the original piece. That means every element is completely re-engineered.
What the large and small works share visually is intentional, but it is an allusion, not a copy. The work maintains a radial symmetry, while abandoning one plane of lateral symmetry. Scaling the piece allowed me to open up the composition, to reach inside and approach assembly in a different manner. Whereas the small work is light enough to be assembled using only magnets, this work has large bolts that thread through the inside of each module. This meant creating clearance for both the bolts, my hand and a very very small socket wrench.
This opening up also introduced new sight lines and a means to bring the eye into as well as around the work.
There are a lot more details on this piece, but they are not strictly ornamentation. I had a lot of fun playing with overt assembly methods which lend a certain utilitarian-ness to the work.
The video above details some of my trials and tribulations with some of the assemblies.
Sadly, a lot of the video I shot during the photoshoot was no good, but I pieced together something reasonably workable for a demo as well. Lots of great details on this one Eventually I will get the final drawing for this work together, but I like to give myself more time after a large work is completed to refine such a large document. Rest assured it will be ready in time for the opening reception. (Edit) drawing below.Sadly, this drawing is huge and does not read well on a screen, but you get the idea. Thanks for reading, and as always, comments and questions are welcome.
Hello all, it's that time again. Today I am introducing what I am calling...simply...the RR 212371.
(If you are unfamiliar with my naming scheme, that is just my way of encrypting titles so that interpretations don't get muddled by more literal naming schemes)
This piece weaves a number of ideas and influences into one deceptively simple design. For starters, like many of my pocket art pieces, it is a kinetic piece with a series of rollers that reward your curious thumbs as you handle the work.
Perhaps some might consider rollers less novel than some of my other mechanics, but it is (in my opinion) expert in its implementation for its contribution to the aesthetic and its tactility.
This piece also contains a number of allusions to knife making forms. Even though I am not a knife maker, I am a student of its aesthetics. So I have taken great care with this piece to elevate my relationship with that craft. There are also visual references to some of my own previous works, or an earlier aesthetic. On the technical front, I was able to crack a process idea I had been toying with for many years. I always thought It might be possible to use an offset turning set up–one where the axis of rotation was perpendicular to the axis of symmetry on the piece–as a design constraint to derive a novel geometry. I had tried to design around this on a number of occasions with little progress until now. Work-holding was always the biggest obstacle with previous attempts. But the necessity of using a split design to allow me to properly nest the rollers helped me solve it. And it did so in a way that presented nearly all of the visual opportunities I listed above. In this way, solving a new problem, helped me solve an old one.
The video above does a good job of explaining what I mean. As I also touch on in the video, in my mind this piece is not a materials piece, it is a piece about line and form. It wants to be exclusively stainless steel in my opinion. I can see little reason to break with that at this time outside of maybe making the rollers in brass or bronze so they run a little smoother on the stainless pins. So if you were expecting a range of wild colors or other materials this time, that will not be forthcoming. Less is definitely more for me with this design.
To wrap up, I am just so pleased I was able to pack so much into this little piece. There is a perfect blend of utilitarian notes, vague creature feel, implied functionality, and real functionality. It really represents the whole language I have been building over the years in a way that I can so rarely capture. What a gem.
Overall dimensions on this work are approximately 2.5"x2.25"x1"
Note to collectors: I am definitely going to make an edition of this work, as I want to spend some time with the design. So if this is a must have for your collection, expect a sign up next week. The sign up for this work will open on Monday July 29th at 11 AM EST. I will send out the link through my usual channels (email, the blog, IG etc)Figure on a one week order window and then the books on this work will close forever.
I know everyone wants to know the pricing on new works, but that is my job to figure out between now and the sign up (it is always more complicated than you think). So mark your calendars and I will have that info sorted out by sign up day. Thanks as always for your eyeballs and your patronage. And as always, comments and questions are welcome. Lastly, lastly, I wouldn't be doing my job if I didn't mention I have a new book out this year. The details of which are all at this link (where it just so happens you can also order it)
Hello Everyone This is going to be a proper newsletter with multiple announcements, including new works, exhibitions, and some other exciting news. But let's start by introducing the Sculptural Mag Vessel. I had been wondering if I would ever come back to my vessel series, and I got here (as I often do) by accident. I have been continuing to play around with a number of mechanics for integration into sculptural pieces in the hopes that it will help me talk more about what makes machining so special as a sculptural medium. And, when it all works, it does help a lot. However just as often I find myself stuck with the kinds of problems that most designers face. That is, some mechanics are just hard to make look good....well, until I remind myself that I am not a designer in the traditional sense. When I was writing my book, I talked a bit about how the field of design is constrained by the function of the objects that are the focus of the design attempt, and how my process is very different from this. That is, if I wanted to design a cool clock, and I can't get the design to work, I am not bound to continue to try and make a clock. Instead, I can take the parts of the design that are working, and move on to a new function or problem. So the clock in this example is free to become a toaster or lawn mower, or anything else.
All I am saying is I am not constrained by the object, as an artist I am free to change however I want, and in this case, I was struggling to design a new entry in my "Watch Pocket" series, and somehow ended up on a tangent making a rather fascinating vessel piece. The mechanic I was working on just wouldn’t play nice with my original vision, so I let the mechanic tell me what it wanted to be. Once I realized that, I was able to pull in all of the other influences that fleshed out this beautiful design. Another constraint (this time an engineering constraint) that I am unbound by is practicality and robustness. Unlike the other vessels in this series, the mechanic for this piece uses permanent magnets for actuation. That is, the components aren’t moved by a mechanical linkage of any kind, they are forced in and out by changing the orientation (polarity) of magnets on the inner drum of the knob. This configuration works just fine in an environment of care and consideration, but it is not the kind of thing one would employ for rigorous daily (and dirty) use. Things just might be too easily gummed up. This is true of all of the vessels and mechanical art I have made really. It is just something that is coming into better view for me. That is, one of the most appealing aspects of a project like this is that one gets to take what would otherwise be an impractical mechanic, one that would be useless in a utilitarian product with more rugged requirements, and place it into the context of a fine art object where it is not only completely appropriate, but supremely desirable. A magnetic latching system may be too complicated and touchy for the real world, but in the art world, it is an intriguing focal point that can communicate why engineering matters even in the world of aesthetics. That is what this piece does for me anyway. The Sculptural Mag Vessel is 3" diameter by 2-3/8" tall. It is a hefty little guy at 20 ounces in its current form. Note for collectors: I am still very much sorting out the details on how to do a small edition of these works. As far as editions go, this is a very complicated piece. I want to be sure I preserve some ability to refine this design as I go, but I also know it is important to take care of business in terms of who is interested in adding one of these to their collection. So while I need a little more time to tinker and figure out how to make a quantity of these that maintains some freedom for me to make each one unique. I am going to open up a sign up later this week so that everyone who is interested can reserve their piece before I commit to specific details and numbers. Once I have a head count, that should help me determine the scale of the project. So look for a somewhat limited sign up to open on Thursday March 14th at 11 AM EST. On this sign up, I will outline how this project will unfold and how I intend to make each of these sculptural vessels special for you. I look forward to hearing from some of you and as always, comments and questions are welcome. _________________________________________________________________________ Exhibition announcement
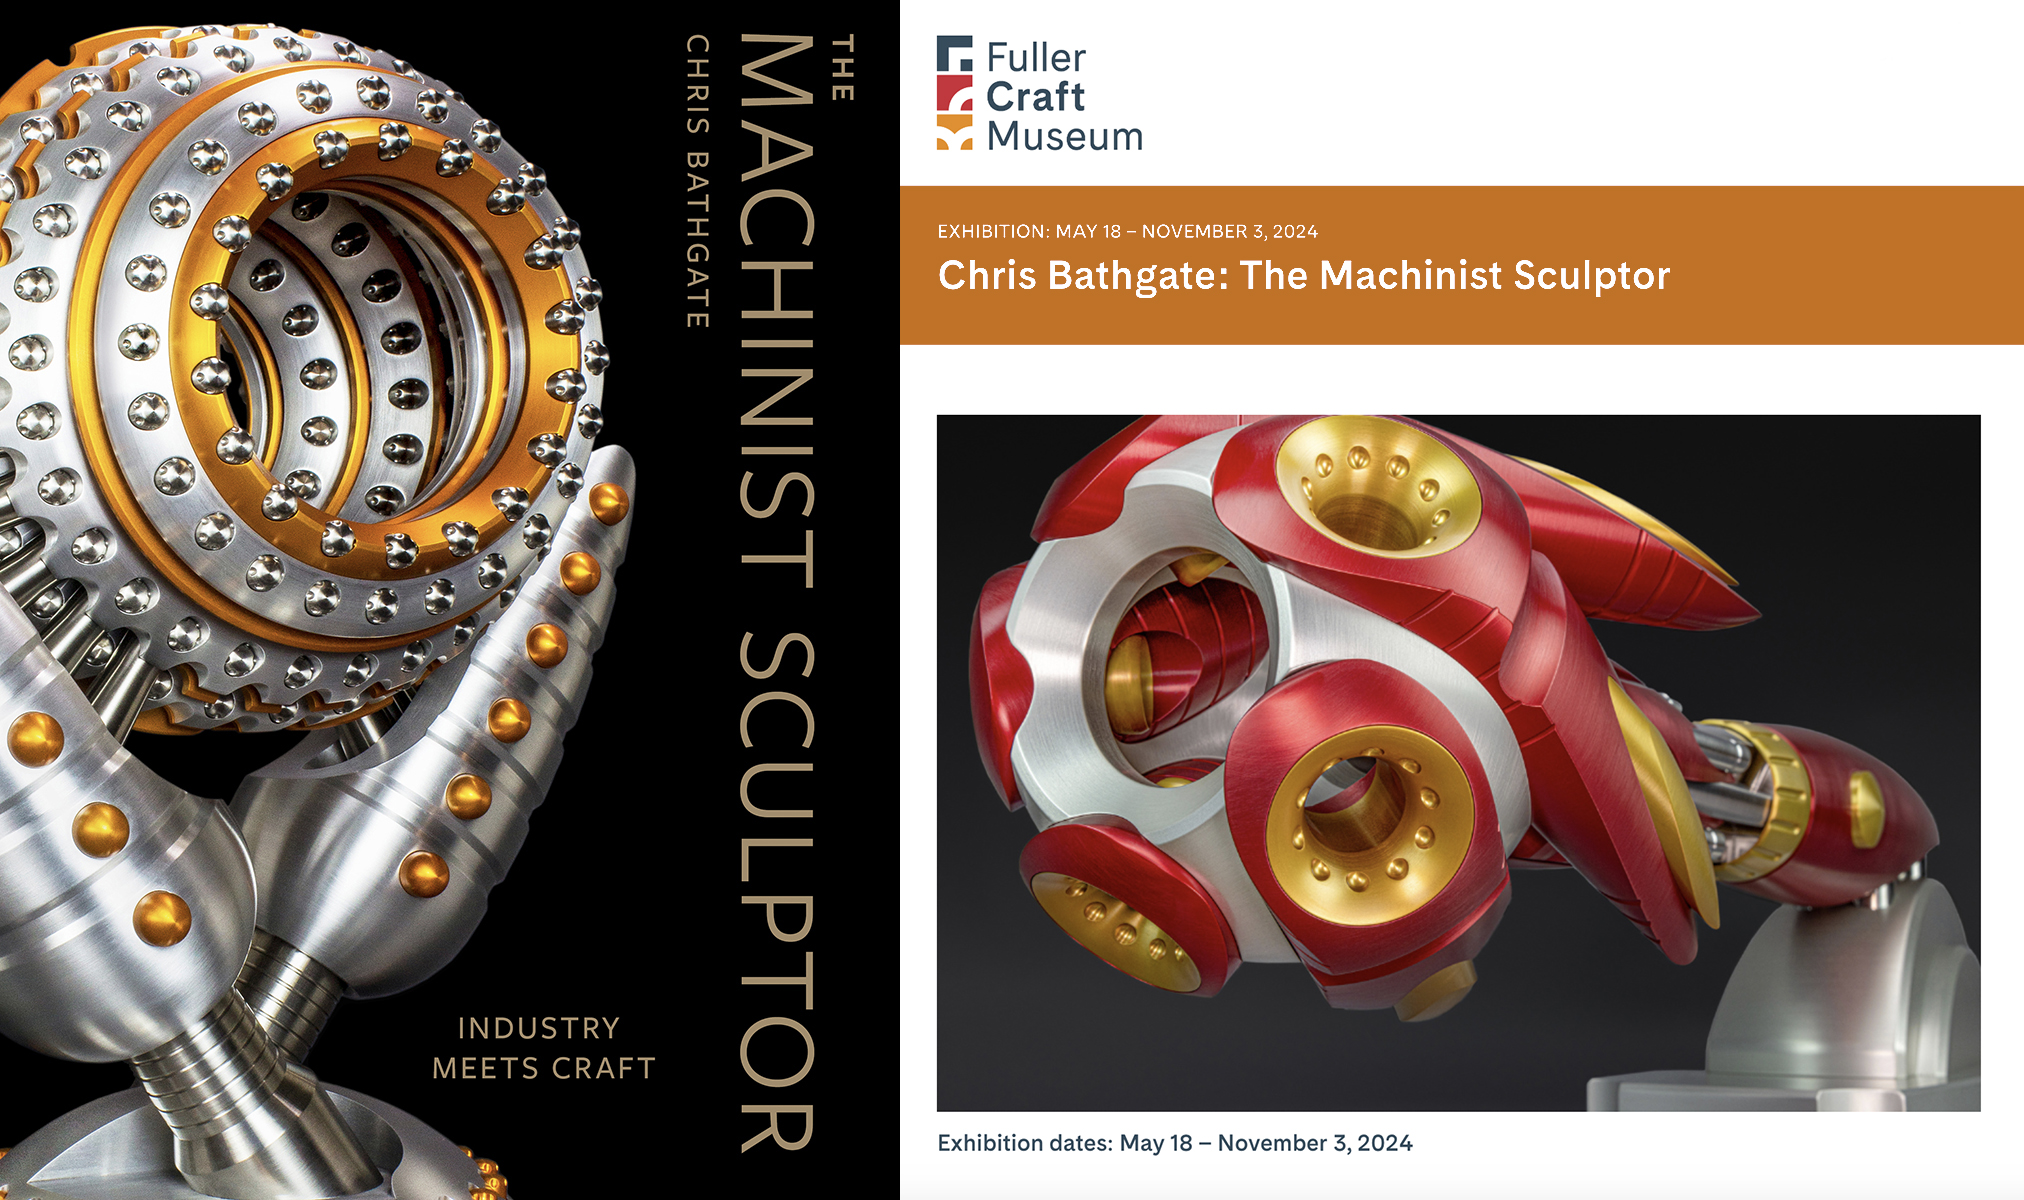
In other news, I want to formally announce an upcoming exhibition of my work at the Fuller Craft Museum beginning May 18th and running until Early November.
This exhibition is in conjunction with the release of my new book and shares its title. This will be a rather large collection of both my larger sculptures, and as many of my little creations as we can cram into cases. It will be a very nice show worth the trip.
The opening reception will be Sunday, May 19 from 2- 5pm. I will be on hand for a brief discussion with the director, to talk shop, and sign books. So if you have been wanting to get your copy of my book signed, now you know where to find me. We will have some extra books on hand as well, so I hope to see some of you there.
_________________________________________________________________________ I am building a new studio!
Lastly, I’d like to share the news that after much dithering and saving my pennies, I am starting construction on a brand new shop. After 20 years of dwelling in basements to create my work, I am finally going to build something that can properly hold what my studio practice has become. I make it a habit not to talk about things until they are real. But now that there is a giant hole in the ground, it finally feels real enough for me to start posting about it.
My current shop, in the basement of my home, is bursting at the seams. It is an organic space, consisting of thousands of ad hoc solutions and shortcuts piled on top of one another. It is efficient in that I never thought I could fit so many tools, and squeeze so much capability, out of such a modest space. But it is also inefficient in lots of obvious ways. It is cramped, and has limited head room for large tools. Getting stuff in and out is a nightmare, and staying organized when there isn’t enough places to put things is like playing one of those sliding puzzles. I have always liked working within constraints, but it was high time I admit to myself that my current shop, although I love it dearly, is holding me back. So about a year ago, I started working with an architect to build something better.
I have never had a “planned” space. So I am going to take my time building this space out and fine tuning the layout. I have no idea how this will go, but I am excited to haver finally (Finally!) broken ground. It won’t be the biggest machine shop in the world, but by studio artist standards, it is going to be pretty damn sweet. Keep an eye on my Instagram feed if you want to follow along on the progress of the new studio.
And of course, no post would be complete without me reminding everyone that my new book is available in bookstores everywhere, at Amazon.com, and directly from the publisher here at Schiffer books Thank you for your time and attention. SincerelyChris Bathgate
This is the last piece of the year, and it has been a very fruitful one for me in a lot of ways, so I think I will start this last post of 2023 with a story. So here goes, and also, look at the new work while you read!) I was having lunch with a collector friend of mine a few weeks ago. We were talking about art and music (naturally) and he commented on how he felt I was much better able to talk about creating art in a way that he never could when he plays music.
I was a little struck by what he said because, while I recognize that I am certainly able to talk about the topics and influences that surround my work, I am no better able to describe the free associative tasks that go into conjuring a design for a sculpture than a jazz musician is able to describe what is going on while they are riffing during a session. That is I can say "what" happened, but I cannot truly say I know the "how" or "why" when designing a piece.
And to be honest, I have never really met an artist that could. Which is to say I think we all recognize that creativity is mysterious like that, which is why it seems so special. We can analyze and even plan some amount of constraints we want when we go into making something, and we can apply all sorts of logic, critique, and context to what results afterward, but the squishy creative part that I simply call “the middle” remains largely inaccessible to us. We can catch glimpses of "the middle" and even get better at riding the indescribable wave like a surfer, but that free associative state in which connections are made between wildly disparate pieces of inspiration in order to make something new, by my estimation, seems to take place largely within the subconscious.
And thats that. I can't talk about it any more than anyone else. I can only talk about the circumstances leading up to it, and what happens during the act of building the thing that I thought of afterward.
I posited that maybe musicians, by the performative nature of their work, simply spend a lot more time “in the middle” than visual artists who might have more time on either end of a creative act to rub their chins, ponder, and process.
Anyway, thats my story, and with that all said, I want to introduce my newest major work, and share some of the inputs that led to this output.
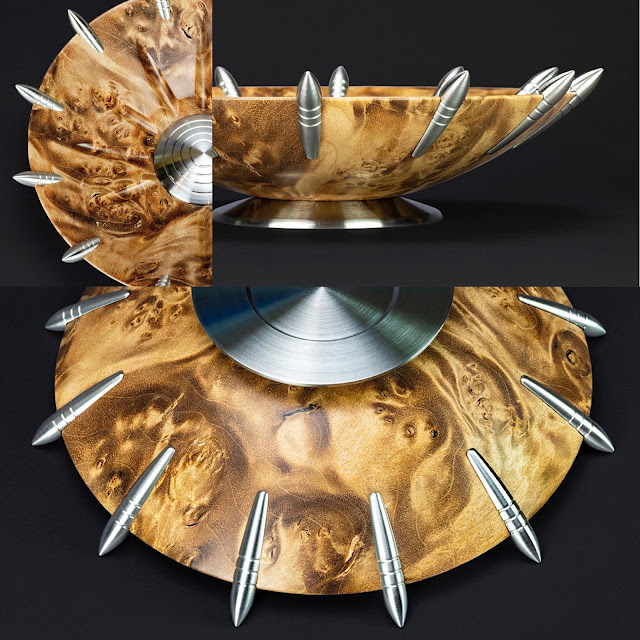
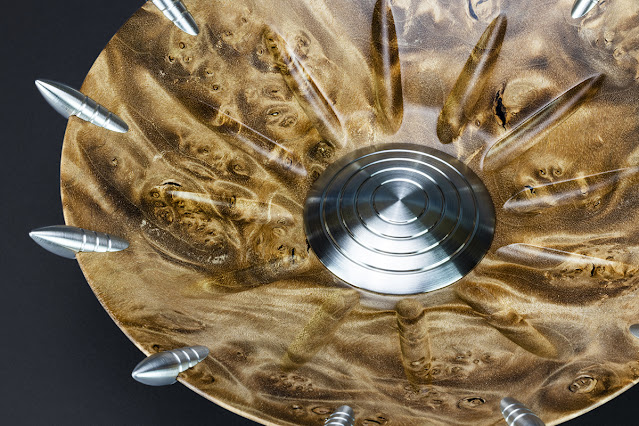
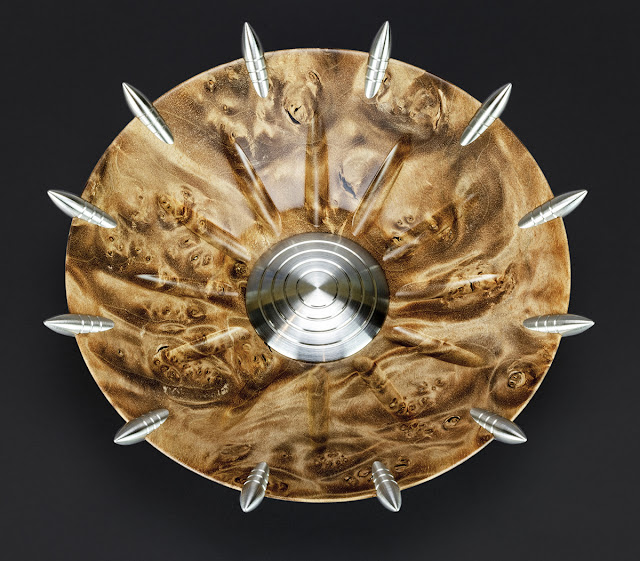
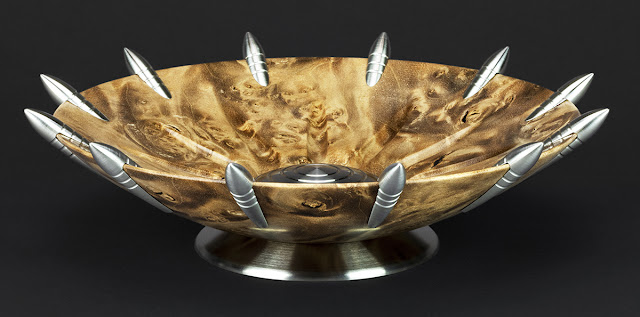
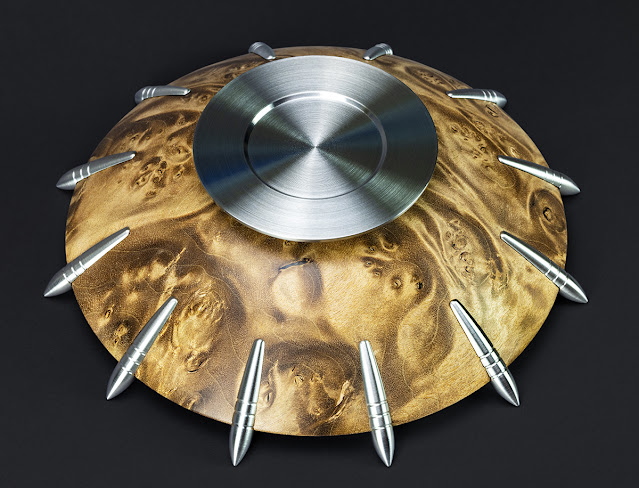
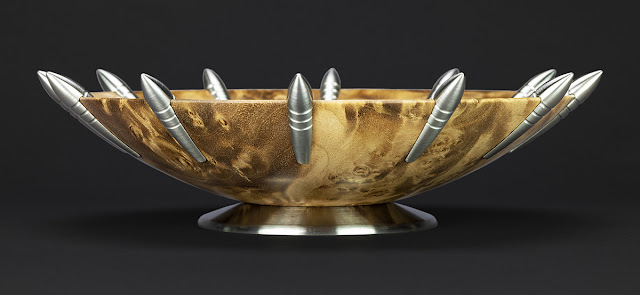
Introducing the TK 671322222512. Here is what I can say about the inputs for this particular piece. In the last year, I have been inspired by a very special tea pot made by an artist I follow, some ancient stone disks from the National Museum of Asian Art, a bunch of automotive design stuff, and of course my own recent adventures in wood turning. How all of those pieces fit together to produce this particular composition are not entirely clear, but all of those things have a "feel" that I think speaks directly to what this work is about. Especially details like the inner ring. And of course, on the practical side, the real catalyst for this piece is simply that I had this beautiful blank of stabilized Box Elder Burl left over from another project, and was determined not to waste it.
Perhaps that is not entirely satisfying, but it is something I have become quite comfortable with. So thats it, when I write about my work, I simply prefer to spend my time making note of the interesting inputs I've discovered. I like talking about leveraging different tools and techniques to help me express my ideas, and then attempting to place my output into the broader context of craft and the history of humans who make things. But in terms of how I truly come to make what I make, it just happens, it is automatic.
It is, and kind of has to be, that simple. But don't get the wrong idea, I am stoked that I also get to build and explore a lot of cool engineering, design, and materials science through my process along the way. I am just saying that is a different facet of my work from what we call creativity. Hopefully it can be freeing to realize nobody truly understands what they are doing. The end. This piece stands 14.25" tall, the disk is 9" diameter, and the base is 6" tip to tip Lastly, I hope everyone has had a productive year and I look forward to seeing what 2024 will bring. Happy New Year, and as always, comments and questions are welcome.
Lastly, lastly. Of course, I am obligated to mention for the foreseeable future that if you haven't already, check out my new book. The details of which are all at this link (where it just so happens you can also order it)
Introducing the Mod 4, the unexpected fourth entry in my module series.
I say unexpected because I had thought I had put this idea to bed two years ago. Well it turns out that having spent the intervening years putting my life's work to print has meant re-evaluating more than a few of my past projects. It just comes with the territory, and this particular project really stuck out for me as having one glaring missed opportunity.
The original Module tryptic consisted of magnetically assembled modular works based around three platonic solids. A tetrahedron, a hexahedron, and an octahedron. Each sculpture is composed of a simpler, smaller module that assembles into a larger composition using an array of strong magnets. The next shape in the platonic solid progression is a dodecahedron, a shape that has 12 faces.
Well, if you count, this piece only has ten modules, and that is because as an artist, I have the luxury to edit and change the rules however I want, and in this case, I decided to take a little detour. So while it is based on a dodecahedron, I opted for the chance to create a more interesting interior space, and so omitted two of the modular faces.
I explain all this and much more of the technical tribulations of designing this piece in the video above.
I love these module pieces because they create a lot of complexity from so few unique parts. And of course the fact that they assemble and disassemble quickly with the use of magnets is also endlessly appealing. The main reason however that I am pursuing this small composition now, is that I believe it will be a springboard for a larger piece I have cooking in my brain.
The size on this piece is about 2.75" from tip to tip and about 1.6" deep
I am continuing to refine this work, but I wanted to get a post out. As I write this, I am making a version in titanium to make a stronger, lighter weight piece. The magnets work perfectly fine in stainless steel, but the Titanium will lighten the piece substantially, and I believe that will be appealing in this case.
Titanium also opens up some interesting anodizing options that I am looking forward to exploring. At the moment, I have been tackling the very limited Ti anodizing I use with a modified (and inferior) process (limited to the usual Gold, blue, and Purple colors). I thought it was high time I set up a more capable titanium anodizing station, which is very different from aluminum anodizing. This will take just a little time while I bring in supplies, but in no time I hope to have some good examples to show. In the meantime, I hope you enjoy the first prototype work. Note to collectors: While I am hesitant to announce a pre-order without all of the pieces in place yet, but I also know some people are already chomping at the bit to add one of these pieces to their collection. So lets set a date, and then if things change, then well we all will have to adjust. So here goes. Sign up for this work will be Wednesday Nov 29th at 11 AM EST.
I will send out the link through my usual channels (email, the blog, IG etc)
All of the details for the sale, along with (hopefully) full specs on the Titanium version will be sorted out by then. So mark your calendars and I will have more info when the time comes.
Also an exciting update on the release of my new book! The release date has been moved up to NOV 28th! Just a week away. So if you get your order in now, it will be in your hands with plenty of time before the holidays. Some early pre-orders have already been delivered! What an unexpected surprise to even myself. I’m totally stoked! (and I never use that word, but it is the correct one) As always comments and questions are welcome.
Hello Everyone, Today I have the unique pleasure to announce something that I have been working on (secretly) for longer than I care to admit. Thankfully the time has finally arrived to let the cat out of the bag. I HAVE A NEW BOOK!
This book is titled “The Machinist Sculptor” and if you haven’t already guessed it – it is about my art yes – but it is also about the aspirational idea of machine work as a new studio craft. That is the idea that machine work has the potential to stand alone as a unique artistic medium with intrinsic characteristics, not just a tool that can be employed in service to other artistic forms (even though that is fascinating as well).
For this book, I have partnered with Schiffer publishing to transform my over twenty years of work, creating machined metal art (and writing about it), into a reflective history and quasi-manifesto on what it means to make art with the technologically diverse tools of the machinists trade.
It is a full-throated attempt to place what I do (make art with machine tools) into a broader context about how various tools and practices (do and do not) find their way into the hands of artists and artisans. How the tools of mass production eventually become the tools of cultural production.
I presume many longtime followers of my work will have seen the self published catalogs I have released over the years. Without diminishing those efforts, I want to say "THIS BOOK IS NOT ONE OF THOSE". This book is a quantum leap forward even if some of the bones of this book may be familiar (it is my work after all). If I may be frank, this book is my first time working with a bonafide publisher, and so for the first time I had the pleasure of working with editors and designers to fully shape my story, along with everything else I have learned from two decades of metalworking into an expansive text about the many spheres of knowledge and influence my craft touches. It is a complete rethinking, redesign, and expansion of the original essays that set me down this road and made me an unintentional expert in a field that is a nexus for art, craft, and design.
At 288 pages, this 9"x12 "foil wrapped hard bound print is truly the most beautiful friend of the coffee table I have ever seen. Many kind folks have worked very hard on this print, and it truly shows. I would be grateful if you would give me the opportunity to share this most sincere and detailed perspective an under-appreciated craft, by picking up a copy for yourself, a friend, or colleague.
The Machinist Sculptor is being printed and distributed by Schiffer publishing and will be available at bookstores everywhere. The official release date is Jan 28th, but you can pre-order it now on Amazon. And of course, thank you.
P.S. I am going to post the link to the Amazon pre-order here. You will have plenty of opportunities to reserve a copy because, like it or not, I am going to bring this up frequently between now and the release date. Pre-order link I am not one to beat my drum too much, so I will apologize in advance for that, but that is how these things work. As always, questions and comments are welcome.
Hello Everyone I know you all just heard from me last week, but it has actually been quite a while since I have released a larger one of a kind work. Partly it is because they just take so very long to design and build (this build stretched to seven months), but it is also because I have been caught up in a line of thinking that has (temporarily) taken me away from this kind of work. But although the big works have taken a back seat as of late, I am glad to be unveiling this fantastic, and very large, new release. I call it the BB 462222312 For one of my larger works, this piece is unique in that it moves. Well, it spins….but only if you spin it. This fact was the source of a whole lot of internal debate for me, because I usually prefer my larger works to be completely static, with any movement or functionality implied. But for this piece, in this composition, I just could not resist the opportunity.
In fact, the original design was completely static. But once I realized that this piece could potentially spin, and that I could fit the hardware to do so without compromising the original composition, I decided I had nothing to lose on the experiment.
As you can see here, the bearing assembly fits rather handily inside the base tube.
Now I will say again that this piece does not spin on its own. It doesn’t have a motor to drive the rotation, and I am certain for some this will be a missed opportunity. But I do not see it this way.
For this branch of my work, I have embraced a more open interpretation and that means leaving things vague. In my eyes, a whirling motorized piece of sculpture would be just that, and nothing more. I think this piece invites a kind of interpretation, and then, if you are brave enough to reach out and touch it, you are rewarded with the fact that it spins.
Also, I just simply could not live with the compromises this kind of overt mechanization would require. Be it visible wires or belts, or just the idea that the work would be transformed from a piece of largely visual art into an animation or an actual, rather than metaphorical, machine. It is a tough distinction for me to describe, but for this piece, I did try to have it both ways. And for me, I am quite satisfied. I am sure for some, I have successfully straddled the line between avoiding too much novelty and humoring a desirable functionality, but I have no doubt that to others, I have simply failed to commit. This suits me just fine, as it is in the ambiguity that I feel these larger pieces find their place. I also design the collar on the base with a rubber O ring that can be tightened against the body. This gently prevents the work from spinning if one desires to stop the work in a particular position. I wouldn't call it a lock because it can be easily over come, but it does work as a sort of brake. This work also has a glorious interior space that images just do not do justice.
The technical drawing for this work is massive as well (90"x30") again, a struggle for small screens. Dimensions of the work are 31" long x 9.6" tall x 7.25" deep
I look forward to hearing all of your thoughts and comments if you choose to share them.
Hello everyone, todays post is a small work that feels like a departure from some of my other design editions.
This work has a little more of a utilitarian feel and some rather overt accessory references, but nonetheless is a necessary step on my machinist artist journey.
When I think about the decorative objects that I have coveted in my lifetime, one thing that immediately comes to mind for me is the handful of pocket watches I have owned. It seems somehow I have been working all this time completely oblivious to a bit of self knowledge that now seems totally obvious. I grew up during the 80’s and 90’s. During that time, pocket watches weren't cool (were they ever?) and most people didn't have them, but for some reason or another, I kept ending up with them. Not because I needed to know the time. but because I was drawn to them for tactile reasons. They were (and are) just nice objects to hold and fiddle with. Even now I have one at my desk that I turn over in my hands from time to time. So recently, I got into a conversation with someone who asked why I couldn't make my other pocket sculptures even smaller. My reply was simply that experience showed me that anything smaller was prone to being easily dropped and damaged. A human hand can only hold objects of a certain size securely, anything smaller and things start slipping through our fingers. “To make it smaller” I said “ it would need to be on a chain”.
“Great idea” they said.
And then I stopped and thought about it. The idea of the chain brought me immediately to the humble pocket watches I have known (and my gross oversight as an artist). It all finally clicked and I was off down this really fun rabbit hole. Once I settled on the pocket watch as a conceptual idea, I set about the process of bending all that towards something that straddled the line between utility and sculpture. I am calling this work the WP1, and it is likely the first in a series of "Watch Pocket Art". The work as designed can be strung on a chain and worn like a standard pocket watch, put on a lanyard, or anything else really. Just please promise me you won't put it on a keychain. I can't bear the thought of this beautiful piece being reduced to a mere key ring, or being clobbered by a mass of keys. To aid with discussions about this work, I am using watch nomenclature to describe its parts. Above we have the "Long hand" in anodized aluminum, and the "Lens" in Pink Box Elder. The remaining parts are in Stainless steel. The mechanics of this piece are pretty fun. I really like big chunky mechanisms that are easy to understand, and so I have created a ratcheting mechanism that utilizes a stacked set of detents rather than a common pawl lock. You can move the long hand of the work lever-like to index the lens and short hand around in a tick tock fashion. You can also palm the work and operate it one handed if you have a little finger dexterity.
I do my best to explain all this in detail in the video below but here is a picture showing a standard pawl mechanism next to my arrangement.
As you can see, unlike a clock motion, the assembly is relatively large and comprehensible, which makes it easier to appreciate. Regardless there is a lot that goes into crafting each of the unique components in this piece and I am continuing to refine the design even now. Given its overtly decorative nature, this is one of the few projects where it feels appropriate for me to really mix, match, and explore a wide range of material combinations. So both hardwoods and exotic metals are on the table this time around. albeit with some limitations due to the process I have set up to fabricate these parts. More on this later. For now I hope you will enjoy this clockwork kinetic sculpture.
Notes for collectors: As has become customary, these works will be produced as part of a one time, limited edition.
For those interested in adding this sculpture to your collections, the sign-up for the pre-order will go live on Monday August 7th at 11AM EST.
A link will go out via newsletter, as well appear on my blog and Instagram profile (@c_bathgate). Pricing and other details of the sale will be available on the sign up form.
There is going to be a lot of information on this sign up, and a lot of options as well, so if you plan to add your name to the list, maybe start envisioning a few ideas of what you might like your work to look like.
I think I am going to offer the Lens (or dial) in a wide range of hardwoods, as well as Mokume-gane, Titanium Damascus, and superconductor.
The hands will be available in either stainless steel or anodized aluminum (aluminum can be dyed within my standard color pallet)
I will offer the bezel in either stainless, brass, or Mokume-gane. (Maybe also Ti-mascus or SC but the size and complexity of this element will require special considerations that will make this a pricy option)
All other parts will be stainless only.
As far as the chain: My initial thought was to supply this with a pretty generic chain, but after talking to people and realizing how varied preferences were, I actually think it is best to leave it up to individual collectors. Some have expressed the desire to put it on a lanyard, others prefer precious metal chains, some have mentioned leather fobs, and even one mentioned they have a custom chain made by another maker. So I think given that it is an element that I do not intend to craft myself, it really is optional. I can link to the chain pictured above, and even recommend a few makers doing some crazy stuff.
I do not mean to punt on the chain, but to do it justice, it would really have to be it's own project. Which is to say that I have already started discussing a collaboration along those lines with other makers. Time will tell.
OK, that is all for now, I will have more info and pricing on the sign up when it goes live. See some of you next week. And as always, comments and questions are welcome.
Hello everyone. I have been in a reflective mood lately, so today's post is about a design both old and new. This time, my instinct to revisit past projects has taken me to my Kinetic Detent Slider series. Like its predecessors, the mechanism for this work is intentionally trivial and features a simple piston mechanic that locks in place using a spring ball detent. The appeal of this project is that it is one of those elegantly simple designs that allows me to marry mechanical functionality, with something so visually unique I have been unable to replicate it since. It is a craft form with a timeless feel that is ripe for endless iteration. I am calling this sculpture the “KDS1-VW”
For those of you familiar with my older works, maybe some of you are wondering why I have come back to this design after a 7 year break? The short answer is that if you give an artist the opportunity to engage in nostalgia, they will almost always take it. Without giving too much away, I have recently had a unique opportunity to write at length about my journey through the rewarding craft of Machining. This has helped me reflect on the many ways machine work, both digital and manual, is (finally) seeping further into the cracks of creative society. In doing so, I just couldn't help revisiting a design that holds a very special place in my practice. When I take a look at my own journey, there are a small number of works that stand above the rest as touchstones that mark a change in my relationship to my medium. My original Slider sculpture, which at first I just called a “pocket sculpture” before taking on its official nickname, is one of them. I'd be willing to bet there are quite a few people reading this blog today who are here primarily because of the popularity of the S1 sculpture. It is this work that really helped me understand that if I was going to define my work in terms of developing machining as a studio craft, I would need to create projects that bridged the world of fine art with some of the other decorative craft trends I was seeing pop up among machinists. So however old this original idea, I am glad came back to this work. Because aside from bringing me a lot of personal joy, there was also plenty of room for improvement in both process, engineering, and design. In the video above, I do my best to detail many of the design changes that I was able to incorporate. Materials I have experimented with so far are as follows. Left to right above is red stabilized BoxElder, two tone Amboyna Burl with sapwood, and blue stabilized Boxelder. Left to right here is Chechen, Amboyna Burl, and Ironwood. Ironwood comes in a lot of flavors, from high contrast burls in bright orange, to more uniform browns. I use it because of this variety and it machines extremely well.
So thats it, this work is special to me because it set me on a path to realizing that machining is a profession that exists simultaneously as an industry, a craft, and science with a built in means to apply it. It is a process that uniquely blurs the line between fine art, craft, and design in way that I could use to tell a story about the idea of craft itself. I feel lucky to be afforded the opportunity to make beautiful objects that pull influence from the many spheres of knowledge it touches. In resurrecting this design, I hope to create a further opportunity to talk about traditional craft forms within the field of machining. That is forms that "ALL" machinists can make to learn the fundamentals of the craft. but more on that in a later post. Notes for collectors: I think it would be a crime not offer this work up as an edition so I have already started gearing up. Development continues on a few aspects of the work; namely a display stand and fine tuning my process for safely processing the wood elements. But nothing that will substantially alter the work itself. For those interested in adding this sculpture to your collections, the sign up will go live on Thursday March 16th at 11AM EST. As always, a link will go out via newsletter, as well appear on my Blog and Instagram profile. Pricing and other details of the sale will be available on the sign up form.
Notes on wood selection for the inlays: I will try to have all relevant information pertaining to material selection on the sign up, but I do want to make a brief comment now on the fact that these works employ the use of exotic and stabilized hardwoods. These hardwoods are not always easy to source and so while I will do my very best to get my hands on everything I need to get you the work you desire, some supplies will be limited. If one particular selection proves popular, I may have difficulty sourcing enough material. So I would caution those who feel strongly about what they want, to sign up as early as possible, and everyone else to maybe think about a backup choice if that becomes necessary. Another note is that the process I have set up for shaping these rather tricky inlays is only suitable for a certain range of materials, so while I am open to suggestions, there is a limit to what will work. Crumbly or fractious woods simply won't survive the process, and exotic metals and other materials are unsuitable for the work-holding and turning process I have built. Above is a sampling of some of the woods I am going to offer. These are the materials that I feel work best with this process. I hope that is useful information. OK, with all the tricky details out of the way, I just want to say that these new pieces are absolutely stunning and I can't wait to make some more of them. More soon, and as always, comments and questions are welcome.
Hello Everyone. New work time. And since this is a proper one of a kind sculpture, it adheres to the naming routine I developed ages ago for this kind of work. So this sculpture's proper title is BY222422 Maybe one day I will tell everyone what that means. I have been continuing to explore the ways that I can bring (my home brewed) stabilized hard woods into my practice, both practically and aesthetically. I am finding that while stabilization does create a substrate that is much more amenable to the kinds of machining process I use in metal, there are plenty of limitations and extra considerations one needs to take into account. Managing tear-out when milling and drilling intersecting geometry is a big one. Working around knots and other inclusions in the wood is its own unique departure from my usual work as well. Also simple things that have an as yet known answer like can you simply drill hole and run a standard tap into stabilized wood to create threads? In this case, yes if you are careful! but plan B was to mill the threads. Unraveling all of that has just been so informative and a lot of fun. One of the ways I thought to really compare and contrast the differences between machining wood and metal was, although simple enough, pretty revealing to me. That was to make identical complex parts in the different materials. Originally I thought I might make two identical works, one in wood (Boxelder in this case) and one in aluminum. Then I saw the benefits in making a single hybrid piece, both aesthetic, practical, and conceptual. First, a work that embodies both materials is more illustrative of the ideas I explained above, rather than having to explain the concept, it is plain to see in a single work. But there were engineering considerations as well. The final geometry of the form leaves some pretty thin cross sections in the form, and I honestly didn’t know how the Boxelder material would perform given the large number of threaded elements piercing it. Threads can put internal stress on an object, so would the cumulative forces eventually cause the piece to break or crack? Would it warp? I knew the aluminum would be perfectly strong and stable in this situation, but I had no idea how the wood might perform; so sandwiching them together was a way of supporting this element for which there was lots of uncertainty. It also is aesthetically more interesting to me as well.
Now whether or not this heavily processed piece of boxelder will eventually shrink or warp over a longer time frame remains very much to be seen. Stabilization does seem to do a good job plasticizing the wood and I dried the wood thoroughly before processing it, but in talking to different woodworkers, I have been assured that nothing is ever a sure thing. That is in itself sort of a fascinating way to look at a craft.
I have a fair amount of confidence that things will hold, but if they don’t, I am most curious to learn what effect being bolted to a metal support will have. Will it help keep it in place, or cause the wood to crack or fracture along its connecting points? There are a lot of machined fits in this piece that I just do not often see in wooden objects so there are plenty of opportunities for things to happen, and if they do, will they add to the piece? Will they be interesting in their own way?
My attitude is, let's find out.
The size of this work is 8.4"Diameter, by 2.5" thick. Note for collectors: As of this initial writing, this piece is currently available for collection. And as always, comments and questions are always welcome. Also, thanks for following along, and since this is the last work I am likely to finish this year, I hope everyone has a good end of year holiday, and a happy new year.
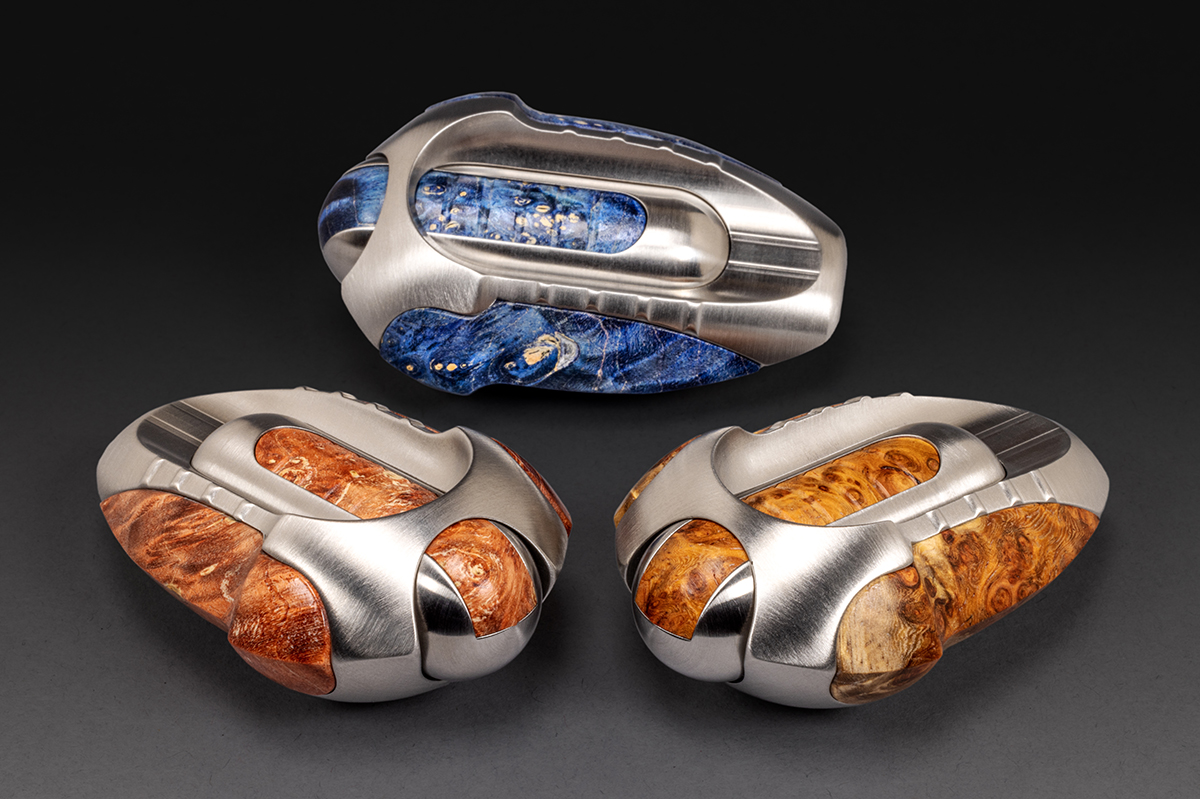
Hello everyone. I am back from the shop with new work to share. This time it is a trio of little wonders simply titled the "S3C". This work is the third and final design in my "bead-like" series that I've been intermittently working on this year.
For
For those just joining this project, or those in need of refreshing, above is a family photo of the full series. I have taken as my starting point for this series the simple idea of the inherent difficulty in creating interesting interior space using the reductive processes inherent to machine work. In iterating around this simple challenge, I hope to build to something a little more complex in the near future.
For now these little works are excelling in more ways than one.
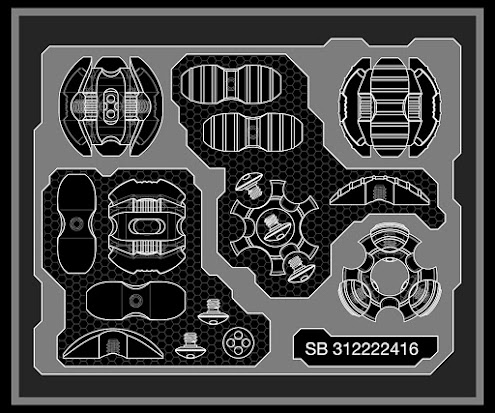
One of the other concepts I have tackled in this series is the use of exotic materials in various metal working circles. I have been incorporating a single different exotic materials into each new design rather than using all of them at once (as is more common). So far, I have used Superconductor for the SB312, Mokume-gane for the S2B, and now with this work, I have brought Titanium Damascus into the conversation. I had hoped to incorporate each new material in a restrained and considered way, adapting each design to the particular challenges of its particular material. I am not sure how successful I have been in that regard, but I have enjoyed taking my time to get to know the quirks of these exotic alloys, and their limitations. Like the name implies, Titanium Damascus is a composite material that is forged much like Mokume-gane or other Damascus steels, only it uses two different grades of titanium alloy. This composite, when subject to heat bluing, exhibits a coloration that is quite striking and unique. Here is a link that gives a little more detail on the origin of Titanium Damascus, but mostly if you try and search it, what you will find is a slew of products and decorative pieces for sale that are made with the material. To call it trendy is a bit of an understatement, and its commercial potential is spreading much faster than useful information about it. But there is no arguing that it is a beautiful material In terms of machining, it is a pretty difficult material to work with. Titanium is generally challenging, but add to that a composite material with varying hardness and things only become even more so. Additionally there is a bit more danger in that if a cutter becomes dull or breaks, things can get too hot quickly and titanium can actually catch fire (and metal fires are no joke). So you can see why this is a material to be taken seriously. I don't love the idea of using large quantities of this material in my home shop on a regular basis because familiarity breed mistakes, but at this point in my career, the exceptions are what I live for and I know how to be careful. But, with a little extra care, patience and more than a few added precautions, I am confident I can handle this project without burning my house down in the name of my art. But it never hurts to say these things out loud to make sure that they sound like they are true. Anyway, I digress.
I don't want to ramble on too long with my keyboard, so I decided to switch on a camera and ramble a bit there instead. I hope it serves the same purpose. See the demonstration video above to learn more about how the work is assembled and some other little process tidbits. As ever, I appreciate all of you who continue to take an interest in my work. Your comments and questions are always welcome. For those who collect, there are notes at the bottom of the post. Dimensions of the piece are approximately 3" Diameter by 2" deep.
Notes for collectors: As with the other two works in the series, I will be offering this design up as a one time limited edition. The sale of these works will be a pre-order with work to begin a few weeks after the sign up closes.
Pricing is going to be a little bit tricky for this work because it is both a larger work, and one with a few variables in terms of material selection.
The body of this work is machined in 6061 Aluminum and then anodized, you will have a wide choice of colors for the body of the work.
The screw details on the work will only be available in stainless steel (this is my artistic decision)
The inner rods will be available in either stainless steel, or brass (this is my artistic decision)
The outer (I am calling them "fingers" ) will be available in either Stainless steel, Brass, or Titanium Damascus. This selection will effect the price of the work as Titanium Damascus is a considerably more expensive and time consuming material to work.
I do not post pricing on publicly facing media, but I will have all relevant details and pricing sorted out by the time the sign up begins and it will be listed at the sign up link.
The sign up will go live on Monday November 7th at 11 AM EST. I will post the sign up link to my email newsletter, here on the blog, as well as on my instagram page.
Thank you and appreciate your support for my work.
Hello everyone Today I have a piece to share that is four years in the making. I call it "The Sculptural Knife Urn" and it is the third work in my Sharps series of knife-centric craft forms. This is the last piece in this incredibly fruitful triptych of works. I dare say it has completely changed the path of my sculpture practice. I can't talk about this project without partially re-stating the impetus for embarking on this project. It has been helpful revisiting my thesis with each installment, as it has allowed me to chew on my original assumptions and reframe them in light of new developments. So for those who like my longer posts, this is one of them. The industrial Arts as Muse: I'd hoped this fascinating tangent into knives and craft forms would help me tease out the interconnected nature of various industrial crafts. As I have tried to understand my relationship with my process, I have often turned my attention to other craft traditions such as ceramics, glass, and wood-turning. I've looked for parallels to how each of those practices transitioned from the factory floor to the artists studio–so that I can better do the same with the medium of machine work. In each of these crafts, I found a remarkably similar story and I was moved to try and combine influences from all of them into a single series of works.
On reflection, I've come to realize this project isn’t really about knife making–it isn’t about vases, bowls, or urns either–it is about the state of craft as we find it. It is an appreciation of the idea that craft isn’t a rest-home for idiosyncratic or cast off processes, or where practitioners of defunct trades go to retire–it is a natural step in the material progress of our species. Craft, whether part of the fine art landscape or somewhere else along the spectrum of utility and decor, is an important part of how we innovate to solve tangible needs. When material processes are brought into being, usually through the sciences or engineering, their uses are narrow and specific. But when the technology around that process is sufficiently advanced (or even obsolete for industrial use), it is artists and craftspeople who help flesh out the myriad alternative ways in which that process can be applied. Artists are the ones responsible for transforming material innovations into cultural innovations that more broadly influence a society. I talk a lot on this blog about how using modern machine tools to make art is a relatively new phenomenon, but I don’t think I have accurately portrayed what I mean by that. Indeed artists have been employing machine tools to produce various kinds of artwork for decades–a century or more even–so I should clarify what I mean when I say that machining–as a vocation–is becoming a new art form. While the tools I use have been employed in the production of fine art – through various fabrication shops, organizational structures, and outsourced expertise–it is only just now beginning to exist as a studio craft movement in the same vein as other more established craft traditions–one who's practice is directly engaged with the medium rather than just being a means to an end. What do I mean by that? I mean that the prerequisite for exploring a medium as a studio craft–by my estimation– is that an artist must be able to bring the entire enterprise under their control (one artist, one studio). In the most decadent way, every aspect of a practice must become available for creative appropriation, deconstruction, and exploration. I say this more as an aspiration than a hard rule, but a solo artist practice is one of the few settings that provides the freedom necessary for the uninhibited level of investigation it takes to create artifacts that both influence, and distinctly represent, a medium. Personal access to modern forms of metalworking equipment–the kind that makes the most rigorous artistic exploration possible–has been largely out of reach for most practicing artists until very recently. History has plenty of examples to demonstrate how a process blooms once conditions change, allowing artists to truly own the means of production, so let's use fine art glass as an example. Glass work: A very brief and incomplete history. Decorative glasswork has been around for centuries, but for brevity I am skipping over the Egyptians, and Romans to create a slightly more contemporary example. I think one of the better known glass makers from the turn of the 20th century is Tiffany glass. Louis Comfort Tiffany set up the Tiffany Studio in New York and produced a wide array of stained glass and other decorative glass designs. He developed a number of innovations in the science of creating glass and greatly expanded how it might be used for artistic purposes.
However, the structure of this outfit was as a design house and factory. It was run by teams of artisans and designers working to produce decorative and utilitarian pieces. There were plenty of successful attempts at art, but by and large it was a commercial affair that catered to a decorative class of collectors. The work was constrained by the socio economic guardrails of what a “collectable” glass object could be. In order to sustain the factory, the vast majority of its output was stained glass, lighting, vases, and the like.
Contrast this with the birth of the studio glass movement.
In 1962, on the heels of a boom in interest in the studio ceramics movement, Artist Harvey Littleton and research scientist Dominick Labine developed a design for a small and affordable furnace that could melt glass. This small advent removed the need for teams of operators as well as greatly reduced financial and physical infrastructure needs. It singlehandedly created the conditions for solo artists to bring the production of glass art directly into their studios. In the same manner as a painter might paint, artist were able to work freely with glass, away from outside eyes and commercial influence. This meant glass art could be practiced by one artist in one studio.
Glass art's popularity began to grow and this era saw an explosion in the creative output of artists using glass. The guard rails were suddenly gone and a piece of glass art could be literally anything (or nothing at all). Experimentation was rampant and this gave rise to the fine art landscape we see in glass today. Many of the examples of glass sculpture we see in museums were born out of this era. The story of glass art resonates with me because very similarly, and until very recently, artists looking to leverage machine tools and modern digital fabrication technology for the creation of art would likely have needed to rely on design firms, tech schools, and fabrication studios with teams of specialists who could assist in programing, running, and maintaining the machines that were beyond their experience and financial reach. Like early glass factories– this limited access to tools has a way of constraining the way digital fabrication technology is used. Limited access can have the effect of relegating the artist to being primarily a designer, which places them in a more perfunctory role in the production of their own work.
Now don't get me wrong, institutional settings are perfectly appropriate for early education. Maker spaces, apprenticeships, and schools are important resources for developing a practice. Likewise, there will always be legitimate reasons for artists to share resources and hire outside experience for the production of work, be it for conceptual reasons, or practical constraints. But that is no reason not advocate for an ideal. Every artist who is invested in directly exploring their craft, should strive for creative independence and plan their exit from institutional reliance as soon as it is appropriate. There is no substitute for owning and running your practice in its entirety. Anything that limits when, where, or how you can pursue an idea can be detrimental to your ability to create. History backs me up on this. So seize the means of production and make it a conceptual part of your art. Machine tool technology over the last two decades has become quite scalable (small). Financial accessibility is still up for some debate on what is achievable for an artist looking to pursue ideas over profit. However difficult, it is currently possible to bring these tools under an artist's roof, and it has been my intention for the last twenty years to do just that. I started out exploring modern machine work with an eye toward fine art sculpture, but over the years, pursuing work in the spirit of many of the studio crafts that have come before has also become an important part of how I define my work. So long story short, here I am with a razor sharp decorative urn made of machined knives and decorative hardwoods. A piece that is (somehow) supposed to embody all that I have said. Sheeesh! I hope some of you will appreciate the nuance I have poured into a project like this, it is certainly what keeps me digging ever deeper into the possibilities of my craft. Some additional thoughts: I want to close this out by saying that I try to be careful about subscribing to various dogmas. I have enumerated a very particular way of thinking about the evolution of craft. One that simplifies and ignores differences in geography and time (that is, people used tools and materials differently, in different places, at different times throughout history). In doing so I have no doubt implied that there is some greater value or purpose in creating “fine art” as it is understood in western culture. But this is not quite right. I want to be clear that life is not as neat and tidy as the above summary–or art canon–depicts. Artists, designers and craftsmen will always fall along a spectrum in how they utilize tools, materials, and concepts; no doubt overlapping many different worlds during their lifetime of creating. However, I feel it is instructive to think about the various stages that material technologies undertake as they move through a particular culture. Creating fine art is just one of a number of equally noble ends (like science) that help us to appreciate the means by which we express ourselves. How processes make their way from discovery, to utility application, to culture producer, to conceptual symbol for a unique moment in time, is a useful framework that can help us all make better work–whatever that work may be. Technical Notes: In building this piece, I. was able to incorporate many of the techniques and processes I have been honing over the years. Most recent of those being the dyeing and stabilization of hardwoods. After my experiment making several turned wooden bowls, where the incorporated woods were structural elements of the piece, I wanted to turn to a much more decorative approach. The green maple burl pieces in this design are not structural, but instead serve only as inlays and bosses. They function as allusions to other decorative elements I have admired in my research. I am calling this third work an “Urn” but like most of my works, strict classification is neither easy, nor necessary. above is the earliest concept sketch for the whole series. As you can see, as the project slowly progressed (less than one work a year) the deviation from my original plan became more and more severe. My original urn design (on the right) is completely unrecognizable from what I ended up creating. This is exactly as one should expect, as each work in the series added new information and challenges that needed to be incorporated. My original urn design did have an interesting assembly mechanic, but perhaps I will use that somewhere else in the future. As an urn, this piece is incredibly over engineered. Rather than being machined from one piece, the inner vessel has half a dozen interlocking and threaded segments that stack to create the volume of the piece. This allowed me to add some wonderful details and color to the interior space of the urn, as well as create a support structure that would hold the wooden elements without relying on them for structural support. This complex arrangement also gave me a small amount of adjustability to ensure the blades could be properly installed. Which brings me to the blades themselves. I have tried to rationalize my use of razor sharp blades in various ways. Now that I am at the end of my journey, I think they need little justification. Their aesthetic contribution to the work is very evident in this piece. That they add a conceptual layer to the work is only a further bonus. Turned knife blades? Sometimes you just have to try something because you can. In all my research into knife making, it always seemed like the smooth curved bevels on some blades might be achieved using a facing operation on a lathe. There is no reason to do it this way of course, and I have never seen it done this way. All the more reason to try it. So I designed the blade forms intending to try and turn the bevels on a lathe, which is a very unusual set up for a knife maker. This process was pretty rough on the cutting tool inserts and many were chipped long before they should have. 440C stainless is a hard material, which does not lend itself to this kind of cut. But it actually worked! and the finish was pretty good. Who knows, maybe there are other ways to make knives on lathes.
Above is a process video that illustrates this turning operation for the blades (approximately the 13:25 mark). I tried to capture the bulk of the steps that brought this piece of art into being, but life in the shop gets hectic and I did miss a few steps. Some other video clips were lost due to technical issues. But all in all, it is still a great ride. One last thing that I have wrestled with over these three knife projects was the level of finish to apply to the blade forms. I have tried to approach their creation as a machinist would–as opposed to a blacksmith or knife grinder. To that end, I have eschewed the common practice of bringing the final knife forms to a very high mirror polish. There is some economy in doing this, but my primary reason for not doing so is because, over the course of my entire practice, I have found mirror finishes to greatly distract from seeing the form of an object as a whole (I have always preferred satin finishes or finishes with grain). With a mirror finish one does not see the object, only the reflections around it (photography is also a nightmare). Likewise, even though I am a machinist that uses numerous automated processes, I have come to appreciate small bits of evidence as to how a part was crafted, such as fine turning marks you can only see under close inspection. Even with computerized tooling, each process has its own signature look if you know what you are seeing. I think to most eyes, the difference will be small, but to me it is important that I can tell how each part is made, not by remembering, but by looking at it. Anyway, I am glad to bring this tryptic to a close and apply what I have learned to new sculptural adventures going forward. Thanks for sticking with me for the long read. As always, comments and questions are welcome.
This piece builds on the SB 312 sculpture I released earlier this year. Whereas that work was a static sculpture with purely aesthetic aspirations, this next entry has kinetic elements that drastically change the way the work is experienced. When handling the original SB-312 sculpture, there was something I just couldn’t shake about the geometry. I kept feeling that I wanted the three legs of the piece to slide up and down so I could reposition them.
It was a case where the implied functionality of the piece was both obvious and powerful, so I resolved that this was the direction for this next work in the series. But with functionality comes a different set of challenges which can influence the visual elements of the piece. In order to achieve a moving mechanic, the composition needed to be elongated and enlarged, Mostly to accommodate the magnetic arrangement that achieved the motion I wanted, but also to improve the grip on the piece.
The magnets create an interesting haptic feel as the individual sliders jump from position to position. Anyone who remembers the MG series can probably see this is a similar functionality, albeit a little inverted with much less reliance on magnetic force to hold the work together. The S2B has a custom shoulder bolt that retains and constrains the motion of each sliding element. Mechanics were not the only thing influencing the look of this sculpture. If you remember from my post on SB-312 One thing I hoped to achieve in this series was to explore some popular exotic metals—in a careful and thoughtful manner that played directly to a single chosen material.
For this series I have introduced a material known as Mokume-gane which is a unique metal laminate intended to mimic wood grain. This material has its origins in 17th century Japan with the making of ornamental samurai swords. The process for making Mokume-gane eventually found its way west, into jewelry making and other decorative traditions, and most recently into a much more industrialized (if still decorative) form of machined art. In researching this material, I was reminded of why I am so careful about bringing exotic materials into my practice. While it is easy to just buy a novel material and start cutting to meet a decorative end, I think a lot is missed that way. Mokume-gane is a complex and varied material with a fascinating history, it feels weird to just pick it up and use it without some kind of formal introduction. For instance, there are a few ways to make the material, something I would like to learn more about. Jewelers often incorporate a variety of noble and base metals into various formulations as well. Some use more precious metals like gold and silver in their home brewed versions of Mokume-gane, while other versions are more economical, containing mostly copper alloys and nickel silver.
The material I used, which is more suitably sized for machine work, is composed of layers of brass, copper, and nickel silver. Each variation of Mokume-gane behaves differently and can be finished and patinated in a variety of ways. Which again, I still have much to learn. Admittedly, my use of Mokume-gane here is pretty straight forward and consistent with other machined art that I have seen (we all learn from doing though). The finish on this prototype is a simple etch with ferric chloride to bring out contrast in the metals and matte the finish. The sculpture measures 2" long and 1.5" Diameter
I look forward to incorporating this unique material in a more comprehensive way in the future, but for now, this is the first step in my education. Above are some of the concerns and considerations of this material.
Some closing thoughts.
As I continue to pursue these small sculptures, it has emerged that my two different modes of working, kinetic and more traditional sculpture, might be slowly converging.
I am less wedded to the idea of incorporating a mechanic for my small work, and more open to the idea in larger one-of-a-kind pieces. Sometimes I begin a design with a mechanic in mind, but it becomes unworkable and I abandon it in favor of a more accomplished static sculpture. The inverse is also becoming true and I have found myself designing larger works with no intention of adding kinetic elements, only to be tempted by opportunities to do just that.
Perhaps, just maybe, I am become less rigid in what I hope to achieve with any given design, favoring a more fluid process. I think one might describe that, as personal growth.
Anyway, hope you enjoy the piece.
Notes for collectors: As has become customary, I will be offering these works up as a one time limited edition. You will be able to acquire them individually, or as a set. Pricing and all relevant details of the sale will be posted at the time of sign up. (please note that Mokume-gane is a considerably more expensive material and this will reflect in pricing) The sign up will go live on Thursday July 7th at 11 AM EST. I will leave the sign up open for a little longer than usual because I know a lot of you are traveling this time of year. Probably a week to ten days, and then the books will close forever. I will post the sign up link to my email newsletter, here on the blog, as well as on my instagram page.
Notes on Mokume-gane: For those thinking of collecting the Mokume-gane version of this work—this metal is used often in jewelry making, but it does not mean that it is an inert material. Like Brass or copper, Mokume-gane requires care to maintain. It will tarnish of not regularly waxed after handling. Some people enjoy the look of this, others do not. Additionally, Any time you mix metals in an environment where they will be in contact with an acid (you, your body) it invites something called galvanic corrosion. Handling this material will change it over time, in ways that are hard to predict. It may be the case that the material will simply change color or the etch may deepen in a way that is pleasing, but I want to be clear that this is experimental art, engaged in with open eyes and realistic expectations. Here is a link to an extreme example of what can happen to a similar material under what I consider to be extreme conditions. I cannot speak to the exact material or method used. Obviously you won’t be wearing this piece of art day and night, let alone subjecting it to a total submersion in an acidic medium. The experiment in the article is interesting and educational, but not reflective of any real world scenario that would unfold with this sculpture. Unlike a ring, you won't be washing your hands with it, handling acidic foods (yes also urine is a problem with jewelry), or bathing with it. I would not expect anything of this magnitude to occur with the work under normal use. But I think it is important to inform collectors so we are all on the same page. If you intend to lightly use the work, and display it, I expect it will perform perfectly well. There are examples of Mokume-gane craftwork that are hundreds of years old.
So with that said, if any of that sounds scary to you, if any patina or change in the material is unacceptable to you, or you are a serious fidgeter who wants the most durable object you can get, I would simply steer you to the stainless steel version of the work. Stainless steel, without a doubt, will outlast us all. Thanks again, and as always, comments and questions are welcome.
I know it hasn’t been long since my last post, but unexpectedly (even for me) I have completed the final installment in my Mazer (bowl) series.
This work is a part of a triptych of bowl shapes. All of them loosely based around a Mazer, which is an ancient drinking vessel that typically had a boss in the center and a flat foot on the bottom. Mazer's also had a wide array of gilding and decorative elements that made them kind of impractical. This is of course appealing to me as a sculptor, as I like it when aesthetics take precedent over usefulness.
The main bowl form of the M3 is made of stabilized maple burl with a blue dye added to the stabilizing fluid. The metal details in the piece are machined out of aluminum, then finished and anodized with a warm champaign copper color. Both of these colors play very differently depending on the light. The Maple can sometimes seem more green than blue, and the copper can appear pinkish to a brassy-yellow against the blueish maple when viewed in warm light. It is really interesting to observe, especially if you are into color theory. The progression with the set is interesting too. The first Mazer in the series (M1) was kind of an accident. It was made from a repurposed and slightly damaged piece of Desert Ironwood that came out of my SKB (sculptural knife Bowl) project. It is very hard to find ironwood in this size, so I didn't want to scrap the piece. Instead I decided to have some fun with it as a side experiment. I didn't think much of the end result at first, and I didn't even properly photograph the piece until much later. It doesn't even have an official blog post. But after a time I realized there was more there, and so when the need for some additional wood experiments came up, I knew I had something worthwhile I could pursue. Looking at the M1 in the context of the triptych, this first work seems almost rustic and kind of chunky. Functionally speaking, it is the most utilitarian piece. I think it is great starting point for representing how craft forms can diverge from utility over time.
I don't feel I need to say too much about the M2 as I just posted about it a few short weeks ago. The piece is still very much a bowl shape. but the decorative elements go a long way to thwart utility in favor of more sculptural appeal. I also remain proud of how well my first attempt at stabilizing my own piece of Maple Burl turned out. The M3 is the final work in the series. It is quite shallow for a Mazer. One could barely call it a bowl form at all, but it looks amazing. Running with the idea that many utilitarian crafts eventually abandon function in pursuit of decorative and craft concepts, the bare minimum interpretation of a what a bowl could be won the day. I think they are all great successes and I love how they each have their own unique nature. Dimensions are 6.5" Diameter by 1"deep Side Notes: As I alluded to at the top, that this work exists at all is a perfect example of the way a good work ethic can smooth out the emotional roller coaster of making art. When I closed out my last post two weeks ago, I wasn’t really sure if I was going to pursue this piece (at least not anytime soon). I have written before that even if a piece is a triumph, I can sometimes feel a little deflated at the end of a project. I can intellectualize that I have achieved something. However emotionally, it is a much more mixed sensation. Many artist need a little time and space between themselves and their works to fully appreciate them.
Mentally, I was a little reluctant to dive right back into a new work of the same concept. Fortunately my working impulses don’t really give me much room to procrastinate. I went back into the shop (after a good night's rest) still thinking I would just focus on some projects that I already have underway, when I just happened to walk past the stabilized Maple blank I had prepared for this piece.
I glanced at it—then before I had time to think it was in my hand—next thing I knew, I was turning it in my lathe.
Almost mechanically, I had started the work whether I wanted to or not. Such is discipline.
My work-habits often save me from hitting a creative wall. Because I have been practicing for so long, muscle memory can easily take over for me when my mind needs a little time to catch up. In this case, it wasn’t long before I was fully reinvested in this piece and excited to see through to the end.
I find that my actions often lead my feelings in this way. It is another reason why I make art. It gives me the chance to step back and watch how my own mind works.
It is a cliche at this point that artist make work in order to understand themselves, and in the context of this single work, it is a lot to put onto a little wooden bowl. But for me it is true, and this idea comes up again and again as I work. I think it would be wrong not to talk about it when talking about my work, so thanks for hearing my little confessions from time to time. Note for collectors: Now that this trio is complete, I am entertaining the idea of offering the set up for collection. I am going to keep this low key, as it is my hope that I can keep the three works together as a triptych. If that is too much to ask, I will be quite happy to keep these little beauties in my personal collection. But if there is any interest, please just drop me a note and we can discuss it. And of course, as always, questions and comments are welcome.
This work was just supposed to be a quick sketch. Something to help me as I learn the process of resin stabilizing hardwood. But as is always the case, the project grew and a month slipped passed, and now I have this wonderful Mazer style bowl to share with all of you. Stabilizing wood is a process that both strengthens a piece of wood, and makes it dimensionally stable so that it can be utilized in more precision applications.
In previous projects, I relied on sourcing stabilized material from other skilled makers. But as my desire to make new shapes and forms grew, I quickly realized I had outgrown the sizes and shapes of material that were readily available. I approached a few people who specialize in stabilization with special requests and was alternately told that it was not possible, or not profitable, to make stabilized wood in the sizes and shapes that I wanted.
I could live with, "not possible" if it were true, but "not profitable" sounded like a silly reason not to do something, so I had to try it myself to see what was what.
The process is not terribly complicated and the setup relatively affordable if you have a small space to make a mess. It involves drying the wood, then placing it in a vacuum chamber while submerged in a special resin.
Under vacuum, much of the air and residual moister are pulled from the wood (you can never truly get all of it). After many hours under vacuum, pressure is returned to the chamber and the resin is forced deeper into the wood by normal atmospheric pressure and good old capillary action.
After a long soak, the wood is then placed in an oven where the resin cures and hardens. The result is a plasticized piece of wood that is perfect for machining and other fine craft work.
It is a fascinating process to learn, and I am simplifying just a bit. This work represents my first attempt at using a piece of wood from my own process. The wood you see is a piece of Maple Burl. It was stabilized as a 7" round and finished down to 6"diameter.
The metal details are all in Stainless steel. I went with a wooden bowl form because I just love the work of so many wood turners. But since I am not quite a wood turner myself, I went with a very ornate style of bowl called a Mazer. A far more decorative than functional object for sure. This is what happens when you give a machinist wood to turn I guess.
Anyhow, this is the first step on my journey towards a much more ambitious piece. I have one more "small sketch" that I was planning, but considering how long this first one took, I might have delay that work for a little while. I am just not sure there is time in my current work flow. But we will see what happens.
Thanks for looking, and as always, comments and questions are welcome.
Hello everyone. I have been hard at work on a couple projects and this wonderful set of pocket sized sculptures is the first to make it across the finish line.
In keeping with my recent forays into new materials, I decided it was high time I bring an exotic material into the mix that I have long appreciated. This material is colloquially known as "superconductor". I know some of you are familiar, but others are likely wondering what is superconductor? Well, there are actually many materials classed as having superconducting qualities, but in this case what I am referring to is Niobium-titanium filaments encased in a copper matrix. Niobium–titanium superconductor is a material that comes in many shapes and sizes. It is an industrial product primarily used in science engineering, but it has (unsurprisingly) acquired quite a cult following in the metal working and maker communities. Characterized by thin rods of what is essentially titanium, arranged within a larger body of solid copper, it is a metal that presents a sort of abstract grain structure. When machined into compound forms, it produces very predictable and pleasing patterns. The copper, which is susceptible to most acids, can then be etched or almost entirely dissolved, leaving the more resistant titanium rods intact to accentuate the grain pattern. There are machinist makers using this material for all sorts of fascinating decorative work. Knives, rings, and spinning tops to name the more prominent examples. This is of course exciting to me as a sculptor. I love it when artist co-opt tools and technology for their own special kind of cultural production. Superconductor is a difficult material to shape however, as the copper is pure, which makes it very soft and gummy, while the titanium sections are tough and prone to work hardening. This makes it hard to optimize for either scenario. Not to mention that titanium is flammable. If you chip a cutter and catch a spark wrong, you could be in for a small fireworks show. A little extra care to keep the work space clean and free of turnings is more than a good idea. But, if you are careful, you can pull it off without too much trouble. The results are very striking and quite worth the effort. Now enough about superconductor, because this all-stainless steel piece is also bursting with charm. I think it is an important part of the pair, as I wouldn't really have known the best way to approach the superconductor without it. I actually designed this steel version as a sort of contrast piece, as a creative check for myself. I wanted to be able to compare the two and make sure my design was not solely dependent on the novelty of the superconductor to make the composition work. Maybe that seems weird to some of you, but I reasoned that if the design didn't work in stainless, then perhaps I am relying too much on my exotic material to improve what is otherwise a mediocre composition. As you can see, that just isn't the case. It's gorgeous. Another thing I hoped to achieve with this design is that I have been thinking a lot about the challenges of creating interesting interior spaces within my work. This was a sketch to help me with some larger work I have on the drawing board. I love using little pieces as test beds for bigger work.
In the video above, I explain some of the technical constraints that guided the design. Sometimes a video goes a long way in demonstrating what the heck I am talking about. Other times it just highlights how often I say "ummmm"!!! (Oh well) At just 1.3" tall or 33mm, these works are some of the smallest I have made. Note for collectors: As has become customary, I will be offering these works up as a one time limited edition. You will be able to acquire them as a pair, or individually in all stainless steel or superconductor. Pricing and all relevant details of the sale will be posted at the time of sign up. (please note that superconductor is a considerably more expensive material and this will reflect in pricing) The sign up will go live on Wednesday March 2nd at 11 AM EST. It will run for just a few days, or until I determine my books are too full. I will post the sign up link to my email newsletter, here on the blog, as well as on my instagram page. It should be a fun project! As always, questions and comments welcome.
I know I Just posted a project two weeks ago, but art happens when it does and I have a new creation to share. The MoTF kinetic sculpture. (if you want to pronounce it as "Motif" I wont stop you)
The genealogy of this piece is a little involved, so rather than write a long explanation, I just thought it was best to switch on the camera and ramble through it. The video above does a pretty good job demonstrating the origins of this design. This design was another one that seemed to take ages to crack, but I am happy with the final result and it is super satisfying to hold and actuate. In terms of materials, I am going to keep things simple. All stainless steel, or a brass and stainless combo is all this design wants in my opinion. Notes for Collectors: Normally, I try to work on just one project at a time. However my current project (the OoT) is occupying only two of my machines because of the constraints of that particular project. The rest of my toolroom is sitting idle and....well..... I think I might be able to manage a second project so long as I don't push myself too hard. So here we are. If you would like to add one of these new kinetic works to your collection, I will be posting a sign up next Wednesday (November 17th) at 11AM EST Production will ramp up slowly, but I am confident I can juggle two projects at once as I bring this year to a close. I am still working out the details and making small improvements to the design, but I'll have it sorted by next week. A link will go out to my usual accounts (Instagram, my newsletter, and this blog) at 11 AM sharp. As always, comments and questions are welcome.
Introducing the "OoT Sculpture". This small sculpture is my second attempt with an incredibly challenging technical concept, one I had no expectation of ever repeating. Earlier in 2020, I attempted to make a complex composition using only turning operations. That is, using only two axis of mechanical motion to machine a form that transcended the simple cylindrical shapes one would expect from such constrains. The result of my first effort resulted in the DoT. This new piece takes that same concept to a very different place.
This type of technical concept is right up my alley, as it is deceptively difficult to tease an elegant design out of such tight constraints. I know wood-turners are often bound to only two axis of motion (and I admire that) but as a machinist with a world of tooling and processes at my disposal, this kind of voluntary deprivation is humbling and lead me to visual and mechanical solutions I might otherwise not have considered. The source inspiration for the aesthetic of this sculpture is actually a concept I have visited a few times.
I was laid up (very briefly) a few months ago recovering from some minor surgery and I thought it would be a good opportunity to lay down some new ideas for larger work.
But instead of a productive drawing session, I found myself struggling. It is actually pretty hard to be inspired when you are just laying around looking at a screen (or the ceiling), I do my best thinking when my hands are busy in the shop.
So, as I often do when I find myself a little stuck, I started digging through old sketches.
I soon came upon some drawings from a series I made back in 2012- 2014.
It was a series with more than a few evolutions, all largely successful. But I did remember some things I was unhappy with, and it seemed to me that there challenges left unexplored. Then it occurred to me that this perfectly suited to a 2-axis lathe challenge as will
So I decided to dive back in and before long I had something worth pursuing, Something that I could breath new life into with an incredibly technical and formalistic twist.
This piece is about 4.75" long.
This work requires the use of a whole lot of unorthodox turning setups and little tricks I have learned over the years.
I was also able to employ a novel fastening setup that quickly enables the work to be disassembled an reassembled (for those who a brave anyway). It also rotates and slides freely in the stand, partly out of fidelity to the concept and partly because there is no wrong or right way to orient the piece to view it. Thanks for reading, and as always, questions and comments are welcome.
Notes for collectors: I am going to make a very limited edition of these works. Production will be limited to just 30 pieces, with the first 15 spots assigned on a first come first serve basis, and the remaining 15 assigned via lottery. The sign up will open on Friday October 29th (11AM EST) and will close on October 31st. I will post the link to the usual places, Blog, IG, and Email newsletter. Pricing and color options will be posted along with the sign up link this coming Friday. Good luck for those who are interested.
It's that time again. Time to introduce a new sculpture and ramble a bit about the things I was thinking when I was making the thing. I'm calling this work the Module 3 or "Mod3" and it has a mechanic that I think is quite unique, if a little hard to explain. This is the third and final installment in my module series, which began as a simple exploration using a magnetic assembly system in place of mechanical fasteners. This fastening system had a geometric component so I thought it would be interesting to lean into some influences from the math art community as well. For the first work in the series (NC-3), a simple modular sculpture based around an octahedron form was all I hoped to achieve. For the second work in the series (TKS) I found myself trying to use some of the inherent magnetism in the assembly to add motion and even more modularity. This work was based around a tetrahedron.
For this third piece, I chose the hexahedron or cube. This shape presented a unique opportunity for magnetic motion.
I came up with an arrangement of magnets that allows a hub on each of the modules to slide linear along its axle when rotated 90 degrees. This motion is achieved by bringing the polarity of internal magnets into alignment in such a way that they alternately repel and attract one another.
The motion is not unlike an electric solenoid, but uses only rare earth magnets.
I had originally planned for something simpler but evolution has a way of adding complexity, so who am I to argue.
I try to touch on the wide range of influences that lead to this piece in the video above. The main one being how Joining each of the three sculptures together helped guide the rest of the process.
below are the magnetic arrangements for joining each of the three sculptures in the module series.
This map shows how each of the modules interacts for basic assembly. As you can see, each configuration required a vastly different approach to spreading out the polarity to get even attraction across all elements. In of itself, it is a fascinating puzzle, but that each map also influenced the mechanical and visual outcome of its respective sculpture makes it much more so.
This video is an in depth tear-down of how the mechanic works. It will no doubt do a better job demonstrating the mechanism than anything I could write. I also show and reference "Polymagnets" which proved to be a fascinating influence on this project as well. There is a video at the link that better explains that technology. The work you see in these pictures is just the first prototype, it works and looks great. but I do have a bit of work to refine the process for making more of these works. Most notable is smoothing out the process for installing all 72 magnets. The press fits and irregular sizing of the magnets themselves had me fiddling with them for far too long. I will no doubt be able to get it ironed out with a few reamers and some 3D printed fixture-ing. All part of the fun.
Closing thoughts: There are lots of things about making sculpture that are difficult to explain. One of them is how different modes of thinking come into play during different stages of creating a work. When designing purely visual work, the constraints of reconciling one's ideas with a real world medium are challenging enough. Add to that the complexity of introducing mechanical motion or functionality and it is easy to find yourself struggling against competing interests. The demands of "function" do not always play nicely with "form" no matter how the saying goes. All of this is simply to say this new kinetic sculpture work was QUITE a challenge. This design brought together many different, and at times competing influences. I have a folder with seventy drawings that are a testament to the many changes this work underwent on its way from digital concept to a real world mechanical object. I'm not complaining. It is all fun to me. However some sculptures design themselves while others I have to REALLY work for. This design was definitely the latter. After much toil, the prototype is done and I am feeling triumphant. I learned a lot and had some interesting breakthroughs I will say that the difficult nature of this project has given me a chance to reflect on why I have continued to pursue these small mechanical works and why they resonate so well in the first place. I have come to see these kinetic works in the context of participatory art. Whether it is a performance, an immersive installation or something else, people often want their art (visual or otherwise) to be more than just something to look at. These small works represent a basic form of participatory art in that they are simply “art that you can hold”. Not a high concept mind you, but most early sculptural forms were in fact decorative tools or adorned utilitarian objects. There is instinct and history in making objects that satisfy this easily overlooked and surprisingly powerful way of experiencing art...... with your fingers! Notes for collectors: So as is customary, I will offer these up as a limited edition. But before I get into that, I also wanted to mention this work has a sort of "built in" bonus sculptures. It turns out that the individual modules for this piece are quite pleasing on their own. They are great fun to hold and operate, The little modules are also fascinating pieces aesthetically. I made a small 3D printed stand to help facilitate this little quirk and I feel compelled to consider it a work in its own right. So there will be an option to buy just a single module for those who want to do so. Seeing as the Mod3 is pretty complex, and that inevitably means it will be pricier than the other two works in the series. It seemed like a good way forward. I will of course include a single stand with the larger version as well.
This work will be available in stainless steel ONLY. The list of reasons why is long so I am going to chalk it up to creative license. I feel this work is best represented in this format. I appreciate the understanding. The sign up sale will go live on Thursday July 22nd. (11AM EST) with all of the usual important info included at the sign up link. I will post the link on this blog, my email newsletter, and my Instagram account. Seeing as it is summer time and many people are traveling or otherwise out of communication, I am going to be more flexible than usual with this sign up. Instead of a hard date for closing the sign up, I am going to leave myself some wiggle room to make sure everyone has had time to receive my communications and can transmit their interest in the work. And of course, as always, questions and comments are welcome.
Introducing the TKS, The second in a series of magnetically modular mini sculptures. Everyone knows I love iterating around an idea and my last small magnetic work was ripe to expand upon. The first of the series was the NC3. When working on that piece I wrote about the novelty (and perils) of using magnets. I said that I am cautious when using materials that are inherently novel because novelty itself can become the dominant medium, one with a short shelf-life. While I am always careful about how I employ mechanics to ensure I am pursuing sculptural ends, it is easy to become dogmatic to ones detriment, and it occurs to me that in order to truly understand something (like novelty) it helps to lean into it on occasion. So with that said let's dive into what's behind this new piece. In addition to magnets, I have added some ball-bearings to the configuration, because if I am going to explore mechanical novelty, well, it ought to have layers. This results in a magnetically modular piece that not only spins, but also has a remarkable tactile feeling when rolled around in the hand. This piece is as much a joy to hold as it is to look at. There is more to why I find this work so interesting, so lets keep going. Another topic that arose while working on the NC-3, the work that preceded this, is that it was based on well-defined geometric principles. The NC-3 was built around a platonic solid called a octahedron. This new work is built on another platonic solid, the tetrahedron. While practicing machine work requires good working knowledge of various geometric principals, I have never really considered what I do to be “math art”. If you dig around a bit, you will find that math art is quite its own thing (see my sculptor pal George Hart). Math art is not really something I can lay any real claim to (for lack of true mastery) but my work often overlaps with it at the edges and this is a case where I wanted to push into that sphere, if just a little. And so I quite intentionally adopted the tetrahedral format as my starting point rather than just being a convenient coincidence. The frame work for the entire piece was built around something called the "dihedral angle" which is the angle between the faces of a given shape. The dihedral angle of a tetrahedron is 70.529° and it is an important angle because it is used to ensure all of the magnets sit face to face when assembled. The rest of the visual form was derived from using that angle as a constraint. In addition to basic geometry, this work had a number of more technical engineering challenges that proved a great opportunity to apply some fascinating physics principles. For starters, unlike a octahedron, mating the parts of a tetrahedron with magnets does not present a straightforward solution in terms of arranging the polarity across them. Getting four individual pieces to attract the other three meant that I couldn’t simply apply a single polarity (north, or south) to each part evenly. Instead I ended up with a polarity map like the one you see above. The result is that while the NC-3 was fully rearrangeable, this work really only assembles one or two ways. Getting the magnetic assembly solved was just the beginning however. Making the rest of the mechanics play nicely meant finding a sweet spot between the mass of the parts and the magnetic forces employed to hold them together. My first prototype for this sculpture had two main issues. The mass of the stainless steel spinning elements was a bit on the heavy side, and the magnetic pull holding them together was a bit on the weak side. This meant that the centrifugal force of spinning the sculpture was prone to sending those stainless elements flying off. To make the parts lighter without wildly altering the piece, I applied what is known as the square cube law, which states that an object's volume increases (or decreases) at a greater rate than its surface area when being scaled. A simple example is that a 1" cube has a surface area of six square inches and a volume of one cubic inch. If you double its size to a 2" cube, the surface area increases to twenty-four square inches (a factor of 4 or 22). However the volume of that same cube increases to eight cubic inches, (a factor of 8 or 23) Practically applied, by decreasing the overall size of the parts by a mere 3%, I was able to make the entire work a full 10% lighter (I also fiddled with some internal dimensions to squeeze that extra 1%). To increase the magnetic attraction between the parts, I had to move the magnets closer to their target. How much closer would make a difference? It turns out a very small amount, and the inverse square law is how to explain this. The force of attraction between two magnetic poles is inversely proportional to the square of the distance between them. In this instance I was solving for magnet to steel, but the principal is the same. After crunching the numbers, I calculated that I could increase the magnetic force by a factor of 2.6 simply by moving the magnets a mere .016” closer to the parts I wanted to stick. This small design change was trickier than it seems, but it made an enormous difference. Now the parts all attach quite securely.
This is all pretty basic stuff to an engineer, but I still find it immensely satisfying to be able to ground elements of my work in some real nuts-and-bolts logic. In the video above I discuss all of this a bit more casually. A video is worth a million words however, so hopefully it helps smooth out all the "umms" and "ahhhs"that come out of my mouth. Another fun thing is that since these pieces contain magnets they sort of talk to each other when moved in proximity. I am pleased with how many interests of mine I was able to wrap into this little work. I hope it helps demonstrate how pursuing machine-work as a visual medium constantly brings one into contact with other spheres of knowledge. I have never had to look far to find a catalyst for a visual concept and this piece embodies this idea nicely. Who knows, maybe this will end up being a three piece set. Simulated color pallet for the edition So as is customary, I am going to offer these up as an edition. I am adding pink and yellow to my anodizing line so there will be lots to choose from in terms of colors. I will post a sign-up starting Friday April 16th at 10 AM EST. I will include details of the sale as well as the price at that time. As always, comments and questions are welcome.
Introducing the next installment in my “Sharp Arts” series, The "Sculptural Knife Bowl". It is a piece that combines elements of knife making and wood turning (and yes a big chunk of iron-nickel meteorite) into an object that is far more sculptural than it is functional.
If you are unfamiliar with my earlier project, The Sculptural Knife Vase, I highly recommend you visit it as the premise for this sculpture remains similar and I have written a tightly packed thesis for the whole project on that page.
But even if you don’t go back, I will adventure to flesh this out some here as well, there is always more to say, if in a slightly different way.
The premise for my sharp artworks series, simply put, is that machine-work is a medium that straddles a lot of worlds within the industrial and decorative arts. To properly understand machine-work as a sculptural medium, one needs to foster an appreciation for the way it intersects the fields of glass art, woodturning, ceramics and the other metal trades. Most of the industrial trades that have since been turned to various arts mediums have distinct craft forms that help define them.
These craft-forms are of interest to me because while machining is a craft that shares a similar industrial past, there are few signature forms one can point to that uniquely representative it as a medium.
The machinist landscape seems to lack ubiquitous forms that fall neatly into the paradigm of craft and craft-form.
Because of this absence of unique craft-forms within the world of machined metal, I have spent considerable time exploring what a “machined craft-form” might be. Should machining eventually find better standing as a sculptural medium, what forms might come to define it?
knife making and wood-turning have been front of mind for me a lot lately. I follow quite a few craftspeople within these fields who demonstrate manual dexterity and skill, as well as a thoughtfulness with materials that I find inspiring.
My appreciation for these makers has led me to believe that telling my story means telling their stories. To do this properly, I reasoned direct appropriation would not suffice. If I were to simply turn a bowl, then it wouldn’t be a commentary on woodturning, it would simply be an instance of that vocation. Likewise, making a traditional knife wouldn’t be recognizable as anything other than an exercise in knife making as well.
I felt the best way to do a proper appreciation that creates an opportunity for dialogue was to combine various craft forms in a way that played off each other in an interesting way and highlighted the unique possibilities my medium brings to them. It has led to this kind of mash-up, where elements from multiple disciplines are combined to make objects that are wholly impractical, intentionally more sculptural than functional, but represent the commonalities between various modes of object making. This is my second attempt with this line of thinking and the result is the Sculptural Knife Bowl.
Why Woodturning?
Woodturning is a craft that most resembles aspects of my own process. Aside from the fact that woodturning is most often performed with hand guided tools instead of constrained by manual or automated machine motion, turning wood and turning metal have much in common.
When I meet woodturners there is instant kinship. They get my work instantly and the conversations quickly proceed to highly technical and interesting topics.
One of the most common craft forms within woodturning is bowl making, and so it seemed a natural fit for this project. Sometimes it is as simple as that.
Why knife making?
I have already written extensively about this over on the Sculptural Knife Vase post so I will just pull some quotes from there.
Knife making is a discipline that perfectly captures the dichotomy between historical and contemporary industrial processes. It is a field that mixes historic and modern methods and is that rare craft that maintains working “first hand knowledge” of nearly every technological step of its long history.
While its historical traditions are alive and well, the world of knife making has also been completely transformed by the adoption of modern machine tools and new technology.
Knife making’s influence on the creative culture of machine-work is undeniable. It has a long decorative arts tradition that has only grown with the adoption of digital fabrication technology. As a metal sculptor who is involved in the ways the process can inform the aesthetic elements of a craft, knife making is beyond fascinating to me.
I found it difficult to approach the craft directly through my work. My process typically involves stripping away the utility from various design or craft concepts to better reveal what is aesthetically interesting about them. However it occurred to me that it isn’t necessary to fully strip the utility from a knife to appreciate its inherent aesthetic qualities; one can simply put those qualities into a unique context.
The knife bowl?
Creating a distinct and impractical Bowl might seem an odd way to explore woodturning and knife making together, but as with the Sculptural Knife Vase (above), using blades as sculptural elements creates an interesting contrast that elevates what would otherwise be utilitarian forms into something to be appreciated aesthetically. It is the best way I know of to get people to stop and consider what the decorative arts have given to the creative arts and vice versa.
I am committed to periodically visiting this tangent in my work as time permits. When I sketched out a plan for this series, I made three designs, two of which I have now made.
Time will tell whether or not I get around to the third and final piece in this saga, but no doubt these experiences will find expression elsewhere in my work.
Process notes:
I have folded in many of the technical elements I learned over the last few years. I spent the better part of last year making sculptures with components that were turned from various exotic hardwoods. My approach to the blades was also heavily informed by my previous work.
The body of the bowl is turned in Desert Ironwood, which is actually a common knife making material, but not one you often find in a wood turning studio. Likewise, I couldn't resist the urge to include a large piece of machined iron nickel meteorite (a very exotic knife making material with historical roots) as the focal point for the bottom of the bowl.
I documented some, but not all, of my work on this one. I was juggling a few projects and so I was spotty with the camera for a bit. Above is what I was able to capture. I hope it is at least partially illuminating (if incomplete).