Sometimes you need to create a password or other random string of letters and numbers in a script or on the command line. I normally use the excellent tool pwgen, but sometimes that is not available on the system you are working on.
When pwgen isn’t available, you can sanitize the output of /dev/urandom so that you only get text and numbers. The following command will output a 10-character string:
When scripting, it is often necessary to store some temporary data. This is not persistent data, it does not hold any important information that needs to be retained for longer than the execution of the script.
I’ve used lots of methods to create temporary directories and files that I end up recreating every time.
I recently upgraded a server to Debian Trixy, and I noticed some new lines in /var/log/auth.log:
2025-11-30T00:17:48.220870+00:00 WEB sshd[55238]: srclimit_penalise: ipv4: new 1.2.3.4/32 active penalty of 1s seconds for penalty: connections without attempting authentication
After a little searching, I found that the new version of the SSH server included with Trixy had a new directive PerSourcePenalties.
This directive allows you to automatically deny login requests from IPs that have committed login failures and exceeded your configured maximum. Like Fail2Ban, but not using a firewall.
I recently looked at generating spoken audio from text using here. I have found another way to do this, but locally, instead of sending all the data to Google.
WireGuard is an excellent replacement for OpenVPN. If you haven’t already started using it, check out my quick start guide.
A small annoyance I’ve had with WireGuard is that when I want to see who is connected, their data transfer, etc., the wg output only identifies them by their public key. E.g.:
The tool that produced the best results was gTTS. This tool sends written text to Google
Translate’s text-to-speech API and returns the text in spoken audio. There are many languages available (get the full list with gtts-cli --all) and the audio out can either be saved to a file or
sent to stdout.
I recently modified this website to be accessible via IPv6 so I needed to test that Apache would respond with the site when accessed over IPv6.
cURL allows access to an IP address of a server and supply a hostname, bash-prompt.net. This means that cURL will initiate the HTTPS connection to the IP address and then reply with the correct website when it receives the hostname.
We typically use the whois command to get information about domain names. whois can also get the organization information about the company that an IP address is registered to.
Every IP address is registered to an organization by an IP authority. You can find the list authorities here. When an organization requests and is allocated an IP address, typically in a block, they must supply information about their organization such as country, contact information and an abuse reporting email.
The data does not align with the labels on the top line making it harder to parse. If we pass this into column as standard input column will neatly print the same information in understandable columns:
dd is a very old command. It was published over 50 years ago in 1974 for Unix. This age makes the syntax of its commands quite unusual. Given that this command is frequently used to overwrite partitions and entire storage devices the unusual nature of its command syntax is dangerous. It’s a rite of passage for every Linux Sysadmin to dd over something viable, destroying it.
There are now more modern commands that can perform the same job as dd using much more standard syntax.
The exit command will allow you to halt a script without executing everything after the exit command.
If you want to do the opposite and skip some of the script there is no builtin command to do this. This is useful for debugging so that you can work only on the problem section without re-executing a prior portion of the scrip.
This debugging tool is useful in your Bash scripts and also in any Bash one-liners that you write.
The echo tool will print any input you give it. Most importantly, it will not execute any commands that are included in the input you give it but it will expand variables, wildcards, etc to show you everything that would happen when you run that command.
When you run a Bash script it will only usually print the output of the commands that you execute. This is fine until you need to figure out why it isn’t doing what you want.
Bash comes with a couple of options that will show you exactly what is being run and also print out the lines of the script in the order of the execution output, including comments.
We frequently have to run many processes from a script. The default behavior is that the processes or jobs are run serially. That is to say that each new process will start when the one before finishes.
On modern multi-core systems, this is wasting a lot of CPU resources and time.
xargs is a complex tool that comes with the ability to run processes in parallel.
The general structure of parallel processing with xargs is as follows:
I like to listen to audiobooks on my older phone. They can get quite large so I thought I would try to transcode (change their encoding format) from the older MP3 to the newer Opus
Opus has a useful setting to encode voice-optimized encoding for voice-over-IP applications. Audiobooks are only someone speaking so this is a perfect application for this setting
I downloaded Don Quixote from LibreVox the free public domain audiobooks as a test file.
OpenSSL is the default package for managing certificates and serving HTTPS pages on Linux servers. It’s how you’re seeing this page via HTTPS right now.
You might be interested in seeing how you can benchmark how fast your server can serve HTTPS requests as a part of tuning it.
the openssl command comes with this ability built in.
The following command will prompt openssl to make as many requests as it can for 30s and print the results:
DNS caching is a good thing. When your local resolver, in this case, systemd-resolved, looks up a domain’s (or hostname’s) IP address it retains or caches, that IP address on your machine so that it doesn’t need to query the nameservers again. This is faster for you and reduces the load on the nameservers.
However, this can become a problem if you’re changing DNS records and need to see the live remote records from the nameservers and not the local cached records.
When we’re scripting or running a command on Linux we sometimes don’t want any output from the command. This output may be the success message from the command on stdout (standard output) or an error message on stderr (standard error).
The usual way to do this is with the classic:
$ <COMMAND> 2>&1 >/dev/null
This redirects stderr into stdout and then sends stdout to the bitbucket /dev/null.
Entering a password incorrectly too many times happens to all of us. It could be entering the desktop or running a sudo command from the command line as a user. After 3 failed attempts sudo will lock that user account from logging in for a period.
Here’s how to reset sudo so they can log in again immediately. Here is me deliberately entering an incorrect password three times for user :
WireGuard is a modern Virtual Private Network (VPN) server that allows you to securely route your data between your Android, iPhone phone, or Linux, Windows, or OSX computer. The older, open-source standard for creating your own VPN was OpenVPN which is, when compared to WireGuard, much harder to set up and configure.
In this guide, I will walk you through installing and configuring the WireGuard server and creating your first client configuration file. You can be up and running in 10 minutes or less because WireGuard was created to be secure by default obviating the need for complicated tweaking and tuning.
Over on my personal website https://elliotcooper.com I encountered a problem when I created a redirect from https://www.elliotcooper.com to https://elliotcooper.com. The web server, in this case, Apache2, first negotiates the HTTPS connection before doing the redirect.
This was a problem because the Let’s Encrypt certificate I generated was only valid for the Common Name (CN) elliotcooper.com. This caused my browser to display a certificate warning as the certificate didn’t include the CN www.ellitocooper.com.
I’ve also noticed this elsewhere when I click on links that are different, usually it’s the wwws, to the CN in the certificate.
We all write over-long Bash one-liners to get something done. They can get difficult to edit when they start taking up more than one line.
Fortunately, Bash allows you to switch from Bash to your editor so you can easily continue editing the command in a real editing environment and run it on exit.
All you need to do is to hit:
CTRL+x CTRL+e
while your working on your command. When you do you and your command will be loaded into whatever editor you have set as you $EDITOR environment variable.
A common job for a system administrator is to troubleshoot a Linux server to find out why it’s running slowly.
The following command will give you a great overview and should only take less than a minute to review.
uptime
The uptime command will, naturally, tell you the uptime of your server but will also give you the load averages. This will tell you how busy your server is and has been in the recent past.
A fairly frequent job of a sysadmin is to do some benchmarking of a website. The first requirement of this is that you have some URLs to give to the benchmarking tool.
I have found that getting a list of all the site’s URLs for assets like HTML pages, images, CSS files etc makes the test a bit more representative.
The following command will very quickly spider a website and generate a text file of all the URLs that it finds:
mdadm is the tried and trusted software RAID tool for Linux. You might think that getting some practice with mdadm is difficult because you need several storage devices.
That’s not true as you can simple create some virtual devices to practice on.
SSH keys are the best way of logging into Linux servers. But traditional keys have their limitations.
They never expire
Organizations commonly have workers that need access access to a system for a limited time, employees, move on etc. Managing this is possible by by removing keys as needed but SSH certificates have an expiry date built right into them.
You even can issue new daily certificates to everyone every morning making them worthless the following day.
Some Bash commands take a long time to finish and provide no estimate for when that will happen. This means that you have to keep switching back to its terminal to check its status.
That’s a pain that interrupts your workflow.
Instead, use this simple command to create a popup notification on your desktop that will let you know the process has finished.
Some Bash tools are so good that then end up being the goto tool for a particular application year after year.
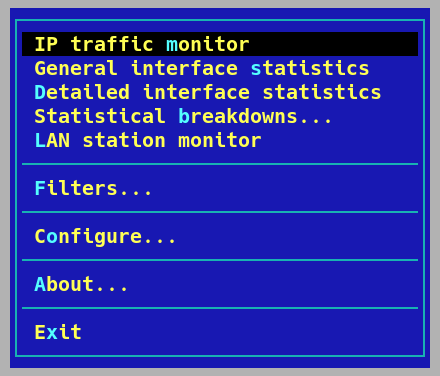
IPTraf now IPTraf-ng, is one such tool. I have been using it for at least 20 years and nothing has come close to replacing it for live network monitoring.
Just fire it up with iptraf-ng to get started. This will bring you to a choice menu:
IP traffic monitor
This section allows you to view your network traffic by connected IP address over an interface, either individually or all together. The fist menu shows this clearly:
A common security measure implemented by APT repository maintainers is to sign the packages they distribute. This ensures that the packages you are installing are the authorized and unmodified packages issued by the package maintainers an no one else.
It can be a little confusing how to import the key into APT to install the new package in the first place.
Here’s the easy way.
I just had to installed the excellent web log analyzer GoAccesss so I will use it as an example.
Bash scripts tend to follow a life time. They start as a long bash command dumped into a file for future use. They then get formatted and prettified when others want to use them.
When your script gets used by others it’s a great idea to add some basic error checking and help information. Let’s look at how to do this.
The example script, print-string.sh, does nothing else but print a string passed to it. Here it is:
We all write Bash scripts. They are convenient, fast and powerful. But how to make them safer?
Bash provides some simple options that you can set at the beginning of every script (unless you have a good reason not to) that will keep things a little safer by causing the script to exit when unexpected stuff happens.
These options are configured with the set option that you can read all about here.
The life of one of your Bash scripts is hard to reckon when you first write it. They often end up at opposite ends of the company on very different systems. This makes it a good idea to make them as portable as possible.
A couple of easy wins here are to replace the traditional interpreter line and drop echo commands.
Script Interpreter
The traditional interpreter line at the start of the file usually links to the binary of the shell that you want the script to get executed by. E.g. for Bash
I just spun up a new CentOS 8 VM and ran the mandatory initial update and was rather surprised to see single packages downloading at 50KBps. I think 1998 would like their acceptable transfer speeds back!
It turns out that a couple of changes to your dnf.conf file will get you back into the 21st century.
A common requirement for backups or just to have a local copy of a website is to mirror it. This is easily done with the wget tool.
wget is a command line tool for retrieving files over a network. As is common with the older Linux tools it has a huge number of really useful options. For this use case wget comes with a bunch options to access a website and by following all the internal links download the entire site to a local, browsable copy.
The GNU nano is a superb Linux text editor. And you absolutely should use it. It’s not a fully-featured IDE nor does it claim to be.
If you’re looking for a fast, lightweight editor that is usually installed by default (or available in the standard repos of every distro) then you should take a look at nano.
I use nano for all my processional Linux administration and content creation. With a few tweaks you can turn nano into a capable editor that will meet your everyday needs.
Bash commands frequently have need many additional options to do exactly what you need. If you have ever seen a command recommended on an internet site like https://serverfault.com they often don’t explain all the options they use.
You could use the man page to check them all but nobody’s got time for that.
In stead use https://explainshell.com. Just dump the command along with all the options into the search bar and you’ll get it all nicely explained.
We all use find to locate stuff on the command line. The -exec option allows us to execute a command on the located objects without having to pipe the output anywhere.
This is convenient but slow.
Find executes the command for every matched file. For example, the following command runs ls -la individually for every file in the /home/user/Documents/ directory:
find /home/user/Documents/ -type f -exec ls -ls {} \;
This command takes 9.5s on the my Documents directory. That’s pretty slow for the 3763 files that are in my Documents directory.
Sometimes you need to determine how many CPU cores a system has. This might be when you’re running make to use some or all of your CPU cores or some compression tools that take a CPU cores argument.
If you’re not trying to find this number in a script you can grep the contents of /proc/cpuinfo:
If you have to work of SSH with a flaky network connection you will have been left with an SSH terminal open to the remote server that is stalled or unresponsive. It will not accept any key presses but isn’t closed either.
I used to think that the only fix was to close the terminal window and SSH in again.
This isn’t the only option as SSH comes with some escape sequences. One of which is to terminate the current connection.
(you really should be using ed25519 if your environment supports it).
What most people don’t realize is that you can make your private key more robust against brute forcing if an unauthorized party gets access to it with a single additional option.
That option is the -a <NUMBER> option. This option tells ssh-keygen to use the number specified of Key Derivation Rounds to use when generating the key. E.g.:
There are lots of terminal based real-time system reporting tools such as glances and htop that are prettier than classic top.
However, sometimes you find yourself on systems that don’t have glances or htop installed so you’ve got to use top. These tips will make top’s output a bit more useful.
Show CPU cores individually
The default output for top is to summarize the system load of all cores. Here’s my laptop:
I use a lot of virtual machines from a number of providers. They usually list them as 1 vCPU which doesn’t give much indication of how much processing power that single core is giving you.
There are lots of fully-featured benchmarking utilities that you could install to get a very details insight of how your CPU performs.
Ain’t nobody got time for that.
Instead, I use the following dead simple single core benchmark. It times how long the system takes to sha312sum 10GB of zeros:
When you copy a file from one Linux server to another you’re first choice will be SSH. SSH is secure and ubiquitous and should be your first choice.
Sometimes the CPU overhead of SSH’s encryption can be the bottle neck on transfer speed. This handicap can be significant if you are copying huge amounts of data.
Everyone knows, or should know, that typing CTRL+R on the command line and typing something will perform a reverse search through your command history.
This system can be improved upon.
With the code shown below you can start typing on the command line then hit the up-arrow to match the last instance in yoru history of what you have’ve written. Pressing the up-arrow again will print the match after the first and so on.
Do you hate getting Pinterest results when you’re using Google Images?
I know I do.
There is a simple uBlock Origin filter that will stop you ever seeing those results again.
First, you need to install the uBlock Origin plugin for your browser. In fact, install it on all your browsers. Load Firefox on your mobile phone and use it there too.
After, you’ve installed uBlock Origin (make sure you install uBlock Origin, both words) go to the settings and find the My filters section. Then copy and paste the following lines:
It’s a very common task to need to download a file on the command line of a remote server. This is fine when the URL is a direct link to a file. However, often things get annoying and the download link has some PHP that redirects to the actual location of the file e.g.:
I was refering the the systemctl man page checking on systemctl status when I saw this:
status [PATTERN...|PID...]]
That’s right, you can use systemctl status <PID> and it will give you information about that process if it was started by systemd, what unit started it along with status information of that unit.
Here’s the example output for a process on this server:
# systemctl status 6555
● nginx.service - A high performance web server and a reverse proxy server
   Loaded: loaded (/lib/systemd/system/nginx.service; enabled; vendor preset: enabled)
   Active: active (running) since Fri 2020-12-18 11:06:57 UTC; 4h 23min ago
     Docs: man:nginx(8)
  Process: 6549 ExecStartPre=/usr/sbin/nginx -t -q -g daemon on; master_process on; (code=exited, status=0/SU
  Process: 6552 ExecStart=/usr/sbin/nginx -g daemon on; master_process on; (code=exited, status=0/SUCCESS)
 Main PID: 6553 (nginx)
    Tasks: 2 (limit: 1149)
   Memory: 22.3M
   CGroup: /system.slice/nginx.service
           ├─6553 nginx: master process /usr/sbin/nginx -g daemon on; master_process on;
           └─6555 nginx: worker process

Dec 18 11:06:57 web-1 systemd[1]: Starting A high performance web server and a reverse proxy server...
Dec 18 11:06:57 web-1 systemd[1]: nginx.service: Failed to parse PID from file /run/nginx.pid: Invalid argume
Dec 18 11:06:57 web-1 systemd[1]: Started A high performance web server and a reverse proxy server.
This tells you that the process was loaded from nginx.service along with a bunch more status information on nginx.service.
Whenever I’ve got a lot of data to transfer I usually kick off the rsync or scp with the default SSH settings and then, after an hour or so, wonder if I could have sped things up with a different cipher.
So I decided to find out now for my future self and maybe save some time.
A quick not about SSH Ciphers
SSH uses several ciphers and algorithms. I have encountered lots of sysadmins that think their choice of SSH key determines their transfer speed. SSH keys are only used by SSH to transmit the shared key that is used for the symmetric cipher which encrypts all of the session data. The admins SSH key does not affect the transfer speed only the choide symmetric cipher does.
SSH is the default method for systems administrators to log into remote Linux systems. Traditionally, [SSH keys] are secured with a password. This situation can be improved upon by enforcing a second authentication factor - a Yubikey.
After you do this then only someone with both the password and the Yubikey will be able to use the SSH key pair to log into your Linux system.
This guide is a quick start to using a Yubikey with SSH.
Load balancing with high availability can be tough to set up. Fortunately, Varnish HTTP Cache server provides a dead simple highly available load balancer that will also work as a caching server.
The modern use of SSL/TLS for all traffic has made this a little harder as Vanish has to handle unencrypted traffic to cache it. This means that we will need to terminate and decrypt the HTTPS connections before they are handed off to Varnish.
We will do this with Apache2.
Load balancing with high availability can be tough to set up. Fortunately, Varnish HTTP Cache server provides a dead simple highly available load balancer that will also work as a caching server.
The modern use of SSL/TLS for all traffic has made this a little harder as Vanish has to handle unencrypted traffic to cache it. This means that we will need to terminate and decrypt the HTTPS connections before they are handed off to Varnish.
Web servers have been able to compress the content they serve for quite a while now. When they receive a request for an asset that lends itself to compression, usually a text file such as HTML or CSS it will compress it before sending it to the browser. The browser will then decompress the file and load it. This process cuts down on the amount of data that is served and also speeds up website loading.
Web servers have been able to compress the content they serve for quite a while now. When they receive a request for an asset that lends itself to compression, usually a text file such as HTML or CSS it will compress it before sending it to the browser. The browser will then decompress the file and load it. This process cuts down on the amount of data that is served and also speeds up website loading.
Web servers have been able to compress the content they serve for quite a while now. When they receive a request for an asset that lends itself to compression, usually a text file such as HTML or CSS it will compress it before sending it to the browser. The browser will then decompress the file and load it. This process cuts down on the amount of data that is served and also speeds up website loading.
Web servers have been able to compress the content they serve for quite a while now. When they receive a request for an asset that lends itself to compression, usually a text file such as HTML or CSS it will compress it before sending it to the browser. The browser will then decompress the file and load it. This process cuts down on the amount of data that is served and also speeds up website loading.
Man pages are the canonical source of information for all the commands that you run on your Linux command line. By default, man pages are not colorized, this makes them a little harder to quickly parse for information.
This quick edit to your .bashrc file adds some syntax highlighting to your man pages. All you need to do is to copy and past the following into your .bashrc file:
After you’ve edited your .bashrc you can use the new configuration by either opening a new terminal or reload the environment of your current one with the following command:
Linux man pages remain the best source of information for using Linux command line tools. You don’t need an internet connection to instantly get a description of how a utility works and an explanation of all of it’s flags, options and syntax.
Using a man page is as simple as running:
man <COMMAND>
The problem is that quickly parsing all the information is difficult. These tips will make your life more efficient whenever you turn to man for information.
Brotli is a high-performance, lossless compression algorithm developed and maintained by Google. It can be use by webservers to compress files like .html and .css files and increase the perforce of websites and reduce their bandwidth requirements.
NGINX does not provide a compiled brotli module for their open source version. This means that you will need to compile the NGINX brotli module from source.
Build NGINX with brotli
First, log into your Ubuntu server and install all the build packages that you will need:
Brotli is a high-performance, lossless compression algorithm developed and maintained by Google. It can be use by webservers to compress files like .html and .css files and increase the perforce of websites and reduce their bandwidth requirements.
NGINX does not provide support for a brotli module for their open source version. This means that you will need to compile the NGINX with brotli support along with the brotli module.
Build NGINX with brotli
First, install all the packages that will be needed:
I recently had to find which repository held the nginx package so I could enable the corresponding deb-src line in order to build the source code with apt.
There are two ways to get this information. The first is with apt show <PACKAGE> e.g.:
Both of these commands tell us that correct repository line in sources.list contains this http://mirrors.digitalocean.com/ubuntu focal-updates/main information.
You probably didn’t know but you can trivially open a network socket and communicate with a host by writing to:
/dev/<PROTO>/<HOST>/<PORT>
The protocol can be UDP or TCP and the host any internet connect machine including localhost.
Why is this useful?
It allows you to create scripts that, for example, grab a webpage and don’t rely on external tools like curl or telnet. This makes the scrip much more portable and you don’t need to run bunch of test to make sure your dependancies are present on the system.
All rechargeable batteries degrade over time. If you’ve ever wondered how your laptop’s battery is holding up this simple command will tell you how you can get some information.
Run the following command:
$ upower -d
And look for the following line:
capacity: 73.7304%
As you can see my laptop’s battery holds 26% less power than it did when it rolled off the assembly line.
When the charger is back in you can also find the time until it’s fully charged again.
GPG is the fist utilty that most admins think of when they need to encrypt some data at reast. However, it is not very simple to quickly encrypt a file with a password.
The toughest part of deciding to mine cryptocurrency is trying to work out if the system you have access can make any profit. In this guide we’ll take a look at how to evaluate a remote Linux server and see if you can make any money using the Minergate GUI.
The remote server that I’m going to use is the following AWS GPU server:
AWS g4dn.xlarge instance:
4 x VCPU (Xeon)
1 NVIDIA K80 GPU
16GB RAM
1 x NVIDIA T4 GPU
$0.15 per hour (spot instance pricing)
Next, I needed to find out how good they are at mining cryptocurrency and work out if they are able to make a profit i.e. generate more cryptocurrency than either the electricity consumption in the case of my laptop or the monthly rental in the case of the cloud machines needs.
Before you can start mining cryptocurrency you need a GPU rocking rig to do all the hard work. Amazon AWS is the world leader in providing computing resources on demand. Normally, spinning up a GPU enabled rig to use for mining is going to get expensive. Fortunately, AWS provide spot instances at a 70-90% discount.
These instances are so cheap because they can, and will, go away with only a few minute’s notice. Spot instances let Amazon rent out unused computing capacity that they will reallocate to full paying customers when they request it. This arrangement suits crypto mining well because mining happens in small chunks so losing a few minute’s work is nothing against the 90% saving.
You’ve got a computer, it’s running Linux and you want to try mining some Monero. Before you commit to running the system at 100% for a few weeks to see if you can make any money you should run a quick evaluation and see how much Monero the system can mine.
Minergate provides a mining client that gives you a simple readout of how many hashes-per-second your system can crunch whilst it is mining and use that to work out your profit.
So you’ve got a system that you want to try mining some Litecoin. The first question you’re going to as is “Will it make any money?”.
That’s a great first question and one that’s pretty easy to answer. All you need is two pieces of information and you can get a quick (rough) answer. This information is:
How quickly can the system generate cryptocurrency?
How much electricity does my system use to do it?
Once you have that information you can use the excellent mining calculator at Cryptcompare to do the math using the current market values to give you an answer.
So you’ve got a system that you want to try mining some Dodgecoins (DOGE). The first question you’re going to as is “Will it make any money?”.
That’s a great first question and one that’s pretty easy to answer. All you need is two pieces of information and you can get a quick (rough) answer. This information is:
How quickly can the system generate cryptocurrency?
How much electricity does my system use to do it?
Once you have that information you can use the excellent Dodgecoin mining profit calculator at https://www.coinwarz.com to do the math using the current market values to give you an answer.
So you’ve got a system that you want to try mining some BitcoinCash (BCH). The first question you’re going to as is “Will it make any money?”.
That’s a great first question and one that’s pretty easy to answer. All you need is two pieces of information and you can get a quick (rough) answer. This information is:
How quickly can the system generate cryptocurrency?
How much electricity does my system use to do it?
Once you have that information you can use the excellent Dodgecoin mining profit calculator at https://www.coinwarz.com to do the math using the current market values to give you an answer.
So you’ve got a system that you want to try mining some Bitcoins (BTC). The first question you’re going to as is “Will it make any money?”.
That’s a great first question and one that’s pretty easy to answer. All you need is two pieces of information and you can get a quick (rough) answer. This information is:
How quickly can the system generate cryptocurrency?
How much electricity does my system use to do it?
Once you have that information you can use the excellent mining calculator at Cryptcompare to do the math using the current market values to give you an answer.
Once you have decided that you want to start mining cryptocurrency you need to work out how fast your mining rig crunch work blocks and earn you crypto coins. Working out how fast your rig is called benchmarking. We will use the BFGMiner coin mining tool to benchmark your system.
BFGMiner is a crypto coin mining utility that includes a benchmark mode. In this mode, it will tell you how many hashes per second your rig can computer. This number is very big so is abbreviated as follows:
VPN’s are great. I moved to Wireguard a while ago and I haven’t looked back. However, sometimes, especially on my laptop, I need a quick VPN. This is the fastest solution I’ve found.
It uses SSH to create an encrypted tunnel and also creates a local SOCKS server. You then configure Firefox to direct all requests to the SOCKS server on localhost that are directed down the tunnel where they exit and travel on to the destination web server.
SSH’ing into a server takes a few seconds. This doesn’t seem like much but when your logging into and out of servers all day removing those seconds makes life a little easier.
The following configuration will create a master connection where all the crypto negation and key exchange takes place. This master connection can then be reused for any subsequent connection meaning that the connections are near instant.
Put the following configuration into your SSH config file at ~/.ssh/config:
A common problem when you’re writing bash scripts or creating one liners is to get something from the end of some text. That could be last N characters, the last word etc etc.
There are a number of ways to do this like without using rev but you will need to remember the unique method for each problem. For example, take the following line:
one.two.three.four.five
Say you want to extract the five from the end of the line. The problem is that you need to grab the last word from lines that have different number of different words. This can get complicated.
Sometimes, especially with huge log files, you need to delete all the data in a file without getting rid of it.
You could just use rm and then touch to re-create the file. The problem is that I inevitably forget to look at the ownerships and and permissions on the file until after I delete it.
Instead of rm copy /dev/null to the file instead. This will zero its contents but keep the file and all of its meta data like its permissions and ownerships.
Getting a concise and informative list of all the hardware components on your system can be hard. The standard tool is lshw. This is a great tool but it’s output can be very verbose.
I recently discovered a different tool that a really terrific job of showing you your hardware information:
If you have a website on your Debian 10 server you are probably thinking of how you can protect it. There are many tools that you can deploy but there is an Apache2 module that you can install, configure and use in a couple of minutes:
libapache2-mod-defensible
This module will lookup the originating IP of any incoming web request and block it if it’s known as an IP engaging in malicious or illegal behavior.
If you have followed my guide for enabling brotli compression with NGINX then your server is already serving your content with brotli compression.
The only downside to this is that NGINX compresses the files every time it serves them. A feature of the brotli module is that it can serve files that have already been compressed with brotli. This means that they you only have to compress them once saving your CPU from doing repete work.
Whenever you visit a website you will almost certainly recieve compressed .html, .css, .js and .xml files. This because they are very compressible, over 90%, which saves bandwidth and speeds up load times.
However, they’re compressed by the webserver every time they are served. This is a waste of CPU cycles and places extra load on both the webserver and the client. The anser is to compress all of these files once on the server and serve the pre-compressed files.
I recently needed to run a GUI application on a remote, headless Linux server. I went down the usual road of trying to get X11 forwarding to work and met the usual slew of errors.
Save yourself the pain and go straight to Xpra if you need to display an application on your laptop that is running on a remote Linux system.
What Does Xpra Do?
Xpra allows you to run a program that has a GUI output on a remote Linux server. This means that they program is running remotely but the GUI is displayed locally on your Laptop.
I recently needed to run an application that was GUI only on a remote, headless server. After I messed with X-Forwarding for long enough to get really frustrated (which wasn’t long) I figured out how to get a desktop running running that I could log into and run the app.
Here’s how.
First, SSH into your server and install the tightVNC server and the Xfce desktop. On Ubuntu 20.03 and Debian 10 the following command will install these for you:
I’ve written about GNU Parallel in a previous post because it’s a really amazing tool. Well, it’s even more amazing than I thought.
Parallel has the built-in ability to send jobs to remote servers, use all of their cores to work on something, and return the results to the current, local directory.
The easiest way to get a handle on how this works is to walk through an example. I’m going to use two remote servers to compress some files. The remote servers are:
A task that comes up often enough that you need to memorize a command and it’s options is to find out what’s listening on a port. Sometimes it’s a result of seeing an error like Address already in use or Socket in use when you try to start a new network process. Or you might need to know what’s listening on what port to configure a firewall etc.
There are other tools that will show you the open network sockets such as nestat and ss but I always find myself using lsof. The output is nicely formatted and informative.
I’ve been using Arch Linux (btw) on my laptop for a while now and I’ve always used an AUR helper to automate finding, installing and updating AUR packages.
I started with packer and then moved on to yaourt when packers development stopped. This also happened to yaourt so I started looking for another.
The yay utility gets a lot of recommendations but it comes with a ~130MB Go dependency which put me off. So I kept looking.