GeistHaus
log in · sign up

https://hansvl.nl/rss.xml

rss
30 posts
Polling state
Status active
Last polled May 19, 2026 05:28 UTC
Next poll May 20, 2026 01:42 UTC
Poll interval 86400s
ETag W/"69409a23-3696c"
Last-Modified Mon, 15 Dec 2025 23:30:43 GMT

Posts

Fixing “Malformed UTF-8 characters” in Laravel

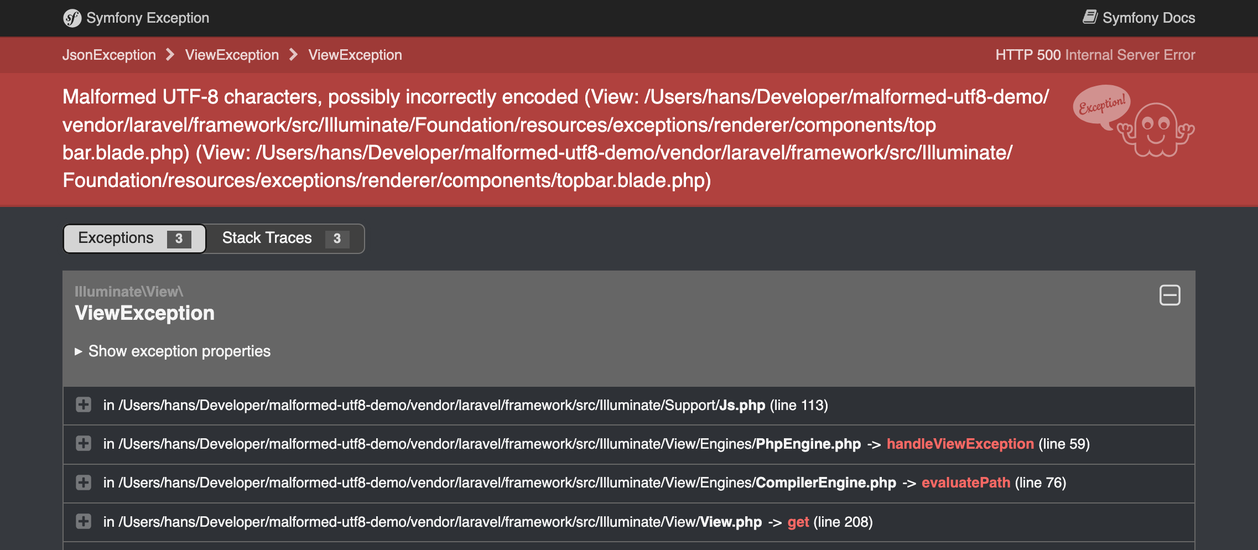
Malformed UTF-8 characters, possibly incorrectly encoded

If you have ever seen this exception, chances are that you are saving byte strings to the database using a package like laravel-model-uuid.

A byte string is arbitrary byte data formatted as a string; bytes, with string as their vehicle. This is great for efficiently storing small amounts of data, but as it’s arbitrary data, it’s not valid UTF-8.

Problems arise when you try to display this data in a web browser or try to parse it somehow.

Normally speaking, you wouldn’t. So why do we see this Symfony exception page?

Cause

Laravel has a beautiful exception page that displays a lot of useful information about the exception that was thrown; the exception class and message, the stack trace, request and session details, and—relevant to what we’re doing—all SQL queries that have occurred during that request up until the point where the exception was thrown, along with their bindings1.

If the exception being rendered is a database exception, the relevant SQL query is also included in the message.

Note the SQL queries in the exception message and in the Queries section

But what happens if this page itself fails to render?

Whenever something goes wrong, an exception is thrown. Relevant data is collected and written to a log, sent to an error reporting service, a webhook for your chat service is triggered, whatever you have configured config/logging.php. And the exception page is rendered.

If—somewhere in the request lifecycle—a byte string is involved in a database operation, this will also be included in the data being passed around, and that throws a spanner in the works.

At some point, the SQL query and its bindings will be parsed as JSON, and that function will fail, because this byte string is—indeed—not valid UTF-8. Now a new exception is thrown. That exception will be rendered as a Symfony exception page; a fallback for when the original exception page fails to render. And the original exception will be lost.

Solution

To solve this issue, we need to turn the byte strings into something that is actually valid UTF-8 before it is passed to something that expects valid UTF-8. There are three problems we need to solve:

  • The bindings in a QueryException’s message need to be sanitized
  • The bindings in the Queries section of the exception page need to be sanitized
  • A bonus problem that we’ll tackle later

Let’s dive in.

Query exceptions

A Illuminate\Database\QueryException is thrown whenever a database operation fails. The message contains the SQL query and its bindings. We can trigger one by trying to create a user where a non-nullable field isn’t specified.

// No email specified
$user->create(['name' => hex2bin('deadbeef')]);

We will go right to the source, the place where the exceptions are thrown, and the data is passed to them: Illuminate\Database\Connection::runQueryCallback. All this method does is run the query callback, and if an exception is thrown, it will be re-thrown as a QueryException.

If this happens, we can sanitize the bindings before re-throwing the exception:

 1namespace App\Database;
 2
 3use Closure;
 4use Exception;
 5use Illuminate\Database\MySqlConnection;
 6use Illuminate\Database\QueryException;
 7use Illuminate\Database\UniqueConstraintViolationException;
 8
 9class ErrorSanitizingMySqlConnection extends MySqlConnection
10{
11    protected function runQueryCallback($query, $bindings, Closure $callback): mixed
12    {
13        try {
14            return $callback($query, $bindings);
15        } catch (Exception $e) {
16            // Sanitize bindings before creating the exception
17            $sanitizedBindings = sanitize_bindings($this->prepareBindings($bindings));
18
19            // […]
20
21            throw new QueryException(
22                connectionName: (string) $this->getName(),
23                sql: $query,
24                bindings: $sanitizedBindings,
25                previous: $e
26            );
27        }
28    }
29}
The method is functionally identical, except for passing sanitized bindings to the QueryException

We can’t override Illuminate\Database\Connection::prepareBindings (line 17), as that would sanitize ALL bindings, including those that would successfully be inserted into the database.

As runQueryCallback is defined on Illuminate\Database\Connection, without any ways to hook into it, we need to override the class for the database connection we are using, e.g., Illuminate\Database\MySqlConnection.

We sanitize the bindings with a helper that we will reuse later:

function sanitize_bindings(array $bindings): array
{
    return array_map(function ($binding) {
        if (! is_string($binding) || mb_check_encoding($binding, 'UTF-8')) {
            return $binding;
        }

        return '0x'.bin2hex($binding);
    }, $bindings);
}
Each non-UTF-8 string binding is replaced with its hexadecimal representation

Now we need to make Laravel use our custom connection class.

Laravel is built with dependency injection as a core part of its architecture. This means that we can swap out nearly any functionality the framework offers for our own implementation, including the class used to manage database connections. We can do this by adding the following to App\Providers\AppServiceProvider::boot:

Connection::resolverFor('mysql', function ($connection, $database, $prefix, $config) {
    return new ErrorSanitizingMySqlConnection($connection, $database, $prefix, $config);
});
Registering the custom connection using dependency injection

And with these changes (source): Success! The exception renders correctly:

Note the sanitized SQL query and bindings in the exception message


The Queries section

A QueryException’s message is not the only place where the SQL query and its bindings are displayed. The Queries section of the exception page also displays them. So something like this will still trigger the “Malformed UTF-8 characters” error:

User::find(1)->update(['name' => hex2bin('deadbeef')]);

throw new Exception('Whoops!');
Successfully executed query will end up in the Queries section of the exception page

To solve this, we need to override the method responsible for rendering the exception. Or to be more precise, the method that generates the data for the Queries section.

 1namespace App\Exceptions\Renderer;
 2
 3use Illuminate\Foundation\Exceptions\Renderer\Exception;
 4
 5class ConfigurableFrameException extends Exception
 6{
 7    public function applicationQueries(): array
 8    {
 9        $queries = $this->listener->queries();
10
11        return array_map(function (array $query) {
12            $sql = (string) $query['sql'];
13
14            $sanitizedBindings = sanitize_bindings($query['bindings']);
15
16            foreach ($sanitizedBindings as $binding) {
17                $result = match (gettype($binding)) {
18                    'integer', 'double' => preg_replace('/\?/', (string) $binding, $sql, 1),
19                    'NULL' => preg_replace('/\?/', 'NULL', $sql, 1),
20                    default => preg_replace('/\?/', "'{$binding}'", $sql, 1),
21                };
22
23                $sql = (string) $result;
24            }
25
26            return [
27                'connectionName' => $query['connectionName'],
28                'time' => $query['time'],
29                'sql' => $sql,
30            ];
31        }, $queries);
32    }
33}
The bindings are sanitized for every query caught by the listener

This whole method is an exact copy of the parent method, except for the sanitized bindings (source).

Note the sanitized bindings in the Queries section

With that, all places where the SQL query and its bindings are displayed are sanitized and will not fail with a Malformed UTF-8 characters error anymore.


Bonus problem: Stacks

In fixing one problem, we have created another:

This is not where the error originated, but it is the first non-vendor class in the trace.

Because we have implemented our own exception renderer, the stack trace will now show our custom Connection class as the first non-vendor class in the trace. While correct, it is not very helpful, as it masks the place where the original error occurred.

We can fix this, but it is a little more involved. The process is as follows:

  • When an exception is thrown, Illuminate\Foundation\Exceptions\Renderer\Renderer takes a request and a throwable and prepares the data to render the exception page: an instance of Illuminate\Foundation\Exceptions\Renderer\Exception

  • It takes the stack trace frames and turn them into instances of Illuminate\Foundation\Exceptions\Renderer\Frame

  • These frames are grouped based on whether they are ‘vendor frames’ or not
     1/**
     2 * Get the exception's frames grouped by vendor status.
     3 *
     4 * @return array<int, array{is_vendor: bool, frames: array<int, Frame>}>
     5 */
     6public function frameGroups()
     7{
     8    $groups = [];
     9
    10    foreach ($this->frames() as $frame) {
    11        $isVendor = $frame->isFromVendor();
    12
    13        if (empty($groups) || $groups[array_key_last($groups)]['is_vendor'] !== $isVendor) {
    14            $groups[] = [
    15                'is_vendor' => $isVendor,
    16                'frames' => [],
    17            ];
    18        }
    19
    20        $groups[array_key_last($groups)]['frames'][] = $frame;
    21    }
    22
    23    return $groups;
    24}
    Frames are grouped by whether they are considered a vendor frame
  • Then finally, the x-laravel-exceptions-renderer::trace view component will render the grouped frames.

So the best way to fix this is to tackle the problem at the source: Which classes are considered vendor classes?

To do this, we need to override the isFromVendor method of the Frame class, we need to override the frames method of the Exception class to use the custom Frame, and we need to override the render method of the Renderer class to use our custom frames. Feel free to inspect the code changes here: Treat custom SQL connection as vendor class

class ConfigurableFrame extends BaseFrame
{
    public function isFromVendor(): bool
    {
        return ! str_starts_with($this->frame['file'], $this->basePath)
            || str_starts_with($this->frame['file'], join_paths($this->basePath, 'vendor'))
            || array_any(
                config('app.classes_treated_as_from_vendor', []),
                fn ($ignored) => $this->class() === $ignored || ($this->frame['class'] ?? null) === $ignored
            );
    }
}
The method responsible for determining whether a frame is from a vendor class

The repository is available on GitHub: pindab0ter/malformed-utf8-demo


  1. Bindings are the values that are bound to the SQL query. Instead of the parameter placeholder ?, the actual value will be displayed. For example:

    -- With parameter placeholder:
    select * from "users" where "users"."email" = ?
    
    -- With bindings:
    select * from "users" where "users"."email" = "some.user@example.com"
     ↩︎
https://hansvl.nl/blog/2025-12-10-fixing-malformed-utf-8-characters-exceptions-in-laravel/
Constraining Laravel's MorphTo relation

Update: This is now available as a package on Packagist: pindab0ter/constrained-morph-to-for-laravel, source on GitHub.

In a project with a polymorphic one-to-one MorphTo relationship, you might want to constrain the relationship to a specific model type. Say, for example, that you have a Comment model that can belong to either a Post or a Video; commentables.

posts
    id - integer
    title - string
    body - text

videos
    id - integer
    title - string
    url - string

comments
    id - integer
    body - text
    commentable_id - integer
    commentable_type - string

Now we’re interested in a Comment’s commentable, but only if it’s a Video.

One way you could do this is to load the relation and then check if the commentable is an instance of Video:

$commentable = Comment::find(1)->commentable;

if ($commentable instanceof Video) {
    // Do something with the video
}

This works, but you would have to do this in every single place where you want this behaviour. It also loads the relation even if it’s not the one you want.

It would be much better if you could just modify the relation so that it returns only the specific type of model you want.

You can do kind of do this by defining a new relationship and adding a whereHas referring back to the declaring model like so1:

class Comment extends Model
{
    public function commentable(): MorphTo
    {
        return $this->morphTo();
    }

    public function video(): MorphTo
    {
        return $this
          ->commentable()
          ->whereHas('comments', function (Builder $query) {
              $query->where('comments.commentable_type', Video::class);
          });
    }
}

This solution only works if every class that is saved as a commentable has a relation back to the Comment model. Another downside is that it still loads the related model even if it is not of the type you want.

Looking for a solution

When you try to simply add a where to the MorphTo relation, you will see that it doesn’t quite work as you might expect.

$comment->commentable()->where('commentable_type', Video::class)->toSql();

This returns the following SQL (formatted for readability):

SELECT *
FROM
  `videos`
WHERE
    `videos`.`id` = ?
AND `videos`.`commentable_type` = ?

This is obviously not what we want, as commentable_type is a column in the comments table, not in the videos table.

The upside is that we now know that by the time the SQL is generated, Laravel already knows what the related model is. We can use this to our advantage by preventing it from loading the related model if it is not of the type we want.

For the final solution, I want to be able to define a relation just like I would any other, but specify which type it needs to be and result in null otherwise.

In order to do that, I started looking into the source code for MorphTo. When exploring HasRelation::morphTo, I found that eager loaded relations are loaded differently than lazy loaded relations. This means we need to solve two different problems.

Lazy loaded relations
Comment::first()->commentable;

Lazy loaded relations are very straightforward. When lazy loading, Laravel will call getResults on the relation instance. For each relation, this method simply executes the query and returns the first result. Unless we prevent it when the query is not for the model we want, of course!

Eager loaded relations
Comment::with('commentable')->first();

Eager loaded relations are a little more involved. Laravel will call addEagerConstraints on the relation instance, which in MorphTo’s case calls buildDictionary . This method is responsible for determining what model to load for each eager loaded relation.

Implementing final solution

The final solution consists of a class and a trait, which together allow you to use the relation in the same way as you would other relation.

ConstrainedMorphTo

This class extends MorphTo and overrides the buildDictionary and getResults methods to prevent any model other than $allowedType to be loaded.

In the case of buildDictionary, we prevent the model from being added to the dictionary if $model->{$this->morphType} does not equal $allowedType. This means that the model will not end up in the list of relations to load eagerly.

The getResults method is also overridden to simply return null if the morphType does not equal $allowedType, instead of executing the database query.

<?php

declare(strict_types=1);

namespace App\Relations;

use Illuminate\Database\Eloquent\Builder;
use Illuminate\Database\Eloquent\Collection as EloquentCollection;
use Illuminate\Database\Eloquent\Model;
use Illuminate\Database\Eloquent\Relations\MorphTo;
use Override;

/**
 * @template TRelatedModel of Model
 * @template TDeclaringModel of Model
 *
 * @extends MorphTo<TRelatedModel, TDeclaringModel>
 */
class ConstrainedMorphTo extends MorphTo
{
    /**
     * @var class-string<TRelatedModel>
     */
    protected readonly string $allowedType;

    /**
     * @param  Builder<TRelatedModel>      $query
     * @param  TDeclaringModel             $parent
     * @param  string                      $foreignKey
     * @param  string                      $ownerKey
     * @param  string                      $type
     * @param  string                      $relation
     * @param  class-string<TRelatedModel> $constrainedTo
     */
    public function __construct(Builder $query, $parent, $foreignKey, $ownerKey, $type, $relation, string $constrainedTo)
    {
        $this->allowedType = $constrainedTo;

        parent::__construct($query, $parent, $foreignKey, $ownerKey, $type, $relation);
    }

    #[Override]
    protected function buildDictionary(EloquentCollection $models): void
    {
        foreach ($models as $model) {
            if ($model->{$this->morphType} !== $this->allowedType) {
                continue;
            }

            if ($model->{$this->morphType}) {
                $morphTypeKey = $this->getDictionaryKey($model->{$this->morphType});
                $foreignKeyKey = $this->getDictionaryKey($model->{$this->foreignKey});

                $this->dictionary[$morphTypeKey][$foreignKeyKey][] = $model;
            }
        }
    }

    /** @inheritDoc */
    #[Override]
    public function getResults()
    {
        if ($this->parent->{$this->morphType} !== $this->allowedType) {
            return null;
        }

        return parent::getResults();
    }
}
HasConstrainedMorphTo

This trait provides the method constrainedMorphTo, which handles loading setting up everything needed to create a new ConstrainedMorphTo instance, whether it is eager or lazy loaded. It has an extra constrainedTo parameter, which is the class name of the model you want to allow. In addition, it always requires the type and id parameters, as the names of these columns are never the same as the morphTo relation name, or we wouldn’t need this method in the first place.

<?php

declare(strict_types=1);

namespace App\Traits;

use App\Relations\ConstrainedMorphTo;
use Illuminate\Database\Eloquent\Model;

/**
 * @mixin Model
 */
trait HasConstrainedMorphTo
{
    /**
     * Define a polymorphic, inverse one-to-one or many relationship, which only allows a specific type of model to be related.
     *
     * @template TRelatedModel of Model
     * @param  class-string<TRelatedModel>  $constrainedTo
     * @param  string                       $type
     * @param  string                       $id
     * @param  string|null                  $name
     * @param  string|null                  $ownerKey
     * @return ConstrainedMorphTo<TRelatedModel, $this>
     */
    public function constrainedMorphTo(string $constrainedTo, string $type, string $id, ?string $name = null, ?string $ownerKey = null): ConstrainedMorphTo
    {
        // If no name is provided, the backtrace will be used to get the function name
        // since that is most likely the name of the polymorphic interface.
        $name = $name ?: $this->guessBelongsToRelation();

        // If the type value is null, it is probably safe to assume the relationship is being eagerly loading
        // the relationship. In this case we will just pass in a dummy query where we
        // need to remove any eager loads that may already be defined on a model.
        $class = $this->getAttributeFromArray($type);

        if (empty($class)) {
            $query = $this->newQuery();
        } else {
            $instance = $this->newRelatedInstance(
                static::getActualClassNameForMorph($class)
            );
            $query = $instance->newQuery()->setEagerLoads([]);
            $ownerKey ??= $instance->getKeyName();
        }

        return new ConstrainedMorphTo(
            query: $query,
            parent: $this,
            foreignKey: $id,
            ownerKey: $ownerKey,
            type: $type,
            relation: $name,
            constrainedTo: $constrainedTo,
        );
    }
}
Usage

You can use the constrainedMorphTo relation in the same way as you would use a normal morphTo relation, except you specify which type of model is the only type allowed. The type and id parameters are required, as they won’t be the same as the relation name and therefore can’t be inferred.

class Comment extends Model
{
    use HasConstrainedMorphTo;

    // Not required, but shown as reference
    public function commentable(): MorphTo
    {
        return $this->morphTo();
    }

    public function video(): MorphTo
    {
        return $this->constrainedMorphTo(
            constrainedTo: Video::class,
            type: 'commentable_type',
            id: 'commentable_id',
        );
    }
}
$comment = Comment::factory()->withPost()->create();
$comment->commentable; // returns a Post object
$comment->video;       // returns null, as the commentable is not a Video
Conclusion

There you have it! A way to constrain a MorphTo relation to a specific model type without making extra database queries. This solution works for both lazy and eager loaded relations, and you can use it just like you would any other relation.


  1. Specify MorphTo model · laravel/framework · Discussion #52336 ↩︎

https://hansvl.nl/blog/constraining-laravels-morph-to-relation/
Advanced Kovarex enrichment process

TL;DR: We take the happy rocks out of the centrifuge and route them back in as long as they are in a quantity divisible by 10. When they are not, we take them out one by one until they are again.

The Kovarex enrichment process is a very interesting recipe in Factorio. Most recipes in the game take a certain amount of one or more ingredients and output a single product.

The Kovarex enrichment process, however, turns 40 uranium-235 (from here on ‘happy rocks’) and 5 uranium-238 (from here on ‘sad rocks’) into 41 happy rocks and 2 sad rocks. It effectively converts 3 sad rocks into 1 happy rock. It is precisely because you have to take these ‘extra’ happy rocks out of the process while putting the rest back in that makes it interesting.

The second happy rock is due to the efficiency modules and normally doesn’t occur every time. The looped animation has been shortened.

The process is primed with 40 happy rocks. Since we get one or two happy rocks more out of the process than we put in, we want to have a system that ensures only excess rocks are taken out.

Obviously, we could just take all the rocks—both happy and sad—through a belt and route them back to an input. But that would be boring, so let’s use circuits instead.

The numbers are ordered in order to explain the process, not to denote the chronological order of the process.

  1. This chest contains everything needed for the process; 40 happy rocks and a few sad rocks. Because inserters will fill the centrifuge to 80 happy rocks, this means there are a total of 120 happy rocks in this system.
  2. This inserter inserts a limited amount of sad rocks into chest ① so that there’s always enough to convert into happy rocks.
  3. This chest is where the centrifuge will output its products. Its contents are sent to modulo % arithmetic combinator ⑤.
  4. Inserters only ever take out one type of item at a time, so by limiting the hand size to 10, we know for sure that happy rocks will be taken out 10 at a time. This is important.
  5. This modulo % arithmetic combinator divides the signal by 10 and outputs the remainder. The output is 0 when the signal is divisible by 10.
  6. This filter inserter only takes out happy rocks when the output of combinator ⑤ is greater than 0.
  7. This stack inserter takes out both happy rocks and sad rocks if happy rocks mod 10 = 0, according to combinator ⑤. When combinator ⑤ outputs 1 or more, this inserter is disabled, and filter inserter ⑥ takes over.

So, chronologically:

The centrifuge finishes, stack inserter ④ takes out the sad rocks, 4 stacks of 10 happy rocks and one stack of 1 happy rock. The sad rocks are immediately passed along as 0 mod 10 is 0. The stacks of 10 are also passed along, since 10 mod 10 is also 0.

After the last stack of happy rocks is put into the chest, there is a non-divisible-by-ten amount of happy rocks, so filter inserter ⑦ stops and filter inserter ⑥ starts taking out happy rocks until the amount of happy rocks in chest ③ mod 10 is 0 again.

There is one little snag. When there is one happy rock in chest ③, it will send a signal of 1 to combinator ⑤, which will then send a signal of 1 to filter inserter ⑦ the next frame. But by then, the happy rock has already been taken out by filter inserter ⑦. This is easily solved by reading the hand contents of stack inserter ④ and sending that signal with hold (not pulse) to combinator ⑤ as well, effectively making its contents an extension of chest ③.

We now have a closed system that only takes new sad rocks as they are needed and only ever outputs the excess happy rocks.

https://hansvl.nl/blog/advanced-kovarex-enrichment-process/
Power shutoff automation in Factorio

Our goal

In Factorio, when you start building solar panels, you will quickly start to resent the coal power plants constantly burning fuel when they shouldn’t be. Let’s assume you have accumulators to store the power your solar panels provide, and that you have enough to get you through the night. Most of the time, at least.

The accumulators provide the current charge percentage as a signal, so like the good Factorio engineer you are, you connect your accumulator to your offshore pump and set it to enable only when the accumulators are below some charge level. Luckily all accumulators in a power network always have the same amount of charge.

The offshore pump is shut off because the accumulators have enough charge.

This works, but this results in the power level hovering around 30%, with the steam engines flickering on and off as the accumulators charge and discharge.

The chart shows the coal power turning off and on around the 30% mark.

We can do better. We can have the offshore pump turn on, and then have it run until it reaches a certain percentage—say 80%. We can already turn the offshore pump on, but how do we decide when to shut it off again?

Factorio offers several combinators to work with basic signal logic. So what we could do is turn the pump on and then use an AND gate to turn the pump off when the pump is on and the accumulator charge is over 80%.

Unfortunately, neither the offshore pump, the boiler nor the steam turbines provide us with a signal1 to tell us whether they’re on or off.

Flip-flops

Enter flip-flops. Flip-flops, also known as latches, are electronic circuits with two possible stable states, 1 or 0, on or off. Being stable means they ‘remember’ their state, which is why these are building blocks of computer memory. This is, in effect, a 1-bit memory cell.

Please note that I do not have any electrical engineering background, and as such I will be talking about these from a programming perspective, not an electrical one. With that out of the way:

Flip-flops have two inputs, and one output. The inputs are called ‘set’ and ‘reset’. When a signal is sent to the set input, the input turns on if it wasn’t already. If you then send a signal to the reset input, it turns off again.

For a visual explanation by one of my favourite YouTubers Sebastian Lague, please watch this timestamped section of the video called How Do Computers Remember?.

Implementing a flip-flop in Factorio

With Factorio’s combinators, we have all the tools to build our own flip-flop. We’re setting out to remember whether the offshore pump is providing water to our coal generator, to be able to determine when to shut it off again.

A flip-flop implemented using Factorio’s combinators.

The accumulator is sending a signal to two arithmetic combinators.

  1. The accumulator signal is sent to a decider combinator that outputs 1 when that signal is < 30%. This is our set signal.

  2. The accumulator signal is also sent to a decider combinator that outputs 1 when the signal is >= 80%. This is our reset signal.

  3. This arithmetic combinator performs a boolean OR (|) on the set signal and the output of this flip-flop. This combination is what causes the steady state, as you will see.

  4. This decider combinator takes the reset signal and performs a boolean NOT (!=) on the signal. This way, if no signal is sent to the reset input, we send a 1 and vice versa.

  5. This final decider combinator performs a boolean AND on the output of the set and the (NOTed) reset signal. As long as the signal is set and NOT reset, we output 1.

    This 1 is also sent back to the OR combinator 3, which will keep the flip-flop in the 1 state.

The final step is to send the output of that final decider combinator—the output of our flip-flop—to our offshore pump, and voilà! We have successfully buffered our signal!

The coal generator is on, even though there is more than 30% charge in the accumulators.


Update (2024-05-10):

When reading through the Circuit network cookbook, I found out that you can make a flip-flop using just one decider combinator. By running a signal wire from the output back to the input, you can create a flip-flop that remembers its state.

A flip-flop implemented using a single decider combinator.

The only downside of this approach is that the output signal (in this case S) is always the same as the input signal, rather than allowing you to choose any signal you want.


  1. A nice overview of which devices send and/or receive which signals can be found here↩︎

https://hansvl.nl/blog/power-shutoff-automation-in-factorio/
Days of week field in Laravel

Table of Contents The context

For a local butchery chain, I created an intranet environment to maintain cleaning schedules, manage deliveries, and more. I built the intranet from the ground up, from software architecture and git init to DTAP1 deployment and continued development.

One of the uses of the intranet was to manage cleaning schedules. These tasks were almost all planned to happen on multiple—but not all— days of the week, every week.

The implementation

How do you store a schedule that repeats weekly on one or more days? The first solution I came up with was to store an array of days of the week in a single column. I must have seen this recently, and ended up using it in this project.

Laravel offers a way to define custom casts for your models2. This enables you to define how a value should be stored in a database column, and how it should be retrieved back into that value.

Enum

The first step was to create an int backed enum for the days of the week:

enum Day: int
{
    case Monday    = 0b00000001;
    case Tuesday   = 0b00000010;
    case Wednesday = 0b00000100;
    case Thursday  = 0b00001000;
    case Friday    = 0b00010000;
    case Saturday  = 0b00100000;
    case Sunday    = 0b01000000;
}

We would then have to be able to get a collection of these Days from an integer, and the other way around:

/**
 * @return Collection<array-key, Day>
 */
public static function collectionFromInt(int $value): Collection
{
    return collect(Day::cases())
        ->filter(fn (Day $day) => $value & $day->value);
}

public static function intFromCollection(Collection $days): int
{
    return $days->reduce(fn (int $acc, Day $day) => $acc | $day->value, 0);
}
Custom cast

With the enum ready, we can now define a custom cast in App\Casts:

namespace App\Casts;

use App\Enums\Day;
use Illuminate\Contracts\Database\Eloquent\CastsAttributes;
use Illuminate\Database\Eloquent\Model;
use Illuminate\Support\Collection;

class DaysOfWeek implements CastsAttributes
{
    /**
     * @param  int|null $value
     * @return Collection<array-key, Day>
     */
    public function get(Model $model, string $key, mixed $value, array $attributes): Collection
    {
        return Day::collectionFromInt($value ?? 0);
    }

    /**
     * @param Collection<array-key, Day> $value
     */
    public function set(Model $model, string $key, mixed $value, array $attributes): int
    {
        return Day::intFromCollection($value);
    }
}
Why this is a bad idea

This approach works, is elegant, and is easy to use. But it isn’t necessary. Serializing and deserializing days of the week into integers is complexity that serves no purpose3. The data is not human-readable, and it makes it harder to query the database for specific days of the week.

A much better solution might have been to just use a boolean column for each day of the week. You can use an accessor/mutator instead of a cast if you prefer working with a collection of Day enums.

In fact, let’s think of what that could look like:

/**
 * @return Attribute<Collection<Day>, void>
 */
protected function weekdays(): Attribute
{
    return new Attribute(
        get: fn (): Collection => collect([
            $this->monday    ? Day::Monday    : null,
            $this->tuesday   ? Day::Tuesday   : null,
            $this->wednesday ? Day::Wednesday : null,
            $this->thursday  ? Day::Thursday  : null,
            $this->friday    ? Day::Friday    : null,
            $this->saturday  ? Day::Saturday  : null,
            $this->sunday    ? Day::Sunday    : null,
        ])->filter(),
        set: fn (Collection $value) => $this->update([
            'monday'    => $value->contains(Day::Monday),
            'tuesday'   => $value->contains(Day::Tuesday),
            'wednesday' => $value->contains(Day::Wednesday),
            'thursday'  => $value->contains(Day::Thursday),
            'friday'    => $value->contains(Day::Friday),
            'saturday'  => $value->contains(Day::Saturday),
            'sunday'    => $value->contains(Day::Sunday),
        ])
    );
}

This way, you can still work with a collection of Day enums, what we store in the database is human-readable, it is easier to query, and it is easier to understand.


  1. DTAP stands for Development, Testing, Acceptance, Production. It’s a common way to manage environments in software development. ↩︎

  2. Laravel: Array & JSON Casting ↩︎

  3. you say: complexity very, very bad
    The Grug Brained Developer ↩︎

https://hansvl.nl/blog/laravel-days-of-week-field/
Provisioning Plesk using Ansible

Table of Contents Introduction

A previous employer was in the business of developing and hosting websites for small and medium-sized businesses. In order to reduce hosting costs, remove our reliance on an unreliable third party, give us more control over our offering, and improve our troubleshooting ability, we wanted to have full control over our web hosting servers.

Requirements

To achieve those goals, we chose to provision our own web hosting servers. There are multiple approaches, ranging from fully managed web hosting services—which is what we wanted to step away from—all the way to on-premises bare metal.

Renting Virtual Private Servers (VPS) gave us the flexibility and control we required, without the headache of managing the metal. The supplier takes care of making sure the machines are running, that the HDDs are replaced when nearing the end of their lifetime, that any network outages are resolved, and so forth. This allows us to focus on precisely the things that we want to do.

Because some customers are either large or security conscious enough to require their own servers, I had to take into consideration that we would have to set up multiple servers. This would also provide some risk management, as one server outage would not automatically result in all our customer’s website being offline, but only a subset, for the duration of the outage.

The servers were going to be used by non-technical people, which meant that the software on them had to be as intuitive and user-friendly as possible. Moreover, as we didn’t have a full-time server administrator, I wanted the software to be batteries-included; to offer decent security and functionality out-of-the-box as much as possible.

This was also the reason that cloud providers like Amazon Web Services, Google Cloud Platform or Microsoft’s Azure were not considered. They require expertise that we didn’t have and probably wouldn’t for the foreseeable future.

Out of the three most popular packages cPanel, DirectAdmin and Plesk, I chose to use Plesk for those reasons.

Provisioning a server

‘Provisioning a server’ means setting it up for it’s intended use. This includes—but is not limited to—configuring hardware, storage, networking, backup and recovery, security, installing software and extensions, user access control, and so forth.

In practical terms, this means logging into the server using SSH and executing commands on the host machine. As mentioned earlier, we would have at least a few servers—later nearing a dozen. Keeping track of which changes were or were not made on which machine was going to require automation.

P l a y b C o o o n k t r A o n l s i m b a l c e h I i n n v e e n t o r y S S H R R R e e e m m m o o o t t t e e e m m m a a a c c c h h h i i i n n n e e e 1 2 3

To do this, I used Ansible1. Ansible is a software package, which runs commands through SSH. The idea is that you don’t define what you want to happen, but how you want things to be. For example, you don’t ‘start a service’, you make sure ‘the service is running’.

One huge advantage of this approach is that Ansible Playbooks are idempotent; you can run them as often as you like, and the system will end up in the desired state every time. It’s not technically idempotent when you include things like ‘upgrade package x to the latest version’, since technically a newer version could be available and that would be a different outcome. But that is only a matter of definitions. Version pinning is available if you want to be strict about that.

Ansible

Ansible uses ‘playbooks’ in YAML notation, which contain the ‘tasks’. These playbooks can be subdivided into ‘roles’ for maintainability and readability. Finally, there’s the inventory, where you define the hosts you want to execute the playbooks on.

A playbook looks like this:

---
- name: Update web servers
  hosts: webservers
  remote_user: root

  tasks:
    - name: Ensure Apache is at the latest version
      ansible.builtin.yum:
        name: httpd
        state: latest

    - name: Write the Apache config file
      ansible.builtin.template:
        src: /srv/httpd.j2
        dest: /etc/httpd.conf

    - name: Ensure Apache is running
      ansible.builtin.service:
        name: httpd
        state: started

This would execute the steps detailed in the tasks section; update apache (httpd) using yum, make sure the configuration file is a certain way by using a .j2 template2, and finally make sure the service is running.

Ansible offers a number of tools to make larger projects manageable:

Roles

A role—which is a bit of an unfortunate name—is a self-contained ‘module’3, it contains everything you could need, enabling you to group tasks together.

roles/
    server/               # This hierarchy represents a “role”
        tasks/            #
            main.yml      # ← Task entrypoint, these get executed
            httpd.yml     # ← Subtask included by main.yml
        handlers/         #
            main.yml      # ← Handlers file
        templates/        # ← Files for use with the template module
            ntp.conf.j2   #
        files/            #
            bar.txt       # ← Files for use with the copy module
            foo.sh        # ← Scripts for use with the script module
        vars/             #
            main.yml      # ← Variables associated with this role

    plesk/                # ↖︎
    monitoring/           # ← Other roles
    some-app/             # ↙︎
A directory structure example. Some lesser used subdirectories ommitted.

In this project, I set up two roles; one to deal with configuring the server itself, and another to configure Plesk.

Tags

It is not uncommon to want to run specific tasks without having to execute all tasks in that playbook, which will take increasingly longer the more the playbook grows. For this, there are tags. For example, if you want to update SSH related settings like authorized_keys, you can run use ansible-playbook --tag=ssh playbook.yml. It will then run playbook.yml, but only execute the tasks that have tags: ssh.

Handlers

There are several tasks that could require a service to be restarted, or a script to be run. It’s not uncommon to have multiple tasks requiring the same action.

Rather than creating a task to reload a service after each task that requires it, you can use a handler. You can define these in the handlers block in the same file, or in handlers/main.yml of the same role.

Handlers run after all tasks in the play have been executed. To use our example from earlier:

---
- name: Update web servers
  hosts: webservers
  remote_user: root

  tasks:
    - name: Write the Apache config file
      ansible.builtin.template:
        src: /srv/httpd.j2
        dest: /etc/httpd.conf
      notify: Restart Apache

  handlers:
    - name: Restart Apache
      service:
        name: httpd
        state: restarted
Facts

Sometimes you need information from the server to decide which actions to take. A great example is managing which Plesk extensions should be installed and/or removed. On a Plesk server, you’d run plesk bin extension --list. One way to make the output of that command available in Ansible is to register a variable.

However, this isn’t always the best solution. When you need to parse the output, or simply when there are multiple pieces of information you need from the server, using registered variables can get unwieldy. Instead, you can use custom facts.

Facts are simply files with a .fact extension in /etc/ansible/facts.d/ that can be JSON, INI or executable files returning JSON. For example. You can create a file /etc/ansible/facts.d/preferences.json:

{
  "general": {
    "foo": "1",
    "bar": "2"
  }
}

This would then be accessible from within a task like so:

{{ ansible_local['preferences']['general']['foo'] }}

But to manage which Plesk extensions are installed, we need facts that are dynamically generated each time we run the playbook. To do that, we need an executable file that returns JSON. I chose to write an easily extendable, self-executable Python file:

#!/usr/bin/python3
import json
import subprocess

def get_installed_extensions() -> list:
    stdout = subprocess.check_output(
        ["sudo", "plesk", "bin", "extension", "--list"],
        stderr=subprocess.DEVNULL
    )

    return stdout.decode("utf-8").splitlines()


print(json.dumps(dict(
    installed_extensions=get_installed_extensions(),
)))
/etc/ansible/facts.d/plesk.fact

Whenever you run a playbook on a server, retrieving these facts is one of the first things that happen, before any other tasks are executed. The facts are accessible in the playbook as ansible_local.plesk, since we named our file plesk.fact. Now, in our playbook, we can use it like this:

- name: Uninstall Advisor extension
  command: plesk bin extension --uninstall advisor
  when: '"advisor - Advisor" in ansible_local.plesk.installed_extensions'
Final thoughts

There are a number of features that are very useful that I haven’t even covered, like Ansible Vault to manage secrets and sensitive information, grouping servers and defining variables on a server-level using the inventory, the multitude of available modules, debugging, and whatever else I forgot I even used.

Ansible enabled me to provision and manage around ten servers, update their configurations, made it easy to add more servers when needed, and ultimately enabled me to put the infrastructure in place that at the time of writing hosts close to a thousand websites.

I’m not a huge fan of YAML, as there are quite a few footguns4, especially when it comes to strings, and has an unintuitive syntax. Unfortunately, it’s an industry standard that is here to stay. And to be frank, it’s worth dealing with it to be able to use Ansible.

Ansible is versatile, has modules for almost everything you can think of, and enables you to organize your code and to run only the tasks you need at that moment. The only downside I can think of is that the execution speed scales poorly once the amount of tasks and servers start to grow. Running the entire playbook on all of our servers quickly started going towards twenty minutes.

I have very few problems with Ansible, and it enabled me to do a lot on my own. Because of that, I would definitely recommend looking into it if there’s anything you could use it for.


  1. While there are alternatives like Puppet, Chef, and Salt, I chose Ansible because of the bar to entry, how simple the agentless architecture is (it requires no additional software on the target machines), and how many ‘modules’ it supports—both out of the box and through third parties. After having used Ansible for a while, there were no major gripes that made me want to take a more serious look at the alternatives. ↩︎

  2. Jinja templates ↩︎

  3. And a ‘module’ is the actual ‘task’ that is being executed on the server. A ‘task’ in Ansible terms is a module with a specific configuration. Get it yet?

    - name: Ensure Apache is at the latest version #           ← Task
      ansible.builtin.yum:                         # ← Module ← Task
        name: httpd                                #           ← Task
        state: latest                              #           ← Task

    At least there’s a glossary available. ↩︎

  4. ‘footgun’ (plural ‘footguns’):

    (programming slang, humorous, derogatory) Any feature whose addition to a product results in the user shooting themself in the foot↩︎

https://hansvl.nl/blog/provisioning-plesk-using-ansible/
Recursively generating heading numbers

For a project I needed to create a page that would show organizational information. Each item is either a root item or a child item. The child items can have child items themselves. This is a recursive structure, which meant I could easily generate header numbers and depth.

/**
 * The heading number including super-items. E.g.: "1.1".
 *
 * @return Attribute<string, void>
 */
protected function headingNumber(): Attribute
{
    return Attribute::get(fn(): string => !$this->parent
        ? "$this->sort_index"
        : "{$this->parent->heading_number}.{$this->sort_index}"
    );
}

/**
 * How many levels this item is, starting at 1.
 *
 * @return Attribute<int, void>
 */
protected function depth(): Attribute
{
    return Attribute::get(fn(): int => 1 + ($this->parent?->depth ?? 0));
}

This makes use of Laravel’s attribute accessors to create computed properties, which can then be accessed like any other property.

Reflection

A WYSIWYG1 editor like is another option. The downside of that is that if you want to make any change to the structure of the page, you are going to have to manually re-number all the headings, as I don’t know of any WYSIWYG editor libraries that support auto numbering of headings. On top of that, it seems like overkill to use a WYSIWYG editor for this.


  1. What You See Is What You Get ↩︎

https://hansvl.nl/blog/laravel-recursive-heading-numbers/
Fish function for WebP

When creating this blog I like to convert my images to WebP, as they save a lot of space at little to no quality loss. For example, the cover image of this post is 87 KB in PNG format, but only 27 KB in WebP format. That’s a 69% reduction. Nice.

I use the cwebp command line tool to convert my images, but there’s something I really don’t like about it. It always requires you to explicitly specify the output file name. This makes it so you can’t just do something like cwebp *.png, as it will just dump the output to stdout. Not very helpful.

As I’m using the fish shell I decided to write a function to make this a little easier:

function convert-to-webp --description='Convert given files to webp format'
  for filename in $argv
    set -l output_filename (path change-extension .webp $filename)
    cwebp -m 6 -q 70 -mt -af -progress $filename -o $output_filename
  end
end

Just chuck it into ~/.config/fish/functions/convert-to-webp.fish1 and you can immediately use convert-to-webp *.png because of fish ’s function autoloading.

I’m especially fond of path change-extension .webp $filename. It’s a very readable way to change the extension of a filename. The surrounding parentheses (used for command substitution in fish) are not required, but do improve readability.

I’ll leave implementing this in bash/zsh as an exercise to the reader.

Note: It turns out this is not needed for this project, as my current Hugo setup automatically converts images to WebP.


  1. The file name doesn’t matter here, as the function name determines how you call it, but it’s good practice to give them the same name. ↩︎

https://hansvl.nl/blog/fish-function-for-webp/
B.O.C.K. Part 2: Reverse engineering Egg, Inc.

To make a Discord bot to help organize co-op teams in Egg, Inc., I needed to get data from the game. There are no documented APIs, so I was going to have to reverse engineer the game’s network traffic.

Charles Proxy

Charles Proxy allows you to intercept network traffic. You can even use it to intercept encrypted HTTPS traffic from your iPhone. Perfect! So I set up my iPhone to use Charles Proxy as a proxy server, and started the game.

Charles Proxy showing network traffic from Egg, Inc.

Whenever I opened the game, I would see a number of requests and responses. The response to /ei/first_contact had almost 100kb of Base64-encoded data. The rest of the traffic didn’t look half as interesting, and when I started there was probably not even half of what is shown in the screenshot.

After decoding, it was still mostly unintelligible, but slightly less so. It was in a binary format, so I grabbed a hex editor and started looking for patterns.

Protobuf

As you can see in the image below, there are some repeating patterns. At the start of the file I could see my in-game name, and my iCloud ID. I was on the right track.

Hex Fiend showing binary and text representations of the response data, revealing repeating patterns.

There was a lot of data, but I couldn’t make sense of most of it. I had seen APIs use JSON or XML, but I’d never seen anything like this before. And since I did see my name and iCloud ID, I knew I wasn’t looking at encrypted data.

After a little bit of research, I figured out that the data was probably serialized using Protocol Buffers. This is a binary format for serializing structured data. It competes with the likes of JSON and XML, but is much more compact and faster to parse. However, it is not human-readable.

To make sense it you need a Protocol buffer definitions file. These .proto files contain the structure of the data, called messages. They define the names and types of the data, which a program uses to encode outgoing and decode incoming messages. For example, a message could be defined as follows:

message User {
  required int32 id = 1;
  required string name = 2;
  repeated Post posts = 3;
}

message Post {
  required string title = 1;
  required string content = 2;
}

Without a definitions file, you only have two pieces of information: a sequence number and the raw bytes of data. You don’t even know how to interpret the data; whether it’s a string, an int32 or something else. It’s the sequence number that links the data to the definitions file and tells the program how to interpret it. This is the purpose of the = 1 and = 2 in the example above.

Reverse engineering

To get the data in a state I could work with, I started the process of reverse engineering the Protocol buffer definitions file. First, I started by looking for patterns in the response data. I noticed that there were a lot of bytes that were appearing in a certain cadence.

There were a lot of blank chunks, just bytes of zeroes, intermingled with consistent structures with repeating elements, where I had also noticed a number that increased by one each time. This is our sequence number!

I can’t remember how I figured out the message boundaries and types, but this is a snippet of the first iteration of my egginc.proto file:

message msg7 {
  int32 unknown1 = 1; // 17 for me, highest egg reached or something?
  uint64 ge_total = 2;
  uint32 ge_spent = 3;
  uint64 soul_eggs = 4;
  double prestige_earnings = 5;
  double lifetime_earnings = 6;
  uint32 piggy_bank = 7;
  uint32 unknown8 = 8;
  repeated name_level epic_research = 9;
  double unknown10 = 10; // looks like a timestamp
  repeated name_level newspaper = 11;
  double unknown12 = 12; // looks like a timestamp
  double unknown13 = 13;
  double video_expire_time = 14; // looks like a timestamp
  repeated name_level achievement = 15;
  uint32 unknown16 = 16;
  uint32 unknown17 = 17;
  repeated uint32 unknown18 = 18; // "highest amount of chickens obtained on that egg"
  repeated uint32 unknown19 = 19; // "level of trophy obtained for their respective eggs"
  uint32 unknown20 = 20; // related to daily gift "day"
  uint64 unknown23 = 23;
  uint32 unknown24 = 24;
  uint32 unknown25 = 25;
  double unknown26 = 26;
  double unknown27 = 27;
}

After a while I realized that I wasn’t going to be able to wade through almost 100,000 bytes of raw binary data by hand. I would have to find a way to get a Protobuf definitions file somehow.

Any application that serializes and deserializes Protobuf messages needs to have the definition of the messages somewhere. Egg, Inc. is available on both the App Store and the Google Play Store. This means that I could look for the Android app’s APK1 file, which I downloaded and extracted.

Unfortunately, there was no ready-made egginc.proto file to be found. The definitions had to be there somewhere, so I was going to have to dig a little deeper. There were a few compiled Android Library (.so) files that looked interesting, so I grabbed my hex editor again and loaded up those files.

Hex Fiend showing binary and text representations of compiled Protobuf definitions in the `libegginc.so` binary data.
Hex Fiend showing binary and text representations of compiled Protobuf definitions in the libegginc.so binary data.

When looking through libegginc.so, I saw the string ei.proto (highlighted in the image above). I struck gold! Everything was here! Message names, property names, types (represented by a number), everything!

With some good old Regex I wrote a tool2 to help me parse the data.

const val START = "ei.proto\u0012\u0002ei\u001A\u000Ccommon.proto"
const val END = "\u0000\u0000\u0000\u0000"

val componentPattern = """\x0A.{0,2}?(?<name>[A-Za-z]+)(?<body>.*?)(?=\x0A.[A-Z][a-z]|$)"""
    .toRegex(DOT_MATCHES_ALL)
val classPattern = """[a-z\d_]{3,}"""
    .toRegex()
val propertyPattern = """\x0A.(?<name>\w+).(?<index>.).*?(?<repeated>.)\x28(?<primitive>.)(?:\x32.\..+?\.(?<reference>[A-Za-z.]*))?"""
    .toRegex(DOT_MATCHES_ALL)
val constantPattern = """(?<name>[A-Z_]{2,})\x10(?<index>.).*?(?:\x0A|$)"""
    .toRegex(DOT_MATCHES_ALL)

// …

fun Int.toType(): String = when (this) {
    1 -> "double"
    2 -> "float"
    5 -> "int32"
    4 -> "uint64"
    8 -> "bool"
    9 -> "string"
    13 -> "uint32"
    else -> "??? ($this)"
}

// …

It took me a lot of time to get the Regex right and to get the types down from the numbers. I also had to figure out how to parse the repeated elements and where messages started and ended, but I got there in the end.

The output of this tool much more helpful than my previous attempts at reading the data by hand.

message Game {
  Egg max_egg_reached = 1;
  uint64 golden_eggs_earned = 2;
  uint64 golden_eggs_spent = 3;
  uint64 soul_eggs = 4;
  double prestige_cash_earned = 5;
  double lifetime_cash_earned = 6;
  uint64 piggy_bank = 7;
  uint32 permit_level = 8;
  repeated Backup.ResearchItem epic_research = 9;
  double next_daily_gift_time = 10;
  repeated Backup.NewsHeadline news = 11;
  double last_news_time = 12;
  double current_multiplier = 13;
  double current_multiplier_expiration = 14;
  repeated Backup.AchievementInfo achievements = 15;
  uint64 uncliamed_golden_eggs = 16;
  uint64 unclaimed_soul_eggs = 17;
  repeated uint64 max_farm_size_reached = 18;
  repeated uint32 egg_medal_level = 19;
  uint32 last_daily_gift_collected_day = 20;
  uint32 current_farm = 22;
  uint64 eggs_of_prophecy = 23;
  uint64 unclaimed_eggs_of_prophecy = 24;
  bool long_idle_notification_set = 25;
  double long_idle_notification_threshold = 26;
  double long_idle_reward = 27;
  uint32 num_daily_gifts_collected = 28;
  bool hyperloop_station = 29;
  repeated Backup.OwnedBoost boosts = 30;
  bool piggy_full_alert_shown = 31;
  uint32 total_time_cheats_detected = 32;
  double prestige_soul_boost_cash = 33;
  double soul_eggs_d = 34;
  double unclaimed_soul_eggs_d = 35;
  bool force_elite_contracts = 36;
  double new_player_event_end_time = 37;
}

As you can see, my suspicion from my first attempt that uint32 unknown1 = 1; represented the highest egg reached was indeed correct. I even coupled the value of the uint32 to the Egg enum that I also pulled from the library file. It was all coming together.

Communicating with the game servers

I set up the project so that it automatically generates classes based on the Protocol buffer definitions and use a library to do the serialization and deserialization for me.

Every time the game launches, it synchronizes the game state with the server. This was the big response I was seeing early on in Charles. I was able to reverse engineer a request message for that initial data exchange request, and lo and behold, the server gave me the entire game state of my Egg, Inc. game!

The next steps were clear: Create a database of player credentials to request those backups, create a Discord bot for them to interact with, and have them start organizing co-ops with it.

Note: The creators of Egg, Inc. have had to deal with cheaters in the past. Security has been much improved since then.

B.O.C.K. has only ever sent read-only requests. Please be a decent human being and don’t cheat.


  1. Android Package Kit, the file format used by Android to distribute and install apps. They are basically ZIP files containing the app’s code and resources. ↩︎

  2. The structure of the APK has changed since writing this tool. Unfortunately, it no longer works on recent versions of the game. ↩︎

https://hansvl.nl/blog/bock-part-2-reverse-engineering-egg-inc/
B.O.C.K. Part 1: Introduction

Egg, Inc.

Egg, Inc.1 is an idle game by the lovely people at Auxbrain.

The conceit of this game is that you have hatcheries that spawn chickens who lay increasingly more and valuable eggs that sell for increasingly high prices. The result is a game where numbers are almost always displayed in orders of magnitude2. To offer some perspective, my lifetime earnings in-game sit at a respectable 194.529 quattuorvigintillion3 bocks.

Idle games

The gameplay loop is simple: you buy upgrade your habitats, hatcheries and transportation vehicles, and buy ‘research’ that further increase your growth and earnings. You then close the game. All the counters keep running, so when you come back after a while you will have accumulated a lot of income, which you can then spend on more growth.

The game is free to play, but offers in-app purchases. I’ve spent some money on it, but nowhere near the amount I’ve spent on other games. Especially considering the amount of time I’ve spent playing it.

Contracts and communities

The game offers weekly time-limited contracts that can be completed by joining a co-op with other players. There are several communities that group people of similar ranking together. I performed well on a number of those, and this lead to me being invited to a private, invite-only Discord community in October 2015.

This community would organize co-op centrally using spreadsheets, detailing team captains, multiple scenarios for different max co-op sizes, Discord channels that would have to be co-ordinated, the works.

I asked them to please tell me this wasn’t all manual labour. It was.

I offered to automate the process. This blog series is about how I created a Discord bot to help.


  1. App Store, Google Play ↩︎

  2. Kongregate, makers of several idle games themselves, have done a great series on the math behind these kind of games: The Math of Idle Games, Part I, Part II, Part III↩︎

  3. That’s about 194.​529.​000.​000.​000.​000.​000.​000.​000.​000.​000.​000.​000.​000.​000. ​000.​000.​000.​000.​000.​000.​000.​000.​000.​000.​000 ↩︎

https://hansvl.nl/blog/bock-part-1-introduction/