After my previous post Tracking renamed files in Git, here’s another entry in my ongoing series “I thought git mv was useless but I was wrong”.
This one’s especially relevant to users on macOS and Windows, where the file system is case-insensitive by default. More precisely, APFS on macOS is case-insensitive but case-preserving by default. That is, A.TXT and a.txt refer to the same file (and these two cannot coexist in the same directory), but the file system records the filename exactly as you entered it.
If you’re on a such a file system and change the case of a filename, Git will not record the new name — unless you use git mv to perform the renaming.
Demo
1. Without git mv (bad)
Note: I tested this on macOS with the default APFS (case-insensitive) file system. You’ll get different results if your file system is case-sensitive.
Let’s create a fresh repository and commit a single file named A.txt:
# Rename the file (change case)
# Note: not using `git mv`
mv A.txt a.txt
git status
nothing to commit, working tree clean
That’s interesting. git status says “nothing to commit” because nothing has changed from its perspective. Git is still tracking a file named A.txt, whose contents haven’t changed.
If we now make edits to the file a.txt (aka A.txt; both names refer to the same file), Git tracks this as a change of the existing file, which is still named A.txt in Git’s datastore:
Now we’re in a situation where the recorded filenames on the file system and in Git have diverged. A fresh clone of the repository will create the file with its original name A.txt because that’s the spelling Git has recorded:
cd ..
git clone testrepo testrepo-clone
cd testrepo-clone
ls
A.txt
I think this is a real problem. You might assume it’s not an issue as long as all people working with this repo are on case-insensitive file systems, but can you guarantee that? And even if you can, you cannot guarantee that the software you’re writing will only ever be used on case-insensitive file systems.
For instance, if your code loads the file named a.txt from the app’s bundle but the CI step that packages your app for release checked the file out as A.txt, your app will fail for users on case-sensitive file systems. And the reason is that Git has stored a different filename than what you’re using.
You can avoid this by using git mv for renaming, as shown in the second demo below.
2. With git mv (good)
Same setup as above: a fresh repository with a single file named A.txt:
That’s it. Git and the file system use the same filename, and so will any new clone of the repository. Future bugs avoided.
Workaround: 2-stage commit
I said in my previous post that it’s not always practical to use git mv for renaming. What to do in this case?
My workaround is to split the rename operation into 2 renamings and commit each separately:
Rename A.txt to an arbitrary temporary name, e.g. a_.txt. This filename must differ from the original filename in more than just case. Commit this as “Rename A.txt to a.txt (step 1/2)”.
Rename a_.txt to the final name a.txt. Commit this as “Rename A.txt to a.txt (step 2/2)”.
By using an intermediate filename that differs in more than just case, we force Git to record the renamings. It looks a little clunky in the commit log, but I’ll take that over introducing a hidden bug.
Git famously doesn’t track file renames. That is, Git doesn’t store the information “file A has been renamed to B in commit X”.
Instead, Git stores snapshots of the repository at each commit. It then uses a (customizable) heuristic during diffing to guess at likely renames: “File B in commit X is new, and file A has been deleted. B is 90 % identical to A’s previous contents, so A was probably renamed to B.”
Linus Torvald’s email is worth reading. It’s well-reasoned and I agree with his arguments:
Tracking renames is a superficial solution that fixes only part of the actual problem: how do you track the history of a particular piece of information, which may be much smaller (a single line) or larger (the design of an entire subsystem) than a file, depending on context.
Shifting the task of history tracking from commit time to search time allows the search algorithm to do a much better job, because it can be tweaked to the structure of the underlying data.
And yet, I still miss the ability to explicitly register a rename operation with Git. Maybe this is because the history tracking tools we have are not as good as what Linus Torvalds envisioned in 2005. Or because sometimes the file is a good enough unit of granularity for history tracking, even if imperfect.
Use a separate commit for the rename
Git’s heuristics work great if renaming a file is all you do in a commit. Tracking only becomes a problem if the renaming coincides with substantial changes to the file’s contents in the same commit. Unfortunately, this happens very frequently in my experience: more often than not, my reason for renaming a file is that I made substantial edits and now the filename no longer represents the file’s contents.
The golden rule: To track a file’s identity across renames, perform the rename in a standalone commit, separate from any edits to the file.
git mv stages the rename but not the edits
Git has the promisingly named git mv command, but since Git doesn’t track renames, git mv is mostly no different than doing the renaming in some other way and then staging the change (the deleted and newly created file). The FAQ answer I linked to above even says so:
Git has a rename command git mv, but that is just for convenience. The effect is indistinguishable from removing the file and adding another with different name and the same content.
But there is an important difference: git mv will stage the rename, but crucially it keeps any edits in the renamed file unstaged. This is exactly what I want since it allows me to commit the rename and the edits separately.
Example: Let’s create a fresh Git repository that contains a single file, and then make some edits to the file:
# Create repository
mkdir testrepo
cd testrepo
git init
# Create a file and commit it
echo "Hello" > A.txt
git add .
git commit -m "Create A"
# Make edits to the file
echo "World" > A.txt
If we now rename A.txt to B.txt and stage the changes, Git won’t track this as a rename:
# Variant 1 (bad):
# Rename A to B
mv A.txt B.txt
# Stage changes
git add .
git status
Changes to be committed:
	deleted:    A.txt
	new file:   B.txt
But, if we instead use git mv to rename the edited file, Git will stage the rename and keep the edits unstaged:
# Variant 2 (good):
# Use git mv for renaming
git mv A.txt B.txt
git status
Changes to be committed:
	renamed:    A.txt -> B.txt

Changes not staged for commit:
	modified:   B.txt
Now we can commit the rename, and then stage and commit the edits:
git commit -m "Rename A to B"
git add .
git commit -m "Edit B"
Great!
If you can’t use git mv
I’m often in situations where I can’t use git mv to rename a file because it’s important to perform the rename in some other tool. For example, I write my notes in Obsidian and track them with Git. Obsidian can automatically update links to a note when you rename it, but only if you do the renaming in Obsidian.
The workaround I came up with in this case:
Rename the renamed file back to its original name. I do this in Terminal using the normal mv command.
Redo the intended renaming, but this time with git mv. This puts the repository into the desired state where I can commit the rename operation separately from edits to the file’s contents.
I wrote myself a shell script to perform these steps:
#!/bin/bash
# git-fix-rename

if [ "$#" -ne 2 ]; then
    echo "Allow git to track a rename even when the renamed file has been edited."
    echo "Usage: $0 <new_filename> <old_filename>"
    exit 1
fi

old="$2"
new="$1"

# Situation: we renamed $old to $new. But Git can’t track the rename
# because we made changes to $new at the same time. `git status` shows:
#
# ```
# $ git status
# Changes not staged for commit:
# 	deleted:    $old
#
# Untracked files:
# 	$new
# ```

# Solution:
# 1. Undo the rename temporarily:
if [ -e "$old" ]; then
    echo "Error: Destination file '$old' already exists. Aborting."
    exit 1
fi
mv "$new" "$old"
# 2. Redo the rename, but this time with `git mv`:
git mv "$old" "$new"

# Result: Git stages the pure rename operation (ready to be committed)
# while leaving the edits to $new unstaged. You can now commit the
# the rename and edit steps separately, allowing Git to track the rename.
#
# ```
# $ git status
# Changes to be committed:
# 	renamed:    $old -> $new
#
# Changes not staged for commit:
# 	modified:   $new
# ```
If you name the script e.g. git-fix-rename (no file extension) and make it executable, you can even call it like any built-in Git command:
# We have renamed A.txt to B.txt and made edits to B.txt.
# Now we want to record the rename in Git.
git fix-rename B.txt A.txt
So far, this has worked well for me. But beware: I wrote the script for myself and it doesn’t have robust edge case handling. There’s a chance it might mess up your uncommitted changes.
The Swift website provides nightly builds of the Swift compiler (called toolchains) for download. Building with a nightly compiler can be useful if you want to check if a bug has already been fixed on main, or if you want to experiment with upcoming language features such as Embedded Swift, as I’ve been doing lately.
A toolchain is distributed as a .pkg installer that installs itself into /Library/Developer/Toolchains (or the equivalent path in your home directory). After installation, you have several options to select the toolchain you want to build with:
In Xcode
In Xcode, select the toolchain from the main menu (Xcode > Toolchains), then build and/or run your code normally.
Not all Xcode features work with a custom toolchain. For example, playgrounds don’t work, and Xcode will always use its built-in copy of the Swift Package Manager, so you won’t be able to use unreleased SwiftPM features in this way. Also, Apple won’t accept apps built with a non-standard toolchain for submission to the App Store.
On the command line
When building on the command line there are multiple options, depending on your preferences and what tool you want to use.
The TOOLCHAINS environment variable
All of the various Swift build tools respect the TOOLCHAINS environment variable. This should be set to the desired toolchain’s bundle ID, which you can find in the Info.plist file in the toolchain’s directory.
Example (I’m using a nightly toolchain from 2024-03-03 here):
# My normal Swift version is 5.10
$ swift --version
swift-driver version: 1.90.11.1 Apple Swift version 5.10 (swiftlang-5.10.0.13 clang-1500.3.9.4)

# Make sure xcode-select points to Xcode, not to /Library/Developer/CommandLineTools
# The Command Line Tools will ignore the TOOLCHAINS variable.
$ xcode-select --print-path
/Applications/Xcode.app/Contents/Developer

# The nightly toolchain is 6.0-dev
$ export TOOLCHAINS=org.swift.59202403031a
$ swift --version
Apple Swift version 6.0-dev (LLVM 0c7823cab15dec9, Swift 0cc05909334c6f7)
Toolchain name vs. bundle ID
I think the TOOLCHAINS variable is also supposed to accept the toolchain’s name instead of the bundle ID, but this doesn’t work reliably for me. I tried passing:
the DisplayName from Info.plist (“Swift Development Snapshot 2024-03-03 (a)”),
the ShortDisplayName (“Swift Development Snapshot”; not unique if you have more than one toolchain installed!),
the directory name, both with and without the .xctoolchain suffix,
but none of them worked reliably, especially if you have multiple toolchains installed.
In my limited testing, it seems that Swift picks the first toolchain that matches the short name prefix (“Swift Development Snapshot”) and ignores the long name components. For example, when I select “Swift Development Snapshot 2024-03-03 (a)”, Swift picks swift-DEVELOPMENT-SNAPSHOT-2024-01-30-a, presumably because that’s the “first” one (in alphabetical order) I have installed.
My advice: stick to the bundle ID, it works. Here’s a useful command to find the bundle ID of the latest toolchain you have installed (you may have to adjust the path if you install your toolchains in ~/Library instead of /Library):
$ plutil -extract CFBundleIdentifier raw /Library/Developer/Toolchains/swift-latest.xctoolchain/Info.plist
org.swift.59202403031

# Set the toolchain to the latest installed:
export TOOLCHAINS=$(plutil -extract CFBundleIdentifier raw /Library/Developer/Toolchains/swift-latest.xctoolchain/Info.plist)
xcrun and xcodebuild
xcrun and xcodebuild respect the TOOLCHAINS variable too. As an alternative, they also provide an equivalent command line parameter named --toolchain. The parameter has the same semantics as the environment variable: you pass the toolchain’s bundle ID. Example:
SwiftPM also respects the TOOLCHAINS variable, and it has a --toolchains parameter as well, but this one expects the path to the toolchain, not its bundle ID. Example:
$ swift build --toolchain /Library/Developer/Toolchains/swift-latest.xctoolchain
Missing toolchains are (silently) ignored
Another thing to be aware of: if you specify a toolchain that isn’t installed (e.g. because of a typo or because you’re trying to run a script that was developed in a different environment), none of the tools will fail:
swift, xcrun, and xcodebuild silently ignore the toolchain setting and use the default Swift toolchain (set via xcode-select).
SwiftPM silently ignores a missing toolchain set via TOOLCHAINS. If you pass an invalid directory to the --toolchains parameter, it at least prints a warning before it continues building with the default toolchain.
I don’t like this. I’d much rather get an error if the build tool can’t find the toolchain I told it to use. It’s especially dangerous in scripts.
You may have noticed that the Swift compiler automatically treats the closure of a DispatchQueue.main.async call as @MainActor. In other words, we can call a main-actor-isolated function in the closure:
import Dispatch

@MainActor func mainActorFunc() { }

DispatchQueue.main.async {
    // The compiler lets us call this because
    // it knows we're on the main actor.
    mainActorFunc()
}
This behavior is welcome and very convenient, but it bugs me that it’s so hidden. As far as I know it isn’t documented, and neither Xcode nor any other editor/IDE I’ve used do a good job of showing me the actor context a function or closure will run in, even though the compiler has this information. I’ve written about a similar case before in Where View.task gets its main-actor isolation from, where Swift/Xcode hide essential information from the programmer by not showing certain attributes in declarations or the documentation.
It’s a syntax check
So how is the magic behavior for DispatchQueue.main.async implemented? It can’t be an attribute or other annotation on the closure parameter of the DispatchQueue.async method because the actual queue instance isn’t known at that point.
A bit of experimentation reveals that it is in fact a relatively coarse source-code-based check that singles out invocations on DispatchQueue.main, in exactly that spelling. For example, the following variations do produce warnings/errors (in Swift 5.10/6.0, respectively), even though they are just as safe as the previous code snippet. This is because we aren’t using the “correct” DispatchQueue.main.async spelling:
let queue = DispatchQueue.main
queue.async {
    // Error: Call to main actor-isolated global function
    // 'mainActorFunc()' in a synchronous nonisolated context
    mainActorFunc() // ❌
}

typealias DP = DispatchQueue
DP.main.async {
    // Error: Call to main actor-isolated global function
    // 'mainActorFunc()' in a synchronous nonisolated context
    mainActorFunc() // ❌
}
I found the place in the Swift compiler source code where the check happens. In the compiler’s semantic analysis stage (called “Sema”; this is the phase right after parsing), the type checker calls a function named adjustFunctionTypeForConcurrency, passing in a Boolean it obtained from isMainDispatchQueueMember, which returns true if the source code literally references DispatchQueue.main. In that case, the type checker adds the @_unsafeMainActor attribute to the function type. Good to know.
Fun fact: since this is a purely syntax-based check, if you define your own type named DispatchQueue, give it a static main property and a function named async that takes a closure, the compiler will apply the same “fix” to it. This is NOT recommended:
// Define our own `DispatchQueue.main.async`
struct DispatchQueue {
    static let main: Self = .init()
    func async(_ work: @escaping () -> Void) {}
}

// This calls our
DispatchQueue.main.async {
    // No error! Compiler has inserted `@_unsafeMainActor`
    mainActorFunc()
}
Perplexity through obscurity
I love that this automatic @MainActor inference for DispatchQueue.main exists. I do not love that it’s another piece of hidden, implicit behavior that makes Swift concurrency harder to learn. I want to see all the @_unsafeMainActor and @_unsafeInheritExecutor and @_inheritActorContext annotations! I believe Apple is doing the community a disservice by hiding these in Xcode.
The biggest benefit of Swift’s concurrency model over what we had before is that so many things are statically known at compile time. It’s a shame that the compiler knows on which executor a particular line of code will run, but none of the tools seem to be able to show me this. Instead, I’m forced to hunt for @MainActor annotations and hidden attributes in superclasses, protocols, etc. This feels especially problematic during the Swift 5-to-6 transition phase we’re currently in where it’s so easy to misuse concurrency and not get a compiler error (and sometimes not even a warning if you forget to enable strict concurrency checking).
The most impactful change Apple can make to make Swift concurrency less confusing is to show the inferred executor context for each line of code in Xcode. Make it really obvious what code runs on the main actor, some other actor, or the global cooperative pool. Use colors or whatnot! (Other Swift IDEs should do this too, of course. I’m just picking on Xcode because Apple has the most leverage.)
And what it can teach us about SwiftUI’s stack layout algorithm
I have one more thing to say on the relative sizing view modifier from my previous post, Working with percentages in SwiftUI layout. I’m assuming you’ve read that article. The following is good to know if you want to use the modifier in your own code, but I hope you’ll also learn some general tidbits about SwiftUI’s layout algorithm for HStacks and VStacks.
Using relative sizing inside a stack view
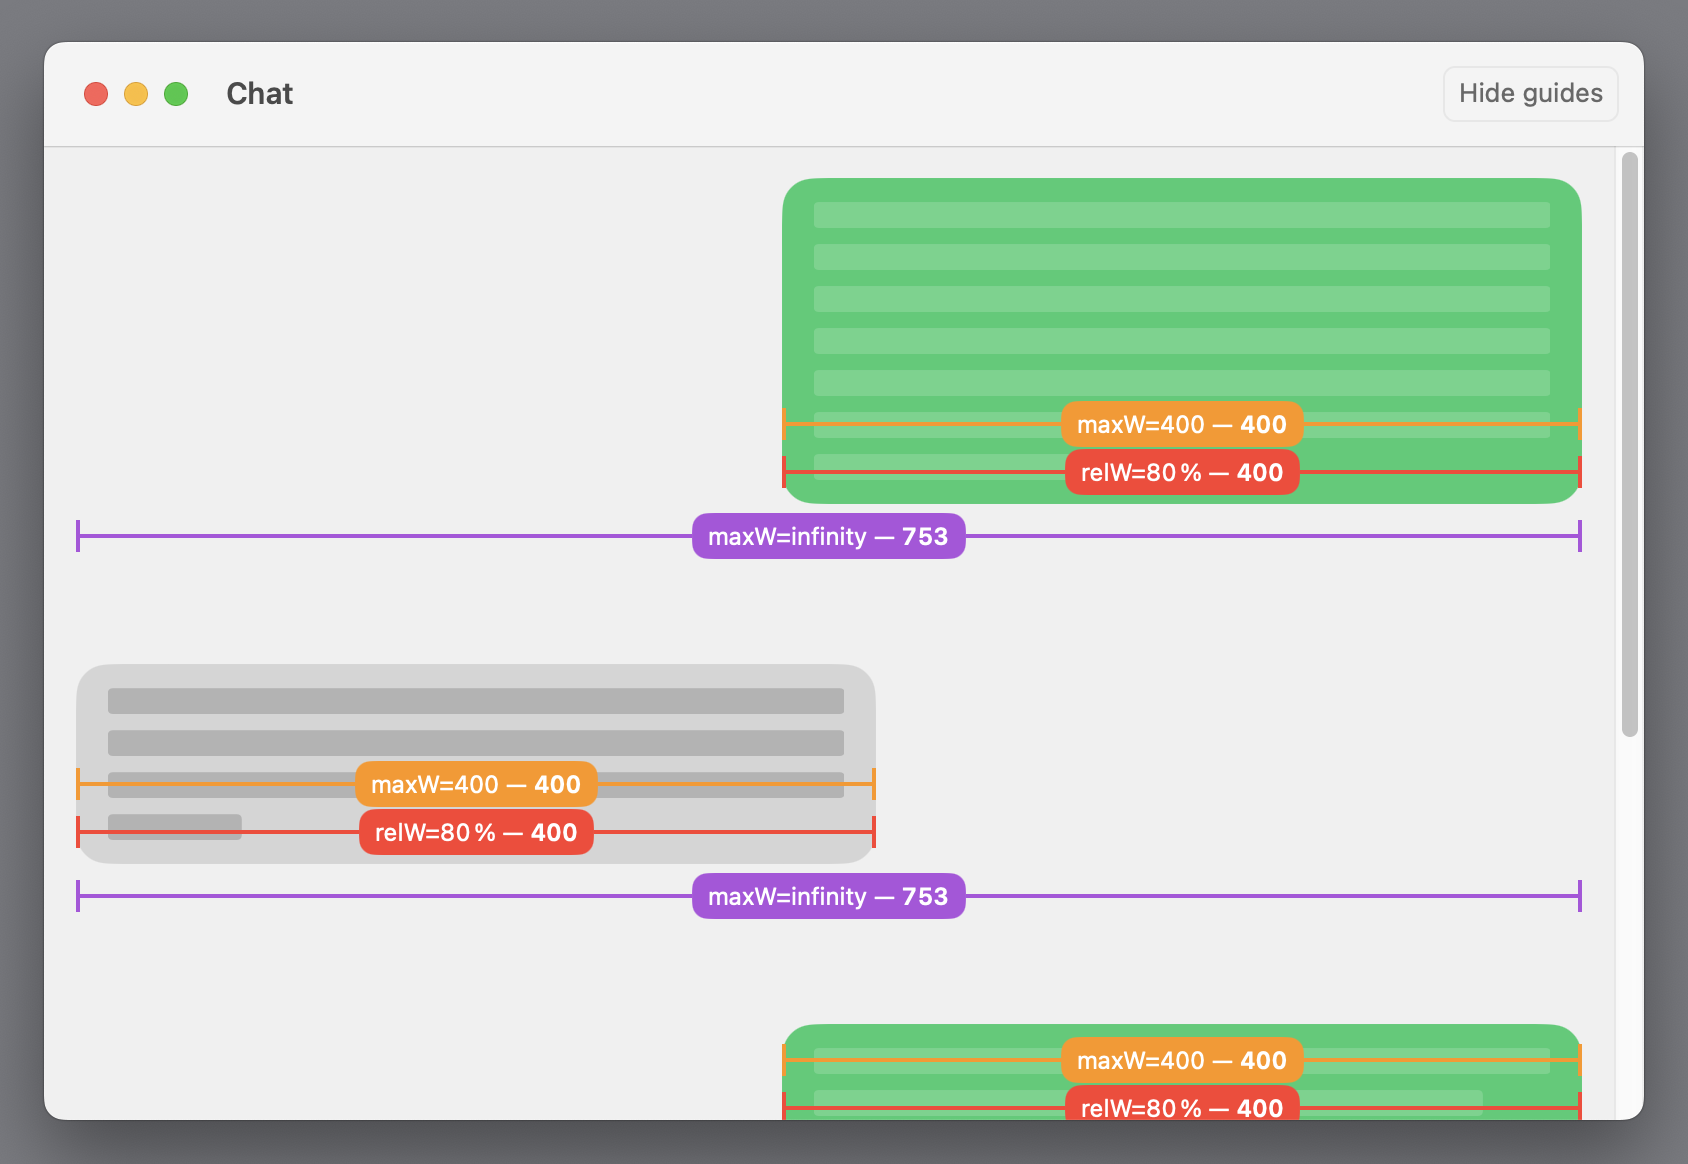
Let’s apply the relativeProposed modifier to one of the subviews of an HStack:
What do you expect to happen here? Will the blue view take up 50 % of the available width? The answer is no. In fact, the blue rectangle becomes narrower than the others:
This is because the HStack only proposes a proportion of its available width to each of its children. Here, the stack proposes one third of the available space to its first child, the relative sizing modifier. The modifier then halves this value, resulting in one sixth of the total width (minus spacing) for the blue color. The other two rectangles then become wider than one third because the first child view didn’t use up its full proposed width.
Update May 1, 2024: SwiftUI’s built-in containerRelativeFrame modifier (introduced after I wrote my modifier) doesn’t exhibit this behavior because it uses the size of the nearest container view as its reference, and stack views don’t count as containers in this context (which I find somewhat unintuitive, but that’s the way it is).
Order matters
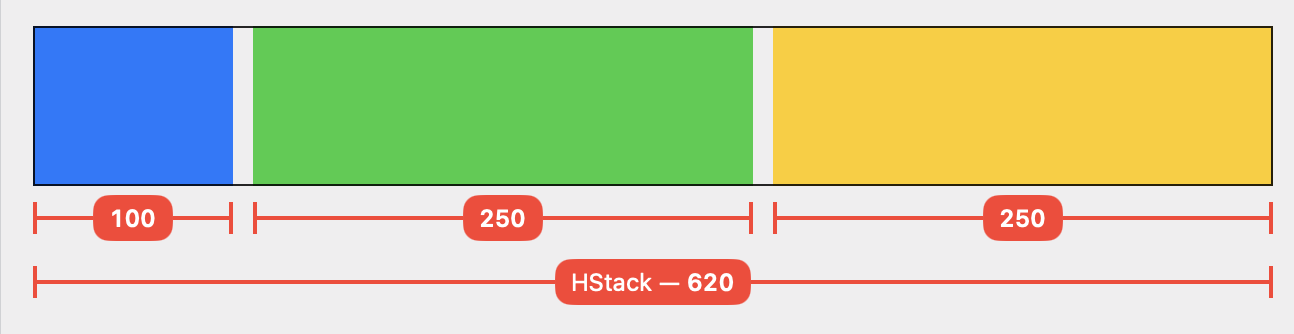
Now let’s move the modifier to the green color in the middle:
Naively, I’d expect an equivalent result: the green rectangle should become 100 pt wide, and blue and yellow should be 250 pt each. But that’s not what happens — the yellow view ends up being wider than the blue one:
I found this unintuitive at first, but it makes sense if you understand that the HStack processes its children in sequence:
The HStack proposes one third of its available space to the blue view: (620 – 20) / 3 = 200. The blue view accepts the proposal and becomes 200 pt wide.
Next up is the relativeProposed modifier. The HStack divides the remaining space by the number of remaining subviews and proposes that: 400 / 2 = 200. Our modifier halves this proposal and proposes 100 pt to the green view, which accepts it. The modifier in turn adopts the size of its child and returns 100 pt to the HStack.
Since the second subview used less space than proposed, the HStack now has 300 pt left over to propose to its final child, the yellow color.
Important: the order in which the stack lays out its subviews happens to be from left to right in this example, but that’s not always the case. In general, HStacks and VStacks first group their subviews by layout priority (more on that below), and then order the views inside each group by flexibility such that the least flexible views are laid out first. For more on this, see How an HStack Lays out Its Children by Chris Eidhof. The views in our example are all equally flexible (they all can become any width between 0 and infinity), so the stack processes them in their “natural” order.
Leftover space isn’t redistributed
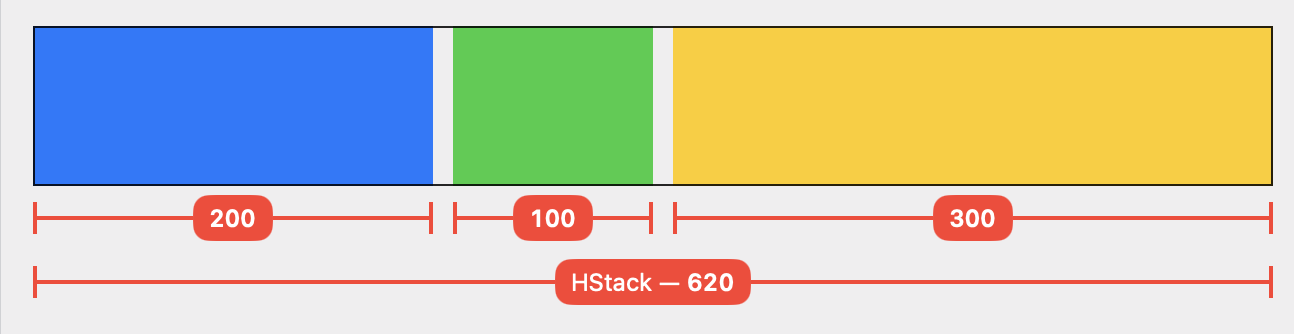
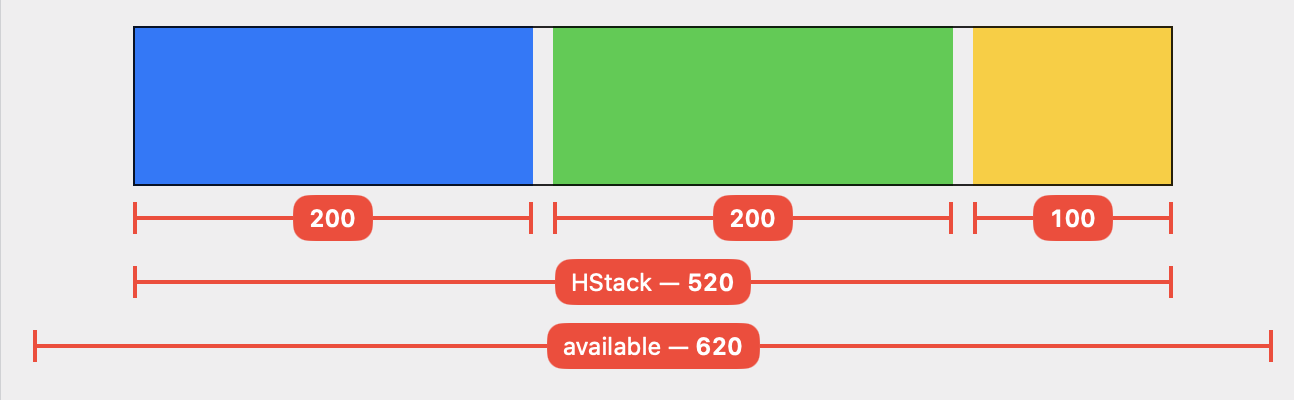
By now you may be able guess how the layout turns out when we move our view modifier to the last child view:
Blue and green each receive one third of the available width and become 200 pt wide. No surprises there.
When the HStack reaches the relativeProposed modifier, it has 200 pt left to distribute. Again, the modifier and the yellow rectangle only use half of this amount.
The end result is that the HStack ends up with 100 pt left over. The process stops here — the HStack does not start over in an attempt to find a “better” solution. The stack makes itself just big enough to contain its subviews (= 520 pt incl. spacing) and reports that size to its parent.
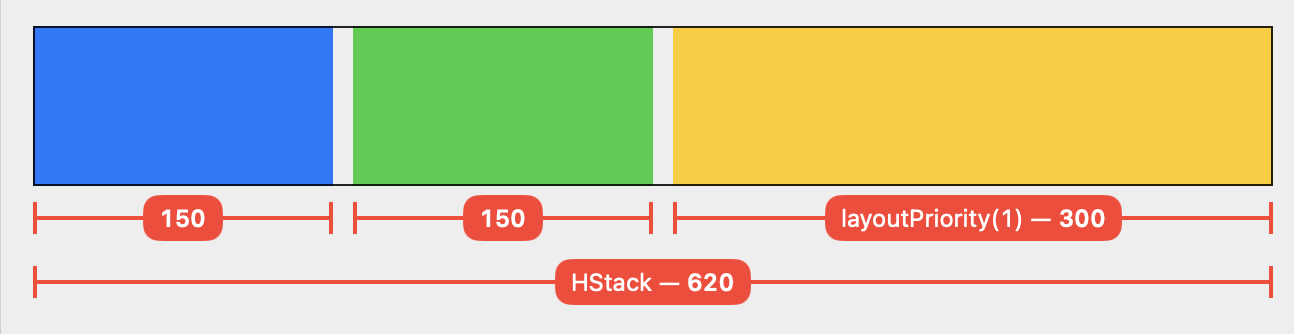
Layout priority
We can use the layoutPriority view modifier to influence how stacks and other containers lay out their children. Let’s give the subview with the relative sizing modifier a higher layout priority (the default priority is 0):
This results in a layout where the yellow rectangle actually takes up 50 % of the available space:
Explanation:
The HStack groups its children by layout priority and then processes each group in sequence, from highest to lowest priority. Each group is proposed the entire remaining space.
The first layout group only contains a single view, our relative sizing modifier with the yellow color. The HStack proposes the entire available space (minus spacing) = 600 pt. Our modifier halves the proposal, resulting in 300 pt for the yellow view.
There are 300 pt left over for the second layout group. These are distributed equally among the two children because each subview accepts the proposed size.
Conclusion
The code I used to generate the images in this article is available on GitHub. I only looked at HStacks here, but VStacks work in exactly the same way for the vertical dimension.
SwiftUI’s layout algorithm always follows this basic pattern of proposed sizes and responses. Each of the built-in “primitive” views (e.g. fixed and flexible frames, stacks, Text, Image, Spacer, shapes, padding, background, overlay) has a well-defined (if not always well-documented) layout behavior that can be expressed as a function (ProposedViewSize) -> CGSize. You’ll need to learn the behavior for view to work effectively with SwiftUI.
A concrete lesson I’m taking away from this analysis: HStack and VStack don’t treat layout as an optimization problem that tries to find the optimal solution for a set of constraints (autolayout style). Rather, they sort their children in a particular way and then do a single proposal-and-response pass over them. If there’s space leftover at the end, or if the available space isn’t enough, then so be it.
SwiftUI’s layout primitives generally don’t provide relative sizing options, e.g. “make this view 50 % of the width of its container”. Let’s build our own!
Use case: chat bubbles
Consider this chat conversation view as an example of what I want to build. The chat bubbles always remain 80 % as wide as their container as the view is resized:
The chat bubbles should become 80 % as wide as their container. Download video
Building a proportional sizing modifier
1. The Layout
We can build our own relative sizing modifier on top of the Layout protocol. The layout multiplies its own proposed size (which it receives from its parent view) with the given factors for width and height. It then proposes this modified size to its only subview. Here’s the implementation (the full code, including the demo app, is on GitHub):
/// A custom layout that proposes a percentage of its
/// received proposed size to its subview.
///
/// - Precondition: must contain exactly one subview.
fileprivate struct RelativeSizeLayout: Layout {
    var relativeWidth: Double
    var relativeHeight: Double

    func sizeThatFits(
        proposal: ProposedViewSize,
        subviews: Subviews,
        cache: inout ()
    ) -> CGSize {
        assert(subviews.count == 1, "expects a single subview")
        let resizedProposal = ProposedViewSize(
            width: proposal.width.map { $0 * relativeWidth },
            height: proposal.height.map { $0 * relativeHeight }
        )
        return subviews[0].sizeThatFits(resizedProposal)
    }

    func placeSubviews(
        in bounds: CGRect,
        proposal: ProposedViewSize,
        subviews: Subviews,
        cache: inout ()
    ) {
        assert(subviews.count == 1, "expects a single subview")
        let resizedProposal = ProposedViewSize(
            width: proposal.width.map { $0 * relativeWidth },
            height: proposal.height.map { $0 * relativeHeight }
        )
        subviews[0].place(
            at: CGPoint(x: bounds.midX, y: bounds.midY),
            anchor: .center,
            proposal: resizedProposal
        )
    }
}
Notes:
I made the type private because I want to control how it can be used. This is important for maintaining the assumption that the layout only ever has a single subview (which makes the math much simpler).
Proposed sizes in SwiftUI can be nil or infinity in either dimension. Our layout passes these special values through unchanged (infinity times a percentage is still infinity). I’ll discuss below what implications this has for users of the layout.
2. The View extension
Next, we’ll add an extension on View that uses the layout we just wrote. This becomes our public API:
extension View {
    /// Proposes a percentage of its received proposed size to `self`.
    public func relativeProposed(width: Double = 1, height: Double = 1) -> some View {
        RelativeSizeLayout(relativeWidth: width, relativeHeight: height) {
            // Wrap content view in a container to make sure the layout only
            // receives a single subview. Because views are lists!
            VStack { // alternatively: `_UnaryViewAdaptor(self)`
                self
            }
        }
    }
}
Notes:
I decided to go with a verbose name, relativeProposed(width:height:), to make the semantics clear: we’re changing the proposed size for the subview, which won’t always result in a different actual size. More on this below.
We’re wrapping the subview (self in the code above) in a VStack. This might seem redundant, but it’s necessary to make sure the layout only receives a single element in its subviews collection. See Chris Eidhof’s SwiftUI Views are Lists for an explanation.
Usage
The layout code for a single chat bubble in the demo video above looks like this:
The outermost flexible frame with maxWidth: .infinity is responsible for positioning the chat bubble with leading or trailing alignment, depending on who’s speaking.
You can even add another frame that limits the width to a maximum, say 400 points:
Here, our relative sizing modifier only has an effect as the bubbles become narrower than 400 points. In a wider window the width-limiting frame takes precedence. I like how composable this is!
If you watch the debugging guides I’m drawing in the video above, you’ll notice that the relative sizing modifier never reports a width greater than 400, even if the window is wide enough:
The relative sizing modifier accepts the actual size of its subview as its own size.
This is because our layout only adjusts the proposed size for its subview but then accepts the subview’s actual size as its own. Since SwiftUI views always choose their own size (which the parent can’t override), the subview is free to ignore our proposal. In this example, the layout’s subview is the frame(maxWidth: 400) view, which sets its own width to the proposed width or 400, whichever is smaller.
Understanding the modifier’s behavior
Proposed size ≠ actual size
It’s important to internalize that the modifier works on the basis of proposed sizes. This means it depends on the cooperation of its subview to achieve its goal: views that ignore their proposed size will be unaffected by our modifier. I don’t find this particularly problematic because SwiftUI’s entire layout system works like this. Ultimately, SwiftUI views always determine their own size, so you can’t write a modifier that “does the right thing” (whatever that is) for an arbitrary subview hierarchy.
nil and infinity
I already mentioned another thing to be aware of: if the parent of the relative sizing modifier proposes nil or .infinity, the modifier will pass the proposal through unchanged. Again, I don’t think this is particularly bad, but it’s something to be aware of.
Proposing nil is SwiftUI’s way of telling a view to become its ideal size (fixedSize does this). Would you ever want to tell a view to become, say, 50 % of its ideal width? I’m not sure. Maybe it’d make sense for resizable images and similar views.
By the way, you could modify the layout to do something like this:
If the proposal is nil or infinity, forward it to the subview unchanged.
Take the reported size of the subview as the new basis and apply the scaling factors to that size (this still breaks down if the child returns infinity).
Now propose the scaled size to the subview. The subview might respond with a different actual size.
Return this latest reported size as your own size.
This process of sending multiple proposals to child views is called probing. Lots of built-in containers views do this too, e.g. VStack and HStack.
Nesting in other container views
The relative sizing modifier interacts in an interesting way with stack views and other containers that distribute the available space among their children. I thought this was such an interesting topic that I wrote a separate article about it: How the relative size modifier interacts with stack views.
Digression: Proportional sizing in early SwiftUI betas
The very first SwiftUI betas in 2019 did include proportional sizing modifiers, but they were taken out before the final release. Chris Eidhof preserved a copy of SwiftUI’s “header file” from that time that shows their API, including quite lengthy documentation.
I don’t know why these modifiers didn’t survive the beta phase. The release notes from 2019 don’t give a reason:
I also don’t remember how these modifiers worked. They probably had somewhat similar semantics to my solution, but I can’t be sure. The doc comments linked above sound straightforward (“Sets the width of this view to the specified proportion of its parent’s width.”), but they don’t mention the intricacies of the layout algorithm (proposals and responses) at all.
containerRelativeFrame
Update May 1, 2024: Apple introduced the containerRelativeFrame modifier for its 2023 OSes (iOS 17/macOS 14). If your deployment target permits it, this can be a good, built-in alternative.
Note that containerRelativeFrame behaves differently than my relativeProposed modifier as it computes the size relative to the nearest container view, whereas my modifier uses its proposed size as the reference. The SwiftUI documentation somewhat vaguely lists the views that count as a container for containerRelativeFrame. Notably, stack views don’t count!
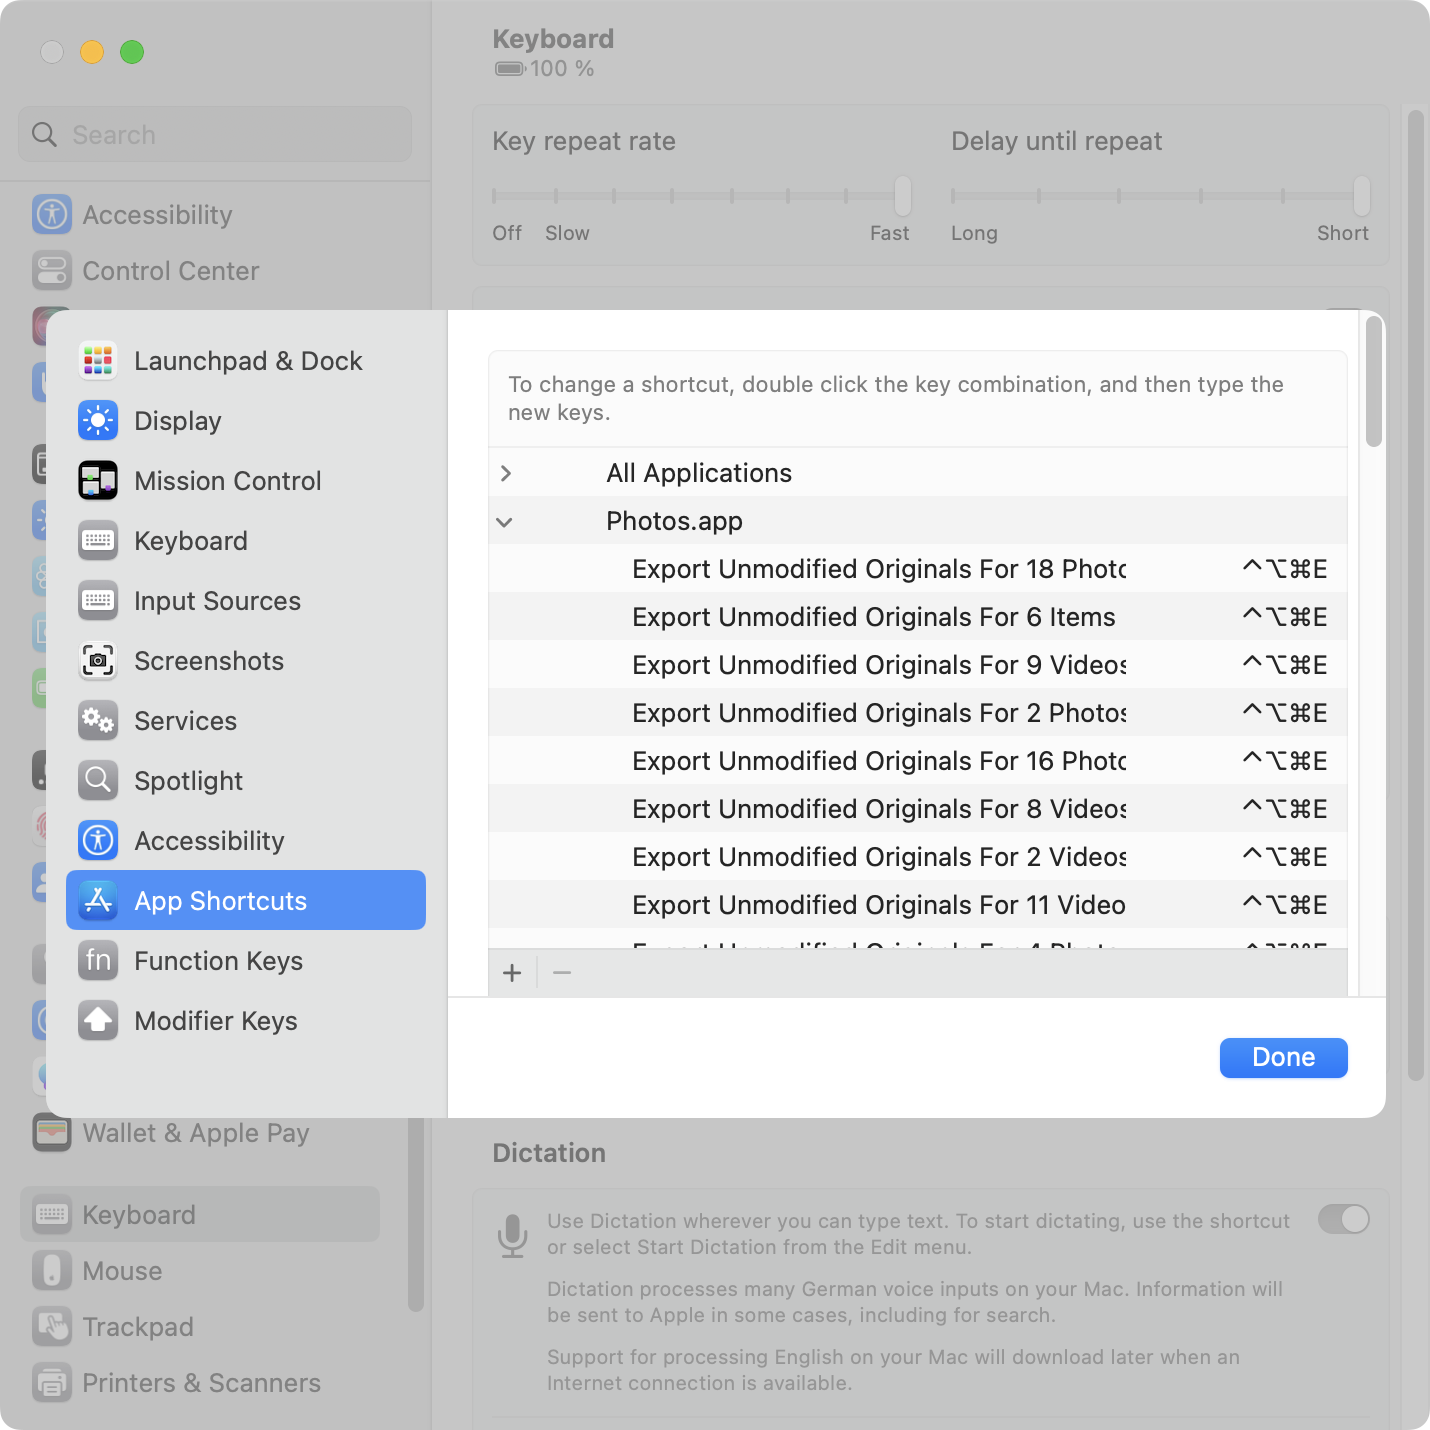
The Photos app on macOS doesn’t provide a keyboard shortcut for the Export Unmodified Original command.
macOS allows you to add your own app-specific keyboard shortcuts via System Settings > Keyboard > Keyboard Shortcuts > App Shortcuts. You need to enter the exact spelling of the menu item you want to invoke.
Photos renames the command depending on what’s selected: Export Unmodified Original For 1 Photo“ turns into ”… Originals For 2 Videos” turns into “… For 3 Items” (for mixed selections), and so on. Argh!
The System Settings UI for assigning keyboard shortcuts is extremely tedious to use if you want to add more than one or two shortcuts.
Dynamically renaming menu commands is cute, but it becomes a problem when you want to assign keyboard shortcuts.
Solution: shell script
Here’s a Bash script1 that assigns Ctrl + Opt + Cmd + E to Export Unmodified Originals for up to 20 selected items:
#!/bin/bash

# Assigns a keyboard shortcut to the Export Unmodified Originals
# menu command in Photos.app on macOS.

# @ = Command
# ^ = Control
# ~ = Option
# $ = Shift
shortcut='@~^e'

# Set shortcut for 1 selected item
echo "Setting shortcut for 1 item"
defaults write com.apple.Photos NSUserKeyEquivalents -dict-add "Export Unmodified Original For 1 Photo" "$shortcut"
defaults write com.apple.Photos NSUserKeyEquivalents -dict-add "Export Unmodified Original For 1 Video" "$shortcut"

# Set shortcut for 2-20 selected items
objects=(Photos Videos Items)
for i in {2..20}
do
  echo "Setting shortcut for $i items"
  for object in "${objects[@]}"
  do
    defaults write com.apple.Photos NSUserKeyEquivalents -dict-add "Export Unmodified Originals For $i $object" "$shortcut"
  done
done

# Use this command to verify the result:
# defaults read com.apple.Photos NSUserKeyEquivalents
Run the script. Feel free to change the key combo or count higher than 20.
Open Photos.app.
Note: There’s a bug in Photos.app on macOS 13.2 (and at least some earlier versions). Custom keyboard shortcuts don’t work until you’ve opened the menu of the respective command at least once. So you must manually open the File > Export once before the shortcut will work. (For Apple folks: FB11967573.)
I still write Bash scripts because Shellcheck doesn’t support Zsh. ↩︎
I rarely participate actively in the Swift Evolution process, but I frequently refer to evolution proposals for my work, often multiple times per week. The proposals aren’t always easy to read, but they’re the most comprehensive (and sometimes only) documentation we have for many Swift features.
The proposal title is now displayed more prominently.
New actions to copy the proposal title (hold down Command) or copy it as a Markdown link (hold down Shift + Command).
The script forwards the main metadata of the selected proposal (id, title, status, URL) to Alfred. If you want to extend the workflow with your own actions, you can refer to these variables.
Foundation overloads the pattern matching operator ~= to enable matching against error codes in catch clauses.
catch clauses in Swift support pattern matching, using the same patterns you’d use in a case clause inside a switch or in an if case … statement. For example, to handle a file-not-found error you might write:
import Foundation

do {
    let fileURL = URL(filePath: "/abc") // non-existent file
    let data = try Data(contentsOf: fileURL)
} catch let error as CocoaError where error.code == .fileReadNoSuchFile {
    print("File doesn't exist")
} catch {
    print("Other error: \(error)")
}
This binds a value of type CocoaError to the variable error and then uses a where clause to check the specific error code.
However, if you don’t need access to the complete error instance, there’s a shorter way to write this, matching directly against the error code:
      let data = try Data(contentsOf: fileURL)
- } catch let error as CocoaError where error.code == .fileReadNoSuchFile {
+ } catch CocoaError.fileReadNoSuchFile {
      print("File doesn't exist")
Foundation overloads ~=
I was wondering why this shorter syntax works. Is there some special compiler magic for pattern matching against error codes of NSError instances? Turns out: no, the answer is much simpler. Foundation includes an overload for the pattern matching operator ~= that matches error values against error codes.1
The implementation looks something like this:
public func ~= (code: CocoaError.Code, error: any Error) -> Bool {
    guard let error = error as? CocoaError else { return false }
    return error.code == code
}
The actual code in Foundation is a little more complex because it goes through a hidden protocol named _ErrorCodeProtocol, but that’s not important. You can check out the code in the Foundation repository: Darwin version, swift-corelibs-foundation version.
This matching on error codes is available for CocoaError, URLError, POSIXError, and MachError (and possibly more types in other Apple frameworks, I haven’t checked).
Double Fine Adventure was a wildly successful 2012 Kickstarter project to crowdfund the development of a point-and-click adventure game and, crucially, to document its development on video. The resulting game Broken Age was eventually released in two parts in 2014 and 2015. Broken Age is a beautiful game and I recommend you try it. It’s available for lots of platforms and is pretty cheap (10–15 euros/dollars or less). I played it on the Nintendo Switch, which worked very well.
Broken Age.
But the real gem to me was watching the 12.5-hour documentary on YouTube. A video production team followed the entire three-year development process from start to finish. It provides a refreshingly candid and transparent insight into “how the sausage is made”, including sensitive topics such as financial problems, layoffs, and long work hours. Throughout all the ups and downs there’s a wonderful sense of fun and camaraderie among the team at Double Fine, which made watching the documentary even more enjoyable to me than playing Broken Age. You can tell these people love working with each other. I highly recommend taking a look if you find this mildly interesting.
The Double Fine Adventure documentary.
The first major game spoilers don’t come until episode 15, so you can safely watch most of the documentary before playing the game (and this is how the original Kickstarter backers experienced it). However, I think it’s even more interesting to play the game first, or to experience both side-by-side. My suggestion: watch two or three episodes of the documentary. If you like it, start playing Broken Age alongside it.
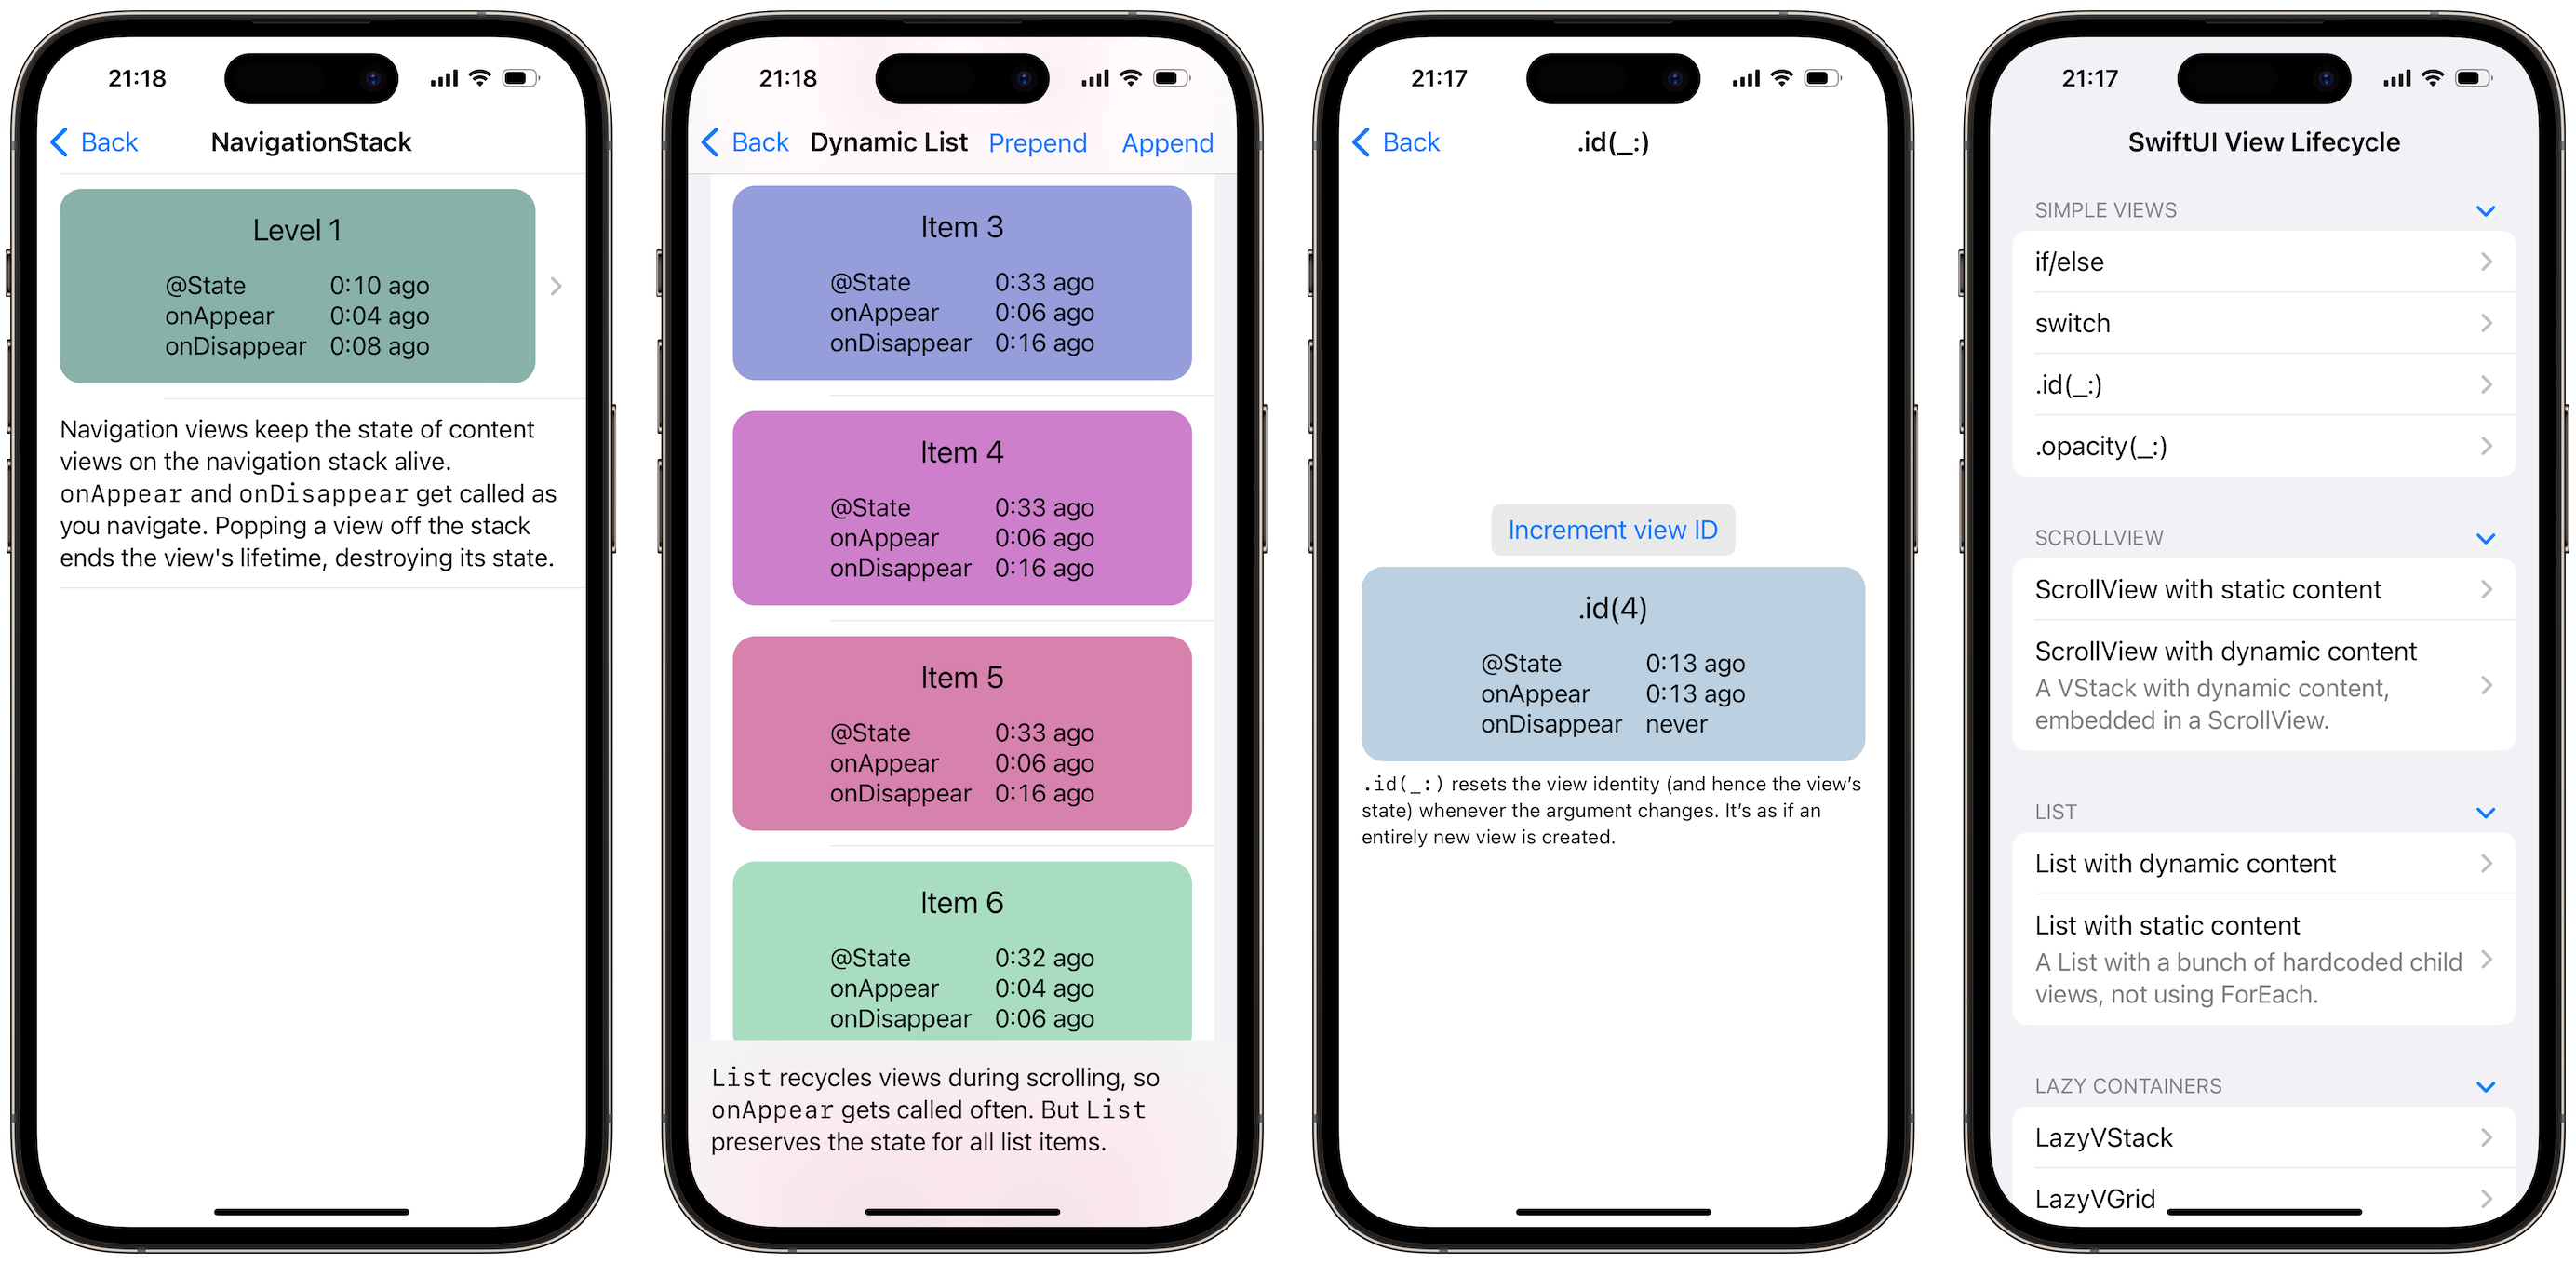
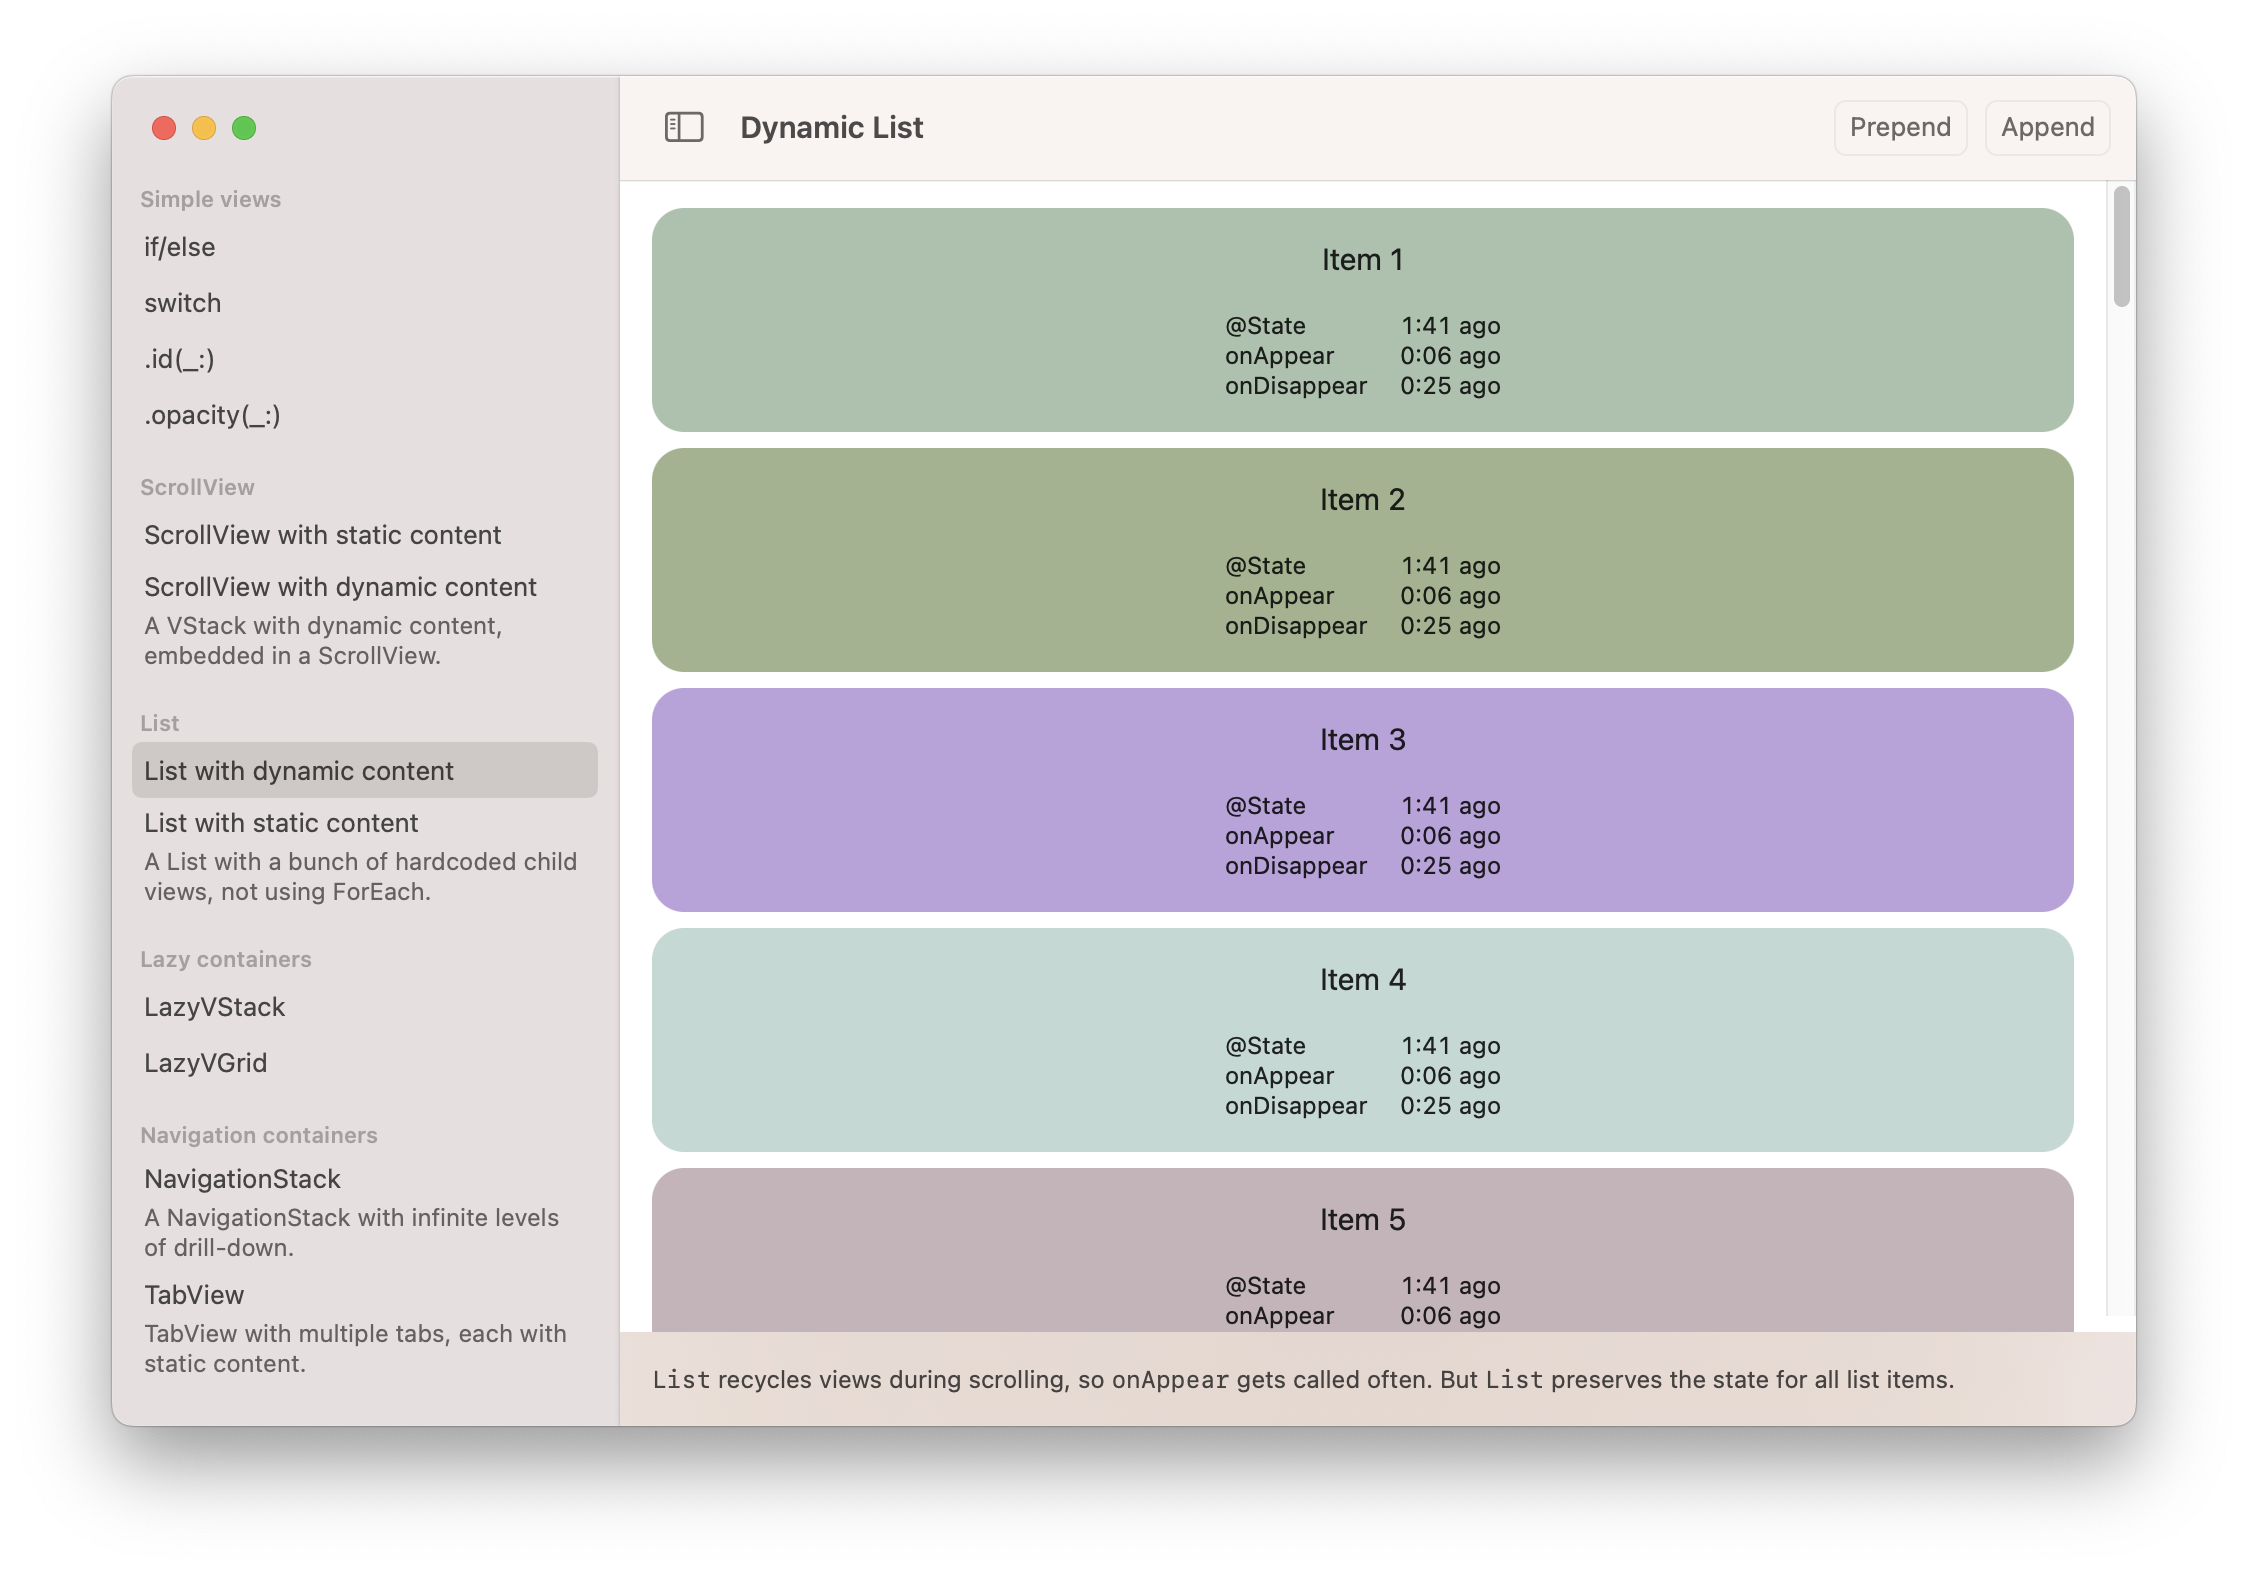
I wrote an app called SwiftUI View Lifecycle. The app allows you to observe how different SwiftUI constructs and containers affect a view’s lifecycle, including the lifetime of its state and when onAppear gets called. The code for the app is on GitHub. It can be built for iOS and macOS.
The view tree and the render tree
When we write SwiftUI code, we construct a view tree that consists of nested view values. Instances of the view tree are ephemeral: SwiftUI constantly destroys and recreates (parts of) the view tree as it processes state changes.
The view tree serves as a blueprint from which SwiftUI creates a second tree, which represents the actual view “objects” that are “on screen” at any given time (the “objects” could be actual UIView or NSView objects, but also other representations; the exact meaning of “on screen” can vary depending on context). Chris Eidhof likes to call this second tree the render tree (the link points to a 3 minute video where Chris demonstrates this duality, highly recommended).
The render tree persists across state changes and is used by SwiftUI to establish view identity. When a state change causes a change in a view’s value, SwiftUI will find the corresponding view object in the render tree and update it in place, rather than recreating a new view object from scratch. This is of course key to making SwiftUI efficient, but the render tree has another important function: it controls the lifetimes of views and their state.
View lifecycles and state
We can define a view’s lifetime as the timespan it exists in the render tree. The lifetime begins with the insertion into the render tree and ends with the removal. Importantly, the lifetime extends to view state defined with @State and @StateObject: when a view gets removed from the render tree, its state is lost; when the view gets inserted again later, the state will be recreated with its initial value.
The lifecycle monitor view displays the timestamps when certain lifecycle events last occurred.
The app allows you to observe these events in different contexts. As you click your way through the examples, you’ll notice that the timing of these events changes depending on the context a view is embedded in. For example:
An if/else statement creates and destroys its child views every time the condition changes; state is not preserved.
A ScrollView eagerly inserts all of its children into the render tree, regardless of whether they’re inside the viewport or not. All children appear right away and never disappear.
A List with dynamic content (using ForEach) lazily inserts only the child views that are currently visible. But once a child view’s lifetime has started, the list will keep its state alive even when it gets scrolled offscreen again. onAppear and onDisappear get called repeatedly as views are scrolled into and out of the viewport.
A NavigationStack calls onAppear and onDisappear as views are pushed and popped. State for parent levels in the stack is preserved when a child view is pushed.
A TabView starts the lifetime of all child views right away, even the non-visible tabs. onAppear and onDisappear get called repeatedly as the user switches tabs, but the tab view keeps the state alive for all tabs.
Lessons
Here are a few lessons to take away from this:
Different container views may have different performance and memory usage behaviors, depending on how long they keep child views alive.
onAppear isn’t necessarily called when the state is created. It can happen later (but never earlier).
onAppear can be called multiple times in some container views. If you need a side effect to happen exactly once in a view’s lifetime, consider writing yourself an onFirstAppear helper, as shown by Ian Keen and Jordan Morgan in Running Code Only Once in SwiftUI (2022-11-01).
I’m sure you’ll find more interesting tidbits when you play with the app. Feedback is welcome!
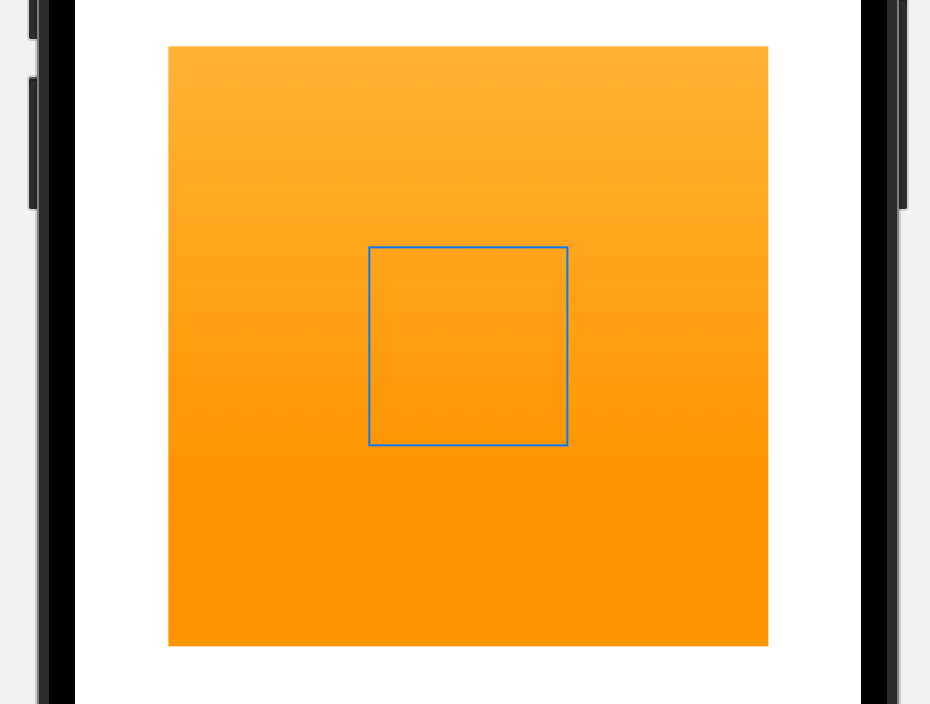
The clipped() modifier in SwiftUI clips a view to its bounds, hiding any out-of-bounds content. But note that clipping doesn’t affect hit testing; the clipped view can still receive taps/clicks outside the visible area.
I tested this on iOS 16.1 and macOS 13.0.
Example
Here’s a 300×300 square, which we then constrain to a 100×100 frame. I also added a border around the outer frame to visualize the views:
Rectangle()
  .fill(.orange.gradient)
  .frame(width: 300, height: 300)
  // Set view to 100×100 → renders out of bounds
  .frame(width: 100, height: 100)
  .border(.blue)
SwiftUI views don’t clip their content by default, hence the full 300×300 square remains visible. Notice the blue border that indicates the 100×100 outer frame:
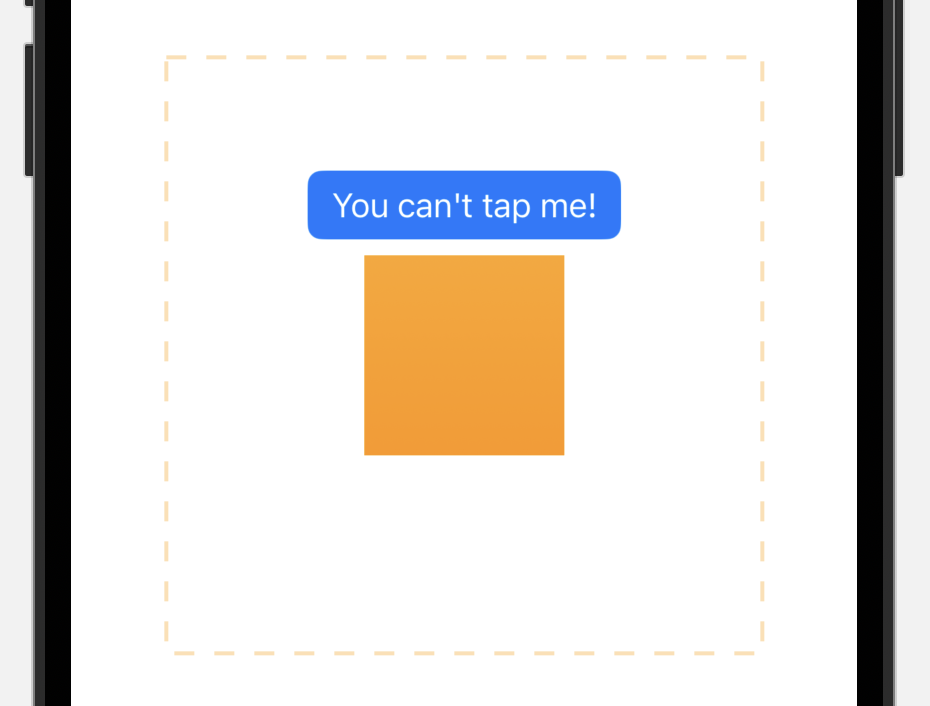
Now let’s add .clipped() to clip the large square to the 100×100 frame. I also made the square tappable and added a button:
When you run this code, you’ll discover that the button isn’t tappable at all. This is because the (unclipped) square, despite not being fully visible, obscures the button and “steals” all taps.
The dashed outline indicates the hit area of the orange square. The button isn’t tappable because it’s covered by the clipped view with respect to hit testing.
The fix: .contentShape()
The contentShape(_:) modifier defines the hit testing area for a view. By adding .contentShape(Rectangle()) to the 100×100 frame, we limit hit testing to that area, making the button tappable again:
Note that the order of .contentShape(Rectangle()) and .clipped() could be swapped. The important thing is that contentShape is an (indirect) parent of the 100×100 frame modifier that defines the size of the hit testing area.
Video demo
I made a short video that demonstrates the effect:
Initially, taps on the button, or even on the surrounding whitespace, register as taps on the square.
The top switch toggles display of the square before clipping. This illustrates its hit testing area.
The second switch adds .contentShape(Rectangle()) to limit hit testing to the visible area. Now tapping the button increments the button’s tap count.
The clipped() modifier doesn’t affect the clipped view’s hit testing region. The same is true for clipShape(_:). It’s often a good idea to combine these modifiers with .contentShape(Rectangle()) to bring the hit testing logic in sync with the UI.
Applies the given animation to this view when the specified value changes.
This sounds unambiguous to me: it sets the animation for “this view”, i.e. the part of the view tree that .animation is being applied to. This should give us complete control over which modifiers we want to animate, right? Unfortunately, it’s not that simple: it’s easy to run into situations where a view change inside an animated subtree doesn’t get animated, or vice versa.
Unsurprising examples
Let me give you some examples, starting with those that do work as documented. I tested all examples on iOS 16.1 and macOS 13.0.
1. Sibling views can have different animations
Independent subtrees of the view tree can be animated independently. In this example we have three sibling views, two of which are animated with different durations, and one that isn’t animated at all:
The two animation modifiers each apply to their own subtree. They don’t interfere with each other and have no effect on the rest of the view hierarchy:
When two animation modifiers are nested in a single view tree such that one is an indirect parent of the other, the inner modifier can override the outer animation for its subviews. The outer animation applies to view modifiers that are placed between the two animation modifiers.
In this example we have one rectangle view with animated scale and rotation effects. The outer animation applies to the entire subtree, including both effects. The inner animation modifier overrides the outer animation only for what’s nested below it in the view tree, i.e. the scale effect:
Note that we can also pass .animation(nil, value: flag) to selectively disable animations for a subtree, overriding a non-nil animation further up the view tree.
3. animation only animates its children (with exceptions)
As a general rule, the animation modifier only applies to its subviews. In other words, views and modifiers that are direct or indirect parents of an animation modifier should not be animated. As we’ll see below, it doesn’t always work like that, but here’s an example where it does. This is a slight variation of the previous code snippet where I removed the outer animation modifier (and changed the color for good measure):
struct Example3: View {
  var flag: Bool

  var body: some View {
    Rectangle()
      .frame(width: 80, height: 80)
      .foregroundColor(.orange)
      .scaleEffect(flag ? 1 : 1.5)
      .animation(.default, value: flag)
      // Don't animate the rotation
      .rotationEffect(flag ? .zero : .degrees(45))
  }
}
Recall that the order in which view modifiers are written in code is inverted with respect to the actual view tree hierarchy. Each view modifier is a new view that wraps the view it’s being applied to. So in our example, the scale effect is the child of the animation modifier, whereas the rotation effect is its parent. Accordingly, only the scale change gets animated:
Now it’s time for the “fun” part. It turns out not all view modifiers behave as intuitively as scaleEffect and rotationEffect when combined with the animation modifier.
4. Some modifiers don’t respect the rules
In this example we’re changing the color, size, and alignment of the rectangle. Only the size change should be animated, which is why we’ve placed the alignment and color mutations outside the animation modifier:
struct Example4: View {
  var flag: Bool

  var body: some View {
    let size: CGFloat = flag ? 80 : 120
    Rectangle()
      .frame(width: size, height: size)
      .animation(.default, value: flag)
      .frame(maxWidth: .infinity, alignment: flag ? .leading : .trailing)
      .foregroundColor(flag ? .pink : .indigo)
  }
}
Unfortunately, this doesn’t work as intended, as all three changes are animated:
It behaves as if the animation modifier were the outermost element of this view subtree.
5. padding and border
This one’s sort of the inverse of the previous example because a change we want to animate doesn’t get animated. The padding is a child of the animation modifier, so I’d expect changes to it to be animated, i.e. the border should grow and shrink smoothly:
struct Example5: View {
  var flag: Bool

  var body: some View {
    Rectangle()
      .frame(width: 80, height: 80)
      .padding(flag ? 20 : 40)
      .animation(.default, value: flag)
      .border(.primary)
      .foregroundColor(.cyan)
  }
}
Font modifiers also behave seemingly erratic with respect to the animation modifier. In this example, we want to animate the font width, but not the size or weight (smooth text animation is a new feature in iOS 16):
struct Example6: View {
  var flag: Bool

  var body: some View {
    Text("Hello!")
      .fontWidth(flag ? .condensed : .expanded)
      .animation(.default, value: flag)
      .font(.system(
        size: flag ? 40 : 60,
        weight: flag ? .regular : .heavy)
      )
  }
}
You guessed it, this doesn’t work as intended. Instead, all text properties animate smoothly:
In summary, the placement of the animation modifier in the view tree allows some control over which changes get animated, but it isn’t perfect. Some modifiers, such as scaleEffect and rotationEffect, behave as expected, whereas others (frame, padding, foregroundColor, font) are less controllable.
I don’t fully understand the rules, but the important factor seems to be if a view modifier actually “renders” something or not. For instance, foregroundColor just writes a color into the environment; the modifier itself doesn’t draw anything. I suppose this is why its position with respect to animation is irrelevant:
RoundedRectangle(cornerRadius: flag ? 0 : 40)
  .animation(.default, value: flag)
  // Color change still animates, even though we’re outside .animation
  .foregroundColor(flag ? .pink : .indigo)
The rendering presumably takes place on the level of the RoundedRectangle, which reads the color from the environment. At this point the animation modifier is active, so SwiftUI will animate all changes that affect how the rectangle is rendered, regardless of where in the view tree they’re coming from.
The same explanation makes intuitive sense for the font modifiers in example 6. The actual rendering, and therefore the animation, occurs on the level of the Text view. The various font modifiers affect how the text is drawn, but they don’t render anything themselves.
Similarly, padding and frame (including the frame’s alignment) are “non-rendering” modifiers too. They don’t use the environment, but they influence the layout algorithm, which ultimately affects the size and position of one or more “rendering” views, such as the rectangle in example 4. That rectangle sees a combined change in its geometry, but it can’t tell where the change came from, so it’ll animate the full geometry change.
In example 5, the “rendering” view that’s affected by the padding change is the border (which is implemented as a stroked rectangle in an overlay). Since the border is a parent of the animation modifier, its geometry change is not animated.
In contrast to frame and padding, scaleEffect and rotationEffect are “rendering” modifiers. They apparently perform the animations themselves.
Conclusion
SwiftUI views and view modifiers can be divided into “rendering“ and “non-rendering” groups (I wish I had better terms for these). In iOS 16/macOS 13, the placement of the animation modifier with respect to non-rendering modifiers is irrelevant for deciding if a change gets animated or not.
Non-rendering modifiers include (non-exhaustive list):
Mac apps built with Xcode 14.0 and 14.0.1 may contain concurrency bugs because the Swift 5.7 compiler can generate invalid code when targeting the macOS 12.3 SDK. If you distribute Mac apps, you should build them with Xcode 13.4.1 until Xcode 14.1 is released.
Here’s what happened:
Swift 5.7 implements SE-0338: Clarify the Execution of Non-Actor-Isolated Async Functions, which introduces new rules how async functions hop between executors. Because of SE-0338, when compiling concurrency code, the Swift 5.7 compiler places executor hops in different places than Swift 5.6.
Some standard library functions need to opt out of the new rules. They are annotated with a new, unofficial attribute @_unsafeInheritExecutor, which was introduced for this purpose. When the Swift 5.7 compiler sees this attribute, it generates different executor hops.
The attribute is only present in the Swift 5.7 standard library, i.e. in the iOS 16 and macOS 13 SDKs. This is fine for iOS because compiler version and the SDK’s standard library version match in Xcode 14.0. But for macOS targets, Xcode 14.0 uses the Swift 5.7 compiler with the standard library from Swift 5.6, which doesn’t contain the @_unsafeInheritExecutor attribute. This is what causes the bugs.
Note that the issue is caused purely by the version mismatch at compile-time. The standard library version used by the compiled app at run-time (which depends on the OS version the app runs on) isn’t relevant. As soon as Xcode 14.1 gets released with the macOS 13 SDK, the version mismatch will go away, and Mac targets built with Xcode 14.1 won’t exhibit these bugs.
Third-party developers had little chance of discovering the bug during the Xcode 14.0 beta phase because the betas ship with the new beta macOS SDK. The version mismatch occurs when the final Xcode release in September reverts back to the old macOS SDK to accommodate the different release schedules of iOS and macOS.
Sources
Breaking concurrency invariants is a serious issue, though I’m not sure how much of a problem this is in actual production apps. Here are all related bug reports that I know of:
This guarantee is unfortunately broken with Xcode 14 when compiling for macOS because it’s shipping with an old macOS SDK that doesn’t declare that withUnsafeContinuation inherits its caller’s execution context. And yes, there is a related actor-isolation issue because of this bug. That will be fixed by the release of the new macOS SDK.
Now, there is a bug in Xcode 14 when compiling for the macOS SDK because it ships with an old SDK. That bug doesn’t actually break any of the ordering properties above. It does, however, break Swift’s data isolation guarantees because it causes withUnsafeContinuation, when called from an actor-isolated context, to send a non-Sendable function to a non-isolated executor and then call it, which is completely against the rules. And in fact, if you turn strict sendability checking on when compiling against that SDK, you will get a diagnostic about calling withUnsafeContinuation because it thinks that you’re violating the rules (because withUnsafeContinuation doesn’t properly inherit the execution context of its caller).
Poor communication from Apple
What bugs me most about the situation is Apple’s poor communication. When the official, current release of your programming language ships with a broken compiler for one of your most important platforms, the least I’d expect is a big red warning at the top of the release notes. I can’t find any mention of this issue in the Xcode 14.0 release notes or Xcode 14.0.1 release notes, however.
Even better: the warning should be displayed prominently in Xcode, or Xcode 14.0 should outright refuse to build Mac apps. I’m sure the latter option isn’t practical for all sorts of reasons, although it sounds logical to me: if the only safe compiler/SDK combinations are either 5.6 with the macOS 12 SDK or 5.7 with the macOS 13 SDK, there shouldn’t be an official Xcode version that combines the 5.7 compiler with the macOS 12 SDK.
SwiftUI’s .task modifier inherits its actor context from the surrounding function. If you call .task inside a view’s body property, the async operation will run on the main actor because View.body is (semi-secretly) annotated with @MainActor. However, if you call .task from a helper property or function that isn’t @MainActor-annotated, the async operation will run in the cooperative thread pool.
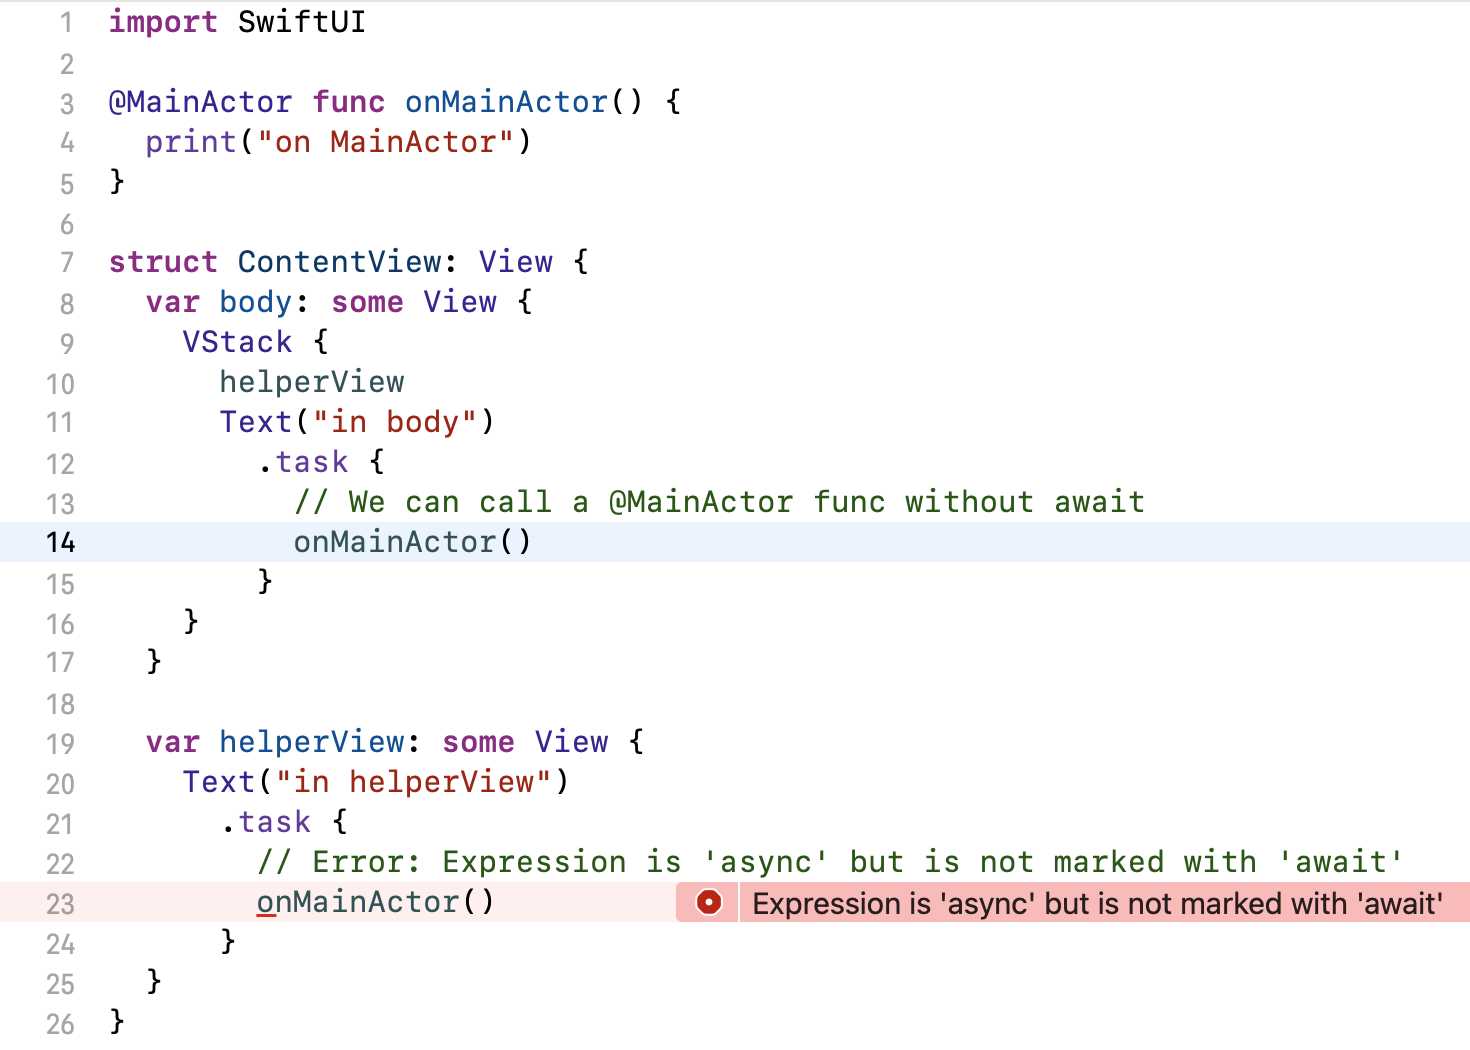
Example
Here’s an example. Notice the two .task modifiers in body and helperView. The code is identical in both, yet only one of them compiles — in helperView, the call to a main-actor-isolated function fails because we’re not on the main actor in that context:
We can call a main-actor-isolated function from inside body, but not from a helper property.
import SwiftUI

@MainActor func onMainActor() {
  print("on MainActor")
}

struct ContentView: View {
  var body: some View {
    VStack {
      helperView
      Text("in body")
        .task {
          // We can call a @MainActor func without await
          onMainActor()
        }
    }
  }

  var helperView: some View {
    Text("in helperView")
      .task {
        // ❗️ Error: Expression is 'async' but is not marked with 'await'
        onMainActor()
      }
  }
}
Why does it work like this?
This behavior is caused by two (semi-)hidden annotations in the SwiftUI framework:
The View protocol annotates its body property with @MainActor. This transfers to all conforming types.
View.task annotates its action parameter with @_inheritActorContext, causing it to adopt the actor context from its use site.
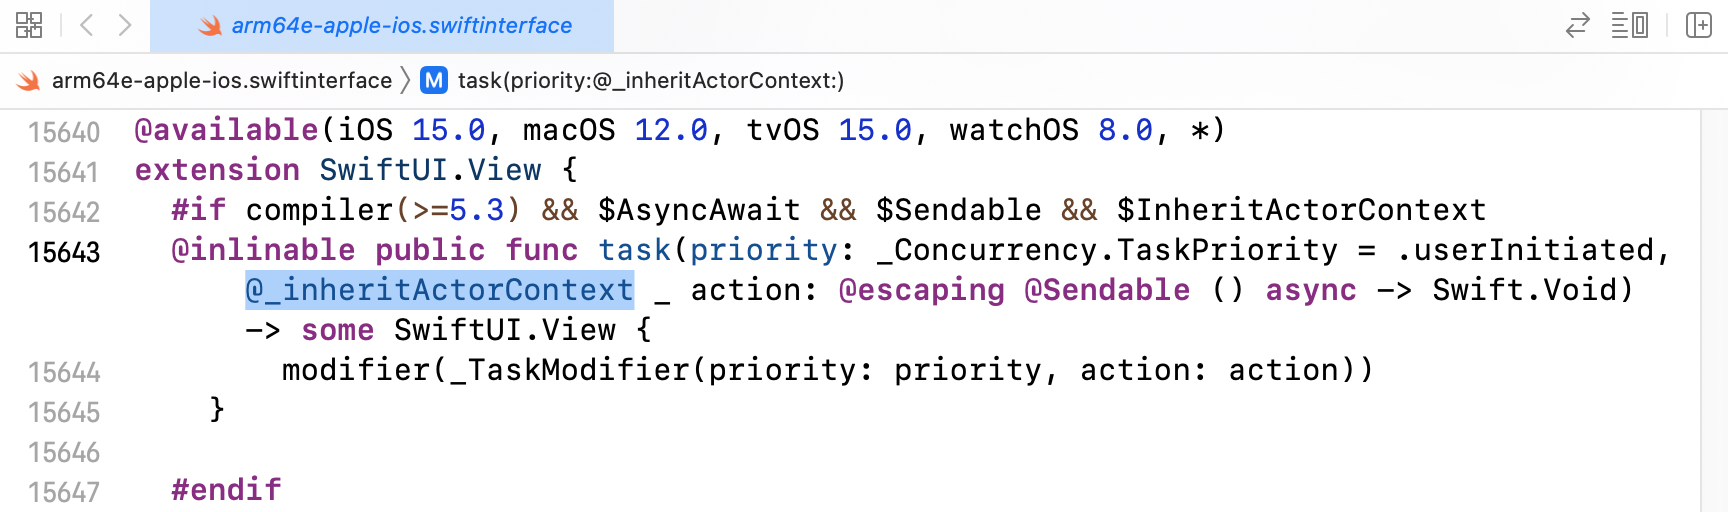
Sadly, none of these annotations are visible in the SwiftUI documentation, making it very difficult to understand what’s going on. The @MainActor annotation on View.bodyis present in Xcode’s generated Swift interface for SwiftUI (Jump to Definition of View), but that feature doesn’t work reliably for me, and as we’ll see, it doesn’t show the whole truth, either.
View.body is annotated with @MainActor in Xcode’s generated interface for SwiftUI.
SwiftUI’s module interface
To really see the declarations the compiler sees, we need to look at SwiftUI’s module interface file. A module interface is like a header file for Swift modules. It lists the module’s public declarations and even the implementations of inlinable functions. Module interfaces use normal Swift syntax and have the .swiftinterface file extension.
SwiftUI’s module interface is located at:
[Path to Xcode.app]/Contents/Developer/Platforms/iPhoneOS.platform/Developer/SDKs/iPhoneOS.sdk/System/Library/Frameworks/SwiftUI.framework/Modules/SwiftUI.swiftmodule/arm64e-apple-ios.swiftinterface
(There can be multiple .swiftinterface files in that directory, one per CPU architecture. Pick any one of them. Pro tip for viewing the file in Xcode: Editor > Syntax Coloring > Swift enables syntax highlighting.)
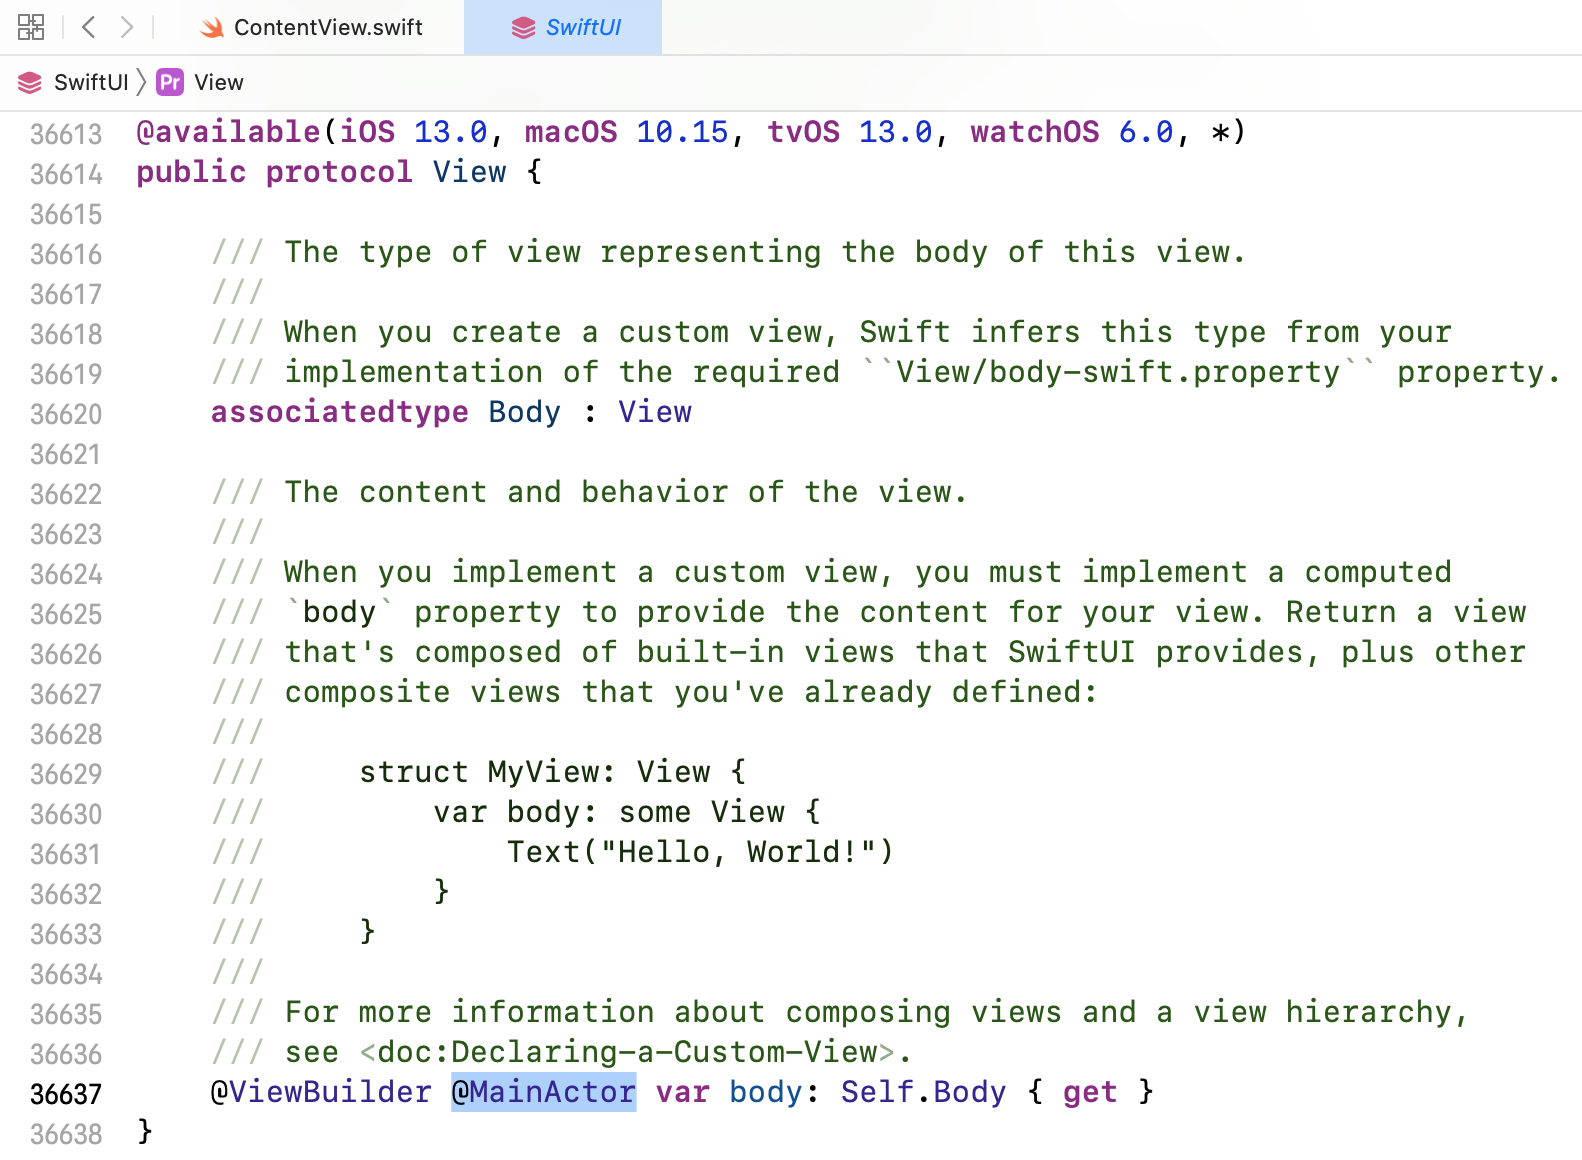
Inside, you’ll find that View.body has the @MainActor(unsafe) attribute:
@available(iOS 13.0, macOS 10.15, tvOS 13.0, watchOS 6.0, *)
@_typeEraser(AnyView) public protocol View {
  // …
  @SwiftUI.ViewBuilder @_Concurrency.MainActor(unsafe) var body: Self.Body { get }
}
And you’ll find this declaration for .task, including the @_inheritActorContext attribute:
A struct or class containing a wrapped instance property with a global actor-qualified wrappedValue infers actor isolation from that property wrapper
Update May 1, 2024:SE-0401: Remove Actor Isolation Inference caused by Property Wrappers removes the above rule when compiling in Swift 6 language mode. This is a good change because it makes reasoning about actor isolation simpler. In the Swift 5 language mode, you can opt into the better behavior with the -enable-upcoming-featureDisableOutwardActorInference compiler flags. I recommend you do.
The lesson: if you use helper properties or functions in your view, consider annotating them with @MainActor to get the same semantics as body.
By the way, note that the actor context only applies to code that is placed directly inside the async closure, as well as to synchronous functions the closure calls. Async functions choose their own execution context, so any call to an async function can switch to a different executor. For example, if you call URLSession.data(from:) inside a main-actor-annotated function, the runtime will hop to the global cooperative executor to execute that method. See SE-0338: Clarify the Execution of Non-Actor-Isolated Async Functions for the precise rules.
On Apple’s policy to hide annotations in documentation
I understand Apple’s impetus not to show unofficial API or language features in the documentation lest developers get the preposterous idea to use these features in their own code!
But it makes understanding so much harder. Before I saw the annotations in the .swiftinterface file, the behavior of the code at the beginning of this article never made sense to me. Hiding the details makes things seem like magic when they actually aren’t. And that’s not good, either.
iOS 16 beta 4 is the first SDK release that supports Live Activities. A Live Activity is a widget-like view an app can place on your lock screen and update in real time. Examples where this can be useful include live sports scores or train departure times.
These are my notes on playing with the API and implementing my first Live Activity.
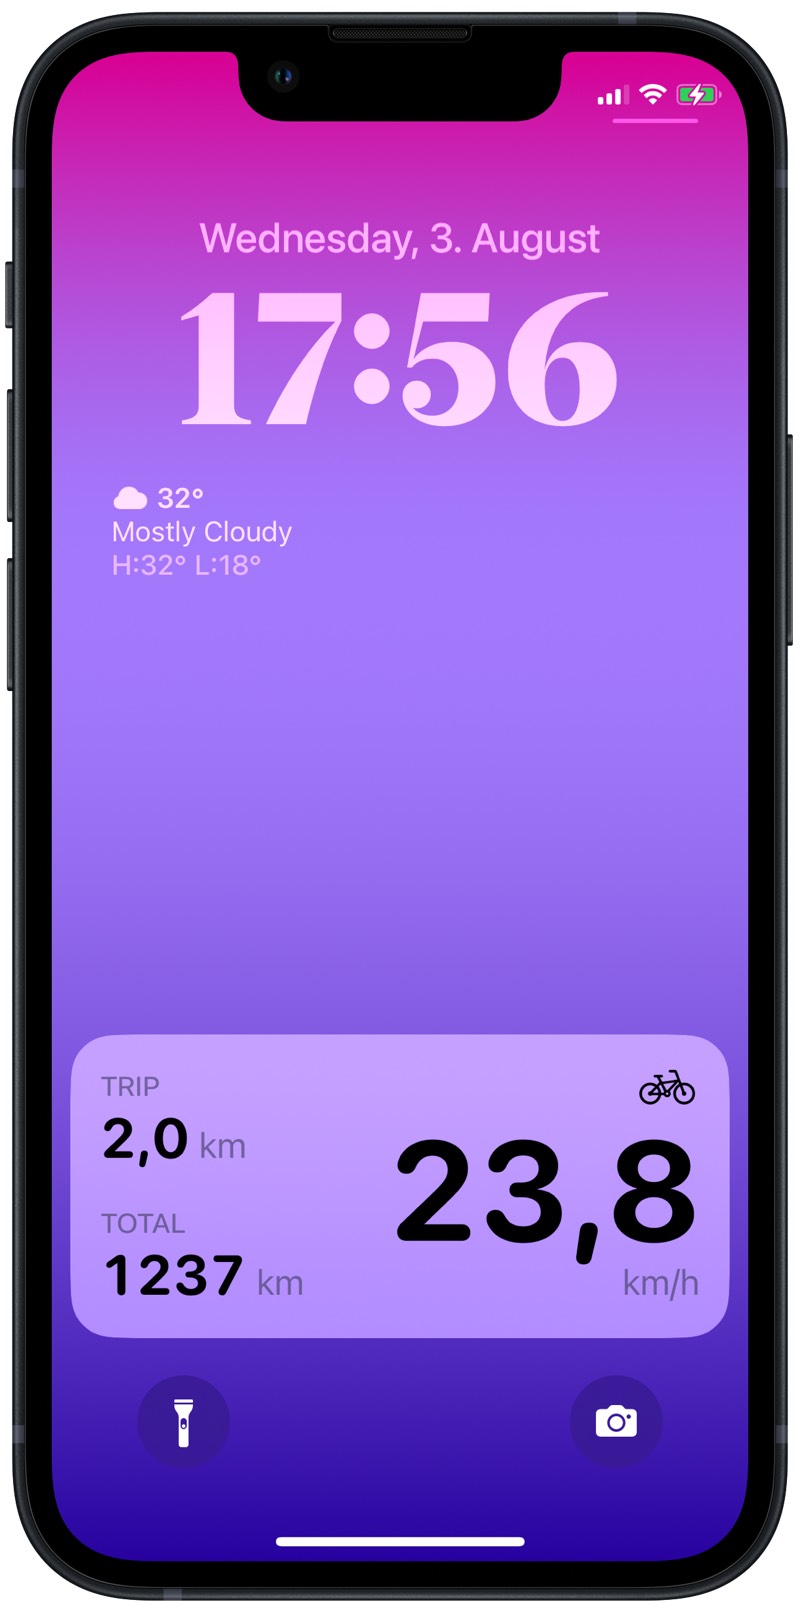
A bike computer on your lock screen
My Live Activity is a display for a bike computer that I’ve been developing with a group a friends. Here’s a video of it in action:
I haven’t talked much about our bike computer project publicly yet; that will hopefully change someday. In short, a group of friends and I designed a little box that connects to your bike’s hub dynamo, measures speed and distance, and sends the data via Bluetooth to an iOS app. The app records all your rides and can also act as a live speedometer when mounted on your bike’s handlebar. It’s this last feature that I wanted to replicate in the Live Activity.
iOS doesn’t ask the user for approval when an app wants to show a Live Activity. I found this odd since it seems to invite developers to abuse the feature, but maybe it’s OK because of the foreground requirement (see below). Plus, users can disallow Live Activities on a per-app basis in Settings.
Users can dismiss an active Live Activity from the lock screen by swiping (like a notification).
Most apps will probably need to ask the user for notification permissions to update their Live Activities.
The app must be in the foreground to start an activity
To start a Live Activity, an app must be open in the foreground. This isn’t ideal for the bike computer because the speedometer can’t appear magically on the lock screen when the user starts riding (even though iOS wakes up the app in the background at this point to deliver the Bluetooth events from the bike). The user has to open the app manually at least once.
On the other hand, this limitation may not be an issue for most use cases and will probably cut down on spamming/abuse significantly.
The app must keep running in the background to update the activity (or use push notifications)
As long as the app keeps running (in the foreground or background), it can update the Live Activity as often as it wants (I think). This is ideal for the bike computer as the app keeps running in the background processing Bluetooth events while the bike is in motion. I assume the same applies to other apps that can remain alive in the background, such as audio players or navigation apps doing continuous location monitoring.
Updating the Live Activity once per second was no problem in my testing, and I didn’t experience any rate limiting.
Most apps get suspended in the background, however. They must use push notifications to update their Live Activity (or background tasks or some other mechanism to have the system wake you up). Apple introduced a new kind of push notification that is delivered directly to the Live Activity, bypassing the app altogether. I haven’t played with push notification updates, so I don’t know the benefits of using this method over sending a silent push notification to wake the app and updating the Live Activity from there. Probably less aggressive rate limiting?
Lock screen color matching
I haven’t found a good way to match my Live Activity’s colors to the current system colors on the lock screen. By default, text in a Live Activity is black in light mode, whereas the built-in lock screen themes seem to favor white or other light text colors. If there is an API or environment value that allows apps to match the color style of the current lock screen, I haven’t found it. I experimented with various foreground styles, such as materials, without success.
I ended up hardcoding the foreground color, but I’m not satisfied with the result. Depending on the user’s lock screen theme, the Live Activity can look out of place.
The default text color of a Live Activity in light mode is black. This doesn’t match most lock screen themes.
Animations can’t be disabled
Apple’s guide clearly states that developers have little control over animations in a Live Activity:
Animate content updates
When you define the user interface of your Live Activity, the system ignores any animation modifiers — for example, withAnimation(_:_:) and animation(_:value:) — and uses the system’s animation timing instead. However, the system performs some animation when the dynamic content of the Live Activity changes. Text views animate content changes with blurred content transitions, and the system animates content transitions for images and SF Symbols. If you add or remove views from the user interface based on content or state changes, views fade in and out. Use the following view transitions to configure these built-in transitions: opacity, move(edge:), slide, push(from:), or combinations of them. Additionally, request animations for timer text with numericText(countsDown:).
It makes total sense to me that Apple doesn’t want developers to go crazy with animations on the lock screen, and perhaps having full control over animations also makes it easier for Apple to integrate Live Activities into the always-on display that’s probably coming on the next iPhone.
What surprised me is that I couldn’t find a way to disable the text change animations altogether. I find the blurred text transitions for the large speed value quite distracting and I think this label would look better without any animations. But no combination of .animation(nil), .contentTransition(.identity), and .transition(.identity) would do this.
Sharing code between app and widget
A Live Activity is very much like a widget: the UI must live in your app’s widget extension. You start the Live Activity with code that runs in your app, though. Both targets (the app and the widget extension) need access to a common data type that represents the data the widget displays. You should have a third target (a framework or SwiftPM package) that contains such shared types and APIs and that the downstream targets import.
WidgetBundle apparently doesn’t support widgets with different minimum deployment targets. If your widget extension has a deployment target of iOS 14 or 15 for an existing widget and you now want to add a Live Activity, I’d expect your widget bundle to look like this:
@main
struct MyWidgets: WidgetBundle {
  var body: some Widget {
    MyNormalWidget()
    // Error: Closure containing control flow statement cannot
    // be used with result builder 'WidgetBundleBuilder'
    if #available(iOSApplicationExtension 16.0, *) {
      MyLiveActivityWidget()
    }
  }
}
This wasn’t a problem for me because our app didn’t have any widgets until now, so I just set the deployment target of the widget extension to iOS 16.0. If you have existing widgets and can’t require iOS 16 yet, a workaround is to add a second widget extension target just for the Live Activity. I haven’t tried this, but WidgetKit explicitly supports having multiple widget extensions, so it should work:
Typically, you include all your widgets in a single widget extension, although your app can contain multiple extensions.
@MainActor is a Swift annotation to coerce a function to always run on the main thread and to enable the compiler to verify this. How does this work? In this article, I’m going to reimplement @MainActor in a slightly simplified form for illustration purposes, mainly to show how little “magic” there is to it. The code of the real implementation in the Swift standard library is available in the Swift repository.
@MainActor relies on two Swift features, one of them unofficial: global actors and custom executors.
Global actors
MainActor is a global actor. That is, it provides a single actor instance that is shared between all places in the code that are annotated with @MainActor.
All global actors must implement the shared property that’s defined in the GlobalActor protocol (every global actor implicitly conforms to this protocol):
@globalActor
final actor MyMainActor {
  // Requirements from the implicit GlobalActor conformance
  typealias ActorType = MyMainActor
  static var shared: ActorType = MyMainActor()

  // Don’t allow others to create instances
  private init() {}
}
At this point, we have a global actor that has the same semantics as any other actor. That is, functions annotated with @MyMainActor will run on a thread in the cooperative thread pool managed by the Swift runtime. To move the work to the main thread, we need another concept, custom executors.
Executors
A bit of terminology:
The compiler splits async code into jobs. A job roughly corresponds to the code from one await (= potential suspension point) to the next.
The runtime submits each job to an executor. The executor is the object that decides in which order and in which context (i.e. which thread or dispatch queue) to run the jobs.
Swift ships with two built-in executors: the default concurrent executor, used for “normal”, non-actor-isolated async functions, and a default serial executor. Every actor instance has its own instance of this default serial executor and runs its code on it. Since the serial executor, like a serial dispatch queue, only runs a single job at a time, this prevents concurrent accesses to the actor’s state.
Custom executors
As of Swift 5.6, executors are an implementation detail of Swift’s concurrency system, but it’s almost certain that they will become an official feature fairly soon. Why? Because it can sometimes be useful to have more control over the execution context of async code. Some examples are listed in a draft proposal for allowing developers to implement custom executors that was first pitched in February 2021 but then didn’t make the cut for Swift 5.5.
@MainActor already uses the unofficial ability for an actor to provide a custom executor, and we’re going to do the same for our reimplementation. A serial executor that runs its job on the main dispatch queue is implemented as follows. The interesting bit is the enqueue method, where we tell the job to run on the main dispatch queue:
We’re responsible for keeping an instance of the executor alive, so let’s store it in a global:
private let mainExecutor = MainExecutor()
Finally, we need to tell our global actor to use the new executor:
import Dispatch

@globalActor
final actor MyMainActor {
  // ...

  // Requirement from the implicit GlobalActor conformance
  static var sharedUnownedExecutor: UnownedSerialExecutor {
    mainExecutor.asUnownedSerialExecutor()
  }

  // Requirement from the implicit Actor conformance
  nonisolated var unownedExecutor: UnownedSerialExecutor {
    mainExecutor.asUnownedSerialExecutor()
  }
}
That’s all there is to reimplement the basics of @MainActor.
Conclusion
The full code is on GitHub, including a usage example to demonstrate that the @MyMainActor annotations work.
Swift’s concurrency design sees system threads as expensive and rather precious resources. …
It is therefore best if the system allocates a small number of threads — just enough to saturate the available cores — and for those threads [to] only block for extended periods when there is no pending work in the program. Individual functions cannot effectively make this decision about blocking, because they lack a holistic understanding of the state of the program. Instead, the decision must be made by a centralized system which manages most of the execution resources in the program.
This basic philosophy of how best to use system threads drives some of the most basic aspects of Swift’s concurrency design. In particular, the main reason to add async functions is to make it far easier to write functions that, unlike standard functions, will reliably abandon a thread when they need to wait for something to complete.
The default concurrent executor is used to run jobs that don’t need to run somewhere more specific. It is based on a fixed-width thread pool that scales to the number of available cores. Programmers therefore do not need to worry that creating too many jobs at once will cause a thread explosion that will starve the program of resources.
import Foundation

let str = try! AttributedString(
  markdown: "Café **Sol**",
  options: .init(interpretedSyntax: .inlineOnly)
)
AttributedString is Codable. If your task was to design the encoding format for an attributed string, what would you come up with? Something like this seems reasonable (in JSON with comments):
This stores the text alongside an array of runs of formatting attributes. Each run consists of a character range and an attribute dictionary.
Unicode is complicated
But this format is bad and can break in various ways. The problem is that the character offsets that define the runs aren’t guaranteed to be stable. The definition of what constitutes a Character, i.e. a user-perceived character, or a Unicode grapheme cluster, can and does change in new Unicode versions. If we decoded an attributed string that had been serialized
on a different OS version (before Swift 5.6, Swift used the OS’s Unicode library for determining character boundaries),
or by code compiled with a different Swift version (since Swift 5.6, Swift uses its own grapheme breaking algorithm that will be updated alongside the Unicode standard)1, the character ranges might no longer represent the original intent, or even become invalid.
Update April 11, 2024: See this Swift forum post I wrote for an example where the Unicode rules for grapheme cluster segmentation changed for flag emoji. This change caused a corresponding change in how Swift counts the Characters in a string containing consecutive flags, such as "🇦🇷🇯🇵".
Normalization forms
So let’s use UTF-8 byte offsets for the ranges, I hear you say. This avoids the first issue but still isn’t safe, because some characters, such as the é in the example string, have more than one representation in Unicode: it can be either the standalone character é (Latin small letter e with acute) or the combination of e + ◌́ (Combining acute accent). The Unicode standard calls these variants normalization forms.2 The first form needs 2 bytes in UTF-8, whereas the second uses 3 bytes, so subsequent ranges would be off by one if the string and the ranges used different normalization forms.
Now in theory, the string itself and the ranges should use the same normalization form upon serialization, avoiding the problem. But this is almost impossible to guarantee if the serialized data passes through other systems that may (inadvertently or not) change the Unicode normalization of the strings that pass through them.
A safer option would be to store the text not as a string but as a blob of UTF-8 bytes, because serialization/networking/storage layers generally don’t mess with binary data. But even then you’d have to be careful in the encoding and decoding code to apply the formatting attributes before any normalization takes place. Depending on how your programming language handles Unicode, this may not be so easy.
Foundation’s solution
The people on the Foundation team know all this, of course, and chose a better encoding format for Attributed String. Let’s take a look.3
let encoder = JSONEncoder()
encoder.outputFormatting = [.prettyPrinted, .sortedKeys]
let jsonData = try encoder.encode(str)
let json = String(decoding: jsonData, as: UTF8.self)
This is an array of runs, where each run consists of a text segment and a dictionary of formatting attributes. The important point is that the formatting attributes are directly associated with the text segments they belong to, not indirectly via brittle byte or character offsets. (This encoding format is also more space-efficient and possibly better represents the in-memory layout of AttributedString, but that’s beside the point for this discussion.)
There’s still a (smaller) potential problem here if the character boundary rules change for code points that span two adjacent text segments: the last character of run N and the first character of run N+1 might suddenly form a single character (grapheme cluster) in a new Unicode version. In that case, the decoding code will have to decide which formatting attributes to apply to this new character. But this is a much smaller issue because it only affects the characters in question. Unlike our original example, where an off-by-one error in run N would affect all subsequent runs, all other runs are untouched.
We can extract a general lesson out of this: Don’t store string indices or offsets if possible. They aren’t stable over time or across runtime environments.
On Apple platforms, the Swift standard library ships as part of the OS so I’d guess that the standard library’s grapheme breaking algorithm will be based on the same Unicode version that ships with the corresponding OS version. This is effectively no change in behavior compared to the pre-Swift 5.6 world (where the OS’s ICU library determined the Unicode version).
On non-ABI-stable platforms (e.g. Linux and Windows), the Unicode version used by your program is determined by the version of the Swift compiler your program is compiled with, if my understanding is correct. ↩︎
The Swift standard library doesn’t have APIs for Unicode normalization yet, but you can use the corresponding NSString APIs, which are automatically added to String when you import Foundation:
The environment in SwiftUI is sort of like a global dictionary but with stronger types: each key (represented by a key path) can have its own specific value type. For example, the \.isEnabled key stores a boolean value, whereas the \.font key stores an Optional<Font>.
I wrote a custom dictionary type that can do the same thing. The HeterogeneousDictionary struct I show in this article stores mixed key-value pairs where each key defines the type of value it stores. The public API is fully type-safe, no casting required.
Usage
I’ll start with an example of the finished API. Here’s a dictionary for storing text formatting attributes:
import AppKit

var dict = HeterogeneousDictionary<TextAttributes>()

dict[ForegroundColor.self] // → nil
// The value type of this key is NSColor
dict[ForegroundColor.self] = NSColor.systemRed
dict[ForegroundColor.self] // → NSColor.systemRed

dict[FontSize.self] // → nil
// The value type of this key is Double
dict[FontSize.self] = 24
dict[FontSize.self] // → 24 (type: Optional<Double>)
We also need some boilerplate to define the set of keys and their associated value types. The code to do this for three keys (font, font size, foreground color) looks like this:
Yes, this is fairly long, which is one of the downsides of this approach. At least you only have to write it once per “keyspace”. I’ll walk you through it step by step.
Notes on the API
Using types as keys
As you can see in this line, the dictionary keys are types (more precisely, metatype values):
dict[FontSize.self] = 24
This is another parallel with the SwiftUI environment, which also uses types as keys (the public environment API uses key paths as keys, but you’ll see the types underneath if you ever define your own environment key).
Why use types as keys? We want to establish a relationship between a key and the type of values it stores, and we want to make this connection known to the type system. The way to do this is by defining a type that sets up this link.
Domains aka “keyspaces”
A standard Dictionary is generic over its key and value types. This doesn’t work for our heterogeneous dictionary because we have multiple value types (and we want more type safety than Any provides). Instead, a HeterogeneousDictionary is parameterized with a domain:
// The domain (aka "keyspace")
enum TextAttributes {}

var dict = HeterogeneousDictionary<TextAttributes>()
The domain is the “keyspace” that defines the set of legal keys for this dictionary. Only keys that belong to the domain can be put into the dictionary. The domain type has no protocol constraints; you can use any type for this.
Defining keys
A key is a type that conforms to the HeterogeneousDictionaryKey protocol. The protocol has two associated types that define the relationships between the key and its domain and value type:
protocol HeterogeneousDictionaryKey {
  /// The "namespace" the key belongs to.
  associatedtype Domain
  /// The type of values that can be stored
  /// under this key in the dictionary.
  associatedtype Value
}
You define a key by creating a type and adding the conformance:
A minimal implementation of the dictionary type is quite short:
struct HeterogeneousDictionary<Domain> {
  private var storage: [ObjectIdentifier: Any] = [:]

  var count: Int { self.storage.count }

  subscript<Key>(key: Key.Type) -> Key.Value?
    where Key: HeterogeneousDictionaryKey, Key.Domain == Domain
  {
    get { self.storage[ObjectIdentifier(key)] as! Key.Value? }
    set { self.storage[ObjectIdentifier(key)] = newValue }
  }
}
Internal storage
private var storage: [ObjectIdentifier: Any] = [:]
Internally, HeterogeneousDictionary uses a dictionary of type [ObjectIdentifier: Any] for storage. We can’t use a metatype such as Font.self directly as a dictionary key because metatypes aren’t hashable. But we can use the metatype’s ObjectIdentifier, which is essentially the address of the type’s representation in memory.
Subscript
subscript<Key>(key: Key.Type) -> Key.Value?
  where Key: HeterogeneousDictionaryKey, Key.Domain == Domain
{
  get { self.storage[ObjectIdentifier(key)] as! Key.Value? }
  set { self.storage[ObjectIdentifier(key)] = newValue }
}
The subscript implementation constrains its arguments to keys in the same domain as the dictionary’s domain. This ensures that you can’t subscript a dictionary for text attributes with some other unrelated key. If you find this too restrictive, you could also remove all references to the Domain type from the code; it would still work.
Using key paths as keys
Types as keys don’t have the best syntax. I think you’ll agree that dict[FontSize.self] doesn’t read as nice as dict[\.fontSize], so I looked into providing a convenience API based on key paths.
My preferred solution would be if users could define static helper properties on the domain type, which the dictionary subscript would then accept as key paths, like so:
extension TextAttributes {
  static var fontSize: FontSize.Type { FontSize.self }
  // Same for font and foregroundColor
}
Sadly, this doesn’t work because Swift 5.6 doesn’t (yet?) support key paths to static properties (relevant forum thread).
We have to introduce a separate helper type that acts as a namespace for these helper properties. Since the dictionary type can create an instance of the helper type, it can access the non-static helper properties. This doesn’t feel as clean to me, but it works. I called the helper type HeterogeneousDictionaryValues as a parallel with EnvironmentValues, which serves the same purpose in SwiftUI.
Is the HeterogeneousDictionary type useful? I’m not sure. I wrote this mostly as an exercise and haven’t used it yet in a real project. In most cases, if you need a heterogeneous record with full type safety, it’s probably easier to just write a new struct where each property is optional — the boilerplate for defining the dictionary keys is certainly longer and harder to read.
For representing partial values, i.e. struct-like records where some but not all properties have values, take a look at these two approaches from 2018:
These use a similar storage approach (a dictionary of Any values with custom accessors to make it type-safe), but they use an existing struct as the domain/keyspace, combined with partial key paths into that struct as the keys. I honestly think that this is the better design for most situations.
Aside from the boilerplate, here are a few more weaknesses of HeterogeneousDictionary:
Storage is inefficient because values are boxed in Any containers
Accessing values is inefficient: every access requires unboxing
HeterogeneousDictionary can’t easily conform to Sequence and Collection because these protocols require a uniform element type
A new Concurrency chapter covering async/await, structured concurrency, and actors
New content on property wrappers, result builders, protocols, and generics
The print edition is now a hardcover (for the same price)
Free update for owners of the ebook
A growing book for a growing language
Updating the book always turns out to be more work than I expect. Swift has grown substantially since our last release (for Swift 5.0), and the size of the book reflects this. The fifth edition is 76 % longer than the first edition from 2016. This time, we barely stayed under 1 million characters:
Character counts of Advanced Swift editions from 2016–2022.
Many thanks to our editor, Natalye, for reading all this and improving our Dutch/German dialect of English.
Hardcover
For the first time, the print edition comes in hardcover (for the same price). Being able to offer this makes me very happy. The hardcover book looks much better and is more likely to stay open when laid flat on a table.
We also increased the page size from 15×23 cm (6×9 in) to 18×25 cm (7×10 in) to keep the page count manageable (Amazon’s print on demand service limits hardcover books to 550 pages).
I hope you enjoy the new edition. If you decide to buy the book or if you bought it in the past, thank you very much! And if you’re willing to write a review on Amazon, we’d appreciate it.