GeistHaus
log in · sign up

https://ohhappyday.com/feed

rss
20 posts
Polling state
Status active
Last polled May 18, 2026 21:15 UTC
Next poll May 19, 2026 19:28 UTC
Poll interval 86400s
ETag W/"ede535c382147611348053342dde5301"
Last-Modified Tue, 14 Mar 2023 16:49:12 GMT

Posts

Hand-Quilted Coasters
place cardsautumncoasterscuttercutting matdiydrinksfabricfallfiskarsquiltscissorssewing
Get ready for those shorter days and cooler nights by adding a little warmth and color to your home or next gathering. We partnered with Fiskars to use their collection of fabric cutting tools to craft these modern patchwork style coasters. These require a bit of machine sewing but are super beginner friendly, and the...

Read More

Show full content

Get ready for those shorter days and cooler nights by adding a little warmth and color to your home or next gathering. We partnered with Fiskars to use their collection of fabric cutting tools to craft these modern patchwork style coasters. These require a bit of machine sewing but are super beginner friendly, and the final hand-quilted details are the perfect thing to work on while curled up on the sofa with your favorite fall flick. Once finished, set these out and serve up some seasonal drinks to kick off the season!

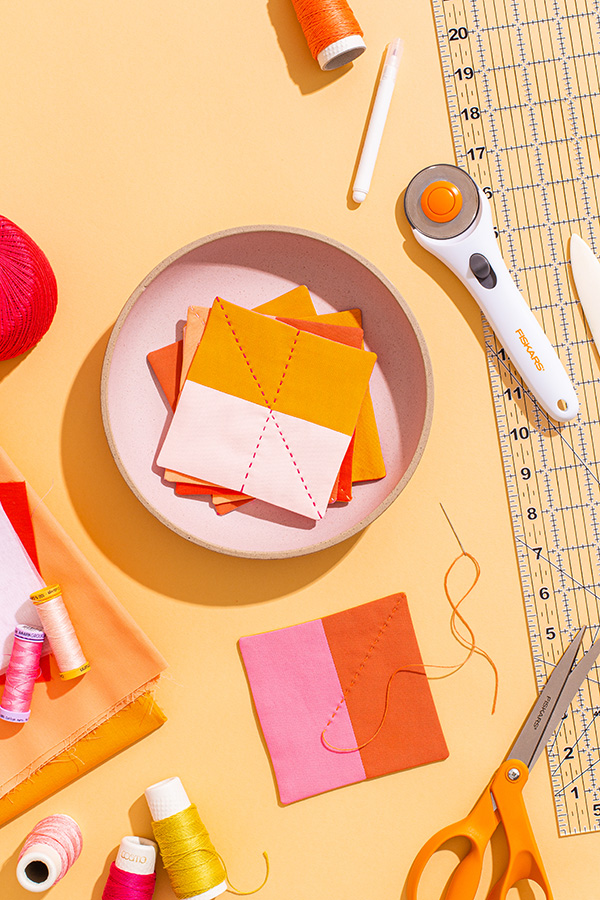
Materials needed: Quilting cotton in multiple colors (orange, terracotta, light pink, apricot, pink), Lightweight interfacing (we used cotton organdy), Fiskars 45mm Stick Rotary Cutter, Fiskars 18″ x 24″ Cutting Mat, Fiskars 6” x 24” Acrylic Ruler, Fiskars Orange Handle Scissors, Sewing machine & thread, Iron/ironing board, Sashiko thread (or embroidery thread), Pins (optional), Water soluble fabric pen (optional), Point turner (or bamboo skewer)

STEP 1: Cut 5” squares from quilting cotton and interfacing using a clear ruler and rotary cutter. For 1 coaster you will need 3 squares of quilting cotton in different colors, and 1 square of interfacing.

STEP 2: Stack two squares of quilting cotton and sew a straight line down the center. You can use a clear ruler and fabric pen to mark the line to make it easier to sew. Once sewn, press open the seam.

STEP 3: On top of the quilted piece, stack one additional square of quilting cotton, followed by the square of interfacing. Secure layers with pins.

STEP 4: Using a ⅜” seam allowance, stitch around the outside of the layers, leaving a 1.5” gap along one side. Once sewn, trim corners as shown and press seam allowances inward.

STEP 5: Flip coaster right side out, using a point turner or bamboo skewer to make corners sharp. Press flat.

STEP 6: Add hand quilted details, using a running stitch down the center of the coaster with sashiko thread. Tip: use a water soluble fabric pen to mark a straight line before stitching. Close seam with invisible hand stitches or fabric glue.

This post is sponsored by Fiskars.

https://ohhappyday.com/?p=65042
Extensions
5 Ways to Fall
partycraftdiyfallombrepiespumpkinrainbowroundupsmores
We are rounding up some of our favorite Fall throwbacks. This also means Halloween is around the corner and it’s time to start costume brainstorming – any suggestions? In the meantime, here are a few of our favorite DIYs to start your Fall Checklist! Rainbow Pumpkin Centerpiece – an OHD classic! Ombre Leaves Backdrop –...

Read More

Show full content

We are rounding up some of our favorite Fall throwbacks. This also means Halloween is around the corner and it’s time to start costume brainstorming – any suggestions? In the meantime, here are a few of our favorite DIYs to start your Fall Checklist!

  1. Rainbow Pumpkin Centerpiece – an OHD classic!
  2. Ombre Leaves Backdrop – also check out the Ombre Pumpkin Centerpiece.
  3. Pumpkin Chip Whoopie Pies – YUM!
  4. Colorful S’mores Party – with the perfect gingham backdrop.
  5. Giant Jack O’ Lantern Balloons – no carving needed.
https://ohhappyday.com/?p=65029
Extensions
No-Sew Modern Quilt Favor Boxes
favorsdiyfallfavor boxfavor boxesfiskarsmodernno-sewpatchworkpinkquilt
Fall is right around the corner and nothing says cozy like warm hues and patchwork quilts! We drew inspiration from both for these sweet favor boxes we created with our favorite Fiskars tools. Based on modern, geometric quilt designs these involve some precise cutting, but allow you to skip the sewing machine. Fill them with...

Read More

Show full content

Fall is right around the corner and nothing says cozy like warm hues and patchwork quilts! We drew inspiration from both for these sweet favor boxes we created with our favorite Fiskars tools. Based on modern, geometric quilt designs these involve some precise cutting, but allow you to skip the sewing machine. Fill them with colorful treats or small school supplies (like erasers, pencil sharpeners, or stickers) for those autumn festivities you’ve got brewing.

Materials needed: Quilting cotton in multiple colors (colors below), 4” Chipwood favor boxes, Fiskars 45mm Stick Rotary Cutter, Fiskars 18″ x 24″ Cutting Mat, Fiskars 6” x 24” Acrylic Ruler, Fiskars Orange Handle Scissors, Freezer paper, Parchment paper, Iron/heat safe work surface, Paint brush, Mod Podge or white glue

Step 1: Using a rotary cutter and clear ruler, measure and cut rectangles measuring 3.5” by 4.5”  from fabric, in a variety of colors. (Here’s our color palette – orange, terracotta, light pink, apricot, pink.) To minimize fraying, cut fabric on the bias (diagonal to the grain). Make additional cuts to some of the rectangles—cut in half diagonally to form triangles, or in half vertically to form narrow rectangles.

Step 2: Place a piece of freezer paper on a heat-safe work surface, with the shiny side facing up. On top, arrange fabric shapes from Step 1 to form a quilt-like design, making sure corners and edges are lined up and flush. Cover with parchment paper and gently press with a hot iron to secure the fabric pieces to the freezer paper, working in sections if necessary to prevent shifting.

Step 3: Brush the lid of a wood favor box with Mod Podge and adhere face down on the fabric “quilt” from Step 2. Let dry.

Step 4: Cut away the excess “quilt” and peel off freezer paper from the box lid. Brush the top surface of the lid with an additional coat of Mod Podge and let dry.

***Tip: To make multiple favor boxes at once, make a larger “quilt” collage in Step 2.

This post is sponsored by Fiskars.

https://ohhappyday.com/?p=65007
Extensions
Candy Coffins
halloweencandycandy favorscoffinsdecordecorationfavorskidspaintparty decorparty favorsseasonalsponsored
Fall calls for pumpkin spice, bonfires, and spooky décor! When we think of fall crafting with the kids, it definitely involves including them in party planning and creating decorations or favors. These adorable little coffins from Walmart could definitely serve double duty! Fill them with candy, and put one at each place setting so guests...

Read More

Show full content

Fall calls for pumpkin spice, bonfires, and spooky décor! When we think of fall crafting with the kids, it definitely involves including them in party planning and creating decorations or favors. These adorable little coffins from Walmart could definitely serve double duty! Fill them with candy, and put one at each place setting so guests can take them home at the end of the night. You could even use alphabet stickers on the inside of the lids to create place cards. Kids can use these acrylic paints to decorate the coffins in their own style, or follow the simple steps below to create our creepy cobweb vibe.

Materials needed: 6” coffin boxes, acrylic craft paint set (bright), acrylic craft paint (black), foam sponge brushes, paintbrush, candy, party supplies

STEP 1: Use a sponge brush to cover the unfinished coffins in black acrylic paint. Allow to dry.

STEP 2: Use a skinny paintbrush to paint “spokes” on the lid going from a center point to the edges of the coffin. Starting near the center point, paint little scallops connecting the spokes. Create several more layers of scallops going up the spokes, leaving little ends extending beyond the scallops. Allow to dry.

STEP 3: Fill the coffins with Halloween candy, add a name inside the lid (or don’t!), and put a coffin at each place setting.

SHOP THIS POST: Kinder eggs, candy corn, Dum Dums lollipops, spiders

This post is sponsored by Walmart.

https://ohhappyday.com/?p=64870
Extensions
Toast Boards with Too Good To Go
dinner partiesfoodbreaddinnergrocerylunchtoasttoast boardtoast toppingstoo good to gowaste freezero waste
We’re excited to partner on this post with Too Good To Go. They are a clever app that connects you with local restaurants and grocery stores with surplus food to help fight food waste, which contributes to 10% of all global greenhouse gas emissions. On the app, we chose a gourmet grocery store and a...

Read More

Show full content

We’re excited to partner on this post with Too Good To Go. They are a clever app that connects you with local restaurants and grocery stores with surplus food to help fight food waste, which contributes to 10% of all global greenhouse gas emissions. On the app, we chose a gourmet grocery store and a juice store and then picked up a “surprise bag” of groceries for a third of the retail price. Read on to see what we made and our top tips for hosting your next waste free gathering.

The bread we toasted all at one time in the oven and then we used the different ingredients and a few things we had in the fridge to make all the toppings–including basil and tomatoes from our garden! It’s fun to even keep a basket of toasted bread with toppings laid out so people can make their own creations.

Here are our top tips for your next zero waste gathering: 

  1. Download the Too Good To Go app here!
  2. Find a local grocery store or restaurant. We love the “surprise bags” because it’s a bit of a surprise to see what we end up with AND a great way to check out a new spot in the neighborhood.
  3. Pull staples from your pantry like bread, seasoning, dips, etc. to complete your meal.
  4. Arrange things in cute dishes (by color if you’re feeling extra creative). We like to mix a variety of them.
  5. Grab a fun tablecloth – make it a picnic outdoors if the weather’s right!
  6. BYOB: Ask everyone to bring their own reusable bags and tupperware for any leftovers.
  7. Repeat as often as possible. PRO TIP: Heart your favorite places on the app to make it easy to find each time.

These are some of our favorite ideas for toppings:
-Ricotta with prosciutto and hot honey
-Avocado with lemon and salt topped with sprouts
-Tomatoes, basil, salt, and olive oil
-Mayo, sliced eggs, cucumbers and fresh dill
-Melted cheese with sautéed mushrooms
-Soppressata and jalapeños

This post is sponsored by Too Good To Go.

https://ohhappyday.com/?p=64859
Extensions
7 Tips for Putting Together a Guest Room
room makeoversbedroomfarmhouseguest bedroomguest roomhostessnew yorkpurpleroom makeoverroom refreshtips
We’re renovating a farmhouse about an hour outside New York City and I’m so excited to be able to host friends there. I think I’m actually more excited about the guest rooms than any of the other spaces. The bedrooms won’t need any more renovations (the kitchen and bathrooms are still being worked on) so...

Read More

Show full content

We’re renovating a farmhouse about an hour outside New York City and I’m so excited to be able to host friends there. I think I’m actually more excited about the guest rooms than any of the other spaces. The bedrooms won’t need any more renovations (the kitchen and bathrooms are still being worked on) so I’ve slowly started putting the rooms together.

7 Tips for Putting Together a Guest Room | Oh Happy Day

We’ve partnered with Purple to share our tips for putting together a guest bedroom. Let us know what you’d add to the list.

1. Add a luggage rack to make it feel like you’re a professional host.

7 Tips for Putting Together a Guest Room | Oh Happy Day


2. Make the bed with a comfy mattress and pillow from Purple! Side Note: Get 10% off your Purple orders with code OHD10 now through November 4, 2021.

7 Tips for Putting Together a Guest Room | Oh Happy Day


3. Put water on bedside table and a chocolate on pillow so it feels like turndown service at a fancy hotel.

7 Tips for Putting Together a Guest Room | Oh Happy Day


4. Steal a sprig from the yard to a touch of wild.

7 Tips for Putting Together a Guest Room | Oh Happy Day


5. Add a card with WiFi and information about stay. It’s always so nice when you don’t have to ask.

7 Tips for Putting Together a Guest Room | Oh Happy Day


6. Pick out books the guest would like from your library and leave in the room.

7 Tips for Putting Together a Guest Room | Oh Happy Day


7. Always sleep in the guest room at least once to give it a dry run. You’ll notice if it gets cold, or you need blackout shades, etc.


This post is sponsored by Purple. 
Styling and photography by Kate Jordan for Oh Happy Day.

https://ohhappyday.com/?p=64776
Extensions
7 Favorite Iceland Experiences
traveldivorce tripexperiencesguideicelanditineraryreykjavikvacation
I recently planned a girls trip to Iceland. We technically called it a “Divorce Trip” because a couple of my friends were getting divorced and we wanted to plan something fun they could look forward to. (On a sidenote: I’m a big believer in this–It doesn’t have to be an overcomplicated international trip, you can...

Read More

Show full content

I recently planned a girls trip to Iceland. We technically called it a “Divorce Trip” because a couple of my friends were getting divorced and we wanted to plan something fun they could look forward to. (On a sidenote: I’m a big believer in this–It doesn’t have to be an overcomplicated international trip, you can plan a hiking trip or an easy weekend staycation–but when I’m going through a tricky time giving myself something to look forward to is so important.) We did a recap on Ashlynn’s podcast right here.

9 Favorite Iceland Experiences | Oh Happy Day

Jen who works with me at Oh Happy Day loves research and helped me plan a great itinerary. We decided to go all the way around the island which meant we did a lot of driving. I think if your trip is ~10 days or less I probably would just cover half the island so you can spend more time hiking and sitting in hot springs. But I really enjoyed seeing everything and it was honestly one of the best trips of my life.

I’m putting a version of our itinerary below but I thought I would highlight my Seven Favorite Experiences as well.

9 Favorite Iceland Experiences | Oh Happy Day

7. Klettar Tower. Jen found this funny lighthouse to stay in. It was seriously my favorite thing. If I ever come back with my family, I would stay here again for a few nights. The whole top floor is a 360 degree windows so you can watch the Northern Lights in the winter. We loved it.

9 Favorite Iceland Experiences | Oh Happy Day

6. Vök Baths. Iceland is famous for its geothermal bath culture. We made it a goal to try as many as we could. Vök Baths was a standout experience for me for a few reasons. If you are based in Reykjavik, it is harder to get to: it is on the East side of the Island and is fairly new. The pools are very very warm (all the pools are varying temperatures) but what’s amazing is they are built on a cold lake. So you can jump from the pier into the freezing water and get out and get in the hot water. I generally dislike any form of cold water and I didn’t realize how much I would love it. If you’re on that side of the island, don’t miss it.

9 Favorite Iceland Experiences | Oh Happy Day

5. Volcano. There isn’t always an active volcano in Iceland but luckily there was one when we were there. It was so breathtaking to see the earth being formed. It was truly one of the coolest experiences of my life. We splurged on a helicopter ride and landed close by but usually there are options to hike there as well.

9 Favorite Iceland Experiences | Oh Happy Day

4. Kolaportið Flea Market. Reykjavik isn’t a large city but I always check for flea markets wherever I’m traveling to. This one is open on Saturdays and Sundays and was so fun to shop. It isn’t big and smells a little funny but I got some treasures and souvenirs to take home to my family. I loved it.

9 Favorite Iceland Experiences | Oh Happy Day

3. Friðheimar Tomato Greenhouse. My friend Heather told me about this place. The majority of Iceland’s fresh produce is grown in greenhouses. This place turned its greenhouse into a restaurant. It is such a cool atmosphere. It was one of our favorite meals of the whole trip.

9 Favorite Iceland Experiences | Oh Happy Day

2. Matur og Drykkur. The last night of the trip we got reservations here. It was excellent. The cocktails and the meal were wonderful. Highly recommend.

9 Favorite Iceland Experiences | Oh Happy Day

1. Hot Springs. We tried a lot of geothermal pools and even stopped at some local community pools. It was so fun. Highly recommend planning your trip around it.

9 Favorite Iceland Experiences | Oh Happy Day
7 Favorite Iceland Experiences | Oh Happy Day

Here is a sample of our itinerary.

  • DAY 5 / East Coast
    • ACTIVITY: Diamond Beach
    • ACTIVITY: Jokulsarlon Glacier Lagoon – Zodiac Boat Ride
    • EAT: Kaffi Hornid, lobster
    • ACTIVITY: Vestrahorn Mountain, Hike
    • ACTIVITY: Sveinsstekksfoss Waterfalls
    • ACTIVITY: Folaldafoss Waterfalls
    • ACTIVITY: Hengifoss and Litlanesfoss Waterfall
    • ACTIVITY: Vok Baths
    • ACTIVITY: Egilsstadir
    • EAT: Aldan
    • ACTIVITY: Borgarfjörður Eystri – Puffins
    • STAY: Hotel 1001 Nott

9 Favorite Iceland Experiences | Oh Happy Day
https://ohhappyday.com/?p=64792
Extensions
Summer Refresh
inspirationfood traysglassespicnicsnacksstoragesummersummer checklistsummer partysummertimetowels
We’ve partnered with Walmart for our summer essentials! They have a new section that features curated trend forward home-goods at really great price points so you can refresh your home from season to season. And the best part: delivery is super quick! We picked a few items to spruce up our new outdoor patio. This...

Read More

Show full content

We’ve partnered with Walmart for our summer essentials! They have a new section that features curated trend forward home-goods at really great price points so you can refresh your home from season to season. And the best part: delivery is super quick! We picked a few items to spruce up our new outdoor patio.

Summer Refresh | Oh Happy Day

This woven bowl set is perfect for fruits and snacks. We also stocked up on rattan trays to serve icy drinks on a hot day.

Summer Refresh | Oh Happy Day

We got a citrus squeezer this year and it’s been put to great use – homemade refreshments all day! We always make extra so there’s a pitcher on hand all the time. Also adding these pretty glasses to our collection. 

Summer Refresh | Oh Happy Day

We’ve been using our blow-up pool and decided to level up by adding this beautiful storage basket of striped towels so we can dry off and lay in the sun to get our Vitamin D. 

Summer Refresh | Oh Happy Day

We’re squeezing all the fun out of the rest of the summer. What are your summer plans?

SHOP THIS POST: Rattan Tray / Rose Glass Tumbler Set / Glass Pitcher / Woven Bowls / Striped Towels / Open Weave Basket

Summer Refresh | Oh Happy Day

This post is sponsored by Walmart. Thank you for supporting our partners that help keep Oh Happy Day running.

https://ohhappyday.com/?p=64790
Extensions
3 Simple Luxuries for Mother’s Day
mother's daybeddingbedroombookscutting machinedaisyfloral designflowersgift ideasgiftshomehome decormompajamaspillowcasepjspurplesheetssleepy jones
Growing up, the best way to show my mom we cared was letting her catch a few extra Zs on a weekend morning so I always associate Mother’s Day with restful time at home and simple, everyday kinds of luxuries—like someone making you coffee, a freshly made bed or a new set of PJs. For...

Read More

Show full content

Growing up, the best way to show my mom we cared was letting her catch a few extra Zs on a weekend morning so I always associate Mother’s Day with restful time at home and simple, everyday kinds of luxuries—like someone making you coffee, a freshly made bed or a new set of PJs. For this post, we partnered with Purple to explore a few fun ways to delight mom this year. Read on for some easy ideas and a daisy-inspired DIY. AND we also have a special discount code to get you started on your Mother’s Day gifting.

LOUNGE-WORTHY GIFTING
We love the idea of gifting mom comfy clothes, a great new read and most importantly, some downtime to enjoy them. A beautiful book is such a foolproof gift—we love that you can really tailor it to the recipient’s interests. We’ve been curating a list of some of our favorites here. These pajamas in spring-ready pastels from the Sleepy Jones + Purple collaboration has us convinced they are a great gifting option. This set of sheets made from the same, knit jersey material, and this pillow insert would make a really great set as well. All together they make for the ultimate relaxing retreat.

BEDROOM BLOOMS
Adding fresh cut flowers to overlooked spaces is my favorite way to make things feel special—they just have a way of making you slow down to enjoy them while they bloom. For an extra element of surprise, sneak a bouquet onto mom’s nightstand and let her be surprised when she wakes up.

DAISY DIY
Daisy prints are officially back from the ‘90s and it’s kind of the best. They feel cheerful and upbeat, and because they’re a bit of a neutral they look great layered on pretty much any solid color. We used a craft cutter and iron-on vinyl to fill this pajama pocket with posies and scatter blooms over a matching pillowcase. You can use our provided template to add this fun detail to basically any pocket—whether you’re adding this to a tee, a tote, or a jacket, it adds a sweet and subtle personal touch. Full instructions below.

Materials Needed: Garment with pocket, iron-on vinyl in 2-3 colors, craft cutter, iron and ironing board, parchment paper, scissors, Daisy Artwork Template for pocket, Daisy Artwork Template for pillowcase

STEP 1: Measure the pocket opening on your clothing item.

STEP 2: Download the provided artwork, and size it to fit your garments pocket appropriately using your craft cutter’s software. Cut the design using 3 different colors of vinyl—one color each for the flowers, flower centers and stems.

STEP 3: Press your garment before applying vinyl to create a smooth and even surface. Follow the manufacturer’s instructions and apply the vinyl using an iron, beginning with the stems. Using a sheet of parchment paper or press cloth during this step helps prevent overheating.

STEP 4: Next apply the flower vinyl cutouts, ironing just long enough for the vinyl to adhere to the fabric. Avoid overheating during this step, since more heat will be applied in the next step.

STEP 5: Finally, layer the flower centers over the existing vinyl and press until adhered.

STEP 6: Voila!

Pillowcase variation: To create the pillowcase, allow your craft cutter to optimize the vinyl material when cutting. Then cut apart and arrange flower shapes on pillowcase in an organic pattern before ironing. Next add flower centers as outlined above and press.

P.S. To celebrate Mother’s Day (and beyond), use OHD10 for 10% off your Purple orders. Discount code expires November 4, 2021. Have a Happy Mother’s Day!

This post is sponsored by Purple.

https://ohhappyday.com/?p=64566
Extensions
In My Easter Basket
easterbasketeaster basketeaster bunnyeaster candyeaster eggeaster eggseaster favorseaster gifts
I love curating Easter Baskets for my kids but this holiday always sneaks up on me in a stressful way. Here are some of my picks for this year. See all of our Easter Baskets picks right here.
Show full content

I love curating Easter Baskets for my kids but this holiday always sneaks up on me in a stressful way. Here are some of my picks for this year. See all of our Easter Baskets picks right here.

!function(d,s,id){ var e, p = /^http:/.test(d.location) ? 'http' : 'https'; if(!d.getElementById(id)) { e = d.createElement(s); e.id = id; e.src = p + '://widgets.rewardstyle.com/js/widget.js'; d.body.appendChild(e); } if(typeof(window.__moneyspot) === 'object') { if(document.readyState === 'complete') { window.__moneyspot.init(); } } }(document, 'script', 'moneyspot-script'); JavaScript is currently disabled in this browser. Reactivate it to view this content.
https://ohhappyday.com/?p=64432
Extensions